1
EXOR
Maintenance Manager User Guide
March 2014
Version: 4.7
Submitted by:
Bentley Systems (UK) Ltd.,
9th Floor,
20 Gracechurch Street,
London
EC3V 0BG
Version: 4.7
i
CONFIDENTIALITY STATEMENT
The contents of this document, including system ideas and concepts, are confidential and proprietary in nature and are not to be
distributed in any form without the prior written consent of Bentley, Inc.
EXOR
MAINTENANCE MANAGER USER GUIDE
DOCUMENT TRACKER
EXOR Maintenance Manager User Guide
Trademark
Bentley and the "B" Bentley logo are either registered or unregistered trademarks or service marks of
Bentley Systems, Incorporated, or one of its direct or indirect wholly-owned subsidiaries.
Other brands and product names are trademarks of their respective owners.
Copyright
Copyright © 2013 Bentley Systems, Incorporated.
All Rights Reserved.
Including software, file formats, and audiovisual displays; may only be used pursuant to applicable
software license agreement; contains confidential and proprietary information of Bentley Systems,
Incorporated and/or third parties which is protected by copyright and trade secret law and may not be
provided or otherwise made available without proper authorization.
Restricted Rights Legend
If this software is acquired for or on behalf of the United States of America, its agencies and/or
instrumentalities ("U.S. Government"), it is provided with restricted rights. This software and
accompanying documentation are "commercial computer software" and "commercial computer software
documentation", respectively, pursuant to 48 C.F.R. 12.212 and 227.7202, and "restricted computer
software" pursuant to 48 C.F.R. 52.227-19(a), as applicable. Use, modification, reproduction, release,
performance, display or disclosure of this software and accompanying documentation by the U.S.
Government are subject to restrictions as set forth in this Agreement and pursuant to 48 C.F.R. 12.212,
52.227-19, 227.7202, and 1852.227-86, as applicable.
Contractor/Manufacturer is Bentley Systems, Incorporated, 685 Stockton Drive, Exton, PA 19341-0678.
Unpublished - rights reserved under the Copyright Laws of the United States and International treaties.
EXOR
MAINTENANCE MANAGER USER GUIDE
DOCUMENT TRACKER
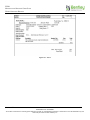
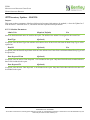
Document Tracker
Document Details
File:
Prepared by:
Maintenance Manager User Guide V4.7.docx
Ian Skinner
Manual Name:
Reviewed by:
Maintenance Manager User Guide
Anne Hammond
Version:
Approved for issue by:
4.7
T.C. Stewart
Date of Issue:
Product Manager:
March 2014
Ian Skinner
File Name:
Document Centre/Exor/Product Manuals/4.7 Product Manuals/4.7 completed documentation/Maintenance Manager User Guide
v4.7.docx
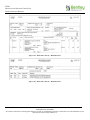
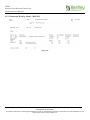
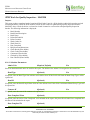
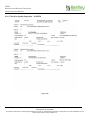
Document Version Control
Revision
Date
By
Chapter/Page
Description
4.0.2.0
25 October 2007
IES
4.0.5.2
February 2009
AH
All
General revisions for release 4.0.5.2
4.1
October 2009
AH
All
General revisions for release 4.1
4.3
November 2010
IS
All
Changes for 4.3 release including:
General revisions for release 4.0.2.0
General changes to defects form, Changes to Defects and
Inspections for creating a work order, changes to Defects
and Work Orders to include Navigator button, Changes to
work orders to include flexible attributes
4.4
May 2011
IS
All
Inspections x/y co-ordinates now updateable.
Copy work order/work order line enhanced
Work order Authorisation enhanced
Work order line Target Date added
Work Order Line Budget re-allocation –MAI3620 added.
4.5
Sept 2011
IS
Various
BOQ and WOL % Uplifts added to defects, Inspections
and work ordering
Work order target complete date updated
4.6
Oct 2012
IS
Various
Document reviewed and updated for 4.6 release. 4
character xsp changes made
4.6.1
Feb 2013
IS
Various
Updated to include Admin Unit changes to defect priorities
4.7
Mar 2014
BA/IS
All
Re-formatted into Bentley template.
P175
Cyclic maintenance work order details updated to reflect
asset based work orders.
Additional Minor changes.
EXOR
MAINTENANCE MANAGER USER GUIDE
TABLE OF CONTENTS
Table of Contents
1
2
Introduction ........................................................................................................................................... 1
Managing Inspections ........................................................................................................................... 3
2.1
Defect Status Codes ...................................................................................................................... 4
2.2
Inspections – MAI3808................................................................................................................. 6
2.2.1
General Information .............................................................................................................. 6
2.2.2
Inspections ............................................................................................................................ 7
2.2.3
Inspection Summary ............................................................................................................. 9
2.2.4
Create Work Order .............................................................................................................. 10
2.2.5
Activities ............................................................................................................................. 12
2.2.6
Defects ................................................................................................................................ 13
2.2.7
Summary ............................................................................................................................. 17
2.2.8
Print ..................................................................................................................................... 17
2.2.9
Create Work Order .............................................................................................................. 18
2.2.10 Repairs ................................................................................................................................ 21
2.2.11 BOQ Items .......................................................................................................................... 23
2.2.12 Manually Completing a Defect. .......................................................................................... 25
2.3
Using Locator with Inspections and Defects .............................................................................. 26
2.3.1
General Information ............................................................................................................ 26
2.4
Create a Defect on Network at X Y using Locator ..................................................................... 27
2.5
Create a Defect on Assets using Locator .................................................................................... 40
2.6
Create Defects on Assets at X Y using Locator .......................................................................... 43
2.7
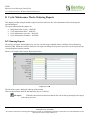
Create a Small Scheme Work Order using Locator .................................................................... 45
2.8
Inspections by Group – MAI3899 .............................................................................................. 50
2.8.1
General Information ............................................................................................................ 50
2.8.2
Inspections by Group .......................................................................................................... 51
2.8.3
Inspected Roads .................................................................................................................. 52
2.9
Defects – MAI3806..................................................................................................................... 53
2.9.1
General Information ............................................................................................................ 53
2.9.2
Defects ................................................................................................................................ 53
2.9.3
Repair .................................................................................................................................. 54
2.9.4
BOQ Items .......................................................................................................................... 54
2.9.5
Defect Summary ................................................................................................................. 55
2.9.6
Edit Defect .......................................................................................................................... 56
2.9.7
Create Work Order .............................................................................................................. 56
2.10 View Defects – MAI3810 ........................................................................................................... 59
2.10.1 General Information ............................................................................................................ 59
2.10.2 View Defects ....................................................................................................................... 60
EXOR
MAINTENANCE MANAGER USER GUIDE
TABLE OF CONTENTS
2.10.3 Select Defects...................................................................................................................... 61
2.11 Match Duplicate Defects – MAI2730 ......................................................................................... 62
2.11.1 General Information ............................................................................................................ 62
2.11.2 Section Details .................................................................................................................... 63
2.11.3 Defect to be Superseded ...................................................................................................... 63
2.11.4 Superseding Defect ............................................................................................................. 63
2.12 Unmatch Duplicate Defects – MAI2760..................................................................................... 65
2.12.1 General Information ............................................................................................................ 65
2.12.2 Section Details .................................................................................................................... 66
2.13 Delete Inspections – MAI2470 ................................................................................................... 67
2.13.1 General Information ............................................................................................................ 68
2.13.2 Delete Inspections ............................................................................................................... 68
2.14 Batch Setting of Repair Dates – MAI2775 ................................................................................. 69
2.14.1 General Information ............................................................................................................ 70
2.14.2 Section................................................................................................................................. 70
2.14.3 Defects ................................................................................................................................ 70
2.14.4 Confirm ............................................................................................................................... 71
2.15 Responses to Notices – MAI3816 ............................................................................................... 72
2.15.1 General Information ............................................................................................................ 72
2.15.2 Notice .................................................................................................................................. 73
2.15.3 Defects ................................................................................................................................ 73
3 Work Order Management ................................................................................................................... 75
3.1
Prerequisites ................................................................................................................................ 75
3.2
Using Locator with Works Ordering (Defects) ........................................................................... 76
3.2.1
General Information ............................................................................................................ 76
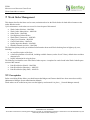
3.3
Work Orders – MAI3800 – View through Locator .................................................................... 77
3.3.1
General Information ............................................................................................................ 77
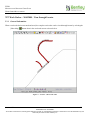
3.4
Work Orders – MAI3800 – Edit Default WOL Shape ............................................................... 79
3.4.1
General Information ............................................................................................................ 79
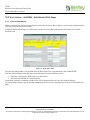
3.5
Works Orders (Defects) – MAI3800 .......................................................................................... 86
3.5.1
General Information ............................................................................................................ 86
3.5.2
Work Order ......................................................................................................................... 87
3.5.3
Work Order Lines ............................................................................................................... 97
3.5.4
Selection Criteria............................................................................................................... 103
3.5.5
BOQ Items ........................................................................................................................ 106
3.5.6
Percentage Uplifting of the value of an individual work order line .................................. 108
3.5.7
Adding Individual Percentage Items to a BOQ Item ........................................................ 108
3.5.8
Adding a Percentage BOQ Item........................................................................................ 109
3.5.9
Adding Non-Contract Items to a Works Order ................................................................. 110
EXOR
MAINTENANCE MANAGER USER GUIDE
TABLE OF CONTENTS
3.5.10 Works Order Audit............................................................................................................ 111
3.5.11 BOQ Details ...................................................................................................................... 113
3.5.12 Standard Item Totals ......................................................................................................... 114
3.5.13 Contractor Totals............................................................................................................... 115
3.5.14 Work Order Flexible Attributes ........................................................................................ 117
3.5.15 Flexible Attributes............................................................................................................. 117
3.5.16 Additional Details – Planning/Support ............................................................................. 118
3.5.17 Additional Details – Quality/Finance ............................................................................... 119
3.5.18 Invoices ............................................................................................................................. 120
3.5.19 Making Interim Payments ................................................................................................. 120
3.5.20 Completing a Works Order Line with an Interim Payment .............................................. 121
3.5.21 Completing a Works Order ............................................................................................... 121
3.5.22 Changing a Completed Works Order ................................................................................ 122
3.5.23 Raising a Notice In the Street Works Register.................................................................. 122
3.5.24 Raising a Notice from Maintenance Manager .................................................................. 124
3.6
TMA Interface – MAI3990 ....................................................................................................... 125
3.6.1
General Information .......................................................................................................... 125
3.6.2
TMA Noticing Tab............................................................................................................ 126
3.6.3
Work Order Lines Tab ...................................................................................................... 130
3.7
Send Notice to Register – TMA1800 ........................................................................................ 131
3.7.1
General Information .......................................................................................................... 131
3.7.2
Upper Section.................................................................................................................... 131
3.7.3
Work Details tab ............................................................................................................... 133
3.7.4
Contacts tab ....................................................................................................................... 136
3.7.5
Co-ordinates tab ................................................................................................................ 137
3.7.6
Permit Conditions tab........................................................................................................ 138
3.7.7
Work Order Lines tab ....................................................................................................... 139
3.7.8
Error Stack ........................................................................................................................ 140
3.7.9
Defaults button .................................................................................................................. 141
3.7.10 Send to Register button ..................................................................................................... 142
3.8
Works Order Authorisation – MAI3848 ................................................................................... 143
3.8.1
General Information .......................................................................................................... 144
3.8.2
Works Order Authorisation ............................................................................................... 144
3.8.3
Works Order Authorisation Worktray .............................................................................. 144
3.9
Other Works – MAI3800 .......................................................................................................... 146
3.9.1
General Information .......................................................................................................... 146
3.9.2
Work Order Lines ............................................................................................................. 148
3.9.3
Adding Other Work to an Order ....................................................................................... 149
3.9.4
Completing Defects when Carrying out Other Work........................................................ 149
EXOR
MAINTENANCE MANAGER USER GUIDE
TABLE OF CONTENTS
3.10 Non Highways Related Works .................................................................................................. 150
3.10.1 Creating Dummy Sections ................................................................................................ 150
3.11 Works Orders – Contractor Interface – MAI3802 .................................................................... 151
3.11.1 General Information .......................................................................................................... 151
3.11.2 Work Orders...................................................................................................................... 152
3.11.3 Work Order Lines ............................................................................................................. 154
3.11.4 BOQ Items ........................................................................................................................ 157
3.11.5 Completing a Works Order ............................................................................................... 158
3.11.6 BOQ Details ...................................................................................................................... 159
3.11.7 Invoices ............................................................................................................................. 160
3.11.8 Works Order Details ......................................................................................................... 161
3.11.9 Flexible Attributes............................................................................................................. 162
3.11.10
Programme Details ........................................................................................................ 163
3.11.11
Standard Item Totals ..................................................................................................... 164
3.12 Works Order (Cyclic) – MAI3800a .......................................................................................... 165
3.12.1 General Information .......................................................................................................... 166
3.12.2 Work Order ....................................................................................................................... 166
3.12.3 Schedules .......................................................................................................................... 175
3.12.4 Select Schedules Button .................................................................................................... 179
3.12.5 BOQ Items ........................................................................................................................ 180
3.12.6 Percentage Uplifting of the value of an individual work order line .................................. 182
3.12.7 Adding Individual Percentage Items to a BOQ Item ........................................................ 182
3.12.8 Computation Method ........................................................................................................ 183
3.12.9 Adding a Percentage BOQ Item........................................................................................ 184
3.12.10
Adding Non-Contract Items to a Works Order ............................................................. 184
3.12.11
Contracts and Rates ....................................................................................................... 185
3.12.12
Works Order Audit........................................................................................................ 186
3.12.13
BOQ Details .................................................................................................................. 188
3.12.14
Standard Item Totals ..................................................................................................... 189
3.12.15
Contractor Totals........................................................................................................... 190
3.12.16
Work Order Flexible Attributes .................................................................................... 192
3.12.17
Additional Details – Planning/Support ......................................................................... 193
3.12.18
Additional Details – Quality/Finance ........................................................................... 194
3.12.19
Invoices ......................................................................................................................... 195
3.12.20
Making Interim Payments ............................................................................................. 195
3.12.21
Completing a Works Order Line with an Interim Payment .......................................... 196
3.12.22
Completing a Works Order ........................................................................................... 196
3.12.23
Changing a Completed Works Order ............................................................................ 197
3.13 Works Order Line Budget Reallocation – MAI3620 ................................................................ 198
EXOR
MAINTENANCE MANAGER USER GUIDE
TABLE OF CONTENTS
3.13.1 General Information .......................................................................................................... 198
3.14 Gang/Crew Allocation – MAI3805........................................................................................... 200
3.14.1 General Information .......................................................................................................... 201
3.14.2 Selection Criteria............................................................................................................... 201
3.14.3 Work Order Lines ............................................................................................................. 203
3.15 Cancel Works Orders – MAI3610 ............................................................................................ 204
3.15.1 General Information .......................................................................................................... 205
3.16 Quality Inspection Results – MAI3820 .................................................................................... 206
3.16.1 General Information .......................................................................................................... 207
3.16.2 Work Order Lines ............................................................................................................. 207
3.17 External Activity – MAI1280 ................................................................................................... 209
3.17.1 General Information .......................................................................................................... 210
3.17.2 External Activity ............................................................................................................... 210
3.17.3 Membership ...................................................................................................................... 211
4 Works Ordering Reports ................................................................................................................... 213
4.1
Running Reports ....................................................................................................................... 213
4.2
Work Order (Unpriced) – MAI3485 ......................................................................................... 215
4.2.1
Selection Parameters ......................................................................................................... 215
4.2.2
Works Order (Unpriced) – MAI3485 ............................................................................... 216
4.3
Work Order (Priced) – MAI3480.............................................................................................. 217
4.3.1
Selection Parameters ......................................................................................................... 217
4.4
BOQ Work Order (Defects) – MAI3906 .................................................................................. 219
4.4.1
Selection Parameters ......................................................................................................... 219
4.4.2
BOQ Work Order (Defects) – MAI3906 .......................................................................... 220
4.5
Work Order (Detail) – MAI3500 .............................................................................................. 222
4.5.1
Selection Parameters ......................................................................................................... 222
4.5.2
Works Order (Detail) – MA3500 ...................................................................................... 222
4.6
Works Order Summary – MAI3505 ......................................................................................... 223
4.6.1
Selection Parameters ......................................................................................................... 223
4.6.2
Work Orders (Summary) – MAI3505 ............................................................................... 224
4.7
Work Order (NMA) – MAI3909 .............................................................................................. 225
4.7.1
Selection Parameters ......................................................................................................... 225
4.7.2
Work Orders (NMA) – MAI3909 ..................................................................................... 226
4.8
Work Order (Enhanced) – MAI3919 ........................................................................................ 227
4.8.1
Selection Parameters ......................................................................................................... 227
4.8.2
Work Orders (Enhanced) – MAI3919............................................................................... 228
4.9
Work Order (Strip Plan) – MAI5130 ........................................................................................ 230
4.9.1
Selection Parameters ......................................................................................................... 230
4.9.2
Works Order (Strip Plan) – MAI5130 .............................................................................. 230
EXOR
MAINTENANCE MANAGER USER GUIDE
TABLE OF CONTENTS
4.10 Review Raised Works Orders – MA3490................................................................................. 231
4.10.1 Selection Parameters ......................................................................................................... 231
4.10.2 Review Raised Works Orders – MAI3490 ....................................................................... 232
4.11 Defects not yet Instructed – MAI3922 ...................................................................................... 233
4.11.2 Defects Not Yet Instructed – MAI3922 ............................................................................ 234
4.12 Summary of Defects Not Yet Instructed – MAI3920 ............................................................... 235
4.12.1 Selection Parameters ......................................................................................................... 235
4.13 Instructed Work by Status – MAI3924 ..................................................................................... 237
4.13.1 Selection Parameters ......................................................................................................... 237
4.13.2 Instructed Work by Status – MAI3924 ............................................................................. 238
4.14 Instructed Defects Due for Completion – MAI3926................................................................. 239
4.14.1 Selection Parameters ......................................................................................................... 239
4.14.2 Instructed Defects due for Completion ............................................................................. 240
4.15 Inventory Updates – MAI3930 ................................................................................................. 241
4.15.1 Selection Parameters ......................................................................................................... 241
4.16 Work for Quality Inspection – MAI3950.................................................................................. 242
4.16.1 Selection Parameters ......................................................................................................... 242
4.16.2 Work for Quality Inspection – MAI3950.......................................................................... 244
4.17 Quality Inspection Performance – MAI3952 ............................................................................ 245
4.17.1 Selection Parameters ......................................................................................................... 245
4.18 Admin Unit Performance – MAI3956 ...................................................................................... 247
4.18.1 Selection Parameters ......................................................................................................... 247
4.18.2 Admin Unit Performance – MAI3956 .............................................................................. 248
5 Cyclic Maintenance Works Orders Admin ....................................................................................... 250
5.1
General Information .................................................................................................................. 250
5.2
CyclicMaintenance Inventory Rules – MAI3626 ..................................................................... 253
5.2.1
General Information .......................................................................................................... 254
5.2.2
Cyclic Maintenance Inventory Rules ................................................................................ 254
5.3
Cyclic Maintenance Schedules – MAI3860.............................................................................. 256
5.3.1
General Information .......................................................................................................... 257
5.3.2
Cyclic Maintenance Schedules ......................................................................................... 257
5.3.3
Schedule Items .................................................................................................................. 259
5.3.4
Calculating the Work Quantity ......................................................................................... 260
5.3.5
Clearing Defects with Cyclic Maintenance Works Orders ............................................... 261
5.3.6
The Next Step ................................................................................................................... 261
5.4
Cyclic Maintenance Schedules by Section – MAI3862 ............................................................ 262
5.4.1
General Information .......................................................................................................... 263
5.4.2
Schedules by Road Section ............................................................................................... 263
5.4.3
Road Sections.................................................................................................................... 263
EXOR
MAINTENANCE MANAGER USER GUIDE
TABLE OF CONTENTS
5.4.4
Schedule Items .................................................................................................................. 264
5.4.5
The Next Step ................................................................................................................... 265
5.5
View Cyclic Maintenance Work – MAI3804 ........................................................................... 266
5.5.1
General Information .......................................................................................................... 266
5.5.2
View Cyclic Maintenance Work ....................................................................................... 267
5.5.3
BOQ Items ........................................................................................................................ 267
5.5.4
BOQ Details ...................................................................................................................... 268
5.6
Maintenance Reports – MAI3825 ............................................................................................. 269
5.6.1
General Information .......................................................................................................... 270
5.6.2
Section Details .................................................................................................................. 270
5.6.3
Maintenance Reports......................................................................................................... 270
5.6.4
Activities ........................................................................................................................... 270
5.7
Valid for Maintenance Rules – MAI3440................................................................................. 271
5.7.1
General Information .......................................................................................................... 272
5.7.2
Valid for Maintenance Rules ............................................................................................ 272
5.8
Related Maintenance Activities – MAI3628............................................................................. 273
5.8.1
General Information .......................................................................................................... 274
6 Cyclic Maintenance Works Ordering Reports .................................................................................. 275
6.1
Running Reports ....................................................................................................................... 275
6.2
BOQ Work Order (Cyclic) – MAI3907 .................................................................................... 276
6.2.1
Selection Parameters ......................................................................................................... 276
6.3
Cyclic Maintenance Done – MAI5032 ..................................................................................... 277
6.3.1
Selection Parameters ......................................................................................................... 277
6.4
Cyclic Maintenance Schedules – MAI3960.............................................................................. 278
6.4.1
Selection Parameters ......................................................................................................... 278
6.4.2
Cyclic Maintenance Schedules – MAI3960 ...................................................................... 278
7 Payments ........................................................................................................................................... 279
7.1
Deselect Items for Payment – MAI3842................................................................................... 280
7.1.1
General Information .......................................................................................................... 281
7.1.2
Work Order Lines ............................................................................................................. 281
7.2
Payment Run – MAI3840 ......................................................................................................... 283
7.2.1
General Information .......................................................................................................... 283
7.2.2
Payment Run ..................................................................................................................... 283
7.2.3
Payment Run Report A ..................................................................................................... 284
7.2.4
Payment Run Report B ..................................................................................................... 285
7.2.5
Payment Run Report C ..................................................................................................... 286
7.3
Query Payment Run Details – MAI3940 .................................................................................. 287
7.3.1
General Information .......................................................................................................... 287
7.3.2
Payment Run Details......................................................................................................... 288
EXOR
MAINTENANCE MANAGER USER GUIDE
INTRODUCTION
1
Introduction
Maintenance Manager by EXOR is an application module that is used in conjunction with network manager by exor to
manage the maintenance functions for a transportation network and its associated attributes.
maintenance manager provides complete control over the management and operation of routine, cyclic and structural
maintenance and allows the user to maintain financial control of maintenance contracts and budgets. It aids in the
implementation of policy standards and provides facilities for monitoring performance against these standards. This
ensures effective work management. In addition, maintenance manager allows for the implementation of inspection
regimes and so provides a legal framework for defending liability claims.
Tools are available within maintenance manager to record and manage, in a user-defined manner, information concerning:
inspections; planned, reactive, ad-hoc and quality. Planning of surveys, performance reporting, and integration
with mobile Data Collection Devices (DCD) are key features.
defects; with definable priority codes and status and an inventory change indicator Full on-line reporting allows
managers to readily assess maintenance needs.
treatments; treatment models translate defect treatments into sets of pre-defined Bill Of Quantity (BOQ) items
that allow engineers to easily translate defects into work packages.
contracts; holding estimates, actuals and retentions for any pre-defined work type. Managers can therefore have
direct access to up-to-date budget positions at any time.
works orders; defect, cyclic and scheme works orders. Automatic costing for multiple contracts and multiple
budget codes, allowing for variations and interim payments. Work can be grouped based on location, pricing,
budget code, defect priority and BOQ item. Using these tools engineers can benefit by comparing scenarios to
plan cost-effective and timely work solutions.
resources; such as contractors, schedule of rates, and budgets. Budgets may be set for any area, financial period or
type of work and can be continually monitored and trends examined. They may be integrated with Corporate
Financial Systems or linked to standard office tools such as desktop spreadsheets for budget profiling. In addition
the on-line assessment of contractor and labour availability is a clear benefit. maintenance manager also interfaces
into contractor-based systems which manage the labour, plant and materials primitives that make up the higher
level BOQ.
maintenance manager includes a wide range of standard reports which enable performance to be monitored against
predetermined standards. These measures include how quickly defects of given priorities are repaired and can be used to
monitor inspectors, contracts and budgets.
maintenance manager by exor is supplied with a standard set of activities, interval codes, defects and treatments, these
can be modified and added to to suit your own operational requirements if required using the modules contained within
this chapter.
This User Manual is one of four manuals that are provided with each copy of Maintenance Manager by Exor (MM).
Those manuals are:
Installation Manual: Describes how to install MM on different computing environments;
Maintenance Manager System Admin Manual: Describes how to configure MM metadata and initially populate
MM tables to conform to an organization’s business processes
Maintenance Manager User Manual: Describes how to use MM on a daily basis to manage the preventative,
recurring and ad hoc maintenance and repair activity
Maintenance Manager Inspection Loader Manual: Describes how to download and upload information between
MM and other applications or Data Collection Devices (lap tops, pen based, PDAs, etc.)
Version: 4.7
1
CONFIDENTIALITY STATEMENT
The contents of this document, including system ideas and concepts, are confidential and proprietary in nature and are not to be distributed in any form
without the prior written consent of Bentley, Inc.
EXOR
MAINTENANCE MANAGER USER GUIDE
INTRODUCTION
This User Manual is intended for those who will use MM to manage the organisations maintenance program. This guide
explains how MM can be used to manage Scheduled and Ad-hoc inspections, Cyclic Maintenance Schedules, the creation
of Works Orders, their allocation to Contractors, and the administration of those orders through to completion and final
payment.
Metadata can be created in MM to enforce compliance with the organizations business rules and procedures. Typically
this might include, inspection frequencies, valid defect types, attributes and priorities, valid treatment types, treatment
models and priorities, levels of financial authority, user privileges, and the creation and maintenance of Contracts,
Contractors, and works items. This metadata will normally be set up by the modules administrator using the Maintenance
manager System Admin Manual.
Details of how to download and upload inspections from Data Collection Devices can be found in the Maintenance
Manager Inspection Loader Manual.
Version: 4.7
2
CONFIDENTIALITY STATEMENT
The contents of this document, including system ideas and concepts, are confidential and proprietary in nature and are not to be distributed in any form
without the prior written consent of Bentley, Inc.
EXOR
MAINTENANCE MANAGER USER GUIDE
MANAGING INSPECTIONS
2
Managing Inspections
This chapter describes the forms used to create, maintain and review Inspections and associated data
Inspections – MAI3808
Inspections by Group – MAI3899
Defects – MAI3806
View Defects – MAI3810
Match Duplicate Defects – MAI2730
Unmatch Duplicate Defects – MAI2760
Delete Inspections – MAI2470
Batch Setting of Repair Dates – MAI2275
Responses to Notices – MAI3816
The form descriptions provide you with detailed information about each Works Ordering form in highways by exor,
including:
an overall description of the form
a detailed explanation of each field, including available features (such as List of Values), default values and other
characteristics
helpful information for using the form
Version: 4.7
3
CONFIDENTIALITY STATEMENT
The contents of this document, including system ideas and concepts, are confidential and proprietary in nature and are not to be distributed in any form
without the prior written consent of Bentley, Inc.
EXOR
MAINTENANCE MANAGER USER GUIDE
MANAGING INSPECTIONS
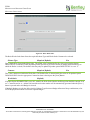
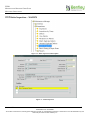
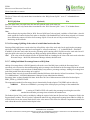
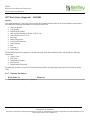
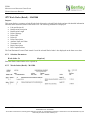
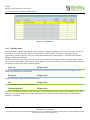
2.1
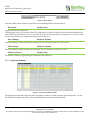
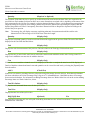
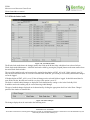
Defect Status Codes
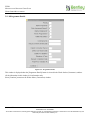
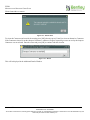
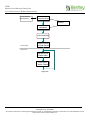
Figure 1 – Status Codes Menu Option
During a defects life cycle it will automatically pass through a number of status code changes from when it is loaded onto
the system to when the repair is completed on a works order.
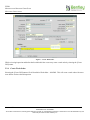
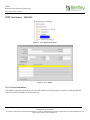
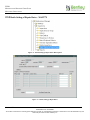
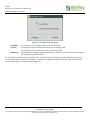
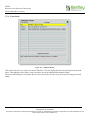
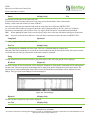
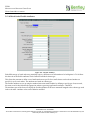
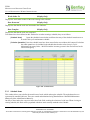
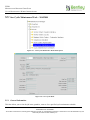
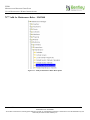
Defect status codes are set up and maintained using Status Codes – HIG9110 as shown below.
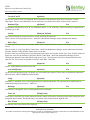
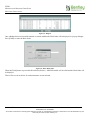
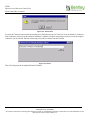
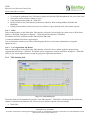
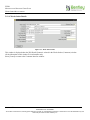
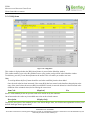
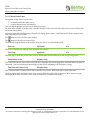
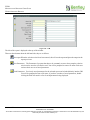
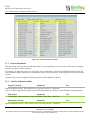
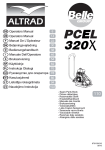
Figure 2 – Defect Status Codes
These status codes are generally maintained by the system administrator. A default set is supplied with the system but
they can be added to suit your organisational requirements. When a new status code is added one or more of the following
features may be applied.
Feature 1
Defects are initially created with this status. This status will be set in Inspections – MAI3808 or
Load Bulk Inspections – MAI2200.
Feature 2
The defect is ready to be assigned to a work order. This status will be set in Inspections –
MAI3808 and checked in Works Orders – MAI3800.
Version: 4.7
4
CONFIDENTIALITY STATEMENT
The contents of this document, including system ideas and concepts, are confidential and proprietary in nature and are not to be distributed in any form
without the prior written consent of Bentley, Inc.
EXOR
MAINTENANCE MANAGER USER GUIDE
MANAGING INSPECTIONS
Feature 3
At least one repair on the defect has been assigned to a work order. This status will be set in
Works Orders – MAI3800.
Feature 4
All repairs for the defect have been completed. This status will be set in Works Orders –
MAI3800.
Feature 5
The defect may be manually amended or deleted. Defects with these statuses may be amended to
a different status, providing it is also allowed with feature 5.
Feature 6
The defect has been repaired via structural maintenance.
Feature 7
Superseded defects are reopened with this status. This happens in Inspections – MAI3808 when a
superseding defect is deleted.
Feature 8
The defect has been written off. If no chainages are recorded, the inspection loader cannot
supersede defects, so they have to be written off. This may be set manually in Inspections –
MAI3808 or automatically from Works Orders – MAI3800 (by setting the work status to NOT
DONE).
Feature 9
The description, type and location are protected. This feature is only relevant when the defect is
updateable (i.e., feature 5 = Y).
If a status code ceases to be required the end date must be set, it must not be deleted for historical reasons.
Version: 4.7
5
CONFIDENTIALITY STATEMENT
The contents of this document, including system ideas and concepts, are confidential and proprietary in nature and are not to be distributed in any form
without the prior written consent of Bentley, Inc.
EXOR
MAINTENANCE MANAGER USER GUIDE
MANAGING INSPECTIONS
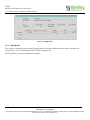
2.2
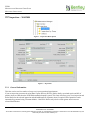
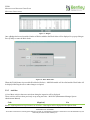
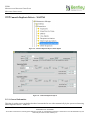
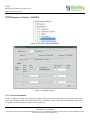
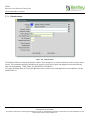
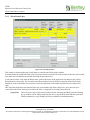
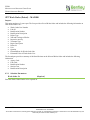
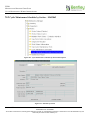
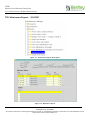
Inspections – MAI3808
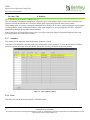
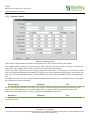
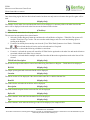
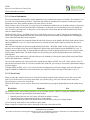
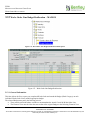
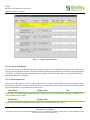
Figure 3 – Inspections Menu Option
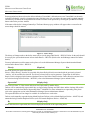
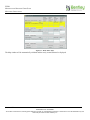
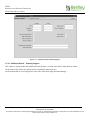
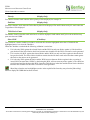
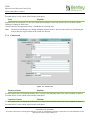
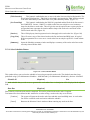
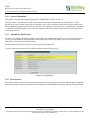
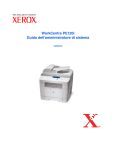
Figure 4 – Inspections
2.2.1
General Information
This form can be used in a number of ways to suit your operational requirements.
If you are inspecting your network using Data Capture Devices (DCD's), Defect details, associated repairs and bill of
quantity items are entered on the DCD and downloaded onto the system. This form will allow you to view inspection and
defect details for the selected inspection and add additional bill of quantity items if required. Bill of quantities can be
automatically generated using Treatment Models – MAI3814. Defects may also be raised against Asset items on a
selected Road Section.
Version: 4.7
6
CONFIDENTIALITY STATEMENT
The contents of this document, including system ideas and concepts, are confidential and proprietary in nature and are not to be distributed in any form
without the prior written consent of Bentley, Inc.
EXOR
MAINTENANCE MANAGER USER GUIDE
MANAGING INSPECTIONS
Ad-hoc inspections carried out as a result of a traffic accident or public enquiry are commonly carried out without the aid
of a DCD, these inspections can be logged directly onto the system using this form. The road section inspected can be
quickly located by using wildcards and some selection criteria in either the Road Section or Description fields. For
example, fill in the mandatory fields then enter %12% followed by [List] will call the gazetteer and display all road
sections and road groups containing the above selection criteria. Similarly in the description field if you enter
%GIANTS% followed by [List] will retrieve all road sections and road groups with GIANTS in the description. This is
very useful if you have set your gazetteer up in inspection areas, routes or zones because you do not have to remember
which group each section is in.
Manual inspections can be entered using this form but if your inspections contain a large number of road sections it is
more advisable to use Inspections by Road Group – MAI3899.
Inspections and associated defects can also be logged onto the system as a result of a public enquiry using Enquiries –
DOC0150.
View the inspection history for a road section by querying back by section. The details can then be viewed using [Next
Record]. This information is vital when defending an insurance claim and can be printed out using the Insurance Claims
Report – MAI2790.
If the system has been set up to use multiple Admin Units for defect priorities the following additional rules apply:
Allowed repair types defined in the Defect Priorities form (MAI3812), for a defect, are based on the Defect
Activity and the Admin Unit of the associated Network.
Validation of the Defect Priority will ensure that the value is valid for the Defect Activity and the Admin Unit of
the associated Network.
The calculation of the Repair due date will take the Admin Unit of the associated Network into account, when
identifying the appropriate Defect Priorities values to be used in the calculation.
The Admin Unit of the associated Network will be used in the identification of the rules defined in Work Order
Automation Rules form (MAI3818) to determine if Work Orders should be automatically created for the details
being processed.
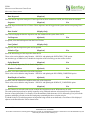
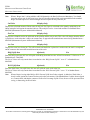
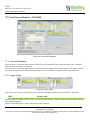
2.2.2
Inspections
This window holds basic details of the inspection such as the date it was performed, who carried it out, the weather and
road conditions at the time as well as the actual road section that was inspected. The number of defects logged during the
inspection will also be displayed in the 'Number of Defects' box.
The [Set Batch Available] button can be used to set the status of all defects for this inspection to 'Available'. The default
status for defects loaded onto the system can be set to something other than available until they have been reviewed after
the download if required, this is set up using Status Codes – HIG9110, this is usually a system administration function.
Inspection Id
(Display Only)
The Inspection ID is a serial reference number generated by the system to uniquely identify each inspection. It cannot be
amended.
Insp. Batch
(Optional)
List
If the inspection has been loaded from a DCD it will be assigned a batch number, this field cannot be updated. When
creating a manual inspection, if the inspection is contained within an existing batch, when querying back the batch select
the number from the List of Values. If the manual inspection is not contained within an existing batch, this field can be
left blank and the system will generate an appropriate number.
Version: 4.7
7
CONFIDENTIALITY STATEMENT
The contents of this document, including system ideas and concepts, are confidential and proprietary in nature and are not to be distributed in any form
without the prior written consent of Bentley, Inc.
EXOR
MAINTENANCE MANAGER USER GUIDE
MANAGING INSPECTIONS
Date Inspected
(Required)
Enter the date the inspection took place. If the inspection has been loaded from a DCD, this field cannot be amended.
Inspector
(Required)
List
Select the inspector from the List of Values. These inspectors must be logged on the system and are set up using Users –
HIG1832.
Date Loaded
(Display Only)
This field will display the date the inspection was first loaded onto the system from a DCD.
2nd Inspector
(Optional)
List
If required, select the 2nd inspector from the List of Values.
Last Updated
(Display Only)
Displays the date the inspection report was last updated.
Initiation Type
(Required)
List
Select the initiation type of this inspection from the list.
These values can be added to using Domains – HIG9120 and updating the INITIATION_TYPE option.
An initiation type of NRM will re-schedule the inspection of the selected type on the section selected.
Safety/Detailed
(Required)
List
Enter 'S' for Safety Inspection, 'D' for Detailed Inspection.
Weather Condition
(Optional)
List
If known, select the weather at the time of the inspection.
These values can be added to using Domains – HIG9120 and updating the WEATHER_CONDITION option.
Road Surface Condition
(Optional)
List
If known, enter the road surface condition at the time of the inspection.
These values can be added to using Domains – HIG9120 and updating the SURFACE_CONDITION option.
Road Section
(Required)
List
Use the Gazetteer to select the road section in which this inspection occurred. Wildcards may be used.
The road section inspected can be quickly located by using wildcards and some selection criteria in either the Road
Section or Description fields. For example, fill in the mandatory fields then enter %12% followed by [List] will call the
gazetteer and display all road sections and road groups containing the above selection criteria.
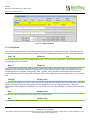
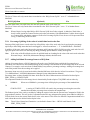
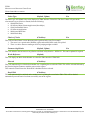
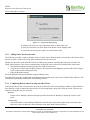
If a Road Section is Closed subsequent to an Inspection being carried out on the Road, a Check Box will be displayed
adjacent to the 'Road Section' field as shown below.
Version: 4.7
8
CONFIDENTIALITY STATEMENT
The contents of this document, including system ideas and concepts, are confidential and proprietary in nature and are not to be distributed in any form
without the prior written consent of Bentley, Inc.
EXOR
MAINTENANCE MANAGER USER GUIDE
MANAGING INSPECTIONS
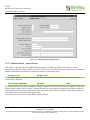
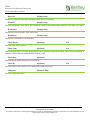
Figure 5 - Road Section
Note that a Road Section cannot be closed if there are outstanding Defects associated with it.
Description
(Display Only)
Displays the full road section name.
Wildcards may be used, If you enter %GIANTS% followed by [List] this will retrieve all road sections and road groups
with GIANTS in the description. This is very useful if you have set your gazetteer up in inspection areas, routes or zones
because you do not have to remember which group each section is in
Start Chainage
(Required, Default)
Enter the chainage at which the inspection commenced. This will default to the start of the section.
End Chainage
(Required, Default)
Enter the chainage at which the inspection terminated. This will default to the end of the section.
Number of Defects
(Display Only)
The number of Defects Logged during this inspection will be displayed.
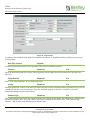
2.2.3
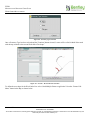
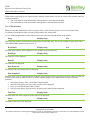
Inspection Summary
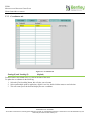
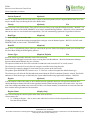
Figure 6 - Inspection Summary Button
The [Summary] button on the Inspection form will display a summary of all the currently queried Inspections. To view
the full detail of an Inspection, click on the required Inspection then press the [Detail] button.
Version: 4.7
9
CONFIDENTIALITY STATEMENT
The contents of this document, including system ideas and concepts, are confidential and proprietary in nature and are not to be distributed in any form
without the prior written consent of Bentley, Inc.
EXOR
MAINTENANCE MANAGER USER GUIDE
MANAGING INSPECTIONS
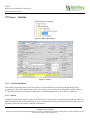
Figure 7 - Create Work Order
While reviewing inspection and defect details within this form a user may create a work order by selecting the [Create
WO] button.
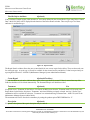
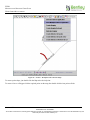
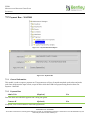
2.2.4
Create Work Order
Selecting the [Create WO] button will call form Raise Work Order – MAI3801. This will create a work order with one or
more defects for the selected inspection.
Version: 4.7
10
CONFIDENTIALITY STATEMENT
The contents of this document, including system ideas and concepts, are confidential and proprietary in nature and are not to be distributed in any form
without the prior written consent of Bentley, Inc.
EXOR
MAINTENANCE MANAGER USER GUIDE
MANAGING INSPECTIONS
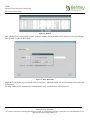
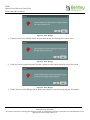
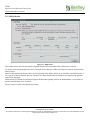
Figure 8 - Raise Work Order
The Raise Works Order form allows the required Scheme Type and Works Order Contract to be selected.
Scheme Type
(Required,Default)
List
This is the Scheme Type for the Work Order. The default value is determined by the value set for Product Option
DEFSCHTYPL or DEFSCHTYPD (depending on the System Flag set for the Section or Budget Allocation Group on
which the Defect is raised). The default value may only be updated if product option DEFSCHTYPU is set to ‘Y’.
Contract
(Required,Default)
List
This is the Contract used within the Work Order. The default value is determined by the value set for product Option
DUMCONCODE. Once the appropriate Contract has been selected press the [Next] Button.
Work Order
(Default)
If Product Option WORREFGEN Is set to M – manual, the Work Order Number and Description should be entered. If set
to C- Contract based or A – Admin Unit based the work order number will be automatically generated when the [Next >]
button is pressed and a valid Budget is selected.
If Multiple Budgets exist for the defect Activity/Scheme Type/Section or Budget Allocation Group combinations, a list
will be displayed from which to select the required Budget.
Version: 4.7
11
CONFIDENTIALITY STATEMENT
The contents of this document, including system ideas and concepts, are confidential and proprietary in nature and are not to be distributed in any form
without the prior written consent of Bentley, Inc.
EXOR
MAINTENANCE MANAGER USER GUIDE
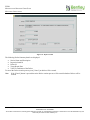
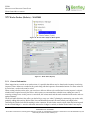
MANAGING INSPECTIONS
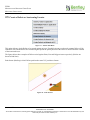
Figure 9 - Budgets
Once a Budget has been selected the Number of Defects added to the Work Order will be displayed in a pop-up dialogue.
Press [Finish] to create the Work Order.
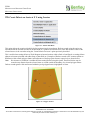
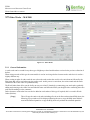
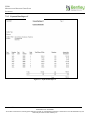
Figure 10 - Raise Work Order
When the [Finish] button is pressed the Work Order (Defects) – MAI3800 module will be called and the Work Order will
be displayed allowing the user to make changes as required.
2.2.5
Activities
A list of those activities that were carried out during the inspection will be displayed.
These activities will have been previously set up using Activities – MAI1200. (Maintenance Manager System
Administrator Manual)
Code
(Required)
List
Select a valid inspection activity from the List of Values. A description will be displayed in the adjacent field.
Version: 4.7
12
CONFIDENTIALITY STATEMENT
The contents of this document, including system ideas and concepts, are confidential and proprietary in nature and are not to be distributed in any form
without the prior written consent of Bentley, Inc.
EXOR
MAINTENANCE MANAGER USER GUIDE
MANAGING INSPECTIONS
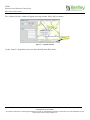
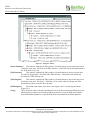
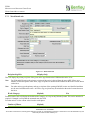
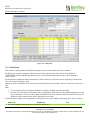
2.2.6
Defects
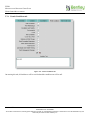
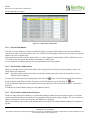
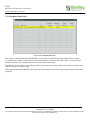
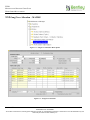
Figure 11 - Defects on Inspection
This window will be displayed when the [Defects] button is selected.
Defect Id
(Display Only)
A system-generated number that uniquely identifies this defect will be displayed.
Time Inspected
(Optional)
If known, enter the time that the inspection took place.
A time must be entered if the repair time mandatory field in Defect Priorities – MAI3812 (Maintenance Manager System
Administrator Manual) is set to 'Y'.
Defect Status
(Required, Default)
Upon creation of a defect, the status will generally default to AVAILABLE; this will enable the defect to be included on
works orders. Once the status code is set to available it is automatically updated by the system:
When the defect is placed on a work order the status will be updated to SELECTED.
Once the work order is instructed the defect status code will be updated automatically to INSTRUCTED.
Version: 4.7
13
CONFIDENTIALITY STATEMENT
The contents of this document, including system ideas and concepts, are confidential and proprietary in nature and are not to be distributed in any form
without the prior written consent of Bentley, Inc.
EXOR
MAINTENANCE MANAGER USER GUIDE
MANAGING INSPECTIONS
Some organisations choose to have the defects default to 'Unavailable', defects that are set to 'Unavailable' can be made
available individually, simply by changing the status field this is the only case where the status code is updated manually.
Alternatively, all defects for an inspection can be made available in one operation by selecting the [Set Batch Available]
button when in the previous window.
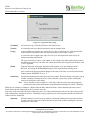
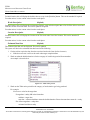
If the status of the defect is changed manually a The Status Reason pop-up window will appear where a reason for the
status change should be entered.
Figure 12 - Status change
The history of changes made to the defect status can be viewed using Audit Details – HIG1505. Rules for the audit should
be set up by the system administrator in form Audit Details – HIG1500. (Refer to the Audit Manager manual for further
details).
For more information on defect status codes please refer to the Maintenance Manager System Administration Manual
section Defect Status Codes – HIG9110.
Priority
(Required)
List
Select the priority for repair of this defect.
Select a ‘Defect Priority’ from the list provided. Only those Defect Priorities associated with the previously selected
‘Activity’ will be available for selection. The Priority selected will be used to generate a Target Date for the Defect
Repair, which is displayed in the bottom right hand corner of the Defect Details window. Defect Priorities and Activities
are associated using Defect Priorities – MAI3812 (refer to the Maintenance Manager System Admin Guide).
Superseded?
(Display Only)
This field will show 'Y' if the current defect has been superseded by another defect.
Defects will be automatically superseded if they are logged using chainage and XSP values and the chainage falls within
the tolerance set in the form Defect Superseding Rules – MAI4406. For more information on superseding rules please
refer to the appropriate section in the Maintenance Manager System Administrator Manual.
The superseded defect will no longer be available for inclusion on a works order.
Defects can be manually superseded using Match Duplicate Defects (refer to Match Duplicate Defects – MAI2730) and
unmatched using Unmatch Duplicate Defects (refer to Unmatch Duplicate Defects – MAI2760)
By
(Display Only)
If this defect has been superseded, this field will display the defect ID of the superseding defect.
Version: 4.7
14
CONFIDENTIALITY STATEMENT
The contents of this document, including system ideas and concepts, are confidential and proprietary in nature and are not to be distributed in any form
without the prior written consent of Bentley, Inc.
EXOR
MAINTENANCE MANAGER USER GUIDE
MANAGING INSPECTIONS
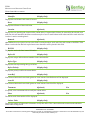
Associating a Defect with an Asset
Defects may be raised against an Asset using the Map Window of the Locator module or directly from the form using the
[Find Asset] button. When either of these methods is used the Asset Type, Primary Key value and Asset Id will be
displayed. Refer to the Asset Manager User guide for information on raising Defects against Assets from the Map
Window or for information relating to Find Assets.
Figure 13
Asset Type
(Optional)
List
Select the asset type that is to be linked to the defect, this asset type will have been previously associated with the
Inspection Activity using Asset Activities – MAI3632.
Asset Ref
(Required)
If you know the asset reference it can be entered in to this field directly, if selected from Locator the asset ref will be
displayed.
Id
(Display Only)
The unique system generated asset id will be displayed.
[Find Asset], when selected this button will call Locator and allow the user to select the appropriate asset to link to the
defect. When locator is displayed it will automatically have a restriction placed on it so any searches for asset data will be
restricted to the network that has been selected in the inspection.
XSP
(Required)
List
If your system has been set to record defects by XSP enter the Cross Sectional Position of the defect. This, together with
the Chainage and Location fields, enables the defect to be located exactly within the section.
Start Chain
(Required)
If your system has been set to record defects by chainage, enter the chainage along the section at which the defect was
found.
Location
(Optional)
If known, enter a free text location description to locate the defect within the section.
If you are not locating defects by chainage and XSP an accurate defect location should be entered.
Defect Desc
(Optional)
If required, enter an additional textual description of the defect.
Special Inst
(Optional)
If required, enter any additional instructions or comments relating to the defect.
Version: 4.7
15
CONFIDENTIALITY STATEMENT
The contents of this document, including system ideas and concepts, are confidential and proprietary in nature and are not to be distributed in any form
without the prior written consent of Bentley, Inc.
EXOR
MAINTENANCE MANAGER USER GUIDE
MANAGING INSPECTIONS
Co-ords X and Y
(Optional)
The Co-ords X and Y fields will display the defect coordinates if the defect has been raised via Locator or within
MapCapture. The user may additionally enter or modify the co-ordinates of the defect in these fields if required.
Roadstud Type
(Optional)`
List
For Roadstud related defects, enter ‘M’ for a Mandatory defect, ‘A’ for an advisory. This field can only be updated if the
inventory type is 'RS'.
Activity
(Required, Default)
List
This field will display the inspection activity carried out during the inspection.
These activities are set up using Activities – MAI1200. (Maintenance Manager System Administrator Manual)
Defect Type
(Required)
List
Select the type of defect. The list of available defects will be restricted to those associated with the previously selected
activity.
This association is set up using Defect Control Data – MAI1300 (Maintenance Manager System Administrator Manual)
(Flexible Attribute Fields) (Number shown in this screen shot)
'Flexible' fields may be displayed on screen dependant on the Defect Activity and Defect Type. These 'flexible' fields will
display the values for the attributes as defined in Defect Control Data – MAI1300 (Maintenance Manager System
Administrator Manual) for the chosen Defect and Activity Type. The field name will also be determined by the value
entered in the 'Text' field for an Attribute in Defect Control Data – MAI1300.
SISS
(Required)
List
(Optional)
List
Select a valid Standard Item Sub-Section Code.
Asset Modification
A code and associated description will identify any asset modification required. These codes are maintained in Domains –
HIG9120 in the ASSET_MODIFICATION domain.
Notify
(Optional)
List
If the defect is notifiable, select a valid organisation to be notified of the defect. The responses to any notifications are
maintained in Responses to Notices – MAI3816.
Recharge
(Optional)
List
If the defect is rechargeable, select a valid organisation to be recharged.
Notice Id
(Display Only)
If this defect is notifiable, the system generated reference number of the notice will displayed here after printing the notice
using Print Notice Details. The date the notice was printed will be displayed in the adjacent field.
Date Printed
(Display Only)
The date the notice was printed will be displayed.
Version: 4.7
16
CONFIDENTIALITY STATEMENT
The contents of this document, including system ideas and concepts, are confidential and proprietary in nature and are not to be distributed in any form
without the prior written consent of Bentley, Inc.
EXOR
MAINTENANCE MANAGER USER GUIDE
MANAGING INSPECTIONS
Per, Imm, Tmp
(Checkbox)
These checkboxes can be used in a number of ways
They will indicate if Permanent, Immediate or Temporary repairs exist against a defect, if one or more of the boxes are
checked, selecting the checked box will result in details of the repair being displayed in the repairs window.
When adding repairs to a defect, selecting the unchecked box will allow you to enter a repair providing the repair category
is valid against the priority of the selected defect. Valid repair categories are set up using Defect Priorities – MAI3812
(Maintenance Manager System Administrator Manual)
If any of the boxes are checked their repairs can be viewed by selecting the [Repairs] button and using the [Next] and
[Previous] buttons once in the repairs window.
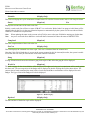
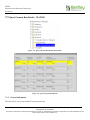
2.2.7
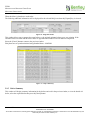
Summary
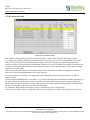
This window will be displayed when the [Summary] button is selected.
A summary of all the defects collected for the selected inspection will be displayed. To view the full details of a defect,
select the required defect then select the [Detail] button, this will take you back to the previous window.
Figure 14 - Defect Summary Button
2.2.8
Print
This button will run the Print Defect Details – MAI3902 report.
Version: 4.7
17
CONFIDENTIALITY STATEMENT
The contents of this document, including system ideas and concepts, are confidential and proprietary in nature and are not to be distributed in any form
without the prior written consent of Bentley, Inc.
EXOR
MAINTENANCE MANAGER USER GUIDE
MANAGING INSPECTIONS
Figure 15 - Create Work Order
2.2.9
Create Work Order
Selecting the [Create WO] button will call form Raise Work Order – MAI3801. This will create a work order for the
selected defect record.
Version: 4.7
18
CONFIDENTIALITY STATEMENT
The contents of this document, including system ideas and concepts, are confidential and proprietary in nature and are not to be distributed in any form
without the prior written consent of Bentley, Inc.
EXOR
MAINTENANCE MANAGER USER GUIDE
MANAGING INSPECTIONS
Figure 16 - Raise Work Order
The Raise Works Order form allows the required Scheme Type and Works Order Contract to be selected.
Scheme Type
(Required,Default)
List
This is the Scheme Type for the Work Order. The default value is determined by the value set for Product Option
DEFSCHTYPL or DEFSCHTYPD (depending on the System Flag set for the Section or Budget Allocation Group on
which the Defect is raised). The default value may only be updated if product option DEFSCHTYPU is set to ‘Y’.
Contract
(Required,Default)
List
This is the Contract used within the Work Order. The default value is determined by the value set for product Option
DUMCONCODE. Once the appropriate Contract has been selected press the [Next] Button.
Work Order
(Default)
If Product Option WORREFGEN Is set to M – manual, the Work Order Number and Description should be entered. If set
to C- Contract based or A – Admin Unit based the work order number will be automatically generated when the [Next >]
button is pressed and a valid Budget is selected.
If Multiple Budgets exist for the defect Activity/Scheme Type/Section or Budget Allocation Group combinations, a list
will be displayed from which to select the required Budget.
Version: 4.7
19
CONFIDENTIALITY STATEMENT
The contents of this document, including system ideas and concepts, are confidential and proprietary in nature and are not to be distributed in any form
without the prior written consent of Bentley, Inc.
EXOR
MAINTENANCE MANAGER USER GUIDE
MANAGING INSPECTIONS
Figure 17 - Budgets
Once a Budget has been selected the Number of Defects added to the Work Order will be displayed in a pop-up dialogue.
Press [Finish] to create the Work Order.
Figure 18 - Raise Work Order
When the [Finish] button is pressed the Work Order (Defects) – MAI3800 module will be called and the Work Order will
be displayed allowing the use to make any changes required.
Version: 4.7
20
CONFIDENTIALITY STATEMENT
The contents of this document, including system ideas and concepts, are confidential and proprietary in nature and are not to be distributed in any form
without the prior written consent of Bentley, Inc.
EXOR
MAINTENANCE MANAGER USER GUIDE
MANAGING INSPECTIONS
Figure 19 - Repairs Button
2.2.10 Repairs
This window is displayed when the [Repairs] button is selected. To return to the defects window select the [Defects]
button.
Category
(Required, Default)
List
Select the defect category, Permanent, Temporary or Immediate. A repair category will only be available for the selected
activity and defect if it has been previously set up using Defect Priorities – MAI3812 (Maintenance Manager System
Administrator Manual)
Status
(Display Only)
Displays the current status of the repair. This status is the status of the works order line and is maintained by Works
Orders (Defects) – MAI3800 and Payment Run – MAI3840.
Date Repair Due
(Display Only)
Displays the date by which the repair should be completed. This is calculated by the system based on the date of
inspection and the defect priority.
Desc
(Optional)
If required, enter a text description of the repair to be carried out.
Date Instructed
(Display Only)
When this defect has been instructed (added to a works order), the date of instruction will appear in this field.
Treatment
(Optional)
List
Select the treatment to be used to rectify this defect. A description will be displayed in the adjacent field.
Valid treatment codes will have been previously associated to activities and defects using Treatment Data – MAI1315.
(Maintenance Manager System Administrator Manual)
The treatment code can be forced to be mandatory by setting the product option TRECODEMAN to ‘Y’.
Version: 4.7
21
CONFIDENTIALITY STATEMENT
The contents of this document, including system ideas and concepts, are confidential and proprietary in nature and are not to be distributed in any form
without the prior written consent of Bentley, Inc.
EXOR
MAINTENANCE MANAGER USER GUIDE
MANAGING INSPECTIONS
Target Complete
(Display Only)
Displays the date by which this repair should be completed. This date is entered when raising a works order.
Work Order
(Display Only)
Once a defect has been placed on a works order the works order number will be displayed.
Time Completed
(Optional)
When known, enter the time of completion of the repair.
A time must be entered if the repair time mandatory field in Defect Priorities – MAI3812 (Maintenance Manager System
Administrator Manual) is set to 'Y'.
Date Completed
(Optional)
When the repair has been completed, the date will appear in this field.
If the Product Option REPCOMPDATE is set to 'Y' defects may be manually completed by entering the date here. The
status of the defect will change to completed and will not be available for inclusion on a works order.
For additional information see Manually Completing a Defect. For more information on Product Options please refer to
the Product Options – HIG9130 section in the Maintenance Manager System Administrator Manual.
Work Sheet
(Display Only)
This field will be used to display the reference number of the work sheet containing this repair once it has been printed.
Payment Id
(Display Only)
This field will be used to display the reference number of the payment covering this repair once it has been received.
Payment Id's are associated to repairs once the Payment Run – MAI3840 module has been executed.
Date Paid
(Display Only)
This field will display the date that the payment run was executed.
Check Batch
(Display Only)
If this repair is selected for a random quality inspection, this field will be used to display the system generated batch
number for that quality inspection
Check Result
(Display Only)
If this repair was selected for a random quality inspection, the results of that inspection will appear in this field.
Check Date
(Display Only)
When required, the date of the quality inspection will appear in this field.
Version: 4.7
22
CONFIDENTIALITY STATEMENT
The contents of this document, including system ideas and concepts, are confidential and proprietary in nature and are not to be distributed in any form
without the prior written consent of Bentley, Inc.
EXOR
MAINTENANCE MANAGER USER GUIDE
MANAGING INSPECTIONS
Figure 20 - BOQ Items Button
2.2.11 BOQ Items
This window contains the details of the individual work items required to rectify the current repair. The BOQ items may
be populated automatically using Treatment Models – MAI3814. (Maintenance Manager System Administrator Manual).
Item Code
(Required)
List
Select the item code representing the standard job item to be used to rectify the current defect. The description for the item
will be displayed in the field below.
Dim 1-3
(Required)
Some or all of the three dimension fields should be completed for each job item. The fields to be completed will vary
depending on the dimensions required for each job item. A typical example would be a patch repair which would require
two dimensions to be completed, for length and width. A pothole, on the other hand, would require three dimensions,
length, width and depth. The message line will display a line of text explaining the unit of measurement to be used in each
case.
Total Qty
(Display Only)
Displays the total quantity of work to be done, based on the values entered in the three Dimension fields above. If the total
quantity is outside the allowable range specified for the standard item as set up using Standard Items – MAI3888
(Maintenance System Administration Manual) an error message will result, press [Expand] to view the allowable quantity
range.
Unit
(Display Only)
Displays the unit of measurement used for costing this standard job item.
Rate
(Display Only)
Displays the standard cost per unit of this job item.
Version: 4.7
23
CONFIDENTIALITY STATEMENT
The contents of this document, including system ideas and concepts, are confidential and proprietary in nature and are not to be distributed in any form
without the prior written consent of Bentley, Inc.
EXOR
MAINTENANCE MANAGER USER GUIDE
MANAGING INSPECTIONS
Note:
When a ‘Rogue Item’ is being added to a Bill Of Quantities, the Rate field becomes Mandatory. You should
insert the rate per unit for this rogue item. Also, the Item Description field can be amended from the standard
Rogue Item description to a more meaningful item description for this particular job.
Lab Units
(Display Only)
Displays the calculated amount of labour units for this job. This figure is calculated as the quantity multiplied by the
labour multiplier held against the standard job item. This multiplier can be viewed and amended via Standard Items –
MAI3888 (Maintenance System Administration Manual)
Est Cost
(Display Only)
Displays the estimated cost for the job based on the quantity and the rate per unit. This value will change when the defect
is placed on a works order that is subject to contract rates as opposed to the standard rates entered using Standard Items –
MAI3888 (Maintenance System Administration Manual).
Act Cost
(Display Only)
Displays the actual cost for the job. This will be blank until the defect is placed on a works order, the work is completed
ant the contractor has entered the actual dimensions of the work.
BOQ Uplift Item
(Optional)
List
Enter the BOQ uplift item, this item will uplift all the BOQ items that have the ‘Allow Percent Items ?’ field set to ‘Y’ in
Standard Items – MAI3888.
The List of Values will only contain those items that have the ‘BOQ Percent Uplift ?’ set to ‘Y’ in Standard Items –
MAI3888
WOL Uplift Item
(Optional)
List
Enter the Work Order Line uplift item, this item will uplift the entire work order line.
The List of Values will only contain those items that have the ‘WOL Percent Uplift ?’ set to ‘Y’ in Standard Items –
MAI3888
Note: When a Repair, having either BOQ or WOL Percent Uplift Item Codes assigned, is added to a Work Order, a
check is made against the Contract for that work order to determine if the Standard Item Code has been assigned
as a Contract Item, and that the contract will allow for Percentage Uplifts. If not, the user will be prevented from
saving, or Instructing, the Work Order.
Version: 4.7
24
CONFIDENTIALITY STATEMENT
The contents of this document, including system ideas and concepts, are confidential and proprietary in nature and are not to be distributed in any form
without the prior written consent of Bentley, Inc.
EXOR
MAINTENANCE MANAGER USER GUIDE
MANAGING INSPECTIONS
2.2.12 Manually Completing a Defect.
If a defect has been completed because of some other work that has been carried out on the highway, it can be manually
completed on the system as follows:
Using either Defects – MAI3806 or View Defects by Section- MAI3810, locate the defect and select the [Edit Defect]
button. This will take you to Inspections- MAI3808 where the defect details can then be modified.
1. In the Repairs for Defects window enter the Date Completed.
2. Select [Save].
3. The Status Reason pop-up will appear where a reason for the status change should be entered.
Figure 21 - Status change
4. Select [Save]. The defect status will automatically be updated to Completed.
The history of changes made to the defect status can be viewed using Audit Details – HIG1505. Rules for the audit should
be set up by the system administrator in form Audit Details – HIG1500. (Refer to the Audit Manager manual for further
details).
Note: The above procedure can only be carried out if the Product Option REPCOMPDATE is set to 'Y' .
Do not change the status of the defect to completed manually.
Version: 4.7
25
CONFIDENTIALITY STATEMENT
The contents of this document, including system ideas and concepts, are confidential and proprietary in nature and are not to be distributed in any form
without the prior written consent of Bentley, Inc.
EXOR
MAINTENANCE MANAGER USER GUIDE
MANAGING INSPECTIONS
2.3
Using Locator with Inspections and Defects
Figure 22 - Locator
2.3.1
General Information
Full information on the use of locator can be found in the Locator and Web Mapping User Guide V4.0
In summary Locator – NM0572 provides Exor Users with an easy to use web based spatial interface that allows new
Inspection and Defect information to be quickly created, as well as existing Defect data to be found and viewed on a map.
Three options relating to the creation of Defects and their associated Inspection record are available:
Create Defect On Assets
Create Defects On Asset at X,Y
Create Defects On Network at X,Y
Once a defect has been created the treatment model can be automatically generated with the option to edit it if required.
The user is then presented with the option to immediately raise a works order once the defects have been entered.
Defects can also be searched for using any combination of network location and defect attribute data within the Locator
search panel.
Once a defect or defects have been selected within Locator standard Exor modules or custom built PL/SQL procedures
can be run as required.
If the system has been set up to use multiple Admin Units for defect priorities the following additional rules apply:
Valid priorites will be based on the list of Defect Priorities defined in the Defect Priorites form (MAI3812) for the
Activity, and where the Admin Unit is within the Admin Unit hierarchy of the associated network
Allowed repair types, defined in the Defect Priorites form (MAI3812), for a defect, are based on the Activity and
the Admin Unit of the associated Network.
Version: 4.7
26
CONFIDENTIALITY STATEMENT
The contents of this document, including system ideas and concepts, are confidential and proprietary in nature and are not to be distributed in any form
without the prior written consent of Bentley, Inc.
EXOR
MAINTENANCE MANAGER USER GUIDE
MANAGING INSPECTIONS
2.4
The calculation of the Repair due date will take the Admin Unit of the associated Network into account, when
identifying the appropriate Defect Priorities values to be used in the calculation
If Automatic Defect Prioritisation is being used (defined by product option DEFAUTOPRI), the Admin Unit of
the Network assigned to the Defect, along with the Defect Activity, will be used to identify appropriate details,
defined in Maintain Automatic Defect Prioritisation form (MAI3813)
Create a Defect on Network at X Y using Locator
Figure 23 - Feature Edit Menu
This option allows a Defect to be created on a Network Section, by clicking at the appropriate location on the map.
To create a Defect on the network, firstly navigate to the appropriate map extent using the Locator Search facilities, the
Map window Navigation tools or a combination of both.
Select the ‘Create Defects on Network at X,Y’ function from the ‘Feature Edit’ tool. The mouse cursor will change to a
‘cross hair’. To create the Defect, click on the required location within the Map window.
The system will attempt to derive a Network location by snapping to an available Layer. Only the visible Layers (defined
within the Layer Control tool) which have been defined as ‘Snapping Layers’ for the Defect theme (in GIS Themes –
GIS0010) will be used by this ‘snapping’ process. A list of all Network Elements (Datum’s or Groups) within a defined
snapping tolerance (defined in GIS Themes – GIS0010) from the Visible Active Layers, is displayed to allow the User to
select the appropriate Network element to which to Snap and derive its location.
Version: 4.7
27
CONFIDENTIALITY STATEMENT
The contents of this document, including system ideas and concepts, are confidential and proprietary in nature and are not to be distributed in any form
without the prior written consent of Bentley, Inc.
EXOR
MAINTENANCE MANAGER USER GUIDE
MANAGING INSPECTIONS
Figure 24 - Select Network
The following details are displayed within the ‘Confirm New Feature Creation’ window.
Network/ Group Type of Element
Element Name
Element Description
Theme or Layer name of snapping theme
Perpendicular distance to the Element from the click position
Offset measure along the Element at the ‘snapping’ point
Units of measurements
Each Section within the List may be ‘highlighted’ on the Map in turn by checking the ‘Select’ option. This allows the
User to select the correct Section on which to create the Defect.
Version: 4.7
28
CONFIDENTIALITY STATEMENT
The contents of this document, including system ideas and concepts, are confidential and proprietary in nature and are not to be distributed in any form
without the prior written consent of Bentley, Inc.
EXOR
MAINTENANCE MANAGER USER GUIDE
MANAGING INSPECTIONS
Figure 25 - Highlight Network
To create the Defect on the selected Network press the [OK] button.
To cancel the entire Defect Creation process press the [Cancel] button.
If the position at which the User clicks to create the Defect on the Network is outside the tolerance set an error message
will be displayed. Acknowledge the message by pressing the [OK] button and re-select the ‘Create Defects on network at
X,Y ‘ option if the Defect is still required.
Figure 26 -Message
When the correct position for the Defect on the Network has been selected the ‘Confirm Network Selection’ window will
be displayed. If the incorrect Section has been selected press [Cancel] otherwise press [Next >] to continue with the defect
creation process.
Version: 4.7
29
CONFIDENTIALITY STATEMENT
The contents of this document, including system ideas and concepts, are confidential and proprietary in nature and are not to be distributed in any form
without the prior written consent of Bentley, Inc.
EXOR
MAINTENANCE MANAGER USER GUIDE
MANAGING INSPECTIONS
Figure 27 - Confirm Network Selection
The following Details are displayed on the ‘Confirm Network Selection’ window:
Network Type and Description
Section Name and Description
Section Admin Unit
X and Y coordinates of the ‘defect’
Version: 4.7
30
CONFIDENTIALITY STATEMENT
The contents of this document, including system ideas and concepts, are confidential and proprietary in nature and are not to be distributed in any form
without the prior written consent of Bentley, Inc.
EXOR
MAINTENANCE MANAGER USER GUIDE
MANAGING INSPECTIONS
Figure 28 - Defect Details
A window will be displayed allowing the Defect details to be entered. To abandon the Defect creation process press the
[Cancel] button.
Date/Time Created
(Default)
The current system date and time will be populated. These may be amended if required.
Inspector
(Required)
List
Select the inspector from the list of values. These inspectors must be logged on the system and are set up using Users –
HIG1832.
Safety/Detailed
(Required)
List
Enter ‘S’ for safety inspection, ‘D’ for detailed inspection.
Activity
(Required)
List
Select the appropriate ‘Activity’ from the list provided. Only the Activities associated with the selected Asset Type will be
available for selection. Activities and Asset Types are associated using Asset Activities – MAI3632 (refer to the
Maintenance Manager System Admin Guide).
Initiation Type
(Required)
List
This is the Initiation Type used for the related Inspection record created for the Defect. The default value is defined using
Product Option INSP_INIT. This must contain a valid value as defined for the INITIATION_TYPE Domain using
Domains – HI9120 (refer to the General System Admin Guide).
Version: 4.7
31
CONFIDENTIALITY STATEMENT
The contents of this document, including system ideas and concepts, are confidential and proprietary in nature and are not to be distributed in any form
without the prior written consent of Bentley, Inc.
EXOR
MAINTENANCE MANAGER USER GUIDE
MANAGING INSPECTIONS
SISS Code
(Required)
List
If required, enter a SISS code (Standard Item Sub-Section). The default value is defined using Product Option DEF_SISS.
Standard Items and Standard Item Sub-Sections are maintained using MAI3886 – Standard Item Sections and SubSections (refer to the Maintenance Manager System Admin Guide).
Defect Type
(Required)
List
Select the appropriate ‘Defect Type’ from the list provided. Only those Defect Types associated with the previously
selected ‘Activity’ will be available for selection. Defects and Activities are associated using Defect Control Data –
MAI1300 (refer to the Maintenance Manager System Admin Guide).
Priority
(Required)
List
Select a ‘Defect Priority’ from the list provided. Only those Defect Priorities associated with the previously selected
‘Activity’ will be available for selection. The Priority selected will be used to generate a Target Date for the Defect
Repair, which is displayed in the bottom right hand corner of the Defect Details window. Defect Priorities and Activities
are associated using Defect Priorities – MAI3812 (refer to the Maintenance Manager System Admin Guide).
Location Description
(Optional)
If required, enter a description for the Location of the Defect. A maximum of 40 characters is allowed.
Defect Description
(Optional)
A description of the Defect may be entered if required. A maximum of 240 characters is allowed.
Special Description
(Optional)
If required, enter any additional instructions or comments relating to the defect. A maximum of 254 characters is allowed.
XSP
(Required)
List
If the system has been set to record defects by XSP enter the cross sectional position of the defect. This together with the
‘Chainage’ and ‘Location’ fields enables the defect to be located exactly within the section.
Notify
(Optional)
List
If the defect is notifiable, select a valid organisation to be notified of the defect. The responses to any notification are
maintained in Responses to Notices – MAI3816.
Recharge
(Optional)
List
If the defect is rechargeable, select a valid organisation to be recharged.
Action Modification
(Optional)
List
An Asset Modification Flag may be set for the Defect Repair. This allows an indicator to be set to signify that the affected
Asset has been ‘Replaced’, ‘Renewed’ or ‘Repaired’ for example. This is useful when carrying out Asset Valuations. The
list of Asset Modification Flags is maintained using Domains – HIG1920 and updating Domain name
ASSET_MODIFICATION (refer to the General System Admin Guide for information relating to System Domains).
Version: 4.7
32
CONFIDENTIALITY STATEMENT
The contents of this document, including system ideas and concepts, are confidential and proprietary in nature and are not to be distributed in any form
without the prior written consent of Bentley, Inc.
EXOR
MAINTENANCE MANAGER USER GUIDE
MANAGING INSPECTIONS
Flexible Defect Attributes
(Optional)
If any Attributes (length, height, width, number etc.) have been defined for the selected Defect Type using Defect Control
Data – MAI1300, these will be displayed at the bottom of the Defect Details window. There may be up to 4 of these
attributes for each defect type.
Figure 29 - Repair Details
The Repair Details window allows the user to enter details for one or more repair for the defect. There are three tabs, one
for each repair type. A repair type will only be available for the selected activity and defect if it has been previously set
up using Defect Priorities – MAI3812 (Maintenance Manager System Administrator Manual)
Create Repair
(Optional/Checkbox)
Tick the checkbox on each tab to indicate that a repair of that type should be created. If data is entered into any of the
fields the checkbox will be ticked automatically. The Permanent Repair will default to ticked.
Treatment
(Optional)
List
If required select a Treatment for the Defects. If selected, the BOQ items from the Treatment model will be used as the
Repair Items for the Defect. Only those ‘Treatments’ associated with the previously selected ‘Activity’/‘Defect Type’
combination will be available for selection. ‘Treatments’ are maintained using Treatment Data – MAI1315 (refer to the
Maintenance Manager System Admin Guide).
The treatment code can be forced to be mandatory by setting the product option TRECODEMAN to ‘Y’.
Description
(Optional)
If required a description of the repair description may be entered.
Version: 4.7
33
CONFIDENTIALITY STATEMENT
The contents of this document, including system ideas and concepts, are confidential and proprietary in nature and are not to be distributed in any form
without the prior written consent of Bentley, Inc.
EXOR
MAINTENANCE MANAGER USER GUIDE
MANAGING INSPECTIONS
Date Repair Due
(Display Only)
The Target Date and Time for the Defect Repair will be displayed. This is generated using the ‘Defect Priority’ previously
entered.
BOQs
(Optional)
List
BOQs for the repair can be entered as required.
If Treatment Models are being used (see Maintenance Manager User/Admin Guides) the default Bill Of Quantity Items
within the Treatment Model defined for the selected Activity/Defect Type/Treatment will be shown. These can be
amended, added to, removed, etc for the current set of Defects.
These BOQ items apply to ALL Defects created within the current selection; however, these may be amended for
individual defects later in the defect creation process.
BOQ Uplift Item
(Optional)
List
Enter the BOQ uplift item, this item will uplift all the BOQ items that have the ‘Allow Percent Items ?’ field set to ‘Y’ in
Standard Items – MAI3888.
The List of Values will only contain those items that have the ‘BOQ Percent Uplift ?’ set to ‘Y’ in Standard Items –
MAI3888
WOL Uplift Item
(Optional)
List
Enter the Work Order Line uplift item, this item will uplift the entire work order line.
The List of Values will only contain those items that have the ‘WOL Percent Uplift ?’ set to ‘Y’ in Standard Items –
MAI3888
Note: When a Repair, having either BOQ or WOL Percent Uplift Item Codes assigned, is added to a Work Order, a
check is made against the Contract for that work order to determine if the Standard Item Code has been assigned
as a Contract Item, and that the contract will allow for Percentage Uplifts. If not, the user will be prevented from
saving, or Instructing, the Work Order.
To continue creating the Defects, press [Next >].
Version: 4.7
34
CONFIDENTIALITY STATEMENT
The contents of this document, including system ideas and concepts, are confidential and proprietary in nature and are not to be distributed in any form
without the prior written consent of Bentley, Inc.
EXOR
MAINTENANCE MANAGER USER GUIDE
MANAGING INSPECTIONS
Figure 30 - Defect Created
The following Defect Summary details are displayed:
Section Name and Description
Inspection batch Id
Defect Id
Target Repair Date
X and Y coordinates of the Defect
To cancel the Defect creation process press [Cancel], no defect will be created.
Note: If the [Cancel] button is pressed the entire Defect creation process will be cancelled and no Defects will be
created.
Version: 4.7
35
CONFIDENTIALITY STATEMENT
The contents of this document, including system ideas and concepts, are confidential and proprietary in nature and are not to be distributed in any form
without the prior written consent of Bentley, Inc.
EXOR
MAINTENANCE MANAGER USER GUIDE
MANAGING INSPECTIONS
Figure 31 - Edit BOQs
To edit the BOQ items before committing the defect press [Next]. This will call the Edit BOQs window. This is only
available when a single repair has been specified. Where multiple repairs have been specified the user will have to finish
the defect creation process then use form Inspections – MAI3808 to edit the defect(s).
The Edit BOQs window allows BOQ items and quantities to be amended, added to, removed etc.
To create the Defect press [Finish].
At the end of the Defect creation process a message will be displayed, offering the option to raise a Works Order to
include the Defects just raised. To raise a Work Order press [Yes] or [No] to finish the entire process.
Figure 32 - Create Work Order
If a Works Order is to be raised the form shown below will be displayed.
Version: 4.7
36
CONFIDENTIALITY STATEMENT
The contents of this document, including system ideas and concepts, are confidential and proprietary in nature and are not to be distributed in any form
without the prior written consent of Bentley, Inc.
EXOR
MAINTENANCE MANAGER USER GUIDE
MANAGING INSPECTIONS
Figure 33 - Raise Work Order
The Raise Works Order form allows the required Scheme Type and Works Order Contract to be selected.
Scheme Type
(Required,Default)
List
This is the Scheme Type for the Work Order. The default value is determined by the value set for Product Option
DEFSCHTYPL or DEFSCHTYPD (depending on the System Flag set for the Section or Budget Allocation Group on
which the Defect is raised). The default value may only be updated if product option DEFSCHTYPU is set to ‘Y’.
Contract
(Required,Default)
List
This is the Contract used within the Work Order. The default value is determined by the value set for product Option
DUMCONCODE. Once the appropriate Contract has been selected press the [Next] Button.
Work Order
(Default)
If Product Option WORREFGEN Is set to M – manual, the Work Order Number and Description should be entered. If set
to C- Contract based or A – Admin Unit based the work order number will be automatically generated when the [Next >]
button is pressed and a valid Budget is selected.
If Multiple Budgets exist for the defect Activity/Scheme Type/Section or Budget Allocation Group combinations, a list
will be displayed from which to select the required Budget.
Version: 4.7
37
CONFIDENTIALITY STATEMENT
The contents of this document, including system ideas and concepts, are confidential and proprietary in nature and are not to be distributed in any form
without the prior written consent of Bentley, Inc.
EXOR
MAINTENANCE MANAGER USER GUIDE
MANAGING INSPECTIONS
Figure 34 - Budgets
Once a Budget has been selected the Number of Defects added to the Work Order will be displayed in a pop-up dialogue.
Press [Finish] to create the Work Order.
Figure 35 - Raise Work Order
When the [Finish] button is pressed the Work Order (Defects) – MAI3800 module will be called and the Work Order will
be displayed.
The Map window will be automatically refreshed and the newly created Defects will be displayed.
Version: 4.7
38
CONFIDENTIALITY STATEMENT
The contents of this document, including system ideas and concepts, are confidential and proprietary in nature and are not to be distributed in any form
without the prior written consent of Bentley, Inc.
EXOR
MAINTENANCE MANAGER USER GUIDE
MANAGING INSPECTIONS
Figure 36 - Locator
To view the full details of a Defect or set of Defects make the Defects Later the Active Layer using the Layer Control
Tool, select the required Defects as described earlier and call the Defects – MAI3806 module from the ‘Select To’ list at
the bottom of the Locator Map window. This will call the Defects module and display full details of the selected Defects.
Version: 4.7
39
CONFIDENTIALITY STATEMENT
The contents of this document, including system ideas and concepts, are confidential and proprietary in nature and are not to be distributed in any form
without the prior written consent of Bentley, Inc.
EXOR
MAINTENANCE MANAGER USER GUIDE
MANAGING INSPECTIONS
2.5
Create a Defect on Assets using Locator
Figure 37 - Feature Edit Menu
This option allows a single Defect to be created against an Asset. If multiple Assets are selected a separate Defect will be
created for each. When Defects are created using this option the spatial position of the Defect is derived from the centroid
of the associated Asset.
The figures below show examples of Defects raised against Point, Line and Polygon Assets respectively (Defects are
shown as Red Stars).
Point feature (Bus Stop) circled. Defect positioned at same X,Y position as feature.
Figure 38 - Point Feature
Version: 4.7
40
CONFIDENTIALITY STATEMENT
The contents of this document, including system ideas and concepts, are confidential and proprietary in nature and are not to be distributed in any form
without the prior written consent of Bentley, Inc.
EXOR
MAINTENANCE MANAGER USER GUIDE
MANAGING INSPECTIONS
Line feature (Lane) highlighted in Green. Defect positioned at mid-point of line
Figure 39 - Line Feature
Polygon feature (Building Unit). Defect positioned at center of Polygon.
Figure 40 - Polygon Feature
To create a defect on an asset, the asset(s) in question must firstly be selected. This can be done using the Locator Search
functionality or by using the Navigation and Feature Selection tools available within the Map window. If a Locator Search
is used to select and zoom to the required asset(s), the Asset Layer will automatically be made the Active Layer. When
selecting an asset directly from the Map window the appropriate Asset Layer must be the Active Layer. This is done using
the Layer Control Tool.
After selecting the asset(s) on which the defect(s) is to be created select the ‘Create Defects On Assets’ option from the
‘Feature Edit Menu’ Tool. This will call a form displaying details of the selected assets that allows the User to confirm
their selection prior to raising defects. If an asset has been selected erroneously it may be de-selected by unchecking the
record selection flag on the right hand side of the form. Only assets that are flagged as ‘selected’ will have defects raised
against them.
Version: 4.7
41
CONFIDENTIALITY STATEMENT
The contents of this document, including system ideas and concepts, are confidential and proprietary in nature and are not to be distributed in any form
without the prior written consent of Bentley, Inc.
EXOR
MAINTENANCE MANAGER USER GUIDE
MANAGING INSPECTIONS
Figure 41 - Confrim Asset Selection
The following Asset Details are displayed on the ‘Confirm Asset Selection’ window:
Asset Type Code
Asset Type Description
Asset Id (Primary Key)
Asset Item Description
X and Y coordinates of the Item centroid position
To continue the process of raising Defects against the selected Assets press the [Next >] button or [Cancel] to abandon the
operation.
The ‘Defect Details’ window will be displayed allowing the defect details to be entered as described under ‘Create a
Defect on Network at X Y using Locator’.
Version: 4.7
42
CONFIDENTIALITY STATEMENT
The contents of this document, including system ideas and concepts, are confidential and proprietary in nature and are not to be distributed in any form
without the prior written consent of Bentley, Inc.
EXOR
MAINTENANCE MANAGER USER GUIDE
MANAGING INSPECTIONS
2.6
Create Defects on Assets at X Y using Locator
Figure 42 - Feature Edit Menu
This option allows the creation of multiple defects against a single selected asset. Defects created using this option are
associated with the selected asset but are located at the X,Y position at which the User clicks and not at the centre of the
selected asset as is the case when using the ‘Create Defects On Assets’ option previously described.
This is useful when creating defects or Work Requests at known locations within a Park or Land Parcel or creating defects
adjacent to but not coincident with a Bus Stop or Guard Rail etc. Examples of Defects created at XY locations (shown as
Red Stars) within a Park (polygon feature) and adjacent to a Bus Stop (point feature) respectively are shown below.
Note: No tolerance or validation is considered when creating Defects using this option. Therefore Defects may be
created at any distance from the selected Asset or created outside the boundary of a selected polygon feature.
Defects created against a Park and located within the park (polygon feature) highlighted in Green.
Figure 43 - Polygon Feature
Version: 4.7
43
CONFIDENTIALITY STATEMENT
The contents of this document, including system ideas and concepts, are confidential and proprietary in nature and are not to be distributed in any form
without the prior written consent of Bentley, Inc.
EXOR
MAINTENANCE MANAGER USER GUIDE
MANAGING INSPECTIONS
Defects created against a Bus Stop and located adjacent to the Bus Stop (point feature) circled in red.
Figure 44 - Point Feature
To Create Defects on an Asset at XY, the asset in question must firstly be selected. This can be done using the Locator
Search functionality or by using the Navigation and Feature Selection tools available within the Map window. If a Locator
Search is used to select and zoom to the required asset(s), the Asset Layer will automatically be made the Active Layer.
When selecting an Asset directly from the Map window the appropriate Asset Layer must be the Active Layer. This is
done using the Layer Control tool.
After selecting the asset on which the defects are to be created, select the ‘Create Defects On Assets at XY’ option from
the ‘Feature Edit Menu’ tool. Click the left mouse button at each of the appropriate XY locations for the defects. A ‘dot’
will be displayed at each ‘click point’ to indicate the position at which the defect will be created. To complete the creation
of the defects against the asset, click the right mouse button. The Confirm Asset Selection and Defect Details window will
be called to allow the defect details to be entered as described under ‘Create a Defect on Network at X Y using Locator’.
Version: 4.7
44
CONFIDENTIALITY STATEMENT
The contents of this document, including system ideas and concepts, are confidential and proprietary in nature and are not to be distributed in any form
without the prior written consent of Bentley, Inc.
EXOR
MAINTENANCE MANAGER USER GUIDE
MANAGING INSPECTIONS
2.7
Create a Small Scheme Work Order using Locator
A small scheme work order can be created through Locator for one or more maintenance section. Each section selected
will be a separate work order line.
Note: The theme for network must be set up in GISThemes – GIS0010 with a function for MAI3801_NET – Raise
Small Scheme Work Order.
To create a small scheme work order on the network, firstly navigate to the appropriate map extent using the Locator
Search facilities, the Map window Navigation tools or a combination of both.
Using the ‘Layer Control Tool’ make the network layer the active layer.
Figure 45 - Layer Control Tool
Using the ‘Feature Selection’ menu select the sections to be added to the small scheme work order.
Figure 46 - Feature Selection Menu
Version: 4.7
45
CONFIDENTIALITY STATEMENT
The contents of this document, including system ideas and concepts, are confidential and proprietary in nature and are not to be distributed in any form
without the prior written consent of Bentley, Inc.
EXOR
MAINTENANCE MANAGER USER GUIDE
MANAGING INSPECTIONS
The ‘Confirm Selection’ window will appear in the map window. Select [OK] to continue.
Select To
Figure 47 - Confirm Selection
Use the ‘Select To’ drop down list to select ‘Raise Small Scheme Work Order’.
Version: 4.7
46
CONFIDENTIALITY STATEMENT
The contents of this document, including system ideas and concepts, are confidential and proprietary in nature and are not to be distributed in any form
without the prior written consent of Bentley, Inc.
EXOR
MAINTENANCE MANAGER USER GUIDE
MANAGING INSPECTIONS
The ‘Raise Small Scheme Work Order – MAI3801_NET will be called.
Figure 48 - Raise Work Order
The Raise Small Scheme Works Order form allows the required Scheme Type and Works Order Contract to be selected.
Scheme Type
(Required,Default)
List
This is the Scheme Type for the Work Order. The default value is determined by the value set for Product Option
DEFSCHTYPL or DEFSCHTYPD (depending on the System Flag set for the Section or Budget Allocation Group on
which the Defect is raised). The default value may only be updated if product option DEFSCHTYPU is set to ‘Y’.
Contract
(Required,Default)
List
This is the Contract used within the Work Order. The default value is determined by the value set for product Option
DUMCONCODE. Once the appropriate Contract has been selected press the [Next] Button.
Work Order
(Default)
If Product Option WORREFGEN Is set to M – manual, the Work Order Number and Description should be entered. If set
to C- Contract based or A – Admin Unit based the work order number will be automatically generated when the [Next >]
button is pressed and a valid Budget is selected.
Press [Next] to call the Budget window. If multiple Budgets exist for the defect Activity/Scheme Type/Section or Budget
Allocation Group combinations, a list will be displayed from which to select the required Budget.
Version: 4.7
47
CONFIDENTIALITY STATEMENT
The contents of this document, including system ideas and concepts, are confidential and proprietary in nature and are not to be distributed in any form
without the prior written consent of Bentley, Inc.
EXOR
MAINTENANCE MANAGER USER GUIDE
MANAGING INSPECTIONS
Figure 49 - Budgets
Once a Budget has been selected the number or sections added to the Work Order will be displayed in a pop-up dialogue.
Press [Finish] to create the Work Order.
Figure 50 - Raise Work Order
When the [Finish] button is pressed the Work Order (Defects) – MAI3800 module will be called and the Work Order will
be displayed.
There will be a work order line for each maintenance section selected.
Version: 4.7
48
CONFIDENTIALITY STATEMENT
The contents of this document, including system ideas and concepts, are confidential and proprietary in nature and are not to be distributed in any form
without the prior written consent of Bentley, Inc.
EXOR
MAINTENANCE MANAGER USER GUIDE
MANAGING INSPECTIONS
Figure 51 - Work Order Lines
The Map window will be automatically refreshed and the newly created Scheme be displayed.
Version: 4.7
49
CONFIDENTIALITY STATEMENT
The contents of this document, including system ideas and concepts, are confidential and proprietary in nature and are not to be distributed in any form
without the prior written consent of Bentley, Inc.
EXOR
MAINTENANCE MANAGER USER GUIDE
MANAGING INSPECTIONS
2.8
Inspections by Group – MAI3899
Figure 52 - Inspections by Group Menu Option
Figure 53 - Inspection by Group
2.8.1
General Information
This form allows inspectors who do not use DCD's to carry out inspections by road group and quickly indicate which
sections have been inspected and which of the inspected sections contained defects. This will considerably speed up data
entry if a paper based inspection system is being used.
Any road group within the gazetteer are valid for use, it is therefore important that your road group hierarchy is set up
correctly to allow you to gain most advantage from the use of this form. Setting up the gazetteer can be viewed in the
Network Manager Manual.
Inspections Created using this form can be viewed or edited using Inspections – MAI3808.
For ad-hoc inspections of individual road sections it is more advisable to use Inspections – MAI3808, discussed above.
Version: 4.7
50
CONFIDENTIALITY STATEMENT
The contents of this document, including system ideas and concepts, are confidential and proprietary in nature and are not to be distributed in any form
without the prior written consent of Bentley, Inc.
EXOR
MAINTENANCE MANAGER USER GUIDE
MANAGING INSPECTIONS
2.8.2
Inspections by Group
This window holds basic details of the inspection such as the date it was performed, who carried it out, the weather and
road conditions at the time.
Inspector
(Required)
List
Select the inspector from the List of Values. These inspectors must be logged on the system and are set up using Users –
HIG1832.
2nd Inspector
(Optional)
List
If required, select the 2nd inspector from the List of Values.
Date Inspected (Required)
Enter the date the inspection took place. If the inspection has been loaded from a DCD, this field cannot be amended.
Weather Condition
(Optional)
List
If known, select the weather at the time of the inspection.
These values can be added to using Domains – HIG9120 and updating the WEATHER_CONDITION option.
Initiation Type
(Required)
List
Select the initiation type of this inspection from the list.
These values can be added to using Domains – HIG9120 and updating the INITIATION_TYPE option.
Road Surface Cond.
(Optional)
List
If known, enter the road surface condition at the time of the inspection.
These values can be added to using Domains – HIG9120 and updating the SURFACE_CONDITION option.
Safety/Detailed
(Required)
List
Enter 'S' for Safety Inspection, 'D' for Detailed Inspection. The default Value for this field is set using Product Option
MANINSACT.
Road Type
(Required)
List
(Required)
Gaz
Enter a valid road group type.
Road
Use the Gazetteer to select the road group to which this inspection applies. A description will be displayed in the adjacent
field
Activity
(Required)
List
Enter the inspection activity.
Version: 4.7
51
CONFIDENTIALITY STATEMENT
The contents of this document, including system ideas and concepts, are confidential and proprietary in nature and are not to be distributed in any form
without the prior written consent of Bentley, Inc.
EXOR
MAINTENANCE MANAGER USER GUIDE
MANAGING INSPECTIONS
2.8.3
Inspected Roads
A summary of the road sections contained in the selected road group will be displayed.
The following check boxes and buttons allow you to indicate the status of the inspection on each section.
Not Inspected
If the section was not inspected check this box. To check all the boxes select the [Set Not Inspected (All)] button and
uncheck those sections that were inspected.
No Defects
If no defects were found on the section check this box, this is the default condition. To check all the boxes select the [Set
No Defects (All)]
Defects
If defects were found on the selected road, as this box is checked the Defects window from Inspections – MAI3808 is
displayed for defect completion.
The [Cancel] button will clear out the road details in the lower half of the window allowing the user to re-select a road
group.
Version: 4.7
52
CONFIDENTIALITY STATEMENT
The contents of this document, including system ideas and concepts, are confidential and proprietary in nature and are not to be distributed in any form
without the prior written consent of Bentley, Inc.
EXOR
MAINTENANCE MANAGER USER GUIDE
MANAGING INSPECTIONS
2.9
Defects – MAI3806
Figure 54 - Defects Menu Option
Figure 55 - Defects
2.9.1
General Information
This module is designed to allow you to retrieve and view defects with their associated repairs and BOQ Items by
selecting one or more defect details within a query, for example, you may wish to view all available, priority 1 defects.
To query defects back by road section or road group it is recommended that you use View Defects – MAI3810.
2.9.2
Defects
The majority of the defects fields are query only allowing you to enter specific criteria when retrieving defect details. The
details of individual defects will be displayed, to view a summary of the defects retrieved following your query press the
[Summary] button, this will display a summary of the defects.
Version: 4.7
53
CONFIDENTIALITY STATEMENT
The contents of this document, including system ideas and concepts, are confidential and proprietary in nature and are not to be distributed in any form
without the prior written consent of Bentley, Inc.
EXOR
MAINTENANCE MANAGER USER GUIDE
MANAGING INSPECTIONS
If the Defect has been raised against an Asset press the [View Asset] button to view the Asset Details. This will call the
Asset Maintenance – NM0590 module (refer to the Asset Manager User Admin Guide).
To obtain a print of the defect details select the [Print] button, this will run Print Defect Details – MAI3902.
The [Edit Defect] button will call the defects window from Inspections – MAI3808 allowing the update of the defect,
repair, boq items if the status of the defect is set to an appropriate value.
The [Create WO] button will allow the defect to be placed onto a work order when reviewing the defect details.
The [Navigator] button opens Navigator which allows the user to view and retrieve data associated with a defect record,
an example of this is shown below: Details on the use of navigator can be found in the Query and Navigator User
Manual.
Order By
(Optional)
List
This will allow the ordering of the query by the criteria selected.
2.9.3
Repair
The repair details for the selected defect will be displayed, if the check boxes indicate that more than one repair exists for
the selected defect, select the repair category field followed by the [Next] or [Previous] buttons to view the additional
repairs.
2.9.4
BOQ Items
The bill of quantity items for the selected repair will be displayed.
These BOQ items will have been generated in one of the following ways:
Entered into the Data Capture Device by the inspector at the time of the inspection..
Automatically by the use of Treatment Models – MAI3814. (Maintenance Manager System Admin Manual)
When the inspection is loaded onto the system either manually or by the use of a DCD, the BOQ items can be added once
the relevant inspection is retrieved.
These BOQ items can be modified and added to in the following ways:
Retrieve the inspection containing the relevant defect.
Version: 4.7
54
CONFIDENTIALITY STATEMENT
The contents of this document, including system ideas and concepts, are confidential and proprietary in nature and are not to be distributed in any form
without the prior written consent of Bentley, Inc.
EXOR
MAINTENANCE MANAGER USER GUIDE
MANAGING INSPECTIONS
When the defect is placed on a works order.
The following additional information will be displayed for the selected BOQ item when the [Expand] key is selected.
Figure 56 - BOQ Item details
This window allows you to compare the actual values vs. the original estimated values to see any variation. If the
estimated values are blank and the actual values are populated the schedule item was added on completion.
Select the [Cancel] button to return to the previous window.
BOQ Items are set up and maintained using Standard Items – MAI3888.
Figure 57 - Defect Summary
2.9.5
Defect Summary
This window will display summary information for the defects retrieved in the previous window, to view the details of a
defect, select the required defect then press the [Detail] button.
Version: 4.7
55
CONFIDENTIALITY STATEMENT
The contents of this document, including system ideas and concepts, are confidential and proprietary in nature and are not to be distributed in any form
without the prior written consent of Bentley, Inc.
EXOR
MAINTENANCE MANAGER USER GUIDE
MANAGING INSPECTIONS
Figure 58 - Edit Defect
2.9.6
Edit Defect
The [Edit Defects] button will call the Defects window from form Inspections – MAI3808. Updates to the defect, repair,
BOQ items can be made if the status of the defect is set to the appropriate value.
Figure 59 - Create Work Order
2.9.7
Create Work Order
Selecting the [Create WO] button will call form Raise Work Order – MAI3801.
Version: 4.7
56
CONFIDENTIALITY STATEMENT
The contents of this document, including system ideas and concepts, are confidential and proprietary in nature and are not to be distributed in any form
without the prior written consent of Bentley, Inc.
EXOR
MAINTENANCE MANAGER USER GUIDE
MANAGING INSPECTIONS
Figure 60 - Raise Work Order
The Raise Works Order form allows the required Scheme Type and Works Order Contract to be selected.
Scheme Type
(Required,Default)
List
This is the Scheme Type for the Work Order. The default value is determined by the value set for Product Option
DEFSCHTYPL or DEFSCHTYPD (depending on the System Flag set for the Section or Budget Allocation Group on
which the Defect is raised). The default value may only be updated if product option DEFSCHTYPU is set to ‘Y’.
Contract
(Required,Default)
List
This is the Contract used within the Work Order. The default value is determined by the value set for product Option
DUMCONCODE. Once the appropriate Contract has been selected press the [Next] Button.
Work Order
(Default)
If Product Option WORREFGEN Is set to M – manual, the Work Order Number and Description should be entered. If set
to C- Contract based or A – Admin Unit based the work order number will be automatically generated when the [Next >]
button is pressed and a valid Budget is selected.
If Multiple Budgets exist for the defect Activity/Scheme Type/Section or Budget Allocation Group combinations, a list
will be displayed from which to select the required Budget.
Version: 4.7
57
CONFIDENTIALITY STATEMENT
The contents of this document, including system ideas and concepts, are confidential and proprietary in nature and are not to be distributed in any form
without the prior written consent of Bentley, Inc.
EXOR
MAINTENANCE MANAGER USER GUIDE
MANAGING INSPECTIONS
Figure 61 - Budgets
Once a Budget has been selected the Number of Defects added to the Work Order will be displayed in a pop-up dialogue.
Press [Finish] to create the Work Order.
Figure 62 - Raise Work Order
When the [Finish] button is pressed the Work Order (Defects) – MAI3800 module will be called and the Work Order will
be displayed.
Version: 4.7
58
CONFIDENTIALITY STATEMENT
The contents of this document, including system ideas and concepts, are confidential and proprietary in nature and are not to be distributed in any form
without the prior written consent of Bentley, Inc.
EXOR
MAINTENANCE MANAGER USER GUIDE
MANAGING INSPECTIONS
2.10 View Defects – MAI3810
Figure 63 - View Defects Menu Option
Figure 64 - View Defects
2.10.1 General Information
This module is intended to allow the user to view defect details by any road group or road section. Adding additional
criteria can restrict the numbers of defects retrieved.
Version: 4.7
59
CONFIDENTIALITY STATEMENT
The contents of this document, including system ideas and concepts, are confidential and proprietary in nature and are not to be distributed in any form
without the prior written consent of Bentley, Inc.
EXOR
MAINTENANCE MANAGER USER GUIDE
MANAGING INSPECTIONS
2.10.2 View Defects
Road Type
(Required)
List
The road type entered here will restrict the road groups displayed when the [Gazetteer] button is selected.
Road Id
(Required)
Gaz
Enter the required road id, selecting the [Gazetteer] button will display the full gazetteer, this can be restricted by either
entering a value in the Road Type field or by entering some criteria in this field.
For example, if you enter %12% followed by [Gazetteer] the gazetteer will display all road sections and road groups
containing the above selection criteria.
Road Desc
(Required)
Gaz
Enter the road description. As above, if you enter %GIANTS% followed by [Gazetteer] the gazetteer will retrieve all road
sections and road groups with GIANTS in the description.
This is very useful if you have set your gazetteer up in inspection areas, routes or zones because you do not have to
remember which group each section is in.
All the following fields can be used in combination to further restrict the defects retrieved when the [Select Defects]
button is selected
Date From
(Optional)
Enter the date from which you wish to search for defects. This field can be used in conjunction with the next field for
searching for defects in a date range.
Date To
(Optional)
Enter the date to which you wish to search for defects.
Defect Status
(Optional)
List
(Optional)
List
(Optional)
List
(Optional)
List
(Optional)
List
Enter a defect status code.
Activity
Enter an inspection activity code.
Priority
Enter a defect priority code.
SISS
Enter a Standard Item Sub Section code.
Notify
Enter a notifiable organisation.
Version: 4.7
60
CONFIDENTIALITY STATEMENT
The contents of this document, including system ideas and concepts, are confidential and proprietary in nature and are not to be distributed in any form
without the prior written consent of Bentley, Inc.
EXOR
MAINTENANCE MANAGER USER GUIDE
MANAGING INSPECTIONS
Recharge
(Optional)
List
Enter a rechargeable organisation.
Once the required selection criteria has been entered there are 2 options available:
Selecting the [Select Defects] button will display all defects meeting the criteria entered for all road sections in the
selected road group, these defects will initially be displayed as a summary, select the [Detail] button to view the detail
using Defects – MAI3806.
Selecting a field in the lower half of the window will display all the road sections in the selected road group, these can be
scrolled through until the required section is found before selecting the [Select Defects] button. This will display all the
defects meeting the criteria entered for the selected road section, these defects will initially be displayed as a summary,
select the [Detail] button to view the detail using Defects – MAI3806
2.10.3 Select Defects
Figure 65 - Select Defects button
The above window will be displayed when the [Select Defects] button is selected. Select the [Detail] button to view the
detail using Defects – MAI3806
Version: 4.7
61
CONFIDENTIALITY STATEMENT
The contents of this document, including system ideas and concepts, are confidential and proprietary in nature and are not to be distributed in any form
without the prior written consent of Bentley, Inc.
EXOR
MAINTENANCE MANAGER USER GUIDE
MANAGING INSPECTIONS
2.11 Match Duplicate Defects – MAI2730
Figure 66 - Match Duplicate Defects Menu Option
Figure 67 - Match Duplicate Defects
2.11.1 General Information
This form is used to identify defects that have been entered into highways by exor at the same location more than once.
This can occur as a result of two separate inspections being carried out on the same section of road identifying the same
defect at different times.
Defects that have also been matched automatically following an inspection using a DCD by virtue of the values set in the
form Defect Superseding Rules – MAI4406 can also be viewed using this module.
Version: 4.7
62
CONFIDENTIALITY STATEMENT
The contents of this document, including system ideas and concepts, are confidential and proprietary in nature and are not to be distributed in any form
without the prior written consent of Bentley, Inc.
EXOR
MAINTENANCE MANAGER USER GUIDE
MANAGING INSPECTIONS
2.11.2 Section Details
When you enter this window, the cursor sits in the Link ID field waiting for you to enter your selection criteria followed
by [Execute Query] to retrieve details of the required section. The following fields can be used with wildcards to query
back existing section details:
Link ID
Agency
Linkcode
Section
Road Number
Length
Description
2.11.3 Defect to be Superseded
All available defects on the selected road section will be queried back, if you are manually superseding a defect you will
probably know the defect id of the defect to be superseded. Select [Enter Query], enter the defect id in the Defect Serial
Number field followed by [Execute Query] to retrieve the defect.
The following information will be displayed:
Defect Serial Number
Length of the Defect
Cross Sectional Position of the Defect
Inspection Date
Defect Priority
Start Chainage
Activity Area
Repair Date Due
Defect Type
Description
Defect Status
2.11.4 Superseding Defect
All available and instructed defects for the selected road section will be queried back, once again, if you are manually
superseding a defect you will probably know the defect id of the defect to superseded the defect selected above. Select
[Enter Query], enter the defect id in the Defect Serial Number field followed by [Execute Query] to retrieve the defect.
The following information will be displayed:
Defect Serial Number
Length of the Defect
Cross Sectional Position of the Defect
Inspection Date
Defect Priority
Start Chainage
Activity Area
Version: 4.7
63
CONFIDENTIALITY STATEMENT
The contents of this document, including system ideas and concepts, are confidential and proprietary in nature and are not to be distributed in any form
without the prior written consent of Bentley, Inc.
EXOR
MAINTENANCE MANAGER USER GUIDE
MANAGING INSPECTIONS
Repair Date Due
Defect Type
Description.
Defect Status
Viewing both defects together will allow you to make a good comparison of the two defects. If you are satisfied with your
selection select the [Supersede Defect] button. If two defects have been mistakenly matched, use Unmatch Duplicate
Defect – MAI2760 to unmatch them.
Version: 4.7
64
CONFIDENTIALITY STATEMENT
The contents of this document, including system ideas and concepts, are confidential and proprietary in nature and are not to be distributed in any form
without the prior written consent of Bentley, Inc.
EXOR
MAINTENANCE MANAGER USER GUIDE
MANAGING INSPECTIONS
2.12 Unmatch Duplicate Defects – MAI2760
Figure 68 - Unmatch Duplicate Defects Menu Option
Figure 69 - Unmatch Duplicate Defects
2.12.1 General Information
This form is used to correct any defects that have been matched in error either automatically by the system or when using
Match Duplicate Defects – MAI2730.
Version: 4.7
65
CONFIDENTIALITY STATEMENT
The contents of this document, including system ideas and concepts, are confidential and proprietary in nature and are not to be distributed in any form
without the prior written consent of Bentley, Inc.
EXOR
MAINTENANCE MANAGER USER GUIDE
MANAGING INSPECTIONS
2.12.2 Section Details
When you enter this window, the cursor sits in the Link ID field waiting for you to enter your selection criteria followed
by [Execute Query] to retrieve details of the required section. The following fields can be used with wildcards to query
back existing section details:
Link ID
Agency
Linkcode
Section
Road Number
Length
Description
When a road section has been retrieved, all defects that have been superseded will be retrieved with their superseding
defect, select the [Unmatch] button to unmatch the selected defects.
Version: 4.7
66
CONFIDENTIALITY STATEMENT
The contents of this document, including system ideas and concepts, are confidential and proprietary in nature and are not to be distributed in any form
without the prior written consent of Bentley, Inc.
EXOR
MAINTENANCE MANAGER USER GUIDE
MANAGING INSPECTIONS
2.13 Delete Inspections – MAI2470
Figure 70 - Delete Inspections Menu Option
Figure 71 - Delete Inspection
Version: 4.7
67
CONFIDENTIALITY STATEMENT
The contents of this document, including system ideas and concepts, are confidential and proprietary in nature and are not to be distributed in any form
without the prior written consent of Bentley, Inc.
EXOR
MAINTENANCE MANAGER USER GUIDE
MANAGING INSPECTIONS
2.13.1 General Information
This form will allow you to delete an inspection as well as all the defects that were identified during that inspection. An
inspection can be deleted if it was entered erroneously and nothing has happened to the contents of that inspection. If any
defects belonging to an Inspection have been selected on a Works Order, or superseded by a subsequent inspection then
the Inspection cannot be Deleted.
Use this module with caution because no history of the deletion is retained on the system.
2.13.2 Delete Inspections
On entry to this window, the cursor sits in the Inspection Id field waiting for you to enter some selection criteria to
identify the inspection to be deleted. Enter your selection criteria and press [Execute Query] to retrieve the inspection(s).
Press [Delete Record] to delete the inspection details.
Note that once deleted, an inspection cannot be ‘undeleted’. As such, care should be exercised when using this form.
Version: 4.7
68
CONFIDENTIALITY STATEMENT
The contents of this document, including system ideas and concepts, are confidential and proprietary in nature and are not to be distributed in any form
without the prior written consent of Bentley, Inc.
EXOR
MAINTENANCE MANAGER USER GUIDE
MANAGING INSPECTIONS
2.14 Batch Setting of Repair Dates – MAI2775
Figure 72 - Batch Setting of Repair Dates Menu Option
Figure 73 - Batch Setting of Repair Dates
Version: 4.7
69
CONFIDENTIALITY STATEMENT
The contents of this document, including system ideas and concepts, are confidential and proprietary in nature and are not to be distributed in any form
without the prior written consent of Bentley, Inc.
EXOR
MAINTENANCE MANAGER USER GUIDE
MANAGING INSPECTIONS
2.14.1 General Information
This form is used to initiate permanent repair procedures for defective advisory roadstuds.
2.14.2 Section
Retrieve the section on which the defective roadstuds have occurred using the following fields:
Link ID
Agency
Linkcode
Section
Local/DTp
Exclude Defects Between St Chain
(Optional)
Enter the start chainage number from which defects should be excluded. If end chainage is entered then start chainage
must be entered too.
End Chain
(Optional)
Enter the end chainage number up to which defects should be excluded. If start chainage is entered then end chainage
must be entered too.
2.14.3 Defects
The details of the defective roadstuds found can be flagged for exclusion or inclusion in the permanent repair program.
Category 2 Defect Type
(Query Only)
Use this field to retrieve the Category 2 defect code for the defective roadstuds.
Advisory Roadstuds St Chain
(Query Only)
Use this field to retrieve the start chainage for advisory roadstuds.
Location Desc
(Display Only)
The location of the advisory roadstuds will be displayed.
XSP
(Query Only)
When you query this field the cross sectional position of the defective roadstuds will be displayed.
Number
(Query Only)
When you query this field, the number of defective roadstuds for the section will be retrieved.
Date Due
(Display Only)
The date on which the roadstuds are due to be repaired is displayed. This date is arrived at by adding the three months to
the date that the last defective roadstud was discovered.
Version: 4.7
70
CONFIDENTIALITY STATEMENT
The contents of this document, including system ideas and concepts, are confidential and proprietary in nature and are not to be distributed in any form
without the prior written consent of Bentley, Inc.
EXOR
MAINTENANCE MANAGER USER GUIDE
MANAGING INSPECTIONS
Exclude [Y/N]
(Required)
Enter either ‘Y’ or ‘N’ which denote exclusion or inclusion from the batch setting of repair dates for the defective
roadstuds.
2.14.4 Confirm
Select the [Set Batch Repair Date] button to confirm the selected roadstuds are to be repaired.
Repair
(Display Only)
The date on which the roadstuds are due to be repaired is displayed. This date is arrived at by adding the three months to
the date that the last defective roadstud was discovered.
Version: 4.7
71
CONFIDENTIALITY STATEMENT
The contents of this document, including system ideas and concepts, are confidential and proprietary in nature and are not to be distributed in any form
without the prior written consent of Bentley, Inc.
EXOR
MAINTENANCE MANAGER USER GUIDE
MANAGING INSPECTIONS
2.15 Responses to Notices – MAI3816
Figure 74 - Responses to Notices Menu Option
Figure 75 - Response to Notices
2.15.1 General Information
If, when carrying out an inspection, an inspector suspects a defect found is the responsibility of an external organisation,
he will enter the details in the notify field in Inspections – MAI3808. A letter is then sent to the notifiable organisation
stating that you believe the defect found is their responsibility.
Version: 4.7
72
CONFIDENTIALITY STATEMENT
The contents of this document, including system ideas and concepts, are confidential and proprietary in nature and are not to be distributed in any form
without the prior written consent of Bentley, Inc.
EXOR
MAINTENANCE MANAGER USER GUIDE
MANAGING INSPECTIONS
This form is provided to allow the responses to defect notifications to be registered as they are received from notifiable
organisations
2.15.2 Notice
Notifiable defect notices are produced automatically in response to the Notify field being completed in Inspections –
MAI3808.
Before the notice can be retrieved it has to be printed using Print Defect Notices – MAI3904.
Enter suitable criteria to restrict the display of notices to those with which you are concerned, then press [Execute Query]
to retrieve those notices. The following fields are query only and can be used to retrieve notice details:
Notifiable Org
Notice Id
Date Printed
Respond By
Admin Unit
2.15.3 Defects
All the defects associated with the selected notice will be displayed.
When a response is received from the notifiable organisation, enter the Response Type, Date of Response, and the
Accepted fields to record the contents of the reply.
Selecting the Defects button will display the defects using Defects- MAI3806.
Defect Id
(Display Only)
The number of the defect. This number is allocated when the defect is first logged and cannot be changed. It serves to
uniquely identify the defect.
Defect Type
(Display Only)
The code and description representing the standard defect type relating to this defect. This will have originally been
decided by the inspector.
Date Raised
(Display Only)
The date the defect was originally recorded.
Road Section Id
(Display Only)
The road section number of the section in which the defect was found.
Resp Type
(Optional)
List
Select a code representing the response of the notifiable organisation to the notice.
These values can be added to using Domains – HIG9120 and updating the RESPONSE_TYPES option.
Response Date
(Required)
Enter the date the response was received. For an Acceptance, this will default to today’s date.
Version: 4.7
73
CONFIDENTIALITY STATEMENT
The contents of this document, including system ideas and concepts, are confidential and proprietary in nature and are not to be distributed in any form
without the prior written consent of Bentley, Inc.
EXOR
MAINTENANCE MANAGER USER GUIDE
MANAGING INSPECTIONS
Accepted By Org
(Optional)
Enter the Org Code of the organisation accepting responsibility for the defect.
Version: 4.7
74
CONFIDENTIALITY STATEMENT
The contents of this document, including system ideas and concepts, are confidential and proprietary in nature and are not to be distributed in any form
without the prior written consent of Bentley, Inc.
EXOR
MAINTENANCE MANAGER USER GUIDE
WORK ORDER MANAGEMENT
3
Work Order Management
This chapter describes the forms used to create, maintain and review the Works Orders for both defect clearance works
orders and other works.
Cyclic maintenance works orders are covered in a later chapter of this manual.
Works Orders (Defects) – MAI3800
Works Order Authorisation – MAI3848
Other Works – MAI3800
Non Highways Related Works
Work Orders (Contractor) – MAI3802
Gang/Crew Allocation – MAI3805
Cancel Work Orders – MAI3610
Quality Inspection Results – MAI3820
Maintain External Activities – MAI1280
The form descriptions provide you with detailed information about each Works Ordering form in highways by exor,
including:
an overall description of the form
a detailed explanation of each field, including available features (such as List of Values), default values and other
characteristics
helpful information for using the form
The following list identifies some of the Works Orders reports. A complete list can be found in the Works Order Reports
section of this manual:
Print Work Orders (Detail) – MAI3500
Print Work Orders (Summary) – MAI3505
Print Work Orders (Strip Plan) – MAI5130
3.1
Prerequisites
Before considering Works Orders you should ensure that Budgets and Contract details have been entered successfully.
(Maintenance Manager System Administration Manual)
Works orders can be created at any time once the highway road network is in place ( Network Manager manual).
Version: 4.7
75
CONFIDENTIALITY STATEMENT
The contents of this document, including system ideas and concepts, are confidential and proprietary in nature and are not to be distributed in any form
without the prior written consent of Bentley, Inc.
EXOR
MAINTENANCE MANAGER USER GUIDE
WORK ORDER MANAGEMENT
3.2
Using Locator with Works Ordering (Defects)
Figure 76 - Locator
3.2.1
General Information
Full information on the use of locator can be found in the Locator and Web mapping User Guide
In summary Locator – NM0572 provides Exor Users with an easy to use web based spatial interface that allows the
raising of a work order on defects.
Work orders can be raised in two ways, these are:
Create a work order directly after entering the defects via locator.
Create a work order by selecting existing defects within locator.
Once the defects have been selected and the work order module is selected standard work order functionality is then
available.
Version: 4.7
76
CONFIDENTIALITY STATEMENT
The contents of this document, including system ideas and concepts, are confidential and proprietary in nature and are not to be distributed in any form
without the prior written consent of Bentley, Inc.
EXOR
MAINTENANCE MANAGER USER GUIDE
WORK ORDER MANAGEMENT
3.3
3.3.1
Work Orders – MAI3800 – View through Locator
General Information
When a work order has been created and saved, the complete work order can be viewed through locator by selecting the
[Show Map]
button when in the work order screen as shown below:
Figure 77 – Locator – Show work order
Version: 4.7
77
CONFIDENTIALITY STATEMENT
The contents of this document, including system ideas and concepts, are confidential and proprietary in nature and are not to be distributed in any form
without the prior written consent of Bentley, Inc.
EXOR
MAINTENANCE MANAGER USER GUIDE
WORK ORDER MANAGEMENT
If the
button is pressed from the Work Order Lines canvas then only then shape for the current Work Order Line will
be highlighted in the Map.
Figure 78 – Locator – Show work order line
Version: 4.7
78
CONFIDENTIALITY STATEMENT
The contents of this document, including system ideas and concepts, are confidential and proprietary in nature and are not to be distributed in any form
without the prior written consent of Bentley, Inc.
EXOR
MAINTENANCE MANAGER USER GUIDE
WORK ORDER MANAGEMENT
3.4
3.4.1
Work Orders – MAI3800 – Edit Default WOL Shape
General Information
When a work order line has been created against a work order the user is able to digitise a new location or shape that more
accurately represents the work order line.
In order to edit the default shape of a Work Order Line the [Get From Map] button on the Work Order Line window
should be used:
Figure 79 - Work Order Lines
The [Get from Map] button is only enabled when the Work Order Line is populated and is not COMPLETED.
Once the [Get From Map] button has been selected the form will search for themes where: The theme is based on the Work Order Lines base theme.
The theme has MAI3800 as a theme function.
If more than one theme is found the extended LOV will be displayed for the user to select the desired theme.
The form will then display a pop-up window prompting the User to select a Geometry type for the new Work Order Line
shape.
Version: 4.7
79
CONFIDENTIALITY STATEMENT
The contents of this document, including system ideas and concepts, are confidential and proprietary in nature and are not to be distributed in any form
without the prior written consent of Bentley, Inc.
EXOR
MAINTENANCE MANAGER USER GUIDE
WORK ORDER MANAGEMENT
Figure 80 - Geometry Type Selection
Once a Geometry Type has been selected and the [Continue] button selected, Locator will be called in Multi Point mode
with the map zoomed to the current Work Order Line shape.
Figure 81 – Locator – Work order line selection
To define the new shape for the Work Order Line select “Send Multiple Points to application” from the “Feature Edit
Menu” button in the Map as shown below.
Version: 4.7
80
CONFIDENTIALITY STATEMENT
The contents of this document, including system ideas and concepts, are confidential and proprietary in nature and are not to be distributed in any form
without the prior written consent of Bentley, Inc.
EXOR
MAINTENANCE MANAGER USER GUIDE
WORK ORDER MANAGEMENT
Figure 82 – Locator – Re-define work order line shape
To return a point shape, just double click the Map at the desired point.
To return a Line or a Polygon click the required points on the map, then double click the last point to finish.
Version: 4.7
81
CONFIDENTIALITY STATEMENT
The contents of this document, including system ideas and concepts, are confidential and proprietary in nature and are not to be distributed in any form
without the prior written consent of Bentley, Inc.
EXOR
MAINTENANCE MANAGER USER GUIDE
WORK ORDER MANAGEMENT
Figure 83 – Locator – Re-define work order line shape
Once a double-click is detected by the map the point(s) will be returned to MAI3800.
If the user has returned points that do not match the selected Geometry Type and error will be raised and the Work Order
Line shape will not be updated, for example:
If the user selected Point and returns more than one point from the map the following error will be raised.
Version: 4.7
82
CONFIDENTIALITY STATEMENT
The contents of this document, including system ideas and concepts, are confidential and proprietary in nature and are not to be distributed in any form
without the prior written consent of Bentley, Inc.
EXOR
MAINTENANCE MANAGER USER GUIDE
WORK ORDER MANAGEMENT
Figure 84 - Error Message
If the user selects Line and only returns one point from the map the following error will be raised.
Figure 85 - Error Message
If the User selects Polygon and returns less than 3 points from the map the following error will be raised.
Figure 86 - Error Message
Finally if the user selects Polygon and the points returned lead to a self intersecting Polygon, for example:-
Version: 4.7
83
CONFIDENTIALITY STATEMENT
The contents of this document, including system ideas and concepts, are confidential and proprietary in nature and are not to be distributed in any form
without the prior written consent of Bentley, Inc.
EXOR
MAINTENANCE MANAGER USER GUIDE
WORK ORDER MANAGEMENT
Figure 87 – Locator – Redefine shape polygon error
Then the following error will be raised.
Version: 4.7
84
CONFIDENTIALITY STATEMENT
The contents of this document, including system ideas and concepts, are confidential and proprietary in nature and are not to be distributed in any form
without the prior written consent of Bentley, Inc.
EXOR
MAINTENANCE MANAGER USER GUIDE
WORK ORDER MANAGEMENT
Figure 88 - Error Message
If no errors are raised by the form then the new shape has been generated and updated in the shape table. However
it has not yet been committed. To save the changes the user must select [Save]
Once the change has been committed the new shape can viewed be by pressing the [Show Map] button
.
Figure 89 - Locator
Note:
When the system has been unable to generate a default shape for the Work Order Line (for example the WOL is
for a Group Of Groups) the [Get From Map] button will still work but will not zoom when initially called. It is
up to the User to locate the area in which the work is to be carried out and then use “Send Multiple Points to
application” from the “Feature Edit Menu” button to create a shape for the Work Order Line.
Version: 4.7
85
CONFIDENTIALITY STATEMENT
The contents of this document, including system ideas and concepts, are confidential and proprietary in nature and are not to be distributed in any form
without the prior written consent of Bentley, Inc.
EXOR
MAINTENANCE MANAGER USER GUIDE
WORK ORDER MANAGEMENT
3.5
Works Orders (Defects) – MAI3800
Figure 90 - Works Orders (Defects) Menu Option
Figure 91 - Work Order (Defects)
3.5.1
General Information
When inspections are carried out on road sections, it is possible that defects may be found on the inventory items being
inspected. These defects are recorded in the system along with the inspectors recommended actions. For these actions to
be carried out, a works order must be raised.
When creating a defects works order, you can select a defect or defects to be rectified and view the inspector’s original
schedule items required to rectify the defect. At this point you can amend these schedule items, adding new ones or
removing existing items. As this process is carried out, the various totals and sub-totals contained on the works order are
updated instantly.
The Work Orders (Defects) form offers you the facility to carry out ‘what if’ planning by constructing your works order,
gradually adding and removing Works Order lines and Schedule Items until the totals match your budget before
confirming the Works Order and forwarding it to the contractor. Works Orders must be raised within the limits imposed
for the selected Budget i.e. once the Allocated Amount for a budget is reached, no further Works Order Lines may be
Version: 4.7
86
CONFIDENTIALITY STATEMENT
The contents of this document, including system ideas and concepts, are confidential and proprietary in nature and are not to be distributed in any form
without the prior written consent of Bentley, Inc.
EXOR
MAINTENANCE MANAGER USER GUIDE
WORK ORDER MANAGEMENT
raised against it. In some circumstances a User may need to raise Works Orders which would exceed the Allocated
amount for a Budget. This can be done by granting the role OVER_BUDGET to the User requiring to exceed the
Budgetary limit.
Works Order lines that have no defects associated with them can also be added to a defect clearance works order, this is
covered in raising Works orders for Other Works, below.
Once a Works Order has been instructed, further Defects or Works Order lines that have no associated Defects may not be
added to the Works Order unless Product Option ADDINSTR is set to 'Y'. Defects can however be removed from the
Works Order any time before the order is completed.
Once a Works Order has been printed using Print BOQ Work Order – MAI3906, further Defects or Works Order lines
that have no associated Defects may not be added to the Works Order unless Product Option ADDPRINT is set to 'Y'.
Changes made to a Works Order, its associated Work Order lines or Bill of Quantity Items may be viewed using the Audit
facility within a Works Order. The Audit window may be called by pressing the [Expand] button on the main Works
Ordering form.
It is possible to define what items in a Works Order are to be Audited by selecting the required fields using form Works
Order Audit Maintenance – MAI3803.
The size of the Audit log trail can be restricted by setting Product Option AUDIT_ALL to 'N'. If this option is set to 'N',
only the initial and final values of a field are recorded in the Audit trail, per session per User and any intermediate changes
are not logged.
If Product Option AUDIT_ALL is set to 'Y' then all interim (changes between saving) changes to the selected fields are
logged. It should be noted that for some Works Orders, the audit trail could be very large if this option is set to 'Y'.
3.5.2
Work Order
When you enter this window, the cursor sits in the Work Order description field waiting for you to enter a new works
order. If you wish to retrieve an existing works order, press [Enter Query], enter your selection criteria, then press
[Execute Query] to retrieve the works order.
Whilst in this window, you can view the Work Order Audit details by pressing the [Expand] button in the toolbar at any
time.
Work Order
List
The method of works order number generation is set up in Product Options – HIG9130, setting the WORREFGEN option.
There are three methods of generating the works order number.
1. Manually entered by the user, the system will check the number is unique.
2. Contract Based, the contract name will prefix a unique number
3. Admin unit based, the admin unit number for the selected contract will prefix a unique number.
A list of existing works orders is only available in query mode.
When creating new Works Orders enter a description of the order in the adjacent field.
Interim Payment?
(Optional)
Enter 'Y' to signify that the Works Order will be subject to Interim Payments on Part Completed Works Order lines. This
may be entered at any time during the life of the Works Order.
Version: 4.7
87
CONFIDENTIALITY STATEMENT
The contents of this document, including system ideas and concepts, are confidential and proprietary in nature and are not to be distributed in any form
without the prior written consent of Bentley, Inc.
EXOR
MAINTENANCE MANAGER USER GUIDE
WORK ORDER MANAGEMENT
Priority
(Optional)
List
Enter a Priority for the Works Order. These will have been previously set up using Work Order Priorities – MAI0312 In
addition the contents of the WOR_PRIORITY list of values, maintained using Domains – HIG9120, will be concatenated
onto the list, this is to cater for backward compatibility. This will automatically populate the Target Date field below.
Road Type
(Required)
List
Select the road type for the works order.
If budgets are to be used the road type must match the road types set in the Product Options – HIG9130, for DoT roads –
BUDGRPTYPD, for Local roads – BUDGRPTYPL.
Road Id
(Required)
List
When <List> is selected only groups of the type entered in the previous field will be displayed, make your selection from
this list without drilling down through the gazetteer.
Scheme Type
(Required, Default)
List
Select the scheme type under which this work will be carried out.
Some restrictions will apply based on the values set using Item Code Breakdowns , they are as follows:
The options available on the list will be restricted to whether the road selected is DoT or Locally owned.
The scheme type selected will restrict the work categories available when raising the order.
The scheme type cannot be changed if works order lines are present on the works order.
The product option DEFSCHTYPU must be set to ‘Y’ if the user is allowed to update the default scheme type.
The scheme type will affect the flexible attributed returned when the [Flexible Attributes] button is selected. The
flexible attributes for each scheme type are defined by the System Administrator using Application Attributes –
MAI3819.
Register
(Optional)
Checkbox
If all the contents of this works order are to be notified to street works this check box will need to be checked. Once
checked the Register Status field will become populated and the [TMA Interface] button will become active. Any work
order lines subsequently added to the work order will have to be ticked manually. If unchecked, all work order lines that
have not had a notice generated will be deselected.
Register Status
(Display Only)
This field will display the current register status of the works order lines.
Current statuses are:
N – Nothing to Register – One or more works order lines have been ticked as Registerable but no notices have
been sent for any of them.
O – Outstanding – one or more of the works order lines have been ticked as Registerable and at least one notice
has been sent for at least one of them. Only work order lines that have a status of INSTRUCTED can be sent to
the register.
C – Complete – All work order lines that have been ticked as Registerable have had a ‘0600’ notice sent. At this
point the [View Register] button will be displayed.
Version: 4.7
88
CONFIDENTIALITY STATEMENT
The contents of this document, including system ideas and concepts, are confidential and proprietary in nature and are not to be distributed in any form
without the prior written consent of Bentley, Inc.
EXOR
MAINTENANCE MANAGER USER GUIDE
WORK ORDER MANAGEMENT
The Refresh button will refresh the status in the active form. The status will be automatically refreshed when the
work order is re-queried.
Status
(Display Only)
This field will display a status code derived from the various status codes of the work order lines to indicate the overall
status of the work order.
Status codes can be viewed in form Status Codes – HIG9110. Work Order Status codes control the work ordering
processes and should not be added to or modified without direct consultation with exor.
Contract
(Required)
List
Select a valid contract under which this work will be carried out. Contracts are set up using Contracts – MAI3880. Only
Contracts with a status of ACTIVE will be displayed.
If you have set up a dummy contract using Product Options – HIG9130 and setting the DUMCONCODE option, this
contract can be selected, this will allow you to fully define the work order before assigning it to a contract. Once you
have specified the relevant Bill of Quantity items for this work order, press the [Contract Totals] button to view a list of
suitable contracts.
If product Option WORREFGEN is set to either 'C' for 'Contract Based' Works Order Reference Number generation or 'A'
for Administration Unit Works Order Reference Number Generation and the initial Contract selected is changed, the
Works Order will be Cancelled and an exact copy made with the new reference number being generated. The original
Works Order will have '**Cancelled**' appended to the start of it's description.
Contractor
(Display Only)
The code and name for the contractor will be displayed. This is obtained from the contract details.
Contact (Optional)
Enter a contact name if required.
Contractor Score
(Optional)
If required, enter a score to represent the performance of the contractor in fulfilling this works order. This can only be
entered when the works order is complete.
Originator
(Required, Default)
List
Select a valid person ID to represent the originator of the work order. Default is the current user.
To be Authorised By
(Optional)
List
When creating a work order the user may nominate another user who should authorise the current work order.
This field will only accept the initials of a user that can view and authorize a work order, this picklist will be populated
with those users that have been given the permission to authorise a work order by the System Administrator using
Maintenance Manager User Data – MAI4410.
Population of this field does not restrict this work order to be authorised by the selected user, it may be authorised by any
user that has the permission to authorise a work order.
Version: 4.7
89
CONFIDENTIALITY STATEMENT
The contents of this document, including system ideas and concepts, are confidential and proprietary in nature and are not to be distributed in any form
without the prior written consent of Bentley, Inc.
EXOR
MAINTENANCE MANAGER USER GUIDE
WORK ORDER MANAGEMENT
Authorised By
(Display Only)
This field is populated in one of a number of ways:
1. A user with the appropriate permission selects the [Authorise] button.
2. A user with the appropriate permission selects the [Instruct] button, this will authorise the work order as well as
instructing it.
3. Using Authorise Works Orders – MAI3848.
4. Using the work order Authorisation Worktray.
Product Option AUTH_OWN must be set to 'Y' in order for the same person to both Raise and Authorise a Works Order.
To Authorise a Works Order its total estimated cost must be within the range defined for the User in Users – HIG1832. If
the User has no limits set, they may authorise any value of Works Order.
This field will be null on old work orders as the Authoriser was not recorded then.
Cost Centre
(Optional)
List
These codes are maintained using Cost Centre Codes
Job Number
(Required, Default)
List
If required, enter the job number for this works order. This field defaults to 00000.
Remarks
(Optional)
Edit
If required, enter any additional remarks relating to the completed works order. This can only be entered when the works
order is complete.
Date Raised
(Required, Default)
Enter the date upon which the works order was raised. This field defaults to the current date. An earlier date may be
entered for retrospective works orders.
Target Complete
(Optional)
This is the overall target date for all the works contained within the work order.
This may be populated in one of two ways:
1. Automatically populated based on the Date Raised and the Work Order Priority.
2. The latest Target date of all the associated work order lines on the work order.
Note: This date will be overridden if work order lines are subsequently added that have a later Target Date.
Note: If the product option UPDWOTGT is set to ‘Y’ the date is to be updated manually ignoring any dates that are
automatically populated.
Date Authorised
(Optional)
This is populated with the system date/time when the Works Order is Authorised via
The Works Order form – MAI3800, [Authorise] or [Instruct] button
The Work Orders Authorisation form – MAI3848
The Works Order Work Tray
When this field is populated following the selection of the [Authorise] button a pop up window will be displayed allowing
the user to enter a date before the sysdate enabling the authorisation of a retrospective work order.
Version: 4.7
90
CONFIDENTIALITY STATEMENT
The contents of this document, including system ideas and concepts, are confidential and proprietary in nature and are not to be distributed in any form
without the prior written consent of Bentley, Inc.
EXOR
MAINTENANCE MANAGER USER GUIDE
WORK ORDER MANAGEMENT
When this field is populated following the selection of the [Instruct] button the date will be the same date as the instructed
date, this also allows the user to enter a date prior to the sysdate for the creation of retrospective work orders.
Note: When the User attempts to Authorise a Works Order this date field is used to determine the total value of Works
Orders already Authorised by the User on the same day.
Note: If the value of the current Works Order would lead to the User’s Daily Authorisation Limit (see the “Max value
per Day” field in Maintenance Manager User Data – MAI4410) being exceeded an error will be displayed and
the current Works Order will not be Authorised
Date Instructed
(Optional)
When the works order has been completely defined and you are ready to issue it to the contractor, set the Date Instructed
to the current date by pressing the [Instruct] button on the form. When the Work Order is instructed this button will be
used to [Complete] a Works Order. When building the works order, leave this field blank.
All works order lines must be priced before the order can be instructed.
When the [Instruct] button is selected the following pop up window is displayed allowing the user to enter a date that is
prior to the sysdate enabling the creation of retrospective work orders.
Figure 92 - Instruct pop up
[Continue] will Instruct the work order at the displayed date and time.
[Cancel] will return the user to the Work Order details with no changes made.
A works order must have a date instructed if the contractor is to view the order using Works Orders – Contractor Interface
– MAI3802 and for the work order to be picked up by the CIM interface.
Last Printed
(Display Only)
When the works order is printed, the date of printing is displayed here. If the works order is reprinted at any time, this
field is updated to reflect the last printing date. This field is part of the works ordering audit trail so each time it is printed
an audit is maintained.
Once a works order has been printed changes to the works order lines are not allowed unless the Product Option
ADDPRINT is set to ‘Y’.
Version: 4.7
91
CONFIDENTIALITY STATEMENT
The contents of this document, including system ideas and concepts, are confidential and proprietary in nature and are not to be distributed in any form
without the prior written consent of Bentley, Inc.
EXOR
MAINTENANCE MANAGER USER GUIDE
WORK ORDER MANAGEMENT
Date Received
(Display Only)
When a contractor accesses the works order using Works Orders – Contractor Interface – MAI3802 this date will be
populated, the id of the user who viewed the work order displayed in the adjacent field.
Date Completed
(Display Only)
When all of the lines on the works order are completed, this field will display the date of completion. Once the works
order is completed and saved, no further changes can be made to the works order.
To complete a works order without completing each individual line select the [Complete] button. This will set all the
BOQ Actual values equal to the current estimated values.
To complete a works order by completing each line individually, the User can change the individual line to completed
manually and enter a date in the next field. At this point changes can be made to the actual values of the BOQ items, these
changes must be made before saving the changes.
Rechargeable
(Optional)
Enter either ‘Y’ or ‘N’ to indicate if some or all or this work order is rechargeable.
Cost Recharged
(Optional)
When a rechargeable defect has been rectified and the works order completed, it is possible to recharge an amount of
money to the contractor. If required, enter that amount here.
Estimates, Sub Total
(Display Only)
As the works order is being compiled, each works order line is costed up based on the current rates for the job items held
against the contract. This figure does not take into account any discount arrangements in place with the contractor.
Estimates, Balancing Sum
(Display Only)
If the contractor to which this works order has been assigned uses Discount Groups, then a percentage discount is applied
to the total estimated works order cost. The pre-discount total is displayed in the Sub-Total field above. The balancing
sum field contains the calculated value of the discount.
Estimates, Total Cost
(Display Only)
This field contains the sum of the Estimated Sub-Total and Estimated Balancing Sum fields above. If the contractor has
no discount groups in place, then the Sub-Total and Total Cost fields will be the same. If a discount group structure is in
place, then this field will show the works order cost after the discount has been applied.
Estimates, Labour Units
(Display Only)
If labour units have been entered in Standard Items – MAI3888 the total labour requirements for carrying out the work
will be displayed here.
Actuals, Sub Total
(Display Only)
As the works order is being completed, the actual works order line values are accumulated into this field. This figure does
not take into account any discount arrangements in place with the contractor.
Version: 4.7
92
CONFIDENTIALITY STATEMENT
The contents of this document, including system ideas and concepts, are confidential and proprietary in nature and are not to be distributed in any form
without the prior written consent of Bentley, Inc.
EXOR
MAINTENANCE MANAGER USER GUIDE
WORK ORDER MANAGEMENT
Actuals, Balancing Sum
(Display Only)
If the contractor to which this works order has been assigned uses Discount Groups, then a percentage discount is applied
to the total actual works order cost as displayed in the field above. The pre-discount total is displayed in the Sub-Total
field above. The balancing sum field contains the calculated value of the discount.
Actuals, Total Cost
(Display Only)
This field contains the sum of the Actual Sub-Total and Actual Balancing Sum fields above. If the contractor has no
discount groups in place, then the Sub-Total and Total Cost fields will be the same. If a discount group structure is in
place, then this field will show the works order cost after the discount has been applied.
Figure 93 - Work Order Content Summary
These three fields are displayed at the bottom of the main works order window and indicate the number and type of work
order lines that are contained within the work order.
A number of buttons have been defined on this window for use when raising a works order, they are as follows:
[Lines]
Opens the defects window and allows the user to add works order lines. This window is also
common to both other works and cyclic maintenance works orders (Figure 96).
[Standard Item Totals]
Opens the standard item totals window and displays the estimated and actual
costs and quantities for each standard item in the works order. (Figure 106)
[Contract Totals]
Opens the contract totals window and displays all contracts that can fulfill the work
contained on the works order with associated costs and scores. (Figure 107)An alternative
contract can now be selected if required.
[Additional Details] Opens the additional details window, additional additional details can be added if
required. (Figure 111)
[Flexible Attributes] Opens the maintain flexible attributes window, attribute values can be added if required.
(Figure 110)
[Navigator]
Opens Navigator which allows the user to view and retrieve data associated a work order, an
example of this is shown below: Details on the use of navigator can be found in the Query
Builder and Navigator User Manual.
Version: 4.7
93
CONFIDENTIALITY STATEMENT
The contents of this document, including system ideas and concepts, are confidential and proprietary in nature and are not to be distributed in any form
without the prior written consent of Bentley, Inc.
EXOR
MAINTENANCE MANAGER USER GUIDE
WORK ORDER MANAGEMENT
Figure 94 - Navigator window
[Notice Summary]
This button is enabled if the TMA product is licensed and one or more notices have been
sent for the work order. The Work Order TMA Interface – TMA3990 will be called and opened at
the ‘Work Order Lines’ tab.
[TMA Interface]
This button is enabled if the TMA product is licensed and one or more work order lines
are ticked as ‘Registerable’. The Work Order TMA Interface – TMA3990 will be called and
opened at the ‘TMA Noticing’ tab.
[TMA Register]
This button is enabled if the TMA product is licensed and one or more notices have been
sent for the work order. The Works – TMA1000 will be called which will display the TMA
Works that have been created for the work order.
[SWM Register]
The SWM works entries in the street works register can be viewed using this button
(Figure 130).
[Copy]
This will copy the entire work order including all work order lines and associated BOQ items, the
following pop up window will be displayed allowing the user to copy the BOQ items and their
associated estimated quantities or copy the BOQ items only without the estimated quantities.
Version: 4.7
94
CONFIDENTIALITY STATEMENT
The contents of this document, including system ideas and concepts, are confidential and proprietary in nature and are not to be distributed in any form
without the prior written consent of Bentley, Inc.
EXOR
MAINTENANCE MANAGER USER GUIDE
WORK ORDER MANAGEMENT
Figure 95 - Copy Works Order popup
[Continue]
will create new copy of the Work Order or Work Order Line.
[Cancel]
will return the user to the Work Order details with no changes made.
[Copy]
is only available on a scheme type work order. If a copy is carried out on a work order that has
combined defect and scheme lines only the scheme portion of the order is copied
A work order can be copied at any stage of its life cycle, the copied work order will be uninstructed awaiting modification.
The copy work order will have a new number in line with the work order numbering convention
the description of the new work order will contain the number of the original order with the word
‘COPY’ appended.
[Print]
Prints the instructed works order, the format of the printout is set up in Product Options –
HIG9130 and setting the WORREPMOD option to the required works ordering report.
Once a works order has been printed changes to the works order lines are not allowed unless the
Product Option ADDPRINT is set to ‘Y’
[Authorise]
Sets the Date Authorised to today's date and time (sysdate). When this button is selected a pop up
window is displayed allowing the user to enter a date that is prior to the sysdate enabling the
creation of retrospective work orders.
Note: A user will only be able to authorise a work order if they have been given the appropriate
permission by the system administrator using Maintenance Manager User Data – MAI4410.
When the User attempts to Authorise a Works Order the Date Authorised field is used to determine the total value of
Works Orders already Authorised by the User on the same day.
If the value of the current Works Order would lead to the User’s Daily Authorisation Limit (see the “Max value per Day”
field in Maintenance Manager User Data – MAI4410) being exceeded an error will be displayed and the current Works
Order will not be Authorised
[Instruct]
When this button is selected a pop up window is displayed containing the current date and time
(sysdate), this allows the user to enter a date that is prior to the sysdate enabling the creation of
retrospective work orders.
Version: 4.7
95
CONFIDENTIALITY STATEMENT
The contents of this document, including system ideas and concepts, are confidential and proprietary in nature and are not to be distributed in any form
without the prior written consent of Bentley, Inc.
EXOR
MAINTENANCE MANAGER USER GUIDE
WORK ORDER MANAGEMENT
If the work order has not been authorised this will also authorise the work order provided the user
has the appropriate permissions (see the [Authorise] button for details).
Once the 'Date Instructed' has been saved, the button will change to read [Complete].
Work order lines can be added to an instructed works order if the Product Option ADDINSTR is
set to ‘Y’.
[Complete]
Completes all works order lines, once this button has been selected and the date entered, no
changes can be made to the works order.
To make changes to the actual BOQ values, Works Order lines should be completed individually
using the following process:
1. Change the work order line status code to COMPLETE.
2. Update all the BOQ items for the work order lines to reflect the actual values
3. Save the changes.
Version: 4.7
96
CONFIDENTIALITY STATEMENT
The contents of this document, including system ideas and concepts, are confidential and proprietary in nature and are not to be distributed in any form
without the prior written consent of Bentley, Inc.
EXOR
MAINTENANCE MANAGER USER GUIDE
WORK ORDER MANAGEMENT
Figure 96 - Work Order Lines
3.5.3
Work Order Lines
This window is displayed when the [Lines] button is selected in the Works Orders Defects window.
It holds details of each of the defects selected for inclusion on the works order. Each of these defects is known as a ‘Work
Order Line’. In addition to the defects the work order line may contain ‘small scheme’ works, this is works defined on the
network but does not have any associated defects.
Work orders can contain a combination of defect and non defect work order lines as required.
Initially all the lines will be blank, defects are added to this window by selecting the [Select Defects] button and entering
the required selection criteria.
This window contains a line for each defect found. If you want to remove a defect from the works order, position the
cursor on the appropriate line and press the [Delete Record] button in the toolbar. The defect will then be removed from
the works order and returned to the ‘pool’ of outstanding defects.
Should you want to add further defects, select the [Select Defects] button again. This will return you to the Selection
Criteria window where you can initiate a further search to recover additional defects. This search will not find the defects
currently on the works order, but if a defect has been removed from the works order as described above, the search will
recover that defect again.
Whilst in this window, you can view full details of a defect by pressing the [Expand] button in the toolbar at any time.
Once a Works Order has been instructed, further Defects or Works Order lines that have no associated Defects may not be
added to the Works Order unless Product Option ADDINSTR is set to 'Y'. Defects can however be removed from the
Works Order any time before the order is completed.
Once a Works Order has been printed using Print BOQ Work Order – MAI3906, further Defects or Works Order lines
that have no associated Defects may not be added to the Works Order unless Product Option ADDPRINT is set to 'Y'.
Each works order line displays a summary of the defect information, the following field descriptions apply to defect
clearance works orders only.
Version: 4.7
97
CONFIDENTIALITY STATEMENT
The contents of this document, including system ideas and concepts, are confidential and proprietary in nature and are not to be distributed in any form
without the prior written consent of Bentley, Inc.
EXOR
MAINTENANCE MANAGER USER GUIDE
WORK ORDER MANAGEMENT
Identifier
(Display Only)
Displays the road Id where this works is located.
Descr
(Display Only)
Displays the full name of the road section.
Location
(Optional)
Displays the text describing the location of the current defect. If required this field may be entered for the selected work
order line, this will not affect the defect record but may be of use for small scheme work orders and if the work order line
is to have a notice created against it.
Remarks
(Optional)
Add additional text as required, access to this field is restricted to those work order lines with a status of INSTRUCTED.
When a work order line has been copied some text to that affect will be placed in this field.
WOL Id
(Display Only)
Displays the work order lines internal Id number.
Defect Id
(Display Only)
Displays the unique defect reference number for the current defect.
Defect Type
(Display Only)
Displays the code representing the type of defect.
Defect Priority
(Display Only)
Displays the priority code for the current defect.
Asset Ref
(Display Only)
If the Selected defect has been raised against an Asset item the Asset Reference will be displayed.
Asset Id
(Display Only)
If the Selected defect has been raised against an Asset item the Asset Id will be displayed.
Treatment
(Optional)
List
If required, select a treatment code to rectify the current defect.
Sheet
(Optional)
List
The defects work sheet number will be displayed.
Labour Units
(Display Only)
Displays the number of labour units estimated to rectify this defect. This is derived from the contract under which this
works order is being raised.
Version: 4.7
98
CONFIDENTIALITY STATEMENT
The contents of this document, including system ideas and concepts, are confidential and proprietary in nature and are not to be distributed in any form
without the prior written consent of Bentley, Inc.
EXOR
MAINTENANCE MANAGER USER GUIDE
WORK ORDER MANAGEMENT
Schedule
(Display Only)
This field will display the cyclic maintenance schedule name. For a defect clearance works order it will always be blank.
Status
(Required)
List
Displays the current status of the works order line.
Initially a works order line will have a status of DRAFT. As work on the Works Order Line progress's this Status will be
changed either by the User, in the case of Interim Payments or automatically by the system as is the case when a Works
Order line is included on a Payment Run.
Note: When updating the status code you must select [Tab] to move to the next field before entering any further data.
Note: Any new work order lines added to a work order that is instructed will have the status of INSTRUCTED.
Completed
(Required)
Enter the completion date of the works order line.
Est Cost
(Display Only)
This field displays the estimated cost of the repair. This cost is calculated from the contract rates.
Note that if this field is blank there is no rate on the current contract for this job item and, therefore, the system is unable
to calculate the cost of the job item and the works order cannot be instructed.
Gang
(Required)
If Gang Allocation has been used to allocate a gang to the repair of this defect the gang id will be displayed.
Work Cat
(Required)
The work category for the selected defect will be displayed. If budgets are being used a commitment will be made against
this Item code. The current position of the Budget can be displayed by double clicking this field as shown below. The
current value of work committed, the actual value of work carried and the overall balance will be displayed for each
Budget. The Upper Limit of the Budget will also be displayed.
Figure 97 - Work Category
Repaired
(Display Only)
The date and time of the defect repair will be displayed.
Version: 4.7
99
CONFIDENTIALITY STATEMENT
The contents of this document, including system ideas and concepts, are confidential and proprietary in nature and are not to be distributed in any form
without the prior written consent of Bentley, Inc.
EXOR
MAINTENANCE MANAGER USER GUIDE
WORK ORDER MANAGEMENT
Act Cost
(Display Only)
This field will display the actual cost of repairing this defect. As the actual cost is only known once the defect has been
repaired and the Status updated to COMPLETED, or an Interim Payment has been made and the Status updated to PARTPAID this field will initially be blank.
Invoice
(Display Only)
This is a payment Invoice flag used within the Financial Payment process. Valid values are:
Null No invoices have been processed or the status is instructed.
O
At least one outstanding records remains in the payments table
H
At least one held record remains in the payments table
B
Both held and outstanding records remain in the payments table
A
Only approved records remain in the payments table
Registerable
(Checkbox)
This tick box is used to indicate whether an individual line should be registered with TMA. If this is checked the
‘Registerable’ tick box at the work order level will be updated automatically (if not already checked).
Register Status
(Display Only)
This Line level Register Status field indicates the Noticing Status of the individual work order line. The status of this field
depends on the following logic:
Nothing Registered – The WOL has been ticked as ‘Registerable’ but no Notices have been sent for it.
Outstanding – The WOL has been ticked as ‘Registerable’ and at least one Notice has been sent for it but not a
0600 – Works Stop Notice.
Completed – The WOL has been ticked as ‘Registerable’ and a 0600 – Works Stop Notice has been sent.
Once a Works Order Line has been included in a Payment Run the Invoice details can be viewed by pressing the
[Invoices] button on the window.
Target Date
(Required)
The target date for the work order line can be entered manually for non defect clearance work orders. The target dates for
the individual work order lines will affect the overall work order Target Date.
For defect clearance work orders:
When a defect and its associated repair are created, the repair has a Target Complete Date associated with it.
When a work order line is created from a defect repair and the work order is instructed or when a repair is selected onto an
existing instructed work order, the work order line Target Date may be calculated in one of two ways depending upon
how the Recalculate Repair Due Dates checkbox has been set in Contracts – MAI3880.
1. If unchecked, the work order line Target Date will be populated with the associated Repair Date Due.
2. If checked, the work order line Target Date will be calculated by applying the same Interval used for the Repair
Due Date to the Works Order Instructed Date.
The interval used is derived from the associated: Defect Activity
Defect Priority
Repair Category
Version: 4.7
100
CONFIDENTIALITY STATEMENT
The contents of this document, including system ideas and concepts, are confidential and proprietary in nature and are not to be distributed in any form
without the prior written consent of Bentley, Inc.
EXOR
MAINTENANCE MANAGER USER GUIDE
WORK ORDER MANAGEMENT
This may be used for the following reason:
For example, if a defect has been found at the end of the working day that should be repaired within 24hours, by the time
the defect is loaded, placed onto a work order the following day, instructed and passed to the contractor, several hours
may have passed and the contractor may not physically have time to repair the defect based on the time the defect was
found. This option resets the work order line target date based on the time the associated work order was instructed and
sent to the contractor (if the CIM interface is used) and hence does not skew the KPI’s in a way to disadvantage the
contractor.
A number of buttons have been defined on this window for use when raising a works order, they are as follows:
[BOQ Items]
Opens the BOQ Items window where BOQ items can be added to or removed from the selected
works order line (Figure 101)
[Select Defects]Opens the Selection Criteria window and allows the user to select the defects that are to be
included on the works order. (Figure 99)
[View Notices] This button is enabled when one or more streetwork notices have been sent for the currently
selected work order line. The Work Order TMA Interface – TMA3990 is called in read only
mode and is navigated to the Work Order Lines tab. (Figure 73)
[TMA Interface]
This button is enabled when one or more work order lines are ticked as Registerable. The
Work Order TMA Interface – TMA3990 is called and is navigated to the TMA Noticing tab (this
is the same functionality as the Work Order level [TMA Interface] button). (Figure 72)
[Get From Map]
This button is enabled when the WOL Id is populated and the Work Order Line status is
not COMPLETE. Locator – NM0572 is called to allow the user to digitise a new location or
shape for the defect or work order. This will give the user the option to enter a point, polyline or
polygon that better represents the location and the shape of the work to be carried out on the
selected work order line. (Figure 36)
[Invoices]
This will display any interim payment invoices that apply to this work order line. (Figure 113)
[Copy Line]
This will create a copy of the selected works order line and associated BOQ items, the following
pop up window will be displayed allowing the user to copy the BOQ items and their associated
estimated quantities or copy the BOQ items only without the estimated quantities.
Version: 4.7
101
CONFIDENTIALITY STATEMENT
The contents of this document, including system ideas and concepts, are confidential and proprietary in nature and are not to be distributed in any form
without the prior written consent of Bentley, Inc.
EXOR
MAINTENANCE MANAGER USER GUIDE
WORK ORDER MANAGEMENT
Figure 98 - Copy Works Order Line popup
[Continue]
[Cancel]
will create new copy of the Work Order or Work Order Line.
will return the user to the Work Order details with no changes made.
A work order line can only be copied if it a small scheme order.
[Summary]
Opens the Defects summary window and displays a summary for each of the works order lines on
the currently selected Works Order.
To view a defect clearance works order line in detail, select the desired line and press the [Expand] button on the form,
this will display the defect details using Defects – MAI3806, In addition full information for the work order line can be
viewed by selecting the [Navigator] button (Figure 94).
Version: 4.7
102
CONFIDENTIALITY STATEMENT
The contents of this document, including system ideas and concepts, are confidential and proprietary in nature and are not to be distributed in any form
without the prior written consent of Bentley, Inc.
EXOR
MAINTENANCE MANAGER USER GUIDE
WORK ORDER MANAGEMENT
3.5.4
Selection Criteria
Figure 99 - Selection Criteria
This window is displayed when the [Select Defects] button is pressed in the Work Order Lines window.
This window contains a collection of selection criteria fields enabling you to select a defect or defects to be used for this
works order. Enter enough of these fields to restrict the selection to the required defects.
Defects may also be selected using the [Asset Query] button or the [PBI] button. This allows you to select defects, which
have been raised against particular Asset Items. Pressing the [Asset Query] button will call the Query Asset window and
allow you to select an individual asset item. This would allow you to select any AVAILABLE defects raised against the
item.
The [PBI] button allows the user to define a Parameter Based Inquiry and select any AVAILABLE defects raised against
the resulting assets items of the inquiry.
Work Category
(Required)
List
Select a work category from the List of Values, these values are linked to budgets and are therefore mandatory. Only
defects with activities that apply to this work category will be selected for inclusion on the current works order.
Activities are associated to a work category using Item Code Breakdowns – MAI1940.
Road Id 1-6
(Optional)
List
If required, select up to 6 roads. Only those defects situated in the specified roads will be selected for inclusion on the
current works order.
Version: 4.7
103
CONFIDENTIALITY STATEMENT
The contents of this document, including system ideas and concepts, are confidential and proprietary in nature and are not to be distributed in any form
without the prior written consent of Bentley, Inc.
EXOR
MAINTENANCE MANAGER USER GUIDE
WORK ORDER MANAGEMENT
Asset Type
(Optional)
List
If required, enter an Type of Asset defect shave been raised against. The list of values will only display asset items for the
selected Road Group.
Asset Ref
(Optional)
Enter the Asset Reference of the Item to be selected.
Id
(Optional)
Enter the Asset Id of the item to be selected.
Defect Priorities 1-6
(Optional)
List
If required, select up to 6 defect priority codes. Only those defects with matching priority codes will be selected for
inclusion on this works order.
Defect Types 1-6
(Optional)
List
If required, select up to 6 defect types. Only those defects with matching defect types will be selected for inclusion on this
works order.
Treatment Types 1-6
(Optional)
List
If required, select up to 6 treatment type codes. Only those defects with matching treatment type codes will be selected for
inclusion on this works order.
SISS Codes 1-6
(Optional)
List
If required, select up to 6 Standard Item Sub Section (SISS) codes. Only those defects with matching SISS codes will be
selected for inclusion on this works order.
Gang Work Type 1-6
(Optional)
List
If required, select up to 6 gang work types. Only those defects that contain SOR items that have been linked to the
selected gang work types will be retrieved. SOR items are linked to Gang work types using Standard Items – MAI3888.
Defect Id
(Optional)
If required, enter the unique defect ID to identify an individual defect to be included on the current works order.
Item Code
(Optional)
List
If required, select the standard job item code representing a particular item of work. All defects which have this job item
logged as the suggested repair will be selected for inclusion on the current works order. Note that wildcards may be used
in the item code.
Include Perm
(Optional,Default)
Enter ‘Y’ to include defects with permanent repairs in the search specified above. The default value is 'Y'.
Inspections between and
(Optional)
Version: 4.7
104
CONFIDENTIALITY STATEMENT
The contents of this document, including system ideas and concepts, are confidential and proprietary in nature and are not to be distributed in any form
without the prior written consent of Bentley, Inc.
EXOR
MAINTENANCE MANAGER USER GUIDE
WORK ORDER MANAGEMENT
If required, enter two dates representing a date range. Only those defects resulting from inspections taking place between
these two dates will be selected for inclusion on the current works order.
Include Temp
(Optional,Default)
Enter ‘Y’ to include defects with temporary repairs in the search specified above. The default value is 'Y'.
XSP
(Optional)
List
If required, select a valid Cross-Sectional Position (XSP). Only those defects located at the specified XSP will be selected
for inclusion on the current works order.
Once you have entered enough selection criteria to select the defects you want to work with, press the [Continue] button
to start the search.
The system will search all outstanding defects to find those that match the criteria defined above. When this search is
complete the following window will be displayed showing all defects that match your search criteria.
Figure 100 - Defect Summary
1.
2.
3.
4.
5.
Select the required defects by checking the check box on the right.
Select [Set All]
to select all defects displayed.
Select [Unset All]
to unselect all defects.
As the defects are selected a running total of useful information is displayed along the bottom of the window.
Press the [Cancel] button to return to the Selection Criteria screen enabling you to refine your search criteria and
initiate another search.
6. Press the [Continue] button to add the selected defects to the works order.
Note: If any of the selected defects have documents associated with them (through document manager), these
documents will automatically be associated with the Works Order as well.
Version: 4.7
105
CONFIDENTIALITY STATEMENT
The contents of this document, including system ideas and concepts, are confidential and proprietary in nature and are not to be distributed in any form
without the prior written consent of Bentley, Inc.
EXOR
MAINTENANCE MANAGER USER GUIDE
WORK ORDER MANAGEMENT
Figure 101 - BOQ Items
3.5.5
BOQ Items
This window is displayed when the [BOQ Items] button is pressed in the Work Order Lines window.
This window enables you to select the BOQ items to rectify the defect specified in the Work Order Lines window.
Initially, it will be populated with the BOQ items specified by the inspector at the time that the defect was recorded either
entered onto the DCD, using treatment models or recorded manually.
Should you want to add further items, press the [Create Record] button in the toolbar. This will enable you to add a new
item.
Note: To avoid problems the [Save] button should be used when each BOQ item has been added.
Note: Once the work order has been instructed, if the wrong BOQ has been entered or the band has changed prior to
the entry of the actual values the incorrect BOQ item should be zeroed (it cannot be deleted as it has been used in
the definition of the estimated values) before entering the correct item.
Item Code
(Required)
List
Select a valid standard job item to represent a task to be carried out by the contractor.
All items added must exist on the selected contract.
Description
(Display Only)
Version: 4.7
106
CONFIDENTIALITY STATEMENT
The contents of this document, including system ideas and concepts, are confidential and proprietary in nature and are not to be distributed in any form
without the prior written consent of Bentley, Inc.
EXOR
MAINTENANCE MANAGER USER GUIDE
WORK ORDER MANAGEMENT
Displays the description of the standard job item. Note that for Rogue Items, this field becomes updateable to allow you to
describe the Rogue Item in greater detail.
Quantity
(Required or Optional)
The first three fields allow the user to specify up to three dimensions associated to the Item if they are required for the
specified item. Each standard job item can have one or more dimensions associated with it, depending on the nature of the
work represented by the job item. For example, replacing damaged kerbing will have a single dimension representing the
length of kerbing to be replaced, whilst filling a pothole may have three dimensions representing the length, width and
depth of the pothole to be filled. Consequently, these three dimension fields are Required or Optional according to the
needs of the job in question.
Note: The message line will display a message explaining what unit of measurement should be used for each
dimension field. This message will be of the form ‘Enter the Length’.
Quantity
(Display Only)
Displays the calculated quantity of work based on the dimensions supplied in the previous fields. The unit of this field is
displayed in the Unit field described below.
Est Labour
(Display Only)
Displays the estimated labour costs if they have been entered against the selected schedule item in Standard Items –
MAI3888.
Unit
(Display Only)
Displays the unit of measurement of this job item. This unit relates to the Total Qty field described above.
Rate
(Display Only)
Displays the rate per unit for this work item as held on the contract under which this works order is being created. If a
rouge item is added the rate must also be added to the item in this field.
Cost
(Display Only)
If the order is not issued the estimated cost will be displayed, if the order is complete the estimated costs are copied and
will be displayed as actual costs
Details of both the estimated and actual costs and quantities can be viewed for each item by selecting the [Expand] button
from the toolbar.
Add %
(Check Box)
If this item is to attract a percentage increase or decrease using a Percentage Item tick this box.
Note that only Standard Job Items which have the 'Allow Percentage Flag?' flag set to 'Y' in Standard Items – MAI3888
can have a Percentage Item associated with them. For information on adding Percentage Items to a Works Order line refer
to the section Adding Percentage Items to a Works Order Line, below.
BOQ Uplift Item
(Optional)
List
Enter the BOQ uplift item, this item will uplift all the BOQ items that have the ‘Allow Percent Items ?’ field set to ‘Y’ in
Standard Items – MAI3888.
Version: 4.7
107
CONFIDENTIALITY STATEMENT
The contents of this document, including system ideas and concepts, are confidential and proprietary in nature and are not to be distributed in any form
without the prior written consent of Bentley, Inc.
EXOR
MAINTENANCE MANAGER USER GUIDE
WORK ORDER MANAGEMENT
The List of Values will only contain those items that have the ‘BOQ Percent Uplift ?’ set to ‘Y’ in Standard Items –
MAI3888
WOL Uplift Item
(Optional)
List
Enter the Work Order Line uplift item, this item will uplift the entire work order line.
The List of Values will only contain those items that have the ‘WOL Percent Uplift ?’ set to ‘Y’ in Standard Items –
MAI3888
Note: When a Repair, having either BOQ or WOL Percent Uplift Item Codes assigned, is added to a Work Order, a
check is made against the Contract for that work order to determine if the Standard Item Code has been assigned
as a Contract Item, and that the contract will allow for Percentage Uplifts. If not, the user will be prevented from
saving, or Instructing, the Work Order.
3.5.6
Percentage Uplifting of the value of an individual work order line
Entering a BOQ uplift item to a work order line will uplift the value of the work order line by applying the percentage
uplift only to those BOQ items that have been flagged as ‘Allow Percent Items’ = ‘Y’ in Standard Items – MAI3888.
In addition, if the entire work order line needs a percentage uplift, entering a WOL Uplift item to the work order line will
apply the uplift to the entire line including any BOQ percentage uplifts that have already been applied.
Note: If the value of the Work Order needs to be uplifted based on a banding for the value of the entire work order then
Discount Groups – MAI3624 (Maintenance Manager Admin) should be used.
3.5.7
Adding Individual Percentage Items to a BOQ Item
Adding a Percentage Item to a Bill Of Quantities allows the cost of the BOQ item to which the Percentage Item is
associated, to be increased or decreased depending on the percentage value defined for the Percentage Item in the selected
Contract. For example, work carried out on Bank Holidays may attract a percentage surcharge. Adding a Percentage Item
to the BOQ would allow this surcharge to be applied.
Percentage Items may only be associated with the Standard Job Items which have the 'Allow Percent Items ?' flag set to
'Y' in Standard Items – MAI3888 (Maintenance Manager System Administration Manual)
Percentage Items are those Standard Job Items which have the Unit of Measurement as defined for Product Option
PERC_ITEM e.g., PERCENTAGE.
The computation method for a Percentage Item is determined by Product Option CUM_PERC and can either by:
NORMAL
When set to NORMAL a percentage item will display the percentage of the standard item.
Or
CUMULATIVE
A setting of CUMULATIVE will result in the percentage item being the sum of the
standard item and other percentage items related to the standard item.
The Product Option Value can be overridden by adding the required value into the 'Percent Item Computation' field in the
program details window. This will set the Computation method for any subsequent Percentage Items added to a BOQ for
a Works Order line on the current Works Order, to the value entered. This allows for different Computation methods to be
used without the need to edit the Product Option value.
Note: These Values (Normal and Cumulative ) are defined in Status Codes – HIG9110 and Domain Code
PERC_ITEM_COMP.
Version: 4.7
108
CONFIDENTIALITY STATEMENT
The contents of this document, including system ideas and concepts, are confidential and proprietary in nature and are not to be distributed in any form
without the prior written consent of Bentley, Inc.
EXOR
MAINTENANCE MANAGER USER GUIDE
WORK ORDER MANAGEMENT
Figure 102 - Normal Computation Method Computation Method
Figure 102 shows a Bill of Quantities where an Item Code, 29/01/001, has a cost of £100.00. A percentage Item has been
associated with it because the bituminous material being used for the repair is of a special grade. The Percentage Item
selected has a rate of 10 % thus the total cost of the repair will be increased by £10.00 to £110.00.
If this work was to be carried out on a weekend, and weekend work attracted a surcharge of 10% on the total cost of a
repair a 2nd percentage item could be associated with the BOQ item to allow for this. If the weekend surcharge only
applied to the cost of the initial Item Code i.e. £100, the extra cost for weekend work would an extra £10 and the
computation method used to calculate this would be NORMAL.
If however, the weekend surcharge applies to the Initial Item Code and any other Percentage Items associated with BOQ
Item, the computation method used should be set to CUMULATIVE. Figure 103 shows the same BOQ item with Product
Option CUM_PERC set to CUMULATIVE.
Figure 103 - Cumulative Computation Method
The initial Percentage Item has been calculated as a percentage of the cost of the BOQ item 29/01/001, i.e. 10% of
£100.00 equaling £10. The 2nd Percentage Item for Weekend Work has been calculated as a percentage of the sum of the
initial BOQ Item 29/01/001 + the initial Percentage Item, i.e. 10% of (£100+£10) giving a total cost of £121.00.
3.5.8
Adding a Percentage BOQ Item
To add a Percentage Item to a Bill of Quantities the Percentage Item must have added to the currently selected Contract. If
a different Contract is subsequently selected, the Works Order cannot be Instructed unless the Percentage Item has also
been added to the newly selected Contract.
Version: 4.7
109
CONFIDENTIALITY STATEMENT
The contents of this document, including system ideas and concepts, are confidential and proprietary in nature and are not to be distributed in any form
without the prior written consent of Bentley, Inc.
EXOR
MAINTENANCE MANAGER USER GUIDE
WORK ORDER MANAGEMENT
To add a Percentage Item do the following:
1. Navigate to the BOQ Items window by clicking on the [BOQ Items] button on the Works Order Lines window.
2. Select the BOQ Item to which the Percentage Item is to be added.
3. Note that this item must have the 'Allow Percentage Item ?' filed set to 'Y' in Standard Items – MAI3888.
4. Check the 'Add %' box for the selected Item on the right of the window.
5. Click on the [Add % Item] button on the BOQ Items window.
6. A list of valid Percentage Items will be displayed.
7. Select the required percentage item from the List
8. The selected percentage item will be added to the BOQ. An will be displayed beside the percentage item to
signify that it is a child item of the main Standard Job Item
Note: Quantities for Percentage Items cannot be amended.
Select the [Check All] to check all BOQ items displayed.
Select [Uncheck All] to clear all checked BOQ items.
3.5.9
Adding Non-Contract Items to a Works Order
Normally, the Bill Of Quantities on a works order is defined as a series of standard job items as described above. These
items have agreed unit rates. Occasionally, however, it is required to add an item to a works order that is not on the
contract. This can be achieved by the use of Rogue Items (sometimes known as ‘Wildcard Items’).
A Rogue Item is simply a standard job item with no preset rate, quantity or description. Generally, it will have item codes
ending ‘9999’. When you select a Rogue Item from the list of items the Item Description, Total Qty, and Rate fields will
be empty. You can then complete these fields to effectively create a non-standard item. It is important to note that for the
software to be able to calculate the works order totals correctly, you must enter a rate for the Rogue Item.
Standard job items (including Rogue Items) are managed through Standard Items – MAI3888 (For further information on
Standard Items, refer to the Contracts and Contractors section of the Maintenance Manager Administration Manual).
Contracts and Rates
It is possible to select standard job items which do not appear on the current contract for this works order. These items can
be identified as the Rate field will be empty, indicating that there is no known unit rate for this item in the selected
contract. In this situation, the software will not be able to calculate the Total Qty for this item and can therefore not cost
the works order correctly. This can be used effectively when comparing multiple contracts, the contract selected when
raising the works order may not be the contract suitable once all the schedule items have been entered.
To circumvent this situation you must do one of the following actions:
Replace the job item with an item which appears on the current contract.
Replace the job item with a Rogue Item.
Select a different contract.
Add the missing item to the current contract.
As a general rule, the works order can only be issued and printed when all the items on it have a rate, either from the
contract or as rogue items.
Version: 4.7
110
CONFIDENTIALITY STATEMENT
The contents of this document, including system ideas and concepts, are confidential and proprietary in nature and are not to be distributed in any form
without the prior written consent of Bentley, Inc.
EXOR
MAINTENANCE MANAGER USER GUIDE
WORK ORDER MANAGEMENT
3.5.10 Works Order Audit
Figure 104 - Work Order Audit
The Works Order Audit shows the changes made to the fields on the Works Order which have been selected in form
Works Order Audit Maintenance – MAI3803 and can be called by pressing the [Expand] button on the menu toolbar form
the main Works Order window.
The size of the Audit log trail can be restricted by setting Product Option AUDIT_ALL to 'N'. If this option is set to 'N',
only the initial and final values of a field are recorded in the Audit trail, per session per User and any intermediate changes
are not be logged.
If Product Option AUDIT_ALL is set to 'Y' then all changes to the selected fields are logged. It should be noted that for
some Works Orders, the audit trail could be very large if this option is set to 'Y'.
The Order in which Audited changes are displayed can be determined by setting a value in the 'Order By' field.
In addition work order auditing may be carried out using Audit Manager, see the Audit Manager User Guide.
The type of audited changes displayed can be determined by clicking the appropriate check box in the 'Show Changes'
portion of the window as shown below
The changes displayed can be restricted to the following areas:
Main Works Order changes
Works Order Line changes
Version: 4.7
111
CONFIDENTIALITY STATEMENT
The contents of this document, including system ideas and concepts, are confidential and proprietary in nature and are not to be distributed in any form
without the prior written consent of Bentley, Inc.
EXOR
MAINTENANCE MANAGER USER GUIDE
WORK ORDER MANAGEMENT
Bill Of Quantity changes
Payment detail changes
The following information is displayed
WOL
(Display Only)
The Defect Id or Works Order Line number will be displayed
BOQ
(Display Only)
The BOQ Standard Item Code will be displayed
Initials
(Display Only)
The initials of the User who made the change will be displayed
Date
(Display Only)
The Date and Time on which the changes were made will be displayed
Item Changed
(Display Only)
A brief description of the Item changed will be displayed.
Change (New Value)
(Display Only)
The new value of the changed item will be displayed.
Old Value
(Display Only)
The old value of the changed item will be displayed.
To close the Works Order Audit and return to the main Works Order form press the [Close] button on the window.
Audit Manager can now be used to audit the changes to a work order, work order line or BOQ items.
Version: 4.7
112
CONFIDENTIALITY STATEMENT
The contents of this document, including system ideas and concepts, are confidential and proprietary in nature and are not to be distributed in any form
without the prior written consent of Bentley, Inc.
EXOR
MAINTENANCE MANAGER USER GUIDE
WORK ORDER MANAGEMENT
3.5.11 BOQ Details
Figure 105 - BOQ Details
This window can be called by pressing the [Expand] button in the menu toolbar when a BOQ item is selected.
It is useful when entering quantities because if the items are banded, this window will show the minimum and maximum
allowed values.
Details of the estimated and actual values are also displayed. If the Works Order Line on which the selected BOQ item is
on, is part of an Interim Payment the Last Valuation cost, Status and the Date the Valuation was entered or the payment
made will be displayed.
When entering a Valuation for an Interim Payment the Minimum Quantity limit for the Standard Item is overridden, but
the Maximum Quantity limit is retained.
Select [Cancel] to return to the BOQ Items window
Version: 4.7
113
CONFIDENTIALITY STATEMENT
The contents of this document, including system ideas and concepts, are confidential and proprietary in nature and are not to be distributed in any form
without the prior written consent of Bentley, Inc.
EXOR
MAINTENANCE MANAGER USER GUIDE
WORK ORDER MANAGEMENT
3.5.12 Standard Item Totals
Figure 106 - Standard Item Totals
This window is displayed when the [Standard Item Totals] button is selected in the Works Orders Defects window.
It is a display only window, which shows all of the Standard Items currently on this Works Order, as well as the total
quantities and costs, both estimated and actual, across the whole works order.
Note that the ‘Actual’ fields are only displayed after a works order line has been completed or an Interim payment made
and will, therefore, initially be empty.
If the contractor has added additional items to the order the estimated values will be empty with the actual values being
populated.
Version: 4.7
114
CONFIDENTIALITY STATEMENT
The contents of this document, including system ideas and concepts, are confidential and proprietary in nature and are not to be distributed in any form
without the prior written consent of Bentley, Inc.
EXOR
MAINTENANCE MANAGER USER GUIDE
WORK ORDER MANAGEMENT
3.5.13 Contractor Totals
Figure 107 - Contractor Totals
This window is displayed when the [Contractor Totals] button is selected in the Works Orders Defects window .
It is a display only window which shows all contracts which can satisfy some or all of the work defined on the Works
Order. For each contract, the window shows the percentage of the order lined that the contract has priced and can
therefore complete, as well as the total cost where that contract is to be used. If available, the window will also show the
average score achieved by that contractor over the past year to date, as well as the total value of orders placed with that
contractor in the year to date.
If the Contractor has had a financial limit on Works Order values that may be issued to him imposed in Contractors –
MAI3881, the Minimum and Maximum values will be displayed.
To select an alternative contract for use on this works order, highlight the required contract then select the [Select
Contract] button.
If product Option WORREFGEN is set to either 'C' for 'Contract Based' Works Order Reference Number generation or 'A'
for Administration Unit Works Order Reference Number Generation and the initial Contract selected is changed, the
Works Order will Cancelled and an exact copy made with the new reference number being generated. The Works Order
will have '**Cancelled**' appended to the start of it's description.
To return to the Works Order form without selecting a Contractor press the [Cancel] button.
If the Value of the Works Order is outside the limits set for the Contractor a warning will be displayed a shown below.
Version: 4.7
115
CONFIDENTIALITY STATEMENT
The contents of this document, including system ideas and concepts, are confidential and proprietary in nature and are not to be distributed in any form
without the prior written consent of Bentley, Inc.
EXOR
MAINTENANCE MANAGER USER GUIDE
WORK ORDER MANAGEMENT
Figure 108 - Outside limit
To select the Contractor and override the warning press [OK] otherwise press [Cancel] to select an alternative Contractor.
If the Contractor selected is not the cheapest Contractor a window will appear requesting a reason as to why the cheapest
Contractor was not selected. Enter the reason and press [OK] to continue with the selection.
Figure 109 -Reason
This will be displayed in the Additional Details Window.
Version: 4.7
116
CONFIDENTIALITY STATEMENT
The contents of this document, including system ideas and concepts, are confidential and proprietary in nature and are not to be distributed in any form
without the prior written consent of Bentley, Inc.
EXOR
MAINTENANCE MANAGER USER GUIDE
WORK ORDER MANAGEMENT
3.5.14 Work Order Flexible Attributes
Figure 110 - Flexible Attributes
3.5.15 Flexible Attributes
Each different type of work order may potentially require a different set of information to be held against it. To facilitate
this the work order flexible attributes can be linked to individual scheme type.
This allows the customer to define a set of attributes that are specific for a small scheme work order and another set
specific for cyclic work orders. The attributes are based on scheme type.
The flexible attributes are set up using the standard asset meta model module by defining a special type of asset record,
this asset record is then linked to the appropriate scheme type using Application Attributes – MAI3819.
The Attributes part of the form will display the flexible attributes of the asset metamodel mapped to the scheme type used
in the work order. Attribute values can be added or modified.
Version: 4.7
117
CONFIDENTIALITY STATEMENT
The contents of this document, including system ideas and concepts, are confidential and proprietary in nature and are not to be distributed in any form
without the prior written consent of Bentley, Inc.
EXOR
MAINTENANCE MANAGER USER GUIDE
WORK ORDER MANAGEMENT
Figure 111 - Additional Details Planning/Support
3.5.16 Additional Details – Planning/Support
This window is displayed when the [Additional Details] button is selected in the Works Orders Defects window.
All the fields in this window are optional and are intended for information only.
Any documents that are to be held against a work order will be held using Document Manager.
Version: 4.7
118
CONFIDENTIALITY STATEMENT
The contents of this document, including system ideas and concepts, are confidential and proprietary in nature and are not to be distributed in any form
without the prior written consent of Bentley, Inc.
EXOR
MAINTENANCE MANAGER USER GUIDE
WORK ORDER MANAGEMENT
Figure 112 - Additional details Quality/Finance
3.5.17 Additional Details – Quality/Finance
This window is displayed when the [Additional Details] button is selected in the Works Orders Defects window.
All the fields within this window with the exception of ‘Not Lowest Cost’ and 'Percent Item Computation' are optional for
additional information only and will be included for reference on works order prints.
Not Lowest Cost
(Display Only)
If the Cheapest qualifying Contractor is not selected, the reason entered as to why the cheapest Contractor was not
selected will be displayed.
Percent Item Computation
(Optional)
(List)
The Product Option Value can be overridden by adding the required value into the 'Percent Item Computation' field in the
Program details window. This will set the Computation method for any subsequent Percentage Items added to a BOQ for
a Works Order line on the current Works Order, to the value entered. This allows for different Computation methods to be
used without the need to edit the Product Option value.
Select [Continue] to return to the Works Orders (Defects) window.
Version: 4.7
119
CONFIDENTIALITY STATEMENT
The contents of this document, including system ideas and concepts, are confidential and proprietary in nature and are not to be distributed in any form
without the prior written consent of Bentley, Inc.
EXOR
MAINTENANCE MANAGER USER GUIDE
WORK ORDER MANAGEMENT
Figure 113 - Invoices
3.5.18 Invoices
Once a Works Order Line or Part of a Works Order Line, in the case of an Interim payment, has been included in payment
run the Invoice details can be displayed by pressing the [Invoices] button on the Works Order Line window.
The Payment Id, Payment Value and Date Paid will be displayed. To add the Invoice number, click in the 'Invoice field'
and enter the appropriate value. Press [Save] on the menu toolbar to save the changes.
If the Works Order Line has had a number of Interim Payments made against it, this is a good way to track the payments
made to date.
Press the [Close] button to return to the Works Order Line window.
3.5.19 Making Interim Payments
Interim payments can be made on part of an individual Works Order Line if needed. This may used where the work
ordered on a Works Order line may take a long period of time to complete or is of very high value. As work proceeds the
Contractor may require payment for the work he has completed to date. Interim payments allow the Standard Items
quantities to be amended to show the actual amount of work done to date or for new Standard Items to be added. Once the
actual quantities have been added the Works Order Line can then be included in a payment run.
As the work progresses further, this Interim Payment process can be repeated until the work is Completed and the Final
Payment is made.
If an Interim Payment is made on a Works Order Line raised to repair a defect, the defect status will be set to STR MAIN
(the Status Code with feature 6 allowed).
A Works Order cannot be completed until all the Works Order Lines on the Works Order are Completed.
Version: 4.7
120
CONFIDENTIALITY STATEMENT
The contents of this document, including system ideas and concepts, are confidential and proprietary in nature and are not to be distributed in any form
without the prior written consent of Bentley, Inc.
EXOR
MAINTENANCE MANAGER USER GUIDE
WORK ORDER MANAGEMENT
Interim payments can only be made on Works Orders that have the 'Interim Payment?' flag set to 'Y'. This flag can be
changed at any time.
To make an Interim Payment follow this process:
Select the Works Order Line for which to make the Interim Payment.
Set the Works Order Line status to VALUATION.
The BOQ estimated quantities will be stored and Zero estimates will be displayed in their place.
Enter the actual quantities of work done to date (that this is a cumulative amount)
Note: When entering a Valuation for an Interim Payment the Minimum Quantity limit for the Standard Item is
overridden, but the Maximum Quantity limit is retained.
If required add any Percentage Items or other Standard Items needed.
Set the Works Order Line status to INTERIM.
Press the [Save] button on the menu toolbar.
The Works Order Line is now ready for part payment on the next Payment Run i.e. the work done to date will be paid, but
the Works Order Line will not be Completed.
When the Works Order Line is included on a Payment Run the Status of the Works Order Line will be set to PART-PAID.
If a further Interim Payment is to be made on this Works Order Line simply repeat this process. Details of the last
valuation can be seen for a BOQ item by pressing the [Expand] button on the menu toolbar when the BOQ item is
selected.
3.5.20 Completing a Works Order Line with an Interim Payment
In order for a Works Order to be completed, all Works Order Lines on it must be completed. If a Works Order Line has
had an Interim Payment made on it, it must also be set to Complete.
If any further work has been done since the last Valuation the Works Order Line Status should be changed to
COMPLETED and the Actual quantity of work done to date entered (this should be the cumulative amount of all work
done), otherwise the Works Order Line will keep the same Actual amounts as for the last Valuation.
When the Works Order Line is Completed and is included in the next payment run, no payment will be made if the Actual
quantities have not been changed since the last Valuation.
3.5.21 Completing a Works Order
When completing a works order it is possible to update the schedule items to reflect the actual cost of repairing the defect.
A works order can be partially completed by completing individual works order lines or fully completed by completing
the whole works order, the limitation to completing the full works order by selecting the [Completed] button is that the
costs of each individual line can not be amended to reflect the actual costs of the work.
To enter the actual cost of a works order line follow this procedure:
1. Change the status of the works order line to COMPLETED.
2. Enter the completed date.
3. Update the dimensions in the BOQ Items window to the actual dimensions.
4. Add any further BOQ items if required.
5. Save the changes
Once the changes have been saved no further changes can be made to that works order line. Once all works order lines are
completed the works order will be completed.
Version: 4.7
121
CONFIDENTIALITY STATEMENT
The contents of this document, including system ideas and concepts, are confidential and proprietary in nature and are not to be distributed in any form
without the prior written consent of Bentley, Inc.
EXOR
MAINTENANCE MANAGER USER GUIDE
WORK ORDER MANAGEMENT
This status can change to COMPLETED in one of two ways, they are as follows:
The [Complete] button is selected in the Works Orders Defects window. This will complete all works order lines in the
current works order, the completed date will also be entered in the next field. If this method is used changes cannot be
made to the actual values of the BOQ items.
The User changes the individual work order line to completed manually and enters a date in the next field. At this point
changes can be made to the actual values of the BOQ items, these changes must be made before saving the changes.
As the works order line passes through the payments cycle the status will be updated automatically.
3.5.22 Changing a Completed Works Order
Once a Works Order or Works Order Line is complete no changes can be made to the value of the order.
If however, when it comes to payment, the Works Order or Works Order Line is held because actual values of the work
are in excess of the allowable differences between estimated values and actual values, the actual values may need to be reentered.
This is carried out with the following procedure:
1. Retrieve the completed works order that needs amending.
2. Move to the relevant works order line.
3. Change the status back to INSTRUCTED.
4. Save the change.
This will result in the actual quantities and costs for the selected works order line being removed, the completed
dates will be cleared in both the selected works order line and the main works order window and the actual costs
will be updated in the works order window.
Costs will be returned to Committed from Actuals within Budgets.
Follow the procedure for completing a Works Order to enter the amended actual values.
3.5.23 Raising a Notice In the Street Works Register
Some activities in the highway require information to be sent to the local ‘Street Works Register’. The Traffic
Management Act (TMA) will introduce new responsibilities on Highway Authorities for those activities that are
‘Registerable’. The following is an extract from the TMA code of practice (issued under consultation):
3.5.23.1 Registerable Works
3.5.23.1.1 Works as designated in 3.5.23.1.2 have to be recorded on the Register. Street works notified by undertakers in
accordance with the provisions laid down in the regulations and chapter 6 of this Code of Practice shall be
recorded in the register by the street authority. Any works which are not notified in accordance with the
provisions in the NRSWA as set out in Chapter 6 are unlikely to be picked up by the street authority and
included on the Register. It is therefore self evident that as far as street works are concerned only those works
which are notifiable will in fact be Registerable, and although strictly speaking the two definitions are not
legally the same, to all intents and purposes they are the same thing in practice. However, NRSWA does not
require local authority road works to be notified in the same way, although they do need to be registered.
Therefore, how a local authority registers its own works is a matter for it to decide, but it is strongly
recommended that they use the same process.
3.5.23.1.2 The requirement is to register, for all works promoters:
Version: 4.7
122
CONFIDENTIALITY STATEMENT
The contents of this document, including system ideas and concepts, are confidential and proprietary in nature and are not to be distributed in any form
without the prior written consent of Bentley, Inc.
EXOR
MAINTENANCE MANAGER USER GUIDE
WORK ORDER MANAGEMENT
1. All works that involve the breaking up or resurfacing of any street, (but see below for pole testing
involving excavation.).
2. All works that involve the opening of the carriageway or cycleway of traffic sensitive streets at traffic
sensitive times.
3. All works that require the use of any form of temporary traffic control as defined in the Code of Practice
for Safety at Street Works and Road Works.
4. All works that reduce the number of lanes available on a carriageway of three or more lanes.
5. All works that require a temporary traffic restriction order or notice or the suspension of pedestrian
crossing facilities
6. All works that require a reduction in width of the existing carriageway of a traffic sensitive street at a
traffic sensitive time.
Non Registerable
1. Traffic Census Surveys
Traffic census surveys have deliberately not been included as disclosure of this information prior to a
census taking place can encourage a change to the normal pattern of traffic flows.
2. Pole testing
Pole testing involving excavation does not require registration via the noticing system in advance of work
commencing as per other types of excavation, unless one or more of rules 2 – 6 above, apply. However in
all circumstances the work must be registered within 10 days of completion
3.5.23.1.3 Regulations provide that the register must record the following information:
Particulars of all notices under sections 54, 55 and 57 served to the highway authority relating to street
works in any street which is a maintainable highway;
Particulars of all notices given under sections 54, 55 and 57 served on street managers relating to street
works in any street which is not a maintainable highway;
Particulars of all directions given under section 56 or 56A;
Particulars of all notices, consents and directions published or given by a street authority under section 58
or 58A;
Particulars of all notices served by an undertaker under section 58A;
Particulars of all notices served by a street authority under section 66;
Particulars of all notices given by a street authority under s72(3);
Particulars of all notices given under section 74 [or 74A];
Description and location of street works for which plans and sections have been submitted under
Schedule 4 to NRSWA (streets with special engineering difficulties);
Particulars of notices given by any relevant authority under Schedule 4 to NRSWA;
Details of every street for which the local highway authority are the street authority;
Details of every street which is a prospectively maintainable highway;
Details of every street, of which the local highway authority is aware, which is a highway but for which
they are not the street authority;
Version: 4.7
123
CONFIDENTIALITY STATEMENT
The contents of this document, including system ideas and concepts, are confidential and proprietary in nature and are not to be distributed in any form
without the prior written consent of Bentley, Inc.
EXOR
MAINTENANCE MANAGER USER GUIDE
WORK ORDER MANAGEMENT
Details of every street, or part of street, which is a) a protected street; b) a street with special engineering
difficulties or c) a traffic-sensitive street or proposed designations;
Description and location of both street authority works for road purposes and any such works that are
proposed;
Particular of consents under s61, along with any conditions, or directions under s62;
Particulars of street works licenses, including details of conditions and changes of ownership;
Information under section 70(3) and (4A) as to completion of reinstatements;
Particulars of apparatus notified to the street authority under section 80(2);
Every notice of works under section 85(2);
Details of road closure and diversions where an order under section 14 of the Road Traffic Regulation Act
1984 is required.
The road category of each street.
3.5.23.1.4 Registerable and notifiable works
There is a difference between Registerable works and notifiable works. The difference is not great in practice as far as
street works are concerned, but Registerable works are those which should be registered under s 53 of NRSWA, which
includes some highway authority road works, and notifiable works are those which require notices under s 54, 55 and 57
of NRSWA, which are utility street works.
3.5.23.1.5 Bar holes
Bar holes are used to detect and monitor gas leaks. When bar holes are carried out and it is known that no further street
works are required (such as when a gas leak is reported but none detected), a registration should be sent within 10 days,
once final monitoring checks have been established. The bar holes will count as a single excavation and reinstatement for
registration purposes.
An immediate (i.e. emergency) notice must be sent within two hours of the commencement of any other Registerable
street works activity (i.e. excavation, or any other activity defined in 5.8.2) associated with the bar holes. In this latter
case, these bar holes will not count as further excavations and reinstatements for the purposes of registrations.
All bar holes must be reinstated and registered when work on site is complete.
3.5.24 Raising a Notice from Maintenance Manager
Maintenance Manager allows ’Work Items’ to be sent to the Street Works Register using the [TMA Interface] button on
the Work Orders (Defects) – MAI3800 and Work Orders (Cyclic) – MAI3800A modules as shown below.
The [TMA Register] button will become active when the Register checkbox has been selected. Pressing this button will
call the TMA Interface – MAI3990 form.
Figure 114 - TMA Interface button
Note:
Street Works Manager by Exor MUST be implemented to send ‘Work Items’ to the Street Works Register.
Version: 4.7
124
CONFIDENTIALITY STATEMENT
The contents of this document, including system ideas and concepts, are confidential and proprietary in nature and are not to be distributed in any form
without the prior written consent of Bentley, Inc.
EXOR
MAINTENANCE MANAGER USER GUIDE
WORK ORDER MANAGEMENT
3.6
TMA Interface – MAI3990
Figure 115 - TMA Interface Menu Option
Figure 116 - TMA Interface
3.6.1
General Information
This module will allow the user to manage the notices that are to be generated for the work order lines in both Work
Orders (Defect and Small Scheme) – MAI3800 and Work Orders (Cyclic) – MAI3800A.
The purpose of this module is:
To automatically derive and associate one or more USRN’s for each instructed, registered work order line.
Multiple work order lines may be on one notice if those lines all fall on the same street. Multiple Notices may be
generated for one work order line if that work order line spans a number of streets.
Version: 4.7
125
CONFIDENTIALITY STATEMENT
The contents of this document, including system ideas and concepts, are confidential and proprietary in nature and are not to be distributed in any form
without the prior written consent of Bentley, Inc.
EXOR
MAINTENANCE MANAGER USER GUIDE
WORK ORDER MANAGEMENT
To facilitate the production of key TMA notice against each affected USRN throughout the life cycle of the works
This module can be called in a number of ways:
Using fastpath and the module Id – TMA3990
By the selection of the [TMA Interface] button form within the Work Ordering Modules MAI3800 and
MAI3800a
Directly from the Menu as shown below, the user will have to query back the work order number required.
3.6.1.1 Roles
Each user that needs to use the Work Order TMA Interface will need a role assigned to give them access to Work Order
(Defects) – MAI3800, Send Notice to Register – TMA1800 and TMA Interface –TMA3990
The module role TMA_USER that includes TMA1800 and TMA3990
is created as standard when TMA is implemented.
Users will therefore need the role of TMA_USER assigning. (Refer to your System Administrator to assign the
appropriate role.)
3.6.1.2 User Organisation and District
Each user that needs to use the Work Order TMA Interface will need to have a default org/district assigned using
Organisations and Districts – NSG0120. This default will be assigned to a works in Send Notice to Register – TMA1800.
(Refer to your System Administrator to assign the appropriate organisation and district.)
3.6.2
TMA Noticing Tab
Figure 117 - TMA Noticing tab
These three fields will be automatically queried if form TMA Interface – TMA3990 is called from the Work Ordering
modules. If called from the Menu the user will have to query back the required work order number.
Work Order
Version: 4.7
126
CONFIDENTIALITY STATEMENT
The contents of this document, including system ideas and concepts, are confidential and proprietary in nature and are not to be distributed in any form
without the prior written consent of Bentley, Inc.
EXOR
MAINTENANCE MANAGER USER GUIDE
WORK ORDER MANAGEMENT
Description
Date Raised
TMA Works Ref
(Display Only)
When the notice has been sent to the TMA Register the Works reference will be displayed. This will be blank until the
first notice is sent to the register.
USRN
(Display Only)
The USRN that has been derived against the work order line will be displayed:
For defect clearance work order the USRN’s will be derived based on the Road Section against the defect and the
xy, measure available on the defect to find the accurate USRN.
For small scheme and cyclic work orders USRN’s will be derived based on the Road Section against the work
order line.
There are cases when USRN cannot be determined for the Road Section. In such cases the Street field will be populated
with Street cannot be determined for the Road Section and the Select Notice check box will be disabled. User will not be
allowed to send any TMA Notice against the work order line.
Street Name
(Display, Query)
The Street Name for the derived USRN will be displayed.
Phase End Date
(Display, Query)
This is the TMA actual end date, if this is not available the estimated end date will be displayed.
Last Notice Type
(Display, Query)
The last notice type that has been sent from the list of notices displayed below will be displayed. For the available notices,
see below:
Next Notice Type
(Display, Query)
The next notice from the available list of notices for the selected regime will be displayed. For the available notices, see
below:
3.6.2.1 How the Notice Types are derived.
As requested by the user group only a subset of works notices will be processed from this interface. Other notice types
will have to be manually entered using the TMA modules.
The noticing regime (Notice or Permit) will be derived from the street characteristics.
The following notice types may be used:
0200 – Initial Notice
0210 – PAA (Major)/Permit Application (Non-Major)
0300 – Confirmation Notice
0310 – Permit Application
0400 – Actual Start Date
0600 – Works Stop
Version: 4.7
127
CONFIDENTIALITY STATEMENT
The contents of this document, including system ideas and concepts, are confidential and proprietary in nature and are not to be distributed in any form
without the prior written consent of Bentley, Inc.
EXOR
MAINTENANCE MANAGER USER GUIDE
WORK ORDER MANAGEMENT
Once the noticing regime has been derived and a notice has been sent only notices relevant to the specific regime will be
used.
WOL Count
(Display Only)
The number of work order lines associated with Notice will be displayed. A summary of the work order lines for this
notice will be displayed in the work order lines area at the bottom of the window.
Select Notice
(Checkbox)
Select/Deselect the notice that is to be progressed.
The user now has two options for a selected notice
1. Select the [Send to Register] button to send the notice to Send Notice to Register – TMA1800. The system will
send the ‘Next Notice Type’ notice. The user can then make changes and view errors and warnings prior to
sending to the Register.
2. If a notice has already been sent they can select the [View TMA Works] button to view Works – TMA1000.
Select all and deselect all can be used to select the notices if required.
When the Checkbox is selected the following validation is carried out:
If a notice is selected the system will search for all TMA Notices against the work order line and marks all notices
associated with the work order line as selected.
If a notice is selected that has multiple work order lines then all the notices against those work order lines will be
selected.
TMA Works Description
(Display Only)
The Works Description that had been entered and edited using Send Notice to Register – TMA1800 will be displayed.
WOL Id
(Display Only)
The unique system generated work order line Id will be displayed.
Location
(Display Only)
The defect location will be displayed if the selected work order line is a defect clearance line.
Road Id
(Display Only)
The road id for the selected work order line will be displayed.
Description
(Display Only)
The road section description for the work order line will be displayed.
Defect Id
(Display Only)
For defect clearance work order lines the defect Id will be displayed.
Type
(Display Only)
For defect clearance work orders the defect type code will be displayed, for example POTH.
Version: 4.7
128
CONFIDENTIALITY STATEMENT
The contents of this document, including system ideas and concepts, are confidential and proprietary in nature and are not to be distributed in any form
without the prior written consent of Bentley, Inc.
EXOR
MAINTENANCE MANAGER USER GUIDE
WORK ORDER MANAGEMENT
Priority
(Display Only)
For a defect clearance work order the defect priority will be displayed, for example 2.1.
End Date
(Display Only)
For defect clearance work orders the Defect Due by date will be displayed. For small scheme and cyclic work orders the
Target Date will be displayed.
TMA Notice Count
(Display Only)
The number of notices that this work order line is on will be displayed. Small scheme and Cyclic work order lines may
span more that one USRN.
Select WOL
(Checkbox)
This Checkbox is used to include or exclude a work order line from the highlighted notice above. Default for the
highlighted notice is to select the Checkbox.
When the Checkbox is unchecked the following validation is carried out:
If it is the only WOL against the selected Notice and the WOL has only one Notice against it, if the check box
gets deselected, the Select Notice check box becomes non selectable for this WOL so no notice can be generated.
If it is not the only WOL against the selected Notice and the WOL has only one Notice against it then the check
box gets deselected. The Select Notice checkbox remains checked for those work order lines that remain against
the notice so the notices can be generated.
If it is the only WOL against the Notice and the WOL has more than one Notices against it then, a warning is
issued, WOL has more than 1 USRN’s, deselecting this WOL will not create any notice against it. The check box
get deselected and also deselects this WOL from other TMA Notices in the form and the Select Notice check box
becomes non selectable for this WOL so no notice can be generated.
Show Map, when the user has highlights a notice in the top half of the form they may select the [Show Map]
button to display the USRN that has been selected.
Version: 4.7
129
CONFIDENTIALITY STATEMENT
The contents of this document, including system ideas and concepts, are confidential and proprietary in nature and are not to be distributed in any form
without the prior written consent of Bentley, Inc.
EXOR
MAINTENANCE MANAGER USER GUIDE
WORK ORDER MANAGEMENT
3.6.3
Work Order Lines Tab
Figure 118 - Work Order Lines tab
This tab shows the information in the reverse way to that of the TMA Noticing tab.
If this module is called directly from the menu this will be the default tab the user will be presented with.
All of the fields within this tab are Display only with the exception of:
Select
(Checkbox)
This checkbox is selected followed by [View TMA Works] to take the user to Works – TMA1000 to display the works
details for the selected notice.
[View Works Order]
(Button)
If this module has been called from the menu this will display Works Orders – MAI3800/MAI3800A.
Version: 4.7
130
CONFIDENTIALITY STATEMENT
The contents of this document, including system ideas and concepts, are confidential and proprietary in nature and are not to be distributed in any form
without the prior written consent of Bentley, Inc.
EXOR
MAINTENANCE MANAGER USER GUIDE
WORK ORDER MANAGEMENT
3.7
Send Notice to Register – TMA1800
Figure 119 - Send Notice To Register
3.7.1
General Information
When the form is called from TMA Interface -TMA3990 it will automatically query back the details of the “candidate”
notices that the user asked to be produced.
If no notices were selected in TMA Interface -TMA3990, then the message ‘No records to process’ will appear when the
form starts. Once the alert box has been dismissed the form will exit and you will return to where you came from.
3.7.2
Upper Section
Figure 120 - Upper Section
This section of the form will display all the notices that were selected in Work Order TMA Interface – TMA3990.
USRN
(Display Only)
This will display the USRN and Street Name as selected in TMA Interface -TMA3990, when called from TMA3990 the
street cannot be updated.
When Called from Enquiries – DOC0150 the street can be changed.
Version: 4.7
131
CONFIDENTIALITY STATEMENT
The contents of this document, including system ideas and concepts, are confidential and proprietary in nature and are not to be distributed in any form
without the prior written consent of Bentley, Inc.
EXOR
MAINTENANCE MANAGER USER GUIDE
WORK ORDER MANAGEMENT
Notice Type
(Default, Update)
List
The notice type will default to the value displayed in TMA Interface -TMA3990. The list of values will present the
relevant notice types (Notice or Permit) from the following:
0200-Initial Notice
0210-PAA (Major)/Permit Application (Non-Major)
0300-Confirmation Notice
0310-Permit Application
0400-Actual Start Date
0600-Works Stop
Choice of Notice
(Checkbox)
List
This will be ticked if there is more than one notice type that can be sent. For example:
1. The street is on a permit and a NRSWA regime and an 0200/0210 needs to be picked
2. There is a choice between sending an 0300 or jumping straight to a 0400.
Promoter Org/District
(Default, Update)
List
This will default to the current users org/district as defined in My Districts – NSG0130 . This can be updated if required.
Works Reference
(Default)
This will display the Work Order Number as selected in TMA Interface -TMA3990.
Selected
(Checkbox)
This will automatically be ticked unless another user is updating the record in the TMA. This will be selected followed by
the [Send to Register] button to send the notices to the register.
This cannot be selected once the ‘Dealt With’ checkbox has been selected.
Dealt With
(Checkbox)
This will automatically be unticked unless another user is updating the record in the TMA. This will be checked
automatically once the notice has been successfully sent to the register.
Version: 4.7
132
CONFIDENTIALITY STATEMENT
The contents of this document, including system ideas and concepts, are confidential and proprietary in nature and are not to be distributed in any form
without the prior written consent of Bentley, Inc.
EXOR
MAINTENANCE MANAGER USER GUIDE
WORK ORDER MANAGEMENT
3.7.3
Work Details tab
Figure 121 - Work Details tab
Recipient Org/Dist
(Display Only)
This will display the primary recipient of the given notice type based on the USRN that the notice is for.
Note: For 0200 and 0210 notices the primary recipient of the notice is derived from the street ASD. If there are a
number of interested parties in the street, copy recipients are identified and included on the notice but not shown
on the form.
Note: For other notice types the primary and copy recipients of the opening 0200/0210 notice are identified and those
are the ones included on the notice. As before, copy recipients may be included on the notice but not shown on
the form.
Works Category
(Default)
List
For Initial notices this will display the default works category, as set up in the [Defaults] button. This can be amended if
required. if changed it will update the estimated start date field.
For other notices it is the current value from the works/phase.
Number of Phases
(Default)
Version: 4.7
133
CONFIDENTIALITY STATEMENT
The contents of this document, including system ideas and concepts, are confidential and proprietary in nature and are not to be distributed in any form
without the prior written consent of Bentley, Inc.
EXOR
MAINTENANCE MANAGER USER GUIDE
WORK ORDER MANAGEMENT
For Initial notices this will display the default value as set up in the [Defaults] button. This can be amended if required.
For other notices it is the current value from the works/phase.
Works Description
(Default)
For Initial notices this will display the maintenance manager work order description then a list of all the defects associated
with the relevant work order lines. This can be updated if required.
For other notices it is the current value from the works/phase.
Location Description
(Default)
For Initial notices this will display the location of the first work order line with a location. This can be amended if
required.
For other notices it is the current value from the works/phase.
Estimated Start Date
(Default)
The estimated start date will be displayed. This can be updated.
The system will derive the estimated start date based on the following:
1. Get the earliest repair due date from the associated work order lines (defect clearance).
If this does not exist it will use the work order target completion date.
2. Work out what the default duration is for the category of works being noticed from metadata.
An example is shown below:
Figure 122 - TMA Notice period
3. Work out the TMA notice period for the category of works/notice type being produced
For example:
If we have a value for the target date
If target date is today OR in the future then
end date = target date
start date = estimated end date minus the default duration. Ensure that start date cannot be < today.
Else if that target date < today then
estimated end date to today
Version: 4.7
134
CONFIDENTIALITY STATEMENT
The contents of this document, including system ideas and concepts, are confidential and proprietary in nature and are not to be distributed in any form
without the prior written consent of Bentley, Inc.
EXOR
MAINTENANCE MANAGER USER GUIDE
WORK ORDER MANAGEMENT
estimated start date to today
Else
start date = today
end date = start date plus the default duration.
Estimated End Date
(Default)
This will default to the earliest start date for the individual work order lines or the target date for the work order. This can
be updated.
Actual Start Date
(Default)
For Initial notices this will be null. This can be updated.
For other notices it’s the current value from the works/phase.
If that value is null and you’ve instructed TMA Interface – TMA3990 to send an Actual Start Notice then the value will
get defaulted to the estimated start date.
Actual End Date
(Default)
For Initial notices this will be null. This can be updated.
For other notices it’s the current value from the works/phase.
If that value is null and you’ve instructed TMA Interface – TMA3990 to send an Actual Start Notice then the value will
get defaulted to the estimated end date.
Estimated Insp. Units
(Default)
For Initial notices this will display the default value, as set up in the [Defaults] button. This can be amended if required.
For other notices it is the current value from the works/phase.
Actual Insp. Units
(Default)
For Initial notices this will default to null. This can be updated.
For other notices it is the current value from the works/phase.
Works Restricted
Working Hours
Parking Suspensions
Footway Closure
(Checkbox, Default)
For Initial notices this will display the default value, as set up in the [Defaults] button. This can be amended if required.
Version: 4.7
135
CONFIDENTIALITY STATEMENT
The contents of this document, including system ideas and concepts, are confidential and proprietary in nature and are not to be distributed in any form
without the prior written consent of Bentley, Inc.
EXOR
MAINTENANCE MANAGER USER GUIDE
WORK ORDER MANAGEMENT
For other notices it is the current value from the works/phase.
Notes
(Default)
Populated with relevant details as to how the estimated start/end dates are derived when the form is invoked with the
intention of sending an initial notice.
Can also contain a message about locking – should there be a locking issue.
Note: The notes do not change as you change attribution of block items i.e. they are static and a way of informing the
end user how the original values on the record were derived.
3.7.4
Contacts tab
Figure 123 - Contacts tab
Promoter Contact
(Default)
For Initial notices this will display the default value, as set up in the [Defaults] button. This can be amended if required.
For other notices it is the current value from the works/phase.
Contractor Contact
(Default)
For Initial notices this will display the default value, as set up in the [Defaults] button. This can be amended if required.
For other notices it is the current value from the works/phase.
Version: 4.7
136
CONFIDENTIALITY STATEMENT
The contents of this document, including system ideas and concepts, are confidential and proprietary in nature and are not to be distributed in any form
without the prior written consent of Bentley, Inc.
EXOR
MAINTENANCE MANAGER USER GUIDE
WORK ORDER MANAGEMENT
3.7.5
Co-ordinates tab
Figure 124 - Co-ordinates tab
Easting(X) and Northing(Y)
(Default)
For Initial notices this default to the x/y value at the start of the street.
To update the co-ordinates do the following:
1. Select the [Get from Map] button, this will take you to Locator
2. Select send multiple point to application, digitise a new line, double click the mouse to end selection
3. This will return you to the form and display the new co-ordinates.
Version: 4.7
137
CONFIDENTIALITY STATEMENT
The contents of this document, including system ideas and concepts, are confidential and proprietary in nature and are not to be distributed in any form
without the prior written consent of Bentley, Inc.
EXOR
MAINTENANCE MANAGER USER GUIDE
WORK ORDER MANAGEMENT
3.7.6
Permit Conditions tab
Figure 125 - Permit Conditions tab
On entering this tab, all checkboxes will be un-ticked and the condition text will be null.
Version: 4.7
138
CONFIDENTIALITY STATEMENT
The contents of this document, including system ideas and concepts, are confidential and proprietary in nature and are not to be distributed in any form
without the prior written consent of Bentley, Inc.
EXOR
MAINTENANCE MANAGER USER GUIDE
WORK ORDER MANAGEMENT
3.7.7
Work Order Lines tab
Figure 126 - Work Order Lines tab
Id
(Display Only)
This will display the unique system generated work order line Id.
Description
(Display Only)
This will display a concatenation of Defect Id, Defect Type, Priority and Location.
Version: 4.7
139
CONFIDENTIALITY STATEMENT
The contents of this document, including system ideas and concepts, are confidential and proprietary in nature and are not to be distributed in any form
without the prior written consent of Bentley, Inc.
EXOR
MAINTENANCE MANAGER USER GUIDE
WORK ORDER MANAGEMENT
3.7.8
Error Stack
Figure 127 - Validation Results
This works in the same way as the error stack in TMA1001. This will display the errors and warnings for the selected
notice. The highlights error will have a more descriptive text in the Additional Information window.
The errors and warnings are refreshed as the user moves from notice to notice or by the selection of the green refresh
button.
Version: 4.7
140
CONFIDENTIALITY STATEMENT
The contents of this document, including system ideas and concepts, are confidential and proprietary in nature and are not to be distributed in any form
without the prior written consent of Bentley, Inc.
EXOR
MAINTENANCE MANAGER USER GUIDE
WORK ORDER MANAGEMENT
3.7.9
Defaults button
Figure 128 - Defaults button
The [Defaults] button will display the defaults window. These defaults are set for the selected set of notices in the current
session. To permanently change the defaults for the system you will need to speak with Support because the following
table will need updating – TMA_SEND_TO_REGISTER_GATEWAYS.
The [Apply Defaults] button will cycle through all the notice records selected and update the relevant attributes with the
default values set.
Version: 4.7
141
CONFIDENTIALITY STATEMENT
The contents of this document, including system ideas and concepts, are confidential and proprietary in nature and are not to be distributed in any form
without the prior written consent of Bentley, Inc.
EXOR
MAINTENANCE MANAGER USER GUIDE
WORK ORDER MANAGEMENT
3.7.10 Send to Register button
Figure 129 - Send to Register button
The Results window is displayed when the ‘Send to Register’ button is selected.
Each selected notice will have a record displayed showing whether or not the attempt at registration was successful.
When successfully registered the ‘Dealt With’ checkbox for the notice record is ticked so it cannot be re-noticed.
The [< Back] button takes you back to the main screen.
The [Exit] button will close the form and return you to TMA Interface -TMA3990.
When a Notice is raised from a works order the register checkbox will be ticked and the register status will be set to ‘O –
Outstanding’ . The Street Works Notice can be viewed by pressing the [TMA Register] button (Figure 130).
Version: 4.7
142
CONFIDENTIALITY STATEMENT
The contents of this document, including system ideas and concepts, are confidential and proprietary in nature and are not to be distributed in any form
without the prior written consent of Bentley, Inc.
EXOR
MAINTENANCE MANAGER USER GUIDE
WORK ORDER MANAGEMENT
Figure 130 - TMA Notice
3.8
Works Order Authorisation – MAI3848
Figure 131 - Work Order Authorisation Menu Option
Version: 4.7
143
CONFIDENTIALITY STATEMENT
The contents of this document, including system ideas and concepts, are confidential and proprietary in nature and are not to be distributed in any form
without the prior written consent of Bentley, Inc.
EXOR
MAINTENANCE MANAGER USER GUIDE
WORK ORDER MANAGEMENT
Figure 132 - Work Order Authorisation
3.8.1
General Information
This form is used to authorise previously raised Works Orders. Only those Works Orders with a total cost within the
Authorisation limits set for the current User in Users – HIG1832 will be displayed. If the User has no limits set, they may
authorise any value of Works Order.
If the current User has also raised the Works Orders i.e. is the 'Originator', Product Option AUTH_OWN must be set to
'Y' in order for the same person to both Raise and Authorise a Works Order.
To view the details of a Works Order press the [Expand] button on the menu toolbar.
3.8.2
Works Order Authorisation
When you enter this form no Works Order details will be displayed. Press the [Execute Query] button to retrieve the
Works Orders to be authorised.
Note: Only those Works Orders with a total cost within the Authorisation limits set for the current User in Users –
HIG1832 will be displayed.
To select ALL of the Works Orders displayed press the Check All
button. A tick will be displayed in the check box
beside the Works Order Total Cost field. To deselect ALL Works Orders press the UnCheck All
button.
To select individual Works Orders to be authorised click in the check box of the Works Order required. A tick will be
displayed.
To authorise the selected Works Orders press the [Authorise] button.
3.8.3
Works Order Authorisation Worktray
The Work Order Authorisation Worktray is an Information Manager module that presents the user with a list of all the
raised work orders that they are responsible for by geographical area and work category (budget). The user can choose to
authorise and instruct a work order or forward it to another user’s Worktray.
When in the Worktray, the user has all the standard functions available from within Information Manager for display of
the data.
Version: 4.7
144
CONFIDENTIALITY STATEMENT
The contents of this document, including system ideas and concepts, are confidential and proprietary in nature and are not to be distributed in any form
without the prior written consent of Bentley, Inc.
EXOR
MAINTENANCE MANAGER USER GUIDE
WORK ORDER MANAGEMENT
In addition they can:
Further restrict the data displayed by road group
Drill to work order line and BOQ details
Hover on the work order number to view work order line summary
Drill from the work order number to the Navigator module to view all work order details
View the work order location on a map
View associated documents
An example of the Worktray showing ‘hover’ on the work order number is shown below
Figure 133 - Work Order Autorisation Worktray
Full details of the work order authorisation worktray can be found in the Information Manager User Guide.
Version: 4.7
145
CONFIDENTIALITY STATEMENT
The contents of this document, including system ideas and concepts, are confidential and proprietary in nature and are not to be distributed in any form
without the prior written consent of Bentley, Inc.
EXOR
MAINTENANCE MANAGER USER GUIDE
WORK ORDER MANAGEMENT
3.9
Other Works – MAI3800
Figure 134 - Other Works
3.9.1
General Information
A works order can be created for any other type of highways related work that does not involve the previous collection of
defects.
When raising an order of this type the same module is used as in raising a defect clearance works order but it is used in a
slightly different way.
When creating an order for other work the user selects the road sections the work is to be carried out on followed by the
BOQ items that will be used when carrying out the work. As this process is carried out, the various totals and sub-totals
contained on the works order are updated instantly.
The Work Orders form offers you the facility to carry out ‘what if’ planning by constructing your works order, gradually
adding and removing works order lines and schedule items until the totals match your budget before confirming the works
order and forwarding it to the contractor.
Defect clearance works order lines can also be added to works orders of this type if required, this is covered in Works
Orders (Defects).
[Copy]
This will copy the entire work order including all work order lines and associated BOQ items, the
following pop up window will be displayed allowing the user to copy the BOQ items and their
associated estimated quantities or copy the BOQ items only without the estimated quantities.
Version: 4.7
146
CONFIDENTIALITY STATEMENT
The contents of this document, including system ideas and concepts, are confidential and proprietary in nature and are not to be distributed in any form
without the prior written consent of Bentley, Inc.
EXOR
MAINTENANCE MANAGER USER GUIDE
WORK ORDER MANAGEMENT
Figure 135 - Copy Works Order pop-up
[Continue] will create new copy of the Work Order or Work Order Line.
[Cancel] will return the user to the Work Order details with no changes made.
The [Copy] button is only available on a scheme type work order. If a copy is carried out on a
work order that has combined defect and scheme lines only the scheme portion of the order is
copied
A work order can be copied at any stage of its life cycle, the copied work order will be uninstructed awaiting modification.
The copy work order will have a new number in line with the work order numbering convention
the description of the new work order will contain the number of the original order with the word
‘COPY’ appended.
Details are entered into the Work Order window in the same way as they are entered for defect clearance work orders, this
is covered in detail in Works Orders (Defects).
Version: 4.7
147
CONFIDENTIALITY STATEMENT
The contents of this document, including system ideas and concepts, are confidential and proprietary in nature and are not to be distributed in any form
without the prior written consent of Bentley, Inc.
EXOR
MAINTENANCE MANAGER USER GUIDE
WORK ORDER MANAGEMENT
3.9.2
Work Order Lines
Figure 136 - Work Order Lines
This window is displayed when the [Lines] button is selected in the Works Orders window.
It contains details of each Works Order Line selected for inclusion on the Works Order. Initially all the lines will be blank,
work order lines are added to this window following the procedure below.
If you want to remove a line from the Works Order, position the cursor on the appropriate line and press the [Delete
Record] button in the toolbar. The line and its associated schedule items will then be removed from the Works Order.
Should you want to add further lines select the [Create Record] button in the toolbar and follow the procedure below
again.
Once the Works Order has been instructed lines may not be added to the Works Order Lines, lines can however be
removed from the Works Order any time before the order is completed by selecting [Delete Record].
[Copy Line]
This will create a copy of the selected works order line and associated BOQ items,the following
pop up window will be displayed allowing the user to copy the BOQ items and their associated
estimated quantities or copy the BOQ items only without the estimated quantities.
Version: 4.7
148
CONFIDENTIALITY STATEMENT
The contents of this document, including system ideas and concepts, are confidential and proprietary in nature and are not to be distributed in any form
without the prior written consent of Bentley, Inc.
EXOR
MAINTENANCE MANAGER USER GUIDE
WORK ORDER MANAGEMENT
Figure 137 - Copy Works Order pop-up
[Continue] will create new copy of the Work Order or Work Order Line.
[Cancel] will return the user to the Work Order details with no changes made.
A work order line can only be copied if it a small scheme order.
3.9.3
Adding Other Work to an Order
The following procedure is used to add other work to a works order without the need to select defects, this facility allows
the user to create a works order for any other work that needs to be carried out.
Double click the mouse in the Road Id field, this will display the gazetteer containing the road group selected in the
Works Orders window. Only sections contained in this road group can be selected for inclusion on the works order.
1. Drill Down through the gazetteer and select the required road section.
2. Using the list of values enter the Work Category. Note that the current Budgetary position of the Work Category
can be seen be double Clicking this field .
3. Enter any Remarks required.
Select the [BOQ Items] button and add the required schedule items.
From this point on raising, updating and completing an order for other work is the same as Works Orders (Defects). This
includes full explanations of the fields in the remaining windows.
3.9.4
Completing Defects when Carrying out Other Work
If, due to the nature of the work carried out, the work on order has the effect of completing a number of defects that have
been found as a result of inspections, these defects will need completing to keep your records up to date. There are two
methods of doing this, they are as follows:
Manually.
Defects can be manually completed using the procedure described in Manually Completing a Defect in this
guide.
Automatically.
The relevant defects can be added as additional work order lines in the current 'other work' works order in the
same way as they are added to a defect clearance works order Works Orders (Defects).
Version: 4.7
149
CONFIDENTIALITY STATEMENT
The contents of this document, including system ideas and concepts, are confidential and proprietary in nature and are not to be distributed in any form
without the prior written consent of Bentley, Inc.
EXOR
MAINTENANCE MANAGER USER GUIDE
WORK ORDER MANAGEMENT
Once the defects are on the order they can each have a single rogue item with a zero rate and hence a zero cost
associated with them.
Therefore when the works order is completed all the defects will be completed without affecting the cost of the order.
3.10 Non Highways Related Works
The Works Ordering system references your road network when raising works orders. However there are occasions where
you will wish to raise a works order to carry out some work on a part of your organisation that is not related to the
network, examples of this are depot work, grounds maintenance and vehicle maintenance.
The following procedure details a method of raising a works order with the use of dummy sections, each section may be
used to represent one of your Depots.
3.10.1 Creating Dummy Sections
It is important that prior to adding dummy sections to your road network that you first discuss the implications of doing so
with your Network Manager or Systems Administrator, you may wish to discuss numbering and naming conventions so
you do not accidentally use the dummy network for anything other that it was intended.
The following procedure details a method of creating dummy sections for use in works ordering, additional road group
types, road groups and gazetteer entries can be made if required.
Each road section starts and ends with a Node, a new dummy node will need to be created for use with the dummy
sections. This is carried out using Nodes – NM0101.
Create a new dummy section, give the link and section meaningful descriptions. This is carried out using Elements –
NM0105.
Create a new road group of type TOP, this will ensure the new sections can be accessed through the gazetteer, add the
new sections to that group. This is carried out using Groups of Sections – NM0110.
A works order can now be raised against the new TOP group defined above.
Other work can now be added to the order.
Version: 4.7
150
CONFIDENTIALITY STATEMENT
The contents of this document, including system ideas and concepts, are confidential and proprietary in nature and are not to be distributed in any form
without the prior written consent of Bentley, Inc.
EXOR
MAINTENANCE MANAGER USER GUIDE
WORK ORDER MANAGEMENT
3.11 Works Orders – Contractor Interface – MAI3802
Figure 138 - Works Ordersn(Contractor) Menu Option
Figure 139 - Contractor Interface
3.11.1 General Information
This form is designed to allow the contractor to log on to the system, enter the actual values of the repair and complete the
works orders that have been issued.
Version: 4.7
151
CONFIDENTIALITY STATEMENT
The contents of this document, including system ideas and concepts, are confidential and proprietary in nature and are not to be distributed in any form
without the prior written consent of Bentley, Inc.
EXOR
MAINTENANCE MANAGER USER GUIDE
WORK ORDER MANAGEMENT
Works Orders can be built up over a period of time, therefore Works Orders will only be visible in this window under the
following conditions:
The works order has been authorised by entering initials in the Authorised by field.
The works order has been instructed by entering a date in the Date Instructed field.
3.11.2 Work Orders
When you enter this window there will be no orders visible, select [Execute Query] to retrieve all available orders.
To print the selected Works Order select the [Print] button in the menu toolbar.
To view additional information on the selected works order select the [Expand] button on the toolbar.
Gang
(Display Only)
List
This allows the selection work that has been assigned to an individual gang. This is only available in query mode when
the GANGENABLE product option is set to ‘Y’
Work Order
(Display Only)
List
The work order numbers will be displayed. List is available in query mode only.
Road Type
(Display Only)
The road type will be displayed.
Road Id
(Display Only)
The road Id will be displayed.
Date Instructed
(Display Only)
The date the order was instructed will be displayed.
Date Completed
(Display Only)
When the works order is completed the date complete will be displayed. When querying back works orders, this field can
be used to query back all orders that have not been completed using the query where facility using the following
procedure:
Select [Enter Query], enter :a in the Date Completed field.
Select [Execute Query], the query where window will be displayed.
Enter : a is null into the query where window.
Select [Execute Query] again to retrieve all works orders without a date completed.
Total Cost
(Display Only)
The total actual cost of the completed works order will be displayed.
Status
(Display Only)
The status of the order will be displayed.
Version: 4.7
152
CONFIDENTIALITY STATEMENT
The contents of this document, including system ideas and concepts, are confidential and proprietary in nature and are not to be distributed in any form
without the prior written consent of Bentley, Inc.
EXOR
MAINTENANCE MANAGER USER GUIDE
WORK ORDER MANAGEMENT
As the works order line passes through the payments cycle the status will be updated automatically. If a works order has a
combination of lines that have been paid with some being unpaid the status will be PART PAID.
Checkbox
(Optional)
When checked this will display the date, time and user Id in the ‘Date received’ field in MAI3800 allowing the contractor
to indicate that they have received and are working on the selected work order.
A number of buttons have been defined on this window for use when completing a works order, they are as follows:
[Lines]
Opens the defects window and allows the user to add works order lines. This window is also
common to both other works and cyclic maintenance works orders. (Figure 140)
[WO Detail]
Opens the defects window enabling the contractor user to complete individual lines on the
selected works order. (Figure 144)
[Flexible Attributes] Opens the maintain flexible attributes window, attribute values can be added if required.
(Figure 145)
[Programme Details] Displays the programme details window. (Figure 146)
[Standard Item Totals]
Displays the standard item totals window and shows the estimated and actual
costs and quantities for each standard item in the works order. (Figure 147)
[Complete]
Completes all works order lines on the selected order, once this button has been selected and the
date entered, no changes can be made to the works order. To make changes to the actual BOQ
amounts works order lines should be completed individually.
Version: 4.7
153
CONFIDENTIALITY STATEMENT
The contents of this document, including system ideas and concepts, are confidential and proprietary in nature and are not to be distributed in any form
without the prior written consent of Bentley, Inc.
EXOR
MAINTENANCE MANAGER USER GUIDE
WORK ORDER MANAGEMENT
3.11.3 Work Order Lines
Figure 140 - Work Order Lines
This window is displayed when the [Lines] button is selected in the Works Orders (Contractor) window.
It shows each works order line on the selected works order, if the order contains defects, full details of the defect can be
viewed by pressing the [Expand] button in the toolbar, this will display Defects – MAI3806.
This window contains a line for each works order line. Works order lines cannot be added or removed from this window.
Each works order line displays a summary of the defect information, the majority of the fields are display only.
Road Id
(Display Only)
Displays the road Id where this defect is located.
Descr
(Display Only)
Displays the full name of the road section.
Location
(Display Only)
Displays the text describing the location of the defect.
Defect Id
(Display Only)
Version: 4.7
154
CONFIDENTIALITY STATEMENT
The contents of this document, including system ideas and concepts, are confidential and proprietary in nature and are not to be distributed in any form
without the prior written consent of Bentley, Inc.
EXOR
MAINTENANCE MANAGER USER GUIDE
WORK ORDER MANAGEMENT
Displays the unique defect reference number for the defect.
Defect Type
(Display Only)
Displays the code representing the type of defect.
Defect Priority
(Display Only)
Displays the priority code for the current defect.
Schedule
(Display Only)
This field will display the cyclic maintenance schedule name.
Treatment
(Display Only)
If required, select a treatment code to rectify the current defect.
Sheet
(Display Only)
The defects work sheet number will be displayed.
Labour Units
(Display Only)
Displays the number of labour units estimated to rectify this defect. This is derived from the contract under which this
works order is being raised
Status
(Required)
List
Displays the current status of the works order line.
Initially a works order line will have a status of DRAFT.
Once the work order has been instructed and saved the work order line will become INSTRUCTED.
This status will change to COMPLETED in one of two ways, they are as follows:
1. Select the [Complete] button on the initial window, this will not allow the update of BOQ items.
2. Change the status of the works order line to COMPLETED.
Enter the completed date.
Update the dimensions in the BOQ Items window to the actual dimensions
Add any further BOQ items if required.
Save the changes
Once the changes have been saved no further changes can be made to that works order line or its BOQ items.
The following button has been defined on this window for use when completing a works order:
[BOQ Items]
Opens the BOQ Items window where BOQ items can be added to or modified on the selected
works order line.
As the works order line passes through the payments cycle the status will be updated automatically.
The product option STATVAL controls the contents of the list of values, if it is set to ‘Y’, ACTIONED can be selected
from the list of values.
Also if set to Y and the current status is ACTIONED, UNAPPROVED, INTERIM, or PART PAID then the status can be
changed to VALUATION.
Version: 4.7
155
CONFIDENTIALITY STATEMENT
The contents of this document, including system ideas and concepts, are confidential and proprietary in nature and are not to be distributed in any form
without the prior written consent of Bentley, Inc.
EXOR
MAINTENANCE MANAGER USER GUIDE
WORK ORDER MANAGEMENT
Comp Date
(Required)
If the status is changed to completed the completion date of the works order line must be entered.
Gang
(Optional)
List
Enter the Gang that was use to carry out the work.
Gangs are enabled by setting the Product Option GANGENABLE to ‘Y’
The list of values is maintained in Domains – HIG9120 and update the GANG domain
Work Cat
(Display Only)
The work category for the selected defect will be displayed.
Remarks
(Display Only)
Edit
Enter any remarks regarding the works order line will be displayed.
Act Cost
(Display Only)
This field will display the actual cost of repairing this defect. As the actual cost is only known once the defect has been
repaired and the status updated to COMPLETED or PART PAID in the case of an Interim payment, this field will initially
be blank.
Target Date
(Display Only)
This field will display the target date and time for the work order line. The date and time displayed here will depend on
how the system administrator has set the system to behave with regard to target dates. See the target date for work order
lines (Figure 96).
For information on making an Interim Payment refer to the section Completing a Works Order Line with an Interim
Payment, above.
Version: 4.7
156
CONFIDENTIALITY STATEMENT
The contents of this document, including system ideas and concepts, are confidential and proprietary in nature and are not to be distributed in any form
without the prior written consent of Bentley, Inc.
EXOR
MAINTENANCE MANAGER USER GUIDE
WORK ORDER MANAGEMENT
Figure 141 - BOQ Items
3.11.4 BOQ Items
This window is displayed when the [BOQ Items] button is pressed in the Work Order Lines window.
The BOQ items cannot be changed to reflect the actual values until the status of the line has been updated to
COMPLETED and the completed date added or in the case of an Interim Payment, the status code is changed to
VALUATION.
For information on making an Interim Payment on a Works Order Line refer to the section Completing a Works Order
Line with an Interim Payment, above.
Should you want to add further items, press the [Create Record] button in the toolbar. This will enable you to add a new
item.
Note:
1. To avoid problems the [Save] button should be used when each BOQ item has been added.
2. Once the work order has been instructed, if the wrong BOQ has been entered or the band has changed prior to the
entry of the actual values the incorrect BOQ item should be zeroed (it cannot be deleted as it has been used in the
definition of the estimated values) before entering the correct item.
For information on adding a Percentage Item to a BOQ refer to the section Adding a Percentage Item – Page 109, above.
Item Code
(Required)
List
Select a valid standard job item to represent a task to be carried out.
Version: 4.7
157
CONFIDENTIALITY STATEMENT
The contents of this document, including system ideas and concepts, are confidential and proprietary in nature and are not to be distributed in any form
without the prior written consent of Bentley, Inc.
EXOR
MAINTENANCE MANAGER USER GUIDE
WORK ORDER MANAGEMENT
Any items added must exist on the selected contract.
Description
(Display Only)
Displays the description of the standard job item.
Dim 1/Dim2/Dim3
(Required or Optional)
Each standard job item can have one or more dimensions associated with it, depending on the nature of the work
represented by the job item. For example, replacing damaged kerbing will have a single dimension representing the length
of kerbing to be replaced, whilst filling a pothole may have three dimensions representing the length, width and depth of
the pothole to be filled. Consequently, these three dimension fields are Required or Optional according to the needs of the
job in question.
Note that the message line will display a message explaining what unit of measurement should be used for each dimension
field. This message will be of the form ‘Enter the Length’.
Quantity
(Display Only)
Displays the calculated quantity of work based on the dimensions supplied in the previous fields. The unit of this field is
displayed in the Unit field described below.
Unit
(Display Only)
Displays the unit of measurement of this job item. This unit relates to the Total Qty field described above.
Rate
(Display Only)
Displays the rate per unit for this work item as held on the contract under which this works order is being created
Cost
(Display Only)
The actual cost will be displayed.
Additional BOQ details can be viewed for each item by selecting the [Expand] button from the toolbar.
%
(Check Box)
If this item is to attract a percentage increase or decrease using a Percentage Item tick this box. Note that only Standard
Job Items which have the 'Allow Percentage Flag?' flag set to 'Y' in Standard Items – MAI3888 can have a Percentage
Item associated with them. For information on adding Percentage Items to a Works Order line refer to the section Adding
a Percentage Item – Page109, above.
BOQ Uplift Item
(Display Only)
The % BOQ uplift item used for all boq items that require a % uplift will be displayed.
WOL Uplift Item
(Display Only)
The Work Order Line uplift item for the selected work order line will be displayed
3.11.5 Completing a Works Order
When completing a works order it is possible to update the schedule items to reflect the actual cost of repairing the defect.
Version: 4.7
158
CONFIDENTIALITY STATEMENT
The contents of this document, including system ideas and concepts, are confidential and proprietary in nature and are not to be distributed in any form
without the prior written consent of Bentley, Inc.
EXOR
MAINTENANCE MANAGER USER GUIDE
WORK ORDER MANAGEMENT
For information on making an Interim Payment refer to the section Making an Interim Payment above.
To enter the actual cost of repairing the defect and Complete the Works Order Line follow the procedure below:
Change the status of the works order line to COMPLETED.
Enter the completed date.
Update the dimensions in the BOQ Items window to the actual dimensions
Add any further BOQ items if required.
Note:
To avoid problems the [Save] button should be used when each BOQ item has been added.
Once the work order has been instructed, if the wrong BOQ has been entered or the band has changed prior to the
entry of the actual values the incorrect BOQ item should be zeroed (it cannot be deleted as it has been used in the
definition of the estimated values) before entering the correct item.
Save the changes
Once the changes have been saved no further changes can be made to that works order line or its BOQ items. Once all
works order lines are completed the works order will be completed.
3.11.6 BOQ Details
Figure 142 - BOQ Details
This window can be called by pressing the [Expand] button in the menu toolbar when a BOQ item is selected.
It is useful when entering quantities because if the items are banded, this window will show the minimum and maximum
allowed values.
Version: 4.7
159
CONFIDENTIALITY STATEMENT
The contents of this document, including system ideas and concepts, are confidential and proprietary in nature and are not to be distributed in any form
without the prior written consent of Bentley, Inc.
EXOR
MAINTENANCE MANAGER USER GUIDE
WORK ORDER MANAGEMENT
Details of the estimated and actual values are also displayed. If the Works Order Line on which the selected BOQ item is
on, is part of an Interim Payment the Last Valuation cost, Status and the Date the Valuation was entered or the payment
made will be displayed.
When entering a Valuation for an Interim Payment the Minimum Quantity limit for the Standard Item is overridden, but
the Maximum Quantity limit is retained.
Select [Cancel] to return to the BOQ Items window
3.11.7 Invoices
Figure 143 - Invoices
Once a Works Order Line or Part of a Works Order Line, in the case of an Interim payment, has been included in payment
run the Invoice details can be displayed by pressing the [Invoices] button on the Works Order Line window.
The Payment Id, Payment Value and Date Paid will be displayed. To add the Invoice number, click in the 'Invoice field'
and enter the appropriate value. Press [Save] on the menu toolbar to save the changes.
If the Works Order Line has had a number of Interim Payments made against it, this is a good way to track the payments
made to date.
Press the [Close] button to return to the Works Order Line window.
Version: 4.7
160
CONFIDENTIALITY STATEMENT
The contents of this document, including system ideas and concepts, are confidential and proprietary in nature and are not to be distributed in any form
without the prior written consent of Bentley, Inc.
EXOR
MAINTENANCE MANAGER USER GUIDE
WORK ORDER MANAGEMENT
3.11.8 Works Order Details
Figure 144 - Work Order Details
This window is displayed when the [WO Details] button is selected in the Works Orders (Contractor) window.
All the information in this window is for information only.
Select [Cancel] to return to the Contractor Interface window.
Version: 4.7
161
CONFIDENTIALITY STATEMENT
The contents of this document, including system ideas and concepts, are confidential and proprietary in nature and are not to be distributed in any form
without the prior written consent of Bentley, Inc.
EXOR
MAINTENANCE MANAGER USER GUIDE
WORK ORDER MANAGEMENT
3.11.9 Flexible Attributes
Figure 145 - Flexible Attributes
Each different type of work order may potentially require a different set of information to be held against it. To facilitate
this the work order flexible attributes can be linked to individual scheme type.
This allows the customer to define a set of attributes that are specific for a small scheme work order and another set
specific for cyclic work orders. The attributes are based on scheme type.
The flexible attributes are set up using the standard asset meta model module by defining a special type of asset record,
this asset record is then linked to the appropriate scheme type using Application Attributes – MAI3819.
The Attributes part of the form will display the flexible attributes of the asset metamodel mapped to the scheme type used
in the work order. Attribute values can be added or modified.
Version: 4.7
162
CONFIDENTIALITY STATEMENT
The contents of this document, including system ideas and concepts, are confidential and proprietary in nature and are not to be distributed in any form
without the prior written consent of Bentley, Inc.
EXOR
MAINTENANCE MANAGER USER GUIDE
WORK ORDER MANAGEMENT
3.11.10Programme Details
Figure 146 - Programme Details
This window is displayed when the [Programme Details] button is selected in the Works Orders (Contractors) window.
All the information in this window is for information only.
Select [Continue] to return to the Works Orders (Contractors) window.
Version: 4.7
163
CONFIDENTIALITY STATEMENT
The contents of this document, including system ideas and concepts, are confidential and proprietary in nature and are not to be distributed in any form
without the prior written consent of Bentley, Inc.
EXOR
MAINTENANCE MANAGER USER GUIDE
WORK ORDER MANAGEMENT
3.11.11Standard Item Totals
Figure 147 - Stamdard Items
This window is displayed when the [Standard Item Totals] button is selected in the Works Orders (Contractor) window.
It is a display only window, which shows all of the Standard Items currently on this Works Order, as well as the total
quantities and costs, both estimated and actual, across the whole works order.
Note that the ‘Actual’ fields are only displayed after a works order line has been completed or an Interim payment made
and will, therefore, initially be empty.
If the contractor has added additional items to the order the estimated values will be empty with the actual values being
populated.
Select [Cancel] to return to the Works Orders (Contractor) window.
Version: 4.7
164
CONFIDENTIALITY STATEMENT
The contents of this document, including system ideas and concepts, are confidential and proprietary in nature and are not to be distributed in any form
without the prior written consent of Bentley, Inc.
EXOR
MAINTENANCE MANAGER USER GUIDE
WORK ORDER MANAGEMENT
3.12 Works Order (Cyclic) – MAI3800a
Figure 148 - Work Order (Cyclic) Menu Option
Figure 149 - Work Order (Cyclic)
Version: 4.7
165
CONFIDENTIALITY STATEMENT
The contents of this document, including system ideas and concepts, are confidential and proprietary in nature and are not to be distributed in any form
without the prior written consent of Bentley, Inc.
EXOR
MAINTENANCE MANAGER USER GUIDE
WORK ORDER MANAGEMENT
3.12.1 General Information
The cyclic maintenance system allows regular maintenance to be predefined by means of a schedule. This schedule is set
up via the Cyclic Maintenance Schedules – MAI3860, and defines the standard job items that will make up the regular
maintenance work, along with the quantities and costs of those job items.
When creating a cyclic works order, you select the cyclic maintenance schedule to be used and the software will generate
all of the works order lines and associated Bills of Quantities. At this point you can amend these job items, adding new
ones or removing existing items. As this process is carried out, the various totals and sub-totals contained on the works
order are updated instantly.
The Work Order (Cyclic) – MAI3800 form offers you the facility to carry out ‘what if’ planning by constructing your
works order, gradually adding and removing works order lines until the totals match your budget before confirming the
works order and forwarding it to the contractor.
Once a Works Order has been instructed, further Works Order lines may not be added to the Works Order unless Product
Option ADDINSTR is set to 'Y'. Defects can however be removed from the Works Order any time before the order is
completed.
Once a Works Order has been printed using Print BOQ Work Order – MAI3906, further Defects or Works Order lines
that have no associated Defects may not be added to the Works Order unless Product Option ADDPRINT is set to 'Y'.
Changes made to a Works Order, its associated Work Order lines or Bill of Quantity Items may be view using the Audit
facility within a Works Order. The Audit window may be called by pressing the [Expand] button on the main Works
Ordering form.
It is possible to define what items in a Works Order are to be Audited by selecting the required fields using form Works
Order Audit Maintenance – MAI3803.
The size of the Audit log trail can be restricted by setting Product Option AUDIT_ALL to 'N'. If this option is set to 'N',
only the initial and final values of a field are recorded in the Audit trail, per session per User and any intermediate changes
are not be logged.
If Product Option AUDIT_ALL is set to 'Y' then all interim (changes between saving) changes to the selected fields are
logged. It should be noted that for some Works Orders, the audit trail could be very large if this option is set to 'Y'.
3.12.2 Work Order
When you enter this window, the cursor sits in the Work Order description field waiting for you to enter a new works
order. If you wish to retrieve an existing works order, press [Enter Query], enter your selection criteria, then press
[Execute Query] to retrieve the works order.
Whilst in this window, you can view the Work Order Audit details by pressing the [Expand] button in the toolbar at any
time.
Work Order
(Required)
List
The method of works order number generation is set up in Product Options – HIG9130, setting the WORREFGEN option.
There are three methods of generating the works order number.
1. Manually entered by the user, the system will check the number is unique.
2. Contract Based, the contract name will prefix a unique number
3. Admin unit based, the admin unit number for the selected contract will prefix a unique number.
A list of existing works orders is only available in query mode.
When creating new Works Orders enter a description of the order in the adjacent field.
Version: 4.7
166
CONFIDENTIALITY STATEMENT
The contents of this document, including system ideas and concepts, are confidential and proprietary in nature and are not to be distributed in any form
without the prior written consent of Bentley, Inc.
EXOR
MAINTENANCE MANAGER USER GUIDE
WORK ORDER MANAGEMENT
Interim Payment?
(Optional)
Enter 'Y' to signify that the Works Order will be subject to Interim Payments on Part Completed Works Order lines. This
may be entered at any time during the life of the Works Order.
Priority
(Optional)
List
Enter a Priority for the Works Order. These will have been previously set up using Work Order Priorities – MAI0312 In
addition the contents of the WOR_PRIORITY list of values, maintained using Domains – HIG9120, will be concatenated
onto the list, this is to cater for backward compatibility. This will automatically populate the Target Date field below.
Road Type
(Required)
List
Select the road type for the works order.
If budgets are to be used the road type must match the road types set in the Product Options – HIG9130, for DoT roads –
BUDGRPTYPD, for Local roads – BUDGRPTYPL.
Road Id
(Required)
List
When <List> is selected only groups of the type entered in the previous field will be displayed, make your selection from
this list without drilling down through the gazetteer.
Scheme Type
(Required, Default)
List
Select the scheme type under which this work will be carried out.
Some restrictions will apply based on the values set using Item Code Breakdowns – MAI194 (Maintenance Manager
System Administration Manual), they are as follows:
The options available on the list will be restricted to whether the road selected is DoT or Locally owned.
The scheme type selected will restrict the work categories available when raising the order.
The scheme type cannot be changed if works order lines are present on the works order.
The product option DEFSCHTYPU must be set to ‘Y’ if the user is allowed to update the default scheme type.
The scheme type will affect the flexible attributed returned when the [Flexible Attributes] button is selected. The flexible
attributes for each scheme type are defined by the System Administrator using Application Attributes – MAI3819
Register
(Optional)
Checkbox
If all the contents of this works order are to be notified to street works this check box will need to be checked. Once
checked the Register Status field will become populated and the [TMA Interface] button will become active. Any work
order lines subsequently added to the work order will have to be ticked manually. If unchecked, all work order lines that
have not had a notice generated will be deselected.
Register Status
(Display Only)
This field will display the current register status of the works order lines.
Current statuses are:
N – Nothing to Register – One or more works order lines have been ticked as Registerable but no notices have
been sent for any of them.
Version: 4.7
167
CONFIDENTIALITY STATEMENT
The contents of this document, including system ideas and concepts, are confidential and proprietary in nature and are not to be distributed in any form
without the prior written consent of Bentley, Inc.
EXOR
MAINTENANCE MANAGER USER GUIDE
WORK ORDER MANAGEMENT
O – Outstanding – one or more of the works order lines have been ticked as Registerable and at least one notice
has been sent for at least one of them. Only work order lines that have a status of INSTRUCTED can be sent to
the register.
C – Complete – All work order lines that have been ticked as Registerable have had a ‘0600’ notice sent. At this
point the [View Register] button will be displayed.
The Refresh button will refresh the status in the active form. The status will be automatically refreshed when the
work order is re-queried.
Status
(Display Only)
This field will display a status code derived from the various status codes of the work order lines to indicate the overall
status of the work order.
Status codes can be viewed in form Status Codes – HIG9110. Work Order Status codes control the work ordering
processes and should not be added to or modified without direct consultation with exor.
Contract
(Required)
List
Select a valid contract under which this work will be carried out. Contracts are set up using Contracts – MAI3880.
(Maintenance Manager Administration Manual)
If you have set up a dummy contract using Product Options – HIG9130 and setting the DUMCONCODE option, this
contract can be selected, this will allow you to fully define the work order before assigning it to a contract. Once you
have specified the relevant Bill of Quantity items for this work order, press the [Contract Totals] button to view a list of
suitable contracts.
If product Option WORREFGEN is set to either 'C' for 'Contract Based' Works Order Reference Number generation or 'A'
for Administration Unit Works Order Reference Number Generation and the initial Contract selected is changed, the
Works Order will Cancelled and an exact copy made with the new reference number being generated. The Works Order
will have '**Cancelled**' appended to the start of it's description.
Contractor
(Display Only)
The code and name for the contractor will be displayed. This is obtained from the contract details.
Contact
(Optional)
Enter a contact name if required.
Contractor Score
(Optional)
If required, enter a score to represent the performance of the contractor in fulfilling this works order. This can only be
entered when the works order is complete.
Originator
(Required, Default)
List
Select a valid person ID to represent the originator of the contract. Default is the current user.
To be Authorised By
(Optional)
List
When creating a work order the user may nominate another user who should authorise the current work order.
Version: 4.7
168
CONFIDENTIALITY STATEMENT
The contents of this document, including system ideas and concepts, are confidential and proprietary in nature and are not to be distributed in any form
without the prior written consent of Bentley, Inc.
EXOR
MAINTENANCE MANAGER USER GUIDE
WORK ORDER MANAGEMENT
This field will only accept the initials of a user that can view and authorize a work order, this picklist will be populated
with those users that have been given the permission to authorise a work order by the System Administrator using
Maintenance Manager User Data – MAI4410.
Population of this field does not restrict this work order to be authorised by the selected user, it may be authorised by any
user that has the permission to authorise a work order.
Authorised By
(Optional)
List
Only the current User Initials are allowed to be entered in this field. If the current user has also raised the Works Order i.e.
is the 'Originator', Product Option AUTH_OWN must be set to 'Y' in order for the same person to both Raise and
Authorise a Works Order. To Authorise a Works Order its total estimated cost must be within the range defined for the
User in Users – HIG1832. If the User has no limits set, they may authorise any value of Works Order.
Works Orders may be individually using this field or in batches using form Works Order Authorisation – MAI3848.
Cost Centre
(Optional)
List
These codes are maintained using Cost Centre Codes –MAI3844 (Maintenance Manager Administration Manual)
Job Number
(Required, Default)
List
If required, enter the job number for this works order. This field defaults to 00000.
Remarks
(Optional)
Edit
If required, enter any additional remarks relating to the completed works order. This can only be entered when the works
order is complete.
Date Raised
(Required, Default)
Enter the date upon which the works order was raised. This field defaults to the current date. An earlier date may be
entered for retrospective works orders.
Target Complete
(Optional)
This is the target date for all the works contained within the work order.
This may be automatically populated based on the Date Raised and the Work Order Priority. If the product option
UPDWOTGT has been set to ‘Y’ the user may update this date manually.
Date Authorised
(Optional)
This is populated with the system date/time when the Works Order is Authorised via
The Works Order form – MAI3800, [Authorise] or [Instruct] button
The Work Orders Authorisation form – MAI3848
The Works Order Work Tray
When this field is populated following the selection of the [Authorise] button a pop up window will be displayed allowing
the user to enter a date before the sysdate enabling the authorisation of a retrospective work order.
When this field is populated following the selection of the [Instruct] button the date will be the same date as the instructed
date, this also allows the user to enter a date prior to the sysdate for the creation of retrospective work orders.
Note:
Version: 4.7
169
CONFIDENTIALITY STATEMENT
The contents of this document, including system ideas and concepts, are confidential and proprietary in nature and are not to be distributed in any form
without the prior written consent of Bentley, Inc.
EXOR
MAINTENANCE MANAGER USER GUIDE
WORK ORDER MANAGEMENT
When the User attempts to Authorise a Works Order this date field is used to determine the total value of Works
Orders already Authorised by the User on the same day.
If the value of the current Works Order would lead to the User’s Daily Authorisation Limit (see the “Max value per
Day” field in Maintenance Manager User Data – MAI4410) being exceeded an error will be displayed and the current
Works Order will not be Authorised
Date Instructed
(Optional)
When the works order has been completely defined and you are ready to issue it to the contractor, set the Date Instructed
to the current date by pressing the [Instruct] button on the form. When the Work Order is instructed this button will be
used to [Complete] a Works Order. When building the works order, leave this field blank.
All works order lines must be priced before the order can be instructed.
When the [Instruct] button is selected the following pop up window is displayed allowing the user to enter a date that is
prior to the sysdate enabling the creation of retrospective work orders.
Figure 150 - Instruct pop-up
[Continue]
will Instruct the work order at the displayed date and time.
[Cancel]
will return the user to the Work Order details with no changes made.
A works order must have a date instructed if the contractor is to view the order using Works Orders – Contractor Interface
– MAI3802 and for the work order to be picked up by the CIM interface.
Last Printed
(Display Only)
When the works order is printed, the date of printing is displayed here. If the works order is reprinted at any time, this
field is updated to reflect the last printing date. This field is part of the works ordering audit trail so each time it is printed
an audit is maintained.
Once a works order has been printed changes to the works order lines are not allowed unless the Product Option
ADDPRINT is set to ‘Y’.
Version: 4.7
170
CONFIDENTIALITY STATEMENT
The contents of this document, including system ideas and concepts, are confidential and proprietary in nature and are not to be distributed in any form
without the prior written consent of Bentley, Inc.
EXOR
MAINTENANCE MANAGER USER GUIDE
WORK ORDER MANAGEMENT
Date Received
(Display Only)
When a contractor accesses the works order using Works Orders – Contractor Interface – MAI3802 this date will be
populated, the id of the user who viewed the work order displayed in the adjacent field.
Date Completed
(Display Only)
When all of the lines on the works order are completed, this field will display the date of completion. Once the works
order is completed and saved, no further changes can be made to the works order.
To complete a works order without completing each individual line select the [Complete] button. This will set all the
BOQ Actual values equal to the current estimated values.
To complete a works order by completing each line individually, the User can change the individual line to completed
manually and enter a date in the next field. At this point changes can be made to the actual values of the BOQ items, these
changes must be made before saving the changes.
Rechargeable
(Optional)
Enter either ‘Y’ or ‘N’ to indicate if some or all or this work order is rechargeable.
Cost Recharged
(Optional)
When a rechargeable defect has been rectified and the works order completed, it is possible to recharge an amount of
money to the contractor. If required, enter that amount here.
Estimates, Sub Total
(Display Only)
As the works order is being compiled, each works order line is costed up based on the current rates for the job items held
against the contract. This figure does not take into account any discount arrangements in place with the contractor.
Estimates, Balancing Sum
(Display Only)
If the contractor to which this works order has been assigned uses Discount Groups – MAI3624 (Maintenance Manager
Administration Manual), then a percentage discount is applied to the total estimated works order cost. The pre-discount
total is displayed in the Sub-Total field above. The balancing sum field contains the calculated value of the discount.
Estimates, Total Cost
(Display Only)
This field contains the sum of the Estimated Sub-Total and Estimated Balancing Sum fields above. If the contractor has
no discount groups in place, then the Sub-Total and Total Cost fields will be the same. If a discount group structure is in
place, then this field will show the works order cost after the discount has been applied.
Estimates, Labour Units
(Display Only)
If labour units have been entered in Standard Items – MAI3888 the total labour requirements for carrying out the work
will be displayed here.
Actuals, Sub Total
(Display Only)
As the works order is being completed, the actual works order line values are accumulated into this field. This figure does
not take into account any discount arrangements in place with the contractor.
Actuals, Balancing Sum (Display Only)
Version: 4.7
171
CONFIDENTIALITY STATEMENT
The contents of this document, including system ideas and concepts, are confidential and proprietary in nature and are not to be distributed in any form
without the prior written consent of Bentley, Inc.
EXOR
MAINTENANCE MANAGER USER GUIDE
WORK ORDER MANAGEMENT
If the contractor to which this works order has been assigned uses Discount Groups – MAI3624 (Maintenance Manager
Administration Manual), then a percentage discount is applied to the total actual works order cost as displayed in the field
above. The pre-discount total is displayed in the Sub-Total field above. The balancing sum field contains the calculated
value of the discount.
Actuals, Total Cost
(Display Only)
This field contains the sum of the Actual Sub-Total and Actual Balancing Sum fields above. If the contractor has no
discount groups in place, then the Sub-Total and Total Cost fields will be the same. If a discount group structure is in
place, then this field will show the works order cost after the discount has been applied.
Figure 151 - Work Order Content Summary
These three fields are displayed at the bottom of the main works order window and indicate the number and type of work
order lines that are contained within the work order.
A number of buttons have been defined on this window for use when raising a works order, they are as follows:
[Schedules]
Opens the Schedules window and allows the user to add works order lines.
[Standard Item Totals]
Opens the standard item totals window and displays the estimated and actual
costs and quantities for each standard item in the works order.
[Contract Totals]
Opens the contract totals window and displays all contracts that can fulfill the work
contained on the works order with associated costs and scores.
An alternative contract can now be selected if required.
[Additional Details] Opens the additional details window, additional additional details can be added if
required.
[Flexible Attributes] Opens the maintain flexible attributes window, attribute values can be added if required.
(Figure 110)
[Navigator]
Opens Navigator which allows the user to view and retrieve data associated a work order, an
example of this is shown below: Details on the use of navigator can be found in the Query
Builder and Navigator User Manual.
Version: 4.7
172
CONFIDENTIALITY STATEMENT
The contents of this document, including system ideas and concepts, are confidential and proprietary in nature and are not to be distributed in any form
without the prior written consent of Bentley, Inc.
EXOR
MAINTENANCE MANAGER USER GUIDE
WORK ORDER MANAGEMENT
Figure 152 - Navigator
[Notice Summary]
This button is enabled if the TMA product is licensed and one or more notices have been
sent for the work order. The Work Order TMA Interface – TMA3990 will be called and opened at
the ‘Work Order Lines’ tab.
[TMA Interface]
This button is enabled if the TMA product is licensed and one or more work order lines
are ticked as ‘Registerable’. The Work Order TMA Interface – TMA3990 will be called and
opened at the ‘TMA Noticing’ tab.
[TMA Register]
This button is enabled if the TMA product is licensed and one or more notices
have been sent for the work order. The Works – TMA1000 will be called which will display the
TMA Works that have been created for the work order.
[SWM Register]
The SWM works entries in the street works register can be viewed using this button
(Figure 130).
[Copy]
Copy work order is intended for use on small scheme work orders.
[Print]
Prints the instructed works order, the format of the printout is set up in Product Options –
HIG9130 and setting the WORREPMOD option to the required works ordering report.
Once a works order has been printed changes to the works order lines are not allowed unless the
Product Option ADDPRINT is set to ‘Y’
Version: 4.7
173
CONFIDENTIALITY STATEMENT
The contents of this document, including system ideas and concepts, are confidential and proprietary in nature and are not to be distributed in any form
without the prior written consent of Bentley, Inc.
EXOR
MAINTENANCE MANAGER USER GUIDE
WORK ORDER MANAGEMENT
[Authorise]
Sets the Date Authorised to today's date and time (sysdate). When this button is selected a pop up
window is displayed allowing the user to enter a date that is prior to the sysdate enabling the
creation of retrospective work orders.
Note:
A user will only be able to authorise a work order if they have been given the appropriate permission by the system
administrator using Maintenance Manager User Data – MAI4410
When the User attempts to Authorise a Works Order the Date Authorised field is used to determine the total value of
Works Orders already Authorised by the User on the same day.
If the value of the current Works Order would lead to the User’s Daily Authorisation Limit (see the “Max value per
Day” field in Maintenance Manager User Data – MAI4410) being exceeded an error will be displayed and the current
Works Order will not be Authorised
[Instruct]
When this button is selected a pop up window is displayed containing the current date and time
(sysdate), this allows the user to enter a date that is prior to the sysdate enabling the creation of
retrospective work orders.
If the work order has not been authorised this will also authorise the work order provided the user
has the appropriate permissions (see the [Authorise] button for details).
Once the 'Date Instructed' has been saved, the button will change to read [Complete].
Work order lines can be added to an instructed works order if the Product Option ADDINSTR is
set to ‘Y’.
[Complete]
Completes all works order lines, once this button has been selected and the date entered, no
changes can be made to the works order.
To make changes to the actual BOQ values, Works Order lines should be completed individually
using the following process:
1: Change the work order line status code to COMPLETE.
2: Update all the BOQ items for the work order lines to reflect the actual values.
3: Save the changes.
Version: 4.7
174
CONFIDENTIALITY STATEMENT
The contents of this document, including system ideas and concepts, are confidential and proprietary in nature and are not to be distributed in any form
without the prior written consent of Bentley, Inc.
EXOR
MAINTENANCE MANAGER USER GUIDE
WORK ORDER MANAGEMENT
3.12.3 Schedules
Figure 153 - Schedules
When this window is first displayed it will be blank, select the [Select Schedules] button to retrieve the required schedule.
It holds details of each of the cyclic maintenance tasks selected for inclusion on the works order. Each of these tasks is
known as a ‘Work Order Line’.
Initially, this block will contain a line for each of the road sections within the selected group. If the "By Asset" flag set to
'Y' in the Cyclic Maintenance By Road Section Form - MAI3862 a work order line will be displayed for each asset.
If you want to remove a section from the works order, position the cursor on the appropriate line and press [Delete
Record] in the toolbar.
Pressing the [Expand] button whilst on a works order line will display View Cyclic Maintenance Work.
Once a Works Order has been instructed, Works Order lines may not be added to the Works Order unless Product Option
ADDINSTR is set to 'Y'.
Once a Works Order has been printed using Print BOQ Work Order – MAI3906, further Works Order lines may not be
added to the Works Order unless Product Option ADDPRINT is set to 'Y'.
Identifier
(Display Only)
Displays the road part/section ID where this work is located.
Version: 4.7
175
CONFIDENTIALITY STATEMENT
The contents of this document, including system ideas and concepts, are confidential and proprietary in nature and are not to be distributed in any form
without the prior written consent of Bentley, Inc.
EXOR
MAINTENANCE MANAGER USER GUIDE
WORK ORDER MANAGEMENT
Descr
(Display Only)
Displays the full name of the road section.
Location
This field will always be blank when dealing with cyclic works order lines.
Remarks
(Display Only)
Enter any remarks regarding the works order line prior to completing the works order line.
WOL Id
(Display Only)
Displays the work order lines internal Id number.
Defect Id
This field will always be blank when dealing with cyclic works order lines.
Defect Type
This field will always be blank when dealing with cyclic works order lines.
Defect Priority
This field will always be blank when dealing with cyclic works order lines.
Asset Ref
(Display Only)
If this work order is as a result of a schedule where the "By Asset" flag set to 'Y' in the Cyclic Maintenance By Road
Section Form - MAI3862 the Asset Ref will be displayed.
Asset Id
(Display Only)
If this work order is as a result of a schedule where the "By Asset" flag set to 'Y' in the Cyclic Maintenance By Road
Section Form - MAI3862 the Asset Id will be displayed.
Treatment
This field will always be blank when dealing with cyclic works order lines.
Sheet
This field will always be blank when dealing with cyclic works order lines.
Lab Units
(Display Only)
Displays the number of labour units estimated to rectify this defect. This is derived from the contract under which this
works order is being raised. If the Labour Units field is blank, check that the current job item appears on the contract.
Schedule
(Display Only)
This field will display the cyclic maintenance schedule number.
Version: 4.7
176
CONFIDENTIALITY STATEMENT
The contents of this document, including system ideas and concepts, are confidential and proprietary in nature and are not to be distributed in any form
without the prior written consent of Bentley, Inc.
EXOR
MAINTENANCE MANAGER USER GUIDE
WORK ORDER MANAGEMENT
Status
(Display Only)
List
Displays the current status of the works order line.
For more information on status codes please refer to the section Defect Status Codes in this manual.
Initially a works order line will have a status of DRAFT.
Once the work order has been instructed and saved the work order line will become INSTRUCTED.
As work on the Works Order Line progress's this Status will be changed either by the User, in the case of Interim
Payments or automatically by the system as is the case when a Works Order line is included on a Payment Run.
Note: When updating the status code you must select [Tab] to move to the next field before entering any further data.
Note: Any new work order lines added to a work order that is instructed will have the status of INSTRUCTED.
Completed
(Optional)
Enter the completion date of the works order line.
Est Cost
(Display Only)
This field displays the estimated cost of the repair. This cost is calculated from the contract rates.
Note that if this field is blank there is no rate on the current contract for this job item and, therefore, the system is unable
to calculate the cost of the job item and the works order can not be instructed.
Gang
(Required)
If Gang Allocation has been used to allocate a gang to the repair of this defect the gang id will be displayed.
Work Cat
(Required)
The work category for the selected work will be displayed. If budgets are being used a commitment will be made against
this Item code. The current position of the Budget can be displayed by double clicking this field as shown below. The
current value of work committed, the actual value of work carried and the overall balance will be displayed for each
Budget. The Upper Limit of the Budget will also be displayed.
Figure 154 - Work Category
Repaired
(Display Only)
The date and time of the defect repair will be displayed..
Act Cost
(Display Only)
Version: 4.7
177
CONFIDENTIALITY STATEMENT
The contents of this document, including system ideas and concepts, are confidential and proprietary in nature and are not to be distributed in any form
without the prior written consent of Bentley, Inc.
EXOR
MAINTENANCE MANAGER USER GUIDE
WORK ORDER MANAGEMENT
This field will display the actual cost of carrying out the work. As the actual cost is only known once the defect has been
repaired and the Status updated to COMPLETED, or an Interim Payment has been made and the Status updated to PARTPAID this field will initially be blank.
Invoice
(Display Only)
This is a payment Invoice flag used within the Financial Payment process. Valid values are:
Null
No invoices have been processed or the status is instructed.
O At least one outstanding records remains in the payments table
H At least one held record remains in the payments table
B Both held and outstanding records remain in the payments table
A Only approved records remain in the payments table
Once a Works Order Line has been included in a Payment Run the Invoice details can be viewed by pressing the [Invoice]
button on the window.
Once the changes have been saved no further changes can be made to that works order line.
Registerable
(Checkbox)
This tick box is used to indicate whether an individual line should be registered with TMA. If this is checked the
‘Registerable’ tick box at the work order level will be updated automatically (if not already checked).
Register Status
(Display Only)
This Line level Register Status field indicates the Noticing Status of the individual work order line. The status of this field
depends on the following logic:
Nothing Registered – The WOL has been ticked as ‘Registerable’ but no Notices have been sent for it.
Outstanding – The WOL has been ticked as ‘Registerable’ and at least one Notice has been sent for it but not a
0600 – Works Stop Notice.
Completed – The WOL has been ticked as ‘Registerable’ and a 0600 – Works Stop Notice has been sent.
Once a Works Order Line has been included in a Payment Run the Invoice details can be viewed by pressing the [Invoice]
button on the window.
Target Date
(Required)
The target date for the work order line can be entered manually for non defect clearance work orders. The target dates for
the individual work order lines will affect the overall work order Target Date.
A number of buttons have been defined on this window for use when raising a works order, they are as follows:
[BOQ Items]
Opens the BOQ Items window where BOQ items can be added to or removed from the selected
works order line. (Figure 156)
[Select Schedules]
Opens the Selection Criteria window and allows the user to select the schedules that are
to be included on the works order. (Figure 155)
[View Notices] This button is enabled when one or more streetwork notices have been sent for the currently
selected work order line. The Work Order TMA Interface – TMA3990 is called in read only
mode and is navigated to the Work Order Lines tab. (Figure 73)
Version: 4.7
178
CONFIDENTIALITY STATEMENT
The contents of this document, including system ideas and concepts, are confidential and proprietary in nature and are not to be distributed in any form
without the prior written consent of Bentley, Inc.
EXOR
MAINTENANCE MANAGER USER GUIDE
WORK ORDER MANAGEMENT
[TMA Interface]
This button is enabled when one or more work order lines are ticked as Registerable. The
Work Order TMA Interface – TMA3990 is called and is navigated to the TMA Noticing tab (this
is the same functionality as the Work Order level [TMA Interface] button). (Figure 72)
[Get From Map]
This button is enabled when the WOL Id is populated and the Work Order Line status is
not COMPLETE. Locator – NM0572 is called to allow the user to digitise a new location or
shape for the defect or work order. This will give the user the option to enter a point, polyline or
polygon that better represents the location and the shape of the work to be carried out on the
selected work order line. (Figure 36)
[Invoices]
This will display any interim payment invoices that apply to this work order line. (Figure 169)
[Copy Line]
This will create a copy of the selected works order line and associated BOQ items, all copied
BOQ item quantities are re-set to zero. A work order line can only be copied if it a small scheme
order.
[Summary]
Opens the Schedules summary window and displays a summary of the works order lines on the
currently selected Works Order.
3.12.4 Select Schedules Button
Figure 155 - Select Schedules Button
This window allows you to select the schedule to be used to generate this works order. The schedule must have been
predefined using Cyclic Maintenance Schedules – MAI3860 and Cyclic Maintenance Schedules by Section – MAI3862.
Schedule Id
(Required)
List
Select the schedule that you wish to use to generate this works orders lines. A description will be displayed in the adjacent
field.
Date Due
(Required)
Enter a date by which the work must be completed. This can be printed on the works order if required.
Two buttons have been defined on this window for use when raising a works order, they are as follows:
[Continue]
The system will generate the works order lines and their associated BOQ items. A works order
line will be created for each road section within the schedule.
[Cancel]
Return to the Selection Criteria window without returning any works order lines.
Version: 4.7
179
CONFIDENTIALITY STATEMENT
The contents of this document, including system ideas and concepts, are confidential and proprietary in nature and are not to be distributed in any form
without the prior written consent of Bentley, Inc.
EXOR
MAINTENANCE MANAGER USER GUIDE
WORK ORDER MANAGEMENT
3.12.5 BOQ Items
Figure 156 - BOQ Items
This window is displayed when the [BOQ Items] button is pressed in the Schedules window.
This window enables you to select the schedule items to carry out the work specified in the Schedules window.
To add items, press the [Create Record] button in the toolbar. This will enable you to add a new item.
Note:
To avoid problems the [Save] button should be used when each BOQ item has been added.
Once the work order has been instructed, if the wrong BOQ has been entered or the band has changed prior to the
entry of the actual values the incorrect BOQ item should be zeroed (it cannot be deleted as it has been used in the
definition of the estimated values) before entering the correct item.
Item Code
(Required)
List
Select a valid standard job item to represent a task to be carried out by the contractor.
On an Instructed works order any items added must exist on the selected contract.
Description
(Display Only)
Displays the description of the standard job item. Note that for Rogue Items, this field becomes updateable to allow you to
describe the Rogue Item in greater detail.
Version: 4.7
180
CONFIDENTIALITY STATEMENT
The contents of this document, including system ideas and concepts, are confidential and proprietary in nature and are not to be distributed in any form
without the prior written consent of Bentley, Inc.
EXOR
MAINTENANCE MANAGER USER GUIDE
WORK ORDER MANAGEMENT
Quantity
(Required or Optional)
The first three fields allow the user to specify up to three dimensions associated to the Item if they are required for the
specified item. Each standard job item can have one or more dimensions associated with it, depending on the nature of the
work represented by the job item. For example, replacing damaged kerbing will have a single dimension representing the
length of kerbing to be replaced, whilst filling a pothole may have three dimensions representing the length, width and
depth of the pothole to be filled. Consequently, these three dimension fields are Required or Optional according to the
needs of the job in question.
Note: The message line will display a message explaining what unit of measurement should be used for each
dimension field. This message will be of the form ‘Enter the Length’.
Quantity
(Display Only)
Displays the calculated quantity of work based on the dimensions supplied in the previous fields. The unit of this field is
displayed in the Unit field described below.
Unit
(Display Only)
Displays the unit of measurement of this job item. This unit relates to the Total Qty field described above.
Rate
(Display Only)
Displays the rate per unit for this work item as held on the contract under which this works order is being created. If a
rouge item is added the rate must also be added to the item.
Cost
(Display Only)
If the order is not issued the estimated cost will be displayed, if the order is complete the actual cost will be displayed.
Details of both the estimated and actual costs and quantities can be viewed for each item by selecting the [Expand] button
from the toolbar.
Add %
(Check Box)
If this item is to attract a percentage increase or decrease using a Percentage Item tick this box. Note that only Standard
Job Items which have the 'Allow Percentage Flag?' flag set to 'Y' in Standard Items – MAI3888 can have a Percentage
Item associated with them. For information on adding Percentage Items to a Works Order line refer to the section Adding
Percentage Items to a Works Order Line, below
Total Est Labour
(Display Only)
Displays the total estimated labour costs for the cyclic works.
Total Cost
(Display Only)
Displays the total cost of the cyclic works.
BOQ Uplift Item
(Optional)
List
Enter the BOQ uplift item, this item will uplift all the BOQ items that have the ‘Allow Percent Items ?’ field set to ‘Y’ in
Standard Items – MAI3888.
Version: 4.7
181
CONFIDENTIALITY STATEMENT
The contents of this document, including system ideas and concepts, are confidential and proprietary in nature and are not to be distributed in any form
without the prior written consent of Bentley, Inc.
EXOR
MAINTENANCE MANAGER USER GUIDE
WORK ORDER MANAGEMENT
The List of Values will only contain those items that have the ‘BOQ Percent Uplift ?’ set to ‘Y’ in Standard Items –
MAI3888
WOL Uplift Item
(Optional)
List
Enter the Work Order Line uplift item, this item will uplift the entire work order line.
The List of Values will only contain those items that have the ‘WOL Percent Uplift ?’ set to ‘Y’ in Standard Items –
MAI3888
Note:
When a Repair, having either BOQ or WOL Percent Uplift Item Codes assigned, is added to a Work Order, a check is
made against the Contract for that work order to determine if the Standard Item Code has been assigned as a Contract
Item, and that the contract will allow for Percentage Uplifts. If not, the user will be prevented from saving, or
Instructing, the Work Order.
3.12.6 Percentage Uplifting of the value of an individual work order line
Entering a BOQ uplift item to a work order line will uplift the value of the work order line by applying the percentage
uplift only to those BOQ items that have been flagged as ‘Allow Percent Items’ = ‘Y’ in Standard Items – MAI3888.
In addition, if the entire work order line needs a percentage uplift, entering a WOL Uplift item to the work order line will
apply the uplift to the entire line including any BOQ percentage uplifts that have already been applied.
Note: If the value of the Work Order needs to be uplifted based on a banding for the value of the entire work order then
Discount Groups – MAI3624 (Maintenance Manager Admin) should be used.
3.12.7 Adding Individual Percentage Items to a BOQ Item
Adding a Percentage Item to a Bill Of Quantities allows the cost of the BOQ item to which the Percentage Item is
associated, to be increased or decreased depending on the percentage value defined for the Percentage Item in the selected
Contract. For example, work carried out on Bank Holidays may attract a percentage surcharge. Adding a Percentage Item
to the BOQ would allow this surcharge to be applied.
Percentage Items may only be associated with the Standard Job Items which have the 'Allow Percent Items ?' flag set to
'Y' in Standard Items – MAI3888 (Maintenance Manager System Administration Manual)
Percentage Items are those Standard Job Items which have the Unit of Measurement as defined for Product Option
PERC_ITEM e.g., PERCENTAGE.
The computation method for a Percentage Item is determined by Product Option CUM_PERC and can either by:
NORMAL
When set to NORMAL a percentage item will display the percentage of the standard item.
Or
CUMULATIVE
A setting of CUMULATIVE will result in the percentage item being the sum of the
standard item and other percentage items related to the standard item.
The Product Option Value can be overridden by adding the required value into the 'Percent Item Computation' field in the
Program details window. This will set the Computation method for any subsequent Percentage Items added to a BOQ for
a Works Order line on the current Works Order, to the value entered. This allows for different Computation methods to be
used without the need to edit the Product Option value.
Version: 4.7
182
CONFIDENTIALITY STATEMENT
The contents of this document, including system ideas and concepts, are confidential and proprietary in nature and are not to be distributed in any form
without the prior written consent of Bentley, Inc.
EXOR
MAINTENANCE MANAGER USER GUIDE
WORK ORDER MANAGEMENT
Note that these Values (Normal and Cumulative ) are defined in Status Codes – HIG9110 and Domain Code
PERC_ITEM_COMP.
3.12.8 Computation Method
Figure 157 - Normal Computation Method
Figure 157 shows a Bill of Quantities where an Item Code, 29/01/001, has a cost of £100.00. A percentage Item has been
associated with it because the bituminous material being used for the repair is of a special grade. The Percentage Item
selected has a rate of 10 % thus the total cost of the repair will be increased by £10.00 to £110.00.
If this work was to be carried out on a weekend, and weekend work attracted a surcharge of 10% on the total cost of a
repair a 2nd percentage item could be associated with the BOQ item to allow for this. If the weekend surcharge only
applied to the cost of the initial Item Code i.e. £900, the extra cost for weekend work would an extra £90 and the
computation method used to calculate this would be NORMAL.
If however, the weekend surcharge applies to the Initial Item Code and any other Percentage Items associated with BOQ
Item, the computation method used should be set to CUMULATIVE. Figure 126 shows the same BOQ item with Product
Option CUM_PERC set to CUMULATIVE.
Version: 4.7
183
CONFIDENTIALITY STATEMENT
The contents of this document, including system ideas and concepts, are confidential and proprietary in nature and are not to be distributed in any form
without the prior written consent of Bentley, Inc.
EXOR
MAINTENANCE MANAGER USER GUIDE
WORK ORDER MANAGEMENT
Figure 158 - Cumulative Computation Method
The initial Percentage Item has been calculated as a percentage of the cost of the BOQ item 29/01/001, i.e. 10% of
£100.00 equaling £10. The 2nd Percentage Item for Weekend Work has been calculated as a percentage of the sum of the
initial BOQ Item 29/01/001 + the initial Percentage Item, i.e. 10% of (£100+£10) giving a total cost of £121.00.
3.12.9 Adding a Percentage BOQ Item
To add a Percentage Item to a Bill Of Quantities the Percentage Item must have added to the currently selected Contract.
If a different Contract is subsequently selected, the Works Order can not be Instructed unless the Percentage Item has also
been added to the newly selected Contract.
To add a Percentage Item do the following:
1. Navigate to the BOQ Items window by clicking on the [BOQ Items] button on the Works Order Lines window.
2. Select the BOQ Item to which the Percentage Item is to be added.
Note: This item must have the 'Allow Percentage Item ?' filed set to 'Y' in Standard Items – MAI3888.
3. Check the 'Add %' box for the selected Item on the right of the window.
4. Click on the [Add %] button on the BOQ Items window.
5. A list of valid Percentage Items will be displayed.
6. Select the required %age item from the List
7. The selected %age item will be added to the BOQ. An will be displayed beside the %age item to signify that it
is a child item of the main Standard Job Item
Note: Quantities for Percentage Items cannot be amended.
8. Select the [Check All] to check all BOQ items displayed.
9. Select [Uncheck All] to clear all checked BOQ items.
3.12.10Adding Non-Contract Items to a Works Order
Normally, the Bill of Quantities on a works order is defined as a series of standard job items as described above. These
items have agreed unit rates. Occasionally, however, it is required to add an item to a works order that is not on the
contract. This can be achieved by the use of Rogue Items (sometimes known as ‘Wildcard Items’).
A Rogue Item is simply a standard job item with no preset rate, quantity or description. Generally, it will have item codes
ending ‘9999’. When you select a Rogue Item from the list of items the Item Description, Total Qty, and Rate fields will
be empty. You can then complete these fields to effectively create a non-standard item. It is important to note that for the
software to be able to calculate the works order totals correctly, you must enter a rate for the Rogue Item.
Version: 4.7
184
CONFIDENTIALITY STATEMENT
The contents of this document, including system ideas and concepts, are confidential and proprietary in nature and are not to be distributed in any form
without the prior written consent of Bentley, Inc.
EXOR
MAINTENANCE MANAGER USER GUIDE
WORK ORDER MANAGEMENT
Standard job items (including Rogue Items) are managed through Standard Items – MAI3888 (For further information on
Standard Items, refer to the Contracts and Contractors section of the Maintenance Manager Administration Manual).
3.12.11Contracts and Rates
It is possible to select standard job items which do not appear on the current contract for this works order. These items can
be identified as the Rate field will be empty, indicating that there is no known unit rate for this item in the selected
contract. In this situation, the software will not be able to calculate the Total Qty for this item and can therefore not cost
the works order correctly. This can be used effectively when comparing multiple contracts, the contract selected when
raising the works order may not be the contract suitable once all the schedule items have been entered.
To circumvent this situation you must do one of the following actions:
Replace the job item with an item which appears on the current contract.
Replace the job item with a Rogue Item.
Select a different contract.
Add the missing item to the current contract.
As a general rule, the works order can only be issued and printed when all the items on it have a rate, either from the
contract or as rogue items.
Version: 4.7
185
CONFIDENTIALITY STATEMENT
The contents of this document, including system ideas and concepts, are confidential and proprietary in nature and are not to be distributed in any form
without the prior written consent of Bentley, Inc.
EXOR
MAINTENANCE MANAGER USER GUIDE
WORK ORDER MANAGEMENT
3.12.12Works Order Audit
Figure 159 - Work Order Audit
The Works Order Audit shows the changes made to the fields on the Works Order which have been selected in form
Works Order Audit Maintenance – MAI3803 and can be called by pressing the [Expand] button on the menu toolbar form
the main Works Order window.
The size of the Audit log trail can be restricted by setting Product Option AUDIT_ALL to 'N'. If this option is set to 'N',
only the initial and final values of a field are recorded in the Audit trail, per session per User and any intermediate changes
are not be logged.
If Product Option AUDIT_ALL is set to 'Y' then all changes to the selected fields are logged. It should be noted that for
some Works Orders, the audit trail could be very large if this option is set to 'Y'.
The Order in which Audited changes are displayed can be determined by setting a value in the 'Order By' field.
In addition work order auditing may be carried out using Audit Manager
The type of audited changes displayed can be determined by clicking the appropriate check box in the 'Show Changes'
portion of the window as shown below
Figure 160 - Show Changes
The changes displayed can be restricted to the following areas:
Version: 4.7
186
CONFIDENTIALITY STATEMENT
The contents of this document, including system ideas and concepts, are confidential and proprietary in nature and are not to be distributed in any form
without the prior written consent of Bentley, Inc.
EXOR
MAINTENANCE MANAGER USER GUIDE
WORK ORDER MANAGEMENT
Main Works Order changes
Works Order Line changes
Bill Of Quantity changes
Payment detail changes
The following information is displayed
WOL
(Display Only)
The Defect Id or Works Order Line number will be displayed
BOQ
(Display Only)
The BOQ Standard Item Code will be displayed
Initials
(Display Only)
The initials of the User who made the change will be displayed
Date
(Display Only)
The Date and Time on which the changes were made will be displayed
Item Changed
(Display Only)
A brief description of the Item changed will be displayed.
Change (New Value)
(Display Only)
The new value of the changed item will be displayed.
Old Value
(Display Only)
The old value of the changed item will be displayed.
To close the Works Order Audit and return to the main Works Order form press the [Close] button on the window.
Version: 4.7
187
CONFIDENTIALITY STATEMENT
The contents of this document, including system ideas and concepts, are confidential and proprietary in nature and are not to be distributed in any form
without the prior written consent of Bentley, Inc.
EXOR
MAINTENANCE MANAGER USER GUIDE
WORK ORDER MANAGEMENT
3.12.13BOQ Details
Figure 161 - BOQ Details
This window can be called by pressing the [Expand] button in the menu toolbar when a BOQ item is selected.
It is useful when entering quantities because if the items are banded, this window will show the minimum and maximum
allowed values.
Details of the estimated and actual values are also displayed. If the Works Order Line on which the selected BOQ item is
on, is part of an Interim Payment the Last Valuation cost, Status and the Date the Valuation was entered or the payment
made will be displayed.
When entering a Valuation for an Interim Payment the Minimum Quantity limit for the Standard Item is overridden, but
the Maximum Quantity limit is retained.
Select [Cancel] to return to the BOQ Items window
Version: 4.7
188
CONFIDENTIALITY STATEMENT
The contents of this document, including system ideas and concepts, are confidential and proprietary in nature and are not to be distributed in any form
without the prior written consent of Bentley, Inc.
EXOR
MAINTENANCE MANAGER USER GUIDE
WORK ORDER MANAGEMENT
3.12.14Standard Item Totals
Figure 162 - Standard Item Totals
This window is displayed when the [Standard Item Totals] button is selected in the Works Orders Defects window.
It is a display only window, which shows all of the Standard Items currently on this Works Order, as well as the total
quantities and costs, both estimated and actual, across the whole works order.
Note that the ‘Actual’ fields are only displayed after a works order line has been completed or an Interim payment made
and will, therefore, initially be empty.
If the contractor has added additional items to the order the estimated values will be empty with the actual values being
populated.
Version: 4.7
189
CONFIDENTIALITY STATEMENT
The contents of this document, including system ideas and concepts, are confidential and proprietary in nature and are not to be distributed in any form
without the prior written consent of Bentley, Inc.
EXOR
MAINTENANCE MANAGER USER GUIDE
WORK ORDER MANAGEMENT
3.12.15Contractor Totals
Figure 163 - Contractor Totals
This window is displayed when the [Contractor Totals] button is selected in the Works Orders Defects window.
It is a display only window which shows all contracts which can satisfy some or all of the work defined on the Works
Order. For each contract, the window shows the percentage of the order lined that the contract has priced and can
therefore complete, as well as the total cost where that contract is to be used. If available, the window will also show the
average score achieved by that contractor over the past year to date, as well as the total value of orders placed with that
contractor in the year to date.
If the Contractor has had a financial limit on Works Order values that may be issued to him imposed in Contractors –
MAI3881, the Minimum and Maximum values will be displayed.
To select an alternative contract for use on this works order, highlight the required contract then select the [Select
Contract] button.
If product Option WORREFGEN is set to either 'C' for 'Contract Based' Works Order Reference Number generation or 'A'
for Administration Unit Works Order Reference Number Generation and the initial Contract selected is changed, the
Works Order will Cancelled and an exact copy made with the new reference number being generated. The Works Order
will have '**Cancelled**' appended to the start of its description.
To return to the Works Order form without selecting a Contractor press the [Cancel] button.
If the Value of the Works Order is outside the limits set for the Contractor a warning will be displayed a shown below.
Version: 4.7
190
CONFIDENTIALITY STATEMENT
The contents of this document, including system ideas and concepts, are confidential and proprietary in nature and are not to be distributed in any form
without the prior written consent of Bentley, Inc.
EXOR
MAINTENANCE MANAGER USER GUIDE
WORK ORDER MANAGEMENT
Figure 164 - Outside limit
To select the Contractor and override the warning press [OK] otherwise press [Cancel] to select an alternative Contractor.
If the Contractor selected is not the cheapest Contractor a window will appear requesting a reason as to why the cheapest
Contractor was not selected. Enter the reason and press [OK] to continue with the selection.
Figure 165 - Reason
This will be displayed in the Additional Details Window.
Version: 4.7
191
CONFIDENTIALITY STATEMENT
The contents of this document, including system ideas and concepts, are confidential and proprietary in nature and are not to be distributed in any form
without the prior written consent of Bentley, Inc.
EXOR
MAINTENANCE MANAGER USER GUIDE
WORK ORDER MANAGEMENT
3.12.16Work Order Flexible Attributes
Figure 166 - Flexible Attributes
Each different type of work order may potentially require a different set of information to be held against it. To facilitate
this the work order flexible attributes can be linked to individual scheme type.
This allows the customer to define a set of attributes that are specific for a small scheme work order and another set
specific for cyclic work orders. The attributes are based on scheme type.
The flexible attributes are set up using the standard asset meta model module by defining a special type of asset record,
this asset record is then linked to the appropriate scheme type using Application Attributes – MAI3819.
The Attributes part of the form will display the flexible attributes of the asset metamodel mapped to the scheme type used
in the work order. Attribute values can be added or modified.
Version: 4.7
192
CONFIDENTIALITY STATEMENT
The contents of this document, including system ideas and concepts, are confidential and proprietary in nature and are not to be distributed in any form
without the prior written consent of Bentley, Inc.
EXOR
MAINTENANCE MANAGER USER GUIDE
WORK ORDER MANAGEMENT
Figure 167 - Additional Details Planning/Support
3.12.17Additional Details – Planning/Support
This window is displayed when the [Additional Details] button is selected in the Works Orders window.
All the fields in this window are optional and are intended for information only.
Any documents that are to be held against a work order will be held using Document Manager.
Version: 4.7
193
CONFIDENTIALITY STATEMENT
The contents of this document, including system ideas and concepts, are confidential and proprietary in nature and are not to be distributed in any form
without the prior written consent of Bentley, Inc.
EXOR
MAINTENANCE MANAGER USER GUIDE
WORK ORDER MANAGEMENT
3.12.18Additional Details – Quality/Finance
Figure 168 - Additional details Quality/Finance
This window is displayed when the [Additional Details] button is selected in the Works Orders window.
All the fields within this window with the exception of ‘Not Lowest Cost’ and 'Percent Item Computation' are optional for
additional information only and will be included for reference on works order prints.
Not Lowest Cost
(Display Only)
If the Cheapest qualifying Contractor is not selected, the reason entered as to why the cheapest Contractor was not
selected will be displayed.
Percent Item Computation
(Optional)
List
The Product Option Value can be overridden by adding the required value into the 'Percent Item Computation' field in the
Program details window. This will set the Computation method for any subsequent Percentage Items added to a BOQ for
a Works Order line on the current Works Order, to the value entered. This allows for different Computation methods to be
used without the need to edit the Product Option value.
Select [Continue] to return to the Works Orders (Defects) window.
Version: 4.7
194
CONFIDENTIALITY STATEMENT
The contents of this document, including system ideas and concepts, are confidential and proprietary in nature and are not to be distributed in any form
without the prior written consent of Bentley, Inc.
EXOR
MAINTENANCE MANAGER USER GUIDE
WORK ORDER MANAGEMENT
3.12.19Invoices
Figure 169 - Invoices
Once a Works Order Line or Part of a Works Order Line, in the case of an Interim payment, has been included in payment
run the Invoice details can be displayed by pressing the [Invoices] button on the Works Order Line window.
The Payment Id, Payment Value and Date Paid will be displayed. To add the Invoice number, click in the 'Invoice field'
and enter the appropriate value. Press [Save] on the menu toolbar to save the changes.
If the Works Order Line has had a number of Interim Payments made against it, this is a good way to track the payments
made to date.
Press the [Close] button to return to the Works Order Line window.
3.12.20Making Interim Payments
Interim payments can be made on part of an individual Works Order Line if needed. This may used where the work
ordered on a Works Order line may take a long period of time to complete or is of very high value. As work proceeds the
Contractor may require payment for the work he has completed to date. Interim payments allow the Standard Items
quantities to be amended to show the actual amount of work done to date or for new Standard Items to be added. Once the
actual quantities have been added the Works Order Line can then be included in a payment run.
As the work progresses further, this Interim Payment process can be repeated until the work is Completed and the Final
Payment is made.
If an Interim Payment is made on a Works Order Line raised to repair a defect, the defect status will be set to STR MAIN
(the Status Code with feature 6 allowed).
A Works Order cannot be completed until all the Works Order Lines on the Works Order are Completed.
Interim payments can only be made on Works Orders that have the 'Interim Payment?' flag set to 'Y'. This flag can be
changed at any time.
To make an Interim Payment follow this process:
Select the Works Order Line for which to make the Interim Payment.
Set the Works Order Line status to VALUATION.
The BOQ estimated quantities will be stored and Zero estimates will be displayed in their place.
Enter the actual quantities of work done to date (that this is a cumulative amount)
Version: 4.7
195
CONFIDENTIALITY STATEMENT
The contents of this document, including system ideas and concepts, are confidential and proprietary in nature and are not to be distributed in any form
without the prior written consent of Bentley, Inc.
EXOR
MAINTENANCE MANAGER USER GUIDE
WORK ORDER MANAGEMENT
Note:
When entering a Valuation for an Interim Payment the Minimum Quantity limit for the Standard Item is
overridden, but the Maximum Quantity limit is retained.
If required add any Percentage Items or other Standard Items needed.
Set the Works Order Line status to INTERIM.
Press the [Save] button on the menu toolbar.
The Works Order Line is now ready for part payment on the next Payment Run i.e. the work done to date will be paid, but
the Works Order Line will not be Completed.
When the Works Order Line is included on a Payment Run the Status of the Works Order Line will be set to PART-PAID.
If a further Interim Payment is to be made on this Works Order Line simply repeat this process. Details of the last
valuation can be seen for a BOQ item by pressing the [Expand] button on the menu toolbar when the BOQ item is
selected.
3.12.21Completing a Works Order Line with an Interim Payment
In order for a Works Order to be completed, all Works Order Lines on it must be completed. If a Works Order Line has
had an Interim Payment made on it, it must also be set to Complete.
If any further work has been done since the last Valuation the Works Order Line Status should be changed to
COMPLETED and the Actual quantity of work done to date entered (this should be the cumulative amount of all work
done), otherwise the Works Order Line will keep the same Actual amounts as for the last Valuation.
When the Works Order Line is Completed and is included in the next payment run, no payment will be made if the Actual
quantities have not been changed since the last Valuation.
3.12.22Completing a Works Order
When completing a works order it is possible to update the schedule items to reflect the actual cost of repairing the defect.
A works order can be partially completed by completing individual works order lines or fully completed by completing
the whole works order, the limitation to completing the full works order by selecting the [Completed] button is that the
costs of each individual line can not be amended to reflect the actual costs of the work.
To enter the actual cost of a works order line follow this procedure:
1. Change the status of the works order line to COMPLETED.
2. Enter the completed date.
3. Update the dimensions in the BOQ Items window to the actual dimensions.
4. Add any further BOQ items if required.
5. Save the changes
Once the changes have been saved no further changes can be made to that works order line. Once all works order lines are
completed the works order will be completed.
This status can change to COMPLETED in one of two ways, they are as follows:
The [Complete] button is selected in the Works Orders Defects window. This will complete all works order lines in the
current works order, the completed date will also be entered in the next field. If this method is used changes cannot be
made to the actual values of the BOQ items.
The User changes the individual line to completed manually and enters a date in the next field. At this point changes can
be made to the actual values of the BOQ items, these changes must be made before saving the changes.
As the works order line passes through the payments cycle the status will be updated automatically.
Version: 4.7
196
CONFIDENTIALITY STATEMENT
The contents of this document, including system ideas and concepts, are confidential and proprietary in nature and are not to be distributed in any form
without the prior written consent of Bentley, Inc.
EXOR
MAINTENANCE MANAGER USER GUIDE
WORK ORDER MANAGEMENT
3.12.23Changing a Completed Works Order
Once a Works Order or Works Order Line is complete no changes can be made to the value of the order.
If however, when it comes to payment, the Works Order or Works Order Line is held because actual values of the work
are in excess of the allowable differences between estimated values and actual values, the actual values may need to be reentered.
This is carried out with the following procedure:
1. Retrieve the completed works order that needs amending.
2. Move to the relevant works order line.
3. Change the status back to INSTRUCTED.
4. Save the change.
This will result in the actual quantities and costs for the selected works order line being removed, the completed
dates will be cleared in both the selected works order line and the main works order window and the actual costs
will be updated in the works order window.
Costs will be returned to Committed from Actuals within Budgets.
Follow the procedure for completing a Works Order to enter the amended actual values.
Version: 4.7
197
CONFIDENTIALITY STATEMENT
The contents of this document, including system ideas and concepts, are confidential and proprietary in nature and are not to be distributed in any form
without the prior written consent of Bentley, Inc.
EXOR
MAINTENANCE MANAGER USER GUIDE
WORK ORDER MANAGEMENT
3.13 Works Order Line Budget Reallocation – MAI3620
Figure 170 - Work Order Line Budget Reallocation Menu Option
Figure 171 - Work Order Line Budget Reallocation
3.13.1 General Information
This form allows the User to query any completed Works Order and amend the Budget (Work Category) on each
individual Works Order Line to another appropriate budget.
The selected Budget must satisfy the following criteria:
There must be sufficient balance available to accommodate the Actual Cost of the Works Order Line.
The Financial Year must be either the same as that of the original Budget or the following Financial Year.
Version: 4.7
198
CONFIDENTIALITY STATEMENT
The contents of this document, including system ideas and concepts, are confidential and proprietary in nature and are not to be distributed in any form
without the prior written consent of Bentley, Inc.
EXOR
MAINTENANCE MANAGER USER GUIDE
WORK ORDER MANAGEMENT
Must satisfy the normal validation that would be applied by the Works Orders form (MAI3800)
When a Budget change is performed the Actual Cost of the Works Order Line will be removed from the original Budget
and added to the new Budget.
The top part of the form is query only.
The bottom part of the form is display only with the exception of:
Work Category
(Optional)
List
Enter the amended budget for the selected work order line.
Version: 4.7
199
CONFIDENTIALITY STATEMENT
The contents of this document, including system ideas and concepts, are confidential and proprietary in nature and are not to be distributed in any form
without the prior written consent of Bentley, Inc.
EXOR
MAINTENANCE MANAGER USER GUIDE
WORK ORDER MANAGEMENT
3.14 Gang/Crew Allocation – MAI3805
Figure 172 - Gang/Crew Allocation Menu Option
Figure 173 - Gang/Crew Allocation
Version: 4.7
200
CONFIDENTIALITY STATEMENT
The contents of this document, including system ideas and concepts, are confidential and proprietary in nature and are not to be distributed in any form
without the prior written consent of Bentley, Inc.
EXOR
MAINTENANCE MANAGER USER GUIDE
WORK ORDER MANAGEMENT
3.14.1 General Information
Once a work order has been raised and issued by the client the contractor may wish to organize that work in their own
way to suit the skill set of their own work gangs.
This form is designed to allow the association of work order lines to individual work gangs as well as re-allocating work
between gangs.
The product option GANGENABLE will be set to ‘Y’ to allow the use of gangs. Once set, additional fields will be
displayed in Work Orders (Defects) – MAI3800 in both the work order line and the selection criteria windows and Work
Order – Contractor Interface – MAI3802 in the work order lines window.
Each appropriate schedule of rates item can have a Gang Work Type associated with it using Standard Items – MAI3888.
This allows the grouping of item according to the type of work associated with a defect. The association of the gang work
type will aid in the selection criteria of the works orders when locating defects.
Gang Work Types are set up in Domains – HIG9120 in the GANG_WORK_TYPE domain.
Gangs are set up in Domains – HIG9120 in the GANG domain.
This form can be used in 2 modes depending on the checkbox selected.
1. Allocate a Gang checkbox, this gives the user the ability to restrict the work order lines retrieved using the
selection criteria, select the lines required then allocate a gang to those lines.
2. Re-allocate a Gang checkbox, this substitutes the Status field with the Gang field allowing the user to retrieve
work order lines already allocated to a gang, select the lines required then re-allocate them to another gang. The
lines retrieved can be further restricted by the selection of other criteria.
3.14.2 Selection Criteria
These fields are used to restrict the work order lines retrieved in the work order lines block, the more fields entered the
more restrictions will be applied. Making no selections in this block will retrieve all unallocated works order lines in the
next block.
Road Type
(Optional)
List
The road type entered here will restrict the road groups displayed in the adjacent field
Road Id
(Optional)
Gaz
Enter the required road group that is to be used to restrict the works order lines retrieved.
Status
(Optional)
List
This field will be displayed when the Allocate Gang checkbox is selected. Enter a status Code.
The status code is unrestricted allowing this form to also be used for general work order queries.
Gang
(Optional)
List
This field will be displayed when the Allocate Gang checkbox is selected.
Enter the gang details that are to have lines re-allocated to another gang.
Gangs are set up in Domains – HIG9120 in the GANG domain.
Defect Priority
(Optional)
Version: 4.7
List
201
CONFIDENTIALITY STATEMENT
The contents of this document, including system ideas and concepts, are confidential and proprietary in nature and are not to be distributed in any form
without the prior written consent of Bentley, Inc.
EXOR
MAINTENANCE MANAGER USER GUIDE
WORK ORDER MANAGEMENT
Enter the defect priority code.
Treatment
(Optional)
List
(Optional)
List
Enter the treatment code.
Gang Type
Enter the Gang work type.
Gang Work Types are set up in Domains – HIG9120 in the GANG_WORK_TYPE domain.
SISS Code
(Optional)
List
Enter a Standard Item Sub Section code.
Date Raised
Target Complete
Date Instructed
(Optional)
Select the checkbox to include a date search on the work order dates below.
Date From
(Optional,)
Enter the date from which you wish to make a search. This field can be used in conjunction with the next field for
searching for defects in a date range.
Date To
(Optional. Default)
Enter the date to which you wish to search for defects, default is 7 days after the Date From.
Version: 4.7
202
CONFIDENTIALITY STATEMENT
The contents of this document, including system ideas and concepts, are confidential and proprietary in nature and are not to be distributed in any form
without the prior written consent of Bentley, Inc.
EXOR
MAINTENANCE MANAGER USER GUIDE
WORK ORDER MANAGEMENT
3.14.3 Work Order Lines
The contents of this window will be either
1. All un-allocated works order lines or
2. All lines allocated to the selected gang
This will depend upon the selection criteria entered previously.
All fields in this window are display only, select the checkbox for the work order lines that are to be selected followed by
the [Assign Gang] button.
Selecting a work order line followed by [Expand] will display Works Orders – MAI3800 and will be the complete work
order containing the line selected.
The
button will select all lines in this window.
The
button will de-select all selected lines.
The scroll bar along the bottom of the window allows the user to view all available fields.
Order By
(Optional)
List
These two fields allow the ordering of the work order lines details.
New Gang
(Optional)
List
Enter the gang to which the selected lines are to be Allocated/Re-allocated followed by the [Assign Gang] button.
Gang Labour Units
(Display Only)
This is the Total Labour Units of ALL work order lines assigned to the selected gang where the Work Order Line status is
‘Instructed’. This is used to display the total Labour Units for all outstanding work allocated to a Gang.
Total Selected Labour Units
(Display Only)
This is the Total Sum of Labour Units of the selected WO Lines in the ‘Work Order Lines’ block of the form.
The Gang Labour Units and Total Labour Units summary fields are to allow the assignment of Work Orders to a gang
based upon the number of Labour Units a Gang can complete in a standard working day.
Version: 4.7
203
CONFIDENTIALITY STATEMENT
The contents of this document, including system ideas and concepts, are confidential and proprietary in nature and are not to be distributed in any form
without the prior written consent of Bentley, Inc.
EXOR
MAINTENANCE MANAGER USER GUIDE
WORK ORDER MANAGEMENT
3.15 Cancel Works Orders – MAI3610
Figure 174 - Cancel Works Orders Menu Option
Version: 4.7
204
CONFIDENTIALITY STATEMENT
The contents of this document, including system ideas and concepts, are confidential and proprietary in nature and are not to be distributed in any form
without the prior written consent of Bentley, Inc.
EXOR
MAINTENANCE MANAGER USER GUIDE
WORK ORDER MANAGEMENT
Figure 175 - Cancel Work Order
3.15.1 General Information
This option is the only means of cancelling a works order (Works Orders are also marked as **Cancelled** if the selected
Contract is changed on the Works Order form).
When a works order is cancelled, it can be viewed using the form Works Orders – MAI3800. If you view this cancelled
works order you will notice it has **Cancelled** in the description text and will have been marked as completed on
today’s date. This is only there for historical purposes and cannot be used. Historical works orders are useful when
querying contractor details and monitoring a contractor’s performance over previous financial years.
Only orders that have not been completed can be cancelled.
Once the works order has been cancelled it will also do the following:
Release the Works Order Lines, i.e. any defects associated with this works order will return to the pool of defects ready to
be picked up on another works order for completion, i.e. the defects status will be set to AVAILABLE.
Cyclic maintenance activities on the cancelled works order will be released.
Any figure that has been committed to a budget will be released and returned to the budget.
Once you have queried back the order to be cancelled press the [Cancel Works Order] button followed by the save button
in the toolbar.
Version: 4.7
205
CONFIDENTIALITY STATEMENT
The contents of this document, including system ideas and concepts, are confidential and proprietary in nature and are not to be distributed in any form
without the prior written consent of Bentley, Inc.
EXOR
MAINTENANCE MANAGER USER GUIDE
WORK ORDER MANAGEMENT
3.16 Quality Inspection Results – MAI3820
Figure 176 - Quality Inspection Results Menu Option
Version: 4.7
206
CONFIDENTIALITY STATEMENT
The contents of this document, including system ideas and concepts, are confidential and proprietary in nature and are not to be distributed in any form
without the prior written consent of Bentley, Inc.
EXOR
MAINTENANCE MANAGER USER GUIDE
WORK ORDER MANAGEMENT
Figure 177 - Quality Inspection Results
3.16.1 General Information
This option is used to record the results of Quality Inspections carried out on completed Work Order Lines. Works Order
Lines are only displayed on this form if they have been selected during the running of report 'Work for Quality Inspection
– MAI3950' . Once Quality Inspection results have been updated using this form they can be reported on using 'Quality
Inspection Performance – MAI3952'.
3.16.2 Work Order Lines
When you enter this window it will be in query mode, enter your selection criteria followed by [Execute Query] to return
the required works order line details. Quality Inspections can be queried on Check Batch, Road Id, Defect Id, Schedule Id,
Works Order Number or any combination of these fields.
Check Batch
(Display Only)
List
Displays the Check Batch number generated during the running of report 'Work for Quality Inspection – MAI3950'. List
is only available in query mode.
Road Id/Desc
(Display Only)
Displays the section ID and description of the road section to which this works order relates.
Version: 4.7
207
CONFIDENTIALITY STATEMENT
The contents of this document, including system ideas and concepts, are confidential and proprietary in nature and are not to be distributed in any form
without the prior written consent of Bentley, Inc.
EXOR
MAINTENANCE MANAGER USER GUIDE
WORK ORDER MANAGEMENT
Defect Id
(Display Only)
Displays the unique ID of the defect which this works order was rectifying.
Schedule
(Display Only)
For cyclic maintenance works orders, this field displays the ID of the schedule under which this works order was created.
Work Order
(Display Only)
Displays the reference number of this works order.
Work Sheet
(Display Only)
Displays the serial number of the worksheet.
Check Result
(Optional)
List
(Optional)
List
Enter the result of the inspection..
Check Code
If the inspection result is 'Fail' enter the appropriate code to define the reason for the failure. These values are amended in
Domains – HIG9120 and by editing Domain CHECK_CODE.
Check Date
(Optional)
Enter the date the Quality Inspection was carried out.
Check By
(Optional)
List
Enter the Initials of the supervisor who conducted the Quality Inspection.
Comments
(Optional, Edit)
Enter any required comments.
Version: 4.7
208
CONFIDENTIALITY STATEMENT
The contents of this document, including system ideas and concepts, are confidential and proprietary in nature and are not to be distributed in any form
without the prior written consent of Bentley, Inc.
EXOR
MAINTENANCE MANAGER USER GUIDE
WORK ORDER MANAGEMENT
3.17 External Activity – MAI1280
Figure 178 - External Activities Menu Option
Version: 4.7
209
CONFIDENTIALITY STATEMENT
The contents of this document, including system ideas and concepts, are confidential and proprietary in nature and are not to be distributed in any form
without the prior written consent of Bentley, Inc.
EXOR
MAINTENANCE MANAGER USER GUIDE
WORK ORDER MANAGEMENT
Figure 179 - External Activity
3.17.1 General Information
When activities are carried out on road sections by external organisation units, they should be recorded within the system
to enable engineers to assess the implications of any planned maintenance. For example, if the Gas Board is due to replace
a main, it is pointless to resurface the road first.
These activities will be flagged as external activities in the work order line description when a work order is raised.
3.17.2 External Activity
When you enter this form the cursor sits in the ‘Code’ field waiting for you to enter your selection. Press [Execute Query]
to obtain existing information.
Code
(Optional)
Enter the external activity code that is to be set up. This will be used to reference standard external activities.
Description
(Required)
Enter a description of the external activity.
Organisation Code
(Required)
List
Enter the identifier of the organisation performing the external activity. The organisation will have been set up using
Organisations – MAI1870.
Version: 4.7
210
CONFIDENTIALITY STATEMENT
The contents of this document, including system ideas and concepts, are confidential and proprietary in nature and are not to be distributed in any form
without the prior written consent of Bentley, Inc.
EXOR
MAINTENANCE MANAGER USER GUIDE
WORK ORDER MANAGEMENT
Name
(Display Only)
The organisations name will be displayed.
Address
(Display Only)
The organisations address will be displayed.
Figure 180 - Membership
3.17.3 Membership
This window is used to maintain the links and dates associated with the external activity.
Link Id
(Required)
List
(Required)
List
Enter the linkcode for the required section.
Section
Enter the section number
Version: 4.7
211
CONFIDENTIALITY STATEMENT
The contents of this document, including system ideas and concepts, are confidential and proprietary in nature and are not to be distributed in any form
without the prior written consent of Bentley, Inc.
EXOR
MAINTENANCE MANAGER USER GUIDE
WORK ORDER MANAGEMENT
Start Date
(Required)
Enter the date the external activity is due to start
Signed Off Date
(Optional)
Enter the date the activity has been completed or signed off.
Version: 4.7
212
CONFIDENTIALITY STATEMENT
The contents of this document, including system ideas and concepts, are confidential and proprietary in nature and are not to be distributed in any form
without the prior written consent of Bentley, Inc.
EXOR
MAINTENANCE MANAGER USER GUIDE
WORKS ORDERING REPORTS
4
Works Ordering Reports
This chapter provides examples and the required selection criteria for the Works Ordering and associated Reports.
The reports illustrated in this chapter are:
Work Order (Unpriced) – MAI3485
Work Order (Priced) – MAI3480
BOQ Work Order (Defects) – MAI3800
Work Orders (Detail) – MAI3500
Work Orders (Summary) – MAI3505
Work Orders (NMA Format) – MAI3909
Work Orders (Enhanced Format) – MAI3919
Work Orders (Strip Plan) – MAI5130
Review Raised Work Orders – MAI3490
Defects Not Yet Instructed – MAI3922
Summary of Defects Not Yet Instructed – MAI3920
Instructed Work by Status – MAI3924
Instructed Defects due for Completion – MAI3926
Inventory Updates – MAI3930
Work for Quality Inspection – MAI3950
Quality Inspection Performance – MAI3952
Admin Unit Performance – MAI3956
4.1
Running Reports
The majority of reports within highways by exor are accessed using a standard window called the Generic Reporting
Interface (GRI). Whilst the selection criteria for each report will change from report to report, the way the reports are run,
viewed and printed remains constant.
Below is an example of the Generic Reporting Interface.
Version: 4.7
213
CONFIDENTIALITY STATEMENT
The contents of this document, including system ideas and concepts, are confidential and proprietary in nature and are not to be distributed in any form
without the prior written consent of Bentley, Inc.
EXOR
MAINTENANCE MANAGER USER GUIDE
WORKS ORDERING REPORTS
Figure 181 - GRI
The title of the report is displayed at the top of the window.
There are three buttons down the left hand side, they are as follows:
Run report. When the selection criteria has been entered, this will run the report and place the output in the
report previewer.
Save Parameters. The Parameters for reports that have to be constantly re-run or have complex selection
criteria can be saved to a file and re-used. You will be prompted to enter a file name. Each user
can have their own set of saved parameters.
Load Parameters. Previously saved parameters for the selected report can be loaded directly into the GRI.
You will be prompted to enter a file name, if you have a number of saved parameters, double
clicking the field will result in a list of saved parameters being displayed.
Version: 4.7
214
CONFIDENTIALITY STATEMENT
The contents of this document, including system ideas and concepts, are confidential and proprietary in nature and are not to be distributed in any form
without the prior written consent of Bentley, Inc.
EXOR
MAINTENANCE MANAGER USER GUIDE
WORKS ORDERING REPORTS
4.2
Work Order (Unpriced) – MAI3485
Purpose:
This option produces a 3-part report. The first provides an unpriced Work Order for the selected Works Order Number
and includes the following information on each Works Order Line:
WO Line Number
Link Number
Road Section Number
Start and End Chainage of Defect on W.O. Line
XSP of Defect on W.O. Line
Item Type
Repair Description
Unit (Flexible attribute)
Order Quantity
Rate
Discount %
Order Value
The Second part provides a summary of the Road Sections on the Selected Works Order and includes the following
information:
Agency Code
Link Code
Road Section Number
Section Class
Road Section Description
The third part provides a list of Cross Sectional Positions (XSP's) on the Road Sections selected on the chosen Works
Order.
4.2.1
Selection Parameters
Works Order No
(Required)
Enter the Works Order Number to be reported on.
Version: 4.7
215
CONFIDENTIALITY STATEMENT
The contents of this document, including system ideas and concepts, are confidential and proprietary in nature and are not to be distributed in any form
without the prior written consent of Bentley, Inc.
EXOR
MAINTENANCE MANAGER USER GUIDE
WORKS ORDERING REPORTS
4.2.2
Works Order (Unpriced) – MAI3485
Figure 182 - Part 1
Figure 183 - Part 2
Figure 184 - Part 3
Version: 4.7
216
CONFIDENTIALITY STATEMENT
The contents of this document, including system ideas and concepts, are confidential and proprietary in nature and are not to be distributed in any form
without the prior written consent of Bentley, Inc.
EXOR
MAINTENANCE MANAGER USER GUIDE
WORKS ORDERING REPORTS
4.3
Work Order (Priced) – MAI3480
Purpose:
This option produces a 2-part report. The first provides a Priced Works Order and includes the following information on
each Works Order Line:
Works Order Line Number
Link Id
Road Section Number
Road Section Description
Defect Type
XSP and Chainage of Defect
Inspection Activity
Treatment Type
Repair Description
Defect Id
Unit
Quantity
Estimated Rate for Works Order Line
Estimated Value of Works Order Line
The Second part provides a summary of the Road Sections on the Selected Works Order and includes the following
information:
Agency Code
Link Code
Road Section Number
Section Class
Road Section Description
4.3.1
Selection Parameters
Works Order No
(Required)
Enter the Works Order Number to be reported on.
Version: 4.7
217
CONFIDENTIALITY STATEMENT
The contents of this document, including system ideas and concepts, are confidential and proprietary in nature and are not to be distributed in any form
without the prior written consent of Bentley, Inc.
EXOR
MAINTENANCE MANAGER USER GUIDE
WORKS ORDERING REPORTS
Figure 185 - Work Order (Priced) – MAI3480, Part 1
Figure 186 - Work Order (Priced) – MAI3480, Part 2
Version: 4.7
218
CONFIDENTIALITY STATEMENT
The contents of this document, including system ideas and concepts, are confidential and proprietary in nature and are not to be distributed in any form
without the prior written consent of Bentley, Inc.
EXOR
MAINTENANCE MANAGER USER GUIDE
WORKS ORDERING REPORTS
4.4
BOQ Work Order (Defects) – MAI3906
Purpose:
This report produces a detailed Work Order, which includes any Bill of Quantity items specified, for Work Order Lines on
the Selected Works Order. You may choose to print Labour Units and/or target repair dates for each Work Order Line
using the appropriate Selection Parameters. You may also choose to print only the Work Order, only a Control Sheet for
the Work Order or both.
4.4.1
Selection Parameters
Work Order No
(Required)
List
Enter the Works Order Number to be reported on.
Work Sheet No
(Optional)
To reprint part of an already printed Work Order, enter the Work Sheet Number to be reprinted. This appears near the top
of each Sheet.
Print Lab Units (Y/N)
(Required, Default)
List
Enter 'Y' to include the number of Labour Units needed to complete a Bill of Quantity Item on a Works Order Line or 'N'
to not include Labour Units. The default value is 'N'.
Print Target Repair Dates
(Required, Default)
List
Enter 'Y' to include the target repair date for a Work Order Line or 'N' to omit this detail. The default value is 'N'.
Wrks ord/Ctrl sht/Both
(Required, Default)
List
Enter 'W' to print only the Work Order, 'C' to print only the Control Sheet for a Work Order or 'B' to print both.
Version: 4.7
219
CONFIDENTIALITY STATEMENT
The contents of this document, including system ideas and concepts, are confidential and proprietary in nature and are not to be distributed in any form
without the prior written consent of Bentley, Inc.
EXOR
MAINTENANCE MANAGER USER GUIDE
WORKS ORDERING REPORTS
4.4.2
BOQ Work Order (Defects) – MAI3906
Figure 187 - Work Order
Version: 4.7
220
CONFIDENTIALITY STATEMENT
The contents of this document, including system ideas and concepts, are confidential and proprietary in nature and are not to be distributed in any form
without the prior written consent of Bentley, Inc.
EXOR
MAINTENANCE MANAGER USER GUIDE
WORKS ORDERING REPORTS
Figure 188 - Control Sheet
Version: 4.7
221
CONFIDENTIALITY STATEMENT
The contents of this document, including system ideas and concepts, are confidential and proprietary in nature and are not to be distributed in any form
without the prior written consent of Bentley, Inc.
EXOR
MAINTENANCE MANAGER USER GUIDE
WORKS ORDERING REPORTS
4.5
Work Order (Detail) – MAI3500
Purpose:
This report displays a summary of each Works Order Line on the selected Works Order and provides detailed information
about the defect associated with a Works Order Line. The following information is displayed:
Link and Section Id
Road Section Description
Road Section Length
Defect Chainage
Defect XSP
Defect Id
Defect Description
Attribute Name and Value
Treatment Code
Repair Description
Due Completion Date
The Total Estimated Cost and Total Actual Cost of the selected Works Order is also displayed on the front cover sheet.
4.5.1
Selection Parameters
Works Order No
(Required)
Enter the Works Order Number to be reported on.
4.5.2
Works Order (Detail) – MA3500
Version: 4.7
222
CONFIDENTIALITY STATEMENT
The contents of this document, including system ideas and concepts, are confidential and proprietary in nature and are not to be distributed in any form
without the prior written consent of Bentley, Inc.
EXOR
MAINTENANCE MANAGER USER GUIDE
WORKS ORDERING REPORTS
4.6
Works Order Summary – MAI3505
Purpose:
This report produces a summary of all Works Orders which meet the required selection parameters for the selected Road
Group. The Total Estimated Cost and Total Actual Cost of all qualifying Work Orders is also calculated. The following
information is displayed:
Work Order Number
Road Part/Link Id
Scheme Type
Work Order Description
Estimated Cost of Work Order
Actual Cost of Work Order
Date Instructed
Date Completed
Date Last Printed
Raised By
Number of Defects
Total Estimated Cost of all qualifying Work Orders
Total Actual Cost of all qualifying Work Orders
4.6.1
Selection Parameters
Admin Unit
(Required, Default)
List
Select an administrational unit to be used for this report. The default is the Admin Unit assigned to the current User.
Road Id
(Required)
List,Gaz
Enter the Road Group or individual Road Section Id to be reported on.
From Date
(Optional)
If required, enter the earliest ‘Date Raised ’ to be included on the report. Only those Works Orders raised after this date
will be included in the report.
To Date
(Optional)
If required, enter the latest ‘Date Raised ’ to be included on the report. Only those Work Orders raised before this date
will be included in the report.
Scheme Type
(Required)
List
Enter the Works Order Scheme type to be reported on.
Cyclical Maintenance Onl
(Required, Default)
List
Enter 'Y' to only include Cyclical Maintenance Work Orders only or 'N' to include both Cyclic and Defect Clearance
Work Orders. The default value is 'N'.
Version: 4.7
223
CONFIDENTIALITY STATEMENT
The contents of this document, including system ideas and concepts, are confidential and proprietary in nature and are not to be distributed in any form
without the prior written consent of Bentley, Inc.
EXOR
MAINTENANCE MANAGER USER GUIDE
WORKS ORDERING REPORTS
Local or DTp Flag
(Required )
List
Enter 'D' to select Work Orders on DoT roads or 'L' to select Work Orders on local roads.
Complete or Outstanding
(Optional)
List
Enter 'C' to include only Completed Work Orders, 'O' to include only Outstanding Work Orders, or leave blank to include
both.
Work Category
(Optional)
List
If required, enter the Work Category or partial Work Category with LIKE operator.
4.6.2
Work Orders (Summary) – MAI3505
Version: 4.7
224
CONFIDENTIALITY STATEMENT
The contents of this document, including system ideas and concepts, are confidential and proprietary in nature and are not to be distributed in any form
without the prior written consent of Bentley, Inc.
EXOR
MAINTENANCE MANAGER USER GUIDE
WORKS ORDERING REPORTS
4.7
Work Order (NMA) – MAI3909
Purpose:
This report produces a detailed work order in a format acceptable to NMA’s. The following information is displayed:
Work Order Number
Work Order Description
Defect Id
Cost Code
Work Category
Link Id
Road Section Number
Road Section Description
Schedule of Rate Item Code
Schedule of Rate Description
Unit
Rate
Quantity
Estimated Value of Works Order Line (including any percentage discount)
4.7.1
Selection Parameters
Confirmed Works Order No
(Required)
Enter the Works Order Number to be reported on.
Version: 4.7
225
CONFIDENTIALITY STATEMENT
The contents of this document, including system ideas and concepts, are confidential and proprietary in nature and are not to be distributed in any form
without the prior written consent of Bentley, Inc.
EXOR
MAINTENANCE MANAGER USER GUIDE
WORKS ORDERING REPORTS
4.7.2
Work Orders (NMA) – MAI3909
Figure 189
Version: 4.7
226
CONFIDENTIALITY STATEMENT
The contents of this document, including system ideas and concepts, are confidential and proprietary in nature and are not to be distributed in any form
without the prior written consent of Bentley, Inc.
EXOR
MAINTENANCE MANAGER USER GUIDE
WORKS ORDERING REPORTS
4.8
Work Order (Enhanced) – MAI3919
Purpose:
This option produces a 2-part report. This report produces an enhanced version of Print Work Order that includes extra
fields and layout changes. The first provides contract details and includes the following information:
The following information is displayed:
Contractor
Work Order Number
Work Order Description
Date Issued
Date Instructed
Estimated Values of the Work Order
Actual Values of the Work Order
The Second part provides details of each work order line and includes the following information:
Repair Due Date
Road Name
Link and Section Number
Defect Chainage
Defect XSP
Defect Id
Defect Priority
Defect Description
Defect Location
Repair Treatment
BOQ Item Code
BOQ Description
Quantity
Unit
Rate
Estimated Value of Works Order Line (including any percentage discount}
4.8.1
Selection Parameters
Draft Report?
(Required)
List
Enter the either ‘Y’ or ‘N’ to indicate whether the report is to be draft.
Confirmed Works Order No
(Required)
Enter the Works Order Number to be reported on.
Version: 4.7
227
CONFIDENTIALITY STATEMENT
The contents of this document, including system ideas and concepts, are confidential and proprietary in nature and are not to be distributed in any form
without the prior written consent of Bentley, Inc.
EXOR
MAINTENANCE MANAGER USER GUIDE
WORKS ORDERING REPORTS
4.8.2
Work Orders (Enhanced) – MAI3919
Figure 190 - Part 1
Version: 4.7
228
CONFIDENTIALITY STATEMENT
The contents of this document, including system ideas and concepts, are confidential and proprietary in nature and are not to be distributed in any form
without the prior written consent of Bentley, Inc.
EXOR
MAINTENANCE MANAGER USER GUIDE
WORKS ORDERING REPORTS
Figure 191 - Part 2
Version: 4.7
229
CONFIDENTIALITY STATEMENT
The contents of this document, including system ideas and concepts, are confidential and proprietary in nature and are not to be distributed in any form
without the prior written consent of Bentley, Inc.
EXOR
MAINTENANCE MANAGER USER GUIDE
WORKS ORDERING REPORTS
4.9
Work Order (Strip Plan) – MAI5130
Purpose:
This report produces a strip plan report showing a summary of the defects on the Selected Work Order in their Cross
Sectional Positions. The following information is displayed:
Link and Section Number
Road Class
Defect Chainage
Defect XSP (displayed in strip plan format)
Defect Description
Attribute Value
Defect Location
Treatment Description
A Cross Sectional Position Key is also provided
4.9.1
Selection Parameters
Works Order No
(Required)
Enter the Works Order Number to be reported on.
4.9.2
Works Order (Strip Plan) – MAI5130
Figure 192
Version: 4.7
230
CONFIDENTIALITY STATEMENT
The contents of this document, including system ideas and concepts, are confidential and proprietary in nature and are not to be distributed in any form
without the prior written consent of Bentley, Inc.
EXOR
MAINTENANCE MANAGER USER GUIDE
WORKS ORDERING REPORTS
4.10 Review Raised Works Orders – MA3490
Purpose:
This report produces a summary list of all Work Orders which match the required selection parameters. The following
information is displayed:
Date Raised
Road/Group Id
Work Order No.
Maintenance Work Order or Defect Clearance
SISS Code
Expenditure Code
Date Closed
4.10.1 Selection Parameters
Works Order Status
(Required, Default)
List
Enter 'A' to include all Work Orders, 'C' to include Completed Work Orders only, or 'R' to include Raised but not
completed Work Orders.
Date From
(Required, Default)
Enter the earliest date from which to select Work Orders. Only Work Orders Raised after this date will be included in the
report. The default value is the 'system date -365 days'.
Date To
(Required, Default)
Enter the latest date from which to select Work Orders. Only Work Orders Raised before this date will be included in the
report. The default value is the 'system date'.
Local or DoT Flag
(Required, Default)
Enter 'D' to include Work Orders on DoT roads or 'L' for Work Orders on Local roads. The default value is 'D'.
Version: 4.7
231
CONFIDENTIALITY STATEMENT
The contents of this document, including system ideas and concepts, are confidential and proprietary in nature and are not to be distributed in any form
without the prior written consent of Bentley, Inc.
EXOR
MAINTENANCE MANAGER USER GUIDE
WORKS ORDERING REPORTS
4.10.2 Review Raised Works Orders – MAI3490
Figure 193
Version: 4.7
232
CONFIDENTIALITY STATEMENT
The contents of this document, including system ideas and concepts, are confidential and proprietary in nature and are not to be distributed in any form
without the prior written consent of Bentley, Inc.
EXOR
MAINTENANCE MANAGER USER GUIDE
WORKS ORDERING REPORTS
4.11 Defects not yet Instructed – MAI3922
Purpose:
This report produces a List of defects which have a Status of 'AVAILABLE' and which meet the required selection
parameters. Defects, which appear on this report, may be selected on a Work Order. The following information is
displayed:
Defect Id
Defect Type
Link and Section Id
Road Section Description
Defect Location
Rechargeable Organistaion
Defect XSP
Defect Chainage
Date Inspected
Due Date
Days to due date
Special Instructions
Repair Type
Defect Priority
BOQ Item
BOQ Quantities
Total Cost/Labour Units
4.11.1.1 Selection Parameters
Admin Unit
(Required, Default)
List
Select an administrational unit to be used for this report. The default is the Admin Unit assigned to the current User.
Road Type
(Optional)
List
If required, enter the Road Type from which to select defects from. If this field is left blank all Road Group Types will be
reported on.
Road Id
(Optional)
List
If required, enter the Road Group Id from which to select defects from. If this field is left blank all Road Group Types will
be reported on.
From Date
(Optional)
If required, enter the earliest ‘Date Inspected ’ to be included on the report. Only those Defect Records recorded after this
date will be included in the report.
To Date
(Optional)
Version: 4.7
233
CONFIDENTIALITY STATEMENT
The contents of this document, including system ideas and concepts, are confidential and proprietary in nature and are not to be distributed in any form
without the prior written consent of Bentley, Inc.
EXOR
MAINTENANCE MANAGER USER GUIDE
WORKS ORDERING REPORTS
If required, enter the latest ‘Date Inspected ’ to be included on the report. Only those Defect Records before this date will
be included in the report.
Defect Type
(Optional)
List
If required, enter the Defect Type to be included on the report. If this field is left blank all defect types will be included.
Defect Priority
(Optional)
List
If required, enter the defect priority to be reported on. If this field is left blank all defect priorities will be included. To
report on multiple Defect Priorities, press the [Create Record] button on the toolbar.
SISS
(Optional)
List
If required, enter the Standard Item Sub Section (SISS) to be reported on. If this field is left blank all SISS Codes will be
included. To include multiple SISS codes, press the [Create Record] button on the toolbar.
Item Code
(Optional)
List
If required, enter the Item code to be reported on. If this field is left blank all Item Codes will be included. To include
multiple Item Codes, press the [Create Record] button on the toolbar.
XSP
(Optional)
List
If required, enter the Cross Sectional Position of defects to be reported on. If this field is left blank defect on all XSP's will
be included.
4.11.2 Defects Not Yet Instructed – MAI3922
Figure 194
Version: 4.7
234
CONFIDENTIALITY STATEMENT
The contents of this document, including system ideas and concepts, are confidential and proprietary in nature and are not to be distributed in any form
without the prior written consent of Bentley, Inc.
EXOR
MAINTENANCE MANAGER USER GUIDE
WORKS ORDERING REPORTS
4.12 Summary of Defects Not Yet Instructed – MAI3920
Purpose:
This report produces a List of defects which have a Status of 'AVAILABLE' and which meet the required selection
parameters. Defects, which appear on this report, may be selected on a Work Order. The report is ordered by Road Id and
is divided by Priority and Standard Item Sub Section. The following information is displayed:
Road Group Name/Link and Section Id
Defect Priority
SISS
Labour Units
Cost
4.12.1 Selection Parameters
Admin Unit
(Required, Default)
List
Select an administrational unit to be used for this report. The default is the Admin Unit assigned to the current User.
Road Type
(Optional)
List
If required, enter the Road Type from which to select defects from. If this field is left blank all Road Group Types will be
reported on.
Road Id
(Optional)
List
If required, enter the Road Group Id from which to select defects from. If this field is left blank all Road Group Types will
be reported on.
From Date
(Optional)
If required, enter the earliest ‘Date Inspected ’ to be included on the report. Only those Defect Records recorded after this
date will be included in the report.
To Date
(Optional)
If required, enter the latest ‘Date Inspected ’ to be included on the report. Only those Defect Records before this date will
be included in the report.
Defect Type
(Optional)
List
If required, enter the Defect Type to be included on the report. If this field is left blank all defect types will be included.
Defect Priority
(Optional)
List
If required, enter the defect priority to be reported on. If this field is left blank all defect priorities will be included. To
report on multiple Defect Priorities, press the [Create Record] button on the toolbar.
SISS
(Optional)
Version: 4.7
List
235
CONFIDENTIALITY STATEMENT
The contents of this document, including system ideas and concepts, are confidential and proprietary in nature and are not to be distributed in any form
without the prior written consent of Bentley, Inc.
EXOR
MAINTENANCE MANAGER USER GUIDE
WORKS ORDERING REPORTS
If required, enter the Standard Item Sub Section (SISS) to be reported on. If this field is left blank all SISS Codes will be
included. To include multiple SISS codes, press the [Create Record] button on the toolbar.
Item Code
(Optional)
List
If required, enter the Item code to be reported on. If this field is left blank all Item Codes will be included. To include
multiple Item Codes, press the [Create Record] button on the toolbar.
XSP
(Optional)
List
If required, enter the Cross Sectional Position of defects to be reported on. If this field is left blank defect on all XSP's will
be included.
Summary of Defects Not Yet Instructed
Figure 195
Version: 4.7
236
CONFIDENTIALITY STATEMENT
The contents of this document, including system ideas and concepts, are confidential and proprietary in nature and are not to be distributed in any form
without the prior written consent of Bentley, Inc.
EXOR
MAINTENANCE MANAGER USER GUIDE
WORKS ORDERING REPORTS
4.13 Instructed Work by Status – MAI3924
Purpose:
This report produces a list of all Defects currently on a Work Order which meet the required selection parameters.
4.13.1 Selection Parameters
Admin Unit
(Required, Default)
List
Select an administrational unit to be used for this report. The default is the Admin Unit assigned to the current User.
Road Type
(Optional)
List
If required, enter the Road Type from which to select defects from. If this field is left blank all Road Group Types will be
reported on.
Road Id
(Optional)
List
If required, enter the Road Group Id from which to select defects from. If this field is left blank all Road Group Types will
be reported on.
Date Instructed From
(Optional)
If required, enter the earliest ‘Date Instructed ’ to be included on the report. Only those Defects on Work Orders
Instructed after this date will be included in the report.
Date Instructed To
(Optional)
If required, enter the latest ‘Date Instructed ’ to be included on the report. Only those Defects on Work Orders Instructed
before this date will be included in the report.
Work Status
(Required)
List
(Optional)
List
Enter the Work Status to be reported on.
Defect Priority
If required, enter the defect priority to be reported on. If this field is left blank all defect priorities will be included. To
report on multiple Defect Priorities, press the [Create Record] button on the toolbar.
Contract Name
(Optional)
List
If required, enter the name of the contract to be reported on.
Repair Type (P/T)
(Optional)
List
Enter 'P' to include Defects with Permanent Repair types only, 'T' to include Defects with Temporary Repair types only or
leave blank to include both.
Version: 4.7
237
CONFIDENTIALITY STATEMENT
The contents of this document, including system ideas and concepts, are confidential and proprietary in nature and are not to be distributed in any form
without the prior written consent of Bentley, Inc.
EXOR
MAINTENANCE MANAGER USER GUIDE
WORKS ORDERING REPORTS
4.13.2 Instructed Work by Status – MAI3924
Figure 196
Version: 4.7
238
CONFIDENTIALITY STATEMENT
The contents of this document, including system ideas and concepts, are confidential and proprietary in nature and are not to be distributed in any form
without the prior written consent of Bentley, Inc.
EXOR
MAINTENANCE MANAGER USER GUIDE
WORKS ORDERING REPORTS
4.14 Instructed Defects Due for Completion – MAI3926
Purpose:
This report produces a list of all defects which are currently on Work Orders but have not yet been completed i.e. have a
status of 'Instructed', and which meet the required selection parameters. The following information is displayed:
Road Group
Priority
Defect Id
Road Section Id
Road Section Description
XSP
Start Chainage of Defect
Date Instructed
Labour Units
Work Status
Total Cost
4.14.1 Selection Parameters
Admin Unit
(Required, Default)
List
Select an administrational unit to be used for this report. The default is the Admin Unit assigned to the current User.
Road Type
(Optional)
List
If required, enter the Road Type from which to select defects from. If this field is left blank all Road Group Types will be
reported on.
Road Id
(Optional)
List
If required, enter the Road Group Id from which to select defects from. If this field is left blank all Road Group Types will
be reported on.
Date Instructed From
(Optional)
If required, enter the earliest ‘Date Instructed ’ to be included on the report. Only those Defects on Work Orders
Instructed after this date will be included in the report.
Date Instructed To
(Optional)
If required, enter the latest ‘Date Instructed ’ to be included on the report. Only those Defects on Work Orders Instructed
before this date will be included in the report.
Defect Priority
(Optional)
List
If required, enter the defect priority to be reported on. If this field is left blank all defect priorities will be included. To
report on multiple Defect Priorities, press the [Create Record] button on the toolbar.
Contract Id
(Optional)
Version: 4.7
List
239
CONFIDENTIALITY STATEMENT
The contents of this document, including system ideas and concepts, are confidential and proprietary in nature and are not to be distributed in any form
without the prior written consent of Bentley, Inc.
EXOR
MAINTENANCE MANAGER USER GUIDE
WORKS ORDERING REPORTS
If required, enter the name of the contract to be reported on.
Works Order No
(Required)
List
If required, enter the Works Order Number to be reported on.
SISS
(Optional)
List
If required, enter the Standard Item Sub Section (SISS) to be reported on. If this field is left blank all SISS Codes will be
included. To include multiple SISS codes, press the [Create Record] button on the toolbar.
XSP
(Optional)
List
If required, enter the Cross Sectional Position of defects to be reported on. If this field is left blank defect on all XSP's will
be included.
4.14.2 Instructed Defects due for Completion
Figure 197
Version: 4.7
240
CONFIDENTIALITY STATEMENT
The contents of this document, including system ideas and concepts, are confidential and proprietary in nature and are not to be distributed in any form
without the prior written consent of Bentley, Inc.
EXOR
MAINTENANCE MANAGER USER GUIDE
WORKS ORDERING REPORTS
4.15 Inventory Updates – MAI3930
Purpose:
This report produces a summary of defects which require Inventory information to be updated, i.e. have the 'Update Inv ?'
field on Defects – MAI3806 set to 'Y', and which meet the required selection parameters.
4.15.1 Selection Parameters
Admin Unit
(Required, Default)
List
Select an administrational unit to be used for this report. The default is the Admin Unit assigned to the current User.
Road Type
(Optional)
List
If required, enter the Road Type from which to select defects from. If this field is left blank all Road Group Types will be
reported on.
Road Id
(Optional)
List
If required, enter the Road Group Id from which to select defects from. If this field is left blank all Road Group Types will
be reported on.
Date Inspected From
(Optional)
If required, enter the earliest ‘Date Inspected ’ to be included on the report. Only those Defect Records recorded after this
date will be included in the report.
Date Inspected To
(Optional)
If required, enter the latest ‘Date Inspected ’ to be included on the report. Only those Defect Records before this date will
be included in the report.
Version: 4.7
241
CONFIDENTIALITY STATEMENT
The contents of this document, including system ideas and concepts, are confidential and proprietary in nature and are not to be distributed in any form
without the prior written consent of Bentley, Inc.
EXOR
MAINTENANCE MANAGER USER GUIDE
WORKS ORDERING REPORTS
4.16 Work for Quality Inspection – MAI3950
Purpose:
This report produces a random batch of completed Work Order Lines for a Work Quality Audit which meet the required
selection parameters. When the Work Audit is carried out ,the results are updated using 'Quality Inspection Results –
MAI3820'. Once a Work Order line is selected in a batch it cannot be re-selected in subsequent Quality Inspection
batches. The following information is displayed :
Batch Number
Road Id and Description
Road Group
Defect/Schedule Id
Defect Location
Works Order No
Work Sheet No
Date Completed
BOQ Items and dimensions
Check Result (Place holder)
Check Code (Place holder)
Comments (Place holder)
Checked by (Place holder)
Date Checked (Place holder)
4.16.1 Selection Parameters
Admin Unit
(Required, Default)
List
Select an administrational unit to be used for this report. The default is the Admin Unit assigned to the current User.
Road Type
(Optional)
List
If required, enter the Road Type from which to select defects from. If this field is left blank all Road Group Types will be
reported on.
Road Id
(Optional)
List
If required, enter the Road Group Id from which to select defects from. If this field is left blank all Road Group Types will
be reported on.
Contract Id
(Optional)
List
If required, enter the name of the contract to be reported on.
Date Completed From
(Optional)
If required, enter the earliest ‘Date Completed’ to be included on the report. Only those Work Order Lines completed after
this date will be included in the report.
Date Completed To
(Optional)
Version: 4.7
242
CONFIDENTIALITY STATEMENT
The contents of this document, including system ideas and concepts, are confidential and proprietary in nature and are not to be distributed in any form
without the prior written consent of Bentley, Inc.
EXOR
MAINTENANCE MANAGER USER GUIDE
WORKS ORDERING REPORTS
If required, enter the latest ‘Date Completed’ to be included on the report. Only those Work Order Lines completed before
this date will be included in the report.
Sample Percentage
(Required, Default)
Enter the Percentage of Work Order lines, which meet the required selection parameters, to select for the Quality Audit.
The default value is 5%.
SISS
(Optional)
List
If required, enter the Standard Item Sub Section (SISS) to be reported on. If this field is left blank all SISS Codes will be
included.
Version: 4.7
243
CONFIDENTIALITY STATEMENT
The contents of this document, including system ideas and concepts, are confidential and proprietary in nature and are not to be distributed in any form
without the prior written consent of Bentley, Inc.
EXOR
MAINTENANCE MANAGER USER GUIDE
WORKS ORDERING REPORTS
4.16.2 Work for Quality Inspection – MAI3950
Figure 198
Version: 4.7
244
CONFIDENTIALITY STATEMENT
The contents of this document, including system ideas and concepts, are confidential and proprietary in nature and are not to be distributed in any form
without the prior written consent of Bentley, Inc.
EXOR
MAINTENANCE MANAGER USER GUIDE
WORKS ORDERING REPORTS
4.17 Quality Inspection Performance – MAI3952
Purpose:
This report produces a summary of Quality Inspections carried out and updated in 'Quality Inspection Results –
MAI3820'. The following information is displayed:
Supervisor Code
Number of Inspections carried out
Number of repairs checked
Number of repairs passed
% Passed
Number Borderline
% Borderline
Number Failed
% Failed
Total Repairs Completed
% Checked
4.17.1 Selection Parameters
Admin Unit
(Required, Default)
List
Select an administrational unit to be used for this report. The default is the Admin Unit assigned to the current User.
Road Type
(Optional)
List
If required, enter the Road Type from which to select defects from. If this field is left blank all Road Group Types will be
reported on.
Road Id
(Optional)
List
If required, enter the Road Group Id from which to select defects from. If this field is left blank all Road Group Types will
be reported on.
Quality Inspected From
(Optional)
If required, enter the earliest date of Quality Inspection to be included on the report. Only those Work Order Lines quality
inspected after this date will be included in the report.
Quality Inspected To
(Optional)
If required, enter the latest date of Quality Inspection to be included on the report. Only those Work Order Lines quality
inspected before this date will be included in the report.
Version: 4.7
245
CONFIDENTIALITY STATEMENT
The contents of this document, including system ideas and concepts, are confidential and proprietary in nature and are not to be distributed in any form
without the prior written consent of Bentley, Inc.
EXOR
MAINTENANCE MANAGER USER GUIDE
WORKS ORDERING REPORTS
Figure 199 - Quality Inspection Performance – MAI3952
Version: 4.7
246
CONFIDENTIALITY STATEMENT
The contents of this document, including system ideas and concepts, are confidential and proprietary in nature and are not to be distributed in any form
without the prior written consent of Bentley, Inc.
EXOR
MAINTENANCE MANAGER USER GUIDE
WORKS ORDERING REPORTS
4.18 Admin Unit Performance – MAI3956
Purpose:
This report provides a 2 part report. The first is a summary of the performance of an Administrative Unit in terms of the
quantity of work done within the required timescale. The report provides a summary count for each defect priority and
totals work in the following categories.
Number of defects completed Within Target Time
Number of defects completed 0-7 days late
Number of defects completed 8-14 days late
Number of defects completed 15-28 days late
Number of defects completed more than 28 days late (this total may include defects not yet completed)
The report also provides the following information:
Total Work Written Off
% Within Time
If a defect has not been repaired within the required Target Time a summary of the Defect the Work Order it has been
instructed on is provided on Part 2 of the Report.
4.18.1 Selection Parameters
Admin Unit
(Required, Default)
List
Select an administrational unit to be used for this report. The default is the Admin Unit assigned to the current User.
Date Inspected From
(Optional)
Enter the earliest date of Inspection to be included on the report. Only those Defects raised after this date will be included
in the report.
Date Inspected To
(Optional)
Enter the latest date of Inspection to be included on the report. Only those Defects raised before this date will be included
in the report.
Version: 4.7
247
CONFIDENTIALITY STATEMENT
The contents of this document, including system ideas and concepts, are confidential and proprietary in nature and are not to be distributed in any form
without the prior written consent of Bentley, Inc.
EXOR
MAINTENANCE MANAGER USER GUIDE
WORKS ORDERING REPORTS
4.18.2 Admin Unit Performance – MAI3956
Figure 200 - Part 1
Version: 4.7
248
CONFIDENTIALITY STATEMENT
The contents of this document, including system ideas and concepts, are confidential and proprietary in nature and are not to be distributed in any form
without the prior written consent of Bentley, Inc.
EXOR
MAINTENANCE MANAGER USER GUIDE
WORKS ORDERING REPORTS
Figure 201 - Part 2
Version: 4.7
249
CONFIDENTIALITY STATEMENT
The contents of this document, including system ideas and concepts, are confidential and proprietary in nature and are not to be distributed in any form
without the prior written consent of Bentley, Inc.
EXOR
MAINTENANCE MANAGER USER GUIDE
CYCLIC MAINTENANCE WORKS ORDERS ADMIN
5
Cyclic Maintenance Works Orders Admin
This chapter describes the forms used to manage Cyclic Maintenance Works Orders.
This chapter contains the following forms:
Cyclic Maintenance Inventory Rules – MAI3626
Cyclic Maintenance Schedules – MAI3860
Cyclic Maintenance Schedules by Section – MAI3862
View Cyclic Maintenance Work – MAI3804
Maintain Maintenance Reports – MAI3250
Valid for Maintenance Rules – MAI3440
Related Maintenance Activities – MAI3628
The form descriptions provide you with detailed information about each Cyclic Maintenance Works Ordering form in
highways by exor, including:
an overall description of the form
a detailed explanation of each field, including available features (such as List of Values), default values and other
characteristics
helpful information for using the form
5.1
General Information
The Cyclic Maintenance system allows the generation of cyclic works orders to perform regular maintenance tasks. These
works orders are automatically generated on request and are complete down to the level of the individual job items and
quantities required.
To be used effectively, the cyclic maintenance system requires that the road network be defined and all the relevant
inventory be loaded against it. These activities are covered in the Network Manager and Asset Manager manuals
respectively.
If however, the inventory on the system is inaccurate or the type required for the cyclic activity does not exist on the
required sections, cyclic maintenance can be carried out on these sections although it is a slightly more manual task.
The cyclic maintenance system uses the network and inventory data to ascertain how much work there is to be done of a
certain type. For example, the cyclic operation of Grass Cutting requires the knowledge of what length of grass verge
exists along the relevant roads. Once this quantity has been calculated, the system can raise a cyclic works order to action
a specific length of Grass cutting. As this item will exist on a contract, this work can be costed and budgeted for.
Version: 4.7
250
CONFIDENTIALITY STATEMENT
The contents of this document, including system ideas and concepts, are confidential and proprietary in nature and are not to be distributed in any form
without the prior written consent of Bentley, Inc.
EXOR
MAINTENANCE MANAGER USER GUIDE
CYCLIC MAINTENANCE WORKS ORDERS ADMIN
'A33 Grass Cutting.
Twice Yearly'
Contract
Schedule
'Grass Cutting
@ £47.50/km'
Works Order
C.M. Rules
'Grass Cutting
32.75km Verge'
'Grass Cutting = Verge
Factor = 0.001'
'A33 Grass Cutting.
32.75km @ £47.50 = £1555.63'
Works Order
Inventory
'32750m of Verge'
Network
'A33 Route length = 44250m'
Figure 202
When a new schedule is created using Cyclic Maintenance Schedules – MAI3860, the system will scan the network,
calculating how much inventory will be affected by the work to be done under the schedule. This amount is available to
view within the schedule.
You must then use Cyclic Maintenance Schedules By Section – MAI3862 to determine, for each road section within the
scheduled road group, exactly how much work you want to be carried out each time the schedule is run. It is possible to
simply accept the calculated quantity, or you may choose to override this quantity and enter your own value. This process
may be done at group level, depending on how the values are set up in Product Options – HIG9130, setting the
USECYCGRPD (DoT roads) or USECYCGRPL (Local roads) options.
Once the schedules have been created and the quantities of work to be done calculated, cyclic works orders can then be
created at any time using Works Orders (Cyclic)- MAI3800. This form will, when given a schedule name, generate and
cost an appropriate works order to cover all the work needed to fulfill the schedule. This works order can then be viewed,
amended and printed for issue to the contractor.
Version: 4.7
251
CONFIDENTIALITY STATEMENT
The contents of this document, including system ideas and concepts, are confidential and proprietary in nature and are not to be distributed in any form
without the prior written consent of Bentley, Inc.
EXOR
MAINTENANCE MANAGER USER GUIDE
CYCLIC MAINTENANCE WORKS ORDERS ADMIN
Define Network
And Inventory
Maintain Cyclic
Inventory Rules
Contract
Maintain
Schedules
[Calc Quantities]
'One-off' Setup
Maintain Sched.
by Road Section
Regular Use
Maintain Cyclic
Works Order
Print Cyclic
Works Orders
Figure 203
Version: 4.7
252
CONFIDENTIALITY STATEMENT
The contents of this document, including system ideas and concepts, are confidential and proprietary in nature and are not to be distributed in any form
without the prior written consent of Bentley, Inc.
EXOR
MAINTENANCE MANAGER USER GUIDE
CYCLIC MAINTENANCE WORKS ORDERS ADMIN
5.2
CyclicMaintenance Inventory Rules – MAI3626
Figure 204 - Cyclic Maintenance Inventory Rules Menu Option
Version: 4.7
253
CONFIDENTIALITY STATEMENT
The contents of this document, including system ideas and concepts, are confidential and proprietary in nature and are not to be distributed in any form
without the prior written consent of Bentley, Inc.
EXOR
MAINTENANCE MANAGER USER GUIDE
CYCLIC MAINTENANCE WORKS ORDERS ADMIN
Figure 205 - Cyclic Maintenance Inventory Rules
5.2.1
General Information
When a cyclic maintenance works order schedule is set up it looks at the data within this form to work out the quantity of
work to be done based on the inventory contained on the selected sections
Before cyclic maintenance works orders can be generated from the system, a set of rules for each type of inventory to be
included must be created. These rules determine which inventory types will be affected when each of the standard jobs are
carried out.
If no inventory exists on the sections and the actual values are to be entered using Cyclic Maintenance Schedules by
Section – MAI3862 no rules need entering.
5.2.2
Cyclic Maintenance Inventory Rules
When you enter this window the cursor sits in the Loca/DTp field waiting for you to enter new data. To obtain existing
data press [Execute Query] from the toolbar.
Item Code
(Required)
List
Select a valid job item from the List of Values to represent the work.
Description
(Display Only)
A description of the item code will be displayed.
Version: 4.7
254
CONFIDENTIALITY STATEMENT
The contents of this document, including system ideas and concepts, are confidential and proprietary in nature and are not to be distributed in any form
without the prior written consent of Bentley, Inc.
EXOR
MAINTENANCE MANAGER USER GUIDE
CYCLIC MAINTENANCE WORKS ORDERS ADMIN
Local/DoT
(Required)
List
(Required)
List
Enter ‘L’ for Local, ‘D’ for DoT inventory.
Inv Type
Select a valid inventory item type to represent the inventory which the current job item acts upon.
Attribute Condition
(Optional)
If required, enter a logical condition to restrict the inventory affected by the current job item. This field is used to be more
selective with the inventory item and can limit the work to inventory of a given type. It is populated with the inventory
item 'Column Name' and 'Attribute Values' which can be established from Asset Metamodel – NM0410. For example, for
grass cutting on an embankment where the angle of the embankment required is less than 45° the Attribute condition
would be: IIT_ANGLE < 45
Factor
(Optional)
Enter a factor if the contract rate is charged on a different unit of measurement to the unit the inventory item is normally
measured in.
For example, a verge is measured in metres but the SOR price may be priced per kilometre, in this case a factor of 0.001
can be applied converting the verge length from metres to kilometres.
Version: 4.7
255
CONFIDENTIALITY STATEMENT
The contents of this document, including system ideas and concepts, are confidential and proprietary in nature and are not to be distributed in any form
without the prior written consent of Bentley, Inc.
EXOR
MAINTENANCE MANAGER USER GUIDE
CYCLIC MAINTENANCE WORKS ORDERS ADMIN
5.3
Cyclic Maintenance Schedules – MAI3860
Figure 206 - Cyclic Maintenance Schedules Menu Option
Figure 207 - Cyclic Maintenance Schedule
Version: 4.7
256
CONFIDENTIALITY STATEMENT
The contents of this document, including system ideas and concepts, are confidential and proprietary in nature and are not to be distributed in any form
without the prior written consent of Bentley, Inc.
EXOR
MAINTENANCE MANAGER USER GUIDE
CYCLIC MAINTENANCE WORKS ORDERS ADMIN
5.3.1
General Information
It allows the definition of cyclic maintenance schedules for use when generating cyclic works orders.
A cyclic maintenance schedule is simply a list of standard job items and quantities, which are to be carried out along a
predetermined stretch of road at a predefined frequency. An example would be Grass Cutting all the grass verges and
embankments along the A33 twice yearly.
The schedule itself is linked to a road group or road section, thus allowing the amounts of inventory items along each
section to be calculated. In this way, this form can automatically calculate work volumes for each standard job item.
The method of calculation is set up in Product Options – HIG9130, setting the USECYCGRPD (DoT roads) or
USECYCGRPL (Local roads) options to either 'Y' or 'N'. These product options determine whether road schedules and
associated work order lines, will be based on road groups or road sections.
In Work Orders (Cyclic), if this option is set to 'Y' then each road work order line will be based on a road group. If set to
N then lines will be based on a road section.
In Cyclic Maintenance Schedules, if this option is set to 'Y' then actual quantities may be entered for the schedule items. If
set to N they may not be entered.
In Cyclic Maintenance Schedules by Section, if this option is set to 'N' then actual item quantities for road sections are
automatically accumulated into schedule totals. If set to 'Y' there is no accumulation.
This option must not be amended on a live system.
Due to the varying nature of cyclic maintenance work a number of different road group types may be required for
different routes etc., for example the grass cutting route will differ from the gully emptying route and the winter
maintenance gritting route will differ from both the above.
The group types that can be used in cyclic maintenance schedules are set up in Product Options – HIG9130, setting the
CYCGRPTYPD (DoT roads) or CYCGRPTYPL (Local roads) options to be a list of the required group types in the form
GRIT, GULY, GRAS etc. Schedules may only be set up against groups of these types.
These group types and associated groups are set up using the modules contained in the Network Manager volume.
The link between the job item and the inventory type is created using Cyclic Maintenance Inventory Rules – MAI3626
and must be done before any schedules can be created using the inventory on the road sections.
5.3.2
Cyclic Maintenance Schedules
On entering this window, the cursor sits in the Name field waiting for you to enter a new schedule. To view existing
schedules, select [Enter Query] enter your selection criteria followed by [Execute Query].
Schedule Id
(Default)
A unique system generated schedule id will be displayed.
Name
(Required)
Enter a descriptive name for this schedule.
Last Qty Calculations
(Display Only)
Displays the date that the quantity of work required was calculated for this schedule. This calculation is initiated by
pressing the [Calculate Quantities] button.
Version: 4.7
257
CONFIDENTIALITY STATEMENT
The contents of this document, including system ideas and concepts, are confidential and proprietary in nature and are not to be distributed in any form
without the prior written consent of Bentley, Inc.
EXOR
MAINTENANCE MANAGER USER GUIDE
CYCLIC MAINTENANCE WORKS ORDERS ADMIN
Description
(Optional)
If required, enter further descriptive text concerning the schedule.
Work Category
(Required)
List
Select a work category that is to be associated with this schedule.
Work categories are defined using Item Code Breakdowns – MAI194 (Maintenance Manager System Administration
Manual).
Agency
(Required, Default)
List
(Optional)
List
Select the agency responsible for this schedule.
SISS
If required, select a Standard Item Sub Section code to restrict the schedule.
Frequency
(Required)
List
Select a frequency code to indicate how often the work contained in this schedule will take place. The frequency codes are
defined via Interval Codes – HIG1220 (Maintenance Manager System Administration Manual).
Schedule by Asset
(Optional)
List
Enter ‘Y’ to generate a cyclic work order with a work order line per asset using Cyclic Works Orders – MAI3800A. The
work order line created will also contain the asst reference.
With this field set to ‘Y’ the schedule will not be visible in Cyclic Maintenance by Road Section – MAI3862.
Road Group Type
(Required)
List
Select a valid road group type from the List of Values. The road groups available will have been defined in a product
option
Road Group Id
(Required)
List
Use the Gazetteer to select the road group to which this schedule will apply. Only road groups of the type entered in the
previous field will be available.
Road Group Desc
(Display Only)
Displays the full name of the selected road group.
Start Date
(Optional)
Enter the start date of the schedule.
End Date
(Optional)
Enter the end date of the schedule.
The next group of fields display information about the 5 most recent works orders relating to this schedule. This
represents the last 5 times that the work contained on this schedule was performed. As such they will initially all be blank.
Version: 4.7
258
CONFIDENTIALITY STATEMENT
The contents of this document, including system ideas and concepts, are confidential and proprietary in nature and are not to be distributed in any form
without the prior written consent of Bentley, Inc.
EXOR
MAINTENANCE MANAGER USER GUIDE
CYCLIC MAINTENANCE WORKS ORDERS ADMIN
Works Order No
(Display Only)
Displays the works order number of the order relating to this schedule.
Date Instructed
(Display Only)
Displays the date that the work was instructed to the contractor.
Date Complete
(Display Only)
Displays the date that the work was completed.
Two buttons have been defined on this window for use when creating a schedule, they are as follows:
[Schedule Items]
Opens the schedule items window and allows the entry of the schedule items that are to
be used in this cyclic maintenance schedule.
[Calculate Quantities] Once the schedule items have been entered in the next window, this button will calculate
the actual quantities to be included in the schedule based on the values set up in Cyclic
Maintenance Inventory Rules – MAI3626 and the inventory present in the road sections for the
selected road group.
Figure 208 - Schedule Items
5.3.3
Schedule Items
This window allows you to define the actual items of work, which make up the schedule. The tasks themselves are
represented by standard job items. These are created and maintained using Standard Items- MAI3888 Maintenance
Manager System Administration Manual).).
On entry to the window, the cursor sits in the Item Code field, awaiting the selection of a job item. When viewing an
existing schedule, this block will be populated with those items currently attached to the schedule.
Version: 4.7
259
CONFIDENTIALITY STATEMENT
The contents of this document, including system ideas and concepts, are confidential and proprietary in nature and are not to be distributed in any form
without the prior written consent of Bentley, Inc.
EXOR
MAINTENANCE MANAGER USER GUIDE
CYCLIC MAINTENANCE WORKS ORDERS ADMIN
Item Code
(Required)
List
Select a standard job item from the List of Values. This represents a job of work which will appear as such on the works
orders generated for this schedule.
If an item is added and it has no associated inventory rules a warning message will be displayed. If you want the system to
calculate the quantities automatically, delete the item that displayed the warning message, go back to Cyclic Maintenance
Inventory Rules, add the required rule, then re enter.
Description
(Display Only)
The full description of the standard job item will be displayed.
Unit
(Display Only)
Displays the unit of measurement of this job item.
Calculated Quantity
(Display Only)
This field will display the amount of work to be done, as calculated by the system, each time this schedule is used. This
calculation is a one-off ‘batch’ process (see below) and is initiated once the entire schedule has been defined. As such, it
will initially be blank. The calculated quantity will be copied into the actual quantity field.
Actual Quantity
(Optional/Display Only)
This field will display the actual amount of work to be done each time a works order is generated for this schedule, if
USECYCGRPL or USECYCGRPD is set to ‘Y’ the actual quantity can be updated, if set to ‘N’ it can not be updated here
it must be updated at section level using Cyclic Maintenance Schedule By Section. Once it has been updated using Cyclic
Maintenance Schedule By Section this field becomes display only because the actual quantities have been entered at
section level.
Last Updated
(Display Only)
Displays the date that this line of the schedule was last recalculated or manually updated.
5.3.4
Calculating the Work Quantity
When the schedule items are first added to the schedule, the Calculated Quantity field will be blank. Once you have
completed the definition of the schedule, press the [Calculate Quantities] button. This will cause the system to scan
through the network and its associated inventory, looking for inventory items on the road sections relating to this schedule
which will be affected by the jobs contained within the schedule. It is therefore possible for the system to calculate how
much work running this schedule will create. This is then displayed in the Calculated Quantity field.
If the sections do not contain the required inventory items the calculated quantity field will be blank, it can be updated
here if the product option USECYCGRPL or USECYCGRPD are set to ‘Y’. If not the actual quantities are added to
individual sections using Cyclic Maintenance Schedules By Section, the actual quantities will be populated with the
calculated quantities remaining 0.
Note: This calculation may take some time. This will depend largely on the complexity of your road network as well as
the amount of inventory held against it.
Version: 4.7
260
CONFIDENTIALITY STATEMENT
The contents of this document, including system ideas and concepts, are confidential and proprietary in nature and are not to be distributed in any form
without the prior written consent of Bentley, Inc.
EXOR
MAINTENANCE MANAGER USER GUIDE
CYCLIC MAINTENANCE WORKS ORDERS ADMIN
5.3.5
Clearing Defects with Cyclic Maintenance Works Orders
A cyclic maintenance activity that is linked to a works order can clear defects if the regular inspection activity and
associated defect found is linked to the cyclic activity.
For example,
An inspection activity of GA (Grassed Areas) could result in a defect of type IWED (Injurious Weed), this defect could in
turn be cleared when the cyclic maintenance activity 69 (Grassed Areas: Treat Vegetation) is carried out on the section.
These rules are set up and maintained using Valid for Maintenance Rules – MAI3440.
Each cyclic maintenance schedule is linked to a works category using this module. Works categories are linked to cyclic
maintenance activities using Item Code Breakdowns – MAI1940.
5.3.6
The Next Step
If the calculated quantity is known to be accurate then each section will have the relevant number of assets associated with
it, this can be viewed using Cyclic Maintenance Schedules by Section, these can be updates on a section by section level if
required, the changes will be reflected in the Actual Quantity field.
If having created a schedule and calculated the quantity of work the count is inaccurate due to the lack of relevant
inventory in the database, the next step is to use Cyclic Maintenance Schedules By Section – MAI3862 to apportion that
work amongst the individual road sections that make up the schedule if the work orders are to be raised at section level
and not at group level.
Version: 4.7
261
CONFIDENTIALITY STATEMENT
The contents of this document, including system ideas and concepts, are confidential and proprietary in nature and are not to be distributed in any form
without the prior written consent of Bentley, Inc.
EXOR
MAINTENANCE MANAGER USER GUIDE
CYCLIC MAINTENANCE WORKS ORDERS ADMIN
5.4
Cyclic Maintenance Schedules by Section – MAI3862
Figure 209 - Cyclic Maintenance Schedules by Section Menu Option
Figure 210 - Schedule by Section
Version: 4.7
262
CONFIDENTIALITY STATEMENT
The contents of this document, including system ideas and concepts, are confidential and proprietary in nature and are not to be distributed in any form
without the prior written consent of Bentley, Inc.
EXOR
MAINTENANCE MANAGER USER GUIDE
CYCLIC MAINTENANCE WORKS ORDERS ADMIN
5.4.1
General Information
This option is used when the product option USECYCGRPD/USECYCGRPL is set to 'N' .
This form allows a schedule to be viewed, along with all of the road sections that make up that schedule. It is then
possible to view the job items which, when the schedule is run, will be carried out on the inventory within each section.
Finally, although the system will calculate how much work is required in each section via Cyclic Maintenance Schedules,
it is possible to amend the quantity on a section by section basis to retain complete control over how much work will be
issued at any one time.
5.4.2
Schedules by Road Section
On entry to this window an existing schedule created using Cyclic Maintenance Schedules must be queried back before
you can view and update the actual amounts on each road section. Select [Enter Query], enter your selection criteria
followed by [Execute Query] from the toolbar.
Schedules with the "By Asset" flag set to 'Y' cannot be queried in this form.
All of the fields in this window are for information and are therefore display only.
Figure 211 - Road Sections
5.4.3
Road Sections
This window displays a list of all the road sections that make up the road group to which this schedule applies. Highlight
the required section and press the [Schedule Items] button see the schedule details that apply to the selected road section.
Version: 4.7
263
CONFIDENTIALITY STATEMENT
The contents of this document, including system ideas and concepts, are confidential and proprietary in nature and are not to be distributed in any form
without the prior written consent of Bentley, Inc.
EXOR
MAINTENANCE MANAGER USER GUIDE
CYCLIC MAINTENANCE WORKS ORDERS ADMIN
Figure 212 - Schedule Items
5.4.4
Schedule Items
Having created the schedule and made the system calculate its suggested quantity of work for each job item, you can use
this window to override this figure with the actual amount of work to be done. The items of work themselves are
represented by standard job items. These are created and maintained using Standard Items – MAI3888. (Maintenance
Manager Administration Manual).
On entry to the window, the cursor sits in the first Actual Quantity field, awaiting the input of an actual quantity for the
first job item on the schedule. Either enter the actual quantity of work to be carried out, or select [Duplicate Record] from
the menu bar to accept the system calculated quantity.
Item Code
(Display Only)
Displays a standard job item representing a job of work to be carried out on this section. This item will appear on the
works orders generated for this schedule.
Description
(Display Only)
Displays the full description of the standard job item.
Unit
(Display Only)
Displays the unit of measurement of this job item.
Calculated Quantity
(Display Only)
This field will display the amount of work to be done, as calculated by the system, each time this schedule is used. This
calculation is a one-off ‘batch’ process and is initiated when the schedule is being created using Cyclic Maintenance
Schedules – MAI3860.
Version: 4.7
264
CONFIDENTIALITY STATEMENT
The contents of this document, including system ideas and concepts, are confidential and proprietary in nature and are not to be distributed in any form
without the prior written consent of Bentley, Inc.
EXOR
MAINTENANCE MANAGER USER GUIDE
CYCLIC MAINTENANCE WORKS ORDERS ADMIN
Actual Quantity
(Optional)
Enter the actual amount of work to be done in this section each time a works order is generated for this schedule. It is
possible to accept the system-generated value from the Calculated Quantity field by [Duplicate Field] from the menu bar
or by pressing [F3] to accept the system calculated quantity.
Last Updated
(Display Only)
Displays the date that this line of the schedule was last updated.
5.4.5
The Next Step
Having created the schedule and entered the actual amount of work to be done for each road section, the next step is to
create a suitable contract to raise the works order against. This is done via Contracts – MAI3880. (Maintenance Manager
Administration Manual)
Note: Before a contract can be created, the contractor relating to that contract must exist. Contractors are created via
Contractors – MAI3881. (Maintenance Manager Administration Manual)
Version: 4.7
265
CONFIDENTIALITY STATEMENT
The contents of this document, including system ideas and concepts, are confidential and proprietary in nature and are not to be distributed in any form
without the prior written consent of Bentley, Inc.
EXOR
MAINTENANCE MANAGER USER GUIDE
CYCLIC MAINTENANCE WORKS ORDERS ADMIN
5.5
View Cyclic Maintenance Work – MAI3804
Figure 213 - View Cyclic Maintenance Work Menu Option
Figure 214 - View Cyclic Work
5.5.1
General Information
This form allows you to view the job items, quantities, costs etc. for a specified cyclic maintenance schedule.
Version: 4.7
266
CONFIDENTIALITY STATEMENT
The contents of this document, including system ideas and concepts, are confidential and proprietary in nature and are not to be distributed in any form
without the prior written consent of Bentley, Inc.
EXOR
MAINTENANCE MANAGER USER GUIDE
CYCLIC MAINTENANCE WORKS ORDERS ADMIN
5.5.2
View Cyclic Maintenance Work
Upon entering this window the system will automatically query back a schedule, to retrieve the required schedule press
[Enter Query], enter the required selection criteria followed by [Execute Query] to retrieve the required schedule.
All fields in this window are queryable and will be display only when the query has been executed.
Select the [BOQ Items] button to display the BOQ Items window.
Figure 215 - BOQ Items
5.5.3
BOQ Items
This window contains details of the standard job items, which make up the current schedule including dimensions rates
and costs.
All fields are display only and cannot be updated. To update the schedule, you should use Cyclic Maintenance Schedules
– MAI3860.
To view additional information for a selected job item press the [Expand] button in the toolbar and the following window
will be displayed:
Version: 4.7
267
CONFIDENTIALITY STATEMENT
The contents of this document, including system ideas and concepts, are confidential and proprietary in nature and are not to be distributed in any form
without the prior written consent of Bentley, Inc.
EXOR
MAINTENANCE MANAGER USER GUIDE
CYCLIC MAINTENANCE WORKS ORDERS ADMIN
Figure 216 - BOQ Details
5.5.4
BOQ Details
This window is displayed by pressing the [Expand] button in the menu toolbar when a BOQ item is selected in the
window above, it is for information therefore all fields are display only.
Select [Continue] to return to the BOQ Items window.
Version: 4.7
268
CONFIDENTIALITY STATEMENT
The contents of this document, including system ideas and concepts, are confidential and proprietary in nature and are not to be distributed in any form
without the prior written consent of Bentley, Inc.
EXOR
MAINTENANCE MANAGER USER GUIDE
CYCLIC MAINTENANCE WORKS ORDERS ADMIN
5.6
Maintenance Reports – MAI3825
Figure 217 - Maintenance Reports Menu Option
Figure 218 - Maintenance Report
Version: 4.7
269
CONFIDENTIALITY STATEMENT
The contents of this document, including system ideas and concepts, are confidential and proprietary in nature and are not to be distributed in any form
without the prior written consent of Bentley, Inc.
EXOR
MAINTENANCE MANAGER USER GUIDE
CYCLIC MAINTENANCE WORKS ORDERS ADMIN
5.6.1
General Information
This form allows to insert, update, delete and review the maintenance work carried out on a section. Details of any cyclic
maintenance work carried out on a section will automatically be displayed here.
Maintenance activities can be manually entered if required so your records are up to date without carrying out cyclic
activities.
5.6.2
Section Details
When you enter this form it will be in query mode. Enter you selection criteria followed by [Execute Query] to retrieve
the required road section. Enter details in one of the following fields:
Link Id
Agency
Linkcode
Section
Road Number
Length
Description
5.6.3
Maintenance Reports
Details of the maintenance carried out on the selected section will be displayed.
Date Work Done
(Required)
Enter the date the maintenance activity took place.
Inspector’s Initials
(Optional)
List
Select the initials of the inspector(s).
St Chain
(Required, Default)
Enter the start number of the chain. This field defaults to zero.
End Chain
(Required, Default)
Enter the end number of the chain. This field defaults to the end of the section.
5.6.4
Activities
The activities carried out will be displayed.
Activity Area
(Required)
List
Enter a valid activity are for the cyclic maintenance work that has been carried out.
Description
(Display Only)
The corresponding description for the activity area will be displayed.
Version: 4.7
270
CONFIDENTIALITY STATEMENT
The contents of this document, including system ideas and concepts, are confidential and proprietary in nature and are not to be distributed in any form
without the prior written consent of Bentley, Inc.
EXOR
MAINTENANCE MANAGER USER GUIDE
CYCLIC MAINTENANCE WORKS ORDERS ADMIN
5.7
Valid for Maintenance Rules – MAI3440
Figure 219 - Valid for Maintenance Rules Menu Option
Version: 4.7
271
CONFIDENTIALITY STATEMENT
The contents of this document, including system ideas and concepts, are confidential and proprietary in nature and are not to be distributed in any form
without the prior written consent of Bentley, Inc.
EXOR
MAINTENANCE MANAGER USER GUIDE
CYCLIC MAINTENANCE WORKS ORDERS ADMIN
Figure 220 - Valid for Maintenance Rules
5.7.1
General Information
This form allows you set up the rules that define when a cyclic maintenance activity will clear a defect that was loaded as
a result of a regular or ad hoc inspection.
For example, an inspection activity of GA (Grassed Areas) could result in a defect of type IWED (Injurious Weed), this
in turn would be cleared when the cyclic maintenance activity 69 (Grassed Areas : Treat Vegetation) is carried out on the
sections.
A standard set of rules are supplied with the system, these can be added to if required.
5.7.2
Valid for Maintenance Rules
Inspection Activity
(Required)
List
Enter an inspection activity. These activities are set up using Activities – MAI1200.
A 'D' or 'S' will be displayed in the adjacent field indicating whether the activity is used in detailed or safety inspections.
Defect Types
(Required)
List
Enter a defect type. These defects are set up using Defect Control Data – MAI1300.
Maintenance Activity
(Required)
List
Enter a maintenance activity. These activities are set up using Activities – MAI1200.
Version: 4.7
272
CONFIDENTIALITY STATEMENT
The contents of this document, including system ideas and concepts, are confidential and proprietary in nature and are not to be distributed in any form
without the prior written consent of Bentley, Inc.
EXOR
MAINTENANCE MANAGER USER GUIDE
CYCLIC MAINTENANCE WORKS ORDERS ADMIN
5.8
Related Maintenance Activities – MAI3628
Figure 221 - Related Maintenance Activities Menu Option
Version: 4.7
273
CONFIDENTIALITY STATEMENT
The contents of this document, including system ideas and concepts, are confidential and proprietary in nature and are not to be distributed in any form
without the prior written consent of Bentley, Inc.
EXOR
MAINTENANCE MANAGER USER GUIDE
CYCLIC MAINTENANCE WORKS ORDERS ADMIN
Figure 222 - Related Maintenance Activities
5.8.1
General Information
This form is used to reschedule cyclic maintenance activities when work has been carried out on a section that has an
affect on that activity. For example, removing old signs along a carriageway and replacing them with new signs could
result on the regular activity of sign cleansing being rescheduled.
These activities are set up and maintained using Activities – MAI1200.
Maintenance Activity
(Required)
List
Enter a maintenance activity. This activity will have been previously linked to a works category using Item Code
Breakdowns – MAI1940. Prior to being selected for use when raising a works order.
Reschedule Activity
(Required)
List
Enter the activity that is to be rescheduled when the above activity is carried out on a section.
Version: 4.7
274
CONFIDENTIALITY STATEMENT
The contents of this document, including system ideas and concepts, are confidential and proprietary in nature and are not to be distributed in any form
without the prior written consent of Bentley, Inc.
EXOR
MAINTENANCE MANAGER USER GUIDE
CYCLIC MAINTENANCE WORKS ORDERING REPORTS
6
Cyclic Maintenance Works Ordering Reports
This chapter provides examples and the required selection criteria for the Cyclic Maintenance Works Ordering and
associated Reports.
The reports illustrated in this chapter are:
BOQ Work Order (Cyclic) – MAI3907
Cyclic Maintenance Done – MAI5032
Cyclic Maintenance Activities – MAI3105
Cyclic Maintenance Schedules – MAI3960
6.1
Running Reports
The majority of reports within highways by exor are accessed using a standard window called the Generic Reporting
Interface (GRI). Whilst the selection criteria for each report will change from report to report, the way the reports are run,
viewed and printed remains constant.
Below is an example of the Generic Reporting Interface.
Figure 223 - GRI
The title of the report is displayed at the top of the window.
There are three buttons down the left hand side, they are as follows:
Run report.
When the selection criteria has been entered, this will run the report and place the output
in the report previewer.
Version: 4.7
275
CONFIDENTIALITY STATEMENT
The contents of this document, including system ideas and concepts, are confidential and proprietary in nature and are not to be distributed in any form
without the prior written consent of Bentley, Inc.
EXOR
MAINTENANCE MANAGER USER GUIDE
CYCLIC MAINTENANCE WORKS ORDERING REPORTS
Save Parameters. The Parameters for reports that have to be constantly re-run or have complex selection
criteria can be saved to a file and re-used. You will be prompted to enter a file name. Each user
can have their own set of saved parameters.
Load Parameters. Previously saved parameters for the selected report can be loaded directly into the GRI.
You will be prompted to enter a file name, if you have a number of saved parameters, double
clicking the field will result in a list of saved parameters being displayed.
6.2
BOQ Work Order (Cyclic) – MAI3907
Purpose:
This report produces a detailed Cyclic Maintenance Work Order, which includes any Bill of Quantity items specified, for
Work Order Lines on the Selected Works Order. You may choose to print Labour Units and/or target repair dates for each
Work Order Line using the appropriate Selection Parameters. You may also choose to print only the Work Order, only a
Control Sheet for the Work Order or both.
6.2.1
Selection Parameters
Work Order No
(Required)
List
Enter the Works Order Number to be reported on.
Work Sheet No
(Optional)
To reprint part of an already printed Work Order, enter the Work Sheet Number to be reprinted. This appears near the top
of each Sheet.
Print Lab Units (Y/N)
(Required, Default)
List
Enter 'Y' to include the number of Labour Units needed to complete a Bill of Quantity Item on a Works Order Line or 'N'
to not include Labour Units. The default value is 'N'.
Wrks ord/Ctrl sht/Both
(Required, Default)
List
Enter 'W' to print only the Work Order, 'C' to print only the Control Sheet for a Work Order or 'B' to print both.
Version: 4.7
276
CONFIDENTIALITY STATEMENT
The contents of this document, including system ideas and concepts, are confidential and proprietary in nature and are not to be distributed in any form
without the prior written consent of Bentley, Inc.
EXOR
MAINTENANCE MANAGER USER GUIDE
CYCLIC MAINTENANCE WORKS ORDERING REPORTS
6.3
Cyclic Maintenance Done – MAI5032
Purpose:
This report provides a summary of all Cyclical Maintenance work carried out on the selected Road Section. The following
information is displayed:
Linkcode
Section Number
Report Number
Date Work Done
Starrt Chainage
End Chainage
Activity Area
Activity Description
6.3.1
Selection Parameters
Admin Unit
(Required, Default)
List
Select an administrational unit to be used for this report. The default is the Admin Unit assigned to the current User.
Road Id
(Required)
List, Gaz
If required, enter the Road Group Id from which to select defects from. If this field is left blank all Road Group Types will
be reported on.
Start Chainage
(Optional)
Enter the chainage from which to start reporting from. Only cyclic maintenance work carried out after this chainage
position will be included in the report.
End Chainage
(Optional)
Enter the chainage from which to stop reporting from. Only cyclic maintenance work carried out before this chainage
position will be included in the report.
Version: 4.7
277
CONFIDENTIALITY STATEMENT
The contents of this document, including system ideas and concepts, are confidential and proprietary in nature and are not to be distributed in any form
without the prior written consent of Bentley, Inc.
EXOR
MAINTENANCE MANAGER USER GUIDE
CYCLIC MAINTENANCE WORKS ORDERING REPORTS
6.4
Cyclic Maintenance Schedules – MAI3960
Purpose:
This report displays the selected Cyclic Maintenance Schedule.
6.4.1
Selection Parameters
Admin Unit
(Required, Default)
List
Select an administrational unit to be used for this report. The default is the Admin Unit assigned to the current User.
Road Id
(Optional)
List, Gaz
If required, enter the Road Id from which to select Cyclic Maintenance from. If this field is left blank all Road Group
Types will be reported on.
Schedule Id
(Optional)
List
Enter the Cyclic Maintenance Schedule Id to be reported on
6.4.2
Cyclic Maintenance Schedules – MAI3960
Figure 224
Version: 4.7
278
CONFIDENTIALITY STATEMENT
The contents of this document, including system ideas and concepts, are confidential and proprietary in nature and are not to be distributed in any form
without the prior written consent of Bentley, Inc.
EXOR
MAINTENANCE MANAGER USER GUIDE
PAYMENTS
7
Payments
This chapter describes the forms used to create, maintain and review Payments following the completion of works orders
or individual works order lines. They are the following forms:
Deselect Items For Payment – MAI3842
Payment Run – MAI3840
Query Payment Run Details – MAI3940
List of Items for Payment – MAI3942
The form descriptions provide you with detailed information about each Payment related form, including:
an overall description of the form
a detailed explanation of each field, including available features (such as List of Values), default values and other
characteristics
helpful information for using the form
Version: 4.7
279
CONFIDENTIALITY STATEMENT
The contents of this document, including system ideas and concepts, are confidential and proprietary in nature and are not to be distributed in any form
without the prior written consent of Bentley, Inc.
EXOR
MAINTENANCE MANAGER USER GUIDE
PAYMENTS
7.1
Deselect Items for Payment – MAI3842
Figure 225 - Deselct Items for Payment Menu Option
Figure 226 - Deselect Items for Payment
Version: 4.7
280
CONFIDENTIALITY STATEMENT
The contents of this document, including system ideas and concepts, are confidential and proprietary in nature and are not to be distributed in any form
without the prior written consent of Bentley, Inc.
EXOR
MAINTENANCE MANAGER USER GUIDE
PAYMENTS
7.1.1
General Information
Once an entire Works Order, an individual Works Order line or in the case of an Interim payment, part of a Works Order
line has been completed, they are ready to be processed through the payment run.
The purpose of this module is to allow you to determine which completed Works Orders or Works Order lines you would
like to be included in the next payment run. Unless a works order is specifically deselected using this screen, it will be
paid by the next payment run. Those items, which are deselected, will remain so until they are explicitly set to be ready
for paying.
Items may be deselected if there is a large discrepancy between the Estimated and Actual costs. This allows you to
deselect the item from payment until discussions have been made with the contractor.
If amendments need to be made to an already completed works order or works order line follow the procedure Changing a
Completed Works Order earlier in this manual.
To view Works Order details press the [Expand] button on the menu toolbar.
7.1.2
Work Order Lines
When you enter this window it will be in query mode, enter your selection criteria followed by [Execute Query] to return
the required works order line details. Completed Works Order Lines can be queried on Contract Id, Road Id, Defect Id,
Schedule Id, Works Order Number or any combination of these fields.
Selecting the [Expand] button will take you to Maintain Work Orders – MAI3800 and display the full work order details
Contract
(Display Only)
List
Displays the number of the contract. List is only available in query mode.
Road Id/Desc
(Display Only)
Displays the section ID and description of the road section to which this works order relates.
Remarks
(Display Only)
The remarks on the work order line will be displayed.
Defect Id
(Display Only)
Displays the unique ID of the defect which this works order was rectifying.
Schedule
(Display Only)
For cyclic maintenance works orders, this field displays the ID of the schedule under which this works order was created.
Orig. Initials
(Display Only)
The Originators initials from the work order will be displayed.
Work Order
(Display Only)
Displays the reference number of this works order.
Work Sheet
(Display Only)
Version: 4.7
281
CONFIDENTIALITY STATEMENT
The contents of this document, including system ideas and concepts, are confidential and proprietary in nature and are not to be distributed in any form
without the prior written consent of Bentley, Inc.
EXOR
MAINTENANCE MANAGER USER GUIDE
PAYMENTS
Displays the serial number of the worksheet.
Orig. Name
(Display Only)
The Originators name will be displayed.
Check Result
(Display Only)
If a quality inspection has been carried out against this work order, the result of the inspection will be displayed in this
field.
Cost
(Display Only)
Displays the total cost of the works order or work order line.
Paid to date
(Display Only)
The amount that has been paid on this work order will be displayed.
Auth. Initials
(Display Only)
The Authorising officers initials from the work order will be displayed.
Balance
(Display Only)
The Balance on the work order or work order line will be displayed.
Estimated Cost
(Display Only)
Displays the estimated cost of the works order or work order line.
Auth. Name
(Display Only)
The Authorising officers name will be displayed.
Status
(Required, Default)
List
To stop a works order from being paid in the next payment run, set this field to ‘HELD’. To release the payment, set the
field back to ‘COMPLETED'. The payment will then be made by the next Payment Run (Refer to the section Payment
Run – MAI3840) below. If the Works Order Line is part of an Interim Payment the Status code may be changed to either
'VALUATION' which would allow the actual quantities of the BOQ items to be amended or 'UNAPPROVED'. To release
the payment, set the field back to ‘INTERIM'. The payment will then be made by the next Payment Run (Refer to the
section Payment Run – MAI3840) below.
Percent Diff.
(Display Only)
The percentage difference between the cost and the estimated cost will be displayed.
Version: 4.7
282
CONFIDENTIALITY STATEMENT
The contents of this document, including system ideas and concepts, are confidential and proprietary in nature and are not to be distributed in any form
without the prior written consent of Bentley, Inc.
EXOR
MAINTENANCE MANAGER USER GUIDE
PAYMENTS
7.2
Payment Run – MAI3840
Figure 227 - Payment Run Menu Option
Figure 228 - Payment Run
7.2.1
General Information
This module is used to request a payment run. The payment run will pay all unpaid completed works orders and works
order lines which meet the input criteria, except for those which have held from payment using Deselect Items For
Payment – MAI3842
7.2.2
Payment Run
Admin Unit
(Required)
List
Enter the admin unit which this payment run is being run against.
Contract Id
(Optional)
List
If required, select a valid contract to restrict the payment run.
Version: 4.7
283
CONFIDENTIALITY STATEMENT
The contents of this document, including system ideas and concepts, are confidential and proprietary in nature and are not to be distributed in any form
without the prior written consent of Bentley, Inc.
EXOR
MAINTENANCE MANAGER USER GUIDE
PAYMENTS
Apply V.A.T (Y/N)
(Optional)
List
Enter ‘Y’ to apply VAT to all the job item costs.
Select the [Process Payment Run] button to carry out the payment run.
The following three reports will be produced:
7.2.3
Payment Run Report A
Figure 229 – Payment Run Report A
Version: 4.7
284
CONFIDENTIALITY STATEMENT
The contents of this document, including system ideas and concepts, are confidential and proprietary in nature and are not to be distributed in any form
without the prior written consent of Bentley, Inc.
EXOR
MAINTENANCE MANAGER USER GUIDE
PAYMENTS
7.2.4
Payment Run Report B
Figure 230 - Payment Run Report B
Version: 4.7
285
CONFIDENTIALITY STATEMENT
The contents of this document, including system ideas and concepts, are confidential and proprietary in nature and are not to be distributed in any form
without the prior written consent of Bentley, Inc.
EXOR
MAINTENANCE MANAGER USER GUIDE
PAYMENTS
7.2.5
Payment Run Report C
Figure 231 - Payment Run Report C
Version: 4.7
286
CONFIDENTIALITY STATEMENT
The contents of this document, including system ideas and concepts, are confidential and proprietary in nature and are not to be distributed in any form
without the prior written consent of Bentley, Inc.
EXOR
MAINTENANCE MANAGER USER GUIDE
PAYMENTS
7.3
Query Payment Run Details – MAI3940
Figure 232 - Query Payment Run Details Menu Option
Figure 233 - Query Payment Run Details
7.3.1
General Information
This form allows you to view the details of past payment runs.
Version: 4.7
287
CONFIDENTIALITY STATEMENT
The contents of this document, including system ideas and concepts, are confidential and proprietary in nature and are not to be distributed in any form
without the prior written consent of Bentley, Inc.
EXOR
MAINTENANCE MANAGER USER GUIDE
PAYMENTS
7.3.2
Payment Run Details
This window displays details of all previous payment runs. To restrict the display to a selected run or runs, press [Enter
Query], enter some criteria to determine the payment runs you want to see, followed by [Execute Query].
The window is arranged in the form of an arithmetic expression, allowing you to see how the payment amount was arrived
at. The fields used in this expression are:
Total Value – Retentions + VAT = Total Payment Amount.
Contract
(Display Only)
Displays the unique ID of the contract for which this payment was run.
Payment Id
(Display Only)
Displays the unique, system generated ID of the payment run.
Run Date
(Display Only)
Displays the date upon which the payment run took place.
Username
(Display only)
Displays the name of the user who requested the payment run. Note that the payment run is requested through Payment
Run – MAI3840.
First Payment/Last Payment
(Display Only)
Displays the range of payment numbers which were allocated during the payment run.
Total Value
(Display Only)
Displays the total value of the job items for the works orders included in this payment run. Note that some works order
may have been deselected for payment using Deselect Items For Payment – MAI3842 and will not therefore be included
in this total.
Retention
(Display Only)
If a retention has been specified, the calculated retention amount will be displayed here. Retentions are calculated as a
percentage of total contract value, up to a maximum value. The retention percentage and the maximum value are defined
when the contract is created via Contracts – MAI3880 (Maintenance Manger Administration Manual).
VAT
(Display Only)
If the payment run was set to calculate and include VAT, the total VAT amount will be displayed here.
Payment Amount
(Display Only)
The total amount actually paid will be displayed here.
Version: 4.7
288
CONFIDENTIALITY STATEMENT
The contents of this document, including system ideas and concepts, are confidential and proprietary in nature and are not to be distributed in any form
without the prior written consent of Bentley, Inc.