1
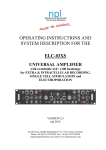
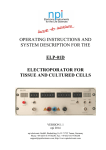
OPERATING INSTRUCTIONS AND
SYSTEM DESCRIPTION FOR THE
ELC-01MX
ELC AMPLIFIER MODULE
for EXTRA & INTRACELLULAR RECORDING,
SINGLE CELL STIMULATION and
ELECTROPORATION
VERSION 2.6
npi 2015
npi electronic GmbH, Bauhofring 16, D-71732 Tamm, Germany
Phone +49 (0)7141-9730230; Fax: +49 (0)7141-9730240
[email protected]; http://www.npielectronic.com
ELC-01MX User Manual
Table of Contents
1 Safety Regulations .............................................................................................................. 3
2 EPMS-07 Modular Plug-In System .................................................................................... 4
2.1 General System Description / Operation ..................................................................... 4
2.2 EPMS-07 Housing ....................................................................................................... 4
2.3 EPMS-H-07 Housing................................................................................................... 4
2.4 EPMS-E-07 Housing ................................................................................................... 4
2.5 EPMS-03 ..................................................................................................................... 5
2.6 PWR-03D .................................................................................................................... 5
2.7 System Grounding ....................................................................................................... 6
2.7.1
EPMS-07/EPMS-03 ...................................................................................... 6
2.7.2
EPMS-E-07 ................................................................................................... 6
2.8 Technical Data ............................................................................................................. 6
2.8.1
EPMS-07, EPMS-E-07 and EPMS-H-07 ..................................................... 6
2.8.2
EPMS-07 and EPMS-H-07 ........................................................................... 6
2.8.3
EPMS-E-07 ................................................................................................... 6
2.8.4
EPMS-03 ....................................................................................................... 6
3 Rationale ............................................................................................................................. 7
4 ELC-01MX ......................................................................................................................... 9
4.1 ELC-01MX Components ............................................................................................. 9
4.2 Optional Accessories ................................................................................................... 9
4.3 System Description ...................................................................................................... 9
4.3.1
Operation modes of the amplifier ................................................................. 9
4.3.2
Input configuration:....................................................................................... 10
4.3.3
Computer control of the mode of operation .................................................. 10
4.3.4
Output configuration ..................................................................................... 10
4.3.5
Digital displays ............................................................................................. 10
4.4 Description of the Front Panel ..................................................................................... 11
5 Headstage ............................................................................................................................ 16
5.1 Headstage Elements ..................................................................................................... 17
5.2 Headstage Bias Current Adjustment ............................................................................ 18
6 Passive Cell Model ............................................................................................................. 19
6.1 Cell Model Description ............................................................................................... 19
6.2 Connections and Operation ......................................................................................... 20
7 Introduction into Experiments ............................................................................................ 22
7.1 Recordings with the Differential Headstage (optional) ............................................... 22
7.2 Extracellular Voltage Measurement ............................................................................ 23
7.3 Extracellular Stimulation and Electroporation ............................................................ 24
7.3.1
Stimulation with Current .............................................................................. 24
7.3.2
Electroporation with Current ........................................................................ 24
7.3.3
Stimulation with Voltage .............................................................................. 24
7.3.4
Electroporation with Voltage ........................................................................ 24
7.4 Intracellular Recording ................................................................................................ 25
7.4.1
Current Clamp Recording ............................................................................. 25
7.4.2
Voltage Clamp Recording............................................................................. 25
8 Literature ............................................................................................................................. 26
9 Technical Data .................................................................................................................... 30
version 2.6
page 2
ELC-01MX User Manual
1 Safety Regulations
VERY IMPORTANT: Instruments and components supplied by npi electronic are NOT
intended for clinical use or medical purposes (e.g. for diagnosis or treatment of humans),
or for any other life-supporting system. npi electronic disclaims any warranties for such
purpose. Equipment supplied by npi electronic must be operated only by selected,
trained and adequately instructed personnel. For details please consult the GENERAL
TERMS OF DELIVERY AND CONDITIONS OF BUSINESS of npi electronic, D-71732
Tamm, Germany.
1)
GENERAL: This system is designed for use in scientific laboratories and must be
operated by trained staff only. General safety regulations for operating electrical devices
should be followed.
2)
AC MAINS CONNECTION: While working with the npi systems, always adhere to the
appropriate safety measures for handling electronic devices. Before using any device
please read manuals and instructions carefully.
The device is to be operated only at 115/230 Volt 60/50 Hz AC. Please check for
appropriate line voltage before connecting any system to mains.
Always use a three-wire line cord and a mains power-plug with a protection contact
connected to ground (protective earth).
Before opening the cabinet, unplug the instrument.
Unplug the instrument when replacing the fuse or changing line voltage. Replace fuse
only with an appropriate specified type.
3)
STATIC ELECTRICITY: Electronic equipment is sensitive to static discharges. Some
devices such as sensor inputs are equipped with very sensitive FET amplifiers, which can
be damaged by electrostatic charge and must therefore be handled with care. Electrostatic
discharge can be avoided by touching a grounded metal surface when changing or
adjusting sensors. Always turn power off when adding or removing modules,
connecting or disconnecting sensors, headstages or other components from the
instrument or 19” cabinet.
4)
TEMPERATURE DRIFT / WARM-UP TIME: All analog electronic systems are
sensitive to temperature changes. Therefore, all electronic instruments containing analog
circuits should be used only in a warmed-up condition (i.e. after internal temperature has
reached steady-state values). In most cases a warm-up period of 20-30 minutes is
sufficient.
5)
HANDLING: Please protect the device from moisture, heat, radiation and corrosive
chemicals.
version 2.6
page 3
ELC-01MX User Manual
2 EPMS-07 Modular Plug-In System
2.1
General System Description / Operation
The npi EPMS-07 is a modular system for processing of bioelectrical signals in
electrophysiology. The system is housed in a 19” rack-mount cabinet (3U) has room for up to
7 plug-in units. The plug-in units are connected to power by a bus at the rear panel.
The plug-in units must be kept in position by four screws (M 2,5 x 10). The screws are
important not only for mechanical stability but also for proper electrical connection to the
system housing. Free area must be protected with covers.
2.2
EPMS-07 Housing
The following items are shipped with the EPMS-07 housing:
✓
✓
✓
✓
EPMS-07 cabinet with built-in power supply
Mains cord
Fuse 2 A / 1 A, slow (inserted)
Front covers
Figure 1: Left: front view of empty EPMS-07 housing.
In order to avoid induction of electromagnetic noise the power supply unit, the power switch
and the fuse are located at the rear of the housing (see Figure 2, right).
2.3
EPMS-H-07 Housing
In addition to the standard power supply of the EPMS-07, the EPMS-H-07 has a built-in high
voltage power supply. This is necessary for all MVCS / MVCC modules, the HVA-100, HVTR150 and HVC-03M modules. The output voltage depends on the modules in use.
2.4
EPMS-E-07 Housing
The following items are shipped with the EPMS-E-07 housing:
✓
✓
✓
✓
✓
✓
EPMS-E-07 cabinet
External Power supply PWR-03D
Power cord (PWR-03D to EPMS-E-07)
Mains chord
Fuse 1.6 A / 0.8 A, slow (inserted)
Front covers
version 2.6
page 4
ELC-01MX User Manual
The EPMS-E-07 housing is designed for low-noise operation, especially for extracellular and
multi-channel amplifiers with plugged in filters. It operates with an external power supply to
minimize distortions of the signals caused by the power supply.
2.5
EPMS-03
The following items are shipped with the EPMS-03 housing:
✓
✓
✓
✓
EPMS-03 cabinet with built-in power supply
Mains cord
Fuse 034 A / 0,2 A, slow (inserted)
Front covers
Figure 2: Left: front view of EPMS-03 housing. Right: rear panel detail of EPMS-03 and
EPMS-07 housing.
In order to avoid induction of electromagnetic noise the power supply unit, the power switch
and the fuse are located at the rear of the housing (see Figure 2, right).
2.6
PWR-03D
The external power supply PWR-03D is capable of driving up to 3 EPMS-E housings. Each
housing is connected by a 6-pole cable from one of three connectors on the front panel of the
PWR-03D to the rear panel of the respective EPMS-E housing. (see Figure 3, Figure 4). A
POWER LED indicates that the PWR-03D is powered on (see Figure 3, left). Power switch,
voltage selector and fuse are located at the rear panel (see Figure 3, right).
Note: The chassis of the PWR-03D is connected to protective earth, and it provides protective
earth to the EPMS-E housing if connected.
Figure 3: Left: PWR-03D front panel view
Right: PWR-03D rear panel view.
Note: This power supply is intended to be used with npi EPMS-E systems only.
version 2.6
page 5
ELC-01MX User Manual
2.7
2.7.1
System Grounding
EPMS-07/EPMS-03
The 19" cabinet is grounded by the power cable through the ground pin of the mains
connector (= protective earth). In order to avoid ground loops the internal ground is isolated
from the protective earth. The internal ground is used on the BNC connectors or GROUND
plugs of the modules that are inserted into the EPMS-07 housing. The internal ground and
mains ground (= protective earth) can be connected by a wire using the ground plugs on the
rear panel of the instrument. It is not possible to predict whether measurements will be less or
more noisy with the internal ground and mains ground connected. We recommend that you try
both arrangements to determine the best configuration.
2.7.2
EPMS-E-07
The 19" cabinet is connected to the CHASSIS connector at the rear panel. It
can be connected to the SYSTEM GROUND (SIGNAL GROUND) on the
rear panel of the instrument (see Figure 4).
The chassis can be linked to PROTECTIVE EARTH by connecting it to the
PWR-03D with the supplied 6-pole cable and by interconnecting the
GROUND and PROTECTIVE EARTH connectors on the rear panel of the
PWR-03D (see Figure 3). Best performance is generally achieved without
connection of the chassis to protective earth.
Important: Always adhere to the appropriate safety measures.
Figure 4: Rear panel connectors of the EPMS-E-07
2.8
Technical Data
2.8.1 EPMS-07, EPMS-E-07 and EPMS-H-07
19” rack-mount cabinet, for up to 7 plug-in units
Dimensions: 3U high (1U=1 3/4” = 44.45 mm), 254 mm deep
2.8.2 EPMS-07 and EPMS-H-07
Power supply: 115/230 V AC, 60/50 Hz, fuse 2 A / 1 A slow, 45-60 W
2.8.3 EPMS-E-07
External power supply (PWR-03D) 115/230 V AC, 60/50 Hz, fuse 1.6/0.8 A, slow
Dimensions of external power supply:
(W x D x H) 225 mm x 210 mm x 85 mm
2.8.4 EPMS-03
Power supply:
115/230 Volts AC, 60/50 Hz, fuse 0.4 A / 0.2 A slow
Maximum current supply: 500 mA
Dimensions:
3U high (1U=1 3/4” = 44.45 mm), 254 mm deep, 265 mm wide
version 2.6
page 6
ELC-01MX User Manual
3 Rationale
“Loose patch” recordings (or “loose seal” recordings [Roberts & Almers, 1992]) are used to
record from single excitable cells without damage, i.e. without a direct access to the cell
interior. This technique was described in a seminal paper, “A method has been developed
permitting measurement of membrane impedance and current, as a function of
transmembrane potential, at small, electrically isolated regions of the muscle cell surface
without microelectrode impalement.”[Strickholm 1961], twenty years before the introduction
of “tight seal recording” by Neher and Sakmann [Review in Sakmann & Neher 1995].
The loose seal has a resistance of a few ten to a few hundred MΩ, and it creates an electrically
isolated access to a single neuron. This isolated area can be used for precise recording,
stimulation, or drug and dye application on the single-cell level without damaging the cell
[Babour & Isope, 2000]. In contrast to tight seal recordings, this technique has the great
advantage that the same electrode can be reused for recording from several cells.
Since its beginnings, several attempts have been made to make such precise extracellular
methods accessible to various preparations. An excellent overview can be found in the chapter
by Roberts & Almers [Roberts & Almers, 1992]. Over the years the method was extended to
cultured neurons and brain slice preparations, and also for in vivo recordings [Bureau et al,
2004], Sakmann, 2006]. The method is particularly well suited for long term recording with
little damage to the recorded neuron [Nunemaker et al, 2003]. It can be used both for somatic
and axonal recording [Khaliq & Raman, 2005]. Even subcellular structures such as synaptic
boutons are accessible to loose patch recordings [Auger & Marty, 2000].
Another valuable application of this method is single-cell stimulation. The high resistance
loose patch allows the application of 1-2 V stimuli to only one cell [Babour & Isope, 2000].
In the nineties of the last century the method of juxtacellular dye application (juxtasomal
filling) became popular [Pinault, 1996]. This staining method is based on repetitive current
pulse trains applied in the close vicinity of cell somata or dendrites, and has now become well
established in the field of slice and in vivo preparations [Klausberger, 2004, Duque, A and L.
Zaborszky 2006, Pinault, 2011].
In parallel, attempts were made towards transfection of single cells by electroporation using
patch pipettes. DNA or other large molecules were successfully inserted through a patch
pipette into living cells by using an optimized protocol (application of 10 V / 1 ms pulse
trains) [Rathenberg et al, 2003, Stan et al 2010].
Another significant advance from classical in vivo recording methods [such as Lalley et al,
1999] is the use of this method in novel applications under in vivo conditions. An excellent
example of these kinds of technological advances are the studies of Helmchen and Stosiek
[Helmchen et al, 2002; Stosiek et al, 2003; Brecht et al, 2002, Nevian & Helmchen 2007],
which used patch clamp recording together with two-photon microscopy. Assays have also
been developed that enable both monitoring and manipulation of single cells under in vivo
conditions [Brecht et al, 2004]. Besides sophisticated optics, these techniques always require
precise recording and stimulation amplifiers that usually must work with patch electrodes.
High resolution in vivo recordings with ELC amplifiers are meanwhile a standard in many
labs [Geis et al, 2011, Resinger et al 2011], and by using miniature headstages recordings
from free moving animals are possible [Epsztein et al, 2011].
version 2.6
page 7
ELC-01MX User Manual
Today three methods are used to record electrically in vivo or in vitro:
❏ Recordings using patch (suction) electrode from single neurons
❏ Whole-cell patch clamp technique (tight seal recording, intracellular)
❏ Loose patch technique (loose seal recording, extracellular)
❏ Intracellular recordings with sharp microelectrodes
❏ Extracellular recordings with glass or metal electrodes
The amplifiers normally used for these types of measurements are specialized for the
recording of the potentials or currents generated by the neurons under investigation. If these
recording methods are combined with dye injection, electroporation, stimulation or other
electrical techniques that require multiple use of the recording electrode, additional constraints
are imposed on the experimental setup that may require the acquisition of additional
components.
The ELC series of amplifiers fills this gap. It allows intracellular, extracellular, voltage-clamp
or current clamp recordings both with sharp or patch electrodes as well as additional protocols
like electroporation or juxtasomal filling and amperometry / voltammetry methods. The ELC
amplifier is the “Swiss Army Knife” of modern electrophysiology. It is not only easy to use,
but it is also sufficiently versatile to enable the use of a single amplifier for many
sophisticated experiments.
version 2.6
page 8
ELC-01MX User Manual
4 ELC-01MX
4.1
ELC-01MX Components
The following items are shipped with the ELC-01MX system:
✓
✓
✓
✓
4.2
o
o
o
o
4.3
Amplifier module for the EPMS-07 system
GND (2.6 mm banana plug) and (optional) REF. (SMB) connectors for headstage
Headstage
User manual
Optional Accessories
Differential headstage
Miniature headstage
Cell model
Pipette holder
System Description
The ELC-01MX was designed for intra- and extracellular recording, precise (single cell)
electrical stimulation as well as juxtasomal filling with patch electrodes. The system consists
of a module for the npi EPMS-07 modular system and a small headstage with holding bar,
dovetail or a mounting plate. It can be used in slices or in in vivo preparations using the
optional headstage with a differential input or for recordings in free moving animals using a
miniature headstage. It has separate capacity compensation controls for VC and CC mode, all
controls (Bridge balance, CC cap comp, offset, holding controls) are calibrated 10-turn
potentiometers.
The ELC-01MX is capable to record extracellularly DC or AC coupled, to stimulate with
current or voltage and to perform non-invasive juxtasomal filling of cells with dyes or DNA.
The amplifier can also be used to record and stimulate intracellularly in current clamp (CC) or
voltage clamp (VC). It is also suitable for amperometric or voltammetric investigations with
carbon fiber electrodes.
4.3.1 Operation modes of the amplifier
The operation modes of the amplifier are selected by a rotary switch with five positions:
The selected mode is indicated by LEDs above the two digital displays.
EXT:
CC
OFF:
VC
VCx10
version 2.6
VC or CC are selected by a TTL pulse applied to the MODE SELECT BNC
CURRENT CLAMP MODE: used to inject current signals
CC Mode with all input signals turned off
VOLTAGE CLAMP mode: potential commands are applied to the electrode
High-range VC mode: for stimulation and electroporation
page 9
ELC-01MX User Manual
In addition, using a toggle switch a bridge balance circuit can be activated to compensate for
the electrode artifact (BRIDGE mode, only in CC mode). With the same switch the
ELECTRODE RESISTANCE test mode is activated. The electrode resistance is measured
directly in MΩ and displayed on the POTENTIAL display.
4.3.2 Input configuration:
The amplifier has two inputs for VC and CC mode. The signal applied to the analog input
BNCs is converted either into a voltage command signal (x1 or x10 scaling) for the VC or
VCx10 voltage clamp modes, or to a current in the CC and BRIDGE mode. Besides this, a
signal generated from the 10-turn HOLD potentiometer can be transferred into a pulse using
the GATE TTL input BNC. This control can be also used as HOLDING potentiometer if the
switch in the GATE BNC is turned off.
4.3.3 Computer control of the mode of operation
In the EXT position of the MODE OF OPERATION switch the amplifier can be controlled by
a TTL signal connected to the MODE SELECT BNC (LO = CC, HI = VC).
4.3.4 Output configuration
The ELC-01MX amplifier has two output BNC connectors for POTENTIAL and one output
BNC for the CURRENT signal. The POTENTIAL OUTPUT x1 is a pure DC output that
monitors the electrode potential. The signal at the FILTERED OUTPUT can be high-pass
filtered (6 corner frequencies), amplified (x10/x100/x1000) and filtered by a 3 kHz low-pass
filter.
The current output signal is amplified (x1/x10/x100) and also passed through a 3 kHz lowpass filter. All filters can be bypassed.
4.3.5 Digital displays
All ELC amplifiers are equipped with two digital displays, one for CURRENT (nA) and one
for POTENTIAL (mV) or ELECTRODE RESISTANCE (MΩ). The mode of operation is
indicated by a row of LEDs located close to the digital displays.
version 2.6
page 10
ELC-01MX User Manual
4.4
Description of the Front Panel
Figure 5: ELC-01MX front panel view
In the following description of the front panel elements each element has a number that is
related to that in Figure 5. The number is followed by the name (in uppercase letters) written
on the front panel and the type of the element (in lowercase letters). Then, a short description
of the element is given. Some elements are grouped in functional units (e.g. extracellular
recording unit) and are described as units regardless of the order of numbers.
(1) CURRENT (nA) display
Display showing the current flowing through the electrode in XX.XX nA (max 19.99 nA).
version 2.6
page 11
ELC-01MX User Manual
(2) PIP. HOLD / OFFSET potentiometer
Control to compensate for the electrode potential OFFSET (ten-turn potentiometer,
symmetrical, i.e. 0 mV = 5 on the dial) in CC mode (range: ±100 mV), or to zero the pipette
current in VC mode.
In CC mode any offset caused by electrode (tip potential, liquid junction potential etc.) is
cancelled by subtracting this potential value from the electrode, i.e. an offset of –10 mV is
cancelled by subtracting -10 mV using this potentiometer.
In VC mode an offset at the electrode would lead to current flow through the electrode
because without a COMMAND the electrode will be clamped to 0 mV, and the VC circuit
generates a current to achieve this. In order to avoid this current flow the electrode has to be
clamped to its offset potential, i.e. a potential has to be added to the COMMAND. In the
scenario mentioned above the electrode has to be clamped to –10 mV. Then, the electrode is
clamped to its offset potential and no current will flow.
If the OFFSET is correctly compensated in CC mode, there is automatically no current flow
when approaching the cell in VC mode. However, liquid junction potentials occurring after
establishing the whole-cell configuration are not automatically cancelled.
Important: Command potentials are not affected. Potential out shows zero!
Note: This procedure has to be done at the beginning of the experiment as soon as the pipette
has contact to the bath solution, i.e. before approaching a cell.
(3) CUR. OUTP. SENSITIVITY switch
Switch to select the scaling of the CURRENT OUTPUT
0.1
1
10
0.1 V/nA (1 V = 10 nA)
1 V/nA (1V = 1 nA)
10 V/nA (1 V = 0.1 nA)
(4) HOLD. CUR. (nA) potentiometer
Ten-turn potentiometer for generating a holding current in CC or BRIDGE mode, or for
setting the amplitude of the GATED stimulus (see also #9), range: ±100 nA (100 = 10 nA).
(5) HOLD. CUR. (nA) polarity switch
Switch for setting the polarity of the holding current in CC or BRIDGE mode, or for the
GATED stimulus (see also #9). In zero position the holding current/gated stimulus is disabled.
(6) C.COMP. potentiometer
Ten-turn potentiometer for compensating the capacity of the electrode, clockwise, range:
0-30 pF. Functional in all current clamp modes (CC, CC+ BRIDGE, REL, OFF)
(7) STIM. INPUT 10 nA/V connector
BNC connector for an external command in CC or BRIDGE mode (sensitivity: 10 nA / V, i.e.
1 V = 10 nA).
The voltage signal that is connected here is transformed to a proportional current at the
electrode in CC mode. The signal form remains unchanged.
version 2.6
page 12
ELC-01MX User Manual
(8) MODE SELECT (TTL) connector
BNC connector for remote control of the MODE of operation. The TTL signal connected here
selects the mode of operation remotely (HI = VC, LO = CC); functional in EXT mode only.
(9) GATE connector / ON switch
BNC connector for generating a stimulus with a TTL signal in CC, VC or VCx10 mode. A
current or a voltage stimulus respectively is applied to the electrode as long as the TTL signal
connected here is HI, and the ON switch is set to the upper position (ON). The amplitude of
the stimulus is set by the HOLD. CUR. (nA) potentiometer (#4) in CC mode or the HOLD.
POT. (mV) potentiometer (#18) in VC mode. The polarity of the stimulus is set by the HOLD.
CUR. (nA) polarity switch (#5).
Setting the ON switch to the lower position disables the GATED stimulus, and enables the
setting of a holding current in CC or BRIDGE mode or a holding potential in VC or VCx10
mode.
(10) CURRENT OUTPUT connector / LP FILTER ON switch
BNC connector providing the current flowing through the electrode in nA / V. The scaling is
dependent on the setting of the CUR. OUTP. SENSITIVITY switch (#3).
Setting the LP FILTER ON switch to the upper position (ON) enables the built-in low-pass
filter (corner frequency: 3 kHz, attenuation: -18 dB/octave), i.e. the CURRENT OUTPUT
connector provides the filtered current with the scaling set by switch #3. In the lower position,
the built-in low-pass filter is disabled, i.e. the CURRENT OUTPUT connector provides the
unfiltered current with the scaling set by switch #3.
(11) POTENTIAL OUTPUT connector / LP FILTER ON switch
BNC connector providing the potential at the electrode in mV. The scaling is dependent on
the setting of the POT. OUTP. SENSITIVITY switch (#21).
Setting the LP FILTER ON switch to the upper position (ON) enables the built-in low-pass
filter (corner frequency: 3 kHz, attenuation: -18 dB/octave), i.e. the POTENTIAL OUTPUT
connector provides the filtered potential with the scaling set by switch #21. In the lower
position, the built-in low-pass filter is disabled, i.e. the POTENTIAL OUTPUT connector
provides the unfiltered current with the scaling set by switch #21.
(12) BUZZ push button
Push button to activate the BUZZ circuit. In order to facilitate the penetration of the cell
membrane or to clean the tip of the electrode a BUZZ circuit is provided which is based on
oscillations caused by overcompensating the capacitance compensation system. The
overcompensation of capacitance compensation yields very powerful high-frequency
oscillations. The BUZZ circuit is active as long as the button is pressed.
(13) POTENTIAL OUTPUT x1 connector
BNC connector providing the potential at the electrode in V. The scaling is fixed to x1 and
therefore independent on the setting of the POT. OUTP. SENSITIVITY switch (#20). This
connector is normally used to monitor voltage pulses in the VCx10 mode (see also #23), or
else to provide a DC signal if the high-pass filter (#19, Figure 5) is used.
version 2.6
page 13
ELC-01MX User Manual
(14) COMM. INP. ÷10 mV connector
Please see below (Voltage Clamp Unit)
(15) HEADSTAGE connector
Connector to attach the HEADSTAGE via a flexible cable.
Voltage Clamp Unit
The voltage clamp unit consists of (14) COMM. INP. /10 mV connector, (16, 17)
AMPL and T.CONST. trim-pots, (18) HOLD. POT. (mV) switch and (19) HOLD. POT.
(mV) potentiometer.
(14) COMM. INP. ÷10 mV connector
BNC connector for an external command in VC mode (sensitivity: ÷10 mV, i.e. 100 mV
signal at this connector generates a command of 10 mV) or in VCx10 mode (sensitivity:
x1 mV, i.e. 100 mV signal at this connector generates a command of 100 mV). The
signal form remains unchanged.
(16) AMPL. trim-pot / T.CONST. trim-pot
Trim-pots for compensating for the electrode capacity in VC mode.
A square shaped command pulse in VC will be distorted by the electrode capacity. The
shape of the command can be influenced by these trim-pots in order to get the command
pulse as square as possible.
AMPL. trim-pot:
Trim-pot for setting τ-FAST in the electrode capacity
compensation circuit.
T.CONST. trim-pot: Trim-pot for setting C-FAST in the electrode capacity
compensation circuit.
Note: CAPACITY COMPENSATION works only for the electrode capacity, not for the
capacity of the cell membrane. Therefore, capacitive transients of the cell are always
present when square shaped pulses are applied in VC mode.
(17) HOLD. POT. (mV) switch
Switch for setting the polarity of the holding potential in VC/VCx10 mode or for the
GATED stimulus (see also #10). In zero position the holding potential/gated stimulus is
disabled.
(18) HOLD. POT. (mV) potentiometer
Control for setting the amplitude of the continuous holding potential, or for setting the
amplitude of the GATED stimulus (see also #10) in VC mode (range: ±1000 mV) or in
VCx10 mode (range: ±10 V). In zero position the holding/gated potential is disabled.
version 2.6
page 14
ELC-01MX User Manual
Extracellular recording unit
The extracellular recording unit consist of (20) HP FILTER (Hz) switch and (21) POT.
OUTP. SENSITIVITY switch.
Hint: Set the MODE OF OPERATION switch to OFF for extracellular low-noise
recording.
(19) HP FILTER (Hz) switch
Switch for setting the corner frequency of the high-pass filter (attenuation: -6 dB/octave)
in AC recording mode. DC Recordings are done by switching the HP FILTER (Hz)
switch to DC.
Hint: During AC recording, a DC signal is always provided at the POTENTIAL
OUTPUT x1 BNC connector (#13).
(20) POT. OUTP. SENSITIVITY switch
Switch for scaling the POTENTIAL OUTPUT at the POTENTIAL OUTPUT connector
(#11). Scaling factors: x10, x100, x1000.
Important: The POT. OUTP. SENSITIVITY switch is only related to the POTENTIAL
OUTPUT BNC (#11) and is always active, i.e. not only in extracellular recordings but
also in CC, BRIDGE and VC/VCx10 mode.
(21) REL / BRIDGE ON switch
Switch for activation of either the electrode resistance test circuit (switch set to: REL) or the
BRIDGE balance circuit (switch set to: BRIDGE ON) in CC mode. Both settings are indicated
by LEDs (#26).
The BRIDGE balance circuit compensates for the electrode artifact and allows accurate,
intracellular measurements of the membrane potential und application of current stimuli. The
BRIDGE is adjusted using the BR.BAL. potentiometer (#23).
(22) BR.BAL. potentiometer
If current is passed through the recording electrode in BRIDGE mode, the potential deflection
caused at the electrode resistance is compensated with this control (ten turn potentiometer,
clockwise, calibrated in MΩ, range: 100 MΩ, i.e. 100 = 10 MΩ).
(23) MODE OF OPERATION switch
5-position rotary switch to set the MODE OF OPERATION. The following modes are
possible:
EXT:
VC or CC are selected remotely by a TTL pulse (+5 V) applied to the MODE
SELECT (TTL) connector (#8). HI (>1 V) selects VC, LO (<0.8 V) selects CC.
CC
Current Clamp mode, allows recording and stimulation in current clamp. The
electrode artifact is not compensated unless the BRIDGE mode is activated and
adjusted (see also #22 and #23).
OFF:
CC Mode with all input signals turned off. Can be used for extra- and intracellular
recordings. REL is functional.
VC
VOLTAGE CLAMP mode, allows recording and stimulation in voltage (patch)
clamp. Series resistance and τ-slow are not compensated.
VCx10
High range VC mode (up to ±12 V), used for stimulation and electroporation
version 2.6
page 15
ELC-01MX User Manual
(24) POTENTIAL / RESISTANCE display
Display showing the POTENTIAL at the electrode in XXXX mV or the electrode resistance in
XXX MΩ (see also #22).
(25) Status LEDs
LEDs indicating the unit of the POTENTIAL / RESISTANCE display or the selected MODE
OF OPERATION of the amplifier respectively.
(26) BIAS trim-pot
Trim potentiometer for adjusting the output BIAS current of the headstage (see also chapter
5.2).
5 Headstage
The ELC-01MX comes with a headstage for connecting suction electrodes for loose-patch
clamp or whole cell recordings and / or stimulation or electroporation, respectively, or sharp
electrodes for extracellular or intracellular recordings.
A differential headstage (see Optional accessories in chapter 4.2) or a miniature headstage
for measurements in vivo is also available. For details contact npi.
Figure 6: Headstage of the ELC-01MX
version 2.6
page 16
ELC-01MX User Manual
5.1
•
•
•
•
•
•
•
Headstage Elements
PEL
BNC connector for the electrode holder
REF
Connector for the reference electrode (differential headstage only)
GND
Ground connector
TYPE
Type of amplifier, BA Bridge amplifier, ELC ELC amplifier
R FB
Value of feedback resistor, 10M: 10 MΩ, 100 M: 100 MΩ
Headstage cable to amplifier
Mounting plate (holding bar or dovetail available on request)
The electrode filled with electrolyte is inserted into an electrode holder (optional) that fits into
the BNC connector of the headstage or into an electrode holder adapter. The electrical
connection between the electrolyte and the headstage is established using a carefully
chlorinated silver wire. Chlorinating of the silver wire is very important since contact of silver
to the electrolyte leads to electrochemical potentials causing varying offset potentials at the
electrode, deterioration of the voltage measurement etc. (for details see Kettenmann and
Grantyn (1992)). An automated chlorinating apparatus (ACl-01) is available from npi for
optimal chlorinating of sliver wires (please contact npi for details).
Ground provides system ground and is linked to the bath via an agar-bridge or a Ag-AgCl
pellet. The headstage is attached to the amplifier with the headstage cable (see Figure 6) and
an 8-pole connector. The headstage is mounted to a insulated mounting plate that fits to most
micromanipulators. A holding bar or dovetail is available on request.
Note: The shield of the BNC connector is linked to the driven shield output and must not be
connected to ground. The headstage enclosure is grounded.
Caution: Please always adhere to the appropriate safety precautions (see chapter 1). Please
turn power off when connecting or disconnecting the headstage from the HEADSTAGE
connector!
version 2.6
page 17
ELC-01MX User Manual
5.2
Headstage Bias Current Adjustment
Caution: It is important that this tuning procedure is performed ONLY after a warm-up period
of at least 30 minutes!
The ELC-01MX is equipped with a voltage-to-current converter with a very high output
impedance which is connected to the recording electrode. The zero current of this unit is tuned
with the BIAS current trim-pot (see #26 in Figure 5).
The tuning procedure should be performed regularly (about once a month) since the bias
current changes over time.
The tuning procedure is performed using high-value resistors and/or a cell model. It cannot be
performed with an electrode, since there are always unknown potentials involved (tip
potential, junction potentials).
❏ Disconnect all input signals (except the headstage). Put the holding current switch to
position 0 (#5, Figure 5). Set the operation mode to CC.
❏ Connect the PEL connector of the headstage to ground. If oscillations occur take a resistor
of a few kΩ and connect it to ground.
Note: This cannot be done with the cell model. Please use a wire to connect the input of
the BNC connector on the headstage to GND of the headstage. Do not use the shield of the
BNC connector since it is connected to driven shield.
❏ Tune the OFFSET to zero using the OFFSET control (#2, Figure 5).
Remember: The zero position of the OFFSET control is at 5!!
❏ Remove the wire and attach the cell model or a resistor with a value of about 10 MΩ
across the same connection.
❏ The value displayed at the POTENTIAL DISPLAY is related to the BIAS current of the
headstage according to Ohm's Law. Cancel this voltage by tuning the headstage BIAS
current trim-pot (#27, Figure 5) until the POTENTIAL DISPLAY shows 000.
version 2.6
page 18
ELC-01MX User Manual
6 Passive Cell Model
The cell model is designed to be used to check the function of the instrument either
1. just after unpacking to see whether the instrument has been damaged during transport or
2. to train personnel in using the instrument or
3. in case of trouble to check which part of the setup does not work correctly, i. e. to find out
whether the amplifier is broken or if something is wrong with the electrodes or holders
etc.
Figure 7: ELC-MOD passive cell model
The passive cell model consists only of passive elements, i.e. resistors that simulate the
resistance of the cell membrane and the electrodes, and capacitances that simulate the
capacitance of the cell membrane. A switch allows simulation of two different cell types: a
cell with 50 MΩ and 22 pF (CELL 1, represents an astrocyte like cell) or a cell with 200 MΩ
membrane resistance and 100 pF membrane capacitance (CELL 2, represents an neuron like
cell), or. Electrode immersed into the bath or SEAL formation can be mimicked as well. The
headstage of the amplifier can be connected to one of two different types of electrodes (see
below).
6.1
Cell Model Description
Figure 8: ELC-MOD passive cell model
version 2.6
page 19
ELC-01MX User Manual
1, 3:
2:
4:
5:
connectors for the headstage, 1: electrode resistance: 50 MΩ, 3: electrode resistance:
10 MΩ
GND ground connector, to be connected to GND jack of the headstage
CELL: switch for cell membrane representing a membrane of either 50 MΩ and 22 pF
(CELL 1) or 200 MΩ and 100 pF (CELL 2).
In GROUND (lower) position the electrodes are connected to ground via a 1 kΩ
resistor. In SEAL (upper) position are connected to a 1 GΩ resistor simulating the
formation of a GIGASEAL with a patch electrode.
Figure 9: Schematic diagram of the passive cell model
6.2
Connections and Operation
Checking the configuration
❏ Turn POWER switch of the EPMS housing off.
a) For simulation of an experiment using a patch pipette
❏ Connect the BNC jack labeled 10 MΩ of the cell model to the BNC connector PEL of the
headstage.
version 2.6
page 20
ELC-01MX User Manual
b) For simulation of an experiment using a sharp electrode
❏ Connect the BNC jack labeled 50 MΩ of the cell model to the BNC connector PEL at the
headstage.
For a) and b)
❏ Connect GND of the cell model to GND of the headstage.
Important: When using a differential headstage (optional) the REF connector at the
headstage must not be left open. It must be connected to ground.
Simulation of electrode in the bath
❏ Set switch #4, Figure 8 to the lower position.
❏ Set switch #5, Figure 8 to GROUND position. The 1 kΩ resistor simulates the resistance
of the bath solution. This can be used to train cancellation of offsets, using the bridge
balance and using the capacity compensation.
Simulation of SEAL formation
❏ Set switch #4, Figure 8 to the lower position.
❏ Set switch #5, Figure 8 to SEAL position. The 1 GΩ resistor simulates the SEAL
resistance when forming a GIGASEAL in patch clamp experiments.
Simulation of intracellular recording
Intracellular recordings can be mimicked with one of two cells with different properties. Use
the 50 MΩ electrode connector (#1, Figure 8) for an experiment with sharp electrodes or the
10 MΩ electrode connector (#3, Figure 8) for simulating an experiment with patch electrodes.
❏ Switch the CELL membrane switch (see #4, Figure 8) to the desired position (CELL 1 or
CELL 2).
❏ Turn all controls at the amplifier to low values (less than 1) and the OFFSET in the range
of 5 (zero position) and the OSCILLATION SHUTOFF in the DISABLED position.
❏ Turn POWER switch of the EPMS housing on.
Now you can adjust the amplifier (see below) and apply test pulses to the cell model. The
upper position the CELL membrane switch (CELL 1) simulates a cell with a resistance of
50 MΩ and a capacitance of 22 pF. In the lower position (CELL 2) a cell membrane with
200 MΩ and 100 pF is simulated.
version 2.6
page 21
ELC-01MX User Manual
7 Introduction into Experiments
The ELC-01MX is capable to perform several types of experiments that are briefly introduced
in the following. It is assumed that the capacity of the electrode is compensated, the offset of
the electrode is cancelled and, for intracellular recordings in BRIDGE mode, electrode artifact
is eliminated using the bridge balance circuit.
7.1
Recordings with the Differential Headstage (optional)
Extracellular measurements are mostly done in slices or in vivo, in noisy environments, where
distortions of the recorded signal caused by other instruments and the animal itself are very
common. Additionally, extracellular signals are very small and have to be amplified
enormously. The drawback is that noise is amplified as well. Therefore, the headstage of the
ELC-01MX can be equipped with a differential input that minimizes noise pick-up.
Differential means, that the signal for the amplifier is the difference between the positive (+)
(PEL) and negative (-) (REF.) input of the headstage. This results in canceling of all common
mode signals (i.e. which both electrodes record, e.g. noise). For differential measurements,
both inputs of the headstage (REF. and PEL) are connected to microelectrodes using cables
with grounded enclosure or electrode holders. PEL is connected to the measuring electrode and
REF. to the reference electrode. The experimental chamber is grounded by an Ag-AgCl pellet
(or an AGAR bridge) connected to GND of the headstage (see Figure 10).
Important: For reliable measurements the experimental chamber or animal, respectively, must
be grounded.
Also Very Important: When operating in VC mode, the reference electrode must not have a
resistance of more than 1 kΩ!! CC mode is not affected.
If differential measurement is not required (single-ended measurement configuration, see
Figure 10), the REF input must be connected to ground (GND). The amplifier is in an
undefined state, if the REF is left open, and can go into saturation making reliable
measurements impossible (for more details see Lalley et al., 1999).
version 2.6
page 22
ELC-01MX User Manual
Figure 10: headstage connections, A: differential measurement, B: single-ended measurement
7.2
Extracellular Voltage Measurement
Extracellular measurements are usually done in a loose-patch configuration or with special
metal microelectrodes. Recordings with extracellular metal electrodes is simple. The electrode
is advanced in the region where the recordings will be made using a micromanipulator and the
signals are filtered and amplified (see chapter 5 in Lalley et al., 1999 for details). For loose
patch recording the procedure is the following (Barbour & Isope, 2000, Nunemaker et al,
2003):
❏ Approach the cell in VC mode and apply square voltage pulses to the electrode.
❏ Contact the cell and establish the loose-patch.
❏ Set the MODE OF OPERATION switch (#23, Figure 5) to OFF.
❏ Set the required amplification of the POTENTIAL OUTPUT using #20, Figure 5.
❏ Select DC or filtered AC coupling with switch #19, Figure 5.
❏ If needed apply the LP filter (3 kHz) to the output signal (see #11, Figure 5).
version 2.6
page 23
ELC-01MX User Manual
7.3
Extracellular Stimulation and Electroporation
Cells can be stimulated using current or voltage signals.
7.3.1 Stimulation with Current
❏ Approach the cell in VC mode and apply square voltage pulses to the electrode.
❏ Contact the cell, establish the loose-patch and disconnect the voltage signal from COMM.
INP. / 10 mV (#14, Figure 5).
❏ Set the MODE OF OPERATION switch (#23, Figure 5) to CC.
❏ Set the holding current to zero using switch #5, Figure 5).
❏ For stimulation:
Apply the stimulus signal to the STIM. INPUT 10 nA/V connector (#7, Figure 5)
or
Set switch #9, Figure 5 to the lower position. Adjust the stimulus amplitude with the
holding current potentiometer #4 and set the stimulus polarity using switch #5, Figure 5.
Gate the preset stimulus with a TTL signal linked to the GATE BNC connector (#9,
Figure 5).
7.3.2 Electroporation with Current
Electroporation can be done using the stimulation procedure, but usually the applied current is
much higher and the stimulus duration is shorter.
7.3.3 Stimulation with Voltage
❏ Approach the cell in VC mode and apply square voltage pulses to the electrode.
❏ Contact the cell and establish the loose-patch.
❏ For stimulation apply a voltage signal of the required amplitude and duration to the
COMM. INP. /10 mV connector (#14, Figure 5).
or
Set switch #9, Figure 5 to the lower position. Adjust the stimulus amplitude with the
holding potential potentiometer #18 and set the stimulus polarity using switch #17, Figure
5. Gate the preset stimulus with a TTL signal linked to the GATE BNC connector (#10,
Figure 5).
❏ If necessary, adjust the shape of the voltage signal using the VC. COMP. trim-pots
(#16, Figure 5).
7.3.4 Electroporation with Voltage
Electroporation can be done using the stimulation procedure, but usually the applied voltage is
much higher and the stimulus duration is shorter. For stimuli with large amplitudes set the
MODE OF OPERATION switch #23 to VCx10 enabling electroporation with up to 12 V with
a 100 MΩ electrode.
version 2.6
page 24
ELC-01MX User Manual
7.4
Intracellular Recording
Intracellular recordings can be performed in the whole-cell patch configuration and with sharp
microelectrodes.
7.4.1 Current Clamp Recording
The ELC-01MX can be used like a standard bridge amplifier.
❏ Set the MODE OF OPERATION switch (#23, Figure 5) to CC and switch #21, Figure 5,
to BR.ON.
❏ After impaling the cell readjust the bridge using the BR.BAL. potentiometer (#22, Figure
5)
❏ If needed set an appropriate holding current using the HOLD. CUR. (nA) potentiometer
(#4, Figure 5) and the holding current polarity switch.
❏ Apply stimuli to the cell using the STIM. INPUT 10 nA/V BNC connector (#7, Figure 5).
7.4.2 Voltage Clamp Recording
The ELC-01MX can also be used like a simple patch-clamp amplifier.
❏ Approach the cell in VC mode and apply square voltage pulses to the electrode.
❏ Contact the cell, set a holding potential using the HOLD. POT. (mV) potentiometer (#18,
Figure 5) and establish the whole-cell patch clamp configuration.
❏ If necessary, adjust the shape of the voltage signal using the VC. COMP. trim-pots
(#16, Figure 5).
❏ Apply stimuli to the cell using the COMM. INP. / 10 mV BNC connector (#14, Figure 5).
Important: Voltage/patch clamp experiments are possible only with low resistance patch
pipettes, not with high resistance sharp micro electrodes!
Note: Stimuli can also be applied by gating a reset stimulus in CC or VC mode!
version 2.6
page 25
ELC-01MX User Manual
8 Literature
General Recording Methods and Voltage Clamp Technique
❏ Dietzel, I. D., Bruns, D., Polder, H. R. and Lux, H. D. (1992). Voltage Clamp Recording,
in Kettenmann, H. and R. Grantyn (eds.) Practical Electrophysiological Methods, WileyLiss, NY.
❏ Lalley, P. M., Moschovakis, A. K. and Windhorst, U. (1999). Electrical Activity of
Individual Neurons in Situ: Extra- and Intracellular Recording, in: U. Windhorst and H.
Johansson (eds.) Modern Techniques in Neuroscience Research, Springer, Berlin, New
York
❏ Ogden DC (1994) Microelectrode Techniques. The Plymouth Workshop Handbook,
Second Edition, The Company of Biologists Limited, Cambridge
❏ Polder, H.R., M. Weskamp, K. Linz & R. Meyer (2004) Voltage-Clamp and Patch-Clamp
Techniques, Chapter 3.4, 272-323 in: Dhein, Stefan; Mohr, Friedrich Wilhelm; Delmar,
Mario (Eds.) Practical Methods in Cardiovascular Research, Springer, Berlin, Heidelberg
and New York 2004.
❏ Windhorst, U. and H. Johansson (eds.) Modern Techniques in Neuroscience Research,
Springer, Berlin, Heidelberg, New York.
Juxtasomal Filling, Loose-Patch Techniques (General)
❏ Auger, C., & Marty, A. (2000). Topical Review: Quantal currents at singlesite central
synapses. J Physiol. 526.1, 3-11.
❏ Barbour, B., & Isope, P. (2000). Combining loose cell-attached stimulation and recording.
J Neurosci.Methods. 103, 199–208.
❏ Bureau, I., Shepherd, G. M. G. & Svoboda, K. (2004). Precise Development of Functional
and Anatomical Columns in the Neocortex. Neuron, 42, 789-801.
❏ Duque, A and L. Zaborszky (2006). Juxtacellular Labeling of Individual Neurons In Vivo:
From Electrophysiology to Synaptology, in Zaborszky L., F. G. Wouterlood &
J. L. Lanciego (eds) Neuroanatomical Tract-Tracing 3, 3 Molecules, Neurons, and Systems,
Springer, New York
❏ Joshi, S. & Hawken, M. J. (2006). Loose-patch-juxtacellular recording in vivo-A method
for functional characterization and labeling of neurons in macaque V1. J
Neurosci.Methods. 156, 37-49.
❏ Khaliq, Z. M., & Raman, I. M. (2005). Axonal Propagation of Simple and Complex Spikes
in Cerebellar Purkinje Neurons. J Neurosci. 25, 454-463.
❏ Klausberger, T., Marton, L. F., Baude, A., Roberts, J. D., Magill, P. J. & Somogyi, P.
(2004). Spike timing of dendrite-targeting bistratified cells during hippocampal network
oscillations in vivo. Nature Neuroscience 7, 41-47.
❏ Nunemaker, C. S., DeFazio, R. A., & Moenter, S. M. (2003). A targeted extracellular
approach for recording long-term firing patterns of excitable cells: a practical guide.
Biol.Proced.Online. 5, 53-62.
www.biologicalprocedures.com
❏ Nevian T, & Helmchen, F. (2007). Calcium indicator loading of neurons using single-cell
electroporation. Pflugers Arch. 454, 675-88.
version 2.6
page 26
ELC-01MX User Manual
❏ Pinault, D. (1996). A novel single-cell staining procedure performed in vivo under electrophysiological control: morpho-functional features of juxtacellularly labeled thalamic cells
and other central neurons with biocytin or Neurobiotin. J Neurosci.Methods. 65, 113-136.
❏ Pinault, D. (2011) The Juxtacellular Recording-Labeling Technique, Chapter 4, 41-77 in:
Vertes, R. P. & Stackman, Jr. R.W. (Eds.) Electrophysiological Recording Techniques,
Humana Press, Springer, New York, Dordrecht, Heidelberg, London.
❏ Rathenberg, J., Nevian, T. & Witzemann, V. (2003). High-efficiency transfection of
individual neurons using modified electrophysiology techniques. J Neurosci.Methods. 126,
91-98.
❏ Roberts, W. M., & Almers, W. (1992). Patch Voltage Clamping with Low-Resistance
Seals: Loose Patch Clamp. In: Rudy, B. & Iversen, L. E. (eds.). Ion Channels. Methods in
Enzymology 207, Academic Press San Diego.
❏ Strickholm, A. (1961). Impedance of a Small Electrically Isolated Area of the Muscle Cell
Surface. J Gen.Physiol. 44, 1073-1088.
Tracer injection (juxtasomal filling) and extracellular recording using ELC amplifiers
❏ Bruno, R. M. & Sakmann, B. (2006). Cortex is driven by weak but synchronously active
thalamocortical synapses. Science. 312, 1622-1627.
❏ Fuentealba, P., Begum, R., Capogna, M., Jinno, S., Marton, L. F., Csicsvari, J., Thomson,
A., Somogyi, P., & Klausberger, T. (2008). Ivy cells: a population of nitric-oxideproducing, slow-spiking GABAergic neurons and their involvement in hippocampal
network activity. Neuron. 57, 917-929.
❏ Fuentealba, P., Tomioka, R., Dalezios, Y., Marton, L. F., Studer, M., Rockland, K.,
Klausberger, T., & Somogyi, P. (2008). Rhythmically active enkephalin-expressing
GABAergic cells in the CA1 area of the hippocampus project to the subiculum and
preferentially innervate interneurons. Journal of Neuroscience 28, 10017-10022.
❏ Hoshi, H., Liu, W. L., Massey, S. C., & Mills, S. L. (2009). ON inputs to the OFF layer:
bipolar cells that break the stratification rules of the retina. Journal of Neuroscience 29,
8875-8883.
❏ Subramaniam M, Althof D, Gispert S, Schwenk J, Auburger G, Kulik A, Fakler B, Roeper
J. (2014). Mutant α-synuclein enhances firing frequencies in dopamine substantia nigra
neurons by oxidative impairment of A-type potassium channels. Journal of Neuroscience
34, 13586-99. doi: 10.1523/JNEUROSCI.5069-13.2014.
Transfection using ELC amplifiers
❏ Stan, A., Pielarski, K. N., Brigadski, T., Wittenmayer, N., Fedorchenko, O., Gohla, A.,
Lessmann, V., Dresbach, T., & Gottmann, K. (2010). Essential cooperation of N-cadherin
and neuroligin-1 in the transsynaptic control of vesicle accumulation.
Proc.Natl.Acad.Sci.U.S.A. 107, 11116-11121.
Extracellular recording using ELC amplifiers
❏ Arancillo M, White JJ, Lin T, Stay TL, Sillitoe RV. (2015) In vivo analysis of Purkinje cell
firing properties during postnatal mouse development. Journal of Neurophysiology 113,
578-91. doi: 10.1152/jn.00586.2014.
version 2.6
page 27
ELC-01MX User Manual
❏ Bhumbra GS, Bannatyne BA, Watanabe M, Todd AJ, Maxwell DJ, Beato M. (2014). The
recurrent case for the Renshaw cell. Journal of Neuroscience 34, 12919-32. doi:
10.1523/JNEUROSCI.0199-14.2014.
❏ Geis, C., Weishaupt, A., Hallermann, S., Grunewald, B., Wessig, C., Wultsch, T., Reif, A.,
Byts, N., Beck, M., Jablonka, S., Boettger, M. K., Uceyler, N., Fouquet, W., Gerlach, M.,
Meinck, H. M., Siren, A. L., Sigrist, S. J., Toyka, K. V., Heckmann, M., & Sommer, C.
(2010). Stiff person syndrome-associated autoantibodies to amphiphysin mediate reduced
GABAergic inhibition. Brain., doi: 10.1093/brain/awq253.
❏ Iwai, Y., et al., A simple head-mountable LED device for chronic stimulation of
optogenetic molecules in freely moving mice. Neurosci. Res. (2011),
doi:10.1016/j.neures.2011.01.007
❏ Neef, J., Gehrt, A., Bulankina, A. V., Meyer, A. C., Riedel, D., Gregg, R. G., Strenzke, N.,
& Moser, T. (2009). The Ca2+ channel subunit ß2 regulates Ca2+ channel abundance and
function in inner hair cells and is required for hearing. Journal of Neuroscience 29, 1073010740.
❏ Pangrsic, T., Lasarow, L., Reuter, K., Takago, H., Schwander, M., Riedel, D., Frank, T.,
Tarantino, L. M., Bailey, J. S., Strenzke, N., Brose, N., Muller, U., Reisinger, E., & Moser,
T. (2010). Hearing requires otoferlin-dependent efficient replenishment of synaptic vesicles
in hair cells. Nat.Neurosci. 13, 869-876.
❏ Reisinger, E, Bresee C, Neef J, Nair R, Reuter K, Bulankina A, Nouvian R, Koch M,
Bückers J, Kastrup L, Roux I, Petit C, Hell SW, Brose N, Rhee JS, Kügler S, Brigande JV,
& Moser T. (2011). Probing the Functional Equivalence of Otoferlin and Synaptotagmin 1
in Exocytosis. J Neurosci. 31 ,4886-4895.
❏ Strenzke, N., Chanda, S., Kopp-Scheinpflug, C., Khimich, D., Reim, K., Bulankina, A. V.,
Neef, A., Wolf, F., Brose, N., Xu-Friedman, M. A., & Moser, T. (2009). Complexin-I is
required for high-fidelity transmission at the endbulb of held auditory synapse. Journal of
Neuroscience 29, 7991-8004.
❏ Subramaniam M, Althof D, Gispert S, Schwenk J, Auburger G, Kulik A, Fakler B, Roeper
J. (2014). Mutant α-synuclein enhances firing frequencies in dopamine substantia nigra
neurons by oxidative impairment of A-type potassium channels. Journal of Neuroscience
34, 13586-99. doi: 10.1523/JNEUROSCI.5069-13.2014.
Intracellular recording using ELC amplifiers
❏ Albertson AJ, Williams SB, Hablitz JJ. (2013). Regulation of epileptiform discharges in rat
neocortex by HCN channels. Journal of Neurophysiology. 110, 1733-43.
doi:10.1152/jn.00955.2012.
❏ Bhumbra GS, Bannatyne BA, Watanabe M, Todd AJ, Maxwell DJ, Beato M. (2014). The
recurrent case for the Renshaw cell. Journal of Neuroscience 34, 12919-32. doi:
10.1523/JNEUROSCI.0199-14.2014.
❏ Epsztein, J., Brecht, M., & Lee, A. K., (2011). Intracellular Determinants of Hippocampal
CA1 Place and Silent Cell Activity in a Novel Environment. Neuron 70, 109–120, April
14, 2011
❏ Geis C, Weishaupt A, Grünewald B, Wultsch T, Reif A, et al. (2011) Human Stiff-Person
Syndrome IgG Induces Anxious Behavior in Rats. PLoS ONE 6, e16775.
doi:10.1371/journal.pone.0016775
version 2.6
page 28
ELC-01MX User Manual
❏ Lee D, Shtengel G, Osborne JE, Lee AK. (2014). Anesthetized- and awake-patched wholecell recordings in freely moving rats using UV-cured collar-based electrode stabilization.
Nature Protocols 9, 2784-95. doi: 10.1038/nprot.2014.190.
In-vivo recording with miniature headstage using ELC amplifiers
❏ Epsztein, J., Brecht, M., & Lee, A. K., (2011). Intracellular Determinants of Hippocampal
CA1 Place and Silent Cell Activity in a Novel Environment. Neuron 70, 109–120, April
14, 2011
❏ Lee D, Shtengel G, Osborne JE, Lee AK. (2014). Anesthetized- and awake-patched wholecell recordings in freely moving rats using UV-cured collar-based electrode stabilization.
Nature Protocols 9, 2784-95. doi: 10.1038/nprot.2014.190.
❏ Tang Q, Burgalossi A, Ebbesen CL, Ray S, Naumann R, Schmidt H, Spicher D, Brecht M.
(2014). Pyramidal and stellate cell specificity of grid and border representations in layer 2
of medial entorhinal cortex. Neuron 84, 1191-7. doi: 10.1016/j.neuron.2014.11.009.
❏ Tang Q, Brecht M, Burgalossi A. Juxtacellular recording and morphological identification
of single neurons in freely moving rats. (2014). Nature Protocols 9, 2369-81. doi:
10.1038/nprot.2014.161.
version 2.6
page 29
ELC-01MX User Manual
9 Technical Data
Module for EPMS-07 system with headstage
Headstage:
Input voltage range:
Operating voltage:
Enclosure:
Headstage connector:
Electrode connector:
Ground connector:
Reference electrode connector:
(optional)
Input resistance (CC):
Current range:
±12 V
±15 V
Size: 23 x 70 x 26 mm, grounded
8-pole DIN connector
BNC with driven shield
2.4 mm banana jack
SMB connector
>1013 Ω
±120 nA max. (100 MΩ feedback)
Electrode parameter controls:
OFFSET:
CC CAPACITY COMPENSATION:
VC CAPACITY COMPENSATION:
(τ-fast)
BIAS control (CC only):
range ±100 mV, ten-turn control
range 0 – 30 pF, ten-turn control
time constant and amplitude adjustable with
trim-pots, min. response time: 30 µs
range ±100 pA, current adjustable with trim
potentiometer
Bridge balance:
0-100 MΩ (0-1000 MΩ possible):
Adjustable with ten-turn control
Electrode resistance test:
Sensitivity 1 mV / MΩ:
Display:
application of square current pulses ±1 nA
3 ½ digit, XXX MΩ, activated by push-button
(same as POTENTIAL display)
Bandwidth and speed response:
Full power bandwidth (REL = 0):
25 kHz, rise time (10% - 90%)
<15 µs (REL = 100 MΩ)
<8 µs (REL = 5 MΩ)
Outputs:
Output impedance:
Max. voltage:
Current output:
Current output sensitivity:
Current display:
Current low-pass filter:
Potential output x1:
version 2.6
50 Ω
±12 V
BNC connector, sensitivity V/nA
Rotary switch, range: 0.1, 1, 10
3 ½ digits, XX.XX nA, resolution 10 pA
3-pole BESSEL filter (other options available)
attenuation: -18 dB/octave, corner frequency:
3 kHz
BNC connector, sensitivity 1 mV/mV
page 30
ELC-01MX User Manual
Potential output:
Potential low-pass filter:
Potential high-pass filter:
Digital displays:
Display mV/MΩ:
Display current:
BNC connector, range: 10, 100, 1000
3-pole BESSEL filter (other options available)
attenuation: -18 dB/octave, corner frequency:
3 kHz
1-pole BESSEL filter, other options available,
attenuation: -6 dB/octave, corner frequencies
(Hz): 1, 10, 50, 100, 500
3 ½ digits, XXXX mV or XXX MΩ
3 ½ digits, XX.XX nA
Inputs:
Input impedance analog:
Input range:
Input impedance digital (TTL):
Input TTL:
Current stimulus input:
Step gate input:
Gated stimulus:
Polarity:
Voltage command input:
100 kΩ
±12 V
10 kΩ
range: 0-5 V, LO: <0.8 V, HI: >1 V
via BNC connectors, sensitivity 10 nA / V
via BNC connector (TTL)
with ten-turn control of holding current,
resolution: 100 pA, range: ±100 nA
or
with ten-turn control of holding potential,
in VC mode: resolution: 1 mV, range: ±1 V
in VCx10 mode: resolution: 10 mV, range: ±10 V
selectable with toggle switch
via BNC connector, sensitivity ÷10 mV
EPMS-07 SYSTEM
Power Requirements:
115/230 V AC, 60/50 Hz, fuse 2 A / 1A, slow, 45-60 W (depending on the modules plugged
in)
Dimensions:
19” rack-mount cabinet, 3U high (1U = 1 3/4” = 44.45 mm)
version 2.6
page 31


![Jahresbericht 2007 des Fraunhofer IFF [ PDF 3.03 MB ]](http://vs1.manualzilla.com/store/data/006798304_1-2ffbea970edf0c57999fe80b3092fe9a-150x150.png)