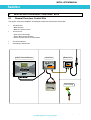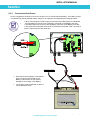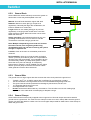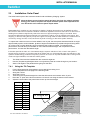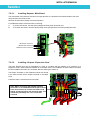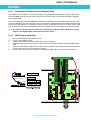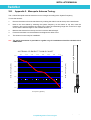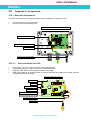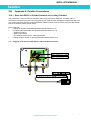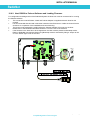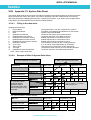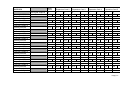
1
Page | 0 INSTALLATION MANUAL 11 RadioNet Revision Draft Description of Change Original Version Change Number 0 Application Version PoleNet RadioNet Host RadioNet Base RadioNet Remote NMC Pro V1.61 or greater V1.61 or greater V2.27 or greater V2.27 or greater V3.02.08 or greater Date of issue: Publisher: 2nd July 2009 Netafim TM (A.C.S.) Ltd. Date Approval 20090824 J. Witherspoon © Copyright 2009, Netafim No part of this publication may be reproduced, stored in an automated data file, or made public in any form or by any means, whether electronic, mechanical, by photocopying, recording or in any other manner without prior written permission of the publisher. Although Netafim takes the greatest possible care both with its products and with the associated manuals, there may be discrepancies in them. Netafim will not however accept responsibility for damage resulting from the use of Netafim products or damage resulting from the use of this manual. Netafim also reserves the right to make changes and improvements to its products or to the associated manuals without notice Doc. Name: RadioNet - User Manual Revision: 01 Crop Management Technologies Page: 1 of 61 pages INSTALLATION MANUAL 22 RadioNet TABLE OF CONTENTS 1. INTRODUCTION 5 1.1. 1.2. 1.3. 1.3.1. 1.3.2. 1.3.3. 1.3.4. 1.3.5. 1.3.6. 1.3.7. SCOPE OF MANUAL IDENTIFICATION OF SYSTEM HARDWARE SYSTEM OVERVIEW HOST UNIT BASE UNIT REMOTE UNIT SAF REMOTE UNIT ANTENNA SOLAR PANEL OUTPUT / INPUT DEVICES 5 5 6 2. SAFETY 8 2.1. 2.2. 2.3. 2.4. RADIO ANTENNAS BATTERIES CONNECTION TO HIGH VOLTAGE OVERHEAD POWER LINES 8 8 8 8 3. TOOLS 9 4. QUICK START GUIDE 10 4.1. 4.2. 4.3. QUICK START GUIDE‐ BEFORE GOING INTO THE FIELD QUICK START GUIDE‐ CENTRAL SITE QUICK START GUIDE‐ REMOTE SITES 10 10 10 5. RADIO LICENCE 11 Doc. Name: RadioNet - User Manual 7 7 7 7 7 7 7 Revision: 01 Crop Management Technologies Page: 2 of 61 pages INSTALLATION MANUAL 33 RadioNet 6. INSTALLATION GUIDE‐ CENTRAL SITE 12 6.1. 6.2. 6.2.1. 6.2.2. 6.2.3. 6.2.4. 6.3. 6.3.1. 6.3.2. 6.3.3. 6.4. 6.5. 6.5.1. 6.5.2. 6.5.3. 6.5.4. GENERAL OVERVIEW‐ CENTRAL SITE INSTALLATION‐BASE UNIT BASE UNIT‐ ANTENNA SITE MOUNTING THE BASE ANTENNA INSTALLATION‐ BASE UNIT ENCLOSURE GUIDELINES INSTALLING‐ BASE UNIT POWER INSTALLATION‐ HOST UNIT INSTALLATION‐ HOST UNIT ENCLOSURE GUIDELINES CONNECTION‐HOST POWER CONNECTION‐HOST COMMUNICATION INSTALLATION‐ CONTROL DEVICE GUIDELINES INSTALLATION‐GROUNDING OF CENTRAL SITE GROUNDING‐GUIDELINES GROUND RODS GROUND WIRE GROUND CLAMPS 12 13 7. INSTALLATION GUIDE‐REMOTE SITE 24 7.1. 7.2. 7.3. 7.3.1. 7.3.2. 7.3.3. 7.4. 7.4.1. 7.4.2. 7.5. 7.5.1. 7.5.2. 7.5.3. 7.5.4. 7.5.5. 7.6. GENERAL OVERVIEW –REMOTE SITE INSTALLATION‐ REMOTE SITE INSTALLATION‐ REMOTE SITE ANTENNAS. ANTENNA SELECTION INSTALLING‐ THE ¼ WAVE WHIP ANTENNA INSTALLING‐ THE STAINLESS STEEL MONOPOLE ANTENNA INSTALLATION‐ SOLAR PANEL USING THE TILT TEMPLATE MOUNTING THE SOLAR PANEL INSTALLATION‐ REMOTE UNIT INSTALLING‐REMOTE UNIT POWER INSTALLING‐REMOTE UNIT OUTPUTS OUTPUT‐HYDRAULIC CONTROL ASSEMBLY OUTPUT‐ RELAY DEVICE. INSTALLING‐ REMOTE UNIT DIGITAL INPUTS INSTALLATION‐ GROUNDING REMOTE SITE 24 24 25 8. HOST ACCESSORIES 37 8.1. 8.1.1. 8.1.2. 8.1.3. 8.1.4. INSTALLING‐HOST INPUT AND OUTPUT CARDS INSTALLING‐HOST PARALLEL INPUT CARD INSTALLING‐HOST OUTPUT CARD OR PLAYBACK CARD HOST OUTPUT CARD ONLY. INSTALLING‐HOST OUTPUT CARD AND THE INPUT CARD. 37 Doc. Name: RadioNet - User Manual 13 14 15 16 17 17 19 20 22 22 22 23 23 23 25 26 26 27 27 28 28 29 31 33 33 34 36 37 38 38 39 Revision: 01 Crop Management Technologies Page: 3 of 61 pages INSTALLATION MANUAL 44 RadioNet 9. MAINTENANCE 40 9.1. 9.2. 9.3. 9.4. 9.5. MAINTENANCE‐HOST UNIT MAINTENANCE‐BASE UNIT MAINTENANCE‐REMOTE UNIT MAINTENANCE‐SOLAR PANEL MAINTENANCE‐BATTERIES 40 40 40 41 41 10. APPENDIX 42 10.1. APPENDIX 1. OPERATING FREQUENCIES 10.2. APPENDIX 2. MONOPOLE ANTENNA TUNING. 10.3. APPENDIX 3. SPECIFICATIONS 10.3.1. HOST UNIT 10.3.2. BASE UNIT 10.3.3. REMOTE UNIT 10.3.4. SOLAR PANEL 10.3.5. T12 V BATTERY T10.3.6.T6 V BATTERY 10.4. TAPPENDIX 4. DIMENSIONS AND CONTENTS T10.4.1.HOST UNIT 10.4.2. U‐BOLT CLAMP 10.4.3. BASE UNIT AND REMOTE UNIT 10.4.4. SOLAR PANEL 10.5. APPENDIX 5: COMPONENTS 10.5.1. BASE UNIT COMPONENTS 10.5.2. HOST UNIT COMPONENTS 10.5.3. REMOTE UNIT CARDS 10.6. APPENDIX 6: POLENET CONNECTIONS 10.6.1. BASE UNIT RS232 TO POLENET SOFTWARE AND LOADING FIRMWARE 10.6.2. HOST RS232 TO POLENET SOFTWARE AND LOADING FIRMWARE 10.7. APPENDIX 6: LABELS 10.7.1. HOST UNIT 10.7.2. BASE UNIT 10.7.3. REMOTE UNIT 10.7.4. SOLAR PANEL 10.8. APPENDIX 8: LATCHING DEVICE COMPATIBILITY LIST 10.9. APPENDIX 9: WARRANTY STATEMENT 10.10. APPENDIX 10: SYSTEM DATA SHEET 10.10.1. FILLING IN THE DATA SHEET. 10.10.2. EXAMPLE OF FILLED IN SYSTEM DATA SHEET. Doc. Name: RadioNet - User Manual 42 43 44 44 45 46 47 47 48 49 49 49 50 50 51 51 52 53 55 55 56 57 57 57 57 57 58 58 59 59 59 Revision: 01 Crop Management Technologies Page: 4 of 61 pages INSTALLATION MANUAL 55 RadioNet 1. INTRODUCTION 1.1. Scope of Manual This manual provides instructions for the installation of RadioNet System and its related components. The manual is a reference tool to the hardware used within the system. The software aspects of the system are covered in the RadioNet Configuration & Diagnostics Manual. The aim is to provide a logical sequence of installation to enable a short set up time and insure reliable system operation. 1.2. Identification of System Hardware SAP Code 74330-012000 74330-012100 74330-012200 74330-013140 74330-010350 74330-009500 74330-005360 74330-005365 74330-002950 74330-003025 Application PoleNet RadioNet Host Unit RadioNet Base Unit RadioNet Remote Unit Remote Expansion Card ¼ Wave Whip with 1m Coaxial S/Steel Whip Antenna Kit with 3m Low Loss Cable S/Steel Whip Antenna Kit with 6m Low Loss Cable S/Steel Whip Antenna Kit with 10m Low Loss Cable Solar Panel and Regulator Kit 6V SLA Battery, 6 VDC, 1.2 AH Doc. Name: RadioNet - User Manual Version V1.61 or greater V1.61 or greater V2.26 or greater V2.26 or greater Revision: 01 Crop Management Technologies Page: 5 of 61 pages INSTALLATION MANUAL 66 RadioNet 1.3. System Overview RadioNet by Netafim is the new generation of wireless control and monitoring systems. Extra detail has been given to the RadioNet range of products to make it versatile, reliable and user friendly. The three basic components include the Host, Base, and Remote units. A n te n n a So la r Pa n e l Re m o t e U n it [SA F] R R ad io N ad io N et Ba se U n it et H o st U n it C o n tro l D e v ic e Re m o t e U n it. O u t p u t /In p u t D e v ic e s. PC -Po le n e t Doc. Name: RadioNet - User Manual Revision: 01 Crop Management Technologies Page: 6 of 61 pages INSTALLATION MANUAL 77 RadioNet 1.3.1. Host Unit The Host functions as an interface between the control system and the wireless platform namely the Base Radio Unit and the Remote Units. The Host communicates to the control application by RS232 or RS485. The HOST can communicate to multiply Base Units via RS485. The Host includes multiple interface protocols giving it the ability to integrate with a wide range of controllers 1.3.2. Base Unit The Base Unit is the communication [radio] platform between the Remote Units and the Host. The Base Unit stores the Route map of the network. The Base Unit radio is programmable to the system frequency. The RadioNet Base can manage up to 254 remote units in a wireless network including the option of using multi layer store & forward (SAF) repeaters. 1.3.3. Remote Unit The Remote Unit is the wireless Input-Output platform for the RadioNet system. The Remote Unit houses a programmable radio and the base I/O card. To the base card up to four expansion cards can be installed. The RadioNet Remote Units are modular in size from 1,3,5,7, 9 digital outputs, and 2 to 10 digital inputs. 1.3.4. SAF Remote Unit The Store and Forward [SAF] or repeater mode in the RadioNet system can be activated in any Remote Unit by updating the Route Map in the Base Unit. A Remote Unit configured in SAF mode maintains all of the Remote Unit features. 1.3.5. Antenna Antennas are fitted to all radio units. An antenna (or aerial) is a transducer designed to transmit or receive electromagnetic waves. In other words, antennas convert electromagnetic waves into electrical currents and vice versa. Physically, an antenna is simply an arrangement of one or more conductors, usually called elements. The RadioNet system used various antennas for different applications. 1.3.6. Solar Panel The Solar Panel is used as part of the automatic battery charging system on the Remote Units. 1.3.7. Output / Input Devices The RadioNet System can connect to various output and input devices. From solenoids and relays to watermeters. Doc. Name: RadioNet - User Manual Revision: 01 Crop Management Technologies Page: 7 of 61 pages INSTALLATION MANUAL 88 RadioNet 2. SAFETY The RadioNet system must be installed by qualified and authorised technicians. Failure to use approved accessories specifically for the RadioNet equipment may result in the system operating in a dangerously unsafe condition. Unauthorized or incorrect modification of the product will negate the approval rating of the product and warranty. Be cautious when operating the equipment in a hazardous atmosphere [e.g. a mine site] as it could result in serious injury or death. 2.1. Radio Antennas The RadioNet, Base Unit, and Remote Units when powered can emit radio energy from their antenna. Care must be taken not to hold on to the antenna of a powered unit. Deliberate misuse of the product could result in harm. Do not use any RadioNet Base Unit or RadioNet Remote Unit that has a damaged antenna. If a damaged antenna comes into contact with your skin, a minor burn can result. 2.2. Batteries Only use Netafim approved Batteries on the RadioNet equipment. All batteries can cause property damage and/or bodily injury, such as burns. If a conductive material such as jewellery, keys, or tools touch exposed terminals the conductive material may complete an electrical circuit (short circuit) and become quite hot. Exercise care in handling any charged battery, particularly when placing it inside container with metal objects. The RadioNet system uses sealed Lead Acid batteries as a power source. Do not puncture the case of the battery. If a battery is found to have a punctured case take caution in handling the battery and avoid contact with the corrosive material in the battery. Always dispose of a used battery in a responsible manner. 2.3. Connection to High Voltage Only electricians qualified to work with high voltage should install RadioNet Remote Units interfacing with High Voltage equipment. 2.4. Overhead Power Lines When installing antennas care must be taken. Insure there is clear space at all times from overhead power lines. Do not erect any mast and associated antenna if power line are in the vicinity. Check your relevant supply utility as to the clearances required in your region. DO NOT RISK IT! Doc. Name: RadioNet - User Manual Revision: 01 Crop Management Technologies Page: 8 of 61 pages INSTALLATION MANUAL 99 RadioNet 3. TOOLS It is expected that the system will be installed by professional personal and therefore fully equipped. However the following tools are required as a minimum to install the RadioNet system. A F. G. B* . H. I. C. MIN MAX AVG REL RANGE HOLD RS232 PEAK Hz J. uA mA Ω 10A _ V K. 4-20 mA ~ V 0 C ΣχαννερΝετ OFF 0 F COMMUNICATIONS RECEIVER PB-TS11 BAND TS MODE V/M mA uA COM PWR V Hz 13 CHROME + VANADIUM 10A D. 13 L. M. E. A. B. C. D. E. F. G. H. I. J. K. L. M. 3.5mm Flat-Blade Screwdriver Used on all Host Terminals and Remote Unit Power Terminal 2mm Flat-Blade Screwdriver *Supplied with the Host. Used on all Output and Input Terminals. Multimeter. Able to read Ohms, True RMS AC and DC voltage as a minimum. Radio Frequency Scanner. Required to listen to the system communications. Spirit Level. Pozidrive - Cross Head Screwdriver #1 Used on all mounting screws in the Host, Base, and Remote. Pozidrive Screw and Driver markings. Pozidrive - Cross Head Screwdriver #2 Used on the Host, Base and remote Lid screws Long Nose Pliers. Used to place jumper on to the Remote Radio if the battery is fitted. Bootlace Ferrules to suit 0.75mm2 cables. As fitted to the Aquative Solenoid. Ferrule Crimping Pliers. 13mm Open End Ring Spanner. Used on all of the U-Bolt clamps and 8mm Open End Ring Spanner used on all SMA Antenna nuts. 3mm Allan Key. Used on the Solar Panel Tilt angle adjustment. Doc. Name: RadioNet - User Manual Revision: 01 Crop Management Technologies Page: 9 of 61 pages INSTALLATION MANUAL 1010 RadioNet 4. QUICK START GUIDE The Quick Start Guide is intended for installation personal that only require a logical sequence to follow. 4.1. 1. 2. 3. 4. 5. 6. 7. 8. 9. 10. 11. 12. 4.2. 1. 2. 3. 4. 5. 6. Quick Start Guide- Before going into the Field Sort the consignment into the major components, Host, Base Unit, Remote Units, Solar Panels, Batteries, and Antennas. Check against supply documentation. Unpack all components and verify their contents. [See Section Dimensions and Contents as to what is supplied] Match Antennas to the Base Unit and the Remote Units. Match Solar Panel and Batteries to the Remote Units. Place the Remote Units into a sequential order according to their Serial Number. Record the information Project Name, Radio Frequency, Serial Numbers etc on the System Data Sheet in section X. Check the firmware version of the equipment upgrade as required. [This will require connecting via Polenet to the equipment] Install expansion cards to Remote Units if required. Fit batteries and regulators to the Remote Units [Do Not Leave Powered Up]. Set the Solar Panel Tilt angle using the supplied template. [Record in System Data Sheet] Trim Antennas to your site frequency. With the aid of the site plan assign Remote Units to Valve or Valve clusters. Mark the Remote Unit as to its required location. Record the information on the Data Sheet. Quick Start Guide- Central Site Install the Base Unit- Antenna Connect Base Unit to the antenna and fix the Base Unit Mount the Host Unit [Check length of supplied RS485 Lead before fixing the unit] Connect Host Battery and Charger.[See Section X] Mount the Control Unit [Check length of supplied RS232 Lead before fixing the unit] Fix Power Supply Surge Unit. 4.3. 1. 2. 3. 4. 5. 6. 7. 8. 9. 10. 11. Quick Start Guide- Remote Sites Check that the Remote Unit is correct for the Location Fit Solar Panel (if exist) and Antenna to masthead. [Refer to Solar Panel installation Section]. Feed all cables through mast for protection. Mount Remote Unit using supplied U-Bolt. Connect Antenna to Remote Unit external SMA fitting. Connect Solar Panel (if exist) cable to regulator. Connect Outputs either a solenoid or relay. Connect Inputs as required. Connect power to the Remote Unit. Check the LED flashes. Listen for close command for all outputs. Refer to the RadioNet Diagnostic and Configuration Manual for System Testing. Doc. Name: RadioNet - User Manual Revision: 01 Crop Management Technologies Page: 10 of 61 pages INSTALLATION MANUAL 1111 RadioNet 5. RADIO LICENCE The RadioNet system operates in the 402 to 472MHz frequency range. Check with your local authority to verify the availability of frequencies and the licensing regulations. It is the operator’s responsibility to use the equipment within the local laws. Note: See Annex 1: For Frequencies requirements in your area. It is illegal to program the RadioNet system to frequencies within licensed bands without first obtaining an approved license. The RadioNet system transmit power must not exceed that of the license free regulations.. It is highly recommended that the system is operated in a licensed band to insure interference free operation and maximize the systems communication reliability. Doc. Name: RadioNet - User Manual Revision: 01 Crop Management Technologies Page: 11 of 61 pages INSTALLATION MANUAL 1212 RadioNet 6. 6.1. INSTALLATION GUIDE- CENTRAL SITE General Overview- Central Site This section covers the installation of RadioNet components found at the Central Site. The Base Unit o Base Antenna o Base Unit Power Source The Host Unit o Host Unit Power Supply o Host to Base Communication o Host to Control Device Communication The Control Device. Grounding of Central Site NM C Control Device N M C - PRO Host Unit Ba se Unit C r o p M an ag e m e n t T e c h no lo g ies C r o p M ana g e m en t T e c h n o lo g ie s C r o p M anag em ent T ec hno log ies 1 2 3 +/ - 4 5 6 0 7 8 9 . M EN U EN T ER H ELP D ELET E FU SE Ground ing LEADACID-12V18Ah Doc. Name: RadioNet - User Manual Revision: 01 Crop Management Technologies Page: 12 of 61 pages INSTALLATION MANUAL 1313 RadioNet 6.2. Installation-Base Unit Recommended Sequence: 1. Locate the Base Antenna 2. Mount the Base Antenna 3. Mount the Base Unit [Pole Kit or Direct] 4. Connect the Antenna to Base 5. Power the Base Unit. N M C - PRO RED C r op M ana gem en t T ec hno log ies C r o p M ana g em en t T e chn o lo g ie s BLACK C r o p M a n ag e m e n t T e c h n o lo g ie s 1 2 3 +/ - 4 5 6 0 7 8 9 . M EN U EN T ER H ELP D ELET E BLACK RED TOBATTERYCHARGER Fuse on Positive Lead FUS E LEAD ACID-12V18Ah 6.2.1. Base Unit- Antenna Site Note: Refer to Section 6.2.2 for the Mounting of the Antenna to the Mast. The site for the Base antenna falls into two types: 1. A Standalone Mast o With the Base Unit attached o With the Base Unit remote. In either case it is recommended that the design of the standalone mast should be a tilt-down type or at least one that offers easy access to the Antenna. 2. Mounted on a Building, Pump Shed or other existing structure. Mount the antenna mast as close as possible to the apex of the building roof. Select the end of the building that is nearest to the area of operation. In all cases the location of the Base Antenna should be governed by the following objectives. A. Height: Keep the antenna as high as possible. At least 9 meters off the ground. B. Obstacles: Clear path to the Remote Units. Refer to the Antenna Mounting section when considering how and where to site the Base Antenna. Refer to the RF Design Guide for recommendations. The standard Base Unit antenna is fitted with a 10-meter antenna cable; use it to the best advantage of the system. Field O b structions Field O b structions O p tion 1. Sta nd a lone M a st O p tion 2. M ounted on Build ing Doc. Name: RadioNet - User Manual Revision: 01 Crop Management Technologies Page: 13 of 61 pages INSTALLATION MANUAL 1414 RadioNet 6.2.2. Mounting the Base Antenna The antenna cable should take a direct path to the Base Unit. Tight bends or crushing of the antenna cable must be avoided. Note: The antenna must pre-cut to the system frequency before installation. Please refer to the cutting chart included in the Appendix at the back of the manual. Allen Screw reta ining the Sta inless Steel element. M a x tub e Ø 30 47 54 Antenna Bra cket Top View Ta p e the ca b le a t this p oint. Run the a ntenna ca b le insid e of the M a st Pole. A A. Note: B. Note: C. Note: D. B D C Antenna mounted on the bracket and attached to the mast tube. The antenna cable is run down the inside of the mast pole to provide physical protection to the cable. Do Not loop and feed the cable down the open top of the tube, this method is prone to bird damage. The Mounting bracket is reversed allowing the antenna cable to feed directly into the centre of the mast pole. Test first this may not be suitable for sizes of pole. Where the mast pole is larger than 30mm in diameter, the angle mounting part of the assembly can be used and attached to the mast with screws. The antenna cable is fed through a hole in the side of the pole, below the bracket. Note: By drilling a 16mm hole in the mast cap the antenna can be mounted directly on top of the mast. The cable is fed down the centre of the mast pole. Protect the Antenna cable from any damage. Remove any shape edges on the material the cable passes through. Sleeve the cable to provide an extra physical barrier if it has to pass through any material Doc. Name: RadioNet - User Manual Revision: 01 Crop Management Technologies Page: 14 of 61 pages INSTALLATION MANUAL 1515 RadioNet In areas prone to bird damage, the exposed antenna cable should be sleeved with a heavy wall poly tubing to provide extra mechanical protection. Alternatively, install the antenna as per “B” or “D” in the drawing. 6.2.3. Installation- Base Unit Enclosure Guidelines The Base location must be easy to access. You need to connect to the Unit with a PC to configure the unit when installing the Base Unit. Mount at eye height [1.5 to 1.8m above the floor] and with a clear area 1m x1m in front of the Unit. Keep at least 100mm below and the width of the unit clear for cabling access. The Base is connected to the Host unit with 3 meters of cable. Insure that it is mounted with in this distance. 10m of Ca b le BASE UNIT Sup p lied : RS485 Ca b le-3 meters Connecting Ba se to Host Clea r Sp a ce for Ca b le Access 180 Two mounting options are available: 1. 2. Using the back plate and all or part of the U-Bolt. Removing the back plate and mounting through the enclosure. 6.2.3.1. Mounting with Back Plate fitted. To a pole with a diameter in the range of 27 to 52 mm using the supplied U-Bolt. Metal or wooden post by retaining the U-Bolt bracket and fixing using the appropriate TEK* screw form. [Metal or Wood *TEK is a hexagon drive screw] Retaining the bracket ensures clearance for the mounting plate screws and a stable mount if fixing to an uneven surface on a wooden post. The minimum length of the screws for this method is 50mm. Wood or M eta l Post Round Pole Reta in the U-Bolt Bra cket * U-Bolt [a s sup p lied ] TEK Wood 12g x 50mm TEK M eta l 12g x 50mm Ø 53mm M a x. Ø 27mm M in. END VIEW Doc. Name: RadioNet - User Manual END VIEW TO P VIEW Revision: 01 Fixing O p tions for the Ba se a nd Remote Unit using the mounting p la te. Crop Management Technologies * U-Bolt Bra cket is used for a ll op tions. Page: 15 of 61 pages INSTALLATION MANUAL 1616 RadioNet 6.2.3.2. Mounting with Back Plate removed The Back Plate can be removed [it is attached with four screws] if the Base is to be fixed to a flat surface. Fixing is through the lid screw holes in each corner of the enclosure base. Screws should be a Pan head type with a screw thread diameter not greater than 4mm The Head of the screw should not exceed 8mm in diameter. 157 mm M a x Screw Hea d Ø 8mm 109 mm Hole Ø 4mm Ba se/Remote Unit Enclosure w ith Lid removed . Once the Base is installed connect the Antenna Cable SMA nut to the underside of the Base Unit enclosure. Note: Tightening 6.2.4. the antenna cable connector: The nut on the SMA plug should be tightened with an 8mm or 5/16” spanner. Hold the SMA jack on the enclosure at the same time with an 8mm spanner when tightening the nut. Installing- Base Unit Power The Base Unit can be supplied from two sources. Standard Method from the Host via the RS485 lead. Optional 12VDC terminal from an external source. 6.2.4.1. RS485 Standard Supply Power for the Base Unit is supplied from the Host’s power supply via the RS485 lead. The Standard RS485 lead supplied with the Host Unit is 3 meters in length. An optional 10-meter RS485 lead can be purchased. Runs longer than 10 meters in length must be fitted with an External 12VDC power supply. 6.2.4.2. External Optional Supply This is used if the Base Unit is to be located at a distance greater than 10 meters. A separate cable must connect to the “A” 12 VDC terminal. The power source can be direct from the Host’s power supply or from another 12 V battery and charging system. The unit will detect power on the external terminal and auto-switch from the RS485 lead to 12VDC terminal. If using a separate battery to the Host, the power lead must be fitted with a XXXmA Externa l Pow er 12V DC. fuse. Check the polarity on both ends of the power lead before inserting the fuse. Doc. Name: RadioNet - User Manual 20900031 RS232 RS232 RS485 RED + 12V G ND BLACK Revision: 01 Crop Management Technologies Page: 16 of 61 pages INSTALLATION MANUAL 1717 RadioNet 6.3. Installation- Host Unit N M C - PRO C r op M ana gem en t T ec hno log ies C r o p M ana g em en t T e chn o lo g ie s C r o p M a n ag e m e n t T e c h n o lo g ie s Recommended Sequence: 2 3 +/ - 4 5 6 0 7 8 9 . M EN U EN T ER H EL P D ELET E Position the Host Unit Mount the Host Unit Power the Host Unit. Connect to Base Unit Connect to the Control Device. E 6.3.1. FUS 1. 2. 3. 4. 5. 1 LEAD ACID-12V18Ah Installation- Host Unit Enclosure Guidelines The Host location must be easy to access. Mount at eye height [1.5 to 1.8m above the floor] and with clear area 1.2m x 1.2m in front of the Unit. Do Not run the RS485 or the RS232 cable in close proximity to high voltage [>110 VAC] cables. Do Not run the RS458 or the RS232 cable in the vicinity of Motor Starters and Variable Speed Drives. Remember the need to connect to the Host Unit with a PC to configure the unit. When mounting the Host, keep the area in the direction of the lid opening clear. Keep 100mm below and the width of the Host Unit clear of other devices for cable access. The supplied RS485 cable [Host to Base Unit] is only 3 meters long. The supplied RS232 cable [Control device to Host] is only 3 meters long. The Host is powered from a 12VDC battery. The power lead is 2m in length. The supplied RS485 lead is terminated at each end with a RJ45 x 8pin modular plug. The cable cannot be removed from the glands without cutting the cable. Note: An optional 10m RS485 lead can be ordered and supplied if the distance between the Host and Base exceeds the standard length. 240 Clea r Sp a ce for Lid Hing ed Ab ove. 165 245 Cr op M anagem ent T ec hno log ies 160 Clea r Sp a ce for Lid Hing ed to the Left Clea r Sp a ce for Lid Hing ed to the Rig ht HO ST UNIT 160 M EN U H ELP 245 D ELET E 100 Clea r Sp a ce for Ca b le Access TM 240 RS232 Ca b le Controller to Host. 3 M eters Sup p lied RS485 Ca b le Host to Ba se. 3 M eters Sup p lied Doc. Name: RadioNet - User Manual Revision: 01 Crop Management Technologies Page: 17 of 61 pages INSTALLATION MANUAL 1818 RadioNet 6.3.2. It is recommended that the Host and Control device are mounted on a flat surface. Remove the left and right Cover Strips from the lid by prising off with a <3mm blade screwdriver. There are driver access points on each strip on the outside long edge at the top and bottom. Using # 2 Pozidrive screwdriver undo the lid retaining screws. Undo the hinge screws and remove the lid. The Host enclosure is fixed through the holes in each corner of the enclosure. Fix one top corner then level the unit before fixing the other corner. Maximum screw head diameter must not exceed 8mm. It is preferred that a Pan head screw be used, Countersunk screw heads can also be used. Do Not over tighten the mounting screws as they can pull through the base. M a x Screw Hea d Ø 8mm. Hole Ø 5mm. Check level. Cover Strip remova l slot. + 12V RS485-IN GND C r o p M anag em ent T ec hno lo g ies RS485 RS485-O UT A B GND 147 LK2LK1 RS232(2) TXD RXD LED1 GND RS232(1) LED2 LED3 J1 Cover Strip in Pla ce BOOT RESET Mounting the Host Unit 226 Cover Strip Removed HO ST Unit M ounting Dimensions. All in M illimeters Doc. Name: RadioNet - User Manual Revision: 01 Crop Management Technologies Page: 18 of 61 pages INSTALLATION MANUAL 1919 RadioNet 6.3.3. Connection-Host Power Power is supplied to the Host Unit from an 18-amp hour 12-volt DC lead acid battery. The battery charge is maintained by mains powered battery charger or an optional user supplied Solar-charging system. When connecting the 12VDC supply to the Host ensure that polarity is maintained. The Red lead must connect to the Positive [+] terminal on the Battery and Host. The Black lead must connect to the Negative [-] terminal on the Battery and Host. The green LED 3 will flash when power is connected to the Host. LED 1 and LED 2 will be continuously lit at the same time. Ensure that correct polarity is maintained when connecting the Charger to the Battery. Failure to do so may result in damage to the charger or the Battery. The Positive cable is fitted with a 20mm x 5 amp Slow Blow Fuse. Doc. Name: RadioNet - User Manual Revision: 01 Crop Management Technologies Page: 19 of 61 pages INSTALLATION MANUAL 2020 RadioNet 6.3.4. 6.3.4.1. Connection-Host Communication Connection-Host Unit to Base RS485 This connection provides the communication channel for the operation of the system. The host receives the command from the Control device interprets the command via the I/O map and sends the information to the Base to transmit to the Remote Units. This communication is two way. The Host is supplied with a 3-meter lead fitted with RJ45 plugs and two glands. Connect the RS485 supplied into the RS485 In port in the Host. o This port is the upper port on the right side of the Host PCB. Connect the other end into the Base Unit RS485 Out port. o This port is the upper port on the right side of the cluster on the Base Unit PCB. Note: Remember Connect “Top to Top” Doc. Name: RadioNet - User Manual Revision: 01 Crop Management Technologies Page: 20 of 61 pages INSTALLATION MANUAL 2121 RadioNet 6.3.4.2. Connection-Host Unit to Control RS232 Communication to the NMC-Pro Controller and the Host is by a proprietary RS232 serial format. The NMC-Pro must one of the following communication cards installed: 1. NMC RS232 Card: Netafim Part # 74340-009100 2. NMC RS485 Card: Netafim Part # 74340-009200 Each Host is supplied with a 3 meter 3 core communication cable for connection between the NMC-Pro and the Host. The Jumpers LK2 and LK1 must in the down position linking the centre and bottom pins. The NMC-Pro must have either: Output Dummy Cards or an Output Licence Key installed. The NMC-Pro must have the Menu 6.2 Remote Unit Type: [Set to] SingleNet The Shield wire is to be connected only to the Host Back Plate. Connection of wires: o Note: In RS232 the RX and TX cross over. Host Host RS232(2) Terminal RS232(2) Label # Name TXD 1 RXD 2 GND 3 Host Back Plate Host End Wire Colour Red Blue Green Shield NMC End Wire Colour Green Blue Red RS232 RS485 High Terminal Name COM TX RX Doc. Name: RadioNet - User Manual RS232 RS485 Label # 3 2 1 Revision: 01 Crop Management Technologies Page: 21 of 61 pages INSTALLATION MANUAL 2222 RadioNet 6.4. Installation- Control Device Guidelines Refer to Installation Manual supplied with the Control Device for a full recommendation. N M C - PRO C r op M ana gem en t T ec hno log ies C r o p M ana g em en t T e chn o lo g ie s C r o p M a n ag e m e n t T e c h n o lo g ie s The Control Device drives the system. Access to this unit will be on a daily basis 1 2 3 4 5 6 0 7 8 9 . +/ - M EN U EN T ER H EL P D ELET E FUS E The Control Unit should be located in an easily accessible location. Mount the Control Unit with the display screen at eye height. There should be 1.2m x 1.2m clear area in front of the Control Device It should be within 3 meters of the Host. Communication to the Host from the Control Unit is via RS232; try to keep the cable length to the distance supplied. Do Not run the RS232 cable in close proximity to high voltage [>110 VAC] cables. Do Not run the RS232 cable in the vicinity of Motor Starters and Variable Speed Consider the connection of the other equipment to the controller. o Local Digital Outputs, e.g. Pumps, Filters, Fertilizer Injection Equipment. o Local Digital Inputs, e.g. Water and fertilizer meters. o Analogue Inputs, e.g. Pressure Transducers, EC and pH sensors. LEAD ACID-12V18Ah 6.5. Installation-Grounding of Central Site Proper grounding provides an easy path for electrical current to return to its source. Electrical equipment can be destroyed or partially damaged by voltage spikes, lightning hits, etc. Proper electrical grounding in combination with the RadioNet internal protection is essential to protect the system, reduce the risk of damage, and prolong its life. Correct selection and installation of grounding equipment will protect the system and reduce the risk of human injury. A grounding system should tie all non-current carrying conductors to earth ground (0 volts). The grounding system should present a minimum resistance to current flow. Make sure all items used are in good condition. For example, a corroded wire clamp attaching a ground wire to a ground rod might add 100 ohms or more resistance to a system. N M C - PRO C r op M ana gem en t T ec hno log ies C r o p M ana g em en t T e chn o lo g ie s C r o p M a n ag e m e n t T e c h n o lo g ie s 1 2 3 +/ - 4 5 6 0 7 8 9 . M EN U EN T ER H EL P D ELET E FUS E LEAD ACID-12V18Ah Less than 5 ohm will be considered as a good ground. 6.5.1. Grounding-Guidelines Bond all ground wires at a central point and take a single wire to the grounding rod. In the NMC Controller connect to the grounding bar inside the controller. In the Host Unit ground to the back mounting plate of the unit. In the Base Unit connect to the supplied crimp terminal. The ground wire must conform to the local electrical standards for minimum size and insulation colour. The ground rod must conform to the local electrical standards for minimum size and construction. Doc. Name: RadioNet - User Manual Revision: 01 Crop Management Technologies Page: 22 of 61 pages INSTALLATION MANUAL 2323 RadioNet 6.5.2. Ground Rods Ground Rods are used to efficiently connect the system to earth where current may be dissipated in the soil. NM C Controller Ra d ioNet Host Ra d ioNet Ba se Unit Material: Ground Rods should be copper clad steel. G round Ba r Diameter: Minimum 16mm [5/8”] (or as per local regulations). Generally the larger the rod diameter, the lower its resistance to current flow. Length: Minimum 2.5 meters [8 feet] (or as per local regulations). A longer ground rod will reach a soil with higher moisture content. Moist soil carries current much better than drier soil. Single grounding: It is important that there is only one grounding location where a rod or series of rods are connected to each other using a ground wire. Note: Multiple independent ground rods will increase the risk of current, from a lightning strike being dissipated through one rod and re-entering the system through an adjacent rod. G round Wire Cop p er Ja cketed Steel G round Rod G round Cla mp Location: Close to the main circuit breaker panel and in moist soil. Rod installation: Drive the rod into the earth until about 100mm (4 inches) is left above grade. If it is impossible to drive the rod to the proper depth, it is acceptable to lay the rod horizontally, 800mm (2.5 feet) below grade. In cases where the rod is prone to damage, for example by lawnmowers or tractors it can be installed in a hole, about 200mm (8 inches) deep so that the rod is about 100mm under grade and 100mm above hole level. 6.5.3. Ground Wire The ground wire is a large copper wire that connects the main circuit panel to the ground rod. Typically, 4mm2 (10 -12 AWG) copper wire is sufficient for runs less than 4 meters. The wire insulation colouring should conform to local standards designating Earth wire. The ground wire should be protected from damage by lawnmowers, tractors, etc. It is important that the wire not be cut. Avoid tight bends in the cable. Do Not coil the earth cable under any circumstance. The coil will act as a chock creating high impedance in the cable while it is attempting to dissipate a surge. 6.5.4. Ground Clamps Ground wires should not be merely wrapped around a ground rod. Ground clamps are used to attach a ground wire to a ground rod. The most common clamp is known as an acorn clamp. Make sure the ground clamps you select are rated for outdoor use. Do not use pipe clamps rated for water lines or hose clamps to attach the ground wire. Doc. Name: RadioNet - User Manual Revision: 01 Crop Management Technologies Page: 23 of 61 pages INSTALLATION MANUAL 2424 RadioNet 7. 7.1. INSTALLATION GUIDE-REMOTE SITE General Overview –Remote Site Antenna This section covers the RadioNet components found at a Remote site. This includes: The Antenna The Solar Charging System The Remote Unit and accessories The Hydraulic Control Devices Grounding The Remote Unit has three main functions: Sola r Pa nel 1. 2. 3. Remote Unit Digital Output device controlling up to 9 appliances. Digital Input device monitoring up to 10 appliances. Radio signal Repeating Site or Store and Forward [SAF] device. C r op M anag em ent T ec h no lo g ies 7.2. Installation- Remote Site Recommended Installation Sequence: 1. 2. 3. 4. 5. 6. 7. 8. Mount the Remote Antenna Adjust the Solar Panel Tilt angle. Fit the Solar Panel Install the Remote Battery Mount the Remote Unit Connect the Output Device Connect the Input Device Ground the System Note: Refer to Section 6.2.2 for the Mounting of the Antenna to the Mast. Refer to Section 7.3 Remote Unit Mounting. Aq ua tive Ground ing Doc. Name: RadioNet - User Manual Revision: 01 Crop Management Technologies Page: 24 of 61 pages INSTALLATION MANUAL 2525 RadioNet 7.3. Installation- Remote Site Antennas. 7.3.1. Antenna Selection Note: All systems must be cut to length according to the system operating frequency. Failure to do so will result in poor radio signal reception and transmission. Refer to the cutting chart in the Appendix for the ½-wave monopole antenna. As a general rule the Antenna should be mounted as high as practically possible. Mounting the antenna higher than necessary will require a heavier mast pole or pole stays both add cost to the system. Typically the antenna should have at least 2 meters of clearance above the maximum crop height in the direction of the Base Unit. The RadioNet Antenna products can be divided into two systems: 1. 2. The ground plane dependant flexible ¼-wave whip antenna with a 1-meter cable. The ground independent ½-wave monopole antenna with rigid stainless steel element. This product is available with 3, 6, and 10-meter antenna cable lengths. This results in four Antenna Options. 1/4 Wave Whip with 1m coaxial. o Used in crops with a height less than 0.6 meters where the base antenna is in view of the remote antenna. o Most vegetable crops on flat ground would fit this application Monopole S/Steel Whip Antenna Kit, 3 m low loss cable. o Used in crops with a height less than two meters in height. o This suits low trellised crops: for example wine and table grape vineyards, tomatoes, kiwi fruit, and passionfruit and cereal crops. Monopole S/Steel Whip Antenna Kit 6.0m low loss cable. o Used in crops with a height less than four meters. o This suits most tree crops: Apples, Pears, Mangoes, Bananas, and Stone Fruit for example. o Obstacles such as terrain or vegetation can be overcome by using this antenna. o Used if the Remote Unit is to be configured to be a repeater. Monopole S/Steel Whip Antenna Kit, 10m low loss cable o Designed to be used as the Base Unit antenna. o Used in Crops with a height less than eight meters. o This suits tall tree crops. o Obstacles such as terrain or vegetation can be overcome by using this antenna. o Used if the Remote Unit is to be configured to be a repeater Doc. Name: RadioNet - User Manual Revision: 01 Crop Management Technologies Page: 25 of 61 pages INSTALLATION MANUAL 2626 RadioNet 7.3.2. Installing- The ¼ Wave Whip Antenna This antenna is used where the distance to the Base or a SAF unit is close and the application has little to no vegetation, terrain, or building obstacles in the signal path. The system consists of three parts the Whip antenna, a SMA adaptor with nut and a one-meter antenna cable. 1/4 Wa ve Whip Antenna . 1. 2. Remove the Nut from the Adaptor. Install the SMA Adaptor to the back-plate tag with the fixed nut to the topside of the tag. Secure with the bulkhead nut on the underside. Screw the ¼ Wave Whip on to the Adaptor. Form an open loop with the spare cable and tie one side together. Connect the Antenna Cable to the underside of the enclosure and to the adaptor Firm all nuts. 3. 4. 5. 6. Antenna Ground Pla ne. SM A Ad a p tor fitted to the Pla te. Remote Unit. The antenna must pre-cut to the system frequency. The system must mount on a Ground plane plate. The Remote Unit mounting back plate serves as the Ground Plane. Please consult with a Netafim Technical Representative if you wish to mount this antenna other than on the supplied mounting back plate. 7.3.3. 1 meter Antenna ca b le. END VIEW Installing- The Stainless Steel Monopole Antenna This Antenna System and its variations are covered in the Antenna Section of the Base Unit 6.2.2 please refer to this section. The ½ wave Monopole Antenna comes complete with various length antennae cables Note: The antenna must pre-cut to the system frequency before installation. Please refer to the cutting chart included in the package with the antenna. Doc. Name: RadioNet - User Manual Revision: 01 Crop Management Technologies Page: 26 of 61 pages INSTALLATION MANUAL 2727 RadioNet 7.4. Installation- Solar Panel The Solar Panel is part of the Automatic Sealed Lead Acid Battery Charging System Keep the Panel covered until the panel has been wired into the voltage regulator. At any given instant, the panel will output maximum power when exposed to the sun. Be careful not to short the panel output cables. Photovoltaic [PV] modules are very sensitive to shading. Shading obstructions can be defined as soft or hard sources. Soft sources where the shadow is diffuse or dispersed such as a tree branch or other item is shading from a distance significantly reduce the amount of light reaching the cell(s) of a module. Hard sources are defined as those that stop light from reaching the cell(s), such as a blanket, tree branch, bird dropping, or the like, sitting directly on top of the glass. If enough cells are hard shaded, the module will not convert any energy and will, in fact, become a tiny drain of energy on the entire system intensity. To capture the maximum amount of solar radiation over a year, the solar panel should be tilted at an angle approximately equal to a site's latitude, [a table of angles and latitudes is provided below] and facing within 15º of due north or south depending upon hemisphere the system is located. To optimize winter performance, the solar array can be tilted 15º more than the latitude angle, and to optimize summer performance, 15º less than the latitude angle. If the solar panel tilt is within 15º of the latitude angle, expect a reduction of 5% or less in the system's annual energy production. If the solar panel tilt is greater than 15º off the latitude angle, the reduction in the system's annual energy production may fall by as much as 15% from its peak available value. During winter months at higher latitudes, the reduction will be greater. The Solar Panel must be installed with the correct tilt angle set. Use the Template supplied [see below cut out] with the panel to set the tilt angle to your location. Set the Tilt angles to the panels before going into the field. 7.4.1. 1. 2. 3. 4. 5. Using the Tilt Template For the best result glue the template to some card before cutting it out. Cut the template out of the page in the following order. Along the 0-X line Along the X-Y line Then along the required tilt angle line. Note the tilt line does not intersect at the C point. Place the “C” point at the tilt screw with the 0-X line will run along the bottom of the bracket. Adjust the under side of the panel frame to line up with the tilt angle. Latitude(o) 0-10 11-15 16-20 21-25 26-30 31-35 36-40 41-45 46-50 51-55 56-60 61-65 Tilt (o) 10 15 20 25 30 35 40 45 50 55 60 65 Tilt Ang le 40° 40 45 50 55 60 65 70 Doc. Name: RadioNet - User Manual 75 80 85 Trim a long 0 - X line. Alig n this line to the b ottom of the b ra cket. Trim a long X-Y line. The X p oint is to g o ha rd a g inst the insid e of the b ra cket. Trim a long your Tilt Ang le. The C line is a lig ned w ith the Tilt Screw . 90 Ang le Revision: 01 Crop Management Technologies Page: 27 of 61 pages INSTALLATION MANUAL 2828 RadioNet 7.4.2. Mounting the Solar Panel For Maximum performance, face the module towards the equator. That is due North in the Southern hemisphere and due South in the Northern Hemisphere. Within 10 degrees of the equator the panel can face either pole without any reduction in performance. The Solar Panel is attached to the antenna mast pole using the supplied U-Bolt It is recommended that the power cable from the panel is installed inside of the mast pole for protection. Tie the cable to the lower side of the bracket arms with cable or zip ties. Feed the power cable down the inside of the mast pole. Add extra protection to the cable where it passes through mast pole. Avoid and source of hard or soft shading. Secure Pa nel to M a st w ith U-Bolt Pa nel Tilt Ad justment. Tie Ca b le O ff to Bra cket. Feed Ca b le Dow n the M a st. Fa ce Pa nel to Eq ua tor 7.5. Installation- Remote Unit The Base Radio and the Remote Unit share the same enclosure and mounting system. Please refer to Section 6.6.2 Installing the Base Unit. Doc. Name: RadioNet - User Manual Revision: 01 Crop Management Technologies Page: 28 of 61 pages INSTALLATION MANUAL 2929 RadioNet 7.5.1. Installing-Remote Unit Power The Remote Unit power supply requirement is for a constant 6-volt DC power source. Typically this is provided in one of three ways. 1. 2. 3. Auto-Charge – Lead Acid Battery with a solar charging system. Rechargeable Battery Option. Disposable Battery Option. 7.5.1.1. Auto-Charge: Sealed Lead Acid Battery and Solar System The term Auto [automatic] refers to a system that automatically maintains the charge in the battery. This is achieved by connecting a 6 volt sealed Lead Acid Battery to a regulated charging system powered form a Solar Panel. [Refer to Section 11.4 for Solar Panel mounting information] Shown below are the steps for installing the Battery and Voltage Regulating Kit: It is best to install all the batteries to the Remote Units before installing them in the field. Step 2 Step 1 Step 3 Step 4 + + A B C F D G H BLACK - E BLUE RED + WHITE + B I Step 1. Installing the Cradle Base plate. Remove Screws “B” from the Main Mounting Plate. Install the Battery Cradle “A” with the Flat end up and the Notched end down. Secure the Cradle with screws “B” Step 2. Installing the Battery. Install the “C” Sealed Lead Acid [SLA] Battery with the Positive [+] terminal Up. Fit the Battery retaining bracket “D” and screw down to the Cradle “A”. Fit the Battery Lead “E” similar to the Diagram with the lead wires running between the Regulator mount standoffs. Step 3. Installing the Voltage Regulator. Attached the Regulator “F” to the Battery Cradle “D” with the screws “G”. Wire in the Terminal leads “H” to the Regulator card and to the Remote Card 207. Take care with the Polarity of each Terminal. The Lead will cross over. o On the Regulator the Positive [+] is the BOTTOM terminal. o On the Remote Card the Positive [+] is the TOP terminal. Step 4. Wiring in the Solar Panel. Cover the Panel before terminating any of the solar output wires. There are two circuits outputting from the Panel in the cable “I” Circuit 1 RED [+] & BLACK [-]. Circuit 2 WHITE [+] & BLUE [-]. They are wired in parallel to the Regulator. The Both Negative [-] wires BLACK & BLUE are connected to the Top two terminal slots. Both Positive [+] wires RED & WHITE are connected to the Bottom two terminal slots. Once all wires are terminated then the Panel can be exposed to light. Doc. Name: RadioNet - User Manual Revision: 01 Crop Management Technologies Page: 29 of 61 pages INSTALLATION MANUAL 3030 RadioNet 7.5.1.2. Rechargeable Battery Option The term Rechargeable refers to the use of [Netafim part # 00035-003150] the battery cradle for six x AA NiMH [Nickel-Metal Hydride] batteries. The NiMH AA sized batteries are available in mAh [milliampere -hour] Ratings from 1100 to 2900. The AA NiMH battery is rated at 1.2 Volts. The batteries are to be sourced by the Client. It is recommended that the highest available mAh rated battery be sourced. The higher the rating the longer interval between charging. The Client will need to source a NiMH x AA mains charger to recharge the batteries. Precautions when using NIMH batteries: It is recommended that the Remote Unit Battery Thresholds be changed to the values in the table below when using NiMH batteries. [This is done using Polenet Software]. Good Warn Low Failed 6.6 V 6.0 V 5.5 V 5.0 V It is not recommended to leave the batteries connected to the Remote Unit once they have reached the Low threshold. This type of battery exhibits a fast fade in output once it falls below 1.1volts per cell. Leaving the battery pack connected for extended periods when the low threshold has been reached will significantly reduce the battery life. Do Not mix batteries of different age or service life. Date mark and number each battery to keep track of their age and usage. 7.5.1.3. Disposable Battery Option The term Disposable refers to the use of [Netafim part # 00035-003170] the battery cradle for four x AA Lithium batteries. The Lithium AA sized batteries are available in mAh [milliampere -hour] Ratings from 2400 to 3000. The AA Lithium battery is rated at 1.5 Volts. The batteries are to be sourced by the Client. It is recommended that the highest available mAh rated battery be sourced. The higher the rating the longer interval between charging. These Batteries are NOT rechargeable. Precautions when using Lithium batteries: It is recommended that the Remote Unit Battery Thresholds be changed to the values in the table below when using Lithium batteries. [This is done using Polenet Software]. Good Warn Low Failed 5.5 V 5.2 V 5.0 V 4.5 V It is not recommended to leave the batteries connected to the Remote Unit once they have reached the Low threshold. This type of battery exhibits a fast fade in output once it falls below 1.3 volts per cell. Do Not mix batteries of different age or service life. Date mark and number each battery to keep track of their age and usage. Doc. Name: RadioNet - User Manual Revision: 01 Crop Management Technologies Page: 30 of 61 pages INSTALLATION MANUAL 3131 RadioNet 7.5.2. Installing-Remote Unit Outputs The Remote Unit output is designed to it interface with the following: Devices intended to receive a pulsed DC voltage up to 15volts DC. This type of device is referred to as a latching solenoid or relay. Either two wire or three wire type devices See Appendix 17.2 for a list a compatible devices. The Remote Unit has a nominal firing voltage of 12VDC. Increasing the firing voltage will increase the current draw on the battery, reducing the battery’s voltage level. Take care when wiring into the output terminal, that the correct output number and location on the terminal is observed. The Remote Unit Outputs Do Not follow a logical sequence. Use the drawing below to locate the correct output number and its Polenet Address number. CARD.1. CARD.2. CARD.3. CARD.4. CARD.5. Ad d . 2.4 Ad d . 2.3 Ad d . 3.4 Ad d . 3.3 DO .3 DO .5 CARD.2 CARD.3 DO .2 2 1 1 DI2 DI1 3 DI1 VALVE A WHT BLK RED 2 VALVE A VALVE B WHT BLK RED WHT BLK RED VALVE B WHT BLK RED CLS O PN CO M O PN 3 4 O PN 3 CO M CO M O PN CLS CLS 3 O PN CO M 4 4 CO M O PN 4 CLS CO M WHT BLK RED WHT BLK RED WHT BLK RED VALVE A VALVE B VALVE A 4 5 BATT CLS 3 CO M 3 CO M CLS CLS O PN 4-20mA O PN CLS CO M O PN CLS 2 0-5V DO .1 DI2 1 DI EN Ad d . 1.3 DO .4 2 CARD.1 Remote Unit basic I/O Card 207 Remote Unit Expansion Card 208 #1 Remote Unit Expansion Card 208 #2 Remote Unit Expansion Card 208 #3 Remote Unit Expansion Card 208 #4 WHT BLK RED VALVE B + 6V DI2 GND 2 DO .8 CARD.5 DI1 DI2 DI1 1 2 1 DO .9 DO .6 DO .7 CARD.4 Ad d . 5.3 Ad d . 5.4 Ad d . 4.3 Ad d . 4.4 Ad d . = PoleNet Ad d ress # DO . = Dig ita l O utp ut # Remote Unit: O utp uts Numb er a nd Ad d ress Doc. Name: RadioNet - User Manual Revision: 01 Crop Management Technologies Page: 31 of 61 pages INSTALLATION MANUAL 3232 RadioNet 7.5.2.1. Installing-Outputs: Main Board The main board of the Remote Unit has one output terminal. It is located on the left-hand side of the main card just above the RJ45 socket. Remove the terminal to identify the terminal position. For all Remote Output Terminals when connecting: To a Two-wire device. Use the Open [OPN] and Close [CLS] Terminals only. To a Three-wire device. Use the Open [OPN], Close [CLS] and the Common [COM] Terminals. GND DI 2 GND DI 2 0-5V RED BLK WHT O PN CLS CO M 4-20mA GND DI 2 0-5V PROG 1 DI EN GND DI 1 DI EN 1 3 RED BLK WHT 4-20mA RJ45 1 3 5 O PN CLS CO M Red /O p en Termina l Bla ck/Close Termina l White/Common termina l 20200100 A. B. BATT + 6V GND 7.5.2.2. Installing- Outputs: Expansion Card The basic Remote Unit can be expanded to a total of 9 outputs with the addition of a maximum of 4 expansion cards. These cards are installed on to the Main Card. The installation of these Cards must follow the first available vacant slot in a clockwise direction starting at Location 2. 2 1 DI2 2 DI1 3 1 DI2 DI1 VALVE A WHT BLK RED VALVE A VALVE B WHT BLK RED WHT BLK RED VALVE B WHT BLK RED O PN CLS CO M O PN 3 CLS 4 CO M O PN CLS CO M O PN CO M 3 CO M CO M O PN CLS CLS 20700100 23 54 43 O PN 3 CO M 4 3 1 4 2 5 WHT BLK RED WHT BLK RED VALVE A VALVE B 4 VALVE A WHT BLK RED 4 5 BATT CO M CLS CLS O PN RED BLK WHT 3 O PN 1 RJ45 CLS 2 4-20mA O PN CLS CO M Note: When connecting the Netafim Aquative Solenoid it is recommended that the pair of wires from each solenoid is sleeved with heat-shrink tubing or taped together with electrical tape. This avoids the possibility of a cross connected solenoid. 2 GND DI 0-5V 1 DI EN Follow the same connections as this terminal. GND DI The Output Terminals on the Expansion Cards are named in the same manner as the Output Terminal on the Main Card. WHT BLK RED VALVE B + 6V DI2 GND Doc. Name: RadioNet - User Manual 2 DI1 DI2 1 2 Revision: 01 Crop Management Technologies DI1 6 71 Page: 32 of 61 pages INSTALLATION MANUAL 3333 RadioNet 7.5.3. Output-Hydraulic Control Assembly Netafim recommend the use of the DC Aquative as the default solenoid with the RadioNet System. This section deals with the plumbing of this unit. "B" Port = Vent "C " Port [Rea r]= Common to Va lve "A" Port = Pressure Aq ua tive DC La tching Solenoid Show n Norma lly O p en = Closed Va lve The standard plumbing is for a “Normally Closed” Valve. The Aquative is then Normally Open. Connect the Pressure Supply to Port “A” , Vent to Port “B” and the Valve to Port “C” the common. If the system requires a “Normally Open” Valve. Configure the Aquative as a Normally Closed solenoid by connecting the Pressure supply to Port “B” and making Port “A” the vent port. It is recommended that the remote valve be fitted with at least a Pressure Selector Tee [shuttle valve] to allow local command of the valve when it is operating. If the valve is located more than 100m from the solenoid it is recommended that the valve is fitted with a Galit Hydraulic Relay. 8mm Hydraulic Command Tube is the minimum recommend size. The pressure supply line to the Aquative assembly must be fitted with a good quality line filter. The Aquative can be supplied assembled on an aluminium-mounting bracket as shown above. The assembly can be supplied in various Aquative combinations from 2 to 10 unit per bracket. It is recommend that rather than using one x 9 Unit Aquative that a 5 Unit and a 4 Unit assembly be used mounted on the mast pole one on top of the other. The keeps the total assembly compact. Number or mark each solenoid and the solenoid wire pair for easy identification in the enclosure. 7.5.4. Output- Relay Device. The Remote Unit can control equipment by switching either AC or DC power through a relay. Netafim recommend the use of the Idec-Izumi Latching Relay. The relay is only design to switch low current devices. Refer to the Idec-Izumi recommendations. Physical View 8 7 6 5 4 3 2 1 Logical View 1 5 10 9 14 13 12 11 10 9 13 4 8 11 + + Reset _ Set _ 12 14 Note: This is a latching device. Test the relay operation before switching on the device it is controlling. It is possible that the unit operates opposite to your requirements. See the Safety Section if connecting to High Voltage! BLACK RED BLACK RED Neta fim Pa rt # 73200-008900 Izumi 12VDC La tching Rela y - M od el No. RY2KS-U Neta fim Pa rt # 73200-002250 Izumi Rela y Ba se to suit rela y. Wiring Connection to Remote Unit using tw o w ires. Doc. Name: RadioNet - User Manual Revision: 01 Crop Management Technologies Page: 33 of 61 pages INSTALLATION MANUAL 3434 RadioNet 7.5.5. Installing- Remote Unit Digital Inputs The Remote Unit will accept digital inputs from devices conforming to the following specifications: The contact is Voltage Free The Maximum “ON” resistance is 500 ohms. The Minimum Pulse width is 500 ms The Pulse Frequency does not exceed 2 Hz. [120 Pulses per minute] Note: A device with a High Pulse rate may result in constant Radio Traffic. Consult Netafim Technical Services before installing a device approaching the maximum pulse rate. The size of the system and the number of layers in the system may restrict the maximum pulse rate. The Remote Unit Inputs follow a logical numbering sequence. On the Expansion Cards the numbering is in a clockwise direction. Use the drawing below to locate the correct output number and its Polenet Address number. CARD.1. CARD.2. CARD.3. CARD.4. CARD.5. CARD.1 Remote Unit basic I/O Card 207 Remote Unit Expansion Card 208 #1 Remote Unit Expansion Card 208 #2 Remote Unit Expansion Card 208 #3 Remote Unit Expansion Card 208 #4 Ad d . 2.1 Ad d . 2.2 Ad d . 3.1 Ad d . 3.2 DI. 3 DI. 5 CARD.2 CARD.3 DI. 4 DI. 6 Ad d .1.1 1 DI2 2 DI1 3 1 DI2 DI1 VALVE A WHT BLK RED 2 VALVE A VALVE B WHT BLK RED WHT BLK RED VALVE B WHT BLK RED CLS O PN CO M O PN 3 4 O PN 3 CO M CO M O PN CLS 3 CLS O PN CO M 4 4 CO M O PN 4 CLS CO M WHT BLK RED WHT BLK RED WHT BLK RED VALVE A VALVE B VALVE A 4 5 BATT CLS 3 CO M 3 CO M CLS CLS O PN 4-20mA O PN CLS CO M O PN CLS 2 0-5V DI. 2 2 1 DI EN DI. 1 Ad d .1.2 WHT BLK RED VALVE B + 6V DI2 G ND 2 DI.10 CARD.5 DI1 DI2 DI1 1 2 1 DI. 9 DI. 8 DI. 7 CARD.4 Ad d . 5.2 Ad d . 5.1 Ad d . 4.2 Ad d . 4.1 DI.= Dig ita l Inp ut # Ad d .= PoleNet Ad d ress # Remote Unit : Inp ut Numb er a nd Ad d ress Doc. Name: RadioNet - User Manual Revision: 01 Crop Management Technologies Page: 34 of 61 pages INSTALLATION MANUAL 3535 RadioNet 7.5.5.1. Digital Inputs- Main Board and Expansion The Remote Unit has the capacity to read a total of 10 Digital Inputs. Two are located on the Main Card above the Output terminal. Two are on each of the Expansion Cards. The Jumper must be in place for the Inputs to function. If the device is an Open Collector type then observe the polarity of the Digital Input. The Terminals have been removed from the Main Card below for clarity. 2 1 DI2 DI1 G ND DI 2 VALVE A WHT BLK RED GND DI VALVE B WHT BLK RED CLS CO M 3 O PN CO M O PN CLS O PN 4 RED BLK WHT CO M 4 CLS 3 CO M 3 O PN CLS 2 4-20mA O PN CLS CO M DI Inp ut 0-5V DI Ground 1 DI EN DI Jump er 5 WHT BLK RED Doc. Name: RadioNet - User Manual WHT BLK RED Revision: 01 Crop Management Technologies Page: 35 of 61 pages INSTALLATION MANUAL 3636 RadioNet 7.6. Installation- Grounding Remote Site Grounding is extensively dealt with under the Central Site Installation for more detail refer to Section 6.5. Proper electrical grounding in combination with the RadioNet internal protection is essential to protect the system, reduce the risk of damage, and prolong its lifetime. Correct selection and installation of equipment will help protect your system and reduce the risk of human injury. Proper grounding provides an easy path for electrical current to return to its source Less than 5 ohm will be considered as a good ground. 4-20m A 3 2 0700100 OPN CLS CO M RED BLK WHT 4 5 BATT o It is important that the wire not be cut. o Avoid tight bends in the cable. o Do Not coil the earth cable under any circumstance. 3 2 2 0-5V GND DI Ground Wire: The ground wire is a large copper wire that connects the main circuit panel to the ground rod. Follow local regulation for minimum sizing. 1 DI EN Ground Rods: Ground rods are used to efficiently connect the system to earth where current may be dissipated in the soil. Typically they are a Copper sheathed Steel Rod. G ND DI + 6V GND Ground Clamps: Ground wires should not be merely wrapped around a ground rod. The most common clamp is known as an acorn clamp. Do not use pipe clamps rated for water lines or hose clamps to attach the ground wire. Note: It is highly Recommended that the Mast Pole have a separated Grounding Wire to the Remote Unit. The Ground Wires are then bonded before inserting into the Ground Rod Clamp. Doc. Name: RadioNet - User Manual Revision: 01 Crop Management Technologies Page: 36 of 61 pages INSTALLATION MANUAL 3737 RadioNet 8. Host Accessories 8.1. Installing-Host Input and Output Cards The Host Unit can be fitted with two on board I/O cards. The Parallel Input Card. The 48 Output Card. 8.1.1. Installing-Host Parallel Input Card This card is designed to allow the RadioNet system to be used with any Control Device with a 24Volt AC output. The maximum number of 24VAC inputs the Card can except is 48. Each of the outputs from the Control Device can be configured in the Host to trigger one or more outputs on the RadioNet system. While the Output in the Control device is “ON” [powered] the Output in the mapped Remote Unit will remain “ON”. NOTE: The Card is called an Input Card because it receives and input into the Host from an external Output. The Input Card is installed in the Host Unit using the supplied standoff mounts and screws. 1. 2. 3. 4. 5. 6. Remove the existing Host retaining screws. Screw in the standoff mounts. Install the Input Card making sure that the header on the under side of the card mates with the pins on the Host PCB. Wire the Control device outputs into the Terminal on the Input Card. Follow the numbered sequence on the Input Card to insure easy output mapping. Connect the Control device common to the common on the Input Card. Use the Left side Common for Inputs 1 to 24 and the Right side Common for Inputs 25 to 48 Doc. Name: RadioNet - User Manual Revision: 01 Crop Management Technologies Page: 37 of 61 pages INSTALLATION MANUAL 3838 RadioNet 8.1.2. Installing-Host Output Card or Playback Card The Output Card is installed in the Host Unit using the supplied standoff mounts and screws. If the Output Card is installed alone the Jumper Lead is used to connect to the Host. The Output Card can be installed with the Input Card. This card is designed to allow the RadioNet system to be used with any Control Device that requires a dry contact as a digital input. The Card mimics an input received in a Remote Unit then outputs the state of this input to the Control device. The maximum number of inputs on the Card can mimic is 48. Each of the inputs from the Remote Units can be configured in the Host to trigger one or more outputs on the Playback Card NOTE: The Card is called an Output Card because it plays back and input from a Remote Unit as an Output to the digital Inputs on the External Control device. 8.1.3. 1. 2. 3. 4. 5. 6. HOST Output Card Only. Remove the existing Host retaining screws. Screw in the standoff mounts. Connect the Jumper Lead to the header pins on the Host Board. Install the Input Card then connect the Jumper Lead to the Header Socket in the lower middle of the Card Wire the Control device Inputs into the Terminal on the Output Card. Follow the numbered sequence on the Output Card to insure easy output mapping. Use the Left side Common for Outputs 1 to 24 and the Right side Common for Outputs 25 to 48 Doc. Name: RadioNet - User Manual Revision: 01 Crop Management Technologies Page: 38 of 61 pages INSTALLATION MANUAL 3939 RadioNet 8.1.4. 1. 2. 3. 4. 5. 6. Installing-HOST Output Card and the Input Card. First install the Host Input Card as per Section 6.2.4.1 Host Parallel Input Card installation. Secure the Input Card with the standoff mounts supplied with the Output Card. The Output Card is then installed above the Input Card. Take care to insure that the header plug on the underside of the Output Card engages with the header socket on the top side of the Input Card. Secure the Output Card to the standoff mounts with the screws provided. Wire as per the instructions for the individual cards. Doc. Name: RadioNet - User Manual Revision: 01 Crop Management Technologies Page: 39 of 61 pages INSTALLATION MANUAL 4040 RadioNet 9. 9.1. MAINTENANCE Maintenance-Host Unit The Host unit requires very little maintenance. However the following checks are recommended. Every 12 months do visual inspection of the unit. Check the 12VDC power supply. [See the Battery Maintenance below] Check the RS232 lead from the controller for signs of damage Check the RS485 lead to the Base for signs of damage. Check inside the enclosure for signs of insect intrusion. Undertake remedial action where required. o Clean and or replace the battery. o Repair of replace any damaged leads. o Clean any insect or dust residue and seal any points of entry. 9.2. Maintenance-Base Unit The Base Unit requires very little maintenance. However the following checks are recommended. Every 12 months do visual inspection of the unit. Check the RS485 lead to the Base for signs of damage. Check the Antenna and Antenna cable for damage. Check inside the enclosure for signs of insect intrusion. Undertake remedial action where required. o Repair of replace any damaged leads. o Repair or replace damaged antenna or antenna cable. o Clean any insect or dust residue and seal any points of entry 9.3. Maintenance-Remote Unit The Remote Unit will require very little maintenance. Periodic visual inspection of each unit will insure reliable operation. The following checks are recommended. Every 12 months do visual inspection of the unit. Check the wiring to the output devices. [Solenoids or relays] Check the Antenna and Antenna cable for damage. Check inside the enclosure for signs of insect intrusion. Check inside for signs of moisture ingress. Check that all terminal screws are tight. Check for any signs of corrosion on the battery terminals. Check the Solar Panel. [Refer to the Solar Panel Maintenance.] Undertake remedial action where required. o Repair of replace any damaged leads. o Repair or replace damaged antenna or antenna cable. o Clean any insect or dust residue and seal any points of entry. o Tighten screws where necessary. o Clean corroded battery terminals, coat with anti-corrosion product if necessary. Doc. Name: RadioNet - User Manual Revision: 01 Crop Management Technologies Page: 40 of 61 pages INSTALLATION MANUAL 4141 RadioNet 9.4. Maintenance-Solar Panel Solar modules require very little maintenance. Under most conditions, normal rainfall is sufficient to keep the module glass clean. Check once per year for build–up of dust or debris. Modules that are mounted, flat [0 deg tilt angle] should be cleaned more often, as they will not "self clean" as effectively modules mounted at a 15 deg tilt or greater. Once a year, check the tightness of terminal screws and the general condition of the wiring. Check to be sure that mounting hardware is tight. Loose bolts could result in a damaged panel. Check for possible shading of the panel from surrounding vegetation. Undertake remedial action where required. o Do not use solvents or abrasive cleaners on any part of the Photovoltaic module. o If dirt build-up becomes excessive, clean the glass with a soft cloth using mild detergent and water o Repair of replace any damaged leads. o Remove any vegetation shading the panel or re-site the panel o Tighten loose fixing screws and bolts. o Adjust the tilt angle if the screw are loose. 9.5. Maintenance-Batteries All batteries supplied with the RadioNet system are valve regulated lead acid type. They are designed to be low maintenance. Gasses generated during float charge are recombined in the cell, meaning there’s no need to add electrolyte. They are trouble-free and safe for operation in any position. The batteries are designed to provide a long service life of approximately 4 to 5 years giving dependable service in normal operating conditions. It is recommended that a visual inspection of the batteries be done every 12 months. Inspect for corrosion of the terminals. Corrosion build-up can create a good deal of electrical resistance, which can contribute to shortened battery life and the waste of power. Remove the charging device and check the unloaded voltage of the battery. Typically the battery voltage should be at or slightly above the rated voltage of the battery. Check the charging system of a battery with a voltage at 20% of the rated voltage. Log on to the RadioNet Host on a six monthly basis with the PoleNet software and the battery voltages. Batteries that are out side of the normal range should be visually inspected. Undertake remedial action where required. o If there is corrosion on the terminal carefully clean these with warm water. o Do not use solvents or abrasive cleaners. Doc. Name: RadioNet - User Manual Revision: 01 Crop Management Technologies Page: 41 of 61 pages INSTALLATION MANUAL 4242 RadioNet 10. APPENDIX 10.1. Appendix 1. Operating Frequencies Frequency Range Country To (MHz) Peak Power (mW) 402.00 MHz 474.00 MHz 500mW WORLD 433.05 MHz 434.79 MHz 25mW AUST LIPD Nil Req. 450.0 MHz 470.00 MHz 100mW AUST (2km Sub-Local) (Fixed Mobile) Required Repeater sites must also be registered 450.0 MHz 470.00 MHz 400mW AUST (5km Local) (Fixed Mobile) Required Repeater sites must also be registered 472.0125 MHz 472.1125 MHz 100mW AUST LIPD Nil Req. 433.05 MHz 434.79 MHz 25mW NZ 458.54 MHz 458.61 MHz 400mW NZ SRD = Unrestricted Nil Req. 466.80 MHz 466.85 MHz 400mW NZ SRD = Unrestricted Nil Req. 471.00 MHz 471.50 MHz 100mW NZ SRD = Unrestricted Nil Req. From (MHz) Designated Use Licence Comments Country depended SRD= Telemetry/Telecommand Doc. Name: RadioNet - User Manual Nil Req. Revision: 01 Crop Management Technologies Page: 42 of 61 pages INSTALLATION MANUAL 4343 RadioNet 10.2. Appendix 2. Monopole Antenna Tuning. The ½ Wave Monopole Antenna element must cut to length according to the System Frequency To tune the antenna: 1. Remove the element from the transformer by undoing the Allen Screw at the top of the transformer. 2. Refer to the chart below by selecting the system frequency on the bottom or top axis; trace the frequency line until it intersects the cutting line. Follow the intersecting length line to the left or right axis to find the desired length for the antenna element “A”. 3. Measure the element from the top end and cut at the desired length. 4. Fit the element back into the transformer and tighten the Allen screw. 5. The antenna is now ready for installation. Note: The tuning chart below is provided as a guide only. All installations should be checked with a VSWR meter. A N T EN N A EL EM EN T T U N IN G C H A R T 445 450 455 460 465 470 270 265 265 260 260 255 255 250 250 245 245 L eng t h A 440 Elem ent L eng t h (m m ) Elem ent L eng t h (m m ) 435 270 240 240 435 440 445 450 455 460 465 470 Fr eq uenc y (M H z) Doc. Name: RadioNet - User Manual Revision: 01 Crop Management Technologies Page: 43 of 61 pages INSTALLATION MANUAL 4444 RadioNet 10.3. Appendix 3. Specifications 10.3.1. Host Unit Environmental Operating Temperature Relative Operating Humidity Operating Altitude Housing Mechanical Dimensions Weight Mounting Electrical Power Requirements Current Consumption Current Consumption -20O C to +65O C (-4O F to +140O F) 0 to 95% without condensation @ +50O C (122O F) -400 m to +4000 m (-1300 ft to 13,000 ft) above sea level IP66 with 1 cable gland and 1 capped hole 240w x 160h x 120d mm 226 w x 146 h x 4.0dia mm Input Voltage 10 to 16Volts DC with les than 1Volt ripple Maximum 2.5 Amps Typical steady state 0.18 Amps Communication Out Communication Ports In Communication Ports In Communication Ports In Communication Ports RS485 Multi Drop 2 Wire Output RS232 to PC Serial port for PoleNet connection Modbus Slave Binary RS232/RS485, 9600 to 115200 bps NMC-PRO RS232/RS485, 9600 bps Doc. Name: RadioNet - User Manual Revision: 01 Crop Management Technologies Page: 44 of 61 pages INSTALLATION MANUAL 4545 RadioNet 10.3.2. Base Unit Environmental Operating Temperature Relative Operating Humidity Operating Altitude Housing Mechanical Dimensions Weight Mounting -20 °C to +65 °C (-4 °F to +140 °F) 0 to 95% without condensation @ +50 °C (122 °F) -400 m to +4000 m (-1300 ft to 13,000 ft) above sea level IP66 with 1 cable gland and 1 capped hole 175 w x 127 x 99d mm 157w x 109h x 4.0dia mm [If supplied bracket not used] Communication Communication Ports Software programming port RS485 Multi Drop 2 Wire RS232 Radio RF Frequency Channel spacing UHF 402 to 474 MHz PoleNet Programmable 12.5 KHz Radio Transmission Tx Power Receiver Sensitivity Programmable 1mW – 400mW -117 dBm TX RF power mode: Diagnostics 5 -16.3 mW @.30 °C - +60 °C (-22 °F to 140 °F) LEDs Red, Electrical Input Voltage Host Source External Source (DC Power In) via RS485 12.00 to 13.80 VDC 12.00 to 13.80 VDC Doc. Name: RadioNet - User Manual Revision: 01 Crop Management Technologies Page: 45 of 61 pages INSTALLATION MANUAL 4646 RadioNet 10.3.3. Remote Unit Environmental Operating Temperature Relative Operating Humidity Operating Altitude Housing Mechanical Dimensions Weight Mounting -20 °C to +65 °C (-4 °F to +140 °F) 0 to 95% without condensation @ +50 °C (122 °F) -400 m to +4000 m (-1300 ft to 13,000 ft) above sea level IP66 with 1 cable gland and 1 capped hole 175 w x 127 x 99d mm 157w x 109h x 4.0dia mm [If supplied bracket not used] Communication Software programming port RS232 to PC base PoleNet Software Radio RF Frequency Channel spacing UHF 433 to 470 MHz PoleNet Programmable 12.5 KHz Diagnostics LED Red Electrical Input Voltage 6 VDC Outputs Number Outputs Type Outputs Voltage Outputs Firing Current Short Circuit Protection Open Circuit Detection 9 Maximum Latching Two or Three wire Auto Sensing 9-15.5 Volts 4 Amps Maximum @ 5 Amps with Auto-Retry Yes Inputs Number Inputs Type Inputs Resistance Inputs Pulse Rate Inputs Pulse Width 10 Maximum Voltage Free Contact 500 ohms Maximum 2Hz Maximum [120 pulses per minute] 500ms Maximum Doc. Name: RadioNet - User Manual Revision: 01 Crop Management Technologies Page: 46 of 61 pages INSTALLATION MANUAL 4747 RadioNet 10.3.4. Solar Panel Solar Panel Mechanical Dimensions Weight Cable length Cable Conductor # / Dia Nominal Area Insulation Insulation Thickness Sheath Thickness Nominal O.D. Colours 142 x 159 x 25mm [ without the mounting bracket] 0.28 kg including cable 5 meters 4 Cores 14/0.2mm 0.4 mm2 PVC/PVC Conductor / Sheath 0.3mm 0.5mm 4.6mm Red & White [+] Positive, Black & Blue [-] Negative Solar Panel Electrical Wired for 6 Volts Rated Power Volts at Max. Power Current at Max. Power Short Circuit Current Open Circuit Voltage Parallel 1.4*Watts 8 V @ MP* 182 mA* 190 mA* 10.7 V @ OC* * Values nominal due to manufacturing tolerance. 10.3.5. 12 V Battery 12 V Battery Mechanical Dimensions Weight Terminal Type 181.5 L x77 W x 167.5 H mm [Height included the Terminals] 5.7 kg T3 Bolted 13 x 14 x 2mm with 6mm Hole [Supplied with Bolt and Nut] 12V Battery Electrical Nominal Voltage Nominal Capacity [20HR] Rated Capacity 12 Volts 18 AH 20 hour rate [0.90A] 1 hour rate [11.16A] 18.0AH 11.16AH Temp affects on capacity. 40o C 103% 25o C 100% o Initial charge current 0 C < 5.4A 86% Voltage 14.4~15.0 V @ 25o C Temp Coefficient -30mV/ oC Doc. Name: RadioNet - User Manual Revision: 01 Crop Management Technologies Page: 47 of 61 pages INSTALLATION MANUAL 4848 RadioNet 10.3.6. 6 V Battery 6V Battery Mechanical Dimensions Weight Terminal Type 97 L x 24 W x 57 H mm [Height included the Terminals] 0.28 kg T1 Spade 4.75 x 6.35 x 0.8mm] 6V Battery Electrical Nominal Voltage Nominal Capacity [20HR] Rated Capacity 6 Volts 1.2 AH 20 hour rate [60mA] 1 hour rate [740mA] 1.20AH 0.74AH Temp affects 40o C 103% o on capacity. 25 C 100% 86% Initial charge current 0o C < 0.36A Voltage 7.2~7.5 V @ 25o C Temp Coefficient -10mV/ oC Doc. Name: RadioNet - User Manual Revision: 01 Crop Management Technologies Page: 48 of 61 pages INSTALLATION MANUAL 4949 RadioNet 10.4. Appendix 4. Dimensions and Contents 10.4.1. Host Unit PoleNet Lea d poleNET/DCE Fla t Screw d river 2.0mm Bla d e 120 60 240 M ounting Holes 146 60 C r o p M anag em ent T ec hno lo g ies 160 160 LID BASE M ounting Holes 226 END VIEW FRO NT VIEW HO ST Unit Dimensions. All in M illimeters The Host is supplied with: Flat Screwdriver 2mm Blade for use on the terminal screws. [Loose] Polenet Adaptor and Lead. [Loose] 2-meter fused DC power lead with terminals. [Fitted] 3-meter RJ11 [6p6c] Lead for RS485 communication to the Base Unit. [Fitted] 10.4.2. U-Bolt Clamp 32 86 Ø 53mm M a x 89 53 Ø 27mm M in U-BO LT Dimensions All in M illimeters. The U-Bolt is supplied with the Base, Remote Unit, and the Solar Panel Doc. Name: RadioNet - User Manual Revision: 01 Crop Management Technologies Page: 49 of 61 pages INSTALLATION MANUAL 5050 RadioNet 10.4.3. Base Unit and Remote Unit The Base and Remote are fitted in the same enclosure. They are supplied with: A 50mm U-Bolt. [Loose] Aluminium Back Mounting plate.[Fitted] 5 x 12mm Glands. Remote Unit. [Fitted] 1 x Capped hole. Base Unit [Fitted] 1 x Open hole for gland access. Base Unit. [Fitted] 35 60 101 51 50 162 162 158 C r o p M anag em ent T ec hno lo g ies 109 127 157 103 176 END VIEW FRO NT VIEW U-Bolt BASE-REM O TE Unit a nd M ount Dimensions. All in M illimeters. 10.4.4. Solar Panel The Solar Panel is supplied with: A 50mm U-Bolt. [Loose] 5 meters of cable. [Fitted] 150 60 25 25 S/N: 27100183 101 Solar Panel 2 x 6V- 1.1W P/N: 00035-002850 SPN: SON: 1000-0651 1102-0104 180 159 142 Sola r Pa nel Dimensions. All d imensions in M illimeters. Doc. Name: RadioNet - User Manual Revision: 01 Crop Management Technologies Page: 50 of 61 pages INSTALLATION MANUAL 5151 RadioNet 10.5. Appendix 5: Components 10.5.1. Base Unit Components The Base Unit consist of two component cards. They are installed one above the other. The lower board is the radio card and the top board is the personality card. Ba se Unit: Note Ra d io Ca rd O ffset for Cla rity RS232 PROG RS485 Ba se Unit Persona lity Ca rd 209 RS485-IN RS485-O UT Ba se Unit Ra d io Ca rd 202 20200100 20900031 RS232 + 12V GND LED1 Ground ing Point Antenna Connection SM A 10.5.1.1. Base Unit Radio Card 202 Push Button: Forces the radio to transmit. Used for diagnostics. Programming Jumper: Jumper required when updating firmware. Diagnostic LED: Refer to the Configuration Manual for usage. Radio card RJ45 Port: Used with Polenet to configure the Radio and update the firmware. [See the Configuration Manual for usage.] Ra d io Ca rd Removed for cla rity Ra d io Ca rd 202 Push Button Prog ra mming Jump er 202 Dia g nostic LED RJ45 Polenet a nd Up g ra d e Port Antenna Ga s Surg e Sup p ressor Inter-Boa rd Ground Lea d Antenna Lea d Doc. Name: RadioNet - User Manual Revision: 01 Crop Management Technologies Page: 51 of 61 pages INSTALLATION MANUAL 5252 RadioNet A. Base Unit Personality Card 209 External source 12 VDC power supply terminal.[Must be fused if used] Future use RS485 terminal. Future use RS232 terminal. Future use RS232 RJ45 socket. ESN: Electronic Serial Number: Identifies the Card on the Host. RS485-OUT RJ45 Socket [connection to host] Future use RS485-in socket. Diagnostics LED #1 209 Card B. C. D. E. F. G. H. E 20900031 RS232 D RS232 C RS485 B A + 12V G ND RS485-IN RS485-O UT 10.5.1.2. LED1 The LED “H” flashes whenever the Base radio transmits. The “H” does not light when the programming jumper is in place on the radio card. F G H LED 10.5.2. Host Unit Components . The indicated components are: Power Supply 12 Volt DC Terminal RS485 Terminal for connection to Control Device. Communication configuration jumpers. RS232 (2) Terminal for connection to the Control Device. Diagnostic LED3 Green: Power indicator, flashes when the host is powered. RS232 (1) Port for connection to Local PC for Configuration, Diagnostics and loading Firmware. Host Serial ID number used for tracking of the Card. RS485-In Socket for Connection to Base Unit. U27 Regulator. Before changing any Jumpers discharge Personal Static electricity by grounding to the tab on the right on this component. This is to prevent permanent damage to the Host! RS485-Out Socket. For future use. Diagnostic LED1 Red and LED2 Green. Not defined yet. When powered they are always on. They are off during firmware upgrading. Reset Button: Not configured. Jumper J1: When linked the Host enters Bootstrap loader mode for Firmware updating. J11 Header pins for connection to the Host onboard I/O cards. Doc. Name: RadioNet - User Manual Revision: 01 Crop Management Technologies Page: 52 of 61 pages INSTALLATION MANUAL 5353 RadioNet 10.5.3. Remote Unit Cards The Remote Unit consist of three main component cards. They are installed one above the other. 1. 2. 3. The lower board is the radio card and above is the personality card or Base Input / Output card To this up to four expansion cards can be installed. Remote Unit: Note Ra d io Ca rd O ffset for Cla rity 2 1 DI2 2 DI1 3 1 DI2 VALVE A WHT BLK RED DI1 2 VALVE A VALVE B WHT BLK RED WHT BLK RED G ND DI VALVE B WHT BLK RED 2 OPN CO M 4 3 20700100 CO M CLS CLS 23 54 O PN 4 O PN COM 4 5 BATT CO M 3 RemoteUnit Persona lity Ca rd 207. CLS CLS O PN RED BLK WHT 4-20mA O PN CLS COM 1 RJ45 3 0-5V Exp a nsion Ca rd Reta iner. 1 DI EN Ba se Unit Ra d io Ca rd 202. G ND DI Remote Unit Exp a nsion Ca rd 208. + 6V G ND G round ing Point. Antenna Connection SM A. 10.5.3.1. Remote Unit Radio Card 202 The Remote Unit shares the same Radio as the Base Unit please refer to Section 6.2.3.1 for the full description. Push Button: Forces the radio to transmit. Used for diagnostics. Programming Jumper: Jumper required when updating firmware. Diagnostic LED: Refer to the Configuration Manual for usage. Radio card RJ45 Port: Used with Polenet to configure the Radio and update the firmware. [See the Configuration Manual for usage.] Doc. Name: RadioNet - User Manual Revision: 01 Crop Management Technologies Page: 53 of 61 pages INSTALLATION MANUAL 5454 RadioNet 10.5.3.2. Remote Unit Personality I/O Card 207 The Remote Unit Personality I/O card is equipped with the following: 2 x Digital Input terminals 1 x Latching Output 4 x Expansion Card Slots. H1 H2 G G ND DI 1 DI EN F 3 2 RED BLK WHT 4-20mA I 3 20700100 O PN CLS CO M C 2 0-5V D GND DI E 4 5 BATT B J + 6V GND A H3 H4 A. B. C. D. E. F. G. H. I. J. Grounding Point Power Supply terminal 6 Volts DC. Latching Output #1 Terminal. 2 or 3 wire pulsed output [DC Latching]. Future use: Analogue input type [4-20mA or 0-5V] Digital Input #2. Digital Input Jumper. Must be in place. Digital Input #1 1 to 4 Header for the Optional I/O Expansion Card. Outputs Capacitor ESN: Electronic Serial Number. 10.5.3.3. Remote Unit Expansion Card 208 The Expansion I/O Card is added to the basic Remote Unit card to increase the input and output capacity of the whole unit. O PN CO M O PN 3 CLS 2 x Digital Inputs. 2 x latching Outputs. CLS CO M The Expansion card is equipped with: 4 B WHT BLK RED WHT BLK RED VALVE A VALVE B A A. B. C. D. C D DI2 DI1 2 1 Expansion Digital Input #2 Expansion Latching Output #1 Expansion Latching Output #2 Expansion Digital Input #1 Doc. Name: RadioNet - User Manual Revision: 01 Crop Management Technologies Page: 54 of 61 pages INSTALLATION MANUAL 5555 RadioNet 10.6. Appendix 6: PoleNet Connections 10.6.1. Base Unit RS232 to PoleNet Software and Loading Firmware This connection is used to configure the Base Radio using the Polenet Software. The Base radio is connected to the serial com-port of the programming PC using the lead and adaptor supplied with the Host Unit. When connecting with the Polenet software the Base must be powered. Either using the Host RS485 lead or the external 12VDC power source. Uses of the Port: Loading the System Route Map [RadioNet Manual Section 5.2.3] Configuring the Base Radio with: [RadioNet Manual Section 5.2.1] o System Frequency o Radio output power o The external power source, voltage thresholds. Loading firmware via the C:\ prompt.[RadioNet Manual Section 9.5] Note: Plugging in the Polenet lead disables the Push Button function. Doc. Name: RadioNet - User Manual Revision: 01 Crop Management Technologies Page: 55 of 61 pages INSTALLATION MANUAL 5656 RadioNet 10.6.2. Host RS232 to Polenet Software and Loading Firmware For configuration and diagnostics of the RadioNet System the Host Unit must be connected to PC running the Polenet software. This connection is serial RS232. A lead and Polenet Adaptor is supplied with each Host for this purpose. It is recommended that this lead is left either inside the Host Enclosure or inside the Control Device enclosure on completion of the installation and commissioning. The Host must be powered by 12VDC before the Polenet software will connect to the Host. Please refer to the RadioNet User Manual Section 5.3 for the use of the software. If the firmware in the Host has to be changed then the Host must be placed into Bootstrap mode. [Refer to RadioNet User Manual Section 9.6] Bootstrap mode is activated by fitting a Jumper to link J1 in the bottom right corner of the Host. Doc. Name: RadioNet - User Manual Revision: 01 Crop Management Technologies Page: 56 of 61 pages INSTALLATION MANUAL 5757 RadioNet 10.7. Appendix 6: Labels All of the Netafim RadioNet equipment is labelled on the outside of the enclosure. The information on the label is to identify the Unit. This identity is used in mapping and configuration of the system. It is recommended that before installing any equipment that the Serial Numbers of all the equipment is recorded on the System Data Sheets. Power input: 12.0-13.8 VDC,2.2A 10.7.1. Host Unit HOST S/N: 21900018 RS232 / RS485 SPN: SON: P/N: 00035-012000 1000-0651 1102-0104 Located on the bottom side of the base. Base Station P/N: 00035-012100 SPN: SON: 10.7.2. Base Unit 1000-0700 1102-0104 S/N: 20200157 Located on the right side of the base. Keep case and cable entry glands sealed See manual for proper earthing 10.7.3. Remote Unit Control RTU Located on the right side of the base. SPN: SON: Mark on the Remote unit if Expansion Cards are fitted. 1000-0710 1102-0104 S/N: 20200100 Expansion 2 P/N: 00035-012200 . Warning: Strictly observe local regulations Keep case and cable entry glands sealed See manual for proper earthing 3 4 5 10.7.4. Solar Panel S/N: 27100183 Located on the back of the panel. Solar Panel 2 x 6V - 1.1W P/N: 00035-002850 SPN: SON: 1000-0651 1102-0104 All labels display the following information: P/N: Netafim’s Part Number S/N: Serial Number. This number also identifies the item in the system. SPN: Manufacturers Part Number. Not used by Netafim. SON: Manufacturers Batch Number. Not used by Netafim. Record the following items on the table in the System Data Sheet section n the following pages Host Unit Serial Number. Base Unit Serial Number. Remote Units Serial Numbers. Doc. Name: RadioNet - User Manual Revision: 01 Crop Management Technologies Page: 57 of 61 pages INSTALLATION MANUAL 5858 RadioNet 10.8. Appendix 8: Latching Device Compatibility List Manufacture Model Netafim Aquative Series 1, 12 VDC Latch Pulse Configuration Wire 2 Orange (Open) Black/White (Close) Colour Netafim Aquative Series 2, 9-40 VDC Latch Pulse 2 Red (Open) Black (Close) Baccara Geva 60 12 VDC Latching Pulse 2 Red (Open) Black (Close) Baccara Geva 60 12 VDC Latching Pulse 3 Red (Open) White (Common) Black (Close) Bermad S985 12-50 VDC Latching Pulse 3 Red (Open) White (Common) Black (Close) Bermad S982 12-50 VDC Latching Pulse 2 Red (Open) Black (Close) Bermad S-392-2 6-40 VDC Latching Pulse 2 Red (Open) Black (Close) Izumi RY2KS 12 VDC Latch Pulse 10.9. 2 or 3 Appendix 9: Warranty Statement Netafim products are warranted to be free from defects in material and workmanship for a period of ONE (1) YEAR, This express warranty is extended by Netafim to the original purchaser only, and only to those purchasing for purpose of leasing or solely for commercial, industrial, or governmental use. This warranty is given in lieu of all other warranties express or implied which are specifically excluded, including warranties of merchantability or fitness for a particular purpose. In no event shall Netafim be liable for incidental or consequential damages to the full extent such may be disclaimed by law. In the event of a defect, malfunction or failure to conform to specifications established by seller, or if appropriate, to specifications accepted by Seller in writing, during the period shown. Netafim, at its option, will either repair or replace the product or refund the purchase price thereof, and such action on the part of Netafim shall be the full extent of Netafim’s liability hereunder. This warranty is void if: A. the product is used in other than its normal and customary manner; B. the product has been subject to misuse, accident neglect, or damage; C. unauthorized alterations or repairs have been made or unapproved parts used in the equipment. This warranty extends only to individual products; batteries are excluded, but carry their own separate limited warranty. Because each radio system is unique, Netafim disclaims liability for range, coverage, or operation of the system as a whole under this warranty except by a separate written agreement signed by an officer of Netafim. Non-Netafim manufactured products are excluded from this warranty, but subject to the warranty provided by their manufacturers, a copy of which will be supplied to you on specific written request. In order to obtain performance of this warranty, purchaser must contact its Netafim salesperson or Netafim at the address first above shown, attention Quality Assurance Department. Doc. Name: RadioNet - User Manual Revision: 01 Crop Management Technologies Page: 58 of 61 pages INSTALLATION MANUAL 5959 RadioNet 10.10. Appendix 10: System Data Sheet The System Data Sheet as shown below provides an essential commissioning step that records information about the equipment used in the system. The sheet is designed to provide a ready reference for the key data required during the Mapping process when configuring the system. If you wish to print the data sheet it is provided in excel spreadsheet format with the PoleNet software. 10.10.1. Filling in the data sheet. Headings and meanings. 1. 2. 3. 4. 5. 6. 7. 8. 9. 10. 11. 12. 13. Project Name Backup File Name Date RadioNet Host Serial # RadioNet Base Unit Serial # RadioNet Host Firmware Version RadioNet Base Firmware Version RadioNet Remote Firmware Version RadioNet Frequency Cycle Time Site Latitude Tilt Angle RadioNet Remote Units Serial # The System Name The farm, project and or location The Name of the Mapping and Route file for the System. System Commissioned Date. Located on the bottom of the Host enclosure. Located on the RHS* of the Base enclosure. PoleNet required to be connected to check. PoleNet required to be connected to check. PoleNet required to be connected to check. The Frequency provided by the Licensing Authority. 4, 8, 16 and 32 second depending on the System. This information is required to set the Solar panel. The angle the Solar Panel is set to for efficient operation. Located on the RHS* of the Remotes enclosure. Note: * RHS = Right Hand Side 10.10.2. Example of filled in System Data Sheet. 1.Fill-in the Remote Unit Serial # OUTPUTS RU Digital Output # Remote Unit S/N 20200100 4. Insert the internal Output Description Controller Output Number usually a # Controller Output sequential number after Remote Unit S/N the local outputs on the controller Output Description Main Card Expansion Card 2 1 2 1.3 X V1 17 Output Description Controller Output # Remote Unit S/N 2. Mark if the output is being used 20200101 1.3 F5 21 20200102 1.3 3 X 2.3 V2 18 X X 2.3 2.4 4 X 3.3 V3 19 V4 20 2.4 3.3 F2 22 X Expansion Card 3 5 X 3.4 3.4 3. Add the Output Description e.g. V1=Valve 1, F1=Filter 1, PM1=Pump1 etc. 2.3 2.4 3.3 3.4 PM1 23 Controller Output # The Inputs are filled in a similar manner. RU Digital Input # Main Card 1 2 20200101 1.1 INPUTS Remote Unit S/N Input Description Controller Input # X WM1 9 1.2 Expansion Card 2 3 4 X 2.1 2.2 DP1 10 Doc. Name: RadioNet - User Manual Revision: 01 Crop Management Technologies Page: 59 of 61 pages Project Name Backup File Name Date RadioNet Host S/N RadioNet Base S/N RadioNet Frequency Cycle Time OUTPUTS RU Digital Output # Remote Unit S/N Output Description Controller Output # Remote Unit S/N Output Description Controller Output # Remote Unit S/N Output Description Controller Output # Remote Unit S/N Output Description Controller Output # Remote Unit S/N Output Description Controller Output # Remote Unit S/N Output Description Controller Output # Remote Unit S/N Output Description Controller Output # MHz Sec. RadioNet Host Version RadioNet Base Version Main Expansion Card 2 Card Site Latitude Deg RadioNet Remote Version Tilt Angle Deg Expansion Card 3 Expansion Card 4 Expansion Card 5 1 1.3 2 2.3 3 2.4 4 3.3 5 3.4 6 4.3 7 4.4 8 5.3 9 5.4 1.3 2.3 2.4 3.3 3.4 4.3 4.4 5.3 5.4 1.3 2.3 2.4 3.3 3.4 4.3 4.4 5.3 5.4 1.3 2.3 2.4 3.3 3.4 4.3 4.4 5.3 5.4 1.3 2.3 2.4 3.3 3.4 4.3 4.4 5.3 5.4 1.3 2.3 2.4 3.3 3.4 4.3 4.4 5.3 5.4 1.3 2.3 2.4 3.3 3.4 4.3 4.4 5.3 5.4 Page | 60 OUTPUTS RU Digital Output # Remote Unit S/N Output Description Controller Output # Remote Unit S/N Output Description Controller Output # Remote Unit S/N Output Description Controller Output # Remote Unit S/N Output Description Controller Output # Remote Unit S/N Output Description Controller Output # Remote Unit S/N Output Description Controller Output # Remote Unit S/N Output Description Controller Output # Remote Unit S/N Output Description Controller Output # Remote Unit S/N Output Description Controller Output # Main Card 1 1.3 Expansion Card 2 Expansion Card 3 Expansion Card 4 Expansion Card 5 2 2.3 3 2.4 4 3.3 5 3.4 6 4.3 7 4.4 8 5.3 9 5.4 1.3 2.3 2.4 3.3 3.4 4.3 4.4 5.3 5.4 1.3 2.3 2.4 3.3 3.4 4.3 4.4 5.3 5.4 1.3 2.3 2.4 3.3 3.4 4.3 4.4 5.3 5.4 1.3 2.3 2.4 3.3 3.4 4.3 4.4 5.3 5.4 1.3 2.3 2.4 3.3 3.4 4.3 4.4 5.3 5.4 1.3 2.3 2.4 3.3 3.4 4.3 4.4 5.3 5.4 1.3 2.3 2.4 3.3 3.4 4.3 4.4 5.3 5.4 1.3 2.3 2.4 3.3 3.4 4.3 4.4 5.3 5.4 Page | 61 INPUTS RU Digital Input # Remote Unit S/N Input Description Controller Input # Remote Unit S/N Input Description Controller Input # Remote Unit S/N Input Description Controller Input # Remote Unit S/N Input Description Controller Input # Remote Unit S/N Input Description Controller Input # Remote Unit S/N Input Description Controller Input # Remote Unit S/N Input Description Controller Input # Remote Unit S/N Input Description Controller Input # Remote Unit S/N Input Description Controller Input # Main Card 1 2 1.1 1.2 Expansion Card 2 3 4 2.1 2.2 Expansion Card 3 5 6 3.1 3.2 Expansion Card 4 7 8 4.1 4.2 Expansion Card 5 9 10 5.1 5.2 1.1 1.2 2.1 2.2 3.1 3.2 4.1 4.2 5.1 5.2 1.1 1.2 2.1 2.2 3.1 3.2 4.1 4.2 5.1 5.2 1.1 1.2 2.1 2.2 3.1 3.2 4.1 4.2 5.1 5.2 1.1 1.2 2.1 2.2 3.1 3.2 4.1 4.2 5.1 5.2 1.1 1.2 2.1 2.2 3.1 3.2 4.1 4.2 5.1 5.2 1.1 1.2 2.1 2.2 3.1 3.2 4.1 4.2 5.1 5.2 1.1 1.2 2.1 2.2 3.1 3.2 4.1 4.2 5.1 5.2 1.1 1.2 2.1 2.2 3.1 3.2 4.1 4.2 5.1 5.2 Page | 62