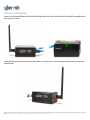
1
XCI Smart Sprinkler Controller User Manual version 1.0 Cloud Configuration and Hardware Installation Guide If you are experiencing difficulties with your Cyber-Rain System, please contact our Technical Support Department: Telephone: (877) 888-1452 ◦ Email: [email protected] Copyright © 2011 Cyber-Rain, Inc. All rights reserved. Table of Contents Introduction ............................................................................................................................................................................................................................................. 4 Package Contents ..................................................................................................................................................................................................................................... 4 Installation ............................................................................................................................................................................................................................................... 5 Pre-Installation Checklist ............................................................................................................................................................................................................ 5 Install Controller ......................................................................................................................................................................................................................... 5 Manual Operation from the Controller Unit............................................................................................................................................................................... 7 Gateway Access Point Installation .............................................................................................................................................................................................. 8 Set Up Gateway Access Point ................................................................................................................................................................................................... 10 Windows 7 and Vista...................................................................................................................................................................................................................... 10 Windows XP ................................................................................................................................................................................................................................... 13 Mac OS X ........................................................................................................................................................................................................................................ 17 Upgrade Existing Installation .................................................................................................................................................................................................... 20 Cyber-Rain Server Login ............................................................................................................................................................................................................ 21 Site Registration Wizard............................................................................................................................................................................................................ 22 Controller Discovery ................................................................................................................................................................................................................. 23 Adding Additional Controllers ................................................................................................................................................................................................... 24 Basic Operation ...................................................................................................................................................................................................................................... 27 Website Orientation ................................................................................................................................................................................................................. 27 Set Up Your Schedule ................................................................................................................................................................................................................ 28 Detailed Operation................................................................................................................................................................................................................................. 36 Home Page ................................................................................................................................................................................................................................ 36 Site Page.................................................................................................................................................................................................................................... 37 Controller Page ......................................................................................................................................................................................................................... 43 Using a Rain Sensor ........................................................................................................................................................................................................................ 55 2|Cyber-Rain XCI Smart Irrigation Controller User Guide Installing and Using a Flow Sensor (Pro Model Only) .................................................................................................................................................................... 57 Controller Alerts (Pro Model Only) ................................................................................................................................................................................................ 61 Zone Page.................................................................................................................................................................................................................................. 65 Manually Enter Flow Rates ............................................................................................................................................................................................................ 80 Cycle and Soak ............................................................................................................................................................................................................................... 81 Stats Page .................................................................................................................................................................................................................................. 82 Help Page .................................................................................................................................................................................................................................. 87 3|Cyber-Rain XCI Smart Irrigation Controller User Guide Introduction Thank you for choosing the Cyber-Rain XCI, the smart sprinkler controller that saves you time, money, and helps the environment. Package Contents A. B. C. D. E. F. G. Cyber-Rain XCI Sprinkler Controller Mounting Hardware Rain/Flow Sensor Harnesses (2 harnesses for Pro model) Valve Wiring Harness (2 harnesses for 16 zone model, 3 harnesses for 24 zone model) Gateway Wireless Access Point and Power Supply) Ethernet Network Cable Controller Power Supply A C B D F E 4|Cyber-Rain XCI Smart Irrigation Controller User Guide G Installation Pre-Installation Checklist The following hardware and software is required to configure the Cyber-Rain XCI controller and run the web-based interface: Broadband Internet access (DSL, cable, etc.) One free Ethernet port on router or DSL/cable modem Computer with Windows XP or above, or Mac OS X or above Monitor with resolution of 1024x768 or higher Minimum Internet browser: Internet Explorer 8, Firefox 3, Safari 5, Chrome 8 Silverlight 4 or above (web browser plug-in, downloadable from the Microsoft website) Install Controller Now is a good time to make a note of your Cyber-Rain XCI controller serial number (14-digit number located on the back of the controller): My Cyber-Rain XCI Serial Number: ___________________________________________________________________ 1. Mount the Controller Mount the controller on the wall with two #10 screws (included) mounted 6” apart (using the included template). If the controller will be mounted to hollow drywall, it is recommended that drywall anchors (included) are used to secure the mounting screws in place. Proper insertion of the drywall anchors requires carefully drilling a hole at each location with a ¼” drill bit (available at your local hardware store), and pushing one anchor into each hole. For outdoor applications, mount the controller in a plastic weatherproof box* (available from most Cyber-Rain authorized resellers or directly from the Cyber-Rain website). In climates that experience exceptionally hot summers, the controller should be mounted in a shaded area as to avoid extreme operating temperatures. * Please note: Cyber-Rain XCI is designed to be installed indoors (e.g., your garage, laundry room, other indoor access area). If you wish to install the unit outdoors, please order an outdoor box from Cyber-Rain or otherwise install the unit in a weatherproof box that is not made of metal. 5|Cyber-Rain XCI Smart Irrigation Controller User Guide 2. Connect the Controller The controller must be connected to your sprinkler valves. If you have an existing sprinkler controller, the sprinkler valves are connected to the controller with the wires typically inserted into numbered slots, which are called zones. Often these wires are in multiple colors. Before disconnecting an existing controller, make note of which wire runs to each sprinkler valve and mark them accordingly. There should be a single wire for each zone plus a common wire. The common wire is generally the white wire. (If you are replacing an existing sprinkler controller note the wire marked “common” or “ground”.) Make sure that each valve wire has at least ½” of wire exposed on the end which will be connected to the Cyber-Rain controller. Connect the common wire to the left most opening in the valve wiring harness (make sure the screw terminals are facing up). Wires are connected by inserting the wire into the corresponding socket from the bottom of the harness and using a 1/8” slotted screwdriver to tighten the wire at the appropriate terminal location. Next, connect the sprinkler valve wires and tighten for each zone starting from left to right starting with zone 1 and going through zone 8. Make sure to note a description of each zone and the slot that you are connecting it to on the chart below. If your sprinkler system has fewer than 8 zones, start with zone 1 and continue until finished. All 8 zones do not need to be activated. If you have more zones than outputs available on your controller (either 8, 16 or 24 depending on your controller model), you will need an additional controller (see section on Adding Additional Controllers). Insert the valve wiring harness into the connector located on the bottom of your controller labeled “C 1 2 3 4 5 6 7 8 M” making sure that it is properly aligned with the two alignment slots. If you have a 16 or 24 zone XCI controller, it will include additional wire harnesses. These wire harnesses have 9 ports instead of 10. If you have additional common lines, connect the commons to the leftmost slots of the additional harnesses. Continue inserting valve wires from left to right starting with zone 9. Then insert the valve wire harness into the unused connector closest to the 10 pin connector. 6|Cyber-Rain XCI Smart Irrigation Controller User Guide Harness 1 (8, 16, and 24 Zone Controllers) # Color Description 1 2 3 4 5 6 7 8 Harness 2 (16, 24 Zone Controllers) 9 10 11 12 Harness 2 (16, 24 Zone Controllers) # Color Description 13 14 15 16 Harness 3 (24 Zone Controllers Only) 17 18 19 20 21 22 23 24 If your irrigation system uses a master valve or pump (usually to draw water from a source such as a well or to provide additional water pressure) you will also need to use the master valve lead marked “M”. The Cyber-Rain controller will provide power to the pump / master valve when a zone is running, and for three seconds after the zone ends. If you do not have a master valve or pump installed, you will not need this feature. Once you have finished wiring the controller, connect the white end of the AC adapter plug to the bottom of the controller making sure that it is tight and secure. (Note: The AC adapter plug can only be inserted one way and will snap securely into place when installed correctly.) Then, connect the wall transformer to a 120VAC wall outlet. Manual Operation from the Controller Unit Your Cyber-Rain XCI controller can manually run individual zones directly from the controller unit. After all zone wires have been installed, you may want to use this feature to check that all zones are working properly. To manually run a zone, press the LEFT or RIGHT controller arrow keys until the desired zone is displayed. Pressing the select button will activate that zone. Press the UP or DOWN arrows to increase or decrease the amount of time your Cyber-Rain zone will stay active. Each press of the UP/DOWN arrow will increase/decrease run times by 30 seconds or, if desired, you can adjust the run time increment from the Details for Controller panel on the Controller page of the Cyber-Rain Cloud system (see the Controller Page section for more info). Press the select button again to turn off watering. 7|Cyber-Rain XCI Smart Irrigation Controller User Guide Gateway Access Point Installation Connect one end of the provided Ethernet cable to the Cyber-Rain Gateway Access Point. Connect the other end of the Ethernet cable into an available Ethernet port on your router or modem. Connect the gateway into a power socket using the provided AC adapter. The LED lights on the AP should momentarily illuminate, and yellow LED light should remain illuminated. 8|Cyber-Rain XCI Smart Irrigation Controller User Guide The gateway LED lights represent the following: Yellow Illuminates when the gateway is connected to power. This light should stay on as long as the gateway is connected to a power supply. White Illuminates when the gateway is connected to the Cyber-Rain server. This light should stay on as long as the gateway is connected to your router and has internet access. Blue Number of lights illuminated indicates the signal strength of communications between the gateway and the controller. 0-1 light indicates no/low signal strength. 2-3 lights indicate moderate/good signal strength. 4 lights indicate excellent/maximum signal strength. (Note: The blue LEDs will only be lit when the gateway is sending or receiving information to or from a controller.) Green Illuminates when information is being sent from the gateway to the controller. It is normal for this to periodically turn on as the gateway needs to periodically send information to the controller. This light will be on in conjunction with the blue lights. Red Illuminates when information is being sent from the controller to the gateway. This will also turn on periodically. This light will also be on in conjunction with the blue lights. 9|Cyber-Rain XCI Smart Irrigation Controller User Guide Set Up Gateway Access Point In order to access the web interface to set up your gateway access point, please go to the section below that corresponds with your computer’s operating system: Windows 7 and Vista, Windows XP, or Mac OS X. Windows 7 and Vista 1. Open the Network folder. This can sometimes be found in the Start Menu, or by opening Windows Explorer and clicking the Network link on the left hand side. 10 | C y b e r - R a i n X C I S m a r t I r r i g a t i o n C o n t r o l l e r U s e r G u i d e 2. In the Network folder an “Other Devices” dropdown should appear, with the Cyber-Rain Gateway shown along with its IP address. Double-click on the Cyber-Rain Gateway icon. 11 | C y b e r - R a i n X C I S m a r t I r r i g a t i o n C o n t r o l l e r U s e r G u i d e 3. This will prompt a web browser window to open and the Cyber-Rain Gateway's home page will appear. The gateway's web interface is used during the initial setup of the device, and can be used later for troubleshooting or reconfiguring the device. The Gateway home page shows information about the access point, and also contains a link to the Cyber-Rain Cloud server. Click the link for the Cyber-Rain Server at the bottom of the page to continue installation. After clicking the Cyber-Rain Server link, a new browser window or tab should appear with the Cyber-Rain Server Login screen displayed. Skip to the next section and follow the instructions to create a new login account for the website. 12 | C y b e r - R a i n X C I S m a r t I r r i g a t i o n C o n t r o l l e r U s e r G u i d e Windows XP 1. Open up My Network Places. This can usually be found on the Start Menu, on the desktop as an icon, or in the “Other Places” menu in the My Computer folder. 13 | C y b e r - R a i n X C I S m a r t I r r i g a t i o n C o n t r o l l e r U s e r G u i d e 2. Under the Network Tasks menu, click Show icons for networked UPnP devices. 3. If Windows Firewall is enabled, you may receive a warning that UPnP has been disabled. Click Yes to allow Windows to detect the Cyber-Rain gateway. 14 | C y b e r - R a i n X C I S m a r t I r r i g a t i o n C o n t r o l l e r U s e r G u i d e 4. A brief installation process should occur to install UPnP support for Windows XP. A Cyber-Rain Gateway icon should display, followed by the device’s IP address. Double-click on the icon. 15 | C y b e r - R a i n X C I S m a r t I r r i g a t i o n C o n t r o l l e r U s e r G u i d e 5. This will prompt a web browser window to open and the Cyber-Rain Gateway's home page will appear. The gateway's web interface is used during the initial setup of the device, and can be used later for troubleshooting or reconfiguring the device. The Gateway home page shows information about the access point, and also contains a link to the Cyber-Rain Cloud server. Click the link for the Cyber-Rain Server at the bottom of the page to continue installation. After clicking the Cyber-Rain Server link, a new browser window or tab should appear with the Cyber-Rain Server Login screen displayed. Skip to the next section and follow the instructions to create a new login account for the website. 16 | C y b e r - R a i n X C I S m a r t I r r i g a t i o n C o n t r o l l e r U s e r G u i d e Mac OS X 1. Download and open the gateway finder program from http://www.cyber-rain.com/downloads/Cloud/Cyber-Rain.dmg. The Cyber-Rain icon will appear on the desktop and automatically open in Finder. 2. Double-click on the Cyber-Rain Gateway Finder icon inside Cyber-Rain disk image. 17 | C y b e r - R a i n X C I S m a r t I r r i g a t i o n C o n t r o l l e r U s e r G u i d e 3. Click Open on the warning message that appears. 4. The gateway should automatically show in the list. 18 | C y b e r - R a i n X C I S m a r t I r r i g a t i o n C o n t r o l l e r U s e r G u i d e 5. Double-clicking on the listed gateway opens the gateway’s settings and configuration page in your default browser. 6. The gateway's web interface is used during the initial setup of the device, and can be used later for troubleshooting or reconfiguring the device. The Gateway home screen shows information about the gateway, and also contains a link to the Cyber-Rain Server. Click the link for the Cyber-Rain Server at the bottom of the page to continue installation. 19 | C y b e r - R a i n X C I S m a r t I r r i g a t i o n C o n t r o l l e r U s e r G u i d e Upgrade Existing Installation If you currently have the Cyber-Rain system installed and are upgrading from the software version to the Cloud version, you will have to put your controller into “pairing mode” in order for your gateway access point to bind with it. Pairing mode allows the controller to be paired with a new computer: When in pairing mode, the controller will display a “>” symbol in the top right corner of its display indicating that it is ready to be detected by the Cyber-Rain system. If the controller is not ready to be paired with a computer, it will display a “|” symbol instead, indicating that it has already been paired with a computer. Follow the steps below to reset the controller. If your controller is not ready to be paired with a computer (and displays the “|” symbol) and you would like to reset the controller and put it back into pairing mode, simply press the UP and RIGHT arrows keys on the controller face at the exact same time and release them after one second. (Note: When resetting a controller, all schedules and settings will be lost on the controller. Once you reset up your schedule in the Cyber-Rain Cloud system, you can press the Save Schedule button on the Controller page to resave your settings and schedule to the controller.) After a brief “Initialization” message appears, the controller will reboot, and once again will be ready to be paired. Once you have fully set up your new Cloud system and controller schedule, and everything is working well for you, you may uninstall the Cyber-Rain software from your computer if desired. 20 | C y b e r - R a i n X C I S m a r t I r r i g a t i o n C o n t r o l l e r U s e r G u i d e Cyber-Rain Server Login 1. A web browser should now be open displaying the Cyber-Rain Server Login screen. Click Register now to create a new login account. 2. After clicking Register now, the following window will appear: Fill out each field. If you hover your cursor over “i” buttons, it gives information about the related field’s requirements. Make sure that all of the password requirements have been met before proceeding. When finished, press the OK button. 21 | C y b e r - R a i n X C I S m a r t I r r i g a t i o n C o n t r o l l e r U s e r G u i d e Site Registration Wizard 1. The Cyber-Rain site will now ask for your location so it can retrieve weather information to use when adjusting your watering time. You may modify the existing site name or leave the default. If you access the site from the gateway interface, the Gateway MAC Address and Gateway Serial Number fields will be automatically populated. Enter your address information, zip code and email. Your email address is needed to notify you of controller alerts and product updates. Cyber-Rain will never share your personal information with third parties without your express consent. Once you have filled out all the fields, click Register Site to associate your site with your account and to continue with the installation process. 22 | C y b e r - R a i n X C I S m a r t I r r i g a t i o n C o n t r o l l e r U s e r G u i d e Controller Discovery When logging in for the first time, the user will be required to set up at least one controller at the site. The Cyber-Rain Controller Discovery screen will open and ask the user to supply information regarding the setup of each controller detected by the gateway. Cyber-Rain automatically finds and binds to your controllers. If this is an upgrade of an existing software installation of Cyber-Rain, see the Upgrade Existing Installation section. See the Adding Additional Controllers section or the Troubleshooting Guide if a controller is not located. 23 | C y b e r - R a i n X C I S m a r t I r r i g a t i o n C o n t r o l l e r U s e r G u i d e Adding Additional Controllers If you require more watering zones than the capacity of your controller or controllers need to be installed at different locations, you will need to purchase an additional Cyber-Rain XCI controller available from Cyber-Rain or your local authorized reseller. Multiple controllers can be operated using the same account and gateway wireless access point included in the complete system. The controllers do not need to be located near each other as long as they are all within signal range of the gateway. Please install any additional controllers in the same manner as your original controller. Adding Additional Controllers to Your Site If you have multiple additional controllers sure only one additional controller is plugged in during the initial setup. Run the Controller Discover Wizard by going to the Home page. Newly added controllers are automatically detected and their serial numbers will be automatically populated. 24 | C y b e r - R a i n X C I S m a r t I r r i g a t i o n C o n t r o l l e r U s e r G u i d e Follow these steps for each controller: 1. Confirm that the serial number of your controller matches the serial number on the Discovery screen (also on the back of the Cyber-Rain controller). If there is a discrepancy, contact Cyber-Rain Technical Support. 2. Give your controller a name (such as “Cyber-Rain Controller 1” or “Joe’s Cyber-Rain”). 3. Select the total number of zones that you want the controller to manage. Each controller can manage up to 8, 16, or 24 zones (depending on the model). 4. You can set up to four start times for your schedule to begin each day. Select the number that suits your needs, and then provide times for each watering cycle to begin. Typically one start time is sufficient as Cyber-Rain automatically uses Cycle and Soak for zones on a slope or with dense soil (if using the recommended horticultural options based on the settings on the Zone page). See the Zone Page and Cycle and Soak sections for more info. 5. Select Register Controller. 6. You will now need to set up your baseline schedule. Read the step-by-step instructions in the following sections. 7. If you have additional controllers to set up, power on the next controller and repeat the above steps (remember to only power on one new controller at a time during the initial setup). Additional controller’s schedules can now be accessed on the Controller page by selecting the desired controller in the Controllers for Site panel, and then viewing the schedule in the Schedule for Controller panel. The zone names and the baseline watering schedule can be edited and the start times for each watering cycle can also be changed (see the Set Up Your Schedule section for more info). 25 | C y b e r - R a i n X C I S m a r t I r r i g a t i o n C o n t r o l l e r U s e r G u i d e After times are entered, click Save Schedule in the Schedule for Controller panel on the Controller page. YOU WILL NEED TO CLICK THE SAVE SCHEDULE BUTTON FOR EACH CONTROLLER. 26 | C y b e r - R a i n X C I S m a r t I r r i g a t i o n C o n t r o l l e r U s e r G u i d e Basic Operation Cyber-Rain strongly recommends that you monitor your landscape conditions over the next two weeks after setting up your schedule and adjust your baseline watering schedule if your plants are looking too dry or too wet. Congratulations! You have finished installing your Cyber-Rain XCI Controller. You can now set your schedule and manage your controllers. See the following sections for step-by-step instructions. Website Orientation At the top right you will see a “Welcome name” area, where “name” is your user name for the Cloud system. To the right of that there is a login/logout button. There are 6 pages within the Cyber-Rain web interface. Click on the corresponding tab to go to the desired page. Each page contains one or more panels to display or control various aspects of your installation. 27 | C y b e r - R a i n X C I S m a r t I r r i g a t i o n C o n t r o l l e r U s e r G u i d e Some panels are collapsed by default. You can expand/collapse a panel at any time by clicking on the arrow in the top-right corner of the panel. Each page and the panels contained in it are described in detail in the Detailed Operation section. Set Up Your Schedule Just a couple more steps to finish setting up your Cyber-Rain Cloud Controller: 1. Enter Watering Day/Time Preferences on Site page: You can restrict Cyber-Rain’s irrigation to certain days of the week or within specific times. On the Site page, press the arrow to expand the Watering Day Preferences panel. 28 | C y b e r - R a i n X C I S m a r t I r r i g a t i o n C o n t r o l l e r U s e r G u i d e Check the days you would like watering to occur and adjust the start/end times, if needed. 29 | C y b e r - R a i n X C I S m a r t I r r i g a t i o n C o n t r o l l e r U s e r G u i d e If your watering days differ depending on the time of the year, you can add “seasonal periods” in the Site Details panel to the left of the Watering Day Preferences panel. 30 | C y b e r - R a i n X C I S m a r t I r r i g a t i o n C o n t r o l l e r U s e r G u i d e 2. Set Irrigation Schedule: This should be the watering schedule for the hottest time of the year. Cyber-Rain will automatically adjust this schedule based on the weather. There are two ways to set the schedule: a. Input Schedule Directly in Controller page: On the Controller page, enter zone names and the number of watering minutes for the hottest time of the year for each day in the Schedule for Controller panel. Press Save Schedule to send this to your controller. This option is best for those who already know how much they should be watering. 31 | C y b e r - R a i n X C I S m a r t I r r i g a t i o n C o n t r o l l e r U s e r G u i d e b. Use Cyber-Rain Suggested Watering Times in Zone page: Cyber-Rain can recommend a water-wise irrigation schedule customized to your yard on the Zone page. First name each zone in the Zones panel. 32 | C y b e r - R a i n X C I S m a r t I r r i g a t i o n C o n t r o l l e r U s e r G u i d e Then tell Cyber-Rain about each zone by using the buttons in the Zone Details panel. Press each button and select the option that best describes your landscape. 33 | C y b e r - R a i n X C I S m a r t I r r i g a t i o n C o n t r o l l e r U s e r G u i d e To the right in the Schedule for Controller panel, Cyber-Rain will recommend watering based on your entries. Press Adjust My Schedule Based on These to automatically schedule your controller. Repeat for the remaining zones. 34 | C y b e r - R a i n X C I S m a r t I r r i g a t i o n C o n t r o l l e r U s e r G u i d e 3. Set-Up Other Irrigation Devices: If your system includes a rain or flow sensor, these can be set up in the bottom left panels on the Controller page. Your Cyber-Rain system will now do the rest. Each day it will check the weather and automatically adjust watering times. You can view upcoming water savings from the Site page, track past water savings on the Stats page, manually run zones from the Controller page, and you can even download the Cyber-Rain Cloud app from the Apple App Store. Full details about every page of the Cyber-Rain Cloud system can be found in the sections below. 35 | C y b e r - R a i n X C I S m a r t I r r i g a t i o n C o n t r o l l e r U s e r G u i d e Detailed Operation The sections below describe each page of the Cyber-Rain Cloud in detail. Home Page The Home page is currently being developed and more features will be available shortly after launch. The Home page has the following panels: 1. Getting Started: This panel displays 3 quick steps for setting up your new Cyber-Rain Cloud system, once you have installed your controller and gateway access point, and created a user account for the system. (These steps can also be found in the Basic Operation section of this manual.) 36 | C y b e r - R a i n X C I S m a r t I r r i g a t i o n C o n t r o l l e r U s e r G u i d e Site Page The Site page is where you control options related to your site(s). A “site” is a specific location that has a gateway access point installed and one or more controllers paired with it. Some examples would be if you had multiple homes, or multiple school or HOA locations that you were managing all from the same Cyber-Rain user account. The information displayed on all the panels in this page changes depending on what site you have selected in the Your Sites panel. 37 | C y b e r - R a i n X C I S m a r t I r r i g a t i o n C o n t r o l l e r U s e r G u i d e The Site page has the following panels: 1. Your Sites: This panel lists all the sites are registered in your account. Clicking a different site changes the display of all other information on this page. 2. Site Details: This panel lists all the details associated with the selected site, including how many controllers and the physical location of the site. 38 | C y b e r - R a i n X C I S m a r t I r r i g a t i o n C o n t r o l l e r U s e r G u i d e 3. Customer Info: This panel lists all the details about your account, including name, address and email address (used for receiving controller alerts and product updates from the Cyber-Rain system). 39 | C y b e r - R a i n X C I S m a r t I r r i g a t i o n C o n t r o l l e r U s e r G u i d e 4. Advanced Settings: This panel lists settings for your weather savings for the selected site. They determine how sensitive your watering will be to precipitation, temperature and humidity. Change as appropriate for your site’s weather conditions. Typically these settings do not need to be adjusted, as they have been calculated to deliver the optimal amount of water under varied conditions. If you wish to disable sprinkler run time reductions due to temperature and humidity, set both “Changer Per 5 Deg. Temp” and “Change Per 5% Humidity” to zero. 5. Site Controllers: This panel displays information about all the controllers at the selected site. 40 | C y b e r - R a i n X C I S m a r t I r r i g a t i o n C o n t r o l l e r U s e r G u i d e 6. Weather Forecast: This panel displays the 5-day weather forecast for your selected site. 41 | C y b e r - R a i n X C I S m a r t I r r i g a t i o n C o n t r o l l e r U s e r G u i d e 7. Watering Day Preferences: This panel displays options for restricting watering based on days/seasons or other watering restrictions for the selected site. Water municipalities sometimes restrict the days of the week or the hours of the day that sprinklers can be turned on. Cyber-Rain offers a simple way to comply with these watering restrictions by allowing you to select the days or time periods during which landscape watering is permitted in your area. This feature can also be used to set watering day and time preferences, such as setting a weekly “mow day”. Cyber-Rain defaults to allow watering on all days, which is indicated by all of the boxes being checked. Uncheck the days which you do NOT want to water. Any days that are unchecked are shown in RED on the Controller and Zone pages and will NOT water, even if minutes are set for those days. If watering day preferences vary by season, set the number of seasons using the Seasonal Periods scroll wheel in the Site Details panel, and then set the restrictions by season as appropriate. Change the Restriction Type of the desired season if you want to restrict based off of Odd or Even days. If watering is not desired during particular hours, set the times that watering is desired in the Start Time and End Time fields in the watering days table. 42 | C y b e r - R a i n X C I S m a r t I r r i g a t i o n C o n t r o l l e r U s e r G u i d e Controller Page The Controller page is where you access settings related to your controllers and their schedule. All the panels and settings are shown for the currently selected controller (you can select different controllers from the Controllers for Site panel on the Controller page). 43 | C y b e r - R a i n X C I S m a r t I r r i g a t i o n C o n t r o l l e r U s e r G u i d e The Controller page has the following panels: 1. Your Sites: This panel lists all the sites are registered in your account. Clicking a different site changes the display of all other information on this page. 2. Details for Controller: This panel displays detailed information and options for the selected controller, including the following fields: Controller Name: Here you can specify a name for your controller. Number of Zones: The maximum setting for this field depends on how many zones your controller has (8, 16 or 24). If you have fewer zones in use then your maximum, you can lower this setting to match the number of zones you have. Controller Online: This check box shows whether your controller is currently online. Use 24 Hour Clock: This feature toggles the time between a 12 hour and 24 hour clock system on the controller. Manual Timer Step Secs: This feature adjusts the time increment for manually running sprinkler zones when pressing “Up” or “Down” on the controller’s keypad. For example, if 15 seconds is selected, each press of the up arrow on the controller will add 15 seconds of watering time for that zone. The watering schedule is not affected by this setting. Use Spanish for LCD: Toggles the language displayed on the controller between English and Spanish. LCD Scroll Speed: This setting adjusts how fast the LCD screen on the controller will scroll text. Pro Controller: This check box shows whether your controller is a standard or Pro version. Last Time Online: This field shows when the controller was last online and communicating with the Cyber-Rain server. Controller messages in queue: Displays the number of messages saved in the queue. Budget Setting: This feature increases or decreases the runtimes for ALL zones by the specified percentage. 44 | C y b e r - R a i n X C I S m a r t I r r i g a t i o n C o n t r o l l e r U s e r G u i d e 3. Start Times: This panel displays the number of start times for the selected controller. You can have up to 4 separate start times set per controller. Any changes made to the start times need to be saved by clicking the Save Schedule button in the Schedule for Controller panel. 45 | C y b e r - R a i n X C I S m a r t I r r i g a t i o n C o n t r o l l e r U s e r G u i d e 4. Current Sensor Alert Settings (Pro Model Only): Cyber-Rain automatically measures the electrical current flowing through each valve while it is in use, and will alert the user of abnormally high or low measurements. Current alerts can be helpful in determining if a valve wire hasn’t been inserted properly or is failing. The default settings for over/under current alerts are set to a wide range to avoid unwanted alerts. To activate low current alerts, set an under current threshold that is above 0 and safely below the typical current levels of your valves. The existing current levels can be read by manually running a zone and watching the current gauge on the Schedule page. An under current threshold of 150 milliamps is generally appropriate for most residential settings. The default over current alert threshold is 750 milliamps, which should be suitable for most installations. Cyber-Rain will stop watering the zone when a high current alert has been tripped, so the threshold should be set with care. See Controller Alerts section for more details. 5. Rain Sensor Settings: If a compatible rain sensor is installed, make sure the Rain Sensor Installed box is checked. 46 | C y b e r - R a i n X C I S m a r t I r r i g a t i o n C o n t r o l l e r U s e r G u i d e This panel expands when you have checked that a rain sensor is installed. The time delay (in hours) before the system resumes watering after the rain sensor hold is no longer active can be adjusted. The user must also select the type of rain sensor installed (normally open/closed). Most rain sensors are normally closed when not activated, so this is Cyber-Rain’s default setting. Consult the rain sensor’s manual to determine its connection type. See the Using a Rain Sensor section for more information. 6. Flow Sensor Settings: If an optional flow sensor is installed, make sure the Flow Sensor Installed box is checked. Flow sensors are only compatible with the Pro model. 47 | C y b e r - R a i n X C I S m a r t I r r i g a t i o n C o n t r o l l e r U s e r G u i d e This panel expands when you have checked that a flow meter is installed. If a compatible flow sensor is installed and connected to the Cyber-Rain controller, this feature will monitor the flow of water through the irrigation system and provide under/overflow alerts and automatic watering holds. For the flow metering to function correctly, the sensor type, calibration settings, fill time, and over/underflow conditions settings must be set. Calibration settings are specific to flow meters, and typically can be found on the box or through the manufacturer’s documentation. A normal flow rate must be set for each zone for alerts to be triggered. (Note: Cyber-Rain will stop watering the zone when a high-flow rate has been detected.) Refer to Installing and Using a Flow Sensor and Controller Alerts sections of this User Manual for more details. 7. Controllers for Site: This panel displays information about all the controllers at the selected site. Clicking a different controller changes the display of most of the other information on this page, including the Schedule for Controller panel. 48 | C y b e r - R a i n X C I S m a r t I r r i g a t i o n C o n t r o l l e r U s e r G u i d e 8. Schedule for Controller: This panel displays your baseline watering schedule for the hottest days of the year. Cyber-Rain will automatically adjust this baseline watering schedule each day based on the forecasted temperature, humidity and rainfall for your zip code. On the left you will see the names of the zones as you assigned them. On the right, you will see the watering times in minutes for each start time for each day and zone. You can either enter your baseline watering schedule manually here, or use the horticultural options on the Zone page to set your schedule automatically. (Note: These are watering times for the HOTTEST days of the year.) You can easily change any zone name by simply typing over the current entry. To adjust watering minutes, simply select the desired day and zone and enter the desired number of minutes. After making any changes, click Save Schedule to save your changes and send them to the controller. 9. Run Status: The Run Status panel shows the current status for the selected controller. 49 | C y b e r - R a i n X C I S m a r t I r r i g a t i o n C o n t r o l l e r U s e r G u i d e To put the controller on a manual hold, click on the Hold button and choose an end date for the hold will put the controller on manual hold. If you have more than one controller at your selected site and want all controllers to be on hold, click the Global Hold check box, then click OK. It will then display the hold in the Run Status panel. Click Resume to cancel the hold before the scheduled resume date. If a zone is currently running, the Run Status panel will display the active zone name and a countdown of how much longer the zone will be running for. To stop the zone immediately, click the Stop button. 50 | C y b e r - R a i n X C I S m a r t I r r i g a t i o n C o n t r o l l e r U s e r G u i d e If rain is in the forecast for tomorrow, the system will automatically stop all watering for the next day. If you wish to override this rain hold, you can click the Override button. This will override the rain shutoff until the following day when it will check the forecast once again. When the controller is on a rain hold due to rain in the forecast, the display on the controller will indicate that all watering has stopped until tomorrow’s date due to rain. If you have installed an optional rain sensor, Cyber-Rain will provide double protection against watering when it is raining. If rain has been detected by the sensor, it will skip all scheduled watering events and state RAIN SENSOR HOLD. This hold will remain in effect until the rain sensor releases it and after any time delay you have added in the Cyber-Rain setup. If you wish to cancel the rain sensor hold, you can click the Override button. After the rain sensor dries there will be a countdown until the hold is cleared, depending on the time delay you have set (the default is 24 hours). To manually cancel the hold immediately, click the Override button. 51 | C y b e r - R a i n X C I S m a r t I r r i g a t i o n C o n t r o l l e r U s e r G u i d e On the Run Status panel you can also perform a manual zone run. Click on the Manual Run button (A). Move the slider bar at the top of the menu (B) to change the duration of the cycle. Check the box to the left of each zone name (C) to activate the corresponding zone. The Check All and Clear All buttons (D) on the bottom allow you to quickly select or deselect all zones. Click the Run/Cycle button (D) to begin the manual run. A B C D 52 | C y b e r - R a i n X C I S m a r t I r r i g a t i o n C o n t r o l l e r U s e r G u i d e E If a controller is offline, this will be shown in the Run Status panel. Check to ensure that the controller is powered on, and the gateway access point is powered on and within range of the controller. See the Connectivity Issues section of the Troubleshooting Guide for more information. 10. Controller Status: The Controller Status panel shows the System Alerts traffic light, the Current mA (milliamps) gauge and the Controller Temperature Gauge. 53 | C y b e r - R a i n X C I S m a r t I r r i g a t i o n C o n t r o l l e r U s e r G u i d e The System Alerts traffic light indicates the status of alerts. A green light means no alerts have been triggered. A yellow light means that an alert has been triggered but Cyber-Rain is continuing to water all zones. A red light generally means that an alert has been triggered and watering has been held for one or all zones. Details on what alerts have been triggered can be found in the Event Log on the Stats page. Alerts can be cleared by pressing the Clear Alerts button. The user will receive emails when alerts are triggered and when all alerts have been cleared. (Note: You can opt out of email alerts by unchecking the email alert boxes in the Site Details panel on the Site page.) For more information on alerts, see the Controller Alerts section. The Current mA gauge measures the current going through an active valve. If your sprinklers are not running, the current meter should indicate no current. The Controller Temperature Gauge indicates the internal temperature of the controller. An alert will be triggered if the controller temperature is outside of normal range (as shown by the green area). If the temperature is too low (as shown by the blue area) there is a risk of irrigation pipes freezing. If the temperature is too high (as shown by the red area) there is a risk of controller malfunction. See the Controller Alerts section for more information. 11. Flow Meter Data: If you have an optional Flow Sensor installed and have enabled it in the Flow Sensor Settings panel, the Flow Meter Data panel will be displayed. This panel has a Flow Rate gauge to show the current flow measured by gallons per minute (GPM). This indicates the rate of water flow going through an active valve. It also has a digital counter which shows aggregate flow for all zones if a flow meter is installed. It operates similar to an odometer and can be reset by pressing the Reset Odometer button. See Installing and Using a Flow Sensor in this User Manual for further details. 54 | C y b e r - R a i n X C I S m a r t I r r i g a t i o n C o n t r o l l e r U s e r G u i d e Using a Rain Sensor Any “dry contact interface type” rain sensor can be attached to your Cyber-Rain controller. The rain sensor will provide a double layer of protection against watering when it is raining. If it senses rain, it will stop all watering regardless of whether the rain has been forecast. Watering will not resume until the rain sensor is no longer activated and the rain sensor countdown has completed. The rain hold length can be changed by setting the delay until watering resumes. Follow these steps to properly integrate a rain sensor to your Cyber-Rain controller: 1. Ensure that your rain sensing device is properly mounted in a location where the rainfall is to be measured. 2. There will be two wire leads that extend from the rain sensor device. Make sure that these leads are long enough to reach the controller. Insert each wire into the included rain sensor harness (see photo of part C in the Package Contents section) and tighten each screw until it clamps down tightly on the wires. Connect the (+) positive wire to the left side opening in the rain sensor harness and the (-) negative wire to the right side opening (make sure the screw terminals are facing up). Normally, the red wire goes to (+) positive terminal and the black wire to the (-) negative terminal. 3. Insert the rain sensor harness into the connector located on the bottom of your controller labeled “RAIN” making sure that it is properly aligned. (Note: This is the 2-wire slot on the LEFT in Pro models.) 55 | C y b e r - R a i n X C I S m a r t I r r i g a t i o n C o n t r o l l e r U s e r G u i d e 4. Activate the rain sensor within Cyber-Rain by selecting the Rain Sensor Installed check box on the Controller page, indicating that you have connected a rain sensor to your controller. 5. Set the rain sensor type and desired delay hours. The default is set to 24 hour delay after the rain sensor has dried. Rain sensors are sold in two different varieties, normally open, and normally closed. Normally open controllers have two wires connected to a switch which does not provide a path for electrical current when dry. When rain is detected, the sensors close the circuit and allow a path for electrical current. Normally closed sensors provide a path for electrical current until rain is detected, at which point the switch is opened and an open circuit is produced. It is important to choose the correct sensor configuration. Choosing the wrong configuration will cause rain sensor holds. Cyber-Rain’s default setting is normally closed. Please determine your sensor type from your sensor’s documentation. To verify the correct sensor type has been chosen, check the Run Status panel on the Controller page. If there is a Rain Sensor Hold and the rain sensor has not been activated by actual rain, the wrong sensor type may have been selected in the Rain Sensor Settings panel on the Controller page. 56 | C y b e r - R a i n X C I S m a r t I r r i g a t i o n C o n t r o l l e r U s e r G u i d e After it has rained and a rain hold has occurred, the hold will remain until the rain sensor dries. Then you will get a countdown as per your rain sensor delay settings. You can click alternatively click Override to manually cancel the rain hold. Installing and Using a Flow Sensor (Pro Model Only) Cyber-Rain Pro controllers are compatible with Data Industrial, ARAD/Netafim, Bermad and other flow sensors that have a magnetic reed (dry contact) interface. When integrated, flow sensors send flow data to the controller interface for accurate flow monitoring. This will enable Cyber-Rain to alert you to broken or blocked sprinklers by sensing abnormally high or low flow. It will also allow irrigation water usage to be determined. To properly implement flow sensing on your Cyber-Rain controller, you must complete the following steps: (Note: If you have a “Meter Type” flow sensor, a minimum of two pulses is required to establish flow rate. If a zone has emitters with very low precipitation rates, the fill time may be longer and there may be a delay in reporting flow to the Cyber-Rain system.) 1. Mount: Follow the instructions given in the flow sensor’s manual to install the flow sensor at the desired location. 2. Wire: The flow sensor wires should be properly shielded as to reduce the risk of electrical interference. Use only shielded and armored buried signal cable, with stranded copper conductor twisted pair 18 AWG wire. Ground the shielding that surrounds the insulated signal wire, but do not ground either of the signal wires as this can introduce electrical noise. Running the signal wires in the same wire harness as the valve wires also increases the likelihood of signal noise. 3. Connect: There will be two wire leads that extend from the signal cable. Make sure that these leads are long enough to reach the controller. Insert each wire into the flow sensor harness (see photo of part C in the Package Contents section) and tighten each screw until it clamps down tightly on the wires. Connect the (+) positive wire to the right side opening in the flow sensor harness and the (-) negative wire to the left side opening (make sure the screw terminals are facing up). Typically the red wire goes to (+) positive terminal and the black wire to the (-) negative terminal. 57 | C y b e r - R a i n X C I S m a r t I r r i g a t i o n C o n t r o l l e r U s e r G u i d e 4. Insert: Insert the flow sensor harness into the connector located on the bottom of your controller labeled “FLOW”, making sure that it is properly aligned. (Note: This is the 2-wire harness on the RIGHT in Pro models.) 5. Setup Parameters: On the Controller page in the Flow Sensor Settings panel, select the Flow Sensor Installed check box indicating that you have connected a flow sensor to your controller. The Flow Sensor Settings panel will now expand and you can select the type of flow meter that you have. a. Meter Type: Select this option if you have a “Meter Type” flow sensor (e.g., ARAD/Netafim, Bermad). The Gallons Per Pulse parameter allows you to calibrate the system to your specific flow sensor. This value is typically found marked on the flow sensor itself. 58 | C y b e r - R a i n X C I S m a r t I r r i g a t i o n C o n t r o l l e r U s e r G u i d e b. DI Type: Select this option if you have a “Data Industrial” impeller type flow sensor. The K Value and Offset parameters should be provided with your meter and allow you to calibrate the system to your specific flow sensor. 6. Set Thresholds: The thresholds are used for setting the alert levels of too much or too little watering flowing through your valves. If Cyber-Rain detects overflow, it will shut off your watering and send you an email. If it detects underflow, it will send you an email but keep watering. Thresholds are set as a percentage difference from normal flow. For example, if the normal flow for a valve is 10 GPM and the overflow threshold is set to 20%, a flow rate of 59 | C y b e r - R a i n X C I S m a r t I r r i g a t i o n C o n t r o l l e r U s e r G u i d e 12 GPM or greater will cause an overflow condition. Likewise, if the underflow threshold is set to 20%, a flow rate of 8 GPM or less will cause an underflow condition. The Cyber-Rain Cloud system sets the default threshold values of 50%, but these can be adjusted as needed. 7. Set Fill Time: Fill time is the amount of time that it takes the irrigation pipes to reach a steady state flow of water. Irrigation pipes tend to flow water more rapidly when first they are first opened as the pipes are pressurized. If the fill time is set too short, the controller will register an overflow event before the flow rate has had a chance to stabilize. To properly determine your fill time for each zone, manually run the zone while keeping note of the elapsed time. The amount of time that passes before the flow rate stabilizes is your fill time. Fill time is typically 30-90 seconds; Cyber-Rain defaults this time to be 30 seconds. 8. Set Normal Flow: Flow sensing does not occur until the normal flow has been set for each zone. Normal flow is the typical rate water flows through each valve when water is flowing at a steady state and everything is working correctly. Normal Flow rate is set for each zone on the Zone page in the Flow Sensor Options panel. It is suggested that the normal flow rate be set after running each zone at least once, as Cyber-Rain will record the last actual flow rate. The Normal Flow rate can be copied from the last recorded flow rate by pressing the Use Observed as Normal Flow Rate button, and then individually adjusting zones as needed. A zone’s last observed flow rate can also be found on the Stats page in the Event Log. Once your flow sensor has been properly installed and setup in the Cyber-Rain Cloud system, you are ready to begin using it for monitoring your irrigation flow and receiving alerts for abnormal flow conditions. You can monitor the actual flow rate through a zone by watching the gauge in the Flow Meter Status panel on the Controller page while that zone is running. The counter will keep track of gallons used and can be reset by pressing the reset button. 60 | C y b e r - R a i n X C I S m a r t I r r i g a t i o n C o n t r o l l e r U s e r G u i d e Controller Alerts (Pro Model Only) Cyber-Rain continually monitors your controller and sprinkler system to make sure everything is working correctly. When the system is working normally, the traffic light on the Controller page will be green. However, if Cyber-Rain detects something outside the thresholds for normal operation, an alert will be triggered and you will be notified in the following ways: The LCD display screen on the controller will indicate an alert. The alert will be shown on the Home page. The traffic light in the Controller Status panel on the Controller page will change to yellow or red. The alert will be logged in the Event Log on the Stats page. You will be sent an alert email to the email address used when creating your account (if the Email New Alerts box is checked in Site Details panel on the Site page). Important: To assure you receive email alerts, add [email protected] to your address book so messages do not get delivered to the junk folder. Cyber-Rain continually checks for three types of alerts – temperature, current and flow. Temperature Alerts Temperature Alerts indicate when the temperature inside the controller box is too high or low. Note that the sensor is measuring the temperature inside the controller box, not the outside air temperature. The thresholds for temperature alerts cannot be changed. Potential temperature alerts are: High Temperature Alert Indicates: The temperature inside controller box is too high. Electronic components within the controller may be damaged. Cyber-Rain response: An alert is triggered, and the controller stops watering all zones. Potential causes of alert: o Controller is located in an area which is very hot. If temperature alerts are frequent, the controller may need to be relocated to avoid damage to the internal electronics. o The controller is overheating due to a malfunction. Please call tech support at 877-888-1452 or email us at [email protected] if you are receiving this alert repeatedly when the outside temperature is not hot. How to clear alert: o This alert will automatically clear itself when the controller temperature returns to the normal range. o Manually clear the alert by pressing Clear Alerts under the stoplight in the Controller Status panel on the Controller page. (Note: The alert will return if the temperature continues to be too high.) Low Temperature Alert Indicates: The temperature inside controller box is close to freezing. Pipes may freeze if sprinklers are left on. Cyber-Rain response: An alert is triggered, but the controller continues to water all zones. Potential causes of alert: 61 | C y b e r - R a i n X C I S m a r t I r r i g a t i o n C o n t r o l l e r U s e r G u i d e o Outside air temperature is close to 32 degrees. How to clear alert: o This alert will automatically clear itself when the controller temperature returns to the normal range. o Manually clear the alert by pressing Clear Alerts under the stoplight in the Controller Status panel on the Controller page. (Note: The alert will return if the temperature continues to be too low.) Current Alerts Current Alerts are triggered when the current running through the sprinkler valves is too high or low. The default settings for alerts are set wide to avoid unwanted alerts, but can easily be adjusted on the Controller page in the Current Sensor Alert Settings panel. To activate low current alerts, set an under current threshold above 0 and safely below the typical current levels going through your valves. You can read your existing current levels by manually running a few zones and watching the current gauge in the Controller Status panel on the Controller page. An under current threshold of 150 milliamps is generally appropriate in most residential settings. The default for an over current alert is 750 milliamps, which should be suitable for the majority of installations. Note that Cyber-Rain will stop watering the zone when a high current alert has been tripped, so the threshold should be set with care. Potential current alerts are: Current Hold Alert Indicates: Current going through valves is above the maximum threshold when all sprinklers are OFF. Cyber-Rain response: An alert is triggered and THE CONTROLLER WILL NOT WATER ANY ZONES until the alert is cleared. Potential causes of alert: o Over Current Threshold is set too low. Check to make sure that the threshold (found in the Current Sensor Alert Settings panel on the Controller page) is set to a value sufficiently higher than the typical zone current. o Electrical short in the wiring. Check to make sure there is no short in the zone wiring using an ohm meter. The resistance should be at least 20 ohms. o If you observe a Current Hold Alert when no zone is running please call Tech Support at 877-888-1452, or email us at [email protected]. The controller may be malfunctioning. How to clear alert and resume watering: o This alert will automatically clear itself when the current going through the valves returns to normal levels. o Manually clear the alert by pressing Clear Alerts under the stoplight in the Controller Status panel on the Controller page. (Note: The alert will return if the current remains above the maximum threshold.) Over Current Alert Indicates: Current going through a valve is above the maximum threshold when that ZONE is running. Cyber-Rain response: Alert triggered and THE CONTROLLER WILL NOT WATER THE AFFECTED ZONE until the alert is cleared. Potential causes of alert: o A sprinkler valve is failing and opening too much. 62 | C y b e r - R a i n X C I S m a r t I r r i g a t i o n C o n t r o l l e r U s e r G u i d e o Your threshold for over current alerts is set too low. Adjust the Over Current Threshold in the Current Sensor Alert Settings panel on the Controller page. How to clear alert and resume watering for the affected zone: o This alert will automatically clear itself when the current going through the valve returns to normal levels. o Manually run the zone from either the controller or computer after the underlying cause has been addressed. o Manually clear the alert by pressing Clear Alerts under the stoplight in the Controller Status panel on the Controller page. (Note: The alert will return the next time Cyber-Rain waters this zone if the current remains above the maximum threshold.) Under Current Alert Indicates: Current going through a valve is below the minimum threshold when that zone is running. Cyber-Rain response: Alert is triggered, but the controller continues to water all zones. Potential causes of alert: o A sprinkler valve is failing and not opening sufficiently. o The sprinkler valve wire is not properly inserted in the valve harness. o Your threshold for under current alerts is set too high. Adjust the Under Current Threshold in the Current Sensor Alert Settings panel on the Controller page. How to clear alert: o This alert will automatically clear itself when the current going through the valve returns to normal levels. o Manually run the zone from either the controller or computer after the underlying cause has been addressed. o Manually clear the alert by pressing Clear Alerts under the stoplight in the Controller Status panel on the Controller page.(Note: The alert will return the next time Cyber-Rain waters if the current remains below the minimum threshold.) Flow Alerts Flow Alerts indicate when abnormally high or low water flow is detected. An optional flow meter must be properly installed to detect flow alerts and the normal flow must be set for each valve. See Installing and Using a Flow Sensor in this User Manual for more information on proper set up. Potential flow alerts are: Flow Hold Alert Indicates: Water is flowing through the valves when all sprinklers are off. Cyber-Rain response: Alert triggered and THE CONTROLLER WILL NOT WATER ANY ZONES until the alert is cleared. Potential causes of alert: o A sprinkler valve has malfunctioned and is stuck open. o Your main line has a leak. How to clear alert and resume watering: o This alert will automatically clear itself when no water flow is detected for one minute. o Manually clear the alert by pressing Clear Alerts under the stoplight in the Controller Status panel on the Controller page. (Note: The alert will return if the flow continues when all of the sprinklers are off.) 63 | C y b e r - R a i n X C I S m a r t I r r i g a t i o n C o n t r o l l e r U s e r G u i d e Over Flow Alert Indicates: More water is flowing through a valve than the overflow alert threshold for that zone. Cyber-Rain response: Alert triggered and THE CONTROLLER WILL NOT WATER THE AFFECTED ZONE until the alert is cleared. Potential causes of alert: o A sprinkler head is broken. o A sprinkler line has a leak. o A sprinkler valve is failing and is opening too much. o Your threshold for over flow alerts is set too low. Increase the Overflow Threshold percentage in the Current Sensor Alert Settings panel on the Controller page. o The normal flow rate for the zone is set too low. To check your normal flow rate setting, go to the Zone page, select your zone and modify the normal flow rate as needed in the Flow Sensor Options panel. How to clear alert and resume watering for the affected zone: o Manually run the zone from either the controller or computer after the underlying cause has been addressed. o Manually clear the alert by pressing Clear Alerts under the stoplight in the Controller Status panel on the Controller page. (Note: The alert will return the next time Cyber-Rain waters if the flow remains above the maximum threshold.) Under Flow Alert Indicates: Less water is flowing through a valve than the underflow alert threshold for that zone. Cyber-Rain response: Alert triggered but controller continues to water all zones. Potential causes of alert: o A sprinkler valve is failing and not opening sufficiently. o A sprinkler head or line is blocked. o The sprinkler valve wire is not properly inserted in the valve harness. o Your threshold for under flow alerts is set too low. Increase the Underflow Threshold in the Current Sensor Alert Settings panel on the Controller page. o The normal flow rate for the zone is set too high. To check your normal flow rate setting, go to the Zone page, select your zone and modify the normal flow rate as needed in the Flow Sensor Options panel. o Your Flow Sensor fill time is set too low, meaning your pipes have not completely filled when the flow sensor starts measuring the flow. Adjust your Flow Sensor Fill Time in the Flow Sensor Settings panel on the Controller page. How to clear alert: o This alert will automatically clear itself when the flow going through the valve returns to normal levels. o Manually run the zone from either the controller or computer after the underlying cause has been addressed. o Manually clear the alert by pressing Clear Alerts under the stoplight in the Controller Status panel on the Controller page. (Note: The alert will return the next time Cyber-Rain waters if the flow remains below the minimum threshold.) 64 | C y b e r - R a i n X C I S m a r t I r r i g a t i o n C o n t r o l l e r U s e r G u i d e Zone Page The Zone page can be used to adjust the settings of a particular zone. This is where you can input details about your zones and receive Horticulture Reccomendations. This is particularly helpful if you’re not sure how long to water your each zone in your landscape. 65 | C y b e r - R a i n X C I S m a r t I r r i g a t i o n C o n t r o l l e r U s e r G u i d e The Zone page has the following panels: 1. Your Sites: This panel lists all the sites are registered in your account. Clicking a different site changes the display of all other information on this page. 2. Site Controllers: This panel displays information about all the controllers at the selected site. Clicking a different controller changes the display of most of the other information on this page, including the Controller Zones and Zone Details panels. 66 | C y b e r - R a i n X C I S m a r t I r r i g a t i o n C o n t r o l l e r U s e r G u i d e 3. Controller Zones: These fields list all the zones on your selected controller. Here you can edit the zone names if desired, which will automatically update Controller page and also the controller itself to show the new name. 67 | C y b e r - R a i n X C I S m a r t I r r i g a t i o n C o n t r o l l e r U s e r G u i d e 4. Zone Details: This panel lists options based on your selected zone. This is also where you can adjust the various horticultural settings to get horticultural recommendations for the selected zone. Note that the horticultural recommendations assume only one sprinkler start time per day. If you have selected multiple start times, you can manually spread the recommended watering minutes by zone across the start times. 68 | C y b e r - R a i n X C I S m a r t I r r i g a t i o n C o n t r o l l e r U s e r G u i d e Plant Type: Category of plant from the pop-up menu that best describes the zone. An average crop coefficient, which signifies the plant’s water use, is generated. If you wish to manually set this to a precise value, select Custom under Plant Type. This will enable the Crop Coefficient field. Your value can be entered directly or you can use the arrows. 69 | C y b e r - R a i n X C I S m a r t I r r i g a t i o n C o n t r o l l e r U s e r G u i d e Sprinkler Type: Type of sprinkler/emitter that is being used in this zone (utilizing the pictures provided). A default precipitation rate (in inches per hour) is generated based on typical values for the type of sprinkler you selected. If you wish to manually set this rate, select Custom under Sprinkler Type. This will enable the Precipitation Rate field. Your rate can be entered directly or you can use the arrows. To determine the precise precipitation rate of your emitters, consult the manufacturer of the sprinklers/emitters, or run a “catch-can” test. 70 | C y b e r - R a i n X C I S m a r t I r r i g a t i o n C o n t r o l l e r U s e r G u i d e Sun Exposure: How sunny most of the zone is for the majority of the day. 71 | C y b e r - R a i n X C I S m a r t I r r i g a t i o n C o n t r o l l e r U s e r G u i d e Slope Type: The slope of the majority of the zone. If your landscape is sloped, Cyber-Rain will automatically cycle your watering by sprinkling a little and then waiting (cycle and soak). This reduces runoff by giving the water a chance to soak in. (Refer to the Cycle and Soak section for more info.) 72 | C y b e r - R a i n X C I S m a r t I r r i g a t i o n C o n t r o l l e r U s e r G u i d e Soil Type: Type of soil that best describes the zone. If your soil easily separates it is sandy, if it clumps together it is clay, and if it is in between it is loam. If you are uncertain of the type, select Loam. If you have clay soil, Cyber-Rain will automatically cycle your watering by sprinkling a little and then waiting (cycle and soak). This gives the water a chance to soak in and reduces runoff. (Refer to the Cycle and Soak section for more info.) 73 | C y b e r - R a i n X C I S m a r t I r r i g a t i o n C o n t r o l l e r U s e r G u i d e Estimated GPM: This field is shown when you do not have a flow sensor installed. Here you can manually enter your flow rate for the selected zone. See the Manually Enter Flow Rates section below for more information. Ignore Weather: Checking this option overrides the automatic weather adjustments for the selected zone (it will run the full minutes set in the schedule for that zone). Enabling “Ignore Weather” will cause the controller to ignore both rain and freeze holds. (i.e. The system will not shut itself off due to rain or freezing temperatures if the “Ignore Weather” box is checked.) Zone Hold: This feature allows you to put designated zones on hold. When activated, the zone will not water for the designated period of time. To utilize this feature, check the box and set the Zone Hold From and Zone Hold Until fields. (Note: If you wish to put all of a controller’s zones on hold, use the Hold button in the Run Status panel on the Controller page.) Wire Color: This option allows you to enter in the wire color for the selected zone. Wire Color Is Striped: This option allows you to enter if the wire color is striped for the selected zone. 74 | C y b e r - R a i n X C I S m a r t I r r i g a t i o n C o n t r o l l e r U s e r G u i d e 5. Flow Sensor Options: This panel is shown if you have a flow sensor installed. Here you can set Normal Flow Rates for the selected zone that your flow sensor uses in conjunction with your set threshold values to determine whether you have normal flow, or an underflow or overflow condition. See the Installing and Using a Flow Sensor section for more information. 6. Zone Image: This panel displays a stock image for the selected zone, which can be replaced with your own image of the zone if desired. GIF, BMP, JPG, and PNG file types are supported. To upload your own picture, click the arrow in the “Upload your own image for this zone” title. 75 | C y b e r - R a i n X C I S m a r t I r r i g a t i o n C o n t r o l l e r U s e r G u i d e Then click in the box that says “Click here to add a new file”. You will then be able to browse your computer for a valid image file to upload for your zone image and then click Open to upload it. You can also select an image from a gallery of preset zone images. Click the arrow to expand the Select zone image from gallery panel, and then click Select Zone Image. 76 | C y b e r - R a i n X C I S m a r t I r r i g a t i o n C o n t r o l l e r U s e r G u i d e Scroll through until you find the desired image on the left. Clicking an image on the left will show you the image on the right side in its full size. Click OK to save your selection. 77 | C y b e r - R a i n X C I S m a r t I r r i g a t i o n C o n t r o l l e r U s e r G u i d e 7. Schedule for this zone: This panel shows schedule information for the selected zone, including the horticultural recommendations based off of the horticultural settings in the Zone Details panel: Zone schedule table: This table shows your schedule for the selected zone, and the total number of weekly minutes according to your current baseline schedule (per start time). Weekly Total of Minutes for This Zone: This field shows you the total weekly minutes for this zone according to your current baseline schedule, including all start times. Maximum Cycle: This field allows you to change the maximum cycle for the selected zone (refer to the Cycle and Soak section for more info). Soak Time: This field allows you to change the soak time for the selected zone (refer to the Cycle and Soak section for more info). Suggested Weekly Minutes: This field is populated with the suggested total number of weekly minutes based on the options you set for that zone in the Zone Details panel. Suggested Watering Days: This field is populated with the suggested number of days that that zone should be watered per week, based on the options you set for that zone in the Zone Details panel. Suggested Maximum Cycle: This field is populated with the suggested maximum cycle for the selected zone, based on the options you set for that zone in the Zone Details panel. Suggested Maximum Soak Time: This field is with the suggested soak time for the selected zone, based on the options you set for that zone in the Zone Details panel. 78 | C y b e r - R a i n X C I S m a r t I r r i g a t i o n C o n t r o l l e r U s e r G u i d e Adjust My Schedule Based on These: This button will apply the recommendations to your zone’s schedule. 79 | C y b e r - R a i n X C I S m a r t I r r i g a t i o n C o n t r o l l e r U s e r G u i d e Manually Enter Flow Rates The Estimated GPM (gallons per minute) field of the zone details panel is visible when you do not have a flow sensor installed/enabled. Cyber-Rain defaults this value to 1.50. The feature allows Cyber-Rain to report water savings and usage in gallons in the Usage Grid and Usage Summary Report panels on the Stats page. The flow rate of each zone can be estimated using the local utility’s water meter using the methodology below. Most utility water meters in the United States use the hundreds of cubic feet (CCF) unit for reporting water use. The user can confirm this at the water meter, or with the water agency. There are 748 gallons of water in 1 CCF. Remember to turn off all other sources of water flow at the site prior to measuring manual flow rates. This includes both outdoor and indoor watering, such as toilets or clothes washers. Otherwise, your flow estimates will not be accurate. 80 | C y b e r - R a i n X C I S m a r t I r r i g a t i o n C o n t r o l l e r U s e r G u i d e Write down the initial reading. Then perform a manual run on the first zone for 5 minutes (unless the zone is a drip system, in which case 20 minutes is recommended). After the run is complete, write down the new water meter reading. Use the following instructions to calculate the zone’s flow rate (in gallons per minute): 1. 2. 3. 4. 5. Subtract the initial meter reading from the final meter reading. Multiply the result by 748 (1 CCF = 748 Gallons). Divide the result by 5 (# of minutes). Enter in the result into the Estimated GPM field on the Zone details panel. Repeat for the next zone. Cycle and Soak Cyber-Rain controllers employ a water saving feature known as Cycle and Soak. Cycle and Soak pauses the zone for a programmable duration of time to allow for the water to soak into the soil. This is especially useful for reducing the chances of water runoff on sloped ground or dense soil. This feature cycles the watering schedule on and off for dense soil or a sloped landscape to reduce water runoff. Water runoff is the wasted water that flows off saturated soil. Cycle and Soak divides the watering sessions on your schedule into alternating on (cycle) and off (soak) periods so that the soil has time to absorb the water. The zone’s cycle time and soak time can be adjusted. The total watering time will not change, but will be divided into sessions, allowing time for the soil to absorb water in between applications. The cycles will not be visually reflected on the schedule panels, but will be transmitted to your controller. To manually change the Cycle and Soak settings, go to the Zone page, then select the controller and zone that you would like to adjust. The Cycle and Soak settings can now be adjusted for that particular zone. Maximum Cycle: Refers to the maximum length of time that a zone should run for before it stops and allows time for water to be absorbed into the soil. Soak Time: Refers to the length of time that the controller should allow for the soil to absorb water before running the zone again. When Cycle and Soak times are set, the controller will water the zone for the Maximum Cycle period, and then pause the zone watering for the scheduled Soak Time. The controller will move on to the next scheduled zone’s watering interval in the meantime. Once the Soak Time has expired, the controller will again water the zone for its Maximum Cycle time, and then pause again for the scheduled Soak Time. This process will repeat until the entire scheduled watering interval is run for each zone that was scheduled. Typical Max Cycle times are in the range of 3-5 minutes, and typical Soak Times are in the range of 15-30 minutes. When the cycle and soak method is used with drip irrigation, the cycle time must be longer. The length of watering time varies depending on the type of emitter type, plant type, and soil type. The Cycle and Soak feature is automatically enabled when using the horticultural recommendations from Zone details panel on the Zone page. To disable Cycle and Soak for a particular zone, select the zone on the Zone page, and set both the Maximum Cycle time and Soak Time to 0 minutes. 81 | C y b e r - R a i n X C I S m a r t I r r i g a t i o n C o n t r o l l e r U s e r G u i d e Stats Page The Stats page shows various information regarding your system, including a detailed log and graphs showing your water usage and water savings. The Stats page has the following panels: 1. Your Sites: This panel lists all the sites are registered in your account. Clicking a different site changes the display of all other information on this page. 2. Apply Date Range: This panel allows you to change the date range that you want to use in filtering the results of the other panels below. 82 | C y b e r - R a i n X C I S m a r t I r r i g a t i o n C o n t r o l l e r U s e r G u i d e 3. Event Log: This panel shows you a detailed log of the activity of every controller in your selected site. It lists each item in date order by default, but it can be sorted by clicking any of the column names on the top of the log. It displays the date and time of the event, followed by the controller name that the event occurred on, which zone number was running at the time of the event, the type of event that occurred, the packet type, a description of the event, the value (if applicable), what the unit is of the value (if applicable) and whether the event was due to a scheduled or manual run. Typical events include: Zone Run: The zone name and the duration in seconds of the watering are shown. NORMAL CURRENT EVENT: The observed current (in milliamps) is shown. LINE FILL EVENT: Indicates the flow rate (in GPM) after the fill time is complete. ALL ZONES OFF: Occurs whenever a zone is shut off. Rain/Flow Sensor Holds: Rain sensor and flow sensor holds and the time and date they occur. 83 | C y b e r - R a i n X C I S m a r t I r r i g a t i o n C o n t r o l l e r U s e r G u i d e 4. Usage Grid: This panel shows you a detailed grid of every controller in your selected site. It lists each item in date order by default, but it can be sorted by clicking any of the column names on the top of the log. It displays the date and time, controller name, zone number, zone name, planned watering (in minutes), actual watering (in minutes), % saving, gallons used, GPM (gallons per minute – only available if a flow sensor is installed or the user has entered manual flow rates) and a check box showing whether a flow sensor is installed on that controller (Pro models only). 84 | C y b e r - R a i n X C I S m a r t I r r i g a t i o n C o n t r o l l e r U s e r G u i d e 5. Usage Summary Chart: This panel graphically represents the water used and water saved by the Cyber-Rain system. The Usage Summary Chart can display the water usage information by minutes (default) or by gallons if a flow meter is used or the flow rate is entered manually (see Manually Enter Flow Rates section). The area of the graph colored orange represents the minutes (or gallons) used, and the area in green represents the saved watering minutes/gallons. Water is considered “saved” when a zone was scheduled to run, but the runtime was reduced due to weather conditions. The usage chart can be displayed for the past week, month, or year to date. 85 | C y b e r - R a i n X C I S m a r t I r r i g a t i o n C o n t r o l l e r U s e r G u i d e 6. Zones Overview: This panel graphically shows you details about your various zones and controllers at the selected site. It can be filtered and sorted using various options, including by controllers, zones, gallons, plant types, slope types, soil types, sun exposures and sprinkler types. It shows you pictures of all zones in all controllers by default. Clicking on a zone image displays detailed information about that zone. 86 | C y b e r - R a i n X C I S m a r t I r r i g a t i o n C o n t r o l l e r U s e r G u i d e Help Page If you are experiencing technical difficulties with your Cyber-Rain system, or you are having trouble installing a new system, please feel free to use the Help page for assistance. This page contains links to the Troubleshooting Guide as an aide to diagnosing and resolving the issue, as well as other helpful information. The Troubleshooting Guide can also be downloaded from the Downloads section of the Cyber-Rain website. Please remember that the Frequently Asked Questions section of the Cyber-Rain website provides answers to the most common queries, and the Cyber-Rain Support Team can be contacted via email at [email protected], or by calling Customer Support toll free at (877) 888-1452 Monday through Friday, 9AM to 5PM Pacific Time. Thank you for choosing the Cyber-Rain Smart Sprinkler Controller! 87 | C y b e r - R a i n X C I S m a r t I r r i g a t i o n C o n t r o l l e r U s e r G u i d e