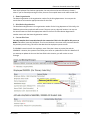
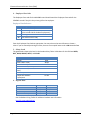
1
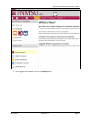
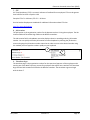
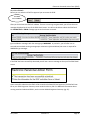
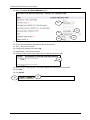
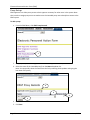
Electronic Personnel Action Forms (EPAF) Hiring Student Employees Confidential Business Information This documentation is proprietary information of Ellucian and New Mexico State University (NMSU) and is not to be copied, reproduced, lent or disposed of, nor used for any purpose other than that for which it is specifically provided without the written permission of Ellucian or NMSU. All rights reserved. The unauthorized possession, use, reproduction, distribution, display, or disclosure of this material or the information contained herein is prohibited. Ellucian, the Ellucian logo, “Banner” and the Banner logo are trademarks of Ellucian. Thirdparty hardware and software product names and trademarks are owned by their respective third-party owners/providers, and Ellucian makes no claim to such names or trademarks. Use of this material is solely for the support of Ellucian Banner products and New Mexico State University. Document Updates Version Date 1.2 11/14/2013 1.0 1.1 1.3 1.4 1.5 1.6 07/08/2013 07/16/2013 12/04/2013 11/03/2014 1/28/2015 6/24/2015 Notes Initial Version Updated recommended comments section to remove requirements Updated Co-op index to indicate “Department Indices only” Updated processing reference links Updated manual Updated Current Hire Date information in PEAEMPL section Added browser support statement (no support for IE). Table of Contents Information Non-Disclosure at NMSU .......................................................................................................... 1 What is an EPAF? .......................................................................................................................................... 2 EPAF key features ..................................................................................................................................... 2 Default values ....................................................................................................................................... 2 Lookup fields ......................................................................................................................................... 2 Field validation (error checking) ........................................................................................................... 2 How to access EPAFs ..................................................................................................................................... 3 What you should know before you begin the EPAF process .................................................................... 3 Access EPAF through my.nmsu.edu using your browser .......................................................................... 4 EPAF Categories ............................................................................................................................................ 7 Student – Hire/Rehire, HSHIR ................................................................................................................... 7 Creating a new HSHIR EPAF .................................................................................................................. 7 How to determine the query date ........................................................................................................ 8 Position Selection Screen ...................................................................................................................... 8 Employee PEAEMPL ............................................................................................................................ 10 Activate Hire/Rehire NBAJOBS............................................................................................................ 12 Labor Distribution Section .................................................................................................................. 16 Routing Queue Section ....................................................................................................................... 19 Save then Submit ................................................................................................................................ 21 Move an employee from work-study to regular funding ....................................................................... 22 Originator Summary.................................................................................................................................... 25 Sorting the transaction list ...................................................................................................................... 25 Viewing comments and warnings ........................................................................................................... 25 Search Transactions ................................................................................................................................ 26 Current tab .............................................................................................................................................. 27 Transaction status ................................................................................................................................... 27 Edit a saved EPAF ................................................................................................................................ 28 Delete the EPAF .................................................................................................................................. 28 History tab............................................................................................................................................... 29 Return the EPAF for correction ........................................................................................................... 29 Void the EPAF ...................................................................................................................................... 29 Default Routing Queue ............................................................................................................................... 30 Set the default routing queue ................................................................................................................. 30 EPAF Approvals ........................................................................................................................................... 31 EPAF Approver Summary ........................................................................................................................ 31 Viewing pending approvals ................................................................................................................. 31 Important checks for approvers ............................................................................................................. 32 Return an EPAF for correction ............................................................................................................ 32 Approving an EPAF transaction........................................................................................................... 32 Filter Transactions................................................................................................................................... 33 Proxy Set-up ............................................................................................................................................ 34 Act as a Proxy .......................................................................................................................................... 36 Glossary of common terms ......................................................................................................................... 37 This Page Intentionally Left Blank Electronic Personnel Action Form (EPAF) Information Non-Disclosure at NMSU New Mexico State University maintains the confidentiality and security of records in compliance with the Family Educational Rights and Privacy Act of 1974 (FERPA), the Health Insurance Portability and Accountability Act (HIPPA), and the Gramm-Leach-Bliley Act GLBA), in addition to other federal and state laws. These laws pertain to the security and privacy of personal academic, medical and financial information, along with identifying information such as social security numbers. Family Educational Rights and Privacy Act of 1974 (FERPA) Policy: http://research.nmsu.edu/compliance/IRB/resources.html#3 FERPA protects students’ records. FERPA requires post-secondary educational institutions and agencies to conform to fair information practices in their handling of student data. Among the provisions of the act are the requirements that data be used only for intended purposes and that those responsible for student data take reasonable precautions to prevent misuse of it. Examples include Social Security Numbers, grades, date of birth, etc. Health Information and Portability Accountability Act (HIPAA): http://research.nmsu.edu/compliance/IRB/resources.html#7 HIPPA protects all medical records and other individually identifiable health information used or disclosed in any form, whether electronically, on paper, or orally. Gramm-Leach-Bliley (GLB) Act: http://www.nmsu.edu/manual/documents/07-29-09-policy-manual-final020110.pdf GLBA protects private, non-public information of individuals. Private, non-public information consists of information such as name, Social Security Number, date and location of birth, gender, credit card numbers and driver’s license numbers. Within NMSU, employees are authorized access to University records only to the extent necessary to perform their official university duties, and are responsible for protecting such information against unauthorized access or disclosure. The New Mexico State University Policy Manual, Chapter 2 General Operating Policies, Section 2.90 contains specific information related to disclosure of records and information. Examples in this manual may have personal data altered or blacked out to ensure privacy. June, 2015 Version 1.6 Page 1 Electronic Personnel Action Form (EPAF) What is an EPAF? An Electronic Personnel Action Form (EPAF) is used to originate electronic documents needed to process personnel actions, such as hiring transactions and changes to existing job data. EPAF is a Banner module that was designed to accommodate a more efficient approval signature process for centralized and decentralized HR operations or actions. It improves and simplifies the process for completing and approving a wide range of Personnel Action Forms (PAFs) for all employee types. EPAF actions are originated electronically by the various departments within the university to communicate employment decisions about their employees to the HR and Payroll department. They are then electronically routed to the appropriate approvers. Once approved, they are applied to Banner directly by a central process. EPAF is fully electronic (Web-based) and EPAF actions can be created and routed using Banner Employee Self-services (ESS) which is accessible through myNMSU. Access to EPAF is not granted to all NMSU employees; it is only for those employees who have been designated in the system as EPAF originators and/or approvers. The type of EPAF you create depends on the change you are making. Additional EPAFs will become available in the system as they are developed. The different types of EPAFs are classified as “Approval Categories”. In addition to general functions of EPAF, this document describes how to process student employee hiring actions in the HSHIR Approval Category. EPAF key features Default values The EPAF system populates default field values based on the EPAF category selected as well as information obtained from Banner, such as previous job and employee record information. Most default values can be changed if needed, however some values are automatically populated and cannot be changed. Fields that cannot be changed are indicated as not enterable next to the field label. Default values are a benefit because they save time when completing EPAFs for the most common types of transactions. Lookup fields Lookup fields are used to search and select appropriate values for a field. EPAF integrates with Banner data in order to help find a variety of values, such as values related to employees, organizations, and positions. Lookup fields are indicated by a magnifying glass icon . Field validation (error checking) EPAF uses a two stage validation check that examines entered values to determine if the values are valid given information about the transaction that you have provided. For example, EPAF validates effective and personnel dates based on the job change reason you have selected. Page 2 Version 1.6 June, 2015 Electronic Personnel Action Form (EPAF) If an EPAF transaction fails validation a message will display indicating the details about the failed validation and how to resolve the issue. There are three types of validation messages, Error messages, Validation messages and Warning messages. Validation messages indicated as ERROR or VALIDATION must be corrected in order to submit the EPAF for approval. Validation messages indicated as WARNING should be noted; however you may submit the EPAF for approval if a warning message exists. An error will prevent you from submitting the EPAF until the error is corrected, but you can still save the EPAF if errors are present. How to access EPAFs What you should know before you begin the EPAF process As you begin an EPAF the system will require specific information about the transaction that you should gather ahead of attempting to originate an EPAF. Specifically, you should know the following details about the transaction, or obtain this information, before you create a new EPAF. • • • AggieID (ex. 800XXXXXX) of the person to be hired * Personnel date of the person to be hired (the date the person will report to work) The position number for the position that will be filled * If the person you are hiring does not have an AggieID or they have never worked for the university, please complete the New Hire form on the HRS Web site (http://hr.nmsu.edu/managers/newhire/). Access is required to use the EPAF system. Please download, complete, and route the security form to gain access to the system: http://af.nmsu.edu/forms/ Some job aids and tools will also help: Processing Toolkit – The Processing Toolkit is a collection of resources that provides details about hiring student employees, including information about regular and work-study employment processing using EPAF. http://hr.nmsu.edu/toolkits/ Work-study Resources – Provides information about Federal, State and Crimson Scholar Work-study Programs at NMSU. Work-study Handbook: http://fa.nmsu.edu/work-study/handbook/ Work-study Employer Responsibilities: http://fa.nmsu.edu/work-study/employers/ June, 2015 Version 1.6 Page 3 Electronic Personnel Action Form (EPAF) Access EPAF through my.nmsu.edu using your browser Please Note: Internet Explorer is not support. We recommend alternate browsers such as the latest versions of Mozilla Firefox, Google Chrome, or Apple Safari. The EPAF system is accessible through myNMSU. The myNMSU portal allows you to use a single user name and password to access many of the electronic services at NMSU. 1 2 https://my.nmsu.edu 1. Enter your NMSU User Name and Password. 2. Click on the Login button. Page 4 Version 1.6 June, 2015 Electronic Personnel Action Form (EPAF) 3 3. Once logged into myNMSU, click on the Employee tab. June, 2015 Version 1.6 Page 5 Electronic Personnel Action Form (EPAF) 4 4. Click on Employee to open Self-Service Banner in a new window or tab. 5 5. Select Electronic Personnel Action Forms. Page 6 Version 1.6 June, 2015 Electronic Personnel Action Form (EPAF) EPAF Categories Categories are used to select specific data entry forms related to the personnel action you want to perform. In the following section we detail the Student – Hire/Rehire, HSHIR category, describing each field that is available on the form including a basic description of acceptable values and relevant examples. Student – Hire/Rehire, HSHIR This section describes the process of completing a Student – Hire/Rehire, HSHIR approval category to hire a Regular and Work-study students. Creating a new HSHIR EPAF 1 1. From the Electronic Personnel Action Form screen, click New EPAF. 2 3 4 5 2. Enter the Banner ID of the employee that will be affected by the EPAF transaction. • You can do a search for the Banner ID by clicking on the magnifying glass. Employees can be looked up using their first and last names, Banner IDs and/or SSNs. 3. Enter the Query Date (defaults to today’s date). See the section labeled “How to determine the query date” for additional details about how to select the appropriate query date for the transaction. June, 2015 Version 1.6 Page 7 Electronic Personnel Action Form (EPAF) 4. Select the Approval Category as appropriate. In this case we are creating a Student – Hire/Rehire, HSHIR EPAF. 5. Click Go. How to determine the query date The query date is used to find jobs and display the job status for each job as of the query date entered. The query date is also used to default values on the EPAF detail screen. Caution: The query date defaults to the current date and this may not always be what you want. The query date must be earlier than or equal to the effective date for the job. To ensure that the query date is earlier than the effective date, select the first day of the month for which the employee will be hired. For example, if an employee will begin work on 11/15/2014, set the query date to 11/01/2014. Position Selection Screen On the position selection screen, you determine the position number and suffix for the action. 1 2 3 1. Select a position number Before you begin the EPAF process you must first know the position number you will be affecting with the EPAF transaction. Student positions are hired using a single pooled position number: 999992 Note: The University has moved to a single pooled position number, effective with the EPAF implementation, which will be utilized for all regular, work-study and Co-Op student employment. Do not use previous student hire position numbers. 2. Click All Jobs and select a position suffix Specifying the correct position suffix is important because it helps to maintain a clear employment history for the employee records in Banner. The position suffix is a two digit alphanumeric code that uniquely identifies the position into which the employee will be hired. First, you’ll want to determine if you are re-hiring an employee for a position in your department or if you are hiring an employee for a position in your department for the first time by examining the job history. Click All Jobs to see the complete job history. Page 8 Version 1.6 June, 2015 Electronic Personnel Action Form (EPAF) Has the employee ever been hired at NMSU using this position number according to their job history? If No, enter suffix 00. If Yes, is the employee being rehired using the exact same organization number? • • If No, increase the highest suffix number by 1. If Yes, do the payroll effective dates for the new job overlap with the payroll effective dates for the active/terminated job? Yes: increase the highest suffix by one No: Reuse the suffix of the most recently used position number 3. Click Go 4. Click Save. Click save will populate the PEAEMPL section with information if a PEAEMPL record exists for this person. Also, clicking save will populate the NBAJOBS section with current information from Banner if the position that you are filling is a rehire in your department. This is important because you’ll need this information to determine your next steps. Remember to click Save before continuing to complete the EPAF form. 4 June, 2015 Version 1.6 Page 9 Electronic Personnel Action Form (EPAF) Employee PEAEMPL Each employee has only one PEAEMPL record, even if they have more than one job. In order to maintain consistent information for employees that are being rehired or have more than one position, PEAEMPL should only be updated completely if this is the first job for this person at NMSU and it is only updated partially if the job will be the primary job for this person (i.e. they have no active jobs). If you are filling a position as a secondary or overload job because the employee already has current active jobs, leave the entire PEAEMPL blank and you should continue on to the NBAJOBS section of the form. The current information in this section populates PEAEMPL with information provided from Banner. If you can’t see the current values for the PEAEMPL record you lack the necessary security to view the record details or no current PEAEMPL exists for this person. Completing the PEAEMPL section for primary jobs 1. Employee Class Code The Employee Class is the most powerful rule from within Banner HR, and its attributes “trickle down” to many other areas of the system. The Employee Class is assigned to the Position Class (NTRPCLS), which is then assigned to the Position (NBAPOSN/NBAPBUD), which is then assigned to the Job (NBAJOBS). It establishes earnings codes, leave and benefit categories, FT/PT Status, Pay ID, time entry method, and Pay (salary/hourly) indicator. Employee Class Reference Code Description SW Student Work-study SR Student Regular (this includes CO-OP Student Employment) S7 PSL Regular Student S8 PSL Student Work-study Page 10 Version 1.6 June, 2015 Electronic Personnel Action Form (EPAF) Enter the Employee Class Code as appropriate. You may also use the search feature to locate a value. If you are manually entering the value, be sure to use capital letters such as S7 instead of s7. 2. Home Organization The Home Organization is the organization number for the hiring department. You may use the search feature to locate the appropriate value for this field. 3. Distribution Organization The Distribution Organization is the organization number for the hiring department. Technically, this field determines where paychecks will be sent if they are sent to a physical location. You may use the search feature to locate the appropriate value for this field. The Distribution Organization number must match the Home Organization number. 4. Current Hire Date You only complete the Current Hire Date for the transaction if this is the first job for this person at NMSU. Otherwise, leave this field blank. The Current Hire date is the same as the personnel date for the position you are hiring. This will be the date that the employee reports to work. If a PEAEMPL record exists for the employee, even if they don’t have any active jobs and the PEAEMPLE is inactive, the system will not allow you to enter or update the Current Hire Date field. If you attempt to update the Current Hire Date field in this situation, you will receive an error message. June, 2015 Version 1.6 Page 11 Electronic Personnel Action Form (EPAF) Remember: The PEAEMPL section should only be completed if the position will be the primary job for the employee. Leave the Current Hire Date blank, unless this is the first job for this person at NMSU. If secondary or overload job, leave All PEAEMPL fields blank. Activate Hire/Rehire NBAJOBS 1 2 3 4 5 6 7 0 1. Contract Type The contract type is used to specify if the position that is being filled is a primary, secondary, or overload job for the employee to be hired. Primary – The primary job is the employee’s primary function and employing department. An employee can only have one primary job at a time and if they have more than one job, one must be designated as the primary. The primary job determines the type of benefits the employee is eligible for, how the employee is reported, how they are listed in the online phonebook, and where pay checks will be sent, etc. Secondary – A job the employee will be working in addition to their primary job. In order to determine the contract type you need to collect information about the employee’s job history. If an employee currently has no active jobs you can specify Primary as the contract type. If an employee currently has an active job you may specify secondary. Page 12 Version 1.6 June, 2015 Electronic Personnel Action Form (EPAF) If the EPAF is submitted as a primary contract type and the employee currently has a primary job, a validation error message will display indicating that the person already has a primary job. In this case choose secondary contract type and clear all values from the PEAEMPL section to pass the validation check. 2. Personnel Date This is the date that the employee reports to work for this position. The value entered for the Personnel date will be used to determine the Job Begin Date and Job Effective Date. Reference the processing tools for acceptable values for academic term hires: http://hr.nmsu.edu/toolkits/ 3. Title The title automatically defaults to Student Aide. In the drop down menu, select the preferred title. Note: This field is not validated. Please take care when entering a title to ensure consistency and correct spelling. Use the exact title that best matches the description of the employee’s duties. Title Student Aide Student Assistant Student Co-Op Student Grad Spec Student Server Tipped June, 2015 Description Student employees whose duties are primarily clerical, labor, or service– worker functions and who usually are not required to bring experience or expertise to the job. These individuals do not supervise the work of others. Student employees, whose duties are of a technical and/or professional nature and entail significant responsibility, possibly including the supervision over work of others. Typically a specific expertise and/or previous experience will be required for a Student Assistant position. Student employees whose duties meet the standards for cooperative education as prescribed by the New Mexico Commission on Higher Education, Cooperative Education Network. “Cooperative Education (Coop) is a formalized program, under the direction of a post-secondary institution, to optimize learning in an alternate setting. Cooperative Education provides experience-based learning for college students through paid employment in practical, curriculum-related work assignments structured to meet students’ interests, abilities, and aptitudes while meeting employers’ needs.” Each term, co-op assignments must be approved by, and students enrolled with, the appropriate Cooperative Education Program office (i.e., the Co-op Office on the main or branch campus that offers the student’s major). Graduate student employees whose duties are of a technical and/or professional nature similar to those performed by Graduate Assistants (e.g., Teaching Assistants, Research Assistants, etc.). Graduate Specialists generally will be paid hourly at rates of pay equivalent to those of Graduate Assistants, as determined by the Graduate School Dean. Restaurant (Fulton Center/Golf Course) server/beverage cart. Compensation includes earning tips. Version 1.6 Page 13 Electronic Personnel Action Form (EPAF) 4. Employee Class Code The Employee Class code for the NBAJOBS record should match the Employee Class code for the PEAEMPL record if the job is the primary job for the employee. Employee Class Reference Code Description SW Student Work-study SR Student Regular (this includes CO-OP Student Employment) S7 PSL Regular Student S8 PSL Student Work-study Enter the Employee Class Code as appropriate. You may also use the search feature to locate a value. If you are manually entering the value, be sure to use capital letters such as SW instead of sw. 5. Salary Grade The grade levels relate to the level in the Student Salary Table. Valid values for this field are WFED, WST, WCIN, WCOUT, WTUT, and CO-OP. Classification Regular Federal Work-study State Work-study Crimson Scholar (In-state) Crimson Scholar (Out-ofstate) Work-study Tutor Cooperative Student Employment Grade REG WFED WST WCIN WCOUT WTUT CO-OP 6. Regular Rate Classification Student Aide Student Assistant Student Co-op Student Graduate Specialist Minimum $7.50 $7.63 $7.50 $7.50 Maximum $8.80 $10.92 $15.77 $15.77 See the Student Hiring Toolkit for additional student rate information http://hr.nmsu.edu/toolkits/ Page 14 Version 1.6 June, 2015 Electronic Personnel Action Form (EPAF) 7. FTE Full Time Equivalency (FTE) is a numeric indicator of workload for an employee. FTE must be greater than 0.00 but less than or equal to 1.00 Example: FTE of 1 = 40 hours; FTE of .5 = 20 hours See the Student Employment Handbook for additional information about FTE rules. http://hr.nmsu.edu/toolkits/ 8. Job Location The job location is the organization number for the department that is hiring the employee. The Job Location field and Timesheet Orgn field must be different numbers. The Job Location field is a dropdown menu that displays values in ascending order by job location number. You can quickly select the job location from the dropdown by selecting the job location menu and typing the job location number. Note that in order to move to the desired number using this method you must type the number rapidly on your keyboard. 8 9 9. Timesheet Orgn The timesheet orgn is the organization number for the supervisor/approver of the employee and is used as part of the Web Time entry process for employees that report hours worked. The Timesheet Orgn field and Job Location field must be the different numbers. The timesheet orgn must begin with the letter T. June, 2015 Version 1.6 Page 15 Electronic Personnel Action Form (EPAF) Labor Distribution Section The labor distribution section populates with information from Banner regarding the funding for this position. For rehires you may need to simply verify that the information is correct, however in other cases the index number or distribution percentages may need to be changed. Labor Distribution Effective Date The effective date for the labor distribution is initially defaulted to the query date that you selected when the EPAF was created. When the NBAJOBS Hire/Re-hire section is completed the Labor Distribution Effective Date will automatically change to the job effective date. If the query date for the EPAF is later than the desired labor distribution effective date an error will occur and you’ll need to delete the current EPAF and start a new transaction. Page 16 Version 1.6 June, 2015 Electronic Personnel Action Form (EPAF) Index and Account Code If you are rehiring the employee for a position within the same department the index number for the labor distribution will automatically populate with the previously used index number. If this is a new hire for your department a default index number will be automatically populated into the index number field. You cannot submit the transaction with the default index number for your department so an appropriate index to fund this position should be selected. In any event, you should always verify that the index number is the correct funding source for the position, whether the transaction is for a new hire or a rehire. Student Employment Type Work-study Index Federal Work-study 103517 Account Funding Distribution* 618200 103553 Department index pays 30% Work-study index pays 70% 618400 Contact Honors College Department index pays 30% Work-study index pays 70% 618500 108195 Department index pays 50% Crimson Scholar index pays 50% 618700 Tutor America Reads Program 119525 Department index pays 50% Crimson Scholar index pays 50% 618100 Co-op Department Indices only Tutor index pays 100% 618100 Regular Department Indices only Co-op index pays 100% 618100 State Work-study Crimson Scholar (In State) Crimson Scholar (Out-of-state) Department pays 100% * All indices used in the Labor Distribution section should use the same account code June, 2015 Version 1.6 Page 17 Electronic Personnel Action Form (EPAF) Changing an Index If you need to change the index number, follow these steps: 1. Enter the new index number in the index number field. 2. Click the Default from index button. a. The page will reload and an error will indicate that an account code is required. 3. Key in the account code into the Account field. 4. Click Save and add new row. Adding an Index In some cases the position may be funded by more than one funding source. If you need to add another index number to the labor distribution, follow these steps: 1. Place a capital N in the COA column of the next blank row. 2. Enter the new index number in the index number field on the next row of the labor distribution list. 3. Click the Default from index button. 4. Enter the account code number as appropriate. 5. Click Save and add new row. Changing the labor distribution percentage If the position is funded by more than one index number you can change the percentage that each index will pay out for the position. If you need to change the labor distribution percentages for the position, follow these steps: 1. Enter the percent to be distributed in the Percent field for the first index. Note: You must enter a whole number. For example, use 50 to indicate 50%, not .5 2. Enter the percent to be distributed in the Percent field for the second index. Additional indexes may be added to the labor distribution and the percentage should be indicated for each index. The total of all distributions must equal 100%. 3. Click Save and add new row. Remove an Index In some cases you may need to remove an index number used to fund a position. You only need to remove indexes if more than one index was used in the past and the additional index is not needed. If you need to change the index, follow the procedure for changing an index as described on page 18. If you need to remove an index from the labor distribution, follow these steps: 1. Click the Remove checkbox associated with the index row that you would like to remove. 1 2. Click Save and add new row. Page 18 Version 1.6 June, 2015 Electronic Personnel Action Form (EPAF) Routing Queue Section The routing queue specifies the approval levels and approvers for the EPAF transaction. You can default the routing queue used for each EPAF Category to specify the approvers used for future transactions. If you set-up the default routing queue you can still specify different approvers if necessary for each transaction. See the Default Routing Queue section (pg. 31) for additional details. All EPAF’s have a minimum of two levels of approvals: Dean/VP and Payroll. The Payroll level does not approve or review the transaction in any way, rather the Payroll level simply loads the EPAF records into Banner. Only the approver selected for the Dean/VP level will review and approve the transaction. 1. Enter the User Name for each level of approver a. The search function can be used by clicking on the magnifying glass to the left of user name b. For the Payroll approval level you may select any available approver on the search screen 2. Click Save and Add New Rows button to save your changes and populate the name of the approver June, 2015 Version 1.6 Page 19 Electronic Personnel Action Form (EPAF) Comment Originators add comments to the EPAF in order to provide additional information about the transaction that is not otherwise recorded in the submission form. The comments will be saved with the EPAF transaction and will be reviewed by EPAF approvers at the Dean/VP approval level. Both originators and approvers will be able to see the comments in the originator or approval summary screens respectively. Adding comments to an EPAF You can add multiple comments to an EPAF transaction; however comments cannot be deleted once the form is saved. If the EPAF has already been saved with comments the comment contents will not display in the comment field. In order to see previously saved comments click the note button next to the comment field. Notes button Comments may also be added to an EPAF by approvers. If an EPAF is returned for correction, the approver comments will provide information about why the EPAF was returned. See the section titled Viewing Comments and Warnings (pg. 26) for additional information about viewing EPAF comments. Note: Comments cannot be deleted. Page 20 Version 1.6 June, 2015 Electronic Personnel Action Form (EPAF) Save then Submit Before you can submit an EPAF for approval you must save the EPAF. Click Save before Submit! After you click submit the EPAF will validate. If errors or warnings are generated, you will see the error messages displayed at the top of the EPAF detail screen. You will not be able to submit the EPAF until the VALIDATION or ERROR message type errors have been corrected. Ignore validation messages with the message type WARNING. In particular, you will often see an encumbrance method warning message upon submission (pictured below). No action is required for WARNING type messages. If the EPAF has been successfully submitted you will see a success message at the top of the EPAF detail screen. Upon successful submission the EPAF will be routed to the Dean/VP level approver. The EPAF will now be on your EPAF Originator Summary screen under the History tab. For additional information about viewing saved and submitted EPAFs, see the section labeled Originator Summary (pg. 25). June, 2015 Version 1.6 Page 21 Electronic Personnel Action Form (EPAF) Move an employee from work-study to regular funding It is the responsibility of the employer to ensure the student’s earnings do not exceed the work-study award for the Academic Year. IF EARNINGS EXCEED THE AWARD, THE EMPLOYER MUST PAY 100% OF THE OVERAGE. Work-study awards are subject to revision, increase or decrease because of changes to a student’s situation, and/or availability of funding. If a student depletes his/her work-study funds, any overage that may have occurred will be billed to their hiring department. The HSHIR EPAF can be used to change the funding source for a position from work-study funding to regular department funding in such situations. The procedure detailed below describes the process of changing the funding source for an existing student job from work-study funding to regular funding. 1. From the EPAF Main Menu, click New EPAF 1 2. Enter the employee’s Aggie ID number 2 3 4 5 3. Enter the 1st day of the month for the employee’s effective start date. 4. Choose the Student – Hire/Rehire ,HSHIR approval category. 5. Click Go Page 22 Version 1.6 June, 2015 Electronic Personnel Action Form (EPAF) 6. From the Job Selection screen, locate the current job that you would like to modify. Note the position number and suffix used for this job. 7 8 6 7. Key in the position number and position suffix for the job that you would like to modify. 8. Click Go 9. Click Save 9 June, 2015 Version 1.6 Page 23 Electronic Personnel Action Form (EPAF) 10. Skip to the Active Hire/Rehire NBAJOBS section 11 12 13 15 11. 12. 13. 14. 15. 16. 14 Set the Contract Type to Secondary. Set the Personnel Date to the effective date of the new job Title = Use the current value Change the Employee Class Code to SR Regular Rate = Use the current value Remove the Work-study labor index from the Labor Distribution section 16 17. Make sure the remaining labor distribution department indices sum to equal 100% 18. Click Save 19. Click Submit 18 Page 24 19 Version 1.6 June, 2015 Electronic Personnel Action Form (EPAF) Originator Summary The originator summary displays EPAF transaction information for EPAFs that have been submitted for approval or saved. The list only includes transactions that you have submitted. Transactions by other departments or other originators in your department will not display in this list. Sorting the transaction list You can sort the EPAF transaction list by column heading. Click the arrows in the column to be sorted in order to sort the transactions. 1 2 1. Click the up arrow to sort the column in ascending order. 2. Click the down arrow to sort the column in descending order. Note: You can only sort by one column at a time; you cannot sort using multiple columns simultaneously. Viewing comments and warnings You can view the comments and warnings recorded for an EPAF by selecting the link Comments or Warnings from the list of EPAF transactions. This option will display all comments that were created by either the originator or approver. June, 2015 Version 1.6 Page 25 Electronic Personnel Action Form (EPAF) Search Transactions You can search for transactions if you know the first name, last name, or ID of the person that is affected by the transaction. You can also search by transaction number and limit the number of results displayed per page. Note: You will only be able to see EPAFs that you have originated or EPAFs that have been routed to you for approval. To search for transactions: 1. From the EPAF menu, click either EPAF Approver Summary or EPAF Originator Summary. 2. Click Search The EPAF search screen displays. 3. Search using information about the person being affected by the EPAF by typing their name or ID in the fields as indicated. You may also search using the EPAF transaction number if the transaction number is known. 4. Click Go An EPAF search results screen will display showing all transactions that match your search criteria. 5. You can view the transaction detail for a transaction by clicking on the employee name. Page 26 Version 1.6 June, 2015 Electronic Personnel Action Form (EPAF) Current tab The current tab displays EPAF transactions that are saved or returned for correction. Transaction status Status Waiting Pending Return for Correction Approved Complete Disapproved Void Canceled June, 2015 Description This status indicates that the transaction is in the process of being created and has not been submitted to the approval queue. Indicates that the transaction requires positive action by the approver(s). The transaction remains at this status until action is taken by the person required to take action on the transaction. This status indicates that an EPAF has been returned for correction by the originator or the approver. The transaction status is approved for the person when all the person(s) defined in the approval queue have approved the transaction. The transaction remains at this status until the person defined in the queue with apply privileges applies the transaction to the database. The transaction status becomes Complete after the transaction has been applied to the database. The transaction has been disapproved by a person defined in the approval queue. The individuals defined after them in the approval queue can no longer need to take action on the item. The originator or superuser has voided the transaction. It is no longer a valid transaction. The originator or superuser may void the transaction at any time during the approval process. The originator or superuser are the only people that can void the original transaction. This status will be used when you opt to cancel an entire transaction after it has been applied to the database. Cancelling a transaction after it has been applied will have no effect on the transaction in Banner. Version 1.6 Page 27 Electronic Personnel Action Form (EPAF) Edit a saved EPAF After the EPAF is saved it becomes available on the current tab of the EPAF originator summary. To edit a saved EPAF: 1. From the EPAF menu, click EPAF Originator Summary The Current tab displays 2. Locate the transaction in the list If you have several EPAFs you can sort, filter, or search for the transaction that you want to find. 3. Click on the name of the employee or transaction ID for the EPAF you want to edit. The EPAF detail screen will open in preview mode (read only) 4. Click Update to edit the EPAF transaction. Delete the EPAF EPAFs that have been saved and have not been submitted for approval can be deleted. Once an EPAF is deleted it is permanently removed and it will not appear on the originator summary screen. To delete an EPAF: 1. From the EPAF menu, click EPAF Originator Summary The Current tab displays 2. Locate the transaction in the list If you have several EPAFs you can sort, filter, or search for the transaction that you want to find. 3. Click on the name of the employee or transaction ID for the EPAF you want to delete. The EPAF detail screen will open in preview mode (read only) 4. Click Delete to delete the EPAF transaction permanently. Note: You cannot delete an EPAF if it has been submitted for approval. Only saved EPAFs can be deleted. In order to otherwise make a submitted EPAF inactive you should void the EPAF, which may require that you return the transaction for correction to yourself. For additional information about returning EPAFs for correction and voiding transactions, please see the History tab section below. Page 28 Version 1.6 June, 2015 Electronic Personnel Action Form (EPAF) History tab The history tab displays EPAF transactions that have been submitted for approval. In addition, EPAFs that have been voided will also appear under the history tab. Return the EPAF for correction An originator can return an EPAF for correction after it has been submitted for approval in order to make updates or to void the transaction. Once the EPAF has been returned for correction it will move to the Current tab of the originator summary screen. Note: You can only act on EPAFs that you have originated. To return an EPAF for correction: 1. From the EPAF menu, click EPAF Originator Summary The Current tab displays 2. Click the History tab 3. Locate the transaction in the list If you have several EPAFs you can sort or search for the transaction that you want to find. 4. Click on the name of the employee for the EPAF you want to return for correction. The EPAF detail screen will open in preview mode (read only) 5. Click Return for Correction to move the EPAF back to your current tab. Void the EPAF EPAFs that have been saved or have been submitted for approval can be voided by the originator. Once an EPAF has been voided it will remain on the EPAF originator summary screen under the History tab. 1. From the EPAF menu, click EPAF Originator Summary The Current tab displays 2. Locate the transaction in the list If you have several EPAFs you can sort or search for the transaction that you want to find. 3. Click on the name of the employee for the EPAF you want to void. The EPAF detail screen will open in preview mode (read only) 4. Click Void to remove the EPAF from approval queues and move the transaction to the history tab. June, 2015 Version 1.6 Page 29 Electronic Personnel Action Form (EPAF) Default Routing Queue Default routing queues can be set-up by approval category. Mandatory levels are set-up automatically but you can manually populate the Dean/VP approval user and the Payroll approval user. Default routing queues are available for each EPAF approval category. If you use more than one EPAF approval category you need to set the defaults for each category used. Set the default routing queue 3 4 5 6 1. From the EPAF Menu, click EPAF Originator Summary 2. Click Default Routing Queue 3. From the Approval Category drop-down list, select the approval category for which the routing queue defaults will be set. 4. Click Go. Different approval categories may have different approval levels and required actions which will be pre-populated into the approval level field and required action field respectively. For each approval level you will select a user that will be the default value every time you use the approval category. Note: Approvers at various levels can be changed on a case-by-case basis as you are submitting the EPAF, even if a default exists. 5. Use the magnifying glass icon to select the user to populate in the approval level field. 6. Click Save and Add New Rows. Repeat the process for each approval category where you would like to set default values. Page 30 Version 1.6 June, 2015 Electronic Personnel Action Form (EPAF) EPAF Approvals Approval processing begins when an EPAF is submitted. The transaction will appear under the approvers EPAF Approver Summary in Self Service Banner (SSB). Approvers act to validate and approve all EPAF transactions based on the approval queue that is required for the personal action that is being originated. The approval queue is specified by the originator when the EPAF is created during the origination process. Banner EPAF does not generate email notifications when EPAF transactions are pending. Approvers must check their approval queue periodically. EPAF Approver Summary Viewing pending approvals 1. From the EPAF menu, click EPAF Approver Summary The Current tab displays with a list of transactions awaiting your approval. 2. Locate the transaction in the list that you want to evaluate If you have several EPAFs you can sort, filter, or search for the transaction that you want to find. 3. Click on the name of the employee or transaction ID for the EPAF you want to evaluate. The EPAF detail screen will open in preview mode (read only) June, 2015 Version 1.6 Page 31 Electronic Personnel Action Form (EPAF) Important checks for approvers Listed below are some important manual checks that you’ll need to perform for each EPAF transaction. Labor Distribution Section Index number Confirm that the correct index number is being used to fund the position. Account Confirm that the correct account is being used for this type of expenditure. Comments Comments are added to the EPAF transaction by the Originator when the EPAF is created. Originators use the comments section to include additional information about the transaction not otherwise recorded in the available form fields. Examine the comments to determine if sufficient information is provided in order to approve the transaction. Return an EPAF for correction If the EPAF transaction lacks required details or contains errors you can return the EPAF for correction to the originator of the EPAF. To return the EPAF for correction: 1. From EPAF approver preview screen, click Add Comment. 2. Add comments to the transaction with sufficient information that would enable the originator to identify and correct the error or omission in the EPAF transaction. 3. Click Save to save the comments. 4. Click Return for Correction to return the EPAF to the Originator. Approving an EPAF transaction If the EPAF transaction contains all required details and no errors are found you can approve the transaction in order to move the transaction to the Apply transaction status. To approve the EPAF transaction, from EPAF approver preview screen, click Approve. Page 32 Version 1.6 June, 2015 Electronic Personnel Action Form (EPAF) Filter Transactions Filters apply to both the current and history tabs. Filters allow you to view only those records that meet your filter parameters directly through your Originator or Approver Summary screens. You can filter transactions by date and choose the number of records to display per page. 2 3 4 5 To add a filter: 1. From the EPAF Menu, click Act as a Proxy. 2. Set the submitted from date as appropriate to limit returned results in your summary screen that are greater than the date entered. 3. Set the submitted to date as appropriate to limit returned results in your summary screen that are less than the date entered. 4. Set the number of results to display per page by selecting an option from the transactions per page drop-down list. 5. Click Go Once a filter is applied it will remain until you remove the filter. To remove a filter: 1. From the EPAF Menu, click Act as Proxy. 2. Clear all date fields in the filter screen. 3. Click Go June, 2015 Version 1.6 Page 33 Electronic Personnel Action Form (EPAF) Proxy Set-up EPAF approvers can allow proxy access to their approver summary for other users in the system. Note that in order to assign proxy access to another user the intended proxy must already have access to the EPAF system. To add a proxy: 1. From the EPAF Menu, click EPAF Proxy Records. 1 2. As appropriate, choose the Approval Level from the approval level dropdown list. 3. Select the name of the intended proxy from the Name dropdown list. Note: You can quickly select the name from the list by selecting the dropdown and typing the last name of the proxy. 2 3 4 5 4. Click the Add checkbox. 5. Click Save. Page 34 Version 1.6 June, 2015 Electronic Personnel Action Form (EPAF) 2 3 4 To remove a proxy: 1. 2. 3. 4. From the EPAF Menu, click EPAF Proxy Records. As appropriate, choose the Approval Level from the approval level dropdown list. Click the Remove checkbox next to the name of the user whose access should be removed. Click Save. June, 2015 Version 1.6 Page 35 Electronic Personnel Action Form (EPAF) Act as a Proxy If you have been assigned proxy access by another user you can view the approver summary for that user and act on their behalf. 2 3 To act as a proxy: 1. From the EPAF Menu, click Act as a Proxy. 2. From the Proxy For dropdown list, choose the user from the list of users. 3. Click Go. Note: Your Proxy access will be enabled for the entire session. Any actions taken by you when acting as Proxy will be recorded under your name, not the name of the proxy. Proxy access simply allows you to view information available under another user’s approver summary. Proxy access does not grant additional security. Page 36 Version 1.6 June, 2015 Electronic Personnel Action Form (EPAF) Glossary of common terms Approval Category Approval Level Approval Type Approver Effective Date Originator Personnel Date Query Date Queue Status Transaction Transaction Status June, 2015 Refers to the name of the EPAF and its purpose. It must contain one approval type at the least. Refers to a step in the approval hierarchy through which the transaction must go through before applying changes to the database. Refers to the type of actions requested on the EPAF form. Every approval type shows on the form as a separate section. Examples of such types are the Job Details Information and the Job Labor Distribution types or sections. Any user designated as part of the approval hierarchy to approve or reject an EPAF. The payroll effective date of the action. This date cannot be before the last paid date. If the real action date is prior to this date, you must enter the next day. The user initiating and submitting the EPAF transaction. The date the action is effective; the true effective date. The first date of the month when the employee will report to work. Refers to the status of the transaction with regard to an individual defined in the routing queue. Refers to the whole approval process from the moment it was initiated by the originator to the moment when changes are applied to the database. Refers to the status of the EPAF transaction as a whole. Version 1.6 Page 37