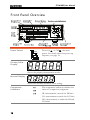
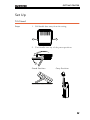
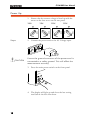
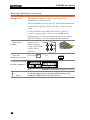
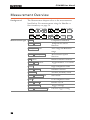
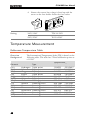
1
D.C. Milli-Ohm Meter GOM-802 USER MANUAL GW INSTEK PART NO. 82OM-80200MD1 ISO-9001 CERTIFIED MANUFACTURER This manual contains proprietary information, which is protected by copyright. All rights are reserved. No part of this manual may be photocopied, reproduced or translated to another language without prior written consent of the Good Will company. The information in this manual was correct at the time of printing. However, Good Will continues to improve products and reserves the right to change specifications, equipment, and maintenance procedures at any time without notice. Good Will Instrument Co., Ltd. No. 7-1, Jhongsing Rd., Tucheng Dist., New Taipei City 236, Taiwan. Table of Contents Table of Contents SAFETY INSTRUCTIONS .................................................... 4 Safety Symbols .................................................... 4 Safety Guidelines ................................................ 5 GETTING STARTED ............................................................ 8 GOM-802 Characteristics .................................... 9 Key Features ...................................................... 11 Front Panel Overview ........................................ 12 Rear Panel Overview ......................................... 16 Set Up ............................................................... 17 MEASUREMENT ............................................................... 21 Measurement Overview .................................... 22 Resistance Measurement .................................. 23 Compare Function ............................................. 26 Temperature Measurement ............................... 32 Temperature Compensation .............................. 34 HANDLER/SCAN/ INTERFACE ......................................... 36 Handler Overview ............................................. 37 Scan Overview ................................................... 38 Configure Interface ........................................... 42 FAQ .................................................................................. 45 APPENDIX ........................................................................ 46 Fuse Replacement ............................................. 47 Temperature Measurement ............................... 48 Specifications .................................................... 51 Declaration of Conformity ................................. 54 INDEX .............................................................................. 55 3 GOM-802 User Manual SAFETY INSTRUCTIONS This chapter contains important safety instructions that you must follow when operating the GOM-802 or when keeping it in storage. Read the following before any operation to insure your safety and to keep the GOM-802 in the best possible condition. Safety Symbols These safety symbols may appear in this manual or on the GOM-802. Warning: Identifies conditions or practices that could WARNING result in injury or loss of life. CAUTION Caution: Identifies conditions or practices that could result in damage to the GOM-802 or to other properties. DANGER High Voltage Attention Refer to the Manual Protective Conductor Terminal Earth (ground) Terminal Do not dispose electronic equipment as unsorted municipal waste. Please use a separate collection facility or contact the supplier from which this instrument was purchased. 4 SAFETY INSTRUCTIONS Safety Guidelines General Guideline CAUTION Do not place any heavy objects on the GOM-802. Avoid severe impact or rough handling that leads to damaging the GOM-802. Do not discharge static electricity to the GOM-802. Use only mating connectors, not bare wires, for the terminals. Do not disassemble the GOM-802 unless you are qualified as service personnel. (Note) EN 61010-1:2001 specifies the measurement categories and their requirements as follows. The GOM-802 falls under category I. Power Supply WARNING Fuse WARNING Measurement category IV is for measurement performed at the source of low-voltage installation. Measurement category III is for measurement performed in the building installation. Measurement category II is for measurement performed on the circuits directly connected to the low voltage installation. Measurement category I is for measurements performed on circuits not directly connected to Mains. AC Input voltage: 100V/ 120V/ 220V/230 V AC, 50/60Hz, 27VA, 22W The power supply voltage should not fluctuate more than 10%. Connect the protective grounding conductor of the AC power cord to an earth ground, to avoid electrical shock. Fuse type: Line Voltage Rating Fuse 100V 90-110V T0.3A 250V 120V 108-132V T0.3A 250V 220V 198-242V T0.25A 250V 230V 216-250V T0.25A 250V Make sure the correct type of fuse is installed before power up. To avoid fire, only replace the fuse with the specified type and rating. Disconnect the power cord before fuse replacement. Make sure the cause of a fuse blowout is fixed before fuse replacement. 5 GOM-802 User Manual Cleaning the GOM-802 Operation Environment Disconnect the power cord before cleaning. Use a soft cloth dampened in a solution of mild detergent and water. Do not spray any liquid into the GOM-802. Do not use chemicals or cleaners containing harsh material such as benzene, toluene, xylene, and acetone. Location: Indoor, no direct sunlight, dust free, almost non-conductive pollution (Note below) Relative Humidity: < 80% Altitude: < 2000m Temperature: 0°C to 40°C (operation) (Note) EN 61010-1:2001 specifies the pollution degrees and their requirements as follows. The GOM-802 falls under degree 2. Pollution refers to “addition of foreign matter, solid, liquid, or gaseous (ionized gases), that may produce a reduction of dielectric strength or surface resistivity”. Pollution degree 1: No pollution or only dry, non-conductive pollution occurs. The pollution has no influence. Pollution degree 2: Normally only non-conductive pollution occurs. Occasionally, however, a temporary conductivity caused by condensation must be expected. Pollution degree 3: Conductive pollution occurs, or dry, non-conductive pollution occurs which becomes conductive due to condensation which is expected. In such conditions, equipment is normally protected against exposure to direct sunlight, precipitation, and full wind pressure, but neither temperature nor humidity is controlled. Location: Indoor Temperature: −10°C to 70°C Storage Environment Disposal Do not dispose this instrument as unsorted municipal waste. Please use a separate collection facility or contact the supplier from which this instrument was purchased. Please make sure discarded electrical waste is properly recycled to reduce environmental impact. 6 SAFETY INSTRUCTIONS Power cord for the United Kingdom When using the GOM-802 in the United Kingdom, make sure the power cord meets the following safety instructions. NOTE: This lead / appliance must only be wired by competent persons WARNING: THIS APPLIANCE MUST BE EARTHED IMPORTANT: The wires in this lead are coloured in accordance with the following code: Green/ Yellow: Earth Blue: Neutral Brown: Live (Phase) As the colours of the wires in main leads may not correspond with the coloured marking identified in your plug/appliance, proceed as follows: The wire which is coloured Green & Yellow must be connected to the Earth or coloured terminal marked with either the letter E, the earth symbol Green/Green & Yellow. The wire which is coloured Blue must be connected to the terminal which is marked with the letter N or coloured Blue or Black. The wire which is coloured Brown must be connected to the terminal marked with the letter L or P or coloured Brown or Red. If in doubt, consult the instructions provided with the equipment or contact the supplier. This cable/appliance should be protected by a suitably rated and approved HBC mains fuse: refer to the rating information on the equipment and/or user instructions for details. As a guide, a cable of 0.75mm2 should be protected by a 3A or 5A fuse. Larger conductors would normally require 13A types, depending on the connection method used. Any exposed wiring from a cable, plug or connection that is engaged in a live socket is extremely hazardous. If a cable or plug is deemed hazardous, turn off the mains power and remove the cable, any fuses and fuse assemblies. All hazardous wiring must be immediately destroyed and replaced in accordance to the above standard. 7 GOM-802 User Manual GETTING STARTED This chapter describes the GOM-802 in a nutshell, including its main features as well as its front and rear panels. After going through the panel overview, follow the Power-up sequence before attempting to use the instrument. Please note the information in this manual was correct at the time of printing. However as GW Instek continues to improve its products, changes can occur at any time without notice. Please see the GW Instek website for the latest information and content. Characteristics GOM-802 Characteristics ......................................... 9 Key Features ........................................................... 11 Panel Overview Front Panel Overview ............................................. 12 Rear Panel Overview .............................................. 16 Setup Tilt Stand ............................................................... 17 Power Up ............................................................... 18 4 Wire Kelvin Connection ....................................... 19 Zeroing (Relative Function) ................................... 20 8 GETTING STARTED GOM-802 Characteristics GOM-802 is a high precision programmable DC Milli-ohm meter suitable for low resistance measurements of switches, relays, connectors, PCB tracks and a variety of other devices. With the easy-to-use features, superior performance, and automatic test interfaces, the GOM-802 is a dependable instrument for resistance measurements. Easy to Use Features The GOM-802 includes an easy to use comparator function (HI-LO-GO) that is able to easily set upper and lower limits for pass/fail testing. The alarm buzzer can be used with the comparator function. The flexible handler interface can be used to monitor the status of the pass/fail testing. The relative feature enables the GOM-802 to easily compensate for any stray resistance. Up to 20 different sets of HI-LO-GO settings can be stored to satisfy a number of different testing conditions. The GOM-802 is also able to recall the last test setting that was used every time it is turned on. Performance The GOM-802 has nine selectable measurement ranges from 30mΩ to 3MΩ, a constant current source of 1uA to 1A, an accuracy of 0.05%, a 1uΩ resolution and performs measurements using four wire Kelvin connections for accurate, consistent measurements. The ability to choose between high measurement accuracy with 7 samples/sec (full scale at 30000) or high speed measurements with 30 samples/sec (full scale at 3000) allows the GOM-802 the flexibility to fulfill a number of different measurement roles. 9 GOM-802 User Manual Temperature Compensation Temperature Compensation (Optional): Automatic Testing For automatic testing The GOM-802 has a handler interface designed for automatic testing. The handler interface outputs the status of PASS, FAIL, HI, LO, READY and EOT signals and inputs a trigger control signal. An RS-232 and GPIB option is also available for computer control applications. Applications Production testing for contact resistance of switches, relays, connectors, cables and printed circuit boards and other low resistance devices. The optional temperature probe (PT-100) can be used to extrapolate the resistance of a DUT at a certain temperature. When the temperature coefficient and the required temperature (of the resistance measurement) is keyed in under TC mode, the GOM-802 will display the extrapolated measurement. Component testing of resistors, motors, fuses and heating elements. Incoming inspection and quality assurance testing. Conductivity evaluation for product design. 10 GETTING STARTED Key Features 30,000 counts. Measurement Range: 30mΩ~3MΩ. 0.05% accuracy. Hi/Lo comparator and limit percentage setting with 20 memory sets. REL, Actual and % value measurements. Manual or Auto-ranging. Continuous or Triggered measurement modes. Temperature compensation and measurement. Four-wire measurement method. Auto-recall last setting on power-up. Diode test. Alarm setting for PASS/FAIL test result. Sampling rate: 7 or 30 sampling/sec. Standard interface: Scan/Handler, optional interfaces: RS-232 + GPIB. 11 GOM-802 User Manual Front Panel Overview Power Switch Turns On or Off the main power. For details about the power up sequence, see page 18. Primary Value Display Shows the primary measurement results. Normal Display Shows the Normal (nominal) value setting. Comparator Indicators The comparator indicators indicate the status of comparison judgments. HI: measurement exceeds the HI limit LO: measurement exceeds the LO limit GO: measurement is within the HI and LO limits. 12 GETTING STARTED Function Control Indicators Indicates when a function key is active. Measurement Terminals Sense HI and Sense LO terminals. Current Source Terminals Current Source Terminals, Source HI and Source LO. Negative Terminal Negative Terminal. This terminal has the same potential as earth, but cannot be substituted for it. Function Keys The COMP TEMP key activates the comparator function. The secondary function turns on the temperature compensation function. Temperature compensation The Cursor keys are used to edit parameters and navigate the menu tree. The Up/Down arrow keys are used to change the values and range of the different parameters. The secondary function recalls previously saved settings. Recall settings The AUTO/MAN SPEED key toggles the range between automatic and manual and toggles between 7 samples per second and 30 samples per second. 13 GOM-802 User Manual Sample speed The REL% VALUE key is used to perform a zero adjustment to the test leads or a DUT. Using the shift key will display the measured values as a percentage of the normal value. Percentage values The LOCAL GPIB/RS232 key will switch the milliohm meter between local and remote mode. The secondary function will set the I/O interface to GPIB or RS-232. GPIB/ RS232 mode Sets the High limit % values. The secondary function activates the Handler function. HANDLER SHIFT Handler mode HIGH Sets the normal (Nominal) value for the comparator function. Scan function Sets the lower % limit for the comparator function and turns the buzzer on for either a PASS or FAIL judgment or turns the buzzer off. Buzzer ON/OFF 14 GETTING STARTED Turns the external trigger on to allow the MANUAL TRIG TRIG key to be used as a manual trigger. The secondary function will set the trigger to internal. Turns the internal trigger ON/OFF Enter key. The SHIFT key is used to access the secondary functions. Lower Limit Display (LO) Displays the lower limit as as a percentage. Upper Limit Display (HI) Displays the upper limit as a percentage. Interface Indicator The interface indicator shows the status mode of the GOM-802. Remote mode (RMT), Handler mode (HAND) or Scan mode. 15 GOM-802 User Manual Rear Panel Overview AC Input Accepts the power cord. AC 100/120V or 220/230V; 50/60Hz. For the power on sequence, see page 18. Fuse Socket Holds the main fuse: 100/120V: T0.3A 250V; 220/230V: T0.25A 250V; For the fuse replacement details, see page 47. RS-232C port Accepts an RS-232C cable for remote control; DB-9 male connector. For remote control details, see page 43. GPIB port Accepts a GPIB cable for remote control (page 42). Handler / Scan port The Handler/Scan port is used to output pass/fail/high/low comparison results. Temperature Sensor The temperature sensor input for the optional PT-100 temperature probe. 16 GETTING STARTED Set Up Tilt Stand Steps 1. Pull handle base away from the casing. 2. Turn handle into any of the preset positions. Stand Position Carry Position 17 GOM-802 User Manual Power Up 1. Ensure that the correct voltage is lined up with the arrow on the fuse cover on the rear panel. 120V 220 120 100 100 100 230 230 220 120 230 230V 220 120 100 230 220 Steps 220V 120 100V 2. Connect the power cord to the AC Voltage input. 220 120 230 10 0 CAUTION Ensure the ground connector of the power cord is connected to a safety ground. This will affect the measurement accuracy. 3. Press the main power switch on the front panel. ER POW 4. The display will light up and show the last setting used before the last shut down. 18 GETTING STARTED Example: Resistance measurement mode 4 Wire Kelvin Connection Background The GOM-802 uses 4 wire Kelvin connections for accurate measurements. Diagram + - Description Source HI The Source HI carries the measuring current source. It is connected to the + side of the DUT. Source LO The Source LO terminal accepts the signal return current. Connects to the – side of the DUT. Sense HI Monitors the positive (+) potential. Sense LO Monitors the negative (-) potential. GND If the component has a large metallic area not connected to either terminal, connect it to ground to reduce noise. 19 GOM-802 User Manual Zeroing (Relative Function) Background The Relative function is used to perform a zero adjustment on the test leads. After the Relative value is pre-set, each measurement that is displayed is equal to the actual value – relative preset value. If the measured value minus the relative value is a negative, a minus sign is shown on the MSB (most significant bit). At low measurement speeds the minus sign will alternate with the displayed measurement. 1. Short the cables Short the test cables together using a short thick copper wire if necessary. 1. Set the Reference value Press the REL%VALUE key. 2. Relative mode display appears REL Note 20 Indicates the Relative function is active The Auto-range function will be disabled when using compare mode with the relative function. MEASUREMENT MEASUREMENT Overview Measurement Overview .......................................... 22 Resistance Resistance Measurement ....................................... 23 Select the Resistance Range ................................... 24 Rate Select Measurement Rate ....................................... 25 Trigger Using the Trigger Function ..................................... 25 Compare Compare Function .................................................. 26 Save Compare Settings .......................................... 28 Recall Compare Settings ........................................ 29 Buzzer Buzzer Function ..................................................... 30 Percentage Display as Percentage ............................................ 31 Relative Relative Function .................................................... 32 Temperature Temperature Measurement .................................... 32 Relative Function .................................................... 33 Temperature Compensation Temperature Compensation ................................... 34 Select the Resistance Range ................................... 35 Relative Function .................................................... 35 21 GOM-802 User Manual Measurement Overview Background The Measurement chapter refers to the measurements listed below. For measurements using the Handler or Scan interfaces, see page 36. Measurement type COMP TEMP 22 Comparison function SHIFT+ COMP TEMP Temperature sensor function AUTO/MAN SPEED Auto-range Manual range SHIFT+ AUTO/MAN SPEED Measurement speed function REL %/VALUE Relative function selector SHIFT+ REL %/VALUE Toggle Relative % or Value HIGH HANDLER High comparison limit SHIFT+ HIGH HANDLER Handler function NORMAL SCAN Normal (nominal) value SHIFT+ NORMAL SCAN Scan mode LOW Low comparison limit SHIFT+ LOW Buzzer on/off MANUAL TRIG INT Trigger settings SHIFT+ MANUAL TRIG INT Internal trigger setting MEASUREMENT Resistance Measurement 1. Select the Resistance function. Press SHIFT + COMP TEMP to access the main function mode. Press the Up and Down arrow keys to select resistance measurement mode (shown above). There are three different modes: (resistance), (temperature) (temperature compensation) and mode. Press ENTER to confirm 2. Resistance mode display appears. 3. Connect the test lead and measure Note Auto Indicates automatic ranging mΩ Milliohms Ω Ohms kΩ Kilo ohms 4-wire resistance: Use the SOURCE HI and the SOURCE LO port for measurement, and the SENSE HI, and SENSE LO port for sensing. When switching from a high range to a low range, please allow a moment for the circuits to settle before measuring. 23 GOM-802 User Manual Select the Resistance Range Background Auto Range The resistance range can be used with normal resistance measurement as well as the temperature compensation function. Press the Up and Down arrow keys to manually select the resistance range. Manual Press the AUTO/MAN key to use automatic ranging. Selection List Range Resolution(7 meas./s) 30mΩ 1uΩ 300mΩ 10uΩ 3Ω 100uΩ 30Ω 1mΩ 300Ω 10mΩ 3kΩ 100mΩ 30kΩ 1Ω 300kΩ 10Ω 3MΩ 100Ω Note 24 For detailed specifications, please see the specifications on page 51. MEASUREMENT Select Measurement Rate Background The resistance measurement speed has 2 ranges: low and high. Low speed is the most accurate with 7 measurements/second and a full scale of 30,000 counts. High speed has 30 measurements/second with a full scale 3,000 counts. The rate function is applicable to the resistance, temperature and temperature compensation measurements. 1. Select Rate Press the SHIFT + AUTO/MAN SPEED keys to switch between the LO and HI rates. LO rate The low rate is shown with a full scale of 5 digits in the resistance measurement mode. HI rate The high rate is shown with a full scale of 4 digits. Note For detailed specifications, please see the specifications on page 49. Using the Trigger Function Background The GOM-802 can use internal or manual triggering for the resistance, temperature and temperature compensation measurement modes. External triggering is only supported with the Handler and Scan modes. By default the GOM-802 is in internal triggering mode. INT 1. Select Manual Press MANUAL TRIG to switch to manual triggering mode. Trigger 25 GOM-802 User Manual The EXT indicator will be lit when the manual trigger is active. 2. Manually Triggering Measurements Press the MANUAL TRIG INT key each time you want to start a single measurement. The EXT indicator will be lit when the manual trigger is active. Internal Triggering Press SHIFT + MANUAL TRIG INT to return the triggering mode back to internal mode. The EXT indicator will become cleared from the display. Compare Function Background The compare function compares a measured value to a “Normal” value that has an upper (HI) and lower (LO) limit. The upper and lower limit is set as a percentage of the Normal value. A measured value that falls within the upper and lower limits is considered a GO (pass), a value that falls below the lower limits is considered LO, and a value that falls over the upper limit is a HI. 26 MEASUREMENT The GO, HI or LO indicators will light up for each measured value that is compared to the upper and lower limits. 1. Select the compare function Press COMP TEMP to access the compare mode, as shown above. 2. Normal value setting Press NORMAL SCAN to set NORMAL value setting. Use the Left and Right arrow keys to select a digit. The selected digit will flash. Use the Up and Down arrow keys to edit the value of the selected digit. Range 33000~00000 Press ENTER to confirm the setting. Note After setting the Normal value, the HI and LO limits will be changed to reflect the new Normal value setting. 3. HI limit setting Press HIGH SCAN to set the HI percentage limit. Use the Left and Right arrow keys to select a digit. The selected digit will flash. 27 GOM-802 User Manual Use the Up and Down arrow keys to edit the value of the selected digit. Range 000~999 Press ENTER to confirm the setting. 4. LO limit setting Press LOW to set the LO percentage limit. Use the Left and Right arrow keys to select a digit. The selected digit will flash. Use the Up and Down arrow keys to edit the value of the selected digit. Range 000~999 Press ENTER to confirm the setting. Save Compare Settings Background The save function saves the Normal, High and Low limit settings in memory. If these values are not saved, the settings will be lost after exiting Compare mode. Up to 20 Normal, High, Low settings can be saved on the GOM-802. 1. Select Save mode RECALL Press SHIFT + to access the RECALL/SAVE mode. Press the Up and Down arrow key to show “SAVE” in the main display, as shown above. 28 MEASUREMENT Press enter to confirm. 2. Select memory location Use the Left and Right arrow keys to select a digit. The selected digit will flash. Use the Up and Down arrow keys to edit the value of the selected digit. Range 00~19 Press ENTER to confirm the setting. After saving the settings, the meter will return to the compare mode function. Note Pressing SHIFT before pressing ENTER will exit the Save mode. Recall Compare Settings Background The Recall function retrieves the Normal, High and Low limit settings from one of 20 memory locations. If these values are not saved, the settings will be lost after exiting Compare mode. Up to 20 Normal, High, Low settings can be saved on the GOM-802. 1. Select Recall mode RECALL Press SHIFT + to access the RECALL/SAVE mode. Press the Up and Down arrow key to show “CALL” in the main display, as shown above. Press ENTER to confirm. 29 GOM-802 User Manual 2. Select memory location Use the Left and Right arrow keys to select a digit. The selected digit will flash. Use the Up and Down arrow keys to edit the value of the selected digit. Range 00~19 Press ENTER to confirm the setting. After saving the settings, the meter will return to the compare mode function. Note Pressing SHIFT before pressing ENTER will exit the Recall mode. Buzzer Function Background The buzzer function can make the buzzer sound when the compare test has passed (GO) or failed (NOGO). The buzzer settings are only applicable in Compare mode. 1. Select Buzzer Function Press the SHIFT key and then press LOW key. 2. Buzzer function display appears Press the Up and Down arrow key to choose the buzzer mode. NON Buzzer function off bF Buzz on Fail (No Go) bP Buzz on Pass (Go) Press ENTER to confirm the selection. 30 MEASUREMENT Note Pressing SHIFT before pressing ENTER will exit the Buzzer function settings. Display as Percentage Background In the compare function, the measured value can be displayed as a percentage of the Normal value rather than the actual value. For example, if the Normal value is 20.000, and the actual value is 10.000, then as a percentage it would be displayed as 50.00%. 1. Select Buzzer Function Press the SHIFT key and then press the REL %VALUE. SHIFT 2. Percentage display appears 3. Return to normal display Note Press the SHIFT key and then press the REL %VALUE. The Auto-range function will be disabled when using the percentage display. 31 GOM-802 User Manual Relative Function Background The Relative function is used to perform a zero adjustment on the test leads or the resistance of the DUT. After the Reference value is pre-set, each measurement that is displayed is equal to the actual value – relative preset value. If the measured value minus the relative value is a negative, a minus sign is shown on the MSB (most significant bit). At low measurement speeds the minus sign will alternate with the displayed measurement. 1. Set the Reference value Press the REL%VALUE key. 2. Relative mode display appears REL Note Indicates the Relative function is active The Auto-range function will be disabled when using compare mode with the relative function. Temperature Measurement Background The temperature measurement function uses the optional PT-100 temperature probe. The measured temperature is displayed on the NORMAL display. For more information on the optional PT-100 sensor, see the appendix on page 48. There is only one range in when using the temperature function. 1. Select the Temperature function. Press SHIFT + COMP TEMP to access the main function mode. 32 MEASUREMENT Press the Up and Down arrow keys to select the ˚C measurement mode (shown above). There are three different modes: (resistance), (temperature) (temperature compensation) and mode. Press ENTER to confirm 2. Temperature mode display appears. 3. Temperature mode connection. The temperature is displayed on the NORMAL display. The temperature sensor uses the rear panel TC port for input. Relative Function Background The Relative function can also be used with the temperature function. The temperature displayed is the temperature of the sensor minus the temperature of the sensor when the REL %VALUE key was pressed. 1. Set the Reference value Press the REL%VALUE key. 2. Relative mode display appears REL Indicates the Relative function is active 33 GOM-802 User Manual Temperature Compensation Background 1. Select the Temperature compensation mode. If the resistance of a DUT at a particular temperature is needed the compensation function can be used. This function can simulate the resistance of a DUT at a desired temperature. If the ambient temperature and the temperature coefficient of the DUT are known, it is possible to determine the resistance of a DUT at any temperature. Press SHIFT + COMP TEMP to access the main function mode. Press the Up and Down arrow keys to select the TC measurement mode (shown above). There are three different modes: (resistance), (temperature) (temperature compensation) and mode. Press ENTER to confirm. 2. Temperature compensation mode appears. Edit the desired temperature and the temperature coefficient of the DUT. Use the Left and Right arrow keys to select a digit and use the Up and Down arrow keys to edit the digit. Desired Temperature 0~99.9 Temperature Coefficient 0000~9999 Press ENTER to confirm the selection and start measurement. 34 MEASUREMENT 3. Temperature compensation connection. Sensor Connection: DUT connection 4 Wire: Select the Resistance Range Background Auto Range Manual The resistance range can be selected when using the temperature compensation function. Press the Up and Down arrow keys to manually select the resistance range Press the AUTO/MAN key to use automatic ranging. Relative Function Background The Relative function can also be used with the temperature compensation function. 1. Set the Reference value Press the REL%VALUE key. 2. Relative mode display appears REL Indicates the Relative function is active 35 GOM-802 User Manual HANDLER/SCAN/ INTERFACE Handler Handler Overview .................................................. 37 Scan Scan Overview ....................................................... 38 Scan Setup ............................................................. 38 Scan Output ........................................................... 41 Interface Configure Interface ................................................ 42 Configure GPIB Interface ....................................... 42 Configure RS-232 Interface .................................... 43 Interface Function Check ....................................... 44 36 HANDLER/SCAN/ INTERFACE Handler Overview Background The Handler Interface is used to help bin components based on the Go-NoGo comparator function test. There are 6 TTL outputs and one TTL input. The Handler interface can only be used with the resistance measurement and compare measurement modes. Interface and pin assignment 9 Pin D-SUB (Female) Pin Assignment START Start the trigger for a single measurement. Negative edge trigger. READY High when the measurement has finished. The instrument is ready for the next trigger.. EOT High when the AD conversion has completed. The DUT is ready to be changed. LOW High when the compare result is deemed LO. HIGH High when the compare result is deemed HI. FAIL High when the compare result is either HI or LO (fail). PASS High when the compare result is GO (pass). Note The output current from all the terminals and the +5V terminal cannot exceed 60mA. 37 GOM-802 User Manual Scan Overview Background The Scan function is used to automatically bin groups of up to 100 components. The scan function, unlike the handler interface must first be activated using the panel keys. There are a total of 6 outputs as well as a GND and power (+5V) pin. Interface and pin assignment 9 Pin D-SHELL (Female) Pin Assignment Relay Controls the relay output. Pass Pass signal. Indicates a GO compare result is GO (pass). Low Low signal. Indicates a LO compare result. High High signal. Indicates a HI compare result. Clock The clock signal will pulse high when each group of output signals (Ready, Pass, Low, High) are ready. There are up to 100 groups of output signals STRB After all (100) output groups are ready, the STRB signal will pulse high. Scan Setup Background The scan function is accessed via the compare mode. 1. Select the compare function Press COMP TEMP to access the compare mode, as shown above. 38 page 26 HANDLER/SCAN/ INTERFACE 2. Select the resistance function. Press SHIFT + COMP TEMP to access the main function mode. Press the Up and Down arrow keys to select the resistance measurement mode (shown above). There are three different modes: (resistance), (temperature) (temperature compensation) and mode. Press ENTER to confirm. 3. Resistance mode and Compare display appears. 4. Resistance Range Press the Up and Down arrow keys to manually select the resistance range. 5. Select the Scan mode. Press SHIFT + NORMAL SCAN to access the scan mode. Press the Up and Down or Left and right arrow keys to select the number of counts. Count range 0~100 Press ENTER to confirm. 6. Select the Delay time. Press the Up and Down or Left and Right arrow keys to set the sweep delay time. Each count unit has a delay time of 16.2 ms. 39 GOM-802 User Manual Count units 30~30,000 Press ENTER to confirm. 7. The Ready Display appears Note After the Ready indicator is shown it is not possible to make any changes to the compare function or range. 8. Start the scan. Press the MANUAL TRIG INT key to start the sweep measurements. The results will be displayed on screen and output through the scan port until finished. 9. View Results Press the Up and Down arrow keys to cycle through each result. The measurement number will be displayed on the Normal display and the measurement on the main screen. 10. Exit Scan mode 40 Press SHIFT + NORMAL SCAN at any time to exit the scan mode. HANDLER/SCAN/ INTERFACE Scan Output Background The timing diagrams for the scan output under different conditions are shown below. Ready message displayed… After the MANUAL TRIG INT key is pressed… Relay Pass Low High Clock STRB 1 2 99 100 Scan channel 1. Delay time has elapsed. Scan channel n, delay time has elapsed. Scan Channel 100. Delay time has elapsed. Scan output signal timing. 41 GOM-802 User Manual Configure Interface Overview The RS-232 and GPIB interfaces are factory installed options for remote control of the GOM-802. The remote control interfaces allow the GOM-802 to be programmed for automatic testing. For more information on the remote control programming, please see the GOM-802 programming manual. Interface GPIB 24 pin female GPIB port RS-232 DB-9 male port Configure GPIB Interface Background The GPIB interface is SCPI-1994, IEEE488.1 and IEEE488.2 compliant. 1. Select the GPIB address. Press SHIFT + LOCAL GPIB/RS232 to access the GPIB/RS232 settings. Press the Left or Right arrow key to enter the GPIB address settings. Press the Up and Down arrow keys to set the GPIB address. GPIB Address 0~31 Press ENTER to confirm. The display returns to the main display. Connect one end of the GPIB cable to the computer and the other end to the GPIB port on the GOM-802. 42 or HANDLER/SCAN/ INTERFACE GPIB Constrains Maximum 15 devices altogether, 20m cable length, 2m between each device Unique address assigned to each device At least 2/3 of the devices turned on No loop or parallel connection Configure RS-232 Interface Background The GOM-802 uses an RS-232C connection for remote control. When connecting to a PC ensure the correct baud rate, parity, data bits, stop bit and data control settings are used. Settings Baud rate 1200, 2400, 4800, 9600 Parity None Data bits 8 Stop bit 1 Data flow control None 1. Select the RS-232 baud rate Press SHIFT + LOCAL GPIB/RS232 to access the GPIB/RS232 settings. Press the Up and Down arrow keys to set the baud rate. Baud rate 1200, 2400, 4800, 9600 Press ENTER to confirm. The display goes back to the main display. Connect the RS-232C cable to rear panel RS232 port. RS-232C pin assignment Pin 2: RxD Pin 3: TxD Pin 5: GND Pin 1, 4, 6 ~ 9: No Connection 9876 54321 43 GOM-802 User Manual PC – GOM RS-232C Connection The RS232 connection uses a Null-modem connection, in which transmit (TxD) and receive (RxD) lines are cross-linked. Interface Function Check Operation Run this query from the terminal. *idn? This should return the Manufacturer, Model number, and Firmware version. GW. Inc, GOM-802 , FW1.00 Function Check Errors 44 If you do not receive a proper response from the Meter, please check if the power is on, the GPIB address/RS232 baud rate is correct, and all cable connections are active. FAQ FAQ ● What are the different measurement speeds? ● The GOM-802 performance does not match the specifications. What are the different measurement speeds? There are two measurement speeds for both resistance and temperature measurement. At 30,000 counts the measurement speed is 7 readings/s, at 3,000 counts the measurement speed is 30 readings/s. The GOM-802 performance does not match the specifications. Make sure the device is powered on for at least 30 minutes, within +18°C~+28°C with a humidity not exceeding 80%. This is necessary to stabilize the unit to match the specifications. If there is still a problem, please contact your local dealer or GWInstek at [email protected]. 45 GOM-802 User Manual APPENDIX Fuse Replacement Replace the AC source fuse .................................... 47 Temperature Measurement Reference Temperature Table ................................. 48 RTD SensorsTemperature .................................... 49 Optional Platinum Sensor...................................... 49 Specifications Resistance Measurement ....................................... 51 Temperature Measurement .................................... 52 Temperature Correction Function .......................... 52 Interface................................................................. 53 Environmental ....................................................... 53 General .................................................................. 53 CE Declaration 46 Declaration of Conformity ...................................... 54 APPENDIX Fuse Replacement Replace the AC source fuse 1. Remove the power cord. 22 0 120 230 10 0 2. Remove the fuse socket using a flat screwdriver. 2 20 120 230 1 00 3. Replace the fuse in the holder. 22 0 120 230 1 00 Steps 47 GOM-802 User Manual 4. Ensure the correct line voltage is lined up with the arrow on the fuse holder. Insert the fuse socket. 220 220 120 120 230 230 100 100 Rating 100V/120V TT0.3A 250V 220V/230V T0.25A 250V Temperature Measurement Reference Temperature Table Overview Background Element (H 2 ) (Ne) (O 2 ) (Ar) (Hg) (H 2 O) (Ga) (In) (Sn) (Zn) (Al) (Ag) (Au) 48 The International Temperature Scale (ITS) is based on the following table. The table has 17fixed calibration points as of 1990. Type Hydrogen Triple point Neon Triple point Oxygen Triple point Argon Triple point Mercury Triple point Water Triple point Gallium Melting point Indium Freezing point Tin Freezing point Zinc Freezing point Aluminum Freezing point Silver Freezing point Gold Freezing point Temperature ˚K ˚C 13.8033 -259.3467 24.5561 248.5939 54.3584 218.7916 83.8058 -189.3442 234.325 -38.8344 273.16 +0.01 302.9146 29.7646 429.7485 156.5985 505.078 231.928 692.677 419.527 933.473 660.323 1234.93 961.78 1337.33 1064.18 APPENDIX RTD Sensors Overview Resistive Thermal Devices (RTDs) are commonly used as temperature sensors. RTDs change resistance linearly over a specific range of temperature. The table below shows some of the inherent features of RTDs compared to thermocouples. Feature Accuracy Resolution Speed of response Self-heating Long term stability Output characteristics Description Higher accuracy 0.1~1.0˚C, higher resolution Slower Yes Good Approx. 0.4ohm/˚C, near linear Optional Platinum Sensor Introduction The optional platinum sensor is a PT-100 sensor. The PT-100 sensor meets the German DIN43760: 1968 3 wire measurement specification. These sensors are one of the most common temperature sensors used in industry. These sensors have a nominal resistance of 100Ω at 0˚C. The relationship between temperature and resistance for the PT-100 sensor can be described with the Gallendarvan Dusen equation shown below: R RTD =R 0 [1+AT+BT 2 +CT 3 (T-100)] Where: R RTD is the calculated resistance of the RTD. R 0 is the known RTD resistance at 0˚C. T is the temperature in˚C A=alpha [I+(delta/100)] B=-I(alpha)(delta)(Ie-4) C=-I(alpha)(beta)(Ie-8) The Alpha (A), Beta (B), Delta (D) values for the 49 GOM-802 User Manual PT-100 sensor are listed below: Type PT-100 Standard ITS90 Temperature Calculation Example Alpha 0.003850 Beta 0.10863 Delta 1.49990 Ω @ 0˚C 100Ω Example—Calculating the resistance of a PT-100 RTD at 100˚C (T). The following R0 (Ω at 0˚C), alpha, beta, and delta values are used for the PT-100 RTD: T=100˚C R 0 ( Ω at 0˚C) = 100 Ω Alpha=0.003850 Beta=0.10863 Delta=1.49990 A, B, and C are calculated according to equations listed above: A=0.00391 B=5.77e-7 C=4.18e-12 The resistance of the RTD at 100˚ C (R100) is then calculated as follows: R 100 : =R 0 [1+AT=BT 2 +CT 3 (T-100)] =100{1+[(0.00391)(100)]+[(-5.77e-7)(100 2 ) +[(-4.18E-12)(100 3 )(100-100)]]} =138.5 Ω 50 APPENDIX Specifications Conditions Background The specifications are applicable under the following conditions: A 1-year calibration cycle. An operating temperature of 18 to 28 ˚C (64.4 to 82.4˚F). Relative humidity not exceeding 80%. Accuracy is expressed as ±(percentage of reading + digits). The instrument requires 30 minutes warm-up time to achieve rated accuracy. The power cord protective grounding conductor must be connected to ground. Resistance Measurement 30000 counts (speed : 7 readings/second) Measuring Open-Terminal Range Resolution Current Accuracy Voltage 1A approx. 0.1%+6* ~1.772V 30mΩ 1μΩ 100mA 0.05%+6* ~1.772V 300mΩ 10μΩ 100mA 0.05%+3 ~1.772V 3Ω 100μΩ 10mA 0.05%+2 ~1.772V 30Ω 1mΩ 1mA 0.05%+2 ~1.772V 300Ω 10mΩ 0.05%+2 ~1.770V 3kΩ 100mΩ 100μA 0.05%+2 ~4.570V 30kΩ 1Ω 100μA 0.05%+2 ~4.526V 300kΩ 10Ω 10μA 0.05%+2 ~4.148V 3MΩ 100Ω 1μA 3000 counts Accuracy (speed: 30 readings/second) ±5 counts ** *When the instrument is set to 30mΩ or 300mΩ ranges, the resistance value will be changed while connecting or disconnecting the test lead to the panel due to the different temperature between internal and external parts of the instrument. Therefore, please must wait 1 minute in order to obtain an accurate value after the test leads have been connected or disconnected. * When Kelvin clips are used to resume testing after a long period of time, please wait for a short time to stabilize the measurement. ** In high speed mode, first ensure that the instrument has been grounded through the power cord. 51 GOM-802 User Manual Measurement Auto-ranging Over input range Maximum Applied voltage Comparator Buzzer mode switchable Four-terminal method. Provided. “OL” indication 30m~3Ω range: 30VpDC Other range: 100VpDC 20 sets of comparator status can be selected. NON, PASS, FAIL Temperature Measurement Temperature sensor (option) Range -50.0˚C ~ -10.0˚C -9.9˚C ~ 39.9˚C 40˚C ~ 100˚C Platinum resistor. Lead length: 1.5m approx. Accuracy Speed: 7 readings/second 0.3%+1.0˚C 0.3%+0.5˚C 0.3%+1.0˚C Accuracy Speed: 30 readings/second 0.3%+3˚C 0.3%+2˚C 0.3%+3˚C Temperature Correction Function Temperature 0.0˚C~39.9˚C correction range Reference temperature 0˚C~99.9˚C range Thermal coefficient ±9999 ppm range Temperature range Accuracy of temperature compensation for 3930 ppm/Cu wire, speed: 7 readings/second.* 0.3%+resistance measurement accuracy. 0˚C~39.9˚C 0.6%+resistance measurement accuracy. 40˚C~100˚C *The temperature coefficient for the other settings must be calculated individually according to different conditions. *If the temperature coefficient or the difference between the environmental temperature and the required temperature exceeds normal operation, after calculating the compensation, the variation to the reading value will be significant. 52 APPENDIX Interface Handler interface* Signal: START TTL input Signal: LOW, HIGH, FAIL, PASS, EOT, READY total 6 TTL outputs. (This function is valid only under the resistance measurement mode and the compare mode is enabled.) Scan* Signal: READY, PASS, LOW, HIGH, CLOCK, STRB total 6 TTL outputs. (This function is valid only under the resistance measurement mode and the compare mode is enabled.) RS-232+ GPIB (option) IEEE488.1-1987, IEEE488.2-1992 and SCPI-1994 * The Scan and Handler interface use the same connector Environmental Operation Environment Storage temperature Indoor use, altitude up to 2000m. Ambient Temperature 0˚C to 40˚C. Relative Humidity 80% (Maximum). Installation category II Pollution Degree 2 -10˚C to 70˚C. General Power source Accessories Dimension Weigh AC 100V/120V/220V/230V±10%, 50/60Hz, 27VA, 22W. Test Lead × 1, User manual × 1, Programmable manual × 1 (option), Temperature sensor (option) × 1 251(W)×91(H)×291(D) mm Approx. 3 kg 53 GOM-802 User Manual Declaration of Conformity We GOOD WILL INSTRUMENT CO., LTD. (1) No.7-1, Jhongsing Rd., Tucheng Dist., New Taipei City, Taiwan (2) No. 69, Lu San Road, Suzhou City (Xin Qu), Jiangsu Sheng, China declare, that the below mentioned product Type of Product: DC Milliohm Meter Model Number: GOM-802 is herewith confirmed to comply with the requirements set out in the Council Directive on the Approximation of the Law of Member States relating to Electromagnetic Compatibility (89/336/EEC, 92/31/EEC, 93/68/EEC). For the evaluation regarding the Electromagnetic Compatibility and Low Voltage Equipment Directive, the following standards were applied: ◎ EMC EN 61326: Electrical equipment for measurement, control and laboratory use –– EMC requirements (1997+A1: 1998+A2: 2001) Conducted and Radiated Emission Electrostatic Discharge EN 55011: 1998 class A IEC 61000-4-2: 1995+A1: 1998 Current Harmonic Radiated Immunity IEC 61000-3-2: 2000 IEC 61000-4-3: 1996+A1: 1998 Voltage Fluctuation Electrical Fast Transients IEC 61000-3-3: 1995 IEC 61000-4-4: 1995 Surge Immunity ------------------------IEC 61000-4-5: 1995 Conducted Susceptibility ------------------------IEC 61000-4-6: 1996 Power Frequency Magnetic Field ------------------------IEC 61000-4-8: 1993 Voltage Dips/ Interrupts ------------------------IEC 61000-4-11: 1994 ◎ Safety Low Voltage Equipment Directive 73/23/EEC & amended by 93/68/EEC IEC / EN 61010-1: 2001 54 Index INDEX Buzzer setting ............................................................... 30 Characteristics .................................................... 9 Compare function setting ............................................................... 26 Declaration of conformity ............................... 54 Disposal instructions ......................................... 6 EN 61010 measurement category ..................................... 5 pollution degree ................................................ 6 Environment operation ............................................................ 6 storage ................................................................ 6 FAQ .................................................................... 45 Front panel overview....................................... 12 Fuse AC fuse replacement ...................................... 47 safety instructions ............................................. 5 Getting Started chapter ..................................... 8 Handler overview .......................................................... 37 Interface GPIB setting ............................................. 42 overview .......................................................... 42 RS-232 setting ............................................. 43 Overview measurement ................................................... 22 Percentage setting ............................................................... 31 Power supply safety instructions..................... 5 Power up ........................................................... 18 PT-100 sensor temperature calculation ......... 49 Rate setting ............................................................... 25 Rear panel overview ........................................ 16 Reference temperature table ..................... 48, 50 Relative function setting ......................................................... 32, 33 Resistance setting ............................................................... 23 Resistance measurement connection........................................................ 19 Safety instruction Guidelines.......................................................... 5 Safety instructions fuse ..................................................................... 5 power supply .................................................... 5 symbol ................................................................ 4 Scan overview .......................................................... 38 setting ............................................................... 38 Service contact .................................................. 45 Specifications .................................................... 51 Table of contents ................................................ 3 Temperature setting ............................................................... 32 Temperature compensation setting ............................................................... 34 Tilt stand ........................................................... 17 Trigger setting ............................................................... 25 United Kingdom power cord ........................... 7 Zeroing connection........................................................ 20 55