1
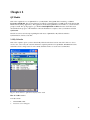
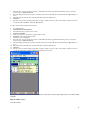
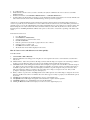
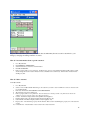
Version 2.0
User’s Manual
A ocet
57 Spadina Avenue
Phone: 1-877-529-6659
Suite 210
Fax: 1-416-640-6027
Toronto, Ontario, Canada
E-mail: [email protected]
M5JV 2J2
Web site: www.QXpress.com
1
QXpress
Copyright ©1998-2006 Alocet Incorporated. This documentation cannot be reproduced in full or
in part by any means without the prior written consent of Alocet Incorporated.
Alocet provides this documentation as is without warranty of any kind, express or implied,
including but not limited to implied warranties of appropriateness for specific purposes or
merchantability. In no event or under any circumstances shall Alocet or its suppliers or
distributors be liable for any damages whatsoever, including and without limitation, damages,
resulting from business loss, which may arise from the use or inability to use this documentation,
even if Alocet, its suppliers or distributors have been previously advised of the possibility of
such damages. Since some states do not allow the exclusion or limitation of liability for
consequential or incidental damages, the above limitation may not apply to you.
Alocet, QXpress and their logos are trademarks of Alocet Incorporated. Other brand and product
names are trademarks or the registered trademarks of their respective corporations.
2
Chapter 1
1.1 QX Mobile Server
Welcome to QX Mobile! At this point you should have downloaded and installed QXMobile from our web site. If
not please download and install the application from http://www.alocet.com/downloads/qxmobile.exe.
Once you get QX Mobile Server installed on your desktop, click Start > All Programs > QXpress > QX Mobile
Server > QX Mobile Server. If you get an error message, most likely you don’t have ActiveSync installed. To
install ActiveSync go to Start > All Programs > QXpress > QX Mobile Server > Install ActiveSync.
Here is a listing of what happens when you start QX Mobile Server.
•
•
•
•
Starts the server to listen for incoming wireless QX Mobile connections from a Pocket PC (PPC). The first
time you start up QX Mobile you may be prompted by your firewall software to allow QX Mobile access to
wait for incoming connections. Make sure you click Unblock.
Uploads current IP Address and Port Number of your system so QX Mobile on the Pocket PC can
communicate with your desktop and synchronize information.
If your PPC is in the cradle, it will detective if QX Mobile is installed. If it is not installed, you will be
prompted to install QXMobile.
The first time you Synchronize the data you will be prompted to allow access to QX Mobile to access data.
Click Yes, Always.
With minimal amount of effort, you'll be able to synchronize QXpress with QX Mobile on your Pocket PC. QX
Mobile Server is separated into two parts. One is the General tab where the basic information you need to
synchronize and use QX Mobile. The other portion is the Advanced tab where you can fine-tune what is
synchronized and displayed on QX Mobile on your PPC. Every time you wish to synchronize data from QXpress to
QX Mobile and vice versa, just place your PPC in your cradle and click Synchronize.
3
General tab
The General section has 3 parts.
Fig. 1.1 The General screen shows the minimum requirements you need to synchronize with QX Mobile.
1. Choose Your Database
• This section will list your last 5 databases opened (Note these are only databases opened by QX6 or Later).
Automatically your most recent database will be selected. If you have Login Permission enabled in
QXpress, then the Login and Password text boxes will appear (not shown above). Enter your Login and
Password and click Login. You’ll need to enter your Login and Password for QX Mobile Server to retrieve
and enter information when synchronizing.
2. Choose the Crew(s) and/or Crew Groups
Here you’ll have 2 options.
Option 1. Select a crew or crew group. If you don’t select any crews/crew groups, all crews will be synchronized.
Option 2. Select a profile. Profiles allow you to control what information is displayed, added and edit on QX
Mobile. As well, profiles allow you to create specific captions for desired terms, allows you to group crews and
crew groups under a specific profile and setup your Custom Entry Screen. If you have Login Permissions enabled in
QXpress, you'll need to login first and then you can see your crews and crew groups.
4
Profile:
You can select what information to view, add, edit and customize the order and caption names of most fields that are
synchronize with QX Mobile. This allows you to create multi-language support, limit information on what
employees can view, only display fields that need information entered and define your own form to enter/view
information.
To setup a profile, proceed through these steps.
1.
2.
3.
4.
5.
6.
7.
8.
Click Select / Create Profile option.
A list box will appear listing all the profiles you have added.
To begin the creation of a new profile click Add.
The Profile Wizard will appear.
The first screen asks you for basic information such as the name of the profile you are about to create and the
crew / crew groups you wish to include in the profile.
The second tab will appear that will be initially called Custom Entry Screen. Here is where you can create your
own form on QX Mobile. Read the next section on how to set up this feature.
Click Next. Each screen will be correlated to a specific area of QXpress. For example Customer Information
containing Routing & Invoicing or Act. Material Usage for a particular service. You can set up the display
order, caption of the service and if the field should be displayed, added or edited. If the checkbox for the field is
disabled, then you will not be allowed to change the value. New tabs added for Version 2 are Payment Method
and Subcontractors.
Once you’ve gone through each screen, click Finish. The profile will be created and listed now under the Select
/ Create Profile option.
To setup the Custom Entry Screen you can follow this tutorial
http://www.qxpress.com/movietutorials/QXMobileCustomDataEntry.html or proceed through these steps.
1.
2.
3.
4.
5.
6.
7.
8.
9.
Click Select / Create Profile option.
A list box will appear listing all your profiles.
To begin the creation of a new profile click Add.
The Profile Wizard will appear.
Click on the tab that says Custom Entry Screen.
Page Layout Section: Here you can enter the name of the form and the layout you wish to see it on the Pocket
PC. To change the name from Custom Entry Screen to a customized name, enter the value into the Name
textbox. As you type you will see the tab name change. The layout will be either Portrait or Landscape.
Selected Tab Information: This will be the name of the selected tab. You’ll have three tabs that you can name
and place controls on.
To add controls to the form perform the following steps.
1. Click Add.
2. Select the type of control to add. Items beginning with Standard will be a textbox, datetime picker or
dropdown. List will show a grid. Special controls will add either a button or job item that will add service times
or material usage. Time / Material will add the controls for recording services times for crews, identical to the
Time / Material screen in QX Mobile Version 1.0. In this example let’s select Customer Custom Field.
3. A frame will appear with more options. Here you can add the specific control. From the selection in the
previous step, we will see a list of all the viewable customer custom fields in the Control drop down. Select one.
When it is select the Label for the control will appear, you can use this label or enter a label of your choice.
Also you may set the width and height of the control.
4. Once the information is set properly, Click Add. You’ll see the control added to the tab.
You may move each of the controls anywhere you’d like on the tab. Once you’ve set up the tabs as you’d like
click Finish. The next time you synchronize, the information will be available to see/use in QX Mobile under
Schedule > {Dynamic Control Name}
5
3. Choose My Calendar Date Range of Services
• This is the date range of services you can synchronize. You can upload just one day, a week, a month or
even a year. The date range will be saved the next time you start up QX Mobile Server. For example if the
date range to is set to 5 days in the future, the next time you start QX Mobile Server, the date range to will
still remain 5 days from the current day. Please note, the bigger the date range, the large the database. As
the Pocket PC usually has limited space for files, its advised to keep the date range as small as needed.
6
Advanced tabs
The Advanced section you can specify date ranges to upload contact events and invoices, monitor server activities,
select template designer for invoices, work orders and reports, re-process data synchronized from QX Mobile and
view unresolved items.
Server Activity
1.
2.
3.
Server activity when synchronizing data and wireless communication. In the list you’ll see activity as it
relates to wireless connections and synchronization. Any interaction that involves passing data from QX
Mobile to QXpress and from your Pocket PC to your desktop will appear here.
Choose your IP Address and Port Number – The IP Address will be assigned automatically when the server
starts and can be retrieved by QX Mobile by going to Activities > Synchronize and click Synchronize >
Get IP Address and Port Number in the toolbar at the top. The port number here must be the same port
number entered on the PPC.
QX User Name - this is your QX User Name and should be automatically fetched by QX Mobile server
when selecting your database. This is used to allow the QX Mobile on your PPC to determine what IP
Address and Port Number you are using on QX Mobile Server if the PPC device is away from the office
and has Internet access. You will not have to update this information.
To stop the server for incoming wireless synchronization calls, perform the following.
1.
Click Tools > Close Server.
To change the Port Number, perform the following.
1.
2.
3.
Click Tools > Close Server.
Change the Port Number in the text box.
Click Tools > Start Server.
If the server is listening, the Server Activity box will have a Green/Yellow color. If the server is closed it will be
Dark Green. You don't need to have the server listening for incoming connections to synchronize information with
your PPC if it’s in the cradle. However if you wish to utilize wireless synchronization, then the server must be
running.
Port Forwarding.
If you’re network is behind a firewall, you may have to invoke port forwarding. We can’t provide assistance on
how to invoke port forwarding as every router is set up differently. If you feel like you have enough networking
expertise and feel confident you can program the router for port forwarding we recommend the following web site.
http://www.portforward.com/
Find the router type you have on your network and you will be given instructions on how to set up port forwarding.
In addition to being behind a firewall, you may only have the option to start the server with the internal IP Address
and not the external IP Address listed. If your network is set up for port forwarding to a specific computer, you may
only have to start QX Mobile Server with the internal IP Address. Check the option Use Internal IP Address; Upload
External IP Address to make sure your external IP Address is uploaded to Alocet’s server so your PPC can
automatically determine what IP Address to use to connect to QX Mobile Server and not use the internal IP Address.
7
Settings
1. Choose Invoice and Contact Events Date Range
• This allows you to select how far back you wish synchronized Invoice information and how far in the
future you wish to synchronize Contact Events with QX Mobile.
2. QX Mobile Database Generation.
• For extremely large customer lists > 1000, you may want to use the Use Previous Database option. What
this will do is use a previously generated database for the customer list, but all remaining information will
be refreshed. This can decrease the time it takes to synchronize with the PPC. To make sure a database is
created with a fresh list of customer, select Create New Database.
3. Synchronize only ‘On Route’ services.
• You may only need to upload services that are ‘On Route’. If you select Yes in the drop down, then
only service that have the status of On Route will be synchronized. If No is selected, then all services
will be uploaded if they fall under the crew/profile selected.
4. Password List.
• List all the passwords for QX Mobile you are entitled to. You’ll see the Purchase ID and either the
Pocket PC Name or Pocket PC Device ID. You’ll also see the expiry date. If you are trying to
synchronize with a Pocket PC that is not on the list, then you will receive a warning message.
5. Force transfer of latest QXMobile.exe.
• This will force the transferring of the latest QXMobile.exe to your pocket pc.
8
6. Refresh Uploading of IP Address Every.
• This will upload your IP Address in the number of minutes indicated. This is used for scenarios where
your IP Address will change and QX Mobile needs to determine what the new IP Address is to
synchronize.
.
Fig. 1.3 Set amount of invoice history and future contacts for your crew.
9
Template Designer
You may use Template Designer Invoices, Estimates and Work Orders/Route Lists with QX Mobile if you have one
of the printers listed at the end of this manual. Simply select which template you would like to use for each of
Invoice, Estimate and Work Order. The selected Template will be used when generating the appropriate print out on
QX Mobile.
Database Repository
For each synchronization you do when the PPC is in the cradle, there will be a database repository of the last 4 days.
If you wish to re-process a database (go through all the events from a particular Pocket PC’s database in the past) all
you have to do is select it from the list. Each will end in sdf, but have a unique name in the format
day_month_year_hour_minute_second_AmorPM.sdf.
Once you have selected the database, click Re-Process and the information entered in for that database will be
processed.
Fig. 1.5 Re-process old information.
Unresolved Items.
Occasionally there are instances where information could not be successfully passed from the QX Mobile to
QXpress. If any action fails, it will be recorded in this list. To view information about the action trying to be
performed select the record in the list. Click Details and a pop up will appear giving details of what the event was
trying to perform, for what customer and (if applicable) what service.
10
1.2 Other Actions.
1.
Start Server. Tools > Start Server.
2.
Close Server. Tools > Close Server.
3.
Email Log. Tools > Email Log.
4.
Install/Re-install QX Mobile on PPC. Tools > Install QX Mobile on PPC.
5.
Install printing software. Tools > Install Printing Software.
6.
Find Pocket PC version. Tools > Find Pocket PC version.
11
Chapter 2
QX Mobile
This section explains how to use QX Mobile on your Pocket PC. Once QX Mobile is installed go to Start >
Programs > QX Mobile. If its not listed then its most likely not installed. Place your PPC in the cradle and start QX
Mobile Server (desktop application). The application should detect QX Mobile is not installed, so you will receive a
prompt to install. If no prompt appears, go to Tools > Install QX Mobile on PPC. The status bar in the bottom
should indicate the progress of the installation. Once the installation is complete, select your database and click
Synchronize
The follow sections are broken up explaining the main areas of QX Mobile. My Calendar, Wireless
Synchronization, Services, Customer.
2.1 My Calendar
This section explains options you have when in My Calendar and related sections. We will look how to view a
service; view, add or edit your customer information, updated preferences for QX Mobile, Time/Material screen,
reschedule services, change status of service in My Calendar and how to use the Job Cost Timesheet.
Fig. 2.1: View services to perform on any day of the week.
How do I add a service?
From My Calendar
1.
2.
Click Schedule > New.
Add Service screen will appear.
12
3.
4.
5.
6.
7.
Select the Type of service in the drop down box. This will be One Time / appointment, Recurring service, Zone-based
service, Project or Billing Installment.
Select the Charge Description you wish to add as the parent service. This will only list items that have a QB Item Type of
Service.
Select the Customer from the drop down list. All active customers will be listed.
Click Save.
Once the service is added you'll be prompted if you wish to edit the service now. If you don't wish to edit the service now
you can edit it later and will be returned to My Calendar.
To add a service from the Customer View Screen.
1.
2.
3.
4.
5.
6.
7.
8.
Go to My Calendar.
Click Customer > Customer List.
Select the Customer you wish to add a service.
Click Go to Customer.
In the drop down box located in the top right select Schedule.
Click New on the menu bar at the bottom.
Add Service screen will appear.
Select the Type of service in the drop down box. This will be One Time / appointment, Recurring service, Zone-based
service, Project or Billing Installment.
9. Select the Charge Description you wish to add as the parent service. This will only list items that have a QB Item Type of
Service.
10. Select the Customer from the drop down list. All active customers will be listed.
11. Click Save.
12. Once the service is added you'll be prompted if you wish to edit the service now. If you don't wish to edit the service now
you can edit it later and you will be returned to the Customer View screen.
Fig. 2.1: To view quickly information about a customer, select the dot located on the right of the service listed in My
Calendar.
How do I edit a service?
From My Calendar.
13
1.
2.
3.
4.
Go to My Calendar
In My Calendar select the service you wish to edit with your stylist. You will know the service is selected, as it will be
highlighted in blue.
In the bottom menu bar select Schedule > Edit Occurrence * or Schedule > Edit Series *
You'll be taken to the Work Order screen where you can edit General, Job Items, Service Times, Service Custom Fields, add
and/or delete Job Items, Service Times and Material Usage and accept customer signatures.
* Easiest way to explain the difference between Occurrence and Series is that Occurrence is information that is relevant for a
service for a specific day. Series information for a service will be relevant for each and every service that will be performed for a
particular service. You can only add/edit/delete service times and material usage for services that are an occurrence. On the other
hand recurring dates can only be edited in the Series. One Time and Project service will only be allowed to edit an occurrence.
Recurring Services and Billing Installments will have both options to edit a Series or Occurrence, depending on the Status of the
service.
From Customer View screen.
1.
2.
3.
4.
5.
6.
7.
8.
Go to My Calendar.
Click Customer > Customer List.
Select the Customer you wish to add a service.
Click Go to Customer.
In the drop down box located in the top right select Schedule or History.
Select the service you wish to edit.
Click Edit on the menu bar at the bottom.
The Work Order Screen will be displayed for the service.
How do I start a service and add start service times quickly?
From My Calendar
8.
9.
10.
11.
12.
13.
14.
15.
16.
Click Schedule > Time / Materials.
The Time / Material screen will appear showing W.O. #, crew assigned for the service, crew instructions, customer name
and job site.
Click the Crew… button and you will see all employees listed, with the employees assigned to the crew having a checkbox
beside it. You can change the employees for the crew by checking and un-checking the desired employees.
Click Start and the service will be placed On Route and each employee assigned to the crew will have a start time assigned
to it. If there are any services that have not been completed yet that have service times started, you will be prompted if you
would like to place the service to Done and each employee will have a stop time assigned for the previous service. Note:
The service must have employees assigned to the crew. If there are no employees assigned to the crew, then you will
prompted to add employees. Follow step 10 to add employees.
When you wish to stop the service, click Stop and the service will be placed to done. Each employee assigned to the service
that has a checkbox next to him or her will have the service time stopped. You may stop employees at different time periods
if you wish.
The Mat. button will display the Act. Material Usage screen to enter material usage.
The Signature button will display the Signature screen that allows to capture customer signatures.
Click Print will allow you to print Estimates, Invoices and Work Orders.
Clicking the Reset button will reset the employees for the crew to the original employee set.
14
Fig. 2.2: The Custom Entry Screen by default will show the Time Entry Screen, but can be customized to your
liking, by arranging and adding a number of controls.
How do I view information about a specific customer?
1.
2.
3.
4.
5.
Go to My Calendar.
Click Customer > Customer List.
Select the Customer you wish to view information.
Click Go to Customer.
In the top right you'll see a drop down box. You'll have the option to view summary information. Edit contact, routing
and invoicing and customer custom fields. Can view scheduled services and history. Add and delete Contact Events
and Property Size.
How do I edit a customer?
From My Calendar
1.
2.
Go to My Calendar.
Select a service in My Calendar that belongs to the customer you wish to edit. You'll know a service is selected, as the
record will turn blue.
3. In the bottom menu bar click Customer > Go to this Customer.
4. The Customer View Screen will appear.
5. In the top right you'll see a drop down box. You can edit Contact, Routing and Invoicing and Custom Fields and
add/delete Customer Variable and Contact Event information.
6. Contact - information displayed/entered in QuickBooks and QXpress.
7. Routing and Invoicing - information displayed/entered in QXpress only.
8. Custom Fields –information displayed/entered only in QXpress only.
9. Property Size – Add and delete property size information. This is used in determining the property size of the customer
as well.
10. Contact Events – Add and delete contact events for the selected customer.
15
From Customer List
1.
2.
3.
4.
5.
6.
7.
8.
In the bottom menu bar click Go to Customer.
The Customer View Screen will appear.
In the top right you'll see a drop down box. You can edit Contact, Routing and Invoicing and Custom Fields and
add/delete Customer Variable and Contact Event information.
Contact information displayed/entered in QuickBooks and QXpress.
Routing and Invoicing - information displayed/entered in QXpress only.
Custom Fields - information displayed/entered in QXpress only.
Property Size – Add and delete property size information. This is used in determining the property size of the customer
as well.
Contact Events – Add and delete contact events for the selected customer.
How do I add a customer?
From My Calendar.
1.
2.
3.
4.
5.
6.
Go to My Calendar screen.
In the bottom menu bar click Customer > New QuickBooks Customer...
The Add Customer screen will appear.
A minimum requirement to add a customer is the Name field. If you enter the first and last name fields, then the Name
field will automatically be entered.
Once all the information you wish to add is entered.
Click Save.
From Customer List
1.
2.
3.
4.
In the bottom of the screen click the menu bar click New.
The Add Customer screen will appear.
A minimum requirement to add a customer is the Name field. If you enter the first and last name fields, then the Name
field will automatically be entered
Once all the information you wish to add is entered click Save.
How do I call a customer (only for Pocket PC Phones)?
From My Calendar.
1.
2.
3.
4.
Go to My Calendar screen.
Select a service in My Calendar.
In the bottom menu bar click Customer > Call {phone number}
If the phone number appears to be a proper phone number your phone will attempt to dial the number.
How do I change the status of a service?
1.
2.
3.
4.
5.
6.
Go to My Calendar
Select the service you wish to change the status with your stylist.
To change the status to Pending, in the bottom menu bar click Schedule > Status to 'Pending'.
To change the status to OnRoute, in the bottom menu bar click Schedule > Status to 'On Route'.
To change the status to Done, in the bottom menu bar click Schedule > Status to 'Done'.
To change the status to Cancel, in the bottom menu bar Schedule > Status to 'Cancel'. The service will no longer be
seen My Calendar.
Note: You’ll know the status of the service by the icon in the right of My Calendar. The icons correlate to the ones found in
QXpress.
16
Fig. 2.3 The Custom Entry Screen takes the place of the Time/Material Screen which gives a great deal more flexibility and
options for the user.
How do I view the waiting list?
1.
2.
3.
4.
Go to My Calendar.
In the menu bar go to Schedule > Waiting List.
The Waiting List will appear with Zone services not fetched yet and One time / appointment services that are on the
waiting list.
In the top of the screen you can filter by the Job Kind and the number of days since the last service.
How do I fetch a service in the waiting list?
1.
2.
3.
4.
5.
6.
7.
Go to My Calendar.
In the menu bar go to Schedule > Waiting List.
Select the service you wish to fetch. Service selected will appear in blue.
Select the day you wish to fetch the service, the Fetch Date.
Select the scheduled start and stop time of the service.
In the bottom menu bar click Fetch.
Zone services that are fetched automatically have the status to 'On Route'. One time / appointment services will have
the status of 'Pending'. The service will be visible now on the date you fetched it in My Calendar.
How do I edit a service in the waiting list?
1.
2.
Go to My Calendar.
In the menu bar go to Schedule > Waiting List. .
17
3.
4.
5.
Select the service you wish to fetch. Service selected will appear in blue.
In the bottom menu bar click Edit.
The Work Order screen will appear. You can edit the service before its is fetch.
How do I reschedule/postpone a service
1.
2.
3.
4.
5.
6.
7.
Go to My Calendar.
Select the service you wish to reschedule.
In the bottom menu bar select Activities > Reschedule/Postpone.
A pop up will appear that allows you to select the new date as well as a save or cancel the reschedule action.
Select the reschedule date for the selected service.
Click Save (floppy disk).
If you wish to cancel the rescheduling/postpone date then click Cancel (X). This will not delete the service. It will
only hide the Reschedule/Postpone pop-up screen.
How do I set my preferences?
1.
2.
3.
4.
5.
Go to My Calendar
On the bottom menu bar go to Activities > Preferences.
The Preferences screen will appear.
You can set General and Printer settings.
Under General you can set the following.
• My Calendar Show - Displays what is seen in My Calendar. You have the option of Customer Name,
Service and Job Site. The first drop down will be what will readily shown in My Calendar. So if you wish to
see the service easily, select ‘Service’ from the drop down.
• My Calendar Order - list by time or by sort code.
• Font Size - font size used in the application. Can range from 6-9.
• Font Style - style of the font used in the application.
• Customer Selection – whenever you have to select a customer you’ll have to option to select if from a drop
down list or from a filter. For large customer lists, it’s recommended to use the filter option.
• Charge Descrip. Selection – whenever you have to select a charge description you’ll have to option to select
if from a drop down list or from a drill down. For large charge description lists, you may find it advantageous
to use the drill down as it breaks the charge description list into levels analogous to QuickBooks.
• Show Work Order #
• File Storage Location: Will list all storage card locations. If you leave this option blank or set it back to
blank, you’ll be using the default database location at “\Program Files\QX Mobile\QXMobileDB\” directory.
• Backg’d Color (RGB): Allows you to set the color scheme of the background of QX Mobile. This is based
on the Red Green Blue color system.
• Time/Mat. Language: Option to show the buttons under the Time / Material screen in either Spanish or
English.
•
6.
Purge history From: Anywhere from 2 weeks to 6 months you can purge old history data that has
been entered by the user only on the Pocket PC.
• Auto Find IP: If this is set to ‘Yes’, QX Mobile will automatically find the IP Address and Port
Number of the main computer that host QX Mobile Server so you can easily retrieve information.
Under Printing you can set the following.
• Invoice Header – Set the header you wish to appear for an invoice.
• Estimate Header – Set the header you wish to appear for an estimate.
• Work Order Header – Set the header you wish to appear for a work order.
• Signature on Invoice – Select to print the customer’s signature on the invoice.
• Signature on Estimate – Select to print the customer’s signature on the estimate.
• Signature on Work Order – Select to print the customer’s signature on the work order.
• W.O. # as Invoice # - Use the Work Order Number as the Invoice number for the invoice. Reason
you may to do this is Invoice numbers are only generated from QXpress and therefore QX Mobile
cannot show an Invoice Number. For reference, however, a Work Order number can be used.
• Show Sales Rep. – Option to show sales rep. on invoices.
18
•
7.
Custom Fields 1-6. You will have an option to show up to 6 custom fields on an invoice. The drop
down will list all your custom fields available and allow you to place the order in which to view
the custom fields.
Click Save to save any changes you’ve made or Back to close the screen without saving changes.
How do I add/edit Service Times in the Job Cost Timesheet?
1.
2.
3.
Go to My Calendar.
In the bottom menu click Activities > Job Cost Timesheet....
The top drop down control will list all customers that have services with the status of OnRoute for the date range
selected in My Calendar. Depending on what preference you set up in the Preferences screen under ‘My Calendar
Order’; you will also see the Sort Code or Start/Stop Time of the service for the customer.
4. Select the Customer you wish to fill out the service times.
5. Once the customer is selected, all the services for the customer will be listed in the drop down below the customer drop
down. You will see the W.O. (work order) # before the service name.
6. Select the service you wish to enter the service times.
7. Fill in the information you wish to enter for the customer. If you wish to enter the same start and stop times for each
crew member, then select CREW in the Employee drop down.
8. You can also have the option of setting the service to done by changing the Service is Done to Yes.
9. Once the information is filled out click Save.
10. If you wish to edit a specific service time, selected the Service Time in the list below for the employee.
11. Make necessary changes.
12. Click Save.
Note. QX Mobile will know to update the service time if it is highlighted and to add a new service time if no employee service
time is selected.
How do I view invoices?
1.
2.
3.
4.
5.
Go to My Calendar.
Click Invoice button.
In the top drop down button select Search By Customer and Search By Invoice Number.
If you select Search By Customer a drop down below will appear with all active customers. Select the customer and all
synchronized invoices for the customer will appear.
If you select Search By Invoice Number. If the invoice number was synchronized it will appear below.
How do I view the Charge Description List ?
1.
2.
3.
4.
5.
6.
Go to My Calendar
Select Charge Description List button.
You'll see a listing of all your Charge Descriptions.
To filter the charge description lists enter the name of the charge description into the text box.
Click Filter.
Charge descriptions that match your filter criteria will be listed.
How do I add a New Charge Description?
1.
2.
Go to My Calendar
Select Charge Description List button.
19
3.
4.
5.
6.
You'll see a listing of all your Charge Descriptions.
In the bottom menu bar click New.
You'll have a number of options to enter information. Required fields are Charge Description and Item.
Click Save.
How do I view Contact Manager Events?
1.
2.
3.
4.
5.
6.
7.
8.
9.
Go to My Calendar.
Click Contact Manager button.
The first drop down button will have the option Search by Customer or Search by Date.
If you select Search by Customer the drop down below will appear with all active customers.
Select the customer you wish to see all Contact Events that was synchronized.
All contact events will be listed for the customer.
If you Search by Date a Date picker will appear below.
Select the date you wish to see all Contact Events that was synchronized.
All contact events will be listed for the date.
How do I add a Contact Manager Event?
1.
2.
3.
4.
5.
6.
Go to My Calendar.
Click Contact Manager button.
In the bottom menu bar click New.
The Contact Event screen will appear.
Enter the desired information. Required fields are Status, Type and Customer Name. Reminder date (when you wish to
have the contact event appear) is in the format year-month-dayThour:minute:second
Click Save.
How do I delete a Contact Manager Event?
7.
8.
9.
10.
11.
Go to My Calendar.
Click the Contact Manager button.
Filter the contact events until the desired contact event can be seen.
Select the contact event you wish to delete.
Click Delete.
How do I view only services for only one crew in My Calendar?
1.
2.
Go to My Calendar
On the top left there is a drop down box. To view all crews select ALL. To view a particular crew selects the crew
number. Crews will be limited to the ones you have selected when synchronize on the QX Mobile Server.
20
2.2 QX Mobile - Wireless Synchronization
How do I wirelessly synchronize information?
There are 3 screens where you can synchronize data. Depending on what screen you are on it will synchronize different
information. For each of these situations you must be connected to the Internet and QX Mobile Server must be listening for
incoming connections on your desktop computer.
Note: Any synchronization call you make will also send information you have entered into QX Mobile to QX Mobile Server for
entry into QXpress.
From Synchronize Screen.
1.
2.
3.
4.
5.
6.
7.
8.
Go to My Calendar.
Click Activities > Synchronize.
The Synchronization screen will appear.
At the top you'll see the time modified option. When the Synchronization request is sent, it will use the Time Modified value
to request information only from the time modified to the current time. This allows for much smaller and quicker data
transfer. Once the Synchronization process completes, the Time Modified value will update to the current date and time.
You have the option to set the Time Modified to any date/time.
You'll have the option to update information for My Calendar, Customers, Waiting List, Employees, Charge Description,
Contact Events and Invoices. Just make sure the desired check box is selected.
If the Auto Find IP is set to Yes under Activities > Preferences (which by default it is set to Yes), the IP Address and Port
Number is automatically retrieved when the Synchronization call is made. You can manually change the IP Address and
Port Number, just make sure Auto Find IP is set to No or the information will be updated with each synchronization call.
Click Synchronize > Send and Receive QX Data.
Wait while QXpress sends and retrieves data. You’ll be updated on the progress of the synchronization at the bottom of the
screen.
From My Calendar Screen.
1.
Go to My Calendar select the synchronization button . All QX Mobile information will be sent and process on the server
and all updated information related to My Calendar will be sent back to QX Mobile. You’ll be updated on the progress of
the synchronization in the top right of the screen. The date range in My Calendar will determine what services will be
returned.
From Customer View Screen.
1.
2.
3.
4.
5.
Go to My Calendar.
Click Customer > Customer List.
Select a customer in the list.
Click Go to Customer.
The Customer View screen will appear.
6.
7.
Click the Synchronization button at the top of the screen.
Updated information will be received in regards to the selected customer as well as the customer’s history and scheduled
services. You’ll be updated on the progress of the synchronization in the top of the screen.
21
2.3 QX Mobile - Services
Following explains how to work with services.
How do I view a summary of a particular service?
1.
2.
3.
4.
5.
Go to My Calendar
Select a service in My Calendar list with your stylist. The service will be highlighted in blue
In the menu bar click Scheduled > Edit Occurrence or Scheduled > Edit Series.
The Work Order screen will appear that will list information for this service. In the top right will be a drop down
button. Select Summary.
Your service summary will appear. Information will appear based on what was selected in the QX Mobile Server when
setting up your profile (default profile will be used if none was selected).
How do I edit a particular service (i.e. General, Job Items, etc)?
1.
2.
3.
4.
Go to My Calendar.
Select a service in the My Calendar list with your stylist. The service will be highlighted in blue
In the menu bar select Scheduled > Edit Occurrence or Scheduled > Edit Series.
Depending on the type of service you have selected or if it is an occurrence or a series you are editing you will have a
number of options to edit the service. In the top right you will have a drop down that you can select what section of the
service to edit. Section are General, Job Items, Custom Fields, etc.
The following are actions you would perform when you'
re in this Work Order screen.
How do I edit General information?
1.
2.
3.
4.
Select General from the top right drop down box.
You will be taken to the General screen.
Edit desired information.
Click Save.
Note: One Time services will have the option to Place on Waiting List drop down, but only One Time Services.
How do I add a Job Items?
1.
2.
3.
4.
5.
6.
Select Job Items from the top right drop down box.
You will be taken to the Job Items screen.
Select the Charge Description from the drop down below the customer name. If you have drill down selected, click on
the details button (…) and select the service. All top-level services will be listed first, when a service is select all child
services will be displayed. If no child services exist, the drill down screen will disappear and place the selected parent
service into the Charge Description input box.
Once your service is selected, default rates, long description, instructions, etc. will be added automatically.
Fill in all the information as you wish.
Click Save.
Note: If you’ve selected to show Charge Type, FL – Flat Rate; QY – By Quantity of Material Usage / Service Time; NC – Non
Chargeable.
How do I edit a Job Item?
1.
2.
3.
4.
Select Job Items from the top right drop down box.
You will be taken to the Job Items screen. You will see a listing of all Job Items for the service in the screen just above
the bottom menu.
Select the Charge Description from list you see at the bottom of the screen. The service will appear in blue when it is
selected.
Once you've highlighted the service, default information for that particular service will be filled for the controls in the
middle of the screen.
22
5.
6.
7.
Make necessary changes in the controls in the middle.
Make sure your service is still highlighted in blue.
Click Save.
How do I delete a Job Item?
1.
2.
3.
4.
5.
Select Job Items from the top right drop down box.
You will be taken to the Job Items screen. You will see a listing of all Job Item(s) for the service in the screen just
above the bottom menu.
Select the Charge Description from list you see at the bottom of the screen. The service will appear in blue when it is
selected.
Make sure your service is still highlighted in blue.
Click Delete.
Note: You cannot delete the main service. To delete a service go to My Calendar and set the service status to Cancel
How do I add a service time?
1.
2.
3.
4.
Select Act. Service Time from the top right drop down box.
You will be taken to the Act. Service Time screen. Select the service in the drop down below the customer name to
determine what service times to add. Services that are contained in the job items list are displayed first, after the ‘-----‘
will contain services that are not already added to the job items list, but can be selected and will be added to the service
time you enter. If you have drill down option selected for Charge Description Filter set in under preferences, you won’t
have any items appear other than the ones selected for the service. To view more services select it from the details
button (…)
Select the start and stop times, notice you will have a CREW option under the Employee control. If you select CREW
when adding a new service, then each crew member for this service will receive the same information. Crew members
are listed under CREW in the drop down.
Click Save.
Note: Act. Service Times will only appear if the Edit Occurrence is selected and service type is not Billing Installment.
How do I edit a service time?
1.
2.
3.
4.
5.
Select Act. Service Time from the top right drop down box.
Select the service time you wish to edit from the ones listed. Once you select the service time the record will highlight
in blue and the values will populate in the controls.
Make necessary changes in the input boxes.
Make sure your service is still highlighted in blue.
Click Save.
How do I delete a service time?
1.
2.
3.
Select Act. Service Time from the top right drop down box.
Select the service time you wish to edit from the ones listed. Once you select the service time the record will highlight
in blue and the values will populate in the boxes
Click Delete.
23
How do I add material usage?
1.
2.
3.
4.
5.
Select Act. Material Usage from the top right drop down box
You will be taken to the Act. Material Usage screen.
Select the material in the drop down below the customer name to determine what material to add. Materials that are
contained in the job items list are displayed first, after the ‘-----‘ will contain material that are not already added to the
job items list, but can be selected and will be added to the material usage you enter. If you have drill down option
selected for Charge Description Filter set under preferences, you won’t have any items appear other than the ones
selected for the material. To view more materials select it from the details button (…).
Enter information into input boxes.
Click Save.
Note: Act. Material Usage will only appear if the Edit Occurrence is selected and service type is not Billing Installment
How do I delete a material usage?
1.
2.
3.
Select Act. Material Usage from the top right drop down box.
Select the material usage you wish to edit from the ones listed just above the bottom menu. Once you select the
material the record will highlight in blue.
Click Delete.
How do I edit custom fields?
1.
2.
3.
Select Custom Fields from the top right drop down box.
Make any changes to the values in the custom fields.
Click Save.
How do I accept a signature?
1.
2.
3.
4.
Select Signature from the top right drop down box
Write your signature.
Below the signature you can enter the individual under this service. You can change this name and record the person
who provides the signature.
Click Save.
Note: Signature will only appear if the Edit Occurrence services.
How do I add Project Scheduling?
1.
2.
3.
4.
Select Project Scheduling from the top right drop down box.
You will be taken to the Project Scheduling screen. Select the Charge Description from the drop down below the
service.
Fill in all the information as desired.
Click Save.
How do I edit Project Scheduling?
1.
2.
3.
4.
5.
6.
Select Project Scheduling from the top right drop down box.
You will be taken to the Project Scheduling screen. You will see a listing of all Job Items for the service in the screen
below. Select the Charge Description from list you see at the bottom of the screen.
Once you have highlighted the service, the information for that particular service will be filled in at the controls in the
middle of the screen.
Make necessary changes.
Make sure record is still highlighted.
Click Save
How do I delete a Project Scheduling?
24
1.
2.
3.
Select Project Scheduling from the top right drop down box.
You will be taken to the Project Scheduling screen. You will see a listing of all Job Items for the service in the screen
below. Select the Charge Description from list you see at the bottom of the screen.
Click Delete
How do I add a subcontractor?
1.
2.
3.
4.
Select Subcontractor from the top right drop down box.
Select the Vendor.
Make necessary changes in the input boxes.
Click Save.
How do I delete a subcontractor?
1.
2.
3.
Select Subcontractor from the top right drop down box.
Select the subcontractor from the ones listed in the grid. Once you select the subcontractor the record will highlight in
blue.
Click Delete.
How do I add a Payment?
1.
2.
3.
Select Payment from the top right drop down box.
Enter information, Amount, Payment Method and QB Account all must have a value entered
Click Save.
How do I Create a Bill/P.O. for materials purchased in the field?
1.
2.
3.
4.
5.
6.
Select Act. Material Usage from the top right drop down box.
Click Create Bill/P.O. for materials purchased in field…
Make sure Vendor Bill or P.O. Number is selected.
Fill out information below such as Vendor, Terms, etc.
Click Tools > Add Job Item.
A new screen will appear. Select the Charge Description. The default information for the selected Charge
Description will be populated.
7. Click Add in the toolbar.
8. Repeat steps 6 and 7 for each item you wish to add.
9. Click Back.
10. You’ll see the items listed.
11. Click Save Options > Save.
12. If P.O. Number is selected, you’ll have the option to Save Options > Save & Sync. This will send the
information back to QX Mobile Server and add the information into QuickBooks, returning the P.O.
Number generated by QuickBooks.
How do I modify the recurring service of a recurring service or billing installment?
If the service in My Calendar and you have the option to edit the occurrence or series then you know it is a
Recurring or Billing Installment. If you select Edit Series then you will have the option to edit the Recurring series.
1.
2.
3.
Select Recurring from the top right drop down box.
Make necessary changes.
Click Save.
How do I print?
You have the option to print out Estimates, Work Orders and Invoices. To view the print screen, follow these steps.
1.
Select Print from the top right drop down box.
25
2.
3.
You will be taken to the print screen. You can select the Billing Message you wish to use in the combo box.
Whatever you select, you’re billing message will be saved. Select if you wish to print an Invoice, Estimate
or Work Order. Invoices will show the sub total, taxes and total before you print the invoice.
When ready to print, click Print.
Note: if you click Schedule > Edit Series only the Estimate option is displayed as this is not an active/onroute-done
service. Please select the template you wish to use in QX Mobile Server under Advanced > Template Designer.
2.4 Customer View
This section explains options you have when you have selected to view/add/edit information about a particular
customer. Once in the customer view you will be able to edit a customer, add/delete property size of a customer,
view equipment information, scheduled and history of services and view/add/delete contact information.
How do go to the Customer View screen?
You have two options.
From My Calendar
1. Select the service of a customer you wish to view information.
2. Click Customer > Go to this Customer.
From Customer List screen.
1. Select the customer from the Customer List screen.
26
2.
Click Go to Customer in the menu bar.
How do I view a summary of the customer?
1.
2.
Select Summary from the drop down box in the top right of the screen.
You’ll see a listing of all information selected as viewable for the customer.
How do I edit Contact Information for a customer?
1.
2.
3.
Select Contact Information from the drop down box in the top right of the screen.
All information pertaining to contact information will be listed here. This information is also synchronized with
QuickBooks. Any information updated here will also be reflected in QuickBooks once synchronized with QX
Mobile Server.
Change desired information and click Save.
How do I view/edit scheduled services?
1.
2.
3.
4.
Select Schedule in the top right drop down box.
You’ll see a listing of scheduled services. This will most likely not be all scheduled services. If you have
Internet connection, you have the option to synchronize information for this customer and all services scheduled
button in the
and the customer’s history will be synchronized wirelessly. Synchronize information by click
Customer View screen.
To edit a scheduled service, select the service from the list.
Click Edit option in the menu bar.
How do I view/edit a service in the customer’s history?
1.
2.
3.
4.
Select History from the drop down box in the top right of the screen.
You’ll see a listing of the customer’s history. Again, this will most likely not be all your customer’s history. If
you have an Internet connection, you’ll have the option to synchronize information for this customer’s service
history. Synchronize information by click
button in the top of the Customer View screen.
To edit a service in the history list, select it from the list.
Click Edit option in the menu bar.
How do I view/add/edit a customer’s equipment information?
1.
2.
3.
4.
5.
6.
Select Equipment from the drop down box in the top right of the screen.
The middle portion provides input for entering in a new equipment for the customer. Fill in all desired
information.
Click Save in the menu tool bar to add the new equipment for the customer.
Listed at the bottom of the screen will be all equipment for this customer.
To delete equipment, select it from the listing.
Click Delete.
How do I view/add/edit a contact event for a customer?
7.
8.
9.
10.
Select Contact Events from the drop down box in the top right of the screen.
The middle portion provides input for entering in a new contact event. Fill in all desired information.
Click Save in the menu tool bar to add the new contact event for the customer.
Listed at the bottom of the screen will be all contact events for this customer. Click on the black dot in the list to
view all the Contact Event Notes.
11. To delete a contact event, select it from the listing.
12. Click Delete.
27
How do I edit a customer’s Routing and Invoicing information?
1.
2.
3.
Select Routing and Invoicing from the drop down box in the top right of the screen.
Edit the information listed. This will all be related to routing and invoicing for the customer.
Once all changes have been made click Save on the menu bar.
How do I edit a customer’s Property Size?
1.
2.
3.
4.
5.
6.
7.
Select Property Size from the drop down box in the top right of the screen.
Enter the Variable Name and Quantity into the appropriate text boxes.
Click Save at the bottom of the screen.
All Variable Names added to the customer will be listed below. Note the Variable Class for each variable name
added will be listed on the right of the listing. Only Variable Names with the Variable Class ‘Property Size’ will
be added to the Property Size of the customer. For more information about how property size is assigned,
consult the QXpress manual. Property size can be view in the Summary section of the Customer View.
Do delete a Variable Name, select it from the list.
Click Delete from the menu bar.
Listing will refresh without the deleted item.
How do I edit a customer’s Custom Fields.
1.
2.
3.
Select Custom Fields from the drop down box in the top right of the screen.
Change/enter the desired information about the customer.
Click Save on the menu bar.
28
**Listing
of Printers Supported.
Printer Name
Specifications
Notes
HP Mobile Printers
with Infrared and Bluetooth
Including HP450 and HP350
Use "HP PCL" printer
selection. Set Color/Mono to
Monochrome if not color!
Including HP 995c - with
Bluetooth, Infrared. Use "HP
PCL" printer selection
Hp deskjet 450 was used by development team.
HP LaserJet
HP Deskjet
Canon PIXMA iP90/i80/I70
Use "Canon BJ (600dpi)"
printer selection
Epson
Stylus, ESC/P2
Canon BJC – 80/85
BJC – 50/55 +
most Canon BubbleJet
printers. Use "Canon BJ
(360dpi)" printer selection
Some of HP's newer low-priced DeskJet printers
are NOT compatible with our HP support. If you go
to HP's website (www.hp.com) and search for a
particular printer, examine the "specifications" page
for the printer - if it says the printer uses HP's PCL
printer language, it will likely work fine. If it only
uses "LIDIL" - (Lightweight Imaging Device
Interface Language), it probably will not to work.
HP PhotoSmart 1000 & 1100 series printers use a
non-standard Infrared port which does not work
with our printing software. Infrared-equipped
PhotoSmart 12xx and later series work fine.
Epson C84, C82, C44, C64 and a few other Epson
printers may NOT be supported.
29
Tips and Tricks.
Listing of functionality of QX Mobile that you may not be aware of.
•
•
•
•
Service - Quick View. In My Calendar you will see a black dot at the end of each service record. If you tap and hold this
black dot with your stylist, addition information such as Customer address, start and stop time, work order number and
invoice type will pop up. Any area where you see this black dot you can tap and hold to see the rest of the information that
could not be shown.
In the Customer List, Customer View – Summary, Work Order Screen – Summary, if you double click (tap) with your
stylist a particular section you will be taken to that area. For the customer list you will be taken to the Customer View screen
for the Customer you double clicked.
If you have a keyboard on your PPC you can you use it to maneuver around QX Mobile.
•
Tabbing will go through each visible control.
To find how much free memory you have on your Pocket PC, Version of QXpress and name of the database you are using
currently go to My Calendar in QX Mobile and click Activities > About. You’ll see a listing of the above mention
information.
30