1
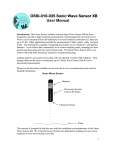
OSSI-010-022 Wave Gauge Blue
Quick Start Guide
This guide will assist the user to obtain data from the Wave Gauge blue in the quickest
time possible. The user is advised to read the user manual in its entirety before actual
deployment of the instrument.
After unpacking the unit, check to see that there is a battery pack with a connector, a DB9
serial communication cable, a Wave Gauge Blue, a compact flash card and Bluetooth
Adaptor. The Wave Gauge Blue will accept compact flash card sizes from 64MB to
64GB.
The top of the Wave Gauge Blue housing (the part with the label) unscrews from the
bottom. Do not screw them together too tightly or it will become difficult to reopen!
If the flash card is not yet installed, insert the flash card with the label upside down facing
you. The extra ridge on the card will be to the back as indicated on the panel. The
battery may be plugged into the cable extending from the electronics. The LED will now
signal the following
1. ON FOR 3 SECONDS = CARD INSERTED OK /COLLECTING DATA
2. CONTINUOUS 1 SEC. ON & 1 SEC. OFF = OK TO REMOVE CARD.
STOPS AFTER CARD REMOVED
3. FAST BLINKING = CARD REMOVED BEFORE CLOSING
FILE OR BAD CARD FORMAT
If the LED signals for 3 seconds the unit will begin to collect data normally. If the red
LED flashes rapidly several times, the initialization has failed and the battery should be
unplugged and reinserted.
To view the data, push the small recessed button on the top of the electronics. The red
LED will begin to blink at a one second interval to indicate that you may now remove the
flash card. Failure to push the button will cause the data to be lost. Insert the flash card
into a PC based flash card reader (user supplied). The files may be imported into the
Interface Software, Word Pad, Exel, Matlab or other text or analysis program.
To assemble the unit for deployment, a light coating of silicon o-ring grease should be
applied to the o-rings and sealing surfaces. The battery is set into the recess in the bottom
half of the unit. The battery connector secured within the track on the side of the battery
pack. The cover or top half of the Wave Gauge Blue may now be screwed all the way
down over the bottom half. Do not screw the halves together too tightly as it will become
difficult to separate them.
1
A very important note about the Wave Gauge Blue:
Note 1: Remember to tell anyone using it that they MUST NOT GET ANY
SALTWATER or SWEAT INSIDE THE UNIT AS THIS WILL CORRODE THE
CIRCUITRY! It must be thoroughly dried before it's opened. Then lay the unit down on
its side. Open the unit very carefully, if there is any water around the 0 Ring it will not
fall into the unit and can be further dried. Hands must be totally dry when opening and
handling the unit.
Note 2: If enabled “The New file Interval In Days” will use the last minute of the
day to close that days file and open a new file for the next Day. The Wave Gauge
Blue will stop recording data at 2359 hours and then start recording data again the
next day at 0000 hours in the new file.
Note 3: See the user manual for information on changing the Wave Gauge Blue
configuration.
2