1
Hog® 3PC
Handbook
Version 1.4.0
Hog® 3PC
Copyright © 2006 by High End Systems. All Rights Reserved
No part of this Handbook may be reproduced or transmitted in any form or by any
means, electronic or mechanical, including photocopying and recording, for any
purpose (except for the training purposes described below), without the express
written permission of High End Systems. For HogPC training purposes, copies can be
made and freely distributed provided that:
1.
The Handbook is not altered in any way and is copied in its entirety.
2.
All copies are distributed free of charge
3.
All copies are used for no purpose other than to educate users in operation.
High End Systems reserves the right to determine what constitutes a legitimate
training purpose and to revoke the right for anyone to duplicate this Handbook at any
time.
Trademarks
The Flying Pig Systems logo, the WHOLEHOG, and the WHOLEHOG 3 are registered
trademarks of Flying Pig Systems. Flying Pig Systems, Effects Engine, and Hog are
trademarks of Flying Pig Systems. Windows is a registered trademark of Microsoft
Microsoft Corporation in the United States and/or other countries.
Other trademarks and trade names may be used in this document to refer to either
the entities claiming the marks and names or their products. High End Systems
disclaims any proprietary interest in trademarks and trade names owned by others.
Changes
Information in this Handbook is subject to change without notice and does not
represent a commitment on the part of High End Systems. High End Systems is not
liable for errors contained in this guide or for incidental or consequential damanges in
connection with furnishing or use of this material.
Hog® 3PC Handbook
P/N 60600259 Version 1.4.0
Printed in the USA
March, 2006
Table of Contents
Installation
Unpacking ..................................................................................1
System Requirements ..................................................................1
Installing the Hog 3PC Application ..................................................2
Software Removal ........................................................................5
Hardware Installation ...................................................................6
USB DMX Widget .......................................................................6
USB LTC Widget ........................................................................6
USB Wings ...............................................................................6
Troubleshooting Hardware Installation ............................................7
Computer Configuration ................................................................8
Network Adapters ......................................................................8
Firewall ....................................................................................8
Operation
Starting the Hog 3PC Application ...................................................9
Launch a New Show ................................................................ 10
Launch an Existing Show .......................................................... 11
Connect to a Show .................................................................. 11
Automatically Launching a Show ............................................... 11
Quitting the Hog 3PC Application ................................................. 12
Working with Hog 3PC Show Files ................................................ 12
Creating ................................................................................. 12
Transferring ........................................................................... 13
Backing Up ............................................................................. 13
Using Hog 3PC Interface ............................................................. 14
Hog 3PC Windows ................................................................... 14
Hog 3PC Front Panel GUI .......................................................... 14
Right Click Menu ..................................................................... 15
Displaying Four Hog 3PC Windows ............................................. 15
Configuration
USB DMX Widgets and Super Widgets .......................................... 16
USB Playback Wings ................................................................... 17
USB Programmer Wing ............................................................... 18
Virtual Faders ........................................................................... 19
MIDI Configuration .................................................................... 19
Networking ............................................................................... 20
Keyboard Shortcuts
Keyboard Shortcut Status ........................................................... 21
Hog 3PC Keyboard Shortcuts ....................................................... 22
Visualizer Support
Visualizing Hog 3PC DMX Output .................................................. 23
Visualizing via an Ethernet Connection .......................................... 23
Visualizing on the Same Computer ............................................... 23
Upgrading USB DMX Widgets
Hog 3PC Handbook
Installation
Unpacking
If you ordered a USB DMX Widget or DMX Super Widget, you should
have received:
• USB DMX widget or Super Widget (Super Widget requires power and a
power supply is included)
• USB cable
• Hog 3PC software installation CD
• This manual
If you ordered a USB Wing, you should have received:
• USB playback or programming wing
• Protective cover for the wing
• USB cable
• Power supply unit with IEC power cable
• LED desklight with protective pouch
If you ordered an LTC Widget, you should have received:
• USB LTC widget
• USB cable
System Requirements
To ensure successful operation of the Hog 3PC software on a personal
computer, verify that your system meets the following minimum
specifications:
• Pentium III compatible processor at 1GHz or higher
• Microsoft Windows XP® (Home or Professional) operating system
(service pack 2 or greater)
• 256MB of RAM
• 200MB of free hard-disk space
• 1024×768 or higher-resolution monitor
For larger shows, using a more powerful processor is advisable. Please
ensure that you are using the most up-to-date drivers for your graphics
card.
1
Hog 3PC Handbook
Installing the Hog 3PC Application
The software for the Hog 3PC system is provided on the accompanying CDROM. You can also download the latest version of the application from the
Flying Pig Systems website at www.flyingpig.com
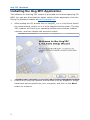
1.
After loading the CD, double click on Hog3PC_x-x-x-x.msi file to launch
the install wizard, where x-x-x-x is the supplied build number. The Hog
3PC installer will check your operating system and windows installer
versions, and then display the welcome screen.
2.
Ensure any Flying Pig Systems USB devices (such as widgets or wings)
have been disconnected from your computer, and click on the Next
button to continue.
2
Hog 3PC Handbook
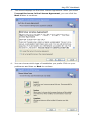
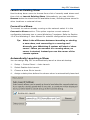
3.
The wizard displays an End User License Agreement. After you select
I accept the terms in the License Agreement, you can click the
Next button to continue.
4.
You can choose which type of installation you prefer. Click on your
preference and then on Next to continue.
3
Hog 3PC Handbook
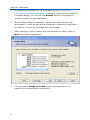
5.
By default the software will be installed into the "C:\Program
Files\Flying Pig Systems\Hog3PC\" directory. If you select Custom or
Complete Setup, you can use the Browse button to navigate to
another location for the application.
6.
When Custom Setup is selected, you can also select which help
languages to install as well as the Visualizer Connectivity Application.
By default all items are installed until deselected.
7.
After selecting a drive location and components to install, click on
Next to continue installation.
8.
This prompts a Ready to Install screen with instructions on
beginning or cancelling the installation.
4
Hog 3PC Handbook
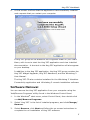
9.
A final screen confirms that the application has successfully installed
and requests that you restart your computer.
A Hog 3PC group will be added to the Programs folder on your Start
Menu, with icons to start the Hog 3PC application and view installed
documentation. A shortcut to the Hog 3PC application will also appear
on your desktop.
In addition to the Hog 3PC application, the Hog 3PC group contains the
Hog 3PC Widget Upgrader, Hog 3PC Handbook, and the Wholehog 3
User Manual.
The Hog 3PC CD also contains installers for the Wholehog 3 Visualizer
Connectivity application and Wholehog 3 console installation software.
Software Removal
You can remove the Hog 3PC application from your computer using the
'Add/Remove Programs' utility found in the Windows Control Panel.
1.
In the Windows® start menu, select Control Panel, then double click
on Add/Remove Programs.
2.
Select ‘Hog 3PC’ in the list of installed programs, and click Change/
Remove.
3.
Select Remove, click Next and follow the on-screen instructions to
complete the un-installation of Hog 3PC software.
5
Hog 3PC Handbook
Hardware Installation
Hardware installation should only be performed after the Hog 3PC software
has been installed on your computer.
Please observe the following important information before connecting your
hardware:
USB DMX Widget
DMX Widgets are high-power USB devices, and so is not compatible with
bus powered USB hubs. If a widget is connected via a bus-powered USB
hub, Windows will report that is does not have enough power available to
run the widget. Always connect the widget either directly to your computer,
or to a self-powered hub.
NOTE:
The Super Widget comes with its own power supply,
so you can connect it to a bus-powered USB hub.
USB LTC Widget
The LTC Widget is a low-power USB device, and so can be used with both
bus powered and self powered USB hubs.
USB Wings
The USB Programming and Playback Wings can be used either with or
without the supplied external power supplies. If used without, the desklight
and internal USB hub will not function, and LED dimming will be
unavailable. All other functions will remain unaffected.
When the internal hub is active (with an external power supply connected),
it operates as a self powered hub. It is therefore possible to connect highpower USB devices to the internal hub, such as the USB DMX Widget, or
another Wing.
The USB Wing is a high-power USB device when used without an external
power supply, and so should not be connected to bus powered USB hubs
unless the external power supply is connected.
Use the supplied cables to connect any Flying Pig Systems USB devices to
your computer. Windows should automatically detect and install the new
hardware. This process may take a few seconds, but should not require any
input from you. If this is the case, you may ignore the rest of this section.
6
Hog 3PC Handbook
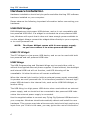
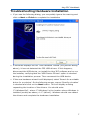
Troubleshooting Hardware Installation
• If you see the following dialog, you may safely ignore the warning and
click on Next or Finish to complete the installation
• If Windows displays the full 'new hardware' wizard (not just the dialog
above), it has not detected the FPS USB drivers. If this happens,
disconnect the USB device, un-install the Hog 3PC software and re-run
the installer, verifying that the 'USB Device Drivers' option is checked
during the installation process. Then reconnect the USB device.
• If the new hardware wizard is still displayed, select 'Search for a suitable
driver for my device'. On the following screen, ensure 'Specify a location'
is checked and click on the Next button. This will display a dialog
requesting the location of the drivers. You should enter
'C:\Windows\Inf', where 'C:\Windows' is the location where Windows is
installed (usually as above, or 'C:\Winnt'). Windows should now detect
the drivers and complete the hardware installation.
7
Hog 3PC Handbook
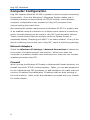
Computer Configuration
Hog 3PC requires Windows XP SP2 or greater to ensure proper networking
functionality. Since the Wholehog 3 Operating System makes use of
multiple processes communicating via TCP/IP sockets, some Windows
computer configurations may prevent the Hog 3PC processes from
communicating with each other.
Not meeting the system requirements of Windows XP SP2 or greater, lack
of an enabled network connection or multiple active network connections,
and/or firewall settings can all result in Hog 3PC communication failures.
These communication failures typically cause the Splash Screen to
repeatedly display "Scanning port 6600" in its status window. If any of the
above conditions prevent the use of Hog 3PC, check the following settings:
Network Adapters
Check the Windows XP Settings / Network Connections to determine
the number of enabled network connections. When more than one
connection is enabled, disable extra connections so that only one remains
enabled and restart Hog 3PC.
Firewall
When running the Windows XP firewall or aftermarket firewall products, the
firewall may block TCP/IP communications. Often, you can add exceptions
for the individual Hog 3PC processes, or add exceptions for traffic that has
a source IP address and destination IP address that are both pointing to
the local machine. Refer to the documentation provided with your firewall
for further details.
8
Hog 3PC Handbook
Operation
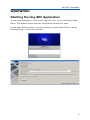
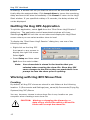
Starting the Hog 3PC Application
To start the application, click on the Hog 3PC icon on your Windows Start
Menu. The Splash Screen and the Hog3 Start window will open.
In the Hog3 Start window, you can choose to Launch New Show, Launch
Existing Show, or Connect to Show.
9
Hog 3PC Handbook
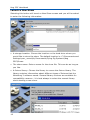
Launch a New Show
Selecting this button will launch a New Show screen and you will be asked
to enter the following information:
• A storage location: Choose the location on the hard drive where you
would like to store the show. The default location is: C:\Documents and
Settings\user_name\My Documents\Flying Pig Systems\Hog
3PC\Shows.
• The show name: Enter a name for the show file. This can be as long as
you like.
• A fixture library: Choose the library to use as the fixture library. The
library contains information about different types of fixtures that the
Wholehog 3 software needs. Several library versions are available for
compatibility reasons - it is best always to select the newest library
when starting a new show.
10
Hog 3PC Handbook
Launch an Existing Show
Use the drop down menu to choose from a list of recently used shows and
then click on Launch Existing Show. Alternatively, you can click the
Browse button to select from all available shows, including those stored in
other locations or external drives.
Connect to a Show
To connect to a show already running on the network select it in the
Connect to Show section. This option requires correct network
configuation between two or more Wholehog 3 systems. Refer to Section
12 of the Wholehog 3 User Manual for network configuration instructions.
Tip:
What is the difference between launching or starting
a new show, and connecting to a running one?
Normally your Wholehog 3 system will start a ‘show
server’. When you connect to a running show, no
server is started; instead you use the server of the
remote system.
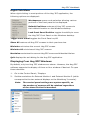
Automatically Launching a Show
You can assign Hog 3PC to automatically launch a show at startup:
1.
Setup → Control Panel → Auto Launch
2.
Select Enable Auto Launch.
3.
Choose a show file to launch.
4.
Assign a delay time before the chosen show is automatically launched.
11
Hog 3PC Handbook
At startup, a window will tell you that the show will be launched automatically after the assigned delay. Click Launch Now to ignore the remaining
delay and launch the show immediately. Click Cancel to return to the Hog3
Start window. If you specified a delay of 0 seconds, the delay window will
not be displayed.
Quitting the Hog 3PC Application
To quit the application, select Quit from the "Shut Down Hog3 Session"
dialog box. The application and all associated windows will close.
Selecting Log Off will exit the current show and display the Hog3 Start
screen where you can select another show to load.
To display the "Shut Down Hog3 Session" dialog box, use one of the
following methods:
• Right click on the Hog 3PC
front panel or any screen to
display the right click menu.
Select Quit.
• Press Setup and then select
Quit from the main toolbar.
Note:
Your show data is stored in the location that you
selected when creating the show file. Since Hog 3PC
saves changes to the disk as they are made there is no
prompt to save the show prior to quitting.
Working with Hog 3PC Show Files
Creating
By default, all Hog 3PC shows are stored in sub folders at the following
location: C:\Documents and Settings\user_name\My Documents\Flying Pig
Systems\Hog 3PC\Shows.
You can, however, choose to store show files in any location on your
computer when creating a new show file.
CAUTION: Altering or changing the hierarchy or
data of any of the files within a Show file
folder will corrupt the show file.
12
Hog 3PC Handbook
Transferring
A Wholehog 3 show file is actually a folder containing several subfolders
and files. Within the Hog 3PC application, this show folder is displayed as a
single Wholehog 3 show file with a Wholehog 3 icon.
When browsing the show folders outside of Hog 3PC, you will be able to
access the subfolders and files that make up your show.
CAUTION: Altering or changing the hierarchy or data
of any of the files within a Show file folder
will corrupt the show file.
Show folders can not be loaded directly into Wholehog 3 or Hog iPC
consoles; backup files must be used. When transferring show files
between systems do not copy show the folders using Windows applications.
Instead, use the backup utility of the Hog 3PC application and then transfer
the backup file to a console or other Hog 3PC system via CD-ROM or
external drives.
Backing Up
To prevent problems when transferring a Wholehog 3 show file from Hog
3PC to another Hog 3PC system, Wholehog 3 console, or Hog iPC console,
always create a backup of the show file using the Wholehog 3 backup
procedure. This backup procedure creates a single compressed file that
contains all the subfolders and files integral to your Wholehog 3 show file.
To create a backup of your show file, within the Hog 3PC application, use the
File Browser pane of the Show Manager window to store a backup of your
current show to another location on the hard disk or an external drive:
1.
Select the Setup → Shows → Current Show.
2.
Click Backup.
3.
Browse to a location on the hard drive or an external drive to save the
backup file.
4.
Click OK. A copy of your show will be saved with _bckf appended to its
file name.
13
Hog 3PC Handbook
The backup file can also be burned to CD or copied to an external drive and
transferred to another Hog 3PC system, Wholehog 3 or Hog iPC console
with no concerns about corruption of the show file. The backup file is also
useful should you need to send a show file via email.
Using Hog 3PC Interface
Hog 3PC Windows
When Hog 3PC opens the Hog3 Start window will be displayed along
with the splash screen. Once a show file is loaded or opened, the
two Hog 3PC default screens will be displayed. You can resize and
position these screens the same as any standard Windows operating
system screens. To resize, simply place your mouse cursor around
an edge or corner to display a resize icon. Click and drag to resize
the window. To move, click and drag on the screen's title bar (at the
top of each screen).
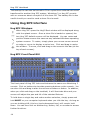
Hog 3PC Front Panel GUI
The front panel of Hog 3PC looks and behaves the same as a Wholehog 3
console. Click on buttons to simulate pressing buttons on the console. You
can also click and drag to alter the various encoders or faders. In addition,
when you click and drag on the trackball, it will illuminate blue and your
mouse will adjust the pan and tilt of the selected fixtures.
To hold down a single key and make another selection, simply press and
hold SHIFT on your computer keyboard when you click the key. As long as
you are holding shift, this key (and subsequent keys) will remain held
down. You can then click on another key, button, cell, or encoder to access
further functions.
14
Hog 3PC Handbook
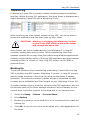
Right Click Menu
When right clicking in most portions of the Hog 3PC application, the
following options are displayed:
Workspaces opens a sub selection allowing various
portions of the front panel to be displayed.
Default Positions restores all Hog 3PC screens to
their default location on the Windows desktop.
Lock Front Panel Position toggles the ability to move
the Hog 3PC Front Panel on the Windows desktop.
Toggle Front Panel toggles the Front Panel on/off.
Show All restores all Hog 3PC screens to their previous size.
Minimize minimizes the current Hog 3PC screen.
Minimize All minimizes all Hog 3PC screens.
Maximize maximizes the current Hog 3PC screen and hides the title bar.
Quit displays the exit dialog for the Hog 3PC application.
Displaying Four Hog 3PC Windows
By default, only two Hog 3PC windows are shown. However, the Hog 3PC
software supports the display of three or four windows if desired. To open
these windows:
1.
2.
Go to the Control Panel / Displays
Set the resolutions for External Monitor 1 and External Monitor 2 (which
correspond to the two external displays on the Wholehog 3 console).
Note:
The control panel settings are system specific, so
the number of screens will be retained regardless
of the show file that is launched.
15
Hog 3PC Handbook
Configuration
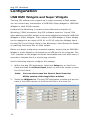
USB DMX Widgets and Super Widgets
The Hog 3PC software can support up to eight universes of DMX output.
You can connect any combination of USB DMX Super Widgets or USB DMX
Widgets to total 8 DMX outputs.
Instead of the Wholehog 3 console's direct Ethernet connection to
Wholehog 3 DMX processors, Hog 3PC software uses two "virtual" DPs
when patching and DMX output is then accomplished via external USB DMX
Widgets or Super Widgets. Each output of a USB Widget or Super Widget
can be mapped to an output of DP #1 or DP #2 using the Widgets tab of
the Hog 3PC Control Panel. Refer to the Wholehog 3 User Manual for details
on patching fixtures to DPs for DMX output.
Before you begin configuring connected widgets, ensure that an USB DMX
Widget or Super Widget is connected to an USB port of the computer. The
"link" indicator on the widget should be illuminated and it will blink every 2
seconds to indicate that it is functioning correctly.
Use the following steps to configure the widgets:
1.
Within the Hog 3PC application, select the Setup key on the Front
Panel and then the Control Panel button on the main toolbar to open
the Control Panel.
Note:
You can also access the Control Panel from the
Utility section of the Hog3 Start window.
2.
Select the Widgets tab. The Hog 3PC application provides one port for
each of the DMX outputs on the first two DPs in the show file.
16
Hog 3PC Handbook
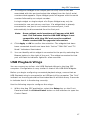
3.
To configure a widget to an output port of a DP, click on the box
associated with the port and select the widget from the list of serial
numbers that appears. Super Widget ports will appear with the serial
number followed by an output number.
A single widget or single output of a Super Widget may only be
connected to one port at any one time. If a widget that is already
connected to one port is con-nected to a second port, it will
automatically be disconnected from the first port.
Note:
Some widget serial numbers will appear with RED
text. This indicates that the USB DMX Widget is not
compatible with Hog 3PC and must be enabled.
Please contact HES for upgrade information.
4.
Click Apply or OK to confirm the selection. The widgets that have
been connected should now have their "Active" "DMX OK" and "TX
Mode" indicators illuminated.
5.
You can identify which widget is connected to the port by selecting the
Beacon button to the right of the port. The widget connected to that
port will flash its indicator lights for a few seconds.
USB Playback Wings
You can connect up to four mini USB Playback Wings to the Hog 3PC
computer. Configuration is very similar to that of the USB DMX Widgets.
Before you begin configuring connected playback wings, ensure that an
USB Playback wing is connected to an USB port of the computer. The "link"
indicator on the wing should be illuminated and it will blink every 2 seconds
to indicate that it is functioning correctly.
Use the following steps to configure the wings:
1.
Within the Hog 3PC application, select the Setup key on the Front
Panel and then the Control Panel button on the interface to open the
Control Panel.
17
Hog 3PC Handbook
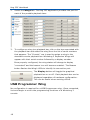
2.
Select the Wings tab. The Hog 3PC application provides one port for
each of the possible playback bars.
3.
To configure a wing to a playback bar, click on the box associated with
the playback bar and select the wing from the list of serial numbers
that appears. The “Console” row is used to assign a wing to the
standard console playback bar. Wholehog 3 Expansion Wings will
appear with their serial number followed by a display number.
Once properly configured, the wing status will change to display
"connected" and the beacon icon will become enabled. The Beacon
button flashes the Wing's LEDs to identify its connection port.
The Display button will toggle the graphical
playback bar on or off. Each playback bar can be
displayed regardless of hardware configuration.
This can be useful when working offline.
USB Programmer Wing
No configuration is required for a USB Programmer wing. Once connected,
it should begin to mimic the programming functions of a Wholehog 3
console.
18
Hog 3PC Handbook
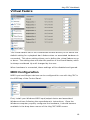
Virtual Faders
The Virtual Faders tab of the Preferences window allows you to define the
default setting for a playback bar's faders when no associated hardware is
connected. This show setting allows you to define the virtual faders as up
or down. The setting does not alter the position of the Grand Master, which
is always considered Up until changed by the user.
When hardware is connected, these settings will be disabled and ignored.
MIDI Configuration
MIDI Input and Output devices can be configured for use with Hog 3PC in
the MIDI tap of the Control Panel.
First, install your Windows MIDI input/output device and associated
Windows drivers following the manufacturer's instructions. Once the
Windows computer properly configures the hardware, it should become
available in the drop down menus of the Hog 3PC MIDI screen.
19
Hog 3PC Handbook
Networking
While the Hog 3PC software can connect to a Wholehog 3 show on a
network, it can not connect directly to a DMX Processor (DP) or MIDI/
Timecode processor (IOP). Refer to section 12 of the Wholehog 3 User
Manual for Wholehog 3 network configuration that allows connection to
other Wholehog 3 shows.
20
Hog 3PC Handbook
Keyboard Shortcuts
Hog 3PC keyboard shortcuts can be toggled on and off using the Pause or
Break key on the computer keyboard. When shortcuts are enabled
(known as map mode), the computer keyboard is mapped to the shortcuts.
When disabled, text entry via the computer keyboard is possible.
Whenever possible, Hog 3PC intelligently disables the keyboard shortcuts
when text entry is expected (after pressing SET or double clicking in a
cell). When the text entry session is completed, the shortcuts are
automatically re-enabled.
Use the Pause or Break key of the PC keyboard to toggle the keyboard
state. By default, shortcuts are disabled when you start a show.
Note:
When shortcuts are disabled, only the shortcut
mapped to SET remains functional to allow quick
labeling from the external keyboard.
Keyboard Shortcut Status
To quickly determine the current state of the keyboard shortcuts, the
Status Bar at the right hand end of the Command Line Toolbar displays
MAP for map mode or Abc for text entry mode.
21
Hog 3PC Handbook
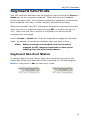
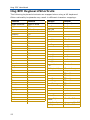
Hog 3PC Keyboard Shortcuts
The following keyboard shortcuts are mapped when using a US keyboard.
Other nationality keyboards may result in different character mappings.
Shortcut
Function
Toggle Shortcuts
Pause or Break
Main GO
Pig
CTRL
Main Pause
Open
ESC or O
Skip Fwd
Set
NumLock or Insert
Skip Back
J
Intensity
F11
Goto
G
Position
F2
Release
Z
Colour
F3
Beam
F4
Pig + Release
ALT + Z
Effects
F7
Assert
A
Macro
F5
Group
F1
Fixture
F12
Scene
F9
Cue
F10
List
F8
Page
F6
Record
R
Function
Next Page
@
Shortcut
} or ] or Space
{ or [
K
: or ;
' or @
Full
~ or #
Thru
* or X
Minus (-)
- or _
Plus (+)
= or +
slash (/)
/ or ?
Point (.)
. or >
Merge
E
Choose Master
1-10
Move
M
GO Master 1-10
Copy
P
Pause Master 1-10 Backspace + 1-0
Delete
D or Delete
Update
U
Live
V
Time
T
Setup
S
Control
L
Fan
F
Highlight
H
Blind
B
Clear
C
Next
N
Back
Y
22
Undo
ALT + 1 - 0
TAB + 1 - 0
CTRL + Z
Redo
CTRL + Y
Visual Cut
CTRL + X
Visual Copy
CTRL + C
Visual Paste
CTRL + V
Visual select Range CTRL + cursors
Backspace
backspace
Enter
Enter
GM
\ and or |
Central Choose
ALT + -
Bottom Right
toolbar
TAB + F1 - F12
Top Left toolbar
Backspace + F1 - F12
Top Right toolbar
ALT + F1 - F12
Hog 3PC Handbook
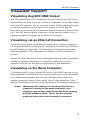
Visualizer Support
Visualizing Hog 3PC DMX Output
Hog 3PC software has been designed to interface directly with ESP Vision
and WYSIWYG to allow real-time on-screen visualization of the DMX output
from Hog 3PC software. You do not need to have a DMX widget connected
to use these features, as the data is sent directly from the Hog 3PC
application to the visualization application without requiring a physical DMX
link. Hog 3PC allows a direct connection on the same computer or to a
separate visualizer computer via an Ethernet connection.
Visualizing via an Ethernet Connection
The Wholehog 3 system is capable of connecting to visualizer computers
connected via Ethernet to the Hog 3PC computer. Currently both ESP Vision
and WYSIWYG are supported. The Wholehog 3 Connectivity application
must be installed on the visualization computer for this connectivity to
function.
Section 30 of the Wholehog 3 User Manual describes the basic information
needed to install the Wholehog 3 Connectivity application on your
visualizer computer as well as the configuration of the application.
Visualizing on the Same Computer
To visualize Hog3PC output using ESP Vision or WYSIWYG running on the
same computer, the Wholehog 3 Connectivity Application must be installed.
It is installed automatically with the Hog 3PC application unless it is
deselect using the Custom Setup option. Refer to the Wholehog 3 User
Manual for installation and use of the Wholehog 3 Connectivity Application.
Note:
When Hog 3PC software is interfaced directly to a
visualizer running on the same computer, your
computer may be less responsive than when running
Hog 3PC software alone. This is normal, as both
programs must share the computer's resources.
23
Hog 3PC Handbook
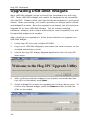
Upgrading USB DMX Widgets
Many USB DMX Widgets (single universe) are compatible only with Hog
2PC. These USB DMX widgets will need to be upgraded to be compatible
with Hog 3PC. Please contact your High End Systems dealer for pricing and
details. When purchasing, you need to provide your Widget serial number
and Widget ID number. Once the upgrade is purchased, you will receive an
Upgrade Kit for each USB DMX Widget. This kit contains labeling,
hardware, software, and a unique authorization code compatible only with
the specified widget serial number.
After receiving your upgrade kit, follow these directions to upgrade your
USB DMX Widget.
1.
Install Hog 3PC from the included CD-ROM.
2.
Plug in your USB DMX Widget(s) that match the serial numbers on the
included authorization sheet.
3.
Launch the Hog 3PC Widget Upgrade application from the Hog 3PC
start menu.
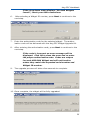
4.
After confirming that the widget(s) are properly connected and the
Link LED is illuminated, press Next.
5.
Select a Widget ID number to upgrade from the drop down menu. To
confirm the selected widget, press the Beacon button to flash the
LEDs on the widget.
24
Hog 3PC Handbook
If the drop down menu displays "No DMX Widgets
found!", check your USB connections.
6.
After selecting a Widget ID number, press Next to continue to the
next step.
7.
Enter the authorization code for the selected widget. The authorization code will be delivered with the Hog 3PC Widget Upgrade Kit.
8.
After entering the authorization code, press Next to continue to the
next step.
If the code is incorrect an error message will be
displayed. Click OK to close the error and re-enter
the proper authorization code. Codes are unique
for each USB DMX Widget and will not function
unless they match the expected serial number and
Widget ID number.
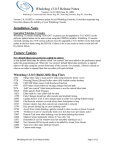
9.
The upgrade process will take a few seconds to complete.
10. Once complete, the widget will be fully upgraded.
25
Hog 3PC Handbook
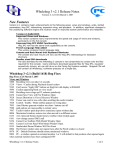
You can now select Start Over to upgrade another widget, or press
Finish or Quit to exit the application.
In the event of an error, a message will be
displayed. Please contact High End Systems
support for further assistance. 800-890-8989 or
[email protected]
26