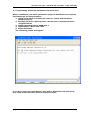
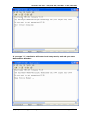
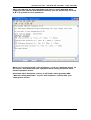
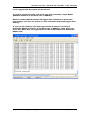
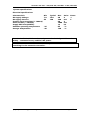
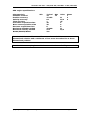
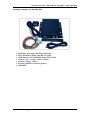
1
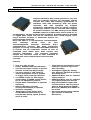
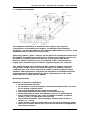
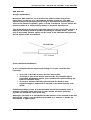
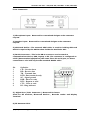
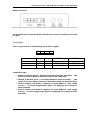
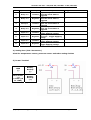
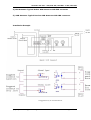
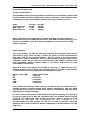
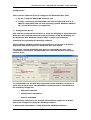
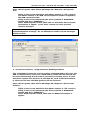
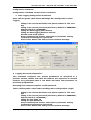
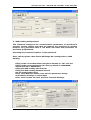
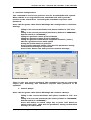
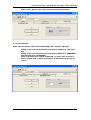
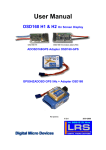
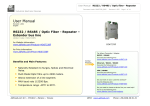
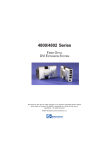
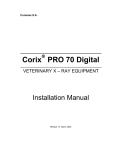
StarFinder AVL
Owners Manual & Reference Guide
Revision 2.0 –January 04
GSM/SMS Version
850/1900 MHz. – 900/1800 MHz.
Important!
Before to install, turn on, or operate the Starfinder AVL Unit ensure the total
accomplishment of your local safety regulations
© by Laipac Technology, Inc. All rights reserved – The Specifications and information regarding the products in this manual are subjected
to change without notice. All statements, information, and recommendations in this manual are believed to be accurate but are represented
without warranty of any kind, express or implied, users must take full responsibility for their applications of any Products - Reproduction of
the contents of this manual, in whole or in part, without written permission of Laipac Technology, Inc. is prohibited.
1
StarFinder AVL Unit – GSM/SMS 850/1900 MHz. or 900/1800 MHz.
INDEX
1 - Introduction
3
Overview
3
Features
3
Hardware & Software Requirements
4
Before installing the Starfinder AVL Unit
2 – Hardware Installation
4
5
Mounting Antennas
6
At sight GPS Antenna installation
6
Covert GPS Antenna installation
6
Front Connectors
7
Back Connectors
8
Installation Example
3 – Hardware Operation
10
11
Power Consumption
11
Reset function
11
Configuration
12
Configuration by Air
12
Request Commands
12
Get System Information
12
Get Current Position
13
Get all Logged Data
16
Get Current Status
16
Get Current Settings
17
Configuration Commands
18
Data Logging Configuration Command
18
Logging Account Configuration
18
SMS Sending Configuration
19
Geofence Configuration
20
Control Commands
20
Control Relay1
20
Control Relay2
21
Programming Parameters vis Serial Port
22
Downloading Logged Data via Serial Port
26
System Specifications
27
GPS Engine Specifications
28
Package Content for Starfinder KIT
29
Optional Accessories
30
4 - Specifications
27
© by Laipac Technology Inc. All Rights Reserved.
Page
2
StarFinder AVL Unit – GSM/SMS 850/1900 MHz. or 900/1800 MHz.
1. Introduction
Overview
Laipac’s Starfinder AVL system provides a very low
cost but powerful solution for automatic vehicle
location and other GPS tracking applications. It
combines with GPS technology with cell phone
networks,
and
was
designed
for
multiple
automotive applications such as vehicle tracking,
monitoring, remote control, and GPS data logging.
In normal condition, it’s DB9 serial port has NMEA
$GPRMC sentence output which can be used for incar navigation. In data log download condition, the DB9 output is switched
to logged data output and can be connected with a PDA, Laptop, short
range wireless modules or Bluetooth devices for
local positions download.
Since the SMS is a connectionless communication,
each
message
should
have
its
own
acknowledgement
message.
Starfinder
AVL’s
communication protocol has been specifically
designed to closely reassembled the NMEA sentence
in format, but all commands consist of sets of
command pairs which have both request and
response commands.
The response command
returns the execution result of each command to
confirm that each command has been executed
correctly.
Features
Just 15 x 15 x 3.5 cm.
Power, NMEA & GSM LED indication
2 x Input by Input-coupler to protect
internal circuit from high voltage
2 x relay output of 15A, ideal for
enable and disable of car's ignition
or trigger other electronic devices.
1 x RS232 output for data logger
downloading or NMEA output device
for in-car navigation purpose.
Keyfob Panic Transmitter as optional
accessory
MIC and Speaker external
connection available as optional
Geofence capability
Data logger ready device with
512Kb internal flash memory. It
records time stamp, speed, position
and I/O state .
© by Laipac Technology Inc. All Rights Reserved.
Time interval and distance travel
setting for position report and
data recording
Intelligent logging by setting
min. distance Password and Unit
ID setting by air
Additional RJ11 port for external
analog sensors
Additional RJ11 port for external
TTL digital peripheral devices
High performance Laipac GPS
receiver built in, the accuracy is
3mts in North America (WAAS)
& Europe (EGNOS) and 10mts in
the world
Get event warning when vehicle
gets outside of selected
Geofences
Page
3
StarFinder AVL Unit – GSM/SMS 850/1900 MHz. or 900/1800 MHz.
Hardware & Software requirements ( for GSM 900/1800 or 850/1900 )
Starfinder AVL system for GSM has built-in GSM dual band modem.
GSM worldwide coverage is divided into 900/1800 and 850/1900 band. For
USA, Canada, Mexico, countries in Central and South America ( except
Brazil ), the suitable unit is Starfinder AVL 850/1900. For European
countries, Asia , Brazil, Africa countries and Middle East, the suitable unit
is Starfinder AVL 900/1800.
The Starfinder AVL unit is delivered without a SIM card. SIM cards must be
purchased and registered with your local GSM carrier. Starfinder AVL GSM
works through SMS ( Short Message Service ) which is also commonly
known as Text Messaging Service. Once you have the SIM Card, place it
into the SIM card holder of Starfinder AVL unit.
Starfinder AVL system is delivered together with CD and diagnostic
software called Starfinder AVLDiag. The users can use Starfinder AVLDiag
to configure and test the Starfinder AVL system. It may also be used to
perform simple vehicle tracking.
For fleet management and other commercial applications, we strongly
suggest to use more powerful software such as Starfinder AVL Software or
comparable packages.
Throughout this manual it will be assumed that the user has access to a
32-bit Microsoft Windows® machine to run the Starfinder AVLDiag
software. For testing over a wireless network, a GSM external modem will
be required. We suggest the Fast Track® modem from Wavecom Inc.
Laipac Technology also provide the complete evaluation kit which includes
this external modem inside the package.
The only other requirement is the Starfinder AVL system itself, complete
with an active GPS antenna and GSM antenna ( all included inside the
package ) and the source of 12V-24V DC power such as car / truck’s power
supply or battery.
Starfinder AVL series of product will be released during 2003 and 2004.
These include GPRS, CDMA/1X , LTR VHF & UHF Radio and Satellite
modem. Starfinder Personal Locator S-911 ( new product under
development ) has the same concept for high quality, easy to use and low
cost design for Location Base Service applications.
Before installing the Starfinder AVL Unit
Please make sure, that you have a SIM-card for the Starfinder AVL Unit
that satisfies the following requirements:
Caller ID from your GSM service provider allowed.
Short Message Service (SMS) has to be supported by your service
provider and activated.
Remove all kind of PIN protection of your SIM cards.
© by Laipac Technology Inc. All Rights Reserved.
Page
4
StarFinder AVL Unit – GSM/SMS 850/1900 MHz. or 900/1800 MHz.
2. Hardware Installation
The standard installation of Starfinder AVL System only requires
connection to a constant power supply, a switched power indicator
(Ignition), and the placement of the combined GPS antenna/receiver. Total
installation time is often less than an hour.
Optionally, hidden "panic" buttons can be placed at convenient locations in
the vehicle and additional connections to sensors and vehicle controls can
be made by crimping connectors directly to the appropriate wires.
However, these connections are not required. Only a constant power
supply and a switched power indicator (Ignition sense) are required.
The Starfinder AVL Unit contains the AVL system's primary electronic
components. Always mount the main module in the vehicle's interior
compartments, in a covert and secure location, ensuring that moisture,
vibration and temperature extremes are minimized. Acceptable locations
include behind the dash, behind the glove compartment, in the trunk,
under the seat or other interior panels.
Mounting Antennas
Antenna’s Installation Guidelines
Mount antennas securely.
RF connectors must be properly connected to the RF cable. Be sure
to use proper crimping tools.
Use a good quality low loss cable as provided
Mount GPS antennas where they will see the most sky
Mount antennas in areas with enough space for a ground plane.
Don’t mount antennas very close to another antenna, at least 2
inches ( 6 cm.) of separation are required
Don’t mount antennas close to people, always leave at least 7
inches (+/- 20cm).
Don’t mount antennas where they are covered or blocked by metal.
Don’t put antennas where they are close to electronic management
and control systems
© by Laipac Technology Inc. All Rights Reserved.
Page
5
StarFinder AVL Unit – GSM/SMS 850/1900 MHz. or 900/1800 MHz.
GPS Antenna
At sight Installation
Mount the GPS antenna on an area of the vehicle where there is no
obstruction to the sky e.g.: through the window of the car. The GPS
antenna may be mounted covert so long as the material obstructing the
view of the antenna is plastic, glass or cloth in material. Do not mount the
antenna where it is obstructed by metal or electrical interference.
The recommended location for the GPS antenna is the roof of the vehicle. A
magnetic mounting method permits mounting in suitable areas. If the
area is not metal surface, epoxy can be used, or an alternate through-hole
mount antenna can be installed.
Covert Antenna Installation
If it is essential that the antenna be fitting out of site, consider the
following:
The view of the sky must be as wide as possible
The field of view must not be obscured by any metallic object
(including windshield wipers, front windscreens with heating, UV
filters or metallic tints)
The top of antenna should point towards the field of view
Signal strength is enhanced if antenna is mounted directly onto
metal
Considering these points, the GPS antenna should be mounted under a
window, normally either the front or rear screen, as these generally
provide the maximum view of the sky.
Although, generally it is acceptable for the antenna to be located under the
dash lining, under a non-metallic parcel shelf (i.e. bumps) or within an
instrument or light cluster.
© by Laipac Technology Inc. All Rights Reserved.
Page
6
StarFinder AVL Unit – GSM/SMS 850/1900 MHz. or 900/1800 MHz.
Front Connectors
1) Microphone Input: Reserved for customized designs under customer
request.
2) Speaker Input: Reserved for customized designs under customer
request.
3) SIM Card Holder : The external SIM holder is used for holding SIM card
which is required by the GSM modem inside the Starfinder AVL.
4) RS232 Connector : This is the DB-9 connector used to attach a
communications device, PDA, Laptop or PC. The connector is configured as
a DTE (data terminal equipment) the same like a PC serial port, so direct
connection to a PC will require the standard RS232 cable.
Pin
1
2
3
4
5
6
7
8
9
Definition
CD – Carrier detect
RD – Receive data
TD – Transmit data
DTR - Data terminal ready
SG – Signal ground
DSR – Data set ready
RTS – Request to send
CTS – Clear to send
RI – Ring indicator
5) Digital Port ( RJ11 Connector ): Reserved for future.
Ideal for RF modules, Bluetooth devices , Barcode reader and Display
Terminal.
6) RF Antenna Cable
© by Laipac Technology Inc. All Rights Reserved.
Page
7
StarFinder AVL Unit – GSM/SMS 850/1900 MHz. or 900/1800 MHz.
Back Connectors
On the back view of the Starfinder AVL there are three connectors from left
to right:
1) I/O port
The I/O port layout is as following (from left to right):
2
1
4
3
6
5
8
7
Name
Relay1
Relay2
INPUT 1
INPUT 2
Default Status
Pin Number
Pin Number
Open
Pin2
Pin1
Close
Pin4
Pin3
Trigger by Input
Pin6
Pin5
Trigger by Input
Pin8
Pin7
Connection tips:
Relay1 is Normal Open ( disconnected between Pin1 and Pin2) - The
action to turn on Relay1 means to connect Pin1 and Pin2
Relay2 is Normal Close ( connected between Pin3 and Pin4) - The
action to turn on Relay2 means to disconnect between Pin3 and Pin4
Pin5 is Positive and Pin6 is negative for input INPUT 1 (volt. range
5–24V ) - A event triggered by input 1 is applying the voltage to
Pin5 and Pin6
Pin7 is Positive and Pin8 is negative for input INPUT 2 (volt. range
5–24V ) - A event triggered by input 2 is applying the voltage to Pin7
and Pin8
© by Laipac Technology Inc. All Rights Reserved.
Page
8
StarFinder AVL Unit – GSM/SMS 850/1900 MHz. or 900/1800 MHz.
Polarity
PIN #
I/O NAME
1
Relay 1-1
Positive
2
Relay 1-2
Negative
3
Relay2-1
Positive
4
Relay 2-2
Negative
5
Input 1-1
Positive
6
Input 1-2
Negative
7
Input 2-1
Positive
8
Input 2-2
Negative
General Description
Output Relay 1
Close the circuit when is
triggered
Input Relay 1
Close the circuit when is
triggered
Output Relay 2
Open the circuit when is
triggered
Input Relay 2
Open the circuit when is
triggered
Output Input-1 – 3 to 12v –
Trigger Applying voltage
Input Input-1
3V to 12V - Trigger Applying
voltage
Output Input-2 – 3V to 12V –
Trigger Applying voltage
Input Input-2 – 3V to 12v –
Trigger Applying voltage
Suggested Connections
Ignition
Ignition
Door Lock
Door Lock
Mechanical Panic Button
Mechanical Panic Button
Customized external Circuit
Customized external Circuit
2) Analog Port ( RJ11 Connector )
Ideal for temperature sensor, pressure sensor and other analog devices
3) Power Terminal
GND
(-)
Battery
Backup
(-)
Main Power
(+)
+13.5V (+9
to +30V)
Battery
Backup
(+)
© by Laipac Technology Inc. All Rights Reserved.
Page
9
StarFinder AVL Unit – GSM/SMS 850/1900 MHz. or 900/1800 MHz.
4) GPS Antenna: Typical Active GPS Antenna with SMA connector
5) GSM Antenna: Typical Passive GSM Antenna with SMA connector
Installation Example
Suggested I/O Connections
© by Laipac Technology Inc. All Rights Reserved.
Page
10
StarFinder AVL Unit – GSM/SMS 850/1900 MHz. or 900/1800 MHz.
3. Hardware Operation
Power consumption
The Starfinder AVL system typically consumes around 140mA at 13.8V with
an extra 50mA consumed when each relay is activated. The following table
summarizes power consumption measured during normal operation.
State
Both relays off
One relay on
Both relays on
Voltage
13.8V
13.8V
13.8V
Current
140mA
190mA
240mA
Note: Starfinder AVL has option to switch the high accuracy GPS to an
alternative low power 16Ch. GPS receiver with GPS shut down feature. The
current consumption can drop down to 500mA in stand-by mode. MOQ
will be required.
Reset function
The reset jumper J6 may be shorted pressing the external reset button
(left side in front view) during a power-up cycle to reset all parameters
and data held in non-volatile memory. This is useful if the password is
forgotten or other parameters such as the modem type have been set to
unknown values. It may also be required after the system software has
been upgraded, please contact Laipac’s technical department for the
consultation of the case.
Note that when the jumper is shorted it will take a while for the nonvolatile memory to be erased. The following table is a guide to the amount
of time various memory configurations will take to reset.
Memory Size (KB)
4K
8K
16K
32K *
64K
Approximate Time
1 minute
2 minutes
3 minutes
6 minutes
12 minutes
The system will take the same amount of time to start up when the nonvolatile memory contains invalid data. Typical examples of this are when
the system is powered up for the first time or the memory chip has been
replaced with a different type.
For this reason patience is recommended when first starting the system if
it fails to respond as it may be caused by the non-volatile memory being
reset. It also takes the GPS longer to acquire after a system is first
installed (or has been out of operation for over a week) so it is
recommended that the system be left for at least 6 minutes with the
antenna and power connected before attempting communications for the
first time.
© by Laipac Technology Inc. All Rights Reserved.
Page
11
StarFinder AVL Unit – GSM/SMS 850/1900 MHz. or 900/1800 MHz.
Configuration
There are two different ways to configure the Starfinder AVL Unit:
1. By Air, using the GSM/SMS network, and
2. Locally, connecting the Starfinder AVL unit trough COM port to a
IBM-PC compatible and use the operating system Windows 2000 or
XP. (Linux & OS/2 are not supported)
1 – Configuration by Air.
This remote configuration can be do it using the AVLDiag or Starfinder AVL
Software. Here are described only the procedures using the AVLDiag, for
the Starfinder AVL Software please refers to their User’s Manual.
Installing and operating the AVLDiag software
The Starfinder AVLDiag software is provided free of charge as a simple
diagnostic and learning tool for Starfinder AVL new users.
For current version, Starfinder AVL has ten commands in total, every
command is returned by the Starfinder AVL Unit and showed in the grey
window area:
To understand how the AVL Diag commands been classified, it may be a
great help a quick start. The Starfinder commands can be classified into
the following categories:
Request Command
Configuration Command
Control Command
The following sections of the manual discuss these categories in detail
and show examples of using the AVLDiag software.
1. Get System Information Using Starfinder AVLDiag Software:
© by Laipac Technology Inc. All Rights Reserved.
Page
12
StarFinder AVL Unit – GSM/SMS 850/1900 MHz. or 900/1800 MHz.
Start->All Programs->Star Finder AVLDiag1.00->Request->Get System
Info:
Filling in the correct Starfinder Unit phone number in ‘TEL’ text box.
The Phone number is the SIM card’s telephone number assigned by
the GSM service provider
Filling in the correct password (the factory default is ‘00000000’,
default Unit ID is ‘99999999’)
Press ‘Send Request’ button, then wait for Starfinder Unit’s system
information to appear press ‘Clear’ button can clear previous
received message.
Note : The SMS text message doesn’t get lost, so be patient to wait for
acknowledgement message. Do not attempt to resend request messages
within seconds.
2. Get Current Position
Using Starfinder AVLDiag Software
This command requests the current position of the Starfinder AVL unit. The
GPS is sampled every second so a valid GPS fix within the last second will
be returned assuming that the GPS is currently in tracking mode. In case
where the system does not have a valid GPS fix, such as the GPS antenna
is obscured, the last valid GPS position will be retrieved.
Start->All Programs->Star Finder AVLDiag1.00->Request->Get Current
Position:
Filling in the correct Starfinder Unit phone number in ‘TEL’ text box
Filling in the correct password (the factory default is ‘00000000’,
default Unit ID is ‘99999999’)
Press ‘Send Request’ button, then wait for NMEA information to
appear.
© by Laipac Technology Inc. All Rights Reserved.
Page
13
StarFinder AVL Unit – GSM/SMS 850/1900 MHz. or 900/1800 MHz.
Note: The above message can also be trigged by events. For example, if
geofence is set, and Starfinder AVL finds the vehicle is out of geofence.
For geofence event, the received message is:
© by Laipac Technology Inc. All Rights Reserved.
Page
14
StarFinder AVL Unit – GSM/SMS 850/1900 MHz. or 900/1800 MHz.
For panic event, the received message is:
For Input 2 (input2) event, the received message is:
For Input 1(input1) event, the received message is:
© by Laipac Technology Inc. All Rights Reserved.
Page
15
StarFinder AVL Unit – GSM/SMS 850/1900 MHz. or 900/1800 MHz.
3. Get All Logged Data:
This command requests all GPS data that has been logged by the
Starfinder AVL. How often data is logged depends on the logging
configuration parameters defined as below. Data is sent as a sequence of
$GPRMC sentences with a success response indicating that all data has
been sent. Response codes are defined in a later section. Executing this
command requires a valid password.
Start->All Programs->Star Finder AVLDiag1.00->Request->Get All Logged
Data:
Filling in the correct Starfinder Unit phone number in ‘TEL’ text box
Filling in the correct password (the factory default is ‘00000000’,
default Unit ID is ‘99999999’)
Press ‘Send Request’ button, then Starfinder AVL begins to
download all logged data from Starfinder’s DB9 serial port. When
the downloading is completed, the Starfinder AVL will send Unit ID
back as an acknowledgement.
4. Get Current Status:
Start->All Programs->Star Finder AVLDiag1.00->Request->Get Current
Status:
Filling in the correct Starfinder Unit phone number in ‘TEL’ text box
Filling in the correct password (the factory default is ‘00000000’,
default Unit ID is ‘99999999’)
Press ‘Send Request’ button, then wait for status information to
report back
© by Laipac Technology Inc. All Rights Reserved.
Page
16
StarFinder AVL Unit – GSM/SMS 850/1900 MHz. or 900/1800 MHz.
5. Get Current Settings:
Start->All Programs->Star Finder AVLDiag1.00->Request->Get Current
Settings:
Filling in the correct Starfinder Unit phone number in ‘TEL’ text box
Filling in the correct password (the factory default is ‘00000000’,
default Unit ID is ‘99999999’)
Press ‘Send Request’ button, then wait for setting parameters to
report back
© by Laipac Technology Inc. All Rights Reserved.
Page
17
StarFinder AVL Unit – GSM/SMS 850/1900 MHz. or 900/1800 MHz.
Configuration Command
Configuration command consist of four commands
1. Data Logging Configuration Command:
Start->All Programs->Star Finder AVLDiag1.00->Configuration->Data
Logging
Filling in the correct Starfinder Unit phone number in ‘TEL’ text
box
Filling in the correct password (the factory default is ‘00000000’,
default Unit ID is ‘99999999’)
Filling the data logging time interval
Filling the data logging distance interval
Set the event mask options
Press ‘Send Request’ button, then wait for parameter setting
confirmation message to report back
Press ‘Clear’ button can clear previous received message.
2. Logging Account Configuration:
This command configures the system parameters as described in a
previous section. Please note that all numbers are expressed in decimal
notation. Any parameter that is left blank will leave that parameter as
previously programmed.
Executing this command requires a valid password.
Start->All Programs->Star Finder AVLDiag1.00->Configuration->Login
Filling in the correct Starfinder Unit phone number in ‘TEL’ text
box
Filling in the correct password (the factory default is ‘00000000’,
default Unit ID is ‘99999999’)
Filling the new UNIT ID
Filling the new password
Press ‘Send Request’ button, then wait for parameter setting
confirmation message to report back
Press ‘Clear’ button can clear previous received message.
© by Laipac Technology Inc. All Rights Reserved.
Page
18
StarFinder AVL Unit – GSM/SMS 850/1900 MHz. or 900/1800 MHz.
3. SMS Sending Configuration:
This command configures the communication parameters as described in
previous section. Please note that all numbers are expressed in decimal
notation. Any parameter that is left blank will leave that parameter as
previously programmed.
Executing this command requires a valid password.
Start->All Programs->Star Finder AVLDiag1.00->Configuration->SMS
Sending
Filling in the correct Starfinder Unit phone number in ‘TEL’ text box
Filling in the correct password (the factory default is ‘00000000’,
default Unit ID is ‘99999999’)
Filling the SMS sending time interval
Filling the SMS sending distance interval
Set the event mask option
Press ‘Send Request’ button, then wait for parameter setting
confirmation message to report back
Press ‘Clear’ button can clear previous received message.
© by Laipac Technology Inc. All Rights Reserved.
Page
19
StarFinder AVL Unit – GSM/SMS 850/1900 MHz. or 900/1800 MHz.
4. Geofence Configuration:
This command is used to set geofence area for the Starfinder AVL system.
When vehicle is out of geofence area, Starfinder AVL will report the
position to the central host. Executing this command requires a valid
password.
Start->All Programs->Star Finder AVLDiag1.00->Configuration->Geofence
Settings
Filling in the correct Starfinder Unit phone number in ‘TEL’ text
box
Filling in the correct password (the factory default is ‘00000000’,
default Unit ID is ‘99999999’)
Filling the geofence center point’s latitude
Filling the geofence center point’s longitude
Filling the geofence latitude and longitude deviation ( delta )
Choose a geofence event mask option
Giving the initial status of geofence
Press ‘Send Command’ button, then wait for parameter setting
confirmation message to report back
Press ‘Clear’ button can clear previous received message.
Control Command
There is only one control command. This command is used to control the
output port. Executing this command requires valid password to be
specified.
1. Control Relay1:
Start->All Programs->Star Finder AVLDiag1.00->Control->Relay1
Filling in the correct Starfinder Unit phone number in ‘TEL’ text
box
Filling in the correct password (the factory default is ‘00000000’,
default Unit ID is ‘99999999’)
Press ‘ON’ button to switch relay1 ON, or press ‘OFF’ button to
switch relay1 OFF, then wait for parameter setting confirmation
message to return back
© by Laipac Technology Inc. All Rights Reserved.
Page
20
StarFinder AVL Unit – GSM/SMS 850/1900 MHz. or 900/1800 MHz.
Press ‘Clear’ button can clear previous received message.
2. Control Relay2:
Start->All Programs->Star Finder AVLDiag1.00->Control->Relay2
Filling in the correct Starfinder Unit phone number in ‘TEL’ text
box
Filling in the correct password (the factory default is ‘00000000’,
default Unit ID is ‘99999999’)
Press ‘ON’ button to switch relay2 ON, or press ‘OFF’ button to
switch relay2 OFF, wait for parameter confirmation message to
return.
© by Laipac Technology Inc. All Rights Reserved.
Page
21
StarFinder AVL Unit – GSM/SMS 850/1900 MHz. or 900/1800 MHz.
2 - Programming Starfinder Parameter Via Serial Port
Before installation, the basic parameters setup for Starfinder are required.
The followings are the procedure:
1. Using serial cable to connect PC Com1(or Com2) and Starfinder
RS232 port(J11)
2. Running PC Start->All Programs->Accessories->Communications>Hyperterminal
3. Setup Hyperterminal as 9600-8-N-1
4. Hypterminal->Menu Call->Call
5. Reset Starfinder
The following screen will appear:
if you don’t input any information, after 20sec, Starfinder will exit serial
port setup mode and enter normal operation mode:
© by Laipac Technology Inc. All Rights Reserved.
Page
22
StarFinder AVL Unit – GSM/SMS 850/1900 MHz. or 900/1800 MHz.
If you type “Y”, Starfinder will enter local setup mode, and ask you enter
Base Station Number:
© by Laipac Technology Inc. All Rights Reserved.
Page
23
StarFinder AVL Unit – GSM/SMS 850/1900 MHz. or 900/1800 MHz.
After enter base station number, then Starfinder will ask you input
password:
After the password is entered, Starfinder will ask you Unit ID:
© by Laipac Technology Inc. All Rights Reserved.
Page
24
StarFinder AVL Unit – GSM/SMS 850/1900 MHz. or 900/1800 MHz.
After entered Unit ID, then Starfinder will ask you enter SMS and Data
Logging’s time interval and distance interval, you can chose only one from
A, B or C options for each questions:
When you’ve answered all of the questions, you’ll see “Settings Saved” on
the screen, then Starfinder has completed local setting mode and enter
normal operation mode.
Each time when Starfinder restart, it will send a short greeting SMS
“Welcome using Starfinder” to your base station to confirm that your
settings are correct.
© by Laipac Technology Inc. All Rights Reserved.
Page
25
StarFinder AVL Unit – GSM/SMS 850/1900 MHz. or 900/1800 MHz.
Local Logged Data Download Via Serial Port
In normal operation mode, the serial port will constantly output NMEA
$GPRMC sentence at the baud rate of 4800b/s.
Besides sending SMS download all logged data command to download
logged data, you also can use PC to send command download logged data
directly.
If you use PC software such like HyperTerminal which is connect to
Starfinder RS232 port(J11) at the baud rate of 9600b/s, then when you
press PC’s Enter Key, all logged data will be downloaded from Starfinder
RS232 port:
© by Laipac Technology Inc. All Rights Reserved.
Page
26
StarFinder AVL Unit – GSM/SMS 850/1900 MHz. or 900/1800 MHz.
System specifications
Electrical specifications
Characteristic
DC Supply Voltage
DC Supply Current
Positive input transient (< 100mS)
Peak Current (< 100mS)
Supply ESD susceptibility
Ambient operating temperature
Storage temperature
Min
7.0
50
-25
-40
Typical
13.8
140
Max
48
240
60
1900
12
85
120
Units
V
mA
V
mA
kV
°C
°C
Notes
1
2
Note 1: Starfinder AVL has advanced power circuit design which can be
widely connected to any vehicle's DC power.
Note 2: Peak current measured when the system turns on for the first time
searching for the network connection.
© by Laipac Technology Inc. All Rights Reserved.
Page
27
StarFinder AVL Unit – GSM/SMS 850/1900 MHz. or 900/1800 MHz.
GPS engine specifications
Characteristic
Channels tracked
Position accuracy
Velocity accuracy
Time accuracy
Cold start acquisition time
Warn start acquisition time
Hot start acquisition time
Maximum altitude tracked
Maximum velocity tracked
WAAS/EGNOS/MSAS
Min
Typical
12
15 CEP
0.1
1
48
38
8
18,000
515
Yes
Max
12
Units
M
M/S
uS
S
S
S
M
M/S
Notes
1
2
2
Note 1: A minimum of three satellites must be tracked for a twodimensional solution and a minimum of four must be tracked for a threedimensional position.
Note 2: GPS accuracy is given with Navstar selective availability turned off.
© by Laipac Technology Inc. All Rights Reserved.
Page
28
StarFinder AVL Unit – GSM/SMS 850/1900 MHz. or 900/1800 MHz.
Package Content for Starting KIT
Starfinder AVL unit with SIM card holder
GPS Antenna P1-SMA 5 mts RG174 cable
GSM Antenna P1-GSM-SMA 3 mts RF174 cable
Cable 1 ( grey - orange - black - yellow )
Cable 2 ( orange - black )
Keyfob ( optional, not in the picture )
CD-ROM
© by Laipac Technology Inc. All Rights Reserved.
Page
29
StarFinder AVL Unit – GSM/SMS 850/1900 MHz. or 900/1800 MHz.
Optionals
The Starfinder AVL Unit is provided with antennas for GPS and GSM
reception, but depending the application other kind of antennas can be
used.
Capsule Compact Active Antenna is a high performance 3 or 5VDC GPS
antenna. Permanent Mount. The antenna offers a 27 dB gain (active patch).
SMA Connector
Ref.: GLP1-RA 3V
GLP1-RA 5V
GLP1-RA
Dual GPS/Cell phone antenna. 5 meter cable, operates on 3-5VDC and has
SMA connector These antennas are waterproof and comply with automotive
temperature and vibration standards.
Ref.: GLP1 – CA GSM
GLP1 – CA CDMA
GLP1-CA
Dual GPS/ GSM or AMPS. The combination of a high gain GPS antenna and 1 dBi GSM band antenna is ideal for those applications that require
durability, small size, covert installation and rugged construction. Available
in 3 or 5VDC and magnetic/permanent mounting..
Ref.: GLP1-GC PM GSM
GLP1-GC MM GSM
GLP1-GC
© by Laipac Technology Inc. All Rights Reserved.
Page
30