1
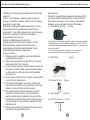
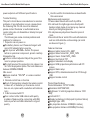
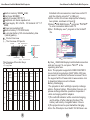
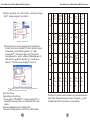
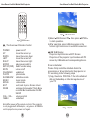
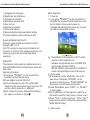
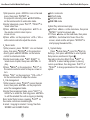
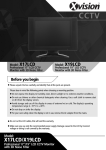
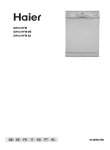
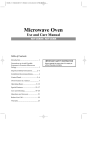
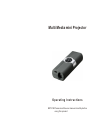
Multi Media mini Projector
Operating Instructions
NOTICE:Please read the user manual carefully before
using this product
User Manual for Multi Media Mini Projector
User Manual for Multi Media Mini Projector
Table of Contents
Safety and Maintenance Instruction..............1
Features Overview......................................2
Product Specifications.................................2
Product Overview........................................3
The Overview of Projector.........................3
The Overview of Function Keys..............3-4
The Overview of Remote Control...............5
Basic Operation..........................................6
System Setup.............................................8
Download Media Files from PC...................13
USB......................................................13
Projection Synchronizes with PC Screen.13
Battery Recharging...................................16
Trouble Shooting......................................17
Accessories.............................................18
User Manual for Multi Media Mini Projector
Thank you for buying this portable multi media mini
projector.
This is a Portable , Hand-size projection
device to play Movie, Music & Photo on a 50 inches
projection screen size.
With built-in 3M optical light engine which is most
advanced technology with the smallest size of
projectors core light engine in core optical source,
this mobile projector is perfect for business
presentation, teaching etc.
Safety and Maintenance Instruction
To prolong the life of the mini projector, all the
following safety, operating instuctions and
maintenance should be read, adhered to and
followed before the unit is operated.
For your safety
1 Please carefully read this user manual before
operating the projector.
2 Take a few moments to review the user manual
while using it for the first time.
3 Do not store or operate the unit where it can drop
into water or other liquid ,cares should be taken
so that water or other liquid can not be spilled
onto the unit.
4 Protect the unit from pinch or strike, always place
it on a flat dry stable place.
5 The optical light engine is the one of the most
important parts of the unit, great care should be
taken to protect it from collion or press.
6 The unit should be situated away from direct
sunshine or heat sources, such as radiator,
electric heaters,heat registers,stoves or other
units(includ-ing amplifiers) which produce heat,
avoid placing it on top of stereo equipment that
radiates heat.
7 Unplug this unit during lightning storms or when
unused for long periods of time.
1
User Manual for Multi Media Mini Projector
Accessories
Carefully unpack the package and make sure that
you have all the following items. In the event that
any itemis missing or if you find any mismatch or
damage, please promptly contact the dealer.
1 AC adpator (5V2A)
1 piece
The projector is attached with a AC adaptor in the accessories.
The power input of the AC adpator ranges from 100V to 240V,
covering all standard voltage around the world, it can be used
all over the world.
Note:The above photo of AC adaptor is for reference
only, please take the actual item as the standard.
2
USB Cable
1 piece
3
Remote Control
1 piece
MENU
ENTER
OSD
PHOTO
MODE
CALENDAR
SLIDE
SHOW
MUSIC
MODE
EXIT
VOL+
VIDEO
MODE
ZOOM
VOL-
4
User Manual
1 piece
5
Protective Pouch
1 piece
18
User Manual for Multi Media Mini Projector
power adpators with different specifications.
Trouble Shooting
This part is to introduce some solutions to common
problems, if any malfunction occurs, please check
the following first.If it still can not be obviated,
please contact the dealer or authorized service
center in time, do not dissamble or attempt to repair
it by yourself .
The following are some common problems and
solutions for reference:
1 Projector can not power on
The battery has run out. Please recharge it with
correct DC adpator before operate.
Fails to press POWER button.The power
button is a precision component, press it carefully.
2Image blurring
Focus is not well adjusted. Adjust the gear of the
lens to a proper position.
The light source of the projector is too close or too
far from the projection plane. The best distance is
between 200MM-2000MM
3No sound
Volume is setted MUTE or volume is setted
too low.
4 Remote control has no function
Check if the insulation sheet in the remote control
is taken off, or the battery in the remote control
has run out, replace with new button cell batteries
to try
5 Fails to connect with PC
Poor contact or the USB cable is with quality
problems. Make sure the connection with USB
cable is perfect and USB cable itself is of good
quality.
17
User Manual for Multi Media Mini Projector
8
Use this unit for its intended use as described in
this user manual
Maintenance and precaution
1.Please clean the unit with a soft dry chiffon.
2.Do not touch the light engine lens directly with
hands or sharp items, do not spray any cleanser
directly on the light engine lens.
3.Do not place any objects on the unit or press it
hard.
4.Never block the air outlet of the unit with materials
such as cloth while the unit is working.(air outlet
as shown in Figure )
Features Overview
Support photo format: JPG BMP
Support video format: AVI MOV MP4
Support music format: MP3 WMA
Support text format:TXT
Support calendar/ clock display
Support USB, projection synchronizes with PC
screen
Support basic setup
Support OTG, data transmission from PC through
USB
Support remote control
Product Specifications
Product dimension:130*55*22 MM;
Resolution:640*RGB*480;
Brightness: 12 cd/m2 (projection distance: 1000
MM);
Contrast:80:1;
Display technology:LCoS(Liquid Crystal on Silicon)
Backlight type: LED;
Min projection distance: 210MM(5.6 inches)
Max projection distance: 2500MM(72 inches)
2
User Manual for Multi Media Mini Projector
User Manual for Multi Media Mini Projector
Built-in memory:128MB 4GB;
Card type:SD/MMC;
Built-in speaker:8R/1W*1;
Earphone out:stereo speaker out.
Power supply: DC +5V/2A DC terminal:3.5*1.3*
6MM;
Power consumption:5W;
Built-in battery:3.7V/2050 mAH;
Li-polymer battery:120 minutes battery time
(rechargeable) .
Attached in the accessories, insert one end to PC
and the other to projector s USB port.
4)After confirm, the screen displays the following
two options, as shown in Figure :
5)Select USB SUB Display and press ENTER
to enter connection status with PC
6)Run EzDisplay.exe program in the install
file
3:press Begin
Capture to
start projection
Product Overview
The Overview of Projector
Air outlet
Earphone port
USB
IR receiving window
Power
2:select resolution which
can meet projector s
specification
SD/MMC
Projection source
Function keys
Reset
Figure
1:select Mirror
mode
DC terminal
Step
Projector overview
The Overview of Function Keys
S.P.:Short Press
L.P.:Long Press
Key
MENU
PHOTO
MUSIC
MOVIE
CALENDAR
SETUP
OFF
Memory
S. function; S. To prev. S. To prev. S. To prev. S. To prev. S. To prev.
P. Device P. Screen P. Screen P. Screen P. Screen P. Screen
switching
MENU L.
-
P.
VOL
L.
-
P.
L.
-
P.
L.
-
P.
L.
-
P.
L.
Move
Set auto
S. the
S. Volume S. Volume S. Volume S. matic
S.
cursor
page
control
control
control
P. up/
P.
P.
P.
P. turning P.
time
down
L.
P.
-
L.
P.
-
L.
P.
-
L.
P.
3
-
L.
P.
-
P.
-
L.
P.
-
-
connect SUB Display
By then USB SUB-Display has finished connection
and can be used. To exit press EXIT in the
operating interface.
Note: The projector supports AVI/MOV/3GP/MP4
movie format in resolution of 640*480 in 30 frame
per second. Use Win AVI software to convert file to
the supported file. Please refer to www.winavi.com
to download video convert software.
Battery Recharging
The projector is built with high capacity recharge
able Li-Polymer battery. When battery has run out,
please recharge it before operation or operate it
while recharging with AC adpator.
1)The red LED indicator will be on while charging,
and it will be off after charging finished. The
battery will be fully charged in about 3 hours.
2)The projector can be operated while charging.
Note: the DC adaptor must be DC 5V/2A.Never use
16
User Manual for Multi Media Mini Projector
2)Open install file, and run the
Bat setup program to install it :
User Manual for Multi Media Mini Projector
install_subvga.
Move
Switch
S. the
S. to the S.
P. cursor P. prev. P.
left
Photo
Move
S.
S. Prev.
the
cursor P. Prev. P. Page
up
Move
S. the
P. cursor
up
-
LEFT L.
Run install_
subvga.bat to
install driver
Step
install dreiver
3)Follow the on-screen prompt to complete the
install ation, then restart PC.After restart, return
to desktop, press Managment of My
Computer , the screen pops up computer
management ,press Device Manager in it ,
then press graphics Card in it, make sure
there is Cordon sub-display icon in it.
L.
-
P.
L.
-
P.
L.
-
P.
L.
-
P.
Move
Move
Switch
S. the
S. to the S. the
S.
S. next
Next
P. cursor P. next. P. cursor P.
P. page
right
down
Photo
Move
S. the
P. cursor
down
-
RIGHT L.
-
L.
-
L.
-
L.
-
-
P.
S.
S.
S. Play/ S. Play/ S. page
S.
confirm
turnning
P. pause P. pause P. or manual P.
confirm
P.
L. Setting
point
P. decreases
P.
P.
P.
L.
P.
Switch
between
Antomatic
-
P.
page
turning
ENTER L.
P.
Make sure there is
Cordon sub-display
display device
-
P.
L. Setting
point
P. decreases
-
L.
P.
-
L.
P.
-
L.
P.
-
L.
P.
-
L.
-
P.
Long
Long
Long
Long
Long
Long
Press
Press
Press
Press
Press
Press
L. for 3
L. for 3
L. for 3
L. for 3
L. for 3
L. for 3
seconds
seconds
seconds
seconds
seconds
seconds
P. to
P. to
P. to
P. to
P. to
P. to
power
power
power
power
power
power
POWER
off
off
off
off
off
off
-
Step
make sure there is Cordon sub-display display device
By then, the driver has been fully installed.
Run the driver
Operating instructions
1)Long press POWER on the projector for 3
seconds to enter power on and enter the main
menu.
2)Power adaptor must be DC5V/2A.
3)Connect the projector with PC by USB cable
15
Prompt:if system halts suddenly by accident means,
press the Reset device(as shown in Figure ) with
something hard to resume to normal work.
4
User Manual for Multi Media Mini Projector
User Manual for Multi Media Mini Projector
MENU
ENTER
OSD
PHOTO
MODE
CALENDAR
SLIDE
SHOW
MUSIC
MODE
EXIT
VOL+
VIDEO
MODE
ZOOM
VOL-
Figure
Figure
Remote Control
The Overview of Remote Control
POWER
UP
DOWN
LEFT
RIGHT
ENTER
SETUP(OSD)
MUTE
CALENDAR
PHOTO
SLIDESHOW
MUSIC
MOVIE
EXIT
ZOOM
VOL+ VOLMENU
power on/off
move the cursor up
move the cursor down
move the cursor left
move the cursor right
play/pause/confirm
basic function setup
voice on/off
undefined
photo mode
slideshow mode
music mode
video mode
exit, back to prev. Screen in turn
enlarge photos under Photo Brow
se mode.But invalid under SLIDE
SHOW
volume control
undefined
Note:After power off by remote control, if the projector
is not plugged with AC adaptor., only press POWER
on the projector can power on it again.
5
USB connect with PC
5)Select USB Connect PC then press ENTER
to start operation.
6)After operation, press USB device icon in the
bottom right hand cornor to exit USB connection.
USB SUB Display:
Projection Synchronizes with PC Screen
Projection of the projector synchronizes with PC
screen by USB cable and corresponding drivers.
Driver installation
Please firstly install the attached disk in the
accessories or driver attached in the projector on
PC according to the following steps
1)Copy the whole INSTALL file in the attached
disk on the desktop or other storage device of
your PC
copy install
file onto PC
Setp
Copy files
14
User Manual for Multi Media Mini Projector
1)
2)
3)
4)
5)
6)
7)
8)
9)
Language:set language
Brightness:set brightness
Contrast:set contrast
Saturation:set saturation
Hue:set hue
Gamma:set gamma
Volume:set volume
Reset default setting:reset default setting
Version:display current software version
Download Media Files from PC
Projector supports data transmission from PC
through USB 1.1/2.0
Note:This projector is precision photoelectronic
products, to protect it from damage caused by error
operating, great care should be taken while
operating.
USB HOST
The projector can be used as a mobile device, it is
built with NAND FLASH to store photos, music and
video files.
Operating instuction:
1)Long press POWER on the projector for 3
seconds to enter the main menu.
2)Power adaptor must be DC5V/2A.
3)Connect the projector with PC by USB cable
attached in the accessories, insert one end to PC
and the other to projector s USB port.
4)After confirm, the screen displays the following
two options, as shown in Figure :
User Manual for Multi Media Mini Projector
Basic Operation
1 Power on
1) Long press POWER on the projector for 3
seconds, the screen will show main menu.If the
built-in battery is too weak to power on,
recharge the battery before power on, or power
on while on charge.Boot screen:
Figure
Press MENU on the projector or EXIT on the
remote control to switch icons
between storage device (such as NAND, SD)
and function (such as PHOTO,
MOVIE, MUSIC),then press LEFT or RIGHT to
select corresponding icon and start playing.
2 Photo mode
1)After power on, press PHOTO icon on the
main menu, then press ENTER on the
projector or directly press PHOTO MODE on
the remote control to enter photo mode.
2)Under Photo Mode, press LEFT or RIGHT
to select photo.
3)Press MENU on the projector or EXIT on
the remote control to return to prev. screen in turn.
4)Press VOL on the projector or VOL+, VOLon the remote control to adjust the volume(under
SLIDE SHOW mode)
3
13
Main Menu
2
Video mode
6
User Manual for Multi Media Mini Projector
1)Afer power on, press MOVIE icon on the main
menu, then press ENTER on
the projector or directly press VIDEO MODE
on the remote control to enter video mode.
2)Under video mode, press LEFT , RIGHT to
select video files.
3)Press MENU on the projector or EXIT on
the remote control to return to prev.
screen in turn.
4)Press VOL on the projector or VOL+, VOLonthe remote control to adjust the volume.
4 Music mode
1)After power on, press MUSIC icon on the main
menu, then press ENTER on the projector or
directly press MUSIC MODE on the remote
control to enter music mode.
2)Under music mode, press LEFT, RIGHT to
select music chapter, then press ENTER to
play.
3)Press MENU on the projector or EXIT on
the remote control to return to the prev. screen in
turn.
4)Press VOL on the projector or VOL+,VOLon the remote control to adjust the volume.
5 File management
1)After power on, press FILES icon on the main
menu, then press ENTER on the projector to
enter file management mode.
2)Under file management mode, press LEFT or
RIGHT to select file, then long press ENTER
to edit the selected file such as copying or deleting
Note: Under file list screen, pressing LEFT on
the remote control can also editing file.
A:select copying to internal to copy files from
SD/MMC card to NAND FLASH.
7
User Manual for Multi Media Mini Projector
Rock: rock mode
Soft:soft mode
Jazz:jazz mode
DBB:DBB mode
2)Auto Play:set music auto play
On:Press Music on the main menu, then press
ENTER to start music auto play
Off :Press Music on the main menu, then press
ENTER , it will show list of music file on the
screen, select one file and press ENTER to
start playing the selected file.,
5
System Setup
Press System Setup icon of the Start Up
Setting , then press ENTER to enter System
Setup screen, as shown in Figure
Operating instruction:Short Press LEFT or
RIGHT to select setting options by moving
cursor up and down, then long press LEFT or
RIGHT to change parameters of the selected
option.
Figure
System Setup Screen
12
User Manual for Multi Media Mini Projector
2)Play Mode: set video repeat mode
Once:only play for once, after playing, return to
video file list
Repeat: repeat all video files
3)Auto Play:set auto play on/off
On :select VIDEO on the main menu, then
press ENTER to enter video auto play mode.
Off : select VIDEO on the main menu, then
press ENTER ,it will show list of video file on
the screen, select one file and press ENTER
to start playing the selected file.,
3 Music Setup
Press Music Setup icon of the Start Up
Setting , then press ENTER to enter Music
Setup screen, as shown in Figure :
Operating instruction:Short Press LEFT or
RIGHT to select setting options by moving
cursor up and down, then long press LEFT or
RIGHT to change parameters of the selected
option.
User Manual for Multi Media Mini Projector
B: select delete files to delete files from SD/
MMC card or from NAND FLASH.
3) Press MENU on the projector or EXIT on
the remote control to return to the prev. screen in
turn.
Note: files can not be copied from NAND FLASH to
SD/MMC card.
6 Ebook reading
1) After power on, press Ebook icon on the main
menu,then press ENTER on the projector or
directly press Ebook on the remote control to
enter calendar mode.
2)Under calendar mode, press LEFT or
RIGHT to move to the prev. or next pages.
3)Press ENTER to switch between automatic
page turning or manual page turning .
4)Press DOWN/VOL to set automatic page
turning intervals.
5)Press MENU on the projector or EXIT on
the remote control to return to prev. Screen in
turn.
System Setup
After power on, press SETUP icon on the main
menu, then press ENTER on the projector or
directly press SETUP on the remote control to
enter system setup, as shown in Figure :
Figure
Music Setup Screen
1)Play Mode:Set music repeat mode
Repeat Once:only play for once, after playing,
return to video file list
Repeat:repeat all music files
Music Effect:set music effect
Normal:normal mode
Pop:pop mode
Classic:classic mode
11
Figure
: Main Menu Setup.
8
User Manual for Multi Media Mini Projector
1).
2).
3).
4).
5).
Fit to Screen: photo is displayed to fit the screen.
Crop to Fill:
photo is displayed in its original
size
Photo Setup
Calendar Setup
Video Setup
Music Setup
System Setup
Operating Instruction: Press LEFT or RIGHT
to select sub-options, then press
ENTER to enter detailed settings. Press
MENU on the projector or EXIT on the
remote control to return to the main menu.
Photo Setup
Press Photo Setup icon of the
tart Up
Setting , then press ENTER to enter
Photo Setup screen., as shown in Figure :
Operating instruction:Short Press LEFT or
RIGHT to select setting options, then long
press LEFT or RIGHT to change parameters
of the selected option.
Figure
User Manual for Multi Media Mini Projector
3)Slideshow Duratio: set intervals between
slideshow photos
4)Slideshow Repeat: set photo repeat mode
Repeat: repeat mode
Once: only play for once
5)Slideshow Effect: set photo slideshow display
mode
There are altogether 11 sildeshow display modes.
6)Clock: clock on/off under slideshow mode.
2
Video Setup
Press Video Setup icon of the
tart Up
Setting , then press ENTER to enter Video
Setup screen, as shown in Figure :Operating
instruction:Short Press LEFT or RIGHT to
select setting options by moving cursor up and down,
then long press LEFT or RIGHT to change
parameters of the selected option.
Photo Setup Screen
1)Display Mode:
Slideshow:Auto start the photo slideshow.
Thumbnail:enter nine thumnail photos preview
mode,select any thumnail photo to start playing
Browse Mode: manual preview mode
2)Display Ratio: photo is centered between
margins.
Full Screen: photo is displayed in full screen
9
Figure
Video Setup Screen.
1)Display Mode:
Full Screen: display video in full screen
Original Size:display video in its original size.
10