1
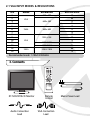
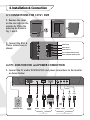
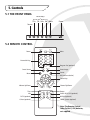
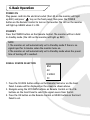
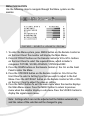
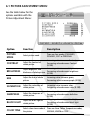
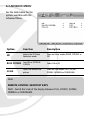
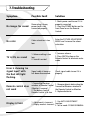
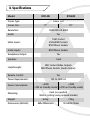
CCTV
Model: X17LCD
Professional 17” LCD CCTV
Monitor with 3D Noise Filter
Model: X19LCD
Professional 19” LCD CCTV
Monitor with 3D Noise Filter
Before you begin
Please unpack the box carefully and identify that all the parts are present.
Please bear in mind the following points when choosing a mounting position.
Do not expose the display to humidity, dust, direct sunlight or to extreme weather conditions.
Do not use thinner or other chemical detergents when cleaning. Use a soft cloth to remove dust
or dirt from the display screen.
Avoid storage and use of this display in areas of extreme hot or cold. The display’s operating
temperature range is -10°C to +40°C.
Do not drop or strike the display.
For your own safety, when the display is not in use, remove the AC adapter from the mains.
Do not cut the LCD cables, this will void the warranty.
Make sure you use only the recommended power supply. Damage caused to the LCD by incorrect
voltage or wiring is not covered by the warranty.
Model:
X17LCD/X19LCD
Professional 17”/19” LCD CCTV Monitor
with 3D Noise Filter
Thank you for purchasing this Xvision monitor. Before operating this product,
please read this instruction manual carefully.
1. Safety Precautions
CAUTION
RISK OF ELECTRICAL SHOCK.
DO NOT OPEN
!
CAUTION: TO REDUCE RISK OF ELECTRIC SHOCK, DO NOT OPEN BACK COVER.
NO USER SERVICEABLE PARTS INSIDE.
REFER SERVICING TO QUALIFIED SERVICE PERSONNEL.
Make sure that you use only the recommended power supply supplied with
the unit.
When installing the monitor, please make sure that you observe the necessary
safety precautions.
Try to avoid all direct contact with the LCD screen as any scratches or
marks left on the surface could affect the image quality.
2. Product Description
The X17LCD and X19LCD feature a 17" and 19” TFT LCD respectively, which
generate 1280 x 1024 pixel (800 TVL) resolution images, making them ideal for
high risk applications. Specially designed for CCTV use, they feature High
Brightness LCD displays with a special noise reduction filter for excellent image
quality and high fidelity speakers for good quality audio. The X17LCD and X19LCD
include VGA, BNC, HDMI, SVHS and Phono inputs for flexible connectivity to
industry standard CCTV equipment and have a built in switch mode power supply
for a flexible operating voltage of 100 to 240V AC and mains interference free
images. The LCD Monitors are designed for Desk mounting as supplied or can be
Wall or Ceiling mounted using an optional bracket (not supplied).
2.1 VGA INPUT MODES & RESOLUTIONS
S/N
1
2
3
4
5
6
7
8
9
10
11
12
13
14
Mode
VGA
SVGA
Resolution
Refresh Rate
720 x 400
70
60
72
75
60
72
75
60
70
75
60
75
60
75
640 x 480
800 x 600
1024 x 768
XGA
1280 X 960
1152 X 864
SXGA
1280 X 1024
Recommended mode: 1280x1024@60Hz
3. Contents
POWER
MUTE
ABC
DEF
1
2
3
LMN
PQR
JLK
GHI
4
5
6
STU
XWX
YZ-
7
8
9
0
F1
SMART S
SMART P
MENU
SOURCE
PR
O
L
VO
G
RA
M
OK
16:9
INFO
DCDi
X17LCD/X19LCD Monitor
Audio Connection
Lead
COLOR
P/N
AUDIO
Remote
Control
VGA Connection
Lead
Mains Power Lead
4. Installation & Connection
4.1 CONNECTIONS FOR CCTV / DVR
1. Remove the cover
on the rear right on the
monitor by lifting the
panel up as shown in
Fig. 1 and 2.
FIG. 1
FIG. 2
VIDEO INPUT
AUDIO INPUT
VIDEO OUTPUT
O OUTPUT
LEFT CHANNEL AUDIO OUTPUT
DIO OUTPUT
RIGHT CHANNEL AUDIO OUTPUT
2. Connect the BNC &
Phono connections as
shown:
VIDEO INPUT
VIDEO INPUT
AUDIO INPUT
AUDIO INPUT
VIDEO OUTPUT
VIDEO OUTPUT
LEFT CHANNEL AUDIO OUTPUT
LEFT CHANNEL AUDIO OUTPUT RIGHT CHANNEL AUDIO OUTPUT
LEFT
OR
S-VIDEO
UDIO
RIGHT
LEFT
RIGHT
RIGHT CHANNEL AUDIO OUTPUT
OR
4.2 PC, DVD/VCR/VCD and POWER CONNECTION
VIDEO
HDMI
AUDIO S-VIDEO
VGA
VIDEO
AUDIO
1. Connect the PC and/or DVD/VCR/VCD and power connections to the monitor
as shown below:
Connect
to DVD/VCR/VCD
etc
Connect
to PC
Connect to DVD/VCR/VCD etc
LEFT
LEFT
RIGHT
OR
OR
EARPHONE JACK
EARPHONE JACK
POWER
SUPPLY
AUDIO
HDMI
POWER
SUPPLY
VGA
AUDIO
HDMI
S-VIDEO
VIDEO
VGA
Connect to PC
Connect to PC
S-VIDEO
VIDEO
AUD
AUDIO
Connect to DVD/VCR/VCD etc
Connect to DVD/VCR/VCD et
5. Controls
5.1 THE FRONT PANEL
Cursor Keys
CH+ CH- Vol+ Vol- Menu
Power
MENU
-
+
SOURCE
Source
5.2 REMOTE CONTROL
POWER
MUTE
Mute
Power
Numerical Keys
ABC
DEF
1
2
GHI
3
JLK
LMN
PQR
4
5
6
STU
XWX
YZ-
7
8
9
0
F1
SMART S
Program List (optional)
SMART P
Smart Image
Smart Sound
MENU
SOURCE
Source
OK (confirm selction)
Menu
Cursor Keys
L
Time
VO
Volume Up/Down
PR
O
G
RA
M
OK
INFO
16:9
DCDi
Colour (optional)
Return
Switch 16:9 / 4:3 (optional)
Info
DCDi (optional)
Channel Up/Down
COLOR
P/N
AUDIO
NICAM (optional)
Colour System (optional)
Note: The Remote Control
takes 2x AAA (1.5V) batteries,
not supplied.
1. Aim the remote control at the infra-red receiver on the front of the LCD.
2. Avoid pressing, dropping, moistening or disassembling the unit.
3. Avoid pressing remote control buttons continuously and quickly. Allow at least 2
seconds for the remote control to function correctly.
4. In BNC, AV, S-Video and PC modes all functions and adjustments are similar to
a standard TV
5.3 CONTROL FUNCTIONS
Key
Power
Mute
Numerical keys
F1
Program List
Smart Sound
Smart image
Menu
Source
Cursor Keys
Function
Turn on or standby
Eliminate sound
Number Input buttons
Invalid
Scan or Set Program List
Intelligent Sound mode selection
Intelligent Image mode select
Press this menu button to display the Main Menu
Press this button to display Signal Source selection menu
Up or Down cursor button: Function select
Left or Right cursor button: Analogue add or reduce
OK
Confirm actions
Volume Up/Down Add or reduce Volume Level
Channel Up/Down Add or reduce Channel Number
Info
System information display switch
Timer
Time Setting button
Return
Press this button to return to last watched channel
Switch 16:9 / 4:3 Switches the scale of the display between
FULL, ZOOM1, ZOOM2, NORMAL or PANORAMA
DCDi
Invalid
Colour
Invalid
Colour System
Invalid
NICAM
Invalid
nu
6. Basic Operation
POWER ON
Plug power cord into the electrical socket (the LED on the monitor will light
up RED) and press '
' key on the front panel, then press the POWER
button on the Remote Control to turn on the monitor. The LED on the monitor
will light up GREEN when it is ON.
Power
Cursor Keys
STANDBY
Press the POWER button on the Remote Control. The monitor will be in held
in standby mode. (the LED on the monitor will light up RED)
CH+ CH- Vol+ Vol- Menu
Source
NOTE:
1.The monitor set will automatically set to Standby mode if there is no
signal input for 5 minutes when the monitor turns on.
2.The monitor set will automatically set to Standby mode when the preset
time of turning off is reached.
MENU
AV
-
BNC
+
SOURCE
SIGNAL SOURCE SELECTION
S-VIDEO
PC
1. Press the SOURCE button either on the Remote Control or on the Front
Panel. A menu will be displayed on the screen as shown above.
2. Navigate using the UP/DOWN buttons on Remote Control or CH+/CHbuttons on the Front Panel to select the signal source from the list.
3. Press the OK button on the Remote Control or MENU button on the Front
Panel to set.
MENU NAVIGATION
Use the following steps to navigate through the Menu systems on the
monitor.
1. To enter the Menu system, press MENU button on the Remote Control or
on the Front Panel. The monitor will display the Main Menu.
2. Press LEFT/RIGHT buttons on the Remote Control or VOL+/VOL- buttons
on the Front Panel to select the required Menu, which includes 5
categories: PICTURE, SOUND, ADVANCE, SYSTEM and BNC.
3. Press the DOWN button on the Remote Control or the CH- on the Front
Panel to enter the Menu.
4. Press the UP/DOWN button on the Remote Control or CH+/CH on the
Front Panel to select a Setting Type that you wish to adjust in the Sort
Menu. Press the LEFT/RIGHT button on the Remote Control or VOL+/ VOLon the Front Panel to adjust the value or setting.
5. Press the MENU button to exit the main menu when the monitor displays
the Main Menu screen. Press the MENU button to return to previous
menu when the monitor displays a sub-menu. Press the SOURCE button to
display the signal source menu.
Note: Settings which can not be adjusted will be hidden automatically
and the colour of the selection will be changed to grey.
6.1 PICTURE ADJUSTMENT MENU
See the table below for the
options available with the
Picture Adjustment Menu:
Option
Function
Description
PICTURE
MODE
Select picture mode
There are four modes; STANDARD,
DYNAMIC, SOFT or PERSONAL
CONTRAST
Adjust the contrast of
whole picture
BRIGHTNESS
Increasing value increases Contrast;
Decreasing value decreases Contrast
(0-100)
Increasing value increases brightness;
Adjust brightness and
Decreasing value decreases brightness
blackness of whole picture
(0-100)
HUE
Adjust the hue of whole
picture
Increasing value increases green;
Decreasing value increases purple (0-100)
SATURATION
Adjust the saturation of
whole picture
Increasing value increases color;
Decreasing value decreases color (0-100)
SHARPNESS
Adjust the sharpness of
whole picture
Adjust the black light of
BLACK LIGHT whole picture
COLOR TONE
Increasing value increases definition;
Decreasing value decreases definition
(0-100)
Increasing value increases black light;
Decreasing value decreases black light
(0-100)
Select colour tone mode of There are three Colour Temperature modes,
the picture
NORMAL, WARM or COOL
Note:
1. The value adjusted by user, such as Contrast, Brightness, Saturation, Hue,
and Sharpness, will be saved automatically when the settings are changed
2. You can only adjust Brightness, Contrast, Sharpness and Black Light in
PERSONAL mode.
REMOTE CONTROL SHORTCUT KEYS
SMART P (Smart Picture) - Switch the Picture Mode between STANDARD,
DYNAMIC, SOFT or PERSONAL
16:9 - Switch the Scale of the display between FULL, ZOOM1, ZOOM2,
NORMAL or PANORAMA
6.2 SOUND ADJUSTMENT MENU
See the table below for the
options available with the
Sound Adjustment Menu:
Option
Function
Description
SOUND MODE Adjust audio effect mode
There are four modes; PERSONAL,
STANDARD, NEWS or MUSIC
BASS
Adjust bass value
Increasing value increases bass;
Decreasing value decreases bass (0-100)
TREBLE
Adjusts treble value
Increasing value increases treble;
Decreasing value decreases treble (0-100)
BALANCE
Adjusts balance of left or
right speakers
Increasing value increases left volume;
Decreasing value increases right volume
(0-100)
Note:
1. The value of 50 is recommended for all the Sound settings
2. The treble or bass value will be saved automatically after it is adjusted
3. You can only adjust bass and treble in PERSONAL mode.
Remote Control Shortcut Keys
SMART S (Smart Sound) - Switch the Sound Mode between PERSONAL,
STANDARD, NEWS or MUSIC
MUTE: Press to MUTE
VOLUME: VOL+, VOL
6.3 ADVANCE MENU
See the table below for the
options available with the
Advanced Menu:
Option
Function
Description
NR
Selects the 3D Noise
Reduction mode
There are three modes; WEAK, STRONG or
OFF
Turn ON or OFF BLUE
BLUE SCREEN SCREEN
SCALE
Select the scale of the
picture
Select ON or OF
There are five modes; FULL, ZOOM1,
ZOOM2, NORMAL or PANORAMA
Note:
REMOTE CONTROL SHORTCUT KEYS
16:9 - Switch the Scale of the display between FULL, ZOOM1, ZOOM2,
NORMAL or PANORAMA
6.4 SYSTEM MENU
See the table below for the
options available with the
System Menu:
Option
Function
Description
OSD
LANGUAGE
Choose OSD menu display
language
Select the Language you wish the OSD
menu to be displayed in.
H-POSITION
Adjust H-position of OSD
menu
V-POSITION
Adjust V-position of OSD
menu
DURATION
Adjust duration of OSD
menu
Increasing value extends the duration time
of OSD menu; (0-100).
HALFTONE
Adjust halftone of whole
picture
Increasing value increases halftone;
Decreasing value decreases halftone (0-8)
SLEEP
Set sleep time of the
machine
Choose between; OFF, 15, 30, 45, 60, UNITE:
MINUTE.
RESET
Default to factory settings
Reset all values to the settings of the factory
Increasing value will move OSD menu right;
Decreasing value will move OSD menu left
(0-100).
Increasing value will move OSD menu down;
Decreasing value will move OSD menu up
(0-100).
7. Troubleshooting
Symptom
Possible Fault
Solution
No image. No sound.
Power plug is loose,
power cord is not
connected properly.
1.Check power cord to see if it is
properly connected
2. Press the POWER button on the
Front Panel or on the Remote
Control.
No color
Color saturation is too
low.
Enter the PICTURE ADJUSTMENT
MENU and increase the colour
saturation.
TV is ON, no sound
1. Volume setting is too
low.
2. Sound is muted.
1. Increase volume.
2. Press MUTE button on the
Remote Control to eliminate mute
mode.
Error is showing ‘no
signal input’ with
the Red LED light
flashing.
Signal cable is loose or
has been disconnected.
Check signal cable to see if it is
properly
Remote control does
not work
1.Transmitter/Receiver
window of Remote Control
/Monitor is covered
2. The battery level of
Remote Control is to low.
1. Remove objects obstructing the
Transmitter/Receiver window of
the Remote Control or Monitor.
2. Replace batteries.
Display is faint
1. Use AUTO-ADJUSTMENT
1. Adjustment is incorrect.
function.
2. Display mode is incorrect.
2. Set to mode :1280x1024@60Hz
8. Specifications
Model:
X17LCD
Screen Type:
Screen Size:
X19LCD
Colour LCD
17”
Resolution:
19”
1280x1024 @ 60HZ
Audio:
Yes
Video Inputs:
SVHS Socket
VGA/HDMI Sockets
BNC/Phono Sockets
Audio Inputs:
BNC/Phono Sockets
Headphone Output:
Yes
Speakers:
Dual
Loopthroughs:
BNC Socket (Video Output)
BNC/Phono Sockets (Audio Output)
Remote Control:
Yes
Power Requirements:
100 to 240V AC
Power Consumption:
<40W
<45W
(<2W on Standby mode) (<2W on Standby mode)
Mounting:
Weight:
Dimensions (WxHxD):
Desk (as supplied)
Wall or Ceiling (using optional bracket)
6.0kg
7.0kg
469x390x62mm
510x430x70mm
CCTV
TECHNICAL SUPPORT:
For Technical Support for any Xvision product please contact your local
distributor.
LIMITED WARRANTY:
This product is supplied with a 1 Year warranty. The Warranty excludes
products that have been misused, (including accidental damage) and
damage caused by normal wear and tear. In the unlikely event that you
encounter a problem with this product, it should be returned to the place of
purchase.
Manufactured exclusively for Xvision - www.x-vision.co.uk
UK/Europe
Xvision Group (UK)
Unit 2, Valley Point,
Beddington Farm Road,
Croydon
Surrey. CR0 4WP
Email:
[email protected]
Far East
Kyoung Am Building
157-27 Samsung-dong
Kangnam-ku
135 090 Seoul
Korea
Email:
[email protected]
Middle East
Burjuman Tower, 18th Floor
PO Box 121828
Dubai 43659
United Arab Emirates
Email:
[email protected]
North America
100 Park Avenue
New York City,
New York
10017
United States
Email:
[email protected]