1
USER’S MANUAL
Information in this document is subject to change without notice. No part of this document may be
reproduced or transmitted in any form or by any means, electronic or mechanical, including photocopying
and recording, for any purpose, for any reason, without express written permission of HEURIS.
The software described in this document is furnished under a license agreement. The software may be
used or copied only in accordance with the terms and conditions of the agreements. It is against the law
to copy the software on any medium except as specifically allowed in the license agreement.
MPEG Power Professional™ User Manual Version 2.0
©1999. HEURIS. All rights reserved.
HEURIS
PO Box 56914
St. Louis, MO 63156
MPEG Power Professional is a registered trademark of HEURIS.
Avid Media Composer and OMF are registered trademarks of Avid Technology, Inc.
QuickTime is a registered trademark of Apple, Inc.
Media100 is a registered trademark of Data Translation.
Windows 95/98, Windows NT, and Windows are trademarks of Microsoft Corporation.
Adobe After Effects is a registered trademark of Adobe Systems.
All other trademarks contained herein are the property of their respective owners.
2
INTRODUCTION
7
CHAPTER 1 – GETTING STARTED: ENCODING YOUR FIRST PROJECT
17
Chapter Overview
1.1 Exporting Your Media
1.2 Opening a New Project
1.3 Inserting a Task and Choosing Encoding Task
1.4 Choosing Encode Settings
1.5 Editing Encode Settings
1.6 Naming Your Destination File
1.7 Start Your Encode
1.8 Monitoring an Encoding Project in Progress
1.9 Viewing Your Finished MPEG file
Chapter Summary
18
18
18
19
20
20
20
21
22
23
23
CHAPTER 2 – PROJECT ENCODING BASICS
Chapter Overview
2.1 The Four Types of MPEG Encoding and Analysis Only Mode
2.2 Choosing a Built-in Template for MPEG Encoding
2.3 Encoding Separate Audio and Video Files
2.4 Managing Encoding Projects
2.5 Interrupting and Resuming Encoding Projects
2.6 Specifying Source and Supported Media
2.7 Multiple Source Files, One MPEG Stream
2.8 Batch Encoding
2.9 Editing User Preferences
Chapter Summary
CHAPTER 3 – MODIFYING ENCODER SETTINGS
Chapter Overview
3.1 Why Make a Custom Template
3.2 The MPEG Power Professional™ built-in Templates
3.3 Custom Templates
3.4 How to Edit Encoder Settings
3.5 Edit Template Tab Settings
3.6 Edit Audio Tab Settings
3.7 Edit Video1 Tab Settings
3.8 Edit Video2 Tab Settings
3.9 Edit Multiplex Tab Settings
Chapter Summary
25
26
26
27
28
31
38
41
41
44
46
48
49
50
50
50
52
53
53
54
56
60
65
67
3
CHAPTER 4 – ANALYSIS MODE AND THE ENCODE CONTROL LIST (ECL)
Chapter Overview
4.1 Why Analyze your Video?
4.2 Using Analysis Only
4.3 Reviewing an Analysis Only Generated .ecl File
4.4 Adding and Removing Encoding Events from an .ecl File
4.5 Controlling Specific Encoding Events
4.6 Manually Creating an .ecl File
4.7 Merging .ecl Files
4.8 Practical Applications for .ecl Files
4.9 Still Pictures
4.10 Encoding Short Segments of Longer Source Files
Chapter Summary
70
70
72
74
78
80
80
90
90
91
93
94
CHAPTER 5 – LET’S MAKE A DVD!
95
Chapter Overview
5.1 Creating a New Project
5.2 Inserting a Task
5.3 Choosing Encoding Settings
5.4 Naming a Destination File
5.5 Editing Encode Settings
5.6 Start Your Encode
5.7 Monitoring an Encoding Project in Progress
5.8 Burning the VOB onto a DVD
5.9 Creating a DVD using Third Party Authoring Systems
Chapter Summary
96
96
97
98
99
99
102
103
104
104
105
REFERENCE SECTION
CHAPTER 6 – QUICK REFERENCE TOPICS: PROJECT ENCODING BASICS
6.1
6.2
6.3
6.4
6.5
6.6
6.7
4
69
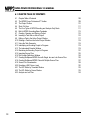
Table of Contents
The MPEG Power Professional™ Toolbar
The Project Toolbar
Short Cut Keys
The Four Types of MPEG Encoding and Analysis Only Mode
Built-in MPEG Encoding Base Templates
Creating, Opening and Saving a Project
107
108
109
110
111
111
112
116
6.8
6.9
6.10
6.11
6.12
6.13
6.14
6.15
6.16
6.17
6.18
6.19
6.20
6.21
6.22
6.23
Inserting a Task into an Active Project
Editing a Task in the Active Project Window
Deleting a Task from the Active Project Window
Using the Task Generator
Interrupting an Encoding Project in Progress
The Interrupted Encodes Window
Monitoring an Encoding Project in Progress
Importing Source Files
The Encode Definitions Window
Creating Multiplexed MPEG Files with Single .abs and .vbs Source Files
Creating Multiplexed MPEG Files with Multiple Source Files
Source File Concatenation
Encoding a Still Picture (.msp files)
The ECL Editor-by timecode Window
The ECL Editor-by frame Window
Analysis and .ecl files
CHAPTER 7 – REFERENCE TOPICS: ADVANCED ENCODING OPTIONS
AND SPECIALIZED TASKS
7.1
7.2
7.3
7.4
7.5
7.6
7.7
7.8
7.9
7.10
7.11
7.12
7.13
7.14
7.15
7.16
7.17
7.18
7.19
Table of Contents
Editing a Built-in Template
Saving a Custom Template
Restoring the Built-in Template Default Settings
Adjusting Audio Bit Rates
Adjusting Video Bit Rates
Adjusting the Display Resolution
Applying Global Filters
Applying Filters to Sections of Source Video via the ECL
Adjusting Search Techniques and Search Distances
Encoding Smaller Sections of Source .omf or .mov via the ECL
Cropping Source Video
Manually Creating an ECL
Editing an Auto-Generated or Manually Created ECL
Using an .ecl file with a Task
Injecting I-frames
Injecting Entry Points
Adjusting GOP Size (N)
Adjusting Reference Interval (M)
116
117
118
118
119
119
121
122
124
125
127
128
130
132
132
134
139
140
141
142
143
144
145
145
146
147
148
149
150
151
152
152
152
153
154
155
5
MPEG POWER PROFESSIONAL 2.0 MANUAL
7.20
7.21
7.22
7.23
7.24
7.25
7.26
7.27
7.28
7.29
7.30
7.31
7.32
Closed GOP
Adjusting Aspect Ratio
Adjusting VBV Size
Adjusting Frame Rate
Creating a VOB
Initial Clock Reference and Easy CD Creator
Multiplex Audio/Video MPEG Elementary Streams
Encoding from a Series of Still Image Files
Source File Concatenation
Encoding a Video CD
Aspect Ratio Chart for MPEG1 and MPEG2
Tips to Help You Make the Fastest Encodes
Tips to Help You Make the Highest-Quality Encodes.
APPENDIX I – How MPEG Works
168
APPENDIX II – Open vs. Closed GOP (and Why You Should Care)
180
APPENDIX III – What in the World is a VOB?
181
APPENDIX IV – What is the Power of the
HEURIS MPEG Export Engine?
181
GLOSSARY
6
155
156
157
158
159
159
160
160
162
163
164
164
165
183
INTRODUCTION
MPEG POWER PROFESSIONAL 2.0 MANUAL
WHAT’S NEW IN MPEG POWER PROFESSIONAL™ 2.0?
Enhanced Performance
MPEG Power Professional™ 2.0 runs significantly faster, allowing users to create MPEG files in a
fraction of the time previously required. MPEG Power Professional™ makes full use of the G4
with Velocity Engine™ and Intel PIII™ MMX/SSE instruction sets. You still have all of the incredible quality you have come to expect from HEURIS, with more control options to increase the quality of your MPEG files. You no longer have to choose between speed and quality. With MPEG
Power Professional™, you have both!
Multiple Files, One MPEG
MPEG Power Professional™ 2.0 allows for source file concatenation—allowing users to lay multiple source files end to end and connect them into one MPEG file. Users can circumvent file size
restrictions imposed by computer operating systems, and do larger encoding jobs in smaller
pieces when convenient.
VOB Creation
MPEG Power Professional™ 2.0 can create VOBs with the Video Object Multiplexing feature.
Users can quickly and easily create VOBs for rapid DVD prototyping using inexpensive DVD
burning packages, such as Adaptec Toast DVD™.
Closed Group of Pictures (GOP)
MPEG Power Professional™ 2.0 can create a Closed Group of Pictures (GOP). Users can create
MPEG appropriate for multi-angle DVD playback with this feature.
PAL/NTSC specific templates
MPEG Power Professional™ 2.0 features PAL and NTSC specific templates. You no longer have
to memorize PAL or NTSC specifications. Specifications are set automatically at the touch of a
button!
Content Analysis
MPEG Power Professional™ version 2.0 supports scene change detection and content analysis
of all media types. All users now have the benefit of MPEG Power Professional’s™ powerful
analysis option.
OTHER MPEG POWER PROFESSIONAL™ FEATURES
MPEG Power Professional™ works directly with all leading NLE systems. In this way, users can
avoid generation loss and produce MPEG files of the highest quality. It provides the best path
from NLE to DVD.
8
INTRODUCTION
MPEG Power Professional™ is a professional level product with frame by frame control over filters, I-frame injection, search methods, search techniques and much more. This precise control
allows users to create MPEG files that exactly match their quality and application requirements.
MPEG Power Professional™ is fully ISO/MPEG and DVD compliant. You can use MPEG Power
Professional™ with confidence, knowing that it will work reliably with DVD authoring and other
multimedia development systems and will play back on all MPEG compliant decoders.
MPEG Power Professional™ is fully compliant with the QuickTime™ Export Interface API. You
can access the powerful features of MPEG Power Professional™ from within other QuickTime™
compliant applications such as Media Cleaner Pro™, Avid Cinema™, Final Cut Pro™, and Adobe
After Effects™. There is no need to render to other file formats, saving time, effort, and disk space.
MPEG Power Professional™ is a true cross platform product that works on both PC and Apple
Macintosh™ systems. You have the flexibility to choose whichever platform is most convenient
and cost effective to digitize, edit, add effects to and encode your video.
MPEG Power Professional™ includes a batch encoding feature. You can set up encoding projects
ahead of time, and then encode them all whenever it’s convenient—even overnight.
MPEG Power Professional™ has many application-specific, built in templates. You can quickly
easily and reliably create MPEG files fully compatible with specific applications such as DVD,
Video-CD and the Internet with just one click.
MPEG Power Professional™ is purely software. You always have the very latest features and
improvements through frequent and inexpensive upgrades.
HEURIS MPEG EXPORT ENGINE PRO™
The HEURIS MPEG Export Engine Pro™ is an export component for QuickTime™ and for the
MoviePlayer that comes with Apple's QuickTime Pro, Adobe After Effects™ and Avid Cinema™
(and other products that support the QuickTime plug-in architecture). It utilizes the export API that
is built into QuickTime and HEURIS' award-winning MPEG encoding engine.
9
MPEG POWER PROFESSIONAL 2.0 MANUAL
The HEURIS MPEG Export Engine Pro™…
• Supports the standard QuickTime™ application interface, so it is accessible within QuickTime™
support enabled products like Avid Cinema™, Adobe After Effects™, and QuickTime Pro™.
• Creates MPEG1 and MPEG2 files
• Provides the ability to create multiplexed, video or audio streams
• Works with QuickTime™ for Macintosh or Windows™
• Offers all the encoding templates in MPEG Power Professional™ as well as user defined
templates.
MANUAL OVERVIEW
MPEG Power Professional™ was designed to provide you with a powerful, easy to navigate compression tool, regardless of your previous experience with MPEG encoding. The user’s manual
for this product was designed with the same goal in mind. The manual includes detailed information about how to set up and complete MPEG encoding tasks using MPEG Power Professional™.
You will also find detailed information about tailoring MPEG to your application needs. Finally, you
will find a comprehensive quick reference section, which helps you find information very quickly
about any aspect of encoding with MPEG Power Professional™. Although you will benefit from
reading this manual in its entirety, the following broad outline will help you decide how best to use
the manual to accomplish your encoding tasks.
Chapter 1 walks you through encoding your first project using source files provided on the MPEG
Power Professional™ tutorial CD. This first chapter gets you started with the basics of project
based encoding, including how to define encoding tasks based on built-in encoding templates.
You can choose the built-in template that best suits your application and all of the encoding
controls will be pre-set for you at optimized levels.
Chapter 2 will show you how to create and manage encoding tasks within projects, how to add
and delete tasks from the encoding project window, and how to interrupt and resume encoding
task projects. This chapter also contains information about creating multiplexed MPEG files containing more than one video and audio source file. You will also learn how to use the Task
Generator and the source file concatenation feature to make your encoding job easier.
Chapter 3 will help you in customizing all of your encoder settings. The chapter goes through the
encoder settings option in detail, and will help you create your own custom templates for MPEG
encoding by adjusting some of the more basic encoding parameters, including bit rates, resolution
10
INTRODUCTION
and cropping your source video when necessary. Also included is a discussion of video filters,
how to choose a global filter to suit your video, and how to select the inverse telecine option if
your video material originated in film. Additionally, here you will find information about advanced
encoding options, including GOP sizes, reference intervals, and frame rates. This chapter also
discusses the different multiplex targets and types, including VOB creation.
Chapter 4 discusses a special task type available within MPEG Power Professional™, analysis
only mode. The MPEG Power Professional™ analysis tool examines your video source material
for the location of cuts, wipes, fades, and other information that can impact the MPEG encoding
process. Analysis mode generates an Encode Control List (ECL).
An ECL contains instructions for the encoding software to apply specific filters or search ranges or
insert I-frames at various points in the video, in order to enhance the video quality of your finished
encoded image. Chapter 4 will show you how to generate an ECL by analysis only or manually,
how to edit it, and how to apply an ECL to a specific encoding task.
Chapter 5 will take you through the steps necessary to prototype a DVD using MPEG Power
Professional™. A discussion of creating the VOB files and then burning the image using a DVD
burning package is covered.
Chapter 6 of the manual contains a comprehensive quick reference guide. Here you will find
specific instructions on how to quickly perform many tasks within MPEG Power Professional™.
As the title suggests, refer to the quick reference guide when you have a specific question about
how to perform a specific task, without worrying about how it relates to other tasks. If you want to
see how the tasks relate to each other as specific steps in a process, then refer to the appropriate
chapter or chapters earlier in the manual.
The reference guide is broken down into two chapters. Each chapter overview contains a table
of contents to help you find specific information quickly and easily. Refer to Chapter 6 for topics
relating to project encoding basics and to Chapter 7 for topics relating to advanced encoding
features and special how-to instructions for various encoding tasks.
The manual also contains several appendices, which should help you to further understand
MPEG and fully utilize the features that are included in the MPEG Power Professional™ 2.0
product.
Finally, the manual contains a comprehensive glossary and index. The page numbers with an
R-prefix indicate that page is located in the reference section of the manual. A page number
without an R indicates that the topic is discussed within the first 5 chapters of the manual.
11
MPEG POWER PROFESSIONAL 2.0 MANUAL
INSTALLING MPEG POWER PROFESSIONAL™
Please see the instruction bulletin included in your product packaging for installation instructions.
GUIDE TO ICONS AND ABBREVIATIONS IN THE USER’S MANUAL
A set of graphic icons appears in the manual, highlighting important information.
WARNING
This icon appears next to text that is critically important, and should not be missed.
INSTRUCTIONS
This icon appears next to any numbered text that details instructions or steps in a process.
REMEMBER
This icon appears next to text which reminds you of important information that has already been
mentioned, but which bears repeating.
Cool Stuff
This icon appears next to text detailing useful facts and other features of MPEG Power
Professional™.
12
INTRODUCTION
TIP
This icon appears next to text detailing shortcuts and other helpful information.
REFERENCE
This icon appears next to references to related chapters and sections of the manual.
Often, the use of abbreviations can cause confusion. Every effort has been made to use
abbreviations logically and consistently in this manual. Please refer to the following table of
conventions if you have any confusion about what an abbreviation means.
MB………Megabytes
Mb……....Megabits
Mb/s…….Megabits Per Second
fps……....frames per second
KB……....Kilobytes
Kb…...….Kilobits
THE MPEG POWER PROFESSIONAL™ TUTORIAL DISC AND HEURIS DVD
Included with your software package is a tutorial CD-ROM. This CD-ROM includes an interactive
tutorial and source file examples. The tutorial is designed to take you on a guided tour of most of
the features of MPEG Power Professional™. The source files included on the disc will come in
handy in Chapter 1, where you will be taken on a step-by step guide of encoding your first project,
and in Chapter 5, where you will be taken on a step-by-step guide of creating a DVD. We will use
these source files throughout the book in our encoding examples.
Also included in your software packaging is the HEURIS DVD. This DVD contains additional
information to help you get started using MPEG Power Professional™. This DVD contains the
entire contents of the tutorial CD-ROM as well as MPEG samples, and a grid of filters, bitrates,
and search methods. This section shows you what clips look like at various bitrates and with
various filtering and search options applied during the encoding process. Finally, the DVD
includes sample MPEG applications and examples from several of our partners and friends. We
gratefully thank them for their support, and hope you enjoy their efforts.
13
MPEG POWER PROFESSIONAL 2.0 MANUAL
ONLINE HELP INFORMATION
Although HEURIS attempts to make our products as straightforward to use as possible, we know
that there are going to be those times when you might need help encoding. Therefore, we have
built a comprehensive help system for you so that you are able to find the information that you
need quickly and easily. First, we have built a comprehensive full-text search online help file for
the Windows™ platform and comprehensive HTML help for Macintosh™ users. These files
include all of the topics contained in this manual in a friendly, online search format.
Additionally, for Windows™ users, we have included a context sensitive cursor to help you along
should you find yourself stuck as to what a certain button on the screen you’re working in should
do. If you need a more detailed description, press F1 or drag the question mark over the button,
box, or portion of the screen you are having trouble with. A box will appear with an explanation of
the area or process, as well as references to the relevant topics in the online help system.
For Macintosh™ users, we have included Balloon Help to help you to easily figure out the
purpose of items on your screen. To use Balloon Help, simply choose SHOW BALLOONS from
the HELP menu. Then, as you are moving your cursor around the MPEG Power Professional™
window, "balloons" will pop up where your cursor is positioned. To turn off the Balloon Help,
choose HIDE BALLOONS from the HELP menu.
Finally, we have included links to various areas of our website, including a link to HEURIS
Technical Support. If you are unable to find your answer in the manual or online help-system,
perhaps our website will contain the information that you need (or a link to someone who does!)
To link to our web, simply go to "Help" on the menu bar and choose whatever link interests you.
Please note that you will need to have an Internet browser and Internet service on your machine
before you can utilize these links.
CONTACTING TECHNICAL SUPPORT
With your purchase of MPEG Power Professional™, you have access to our outstanding technical
support personnel via telephone and E-mail. See the technical support bulletin included in the
MPEG Power Professional™ packaging for details.
14
INTRODUCTION
TROUBLE SHOOTING GUIDE
A trouble-shooting guide is included in your product packaging. This guide contains tips on how
to make the most of your MPEG encoded video. Combined with the information in the appendices of the manual, you have an array of advice from the experts on how to produce high-quality
MPEG encoded video for your interactive applications.
15
MPEG POWER PROFESSIONAL 2.0 MANUAL
16
CHAPTER 1
GETTING STARTED: ENCODING YOUR FIRST PROJECT
MPEG POWER PROFESSIONAL 2.0 MANUAL
CHAPTER OVERVIEW
This chapter takes you on a step-by-step tour of the MPEG Power Professional’s™ basic encoding tools. Follow the steps given here to quickly become acquainted with the MPEG encoding
process. You will learn how to take a source video file found on the tutorial CD and create a finished MPEG file using the MPEG Power Professional™ built-in encoding templates.
1.1 EXPORTING YOUR MEDIA
To create an MPEG encoded file for this application, you must import a digital audio/video source
file. After editing the video and audio assets for this kiosk application, you would export them
from your nonlinear editing system as either an OMF file, AVI file, or QuickTime file.
For information as to how to export from your non-linear editing system, please see the
instructions included with your NLE package.
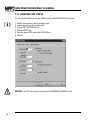
1.2 OPENING A NEW PROJECT
All encoding tasks are managed within encoding projects. To create an encoding project:
1. Select NEW from the FILE menu.
• A new encoding project window will appear with a default name of "Untitled1".
• Save your new project by selecting SAVE AS from the FILE menu.
• Let’s name this project “tutorial”
Now you are ready to insert and define your encoding task(s).
18
GETTING STARTED
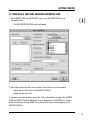
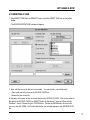
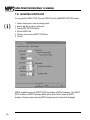
1.3 INSERTING A TASK AND CHOOSING ENCODING TASK
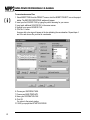
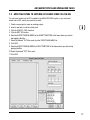
1. Select INSERT TASK from the PROJECT menu or click the INSERT TASK icon on
the project toolbar.
• The ENCODE DEFINITIONS window will appear.
2. Next, add the source file that is to be encoded. You can do this in one of two ways:
• Type a path and a file name in the SOURCE FILES box.
• Browse for your source file.
In this case, let’s browse to find our source file. Click on the button to the right of the SOURCE
FILES box (SELECT button for Macintosh™ users). Browse for your CD-ROM drive. Choose
source file clock.mov and click OPEN. You’ll notice that the file you selected appears in the
SOURCE FILES box.
19
MPEG POWER PROFESSIONAL 2.0 MANUAL
3. In the ENCODE DEFINITIONS window, select MULTIPLEXED ENCODE from the
ENCODING TASK box.
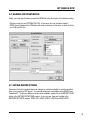
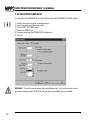
1.4 CHOOSING ENCODE SETTINGS
Select an encoding template.
• Choose the template you want to use from the list of BASE TEMPLATES. In this case,
let’s use the DEFAULT template.
1.5 EDITING ENCODE SETTINGS
Your encode settings are easily edited using MPEG Power Professional™. To edit your settings
or create custom templates, simply click on the EDIT SETTINGS button in the ENCODE
SETTINGS box. Next, you would click on any of the five tabs in the ENCODER SETTINGS
window to modify the settings to your specifications.
Modifying the encoder settings will be discussed in detail in Chapters 3 and 4. For the purposes
of this example, we will use the default settings that the program has selected for us. Click OK to
close the ENCODER SETTINGS window and return to the ENCODE DEFINITIONS window.
1.6 NAMING YOUR DESTINATION FILE
Choose a destination name for your finished .mpg file.
Type a path and a file name in the DESTINATION FILE box. In this case, let’s use the name
“clock.”
20
GETTING STARTED
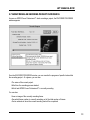
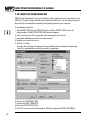
Now that you have set all of the encoding definitions for this task, click the OK button to include
this task in the active encoding project.
• The ENCODE DEFINITIONS window will close. This returns you to the active project
window.
Our sample project file, “tutorial,” currently contains one encoding task.
1.7 START YOUR ENCODE
Now that you have created and saved an encoding project containing at least one encoding task,
it’s time to save the project file and start encoding.
1. Select SAVE from the file menu or click the SAVE icon in the toolbar.
2. From the PROJECT menu, select START ENCODING or click the START ENCODING icon
on the project toolbar.
AND NOW YOU’RE ENCODING!
21
MPEG POWER PROFESSIONAL 2.0 MANUAL
1.8
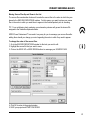
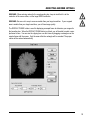
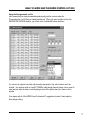
MONITORING AN ENCODING PROJECT IN PROGRESS
As soon as MPEG Power Professional™ starts encoding a project, the ENCODER PROGRESS
window appears.
From the ENCODER PROGRESS window, you can monitor the progress of specific tasks within
the encoding project. At a glance, you can see:
• The name of the current project.
• What time the encoding process started.
• Which task MPEG Power Professional™ is currently encoding.
You can also:
• View an image of the currently encoding frame.
• See which frame number is currently encoding out of the total number of frames.
• Get an estimate of when the current encoding task will be completed.
22
GETTING STARTED
The bottom half of the ENCODER PROGRESS dialog box displays a synopsis of the current
encoding activity. At a glance, you can see what parameters MPEG Power Professional™ is
using to encode your video. Once the current project is completely encoded, a log file of this
encoding activity can be accessed from the PROJECT menu.
1.9 VIEWING YOUR FINISHED MPEG
As each encoding task is completed, you can open and view the finished .mpg file.
REMEMBER : You must have an MPEG player (either hardware or software) installed and
configured on your computer in order to play back .vbs, .abs, and .mpg files, If you do not have
a player installed on your computer, you must either copy your MPEG encoded files to an MPEG
capable machine or install an MPEG player on your computer. To view these MPEG1 files, you
need to have QuickTime 3 or higher or Media Player 6.x or higher.
CHAPTER SUMMARY
Congratulations, you’ve made it through your first encode! You have learned how to process the
basic encoding tasks using MPEG Power Professional™. You now know how to:
• Create an encoding project to manage encoding tasks.
• Define encoding tasks.
• Process an encoding project.
• Monitor an encoding project in process.
More importantly, you now know how to create a finished .mpg file using source files from your
nonlinear editing system and the MPEG Power Professional™ built-in encoding templates. These
same basic processes can be used to create a variety of MPEG encoded files for use in a wide
range of applications.
23
MPEG POWER PROFESSIONAL 2.0 MANUAL
24
CHAPTER 2
PROJECT ENCODING BASICS
MPEG POWER PROFESSIONAL 2.0 MANUAL
CHAPTER OVERVIEW
This chapter will act as a continuation of the quick tour of the product you received in Chapter 1.
Chapter 2 will take you on a more extensive tour of project based encoding.
In particular, you will learn more about:
• The four types of MPEG Encoding and Analysis Only mode
• Choosing a built-in base template for MPEG encoding
• Encoding separate audio and video files
• Managing encoding projects
• Interrupting and resuming encoding tasks
• Specifying your source and supported media
• Batch encoding, including use of the Task Generator
• Editing user preferences
2.1 THE FOUR TYPES OF MPEG ENCODING AND ANALYSIS ONLY MODE
With MPEG Power Professional™, you can produce four different types of MPEG
compressed files:
• Audio Only (file extension .abs)
• Video Only (file extension .vbs)
• Multiplexed Encode (file extension .mpg)
• Still Picture (file extension .msp)
Each encode file type is produced by creating a corresponding encoding task within an encoding
project. Each type of MPEG encoded file is used for a different purpose in creating your interactive application.
An audio only file can be used anywhere in your application that you need to play a CD-quality
audio only clip. This kind of MPEG file generally takes less time to encode than video only files
do. An audio only file and a corresponding video only file can be created as separate tasks in the
same project using the same source material, or can be encoded in separate projects. A video
only file can be used anywhere in your application that you need to display video that does not
have associated audio.
The most commonly used MPEG file is the .mpg file, or multiplexed file. Every .mpg file or multiplexed file can contain zero or more .abs (audio only) and .vbs (video only) files. To create
finished .mpg files for your applications, first encode an .abs file and a .vbs file. The process of
combining them into an MPEG file is called multiplexing, or muxing. This kind of MPEG file takes
less time to encode with MPEG Power Professional™ than do video only encodes.
26
PROJECT ENCODING BASICS
TIP: Choose VIDEO ENCODE if you plan to use a video only MPEG file in your appliation or if
you plan to multiplex the video file with a variety of audio files. Choose MULTIPLEXED ENCODE
if you want to produce a multiplexed MPEG file, but do not need to maintain separate MPEG versions of source audio and video files.
The last MPEG file type MPEG Power Professional™ supports is the still picture. An MPEG still
picture (.msp) is commonly used in a CDi or Video CD application to create menu buttons or
backgrounds.
TIP: Not all authoring packages support the incorporation of .msp files. Refer to the product
documentation and test some encoded files prior to full production.
MPEG Power Professional™ supports a fifth task type, analysis only. An analysis only encode
examines the content of your source video file and gathers useful information about the complexity
of your source file. This may include the location of cuts, wipes, fades, and other information from
the editing process which can influence the encoding process. Creating an ANALYSIS ONLY task
within an encoding project produces an Encode Control List or .ecl file. MPEG Power
Professional™ can use this .ecl file to make decisions about the best way to encode your video to
ensure optimum image quality.
REFERENCE: Please see Chapter 4 for a discussion of how to use an .ecl file in the encoding
process.
2.2 CHOOSING A BUILT-IN BASE TEMPLATE FOR MPEG ENCODING
Within MPEG Power Professional™, every encoding task is based on a built-in base encoding
template. Each template corresponds to a common playback application, such as DVD or CDi.
In each template, the encoding parameters are preset at optimal levels. The list below details the
base encoding templates and the playback platforms and applications they are best suited for.
It will help you decide which base template to use for your encoding tasks.
Additionally, the templates in your MPEG Power Professional™ 2.0 are PAL/NTSC specific. This
means that there is no need for you to memorize your PAL or NTSC settings as these are all built
into the templates.
27
MPEG POWER PROFESSIONAL 2.0 MANUAL
There are sixteen built-in templates:
• 1 X CDROM
• 1 X CDROM PAL
• 2 X CDROM
• 2 X CDROM PAL
• CDi
• CDi PAL
• Default
• DVD
• DVD PAL
• Internet
• MPEG2 Fast
• MPEG2 Fast PAL
• MPEG2 Fields
• MPEG2 Fields PAL
• Video CD
• Video CD PAL
2.3 ENCODING SEPARATE AUDIO AND VIDEO FILES
An MPEG encoded audio/video multiplexed file (file extension .mpg) commonly contains one of
the following combinations:
• A single audio (commonly called .abs) file
• A single video (commonly called .vbs) file
• A single audio file and a single video file
• Multiple audio files and a single video file
• Multiple video files and a single audio file
• Multiple audio files and multiple video files
COOL STUFF: Windows™ users are able to specify what file extensions they prefer for their finished encoded files. To do this, choose PREFERENCES from the EDIT menu and change your
preferred file extensions.
With MPEG Power Professional™, there are two ways to create a finished multiplexed file (.mpg):
• Encode a multiplexed file from your source OMF™ or QuickTime™ file
• Encode separate audio files and video files and multiplex them together to create an MPEG file.
28
PROJECT ENCODING BASICS
Which option you choose depends on your application and your personal preferences. If you
want to be able to access the audio and the video portions of your .mpg file separately, you must
encode them as separate tasks. For example, you might want to multiplex the video with multiple
audio files. If you do not need to access the audio file and the video file separately, then you can
encode a multiplexed file in one task instead of three.
If you want to access the encoded audio separately from the encoded video,
you first create:
• At least one .abs file
• At least one .vbs file
The .abs and .vbs files are then multiplexed together to create an .mpg file. The .abs file and the
.vbs file would be source files for the .mpg file.
You define three separate encoding tasks:
• Create an .abs source file (audio encode)
• Create a .vbs source file (video encode)
• Create a .mpg file (multiplexed encode)
If you do not want to create separate audio and video MPEG files, you can define
a single encoding task:
• Create an .mpg file (multiplexed encode)
In Chapter 1, you learned how to create a .mpg file based on a source .mov or .omf file. In this
section, you will learn how to create a multiplexed file based on separate audio encoded and
video encoded source files.
To create an audio only encoded file, first create a new project:
1. Select NEW from the FILE menu.
2. Select INSERT TASK from the PROJECT menu or click the INSERTTASK icon on the project
toolbar. The ENCODE DEFINITIONS window will appear.
3. Type a path and a file name in the SOURCE FILE box or browse for your file.
4. Choose AUDIO ENCODE as the encoding task type.
5. Choose a BASE TEMPLATE.
6. Type a file name in the DESTINATION FILE box.
7. Click the OK button to include this task in your current encoding project. This returns you to
the encoding project window.
29
MPEG POWER PROFESSIONAL 2.0 MANUAL
Using the same steps you just learned, you can add an encoding task to create a video file based
on the same source material.
From the same active encoding project window:
1. Select INSERT TASK from the PROJECT menu or click the INSERTTASK icon on the project
toolbar. The ENCODE DEFINITIONS window will appear.
2. Choose the video SOURCE FILE you wish to encode.
3. Select VIDEO ENCODE from the ENCODING TASK box.
4. Choose a BASE TEMPLATE.
5. Choose a DESTINATION FILE name.
6. Click the OK button to include this task in your current encoding project.
This returns you to the encoding project window.
In the encoding project window, you now see an encoding task icon labeled myaudio.abs.
Immediately below it is an encoding task labeled myvideo.vbs.
30
PROJECT ENCODING BASICS
Prior to encoding the audio and video tasks, save the active project file:
1. Select SAVE AS from the FILE menu or click the SAVE icon on the toolbar.
2. Select START ENCODING from the PROJECT menu or click the START ENCODING icon on
the project toolbar.
The ENCODER PROGRESS window will appear. When the project has been encoded, you can
review the finished audio and video files. After you have reviewed the files, set up another project
to encode a multiplexed file, using these audio and video files as source material.
1. Select NEW from the FILE menu.
2. Select INSERT TASK from the PROJECT menu or click the INSERTTASK icon on the project
toolbar. The ENCODE DEFINITIONS window will appear.
3. Type the name of the audio source file in the SOURCE FILE box or browse for its location.
Repeat step 3 to add the video source file to the ENCODE DEFINITIONS window.
4. Choose MULTIPLEXED ENCODE as your encoding task type.
5. Choose a BASE TEMPLATE.
6. Name your DESTINATION FILE.
7. Click the OK button to include this task in your current encoding project.
8. Choose SAVE AS from the FILE menu or click the SAVE icon on the toolbar.
9. Select START ENCODING from the FILE menu or click the START ENCODING icon on the
project toolbar.
The video and audio source files that you created in a previous encoding project will be
multiplexed together.
TIP: You can also encode an audio file, a video file, and multiplex the audio and video files
together within the same project file. Create or open a project file and define three tasks. Create
a task to encode the audio file and then create a second task to encode the video file. Then
insert a multiplexed encoding task, using the destination file names from your audio and video
encoding tasks as source files for your multiplexed encoding task. When the project is encoded,
an audio file, a video file, and a multiplexed file will be produced.
2.4 MANAGING ENCODING PROJECTS
Sometimes you will be managing a small number of video and audio clips for inclusion in one
application. You will produce only two or three MPEG files at a time, which can all be processed
effectively in one or two related project files.
Sometimes, however, you will be producing multiple .mpg files for inclusion in multiple
applications. Managing many clips can be a complex task. MPEG Power Professional™
31
MPEG POWER PROFESSIONAL 2.0 MANUAL
contains several tools and processes to help you manage multiple MPEG encoding tasks effectively. Those tools and processes include:
• Grouping tasks into encoding projects.
• Adding or deleting tasks within encoding projects.
• The ability to interrupt and resume encoding projects in progress.
Grouping Tasks into Projects
As you saw in Chapter 1, MPEG Power Professional™ produces .mpg files by processing
encoding tasks.
• MPEG Power Professional™ groups encoding tasks together into projects.
• When you process an encoding project, MPEG Power Professional™ encodes the first task
within your encoding project and then moves on to any additional tasks in your project.
• If sources are not available, MPEG Power Professional™ will skip that task. It will then retry
the skipped task when it finishes encoding the last task in the project.
• The entire project is completed when MPEG Power Professional™ has completely encoded
the last task within the project.
You can create and save an encoding project and then wait to start the encoding process if you
so desire. Often you will define encoding tasks and set up encoding projects during the day, and
start the encoding process at the end of your day so that the project encodes overnight.
As a result, you should group related encoding tasks together in the same project file, where
practical. When you have a large number of clips to manage, however, you may choose to break
them up across a number of encoding projects.
In Chapter 1, you learned how to create a multiplexed file (.mpg) by selecting an .omf, .mov, or
.avi source file, and choosing MULTIPLEXED ENCODE as the encoding task type. Earlier in this
chapter, you learned that you can also create a multiplexed file by first creating separate MPEG
encoded audio and video files and then multiplexing them into an .mpg file.
REFERENCE: For more information about multiplexing audio and video files together, see
section 2.3.
32
PROJECT ENCODING BASICS
For example, suppose you are producing ten different .mpg files from the two different source
data files, but based on the same base template for the same end-use application. First, you
must decide if you wish to encode separate audio files and separate video files or just encode
multiplexed files. Once you have decided what type of files to encode, you can break up the
encoding tasks in a number of ways:
• You can encode ten .abs files together in one project and ten .vbs files together in a separate
project, plus a third project to multiplex the MPEG files.
• You could encode two separate projects with five matching .abs and .vbs encodes, plus a third
project to encode all the .mpg files.
• You could encode ten multiplexed files in one project, if you decide you do not need separate
audio and video files.
There are still other possible combinations.
There is no right or wrong way to break up the tasks. You will find a method that works for you
and your changing applications.
There are a couple of issues to keep in mind, however.
• If you are running encoding projects overnight, note which finished files you will want to access
first and order your encoding tasks accordingly.
• Video only encodes take longer to process with MPEG Power Professional™ than any other
type of encoding task.
TIP: Generally, you will find it easier to group video only encodes together and process them
overnight. Audio only and multiplexed files process quickly. You can process video only encodes
overnight and then review them prior to encoding corresponding audio only files and finally, multiplexed (.mpg) files. When you are producing several clips, this is generally easier than encoding
matching video and audio clips in separate projects and multiplexing them separately.
Adding, Deleting, and Editing Encoding Tasks
For various reasons, you may want to add tasks to or delete tasks from an existing encoding
project. Most of the time, you will define tasks within the encoding projects in advance of actual
encoding. As a result, there will be times when your encoding priorities change and you will want
to re-order or redefine your encoding tasks.
33
MPEG POWER PROFESSIONAL 2.0 MANUAL
In order to edit the tasks in an existing encoding project, you must first open that encoding
project file.
1. Select OPEN from the MPEG Power Professional™ FILE menu.
2. Browse your file system for the encoding project you wish to alter and open the file.
The active encoding project window will appear.
For example, let’s assume that you have opened an encoding project file called "myvideo.mpr".
In the active encoding project window is a list of the encoding tasks included in this project:
• myaudio.abs
• myvideo.vbs
You have several options available to you from this window. You can:
• Add tasks
• Re-order tasks
• Review tasks/refine tasks
• Delete tasks
34
PROJECT ENCODING BASICS
To add a task:
1. Select INSERT TASK from the PROJECT menu. The ENCODE DEFINITIONS window will appear.
2. Define the task by selecting:
• A SOURCE FILE
• An ENCODING TASK
• A BASE TEMPLATE
• A DESTINATION FILE name and location
3. Click OK and the new task, in this case myvideo2.mpg, will appear at the bottom of the
encoding task list.
35
MPEG POWER PROFESSIONAL 2.0 MANUAL
To re-order tasks:
1. Highlight the task you wish to move.
2. Select CUT from the EDIT menu.
3. Highlight where you want to insert the task.
4. Select PASTE from the EDIT menu.
If we move myaudio.abs down to the bottom of the list, it will be encoded last instead of first.
COOL STUFF: You can also drag and drop to reorder your encoding tasks within the active
project window.
36
PROJECT ENCODING BASICS
To review or edit encoding parameters for a tasks:
1. Highlight the name of the task you wish to edit or review.
2. Select EDIT TASK from the PROJECT menu.
The ENCODE DEFINITIONS window will appear.
COOL STUFF: Double clicking on the task will also open the ENCODE DEFINITIONS window for
that task.
At a glance you can see what parameters are in place for this encoding task. After reviewing or
adjusting the encoding parameters, click OK to return to the encoding project window.
To delete a task:
1. Highlight the task you want to delete from the list in the active project window.
2. Select DELETE TASK from the PROJECT menu.
A confirmation dialog box will appear asking you to confirm your deletion:
• Selecting YES will delete the task.
• Selecting NO will return you to the project window without deleting a task.
37
MPEG POWER PROFESSIONAL 2.0 MANUAL
2.5 INTERRUPTING AND RESUMING ENCODING PROJECTS
As you manage encoding tasks, you may find it necessary to interrupt and resume encoding projects after you have started to process them. When you interrupt an encoding project in progress,
MPEG Power Professional™ automatically saves and stores the partially completed encodes and
the encoding parameters you defined in your encoding project. You can then resume encoding an
interrupted project at a later time.
Common reasons to interrupt projects include:
• Placing a particular encoding task or encoding project file either higher or lower in the
encoding queue.
• Stopping one encoding project to start encoding another.
• Using your encoding workstation for another application.
Regardless of the reason you interrupt an encoding project, MPEG Power Professional™ will stop
encoding the current task and will save the partially completed encode and all of the parameters
you originally set up for this encoding project. At any time, you can choose to either resume
encoding this particular project or discard it. You can not playback the partially encoded file.
COOL STUFF: If your encoding workstation loses power while it is processing an encoding project, you will be able to recover and resume encoding the project. MPEG Power Professional™
will save the encoding project for you in a list, allowing you to resume encoding at your convenience.
This section will show you how to interrupt and resume an encoding project in process. This section assumes that you have learned how to:
• Create encoding projects.
• Add encoding tasks to a project.
• Start encoding a project.
REFERENCE: Please refer to Chapter 1 for step-by-step instructions on the above if necessary.
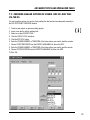
In order to interrupt an encoding project in progress, you must have an encoding project processing on your workstation. For example, let’s go back to the encoding project we did in Chapter 1.
Let’s assume that this project is currently encoding on your workstation.
The ENCODER PROGRESS window appears on your screen, enabling you to monitor encoding
in progress. As you learned in Chapter 1, you can follow the progress of your encoding tasks,
and find out at a glance which encoding tasks have been completed.
38
PROJECT ENCODING BASICS
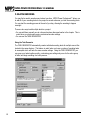
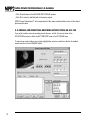
Let’s assume that the clock.mpg encoding project has reached the state shown in the following
picture of the ENCODER PROGRESS window.
As you can see, MPEG Power Professional™ is currently processing task number one out of one.
If you need to interrupt this encoding project in progress for any reason, you simply click on the
INTERRUPT button in the ENCODER PROGRESS window. A confirmation message will appear:
• If you select SUSPEND, the project will be suspended and all of the partially encoded
files will be saved.
• If you select CONTINUE, you will return to the ENCODER PROGRESS window and the project
will continue encoding without interruption.
39
MPEG POWER PROFESSIONAL 2.0 MANUAL
To resume an interrupted encoding project:
1. Select INTERRUPTED ENCODES from the VIEW menu.
The INTERRUPTED ENCODES window will appear, listing all of the currently interrupted encoding projects. You can choose to resume or discard any of these interrupted projects, or to view
the associated log file.
2. Highlight the name of an interrupted encoding project.
3. Click on the RESUME, DISCARD, or OK button.
• RESUME will restart the encoding project from where it was originally interrupted.
The ENCODER PROGRESS window will appear so you can continue to monitor the progress of
this encoding project.
• DISCARD will delete the interrupted encode without resuming it.
WARNING: If you discard an encoding project, any incomplete encodes will be lost. Finished
tasks, however, will not be lost.
• OK will exit the INTERRUPTED ENCODES window without resuming or discarding any projects.
• VIEW LOG will bring up the contents of the log file associated with the highlighted
encoding project.
Log files are generated during the encoding process as MPEG Power Professional™ encodes
each task included in a project. A typical log file contains:
• The destination file name for the encoding task.
• The time that the encoding task started and ended.
• A list of the actions that MPEG Power Professional™ completed during the encoding process.
40
PROJECT ENCODING BASICS
2.6 SPECIFYING SOURCE AND SUPPORTED MEDIA
MPEG Power Professional™ is compatible with a wide range of nonlinear editing (NLE) formats
including Microsoft ™AVI (Audio Video Interleave) , Apple™QuickTime, Avid OMF (Open Media
Framework), and Media 100 QuickTime. In addition , MPEG Power Professional™ can utilize
still image sequences as sources for the encoder.
2.7 MULTIPLE SOURCE FILES, ONE MPEG STREAM
MPEG Power Professional™ gives you the ability to easily concatenate your source files into one
MPEG file. Using the ability to lay files end to end and encode them, you can easily circumvent
the source file size restrictions imposed by the operating system on your computer.
41
MPEG POWER PROFESSIONAL 2.0 MANUAL
To concatenate source files:
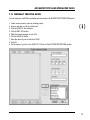
1. Select INSERT TASK from the PROJECT menu or click the INSERT PROJECT icon on the project
toolbar. The ENCODE DEFINITIONS window will appear.
2. Insert your first SOURCE FILE by typing the path or browsing for your source.
3. Insert each additional SOURCE FILE in the same manner.
4. Highlight your second SOURCE FILE.
5. Click the +/- button.
An arrow with a plus sign will appear in the box indicating the concatenation. Repeat steps 4
and 5 for each source file you want to concatenate.
6. Choose your ENCODING TASK.
7. Choose your BASE TEMPLATE.
8. Name your DESTINATION FILE
9. Click OK
You return to the project window.
10. SAVE your project and START ENCODING
42
PROJECT ENCODING BASICS
Moving Source Files Up and Down in the List
The source file concatenation feature will encode the source files in the order in which they are
placed in the ENCODE DEFINITIONS window. For this reason, you want to place your source
files in the order in which you want them to appear in the finished product prior to encoding.
TIP: For a multiplexing task, reordering your elementary streams will govern the stream IDs
assigned to the finished multiplexed stream.
MPEG Power Professional™ has made it very easy for you to rearrange your source files after
adding them should you change your mind regarding the order in which they need to appear.
To change the order of the source files:
1. Go to the ENCODE DEFINITIONS window for the task you want to edit.
2. Highlight the source file that you want to move.
3. Click on the MOVE UP or MOVE DOWN buttons to rearrange your SOURCE FILES.
4. Click OK to return to the project window.
5. SAVE your project and START ENCODING.
43
MPEG POWER PROFESSIONAL 2.0 MANUAL
2.8 BATCH ENCODING
You may find a need to encode many tasks at one time. MPEG Power Professional™ allows you
to add all of your encoding tasks to one project to encode whenever you feel like encoding them.
You can start the encoding process at the end of your day, allowing the encoding to happen
overnight.
There are two ways to add multiple tasks to a project.
• You can add them manually one at a time as has been discussed earlier in the chapter. This is
useful when your tasks each require customized encoder settings.
• You can use the TASK GENERATOR.
Using the Task Generator
The TASK GENERATOR automatically creates individual encoding tasks for multiple source files
located in the same directory. This feature is useful when you have a number of encoding tasks
to accomplish which will have the same encoder settings. Using the TASK GENERATOR, you
can group your tasks together quickly, customizing your settings only once for the entire group
of tasks, and begin encoding in a batch process.
44
PROJECT ENCODING BASICS
To use the Task Generator to encode a group of source files:
1. Select TASK GENERATOR from the PROJECT menu.
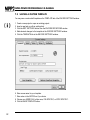
2. Choose your ENCODING TASK. Please remember that the task you choose will
be used for encoding all of the source files you select.
3. Choose your BASE TEMPLATE. Again, the template you choose will be used for encoding all
of the source files you select.
4. Choose your OUTPUT DIRECTORY. There is no need to specify destination file names.
The TASK GENERATOR will automatically name your destination files using the name of the
source files and adding the appropriate extension (.abs, .vbs, .mpg, etc.)
5. Choose the current SOURCE DIRECTORY you want to use to obtain the source files.
Do this either by typing the path or browsing for your directory. A list of available files in that
directory will appear. You can choose to sort the files by TYPE or by NAME. Note that TYPE is
the default selection.
6. Highlight the source files you wish to encode and use the -> to move one file, or specific
highlighted files into the CURRENT SOURCE FILES box. Use the ->> to move all files into the
CURRENT SOURCE FILES box. If you choose a file and then change your mind, use the
<- or <<- buttons to move the file out of the CURRENT SOURCE FILES box.
7. Click OK. This returns you to the project window. As you will see, the tasks that you have just
created in the TASK GENERATOR appear.
8. SAVE your project and START ENCODING as you would any project.
45
MPEG POWER PROFESSIONAL 2.0 MANUAL
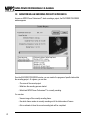
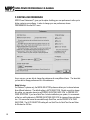
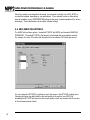
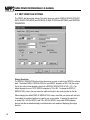
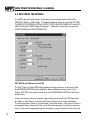
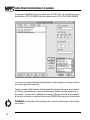
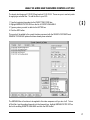
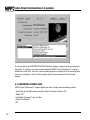
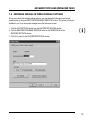
2.9 EDITING USER PREFERENCES
MPEG Power Professional™ gives you the option of editing your user preferences to allow you to
further customize your software. In order to change your user preferences, choose
PREFERENCES from the EDIT menu.
As you can see, you are able to change the preferences for many different items. The items that
you are able to change preferences for in this window are:
Media Selector
For Windows™ systems only, the MEDIA SELECTOR preference allows you to choose between
three different behaviors. The default setting is AUTO SELECTION. Should you wish to change
this setting, you may also choose to set PREFER QUICKTIME OVER VFW or PREFER VFW
OVER QUICKTIME. If you have QuickTime 4 or later installed on your system, it is recommended that you set this behavior to PREFER QUICKTIME OVER VFW for improved frame rate detection. For sources that cannot be encoded through QuickTime, use the PREFER VFW OVER
QUICKTIME. The AUTO SELECTION setting will use QuickTime for QuickTime files and Video
for Windows for AVI files.
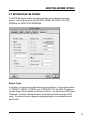
46
PROJECT ENCODING BASICS
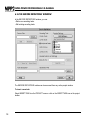
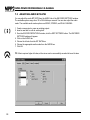
Macintosh Style Interface vs. Original Style Interface
For Macintosh™ users, there is an additional preference setting. You have the ability to choose
your user interface. MPEG Power Professional™ now features a more traditional Mac™ interface
instead of the original interface found in earlier versions of MPEG Power Professional™. This
interface is chosen as your default interface setting. However, if you prefer to use the original
interface, you may choose that here. The new interface gives the program a more "Macintosh™like" behavior, and includes such features as drag-and-drop. The Macintosh Style Interface does
not include a waste document.
Web Links
Your MPEG Power Professional™ software will link to the HEURIS website to search for product
support or feature update notifications. The default setting is every 30 days. To change the number of days, simply type your preferred value in the box. Unchecking the box will tell the system
not to check for updates.
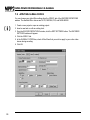
Preferred File Extensions (Windows™ version only)
MPEG Power Professional™ allows you to set your preferences for your preferred file extensions
for audio, video, and multiplexed streams. The default settings for these are .abs, .vbs, and .mpg,
respectively. You can change these preferred settings in this window.
Template Display
MPEG Power Professional™ allows you to choose which templates are displayed in your
ENCODE DEFINITIONS window. You can choose to have the system show NTSC, PAL, BUILTIN, or USER-DEFINABLE templates in the ENCODE DEFINITIONS window. The default for the
software is to show all of the templates, however, if you do not wish to see all templates, simply
click to remove the checkmark from the boxes next to the templates you do not want to see.
Temporary Storage Location
MPEG Power Professional™ allows you to choose your temporary storage location. The default
location is C:/Windows/Temp for Windows™ systems and a "saved states" folder where the application resides on a Mac. You can change this to whatever directory you choose by either typing
the path or browsing for the location you wish to use for temporary storage.
47
MPEG POWER PROFESSIONAL 2.0 MANUAL
CHAPTER SUMMARY
In this chapter, you have learned how to:
• Choose an encoding task type.
• Choose a built-in base template for MPEG encoding.
• Encode separate audio and video files.
• Manage encoding projects
• Interrupt and resume encoding tasks.
• Specify source and supported media.
• Concatenate source files.
• Batch encode and use the task generator.
• Edit user preferences.
Coupled with the skills you learned in Chapter 1, you now have all the tools necessary to produce
MPEG encoded files for a wide variety of end-use applications, using MPEG Power
Professional’s™ built-in encoding templates.
What about applications that call for custom created MPEG files with special encoding parameters
outside of MPEG Power Professional’s™ built-in base templates and basic encoding toolset? The
encoding parameters in MPEG Power Professional’s™ base encoding templates are optimized for
the majority of applications and playback platforms. But, you also have complete access to all of
these encoding parameters and can customize one or all of them to meet the demands of a specific application. These settings will be discussed in detail in Chapter 3 and Chapter 4.
48
CHAPTER 3
MODIFYING ENCODER SETTINGS
MPEG POWER PROFESSIONAL 2.0 MANUAL
CHAPTER OVERVIEW
In this chapter, you will learn the basics of creating custom templates in MPEG Power
Professional™ for use in your encoding projects. First, the default templates are reviewed
in more detail. Then, the chapter discusses creating custom templates by editing the settings in
more detail. Next, the chapter discusses creating custom templates by editing the settings that
can be found on the TEMPLATE, AUDIO, VIDEO1, VIDEO2, and MULTIPLEX tabs of the
ENCODER SETTINGS window. The ENCODE CONTROL LIST will be discussed in Chapter 4.
These options are provided for completeness and to allow the reader to have complete control
over the encoding process. However, be aware that MPEG encoding is a delicate balancing act
of a number of interrelated factors. Very often, changing one value will require another value to
be updated as well.
WARNING: Generally, the advanced encoding options have default values as outlined by the
MPEG standard specification. When these values are changed, it marks a departure from
the standard, and the behavior of the encoding process and the resulting MPEG file may vary
drastically. In some instances, the encoder can generate an MPEG file that can not be displayed
on an MPEG playback device.
3.1 WHY MAKE A CUSTOM TEMPLATE
Why make a custom template when there are several built-in base templates available for use?
There are several reasons why you might want to edit the default settings and create your own
template. You may want to minimize the output file size, or change the final output quality.
Perhaps your video needs to be cropped around the edges to remove an unwanted border.
Maybe you want to apply a particular filter to all or some of your video. Whatever your reason,
MPEG Power Professional™ makes it easy to create custom templates and customize your
MPEG encoding.
3.2 THE MPEG POWER PROFESSIONAL™ BUILT-IN TEMPLATES
When creating custom templates, MPEG Power Professional™ uses one of the built-in templates
as a base from which to make changes. Below is a table summarizing all of the default settings
of the built-in templates.
50
MODIFYING ENCODER SETTINGS
NTSC Templates
Template
1 X CDROM
2 X CDROM
CDi
Internet
Default
DVD
MPEG2 Fast
MPEG2 Fields
Video CD
Audio Bitrate
192 Kb
224 Kb
224 Kb
56 Kb
224 Kb
224 Kb
224 Kb
224 Kb
224 Kb
Audio Mode
Mono
Stereo
Stereo
Mono
Stereo
Stereo
Stereo
Stereo
Stereo
Video Bitrate
1.02 Mb
1.856 Mb
1.150 Mb
400 Kb
1.152 Mb
4.5-9Mb Variable
5 Mb
5 Mb
1.152 Mb
Height
352
352
352
160
352
720
720
720
352
Width
240
240
240
120
240
480
480
480
240
PAL Templates
Template
1 X CDROM PAL
2 X CDROM PAL
CDi PAL
MPEG2 Fast PAL
MPEG2 Fields PAL
DVD Pal
Video CD PAL
Audio Bitrate
192 Kb
224 Kb
224 Kb
224 Kb
224 Kb
224 Kb
224 Kb
Audio Mode
Mono
Stereo
Stereo
Stereo
Stereo
Stereo
Stereo
Video Bitrate
1.02 Mb
1.856 Mb
1.150 Mb
5 Mb
5 Mb
4.5-9 Mb Variable
1.152 Mb
Height
352
352
352
720
720
720
352
Width
288
288
288
576
576
576
288
51
MPEG POWER PROFESSIONAL 2.0 MANUAL
3.3 CUSTOM TEMPLATES
There are several factors to consider when you are designing a custom template for use in your
application. Factors such as your playback device capabilities, your target CPU speed, image
quality requirements and storage issues will all play a role in deciding which settings to use in
your template.
WARNING: When designing a custom template with MPEG Power Professional™, you need to be
aware of the "MPEG balancing act.” In other words, how you budget bits, time, and quality to
come up with the optimum solutions for your needs. The temptation to set all of the values at
their highest limits will result in an encoding task that takes too long to complete and possibly
even results in an MPEG stream of poor quality. High settings may cause frames to be dropped
when played back on hardware that is designed for lower settings. Further, most MPEG playback
devices have limits as to what types of MPEG files they can play, and by setting your values too
high, you may not be able to play back your MPEG file on any system! Therefore, you need to
prioritize requirements and restrictions such as encoding time, image quality, and playback
devices, and to set your values accordingly.
Your playback device may dictate what bit rates you can use to encode your MPEG file. 1X CDROMs are designed to transfer 150 Kb/s. Any MPEG file encoded at a higher bit rate may not be
played back correctly from a 1X CD-ROM. 2X CD-ROMs are designed to transfer 300 Kb/s, and
other playback devices are designed to handle other bit rates. Therefore, you need to determine
your target playback device, and choose an appropriate bit rate before you set up your encoding
parameters. One final note: you may be developing a commercial application, which will go out to
a wide variety of users with an equally wide variety of computers, playback hardware, playback
software, and configurations. This means yet another "balancing decision". If you go with the settings which are safest for the widest variety of machines and configurations, you will be using
lower bit rates and probably end up with slightly lower quality. However, if you pick higher bit
rates, you will probably have higher quality, but some people may not be able to play back your
files. As with any medium of communication, the key is to know your audience. Assess the end
user of your application carefully, before you make final decisions about encoder settings.
When utilizing software decoders, CPU speed may affect MPEG playback. There is a relationship
between CPU speed and MPEG playback; the faster your CPU is, the higher the bit rate of the
MPEG file it can handle. There are no hard and fast rules regarding CPU speed and bit rate.
You will need to experiment with your target system to determine its upper speed limits.
Finally, image quality and storage issues will also help you make your decision when setting the
values of your custom template. Often higher bit rates mean higher image quality. However,
higher bit rates also mean greater storage requirements for your MPEG file.
52
MODIFYING ENCODER SETTINGS
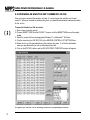
3.4 HOW TO EDIT ENCODER SETTINGS
The encoder settings are edited by clicking the EDIT SETTINGS button in the ENCODE
DEFINITIONS window. When you click the EDIT SETTINGS button on the ENCODE
DEFINITIONS window, the ENCODER SETTINGS window will appear with five tabs: TEMPLATE,
AUDIO, VIDEO1, VIDEO2, and MULTIPLEX.
3.5 EDIT TEMPLATE TAB SETTINGS
The TEMPLATE tab is where your new templates are named and saved. At the top of the tab you
will see the template that was the base for your new template in the BASED ON TEMPLATE box.
Underneath, you will find a box for entering the name of the new template. Also, there is an area
for attaching notes to the template. You can place any comments you want to save regarding
your new template inside this box.
Clicking the SAVE TEMPLATE button will save your new template, while clicking the RESTORE
FROM BASE TEMPLATE button will restore the defaults of the template named in the BASED ON
TEMPLATE box. Clicking OK button at the bottom of the ENCODER SETTINGS window will
apply these changes to the current task only.
53
MPEG POWER PROFESSIONAL 2.0 MANUAL
Should you create a new template to be saved, you may want to identify it as a PAL, NTSC, or
non-specific template, depending on your preferences. If you selected to show or hide certain
types of templates in your PREFERENCES settings, these newly created templates will be shown
accordingly. These identifications do not affect encoder settings.
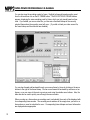
3.6 EDIT AUDIO TAB SETTINGS
The AUDIO tab has three options: the audio BIT RATE, the MODE, and the audio SAMPLING
FREQUENCY. The audio BIT RATE is that amount of audio data that is encoded per second.
For example, the value 192 means that the audio will be encoded at 192 kilobits per second.
You can change the BIT RATE by clicking on one of the values in the BIT RATE scrolling menu.
Changing this value may affect both the size and quality of the audio of your MPEG file.
Increasing the BIT RATE will allow for better sound quality, but will also increase the file size due
to the increased amount of data.
54
MODIFYING ENCODER SETTINGS
The audio MODE indicates how the audio tracks are laid out during encoding. This setting should
correspond to the type of audio you are inputting to the encoder. If you have audio that was
recorded in mono, select the MONO option. If your audio was recorded in stereo, select the
STEREO option. Finally, if your audio is dual channel (for example, two audio tracks, each with
a different language), choose the DUAL CHANNEL option.
WARNING: Not all BIT RATE and MODE combinations are legal by the MPEG standard. MPEG
Power Professional™ will inform you of your attempt to select an invalid MODE / BIT RATE
combination.
The SAMPLING FREQUENCY is the frequency at which the encoded material is represented.
MPEG layer II audio may be sampled at 32, 44.1 or 48kHz. Most, if not all, MPEG decoders
support all three sampling frequencies. By default, MPEG Power Professional™ will sample up or
down the frequency of the source material to the required sampling frequency. However, not all
applications for MPEG layer II audio support all three frequencies. The CDi, Video CD, and DVD
specifications restrict MPEG Layer II audio sampling frequencies as follows:
• CDi and Video CD: audio must be sampled at 44.1kHz, as indicated on the set templates.
• DVD: audio must be sampled at 48kHz, as indicated on its set template.
If you are capturing 48kHz audio, on an Avid Media Composer system for example, you must
resample your audio to 44.1 kHz for inclusion in a CDi or Video CD application. If your audio
source is 44.1kHz, you must resample to 48kHz for DVD authoring.
55
MPEG POWER PROFESSIONAL 2.0 MANUAL
3.7 EDIT VIDEO1 TAB SETTINGS
The VIDEO1 tab has several options. This tab is where you set the DISPLAY RESOLUTION, BIT
RATE, SEARCH TECHNIQUE and DISTANCE, GLOBAL FILTERS and SETTINGS, and CROPPING
PARAMETERS.
Display Resolution
The DISPLAY RESOLUTION refers to the dimensions, in pixels, at which your MPEG file will play
back. The default DISPLAY RESOLUTION for most MPEG1 templates is 352 x 240 (the exception to this is the Internet template, which has a DISPLAY RESOLUTION of 160 x 120.) The
default template for most NTSC MPEG2 templates is 720 x 480. To change the DISPLAY
RESOLUTION, enter in the new values for width and height in the areas provided on the tab.
When changing the default DISPLAY RESOLUTION, keep in mind that your picture will look best
if encoded at a resolution less than or equal to your source media. In practice the upper limit
is usually 352 x 240 (for MPEG1) and 720 x 480 (for MPEG2), since most MPEG playback
devices treat that as standard display resolution and are not capable of displaying files larger
than this.
56
MODIFYING ENCODER SETTINGS
Video Bit Rate
To the right of the DISPLAY RESOLUTION box is the BIT RATE box. In this box, you are able to
choose between CONSTANT RATE and VARIABLE RATE for your encode. Please note that the
VBR option is available only on the MPEG Power Professional™-DVD and MPEG Power
Professional™-Transport packages.
To set up a CBR encode, make sure the CONSTANT radio button is checked and enter your
desired bit rate in the available box. To set up a VBR encode, make sure that the VARIABLE
(VBR) radio button is checked. Then, enter the maximum allowable bit rate in the MAXIMUM
RATE box and the average bit rate in the AVERAGE RATE box.
Search Distance and Technique
MPEG encoding uses a series of algorithms to analyze each area of the video from one frame to
the next, attempting to determine where motion has occurred between the two frames. SEARCH
TECHNIQUE and SEARCH DISTANCE affect how these algorithms are implemented.
SEARCH TECHNIQUE dictates the method that the encoder uses to search the surrounding area
for motion. The five available options are AUTO, LOG, HYBRID, TWO PASS and COMPLETE.
The COMPLETE setting provides the most detail, and LOG can be completed in the shortest
amount of time. The HYBRID option is a compromise between the two extremes, and is usually
sufficient for most encoding tasks. The TWO PASS will give you better image quality for some
sources, but will take longer. For increased quality video with little motion, choose the
COMPLETE option. To decrease encoding time, choose the LOG option. The AUTO option will
allow the setting to be chosen by the encoder.
SEARCH DISTANCE dictates how far away from the current area the encoder looks for matching
video. The five available options are AUTO, SHORT, MEDIUM, LONG and EXTENDED.
Increasing this distance may improve the quality of your video, but will also increase encoding time.
TIP: If your video has little motion (such as a duck floating on a pond), you should set your
SEARCH DISTANCE to a smaller value. If your video contains faster motion (such as a car race),
set your SEARCH DISTANCE to a larger value. If your video has a lot of chaotic motion (such as
an explosion), then set your SEARCH DISTANCE to AUTO or a medium value.
Global Filters
Below the SEARCH DISTANCE box, you will see an area labeled GLOBAL FILTERS, which has
several options: AUTO, MEDIAN, FIR, and NON-LINEAR. The AUTO option is the default option;
it signifies that the encoder will apply whichever global filters it feels are necessary. You can override this option by selecting one or more of the available filters. Since the filters are global, they
will be applied to the entire video stream.
57
MPEG POWER PROFESSIONAL 2.0 MANUAL
Median
This filter is useful for removing noise from video that has a lot of "calm" areas (areas with low
levels of detail). This filter will help remove some of the unwanted artifacts in the video stream
while preserving the edges. An example of a good time to use the MEDIAN filter would be if you
wanted to remove black flecks from a clear blue sky.
FIR
This is a signal processing filter designed to eliminate spikes. It may help reduce "crawling" and
"haloing" around objects.
Nonlinear
This filter will apply a smoothing effect to your clip. The effects of this filter are highly dependent
on the media; it is known as an adaptive filter. If your lines are too harsh, using this filter can help
reduce those effects. This filter is also helpful in reducing aliasing or "staircase" effects.
Global Settings
Inverse Telecine is the process of removing duplicate frames, which have been placed in a video
stream as a result of converting motion picture film to videotape. Motion pictures are manufactured at 24 frames per second, while videotape records at 30 frames per second. Therefore,
when you convert motion picture film to videotape, six frames are duplicated in order to have a
total of 30 frames. Inverse Telecine will calculate which frames are duplicate frames, and will
remove them from the final MPEG stream. If you want MPEG Power Professional™ to automatically adjust the INVERSE TELECINE phase calculations, you must mark AUTO ANALYZE on the
VIDEO2 tab. If you want to manually specify inverse telecine phase calculations, use ECL events.
Cropping Source Video
Cropping is the process of trimming off a small section of video around the edges of your source
video stream. This process can be useful when your video stream has black areas, or control
lines, around its edges. These unwanted areas often appear during the digitizing process.
Cropping your source video during the encoding process is simple.
TIP: If you have field based source media, crop values are applied to each field. If you have
frame based source media, crop values are applied to the entire frame.
The cropping control boxes are on the bottom of the VIDEO1 tab. The area is labeled SOURCE
CROP (pixels). There are four boxes: X, Y, dX, and dY. The X and Y values are the number
of pixels in the X and Y direction, respectively, that you want cropped from the upper left hand
corner. The dX and dY values are the number of pixels along the X and Y axes that you would
like to include in your final MPEG clip.
58
MODIFYING ENCODER SETTINGS
WARNING: When entering values for the crop bounding box, keep in mind that it is at the
resolution of the source video, not the target MPEG resolution.
WARNING: Be sure not to crop to an area smaller than your target resolution. If your cropped
area is smaller than your target resolution, you will lose image quality.
The DISPLAY FRAME button is used for displaying a sample frame to determine your ranges for
the bounding box. When the DISPLAY FRAME button is clicked, you will be able to select a sample frame to view. You can size the clipping box over this frame by dragging a rectangle over the
sample frame with the mouse. Only the area within the rectangle will be encoded. The proper
values will be entered automatically.
59
MPEG POWER PROFESSIONAL 2.0 MANUAL
3.8 EDIT VIDEO2 TAB SETTINGS
The VIDEO2 tab has several options. These options are more advanced than those on the
TEMPLATE, AUDIO, or VIDEO1 tabs. The options that appear on this tab control the GOP SIZE,
CLOSED GOP, REFERENCE INTERVAL, ASPECT RATIO, VBV SIZE, FRAME RATE, and AUTO
ANALYZE functions of MPEG Power Professional™. Additionally, from this tab you can control
FIELD ENCODING and FIELD PREPARATION.
GOP SIZE (N) and Reference Interval (M)
The GOP (Group of Pictures) SIZE setting dictates how many pictures are in each group, while
the REFERENCE INTERVAL setting dictates the distance between reference frames (I- or Pframes). GOP SIZE is also known as the N value, and the REFERENCE INTERVAL is also known
as the M value.
I-frames are frames in which the complete image in that frame is stored. Each GOP begins with
an I-frame. P- and B-frames, on the other hand, only contain part of the image of that frame.
The rest of the frame is formed by "reconstructing" it from other frames. In the case of P-frames it
accomplishes this by looking at its motion vector data and comparing it to the previous reference
frame. It then moves the appropriate parts of the reference image to where the motion vector has
60
MODIFYING ENCODER SETTINGS
indicated. It builds the picture in this manner. B-frames are similar to P-frames, however, they
can reference previous or future reference frames. I-frames take the most number of bytes to
encode. B-frames are generally encoded with the least number of bytes.
For NTSC templates, the default N value is 15 and the default M value is 3. This means every fifteenth frame is an I-frame, and also the beginning of a GOP. Within that GOP, every third frame
is a P-frame. For PAL templates, the default N value is 12 and the default M value is 3. This
means that every twelfth frame is an I-frame, and also the beginning of a GOP, and every third
frame is a P-frame.
These values are the recommended values specified by the MPEG committee. These values
have been shown to produce a good image quality for most types of video. When changing these
values, keep in mind that the M value has to be evenly divisible into the N value. For example, if
N is equal to 12 the valid values for M are 1,2,3,4, and 6.
Closed GOP
Just under the GOP SIZE box on the VIDEO2 tab is a checkbox for CLOSED GOP. Checking
this box allows you to force the encoder to produce only closed GOPs. This means that the
encoder will only look at reference frames within each GOP, rather than looking to a reference
frame within the adjacent GOPs.
This feature is useful to you if you are making a DVD with multi-angle camera shots. Many DVD
players are not equipped to handle this type of video because they did not implement the full
MPEG playback instruction set for multi-angle DVD playback. By using the closed GOP feature,
you can smooth the playback behavior of your multi-angle DVD when switching between angles.
CLOSED GOP may slightly affect overall sequence image quality.
Aspect Ratio
For MPEG1 the aspect ratio represents the ratio of the width of a pixel to its height. For example,
an ASPECT RATIO of .75 would indicate that each pixel is 3/4ths as high as it is wide. For a standard computer monitor, the aspect ratio is 1.0. For MPEG2, the aspect ratio is the ratio of the
width of the picture display to its height.
If you know that your target playback device will be used to display the target application on a
device other than a standard computer monitor, you can change this value to correspond with
your target hardware. This will help preserve the proportions of objects in your MPEG clip.
For example, you encode an animation of a spinning globe and you use an aspect ratio of 1.0
(standard computer setting) and then create a CDi application. CDi applications are often
displayed on televisions that have a different aspect ratio than computers. This could result in
61
MPEG POWER PROFESSIONAL 2.0 MANUAL
an MPEG encoded clip of a spinning globe that is no longer quite round. So it is important to
match your aspect ratio to the intended application playback device. Keep in mind that this setting does not actually perform any aspect ratio conversions. It functions as a label that is
attached to your MPEG file to indicate the correct setting to the playback device.
WARNING: The MPEG1 aspect ratio is the pixel aspect ratio, not the picture aspect ratio as
commonly referred to in many graphic software packages. However, the MPEG2 aspect ratio
is the picture display aspect ratio.
WARNING: Some hardware decoders require certain aspect ratios to play.
VBV Size
The VBV SIZE indicates the size of the buffer required by the intended MPEG decoder to display
the clip. This value should generally match the size of the actual hardware buffer of the MPEG
playback device, if applicable. A VBV setting higher than the physical capacity of the buffer on the
playback device will not display correctly, if at all.
One situation where it may be useful to increase this value is if you are encoding at a high bit
rate, such as 2.3 Mb/s. In this case, you may want to raise the VBV SIZE to 32. However, before
you do this you should check your playback device specifications to make sure it can support this
buffer size. The reverse is also true. If you are encoding a sequence at less than 1.0 Mb/s, you
may need to decrease this value.
TIP: When encoding at bit rates of 1-2 Mb/s, it is best to use the default VBV size (20).
Frame Rate
The FRAME RATE setting is a label on your MPEG file that dictates how many frames should be
displayed per second. The NTSC default is 30 frames per second and the PAL default is 25
frames per second. Videotape is recorded at 29.97 frames per second, while film is produced at
24 frames per second. The process of converting a 24 frame per second film clip into a 30 frame
per second videotape is known as Telecine™. This process will add approximately six duplicate
frames divided among the video fields in the video stream each second, to achieve 30 frames
per second.
62
MODIFYING ENCODER SETTINGS
WARNING: The reverse process, Inverse Telecine, is used to convert from 29.97 frames per
second videotape back to 23.97 frames per second film and to convert 30 fps videotape to 24 fps
film. However, changing this value will not remove any frames from your stream; the encoder will
still encode 29.97 or 30 frames per second, but the playback device will only display 23.97 or 24
frames per second. The overall effect is that your MPEG stream will play back at slower than real
time. In order to perform the Inverse Telecine translation, you must enable the INVERSE
TELECINE option in the GLOBAL SETTINGS box of the VIDEO1 tab. It is usually safest to leave
the FRAME RATE set at AUTO.
Auto-Analyze
To analyze source video and apply the suggested encoding events automatically, create either a
VIDEO ENCODE task or MULTIPLEXED ENCODE task based on your source video file and check
the AUTO ANALYZE check box found on the VIDEO2 tab of the ENCODER SETTINGS window.
MPEG Power Professional™ will analyze the video source as it is encoding. The analysis information will not be available for review. It will be generated and used during the encoding process
and then discarded. The events generated, however, will be listed in the log file and can be
viewed after the encoding process is complete.
Field Encoding
In this area on the VIDEO2 tab of the ENCODER SETTINGS window, you have the option to set
the field encoding parameters if you are encoding from a field-based source. If you want to
encode from a field based source to a frame-based output, you can click on the PROGRESSIVE
ENCODE button on the VIDEO2 tab. Choosing this option will interlace your fields. If you do not
want to interlace your fields, click on the DROP SECOND FIELD IF AVAILABLE checkbox. If
there is a second field, it will be dropped.
If you want to encode your field-based source file as a field-based output file, click the NONPROGRESSIVE ENCODE button on the VIDEO2 tab. This will stack your fields top to bottom. If
your source media is created by a system that intends for the bottom field to be displayed first,
click the SET BOTTOM FIELD FIRST checkbox.
In most instances, the default template settings for field encoding built into MPEG Power
Professional™ are going to be appropriate. However, should your playback device require a different configuration, you have the ability to set it here. Please consult the documentation that
came with your playback device if you have questions as to what your field encoding parameters
should be.
63
MPEG POWER PROFESSIONAL 2.0 MANUAL
Field Preparation
The FIELD PREPARATION box on the VIDEO2 tab of the ENCODER SETTINGS window gives
you the ability to tell the encoder what to do with sources that are marked incorrectly or fields that
may exist in your source video. For example, you may be encoding a file that says that it is a
frame-based file, but may actually contain some fields.
To tell the encoder how to read fields that it cannot accurately detect, click the IF NOT DETECTED
ASSUME FIELDS ARE: checkbox, and then choose either the INTERLACED or STACKED option
below that, depending on how you want the encoder to read your fields. Additionally, if you think
that your fields are stacked "backwards", that is, with the bottom field on top and the top field on
the bottom, you may choose the SWAP FIELDS IF AVAILABLE checkbox. This will reverse the
order in which the fields are stacked.
TIP: Swap fields performs the same action with a true field source.
64
MODIFYING ENCODER SETTINGS
3.9 EDIT MULTIPLEX TAB SETTINGS
The MULTIPLEX tab also contains many options that allow you to customize the encoding
process. From this tab you can set your MULTIPLEX TARGET, MULTIPLEX TYPE, FIRST
STREAM ID, and INITIAL CLOCK REFERENCE.
Multiplex Targets
In this section, you can set your playback device target for multiplexing. You can choose between
1 X CDROM, 2 X CDROM, 4 X CDROM, set a CUSTOM RATE, CDi, and VIDEO CD (which you
can make Adaptec Toast Compatible by clicking the checkbox.) You can also allow MPEG Power
Professional™ to determine the target based on the template you selected by using the AUTO
setting. This setting will select an appropriate multiplexing target for your combined audio and
video bit rates.
65
MPEG POWER PROFESSIONAL 2.0 MANUAL
Multiplex Type
You can choose a MULTIPLEX TYPE for your multiplexed encode in this section. You can choose
between SYSTEM, PROGRAM, DVD VOB, and TRANSPORT. Please note that not all options
are available for all templates. Specifically, the PROGRAM option is available in only MPEG
Power Professional™-2 and higher, the DVD VOB option is only available with MPEG Power
Professional™-DVD and higher, and the TRANSPORT option is only available with MPEG Power
Professional™-Transport.
First Stream ID
The FIRST STREAM ID box on the MULTIPLEX tab of the ENCODER SETTINGS window allows
you to set the ID for the first stream in your multiplexed encode. This will only set the first stream
ID. MPEG Power Professional™ will add 1 to the ID number you select for each additional stream.
For example, let’s assume you want your first video stream ID to be 4 and your first audio stream
ID to be 4. You would type 4 in the AUDIO box and type 4 in the VIDEO box. If you have more
than one audio or video stream, the next stream would have 5 as the ID, the next would be 6, and
so on.
Initial Clock Reference
The INITIAL CLOCK REFERENCE settings on the MULTIPLEX tab of the ENCODER SETTINGS
window allow you to set certain time parameters for your encode. In this area, you are able to set
the INITIAL SCR (System Clock Reference) or the FIRST PTS (Presentation Time Stamp).
For most purposes, the AUTO setting will be the best setting for you to use for your encoding
projects. However, some playback devices or authoring systems specify different settings for the
INITIAL SCR or the FIRST PTS. Please refer to the documentation that came with your playback
device to determine what these settings should be. To change these settings, simply type the
new value in the space provided.
66
MODIFYING ENCODER SETTINGS
CHAPTER SUMMARY
In this chapter you have learned how to change the settings of all the tabs on the ENCODER
SETTINGS window to create your own custom templates. This includes setting audio and video
bit rates, the size of the display, cropping, search techniques, closed GOP, DVD VOB, and much
more.
The settings on the TEMPLATE, AUDIO, and VIDEO1 tabs will be all that is necessary for most
users to create high quality MPEG clips to meet their needs. Advanced users, however, have the
options of changing additional settings on the VIDEO2 and MULTIPLEX tabs. The reader should
use caution when altering these advanced settings. Improper settings may lead to MPEG files
that cannot be displayed on your playback device.
67
MPEG POWER PROFESSIONAL 2.0 MANUAL
68
CHAPTER 4
ANALYSIS MODE AND THE ENCODE CONTROL LIST (ECL)
MPEG POWER PROFESSIONAL 2.0 MANUAL
CHAPTER OVERVIEW
Chapter 4 discusses analysis only mode, one of the task types available within MPEG Power
Professional™, and the creation of Encode Control Lists or .ecl files. You will learn:
• How analysis can benefit your video encoding.
• How to analyze your video.
• What an .ecl file is.
• What specific encoding events you can control with an .ecl file.
• How to edit an .ecl file.
• Practical applications for .ecl files.
4.1 WHY ANALYZE YOUR VIDEO?
In a word, quality. MPEG Power Professional™ takes information it gathers during an analysis of
your video source, and uses it to make decisions about the best way to encode your video.
MPEG Power Professional™ analyzes your source video looking for such video events as scene
changes. For example, it is generally considered beneficial to inject an I-frame at a scene
change.
The Inverse Telecine process provides another opportunity to effectively use the analysis mode. If
you have 30 frames per second video that originated as 24 frames per second film, there are
advantages to restoring the video to its original 24 frames per second as it is encoded. Inverse
Telecine accomplishes this transformation by removing the duplicate frames that were created in
the original conversion from film to video.
The reasons for using Inverse Telecine are:
• You have less video information to compress.
• You can allocate more bits to the information that is left.
In the case of Inverse Telecine, MPEG Power Professional™ uses information gathered during an
analysis pass over your video source to decide which frames are duplicated and should be discarded to ensure smooth video flow. Remember, when there is less information to compress and
more bits to allocate, better image quality is the result.
70
ANALYSIS MODE AND THE ENCODE CONTROL LIST (ECL)
Injecting I-frames and determining the Telecine phase changes (where duplicate frames appear)
are encoding events. There are three different ways to apply encoding events:
• Automatically
• Manually
• A combination of manually and automatically
There are also three different ways to generate encoding events:
• Select the AUTO ANALYZE option (which you learned about in Chapter 3).
• Create an ANALYSIS ONLY task.
• Create a list of events manually.
The best way to generate encoding events depends on how you plan to apply the events and how
much control you wish to have over what used events are.
If you choose AUTO ANALYZE on the VIDEO2 tab, MPEG Power Professional™ will run an
analysis pass just before it starts encoding your video source. Any encoding events it suggests
will automatically be applied during the subsequent encoding phase. No intervention is necessary. However, you will not be able to review or edit the list of encoding events generated prior to
encoding. That list is used during the encoding phase and then discarded.
The ANALYSIS ONLY task type allows you to run an analysis of your video as a separate task
prior to encoding. MPEG Power Professional™ takes the information it gathers during an
analysis only pass over your video source and saves it out into an editable file format called
an Encode Control List or .ecl file. Any encoding events that will be used when it actually
encodes your video source are logged with a corresponding timecode or frame number. You can
review the suggested encoding events and delete or modify any of them prior to encoding.
However, you must process the same video source file twice in two separate encoding tasks in
order to use the contents of the .ecl file while encoding.
A third option is to combine the results of an auto-analysis pass with encoding events you have
manually created. This option allows you to define very specific custom encoding parameters,
while taking advantage of the MPEG Power Professional™ auto-detect scene change capabilities,
Inverse Telecine and auto filtering options. You create a custom .ecl file and then combine it with
auto analysis during encoding. MPEG Power Professional™ will take the ECL events you defined
and merge them with the results of auto-analysis.
71
MPEG POWER PROFESSIONAL 2.0 MANUAL
Section 4.2 will show you how to define an analysis only task and review the resulting .ecl file.
Section 4.6 will show you how to define a manually generated .ecl file, listing custom encoding
options. You will also learn how to combine a manually generated .ecl file with auto-analysis.
Section 4.8 discusses several practical applications for .ecl files.
4.2 USING ANALYSIS ONLY
To use analysis only, create an analysis only task within a new or existing encoding project.
MPEG Power Professional™ will produce an .ecl file, logging all of the suggested encoding
events. Any encoding events that will be used when your video source is encoded are logged
with a corresponding timecode or frame number. The .ecl file can be opened for review or edited
before the corresponding encoding task is generated.
To set up an Analysis Only task:
1. Create a new encoding project or open an existing encoding project.
2. Select INSERT TASK from the PROJECT menu or click the INSERT TASK icon on the project
toolbar
3. In the ENCODE DEFINITIONS window:
• Select ANALYSIS ONLY as the task type.
• Add your video file to the list of sources.
• Choose an encoding BASE TEMPLATE.
• Name a DESTINATION FILE.
(The destination file will default to .ecl, which stands for Encode Control List)
4. Click OK to save the task and add it to the current encoding project file.
5. SAVE the project file.
6. When you are ready to begin the analysis, select START ENCODING from the
PROJECT menu or click the START ENCODING icon on the project toolbar.
72
ANALYSIS MODE AND THE ENCODE CONTROL LIST (ECL)
73
MPEG POWER PROFESSIONAL 2.0 MANUAL
4.3 REVIEWING AN ANALYSIS ONLY GENERATED .ECL FILE
Once you have processed the analysis only task, it is easy to open the resulting .ecl file and
review it. When you created the analysis only task, you specified a destination name and location
for the .ecl file.
To open the finished .ecl file for review:
1. Open a new or existing project.
2. Choose INSERT TASK from the PROJECT menu or click the INSERTTASK icon on the project
toolbar.
3. Select the source file from the appropriate Windows™ or Macintosh™ file folder.
4. Click the check box for USE ECL FILE in the ENCODE CONTROL LIST SETTINGS box.
5. Browse for the .ecl file generated during the analysis only pass. It will be the destination
name you provided when you set up the analysis only task.
6. Click on the EDIT ECL button, and the ECL EDITOR-BY TIMECODE window will appear.
At a glance you can see a list of encoding events with corresponding timecodes.
74
ANALYSIS MODE AND THE ENCODE CONTROL LIST (ECL)
MPEG Power Professional™ assigns a sequential timecode value to each frame. The timecode
is formatted in hours, minutes, seconds and frames. The first frame of your video source corresponds to 00:00:00:00, the second frame corresponds to 00:00:00:01, the third frame to
00:00:00:02, etc.
WARNING: Do not confuse the MPEG Power Professional™ timecode feature with the SMPTE
time code assigned with the original source.
For example, if you wish to insert an encoding event at a scene change in your video, you probably have recorded the exact SMPTE timecode that corresponds to the scene change. The
SMPTE timecode must be converted to MPEG Power Professional™ timecode before it is inserted into an Encode Control List. You do this by subtracting the SMPTE timecode of the first frame
from SMPTE timecode of any events you wish to insert into the ECL. The discussion of the ECL
EDITOR-BY TIMECODE and the ECL EDITOR-BY FRAME, which follows, will show you how to
review and insert encoding events based on timecode and frame number.
TIP: One way to avoid this conversion process is to ensure that your SMPTE timecode of the first
frame is zero.
The ECL EDITOR-BY TIMECODE list shows you the encoding events sequentially as they are
scheduled to occur. In this case, for example, at time code 00:00:05:00, an I-frame will be injected.
The given timecode corresponds to frame 150. You can scroll through all of the scheduled
encoding events, adding and deleting events throughout the timeline.
75
MPEG POWER PROFESSIONAL 2.0 MANUAL
You can also view the encoding events by frame. Highlight a timecode based encoding event
from the list and then click on the BY FRAME button. The ECL EDITOR-BY FRAME window
appears, displaying the same encoding event by frame, which you just viewed based on timecode. If you loaded your source video file, you also see a thumbnail bitmap of the currently
selected frame where the encoding event will occur. (If you did not load your video source file,
the frame bitmap and the slider bar are disabled.)
You can step forward and backward through your source frame by frame by clicking on the arrow
buttons to the right of the frame bitmap. You can move forward or backward by one frame or ten
frames, or you can move to the next or previous event using the outside arrow buttons. Also, the
slider bar can be used to quickly move through the source media.
When you stop on a frame where an encoding event is scheduled, the event will be displayed with
its corresponding frame number. The encoding events window will be empty when you land on a
frame where no event is scheduled to occur. Corresponding frame bitmaps and event information
are displayed when appropriate.
76
ANALYSIS MODE AND THE ENCODE CONTROL LIST (ECL)
Using the Auto-generated .ecl file
Let’s assume that you have processed an analysis only task for a source video file.
This produced an .ecl file that you named myvideo.ecl. When you open myvideo.ecl from the
ENCODE DEFINITIONS window, you will see a list of scheduled I-frame injections:
You can see at a glance how often and at exactly what points in the video I-frames are to be
injected. You can also switch to view BY FRAME to step through frame by frame or from event to
event and see what the video is actually doing at each of the points where an I-frame is to be
injected.
If you agree with all of the MPEG Power Professional™ suggestions for auto I-frame injection,
then change nothing.
77
MPEG POWER PROFESSIONAL 2.0 MANUAL
• Click OK and return to the ENCODE DEFINITIONS window.
• Click OK to return to add this task to the active project.
MPEG Power Professional™ will incorporate all of the video events detailed in the .ecl file when it
processes this task.
4.4 ADDING AND REMOVING ENCODING EVENTS FROM AN .ECL FILE
If you wish to add or remove encoding events from an .ecl file, this can be done in the
ECL EDITOR window in either the BY TIMECODE view or the BY FRAME view.
To remove an event in either view, simply highlight the event or events from the list of enabled
events and click on the REMOVE button.
78
ANALYSIS MODE AND THE ENCODE CONTROL LIST (ECL)
To add an event, you must specify either a corresponding FRAME NUMBER or TIMECODE, highlight the event you wish to insert, and click the ADD button.
COOL STUFF: If you provide the timecode value, the corresponding frame number will appear. If
you are in the ECL EDITOR-BY FRAME view, you can step through your source video to a specific frame. MPEG Power Professional™ will display the corresponding frame number and timecode
value.
When you add an event, you also have the option of inserting information into a NOTES box that
is displayed with the list of enabled encoding events. Typically, you will want to use this box to
note specific information about video content at corresponding encoding events. This eliminates
the need to switch from timecode view to frame view to verify video content, once you have established your encoding events. The notes box is available from both BY TIMECODE view and BY
FRAME view, making it easy to document your encoding events.
Once you have made any changes you wish to the encoding events, click OK and you will be
prompted to save your .ecl file. You can either save it under the original destination name or
under a new name.
You can choose to set up a video only encoding task or multiplexed encoding task employing this
.ecl file as you exit the ENCODE DEFINITIONS window, or you can choose to create the encoding
task at a later time.
In either case, follow these steps to load an .ecl file with a video encoding or multiplexed encoding
task:
1. Check the USE ECL FILE box in the ENCODE DEFINITIONS window.
2. Type the path and file name of the .ecl file you want to use in the USE ECL FILE box in the
ENCODE DEFINITIONS window.
MPEG Power Professional™ will incorporate all of the video events detailed in the .ecl file when it
processes the corresponding video encode task.
79
MPEG POWER PROFESSIONAL 2.0 MANUAL
4.5 CONTROLLING SPECIFIC ENCODING EVENTS
During an analysis only pass over your video source, MPEG Power Professional™ primarily looks
for scene changes, cuts, titling, fades and other video information that can impact the encoding
process. It will typically prepare an .ecl file detailing where I-frames are to be injected and where
Telecine phase changes occur when you have selected the INVERSE TELECINE option on the
VIDEO1 tab of the ENCODER SETTINGS window. There are a variety of other encoding controls
that you can apply selectively to your video source based on timecode values or frame numbers.
Those encoding events include:
• Injecting entry points to create an access point for playback.
• Turning specific filters on and off of segments of a larger video source file.
• Applying any of the MPEG Power Professional™ SEARCH TECHNIQUES and SEARCH
DISTANCES to selected portions of the same video source.
An .ecl file also provides a powerful way to encode still pictures and to encode selected smaller
segments of longer source files. Section 4.9 discusses how to process each of these encoding
tasks.
4.6 MANUALLY CREATING AN .ECL FILE
There are two ways to generate an .ecl file:
• Create an analysis only task corresponding to your video source, as detailed in Section 4.3.
• Manually create an .ecl file based on either timecode or based on frame numbers calculated
as you review your source video.
TIP: When you want to manually incorporate a number of encoding events (besides I-frame injection) into an .ecl file, you may find it useful to first generate an .ecl file with the ANALYSIS ONLY
task and then edit the encoding events MPEG Power Professional™ provides.
To manually create an ENCODE CONTROL LIST for a particular video source:
1. Create a new project or open an existing encoding project.
2. Select INSERT TASK from the PROJECT menu or click the INSERT TASK icon on the project
toolbar.
3. Add your video SOURCE FILE(S) by browsing for them or typing in the path and file name.
80
ANALYSIS MODE AND THE ENCODE CONTROL LIST (ECL)
TIP: You should load your video source in the ENCODE DEFINITIONS window in order to visually
step through your source while creating or editing the .ecl file.
4. Select the USE ECL FILE checkbox in the ENCODE DEFINITIONS window.
5. Click on the EDIT ECL button.
A blank ECL EDITOR-BY TIMECODE window will appear. From this window you can add encoding events based on timecode or you can access a frame-based ECL editor and add encoding
events at specific frame numbers.
81
MPEG POWER PROFESSIONAL 2.0 MANUAL
As you can see from the EVENTS AVAILABLE list, there are a number of encoding events available that can be manually controlled with the ECL EDITOR. Available events include:
• Inject I-frame
• Median Filter ON
• Median Filter OFF
• FIR filter ON
• FIR filter OFF
• Gamma filter ON
• Gamma filter OFF
• Non-linear filter ON
• Non-linear filter OFF
• Light Non-linear ON
• Heavy Non-linear ON
• Inject Entry Point
• Set Short Range Search
• Set Medium Range Search
• Set Long Range Search
• Set Extended Range Search
• Inverse Telecine Phase Change
• Set Log Search
• Set Hybrid Search
• Set Two Pass Search
• Set Complete Search
• Start Encoding
• Stop Encoding
• Comment
• Adjust Average Bitrate
• Interfield Search On
• Interfield Search Off
• Half Pel Search On
• Half Pel Search Off
82
ANALYSIS MODE AND THE ENCODE CONTROL LIST (ECL)
These encoding events fall into a few different categories:
• Image filters
• Search ranges
• Search techniques
• Miscellaneous
“Miscellaneous” includes COMMENTS, INJECT I-FRAME, INJECT ENTRY POINT, START
ENCODING and STOP ENCODING.
Each of the global SEARCH TECHNIQUES, FILTERS, and SEARCH DISTANCES available within
MPEG Power Professional™, as listed on the VIDEO1 tab of the ENCODER SETTINGS window,
can be applied to smaller segments of your source video based on timecode or frame number.
For example, let’s say that you are including a particularly challenging video clip in one of your
applications. It contains a number of smaller segments separated by fades to black, which vary
greatly in terms of motion and complexity. The clip contains an extended beauty shot of a soft
focus grassy meadow (very little motion) with inter-cut shots of very fast-moving, highly detailed
video.
From the discussion of SEARCH DISTANCES and SEARCH TECHNIQUES in Chapter 4, you
know that the beauty shot is probably best encoded with a COMPLETE search because it contains
large areas of low detail and with shorter search ranges because it contains little motion. The segments of high detail, fast-moving video are probably most effectively encoded by a LOG search with
longer search ranges. While a HYBRID search with medium search ranges may prove a very effective compromise for encoding these contrasting video segments, you might wish to specify a specific
SEARCH DISTANCE and SEARCH TECHNIQUE for each contrasting segment of the video source.
To do so, you must know the exact frame where each segment starts and stops or the exact timecode where each segment starts and stops. You can use the ECL EDITOR-BY FRAME window
to step through your video, however, as this is a frame by frame process, it may prove time consuming on longer segments. You may wish instead to calculate exact in and out points using your
digital editing system.
83
MPEG POWER PROFESSIONAL 2.0 MANUAL
Once you have confirmed the in and out timecodes or frame numbers in and out, you can easily
create encoding events that correspond to these segments.
1. In the ECL EDITOR-BY TIMECODE window, type in the timecode or frame number where
you want to insert an encoding event.
2. Highlight the encoding event you wish to insert from the list of encoding EVENTS AVAILABLE.
3. Type any notes you wish to make about the encoding event into the NOTES box.
4. Click on the ADD button.
84
ANALYSIS MODE AND THE ENCODE CONTROL LIST (ECL)
For example, if you have calculated that your beauty shot segment begins at a timecode of
01:02:30:00:
1. Type that figure into the EVENT TIME CODE box.
2. Highlight the SET SHORT RANGE SEARCH event option.
3. Enter whatever notes you wish into the NOTES box.
4. Click on the ADD button.
The SET SHORT RANGE SEARCH event will appear in your event timeline.
You would then set a corresponding encoding event at the same timecode for
SET COMPLETE SEARCH.
85
MPEG POWER PROFESSIONAL 2.0 MANUAL
The segment of high detail, fast moving video begins at 01:06:20:00. You would add an event at
that timecode to SET LOG SEARCH and add a second event to SET LONG RANGE SEARCH.
Just as you can set search distances and techniques for smaller segments of a larger source file,
you can also apply filters selectively.
Perhaps you want to filter the beauty shot discussed above because the original source material
is a bit noisy and definitely not as clean as the fast-moving, detailed video that appears later in
the segment. You can insert an additional event to apply a filter just to the beauty shot segment.
In this case, as the video is smooth and slow moving, a MEDIAN filter may prove the best choice.
REFERENCE: For information about choosing a filter to match a particular type of video, please
see Chapter 3.
86
ANALYSIS MODE AND THE ENCODE CONTROL LIST (ECL)
The beauty shot begins at 01:02:30:00 and ends at 01:06:19:29. These are your in and out points
for applying a selected filter. To add the filter to your ECL:
1. Type the beginning timecode into the EVENT TIME CODE box.
2. Highlight MEDIAN FILTER ON from the list of EVENTS AVAILABLE.
3. Type any notes you wish to add into the NOTES box.
4. Click the ADD button.
This event will be added to the events timeline concurrent with the SEARCH DISTANCE and
SEARCH TECHNIQUE options that have already been selected.
The MEDIAN filter will continue to be applied to this video sequence until you turn it off. To turn
off this filter, type the ending timecode into the timecode box, highlight MEDIAN FILTER OFF on
the list of encoding EVENTS AVAILABLE and click the ADD button.
87
MPEG POWER PROFESSIONAL 2.0 MANUAL
The ECL EDITOR-BY TIMECODE window now looks like this:
Besides selectively applying SEARCH DISTANCES, SEARCH TECHNIQUES, and FILTERS, you
can manually INJECT I-FRAMES and INJECT ENTRY POINTS. Some applications require
random access to specific points in the encoded video. Injecting an entry point allows for that
random access. I-frames are considered to be beneficial at scene changes and at entry points,
although an entry point is not necessarily inserted just because an I-frame is.
88
ANALYSIS MODE AND THE ENCODE CONTROL LIST (ECL)
Both I-frames and entry points can be manually inserted as encoding events based on either
timecode or frame number. To add either I-frames or entry points to the list of enabled encoding events:
1. Specify a corresponding timecode or frame number in either the EVENT TIME CODE or EVENT
FRAME NUMBER box.
2. Select INJECT I-FRAME or INJECT ENTRY POINT from the list of encoding
EVENTS AVAILABLE.
3. Click the ADD button.
For example, if you inject an I-frame at the first frame of the scene change between the beauty
shot and the fast moving, highly detailed segment, it would appear at 01:06:20:00.
Suppose your application supported a random access point at that same scene change. You
would add an encoding event to INJECT ENTRY POINT at 01:06:20:00 as well.
TIP: Use of the INJECT ENTRY POINT event will force the MPEG encoder to also perform an
automatic I-frame injection. It is not necessary to explicitly add INJECT I-FRAME to the ECL in
this case. The reverse, however, is not true.
COOLSTUFF: At any frame number or timecode entry, you can insert a COMMENT encoding event.
You can use this feature to insert any kind of comment you wish into the .ecl file, without tying the comment to a particular event. For example, you can insert a comments only event to mark every scene
change. This eliminates the need to step through the video more than once looking for scene changes.
Once you have added all the encoding events you deem necessary, you are ready to save this
.ecl file and set up a corresponding encoding task.
1. From the ECL EDITOR-BY TIMECODE view, click the SAVE AS button to choose a name and
destination for this file. Remember that ECL files usually have an .ecl extension.
2. Click OK to close the ECLEDITOR-BYTIMECODE window and return to the ENCODE DEFINITIONS
window.
3. If you wish to set up an encoding task right away using this ECL file:
• Make sure the USE ECL FILE checkbox is selected.
• Type your ECL file name into the USE ECL FILE box.
4. Click OK to add this task to the active project window.
When you encode this project, the ENCODE CONTROL LIST you entered will be used for this task.
89
MPEG POWER PROFESSIONAL 2.0 MANUAL
4.7 MERGING .ECL FILES
When you load an .ecl file for attachment to a video encode task or a multiplexed encode task by
selecting the USE ECL FILE checkbox, notice whether or not the AUTO ANALYZE checkbox is
also selected. As you know, the AUTO ANALYZE option will analyze the video prior to encoding
and then enact the encoding events it suggests, all within the same encoding pass.
TIP: If you have checked both USE ECL FILE and AUTO ANALYZE options, MPEG Power
Professional™ will merge the information to the .ecl file you have selected with the results of an
auto analysis pass of your video just prior to encoding. It will incorporate all of the encoding
events provided by the two files.
This feature can save you a lot of labor. For example, you may wish to manually insert a few
encoding events (such as a filter applied to a small segment of the source video), and yet want to
take advantage of MPEG Power Professional’s™ powerful features, like automatic I-frame insertion at scene changes. Why step through your video looking for scene changes and inserting
I-frames manually? Let MPEG Power Professional™ detect scene changes and insert I-frames
automatically AND apply the selective filters you incorporated in your custom .ecl file.
To merge an .ecl file with the results of an auto-analysis pass of your video, check both USE ECL
FILE in the ENCODE DEFINITIONS window and AUTO ANALYZE on the VIDEO2 tab of the
ENCODER SETTINGS window.
TIP: Manually created events will take precedence over auto-generated events in the case that
there are conflicts between the two.
4.8 PRACTICAL APPLICATIONS FOR .ECL FILES
In addition to the custom encoding events that you can apply to specific portions of video sources
by creating or editing an .ecl file, there are two other very practical uses for the encode
control list:
• Encoding still pictures (.msp files).
• Encoding smaller segments of a longer source file as separate finished files.
Both of these encoding tasks are accomplished the same way, using the START ENCODING and
STOP ENCODING event parameters.
90
ANALYSIS MODE AND THE ENCODE CONTROL LIST (ECL)
4.9 STILL PICTURES
There are two ways to encode still pictures:
• You can choose to export a single frame of video from your nonlinear editing system as
a complete source file.
• You can elect to pull a single frame from a larger source file, and enable a START ENCODING
event in an .ecl file, which corresponds to that single frame of video.
If you are encoding several MPEG still pictures from the same source material, the latter is the
most efficient method:
1. Create an encoding project.
2. Select INSERT TASK from the PROJECT menu or click the INSERT TASK icon on the toolbar.
• Choose STILL PICTURE from the list of ENCODING TASKS.
• Select and add your SOURCE FILE.
• Select a BASE TEMPLATE from the list of available templates.
• Name a DESTINATION FILE.
3. Select the USE ECL FILE checkbox.
4. Click on the EDIT ECL button.
The ECL EDITOR-BY TIMECODE window will appear.
If you already know approximately which frame you want to compress as a still picture, you can
enter an approximate frame number, then click on the BY FRAME button to view the corresponding frame. You can then step forward and back with the navigation buttons to find the exact
frame you wish to encode.
5. Enter the frame number in the EVENT FRAME NUMBER box.
6. When that frame is selected and displayed in the frame viewer, the corresponding frame
number and timecode is displayed in the appropriate time index and frame number test boxes.
7. Type any notes you wish into the NOTES box, perhaps a description of the contents of this
particular frame.
8. Highlight the START ENCODING event from the EVENTS AVAILABLE list box and click the
ADD button.
91
MPEG POWER PROFESSIONAL 2.0 MANUAL
A START ENCODING event now appears in the event window at the corresponding frame number.
Once you have selected all of the encoding events you wish to include in this .ecl file, you must
save the file and return to the active project window.
1.
2.
3.
4.
Choose SAVE AS to save this .ecl file, or CANCEL to discard it.
Click OK to return to the ENCODE DEFINITIONS window.
Make sure the USE ECL FILE checkbox is selected.
Confirm the rest of the encoding options you have selected and click OK to save the
encoding task.
The active project window will appear. From this window, you can choose to START ENCODING
or go on to a different task.
For every still picture you want to encode, you must create a separate encoding task using the
above guidelines. Several still picture encoding tasks can be included in the same project regardless of whether or not they are based on the same source material, but only one still picture can
be encoded in each task.
92
ANALYSIS MODE AND THE ENCODE CONTROL LIST (ECL)
4.10 ENCODING SHORT SEGMENTS OF LONGER SOURCE FILES
The START ENCODING and STOP ENCODING event options can also be used to encode segments longer than a single frame. For example, suppose that you have edited three minutes of
material on your nonlinear editing system and plan to create six thirty-second files from that three
minutes of material.
You can edit that material into six separate clips and export all six of them from your nonlinear
editing system, or you can string the clips together into one large file, spacing the clips with segments of black.
• If you export six separate clips, you will have six separate source files, potentially six video
only files, and potentially six audio files.
• If you export just one large source file, you will have considerably fewer files to deal with,
but you will introduce the additional step of creating separate .ecl files when you set up your
encoding tasks.
Each option has advantages and disadvantages, but basically you are choosing between creating
separate files within your nonlinear editing system or creating separate files within MPEG Power
Professional™.
To encode six separate clips from one large source file, follow the same procedure as was
described previously for encoding still pictures, but substitute MULTIPLEXED ENCODE, VIDEO
ENCODE, or AUDIO ENCODE for the encoding task types.
Use the ECLEDITOR - BY FRAME to determine exactly where each segment begins and ends:
1. Create a new project or open an existing project.
2. Choose INSERT TASK from the PROJECT menu or click on the INSERT TASK icon on
the toolbar.
3. Select and add your SOURCE FILE.
4. Choose VIDEO ENCODE, AUDIO ENCODE or MULTIPLEXED ENCODE as your
ENCODING TASK.
5. Choose a BASE TEMPLATE.
6. Name your DESTINATION FILE.
7. Select the USE ECL FILE checkbox.
8. Click on EDIT ECL. THE ECL EDITOR-BY TIMECODE window will appear.
9. Click on the BY FRAME button to step through your source and determine beginning and ending
frames for each of your segments.
93
MPEG POWER PROFESSIONAL 2.0 MANUAL
10. Type any relevant notes about the segment into the NOTES box.
11. Highlight START ENCODING from the EVENTS AVAILABLE list.
12. Click on the ADD button.
13. Step through the sequence by frame to determine the ending frame for this video segment.
14. Type the ending frame number into the FRAME NUMBER box.
15. Type any relevant notes into the NOTES box.
16. Highlight STOP ENCODING from the EVENTS AVAILABLE list.
17. Click on the ADD button.
If there are any other encoding events that you wish to use with this video segment, such as filters, search ranges, etc., select and add them now.
To save this .ecl file and use it in the encoding process:
1. Choose SAVE AS to save the .ecl file or CANCEL to discard it.
2. Click OK to return to the ENCODE DEFINITIONS window.
3. Confirm the encoding options you have selected and click OK to add this task to the active
project.
For each task, repeat the above steps to create in and out points. You can encode the project
you have created at your convenience.
CHAPTER SUMMARY
Analysis tasks and Encode Control Lists (.ecl files) offer you a powerful means to selectively apply
MPEG Power Professional™ encoding parameters to your video sources. The most important
reason to analyze your video is to improve the overall image quality . Analysis suggests encoding
events which, when incorporated into the encoding process, can make your finished video look
better. You can use Encode Control List files (.ecl files) to selectively apply filters, search techniques, and search distances, to inject entry points and I-frames. You can also use encode
control lists to encode MPEG still pictures and to encode multiple short segments of one large
video source file.
94
CHAPTER 5
LET’S MAKE A DVD!
MPEG POWER PROFESSIONAL 2.0 MANUAL
CHAPTER OVERVIEW
In this chapter, you will be taken through the steps of making a DVD with MPEG Power
Professional™. You will learn the basic steps necessary in order to create high-quality MPEG for
your DVD applications. In addition, this chapter will discuss making a DVD using both the MPEG
Power Professional™ VOB feature and making a DVD using third party authoring software. Also,
we will explain the MULTIPLEX tab and VBR option in greater detail. Finally, this chapter will contain a discussion on the multi-camera angle support included with MPEG Power Professional™,
and why it is important to your DVD creation. Please note, many of the features discussed in this
section are available only in MPEG Power Professional™ - DVD and MPEG Power
Professional™ - Transport.
5.1 CREATING A NEW PROJECT
You can build MPEG files appropriate for DVD using the built-in templates. To begin, insert a
task.
All encoding tasks are managed within encoding projects. To create an encoding project:
1. Select NEW from the FILE menu.
• A new encoding project window will appear with a default name of "Untitled1".
• Save your new project by selecting SAVE AS from the FILE menu or click the SAVE icon on
the toolbar
Now you are ready to insert and define your encoding task(s).
96
LET’S MAKE A DVD!
5.2 INSERTING A TASK
1. Select INSERT TASK from the PROJECT menu or click the INSERT TASK icon on the project
toolbar.
• The ENCODE DEFINITIONS window will appear.
2. Next, add the source file that is to be encoded. You can do this in one of two ways:
• Type a path and a file name in the SOURCE FILES box.
• Browse for your source file.
In this case, let’s browse to find our source file from the HEURIS CD-ROM. Click on the button to
the right of the SOURCE FILES box (SELECT button for Macintosh™ users and three dots for
Windows™ users). Browse for your CD-ROM drive. Choose the MEDIAfolder, the source file
gun.mov, and click OPEN. You’ll notice that the file you selected appears in the SOURCE FILES
box.
97
MPEG POWER PROFESSIONAL 2.0 MANUAL
3. In the ENCODE DEFINITIONS window, you need to select the type of encoding you plan to do.
For now, we’ll leave MULTIPLEXED ENCODE as our encoding task.
WARNING: If you are using third party authoring software to create your DVD, you cannot create
a multiplexed encode. Third party DVD authoring software requires you to import elementary
streams, that is, audio only and video only encodes. The authoring software will then multiplex
the streams together as part of its process.
REFERENCE: For a discussion on how to do audio only or video only encodes, please return to
Section 2.3.
5.3 CHOOSING ENCODING SETTINGS
Select a BASE TEMPLATE.
• Choose the template you want to use from the list of BASE TEMPLATES. In this case,
let’s use the DVD template.
When you use the DVD or DVD PAL template, the settings automatically select CLOSED GOP
and DVD VOB.
98
LET’S MAKE A DVD!
5.4 NAMING A DESTINATION FILE
Finally, you must specify where you want the MPEG file to be saved when it is finished encoding.
• Choose a name for your DESTINATION FILE. In this case, let’s use the name “testdvd.”
MPEG Power Professional’s VOB feature will create a directory by this name, in which it will put
your VOB and IFO files.
5.5 EDITING ENCODE SETTINGS
Sometimes, the built-in template has to be changed or customized slightly to meet the specifications of your particular DVD project. Your encode settings are easily edited using MPEG Power
Professional™. To edit your settings or create custom templates, simply click on the EDITSETTINGS
button in the ENCODE DEFINITIONS window. As you can see, there are five tabs in the
ENCODER SETTINGS window: TEMPLATE, AUDIO, VIDEO1, VIDEO2 and MULTIPLEX.
99
MPEG POWER PROFESSIONAL 2.0 MANUAL
REFERENCE: For the purposes of this exercise, we are going to be discussing some of the settings on the VIDEO1, VIDEO2, and MULTIPLEX tabs. This is not meant to be an all-inclusive
discussion of the settings on all of the tabs. If you need a refresher on all of the settings that are
available to edit in MPEG Power Professional™, please refer to Chapter 3.
First, let’s begin with the settings for VARIABLE BIT RATE encoding. To change these settings,
you will need to go to the VIDEO1 tab:
1. Click the EDIT SETTINGS button in the ENCODE DEFINITIONS window.
2. Click on the VIDEO1 tab.
3. The VARIABLE RATE option is selected, and boxes are available for AVERAGE and
MAXIMUM bit rates.
4. You can change these bit rates to comply with the specifications of your DVD project. For the
purposes of this exercise, change the MAXIMUM bit rate to 8000000 bits per second.
Next, let’s look at the CLOSED GOP setting. As you may recall from the discussion of CLOSED
GOP in Chapter 3, the CLOSED GOP option will help to facilitate the playback of your multi-angle
DVD. (For a more detailed discussion and explaination of CLOSED GOP, please see Appendix II).
This option is automatically selected for you when you choose the DVD PAL or DVD template.
To change this setting:
1. Click on the VIDEO2 tab.
2. Click the CLOSED GOP checkbox.
Finally, let’s look at the MULTIPLEX TARGET settings. DVD VOB is set automatically when you
choose the DVD or DVD PAL template. If you want to change this setting, you can do this by
going to the MULTIPLEX tab:
1. Click on the MULTIPLEX tab of the ENCODER SETTINGS window.
2. Click on the appropriate MULTIPLEX TARGET for your application.
3. Click OK to return to the ENCODE DEFINITIONS window.
100
LET’S MAKE A DVD!
The DVD VOB feature is useful if you want to quickly and easily create VOBs for rapid DVD prototyping using inexpensive DVD burning packages, such as Adaptec Toast DVD™.
WARNING: If you are using a third party DVD authoring package, you will need to import
elementary audio only and video only encodes into your DVD authoring system.
Now that you have set all of the encoding definitions for this task, click the OK button to include
this task in the active encoding project.
• The ENCODE DEFINITIONS window will close. This returns you to the active project window.
101
MPEG POWER PROFESSIONAL 2.0 MANUAL
Our sample project file currently contains one encoding task.
5.6
START YOUR ENCODE
Now that you have created an encoding project containing at least one encoding task, it’s time to
save the project file and start encoding.
1. Select SAVE AS from the FILE menu or click the SAVE icon on the toolbar.
2. From the PROJECT menu, select START ENCODING or click START ENCODING icon on the
toolbar.
Now you’re encoding a DVD project!
102
LET’S MAKE A DVD!
5.7 MONITORING AN ENCODING PROJECT IN PROGRESS
As soon as MPEG Power Professional™ starts encoding a project, the ENCODER PROGRESS
window appears.
From the ENCODER PROGRESS window, you can monitor the progress of specific tasks within
the encoding project. At a glance, you can see:
• The name of the current project.
• What time the encoding process started.
• Which task MPEG Power Professional™ is currently encoding.
You can also:
• View an image of the currently encoding frame.
• See which frame number is currently encoding out of the total number of frames.
• Get an estimate of when the current encoding task will be completed.
103
MPEG POWER PROFESSIONAL 2.0 MANUAL
The bottom half of the ENCODER PROGRESS dialog box displays a synopsis of the current
encoding activity. At a glance, you can see what parameters MPEG Power Professional™ is
using to encode your video. Once the current project is completely encoded, a log file of this
encoding activity can be accessed from the VIEW menu.
5.8 BURNING THE VOB ONTO A DVD
When you create a VOB file using the DVD VOB option on the MULTIPLEX tab of the ENCODER
SETTINGS window, you will create a directory of several files, including your specified destination
.vob file. To create your DVD, simply drag the VIDEO_TS and AUDIO_TS directories from your
specified destination directory to a DVD-burning package, such as Adaptec Toast™ DVD. Then,
use the CD/DVD burning package to write to the blank CD/DVD. Congratulations! You’ve now
created a DVD.
5.9 CREATING A DVD USING THIRD PARTY AUTHORING SYSTEMS
When you want to create more complicated DVDs – those with multiple titles – you will want to
use a third party authoring system to create your DVD. This changes your process for creating
a DVD.
To make a DVD using third party authoring systems:
1. Create a new project or open an existing project.
2. Insert a task by choosing INSERT TASK from the PROJECT menu or click the INSERTTASK
icon on the project toolbar.
3. Choose your SOURCE FILE
4. Choose your ENCODING TASK type. For third party authoring systems, you will need to create
elementary video and audio streams. Choose VIDEO ENCODE as your encoding task type.
5. Select your BASE TEMPLATE, either DVD or DVD PAL.
6. Edit any encoder settings you wish to change by clicking on the EDIT SETTINGS button.
7. Name your DESTINATION FILE.
8. Repeat the above steps for your audio source files, choosing AUDIO ENCODE as your
encoding task type.
9. Open your authoring system.
10.Drag the newly created files to your authoring system.
11. Start your encode by choosing START ENCODING from the PROJECT window or click the
STARTENCODING icon on the project toolbar
104
LET’S MAKE A DVD!
CHAPTER SUMMARY
In this chapter, you have learned the basic steps you will need to make a DVD with MPEG Power
Professional™. You have learned how to:
• Create a DVD using the VOB feature contained in MPEG Power Professional™ and an
inexpensive DVD burning package.
• Create a DVD with elementary streams created in MPEG Power Professional™ and a third
party authoring system.
The same basic processes discussed above can be used for most of your DVD development
projects.
105
MPEG POWER PROFESSIONAL 2.0 MANUAL
106
CHAPTER 6
QUICK REFERENCE TOPICS: PROJECT ENCODING BASICS
MPEG POWER PROFESSIONAL 2.0 MANUAL
6.1 CHAPTER TABLE OF CONTENTS
6.1
6.2
6.3
6.4
6.5
6.6
6.7
6.8
6.9
6.10
6.11
6.12
6.13
6.14
6.15
6.16
6.17
6.18
6.19
6.20
6.21
6.22
6.23
108
Chapter Table of Contents
The MPEG Power Professional™ Toolbar
The Project Toolbar
Short Cut Keys
The Four Types of MPEG Encoding and Analysis Only Mode
Built-In MPEG Enocoding Base Templates
Creating, Opening, and Saving a Project
Inserting a Task Into an Active Project
Editing a Task in the Active Project Window
Deleting a Task from the Active Project Window
Using the Task Generator
Interrupting an Encoding Project in Progress
The Interrupted Encodes Window
Monitoring an Encoding Project in Progress
Importing Source Files
The Encode Definitions Window
Creating Multiplexed MPEG files with Single .abs and .vbs Source Files
Creating Multiplexed MPEG Files with Multiple Source Files
Source File Concatenation
Encoding a Still Picture (.msp)
The ECL Editor by Timecode Window
The ECL Editor by Frame Window
Analysis and .ecl Files
108
109
110
111
111
112
116
116
117
118
118
119
119
121
122
124
125
127
128
130
132
132
134
QUICK REFERENCE TOPICS: PROJECT ENCODING BASICS
6.2 THE MPEG POWER PROFESSIONAL™ TOOLBAR
The MPEG Power Professional™ toolbar offers you point and click access to most of the
commands found in the FILE, EDIT and HELP menus. Whenever MPEG Power Professional™ is
open on your desktop, this toolbar is available. You can choose to view or hide this toolbar by
selecting TOOLBAR in the product’s VIEW menu.
The following commands are available by clicking icons in the product toolbar:
New Project
Creates a new empty project window
Open Project
Opens an existing project file.
Save Project
Saves the Active Project
Cut
Cuts the selected object or text and places it onto the clipboard.
Copy
Copies the selected object or text and places it on the clipboard.
Paste
Pastes the object or text from the clipboard.
Print
Prints a summary of the active project.
About
Displays copyright and system information.
What’s This
Enables context sensitive help.
109
MPEG POWER PROFESSIONAL 2.0 MANUAL
6.3 THE PROJECT TOOLBAR
The MPEG Power Professional™ project toolbar offers you point and click access to all of the
commands found in the PROJECT menu. The project toolbar is only available when you have an
active encoding project open on your desktop. You can choose to view or hide this toolbar by
selecting PROJECT TOOLBAR in the product’s VIEW menu.
The following commands are available by clicking icons in the project toolbar:
Start Encoding
Starts encoding the tasks in the active encoding project.
Insert Task
Inserts a task into the active encoding project.
Edit Task
Opens the ENCODE DEFINITIONS window for the currently selected (highlighted) task in
the active project window.
Delete Task
Deletes the currently selected (highlighted) task in the active project window.
Resume
Resumes an interrupted encode.
Discard
Discards an interrupted encode.
View Log File
Displays the encoding log file for the active encoding project.
110
QUICK REFERENCE TOPICS: PROJECT ENCODING BASICS
6.4 SHORT CUT KEYS
The following table indicates the keyboard shortcuts available within MPEG Power Professional™.
Task
Create New Project
Open Existing Project
Save Current Project
Print
Undo
Cut
Copy
Paste
Start Encoding
Insert Task
Edit Task
Delete Task
Resume Interrupted Encode
Discard Interrupted Encode
View Log File
Windows™ Command
Ctrl+N
Ctrl+O
Ctrl+S
Ctrl+P
Ctrl+Z
Ctrl+X
Ctrl+C
Ctrl+V
Ctrl+E
Ctrl+A or Insert key
Ctrl+T
Ctrl+D or Delete key
Ctrl+R
Ctrl+I
Ctrl+L
Mac™ Command
Command+N
Command+O
Command+S
Command+P
Command+Z
Command+X
Command+C
Command+V
Command+E
Command+A
Command+T
Command+D
Command+R
Command+I
Command+L
6.5 THE FOUR TYPES OF MPEG ENCODING AND ANALYSIS ONLY MODE
With MPEG Power Professional™, you can produce four types of MPEG compressed files:
• Audio only (file extension .abs)
• Video only (file extension .vbs)
• Multiplexed (file extension .mpg)
• Still picture (file extension .msp)
Audio Only (.abs):
• Use when you require audio without associated video.
• Multiplex with .vbs (video only) files to produce .mpg files
111
MPEG POWER PROFESSIONAL 2.0 MANUAL
Video Only (.vbs):
• Use when you require video without associated audio.
• Multiplex with .abs (audio only) files to produce .mpg files.
Multiplexed Files (.mpg):
• Use when you require associated audio and video.
• A typical .mpg file or multiplexed file contains one or more audio only and/or one or more
video only files.
• Encode a multiplexed file directly from source data, or first create separate .abs and/or
.vbs source files.
Still Picture (.msp):
• Commonly used in a CDi or Video CD application to create menu buttons or backgrounds.
WARNING: Not all authoring packages support the incorporation of .msp files. Refer to the product documentation and test some encoded files prior to full production.
With MPEG Power Professional™, you can also produce ENCODE CONTROL LISTS.
Analysis Only (.ecl):
• Analyzes source media files
• Gathers useful information about the location of cuts, wipes, fades, titling, and other aspects of
the source media.
6.6 BUILT-IN MPEG ENCODING BASE TEMPLATE
Within MPEG Power Professional™, every encoding task is based on an encoding template.
Each built-in template corresponds to a common playback application, such as 1X CDROM or
CDi. Each template’s encoding parameters, including bit rates and resolutions, are preset for you
at appropriate levels.
When you define encoding tasks, they are based on an encoding template.
You can:
• Use a built-in template as is.
• EDIT SETTINGS and create a custom template.
REFERENCE: For more information on how to edit settings, please see Chapter 3. For reference
topics on editing template settings, see Chapter 7.
112
QUICK REFERENCE TOPICS: PROJECT ENCODING BASICS
There are sixteen built-in templates:
• 1 X CDROM
• 1 X CDROM PAL
• 2 X CDROM
• 2 X CDROM PAL
• CDi
• CDi PAL
• Default
• DVD
• DVD PAL
• Internet
• MPEG2 Fast
• MPEG2 Fast PAL
• MPEG2 Fields
• MPEG2 Fields PAL
• Video CD
• Video CD PAL
The built-in templates and playback platforms/applications they are best suited for are
detailed below.
1 X CDROM and 1 X CDROM PAL:
• Playback from a computer with at least a single-speed CD-ROM drive and either a hardware
MPEG player or a software MPEG player.
• Optimized for playback from a single-speed CD-ROM drive.
• Use for 1X CD-ROM drive or faster.
2 X CDROM and 2 X CDROM PAL:
• Playback from a computer with at least a double-speed CD-ROM drive and a hardware
MPEG player.
• Optimized for playback from a double-speed CD-ROM drive.
• Use for 2X CD-ROM drive or faster.
CDi and CDi PAL:
• Playback from a CDi player or an MPEG hardware or software player that can play back
CDi files.
• Recommended video bit rate for CDi playback.
• Optimized for single-speed playback.
113
MPEG POWER PROFESSIONAL 2.0 MANUAL
Default:
The DEFAULT template is the base template that will always be selected by the encoder if the
user makes no further template selections.
DVD and DVD PAL:
• Useful for creating streams suitable for use in DVD authoring systems.
• Uses VARIABLE BIT RATE encoding for the highest possible quality with the smallest possible file
• Automatically will select the DVD-VOB option on the MULTIPLEX tab.
• Automatically will select CLOSED GOP for multi-angle DVD playback.
Internet:
• Distribution over the Internet or other wide area network with constrained bandwidth.
• Much smaller file sizes.
• Use for web pages or other applications where file size and download time are bigger
considerations than image quality.
MPEG2 Fast and MPEG2 Fast PAL:
• Quickest MPEG2 encoding options
• Useful for higher volume MPEG2 encoding and multimedia application prototyping
• Can be used with ECL events to achieve similar quality to MPEG2 FIELDS with much shorter
encode times, depending upon media to be encoded.
• Requires moderate to high storage space and delivery bandwidth
• Best played back with hardware decoding solution.
MPEG2 Fields and MPEG2 Fields PAL:
• High quality, full resolution MPEG2 video
• Useful for dedicated kiosks and other installations where highest quality MPEG2 video is desired.
• Requires moderate to high storage space and delivery bandwidth
• Best played back with hardware decoding solution.
Video CD and Video CD PAL:
• Playback from a dedicated Video CD 1.1 or 2.0 player or an MPEG hardware or software player
that can read the Video CD 1.1 or 2.0 format.
• Required video bit rate for Video CD playback.
• Optimized for single-speed playback.
114
QUICK REFERENCE TOPICS: PROJECT ENCODING BASICS
NTSC Templates
Template
1 X CDROM
2 X CDROM
CDi
Internet
Default
DVD
MPEG2 Fast
MPEG2 Fields
Video CD
Audio Bitrate
192 Kb
224 Kb
224 Kb
56 Kb
224 Kb
224 Kb
224 Kb
224 Kb
224 Kb
Audio Mode
Mono
Stereo
Stereo
Mono
Stereo
Stereo
Stereo
Stereo
Stereo
Video Bitrate
1.02 Mb
1.856 Mb
1.150 Mb
400 Kb
1.152 Mb
4.5-9 Mb Variable
7 Mb
7 Mb
1.150 Mb
Height
352
352
352
160
352
720
720
720
352
Width
240
240
240
120
240
480
480
480
240
Height
352
352
352
720
720
720
352
Width
288
288
288
576
576
576
288
PAL Templates
Template
1 X CDROM PAL
2 X CDROM PAL
CDi PAL
DVD Pal
MPEG2 Fast PAL
MPEG2 Fields PAL
Video CD PAL
Audio Bitrate
192 Kb
224 Kb
224 Kb
224 Kb
224 Kb
224 Kb
224 Kb
Audio Mode
Mono
Stereo
Stereo
Stereo
Stereo
Stereo
Stereo
Video Bitrate
1.02 Mb
1.856 Mb
1.150 Mb
4.5-9 Mb Variable
7 Mb
7 Mb
1.150 Mb
TIP: Regardless of CD-ROM drive speed, software MPEG players generally do not perform as
efficiently as hardware players. However, on very fast Pentium™ CPUs at low bit rates or when
coupled with hardware acceleration, such as optimized version specifically designed to work with
your video card, you may get results comparable to hardware. It is recommended that you experiment with various encoding templates to find on that works well with your software MPEG player,
before you encode large amounts of video. Generally, the 1 X CDROM template produces
MPEG files suitable for software playback.
115
MPEG POWER PROFESSIONAL 2.0 MANUAL
6.7 CREATING, OPENING AND SAVING A PROJECT
Quick Reference: How to create a new project file.
1. From the FILE menu, select NEW or click on the NEW icon on the project toolbar.
2. An empty project window will appear with a default name of Untitled1.
Quick Reference: How to open an existing project file
1. From the FILE menu, select OPEN or click on the OPEN icon on the project toolbar.
2. Select your saved project file (.mpr).
3. Click OPEN to open the selected project file.
4. The project file window will appear, with the name of the active project in the title bar.
Quick Reference: Saving a Project File
1. You can save the active project file at any time, but you must save the active project file prior to
selecting START ENCODING.
2. Select SAVE AS from the FILE menu or click the SAVE icon in the project toolbar.
6.8 INSERTING A TASK INTO AN ACTIVE PROJECT
With the active project window open:
1. Select INSERT TASK from the PROJECT menu or click on the INSERT TASK icon on the
project toolbar.
The ENCODE DEFINITIONS window will appear.
2. Define an encoding task:
• Add one or more SOURCE FILES.
• Choose an ENCODING TASK from the checklist.
• Choose an encoding BASE TEMPLATE.
• Name a DESTINATION FILE and location.
3. Click OK.
4. The active project window will update to reveal the name of the new task and a corresponding
task icon.
116
QUICK REFERENCE TOPICS: PROJECT ENCODING BASICS
6.9 EDITING A TASK IN THE ACTIVE PROJECT WINDOW
To edit any of the tasks in your active project file:
1. Highlight the task you wish to edit.
2. From the PROJECT menu select EDIT TASK or click on the EDIT TASK icon on the project
toolbar.
3. The ENCODE DEFINITIONS window will appear. At a glance you can see the encoding
parameters for the task you have selected.
4. Make any changes you wish to the encoding parameters.
5. Click OK to save your changes and return to the active project window.
-orClick CANCEL to discard any changes you have made and return to the active project window.
COOL STUFF: You can also open any task for editing by double-clicking it.
117
MPEG POWER PROFESSIONAL 2.0 MANUAL
6.10 DELETING A TASK FROM THE ACTIVE PROJECT WINDOW
You can delete a task from an active project window:
1. In the active project window, highlight the name of the task you wish to delete.
2. From the PROJECT menu, select DELETE TASK or click on the DELETE TASK icon on the
project toolbar.
A confirmation window will appear asking you to confirm the deletion.
3. Click YES to confirm deletion of the selected task and return to the active project window.
-orClick NO to cancel deletion and return to the active project window.
6.11 USING THE TASK GENERATOR
To use the Task Generator to encode a group of source files:
1. Select TASK GENERATOR from the PROJECT menu.
2. Choose your ENCODING TASK. Please remember that the encoding task you choose will be
used for encoding all of the source files you select.
3. Choose your BASE TEMPLATE. Again, the template you choose will be used for encoding all
of the source files you select.
4. Choose your OUTPUT DIRECTORY. There is no need to choose destination file names.
The Task Generator will automatically name your destination files using the name of the
source files and adding the appropriate extension (.abs, .vbs, .mpg, etc.)
5. Choose the SOURCE DIRECTORY you want to use to obtain the source files. Do this either
by typing the path or browsing for your directory. A list of available files in that directory will
appear. You can choose to sort the files by TYPE or by NAME. Note that TYPE is the default
selection.
6. Highlight the source files you wish to encode and use the -> to move one file, or selected
files into the CURRENT SOURCE FILES box. Use the ->> to move all files into the CURRENT
SOURCE FILES box. If you choose a file and then change your mind, use the <- or <<buttons to move the file out of the CURRENT SOURCE FILES box.
7. Click OK. This returns you to the project window. As you will see, the tasks that you have just
created in the Task Generator appear.
8. SAVE your project and START ENCODING as you would any project.
118
QUICK REFERENCE TOPICS: PROJECT ENCODING BASICS
6.12 INTERRUPTING AN ENCODING PROJECT IN PROGRESS
Once you have started to encode the tasks in an encoding project, the ENCODER PROGRESS
window will appear indicating the progress of the encoding tasks within the active project.
From this status window, you can interrupt any actively encoding project.
TIP: MPEG Power Professional™ periodically saves the task as it is encoding. In the case of a
power failure you may restart the encode where it was interrupted when power was lost.
When a project is interrupted:
MPEG Power Professional™ saves all partially encoded files and encoding parameters for later
resumption of the encoding process. All interrupted encoding projects can be either resumed or
discarded at your convenience.
You can close the MPEG Power Professional™ application and use your workstation for other
tasks, even shut off your computer, and then re-open the MPEG Power Professional™ application
and resume encoding any interrupted encoding project without loss of data.
To interrupt an encoding project:
1. From the ENCODER PROGRESS window, click on the INTERRUPT button.
A confirmation window will appear asking you to confirm the interruption request.
2. Click OK to interrupt the actively encoding project
-orClick CANCEL to close the confirmation window and return to the actively encoding project
without interrupting the current task.
6.13 THE INTERRUPTED ENCODES WINDOW
To display the INTERRUPTED ENCODES window:
From the VIEW menu, select INTERRUPTED ENCODES.
The INTERRUPTED ENCODES window will open and display a list of the interrupted encodes
that MPEG Power Professional™ has detected.
119
MPEG POWER PROFESSIONAL 2.0 MANUAL
From the INTERRUPTED ENCODES window, you can:
• Resume an interrupted encoding project.
• Discard an interrupted encoding project.
• View the log file of an interrupted encoding project.
• Open an interrupted project.
To resume an interrupted project file:
1. Highlight the name of the project you wish to resume encoding.
2. Click on the RESUME button.
The ENCODER PROGRESS window will appear, allowing you to continue to monitor the
progress of this encoding project.
To discard an interrupted project file:
1. Highlight the name of the project you wish to discard.
2. Click on the DISCARD button.
A confirmation window will appear asking you to confirm that you wish to delete the highlighted
project.
3. Click OK to discard any interrupted encode.
-orClick CANCEL to return to the INTERRUPTED ENCODES window without discarding
anything.
To view the log file for an interrupted encoding project:
1. Highlight the name of the project with the log file you wish to view.
2. Click on the VIEW LOG button. The log file will open in your default text file viewer.
A typical log file contains:
• The destination file name for the encoding task
• The time that the encoding task started and ended.
• A list of the actions that MPEG Power Professional™ completed during the
encoding process.
3. After reviewing the contents of the log file, close the file and the viewer.
120
QUICK REFERENCE TOPICS: PROJECT ENCODING BASICS
To open an interrupted encoding project:
1. Double click on the name of the project you wish to open or click the OPEN button.
2. A window appears asking you if you want to resume the project after opening.
Click YES to open and resume.
-orClick NO to open without resuming.
To exit the INTERRUPTED ENCODES window, click OK.
If an active project is open, you will return to the active project window. If there is no active project open, you will return to the main product window.
6.14 MONITORING AN ENCODING PROJECT IN PROGRESS
When you start encoding a project, the ENCODER PROGRESS window appears. From this
window, you can monitor the progress of the specific tasks within your encoding project.
At a glance you can see:
• The name of the current project.
• What time the encoding process started.
• Which task MPEG Power Professional™ is currently encoding.
You can also:
• View an image of the currently encoding frame.
• See which frame number is currently encoding out of a total number of frames.
• Get an estimate of when the current encoding task will be completed.
121
MPEG POWER PROFESSIONAL 2.0 MANUAL
The bottom half of the ENCODER PROGRESS window displays a synopsis of the current encoding activity. At a glance, you can see what parameters MPEG Power Professional™ is using to
encode the current task. Once the current encoding project is complete (all of the encoding tasks
have been completed), a log file of this encoding activity can be accessed from the project
window.
6.15 IMPORTING SOURCE FILES
MPEG Power Professional™ supports digital input from all major nonlinear editing systems:
• QuickTime (and all NLE systems using the QuickTime Export Interface API)
• Media 100™
• Avid Media Composer™ and .omf files
• Adobe After Effects™
• AVI
122
QUICK REFERENCE TOPICS: PROJECT ENCODING BASICS
MPEG Power Professional™ uses the source files as digital video and audio source material to
produce these MPEG files:
.abs (audio only)
.vbs (video only)
.mpg (multiplexed encode)
.msp (still picture)
.ecl (analysis only)
There are three common ways to import source files from your nonlinear editor:
1. Transfer data by some physical medium such as a removable drive or digital tape:
Examples include Bernoulli™, ZIP™, or Jaz™ drives.
Advantage: Reliable data transfer.
Disadvantage: Large video files may exceed the capacity of some removable medium.
2. Transfer data over a local network.
Advantage: Large file sizes can be accommodated without the need to write to an external
tape drive.
Disadvantage: Getting your Windows™ encoding workstation to "talk" to Mac-based editing
systems can be difficult.
3. Leave the data on the encoding workstation and encode remotely.
Advantage: Avoid copying data and save drive space on the encoding workstation.
Disadvantage: Editing system could "disappear" from the network in the middle of the
encoding process because some editing systems shut off networking while they are running.
To add a source file to an encoding task:
1. Select INSERT TASK from the PROJECT menu or click the INSERT TASK on the project toolbar..
The ENCODE DEFINITIONS window will appear.
2. Type a file name in the SOURCE FILE box or browse for the location of the source
file by clicking the browse (Windows™) or SELECT (Macintosh™) button.
123
MPEG POWER PROFESSIONAL 2.0 MANUAL
6.16 THE ENCODE DEFINITIONS WINDOW
In the ENCODE DEFINITIONS window, you can:
• Define new encoding tasks.
• Edit existing encoding tasks.
The ENCODE DEFINITIONS window can be accessed from any active project window.
To insert a new task:
Select INSERT TASK from the PROJECT menu or click on the INSERT TASK icon on the project
toolbar.
124
QUICK REFERENCE TOPICS: PROJECT ENCODING BASICS
To Edit an existing task:
Highlight and double-click on an existing task in the active project window.
-orSelect EDIT TASK from the PROJECT menu.
-orClick on the EDIT TASK icon on the project toolbar.
To define an encoding task, you must define each of the following options:
• An encoding task type (VIDEO ENCODE, AUDIO ENCODE, MULTIPLEXED ENCODE, STILL
PICTURE, ANALYSIS ONLY).
• A SOURCE FILE (.mov, .omf, .abs, .vbs)
• A DESTINATION FILE name and location (.abs, .vbs, .mpg, .msp, or .ecl)
• An encoding BASE TEMPLATE.
Click on the EDIT SETTINGS button to access all of the user-definable encoder settings.
6.17 CREATING MULTIPLEXED MPEG FILES WITH SINGLE .ABS AND .VBS
SOURCE FILES
Within MPEG Power Professional™, you can create .mpg files by combining related .abs (audio
only) and .vbs (video only) files. The process of combining these source files together is called
multiplexing or muxing.
As with all encoding tasks processed in MPEG Power Professional™, you first create an encoding
project in which to multiplex source files:
1. Create a new project or open an existing project.
2. Select INSERT TASK from the PROJECT menu or click the INSERT TASK icon on the
project toolbar.
3. Add your SOURCE FILES to the ENCODE DEFINITIONS window
4. Choose MULTIPLEXED ENCODE from the ENCODING TASK box.
5. Choose a BASE TEMPLATE from the list of encoding templates.
6. Choose a destination and a name for your .mpg file. Browse for an appropriate folder and
name the file.
125
MPEG POWER PROFESSIONAL 2.0 MANUAL
REMEMBER: When you are multiplexing together an audio file and a video file, select a BASE
TEMPLATE with a mux rate large enough to accommodate the combined bit rates of the source
files, or customize your bit rate by changing the BIT RATE on the VIDEO1 tab.
7. Click OK to add this task to your encoding project.
8. Save your project by selecting SAVE AS from the FILE menu or click the SAVE icon on the
toolbar
9. Select START ENCODING from the PROJECT menu or click the START ENCODING icon on
the project toolbar.
The ENCODER PROGRESS window will appear with the information about the current encoding task.
126
QUICK REFERENCE TOPICS: PROJECT ENCODING BASICS
6.18 CREATING MULTIPLEXED MPEG FILES WITH MULTIPLE SOURCE FILES
Within MPEG Power Professional™, you can create .mpg files by combining related .abs and .vbs
files. The process of combining these source files together is called multiplexing or muxing.
Most often, a multiplexed .mpg file contains one .abs file and/or one .vbs file as described in
Chapter 2. Sometimes an application calls for combining more than one audio file and more than
one video file together into a single .mpg file.
To multiplex several audio and/or video streams:
1. Create or open an encoding project.
2. Select INSERT TASK from the PROJECT menu or click the INSERTTASK icon on the
project toolbar.
3. Add SOURCE FILES by browsing for their location or typing in the file name and path.
4. Select MULTIPLEXED ENCODE as the encoding task type.
5. Select a BASE TEMPLATE.
6. Select a DESTINATION FILE name with a .mpg file extension.
7. Click OK. You will return to the active project window.
8. Select SAVE from the FILE menu or click the SAVE icon on the toolbar.
9. Select START ENCODING from the PROJECT menu or click the START ENCODING icon on the
project toolbar when you are ready to start encoding this project.
Adding multiple .vbs files (video) is handled the same way as adding multiple .abs files (audio). In
all cases, you must create all of your source files first, by setting up related encoding tasks. Once
you have encoded all of your source .abs file and .vbs files, you can add up to 32 .abs files and
up to 16 .vbs files to the same .mpg file by following the steps outlined above.
WARNING: An .mpg file that complex may not even be playable from a 4X or 6X CD-ROM drive.
Before creating MPEG files containing multiple audio and video files, take the time to calculate the
projected total bit rate of your finished system file (add the bit rates for each separate audio and
video source file together) and determine whether or not it will be payable from your target playback platform.
WARNING: Some MPEG playback devices do not provide explicit configuration options to switch
between multiple audio/video streams in an MPEG file. You may need to write special MCI commands to do this. Additionally, in a multiplexed encode, reordering your elementary streams will
govern the stream IDs assigned to the finished multiplexed encode.
127
MPEG POWER PROFESSIONAL 2.0 MANUAL
6.19 SOURCE FILE CONCATENATION
To concatenate source files:
1. Select INSERT TASK from the PROJECT menu or click the INSERTTASK icon on the project
toolbar. The ENCODE DEFINITIONS window will appear
2. Insert your first SOURCE FILE by typing the path or browsing for your source.
3. Insert each additional SOURCE FILE in the same manner.
4. Highlight your second SOURCE FILE.
5. Click the +/- button.
An arrow with a plus sign will appear in the box indicating the concatenation.
Repeat steps 4 and 5 to concatenate each additional source file.
6. Choose your ENCODING TASK.
7. Choose your BASE TEMPLATE.
8. Name your DESTINATION FILE.
9. Click OK (You return to the project window.)
10.SAVE your project and START ENCODING.
128
QUICK REFERENCE TOPICS: PROJECT ENCODING BASICS
WARNING: For proper encoding behavior, all concatenated sources should be of the same type,
format, and resolution. Additionally, neither audio only (.abs) nor video only (.vbs) files should be
concatenated.
129
MPEG POWER PROFESSIONAL 2.0 MANUAL
6.20 ENCODING A STILL PICTURE (.MSP)
MPEG still pictures are often used to create menu buttons or background screens in CDi applications.
There are two ways to encode still pictures:
• Export a single frame of video from your nonlinear editing system as a source file.
• Select a single frame from a larger source file using a START ENCODING event in an .ecl file.
If you are encoding several MPEG still pictures from the same source material, the latter is the
most efficient method.
To encode a still picture:
1. Select INSERT TASK from the PROJECT menu or click the INSERTTASK icon on the project
toolbar.
2. Select and add your SOURCE FILE.
3. Select STILL PICTURE from the ENCODING TASK box.
4. Select a BASE TEMPLATE.
5. Name your DESTINATION FILE.
6. Click the USE ECL FILE checkbox.
7. Click the EDIT ENCODE CONTROL LIST button.
8. Enter the frame number in the EVENT FRAME NUMBER box.
9. Highlight the START ENCODING event from the EVENTS AVAILABLE box and click the
ADD button.
130
QUICK REFERENCE TOPICS: PROJECT ENCODING BASICS
Once you have selected the intended frame and inserted the corresponding START ENCODING
event, you must save the file and return to the project window.
10. Choose SAVE AS to save this ECL file.
11. Click OK to return to the ENCODE DEFINITIONS window.
12. Click OK.
13. SAVE your project.
For every still picture you want to encode, you must create a separate encoding task using the
above guidelines. Several still picture encoding tasks can be included in the same project regardless of whether or not they are based on the same source material, but only one still picture can
be included in a single encoding task.
131
MPEG POWER PROFESSIONAL 2.0 MANUAL
6.21 THE ECL EDITOR BY TIMECODE WINDOW
The ECL EDITOR-BY TIMECODE window displays a chronological listing of all the encoding
events included in an .ecl file.
You can add encoding events by highlighting an event from the EVENTS AVAILABLE list, typing in
a corresponding frame number or timecode entry, and clicking on the ADD button.
You can also remove encoding events from the timeline, by highlighting an event in the timeline
and clicking on the REMOVE button.
From this window you can:
• Click on the BY FRAME button to switch to the ECL EDITOR-BY FRAME view.
• Click on the OPEN button to open an existing .ecl file.
• Click on the SAVE AS button to save the current .ecl file.
• Click on the OK button to close the ECL EDITOR and return to the ENCODE DEFINITIONS
window. You will be prompted to save any changes you have made to the active .ecl file since
you opened it.
• Click on the CANCEL button to close the ECL EDITOR without saving changes you have made
since you opened the active .ecl file.
6.22
THE ECL EDITOR BY FRAME WINDOW
The ECL EDITOR-BY FRAME window displays a bitmap of a specific event in the encoding timeline.
In the ECL EDITOR-BY FRAME window, you can:
• Add encoding events by highlighting an event from the EVENTS AVAILABLE list, typing in a
corresponding frame number or timecode entry, and clicking on the ADD button.
• Add encoding events by stepping through the video one frame at a time or ten frames at a
time to find the desired frame for the encoding event, highlighting an event from the EVENTS
AVAILABLE list and clicking on the ADD button.
• Step through the video source one frame at a time, ten frames at a time, or from encoding `
event to encoding event, using the navigation buttons adjacent to the frame viewer.
The outside button on either side allows you to step through the video source, skipping from
encoding event to encoding event in the timeline.
The middle of the three buttons on either side allows you to step through the video source file ten
frames at a time. The innermost button on either side allows you to step through the video source
one frame at a time.
132
QUICK REFERENCE TOPICS: PROJECT ENCODING BASICS
• Use the slider bar to move through the large portions of the video and narrow the search for a
particular frame.
• Remove encoding events from the timeline, by highlighting an event in the timeline and clicking
on the REMOVE button.
From this window you can:
• Click on the BY TIMECODE button to switch to the ECL EDITOR-BYTIMECODE view.
• Click on the OPEN button to open an existing .ecl file.
• Click on the SAVE AS button to save the current .ecl file.
• Click on the OK button to return to the ENCODE DEFINITIONS window.
• Click on the CANCEL button to close the ECL EDITOR window without saving changes you
have made since you opened the active ECL file.
133
MPEG POWER PROFESSIONAL 2.0 MANUAL
6.23
ANALYSIS AND .ECL FILES
ECL stands for Encode Control List. An .ecl file contains a list of encoding events tailored to a
particular video source. Encoding events fall into these categories:
• Filters
• Search Distances
• Search Techniques
• Other (includes COMMENT, INJECT I-FRAME, INJECT ENTRY POINT, START ENCODING, and
STOP ENCODING)
The following encoding events are available:
• Inject I-frame
• Median Filter ON
• Median Filter OFF
• FIR filter ON
• FIR filter OFF
• Gamma filter ON
• Gamma filter OFF
• Non-linear filter ON
• Non-linear filter OFF
• Light Non-linear ON
• Heavy Non-linear ON
• Inject Entry Point
• Set Short Range Search
• Set Medium Range Search
• Set Long Range Search
• Set Extended Range Search
• Inverse Telecine Phase Change
• Set Log Search
• Set Hybrid Search
• Set Two Pass Search
• Set Complete Search
• Start Encoding
• Stop Encoding
• Comment
• Adjust Average Bit Rate
• Interfield Search ON
• Interfield Search OFF
• Half Pel Search ON
• Half Pel Search OFF
134
QUICK REFERENCE TOPICS: PROJECT ENCODING BASICS
There are three ways to use analysis to aid the compression of your video source material:
• Create an analysis only task that is processed separately from a subsequent video encoding task.
• Select the AUTO ANALYZE checkbox on the VIDEO2 tab.
• Combine the results of an edited ECL file with the AUTO ANALYZE option.
When MPEG Power Professional™ analyzes your source video, it looks for information that can
be useful to the encoding process, including the location of cuts, titling, fades, wipes, etc. This
information is used to create corresponding encoding events, which will be used during the
encoding process in an effort to enhance the image quality of the MPEG files that are produced.
The type of analysis you choose depends on whether or not you want to be able to edit the
encoding events suggested by an analysis of your video source:
• Choose ANALYSIS ONLY if you wish to edit the encoding events generated by MPEG Power
Professional™ prior to encoding.
• Choose AUTO ANALYZE if you want MPEG Power Professional™ to analyze your video and
encode it within the same encoding task.
• Choose USE ECL FILE and check AUTO ANALYZE if you want to combine the results of an
analysis only encoding pass with the auto analyze feature.
TIP: Combining a manually generated or edited .ecl file with the AUTO ANALYZE feature can
save you time and labor. Typically, an analysis of your video source will produce an encoding
event timeline with a framework of auto I-frame injections at scene changes and telecine phase
change suggestions if you have selected INVERSE TELECINE as an encoding parameter. You
can use a manually generated .ecl file to define more complex encoding events such as entry
point injection and start encoding and stop encoding events, then combine the .ecl file with the
AUTO ANALYZE feature. MPEG Power Professional™ merges the results of your .ecl file with
the analysis results, always defaulting to your manually generated .ecl file if there is a conflict
between its events and the events suggested by auto analysis.
135
MPEG POWER PROFESSIONAL 2.0 MANUAL
To Auto Analyze while Encoding:
MPEG Power Professional™ will run an analysis pass just before it starts encoding the video.
Any encoding events it suggests will automatically be applied during the subsequent encoding
phase.
1. Create a video only encoding task within a new or existing project.
2. Click on the EDIT SETTINGS button in the ENCODE DEFINITIONS window.
3. Click on the VIDEO2 tab of the ENCODER SETTINGS window.
4. Click on the checkbox labeled AUTO ANALYZE.
5. Click OK to return to the ENCODE DEFINITIONS window.
6. Click OK.
7. SAVE the project file.
8. Select START ENCODING from the PROJECT menu or click the START ENCODING icon on
the project toolbar.
136
QUICK REFERENCE TOPICS: PROJECT ENCODING BASICS
To process an Analysis Only task:
1. Create a new encoding project or open an existing encoding project.
2. Select INSERT TASK from the PROJECT menu or click the INSERT TASK icon on the project
toolbar.
3. In the ENCODE DEFINITIONS window:
• Select ANALYSIS ONLY as the task type.
• Add your video file to the list of SOURCE FILES.
• Choose an encoding BASE TEMPLATE.
• Name a DESTINATION FILE.
(The destination file extension will default to .ecl, which stands for ENCODE CONTROL LIST.)
4. Click OK to save the task and add it to the current encoding project file.
5. SAVE the project file.
6. When you are ready to begin the analysis, select START ENCODING from the PROJECT menu
or click the START ENCODING icon on the project toolbar.
137
MPEG POWER PROFESSIONAL 2.0 MANUAL
138
CHAPTER 7
REFERENCE TOPICS: ADVANCED ENCODING OPTIONS
AND SPECIALIZED TASKS
MPEG POWER PROFESSIONAL 2.0 MANUAL
7.1 CHAPTER TABLE OF CONTENTS
7.1
7.2
7.3
7.4
7.5
7.6
7.7
7.8
7.9
7.10
7.11
7.12
7.13
7.14
7.15
7.16
7.17
7.18
7.19
7.20
7.21
7.22
7.23
7.24
7.25
7.26
7.27
7.28
7.29
7.30
7.31
7.32
140
Table of Contents
Editing a Built-in Template
Saving a Custom Template
Restoring the Built-in Template Default Settings
Adjusting Audio Bit rates
Adjusting Video Bit rates
Adjusting the Display Resolution
Applying Global Filters
Applying Filters to Sections of Source Video via the ECL
Adjusting Search Techniques and Search Distances
Encoding Smaller Sections of Source .omf or .mov files via the ECL
Cropping Source Video
Manually Creating an ECL
Editing an Auto-Generated or Manually Created ECL
Using an .ecl File with a Task
Injecting I-frames
Injecting Entry Points
Adjusting GOP Size (N)
Adjusting Reference Interval (M)
Closed GOP
Adjusting Aspect Ratio
Adjusting VBV Size
Adjusting Frame Rate
Creating a VOB
Initial Clock Reference and Easy CD Creator
Multiplex Audio/Video MPEG elementary streams
Encoding from a Series of Still Image Files
Source File Concatenation
Encoding a Video CD
Aspect Ratio Chart for MPEG1 and MPEG2
Tips to Help You Make the Fastest Encodes.
Tips to Help You Make the Highest Quality Encodes.
140
141
142
143
144
145
145
146
147
148
149
150
151
152
152
152
153
154
155
155
156
157
158
159
159
160
160
162
163
164
164
165
ADVANCED TOPICS AND SPECIALIZED TASKS
7.2
EDITING A BUILT-IN TEMPLATE
You can edit a built-in template by choosing the EDIT SETTINGS button from the ENCODE
DEFINITIONS window.
1.
2.
3.
4.
5.
6.
7.
Create a new project or open an existing project.
Insert a new task or edit an existing task.
In the ENCODE DEFINITIONS window, highlight a base template.
Click the EDIT SETTINGS button.
The ENCODER SETTINGS window will appear.
Make desired changes on the five ENCODER SETTINGS tabs.
Click OK at the bottom of the ENCODER SETTINGS window.
141
MPEG POWER PROFESSIONAL 2.0 MANUAL
7.3 SAVING A CUSTOM TEMPLATE
You may save a custom-built template on the TEMPLATE tab of the ENCODE SETTINGS window.
142
1.
2.
3.
4.
5.
Create a new project or open an existing project.
Insert a new task or edit an existing task.
Click the EDIT SETTINGS button from the ENCODE DEFINITIONS window.
Make desired changes to the template in the ENCODE SETTINGS window.
Click the TEMPLATE tab in the ENCODE SETTINGS window.
6.
7.
8.
9.
Enter a new name for your template.
Enter notes in the NOTES box if you desire.
Choose your USER FLAG, either none, PAL SPECIFIC, or NTSC SPECIFIC.
Click the SAVE TEMPLATE button.
ADVANCED TOPICS AND SPECIALIZED TASKS
7.4
RESTORING THE BUILT-IN TEMPLATE DEFAULT SETTINGS
At any point during the template editing process, you may discard all changes since the last
saved version by using the RESTORE FROM BASE TEMPLATE function. This option will only be
available to you if you have made changes since the last saved version.
1. Click the EDIT SETTINGS button from the ENCODE DEFINITIONS window.
2. Click the RESTORE FROM BASE TEMPLATE button on the TEMPLATE tab of the
ENCODER SETTINGS window.
3. Click OK to return to the ENCODE DEFINITIONS window.
143
MPEG POWER PROFESSIONAL 2.0 MANUAL
7.5 ADJUSTING AUDIO BIT RATES
You can adjust the audio BIT RATE from the AUDIO tab of the ENCODER SETTINGS window.
The available options range from 32 to 384 kilobits per second. You can also adjust the audio
mode. The available audio mode options are MONO, STEREO, and DUAL CHANNEL.
1. Create a new project or open an existing project.
2. Insert a new task or edit an existing task.
3. From the ENCODE DEFINITIONS window, click the EDIT SETTINGS button. The ENCODER
SETTINGS window will appear.
4. Click on the AUDIO tab.
5. Choose the bit rate from the BIT RATE box.
6. Choose the appropriate audio mode from the MODE box.
7. Click OK.
TIP: Music requires higher bit rates, while voices can be successfully encoded at lower bit rates.
144
ADVANCED TOPICS AND SPECIALIZED TASKS
7.6
ADJUSTING VIDEO BIT RATES
You can adjust the video bit rate from the VIDEO1 tab of the ENCODER SETTINGS window.
1.
2.
3.
4.
5.
6.
Create a new project or open an existing project.
Insert a new task or edit an existing task.
From the ENCODE DEFINITIONS window, click the EDIT SETTINGS button.
Click the VIDEO1 tab.
Enter the video bit rate in the BIT RATE box.
Click OK.
WARNING: Setting the video bit rate too high might create an MPEG file that cannot be played on
your target playback system!
MPEG Power Professional™ 2.0 - DVD allows VARIABLE BIT RATE encoding. When using the
VBR option, you specify a MAXIMUM bit rate and an AVERAGE bit rate. The bandwidth required
to display the video will vary over the course of the sequence, but will never go above your maximum and, overall, will average out to the average bit rate you specified. You can achieve significant quality improvements over CONSTANT BIT RATE encoding for the same number of bytes in
an encoded file, or significantly smaller file sizes for a given bit rate. This type of encoding is recommended for DVD use.
7.7 ADJUSTING THE DISPLAY RESOLUTION
You can adjust the DISPLAY RESOLUTION of your MPEG clip on the VIDEO1 tab of the
ENCODER SETTINGS window.
1. Create a new project or open an existing project.
2. Insert a new task or edit an existing task.
3. From the ENCODE DEFINITIONS window, click the EDIT SETTINGS button. The ENCODER
SETTINGS window will appear.
4. Click the VIDEO1 tab.
5. Enter the picture WIDTH and HEIGHT values in the DISPLAY RESOLUTION box.
6. Click OK.
WARNING: For MPEG1 NTSC hardware decoders, when changing the default display resolutions, you may want to keep in mind that your picture will generally look best if encoded at a resolution less than or equal to your source media. In practice, most MPEG1 NTSC hardware playback devices treat 352x240 as the standard display resolution, and may not be capable of displaying files larger than this. This warning does not apply to MPEG1 PAL using these same hardware decoders or to any other type of MPEG decoder.
145
MPEG POWER PROFESSIONAL 2.0 MANUAL
7.8 APPLYING GLOBAL FILTERS
You can change your global filter settings from the VIDEO1 tab of the ENCODE DEFINITIONS
window. The available filter choices are AUTO, MEDIAN, FIR, and NONLINEAR.
1. Create a new project or open an existing project.
2. Insert a new task or edit an existing task.
3. From the ENCODE DEFINITIONS window, click the EDIT SETTINGS button. The ENCODER
SETTINGS window will appear.
4. Click the VIDEO1 tab.
5. In the GLOBAL FILTERS box, check off the filters that you wish to apply to your entire video
stream during encoding.
6. Click OK.
146
ADVANCED TOPICS AND SPECIALIZED TASKS
7.9
APPLYING FILTERS TO SECTIONS OF SOURCE VIDEO VIA THE ECL
You can insert events into an ECL created by the ANALYSIS ONLY option, or you can insert
events into an ECL which you construct yourself.
1.
2.
3.
4.
6.
Create a new project or open an existing project.
Insert a new task or edit an existing task.
Click the USE ECL FILE checkbox.
Click the EDIT ECL button.
Enter the EVENT FRAME NUMBER or the EVENT TIMECODE of the frame where you wish to
start applying the filter.
7. Select the desired "ON" filter event from the EVENTS AVAILABLE list.
8. Click ADD.
9. Enter the EVENT FRAME NUMBER or EVENT TIMECODE of the frame where you wish to stop
applying the filter.
10.Select the desired "OFF" filter event.
11.Click ADD.
147
MPEG POWER PROFESSIONAL 2.0 MANUAL
7.10
ADJUSTING SEARCH TECHNIQUES AND SEARCH DISTANCES
You can adjust the SEARCH TECHNIQUE and the SEARCH DISTANCE values found on the
VIDEO1 tab of the ENCODER SETTINGS window. The available options for SEARCH
TECHNIQUE are AUTO, LOG, COMPLETE, TWO PASS, and HYBRID. The available options for
SEARCH DISTANCE are AUTO, SHORT, MEDIUM, LONG, and EXTENDED.
1.
2.
3.
4.
5.
6.
Create a new project or open an existing project.
Insert a new task or edit an existing task.
From the ENCODE DEFINITIONS window, click the EDIT SETTINGS button.
Click the VIDEO1 tab.
Choose the desired SEARCH TECHNIQUE from the pull-down menu.
Choose the desired SEARCH DISTANCE from the pull-down menu.
7. Click OK.
TIP: If your video has little motion (such as a duck floating on a pond), you should set your
SEARCH DISTANCE to a smaller value. If your video contains more dynamic content (such as a
race car), set your SEARCH DISTANCE to a larger value. If your video has a lot of chaotic motion
(such as an explosion), then set your SEARCH DISTANCE to AUTO or MEDIUM.
148
ADVANCED TOPICS AND SPECIALIZED TASKS
7.11 ENCODING SMALLER SECTIONS OF SOURCE .OMF OR .MOV FILES
VIA THE ECL
You can encode a portion of a source clip by setting the start and end encode points manually in
the ECL EDITOR-BY TIMECODE window.
1. Create a new project or open an existing project.
2. Insert a new task or edit an existing task.
3. Select your video SOURCE FILE.
4. Click the USE ECL FILE checkbox.
5. Click the EDIT ECL button.
6. Enter the FRAME NUMBER or TIMECODE of the frame where you want to start the encode.
7. Choose START ENCODING from the EVENTS AVAILABLE list, then click ADD.
8. Enter the FRAME NUMBER or TIMECODE of the frame where you want to end the encode.
9. Choose STOP ENCODING from the EVENTS AVAILABLE list, then click ADD.
10.Click OK.
149
MPEG POWER PROFESSIONAL 2.0 MANUAL
7.12
CROPPING SOURCE VIDEO
You can crop your source video to remove unwanted effects around the edges. You can change
the source crop settings from the VIDEO1 tab of the ENCODER SETTINGS window.
1.
2.
3.
4.
5.
6.
1.
2.
3.
4.
5.
6.
7.
8.
Create a new project or open an existing project.
Insert a new task or edit an existing task.
From the ENCODE DEFINITIONS window, click the EDIT SETTINGS button.
Click the VIDEO1 tab.
Enter the desired X, Y, dX and dY values in the SOURCE CROP box.
Click OK.
-orCreate a new project or open an existing project.
Insert a new task or edit an existing task.
From the ENCODE DEFINITIONS window, click the EDIT SETTINGS button.
Click the VIDEO1 tab.
In the SOURCE CROP box, click the DISPLAY FRAME button.
Enter a reference frame number and click the VIEW button.
Holding the left mouse button down, drag a box over the region of the image you wish to crop.
Click OK.
TIP: You’ll get better picture quality if your cropped source resolution is an even multiple of your
target display resolution.
150
ADVANCED TOPICS AND SPECIALIZED TASKS
7.13 MANUALLY CREATING AN ECL
You can create your own ECLby constructing one from events in the ECLEDITOR-BYTIMECODEwindow.
1.
2.
3.
4.
5.
6.
7.
8.
9.
Create a new project or open an existing project.
Insert a new task or edit an existing task.
Click the USE ECL file checkbox.
Click the EDIT ECL button.
Make the desired changes to your ECL.
Click the SAVE AS button.
Enter the name of your file and click SAVE.
Click OK.
Put the name of your file in the USE ECL FILE box of the ENCODE DEFINITIONS window.
151
MPEG POWER PROFESSIONAL 2.0 MANUAL
7.14 EDITING AN AUTO-GENERATED OR MANUALLY CREATED ECL
You can edit an ECL by making changes in the ECL EDITOR-BY TIMECODE window.
1.
2.
4.
5.
6.
7.
8.
9.
Create a new project or open an existing project.
Insert a new task or edit an existing task.
Click the USE ECL FILE checkbox.
Type in an .ecl file name.
Click the EDIT ECL button.
Make desired changes to your ECL.
Click the SAVE AS button.
Click OK.
7.15
USING AN .ECL FILE WITH A TASK
You can specify which ECL a task should use while encoding. This is done in the ENCODE
DEFINITIONS window. MPEG Power Professional™ will use this .ecl file as it encodes your clip.
1. Click the USE ECL FILE checkbox.
2. Enter the name of the .ecl file you wish to use.
3. Click OK.
7.16
INJECTING I-FRAMES
You may inject an I-frame into your MPEG clip from the ECL EDITOR-BY TIMECODE window.
1.
2.
3.
4.
5.
Create a new project or open an existing project.
Insert a new task or edit an existing task.
Click the USE ECL FILE checkbox.
Click the EDIT ECL button.
Enter the EVENT FRAME NUMBER or EVENT TIME CODE of the frame at which you wish to
insert an I-frame.
6. Choose INJECT I-FRAME from the EVENTS AVAILABLE list.
7. Click ADD.
TIP: Insert I-frames at scene changes to improve image quality. An I-frame will be automatically
inserted whenever an entry point is inserted into the ECL.
152
ADVANCED TOPICS AND SPECIALIZED TASKS
7.17 INJECTING ENTRY POINTS
You can inject an entry point into the ECL from the ECL EDITOR-BY TIMECODE window.
1.
2.
3.
4.
5.
6.
7.
Create a new project or open an existing project.
Insert a new task or edit an existing task.
Click the USE ECL FILE checkbox.
Click the EDIT ECL button.
Enter the FRAME NUMBER or TIMECODE of the frame at which you wish to insert an entry point.
Choose INJECT ENTRY POINT from the EVENTS AVAILABLE list.
Click ADD.
TIP: Whenever an entry point is inserted, a sequence header and an I-frame will also be injected.
153
MPEG POWER PROFESSIONAL 2.0 MANUAL
7.18
ADJUSTING GOP SIZE (N)
You can adjust the GOP size from the VIDEO2 tab of the ENCODER SETTINGS window.
1.
2.
3.
4.
5.
6.
Create a new project or open an existing project.
Insert a new task or edit an existing task.
Click the EDIT SETTINGS button.
Click the VIDEO2 tab.
Enter the desired GOP value in the GOP SIZE box.
Click OK.
WARNING: The GOP value must be a multiple of the REFERENCE INTERVAL value.
154
ADVANCED TOPICS AND SPECIALIZED TASKS
7.19 ADJUSTING REFERENCE INTERVAL (M)
You can adjust the REFERENCE INTERVAL size from the VIDEO2 tab of the ENCODER
SETTINGS window.
1.
2.
3.
4.
5.
6.
Create a new project or open an existing project.
Insert a new task or edit an existing task.
Click the EDIT SETTINGS button.
Click the VIDEO2 tab.
Enter the desired value in the REFERENCE INTERVAL box.
Click OK.
WARNING: The REFERENCE INTERVAL value must be a factor of the GOP value.
7.20 CLOSED GOP
You can create a closed GOP on the VIDEO2 tab of the ENCODER SETTINGS window.
This feature is useful to you if you are making a DVD with multi-angle camera shots or may be
required by some authoring systems.
1. Create a new project or open an existing project.
2. Insert a new task or edit an existing task.
3. Click on the EDIT SETTINGS button.
4. Click on the VIDEO2 tab.
5. Click on the CLOSED GOP checkbox.
6. Click OK.
155
MPEG POWER PROFESSIONAL 2.0 MANUAL
7.21 ADJUSTING ASPECT RATIO
You can adjust the ASPECT RATIO from the VIDEO2 tab of the ENCODER SETTINGS window.
1.
2.
3.
4.
5.
6.
Create a new project or open an existing project.
Insert a new task or edit an existing task.
Click the EDIT SETTINGS button.
Click the VIDEO2 tab.
Choose a value from the ASPECT RATIO box.
Click OK.
MPEG1 templates have more ASPECT RATIO choices than do MPEG2 templates. The ASPECT
RATIO list shown for MPEG2 templates differs quite a bit from the list shown for MPEG1
templates. Reference aspect ratios for MPEG2 sequences refer to the ratio of the display.
156
ADVANCED TOPICS AND SPECIALIZED TASKS
7.22
ADJUSTING VBV SIZE
You can adjust the VBV buffer size from the VIDEO2 tab of the ENCODER SETTINGS window.
1.
2.
3.
4.
5.
6.
Create a new project or open an existing project.
Insert a new task or edit an existing task.
Click the EDIT SETTINGS button.
Click the VIDEO2 tab.
Enter the desired value in the VBV SIZE box (in units of 16 kb).
Click OK.
WARNING: Changing the VBV SIZE may produce an MPEG clip that is not playable on your playback device. Make sure your VBV setting is compatible with your playback device.
157
MPEG POWER PROFESSIONAL 2.0 MANUAL
7.23 ADJUSTING FRAME RATE
You can adjust the FRAME RATE from the VIDEO2 tab of the ENCODER SETTINGS window.
1. Create a new project or open an existing project.
2. Insert a new task or edit an existing task.
3. Click the EDIT SETTINGS button.
4. Click on the VIDEO2 tab.
5. Choose a value from the FRAME RATE pull-down list.
6. Click OK.
WARNING: This will force an override to the coded display rate. It will not frame rate convert
your source media between NTSC/PAL, but may aid in compatibility with some media.
158
ADVANCED TOPICS AND SPECIALIZED TASKS
7.24 CREATING A VOB
You can create a VOB using the Video Object Multiplexing feature on the MULTIPLEX tab.
Please note that this feature is only functional with MPEG Power Professional™ DVD and
Transport.
1. Create a new project or open an existing project.
2. Insert a new task or edit an existing task.
3. Select the SOURCE FILE(S) you wish to encode.
4. Choose your ENCODING TASK.
5. Choose either the DVD or DVD PAL base template.
6. Name your DESTINATION FILE.
7. Click OK.
8. SAVE your project and START ENCODING.
WARNING: VOB files may not play back on normal MPEG2 players.
7.25 INITIAL CLOCK REFERENCE AND EASY CD CREATER
Some Video CD authoring packages may specify a required INITIAL CLOCK REFERENCE or
FIRST PRESENTATION TIME STAMP. Use these controls to specify the required clock value in
units of 90,000 Hz. One Adaptec engineer has recommended an INITIAL CLOCK REFERENCE
of 1200 for Video CD streams for best compatibility with Easy CD Creator. Check the recommendations of your authoring package for appropriate values if you experience difficulty using MPEG
streams with other applications.
159
MPEG POWER PROFESSIONAL 2.0 MANUAL
7.26 MULTIPLEX AUDIO/VIDEO MPEG ELEMENTARY STREAMS
An Audio/Video MPEG Elementary Stream is nothing more than an audio only (.abs) or video only
(.vbs) encoded file. If you have separate audio and video files that you need to multiplex together
into one MPEG file, following the steps outlined below. This process will work for all audio / video
streams encoded using MPEG Power Professional™, as well as some other MPEG encoders.
1. Select NEW from the FILE menu.
2. Select INSERT TASK from the PROJECT menu or click the INSERT TASK icon on the
project toolbar. The ENCODE DEFINITIONS window will appear.
3. Type the name of the audio source file in the SOURCE FILE box (or browse for its location).
Repeat step 3 to add the video source file to the ENCODE DEFINITIONS window.
4. Choose MULTIPLEXED ENCODE from the ENCODING TASK box in the ENCODE
DEFINITIONS window.
5. Choose a BASE TEMPLATE.
6. Type a file name in the DESTINATION FILE box.
7. Click the OK button to include this task in your current encoding project.
8. Choose SAVE AS from the FILE menu or click the SAVE icon button on the toolbar.
9. Select START ENCODING from the FILE menu or click the START ENCODING icon on the
project toolbar.
The video and audio source files that you created in a previous encoding project will be multiplexed together into one MPEG file.
7.27 ENCODING FROM A SERIES OF STILL IMAGE FILES
MPEG Power Professional™ has the ability to read Targa files to create MPEG files from still
image frames. In order to encode a Targa sequence, follow the steps outlined below.
1. Select NEW from the FILE menu.
2. Select INSERT TASK from the PROJECT menu or click the INSERT TASK icon on the
project toolbar. The ENCODE DEFINITIONS window will appear.
3. Select your SOURCE FILE. To do this with a Targa sequence, you will need to choose a .tga
file with a number in the file name. All of the other sequentially numbered frames must be in
the same directory as the source file you designate. All frames in the directory will be encoded
regardless of the frame number that you choose.
4. Choose your ENCODING TASK.
5. Choose a BASE TEMPLATE.
160
ADVANCED TOPICS AND SPECIALIZED TASKS
6. Name your DESTINATION FILE.
7. Save your project by clicking the SAVE icon on the toolbar or choose SAVE AS from the FILE
menu.
8. Start your encode by clicking the START ENCODE icon or choose START ENCODING from
the PROJECT menu.
If you do not want to encode all of the .tga frames that are listed in the same directory as your
selected source file, use the ECL EDITOR to specify to the encoder where it should start and stop
encoding.
To specify this in the ECL editor:
1. Select the USE ECL FILE checkbox in the ENCODE DEFINITIONS window.
2. Click on EDIT ENCODE CONTROL LIST.
The ECL EDITOR-BY TIMECODE window will appear.
3. Type the frame number where you want the encoding to begin in the FRAME NUMBER box.
4. Highlight START ENCODING from the EVENTS AVAILABLE list and click ADD.
5. Type the frame where you want to stop encoding in the FRAME box.
6. Highlight Stop Encoding from the EVENTS AVAILABLE list and click ADD.
7. Click on SAVE AS to save your .ecl file.
8. Click OK. This returns you to the ENCODE DEFINITIONS window. You will notice that your
newly created .ecl file appears in the window.
161
MPEG POWER PROFESSIONAL 2.0 MANUAL
7.28 SOURCE FILE CONCATENATION
MPEG Power Professional™ gives you the ability to easily concatenate your source files into one
MPEG file. Using the ability to lay files end to end and encode them, you can easily circumvent
the source file size restrictions imposed by the operating system on your computer.
To concatenate source files:
1. Select INSERT TASK from the PROJECT menu or click the INSERT TASK icon on the
project toolbar. The ENCODE DEFINITIONS window will appear
2. Insert your first source file by typing the path or browsing for your source.
3. Insert each additional source file in the same manner.
4. Highlight your second source file.
5. Click the +/- button.
An arrow with a plus sign will appear in the box indicating the concatenation. Repeat steps
4 and 5 for each additional source file youwish to concatenate.
6. Choose your ENCODING TASK.
7. Choose your BASE TEMPLATE.
8. Name your DESTINATION FILE
9. Click OK. You return to the Project window. SAVE your project and START ENCODING.
162
ADVANCED TOPICS AND SPECIALIZED TASKS
7.29 ENCODING A VIDEO CD
You can encode MPEG appropriate for Video CD by using the built-in templates in MPEG Power
Professional™. Additionally, you can make your Video CD Adaptec Toast™ compatible with the
click of a button.
To create a Video CD:
1. Select NEW from the FILE menu.
2. Select INSERT TASK from the PROJECT menu or click the INSERT TASK icon on the
project toolbar. The ENCODE DEFINITIONS window will appear.
3. Specify your SOURCE FILE.
4. Choose your ENCODING TASK.
5. Choose the VIDEO CD template.
6. Click the EDIT SETTINGS button.
7. Go to the MULTIPLEX tab.
8. Click the VIDEO CD button.
9. If you need to make a Toast compatible CD, click the TOAST COMPATIBLE checkbox.
10.Click OK. This returns you to the ENCODE DEFINITIONS window.
11.Enter the name of your DESTINATION FILE.
12.Save your project by choosing SAVE AS from the FILE menu or clicking the SAVE icon on
the toolbar.
13.Choose START ENCODING from the PROJECT menu or click on the START ENCODING
icon on the project toolbar.
TIP: One Adaptec engineer has recommended an INITIAL CLOCK REFERENCE of 1200 for
VideoCD streams for best compatibility with Adaptec Easy CD Creator. Check the recommendations of your authoring package for appropriate values if you experience difficulty using MPEG
streams with other applications.
163
MPEG POWER PROFESSIONAL 2.0 MANUAL
7.30 ASPECT RATIO CHART FOR MPEG1 AND MPEG2
MPEG1
Square Pels
0.6735
0.7031 (16:9 625-line)
0.7615
0.8055
0.8437 (16:9 525-line)
0.8935
0.9375 (720x576 at 4:3 = 0.9375)
0.9815
1.0255
1.0695
1.1250 (720x485 at 4:3 = 1.1134)
1.575
1.2015
MPEG2
Square Pels
4:3 display
16:9 display
2.21:1 display
7.31 TIPS TO HELP YOU MAKE THE FASTEST ENCODES
The following are some tips to help you make the fastest encodes, when time is a factor to you.
Please note that these tips are for the fastest encodes, not necessarily the highest quality
encodes.
• Crop your source to match your target dimensions, or an even multiple thereof.
• Choose HYBRID as your SEARCH TECHNIQUE.
• Choose a SHORT or MEDIUM SEARCH DISTANCE.
• Use ECL events to turn off HALF-PEL SEARCH
• Use ECL events to turn off INTERFIELD SEARCH
• Turn all GLOBAL FILTERS off
164
ADVANCED TOPICS AND SPECIALIZED TASKS
7.32 TIPS TO HELP YOU MAKE THE HIGHEST QUALITY ENCODES
The following are some tips to help you make the highest quality encodes, when quality is the
most important factor to you. Please note that using these tips may increase the time it takes for
your files to encode.
• AVOID SCALING -- Never scale your source up to a target resolution and avoid scaling down to
target resolution unless you specify an even multiple (ie, one half width, etc.) Instead, use cropping to better scale your video (i.e., 720x240x2 src ->MPEG1 by cropping center 704 horizontal
pels, then setting target resolution to 352 x 240 (resolution reduced by half each way.)
• Use noise free source. Avoid using filters if you don’t really need them; any filtering operation
will "muddy" your source signal to some extent.
• Use ECL events to match the encoder behavior to your source video content. Use LONG or
EXTENDED search ranges for parts of your sequences with high-speed motion. Use SHORT or
MEDIUM search ranges for parts of your video with little or slow motion to conserve bits.
• Analyzing your source video will inject I-frames for you, which results in better overall image quality.
• Raising your BIT RATE will result in better image quality in most cases, but will also result in a larger
file size.
165
MPEG POWER PROFESSIONAL 2.0 MANUAL
166
APPENDICES
MPEG POWER PROFESSIONAL 2.0 MANUAL
APPENDIX I – HOW MPEG WORKS
THREE IMPORTANT CHARACTERISTICS OF VIDEO
Video is simply a sequence of still images displayed or projected (quickly) in succession to one
another. As a result, the human mind is fooled into believing that people or objects in the presented sequence move. In terms of computers, there are three important characteristics of video:
• How fast each picture is displayed (frame rate).
• How many elements create each picture in both the horizontal and vertical dimensions
(frame size). This is normally given in terms of pixels.
• How many different colors the picture/pixel is made from.
Frame rate is the number of frames that are displayed to a viewer each second. For example, in
motion picture film in the United States it is common to display 24 frames each second. In color
television for the US home (called NTSC) 29.97 frames a second are displayed. Even though
computers are not normally thought of in terms of frame rates, most computers "refresh" the
screen by repainting every element of the screen as often as 72 times a second.
Frame size or number of picture elements is the next component of video. This is measured horizontally and vertically in pixels. "Pixels" also referred to as "Pels" are picture elements— the small
dots that make up the displayed picture. Some common dimensions, or resolutions numbers, in
the computer world include: 640 horizontal pixels x 480 vertical pixels, 1024 horizontal x 768 vertical, and 800 horizontal x 600 vertical pixels.
The number of colors that make up each picture or frame is the third component of video. As is
the case with a painter’s palette, a color can be described in terms of several "primary" colors. For
instance, when playing with paints as a child, mixing equal parts of red, yellow and blue created
black. By mixing these primary colors in different combinations, it is possible to produce any other
color. Color mixing works a bit differently with light than with paints, but we can still make any
color from three primaries. In the video world, however, we substitute green for yellow in our "primary" color palette.
168
APPENDICES
RED
A Video Color Palette
BLUE
GREEN
In mixing colors of light, we vary the amount of red, green and blue light that makes up the color
of a pixel. To make video practical, it is necessary to limit the number of differing shades of red,
green, or blue that can be generated. This puts an upper limit on the total number of colors that
video can recreate. Here is an example of a common digital color scheme. Each primary color
(red, green, or blue) may have 256 different levels or shades. Since a color may be composed of
the three primaries, this means we can generate 16.8 million different colors, or 256 levels of red
times 256 levels of green times 256 levels of blue (16.8 million roughly equals 256x256x256).
The color for a pixel is normally written as follows:
pixel_color = (red_level, blue_level, green_level).
What is 24-bit Video?
The previous example just described 24-bit video, without calling it that. The term 24-bit comes
from the fact that 256 shades of the primaries may be represented as an 8 bit value (2 raised to
the 8th power equals 256). Since it takes three primaries to represent a single value it takes
8+8+8 or 24 bits to represent color for a single pixel:
8bits red 8bits green 8bits blue
RRRRRRRRGGGGGGGGBBBBBBBB = 24 bits
As a final note about color and video, it is possible to choose different primaries or entirely different colorspaces/colorsystems. The way we described colors above is not the only way to identify
colors. Different "colorspaces," or methods of describing colors have different uses. For example
169
MPEG POWER PROFESSIONAL 2.0 MANUAL
the common colorspace for printing is CMYK, or cyan, magenta, yellow, and black. CYMK is useful to describe color for print purposes, because these color components correspond to the color
of the inks used.
Another colorspace is YCrCb, or luminance (shade intensity) and chrominance-red and chrominance-blue (chrominance components define the hue and value of the color). This last colorspace
is commonly used in video, primarily because it more closely resembles the colorspace of human
eyes, where rods detect luminance components and cones detect the chrominance components
of color. Because you have many more rods than cones in your retina, you are much less sensitive to chrominance than luminance. For this reason, video uses often rely on imperceptible subsampling or reduction of the chrominance component.
Now that we have discussed frame rates, frame sizes and touched the surface of color and colorspace, let’s talk about MPEG’s definitions of these values. For the purposes of this discussion,
let’s assume our video source is a typical professional digital video format called ITU-T 601 (formerly known as CCIR 601). In this format, we see the video is represented in the following fashion:
• frame rate of 30 frames a second
• picture size of one frame 720x480 (NTSC)
• color and colorspace: YCrCb 4:2:2
Luminance is sampled at full resolution; each chrominance component is sampled at full
resolution one half as often. On average then, it takes 16 bits to represent each pel.
Using these values, it is easy to calculate the total disk space required to hold one second of
uncompressed video in this format:
720
480
345,600
x
30
10,368,000
x
2
30,736,000
x
170
horizontal pixels
vertical pixels
pels per frame
frames per second
pels per second
bytes per pel
total bytes per second
APPENDICES
This means that the average 200 Megabyte hard drive could hold about 10 seconds of uncompressed video. Clearly this is not practical for most applications. This is where the incredible compression power of MPEG comes in. MPEG-1 will reduce this 20 Megabytes/second to 187,500
bytes/second (about 1.5 Megabits/second). This is a compression ratio of over 100:1!
Bits, Bytes, and other Mysteries
There is a great deal of confusion surrounding these terms. One reason for this confusion is that
computer programmers and engineers do not always use these terms in the same way. This section details these terms as understood by computer programmers, with bits being the smallest unit
and Megabytes being the largest. Here is a rough conversion table of these units:
8 bits=1 byte
8 Megabits=1 Megabyte
1,048,576 bytes (or 2 to the 20th power)=1 Megabyte
1,048,576 bits (or 2 to the 20th power)=1 Megabit
So, if you had 23,640,251 bytes, and you wanted to know how many Megabytes you had, you
would divide this number by 1,048,576 bytes:
23,640,251 bytes
divided by
1,048,576 bytes
equals
22.55 Megabytes
However, for the purpose of rough estimates, you could just move the decimal over 6 places to
the left to tell how many Megabytes (about 23 Megabytes). Then to convert to Megabits, just multiply by 8.
To convert from Megabytes to bytes, simply multiply by 1,048,576 or for a rough estimate, move
the decimal 6 places in the other direction.
171
MPEG POWER PROFESSIONAL 2.0 MANUAL
From 20 Megabytes/Second to 187,500 Bytes/Second
The first step of MPEG-1 is to reduce the number of pixels representing the image. It reduces the
resolution of the image from 720x480 pixels to 352x240 pixels—providing more than a 4:1
compression:
352
240
84,480
x
30
2,534,400
x
2
5,068,800
x
horizontal pixels
vertical pixels
pixels per frame
frames per second
pixels per second
bytes per pixel
total bytes per second
The 20 Megabytes per second is reduced to 4.83 Megabytes per second. The 720x480 image
size is considered to be professional video size. It is the image size broadcast studios use when
making video. The basic premise (in analog video) is to work with something larger than you
need, and hopefully by the time it gets to the home (after video editing and retransmission) it will
still contain acceptable quality. Thus MPEG reduces the picture size to 352 x 240.
The next step of video compression is to realize that over a small region of a single frame, the
image does not change much. For example, take a picture of a field with a pond in it. If you only
look at a small portion of the picture, say 8x8 block of pixels, you will probably see a block of
grass, a block of blue sky, or a block that only contains the pond. MPEG takes advantage of this
property of images. It breaks the image into 8x8 blocks and then applies a mathematical function
to each block called a DCT. (DCT stands for Discrete Cosine Transform.) The DCT in and of itself
does not provide any compression. However, the DCT does provide a means for compression.
There are two properties of the DCT that make it well suited for assisting in video compression:
It packs the data most visible to the human eye into a tighter spot, e.g., more zeros appear in the
DCT encoded block (zeros are easy to compress). It orders the data so that it is easier to throw
parts away that are not particularly visible. Generally the DCT results in data in the upper left
hand corner as data to keep, while the bottom right contains data that can be thrown away
(possibly noise in the image).
172
APPENDICES
The key to using the DCT is quantization. The purpose of quantization is to keep only the pixels in
the 8x8 block that are most likely to be visible to the human eye. Quantization also attempts to
make the data more compressible by making values near each other more similar to others (the
more similar the values are the higher the compression). One example of quantization is rounding.
1.4 = 1, 2.6 = 3
In rounding, several digits become fewer digits. This is the only step of MPEG that is considered
"lossy". Again, using the rounding example, once a number is rounded to 1, it is impossible to
determine whether the original number was 1.2 or 1.4 or any other number between .051 and 1.5.
At this point, the data in the 8x8 block has been DCT transformed and quantized (which helped to
organize the data). In the next step, the data is actually compressed (and redundant data is discarded). The compression takes place by removing the redundancies in the data, or more specifically reducing the entropy. For example, we can see that x+x+x+x+x can be represented as 5x.
One example of reducing the entropy or redundancy within the data is as follows:
173
MPEG POWER PROFESSIONAL 2.0 MANUAL
This notation implies that there is a number ‘23’ followed by 63 0’s. This is clearly a compression
of the original data. That is, it is shorter to write {23,(63,’0’)} than (23,0,0,0,...,0,0,0) with sixtythree zeroes written out.
There are two types of mathematical processes for entropy encoding, Huffman encoding and
arithmetic encoding. MPEG uses Huffman encoding. The DCT along with quantization can
(depending on your source material) compress data from 10-20:1 without unacceptable video
"artifacts" (errors or noise visible on the screen). The amount of compression is mostly a function
of the amount of quantization that takes place. The remaining 4.83 Megabytes/second is now
reduced to 0.322 Megabytes/second (15:1 compression).
The next major feature of MPEG compression is the realization that the interframe differences are
also small (intraframe is within a frame, interframe is between frames). If you have ever looked at
two frames of video side by side, you would be hard pressed to see the differences. Or, better put,
the majority of the frame stays the same, while only a small portion changes. MPEG uses this
property as its final tool to assist in compression.
174
APPENDICES
MPEG uses the notion of motion vectors to track movement in an image. Similar to how the
image is broken up into blocks for DCT compression, MPEG again breaks the picture into blocks
(but this time 16x16 pixels, referred to as macroblocks). Each macroblock can be encoded as its
own completely separate motion vector. Therefore, if there are parts of an image that are staying
still (the pond) from frame to frame, a motion vector that does not change from frame to frame
can encode a portion of the pond. If there is a bird flying across the pond, a moving motion vector
that tracks the bird can determine the changes in the bird’s position and encode the bird from
frame to frame. Using motion vectors can easily add 2-4:1 compression so the 352,188 bytes/second easily approaches our target rate of 187,500 bytes/second (about 1.5 Megabits per second).
MPEG and Constant and Variable Delivery Bitrates
An often overlooked, but important part of MPEG, is that it provides a constant delivery bit rate.
Although this is not important to compression, it is important to real world decoding applications.
For example, in the case of MPEG1, the target delivery rate was 187,500 bytes/second or 1.5
Megabits/second. This implies that the bit rate does not fluctuate. On average, no matter the content of the video, the delivery rate will be 1.5 Megabits/second. This is important to anyone who
needs to transmit the encoded material either to a satellite, from a CD-ROM, or through a telephone switch. Without constant bit rate delivery methods it is impossible to determine (cost effec-
175
MPEG POWER PROFESSIONAL 2.0 MANUAL
tively) the most efficient method for transmitting the data. A good analogy is a mailroom chute.
When the delivery rate is constant, the packages move smoothly through the chute. Without a
constant delivery rate, the chute can become overloaded or underused. The only means to handle
a non-constant delivery rate is to build a mechanism into the chute that either speeds up or slows
down the conveyor belt (a costly choice when that "conveyer belt" is really a satellite already orbiting the earth or transoceanic cable buried under the sea). The best way to maximize efficiency of
the chute is to determine the capacity of the chute and make sure all packages are the same size,
and designed to just fill the chute at all times.
Variable bit rate encoding is used primarily within MPEG2 encoding for DVD’s. DVD’s have
adopted a method of allowing the "conveyor belt" to speed up or slow down. There are two primary reasons that variable bit rate encoding is used by DVD’s: first it allows for more video to be
stored on the DVD, and second the quality of the video can appear to be better. Another name
for variable bit rate encoding is "constant quality" encoding versus "constant bit rate" encoding.
Since video changes so dramatically from scene to scene, our ability to perceive artifacts within
the video can also change dramatically from scene to scene. Variable bit rate encoding allows the
video to change the bit rate at which the video is encoded based on the content of the video.
Difficult scenes get more bits while simple to encode scenes get less bits. When encoding using
variable bit rate methods an average bit rate is established as well as a maximum bit rate. These
parameters: average bit rate, and max bit rate set the limits for the encoder, and therefore the
encoders ability to adjust to the content of the video. Variable bit rate encoding is a useful method
of encoding for DVD’s but when the cost of delivery is the most important criteria, such as transmission from satellites, constant bit rate encoding is more desirable.
176
APPENDICES
I-, P-, and B-frames
MPEG organizes video into several logical units. Each unit is logically composed of smaller units.
The basic units of MPEG in order of increasing size are:
• Blocks
• Macroblocks
• Slices
• Pictures
• Group of Pictures (GOP)
GOPs are made up of pictures, which are in turn made from slices that contain macroblocks that
contain blocks.
The largest data element within MPEG is the group of pictures (GOP). This is a self contained,
completely decodable unit. It may consist of an arbitrary number of frames of any of the primary
types (I-, P-, or B-frames).
Blocks are composed of an array of 8x8 pixels. The DCT is performed on the block level.
Macroblocks are composed of blocks (in MPEG1 a macroblock consists of 4 luminance blocks
and 2 chrominance blocks). Motion prediction and interpolation are performed at the macroblock
level.
Motion prediction is useful when objects are just appearing in the current frame and will continue
to exist in future frames.
Bus is predicted.
177
MPEG POWER PROFESSIONAL 2.0 MANUAL
Prediction can also be used when the object exists in the past and exists in the current frame.
Truck is predicted.
It is important to note that MPEG can also make use of interpolation. This is useful when much
action is taking place in the scene. Since the truck exists in all frames, it can be reconstructed
with information from both the future frame and the past frame. The truck is therefore interpolated.
The average of the two will result in the final reconstructed truck. On the other hand, the car is
predicted, since it only exists in the future frame. Use of both prediction and interpolation results
in a better quality "current frame". Simply put, the more information to build the "current" frame,
the better the image will appear.
Truck is interpolated and predicted, car is predicted.
A picture is composed of one or more slices. The "height" of a slice is one macroblock and the
length can be the entire picture or any portion thereof. Slices can be used to aid in error recovery.
In the case of "perfect" transmission mechanisms, such as CD-ROMs, there is normally one slice
to one picture. (Compared to "imperfect" transmission mechanisms like terrestrial broadcast.)
178
APPENDICES
MPEG uses three different types of frames. The primary difference among these frames is how
motion vectors are used in them. Intraframes (I-frames) do not use any form of motion vectors.
Predictive frames (P-frames) make use of predictive type motion vectors. Bi-directional frames
(B-frames) make use of both predictive and interpolative motion vectors.
A typical GOP illustrating information flow from I and P frames to B frames and I frames to P
frames.
179
MPEG POWER PROFESSIONAL 2.0 MANUAL
APPENDIX II – OPEN VS. CLOSED GOP (AND WHY YOU SHOULD CARE)
From our discussion of I-, P-, and B-frames in Appendix I, you should already be familiar with
much of the terminology relating to a Group of Pictures and the three types of frames that make
up the GOP. For a more complete discussion of those two topics, please refer back to Appendix I.
I-frames are stand-alone "reference" frames. They do not rely on any other frame in order to be
decoded. P-frames are predictive, meaning they look back in time to the previous I-frame for
information. B-frames are bi-directional, meaning that they look both to the previous and future
frames in order to be decoded.
A typical GOP would look similar to the following:
I B B PB B P B BP B B
You will notice that the last frame in this GOP is a B-frame. As a B-frame is built using both past
and future information, we can assume that this last B-frame would need to refer to data from the
next GOP in order to be decoded. This is what would happen if we had an Open GOP.
A Closed GOP would isolate each GOP independent of every other GOP in your video. In the
case of a Closed GOP, the last B-frame would be prevented from looking into the next GOP in
order to complete itself, and would rely only on past information.
Why is this important to you?
Let’s say that you want to produce a multi-angle DVD. You would like to place several different
video streams shot from different camera angles onto this DVD to run simultaneously. The user
could switch between these different camera angles with the touch of a button.
If you have an open GOP, and your user switches camera angles, it may take a while for the
video to be able to "catch up" due to the fact that a frame it was referring to in a GOP on the other
video stream is no longer there. This could cause a glitch in playback for a slight period of time
that would be noticeable to the user. When you change streams, your prior GOP does not contain correct picture information for displaying the new stream’s B frames.
If you have a closed GOP, the switch between camera angles is much more immediate because
each of your frames is relying on information found only within its GOP. Thus, the user can switch
the angle and not notice a glitch as the playback device attempts to orient itself in the new video
stream.
180
APPENDICES
With the closed GOP feature in MPEG Power Professional™, you have the ability to create
MPEG appropriate for this type of multi-angle DVD playback. All you have to do to close your
GOP is click the CLOSED GOP checkbox on the VIDEO2 tab of the ENCODER SETTINGS
window. For a more complete discussion of the steps to follow to edit this or any other encoder
settings, please refer to Chapter 3.
APPENDIX III – WHAT IN THE WORLD IS A VOB?
VOB stands for "Video Object" -- A specially constrained MPEG2 program stream, which contains
additional information used exclusively for DVD video. A VOB may include video data, audio data,
sub-picture data, Presentation Control Information, and Data Search Information. Most of this
information is generally assembled by a DVD authoring system. In order to be useful for DVD
prototyping, MPEG Power Professional™ 2.0 provides a basic VOB creation functionality, which
includes MPEG2 video, MPEG audio, and the minimum required PCI and DSI data for playback.
Additionally, MPEG Power Professional™ 2.0 generates basic menu and navigation control files
required for simple DVD use of these VOB files.
By generating a VOB file using MPEG Power Professional™ 2.0, you can quickly and easily create DVDs using many of the inexpensive DVD-burning packages on the market. Additionally, you
may use MPEG Power Professional™ to create the elementary video streams needed for use in
third party DVD authoring packages. For more information on creating a DVD, please refer to
Chapter 5 of this manual.
APPENDIX IV – WHAT IS THE POWER OF THE HEURIS MPEG EXPORT
ENGINE?
The HEURIS MPEG Export Engine allows you to export directly from any program using the
QuickTime Export Interface API. This feature allows you to encode your video to professionalquality MPEG using MPEG Power Professional™, without the need to open the program.
To do this, simply choose "EXPORT TO HEURIS MPEG PRO" from the export menu of your
program, choose one of the built-in templates, the encode type and the destination file name,
and start encoding. Best of all, the HEURIS MPEG Export Engine Pro is part of your MPEG
Power Professional™ software package so you can begin using this feature right away.
181
MPEG POWER PROFESSIONAL 2.0 MANUAL
If you need to make changes to your encoder settings, you will need to open MPEG Power
Professional™ and import your source file(s) as usual. However, if you plan to make multiple
encodes using the same encoder settings, you may create your own custom template incorporating
these settings. These custom templates will then be available to you when you use the HEURIS
MPEG Export Engine Pro.
182
GLOSSARY
MPEG POWER PROFESSIONAL 2.0 MANUAL
.abs
An audio only MPEG file. Also commonly referred to as an .mpa file.
Analog
A system which allows a range of continuous values. For example a cassette tape is an analog
storage device.
Aspect Ratio
Represents the ratio of the x value to the y value of a pixel. For example an aspect ratio of .75
would indicate that each pixel is 3/4ths as high as it is wide.
Authoring
Creation of a document containing hypertext or hypermedia. This can include graphics, sound and
video.
Bit Rate
A measure of data transfer rates. Normally expressed in bits/second.
B-frames
Bi-directional frames.
CBR
Acronym for constant bit rate.
CDi
Acronym for "Compact Disc-Interactive," Philips entry into the home video multiplayer market. In
common usage for industrial Video CD applications.
Closed GOP
Closed Group of Pictures. Useful for multi-angle DVD playback.
Complete Search
The most thorough search technique available. This technique takes longer to encode than the
other options.
DCT
Acronym for "Discrete Cosine Transform".
184
GLOSSARY
Digital
A system which allows only discrete values. For example an audio CD is a digital storage device.
Digitizing
The process of creating a digital file from an analog source.
Dual Channel
An MPEG audio mode that provides two unrelated mono channels.
DVD
Acronym for Digital Versatile Disc.
ECL
Acronym for Encode Control List. A timecode based list of encoding events that will occur during
the compression of an associated source file.
Entry Point Injection
Creation of a random access point within the encoded file. Always corresponds to
an I-frame.
Filters
Image and signal processing techniques often used for noise reduction.
FIR
Acronym for "Finite Impulse Response." Filter commonly used to reduce analog noise associated
with video.
Flattened QuickTime
A QuickTime file format required for exporting from the Macintosh to other platforms.
fps
Acronym for "frames per second."
Frame Rate
Number of frames displayed to a viewer per second.
Gamma Filters
Adjusts luminance levels of the video source while encoding. Useful when MPEG encoded files
will be played back by decoders that do not perform gamma correction.
185
MPEG POWER PROFESSIONAL 2.0 MANUAL
GOP
Acronym for "Group of pictures." The GOP describes the distance between key frames.
Hybrid Search
A proprietary search method which combines the best features of complete search and log
search.
I-frame
Abbreviation for "Intra frames." Sometimes referred to as key frames.
Inverse Telecine
The process of identifying and removing the duplicate frames which were inserted when a video
source of 30 frames per second was generated from a film source of 24 frames per second.
ISO
An acronym for "International Standards Organization."
Log Search
The fastest search method currently available in MPEG Power Professional™.
MCI commands
Acronym for "Media Control Interface." A Microsoft™ standard multimedia playback command set.
Median filter
Useful filter for removing noise from video that has a lot of "calm" areas (areas with low levels of
detail.)
Mono
A single-channel audio format.
.mov
A common QuickTime file extension.
MPEG
An acronym for "Moving Pictures Experts Group". MPEG is the collective noun often used to refer
to ISO working group ISO/IEC JTC1 SC29/WG11, which defines data compression techniques
and standards for moving pictures with associated audio.
186
GLOSSARY
MPEG1
Coding of moving pictures with associated audio for digital storage media at up to about 1.5
Megabits per second (International Standard IS11172, 1992).
MPEG2
International Standard targeted at digital transmission or broadcast of digital video signals.
Supports a wider range of resolutions and bit rates than the MPEG-1 standard. (International
Standard IS13818).
Multiplexing
To combine one or more audio files, and one or more video files into one synchronized file.
Mux Rate
The rate at which separate audio and video files are multiplexed.
Network
The communication interface between computer workstations which allows the sharing of information and data.
Nonlinear Editing System
A computer-based video editing system which allows random access to any point in the video.
Nonlinear filter
A filter that applies a softening effect to a video clip. If lines are too harsh, or the contrast of your
video is too high, using this filter can help reduce those effects.
NTSC
Acronym for "National Television Standards Committee." This committee defined the video signal
format used for terrestrial broadcast of television in the Americas, Canada, Asia and other parts of
the world.
.omf
Extension commonly used for Open Media Framework Interchange (OMFI) files.
A file format introduced by Avid Technology™ to support the exchange of digital audio and video
source information across platforms and applications.
187
MPEG POWER PROFESSIONAL 2.0 MANUAL
P-frames
Predicted frames.
PAL
Television standard in use for terrestrial broadcast in many European nations and Australia.
QuickTime™
Standard created by Apple Computer™ for integrating video and audio into applications.
Reference Interval
The distance between I- and P-frames in a GOP.
Resolution
Display size of an image.
Search Distance
Dictates how far away from the current area the encoder looks for matching video.
SIF
Acronym for "Standard Interchange Format." Generally refers to an image size of 352x240 pixels.
Source File Concatenation
Laying multiple source files end-to-end in order to create one large MPEG file.
Stereo
An MPEG audio mode that provides for two related audio channels.
Template
A convenient structure for storing and using encoder settings with MPEG Power Professional™.
Timecode
A time index generally given as hours, minutes, seconds, and frames.
Two-Pass Search Technique
A proprietary search method that will produce better image quality for some sources.
VBR
Acronym for Variable Bit Rate.
188
GLOSSARY
.vbs
A video only MPEG file; also commonly referred to as a .mpv file
VBV Size
The size of the buffer in a modeled MPEG decoder.
Video CD
A standard for CD-ROMs containing video. Also known as "White Book."
VOB (Video Object)
A specially constrained MPEG2 program stream, which contains additional information used
exclusively for DVD video.
189
MPEG POWER PROFESSIONAL 2.0 MANUAL
190
INDEX
MPEG POWER PROFESSIONAL 2.0 MANUAL
analysis only, 27, 70-71, 72, 74, 77, R112, R135, R137
aspect ratio, 61, R154
adjusting, R156
audio mode, 55, R144
dual channel, 55, R144
mono, 55, R144
stereo, 55, R144
Audio tab, 54-55, R144
audio bit rate, see bit rate, audio
audio encoding, 26, 29, 104, R111
Auto analyze while encoding, 63, 71, 90, R135, R136
base template(s), see "built-in templates"
bit rate(s),
video, 57, 100, R145
audio, 54, R144
built-in template(s), 27-28, 50-51, R112 - R115
Closed GOP, 61, 100, R155, 180
Comments only event, ECL, 82, 89
comments, inserting, 89
complete search, see search technique, complete
constant bit rate, 57, R145
cropping video source, 58-59, R150
cropping window, 59, R150
192
INDEX
deleting tasks, see tasks, deleting
destination file, 20, 99
display resolution, 56, R145
dual channel, see audio mode, dual channel
ECL 71-94, R134 - R137
creating, 71, 80, 84-89, R136 - R137, R151
encoding events, 78, 82-83, R134
editing an, 74, R152
merging, 90
use of, 77, 90, R135, R152
editing tasks, see tasks, editing
Encode Control List(s), see ECL
Encode Definitions window, 19, R124
Encoder Settings window, 20, 53-65
encoding project file, 18, 31-35, 96, R116
encoding task types, 26, R111
entry point, injecting, 89, R153
extended search distance, 57, R148, R165
filters, 57-58, R146 - R147, R164 - R165
applying globally, 57-58, R146, R164 - R165
FIR, 58, R146
frame rates, 62-63, R158
changing, 62-63, R158
193
MPEG POWER PROFESSIONAL 2.0 MANUAL
Gamma filters, 82, R134
GOP size, changing, 60-61, R154
GOP, closed, see closed GOP
hybrid search, see search technique, hybrid
I-frames, 75, 77, 88-89, R152, 177, 179, 180
injecting, 75, 77, 88-89, R152, R165
Image sequences, encoding, R160
inserting tasks, see tasks, inserting.
Internet template, 28, 51, R113, R114, R115
interrupt, 38-39, R118
Interrupted projects, 38-40, R119-R120
Inverse Telecine, applying 58, 70
keyboard shortcuts, R111
log files, view, 40, 63, R110, R120
log search, see search technique, log
long search distance, see search distance, long
Median filter, 58, 86, 87, R146
medium search distance, see search distance, medium
mono, see audio mode, mono
MPEG encoding, types of, 26-27, R111-R112
194
INDEX
MPEG playback, 23
multiplexing, 26-27, 31, R112, R125-R127
Multiplex tab, 65-66, 100, R159
multiplex, encoding, see multiplexing
multiplexing multiple source files, 31, R127
Nonlinear filter, 58, R146
OMFI, 18, 41, R122
project, see encoding project file
QuickTime™ (.mov), 18, 41, R122
reference interval, changing, 60-61, R155
resume, 40, R120
sampling frequency, 55
search distance, 57, R148
extended, 57, R148
long, 57, R148
medium, 57, R148
short, 57, R148
search technique, 57, R148
complete, 57, R148
hybrid, 57, R148
two-pass, 57, R148
log, 57, R148
short search distance, see search distance, short
source files, 19, 41, R122-R123
195
MPEG POWER PROFESSIONAL 2.0 MANUAL
source file concatenation, 42, R128, R162
stereo, see audio mode, stereo
still picture, encoding, 26, 27, 91, R130, R160
task generator, 44, R118
tasks,
adding, 33, 35, R116
deleting, 33, 37, R118
editing, 33, 36, 37, R117
inserting, 19, 33, R116
Templates, 27-28 50-54 R112-R115
editing, 53, R141
restoring, 53, R143
saving custom settings, 52-53, R142
variable bitrate, 57, 100, R145
VBV Buffer, adjusting, 62, R157
Video
bit rate, see bit rate, video
cropping, see cropping video source
VOB, 66, R159
196