1
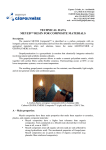
HTO-1000 Thermal Oxidiser User Manual Version: 1.5 www.ecotech.com HTO-1000 User Manual 1.5 This page is intentionally blank Page 2 Table of Contents Table of Contents ........................................................................................................................................................... 3 List of Tables....................................................................................................................................................... 4 Manufacturer’s Statement ............................................................................................................................................. 5 Notice ........................................................................................................................................................................... 5 Safety Requirements ...................................................................................................................................................... 6 Warranty......................................................................................................................................................................... 6 Service and Repairs......................................................................................................................................................... 7 Service Guidelines .............................................................................................................................................. 7 Service and Repairs......................................................................................................................................................... 7 Service Guidelines .............................................................................................................................................. 7 CE Mark Declaration of Conformity ................................................................................................................................ 8 Claims for Damaged Shipments and Shipping Discrepancies ......................................................................................... 9 Damaged Shipments .......................................................................................................................................... 9 Shipping Discrepancies ....................................................................................................................................... 9 Contact Details ................................................................................................................................................... 9 Internationally Recognised Symbols on Ecotech Equipment ........................................................................................ 10 Manual Revision History ............................................................................................................................................... 11 1. 2. 3. 4. Introduction 13 1.1 Description ....................................................................................................................................................... 13 1.2 Specifications ................................................................................................................................................... 13 1.2.1 Converter Efficiency ............................................................................................................................. 13 1.2.2 Flow ................................................................................................................................................ 13 1.2.3 Power ................................................................................................................................................ 15 1.2.4 Physical Dimensions............................................................................................................................. 15 Installation 17 2.1 Initial Check ...................................................................................................................................................... 17 2.2 Assembly – Pneumatic Connections ................................................................................................................ 18 Operation 19 3.1 Ammonia Measurement (NH3) ......................................................................................................................... 19 3.2 Hydrogen Sulfide & Total Reduced Sulfur Measurement (H2S & TRS) ............................................................. 19 3.3 Hydrocarbon Removal (HC) .............................................................................................................................. 20 Calibration 21 4.1 TRS Calibration ................................................................................................................................................. 21 4.2 Ammonia (NH3) Calibration .............................................................................................................................. 21 HTO-1000 User Manual 1.5 Page 3 HTO-1000 User Manual 1.5 5. Page 4 Maintenance 23 5.1 Maintenance Tools .......................................................................................................................................... 23 5.2 Maintenance Schedule .................................................................................................................................... 23 5.3 Maintenance Procedures ................................................................................................................................. 24 5.3.1 SOX Scrubber Efficiency ....................................................................................................................... 24 5.3.2 Temperature Controller Set-up ........................................................................................................... 24 5.3.3 Cleaning the Thermal Converter Oxidising Tube (excluding HTO-1000HC)......................................... 24 Manufacturer’s Statement The HTO-1000 is designed primarily for gaseous sampling using standard gas analysers. By following the guidelines contained in this manual and with the implementation of a good quality-assurance program, the user can obtain accurate and reliable data. This User Manual provides a complete product description including operating instructions, calibration, and maintenance requirements for the HTO-1000. If, after reading this manual you have any questions or you are still unsure or unclear on any part of the HTO-1000 then please do not hesitate to contact Ecotech or your local Ecotech distributor. Ecotech also welcomes any improvements that you feel would make this a more useable and helpful product then please send your suggestions to us here at Ecotech. Please help the environment and recycle the pages of this manual when finished using it. Notice The information contained in this manual is subject to change without notice. Ecotech reserves the right to make changes to equipment construction, design, specifications and/or procedures without notice. Copyright © 2013. All rights reserved. Reproduction of this manual, in any form, is prohibited without the written consent of Ecotech Pty Ltd. Note Hazardous voltages exist within the converter. The converter should be closed when it is left unattended or turned on. Ensure the power cord, plugs and sockets are maintained in a safe working condition. HTO-1000 User Manual 1.5 Page 5 HTO-1000 User Manual 1.5 Safety Requirements To reduce the risk of personal injury caused by electrical shock, follow all safety notices and warnings in this documentation. If the equipment is used for purposes not specified by Ecotech, the protection provided by this equipment may be impaired. Replacement of any part should only be carried out by qualified personnel, using only parts specified by Ecotech as these parts meet stringent Ecotech quality assurance standards. Always disconnect power source before removing or replacing any components. Warranty This product has been manufactured in an ISO 9001/ISO 14001 facility with care and attention to quality. The product is subject to a 12-month warranty on parts and labour from date of shipment (the warranty period). The warranty period commences when the product is shipped from the factory. Lamps, fuses, batteries and consumable items are not covered by this warranty. Each converter is subjected to a vigorous testing procedure prior to despatch enabling it to be installed and ready for use without any further testing. Page 6 Service and Repairs Our qualified and experienced technicians are available to provide fast and friendly service between the hours of 8:30am – 5:00pm AEST Monday to Friday. You are welcome to speak to a service technician regarding any questions you have about your analyser. Service Guidelines In the first instance, please call or email us if you are experiencing any problems or issues with your analyser. If you are within Australia or New Zealand please contact our service response centre via email on [email protected] or call +61 (0)3 9730 7800 If outside of Australia and New Zealand please email our international support department at [email protected] or call +61 3 9730 7800 If we cannot resolve the problem through technical support, please email the following information: Name and phone number. Company name. Shipping address. Quantity of items being returned. Model number/s or a description of each item. Serial number/s of each item (if applicable). A description of the problem. Original sales order or invoice number related to the equipment. When you email us we will assign a Return Material Authorisation (RMA) number to your shipment and initiate the necessary paperwork to process your equipment within 48 hours. Please include this RMA number when you return equipment, preferably both inside and outside the shipping packaging. This will ensure you receive prompt service. HTO-1000 User Manual 1.5 Page 7 HTO-1000 User Manual 1.5 CE Mark Declaration of Conformity This declaration applies to the HTO-1000 Thermal Oxidiser as manufactured by Ecotech Pty. Ltd. of 1492 Ferntree Gully Rd, Knoxfield, VIC, 3180, Australia, and which may be sold in the following configurations: To which this declaration relates is in conformity with the following European Union Directives: Council Directive of 15 December 2004 on the approximation of the laws of Member States relating to electromagnetic compatibility (2004/108/EC) The following standard was applied: EN 61326-1:2006 Electrical Equipment for measurement, control and laboratory use – EMC Requirements – Part 1: General requirements. Immunity Requirements EN61326-1 IEC-61000-4-2 Electrostatic discharge immunity IEC-61000-4-3 Radiated RF immunity IEC-61000-4-4 Electrical fast transient burst immunity IEC-61000-4-5 Surge immunity IEC-61000-4-6 Conducted RF Immunity IEC-61000-4-11 Voltage dips and interruption immunity Electromagnetic Compatibility EN61326-1 CISPR-11 Radiated RF emission measurements CISPR-11 Mains Terminal RF emission measurements IEC-61000-3-3 Mains Terminal voltage fluctuation measurements IEC-61000-3-2 Power Frequency harmonic measurements Council Directive of 12 December 2006 on the harmonization of the laws of Member States relating to electrical equipment designed for use within certain voltage limits (2006/95/EC) The following standard was applied: EN 61010-1:2001 Safety requirements for electrical equipment, for measurement control and laboratory use – Part 1: General requirements For protection against: Electric shock or burn Mechanical HAZARDS Excessive temperature Spread of fire from the equipment Effects of radiation, including laser sources and sonic and ultrasonic pressure Page 8 Claims for Damaged Shipments and Shipping Discrepancies Damaged Shipments Inspect all instruments thoroughly on receipt. Check materials in the container/s against the enclosed packing list. If the contents are damaged and/or the instrument fails to operate properly, notify the carrier and Ecotech immediately. The following documents are necessary to support claims: Original freight bill and bill of lading. Original invoice or photocopy of original invoice. Copy of packing list. Photographs of damaged equipment and container. You may want to keep a copy of these documents for your records. Please refer to the instrument name, model number, serial number, sales order number, and your purchase order number on all claims. You should also: Contact you freight forwarder for an insurance claim. Retain packing material for insurance inspection. Shipping Discrepancies Check all packages against the packing list immediately on receipt. If a shortage or other discrepancy is found, notify the carrier and Ecotech immediately. We will not be responsible for shortages against the packing list unless they are reported promptly (within 7 days). Contact Details Head Office 1492 Ferntree Gully Road, Knoxfield VIC Australia 3180 Phone: +61 (0)3 9730 7800 Fax: +61 (0)3 9730 7899 Email: [email protected] Service: [email protected] International Support: [email protected] www.ecotech.com HTO-1000 User Manual 1.5 Page 9 HTO-1000 User Manual 1.5 Internationally Recognised Symbols on Ecotech Equipment Page 10 On (Supply) IEC 417, No. 5007 Off (Supply) IEC 417, No. 5008 Electrical fuse IEC 60417-5016 Earth (ground) terminal IEC 60417-5017 Protective conductor terminal IEC 60417-5017 Equipotentiality IEC 60417-5021 Alternating current IEC 60417-5032 Caution, hot surface IEC 60417-5041 Caution, risk of danger. Refer to accompanying documents ISO 7000-0434 Caution, risk of electric shock ISO 3864-5036 Manual Revision History Manual PN: M010026 Current Revision: 1.5 Date released: 1 June 2013 Description: User Manual for the HTO-1000 Thermal Oxidiser This manual is the full user manual for the HTO-1000 Thermal Oxidiser. This manual contains all relevant information on theory, specifications, installation, operation, maintenance and calibration. Any information that cannot be found within this manual can be obtained by contacting Ecotech. Edition Date Summary Pages 1.0 January 2003 Initial Release All 1.1 July 2003 Minor corrections Various 1.2 January 2004 HC configuration added Various 1.3 February 2006 Temperature ranges updated 2, 11 1.4 May 2007 Manual redesigned All 1.5 June 2013 Corrections for CE compliance and new formatting All HTO-1000 User Manual 1.5 Page 11 HTO-1000 User Manual 1.5 This page is intentionally blank. Page 12 1. Introduction 1.1 Description The Ecotech HTO-1000 Thermal Oxidiser is a general-purpose thermal converter. It is designed to be used with Oxides of Nitrogen gas analysers for the measurement of NH3 (Ammonia), NO (Nitric Oxide) and NO2 (Nitrogen Dioxide). HTO-1000 can also be used with Sulfur Dioxide gas analysers for the measurement of H2S (Hydrogen Sulfide) or TRS (Total Reduced Sulfur). TRS comprises Hydrogen Sulfide (H2S), Methyl mercaptan (MESH), Dimethyl Sulfide (DMS) Ethyl Mercaptan and Dimethyl Disulfide (DMDS). The HTO-1000 series of thermal oxidisers is specifically configured for each gas application with different catalytic materials and operating temperatures. The converter is available with a SOX scrubber; where the thermal oxidation of chemical compounds requires temperatures not attainable with low temperature ovens. The oxidiser is generally used to oxidise gaseous compounds in an atmosphere containing oxygen. The HTO-1000HC is designed to remove light hydrocarbons such as methane, ethane, propane, etc. 1.2 Specifications 1.2.1 Converter Efficiency Range Ammonia: 88-94% Hydrogen Sulfide: 85-95% Total Reduced Sulfur: 95-99% Hydrocarbon Removal: <20ppb HC per 10 litre/minute Response Time 5-10% of rise/fall time of analyser Operating Temperature 25-1000°C 1.2.2 Flow Flow rate The maximum flow rate of the instrument is determined by the sample concentration at the inlet, the desired converter efficiency and converter temperature. The following flow rates are given as guidelines with which to adjust the instrument to your specific requirements. HTO-1000 User Manual 1.5 Page 13 HTO-1000 User Manual 1.5 ECO-HTO1000 Tested at 820°C H2S to SO2 converter efficiency @ 20 ppb > 90% Flow = 0.75 L/min ECO-HTO1000N Tested at 710°C NH3 losses @ 220 ppb <20 ppb NH3 to NO converter efficiency @ 200 ppb >90% Flow = 0.320 L/min ECO-HTO1000HC Tested at 520°C Inlet concentration 2 ppm Hydrocarbon removal to <20 ppb HC Flow = 10 L/min CAUTION If the maximum flow rate is exceeded, the gas exiting the furnace will be too hot and melt the connections and tubing. Gas Temperature Accuracy ±5 °C Gas Pressure From vacuum to max 2 bar pressure Quartz Tube Volume 88.5 cc/88.5 mL Page 14 1.2.3 Power Operating Voltage 240VAC, 50Hz fuse at 3.15A slow blow 110 VAC, 60Hz fuse at 5A slow blow Consumption 200VA 1.2.4 Physical Dimensions Case Dimensions LxWxH = 220 x 484 x 220 mm (5RU) Weight 9.4kg HTO-1000 User Manual 1.5 Page 15 HTO-1000 User Manual 1.5 This page is intentionally blank. Page 16 2. Installation This section is intended to instruct the user in the proper installation and set-up procedures for the installation and commissioning of the converter. The thermal oxidiser is housed in a rack-mountable case that can be fitted with feet to make a benchtop unit. For bench mounted installations, be sure never to place anything on top of the oxidiser. For panel rack mounting installations be sure to allow the minimum of at least 7.5-cm between top of oxidiser and bottom of instrument above it. In rack type installations it is preferred that the oxidiser be the instrument mounted at the top of the rack. For ventilation calculations, use a heat dissipation factor of 400 watts. In general, the unit should be located in an environment free of dust, moisture, and vibration. Sample tubing should be kept as short as possible and only stainless steel glass line tubing or thick walled teflon tubing should be used, in order to keep absorption losses to a minimum. CAUTION Never place objects on top of HTO-1000 and ensure proper ventilation of unit is always maintained. 2.1 Initial Check Check the unit for shipping damage. If there is any damage found, follow standard procedure and inform shipping company of damages that has occurred. Remove the top covers and check the converter’s oven area. Note: The quartz conversion tube must be inspected to verify its integrity. Operation of the instrument is relatively simple. To verify normal operation prior to installation, perform the following checks: 1. Verify that the correct operating power has been selected for your application. If the instrument is operated at 220-240 50 Hz VAC you are required to install a 2.5 amp slow blow fuse, if it is operated at 115 VAC 60 Hz you require a 5 amp slow blow fuse. Verify that unit is configured for the same voltage as the power source to which it is connected 2. Inspect the quartz tube (non-HC models only) and ensure that it is intact. Replace top cover. 3. Plug the power cord into the power receptacle and into a power source; turn on power at rear of unit. The temperature indicator on the front panel will now display current ambient temperature. 4. Set temperature controller to 200°C using the up keys on the temperature controller. If operating correctly, the red indicator for “On” should light up the temperature controller front panel. 5. After ten minutes the temperature should reach 200°C and control of heating should turn “On/Off”. 6. After the oven has stabilised, adjust the temperature to 400°C and allow oven to stabilise at this new temperature setting. HTO-1000 User Manual 1.5 7. Now set the oven to the desired operating temperature and allow it to stabilise. If the temperature does not stabilise follow tuning instructions of the temperature controller for this new temperature setting. 8. Allow clean air to flow through the converter for at least one hour at the operating temperature before use. This will allow any residual compounds to be converted before usage. Zero air should be measured on the analyser ±0.020ppm max. 9. Following the zeroing of the analyser, a span gas in the range of 80% of full scale should be used to compensate for any losses due to the installation of converter. 2.2 Assembly – Pneumatic Connections Two ¼” O.D. tube fittings are located at rear panel of converter. One is labelled Sample in and is a connection for the sample gas to be converted; the other is labelled Sample out and acts a port for the oxidised gas to be routed to the gas analyser of choice. Note: It’s important to perform a leak check of the pneumatic connections of converter and analyser before proceeding with the measurement. Connect the analyser exhaust to an appropriate exhaust system. H2S Measurement For H2S measurement connect the sample gas direct to the SOx scrubber and connect the output of SO2 scrubber directly to the sample inlet of the oxidiser. NH3, NOX Measurement For NH3, NOX and TRS, connect the sample gas port directly to the sample inlet of oxidiser. For NH3 measurement, install the HTO-1000N on the NX channel. Use a proprietary NH3 scrubber when zeroing the instrument. In stack applications use an ammonia scrubber on the NX inlet between the HTO-1000N and the NX port and also at the NOX channel inlet. TRS & TS Measurement This instrument can be used to obtain TRS (total reduced sulfur) or TS (total sulfur) measurements in conjunction with an SO2 analyser. When measuring TRS, an SOx scrubber should be installed on the inlet of the HTO1000 to remove any SO2; the HTO1000 will convert all other sulfur species into SO2 which can then be measured by an analyser. When measuring TS, no scrubber is required, as this measurement includes SO2 and it should not be removed from the sample. Hydrocarbon Removal For HC removal, connect the incoming air to the Sample in port. Hydrocarbon free air will exit the sample out port. The outlet has an extension tube that allows the gas to cool. Note: Do not reverse the connections or the exhaust gas will be too hot. Page 18 3. Operation The HTO-1000 is factory configured for a particular type of gas conversion. Details of the different applications are provided below. 3.1 Ammonia Measurement (NH3) The model HTO-1000N can be factory configured for the conversion of ammonia (NH3) into nitrogen monoxide (NO). The oven temperature required for the conversion of NH3 to NO should be set within the range of 580°C to 820°C. It is recommended that the instrument be tested and adjusted to match the specific requirements of the system. In this temperature range the conversion of NH3 to NO is the most efficient, however some of the NH3 will be converted to NO2. The conversion process occurs when the gas sample flows through the quartz tube and the catalyst material set to 720°C, all of the oxides of nitrogen (NOX) are thermally oxidised to nitric oxides and some to nitrogen dioxide. The hydrogen molecules are additionally stripped from the NH3 gas sample and converted H2O and the nitrogen molecules recombine with oxygen to form NO and NO2. The model HTO-1000N converter is plumbed to the NX input, the difference between the NOX = (NO + NO2) and the NX = (NH3 + NO2 +NO) channel is that the NH3 each channel has a separate gain in order to compensate for losses in the sampling loops. The average thermal converter efficiency for ammonia conversion is 88-94%. 3.2 Hydrogen Sulfide & Total Reduced Sulfide Measurement (H2S & TRS) The model HTO-1000 is factory configured for the measurement of Hydrogen Sulfide (H2S) or Total Reduced Sulfur (TRS) measurement. For the Hydrogen Sulfide measurement, a SOX scrubber is required. H2S is measured by converting H2S to Sulfur Dioxide (SO2) using the thermal oxidiser then measuring the resultant gas with a Sulfur Dioxide gas analyser. The sample gas is passed through the SOX scrubber on the inlet of the HTO-1000. The SOX scrubber is installed to remove oxidised sulfur compounds in the sample stream before H2S is converted. The SOX scrubber combined with the HTO1000 will yield a > 97% removal of SOX compounds before conversion. Any losses in the converted gas( <1%) will be nullified during the calibration procedure of the analyser. After passing through the SOX scrubber, the sample gas now only consists of H2S. The sample gas is then passed through the quartz tube, which is heated, to >560°C, stripping the hydrogen from the H2S in the sample and converting it to SO2 and H2O. The oven temperature required for the conversion of H2S to SO2 should be set in the range of 560°C to 620°C for an average thermal reduction efficiency of 95 – 98 %. HTO-1000 User Manual 1.5 Page 19 HTO-1000 User Manual 1.5 For TRS Measurement the use of the SOX scrubber is required. The design of the converter complies with U.S. EPA method for the Determination of Total Reduced Sulfur found in the Federal Register 40 CFR Ch1, Pt60, App A, Method 16A (7-1-85 edition). The quartz tube is derived from this method, the operating temperature recommended by U.S.EPA guidelines mentioned in Section 3.4, the operating temperature for a Total Reduced Sulfur conversion temperature is 800°C ±100°C. For gasses other than sulfur compounds, conversion temperatures are to be determined by the end user. As this is a general-purpose device Ecotech Pty Ltd cannot be held responsible for its misuse or misapplication. The sample gas must contain at least 1% oxygen for complete conversion of all TRS to sulfur dioxide (SO2). The lower detectable limit is 0.002ppm when the sample flow is 0.750 l/min and the upper concentration limit is dependent on the resident time of sample gas in the oxidiser. 3.3 Hydrocarbon Removal (HC) The model HTO-1000HC has been factory configured for the removal of light hydrocarbons from ambient sample air. It is commonly used to generate hydrocarbon free zero air. The oven temperature required for the oxidation of light hydrocarbons should be set to 520°C. Typical output is <20ppb HC at up to 10 litres per minute of ambient air, however performance will vary depending on the original concentration and the flow rate. Hydrocarbons are catalytically oxidised, forming mainly CO2 and H2O. The remainder of the zero air system can remove these impurities. Page 20 4. Calibration 4.1 TRS Calibration 1. Connect a suitable dilution gas calibrator, such as the Ecotech GasCal-1100 to the input of the thermal converter. Allow 15 minutes for the analyser to stabilise on zero gas. Note: When the thermal converter is initially turned on, gases and material imbedded on the quartz tube will usually take 60 minutes to burn off. As material burns off it may appear as SO2 or NO. 2. Perform a zero calibration on the analyser; the resulting zero offset generated by the converter should not exceed 0.100ppm. Introduce span calibration gas at 80% of working range and then perform a span calibration on the analyser. 3. Check the zero again and adjust if necessary. 4. To optimise the thermal converter temperature, introduce span gas of 100% of operating range. Allow the thermal converter to stabilise, and then increase the thermal converter temperature by 25°C. Allow 15-25 minutes for the gas analyser value to stabilise. As the temperature of the converter is increased, the span output will also increase until the optimum thermal converter temperature is reached. If operated above the optimum temperature, the efficiency will not be increased and the life of the catalytic material will be limited. The life of catalytic material and quartz tube should last several years under normal usage. Multi point calibration of the thermal converter is recommended at start-up and once per year. 4.2 Ammonia (NH3) Calibration 1. Connect a dilution gas calibrator, such as the Ecotech GasCal-1100, to the input of the thermal converter with new FEP thick walled tubing, and use 1/8 glass lined stainless steel tubing from the NH3 cylinder to the span input of GasCal-1100. Keep all tubing as short as possible. Note: Use only Teflon tubing. 2. Allow 30 minutes for the analyser to stabilise on zero gas. When the thermal converter is initially turned on, gases and material imbedded on the quartz tube and catalyst will usually take approximately 60 minutes to burn off. As the material burns off, NOX or NO readings may be observed on the analyser. 3. Perform a zero calibration from the analyser, the resulting zero offset generated by the converter should not exceed 0.100ppm. Introduce span calibration gas at 80% of working range; perform a span calibration on the analyser. Note: NH3 span gas will be slow to respond. HTO-1000 User Manual 1.5 Page 21 HTO-1000 User Manual 1.5 4. Only use new glass lined SS tubing from the cylinder to GasCal-1100 and a high purity stainless steel regulator. Condition the tubing by running calibration gas through the converter for a period of several hours. 5. The response time of the analyser may be checked using NO calibration gas. Check zeros again and adjust if necessary. To optimise the thermal converter temperature, introduce span gas of 100% of operating range. 6. Allow the thermal converter to stabilise, then increase the thermal converter temperature by 25°C and allow 30-60 minutes for the gas analyser value to stabilise. As the temperature of the converter is increased the span output will also increase until the optimum thermal converter temperature is reached. If operated above the optimum temperature, the efficiency will not be increased and the life of the components inside the HTO-1000 will be limited. The life of catalytic material and quartz tube should last several years under normal usage typical NH3 converter temperature is between 580-820°C. Multi point calibration of the thermal converter is recommended on start-up and once per year. Page 22 5. Maintenance 5.1 Maintenance Tools To perform general maintenance on the HTO-1000, the user will be required to carry the following equipment: Distilled water Decom 90 lab detergent (Cleaning solution diluted 20:1 with distilled water) Glass beaker Teflon tubing Pump Liquid trap Figure 1 – Example of liquid trap 5.2 Maintenance Schedule Table 1– Maintenance schedule Interval (samples)* Item Procedure Page As needed SOX Scrubber Efficiency Check 24 As needed Thermal Converter Oxidising Tube Clean 24 * Suggested intervals for maintenance procedure may vary with sampling intensity and environmental conditions. HTO-1000 User Manual 1.5 Page 23 HTO-1000 User Manual 1.5 5.3 Maintenance Procedures 5.3.1 SOX Scrubber Efficiency The purpose of the SOX scrubber is to remove all Oxides of Sulfur (SOX) found in the average sample concentrations for a period of six months or a total of 300-ppm hours. If the SOX scrubber appears to be not functioning properly, follow the scrubber test procedure: 1. Zero the analyser after allowing 15-minutes of zero air flow. 2. Supply a known concentration of H2S typically 80% of the measurement range, and calibrate the SO2 analyser to read the exact same concentration. 3. Replace the H2S source with SO2 span gas with approximately 250 – 400 ppb SO2. 4. Verify that the analyser does not show more than 5-ppb response to the SO2 input. If it’s higher, then the scrubber must be replaced, as the scrubber is not removing SO2 efficiently. 5.3.2 Temperature Controller Set-up The temperature controller in the Ecotech HTO-1000 Thermal oxidiser has been factory set and tuned to operate as required. With the exception of operating temperature, no other parameter is required to be altered. For temperature controller set-up and tuning instructions refer to controller manual. Set point is shown on the bottom line and the actual furnace temperature is shown on the top line. 5.3.3 Cleaning the Thermal Converter Oxidising Tube (excluding HTO-1000HC) If the conversion efficiency drops to below 80% on the thermal oxidiser or the oxidiser has operated continuously for 12 months, cleaning the sample lines of the converter and the thermal oxidising tube may correct the problem. Follow the procedure below: 1. Turn off the power to the HTO-1000. Disconnect the power cord from the instrument. Disconnect the sample input port from the source and disconnect the sample outlet port from the analyser. If the converter is fitted with an SOX scrubber, disconnect its tubing and remove it. 2. Allow the thermal converter to cool for at least four hours. CAUTION Do not proceed until thermal oxidiser cover and tubes are cool to touch. 3. Connect the sample inlet port of the oxidiser to the liquid trap; connect the vacuum port of the liquid trap to the pump. 4. Connect teflon tubing to the sample outlet port of the oxidiser. Place the other end of the tubing in the beaker with the 20:1 solution. Page 24 5. Start the pump. Allow the pump to run until there is no solution left in the beaker or until the liquid trap becomes full. Repeat this process until the tubing and the quartz tubing are cleaned. 6. Refill the beaker with distilled water and repeat the process at least three times, then allow the pump to run for at least 5 minutes to remove any moisture left in the assembly. 7. Connect a zero air source to the thermal converter (1L/min), connect the power cord to the converter and turn it on. Allow the oxidiser to stabilise at operating temperature for at least two hours. 8. Remove the zero air source, reconnect the sample inlet to the measurement source and then reconnect the sample outlet to the analyser. Reconnect the SOX scrubber to the inlet of the oxidiser; it is normal for SOX scrubber to be replaced when cleaning is performed. 9. Allow the HTO-1000 to run with stabilised flow and temperature for two hours. 10. Perform a zero/span calibration. Following this calibration, a converter efficiency test should be performed. HTO-1000 User Manual 1.5 Page 25 HTO-1000 User Manual 1.5 1492 Ferntree Gully Road, Knoxfield VIC Australia 3180 Phone: +61 (0)3 9730 7800 Fax: +61 (0)3 9730 7899 General email: [email protected] International support: [email protected] www.ecotech.com Page 26