1
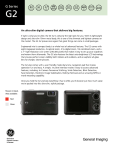
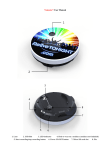
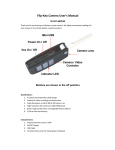
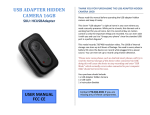
High Definition Car Video Recorder
User’s Manual
Thank you for purchasing HD CAR DVR from our company. In order to help you
operate it correctly, please read this instruction carefully before using.
Product Structure Sketch Map
1.AV OUT Slot 2.USB Slot(5V Power Supply Socket) 3.Mode Key 4.Up Key
5.Down Key 6.Power Switch Key 7.Menu Key 8.Record/Camera Key 9.Camera
Lens
10.Infrared Lamp 11.SD Card Slot 12.Bracket hole
13.Reset Key 14.speaker
15.LCD Screen
16.Microphone
17.Indicator Light
Operating Instructions
HD CAR DVR has the function of video recording, photographing, preview, AV OUT,
network camera , select the function by oneself according to needs during use, please
insert SD/MMC card before use.
【1】Record Mode
After pressing Power Switch Key or connecting to the charger, DVR automatically
enters Record Mode and starts recording, at this time, blue indicator light is
flickering.During video recording, press Record Key to stop video recording, at this time,
blue indicator light is always on.
【2】Camera Mode
After power on, press Mode Key and select to enter Camera Mode, press Camera Key
to take a photo.
【3】Preview Mode
After power on, press Mode Key to select to enter Preview Mode, press Up/Down Key
to select the video files or photo files, press Record Key to play or pause, press Mode Key
to exit Preview Mode.
【4】Delete Function
If you want to delete it, press Menu Key to enter into delete mode, and then, select
Single,All or Select by REC key and Up/Down and confirm to delete the file by press
REC key.
【5】AV OUT Function
Through AV connecting wire, connect the device to TV and other output
terminals,video and audio signals can be shown in TV and other output terminals.
【6】Infrared Photography Function
DVR is equipped with infrared lens and 4 infrared lamps, automatically detect the
environment shading strength, reach good night vision effect.
【7】Motion Detection Function
Set up “Motion Detection” item of video mode menu as “On”, start up motion detection
function.When an object is moving in front of DVR, DVR will automatically start up video
recording; when an object stops moving, it automatically stops video recording and enters
detection standby state.
When exits the motion detection, it automatically turns off the motion detection
function.
【8】Charging
It can charge after DVR is connected to the charger(DC 5V), red indicator light is
always on during charging, after fully charged, red indicator light is off.
【9】Connect to the computer
Connect HD CAR DVR with computer by USB cable, [My computer] will occur
removable disk, the file is stored at Removable Disk/DCIM/100DSCIM. At the moment,
the file of the DVR can be downloaded to the computer.
【10】System Reset
If abnormal condition occurs to thte device during use, use a small stick of diameter 1mm
to press the Reset Key, the system will reset automatically.
Menu Function Settings
Turn on the DVR and press Menu Key under Video mode or Camera mode to enter
into setting interface. Confirm by REC Key and select by Up/Down for the following
setting. Press Menu Key again to exit after finished.
when DVR turns off that the last setting will be saved.
【1】Video mode:
(A).Size: Select[1280×960/720×480/640×480pixels]
(B).Time Stamp:Select Off/Date only/Date&Time
(C).Motion Detect: Select On/Off
Note:When select Motion detect function, it will be recording automatically if there is
an object movement and stop recording if no movement.
(D).Andio Record: Select On/Off
(E).Recording time: select[2/5/15] minute to decide how many time will be storage
per one section.
【2】Camera mode: Size: 1.3M/VGA.
【3】Setting Mode:
Whether under Video mode or capture mode, press Menu Button twice to enter into
Setup interface.
(A).Format: Select it if you want to format the SD card.
(B).Language:Select[Simplified-Chinese/Traditional-Chinese/English/Japanese/
Korean/Russian /French/German/Italian/Spanish/Portuguese]
(C).System Reset: Select[Cancel or Execute system] reset.
(D).Light Frequency: set[50/60Hz]
(E).Date Input:Set correct recording Date and time by Rec Button and Up/Down
Button.
(F).IR LED: Auto or Off.
Note:
1)Please insert the SD/MMC card before recording.
2)This DVR records in cycle if you choose 2/5/15 minutes as storage time.
When the storage medium is full, it will record from the beginig again and erase over the
previously recorded material automatically. It will have 3 seconds pause time, and
namely the contents in the 3 seconds will not recorded.
3)Because the DVR is DC5V input, please use the attached car chager. It have adaptor
12V/24V transfers to 5V already.
Technical Specifications
LCD
2.5 inch TFT LCD Screen
Recording resolution
SXGA/1280*960,VGA/640*480,QVGA/320*240
Visual angle
120-degree wide-angle
Video format
AVI file format 30fps
Photo format
JPEG
Memory card
SD/MMC card 1GB-64GB
Microphone
can record sound
Continuous
time
recording
About 3 hours
Storage consumption
VGA format 1GB/about 35 minutes
USB interface
USB2.0
Battery capacity
750mAH/ Charging time: About 4 hours
Power source
Built-in rechargeable battery or 12V/24V Car Charger
Operating System
Windows2000/me/xp/2003;Vista;macos;linux
Packaging Accessories
User’s Manual, Car charger, USB Cable, AV Line, Bracket