1
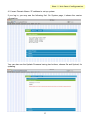
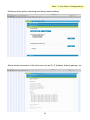
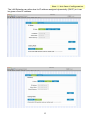
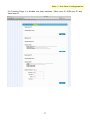
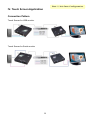
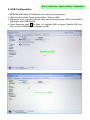
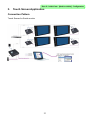
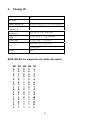
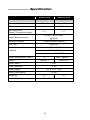
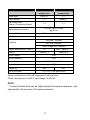
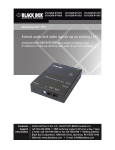
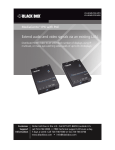
Table of Contents ------------------------ Introduction ................................................................................ 2 ------------------------ Part 1: Uni-Cast Configuration .............................................. 5 Installation..................................................................................................... 5 1. Device Connection .................................................................................... 5 2. Connection Pattern ................................................................................ 6 II. Product Description ..................................................................................... 7 III. Operation....................................................................................................... 8 1. Setting........................................................................................................ 8 2. Push Button Control................................................................................. 9 3. EDID Configuration................................................................................. 10 4. Network Configuration ............................................................................11 IV. Touch Screen Application .......................................................................... 18 ------------------------ Part 2: Multi-Cast (Multi-to-Multi) Configuration ........... 19 I. Installation................................................................................................... 19 1. Device Connection .................................................................................. 19 2. Connection Pattern ................................................................................. 20 3. Host Selection......................................................................................... 21 4. USB Configuration.................................................................................. 22 II. Touch Screen Application ........................................................................ 23 ------------------------ Serial Configuration ............................................................... 24 I. IP Setting ..................................................................................................... 24 II. Change ID .................................................................................................... 25 ------------------------ Specification............................................................................. 26 I. Please read this manual thoroughly and follow the Installation procedures to prevent any damage to the unit or any connecting device. * The final specifications are the actual product based. * Features and functions are subject to change since the manual was written. Please visit the related website to download the latest version of manual for reference. * Any other trademarks mentioned in this manual are acknowledged to be the property of the trademark owners. RoHS ------------------------ Introduction This User’s Manual is suitable for HDMI over Giga LAN Extender (NXMU-M220) DVI over Giga LAN Extender(NXDU-M220) It is divided into 2 parts: Part 1: Uni-Cast Configuration Part 2: Multi-Cast (Multi-to-Multi) Configuration The Uni-Cast application is Plug-and-Play basis. It’s easy to install in seconds. The Multi-Cast application can be used as multi-to-multi. Occasion Uni-Cast advantage one on one Plug-and-play basis control & Via existing LAN system broadcast Save bandwidth Multi-channel can be disadvantage Rotary DIP switch must be paired Only one on one transmitted simultaneous Multi-Cast multiple to multiple control & Single / Multi channels Need High broadcasting simultaneous Bandwidth Multi-drop IGMP Hub broadcast 2 Package Content Sender Unit and / or Receiver Unit x 1 set / pc (see Ordering Information) CAT5 cable (for testing) Plastic Screw Driver x 1 CD with User’s Manual Foot Pad Set Optional Mounting Bracket with Screws RJ11 to RS232 Converter Power Adapter (see Ordering Information) Power Adapter is optional for extender with PoE function. Ordering Information Model NXDU-M220 NXDU-220L NXDU-220R NXMU-M220 NXMU-220L NXMU-220R Type Sender Unit and Receiver Unit Sender Unit Receiver Unit Sender Unit and Receiver Unit Sender Unit Receiver Unit Optional Power Adapter 2 1 1 2 1 1 Overview The HDMI over Giga LAN Extender is a perfect solution for audio and video signal extension via existing LAN (Local Area Network) system. It’s Plug-and-Play basis in uni-cast application, neither GUI control nor RS232 setup is required. However, you need to set an identical ID number (Rotary DIP Switch) for each Sender and Receiver unit. With multicast technology, one local unit can drive multiple remote units with no extra network load. Via IGMP Giga Hub, there are 16 channels selectable and up to 4 channels can be transmitted simultaneously. Amazingly, each channel can be shown to an incredible 65536 displays using a standard IT Ethernet structure on a LAN system. For each source device a local unit is required, and a remote unit is needed for each display device. The HDMI over Giga LAN Extender is Full HD 1080p supported, HDCP compliant and Blu-ray ready. Moreover, this has been common used in applications that require greater distance, high speed transmission, real-time high video resolution, security, and noise immunity. Based on Giga LAN structure, it supports super-high speed transmission. It is ideal for situations that need live presentation, such as public broadcasting, education center, boardrooms, etc. 3 Features ● Extend high definition video signal over LAN, depending on performance network ● Extend USB signal transmission by using the existing LAN system without additional wiring ● Suitable for most of popular USB devices (e.g. USB sticks, USB printers, USB Scanner, external hard disk drives etc.) ● 16 selections on the DIP rotary DIP switch available for pairing ● Up to 4 pairings can be transmitted simultaneously over the Giga LAN System ● Using Giga LAN system for low latency network and well-grouping management ● Automatic EDID configuration ● PoE function supported, no additional power supply for the extender unit ● Well-developed Ethernet technology and TCP/IP communication protocol ● HDCP-compliant and Blu-ray ready ● HDTV compatible; support 1080p, 1080i, 720p, 720i ● Compatible with most of the popular screen resolution to XGA, SXGA, UXGA, WSXGA….Full HD system ● Optional VESA mounting bracket supported (for VESA mountable display attachment) System Requirement 1. HDCP compliant monitors with HDMI interface for the HDCP video source 2. CAT5 / 5e / 6 UTP cable (EIA / TIA 568B industry standard compliant) 3. Ethernet Hub (Giga Ethernet Hub is recommended) System Requirement for PoE 1. Ensure that a PSE device supports PoE function. 2. Ensure that a PSE device can provide sufficient power on the Ethernet cable. 3. STP and FTP cabling are recommended. Relative Product Model Function PoE NVXM-M110 Uni-Cast N/A (NVXM-110L + NVXM-110R) NVXM-M130 Multi-Cast, N/A (NVXM-130L + NVXM-130R) Uni-Cast Yes (NVXM-210L + NVXM-210R) Multi-Cast, Yes (NVXM-230L + NVXM-230R) Video Wall NVXM-M210 NVXM-M230 Video Wall For more information, please check through this manual. 4 Part 1: Uni-Cast Configuration ------------------------ Part 1: Uni-Cast Configuration I. Installation 1. Device Connection WARNING! ● Ensure that all devices are powered off before connecting to the Unit. ● Make sure all devices you will connect are properly grounded. ● Place cables away from fluorescent lights, air conditioners, and machines that are likely to generate electrical noise. ● Please allow adequate space around the unit for air circulation. 1. Connect the video source to the Sender Unit. 2. Connect the monitor to the Receiver Unit. 3. Use CAT5 cables (EIA / TIA 568B industry standard compliant) for connection between Tx/Rx and LAN Hub. 4. Set an identical ID number on Rotary DIP Switch for both Units. 5. Apply the proper power to all connecting devices. NOTE: A). It is highly recommended using Giga Ethernet Hub for optimal transmission quality. B). If users encounter no screen display in computer connection: 1. Make sure the device cables are correctly and firmly attached. 2. Set your display device’s (TV, monitor, etc.) input source as HDMI. 3. Check the PC BIOS configuration about the video output setting. 4. Connect your computer to the HDMI Display DIRECTLY to check if the video signal gets through. 5. Set the Rotary DIP Switch to the correct position. 6. Inappropriate EDID data. Apply EDID Copy to your display (see EDID Configuration section). 7. HDCP issue. The system will disable the video output signal when it detects non-HDCP compliant display(s) on playing the HDCP video source. All the connected output displays MUST be HDCP compliant while the video source is HDCP compliant. 5 Part 1: Uni-Cast Configuration 2. Connection Pattern Single Point-to-Point Application Function as simple video extenders, without Ethernet Hub in between ■ Sender’s and Receiver’s rotary DIP switch should be adjusted on the same position. 6 Part 1: Uni-Cast Configuration II. Product Description Ub Ua T1 T2 T3 T4 T5 T6 T7 T8 T9 R1 R2 R3 R4 R5 R6 R7 R8 R9 T10 R10 USB Connector Video Connector RJ-45 Jack Reset Button Power Supply F2 Push Button F1 Push Button Rotary DIP Switch Serial Port 1 Serial Port 2 Network Status LED T11 Power/Link LED R11 USB Host connection USB device(s) connection Connect to the HDMI source Connect to the HDMI monitor Connect to an Ethernet Hub System reset Apply the proper power to the unit See Push Button Control section Set up ID numbers For system control For data communication Flashing: Connected to network Off once: Abnormal Green: Unlink / Blue: Link OK Flash Blue + Green: Linked but no video source input Red: Unlink / Blue: Link OK Flash Blue + Red: Linked but no video source input 7 Part 1: Uni-Cast Configuration III. Operation The LEDs on the Extender Units show the real-time status indicating the linking and communication between the Sender Unit and the Receiver Unit. Users can identify the current status through the LED indicators on the unit. The quality of the output signal will depend largely upon the quality of video source, cable and display device used. Low quality cables degrade output signal causing elevated noise levels. Please use the proper cable and make sure the display device is capable of handling the resolution and refresh rate selected. NOTE: The system will disable the video output signal when it detects non-HDCP compliant display(s) on playing the HDCP video source. All the connected output displays MUST be HDCP compliant, when the video source is HDCP compliant. 1. Setting User needs to do the first thing setting Unicast mode in the browser because factory default is Multicast Mode. 1.1 How to set Unicast for Sender A). Domain Name The first thing users need to do is setting the unit as Uni-cast mode via browser because the factory default setting is Multi-cast mode. Identical ID setting on the rotary DIP switch of both Sender and Receiver is essential. Open web browser and insert the address. Please see the “Network Configuration” section. B). IP Open web browser and insert Sender’s IP address. If you don’t know IP address, you could find on the corner of Host Selection. Please see the “Network Configuration” section. C). Serial Command 1.2 How to set Unicast for Receiver A). IP Open web browser and insert Receiver’s IP address. If you don’t know IP address, you could find on the corner of Host Selection. Please see the “Network Configuration” section. B). Serial Command For more detail, please follow Network Configuration. 8 Part 1: Uni-Cast Configuration 2. Push Button Control VIDEO Extender over Giga LAN Press once (click within 0.3 sec.) - Link/ Unlink video (also functions for all Tx & Rx in the same channel) F1 Tx F2 Factory Default Setting for Tx: Power off the unit → Press and hold the button → Power on the unit → Release the button after 17 sec. right after the Power/Link LED flashes green & blue) → Re-power the unit Press for 1 sec. - Select Graphic Mode or Video Mode (also functions for all Tx & Rx in the same channel) (Factory default: Graphic Mode) Press for 3 sec. – Enter Anti-Dither Adjustment Mode: Level 1 /Level 2 / Off (also functions for all Tx & Rx in the same channel) (Factory Default: Off) Reset Reboot the system Press once (click within 0.3 sec.) - Link/ Unlink video (also functions for all Tx & Rx in the same channel) F1 Press and hold – USB port function enable/ disable Factory Default Setting for Rx: Power off the unit → Press and hold the button → Power on the unit → Release the button after 17 sec. right after the Power/Link LED flashes red & blue) → Re-power the unit Press for 1 sec. - Select Graphic Mode or Video Mode (also functions for all Tx & Rx in the same channel) (Factory default: Graphic Mode) Rx F2 Press for 3 sec. – Enter Anti-Dither Adjustment Mode: Level 1 /Level 2 / Off (also functions for all Tx & Rx in the same channel) (Factory Default: Off) *EDID Copy: Power off the unit → Press and hold the button → Power on the unit → Release the button after 12 sec. (the Network Status LED flashes yellow) Reset Reboot the system 9 Part 1: Uni-Cast Configuration 3. EDID Configuration EDID (Extended Display Identification Data) is greatly important which contains information about manufacturer name and serial number, product type, maximum image size, color characteristics, factory pre-set timings, frequency range limits, etc. In some cases display problems may occur due to incorrect EDID communication between the display monitor and the unit or inappropriate EDID data programmed by display manufactures. Therefore, by adopting “EDID COPY” function, it will allow the system to copy EDID information from EDID compliant displays in order to assure accurate display performance. ● EDID Copy (on Receiver Unit only) Step 1. Power off the unit Step 2. Press and hold the button F2 Step 3. Power on the unit Step 4. Release the button after 12 sec. (the Network Status LED flashes yellow) NOTE: 1. Using HDMI or DVI for all monitors; do not mix them up in one system. 2. It is suggested using monitors with identical brand and type. 10 Part 1: Uni-Cast Configuration 4. Network Configuration User may want to exchange casting mode between unicast and multicast, set up IP and use EDID Copy function. There are two way to reach, browser and serial command. 2.1. To complete users' goal, configuration via browser is divided into two ways, a. Typing Domain Name in the address bar b. Typing IP in the address bar Before starting take notice of differentiation between Domain Name and IP. 2.1.1. System configuration via Domain Name a Domain Name is for Sender only. b. It is suggested using “Safari” web browser or other web browsers like Google Chrome, Firefox or IE…, etc. If you use other web browser which is not Safari you’ll need to install “bonjour SDK”: Go to the website http://developer.apple.com/opensource/ and look for “bonjour SDK download” for installation. c. The same pair of Sender and Receiver should have identical ID (Rotary DIP Switch number) d. Open web browser and insert the address: http://videolan-gateway0000.local The four digits after the word “videolan-gateway” depends on the position of the Rotary DIP Switch you’ve set. Please refer to the form below. For example, if the position is set up as 7, then the address should be http://videolan-gateway1110.local 11 Part 1: Uni-Cast Configuration Rotary Switch Four digits Domain Name 0 1 2 3 4 5 6 7 8 9 A B C D E F 0000 1000 0100 1100 0010 1010 0110 1110 0001 1001 0101 1101 0011 1011 0111 1111 http://videolan-gateway0000.local http://videolan-gateway1000.local http://videolan-gateway0100.local http://videolan-gateway1100.local http://videolan-gateway0010.local http://videolan-gateway1010.local http://videolan-gateway0110.local http://videolan-gateway1110.local http://videolan-gateway0001.local http://videolan-gateway1001.local http://videolan-gateway0101.local http://videolan-gateway1101.local http://videolan-gateway0011.local http://videolan-gateway1011.local http://videolan-gateway0111.local http://videolan-gateway1111.local 4.1.2. System configuration via IP address a. Type a specific IP in the address bar and go to the setting page for each extender unit such as 169.254.xxx.xxx.It is suggested using “Safari” web browser or Google Chrome, Firefox or IE. b. If users do not know Senders or Receivers IP address, find on the corner of Host Selection Page. 12 Part 1: Uni-Cast Configuration 4.2. Insert Domain Name / IP address to set up system If you log in, you may see the following first. On System page, it shows the version information. You can also see the Update Firmware having two buttons; choose file and Upload, for updating. 13 Part 1: Uni-Cast Configuration Utilities provide system rebooting and factory default setting. Status shows information of the Host unit such as ID, IP Address, default gateway, etc. 14 Part 1: Uni-Cast Configuration The LAN Extender can either has its IP address assigned dynamically (DHCP) or it can be given a fixed IP address. 15 Part 1: Uni-Cast Configuration If there is no DHCP you must assign a static IP for the unit. You can get it from the networking administrator. 16 Part 1: Uni-Cast Configuration On Function Page, it is divided into three sections, Video over IP, USB over IP and serial over IP. 17 Part 1: Uni-Cast Configuration IV. Touch Screen Application Connection Pattern Touch Screen for USB monitor Touch Screen for Serial monitor 18 Part2: Multi-Cast (Multi-to-Multi) Configuration ------------------------ Part 2: Multi-Cast (Multi-to-Multi) Configuration I. Installation 1. Device Connection WARNING! ● Ensure that all devices are powered off before connecting to the Unit. ● Make sure all devices you will connect are properly grounded. ● Place cables away from fluorescent lights, air conditioners, and machines that are likely to generate electrical noise. ● Please allow adequate space around the unit for air circulation. 1. Connect the video source to the Sender Unit. 2. Connect the monitor to the Receiver Unit. 3. Use CAT5 cables (EIA / TIA 568B industry standard compliant) for connection between Tx/Rx and Giga Hub. 4. Set different ID number for each Sender, Receivers are not limited. 5. Apply the proper power to all connecting devices. NOTE: A).It is suggested using the proper Giga Ethernet Hub (IGMP) to ensure optimal transmission quality. (see System Requirement section) B).If users encounter no screen display in computer connection: 1. 2. 3. 4. Make sure the device cables are correctly and firmly attached. Set your display device’s (TV, monitor, etc.) input source as HDMI. Check the PC BIOS configuration about the video output setting. Connect your computer to the HDMI Display DIRECTLY to check if the video signal gets through. 5. Set the Rotary DIP Switch to the correct position. 6. Inappropriate EDID data. Apply EDID Copy to your display (see EDID Configuration section). 7. HDCP issue. The system will disable the video output signal when it detects non-HDCP compliant display(s) on playing the HDCP video source. All the connected output displays MUST be HDCP compliant while the video source is HDCP compliant. 19 Part2: Multi-Cast (Multi-to-Multi) Configuration 2. Connection Pattern Multi-To-Multi Application ■ Each Sender’s ID must be different. 20 Part2: Multi-Cast (Multi-to-Multi) Configuration 3. Host Selection After successfully connecting all of NXMU LAN extenders, you can choose one receiver (For Example, Local IP: 169.254.5.185) to play a source from Senders. When you push F1 on the receiver, you will see one message box in the frame. Node List records four digits (meant Sender’s ID) that you set it before, and you can choose one to enter. (You can check the form for reference below) Once entering this Host Selection Window, we suggest you making system renew Node List by clicking “Refresh” button. After finishing operation between sender and receiver(s), you can push F1 on your sender to disconnect other receivers. Rotary Switch Four digits Domain Name 0 1 2 3 4 5 6 7 8 9 A B C D E F 0000 1000 0100 1100 0010 1010 0110 1110 0001 1001 0101 1101 0011 1011 0111 1111 http://videolan-gateway0000.local http://videolan-gateway1000.local http://videolan-gateway0100.local http://videolan-gateway1100.local http://videolan-gateway0010.local http://videolan-gateway1010.local http://videolan-gateway0110.local http://videolan-gateway1110.local http://videolan-gateway0001.local http://videolan-gateway1001.local http://videolan-gateway0101.local http://videolan-gateway1101.local http://videolan-gateway0011.local http://videolan-gateway1011.local http://videolan-gateway0111.local http://videolan-gateway1111.local 21 Part2: Multi-Cast (Multi-to-Multi) Configuration 4. USB Configuration 1. KB & MS activating are based on first come first served basis. 2. USB device is settled ON status by default. (Starting USB) 3. Make sure other receivers with the same sender stopping their USB device before you share your USB device. 4. Other Receivers push F1 for 3sec. on receiver side or cancel “Enable USB over LAN” to stop USB activation. (Stopping USB) 22 Part2: Multi-Cast (Multi-to-Multi) Configuration II. Touch Screen Application Connection Pattern Touch Screen for Serial monitor 23 ------------------------ Serial Configuration I. IP Setting Telnet Host / client telnet to IP 169.254.0.101 port 24 telnet 169.254.0.101 24 Use "root" to login. List all boards' hostname and IP address : node_list. Configure IP setting Autoip : 169.254.xxx.xxx private IP domain is used and auto-generated on boot. Dhcp client : Use DHCP client to get IP address. Static ip : Use static IP address. To configure IP mode : astparam s ip_mode mode Where "mode" can be: autoip, dhcp, static To configure static IP address : IP : astparam s ipaddr xxx.xxx.xxx.xxx Netmask : astparam s netmask xxx.xxx.xxx.xxx If you want to save the setting into flash and keeps the setting after reboot: astparam save 24 II. Change ID Rx Stop Link Change multicast ip astparam s multicast_ip 225.0.10B0.B1B2B3 Change the hostname_id Change the ch_select to connect to Trigger hostname change astparam s ch_select B0B1B2B3 Restart Link ast_send_event -1 e_reconnect ast_send_event -1 e_chg_hostname astparam s reset_ch_on_boot n Save astparam save reboot Reboot B0,B1,B2,B3 are mapped to the 4-bits dip switch B0 0 1 0 1 0 1 0 1 0 1 0 1 0 1 0 1 B1 0 0 1 1 0 0 1 1 0 0 1 1 0 0 1 1 B2 0 0 0 0 1 1 1 1 0 0 0 0 1 1 1 1 B3 0 0 0 0 0 0 0 0 1 1 1 1 1 1 1 1 ID 0 1 2 3 4 5 6 7 8 9 A B C D E F 25 ------------------------ Specification Sender Unit Receiver Unit NXDU-220L NXDU-220R DVI x 1 N/A Video Output N/A DVI x 1 Top Panel LEDs (Power / Connection Status) x1 x1 Video Input Video Resolution (max.) Maximum Distance Full HD (1920 x 1080) @ 60 Hz * Ethernet-based network LAN Type Giga LAN Avg. BW: 150MHz Bandwidth Inst. BW: 650MHz Static image BW: 100MHz System Expandability (max.) USB2.0 16 1000(each ch.) USB-B x 1 USB-A x 4 Serial Control Yes Serial Extension Yes Power Supply DC 9~12V, 1.5A Power Consumption 13.5W Weight (g) 707 H x W x D (mm) 30 x 150 x 132 (each Unit) 26 711 Sender Unit Receiver Unit NXMU-220L NXMU-220R HDMI x 1 N/A Video Output N/A HDMI x 1 Top Panel LEDs (Power / Connection Status) x1 x1 Video Input Video Resolution (max.) Maximum Distance Full HD (1920 x 1080) @ 60 Hz *Ethernet-based network LAN Type Giga LAN Avg. BW: 150MHz Bandwidth Inst. BW: 650MHz Static image BW: 100MHz System Expandability (max.) USB2.0 16 1000(each ch.) USB-B x 1 USB-A x 4 Serial Control Yes Serial Extension Yes Power Supply DC 9~12V, 1.5A Power Consumption 13.5W Weight (g) 600 605 H x W x D (mm) 27 x 131 x 130 (each Unit) Power over Ethernet: PoE HUB required for PoE operation Power- Nominal Input: 48VDC; Input Range: 36-57VDC NOTE: * 3 levels of Switch Hub can be Daisy-chained for system expansion, and each switch hub can have 100 meters extension. 27 Limited Warranty IN NO EVENT SHALL THE DIRECT VENDOR'S LIABILITY FOR DIRECT OR INDIRECT, SPECIAL, INCIDENTIAL OR CONSEQUENTIAL DAMAGES, LOSS OF PROFIT, LOSS OF BUSINESS, OR FINANCIAL LOSS WHICH MAY BE CAUSED BY THE USE OF THE PRODUCT EXCEEDS THE PRICE PAID FOR THE PRODUCT. The direct vendor makes no warranty or representation, expressed or implied with respect to the contents or use of this documentation, and especially disclaims its quality, performance, merchantability, or fitness for any particular purpose. The direct vendor also reserves the right to revise or update the product or documentation without obligation to notify any user of such revisions or updates. For further information, please contact your direct vendor. All the brand names and registered trademarks are the property of their respective owners. Printed in Taiwan FFP-MVM872Z-000 28