1
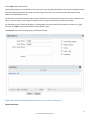
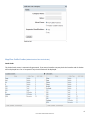
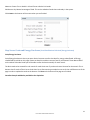
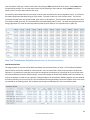
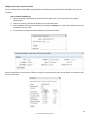
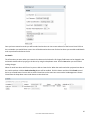
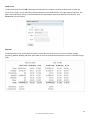
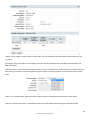
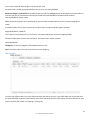
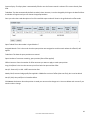
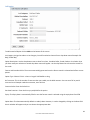
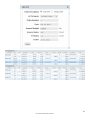
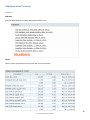
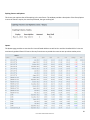
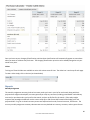
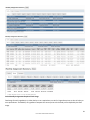
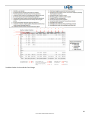
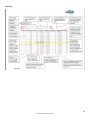
Linus 7 User's Manual Table of Contents Fire Fox .................................................................................................................................................................................... 3 Step By Step Linus7 Setup Guide ............................................................................................................................................ 3 Step One: Business Names.................................................................................................................................................. 3 Step Two: Cattle Classifications .......................................................................................................................................... 4 Step Three: Cattle Loss Reasons ......................................................................................................................................... 5 Step Four: Lot Categories.................................................................................................................................................... 6 Step Five: Cattle Grades ...................................................................................................................................................... 8 Step Six: Feeds .................................................................................................................................................................... 9 Step Seven: Grain and Energy Purchases.......................................................................................................................... 11 Step Eight: Feed Prices ...................................................................................................................................................... 16 Step Nine: Rations............................................................................................................................................................. 17 Step Ten: Classification Defaults ....................................................................................................................................... 18 Step Eleven: Cattle Pricing ................................................................................................................................................ 21 Step Twelve: Entering Lots................................................................................................................................................ 24 Step Thirteen: Fed Cattle Sales Contracts......................................................................................................................... 32 Step Fourteen: Feeder Cattle Sales Contracts .................................................................................................................. 34 Step Fifteen: Feeder Purchase Orders .............................................................................................................................. 34 Step Sixteen: Hedge Accounts…………………………………………………………………………………………………………………………………… 35 Step Seventeen: Canadian Accounts CPIP Policies (Hedge Accounts Tab- CPIP).............................................................. 41 Additional Linus7 Features ................................................................................................................................................... 45 Imports .................................................................................................................................................................................. 47 Tools ...................................................................................................................................................................................... 52 Purchase Calculator .......................................................................................................................................................... 52 Reports .................................................................................................................................................................................. 55 2 Linus7 User's Manual 2012 Version 1.6 Fire Fox Linus 7 works best when opened with Fire Fox rather than Internet Explorer. To Download Fire Fox: http://www.mozilla.org Step By Step Linus7 Setup Guide Follow these simple steps to begin entering data into your Linus7 account. Step One: Business Names (Administration Tab-Business) Business The Business screen is used to enter the names of businesses associated with your operation. This includes names such as where you purchase cattle and where they are fed. E.g. Business Name: Home Feedlot E.g. Business Name: Cargill The following acronyms are used to describe the business type: Owner- OWN Feed Yard- FEED Purchasing Agent - PRCHAG Company- COMP Selling Agent- SELLAG 3 Linus7 User's Manual 2012 Version 1.6 Click + Add to add a new business. Assign the Business an Account Number if it has one and a name E.g. Olds Auction Mart. As you type the Legal Name the Alias Name will be automatically entered. You may change it if you wish. You can also provide a description of the business and add additional notes. You will need to choose the business type using the check boxes next to the business types on the right. A business may apply to only one type or it may apply to all types. Check as many or as few business types as they apply. For Businesses that are a Purchasing Agent or a Selling Agent you need to specify their location or locations. E.g. High River, AB. Click Add in the Locations section to add a location name. Click Save when you are finished entering a new Business Name. Step Two: Cattle Classifications (Administration Tab- Cattle Classifications) Cattle Classification 4 Linus7 User's Manual 2012 Version 1.6 Cattle Classifications are the names you will use to identify cattle by age, group, and sex. You can edit a Classification by selecting Edit in the bottom left corner of the screen. Use the arrows to scroll through the Cattle Classifications. Eg. Steer Calf, Yearling Steer Click +Add to add a new cattle classification and then type in the New Cattle Classification Name. Once you are finished click Submit. Step Three: Cattle Loss Reasons (Administration Tab- Cattle Loss Reasons) Cattle Loss Reasons Cattle Loss Reasons is a list of all the possible causes of death of an animal. The list is automatically populated in your Linus7 account; however you may add, edit and delete items to fit your operation. 5 Linus7 User's Manual 2012 Version 1.6 Click +Add to add a new Cattle Loss description. Assign each reason an acronym and provide a short and long description of each reason. E.g. Acronym- BLT, Short Description- Bloat, Long Description- Loss Due to Bloat Click Create to save the New Cattle Loss Reason. Step Four: Lot Categories (Administration Tab- Lot Category) Lot Category Lot Categories are groups of cattle that are geographically or genetically different and require different basis levels set to establish sale price. For example, Fed Cattle Futures or Feeder Cattle Futures. Separate categories are created for Live Cattle vs. Feeder Cattle and for genetic differences such as Fed Beef, Feeder Cattle and Fed Holsteins. You would also create separate Lot Categories if there is a Geographic difference - for example if you have cattle in Texas and Nebraska you would create two different Categories so that you are able to set the Basis for each. 6 Linus7 User's Manual 2012 Version 1.6 The three most common Lot Categories that you will use are Fed Beef Cattle, Feeder Beef Cattle and Fed Holsteins. It is important to note that once you assign Classification Default Settings to a Lot Category you will be unable to make changes to the Lot Category name or where it is priced from. Click + Add to add new Lot Category. Enter the fields as follows: Category Name: E.g. Fed Beef Cattle Notes: Any additional notes on the lot Priced From: Choose either Fed Cattle Futures or Feeder Cattle Futures Separate Classifications: This is asking if you would like to keep the cattle classifications separate on the reports. For example, Steer Calf and Yearling Steer . Choose Yes or No. 7 Linus7 User's Manual 2012 Version 1.6 Step Five: Cattle Grades (Administration Tab- Cattle Grade) Cattle Grade The Cattle Grade screen is automatically generated . If you own a Canadian company both the Canadian and US Grades will be displayed here. For US companies only the US Grades will be displayed. 8 Linus7 User's Manual 2012 Version 1.6 If you have other Grades that you use in your feedlot you may enter them here.. Click +Add at the bottom of the screen to add a new Grade. Type in the Grade Name and then click Create at the bottom of the screen. The Grades are broken down into four categories: Quality, Yield, Off Grades and Discounts. This list can be rearranged by clicking on Rearrange at the bottom of the screen. Click on the blue field box with the name of the Grade you would like to move and then drag it either up or down on the list. Click Save when you are finished. Step Six: Feeds (Administration Tab- Feeds) Feeds This page displays all feeds that are used to setup rations. All new Canadian Linus7 accounts will have the Feeds section setup with the following: Barley, DDG, Hay, Silage, Supplement and Wheat. You are able to Add, Edit and Delete Feeds using the options at the bottom of the screen. 9 Linus7 User's Manual 2012 Version 1.6 All new U.S. Linus7 accounts will have the Feeds section setup with the following: Corn, Hay, Supplement and WDG. You are able to Add, Edit and Delete Feeds using the options at the bottom of the screen. Click + Add to enter a new feed. Name: Assign the feed a name. E.g. Corn. Show in COG Calculator: By checking this box the feed will be used in the Cost of Gain Calculator Allow Feed Purchase Entries: By checking this box the Feed will be placed on the Grain/Energy Purchases Page. All Energy related Feeds should be selected. E.g. Barley, Corn, WDG, DDGs. Manual Entry of Basis: By checking this box you will be able to enter a Basis for the given feed. If the box is not checked the Basis for Barley will be used for this feed in Canadian accounts and the Basis for Corn will be used in US accounts. You can go back and change this in the future if needed. Use as Ration Ingredient: By checking this box the feed will be included in the list of feeds used to build rations 10 Linus7 User's Manual 2012 Version 1.6 Measure: Choose Ton or Bushel in US and Tonne or Bushel in Canada. DM Percent: Dry Matter Percentage of Feed. This can be edited on Feeds that are already in the system. Click Create at the bottom of the screen when you are finished. Step Seven: Grain and Energy Purchases (Feed Classifications Tab-Grain/Energy Purchases) Grain/Energy Purchases Grain/Energy Purchases is where you enter Grain Contracts as well as the Basis for energy related feeds. All Energy related feeds should be on this page. Please see Step Six to add or remove a feed. If you selected "Enter Manual Basis" on the Admin Tab under Feeds you will be able to enter the Basis manually for each month.. The Basis needs to be entered for each month for each Grain even if you do not have a Contract for that month. This is because Linus7 works off the Current Cash Grain Price. After entering a number be sure to click on a different area of the page in order to update the totals at the bottom. Click Save at the bottom of the page once finished. Canadian Example with Barley and DDG as the Equivalent 11 Linus7 User's Manual 2012 Version 1.6 For each Grain/Energy Purchase (E.g Barley) a report on the totals for that grain is provided showing the total amount in Tonne or Bushels contracted, the Profit or Loss per Tonne or Bushel and the Total Profit or Loss for that grain inTonnes. All feeds are compared to the equivalent of Barley in Canadian Accounts. The Energy Equivalent Percent will come from your nutritionist. 12 Linus7 User's Manual 2012 Version 1.6 13 Linus7 User's Manual 2012 Version 1.6 14 Linus7 User's Manual 2012 Version 1.6 US Example with Corn and WDG as the Energy Equivalent For each Grain/Energy Purchase (E.g Barley) a report on the totals for that grain is provided showing the total amount in Tons or Bushels contracted, the Profit or Loss per Tons or Bushesl and the Total Profit or Loss for that grain in Bushels. All feeds are compared to the equivalent of Corn in US Accounts. The Energy Equivalent Percent will come from your nutritionist. 15 Linus7 User's Manual 2012 Version 1.6 Step Eight: Feed Prices (Feed Classifications Tab-Feed Prices) Feed Prices Feeds on this page include Hay, Supplements, Silage, etc. You need to enter the price per Ton, Tonne or Bushel of each feed manually in the blank field boxes. Click Save when you are finished. 16 Linus7 User's Manual 2012 Version 1.6 Step Nine: Rations (Feed Classifications Tab- Rations) Rations This is where you enter all Rations used in your feeding operation. Each ration is listed by name and shows the percentage of each feed used in the ration. The "Is Standard" is stating whether the ration is included in the Time on Ration Table (this will be discussed in the following step). Click +Add to add a new ration. Enter the ration name manually into the blank field box. Make sure the box titled “Always show in Time on Ration table” is checked if you would like to assign this ration to a group of cattle. The feeds that are shown on the Add New Ration page come from the Feeds entered under the Administration Tab. The Feeds that you setup previously will show here and can be used to build rations. Enter the percentage of each feed as fed in the ration. The percentage must be equal to 100% in order for you to create the ration. Click Create when you are finished. 17 Linus7 User's Manual 2012 Version 1.6 From the Rations Table you are able to edit rations by clicking on Edit at the bottom of the screen. Click Create when finished making changes. You can also delete rations by first selecting a ration and then clicking Delete. You will be asked if you are sure you want to delete the ration. The monthly rations table shows current ration prices for each month based on current ingredient prices. It is found on the Rations page below the table listing all of the rations. The table is split into 3 lines for each ration. The first line represents the total ration cost ($/tonne CDN; $/ton US) on an As Fed basis. The second line represents the total ration costs ($/tonne CDN; $/ton US) on a Dry Matter Basis (As Fed divided by DM % ration). The third line represents only the energy ingredients of a ration in barley equivalence (barley $/tonne CDN) or corn equivalence (corn $/bu US). Step Ten: Classification Defaults (Administration Tab- Classification Defaults) Classification Defaults This page provides an overview of the details associated with each classification of cattle. The Classification Defaults entered will be used as the standard for cattle entered in Lots, Purchase Orders, Sales Contracts and on the Purchase Calculator. It is important to note that you are able to change the classifications for a particular lot if you feel the cattle will perform differently than the default settings. You can also change the Classification Defaults and Time on Ration at anytime as changes are made to your operation. Changes made on the Classification Defaults page will only be reflected on new lots entered, not your current lots. The Classification Defaults grid displays current Dry Matter ration costs which are blended for the feeding period. The Dry Matter percentage is also displayed on the Time on Ration table. 18 Linus7 User's Manual 2012 Version 1.6 To add a new lot category/classification click Add in the bottom left corner. This will bring up a window. Now choose the lot category and appropriate cattle classification to start setting up the classification default information associated to it. Click Add and this will bring up the Time on Ration Table. The rations that you created previously will be listed here. If a ration is missing go back to the Feed Classifications Tab- Rations and click on the Ration Name. Be sure the box titled “Always Show in Time on Ration Table” is checked. Now, on the Time on Ration Table determine what percentage of time the cattle spend on each Ration. The percentages must total 100 in order for it to save. The column will automatically total as you type in percentages. You will also notice that the days on feed (DOF) are automatically calculated as you fill in the time on ration and then totaled at the bottom. Click Save Time on Ration when finished. *This needs to be filled out before the Cost of Gain Calculator is generated* Once the Time on Ration details have been entered and saved this will bring up the Cost of Gain information for the Lot Category and Classification you have selected. Default Settings must be set individually for each Lot Category and Cattle Classification. Once they have been set you will not be able to delete- individual Cattle Classifications, Lot Categories or Rations. The Classification details that need to be filled in are as follows: DM Conversion: Expected dry matter conversion for the animal. Please consult your nutritionist if unsure. E.g 6.5 ADG: Average Daily Gain. E.g. 3.1lbs In Weight: Weight animal enters the feedlot e.g. 500lbs Out Weight: Finished . E.g. 1300lbs 19 Linus7 User's Manual 2012 Version 1.6 Feedlot Margin: This is an estimate of the $ per head per day of your operation. E.g. $0.50. This is the markup that your operation will receive from feeds and other expenses. Since feeds are put in at cost that margin also needs to be added in otherwise your COG will be incorrect. If you put all of your costs in the system at a value that gets invoiced out then the feedlot margin could be put at zero. However, doing it this way will not give you an accurate value. For example; the corn market compared to your corn purchases. Yardage $/hd/day: These are the costs related to yardage which include bedding on a $/hd/day basis. E.g 2 Meds: Medication costs per head over the feeding period e.g. $25 Death Loss %: Death Loss is entered as a percentage. E.g. 1% Interest %: Interest costs associated with feeding cattle. E.g. 3% DOF: Days on Feed. This is automatically calculated based on In Weight, Out Weight and ADG. DM Ration Cost: Present COG: The Cost of Gain is calculated using a blended Dry Matter ration cost for the feeding period in addition to yardage, margin, and meds instead of the nearby barley or corn prices. 20 Linus7 User's Manual 2012 Version 1.6 Adding a Cattle using a Fixed Cost of Gain You can create lots with a fixed COG (using fixed COG classifications) and calculate ROI for fixed COG in the purchase calculator How to create a fixed COG lot: 1. Create a new cattle classification and select fixed COG option (you can't use this option for existing classifications) 2. Create the necessary classification defaults for the new classification 3. Create a new lot with the fixed classification OR change an existing lot to use the new classification (as long as it doesn't have any sales) 4. In Lot Projections, update the COG to whatever you like and click Save When you add cattle to a lot that have a fixed cost of gain, the projections will show as seen below. You are able to edit the Cost of Gain here. 21 Linus7 User's Manual 2012 Version 1.6 Step Eleven: Cattle Pricing (Cattle Contracts Tab- Cattle Pricing) The Cattle Pricing page needs to be setup for all Lot Categories. E.g. Fed Beef Cattle and Feeder Beef Cattle. Select the Lot Category using the drop down menu at the top of the page. Fed Cattle Pricing The Cattle Pricing page allows you to enter your projections on the Basis for each month of the year. Enter your projections into the blank fields and click Save at the bottom of the screen. Canadian Fed Cattle Pricing On Canadian accounts the Canadian Dollar needs to be factored in. The Projected Price is calculated as follows: Live Cattle Price/ CDN $= Total. Take that total and add or subtract the basis to determine the Projected Price. 22 Linus7 User's Manual 2012 Version 1.6 Feeder Cattle Pricing The Feeder Cattle Pricing is different from the Fed Cattle Pricing in that you are able to enter your Basis Projections by Weight. The Feeder Cattle Pricing Page uses the weights from the Cattle Classifications that you set up on your Classification Defaults page. For Example. You have a Steer Calf priced from the Feeder Cattle Board with an put weight of 875lbs. You will need to enter the Basis for each Cattle Classification and each month. If you make a change to the Out Weight on your Classiifcation Defaults page it will also change here. You can adjust the Default Basis using the Slide Up or Slide Down feature for each classification. The Adjustment to Default Basis simplifies the entry of basis for each feeder classification. Canadian Feeder Cattle Pricing On Canadian accounts the Canadian Dollar must me factored in. The Projected Price is calculated as follows: Feeder Cattle Price/ CDN $= Total. Take that total and add or subtract the basis to determine the Projected Price. 23 Linus7 User's Manual 2012 Version 1.6 Step Twelve: Entering Lots (Lot Management Tab- Yardsheets) Yardsheets This is a list of all the lots that have been entered into Linus7. Use the field boxes at the top to quickly access a lot by Name, Sex, Category or Lot Number. You can type in a lot number to access specific lots quickly .Scroll through pages at the bottom either by entering the page number or by using the arrows. Lots are displayed on the page in 10, 20 or 30 depending on your selection. *Must scroll over to access Out Date, Current Weight, and Lot Status. Click + Add to add a new lot. Lot Number: Give each lot a unique name. E.g. based on pen number etc. Lot Category: Use the drop down menu to choose the correct category. The categories come from Lot Category under the Administration tab. E.g. Fed Beef Cattle Cattle Classification: Use the drop down menu to choose the correct classification. This comes from Cattle Classification under the Administration tab. E.g. Steer Calf Feed Yard: Use the drop down menu to choose the feed yard the cattle will be in. The Feed Yards are set up as a Business under the Administration tab. E.g. John Smith's Feedlot Results Yield Adjusted by: This is a measure that allows you to compare ADG, DM Conversion and COG on closed out lots on the same level. Results Yield defaults to 60% on Canadian Accounts and 63% on US Accounts. This number can be changed in the field box provided. Owners: Use the drop down menu to choose who owns the cattle and use the field box to type what percentage of the cattle they own. Additional owners may be added if needed by clicking on Add Owner. Note: Only the cattle owned by the company name of the Linus7 account will show in your reports. Click Create to save the new lot. 24 Linus7 User's Manual 2012 Version 1.6 Once you have created a new lot you will be taken back to the main Lots screen where all of the lots are listed. Click on the Lot Number you would like to access. You will be directed to the screen for that lot where you are able to add details such as purchases and sales to the lot. Lot Details The information you enter when you create the lot become the lot details. All the grey field boxes can be changed in the Lot Details window either by typing in the box or by using the drop down menu. Click on Save when you are finished making changes. When all cattle have been sold from a lot you are able to close the lot. When the cattle reach their projected out date or the cattle have been sold the Send to Pending button will be enabled. Click this button and then Click Closed to send the lot to a Closed Status. You are able to access Closed Lots on the main Lots screen under Lot Management. Choose Closed from the drop down menu under Status to view these lots. 25 Linus7 User's Manual 2012 Version 1.6 Lot Summary This is an overview of cattle entered in this lot. Most significantly it shows the average weight of the cattle and the $/lb. The Date In is an average in date for all purchases in the lot. Assigned Out Dates The Assigned Out Dates is found on the left hand side of the Lots Page. This is a very important item to maintain in your account as the cattle will be shown on the cattle risk report based on the assigned month. You are able to edit the assigned out dates at anytime during the feeding period.Cattle are automatically assigned an out date based on their purchase date taking into account the number of days on feed. Choose edit assignment to add additional marketing dates and to edit the original assignment. 26 Linus7 User's Manual 2012 Version 1.6 Projections Owner: The projections section can be viewed by owner percentage using the drop down menu. Movement & Performance Movement and Performance numbers, such as DM Conversion, Avg Daily Gain etc, come from data entered in Classification Defaults under the Admin Tab. The numbers can be edited for the lot by typing in the grey boxes.Note: Changes to a specific lot will not over ride the Classification Default Settings, they will only change in the specific lot. Avg Out Date: lbs gain/ADG + avg in date AvgDays on Feed: lbs gain/ADG Profit/Loss DM Ration ($/tonne): DM ration reflects the blended DM ration cost for the feeding period COG ($/cwt): COG reflects feed plus margin, yardage, and meds ((DM ration cost/2204.6* (ADG*DM conversion)*DOF)/Gain*100) + ((yardage+margin)*DOF/Gain*100)+(meds/gain*100)Total COG ($/cwt): Cost of Gain including interest & death loss BE w/Int ($/cwt): (Purchase + feeding expenses+interest)/Total yield adjusted sale weight Cattle Futures/Currency: Weighted average Futures prices from individual purchases. When a purchase is created, the Futures price reflects the current quote for the marketing date (using classification defaults to determine out date) BE Basis: BE w/Interest- (Cattle Futures/Currency Futures*100) WtAvg Basis: Weighted average basis levels from individual purchases. When the purchases are created, the basis is automatically filled in from the Cattle Pricing Page using the out month of the cattle Sale Price: Futures Price/CDN Dollar *100 + Basis Profit w/Int ($/hd): (Sale Price- Breakeven)*Avg Sale weight/100 ROI= Profit/(Total Purchase Price+(Total COG/2))*365/DOF*100 27 Linus7 User's Manual 2012 Version 1.6 Closeout Projections When the cattle have been sold and the lot is closed the Closeout Projection numbers will be calculated and displayed in the closeout column. Required Feed Required Feed is calculated based on the rations selected in the Time on Ration Table in the Classification Defaults Section. This is the required feed for the cattle in the lot for the entire feeding period. If cattle are not sold on or before the Date Out, the required feed will only be calculated for one week after that date. For Example if the Projected out Date was September 1 the Required Feed would be calculated until September 7. It is important to ensure that the out dates are accurate in order to properly manage feed requirements. Purchases To add cattle to a lot you need to add a new purchase by clicking Add at the bottom of the purchase section. Use the drop down menus and the field boxes to fill out the Purchase. 28 Linus7 User's Manual 2012 Version 1.6 Click Create when you are finished. Adding a Purchase from a Feeder Purchase Order You can add cattle to a lot from a Purchase Order previously created. To do this uncheck the Generate PO Box on the Add New Purchase Screen. You can then choose the PO# from the drop down list. The New Purchase will be automatically filled in using the information. Click Create at the bottom. Sales To sell cattle from a lot you need to add a new sale by clicking add at the bottom of the Sale section. Use the drop down menus and the field boxes to fill out the Sale. The Pay Weight and Price are both based on the total number of head in 29 Linus7 User's Manual 2012 Version 1.6 the Sale. Averages for individual animals are calculated to the right once this information has been filled in. The Cattle Futures and the Canadian Dollar are automatically filled in using the Front Month Futures. Click Create when you are finished. Adding a Sale from a Fed Cattle Sales Contract You can sell cattle from a lot from a Fed Cattle Sales Contract previously created. To do this uncheck the Generate PO Box on the Add new Purchase Screen. You can then choose the Contract # from the drop down list in the top right. The sale will be automatically filled in using the information. Click Create at the bottom. Please see the Fed Cattle Sales Contracts page. 30 Linus7 User's Manual 2012 Version 1.6 Cattle Losses To add a new cattle loss click Add at the bottom of the Cattle Loss window. Use the drop down menu to select the reason for the death. You can add other Cattle Loss Reasons on the Administration Tab under Cattle Loss Reason. The date can be modified by clicking on the blank field box and selecting the appropriate date from the calendar. Click Create when you are finished. Expenses To add expenses to a lot use the blank field boxes to enter the Total Costs for the Lot in terms of Feed, Yardage, Processing, Medical, Bedding and Other. Remember to enter the total head at the bottom in order to calculate average $/HD. 31 Linus7 User's Manual 2012 Version 1.6 Step Thirteen: Fed Cattle Sales Contracts (Cattle Pricing Tab- Fed Cattle Sales Contracts) Fed Cattle Sales Contracts The Sales Contracts screen provides an overview of all sales contracts. This includes Open, Closed, Pending and Not Priced Contracts. Use the Status drop down menu to sort the list by the status of the contract. Contracts can also be sorted by Buyer and Location using the drop down menus. Open/ Not Priced- This shows Not Priced and Open contracts on the same page. This is the default setting when you open the Fed Cattle Sales Contract page Open- Any prices contracts that have not been filled are considered Not Priced- No futures price has been entered against this contract Pending- These contracts have been filled and are in pending section for review Closed Contracts- Have been filled and once reviewed can be closed. Once closed they cannot be reopened To add a New Contract click +Add at the bottom of the Sales Contract screen. You will need to assign an ID number to the Sales Contract by typing it into the blank field box. Next choose the date that the cattle will be delivered on this contract. Select the Buyer and Location from the drop down menus that are associated with the Sales Contract. Using the Category drop down list assign the contract to one of your Lot Categories e.g. Fed Beef Cattle. Now enter the contract details including the number of head and the average weight. The Total lbs will be automatically calculated using this information. When adding the contract details you are able to specify the cattle classification. 32 Linus7 User's Manual 2012 Version 1.6 33 Linus7 User's Manual 2012 Version 1.6 Step Fourteen: Feeder Cattle Sales Contracts (Cattle Contracts Tab-Feeder Cattle Sales Contracts) Feeder Cattle Contracts can be added/created under the Cattle Contracts menu. Feeder Cattle Contracts will be reflected in the Monthly Risk and Market Sensitivity reports. To create a new Feeder Cattle Contract follow the same steps as a Fed Cattle Sales Contract. Step Fifteen: Feeder Purchase Orders (Cattle Contracts Tab-Feeder Cattle Purchase Orders) Feeder Purchase Orders The Feeder Purchase Orders screen provides an overview of all orders including, Open, Closed and Pending Orders. Use the Status drop down menu to sort the list by the status of the order. The Purchase Orders can also be sorted by Buyer and Location using the drop down menus. To add a New Purchase Order click +Add at the bottom of the screen. You will need to assign an ID number to the Purchase Order by typing it into the blank field box. 34 Linus7 User's Manual 2012 Version 1.6 Assigned User: This is a drop down box that identifies who created the Purchase Order. PO Id: Give the purchase order a unique number. This number will be used to fine the purchase order when linking it to the actual purchase. Buyer, Source and Feed Yard: Choose each from the drop down menus. Purchase Date: Select the date you purchased the cattle from the calendar Delivery Date: Select the date you expect the cattle to be delivered from the calendar. If the cattle are expected over a week or two choose the last delivery date. Number of Head: This must be manually entered for the number of head purchased Choose the Category E.g. Fed Beef and the Classification E.g. Steer Calf, of the cattle on this purchase order, from the drop down menus provided. Once chosen the Out weight, ADG and DM Conversion are automatically filled in based on the Classification Defaults that you previously setup. The final information you must manually enter is the Average Weight and the Price/cwt that you paid. Once the average weight is entered the Out Date will automatically be calculated. DM Ration Cost: This will default to the DM Ration cost in the Classification Default table. Once the details have been filed in on this purchase order (e.g. delivery date) this number will change to reflect the DM ration cost of the feeding period. In addition, the DM ration cost will re-calculate if the in weight, out weight or ADG is different than what is on the Classification Defaults page. If you edit the DM Ration cost the percentage it was changed by will be reflected in the ingredient costs. 35 Linus7 User's Manual 2012 Version 1.6 The Cattle Basis is automatically filled in based on what you previously entered on the Cattle Pricing for the Lot Category on the purchase order. The Cattle Futures and Canadian dollar Futures are also automatically generated based on the marketing month of the cattle. Finally you have the option to enter a Slide Up/Down in $/cwt and the Shrink % on the purchase order. At the bottom of the Add New Purchase Order Screen click Save to create the lot. Step Sixteen: Hedge Accounts (Hedge Accounts Tab- Accounts) Accounts To access the Accounts screen scroll over to the Hedge Accounts Tab and click on Accounts. The purpose of the Accounts screen is to manage each of your accounts in terms of Futures Trades,Call and Put Options. The first step in using this screen is to setup your trading account. To Add a new account click on Add+ at the bottom of the screen. 36 Linus7 User's Manual 2012 Version 1.6 Account Number: This can either be a your trading number or the name that you will use to identify the account For example RBC, ScotiaBank, 1234567 Commission + Fees: Commission is entered as a dollar amount/round turn meaning the total cost to enter the position and leave the position. Fees may include items such as processing fees, NFA fees, etc. The commission for futures is reflected 50% when you open a position and 50% when you close the position. Options are reflected at 100% commission at the time of purchase. Example: $30/round turn Online Brokerage Link: Type the link to your brokerage account here, be sure to start it with http:// Notes: Enter additional comments about the account here Click Create to save the new account When you access an account it is divided into three sections; Futures, Calls and Puts. Each tab shows the number of open positions. Click on the tab to access each section. 37 Linus7 User's Manual 2012 Version 1.6 The account info tab gives the details specific to that trading account. If you did not enter your commission+ fees in the account when you set it up you will need to do that here. Commission +Fees will be reflected on all new trades going forward from the time it is entered. It does not apply commission to previously entered trades. To apply commission to old trades you will need to delete them and re-enter. Futures With futures you are able to offset all open trades. As well you can assign open futures positions to months or multiple months. To enter a new Futures Trade click on + Add Openat the bottom of the Futures Section. 38 Linus7 User's Manual 2012 Version 1.6 Trade #: Linus7 assigns a unique number to each trade. This can be edited to match that actual trade number on your run sheet. Lot Category: Assign the trade to a Lot Category. You will be asked to choose from a drop down menu.Example: Fed Beef, Feeder Beef Trade Description: Use the drop down menu to select from Corn, Canadian Dollar, Feeder Cattle or Live Cattle. Once you have made your selection a second drop down menu will appear. Use this drop down list to choose the month for the trade. Futures: This is automatically generated once the futures month is selected and represents the current quote. Trade Type: Select Long or Short. This defaults to short Live Cattle/Feeder Cattle and long Corn/Canadian Dollar 39 Linus7 User's Manual 2012 Version 1.6 # of Contracts: This is the number of contracts that you traded, not the dollar amount.You can enter full or partial contracts. Example: traded ten contracts, enter 10 here. Contract Price: Enter the price of the contract you traded Example $135.00 Contract Expiry: The Expiry date is automatically filled in once the futures month is selected. This comes directly from DTN. TradeDate: The date automatically defaults to today's date. However, it can be changed by clicking on the date field box. A calendar will appear and you can choose the appropriate date. Click Save at the bottom. Once the position is saved you cannot make changes to it. You must delete and re-enter if you need to make a change. After saving the position when you re-open it 50% of your commission+ Fees will show on the right hand side. Monthly Assignments Linus7 gives you the ability to assign futures positions by month. Monthly Assignments can be edited on open trades. However once that trade has been offset or partially offset the monthly assignment can not be edited. When offsetting a trade, the offset P/L will be show on your monthly assignment and risk report under the month in which you assigned it. Using the example from below it would show in October. Month: You can assign open positions to one or more months. The month will default to the front month, but this can be changes using the drop down list. Use the Add Month button to add additional months. # Contracts at Risk: The number of contracts that are at risk in your account for the given month. Example: You have 600,000lbs of live cattle to be sold in October, which would be 15 contracts. Live Cattle= 40,000lbs/contract Feeder Cattle= 50,000lbs/contract Corn= 5,000bu/contract Canadian Dollar= 100,000/contract Live Cattle/Feeder Cattle =projected sales (from the cattle risk report)/40,000 fed category; 50,000 feeder category 40 Linus7 User's Manual 2012 Version 1.6 Corn= tonnes required (from the grain risk report)/127*1.10 Canadian Dollar = # USD projected sales (from the currency risk report)/100,000 #Contracts Hedges + Contracted:The number of contracts you have hedged (futures or IM options) plus the number of contracts you have in forward sales contracts (lbs forward contracts/40,000 for fed cattle and lbs forward contracts/50,000 for feeder cattle) #Open Contracts Assigned: This is the number of contracts from the open position you are currently assigning to a month. Live Cattle/Feeder Cattle= ((sum contract lbs, net futures lbs, net options IM lbs)+ #open contracts assigned)/40,000 LC; 50,000 FC Corn= ((tonnes contracted/127*1.1)+net futures+ net options IM)+# open contracts assigned)/*5000 Canadian Dollar=((sum contract USD, net futures, net options IM) + # open contracts assigned)/100,000 %Hedged: # of contracts hedged+ contracted/# contracts at risk Price: The contract price from the open contract you are assigning Offset Trades To access your offset trades click on the offset tab within the futures account. In the offset table you will see that both the open and offset trades are hyperlinked to access the trade details quickly. Offset trades will not be delted from your account and they will remain here keeping a running tally. 41 Linus7 User's Manual 2012 Version 1.6 Trade #: Linus7 assigns a unique number to each trade. This can be edited to match that actual trade number on your run sheet. Lot Category: Assign the trade to a Lot Category. You will be asked to choose from a drop down menu.Example: Fed Beef, Feeder Beef Trade Description: Use the drop down menu to select from Corn, Canadian Dollar, Feeder Cattle or Live Cattle. Once you have made your selection a second drop down menu will appear. Use this drop down list to choose the month for the trade. Futures: This is automatically generated once the futures month is selected and provides the current quote. Trade Type: Select Long or Short. This automatically defaults to long Live Cattle/Feeder Cattle and short Corn/Canadian Dollar. # of Contracts: This is the number of contracts that you offset, not the dollar amount. You can enter full or partial contracts.Example: offset ten contracts, enter 10 here. Contract Price: Enter the price of the contract you traded Example $135.00 42 Linus7 User's Manual 2012 Version 1.6 Contract Expiry: The Expiry date is automatically filled in once the futures month is selected. This comes directly from DTN. TradeDate: The date automatically defaults to today's date. However, it can be changed by clicking on the date field box. A calendar will appear and you can choose the appropriate date. Once you select the trade description a list of the available open trades will show in the grid below the offset trade. Open Trade#: The trade number is hyperlinked to ? Assigned Months: This is the month that the open position was assigned to and the month where the offset P/L will appear Trade Date: The date the open position was created Open: Number of contracts remaining open position (after offset applied) Offset Contracts: Enter the number of offset contracts you want to apply to each open position Long Price/Short Price: Lists the contract price from both the open and the offset Net P/L: Futures P/L in USD - 100% commission+fees Nearby Cdn$: Assumes hedge profit/loss applied in CDN dollars at time of offset (does not float), but it can be edited Net P/L (Cdn): Net profit/loss in Canadian dollars Click Save at the bottom. Once the position is saved you cannot make changes to it. You must delete and re-enter if you need to make a change. 43 Linus7 User's Manual 2012 Version 1.6 Call Option To add a new Call Option click on Add+ at the bottom of the screen. Lot Category: Assign the trade to a Lot Category. You will be asked to choose from a drop down menu.Example: Fed Beef, Feeder Beef Option Description: Use the drop down menu to select from Corn, Canadian Dollar, Feeder Cattle or Live Cattle. Once you have made your selection a second drop down menu will appear. Use the drop down list to choose the month for the trade. Futures and Canadian Dollar: These are automatically generated once the futures month is selected and reflect current quotes. Option Type: Choose if this is a short or longcall. Will default to long # of contracts: This is the number of contracts that you traded, not the dollar amount. You can enter full or partial contracts here. Example: traded ten contracts, enter 10 here. Contract Strike: Enter the Strike Price Purchase Premium: Enter the Price you paid/sold for the option. Expiry: The Expiry date is automatically filled in once the futures month is selected using the expiry date from DTN Option Date: The date automatically defaults to today's date. However, it can be changed by clicking on the Date field box. A calendar will appear and you can choose the appropriate date. 44 Linus7 User's Manual 2012 Version 1.6 Put Option To add a new PutOption click on Add+ at the bottom of the screen. Lot Category: Assign the trade to a Lot Category. You will be asked to choose from a drop down menu.Example: Fed Beef, Feeder Beef Option Description: Use the drop down menu to select from Corn, Canadian Dollar, Feeder Cattle or Live Cattle. Once you have made your selection a second drop down menu will appear. Use the drop down list to choose the month for the trade. Futures and Canadian Dollar: These are automatically generated once the futures month is selected and represent current quotes. Option Type: Choose if this is a short or long put. Will default to long. # of contracts: This is the number of contracts that you traded, not the dollar amount. You can enter full or partial contracts here. Example: Purchased ten contracts, enter 10 here. Contract Strike: Enter the Strike Price Purchase Premium: Enter the Price you paid/sold for the option. Expiry: The Expiry date is automatically filled in once the futures month is selected using the expiry date from DTN Option Date: The date automatically defaults to today's date. However, it can be changed by clicking on the Date field box. A calendar will appear and you can choose the appropriate date. 45 Linus7 User's Manual 2012 Version 1.6 Step Seventeen: Canadian Accounts CPIP Policies (Hedge Accounts Tab- CPIP) CPIP The Canadian Price Insurance Program is a price risk management tool from Alberta Financial Services Corporation (AFSC). Producers can choose to insure all of their cattle or only a select group. They can also choose from a variety of policy lengths. Linus7 allows users to organize and record CPIP policies purchased in order to manage overall portfolio risk. The main CPIP screen displays a list of polices along with details including the insured weight, Expiry Date, Insured Index and the Premium Paid. To access a policy click on the policy number. To add a new policy click on Add+ at the bottom of the screen. Policy Number: Use the CPIP Policy number from AFSC to easily cross reference. Date: Click on the blank field box and use the Calendar to select the date of the Policy. Insured Weight: Insured Index: Premium: Enter the premium price you paid for the insurance policy. Expiry: Click on the blank field box and use the Calendar to select the Expiry date of the Policy. Click on Create at the bottom to create the new CPIP Policy. 46 Linus7 User's Manual 2012 Version 1.6 47 Linus7 User's Manual 2012 Version 1.6 48 Linus7 User's Manual 2012 Version 1.6 Additional Linus7 Features Dashboard DTN News Daily DTN News Reports from www.dtnprogressivefarmer.com Quotes Futures quotes refreshed every two minutes with a ten minute delay. 49 Linus7 User's Manual 2012 Version 1.6 Expiring Futures and Options This shows your options that will be expiring in the near future. The window provides a description of the future/option in terms of month it expires, the amount purchased, the type and buy/sell. Quotes The Quotes page provides an overview for Live and Feeder Markets as well as Corn and the Canadian Dollar. Prices are continuously updated from ICE Futures US every few minutes to provide the most current up to date market prices. 50 Linus7 User's Manual 2012 Version 1.6 Imports Linus7 now has the ability to import data from SSG Fusion, Advanced Livestock Tracker and Animal Health International. Imported expenses are split at regular intervals. The expense interval must be set by a system administrator under Global Settings. Steps for importing data from SSG Fusion Linus7 has the ability to be linked to your Fusion account. This prevents you from having to double enter information. Step One: Open the Task Bar in Fusion and click on Fusion Office. Step Two: Click on Lot Info Export. Step Three: Click the + Symbol to Add a New Destination. Label the file Linus7. Step Four: In the Include Location Box choose which Fusion Account you would like to upload data from. Step Five: Under Included Lots use the + and - Symbols to choose which Lots are to be uploaded to Linus7. In the future you can add and remove lots at any time. Step Six: Click on Auto Send Setup. Choose a Filename of your choice. E.g. Feedlot Name <date> (all Filenames must include <date>) 51 Linus7 User's Manual 2012 Version 1.6 Step Seven: Under FTP Information ensure the Box for Upload to destination via FTP every morning is checked. The URL name is: ftp.linus7.com Username and Password: Will be provided to you by your Customer Support Pro. Step Eight: At the very bottom of this page Port should be 25. 52 Linus7 User's Manual 2012 Version 1.6 Step Nine: Under the Manually Export Tab ensure that Send Via Email is clicked. 53 Linus7 User's Manual 2012 Version 1.6 Step Ten: Finally, on the Options Tab under Auto Adding New Lots- The second box should be checked Under Optical Blocks to include when exporting and other options - The first four boxes should be checked. Now that Fusion is setup to automatically import to Linus7 each morning, you will receive an email confirmation. If there are errors in the upload they will show here. Example of an Email from Fusion You are recieving this e-mail because you have set up Fusion to automatically post files to Linus 7.The file Laura 20120424.xml was imported on 4/24/2012 11:45 AM. The import was successful. Be sure to check the log files for errors and missing contacts! 54 Linus7 User's Manual 2012 Version 1.6 View the Import Log at http://uat.linus7.com/Log/FusionImport/c928cfd8-533a-4cf2-b047-a03d00c1a718 View the Skipped Lots Log at http://uat.linus7.com/Log/FusionImport/209f84aa-46b8-4c8d-bc75-a03d00c1a721 Another option is to manually upload a file. An example of when this would be used is if you are making significant changes in Fusion to a lot and you would like your reports in Linus7 to be up to date that same day. To Upload a file from Fusion Click on . You will be asked to locate the File Name on your computer and then click on Open. An email will be sent to your account to verify that the upload was successful. Linus7 uploads your information from Fusion into five categories, New Lots, New Purchases, New Sales, New Cattle Losses and New Expenses. Once the information has been uploaded entries will appear orange if there is a blank field that needs to be filled in. Click on the entry line to determine which field is missing. Click on Confirm once the correction has been made. Every line that has been uploaded will need to be looked at. To do this click on the line and click Save at the bottom. 55 Linus7 User's Manual 2012 Version 1.6 Tools Purchase Calculator The Purchase Calculator is a very important tool designed to help you set purchasing rules. It takes into account several factors including the following, adjusted for your local basis; futures, grain, cattle and currency. The projected cost of gain is adjusted to your actual ration formula and local grain price. The Purchase Calculator should be used daily when making purchasing decisions and if used correctly it will significantly reduce your risk of making poor purchases. The Purchase Calculator opens in its own window and provides three event scenarios that you can analyze at once. The information in the Purchase Calculator comes from your default settings under the Administration Tab. It is important to 56 Linus7 User's Manual 2012 Version 1.6 keep your default setting current to most accurately determine the best price to pay for cattle and to analyze Return on Investment (ROI). You are able to change default numbers here on the Purchase Calculator to reflect the purchasing event you are analyzing. For Example: The yearling steers you are considering have an average weight of 900lbs. You can change the In Weight of 850lbs to 900lbs and the Purchase Calculator will automatically update to reflect this change. If you would like to change the cattle in the event use the drop down menus at the top of the Purchase Calculator to choose a different Lot Category and Classification. Click on Get to update the Purchase Calculator. A very important component to the Purchase Calculator is the Purchase ($/Cwt). This allows you to enter cattle prices E.g. 135.5/cwt. From this the Purchase Calculator calculates your Return on Investment (ROI) and determines your breakeven price. 57 Linus7 User's Manual 2012 Version 1.6 The arrows allow you to prioritize the cattle you buy in order from highest to lowest priority. Clicking the double arrow makes a classification top priority and moves it to the top of the list, while the single arrows allow you to move classifications one spot up or down. 58 Linus7 User's Manual 2012 Version 1.6 59 Linus7 User's Manual 2012 Version 1.6 Once you have set your Category/Classification priorities these classifications will automatically appear as seen above when you want to calculate new purchases. The Category/Classification priorities can be edited/changed to suit your needs at any time. Videos Training and Tutorial Videos are available to assist with various areas of Linus. The video icon is at the top of each page. To view a video simply click on the icon (as shown below). Reports Monthly Assignment The monthly assignment summary looks at how many cattle you have in your lot for each month along with their projected out weight and today BE, how many pounds you sold, any contracts (including priced feeder cattle delivery contracts) or purchase orders you have for that month, and your profit/loss for the month. If the today weight surpasses the outweight the ROI will use the current cattle price and current DOF instead of the hedge price and projected DOF. For grain it shows how many tonnes are fed/used each month, forward contracts, and futures. The currency monthly assignment summary demonstrates currency booked on inventory, contracts, and any open futures. 60 Linus7 User's Manual 2012 Version 1.6 Grain Monthly Assignments-Required Feed Usage Feed usage for each ingredient is in either barley or corn equivalence, not As Fed. Ingredient prices are also in barley or corn equivalences. The MtM P/L of ingredients compares the current price to the locked price multiplied by the feed usage. 61 Linus7 User's Manual 2012 Version 1.6 Monthly Risk 62 Linus7 User's Manual 2012 Version 1.6 *Includes Feeder Purchase Order Feed Usage 63 Linus7 User's Manual 2012 Version 1.6 64 Linus7 User's Manual 2012 Version 1.6 Sensitivity 65 Linus7 User's Manual 2012 Version 1.6 The Grain Risk report found under the Monthly Risk Summary is now referred to as the Grain Hedge Position. *Includes Feeder Purchase Order Feed Usage 66 Linus7 User's Manual 2012 Version 1.6 Feed Usage The Feed Usage Report is broken down into several reports/tables. The Feed Usage Report looks at total usage, as well as the amounts of individual feeds used in each ration. The Total Usage table shows the total tonnage of feeds fed, calculated from the Time on Ration Table while Barley Usage, for example calculates the amount of Barley as fed on a monthly basis. 67 Linus7 User's Manual 2012 Version 1.6 68 Linus7 User's Manual 2012 Version 1.6 Feeder Contracts The Feeder Contracts Report outlines the number of purchase orders you have and provides projections calculated using the Present Cost of Gain and the Projected Price. 69 Linus7 User's Manual 2012 Version 1.6