1
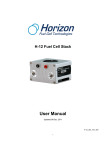
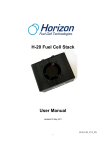
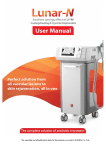
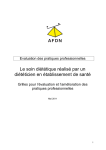
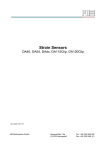
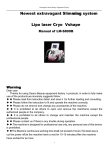
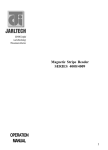
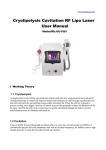
User Guide 1 Contents Operating Manual Structure of 3D Lipo + General Structure Applicator Description Applicator Installation 3 4 5 After-Sale Service 1. Maintenance 2. Warranty 7 10 Cautions 1. Contraindication 2. Cautions when use 3. Cautions after use 11 13 13 Operation 1. Function selection 2. Cavitation 3. Cryolipolysis & Electrophoresis & Vacuum 5. 6 Pixel RF 6. 4 Pixel RF 7. Technical Specification 14 15 19 22 23 24 Finish 25 Contact Info 25 Specification 25 2 Structure of 3D Lipo + General Structure 3 Description of Applicators Cryoelectrophoresis Radio Frequency 4 Cavitation Applicator Installation 1. Cavitation transducer, for body treatments. Place the Cavitation handle on the holder; insert into Cavitation socket. 2. Cryolipolysis Electrophoresis Vacuum handle Combined Cryolipolysis Electrophoresis together for body area Two Cryolipolysis and electrophoresis plates are located inside of the hand piece Place the Cryolipolysis handle on the holder; insert into the Cryolipolysis socket. 5 3. Emergency Bar Client Control for the Vacuum function, press the red button to stop suction, it has the same function as the black button on the Cryolipolysis vacuum handle Place the handle on the holder; insert it to the Emergency Bar socket 4. Body RF Handle, 10MHz multi-polar RF, for treatments on Body area Place the body RF handle on the holder; insert it to the Body RF socket 5. Face RF Handle, 10MHz multi-polar RF, treatments on Face & Neck area. Place the body RF handle on the holder; insert it to the facial RF socket 6 6. Foot Switch, use to start RF treatment, keep pressing foot pedal during RF treatment Place the foot switch on the floor, insert into the Foot Switch socket. Machine Maintenance Correct procedure for filling water chamber Firstly attach the tubes in both the top of the system and then the bottom left option on the base of the system (fig1) FIG 1 In the top tube place a funnel and then place the bottom tube into a container that is higher than the outlet. (Fig2) FIG 2 7 Pour water into the funnel slowly. Note the chamber is not full until you get a continual flow of water coming out of the bottom tube with no air (Fig3) Please ensure Deionized/Purified water is used. Please make sure the water tank is filled with water before Applicator Installation 8 3D-Lipo Maintenance Checks The following checks and procedures are advised to ensure that the 3D-lipo device is operating at its optimum performance and also to prevent any unnecessary damage to the body of the unit Cavitation Check that all 4 transducers are emitting when running (Suggested Daily) Run Check on Manual mode 10% - 100% output. At 100% the hand set should run almost silent. If this is not the case it might be time to replace as the transducers are showing signs of reduced output. (Suggested Monthly) If a handset is running warmer than usual this is also a sign that it might be time to replace Never run cavitation mode if the handset is disconnected or not emitting If there is visible or suspected damage to the cavitation wire turn off and disconnect from the machine immediately and replace hand set. Never run cavitation head unless in contact with a client and with the use of gel. Never coil the wire or wrap around hand set as could lead to wire damage Cryo Always ensure Water tank is full and follow the instructions on the water filling document. (Suggested Weekly) Check that both cooling plates in the hand sets are chilling down (Suggested Daily) If heat is experienced during or prior to a cryo treatment stop the treatment and investigate the problem Always ensure the filter on the back of the machine is free of fluid. Empty immediately if signs of fluid are present ensuring that the O ring remains in place to prevent loss of vacuum. (Suggested daily) 9 Always ensure white top of Cryo hand piece is facing upwards to prevent fluid travelling down the tubing. Replace Cryo head filter at least once per month or sooner if experiencing lack of vacuum. Always ensure that when connecting the Cryo hand set to the machine it is not forced and presented straight, listening for two clicks. Always check both emergency stop buttons are functioning prior to treatment. After-Sale Service Warranty 3D Lipo Ltd stipulates the warranty for the original purchaser as follows: 3D Lipo Ltd provides 12 months warranty period on its any product for any defect caused by material or manufacturing quality starting from the installation day. According to the warranty stipulation, 3D Lipo Ltd responsibilities are limited to repair and replacement of the part and material recognized in conformity with above conditions. 3D Lipo Ltd will not bear any responsibility for any damage caused by misapplication of the user or repair of disapproval Out of Warranty A product that has no SERIAL Number Applicators that have been dropped or knocked Applicator acrylic rack Maintenance Advantages Easy to check and determine problems Simple to find out the solution Quick replacement of Function Module Maintenance Policy Photo must be provided. Without manufacturer’s permission, purchaser may not return the unit; otherwise, the purchaser has to bear the transportation fee and VAT. Manufacturer has the right to refuse returned item. 10 Caution Cavitation Contraindication Please avoid the treatment on, 1. Pregnant women or women who may be pregnant or breast feeding 2. Cardio problems 3. Patients with vascular diseases 4. Patients with pacemakers 5. Patients with thrombosis and or thrombophlebitis 6. Patients being treated with anticoagulants 7. Patients who have undergone a transplant 8. Malfunctioning of the kidneys 9. Patients with a history of cancer 8. Carriers of large metal prostheses 9. Diabetics 10. Epileptics 11. Excess Alcohol 12. Auto immune conditions Radio-Frequency Contraindications Please avoid the treatment on, 1. Pregnancy or women who may be pregnant or breast feeding 2. Scarring, infection of the treatment area 3. History of keloid scarring 4. Use of medication known to induce photosensitivity 5. Fragile skin 6. Patients with tumors 7. Patients with Auto immune conditions 8. Patients with a history of cancer 9. Patients with low/high blood pressure 10. Blood thinning medication 11. Recent skin peels 12. Recent hair removal 13. Skin thinning medication Cryoelelectropheresis Contra Indications Please avoid the treatment on, 1. Pregnant women or women who may be pregnant or breast feeding 2. Cardio problems 3. Patients with vascular diseases 4. Patients with pacemakers 5. Patients with thrombosis and or thrombophlebitis 6. Patients being treated with anticoagulants 7. Patients who have undergone a transplant 8. Patients with a history of cancer 8. Carriers of large metal prostheses 11 9. Diabetics 10. Epileptics 11. Excess Alcohol 12. Skin Thinning medication 13. Water retention 14. Autoimmune conditions 3d-dermology Contra Indications Please avoid the treatment on, 1. Pregnant women or women who may be pregnant or breast feeding 2. Cardio problems 3. Patients with a history of cancer 4. Epilepsy 5. Thrombosis or Phlebitis 6. All Malignant Tumors 7. Influenza or Systemic Diseases 8. Cardiovascular Deficiencies 9. Any acute bacterial or viral infection 10. Malfunctioning of the kidneys 11. Acquired Immune Deficiency Syndrome (AIDS) 12. Rheumatoid Arthritis 13. Multiple Sclerosis 14. Under Physician Care Caution when use Cavitation Function Apply Sufficient amount of gel during treatment application Keep the applicator in full contact with treatment area Do not keep the applicator still on the skin Move the applicator slowly and consistently Avoid the treatment over bone and do not aim directly at the joint Always make a skin fold in order to get better access to the fat tissue In case of resting during treatment, please “PAUSE” and then “STOP” to avoid over-output of the machine After one client treatment or 2 hours usage, please allow 20 minutes for the system to rest, it can prolong the lifetime of cavitation applicator. High usage salons should rotate the use of 2 hand pieces. Radio Frequency Function Apply sufficient amount of gel during treatment application. Keep the applicator in full contact with treatment area, then press the footswitch to start the treatment Do not keep the applicator at the same place Move the applicator slowly, but consistently Always release foot switch before lifting off the skin Cryolipolysis Function 12 Use protection of Anti Freeze pad to prevent skin frostbite Dermology Function Use non allergy oil to aid glide Always work towards nearest lymph nodes Caution after use Cavitation Function Avoid alcohol for 24 hours Avoid caffeine for 2 hours Avoid heavy meal for 2 hours Drink 2 liters of water per day Radio Frequency Function Avoid any heat on treated area for 48 hours Follow treatment with recommended homecare products Drink 2 liters of water per day Cryolipolysis Function Avoid any heat on treated area until skin has normalised Bruising may be apparent for up to 10 days Redness may be present for up to 4 weeks Any numbness will subside gradually 13 Operation Function selection Main Function Interface 1. Cryolipolysis & Electrophoresis. Touch screen and enter into Cryolipolysis & Electrophoresis. 2. Cavitation Touch screen and enter into the Cavitation function 3. RF 4 Pixel Touch screen and enter into 4 pixel RF function. 4. RF 6 Pixel Touch screen and enter into 6 pixel RF function. 14 Operation Cavitation Function Choose Operation Mode 1. Auto Program : automatic operation program on different treatment area, touch this button and enter into automatic operation interface 2. Manual Selection : Select Operation Specifications Manually, touch this button and enter into manual operation interface 3. Back : touch this button return to the Main Function Interface Auto Program Mode 1. Abdomen & Flanks : touch this button and enter into the automatic operation interface of Abdomen and flank area. 2. Thighs & Buttocks : touch this button and enter into the automatic operation interface of buttocks and outboard thighs area. 3. Inner Thighs : touch this button and enter into the automatic operation interface of inboard thighs area. 15 4. Edematous Cellulite touch this button and enter into the automatic operation interface of Edematous Cellulite area. 5. Back : : touch this button return to the Operation Mode Interface ABDOMEN & FLANKS Treatment 1. Select Cavitation working mode: or 2. Select Cavitation power: Select power among, (Default mode is , ) or when selected working mode (default power is ) Select one power among 40W, 50W, 60W when selected working mode (default power is 50W) 4. Start the treatment: Touch to Start the Abdomen & Flanks area treatment 5. Pause button : Pause the treatment. If need to change working mode or working power during treatment, please touch 6. Stop button 7. Back button 8. button first, then select the power and mode. : Stop the treatment. : Return to the Auto Program Mode interface Button: the total treatment time is 40 mins 10. Button: treatment time of left Abdomen is 10 minutes 11. Button: treatment time of right Abdomen is 10 minutes 12. Button: treatment time of left Flanks is 10 minutes 13. Button: treatment time of right Flanks is 10 minutes 16 Operation steps of the rest of Auto Programs are similar as ABDOMEN & FLANKS Cavitation Working Modes: P1 working mode : Power can be adjusted among 120W, 140W and 160W , 5s/1s pulsation output P3 working mode : Power can be adjusted among 160W, 180W and 200W , 2s/0.5s pulsation output P5 working mode : Power can be adjusted among 80W, 100W and 120W , Continuous output MANUAL OPERATION Mode 1. Set the Cavitation working mode (Pulse/Cont mode): Touch and 17 2. Set the Cavitation Power: Touch 3. Set the treatment time: Touch and and from 0% to 100%. to adjust the treatment time. Total treatment time is 30 minutes (preset time: 4. Start the treatment: Touch 5. Pause button ). to Start the Abdomen & Flanks area. : Pause the treatment. If you need to change working mode or working power during treatment, please touch 6. Stop button 7. Back button button first, then select the power and mode. : Stop the treatment. : Return to the Auto Program Mode interface 18 Operation Cryolipolysis & Electrophoresis 1. Set the Vacuum Power: Touch and from 0% to 100%. 2. Set the Vacuum working mode: select the vacuum working mode through , , , (Default mode is constant vacuum) 3. Set the Electrophoresis working mode: Touch different modes. (Default mode is 4. Set the Electrophoresis Power: Touch power from 0% to 100%. and to set ) and to adjust the 19 5. Set the treatment time: Touch and to adjust the treatment time, total treatment time is 45 minutes (preset time: 20 minutes). 6. Start the treatment: Touch 7. Pause button . : Pause the treatment. If need to change working mode or working power during treatment, please touch 8. Stop button 9. Back button button first, then select the power and mode. : Stop the treatment. : Return to the Auto Program Mode interface 20 Electrophoresis working mode 1. Mode : Galvanic Current, Leading ion to permeate into the skin Breaking down the contamination in the skin Accelerating cell updated speed Stimulation the speed of fluid flow 2. Mode : Faradic Current Square Wave Stimulating muscle contractions & passive movement Lifting, tightening and Contouring Sagging Skin 3. Mode : Faradic Current Spike Wave Stimulating Muscle intensively Training muscle to build a perfect & firm bodyline 4. Mode : Faradic Current Twin Spike Wave Powerful Electrophoresis penetration Transforming fat into energy to consume 5. Mode : Faradic Current Step Wave Contracting the muscles rhythmically Aiming at swollen leg exercise 6. Mode : Faradic Current Trapezoid Wave Contracting Muscles quickly Improving the volume of blood circulation Draining away the internal waste of our body 7. Mode : Faradic Current Triangle Wave Stimulating lightly to relax exhausted muscles Aiming at Lymphatic System Care 21 Operation 6 Pixel RF Function 1. Set the working mode: Touch and to select working mode between Pulse mode and Continuous Mode 2. Set the RF Power: Touch and to adjust the RF power from 0% to 100%. 3. Set the treatment time: Touch and to adjust the treatment time, total treatment time is 30 minutes (preset time: 20 minutes). 4. Start the treatment: Touch to Start. To hear emission beep – press foot pedal. 22 5. Pause button : Pause the treatment. If you need to change working mode or working power during treatment, please touch 6. Stop button 7. Back button button first, then select the power and mode. : Stop the treatment. : Return to the Auto Program Mode interface Operation 4 Pixel RF Function 1. Set the working mode: Touch and to select working mode between Pulse mode and Continuous Mode 2. Set the RF Power: Touch and to adjust the RF power from 0% to 100%. 3. Set the treatment time: Touch and to adjust the treatment time, total treatment time is 30 minutes (preset time: 20 minutes). 23 4. Start the treatment: Touch to Start. To hear emission beep – press foot pedal. 5. Pause button : Pause the treatment. If need to change working mode or working power during treatment, please touch 6. Stop button button first, then select the power and mode. : Stop the treatment. 7. Back button : Return to the Auto Program Mode interface Technical Specification Application Radio frequency high frequency wave generator(fractional RF) RF applicator One applicator with 4 pixel for face(pixel: 0.7x0.7CMx4) One applicator with LED and 6 pixel for body (pixel: 0.7x1.5CMx4, 1.5x1.5CMx2) Applicator material Stainless steel Work Frequency 10.0Mhz Absorbed Power Max 50W Output Power 45W Power Supply 110V-120V/220V-240V, 50/60Hz Fuse 2 fuses 5x20 – 250V – 5A F Max actual power noise 3W Elastic Working pressure 0.6 Kpa/cmq per 40x10 E3 cycles/sec. Electronic control system Retroaction controls of working parameters, quickness of pressureacoustic propagation, stable frequency, temperature and deviation from the point of maximum output Treatment Time From 5 to 30 minutes Programs Personalized regulations Parameters Setting RF type emission, time, power Safety Class CE Commands Selection through touch-buttons Visualization Graphic Display 5.6’’ touch screen Operating Temperature From 10 to 35℃ Operation Relative Humidity From 30 to 75% 24 Operation pressure 500 Mbar to 1060 Mbar Size of machine Packing size Net Weight Gross Weight Warranty 12 months Mark CE SE ASIA Contact Info Lifvation Pte Ltd #04-19, focus one, 1 Ubi view, Singapore 408555 Mainline: +65 68489596, Hotline: +65 96470589 Lifvation Sdn Bhd unit 3038, Lot 271 Jalan Dua (off Jalan Chan Sow Lin) Kuala Lumpur 55200 Malaysia Hotline: +6016-736-8399 [email protected] www.Lifvation.com Contact Info Repair or any enquiry should be directed to the following address: 3D Lipo Ltd Units 1 & 2 The Locks Hillmorton Rugby Warwickshire CV21 4PP 01788 220458 Specification Display: 11 inch Color touch screen Power Supply: 110V-120V/220V-240V, 50/60Hz Time Setting: 5 to 30 minutes Cavitation power: 82W 25 Cavitation Frequency: 32 KHz±10% Vacuum Power:-102KPa RF Frequency: 10 MHz Cryolipolysis Temperature: -5̊ Electrophoresis Mode: 7 Modes 26