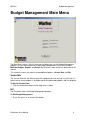
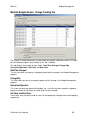
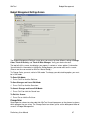
1
WinTen² Budget
Management
Preliminary User Manual
User Manual Edition:
4/13/2005
Your inside track for making your job easier!
Tenmast Software
132 Venture Court, Suite 1
Lexington, KY 40511
www.tenmast.com
Support:
Marketing:
Fax:
(877) 359-5492
[email protected]
(877) 836-6278
[email protected]
(859) 367-7480
WinTen² Budget Management
Preliminary User Manual
User Manual Edition: 4/13/2005
Copyright © 2005 Tenmast Software. All rights reserved.
This manual, as well as the software described in it, is furnished under license and may
be used and/or copied only in accordance with the terms of such license. The content
of this manual is furnished for informational use only, is subject to change without notice,
and should not be construed as a commitment by Tenmast Software. Tenmast Software
assumes no liability for any errors or inaccuracies that may appear in this manual.
Except as permitted by such license, no part of this publication may be reproduced,
stored in a retrieval system, or transmitted, in any form or by any means, electronic,
mechanical, recording, or otherwise, without the prior written permission of Tenmast
Software. Permission to produce copies for official use is expressly granted to organizations and individuals with a current Update and Support Agreement with Tenmast
Software for the maintenance and support of Tenmast Software’s WinTen² Budget Management program.
Any references to company, housing authority, or individual names or identities in examples or screen images are for demonstration purposes only and are not intended to refer
to any actual organization or person.
WinTen²
Budget Management
Table of Contents
PART I: INTRODUCTION....................................................................................................................... 1
OVERVIEW................................................................................................................................................. 2
Features List ......................................................................................................................................... 2
Budgeting Process ................................................................................................................................ 3
Program Integration ............................................................................................................................. 5
Required Programs............................................................................................................................ 5
Budget Management Main Menu.......................................................................................................... 6
PART II: TENMAST BEST PRACTICES .............................................................................................. 7
CYCLICAL ACTIONS .................................................................................................................................. 8
Monthly or Quarterly ............................................................................................................................ 8
Annually ................................................................................................................................................ 8
MANAGE RECORDS WITH BROWSE, MAINTAIN, AND SELECT SCREENS .................................................. 9
Identify Types of Screens....................................................................................................................... 9
Use Common Screen Icons ................................................................................................................. 11
Use Browse and Select Screens .......................................................................................................... 12
Browse and Select Screen Fields .................................................................................................... 12
Browse and Select Screen Navigation ............................................................................................ 13
CREATE BUDGETS ................................................................................................................................... 14
Create a New Budget .......................................................................................................................... 15
Use the Add Budget Wizard ........................................................................................................... 16
Create a Budget Revision.................................................................................................................... 18
Use the Add Budget Revision Wizard ............................................................................................ 19
MAINTAIN BUDGETS ............................................................................................................................... 22
Maintain General Budget Information................................................................................................ 24
Maintain Budget Notes........................................................................................................................ 25
Maintain Budget Information per Account ......................................................................................... 27
EDIT BUDGETS IN SPREADSHEETS .......................................................................................................... 31
Export a Budget .................................................................................................................................. 32
Use the Export Budget Wizard ....................................................................................................... 32
Import a Budget .................................................................................................................................. 33
Use the Import Budget Wizard ....................................................................................................... 34
PROCESS BUDGETS FOR APPROVAL ........................................................................................................ 36
Submit a Budget .................................................................................................................................. 37
Preliminary User Manual
i
WinTen²
Budget Management
Use a Submit Budget Wizard.......................................................................................................... 37
Reject a Budget ................................................................................................................................... 39
Use a Reject Budget Wizard ........................................................................................................... 39
Approve a Budget................................................................................................................................ 40
Use an Approve Budget Wizard ..................................................................................................... 41
MONITOR BUDGETS ................................................................................................................................ 43
Monitor Budget Analysis..................................................................................................................... 45
Monitor Budget Revision History ....................................................................................................... 46
Monitor Budget Approval-Processing Activity ................................................................................... 48
Monitor Budget Audit Trail................................................................................................................. 49
RUN REPORTS ......................................................................................................................................... 51
Preview a Report................................................................................................................................. 52
Save a Report ...................................................................................................................................... 53
Load a Report ..................................................................................................................................... 55
Print a Report ..................................................................................................................................... 56
PRINT DOCUMENTS ................................................................................................................................. 58
Preview a Document ........................................................................................................................... 58
Print a Document................................................................................................................................ 59
PART III: SETUP..................................................................................................................................... 60
PLAN SETUP OPTIONS ............................................................................................................................. 61
Plan Budgeting Process and Schedule................................................................................................ 61
Plan Distribution Schemes.................................................................................................................. 62
IMPLEMENT SETUP .................................................................................................................................. 65
Maintain Default Settings ................................................................................................................... 66
Maintain Monthly Distribution Schemes ............................................................................................ 68
PART IV: APPENDICES ........................................................................................................................ 72
PROGRAM CHANGES FOR EXISTING CLIENTS ......................................................................................... 73
KEYBOARD ACTIONS .............................................................................................................................. 74
INDEX ...................................................................................................................................................... 78
Preliminary User Manual
ii
WinTen²
Budget Management
Part I:
Introduction
Preliminary User Manual
1
WinTen²
Budget Management
CHAPTER
1
Overview
WinTen² Budget Management allows public housing authorities to prepare and revise budgets
and move them through the approval process. It also shares data with the WinTen² General
Ledger program to make it easy for you to compare budgeted amounts with actual expenditures
and revenue.
This chapter provides an overview of the program. Topics addressed include:
•
Features List
•
Budgeting Process
•
Program Integration
•
Budget Management Main Menu
Features List
Here are just some of the ways Budget Management makes your job easier.
Revisions
The program’s revision feature allows you to create a new revision of a budget at any time,
before or after the budget is approved. Revisions make it easy for you to compare multiple
versions of budgets and track the differences among them.
Open Fiscal Years for Budgeting Only
The Budget Management and General Ledger programs allow you to open a new fiscal year for
budgeting only. This allows you to prepare the next budget, but it does not yet allow your
agency to post any transactions in that new fiscal year.
Edit Budgets in Spreadsheets
Budget Management’s import/export feature lets you create and/or edit a budget in an Excel
spreadsheet.
Reports
Budget Management includes many built-in reports to help you prepare and track your agency’s
budgets. The General Ledger program offers many options, using data from Budget
Management, for doing budget comparison tracking on an on-going basis.
The Custom Report Writer program allows managers to create custom reports and make them
available in specific programs. Managers can restrict user access to custom reports based on
user security roles.
Preliminary User Manual
2
WinTen²
Budget Management
Data Integration
Data affecting other WinTen² programs automatically integrates with those programs “live,” in
real time. This eliminates duplicate data entry and ensures that all users have current
information.
Flexibility
WinTen² programs allow your agency to make customizations to reflect your own business
process and make your job easier. Custom options available in Budget Management include
defining your own monthly budget distribution schemes.
Browse Screens and Drill-down
Browse screens with expanded sorting, filtering, and searching options help you find existing
records more easily. You can also drill down to find related records. Expanded drill-down
features provide many different ways to get to the same data.
Wizards
WinTen² programs feature expanded use of wizards to guide you through complex processes
and help ensure that you complete HUD-mandated steps. Budget Management includes many
wizards to help you create budgets and move them through the approval process.
Keyboarding Options
With WinTen² programs, you can choose to use your computer’s mouse or speed data entry by
using expanded keyboard shortcuts. You have the option of navigating through Budget
Management, entering data, and executing commands by using the keyboard almost
exclusively.
Security
Enhanced user security roles allow managers great flexibility in controlling security access
across WinTen² programs.
Budgeting Process
Here is a typical budgeting process for most agencies.
Note:
Your budgeting process may be different, depending on your agency’s policies.
A budget is a financial plan that estimates revenue and expenditures during a given period of
time. Each of your agency’s funds must always be operating under its own, individual budget,
which must be approved by the agency or organization that provided the fund’s money (the
“granting agency”). This granting agency will often, but not always, be HUD.
Most budgets are for one fiscal year containing twelve fiscal periods (months). However, some
budgets (such as capital funds, for instance) can be for multiple fiscal years. Budgets for some
grant funds can have fiscal years containing any number of periods.
The Budget Management program integrates very closely with the WinTen² General Ledger
program. Before you can use Budget Management, you must set up all of your agency’s funds,
including a separate fund for each grant, in the General Ledger program. You must also set up
in General Ledger all the general ledger accounts for each fund.
Preliminary User Manual
3
WinTen²
Budget Management
The budgeting process itself usually begins several months before a fund’s current budget
expires, which is usually annually. Your first step is to use the General Ledger program to open
the next fiscal year for budgeting. This allows you to prepare the new budget, but it does not yet
allow your agency to post any transactions in that new fiscal year.
To prepare a fund’s budget, you will allot the appropriate amount to each of the fund’s revenue
and expenditure accounts for each fiscal period covered by the budget. The values for some
accounts may be zero. (Grant budgets are for accounts that will eventually become asset and
capital accounts and may cover several fiscal years at the same time.)
You will use the Budget Management program to prepare the new budget, which you can do in
many different ways. You can create the new budget from scratch, starting with zero amounts
and entering each account’s budgeted amount manually. More often, you will base a new
budget on either the budgeted amounts or the actual amounts for the prior year (or the greater
of the two), increasing or decreasing the budget by a given percent. You can use the program’s
versioning feature to create one or more revisions of a new budget, each of which will exist as a
different record in the program. Budget Management also includes an import/export feature that
lets you create and/or edit a budget in an Excel spreadsheet.
Distribution schemes make it easy for you to distribute an account’s annual budget, by predefined percentages, across specific fiscal periods within the year – without having to enter the
amount for each period manually. There are several distribution schemes built into the program;
you can also create your own custom distribution schemes.
When you have finished preparing the budget, you will move it through the approval process.
Typically, your agency’s board of commissioners must first approve it, after which you must
submit it for approval by the granting agency.
If either your board or the granting agency rejects the budget, you can make the changes they
request either by editing the budget or by creating a new revision. Creating a new revision
makes it much easier for you to compare the two versions and track the differences between
them. You will then repeat the approval process for the revised budget.
As soon as you mark the budget as approved by the granting agency, it becomes the active
budget for that fund for all the fiscal periods covered by the budget. Any budget analysis views
or reports you use, in either Budget Management or the General Ledger program, will use this
budget.
At the actual start of the new fiscal year, you will use the General Ledger program to open that
fiscal year for posting. This allows your agency to post transactions for that fiscal year.
During the fiscal year, you may often want to compare actual revenue and expenditures to the
budget. You have some options for doing this from within the Budget Management program, but
the General Ledger program gives you many more options and greater flexibility. You will do
most of this kind of budget management and tracking from that program.
You may sometimes need to revise a budget, even after it has been approved. The versioning
feature allows you to create a new revision at any time, before or after the budget is approved.
Simply create a new revision as needed and repeat the approval process for the revised budget.
The previously approved budget will remain active until you mark the new revision as approved
by the granting agency.
Preliminary User Manual
4
WinTen²
Budget Management
Program Integration
Budget Management integrates directly with two other WinTen² programs.
This section addresses Required Programs. (There are no additional “recommended programs”
for Budget Management.)
Hint:
For more information on either of these programs, please see their respective user
manuals or contact Tenmast.
Required Programs
The Master Setup and General Ledger programs are required for Budget Management to
function.
Master Setup
The Master Setup program allows the administrator of your WinTen² programs to control various
high-level settings that affect how the programs interact with each other. Another important
function of Master Setup is to control security permissions, which govern what any individual
can see or do in the programs.
General Ledger
Budget Management uses General Ledger to access information on your agency’s funds and
general ledger accounts. You will also do most of your budget comparison tracking from
General Ledger.
Preliminary User Manual
5
WinTen²
Budget Management
Budget Management Main Menu
The Main Menu screen is the first thing you see when you start the Budget Management
program. It is your starting point for using Budget Management’s three main functions:
Maintain Budgets, Reports, and Setup. We will discuss each of these in detail later in this
manual.
This screen also gives you access to two additional options: Version Date and Exit.
Version Date
The Version Date tells you what version of the program you are running. Use it to learn if a
newer version of the program is available and/or to troubleshoot problems with the program.
To See the Version Date:
Click the Information button or click Help menu > About.
Exit
The Exit option closes the Budget Management program.
To Exit Budget Management:
Press Esc, press X, or click the Exit button.
Preliminary User Manual
6
WinTen²
Budget Management
Part II:
Tenmast Best Practices
Preliminary User Manual
7
WinTen²
Budget Management
CHAPTER
2
Cyclical Actions
This chapter provides a typical schedule of budgeting actions most agencies perform on a
regular basis. Action schedules addressed include:
•
Monthly or Quarterly
•
Annually
Note:
Your cyclical actions may be different, depending on your agency’s policies.
Please check your agency’s guidelines for these actions.
Monthly or Quarterly
Use General Ledger to monitor your budgets on a monthly or quarterly basis. Create budget
revisions as needed.
Monitor Budgets in the General Ledger Program
The General Ledger program offers many options for comparing budgeted amounts with actual
expenditures and income. (For more information on doing this, please see the user manual for
WinTen² General Ledger.)
Revise Active Budgets as Needed
You may sometimes need to revise a budget, even after it has been approved. Use the
program’s versioning feature to create new revisions as needed and move them through the
approval process. (See Create a Budget Revision and Process Budgets for Approval.)
Annually
Create and approve new budgets for your funds as their current budgets near their expiration
dates. At least annually, verify that your setup options are correct.
Create and Approve Budgets
Usually four to five months before a fund’s current budget expires, you will begin the process of
creating a new budget and having it approved. (See Create Budgets and Process Budgets for
Approval.)
Review Setup
At least once each calendar year, the administrator of your WinTen² programs should review
your Setup options for the Budget Management, Master Setup, and General Ledger programs.
(See Plan Setup Options, Implement Setup, and Required Programs.) If you have any
questions, you may contact Tenmast Support at (877) 359-5492 or [email protected].
Preliminary User Manual
8
WinTen²
Budget Management
CHAPTER
3
Manage Records with Browse,
Maintain, and Select Screens
Several different types of screens appear throughout WinTen² programs. Menu screens allow
you to navigate within a program. Browse screens, maintain screens, and select screens
make it easy for you to create, find, view, and edit records. A wizard is a special collection of
screens. Some wizards help you create certain types of records; others help you process
existing records.
This chapter will help you become familiar with the purpose and behavior of each type of screen
and with some of the common icons and options found on them. We will also discuss using
browse and select screens to find your records.
Topics addressed include:
•
Identify Types of Screens
•
Use Common Screen Icons
•
Use Browse and Select Screens
Identify Types of Screens
The different types of screens have different purposes and, for that reason, different
appearances and distinctive features. You can use these features, as well as the screen titles,
to help you identify screen types.
Menu Screens
A menu screen allows you to navigate within a program. Menu screens are easy to recognize
because they show only a collection of buttons. Each button takes you to a different area or
function of the program.
There are two menu screens in Budget Management: the Main Menu screen and the Budget
Management Setup screen. The Main Menu screen is the first thing you see when you start
Budget Management. It gives you access to all of Budget Management’s functions. The Setup
button on the Main Menu screen takes you to the Budget Management Setup screen. It gives
you access to all of the program’s Setup options.
Browse Screens
The main purpose of browse screens is to help you find records quickly and easily. You can
identify browse screens by a set of option fields at the top of the screen and, below them, a
table of records.
Many browse screens have the View, Ordered By, and Search For option fields at the top of the
screen. These fields allow you to find a specific record quickly without having to scroll through
all of them. (See Use Browse and Select Screens.)
Preliminary User Manual
9
WinTen²
Budget Management
The table of records on a browse screen allows you to view and select records. Each row of the
table is a different record. The columns of the table provide a subset of the records’ most
important information.
If you select a record on a browse screen, you can use the edit feature (press Ctrl+E or click the
Edit icon) to open it on a maintain screen. Using the Add feature (pressing Ctrl+A or clicking the
Add icon) on a browse screen opens either a maintain screen or a wizard that you can use to
create a new record.
Maintain Screens
A Maintain screen contains all the fields of information for a single record, sometimes spread
across multiple tabs and/or sub-tabs. Maintain screens allow you to add, view, edit, or delete
individual records.
Because different kinds of records contain different fields of information, maintain screens vary
greatly from one to another. You can recognize them because they have many different fields
for one record. Maintain screens do not have the View, Ordered By, or Search For option fields
at the top of the screen.
Maintain screens have tabs and/or sub-tabs when a certain kind of record has more data fields
than will fit on the screen at one time. Tabs appear near the upper left of the screen, just below
the title bar and menu bar. If a tab has sub-tabs, they appear at the lower left. Not all Maintain
screens have tabs or sub-tabs.
You can sometimes open a maintain screen directly from a menu screen (e.g., for some Setup
options), but you will open most maintain screens by first editing or adding a record from a
browse screen.
Note:
Some types of records use wizards to walk you through the creation of a new
record. In those instances, you will create new records in the wizard, but view and
edit individual records on a maintain screen.
Select Screens
Select screens are very similar to browse screens, but have a different purpose. Select screens
help you select the value of a specific field when adding or editing records.
Whenever you see a field with a lookup icon on a maintain screen or in a wizard, you will use a
select screen to choose the value of that field. Pressing F4 from the field or clicking its lookup
icon will open its select screen. (See Use Browse and Select Screens.)
You can recognize select screens by a set of option fields (often View, Ordered By, and Search
For) at the top of the screen and the Select and Cancel buttons at the bottom of the screen.
Wizards
A wizard is a special collection of screens called “steps.” Some wizards help you create certain
types of records; others help you process existing records. To complete a wizard, you must go
step-by-step through each screen.
Wizards are very easy to recognize. They have Start, Back, Next, and/or Finish buttons at the
bottom of each screen. The titles of wizard screens (see Reading Screen Titles, below) all
contain the word “Wizard.” Each title also tells you which step you are on and how many steps
are in the wizard (e.g., “Step 2 of 5”).
Preliminary User Manual
10
WinTen²
Budget Management
You can start some wizards manually from browse or maintain screens. If a wizard is available,
you will see both a Wizards menu and a Wizards icon (a blue wizard’s hat) near the top of the
screen.
Hint:
The Wizards menu and Wizards icon provide duplicate functionality. You can start any
available wizard using either option. If you prefer to use the keyboard, press Alt+Z to
open the Wizards menu; if you prefer using the mouse, click the drop-down arrow
immediately after the Wizards icon.
Some wizards start automatically when you add a new record (press Ctrl+A or click an Add
icon). Depending on the kind of record you are adding, you will go to either a wizard or a
maintain screen.
The Budget Management program includes many different wizards for creating and processing
budgets. This manual will walk you step-by-step through each of them.
Reading Screen Titles
Every screen has a title, which appears in the title bar, the dark blue bar across the top of the
screen.
The first word of the screen title often identifies the screen type. The titles of browse screens
usually begin with “Browse,” maintain screens with “Maintain,” and select screens with “Select.”
Not all Browse screens, however, have the word “Browse” in the title. Those that do not usually
do have “Search” or “Detail” somewhere in the title. Most wizards have the word “Wizard”
somewhere in the title of each screen.
Use Common Screen Icons
Icon bars appear near the top of browse, maintain, and select screens. An icon bar is a
collection of icons, each of which performs some action.
We have already mentioned the Add, Delete, Edit, and Wizards icons in this chapter. Four other
icons bear discussing here: Prior, Next, Search, and Show/Hide.
Hint:
We will discuss other icons as needed throughout this manual. For a complete list of
icons and their keyboard shortcuts, see the Keyboard Actions appendix to this manual.
Prior and Next
The Prior and Next icons allow you to move from one record to another. They appear on
browse, maintain, and select screens. To activate them, click the icon or press Ctrl+P or Ctrl+N,
respectively.
Hint:
If a maintain screen has more than one tab, these icons may not appear on all tabs.
Search
The search icon appears on most maintain screens. It closes the current maintain screen and
takes you to the corresponding browse screen so you can search for another record. Click the
icon or press Ctrl+H to activate it.
Preliminary User Manual
11
WinTen²
Budget Management
Show/Hide
Some maintain screens show a table of sub-records and a detail information section. This
feature appears in Budget Management, for example, on the Accounts tab of the Maintain
Budgets screen.
The table displays one row of information for each sub-record. A sub-record is something that
“belongs to” the current record, such as an account within a budget.
The detail information section, by default, appears at the bottom of the screen. This section may
display additional information on the sub-record currently selected in the table above it or it may
show summary information for all of the sub-records combined. You can choose to show or hide
the detail information section by pressing Ctrl+O or clicking the Show/Hide icon.
Use Browse and Select Screens
Browse screens help you find records quickly and easily so you can view, edit, or process them.
Select screens help you select the value of a specific field when adding or editing records.
Topics addressed in this section include:
•
Browse and Select Screen Fields
•
Browse and Select Screen Navigation
Browse and Select Screen Fields
Many browse and select screens have three option fields at the top of the screen: View,
Ordered By, and Search For. Some screens do not have the View field.
Hint:
You can read the fields together as a sentence. For example, you might “View open
[budgets] ordered by description [and] search for Public Housing 2005.”
View
The View field is a drop-down list that lets you restrict or filter the records you are seeing,
typically based on some category or status.
On the Browse Budgets screen, for example, you can view “Open” budgets or “Closed” budgets.
The default will be the most common view option. In our example, the default is “Open” budgets.
To Change the View Option:
Tab or click to the View field and choose a value that you want to see.
Ordered By
The Ordered By field is also a drop-down list; it lets you change the sort order of your records.
The options in this field correspond to the columns of information on the screen.
There are two ways for you to change the sort order: change it at the Ordered By drop-down list
or click any column header on the screen. Like the View field, the default for the Ordered By
field will be the most common sort order.
Preliminary User Manual
12
WinTen²
Budget Management
To Change the Sort Order:
Tab or click to the Ordered By field and choose a value on which to sort.
OR
Click any column header on the screen.
Search For
The Search For field lets you type a value and press Enter to search for the first match in your
list. Your choices for the other option fields affect the behavior of the Search For field:
•
You can search only for records that are currently showing, based on the View field.
•
The value you search for must correspond to what is in the Ordered By field.
If you order by status, for example, you must type a status as your search. If you order
by description, you must type a description as your search.
You can type the complete search value or only the first few characters.
Activate the search by pressing Enter or clicking the Go button.
The program will find the first match for what you type. If the record you want is not the first
match, it should be nearby; press DownArrow to move down the table one record at a time until
you find the one you want.
To Search for a Record:
Verify your choices for the View and Ordered By fields. Remember, you will search only
visible records for a value corresponding to your choice in the Ordered By field.
If necessary, tab or click to the Search For field.
Type the first few characters (one or more) of the value you want to find.
Press Enter or click the Go button.
If necessary, press DownArrow to select your choice.
Browse and Select Screen Navigation
The behavior of browse and select screen fields helps you find the record you want as quickly
and easily as possible, sometimes with as few as four or five keystrokes.
When you open a browse or select screen, the active field will be Search For (your cursor will
be flashing there). As mentioned above, the View and Ordered By fields each default to their
most common option.
This means that most often you can simply type the first few characters of what you want to find
and press Enter.
This technique will find the first match for what you typed. The more specific you are with your
search (the more characters you type), the more likely you will “land on” your desired record
immediately. If you do not find your desired record immediately, press DownArrow to choose it.
Once you have found your record, you will most often press Ctrl+E to open it. (If you are on a
select screen, you will press Alt+T to select it.)
Preliminary User Manual
13
WinTen²
Budget Management
CHAPTER
4
Create Budgets
The Budget Management program gives you many options for creating budgets.
Your first choice is whether to create a new budget or a new budget revision. Each of these
options will create a new, separate budget record that you can view and edit independently. The
main difference between the two is if and how they are linked to other budgets.
To say that two or more budgets are “linked” simply means that the program recognizes a
relationship between them that allows you to compare and contrast them quickly and easily.
You will do this most often by running the Budget Revision Comparison Report. (See Run
Reports.)
A new budget is not linked to any prior budget, although it will be linked to any future revisions
of it. A budget revision is linked to its original budget. It must be for the same fund and the same
fiscal year(s) as the original.
In other words, an original budget record and all of its revisions are linked so that you can
analyze and compare related revisions, but each one is a separate record that you can view and
edit independently.
Hint:
Even though a new budget will be a new, unlinked record, you do not have to create it
from scratch. In the next section, we will discuss several options you have for creating
new budgets. (See Create a New Budget.)
You will usually create one new budget for a given fund as that fund’s current budget nears its
expiration date. You can create, edit, and submit this one budget to your board for approval or
you can choose to create one or more revisions of it. The benefit of creating revisions at this
stage is that it allows you to see and compare different alternatives much more easily than if you
edit and re-edit a single budget. Ultimately, you will submit the best revision to your board for
approval.
You will also create a new revision if either your board or the granting agency rejects a budget.
This revision will allow you to edit the budget to incorporate the changes they request, while still
preserving the rejected budget so you can easily compare the two and see the differences
between them.
Finally, you can create a revision of a budget, if necessary, even after it has been approved and
is the active budget for a fund. You may need this option, for example, for budget overruns
during the year. Simply create a new revision as needed and repeat the approval process for
the revised budget. The previously approved budget will remain active until you mark the new
revision as approved by the granting agency.
Preliminary User Manual
14
WinTen²
Budget Management
Your additional options for creating budgets differ between new budgets and budget revisions.
For this reason, we will address those options separately in the following sections of this
chapter:
•
Create a New Budget
•
Create a Budget Revision
Create a New Budget
You will usually create one new budget for a given fund as that fund’s current budget nears its
expiration date. Creating a new budget is a two-step process.
Note:
Before you create a new budget, verify that you have opened the fund’s
appropriate fiscal year for budgeting in the General Ledger program. (Please see
the user manual for WinTen² General Ledger.)
You will first use the Add Budget Wizard to create the new budget record, which defines the
fund and the fiscal year(s) for the new budget. This step also allows you to base the new budget
on either the budgeted amounts or the actual amounts (or the greater of the two) for the prior
year, increasing or decreasing the budget by a given percent.
Hint:
The program also allows your to create the new budget from scratch, starting with zero
amounts and entering each account’s budgeted amount manually.
Note:
You must complete this first step, even if you wish to create the new budget
entirely in a spreadsheet.
In the second step, you will allot the appropriate amount to each of the fund’s revenue and
expenditure accounts for each fiscal period covered by the budget. You can do this within the
Budget Management program (See Maintain Budgets and Maintain Budget Information per
Account.) or you can use the import/export feature to allot these amounts in an Excel
spreadsheet (See Edit Budgets in Spreadsheets.).
Note:
You will usually need to perform this second step, but not always. You might skip
it, for instance, if you simply want to increase the prior year’s values by a certain
percentage across the board.
The Add Budget Wizard is the first step to creating a new budget.
To Start the Add Budget Wizard:
Press Ctrl+A or click the Add icon either on the Browse Budgets screen or on the Main tab
of the Maintain Budgets screen. (See Manage Records with Browse, Maintain, and Select
Screens.)
(See Use the Add Budget Wizard.)
Preliminary User Manual
15
WinTen²
Budget Management
Use the Add Budget Wizard
The Add Budget Wizard will guide you through three steps to create a budget:
•
Step 1: Enter Budget Setup Values
•
Step 2: Enter Budget Fund and Description
•
Step 3: Confirmation
We will walk through these steps separately.
To Move to the Next Step:
Press Page Down or click the Start, Next, or Finish button.
To Move to the Previous Step:
Press Page Up or click the Back button.
To Cancel the Wizard at Any Time:
Press Esc or click the Cancel button.
Hint:
Until you finish Step 3, you can go back and change any information you have entered.
Step 1: Enter Budget Setup Values
This step allows you to choose basic options for creating for the budget.
Step 1 contains five options: Copy from Selected Budget, Fiscal Year, Basis to Create New
Budget, Factor, and Last Reporting Month. Fiscal Year and Basis to Create New Budget are
required. Last Reporting Month may also be required, depending on your choice for Basis to
Create New Budget.
Copy from Selected Budget
Use this option to choose an existing budget as the starting point for the new one.
Fiscal Year
Choose the fiscal year(s) of the new budget. If the budget is for only one fiscal year, choose that
year for both fields.
Basis to Create New Budget
Select whether you wish to create the new budget based on the current year’s budget, the
current year’s actual, the greater of current year’s actual or budget, or by starting with zero
amounts.
Factor
Choose this option to increase or decrease the current budgeted or actual values by a certain
percent. It is available only if you have not chosen “Zero Amounts,” above.
Last Reporting Month
This field applies only if you have chosen “Current Year’s Actual” or “Greater of Current Year’s
Actual or Budget,” above.
Preliminary User Manual
16
WinTen²
Budget Management
This option identifies which actual values to use in calculating the new budget, namely, which
months of the current fiscal year you wish to use as the basis for creating the new budget. The
program will include actual values for all months of the current fiscal year (not calendar year) up
to and including the month you choose here.
You should always create a new budget before the current budget expires, which means that
you will always have some months at the end of the current fiscal year for which you have no
transaction data.
Choose the last month for which you have complete data (and which you wish to include for
purposes of the new budget). The Budget Management program will annualize the data for
these months and use the annualized values to create the new budget.
Hint:
To ”annualize” means to estimate what the values would be for a full twelve months. The
program does this by averaging the values for the months that are included and
multiplying those averages by twelve.
If you use this option, you will often choose the last period that you have closed, since it is the
last period for which you have final actual values. (For more information on closing fiscal
periods, please see the user manual for WinTen² General Ledger.)
Note:
You are not required to close a fiscal period before including it as part of the basis
for creating the new budget. However, if you have not closed the “Last Reporting
Month,” be aware that any future transactions for that period would change its
actual values. The new budget you are creating will not update automatically to
reflect any future transactions.
To Complete Step 1:
Tab or click through the fields, entering the information.
(Fiscal Year and Basis to Create New Budget are required. Last Reporting Month may also
be required.)
Press PageDown or click the Start button to go to the next step of the Add Budget Wizard
(Step 2: Enter Budget Fund and Description).
Step 2: Enter Budget Fund and Description
This step allows you to enter additional information for the budget.
Step 2 contains three editable data fields: Fund, Description, and Notes. Fund and
Description are required.
Some of your choices from Step 1 appear at the top of the screen. These fields are not editable
on this step.
Fund
Choose the fund for this budget.
Description
This is your agency’s text description to identify this budget.
Preliminary User Manual
17
WinTen²
Budget Management
Notes
Enter any notes about this budget that may be helpful for your agency or the granting agency.
Notes might include such things as a percentage change factor used to create the budget or
important changes for specific accounts.
To Complete Step 2:
Tab or click through the fields, entering the information.
(Fund and Description are required.)
Press Page Down or click the Next button to go to the next step of the Add Budget Wizard
(Step 3: Confirmation).
Step 3: Confirmation
Step 3 allows you to confirm some of the information before you finish creating this budget. The
fields on this step are not editable.
To Complete Step 3:
If anything is incorrect, press Page Up or click the Back button to go to the previous step(s)
and correct it.
If everything is correct, press Page Down or click the Finish button to finish creating this
budget.
When you finish, your new budget opens on the Maintain Budgets screen.
As noted above, depending on your choices within the Add Budget Wizard, you may want to
enter or edit budget information (e.g., budget values for specific accounts) by editing the new
budget.
You can also choose to create another new budget or return to the Browse Budgets screen.
To Edit the New Budget:
(See Maintain Budgets and Edit Budgets in Spreadsheets.)
To Create Another New Budget:
Press Ctrl+A or click the Add icon to restart the Add Budget Wizard.
Follow the steps above to complete the wizard. (See Use the Add Budget Wizard.)
To Return to the Browse Budgets Screen:
Press Esc or click the Exit icon.
Create a Budget Revision
You can create a new revision of a budget at any time, before or after the budget is approved. A
budget revision must be based on an original budget and must be for the same fund and the
same fiscal year(s) as that original. Revisions make it easy for you to compare multiple versions
of budgets and track the differences among them.
You can create revisions before the approval process to compare different alternatives more
easily. You will create a new revision if either your board or the granting agency rejects a
Preliminary User Manual
18
WinTen²
Budget Management
budget. You can also create a revision during a fiscal year if needed because of expense
overruns.
Much like creating a new original budget, creating a revision is a two-step process.
You will first use the Add Budget Revision Wizard to create the record for the new revision. We
will walk through that process below.
Note:
You must complete this first step, even if you wish to create the new budget
revision entirely in a spreadsheet.
To complete the revision, you will then adjust the amount allotted to each of the fund’s revenue
and expenditure accounts for each fiscal period covered by the budget. You can do this within
the Budget Management program (See Maintain Budgets and Maintain Budget Information per
Account.) or you can use the import/export feature to allot these amounts in an Excel
spreadsheet (See Edit Budgets in Spreadsheets.).
The Add Budget Revision Wizard is the first step to creating a revision.
To Start the Add Budget Revision Wizard:
Locate the budget for which you wish to make a new revision.
Open this budget on the Main tab of the Maintain Budgets screen. (See Manage Records
with Browse, Maintain, and Select Screens.)
Press Alt+Z to open the Wizards menu, and then press 8.
OR
Click the Wizards drop-down arrow, and then click Create Budget Revision.
(See Use the Add Budget Revision Wizard.)
Use the Add Budget Revision Wizard
The Add Budget Revision Wizard will guide you through two steps to create a budget revision:
•
Step 1: Enter Revision Setup Values
•
Step 2: Confirmation
We will walk through these steps separately.
To Move to the Next Step:
Press Page Down or click the Start or Finish button.
To Move to the Previous Step:
Press Page Up or click the Back button.
To Cancel the Wizard at Any Time:
Press Esc or click the Cancel button.
Hint:
Until you finish Step 2, you can go back and change any information you have entered.
Preliminary User Manual
19
WinTen²
Budget Management
Step 1: Enter Revision Setup Values
This step allows you to choose basic options for creating for the revision.
Step 1 contains three editable data fields: Description, Date, and Notes. Description and Date
are required.
Description
This is your agency’s text description to identify this budget revision.
The description of the original budget appears here by default. You can choose to edit this
description to distinguish between the revision and the original or you can choose to keep the
same description for both.
The Description field is editable on the Main tab of the Maintain Budgets screen. If you choose
to use part of the description to identify the revision, you can easily change it in the future, if you
wish. (See Maintain Budgets and Maintain General Budget Information.)
Hint:
The non-editable Revision field appears both on the Browse Budgets screen and on the
Main tab of the Maintain Budgets screen. It automatically numbers your revisions
sequentially (the original budget is revision “1”). Regardless of how you use the
Description field, the Revision field lets you distinguish easily among your revisions.
Date
Verify or enter the date of the revision.
Notes
Enter any notes about this budget that may be helpful for your agency or the granting agency.
Notes for a revision might include such things as the reason for the revision or important
changes for specific accounts.
To Complete Step 1:
Tab or click through the fields, entering the information.
(Description and Date are required.)
Press PageDown or click the Start button to go to the next step of the Add Budget Revision
Wizard (Step 2: Confirmation).
Step 2: Confirmation
Step 2 allows you to confirm the information before you finish creating this revision. The fields
on this step are not editable.
To Complete Step 2:
If anything is incorrect, press Page Up or click the Back button to go to the previous step
and correct it.
If everything is correct, press Page Down or click the Finish button to finish creating this
revision.
When you finish, your new budget revision opens on the Maintain Budgets screen.
Preliminary User Manual
20
WinTen²
Budget Management
As noted above, you will want to adjust the amount allotted to each of the fund’s revenue and
expenditure accounts for each fiscal period covered by the budget. You can do this immediately
or later.
To Edit the New Revision:
(See Maintain Budgets and Edit Budgets in Spreadsheets.)
To Return to the Browse Budgets Screen:
Press Esc or click the Exit icon.
Preliminary User Manual
21
WinTen²
Budget Management
CHAPTER
5
Maintain Budgets
After you have created a new budget or a budget revision, you will often want to edit budgeted
amounts for specific accounts. You may sometimes want to change the description of a budget,
view other general information about a budget, or view or enter notes.
Topics addressed in this chapter include:
•
Maintain General Budget Information
•
Maintain Budget Notes
•
Maintain Budget Information per Account
You will do all of these things from the Maintain Budgets Screen.
To Open the Maintain Budgets Screen:
Edit a budget (press Ctrl+E or click the Edit icon) on the Browse Budgets screen. (See
Manage Records with Browse, Maintain, and Select Screens.)
Hint:
This screen also opens automatically immediately after you create a new budget or
revision.
Preliminary User Manual
22
WinTen²
Budget Management
Maintain Budgets Screen
The Maintain Budgets screen has five tabs: Main, Accounts, Revision, Activity, and Change
Tracking.
You can use the Main tab to view general budget information or to change the budget
description. (See Maintain General Budget Information.)
You can also use the Main tab to view or enter budget notes (See Maintain Budget Notes.), to
move budgets through the approval process (See Process Budgets for Approval.), and to
monitor budgeted and actual values (See Monitor Budgets and Monitor Budget Analysis.).
You can use the Accounts tab to allot budgeted amounts to specific accounts. (See Maintain
Budget Information per Account.)
You can use the Revisions, Activity, and Change Tracking tabs to monitor revisions, approvals,
and data changes for your budgets. We discuss these options in a separate chapter. (See
Monitor Budgets.)
We will first walk through maintaining general budget information on the Main tab.
Preliminary User Manual
23
WinTen²
Budget Management
Maintain General Budget Information
General budget information includes the budget description and summary information about the
budget.
You will use the Maintain Budgets Screen: Main Tab to maintain this information.
To Open the Main Tab:
This tab appears by default when you open the Maintain Budgets screen.
If you have left it, press Ctrl+Tab or click the Main tab (at the upper left).
Maintain Budgets Screen: Main Tab
This tab contains only one editable data field, Description.
It also contains the non-editable Fiscal Year, Status, and Revision fields and a summary
activity table.
Description
This is your agency’s text description to identify this budget. You can edit it as needed on this
tab.
Fiscal Year
You cannot change the fiscal year(s) of a budget or any of its revisions after you have created
the original budget. If the fiscal year information is incorrect, you must create a new original
budget.
Preliminary User Manual
24
WinTen²
Budget Management
Status
This field identifies whether this budget is the “Active” budget for its fund.
As soon as you mark a budget as approved by the granting agency, it becomes the active
budget for its fund for all the fiscal periods covered by the budget. Any budget analysis views or
reports you use, in either Budget Management or the General Ledger program, will use this
budget. (See Process Budgets for Approval and Approve a Budget.)
Revision
This field shows the revision number of the current record. Revision number “1” means the
current record is the original budget, not a revision. Each revision you create after the original
will be numbered sequentially, beginning with “2.” You can see a full history of related revisions
for the current record on the Revisions tab of this screen. (See Monitor Budgets and Monitor
Budget Revision History.)
Activity Table
The summary activity table fills the bottom of the screen. It shows the latest date, if any, for
each processing action. You can see a full history of processing activity for the current record on
the Activity tab of this screen. (See Monitor Budgets and Monitor Budget Approval-Processing
Activity.)
To Edit the Budget Description:
Press Ctrl+E or click the Edit icon on the Main tab of the Maintain Budgets screen.
Enter the new description.
To save your changes, press Ctrl+S or click the Save icon.
To cancel, press Ctrl+Q or click the Cancel icon.
Maintain Budget Notes
Budget notes can contain any information that may be helpful for your agency or the granting
agency. Notes might include such things as a percentage change factor used to create the
budget, the reason for creating a revision, or important changes for specific accounts.
You can enter notes when you create a new budget or revision and/or when you process
budgets for approval. You can view existing notes or enter additional ones at any time.
You will use the Maintain Budget Notes Screen to maintain your budget notes.
To Open the Maintain Budget Notes Screen:
Locate the budget for which you wish to see or enter notes.
Open this budget on the Main tab of the Maintain Budgets screen. (See Manage Records
with Browse, Maintain, and Select Screens.)
Press Ctrl+T or click the Notes icon.
OR
Press Alt+V to open the View menu, and then press T.
Preliminary User Manual
25
WinTen²
Budget Management
Maintain Budget Notes Screen
The Maintain Budget Notes screen contains non-editable fields at the top of the screen to
identify the current budget. It also contains a note table and a detail information section.
The note table displays one row of information for each of this budget’s notes.
The detail information section, by default, fills the bottom part of the screen. This section
displays detailed information on the note currently selected in the note table above it. You can
choose to show or hide the detail information section by pressing Ctrl+O or clicking the
Show/Hide icon.
You will view, enter, or edit notes in the detail information section; you cannot do so directly in
the table.
The detail information section contains three data fields: Date, Subject, and Notes. All are
required.
The note table also contains one additional, non-editable field, Author.
Date
This is the date the note was created.
Subject
This is a short descriptive subject of the note.
Notes
This is the body of the note.
Preliminary User Manual
26
WinTen²
Budget Management
Author
This field automatically displays the user name of the person who created or last edited the
note.
To Show or Hide the Detail Information Section:
Press Ctrl+O or click the Show/Hide icon.
Hint:
If you have hidden this section, it will also “show” automatically when you edit a record.
To Add a Note:
Press Ctrl+A or click the Add icon on the Maintain Budget Notes screen.
Tab or click through the fields in the detail information section, entering the information.
To save your changes, press Ctrl+S or click the Save icon.
To cancel, press Ctrl+Q or click the Cancel icon.
To Edit a Note:
Select, in the note table, the row of the note you wish to edit.
Press Ctrl+E or click the Edit icon.
Tab or click through the fields in the detail information section, changing information as
needed.
To save your changes, press Ctrl+S or click the Save icon.
To cancel, press Ctrl+Q or click the Cancel icon.
To Delete a Note:
Select, in the note table, the row of the note you wish to delete.
Press Ctrl+D or click the Delete icon.
Press Y or click the Yes button to confirm the deletion.
To Exit this Screen:
Press Esc or click the Exit icon.
Maintain Budget Information per
Account
After you have created a new budget or a budget revision, you will usually want to edit budgeted
amounts for specific accounts. You can do this either by editing the budget on the Accounts tab
of the Maintain Budgets screen or by editing it in a spreadsheet. (See Edit Budgets in
Spreadsheets.)
The following section addresses using the Maintain Budgets Screen: Accounts Tab to maintain
this information.
Preliminary User Manual
27
WinTen²
Budget Management
To Open the Accounts Tab:
Press Ctrl+Tab or click the Accounts tab (at the upper left) on the Maintain Budgets screen.
Maintain Budgets Screen: Accounts Tab
The Accounts tab contains an account table and a detail information section.
The account table displays one row of information for each of this fund’s general ledger
accounts.
The detail information section, by default, fills the bottom part of the screen. This section
displays detailed budget information for the account currently selected in the account table
above it. You can choose to show or hide the detail information section by pressing Ctrl+O or
clicking the Show/Hide icon.
You will edit account budgets in the detail information section; you cannot edit them directly in
the account table.
The detail information section contains a Summary View sub-tab and a Detail View sub-tab.
Both sub-tabs contain the Annual Amount, Prior Budget Amount, and Distribution Scheme
fields.
Preliminary User Manual
28
WinTen²
Budget Management
The Detail View sub-tab also contains twelve editable Budget fields, one for each month in the
fiscal year, and the non-editable Prior Year Actual fields.
The Summary View sub-tab also contains the Explanation field and the non-editable Account
and Description fields.
Annual Amount
This field contains the annual budget for the current account. To enter this amount:
1. Enter a value in this field and then use the Distribution Scheme field to distribute that
amount across the fiscal periods.
OR
2. Enter values in the Budget fields for individual months, in which case the Annual Amount
field will automatically calculate the total for the year.
Prior Budget Amount
This non-editable field shows you the prior annual budget for the current account.
Distribution Scheme
Choose a distribution scheme if you wish to distribute the amount in the Annual Amount field
across the fiscal periods.
Some options in this field are built into the program; others may be defined by your agency.
(See Plan Distribution Schemes and Maintain Monthly Distribution Schemes.)
Preliminary User Manual
29
WinTen²
Budget Management
Budget
These fields contain the amount budgeted for each month. You can enter these amounts
individually, but you will usually use the Annual Amount and Distribution Scheme fields to enter
them automatically. (See Annual Amount, above.)
Prior Year Actual
These non-editable fields show the actual income or expense for each corresponding month in
the prior year.
Explanation
Enter any explanatory notes about this account’s budget that may be helpful for your agency or
the granting agency.
Account and Description
These non-editable fields simply identify the account currently selected in the account table
above. Use it to verify that you are budgeting for the correct account.
To Show or Hide the Detail Information Section:
Press Ctrl+O or click the Show/Hide icon.
Hint:
If you have hidden this section, it will also “show” automatically when you edit a record.
To Edit an Account Budget by Using Distribution Schemes:
Select, in the account table, the row of the account you wish to budget.
Press Ctrl+E or click the Edit icon.
Enter the annual amount for this account.
Tab or click to the Distribution Scheme field and select a distribution scheme.
If necessary, click the Summary View sub-tab.
Tab or click to the Explanation field and enter any explanation for this account budget.
To save your changes, press Ctrl+S or click the Save icon.
To cancel, press Ctrl+Q or click the Cancel icon.
To Edit an Account Budget without Using Distribution Schemes:
Select, in the account table, the row of the account you wish to budget.
Press Ctrl+E or click the Edit icon.
If necessary, click the Detail View sub-tab.
Tab or click through the Budget fields in the detail information section, entering the budget
for each month.
If necessary, click the Summary View sub-tab.
Tab or click to the Explanation field and enter any explanation for this account budget.
To save your changes, press Ctrl+S or click the Save icon.
To cancel, press Ctrl+Q or click the Cancel icon.
Preliminary User Manual
30
WinTen²
Budget Management
CHAPTER
6
Edit Budgets in Spreadsheets
The final step in creating a budget is to allot the appropriate amount to each of the fund’s
revenue and expenditure accounts for each fiscal period covered by the budget. You can do this
within the Budget Management program (See Maintain Budgets and Maintain Budget
Information per Account.), but it is often quicker and easier to enter and/or edit these amounts in
a spreadsheet. The program’s import/export feature allows you to do this.
Note:
If you wish to create a new budget or revision entirely in a spreadsheet, follow
these steps:
1. Create the new budget record. (See Create Budgets.)
2. Export the budget to Excel immediately after you create it.
3. Edit the budget in Excel.
4. Import the budget back into the Budget Management program.
Before you import or export a budget, you should be aware of a few guidelines for avoiding
potential pitfalls. Understanding these guidelines will help you use this powerful feature most
effectively.
Concerning Exports
You can export a budget for only one fiscal year at a time, even if the budget in question is a
multi-year budget.
The program always exports certain information to specific cells of the spreadsheet. It is very
important that you leave some of these cells unchanged.
If you wish to import the edited budget back into the Budget Management program, you must
not change any header, account number, or account description information. You cannot
change anything other than the dollar values in the budget amount cells. Doing so will prevent
the budget from importing correctly into the program.
Note:
Do not change anything in the exported spreadsheet other than dollar values, if
you wish to import the edited budget back into the Budget Management program.
Concerning Imports
Just like exporting, you will import a budget for only one fiscal year at a time, even if the budget
in question is a multi-year budget.
If you import a budget for a fiscal year, it will replace all budgeted values for that fiscal year for
the budget into which you import it.
Topics addressed in this chapter include:
•
Export a Budget
•
Import a Budget
Preliminary User Manual
31
WinTen²
Budget Management
Export a Budget
The Export Budget Wizard allows you to export to a spreadsheet any single fiscal year within a
budget. You can choose to export all accounts for the budget or only a specific range of
accounts.
To Start the Export Budget Wizard:
Open the budget you wish to export on the Main tab of the Maintain Budgets screen. (See
Manage Records with Browse, Maintain, and Select Screens.)
Press Alt+O to open the Tools menu, and then press E.
OR
Click the Tools drop-down arrow, and then click Export Budget.
(See Use the Export Budget Wizard)
Use the Export Budget Wizard
The Export Budget Wizard will guide you through two steps to export a budget:
•
Step 1: Enter Export Values
•
Step 2: Confirmation
We will walk through these steps separately.
To Move to the Next Step:
Press Page Down or click the Start or Finish button.
To Move to the Previous Step:
Press Page Up or click the Back button.
To Cancel the Wizard at Any Time:
Press Esc or click the Cancel button.
Hint:
Until you finish Step 2, you can go back and change any information you have entered.
Step 1: Enter Export Values
This step allows you to enter all the information needed for the export.
Step 1 contains six editable data fields: Export Selected Budget, Fiscal Year, Starting and
Ending Account Numbers, Export File Location, and Open Export into Excel. All fields are
required, except Open Export into Excel.
Export Selected Budget
Choose the budget you want to export.
Fiscal Year
Choose which of the budget’s fiscal years you want to export.
Starting and Ending Account Numbers
These fields define which accounts you will export.
Preliminary User Manual
32
WinTen²
Budget Management
Export File Location
Enter the location and file name for saving the exported budget. You can type this information
directly in the field, but you will most often use the Browse button to select the location and
enter the file name in a Save As dialog box.
Open Export into Excel
If you check this box, the program will open the exported budget in Excel. If you do not check
this box, you can manually open the Excel file at any time.
To Complete Step 1:
Tab or click through the fields, entering the information.
(All fields are required, except Open Export into Excel.)
Press PageDown or click the Start button to go to the next step of the Export Budget Wizard
(Step 2: Confirmation).
Step 2: Confirmation
Step 2 allows you to confirm the information before you finish exporting the budget. The fields
on this step are not editable.
To Complete Step 2:
If anything is incorrect, press Page Up or click the Back button to go to the previous step
and correct it.
If everything is correct, press Page Down or click the Finish button to finish exporting the
budget.
Note:
When working with budgets in Excel, please be mindful of the cautions discussed
at the beginning of this chapter. (See Edit Budgets in Spreadsheets.)
Import a Budget
After you have entered and/or edited budget values in a spreadsheet, you can use the Import
Budget Wizard to import them into the Budget Management program.
Note:
If you import a budget for a fiscal year, it will replace all budgeted values for that
fiscal year for the budget into which you import it.
To Start the Import Budget Wizard:
Open, on the Main tab of the Maintain Budgets screen, the budget for which you wish to
import values. (See Manage Records with Browse, Maintain, and Select Screens.)
Press Alt+O to open the Tools menu, and then press I.
OR
Click the Tools drop-down arrow, and then click Import Budget.
(See Use the Import Budget Wizard.)
Preliminary User Manual
33
WinTen²
Budget Management
Use the Import Budget Wizard
The Import Budget Wizard will guide you through two steps to import a budget:
•
Step 1: Select File to Import
•
Step 2: Confirmation
We will walk through these steps separately.
To Move to the Next Step:
Press Page Down or click the Start or Finish button.
To Move to the Previous Step:
Press Page Up or click the Back button.
To Cancel the Wizard at Any Time:
Press Esc or click the Cancel button.
Hint:
Until you finish Step 2, you can go back and change any information you have entered.
Step 1: Select File to Import
This step allows you to select the file you wish to import.
Step 1 contains only one data field, Import Selection File. It is required.
Import Selection File
Choose the file you wish to import. You can type the path and file name directly in the field, but
you will most often use the Browse button to select the file in a dialog box.
To Complete Step 1:
Use the Browse button to select the file.
OR
Type the path and file name in the Import Selection File field.
Press PageDown or click the Start button to go to the next step of the Import Budget Wizard
(Step 2: Confirmation.)
Step 2: Confirmation
Step 2 allows you to confirm the file information before you finish importing the budget. The
fields on this step are not editable.
The table provides a preview of the data in your selected file. Use it to confirm that you want to
import this file.
Hint:
If it is helpful, you can widen any column in the table to better see its data. Do this by
clicking and dragging the right border of the column’s header cell (the gray box with a
capital letter in it). As you do so, your cursor will change to a horizontal, two-sided arrow.
Preliminary User Manual
34
WinTen²
Budget Management
To Complete Step 2:
If this is not the correct file, press Page Up or click the Back button to go to the previous
step and select the correct one.
If this is the correct file, press Page Down or click the Finish button to finish importing the
budget.
When you finish, your budget remains open on the Main tab of the Maintain Budgets screen.
You can view and/or edit the budget values you just imported by going to the Accounts tab of
this screen.
To Open the Accounts Tab:
Press Ctrl+Tab or click the Accounts tab (at the upper left) on the Maintain Budgets screen.
(See Maintain Budgets and Maintain Budget Information per Account.)
Preliminary User Manual
35
WinTen²
Budget Management
CHAPTER
7
Process Budgets for Approval
After you have fully prepared a budget, you will move it through the approval process. Typically,
you will first submit it to your agency’s board of commissioners, which may approve or reject it.
After your board has approved a budget, you will submit it to the granting agency, which may
also approve or reject it. (See Budgeting Process and Plan Budgeting Process and Schedule.)
There are six wizards in Budget Management to help you process your budgets for approval,
one to record each of these six possible actions:
•
Submit Budget to Board
•
Reject Budget by Board
•
Approve Budget by Board
•
Submit Budget to Agency
•
Reject Budget by Agency
•
Approve Budget by Agency
There is a set sequence to these wizards, which mirrors the sequence of the approval process
itself. For this reason, you can use each wizard only once for a given budget. Each wizard will
be disabled for a budget automatically after you complete it.
Completing certain wizards will also cause other wizards to be disabled for a budget. If you
approve a budget by your board, for instance, that will automatically disable the Reject Budget
by Board wizard. Approving a budget by the agency will automatically disable the Reject Budget
by Agency wizard.
The steps of all of these wizards are almost identical. The only real difference is the names of
the wizards and, of course, the outcomes or actions you are recording.
Because these wizards are so similar, we will address them in pairs. We will first look at the two
“submit” wizards together. We will then look at the two “reject” wizards together and, finally, at
the two “approve” wizards together.
Topics addressed in this chapter include:
•
Submit a Budget
•
Reject a Budget
•
Approve a Budget
You can access all of these wizards from the Maintain Budgets Screen.
Preliminary User Manual
36
WinTen²
Budget Management
To Open the Maintain Budgets Screen:
Edit a budget (press Ctrl+E or click the Edit icon) on the Browse Budgets screen. (See
Manage Records with Browse, Maintain, and Select Screens.)
Hint:
This screen also opens automatically immediately after you create a new budget or
revision.
Submit a Budget
The two submit budget wizards allow you to submit a budget to your board or to the granting
agency, respectively.
To Submit a Budget to Your Board:
Locate the budget you wish to submit.
Open this budget on the Main tab of the Maintain Budgets screen. (See Manage Records
with Browse, Maintain, and Select Screens.)
Press Alt+Z to open the Wizards menu, and then press 2.
OR
Click the Wizards drop-down arrow, and then click Submit Budget to Board.
(See Use a Submit Budget Wizard.)
To Submit a Budget to the Granting Agency:
Locate the budget you wish to submit.
Open this budget on the Main tab of the Maintain Budgets screen. (See Manage Records
with Browse, Maintain, and Select Screens.)
Press Alt+Z to open the Wizards menu, and then press 5.
OR
Click the Wizards drop-down arrow, and then click Submit Budget to Agency.
(See Use a Submit Budget Wizard.)
Use a Submit Budget Wizard
Each submit budget wizard will guide you through two steps to submit a budget:
•
Step 1: Enter Submission Information
•
Step 2: Confirmation
We will walk through these steps separately.
To Move to the Next Step:
Press Page Down or click the Start or Finish button.
To Move to the Previous Step:
Press Page Up or click the Back button.
Preliminary User Manual
37
WinTen²
Budget Management
To Cancel the Wizard at Any Time:
Press Esc or click the Cancel button.
Hint:
Until you finish Step 2, you can go back and change any information you have entered.
Step 1: Enter Submission Information
This step allows you to enter all the information needed to submit the budget.
Step 1 contains two editable data fields: Date and Notes. Date is required.
Date
Enter the date you submitted the budget to the board or to the granting agency.
Notes
Enter any additional information about this submission that may be helpful for your agency or
the granting agency.
Any notes you enter here will be added automatically to your notes for this budget. You can
view and/or edit them from the Maintain Notes screen. (See Maintain Budgets and Maintain
Budget Notes.
To Complete Step 1:
Tab or click through the fields, entering the information.
(Date is required.)
Press PageDown or click the Start button to go to the next step of the submit budget wizard
(Step 2: Confirmation).
Step 2: Confirmation
Step 2 allows you to confirm the information before you finish submitting the budget. The fields
on this step are not editable.
To Complete Step 2:
If anything is incorrect, press Page Up or click the Back button to go to the previous step
and correct it.
If everything is correct, press Page Down or click the Finish button to finish submitting the
budget.
Preliminary User Manual
38
WinTen²
Budget Management
Reject a Budget
The two reject budget wizards allow you to record that a budget was rejected either by your
board or by the granting agency.
To Reject a Budget by Your Board:
Locate the budget that was rejected.
Open this budget on the Main tab of the Maintain Budgets screen. (See Manage Records
with Browse, Maintain, and Select Screens.)
Press Alt+Z to open the Wizards menu, and then press 3.
OR
Click the Wizards drop-down arrow, and then click Reject Budget by Board.
(See Use a Reject Budget Wizard.)
To Reject a Budget by the Granting Agency:
Locate the budget that was rejected.
Open this budget on the Main tab of the Maintain Budgets screen. (See Manage Records
with Browse, Maintain, and Select Screens.)
Press Alt+Z to open the Wizards menu, and then press 6.
OR
Click the Wizards drop-down arrow, and then click Reject Budget by Agency.
(See Use a Reject Budget Wizard.)
Use a Reject Budget Wizard
Each reject budget wizard will guide you through two steps to reject a budget:
•
Step 1: Enter Rejection Information
•
Step 2: Confirmation
We will walk through these steps separately.
To Move to the Next Step:
Press Page Down or click the Start or Finish button.
To Move to the Previous Step:
Press Page Up or click the Back button.
To Cancel the Wizard at Any Time:
Press Esc or click the Cancel button.
Hint:
Until you finish Step 2, you can go back and change any information you have entered.
Step 1: Enter Rejection Information
This step allows you to enter all the information needed to reject the budget.
Step 1 contains two editable data fields: Date and Notes. Date is required.
Preliminary User Manual
39
WinTen²
Budget Management
Date
Enter the date your board or the granting agency rejected the budget.
Notes
Enter the reason for the rejection and/or any additional information about this rejection that may
be helpful for your agency or the granting agency.
Any notes you enter here will be added automatically to your notes for this budget. You can
view and/or edit them from the Maintain Notes screen. (See Maintain Budgets and Maintain
Budget Notes.
To Complete Step 1:
Tab or click through the fields, entering the information.
(Date is required.)
Press PageDown or click the Start button to go to the next step of the submit budget wizard
(Step 2: Confirmation).
Step 2: Confirmation
Step 2 allows you to confirm the information before you finish rejecting the budget. The fields on
this step are not editable.
To Complete Step 2:
If anything is incorrect, press Page Up or click the Back button to go to the previous step
and correct it.
If everything is correct, press Page Down or click the Finish button to finish rejecting the
budget.
Approve a Budget
The two approve budget wizards allow you to record that a budget was approved either by your
board or by the granting agency.
When you mark a budget as approved by the granting agency, that budget immediately
becomes the “active budget” for that budget’s fund for all fiscal periods covered by the budget.
Any budget analysis views or reports you use, either in the Budget Management program or in
the General Ledger program, will use this budget. (See Budgeting Process.)
To Approve a Budget by Your Board:
Locate the budget that was approved.
Open this budget on the Main tab of the Maintain Budgets screen. (See Manage Records
with Browse, Maintain, and Select Screens.)
Press Alt+Z to open the Wizards menu, and then press 4.
OR
Click the Wizards drop-down arrow, and then click Approve Budget by Board.
(See Use an Approve Budget Wizard.)
Preliminary User Manual
40
WinTen²
Budget Management
To Approve a Budget by the Granting Agency:
Locate the budget that was approved.
Open this budget on the Main tab of the Maintain Budgets screen. (See Manage Records
with Browse, Maintain, and Select Screens.)
Press Alt+Z to open the Wizards menu, and then press 7.
OR
Click the Wizards drop-down arrow, and then click Approve Budget by Agency.
(See Use an Approve Budget Wizard.)
Use an Approve Budget Wizard
Each approve budget wizard will guide you through two steps to approve a budget:
•
Step 1: Enter Approval Information
•
Step 2: Confirmation
We will walk through these steps separately.
To Move to the Next Step:
Press Page Down or click the Start or Finish button.
To Move to the Previous Step:
Press Page Up or click the Back button.
To Cancel the Wizard at Any Time:
Press Esc or click the Cancel button.
Hint:
Until you finish Step 2, you can go back and change any information you have entered.
Step 1: Enter Approval Information
This step allows you to enter all the information needed to approve the budget.
Step 1 contains two editable data fields: Date and Notes. Date is required.
Date
Enter the date your board or the granting agency approved the budget.
Notes
Enter any additional information about this budget that may be helpful for your agency or the
granting agency.
Any notes you enter here will be added automatically to your notes for this budget. You can
view and/or edit them from the Maintain Notes screen. (See Maintain Budgets and Maintain
Budget Notes.
Preliminary User Manual
41
WinTen²
Budget Management
To Complete Step 1:
Tab or click through the fields, entering the information.
(Date is required.)
Press PageDown or click the Start button to go to the next step of the submit budget wizard
(Step 2: Confirmation).
Step 2: Confirmation
Step 2 allows you to confirm the information before you finish rejecting the budget. The fields on
this step are not editable.
To Complete Step 2:
If anything is incorrect, press Page Up or click the Back button to go to the previous step
and correct it.
If everything is correct, press Page Down or click the Finish button to finish approving the
budget.
Note:
When you mark a budget or budget revision as approved by the granting agency,
that budget immediately becomes the “active budget” for that budget’s fund for all
fiscal periods covered by the budget. Any budget analysis views or reports you
use, either in the Budget Management program or in the General Ledger program,
will use this budget. (See Budgeting Process.)
Preliminary User Manual
42
WinTen²
Budget Management
CHAPTER
8
Monitor Budgets
During the fiscal year, you may often want to compare actual expenditures and income to the
budget. The General Ledger program offers many options for doing so. You will do most of this
kind of budget management and tracking from that program. (For more information, please see
the user manual for WinTen² General Ledger.)
The Budget Management program, however, does contain a Budget Analysis feature that allows
you to see this information, as well. You may also want to see a history of budget revisions or
approval-processing actions or a comprehensive audit trail of budget data changes.
You will often use reports to gain this information most efficiently. (See Run Reports.)
You can also choose to see this information on-screen in the Budget Management program.
This chapter addresses the following on-screen options:
•
Monitor Budget Analysis
•
Monitor Budget Revision History
•
Monitor Budget Approval-Processing Activity
•
Monitor Budget Audit Trail
You will access all of these options from the Maintain Budgets Screen.
To Open the Maintain Budgets Screen:
Edit a budget (press Ctrl+E or click the Edit icon) on the Browse Budgets screen. (See
Manage Records with Browse, Maintain, and Select Screens.)
Hint:
This screen also opens automatically immediately after you create a new budget or
revision.
Preliminary User Manual
43
WinTen²
Budget Management
Maintain Budgets Screen
The Maintain Budgets screen has five tabs: Main, Accounts, Revision, Activity, and Change
Tracking.
You can use the Main tab to view general budget information or to change the budget
description (See Maintain General Budget Information.), to view or enter budget notes (See
Maintain Budget Notes.), or to move budgets through the approval process (See Process
Budgets for Approval.).
You can also use the Main tab to monitor budgeted and actual values. (See Monitor Budget
Analysis.)
You can use the Accounts tab to allot budgeted amounts to specific accounts. (See Maintain
Budget Information per Account.)
You can use the Revisions tab to monitor revisions. (See Monitor Budget Revision History.)
You can use the Activity tab to monitor approvals. (See Monitor Budget Approval-Processing
Activity.)
You can use the Change Tracking tab to monitor data changes for your budgets. (See Monitor
Budget Audit Trail.)
Below, we will discuss viewing a budget analysis and tracking budget revisions, approvals, and
data changes
Preliminary User Manual
44
WinTen²
Budget Management
Monitor Budget Analysis
The Budget Analysis feature lets you compare actual expenditures and income to the budget.
You will use the Budget Analysis Screen to see this information.
To Open the Budget Analysis Screen:
Locate the budget for which you wish to see a budget analysis.
Open this budget on the Main tab of the Maintain Budgets screen. (See Manage Records
with Browse, Maintain, and Select Screens.)
Press Alt+O to open the Tools menu, and then press B.
OR
Click the Tools drop-down arrow, and then click Budget Analysis.
Budget Analysis Screen
The Budget Analysis screen contains a table of all the accounts in this budget. The table shows
five columns of information for each account: YTD – Actual, Encumbrance, Projected Actual,
Annual Budget, and Budget Variance.
This screen is for informational purposes only. Nothing on this screen is editable.
Hint:
You can print this screen (See Print Documents.) and/or get similar information in
printable form by using the Budget Comparison Report. (See Run Reports.)
Preliminary User Manual
45
WinTen²
Budget Management
YTD – Actual
This shows the actual fiscal year-to-date value for each account.
Encumbrance
This column shows any active encumbrances for each account.
An encumbrance is an amount set aside to cover an expense for which you have not yet
received the invoice. (For more information on encumbrances, please see the user manual for
WinTen² General Ledger and/or WinTen² Purchase Order.)
Projected Actual
The program estimates what the actual annual value will be for each account based on the YTD
– Actual and Encumbrance values.
Annual Budget
This is the annual amount you have budgeted for each account.
Budget Variance
The program estimates an annual budget variance for each account by subtracting the Annual
Budget value from the Projected Actual value (Budget Variance = Projected Actual – Annual
Budget). A negative amount means the account is projected to be under budget. A positive
amount means the account is projected to go over budget.
To Exit this Screen:
Press Esc or click the Exit icon.
Monitor Budget Revision History
The Budget Management program shows you a history of revisions for each budget and the
status of each revision.
You will use the Maintain Budgets Screen: Revisions Tab to see this information.
To Open the Revisions Tab:
Locate the budget for which you wish to see related revisions.
Open this budget on the Main tab of the Maintain Budgets screen. (See Manage Records
with Browse, Maintain, and Select Screens.)
Press Ctrl+Tab or click the Revisions tab (at the upper left) on the Maintain Budgets screen.
Preliminary User Manual
46
WinTen²
Budget Management
Maintain Budgets Screen: Revisions Tab
The Revisions tab contains a revision table and a detail information section. This tab is for
informational purposes only. Nothing on this tab is editable.
The revision table displays one row of information for each revision that is related to this budget
or revision. Depending on the budget or revision you have currently selected (on the Main tab),
this could include the original budget and all other budgets that are revisions of that same
original budget.
The detail information section, by default, fills the bottom part of the screen. This section
displays a summary of approval-processing activity for the revision currently selected in the
table above it. You can choose to show or hide the detail information section by pressing Ctrl+O
or clicking the Show/Hide icon.
The summary information in the detail section shows the latest date, if any, for each processing
action. If you wish to see a full history of approval-processing activity for any revision, you must
open that budget itself on the Activity tab of this screen. (See Monitor Budget ApprovalProcessing Activity.)
To Show or Hide the Detail Information Section:
Press Ctrl+O or click the Show/Hide icon.
Preliminary User Manual
47
WinTen²
Budget Management
Monitor Budget Approval-Processing
Activity
The program shows you a complete history of approval-processing activity for each budget. This
includes all the steps you have taken to move the budget through the approval process. (See
Plan Budgeting Process and Schedule and Process Budgets for Approval.)
You will use the Maintain Budgets Screen: Activity Tab to see this information.
To Open the Activity Tab:
Locate the budget for which you wish to see approval-processing activity.
Open this budget on the Main tab of the Maintain Budgets screen. (See Manage Records
with Browse, Maintain, and Select Screens.)
Press Ctrl+Tab or click the Activity tab (at the upper left) on the Maintain Budgets screen.
Maintain Budgets Screen: Activity Tab
The Activity tab contains a table of approval-processing actions you have taken on the current
budget. This tab is for informational purposes only. Nothing on this tab is editable.
This tab displays three fields for each action: Action Date/Time, Action By, and
Description/Operation.
Preliminary User Manual
48
WinTen²
Budget Management
Action Date/Time
The Action Date/Time tells you when your agency’s employee processed this change in the
Budget Management program.
Action By
This field shows you who at your agency processed this step in the Budget Management
program.
Description/Operation
This identifies the result of the action.
Monitor Budget Audit Trail
The Budget Management program maintains a comprehensive audit trail of changes to your
budgets, including creation of budgets and revisions, data changes to specific fields, and the
processing of approval steps.
You can see this information on the Maintain Budgets Screen: Change Tracking Tab.
To Open the Change Tracking Tab:
Locate the budget for which you wish to see a history of data changes.
Open this budget on the Main tab of the Maintain Budgets screen. (See Manage Records
with Browse, Maintain, and Select Screens.)
Press Ctrl+Tab or click the Change Tracking tab (at the upper left) on the Maintain Budgets
screen.
Preliminary User Manual
49
WinTen²
Budget Management
Maintain Budgets Screen: Change Tracking Tab
The Change Tracking tab contains an action table and a detail information section. This tab is
for informational purposes only. Nothing on this tab is editable.
This tab displays three fields for each action: Date/Time Changed, Changed By,
Description/Operation, Old Value, and New Value.
Date/Time Changed
This tells you when your agency’s employee processed this change in the Budget Management
program.
Changed By
This field shows you who at your agency processed this change in the Budget Management
program.
Description/Operation
This shows you what was done to the budget, e.g., a revision that was created, an approvalprocessing step that was taken, or a field value that was changed.
Old Value and New Value
These fields show you what a field or status for the budget was changed from and changed to,
respectively.
Preliminary User Manual
50
WinTen²
Budget Management
CHAPTER
9
Run Reports
Budget Management includes many built-in reports with powerful filters to help track and
manage your data. If your agency uses the Custom Report Writer program, you can create
custom reports and define who has rights to run them. (Please see the user manual for WinTen²
Custom Report Writer.)
You can manage your reports by choosing from many report options and by previewing or
printing reports. You can save reports as various file types and can reopen QuickReport files in
Budget Management.
Topics addressed in this chapter include:
•
Preview a Report
•
Save a Report
•
Load a Report
•
Print a Report
You will use the Budget Management Reports screen to manage and run your reports.
Preliminary User Manual
51
WinTen²
Budget Management
To Open the Budget Management Reports Screen:
Press R or click the Reports button on the Main Menu.
Preview a Report
You may choose to preview a report before you print it or, even if you are not printing it, you
may choose just to view it on-screen.
You will use the Preview Report Screen to preview your reports.
To Open the Preview Report Screen:
Select the report you wish to view on the Budget Management Reports screen and choose
any filters for the report.
Click the Preview icon.
Preview Report Screen
There are six options on the Preview Report screen: Zoom, Change Page, Print, Save
Report, Load Report, and Close.
Zoom
You have three choices for zooming the preview (making it larger or smaller): the Zoom to Fit,
100%, and Zoom to Width icons.
The Zoom to Fit and Zoom to Width icons size the page to the window. Zoom to Fit, usually the
smallest option, lets you see the entire page and Zoom to Width, usually the largest option,
widens the page to fill the window horizontally. The 100% icon sets the page to its normal, “full”
size, regardless of the window size.
Preliminary User Manual
52
WinTen²
Budget Management
To Change the Zoom:
Click one of the three zoom icons.
Change Page
The Change Page options let you move from one page of your preview to another. Obviously,
they are available only for multiple-page previews. There are four options: the First Page,
Previous Page, Next Page, and Last Page icons. Each icon takes you to its respective page.
To Change the Page:
Click one of the four page icons.
Print
The Print option opens a Print Report dialog box from which you can print the report. (See Print
a Report.)
To Print:
Click the Print icon.
Save Report and Load Report
We will discuss the Save and Load Report options below. (See Save a Report and Load a
Report.)
Close
The Close option closes the preview.
To Close:
Press Esc, press Alt+C, or click the Close button.
Save a Report
Saving an electronic copy of report can be an alternative to printing a hard copy; it allows you to
take a snapshot of your data at any time. You can also choose to manipulate data in the saved
report independently from the Budget Management program.
You can save a report in any of several different file types. If you save a report as a
QuickReport file, you can reopen it (load it) in Budget Management. (See Load a Report.)
Note:
The data in the saved report is only a snapshot; it will not change as information
in the Budget Management program changes. When you need the up-to-date
information in the future, run the report again.
Hint:
Because the saved report is a snapshot, you might consider including its date as part of
the file name when you save it.
The Save Report option is available from the Preview Report screen. (See Preview a Report.)
You will use the Save Report Dialog Box to save a report.
To Open the Save Report Dialog Box:
Click the Save Report icon on the Preview Report screen.
Preliminary User Manual
53
WinTen²
Budget Management
Save Report Dialog Box
There are three primary fields on the Save Report dialog box: Save In, File Name, and Save
as Type.
Save In
The Save In field shows the folder in which you will save the report
File Name
The File Name is the name you will give to the saved report.
Save as Type
You can save a report as one of six different file types: QuickReport file, Excel spreadsheet,
Comma Separated Values, Rich Text Format, Text file, and HTML document. Your choice
of file type will depend on how you want to view and/or manipulate your report data.
If you save a report as a QuickReport file (*.QRP) type, you can view it again by reopening
(loading) it in the Budget Management program. (See Load a Report.) Once you have loaded a
report, you can again choose to save a copy of it as any of the six file types.
You can use the Excel spreadsheet (*.XLS) type in Microsoft Excel. The Comma Separated
Values (*.CSV) type is similar, but more flexible; you can use it in Excel or in any other
spreadsheet program. You can use either file type to import your data into most database
programs. (If you wish to import into a database, you may first need to manipulate or “clean up”
your data.)
The Excel file type allows you to format your report with, for example, formulas, fonts, or
borders. The Comma Separated Values file type is text-only, without any formatting.
You can use RTF (Rich Text Format) (*.RTF) in most word processing programs (e.g., Microsoft
Word or Word Perfect). RTF supports text formatting such as font, font size, font color, etc. A
Text file (*.TXT) is text-only, without any formatting. You can view it in any word processing
program, but it usually opens in Notepad by default.
Use the HTML document (*.HTM) type to save the report as a web page viewable in a web
browser such as Internet Explorer or Netscape Navigator. You might choose this option it you
want to post the report to your Internet or intranet site.
Preliminary User Manual
54
WinTen²
Budget Management
To Save a Report:
Type a name for the file in the File Name field.
If necessary, tab or click to the Save As Type field and choose the file type.
If necessary, tab or click to the Save In field and choose the folder in which to save the
report.
To save the report, press Enter or click the Save button.
To cancel, press Esc or click the Cancel button.
Load a Report
If you have saved any report as a QuickReport file (*.QRP), you can use the Load Report option
to view it in Budget Management. Once you have loaded a report, you can again choose to
save a copy of it in any of the six available file types. (See Save a Report.)
The Load Report option is available from the Preview Report screen. (See Preview a Report.)
You will use the Load Report Dialog Box to load a report.
To Open the Load Report Dialog Box:
Click the Load Report icon on the Preview Report screen.
Load Report Dialog Box
There are three primary fields on the Load Report dialog box: Look In, File Name, and Files of
Type.
Look In
The Look In field shows the folder where you last saved or loaded a report. Use this field, if
necessary, to locate the folder that contains your saved report.
Files of Type
Only QuickReport files can be loaded in Budget Management, so this field is not editable.
Preliminary User Manual
55
WinTen²
Budget Management
To Load a Report:
If necessary, tab or click to the Look In field and choose the folder where your report is
stored.
Select the report you wish to load.
To open the report, press Enter or click the Open button.
To cancel, press Esc or click the Cancel button.
Print a Report
You will use the Print Report Dialog Box to print a report.
To Open the Print Report Dialog Box:
Select the report you wish to print on the Budget Management Reports screen.
Choose any options for the report.
Click the Print icon.
(Or click the Print icon on the Preview Report screen.)
Print Report Dialog Box
There are five primary fields on the Print Report dialog box: Printer, Font Name, Print Range,
Copies, and Duplex.
Font Name
The Font Name field shows the default font for the printer you have chosen. Changing this field
will change the font for all text on the report.
Hint:
Available fonts may vary depending on the printer you have chosen and on the fonts
installed on your computer.
Preliminary User Manual
56
WinTen²
Budget Management
To Change the Font:
Tab or click to the Font Name field and select the Font.
To Restore the Default Font:
Click the Restore Report Font button.
Duplex
Duplex printing prints on both sides of the paper. This affects only multiple-page printouts. You
might choose to duplex if you plan to bind the report in some way (e.g., putting it in a three-ring
binder).
The three options are Off, Long Edge, and Short Edge.
Duplex “Long Edge” if you will bind the document on its left edge, like a book. You will turn the
pages normally, from side to side.
Duplex “Short Edge” if you will bind the document on its top edge. You will turn the pages
vertically, from bottom to top, like a clipboard.
The default is “Off.” This prints on only one side of the paper.
Hint:
Not all printers allow duplex printing.
To Print
If necessary, select the Printer.
If necessary, tab or click to the Font Name field and select the Font.
If necessary, press Alt+G or click the Pages radio button and type a number range in the
From and To fields.
If necessary, tab or click to the Number of Copies field and type or select a number.
If necessary, tab or click to the Duplex field and select your duplexing option.
To print, press Enter or click the OK button.
To cancel, press Esc or click the Cancel button.
Preliminary User Manual
57
WinTen²
Budget Management
CHAPTER
10
Print Documents
You have various options for printing documents in Budget Management.
If your agency uses the Custom Report Writer program, you can create one or more custom
formats for each type of printed document.
Topics addressed in this chapter include:
•
Preview a Document
•
Print a Document
Preview a Document
You may choose to preview a document before you print it or, even if you are not printing it, you
may choose just to view it on-screen.
You will use the Print Preview Screen to preview your printed document.
To Open the Print Preview Screen:
Select the document you wish to view on either a Browse screen or a Maintain screen. (See
Manage Records with Browse, Maintain, and Select Screens.)
Press Ctrl+W or click the Preview icon.
Print Preview Screen
There are four options on the Preview screen: Print, Zoom, Change Page, and Close.
Print
The Print option opens a Print dialog box from which you can print the document. (See Print a
Document.)
To Print:
Click the Print icon.
Zoom
You have four choices for zooming the preview (making it larger or smaller): the Whole Page,
Page Width, and 100% icons and the Percentage Zoom field.
The Whole Page and Page Width icons size the page to the window. Whole Page, usually the
smallest option, lets you see the entire page and Page Width, usually the largest option, widens
the page to fill the window horizontally. The 100% icon sets the page to its normal, “full” size,
regardless of the window size. The Percentage Zoom field lets you enter any percentage from
25% to 250%.
Preliminary User Manual
58
WinTen²
Budget Management
To Change the Zoom:
Click one of the three zoom icons.
OR
Tab or click to the Percentage Zoom field, type a number, and press Enter.
Change Page
The Change Page options let you move from one page of your preview to another. Obviously,
they are available only for multiple-page previews. There are five options: the First Page, Prior
Page, Next Page, and Last Page icons and the Page Number field.
Each of the four icons takes you to its respective page. The Page Number field lets you enter
the number of the page you want to see.
To Change the Page:
Click one of the four page icons.
OR
Tab or click to the Page Number field, type a number, and press Enter.
Close
The Close option closes the preview.
To Close:
Press Esc, press Alt+C, or click the Close button.
Print a Document
You will use the Print Dialog Box to print a document.
To Open the Print Dialog Box:
Select the document you wish to print on either a Browse screen or a Maintain screen. (See
Manage Records with Browse, Maintain, and Select Screens.)
Press Ctrl+R or click the Print icon.
(Or click the Print icon on the Print Preview screen.)
Print Dialog Box
There are three primary fields on the Print dialog box: Printer, Page Range, and Copies.
To Print
If necessary, tab or click to the Printer Name field and select the Printer.
If necessary, click the appropriate Page Range radio button and/or type a number range in
the Pages field.
If necessary, tab or click to the Number of Copies field and type or select a number.
To print, press Enter or click the OK button.
To cancel, press Esc or click the Cancel button.
Preliminary User Manual
59
WinTen²
Budget Management
Part III:
Setup
Preliminary User Manual
60
WinTen²
Budget Management
CHAPTER
11
Plan Setup Options
All WinTen² programs have a variety of Setup options that control the program environment and
govern many aspects of program operation. These options allow your agency to customize the
programs to best meet your needs and make your job easier.
You should carefully plan and then implement your Setup options before using the Budget
Management program. In addition, the administrator of your WinTen² programs should review
your Setup options at least annually.
Topics addressed in this chapter include:
•
Plan Budgeting Process and Schedule
•
Plan Distribution Schemes
Plan Budgeting Process and
Schedule
The budget approval and revision process is usually straightforward, but it is important to have a
clear policy for your agency. One of the main considerations is simply scheduling enough time
to complete the entire process before the current budget expires. Failure to do this could
prevent you from paying bills and/or payroll until the new budget is fully approved.
For most agencies, you must submit a new budget first to your agency’s board of
commissioners for their approval. After your board approves it, you must submit it to the fund’s
granting agency (e.g., HUD) for their approval.
Generally, most granting agencies will require you to submit your initial budget request to them
at least ninety days before the current budget expires.
Note:
Different granting agencies may have different budget submission deadlines. It is
important for you to verify the policy of the granting agency for each of your funds
and plan accordingly.
Working backward from the current budget’s expiration date will help you plan your budgeting
schedule. Based on the meeting dates of your board of commissioners, plan to submit to your
board so that they can complete any adjustments – and you can submit their approved budget
to the granting agency – before that agency’s submission deadline.
You may also want to plan how you will handle budget rejections within the Budget
Management program. The program allows you to edit the rejected budget itself or to create a
new budget revision, which will exist as a new record in the program. We strongly recommend
creating a new revision, because that makes it much easier for you, your board, and/or the
Preliminary User Manual
61
WinTen²
Budget Management
granting agency to compare the two versions and see the differences between them. (The
program contains a Budget Revision Comparison Report for this purpose.)
Your agency’s budget approval process may differ from what we have discussed here. If so, we
recommend you put the process in writing and plan your schedule accordingly.
For help on creating budgets, see Create Budgets.
For help on moving budgets through the approval process, see Process Budgets for Approval.
For help on running the Budget Revision Comparison Report, see Run Reports.
Plan Distribution Schemes
Distribution schemes make it easy for you to distribute an account’s annual budget, by predefined percentages, across specific fiscal periods within the year – without having to enter the
amount for each period manually. There are several distribution schemes built into the program;
you can also create your own custom distribution schemes.
Note:
Distribution schemes are optional in Budget Management. Skip this section if you
choose not to use them.
You assign distribution schemes by account within a budget. In other words, one account may
use one distribution scheme to distribute its annual amount, while other accounts within the
same budget may use different distribution schemes.
The six most commonly used distribution options are already built into the Budget Management
program. They are Annual – First Month, Annual – Last Month, Bi-Monthly, Monthly,
Quarterly, and Semi-Annually.
If you choose one of the built-in distribution schemes for an account, the program will distribute
that account’s annual budget by fiscal period according to the percentages in the following table.
Preliminary User Manual
62
WinTen²
Period
Budget Management
Built-In Distribution Scheme
Annual –
First Month
1
Annual –
Last Month
100%
Bi-Monthly
16.6667%
2
8.3333%
Quarterly
SemiAnnually
25%
50%
8.3333%
3
16.6667%
4
8.3333%
8.3333%
5
16.6666%
6
25%
8.3333%
8.3334%
7
16.6667%
8
8.3333%
25%
50%
8.3334%
9
16.6666%
10
8.3333%
8.3334%
11
16.6667%
12
Total
Monthly
100%
100%
100%
25%
8.3333%
8.3334%
100.0000%
100.0000%
100%
100%
You can also create your own custom distribution schemes. You might choose this option, for
example, to distribute seasonal expenses that do not fit any of the built-in schemes. The next
table gives just three examples of seasonal distribution schemes you might consider. Summer
Maintenance might include such things as landscaping and mowing. Winterization could cover
preparing maintenance equipment, plumbing, and units for cold weather. Winter Maintenance
might include snow removal.
Hint:
We use seasonal expenses only as an example. You can create custom distribution
schemes for any reason, whenever the built-in schemes do not meet your needs.
Preliminary User Manual
63
WinTen²
Budget Management
Month
Custom Distribution Scheme
Summer
Maintenance
Winterization
Winter
Maintenance
Jan
30%
Feb
30%
Mar
5%
Apr
10%
May
20%
Jun
20%
Jul
20%
Aug
20%
Sep
10%
20%
Oct
40%
Nov
40%
Dec
Total
5%
30%
100%
100%
100%
Note:
Please note one important difference between custom distribution schemes and
the six built-in schemes: the built-in schemes distribute amounts by fiscal period;
your custom schemes distribute amounts by calendar month, no matter which
periods those months are within the fiscal year. (For more information on fiscal
years and fiscal periods, please see the user manual for WinTen² General Ledger.)
A custom distribution scheme contains a Description field and twelve monthly Percentage fields.
The description can contain letters and/or numbers. It can be up to sixty characters, but thirty or
fewer usually works best. The Percentage field can contain up to four decimal places (e.g.,
16.6667%).
The combined percentages within each distribution scheme must total exactly 100%. If the
percentages you wish to use do not divide evenly, use all four decimal places for the
percentages and adjust the final decimals so that the total is exactly 100.0000%. (For an
example of this, please note the percentages, above, for the Bi-Monthly and Monthly distribution
schemes.)
For help on setting up your budget distribution schemes in the Budget Management program,
see Maintain Monthly Distribution Schemes.
You will use the Accounts tab of the Maintain Budgets screen to assign distribution schemes to
individual accounts. For help on doing this, see Maintain Budgets and Maintain Budget
Information per Account.
Preliminary User Manual
64
WinTen²
Budget Management
CHAPTER
12
Implement Setup
After planning your Setup options, you must enter your choices into the Budget Management
program before you can begin using it. This section will walk you step-by-step through the
process of entering these options. You will also enter a few simple options we did not discuss in
the planning section of this chapter.
Note:
Please be especially careful when entering Setup options. Inaccurate settings can
cause Budget Management to function in an unexpected manner. In addition, after
you enter your initial settings, prevent accidental changes by using the Master
Setup program to restrict access to the Setup screen. For help on doing this,
please see the user manual for WinTen² Master Setup.
As mentioned above, the administrator of your WinTen² programs should review the planning
and implementation of these Setup options at least annually.
You will use the Budget Management Setup Screen to enter your options.
To Open the Budget Management Setup Screen:
Press S or click the Setup button on the Main Menu.
Preliminary User Manual
65
WinTen²
Budget Management
Budget Management Setup Screen
The Budget Management Setup screen gives you access to two different Setup areas, each
with its own screen. They are:
•
Maintain Default Settings
•
Maintain Monthly Distribution Schemes
We will walk through these areas separately.
Maintain Default Settings
Budget Management Default Settings contains high-level options that affect multiple areas of
the program.
You will use the Budget Management Settings Screen to enter and maintain this information.
To Open the Budget Management Settings Screen:
Press S or click the Settings button on the Budget Management Setup screen.
Preliminary User Manual
66
WinTen²
Budget Management
Budget Management Settings Screen
The Budget Management Settings screen gives you access to three different settings: Change
Color, Track All Activity, and Track All Data Changes. Verify your choice for each.
The top half of this screen also displays your agency’s contact or “return address” information.
You maintain this information in the Master Setup program; you cannot edit it on this screen.
(Please see the user manual for WinTen² Master Setup.)
To Change Color, you must not be in Edit mode. To change your data tracking option, you must
be in Edit mode.
To Enter Edit Mode:
Press Ctrl+E or click the Edit icon.
To Save Changes and Leave Edit Mode:
Press Ctrl+S or click the Save icon.
To Cancel Changes and Leave Edit Mode:
Press Ctrl+Q or click the Cancel icon.
To Exit this Screen:
Press Esc or click the Exit icon.
Change Color
Some agencies choose to color code their WinTen² financial programs so they know at a glance
which program they are using. The Change Color icon allows you to set the background color of
screens in Budget Management.
Preliminary User Manual
67
WinTen²
Budget Management
Hint:
Light colors work best.
To Change Background Color:
Press Ctrl+L or click the Change Color icon.
Click to choose a Basic color.
OR
Click the Define Custom Colors button and choose a custom color.
Click the OK button.
Track All Activity
If you check this field, any approval-processing step that anyone takes for a budget will appear
for that budget on the Activity tab of the Maintain Budgets screen. (See Monitor Budgets and
Monitor Budget Approval-Processing Activity.)
The purpose of this option is to allow you to monitor budgets as you move them through the
approval process, as well as to provide a history of these actions.
Most agencies choose to check this field.
Track All Data Changes
If you check this field, any change that anyone makes to any data field in a budget will appear
for that budget on the Change Tracking tab of the Maintain Budgets screen. (See Monitor
Budgets and Monitor Budget Audit Trail.)
The purpose of this option is to provide an audit trail. It lets you know who changed what and
when they changed it.
Most agencies choose to check this field.
To Change Your Data Tracking Option:
Press Ctrl+E or click the Edit icon.
Check or uncheck the Track All Data Changes field.
To save your changes, press Ctrl+S or click the Save icon.
To cancel, press Ctrl+Q or click the Cancel icon.
To Exit this Screen:
Press Esc or click the Exit icon.
Maintain Monthly Distribution
Schemes
Budget distribution schemes let you easily distribute an account’s annual budget, by pre-defined
percentages, across specific fiscal periods within the year. Six standard schemes are built into
the Budget Management program for your use. You can also choose to define other custom
schemes. We discuss both of these options in the planning section of this manual. (See Plan
Distribution Schemes.)
Preliminary User Manual
68
WinTen²
Budget Management
Note:
Custom distribution schemes are optional in Budget Management. Skip this
section if you choose not to use them. You can still use any of the six built-in
schemes.
You will use the Maintain Distribution Schemes Screen to enter and maintain your agency’s
custom budget distribution schemes.
To Open the Maintain Distribution Schemes Screen:
Press C or click the Schemes button on the Budget Management Setup screen.
Maintain Distribution Schemes Screen
The Maintain Distribution Schemes screen contains a scheme table and a detail information
section.
The scheme table displays one row of information for each of your agency’s custom distribution
schemes.
Hint:
The six standard schemes built into the program do not appear on this screen. (See Plan
Distribution Schemes.)
The detail information section, by default, fills the bottom of the screen. It displays the
information for the scheme currently selected in the table above it. You can choose to show or
hide the detail information section by pressing Ctrl+O or clicking the Show/Hide icon.
You will add or edit distribution schemes in the detail information section; you cannot add or edit
them directly in the scheme table.
Preliminary User Manual
69
WinTen²
Budget Management
The detail information section contains the Description field and twelve monthly Percentage
fields. All thirteen fields are required if you wish to use custom distribution schemes, although
some percentages may be zero.
This section also contains non-editable Cumulative Percentage and Total fields.
Description
This is your text description to identify the distribution scheme.
Percentage
Enter the percent of an account’s annual budget that you want to distribute to each calendar
month. Some may be zero.
Note:
The total of the percentages for each scheme must be exactly 100%.
Cumulative Percentage and Total
These non-editable fields provide additional information to help you assign percentages.
The Cumulative Percentage column shows the year-to-date percentage for each month. (The
program calculates this by adding together a month’s percentage and the percentages of every
prior month in the year.)
The Total field shows the grand total of all percentages. This must be exactly 100.0000%.
Note:
If you add or edit distribution schemes, you may need to close Budget
Management and restart the program before some changes take effect.
To Show or Hide the Detail Information Section:
Press Ctrl+O or click the Show/Hide icon.
Hint:
If you have hidden this section, it will also “show” automatically when you edit a record.
To Add a Distribution Scheme:
Press Ctrl+A or click the Add icon.
Enter the description (required).
Tab or click through the Percentage fields, entering the information.
To save this new distribution scheme, press Ctrl+S or click the Save icon.
To cancel, press Ctrl+Q or click the Cancel icon.
To Edit a Distribution Scheme:
Select the distribution scheme you wish to edit.
Press Ctrl+E or click the Edit icon.
Follow the steps above to edit the distribution scheme.
Preliminary User Manual
70
WinTen²
Budget Management
To Delete a Distribution Scheme:
Select the distribution scheme you wish to delete.
Press Ctrl+D or click the Delete icon.
Press Y or click the Yes button to confirm the deletion.
Note:
You cannot delete a distribution scheme you have assigned to any budget.
To Exit this Screen:
Press Esc or click the Exit icon.
Preliminary User Manual
71
WinTen²
Budget Management
Part IV:
Appendices
Preliminary User Manual
72
WinTen²
Budget Management
APPENDIX
A
Program Changes for Existing
Clients
Tenmast clients who have used the WinTen General Ledger program should take special note
of the following change.
No Budget Setup Options in General Ledger
WinTen² General Ledger does not contain functionality for preparing budgets. Instead, it
integrates closely with the Budget Management program, which you can use for budgeting.
Preliminary User Manual
73
WinTen²
Budget Management
APPENDIX
B
Keyboard Actions
All WinTen² programs offer expanded options for using the keyboard to speed data entry.
When working in WinTen² programs, many users prefer to point and click with the mouse to
execute commands. Those options are available, if you wish to use them. However, as you
become more comfortable with your computer in general and with WinTen² programs in
particular, you may find it quicker and easier to use “keyboard shortcuts” to execute commands.
Here are a few things to remember when using keyboard shortcuts, followed by a list of some of
the more helpful keyboard options.
Pressing and Clicking
When a WinTen² user manual instructs you to “press” a key or keys, it refers to pressing keys
on your keyboard. For example, “press Enter” means, “press the Enter key on your keyboard.”
“Press Spacebar” means, “press the spacebar key.”
Hint:
If the name of an individual key has more than one word in it, the manuals refer to it by
capitalizing all the words and removing the spaces between them. The Page Down key,
for instance, appears as, “PageDown.” The up arrow key appears as, “UpArrow.”
When a WinTen² user manual instructs you to “click” a button or icon, it refers to using the
mouse to click something on the computer screen. For example, “click the Setup button” means,
“use your mouse to click the Setup button on the screen.”
Key Combinations
Most keyboard shortcuts use more than one key at a time. Key combinations are often the Alt
(Alternate) or Ctrl (Control) key followed by a letter or number key.
WinTen² user manuals abbreviate key combinations in the format key+key. For example, “press
Ctrl+C” means, “press and hold Ctrl and then press C.”
Much like the Shift key, the Ctrl and Alt keys modify the way the computer interprets other keys,
but will not type anything by themselves. When a key combination includes one of these keys, it
will appear first in the combination. You should press and hold the first key before pressing the
last key in the combination.
Hint:
Think of this as like using Shift to type a capital letter. For example, pressing Shift+A
should type a capital letter A, but if you press and hold A before pressing Shift, you
might type something like “aaaaaaaA.” However, if you press and hold Shift first, you will
just type “A.” The same holds true for issuing commands with key combinations that
include Alt or Ctrl.
Focus: Using Tab and Enter
When you first enter a screen, “focus” is on a particular button or data field. The program shows
focus with a dotted line around the inside of a button or a flashing cursor in a data field.
Preliminary User Manual
74
WinTen²
Budget Management
You can move focus to the next field or option by pressing Tab. This usually moves focus down
or to the left. Move focus to the previous field or option (usually up or to the right) by pressing
Shift+Tab.
Hint:
If you are in a menu, you can also move focus by pressing the arrow keys.
When a button has focus, you can activate it by pressing Enter, which has the same effect as if
you had clicked the button. When a data field has focus, you can type data into it.
On-Screen Hints
There are three types of on-screen hints you can use to help you remember keyboard shortcuts:
underlined letters, tool tips, and menu prompts.
The names of many commands and fields have one letter underlined. Whenever you see an
underlined letter, you can activate that choice by pressing and holding Alt, and then pressing the
underlined letter. If it is for an icon, button, or menu choice, you will execute that command. If it
is for a field, you will active (put focus on) that field so you can complete it.
Note:
When you are on a Main Menu screen or a Setup screen, you can press and
activate your choice’s underlined letter with or without the Alt key. This works
only on Main Menu and Setup screens.
Hint:
Sometimes the underlines do not appear until you press Alt. This is true in some menus,
for example.
Tool tips, sometimes called “pop ups,” are short messages attached to toolbar icons. If you point
to any toolbar icon, the tool tip will appear in a moment giving you the name of the icon and its
keyboard shortcut, if there is one.
Menu commands that have keyboard shortcuts show the shortcut immediately after the
command name.
Menus
The option mentioned above for using Alt with an underlined letter also works for menus, but it
behaves a little differently. There are also a couple of other menu options to consider.
Menus appear near the upper-left of a screen, just below the screen title. There is often a File,
View, Edit, and Help menu, although this varies from screen to screen.
To open a menu with the keyboard, press and hold Alt and press the underlined letter of the
menu you want to open. For example, Alt+E usually opens the Edit menu.
Hint:
The underlines may not appear until you press Alt.
To close a menu again without executing a command, press Alt by itself.
Once a menu is open, you can press LeftArrow and RightArrow to move from one menu to
another. You can press UpArrow and DownArrow to move through the commands within a
menu. To execute a command, arrow to it and press Enter.
The underlined letters within a menu offer a second option for executing menu commands. If
you have opened the menu with Alt and the underlined letter, you can then activate a particular
menu command by pressing its underlined letter without the Alt key. (Do not press Alt a second
time.)
Preliminary User Manual
75
WinTen²
Budget Management
Note:
If you press Alt a second time, it will close the menu.
Type Ahead
A drop-down list is a field with a set of predefined options from which you can choose. It has a
small down-arrow to the right of it. Drop-down lists offer a feature called “type-ahead.” If you
know your choice, simply type its first few letters. As you type, the program will show you the
first option that matches what you have typed.
Hint:
Drop-down lists also allow you to press DownArrow or UpArrow to toggle through the
choices. You can “open” the list to see the available choices by pressing F4. All of these
options (type-ahead, DownArrow, UpArrow, and F4) will work in combination with each
other.
Preliminary User Manual
76
WinTen²
Budget Management
Common Keyboard Shortcuts
Press
To
F4
Display the items in a drop-down list or open a
select screen.
Alt+Underlined Letter
Activate a choice with an underlined letter
Tab
Move to the next field or option
Shift+Tab
Move to the previous field or option
Ctrl+Tab
Move to the next tab on a screen
Ctrl+Shift+Tab
Move to the previous tab on a screen
Esc
Exit a screen
Ctrl+A
Add a record
Ctrl+D
Delete a record
Ctrl+E
Edit a record
Ctrl+S
Save changes from edit mode
Ctrl+Q
Cancel changes from edit mode
Ctrl+P
View the prior record
Ctrl+N
View the next record
Ctrl+H
Activate the Search icon
Ctrl+O
Activate the Show/Hide icon
Ctrl+R
Activate the Print icon
Ctrl+W
Activate the Preview icon
Alt+T
Activate a Select button
Alt+C or Esc
Activate a Cancel button
PageDown
Move to the next step in a wizard
PageUp
Move to the previous step in a wizard
Common Types of Fields
Field
Keyboard Shortcut
Search For
Type an entry and press Enter
Drop-down list
Use any combination of type-ahead, F4,
DownArrow, or UpArrow
Lookup icon
F4
Checkbox
Spacebar
Radio Button
Arrow keys
Preliminary User Manual
77
WinTen²
Budget Management
Index
Budget Management
cyclical actions ....................................................................................................................... 8
default settings ......................................................................................................................66
features list............................................................................................................................. 2
Main Menu ..........................................................................................................................2, 6
overview ................................................................................................................................. 2
program integration .............................................................................................................2, 5
budgets
account allocations................................................................ 15, 19, 22, 23, 27, 31, 35, 44, 64
adding ...................................................................................................................8, 14, 31, 62
approval processing ............................................................................ 8, 23, 25, 36, 44, 48, 62
approving ............................................................................................................25, 36, 40, 41
editing in spreadsheets.................................................................. 2, 15, 18, 19, 21, 27, 31, 33
exporting .........................................................................................................................31, 32
importing .........................................................................................................................31, 33
monitoring .......................................................................................................8, 23, 25, 43, 68
notes ..................................................................................... 22, 23, 25, 26, 27, 38, 40, 41, 44
planning.....................................................................................................................36, 48, 61
rejecting...........................................................................................................................36, 39
revisions ......................................................................................................................8, 15, 18
scheduling .................................................................................................................36, 48, 61
submitting........................................................................................................................36, 37
cyclical actions ........................................................................................................................... 8
default settings..........................................................................................................................66
distribution schemes ............................................................................. 29, 61, 62, 64, 66, 68, 69
documents
previewing .............................................................................................................................58
printing ............................................................................................................................58, 59
General Ledger ..................................................... 2, 3, 4, 5, 8, 15, 17, 25, 40, 42, 43, 46, 64, 73
icons .....................................................................................................................................9, 11
keyboard actions.................................................................................................................11, 74
Main Menu ..............................................................................................................................2, 6
Preliminary User Manual
78
WinTen²
Budget Management
reports
loading...........................................................................................................51, 53, 54, 55, 56
previewing ...........................................................................................................51, 52, 53, 55
printing ......................................................................................................................51, 53, 56
saving........................................................................................................................51, 53, 55
revisions..........................................................................................................................8, 15, 18
setup
implementing .....................................................................................................................8, 65
planning.............................................................................................................................8, 61
spreadsheets .................................................................................... 2, 15, 18, 19, 21, 27, 31, 33
exporting a budget...........................................................................................................31, 32
importing a budget...........................................................................................................31, 33
Preliminary User Manual
79