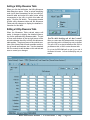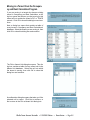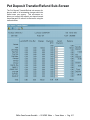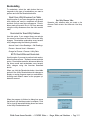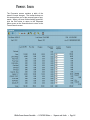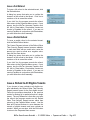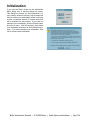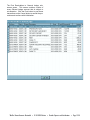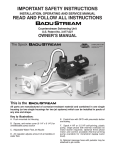
1
132 Venture Court, Suite 1
Lexington, KY 40511
http://www.tenmast.com
Support:
(877) 359-5492
[email protected]
Marketing:
(877) 836-6278
[email protected]
Fax:
(859) 367-7480
WINTEN TENANT ACCOUNTS RECEIVABLE
USER MANUAL VERSION 11/14/2003
FOR PROGRAM VERSION 11/14/2003
©2003 TENMAST SOFTWARE
AND LATER
©2003 Tenmast Software. All rights reserved.
WinTen Tenant Accounts Receivable User Manual
This manual, as well as the software described in it,
is furnished under license and may be used and/or
copied only in accordance with the terms of such
license. The content of this manual is furnished for
informational use only, is subject to change without
notice, and should not be construed as a commitment by Tenmast Software. Tenmast Software assumes no liability for any errors or inaccuracies that
may appear in this manual.
Except as permitted by such license, no part of
this publication may be reproduced, stored in a
retrival system, or transmitted, in any form or by
any means, electronic, mechanical, recording, or
otherwise, without the prior written permission of
Tenmast Software. Permission to produce copies
for official use is expressly granted to organizations
and individuals with a current Update and Support
Agreement with Tenmast Software for the maintenance and support of Tenmast Software’s WinTen
Tenant Accounts Receivable program.
Any references to company, housing authority,
or individual names or identities in examples or
screen images are for demonstration purposes
only and are not intended to refer to any actual
organization or person.
CONTENTS
Introduction 1.1
Program Overview 2.1
Cyclical Actions
2.8
Planning Questions 2.14
Main Menu
2.16
Setup 3.1
Setup Screen
3.2
Default Settings Tab 3.2
Primary Settings Sub-Tab
3.4
Additional Settings Sub-Tab
3.7
Security/Pet Deposit Sub-Tab 3.11
Grievance Sub-Tab
3.13
Delinquent Notice Info Sub-Tab 3.14
Delinquent Notice Memo Sub-Tab
Projects Tab 3.17
Utilities Tab 3.21
Utility Setup Sub-Tab 3.21
Allowance Tables Sub-Tab
3.24
Rate Tables Sub-Tab
3.26
Master Units Tab
3.28
Master Unit Maintenance Sub-Screen
Master Unit Main Tab 3.29
Inspection Status Tab 3.34
Events Tab
3.36
Utilities Tab
3.37
Late Charge Rate Tab
3.38
Special System Functions Tab
3.41
Maintain Caseworkers Sub-Screen 3.44
Maintain Management Codes Sub-Screen
3.16
3.29
3.46
Tenant Actions
4.1
Tenant Search Screen
4.2
Adding or Moving In a Tenant 4.3
Tenant Edit/Review Screen
4.8
Tenant Data Tab
4.8
Deposit/Repay Tab 4.13
Pet Deposit Transfer/Refund Sub-Screen
4.17
Partial Security Deposit Transfer/Refund Sub-Screen 4.19
Security Deposit Transfer/Refund Sub-Screen
4.21
Charges Tab
4.23
Utilities Tab 4.28
Main Utilities Sub-Tab 4.29
Supplemental Meter Readings Sub-Tab 4.31
Details Tab 4.32
Work Orders Tab
4.33
Inspections Tab
4.36
Moving a Tenant Out 4.37
Transferring a Tenant
4.38
History Edit/Review Screen
4.40
Charge Off Edit/Review Screen
4.41
Browse Inspections Sub-Screen
4.42
Inspection Detail Sub-Screen
4.43
Unit Info Tab
4.43
Inspect Tab
4.45
Inspection Items Sub-Screen
4.46
Notes Tab
4.48
Charges, Utilities, and Calculations
Charges Screen 5.2
Late Charges Tab
5.2
Repeating Charges Tab
5.4
Meter Readings Tab 5.6
Utility Recalculations Tab
5.10
Handheld Schedules Tab
5.12
Bring Work Orders Current Tab
Tenant Recalculation Tab
5.16
Payments and Credits
5.1
5.14
6.1
Payments Menu Screen 6.2
Take a Payment 6.3
Payments Screen 6.4
Take a Full Payment
6.5
Take a Partial Payment 6.6
Review the Tenant’s Future Charges
6.7
Take a Security/Pet Deposit Payment 6.8
Take a Payment for Escrow Accounts 6.9
Transfer Payments
6.10
Void a Receipt
6.11
Run Batch Receipts
6.12
Record a Deposit Ticket 6.13
Process Deposit Ticket Wizard 6.13
Record Non-Dwelling Income
6.15
Recording Non-Dwelling Income
6.16
Producing Reports on Non-Dwelling Income
6.17
Charge Off a Tenant
6.18
Issue a Refund
6.20
Issue a Refund to a Selected Tenant
6.21
Issue a Refund to All Eligible Tenants
6.22
Issue a Batch Refund(Process Batch Refunds Wizard)
Reverse a Refund
6.25
Import an Electronic Payment File 6.26
6.23
Reports
7.1
Reports Screen 7.2
Tenant Accounting Tab
7.3
Payments Sub-Tab
7.4
Registers/Delinquent/Additional Sub-Tab
Tenant Management Tab
7.12
Quick Lists Tab
7.19
Utility Meter Readings Tab
7.21
Labels/Mail Merge Tab
7.22
Billing
7.6
8.1
Billing Menu Screen
Post to Ledger
9.1
Task Wizards
10.1
8.2
Promissory Note Creation Wizard/Retroactive Rent Agreement Creation Wizard 10.2
Promissory Note Transfer Wizard/Retroactive Rent Agreement Transfer Wizard 10.4
Edit Monthly Agreement Charge Wizard 10.6
Agreement Removal Wizard
10.7
Reindex
11.1
Periodic Reports and Initialization
Periodic Reports Screen
Daily Tab
12.3
Monthly Tab 12.6
Initialization
12.11
Pre-Initialization
Initialization 12.20
Index i.1
12.2
12.13
12.1
Appendix A: Special Utility Calculations A.1
Appendix B: PHAS Events B.1
Basic Principles of Event Tracking
Event Record Terminology
Examples of Event Sequences
B.1
B.2
B.7
Appendix C: C.1
Fixing Invalid PHAS Event Records
C.1
Invalid PHAS Event Records Report C.2
Errors Found on the Invalid PHAS Event Record Report
C.4
Printing and Comparing Elapsed Days Reports After All Errors Have Been Corrected
Appendix D: D.1
Electronic Payment File Processing
D.1
EPF Setup
D.2
Electronic Payment File Setup Sub-Screen
Electronic Payment File Settings Tab
Importing an EPF D.6
Appendix E: E.1
Using the Payment Wizard E.1
Setting Up the Payment Wizard
E.2
Using the Payment Wizard
E.3
Payment Wizard: Step One
Payment Wizard: Step Two
Payment Wizard: Step Three
E.4
E.5
E.8
D.3
D.3
C.17
INTRODUCTION
The WinTen Tenant Accounts Receivable program
is a data management program designed for use
on computers running the Windows 95, 98, ME,
NT, 2000, or XP operating system. The interface
is designed for use in a Windows environment and
includes point-and-click mouse actions, pull-down
menus, and Windows-based help functions. This
manual contains all of the information you need
to use the WinTen Tenant Accounts Receivable
program (hereafter referred to as Tenant Accounts
Receivable, Receivables, RCV, or TAR).
Version Information
This manual is written for the 11/14/2003 release of
Receivables. It does not apply to previous versions
of the program (including MS-DOS-based ones)
and some sections may be inaccurate with regards
to later versions.
Whenever Tenmast issues an update to this program, we will notify your agency through email. If
you have a current Update & Support Agreement
for this program, you may download and install
the update through the Tenmast Update Manager
program. During the download and installation
process, Update Manager will notify you of the
changes to the program.
We periodically update this manual to reflect significant changes to the program. You may download
this updated documentation from our Web site at
no charge.
Hint: Downloading Manuals
You can find the current version of this manual in the Client
Service Area of our Web site at http://www.tenmast.com.
All manuals are available in PDF file format. You must have
version 4.0 or newer of Adobe Acrobat Reader to open and
print manuals. You can also order printed copies of the
manual through our Marketing/Communication Services
Department.
Getting Help
Though we have made every effort to make this
manual as comprehensive as possible, no document can cover all contingencies. If you encounter
problems with Receivables, call the Tenmast Training & Support Department toll-free at (877) 3595492 or send email to [email protected].
Revisions
To better serve our clients, we constantly update our
manuals, just as we constantly make improvements
in our programs. If you find an error or omission in
this documentation or have a suggestion for improving it, call the Tenmast Marketing/Communication
Services Department toll-free at (877) 836-6278 or
send email to [email protected].
WinTen Tenant Accounts Receivable • 11/14/2003 Edition • Introduction • Page 1.1
WinTen Tenant Accounts Receivable • 11/14/2003 Edition • Introduction • Page 1.2
PROGRAM OVERVIEW
The WinTen Tenant Accounts Receivable program
is designed to assist you in managing financial,
household, and dwelling unit data on every subsidized housing tenant who falls under your agency’s
jurisdiction. It enables you to track both cyclical
(e.g. monthly rent) and one-time (work order)
charges against individual tenants’ accounts. Additionally, it collects HUD-required reporting data
for PHAS and PIC.
Program Integration
As with all WinTen software, Tenant Accounts Receivable is designed to integrate with other WinTen
programs. This data sharing enables for more efficient operation, as multiple programs can pass
data back and forth without the need for operator
intervention. Tenant Accounts Receivable integrates with the following other WinTen modules:
General Ledger
The primary purpose of Tenant Accounts Receivable is to track the payments that tenants make
to your agency and the charges that they accrue.
Receivables periodically posts the financial data
from these transactions to the Receivables Journal database. The General Ledger program then
transfers this data to its General Ledger database.
WinTen Tenant Accounts Receivable • 11/14/2003 Edition • Program Basics • Page 2.1
Occupancy and Rent Calculation
Occupancy and Rent Calculation sends appropriate change instructions to the Tenant Accounts Receivable program whenever a change in a public
housing tenant’s data indicates that the tenant’s
rent should be altered. This change does not
have to be immediate - if you set a future effective
date in Occupancy and Rent Calculation, you can
prepare for a change that will not take effect until
one or more months later. When you initialize Receivables into a new month, the program checks its
database of outstanding changes (known as “F58
Link”) and makes any changes that have effective
dates in the new month.
For a more thorough explanation of the relationship
between Tenant Accounts Receivable, Occupancy
and Rent Calculation, and the F58 Link database,
see the diagram below.
Tenant Accounts Receivable never
operates in future months. For
Receivables, there is no real "future,"
except for repeating charges.
However, Occupancy and Rent
Calculation can record events that
will change a tenant's rent months in
advance of the date on which they
will occur. This program doesn't
have a problem with seeing the
future - it simply makes a note to
change the tenant's rent when the
effective date of the event arrives.
The 58 Link database is the tool that
Tenmast uses to reconcile these two
programs' different views of the
future.
Occupancy and Rent Calculation
When a user records a future rent-changing
event in Occupancy and Rent Calculation, he
assigns the event an effective date. If the
effective date isn't in the current month,
Occupancy and Rent Calculation makes a
note about it in the 58 Link database.
58 Link Database
Every time a user initializes it into a new
month, Tenant Accounts Receivable looks in
the 58 Link database. If it sees any rent
changes for the month into which it's moving, it
grabs those records and changes the
appropriate tenants' rents.
Tenant Accounts Receivable
WinTen Tenant Accounts Receivable • 11/14/2003 Edition • Program Basics • Page 2.2
Master Unit Manager
Receivables stores data on every public housing
unit in your agency’s jurisdiction in its Master Unit
database. HUD requires this data for PIC reporting purposes. The Master Unit Manager program
draws this data from the Master Unit database and
packages it in a format that the PIC Web site can
accept.
PHAS
The PHAS program compiles all data that HUD
requires for PHAS reporting. This includes several
items that Receivables stores, such as move-out
and move-in dates. PHAS gathers this data from
Receivables when you are producing Form HUD50072 in PHAS.
Public Housing Inspections
When you schedule an inspection, the Public Housing Inspections program reads the next inspection
date for the unit from Receivables’ database of tenant information.
When you save a completed inspection, the Inspections program looks at the inspection date
of that inspection and writes that date to the last
inspection date of the unit in the Master Unit database.
If the last inspection date is different from the date
in the Master Unit database, the Inspections program makes the date of the tenant’s next inspection one year after the date of the inspection that
was just completed.
WinTen Tenant Accounts Receivable • 11/14/2003 Edition • Program Basics • Page 2.3
WorkOrder
The WorkOrder program interacts with Tenant Accounts Receivable in a perpetual cycle of two-way
data exchange with a database called Service1
acting as an intermediary. Whenever a user completes a work order, WorkOrder records the tenant
charges for that work order in Service1. During
monthly initialization or bill printing, Receivables
adds those charges to the tenant’s account. During the next monthly initialization after the tenant
has paid the charges, Receivables records the
payment in Service1. WorkOrder, during its next
monthly initialization, picks up the record of the
payment and marks the work order as paid.
For a more thorough explanation of the relationship
between Tenant Accounts Receivable, WorkOrder,
and the Service1 database, see the diagram below.
Tenant Accounts Receivable
Step 3
Step 2
During monthly initialization,
Receivables reads all work order
charges that are recorded in Service1
and applies them to the appropriate
tenants' accounts for the new billing
period.
When you bill a work order's charge,
Receivables marks that work order as
billed and/or posted to the tenant's
account and records this in the
Service1database.
Service1 Database
Step 4
Step 1
Service1 retains a record of the work
order's billing. If you edit the tenant
charge in WorkOrder, a message
appears that tells you that your
agency has already billed the charge
and you need to change the tenant's
account in Receivables.
When you complete a work order,
WorkOrder records all tenant charges
and posts them to the Service1
database.
WorkOrder
WinTen Tenant Accounts Receivable • 11/14/2003 Edition • Program Basics • Page 2.4
Program Navigation
WinTen Tenant Accounts Receivable is the largest
and most complex module that Tenmast offers.
For the new user, navigation among the program’s
screens and tabs may be a bit confusing, particularly in the Setup and Tenant Edit/Review screens.
The diagrams on the following pages illustrate the
navigational relationships between these two areas
and the functions to which they allow access.
WinTen Tenant Accounts Receivable • 11/14/2003 Edition • Program Basics • Page 2.5
Primary Settings Sub-Tab
Additional Settings Sub-Tab
Security/Pet Deposit Sub-Tab
Grievance Sub-Tab
Default Settings Tab
Delinquent Notice Info Sub-Tab
Delinquent Notice Memo Sub-Tab
EPF Setup Sub-Screen
EPF Settings
Address Info Tab
EPF Setup Sub-Screen
Projects Tab
Setup Screen
EPF Setup Sub-Screen
Utility Setup Sub-Tab
Utilities Tab
Allowance Tables Sub-Tab
Rate Tables Sub-Tab
Master Unit Maintenance Sub-Screen
Master Units Tab
Master Unit Main Tab
Inspection Status Tab
Events Tab
Late Charge Rate Tab
Utilities Tab
Special System Functions Tab
Event Information Edit Sub-Screen
(Appendix B)
WinTen Tenant Accounts Receivable • 11/14/2003 Edition • Program Basics • Page 2.6
Main Info Tab
Maintain Notes
Sub-Screen
Browse Inspections
Sub-Screen
Deposit/Repay Tab
Pet Deposit Transfer/Refund
Sub-Screen
Security Deposit Transfer/Refund
Sub-Screen
Charges Tab
Promissory Note/Retro Rent
Agreement Functions
Main Utilities Sub-Tab
Tenant Edit/Review Screen
Utilities Tab
Supplemental Meter Readings Sub-Tab
Details Tab
Inspection Details Sub-Screen
Unit Info Tab
Work Orders Tab
Inspect Tab
Deficiencies Tab
Notes Tab
Inspections Tab
Inspection Items
Sub-Screen
WinTen Tenant Accounts Receivable • 11/14/2003 Edition • Program Basics • Page 2.7
CYCLICAL ACTIONS
Receivables, like most programs that deal with financial data, operates on a monthly activity cycle.
At the beginning and end of each month, you need
to perform certain actions to “close the books” on
the old month and open them for the new month.
Tenmast calls this process initialization, and this
manual examines it in more detail in the Initialization chapter. During each month, you also go
through a normal cycle of activity, as tenants move
in, accrue charges, make payments, and move out.
The following lists are Tenmast’s recommendations
for the actions you should perform during each part
of the Tenant Accounts Receivable operational
cycle.
Beginning a New Month
1.
Review the program’s setup (see the Setup
chapter) and make any necessary changes.
Under most circumstances, you should not
need to change any settings.
2. Print a Monthly Rental Register report for the
beginning of the month (Reports screen, Tenant Accounting tab).
First Week of a New Month (Each Day)
1. Collect payments (cash, checks, money orders)
and print receipts (Payments Menu screen,
Payment with Receipt function).
2. Print the Daily Receipt report and the Report
of Payments without Receipt report (Reports
screen, Tenant Accounting tab).
3. Every day you make a bank deposit, print Bank
Deposit report and Non-Dwelling Deposit Log
report (Reports screen, Tenant Accounting
tab).
4. Make a deposit.
a.
Return the deposit slip to your agency’s
bookkeeper.
b. Record the deposit transaction in the General Ledger module.
5. Print a Monthly Rental Register report or Monthly Rental Register Summary report (Reports
screen, Tenant Accounting tab). When the program asks you if you want to post to the ledger,
click Yes.
WinTen Tenant Accounts Receivable • 11/14/2003 Edition • Program Basics • Page 2.8
6. Process the Complete Totals report and the
Daily Statement of Operations (DSO) report
(Reports screen, Tenant Accounting tab).
a. Print the reports.
b. Initial the reports.
c. Attach any adjustment slips for changes in
charges or changes in previous balances
from the last reports.
d.
Pass the reports to
bookkeeper/accountant.
your
agency’s
1. Review adjustments.
2. Check accounts 1122/2114 and promissory note/retroactive rent accounts (if
used).
3. If OK, initial and go to (e), below.
4. If not OK, reconcile errors, repeat process until OK.
e. Pass the reports to your agency’s executive
director.
1. Review reports.
2. Pass reports back to receivables clerk
for filing and comparison to the next
reports.
7. Perform backups.
WinTen Tenant Accounts Receivable • 11/14/2003 Edition • Program Basics • Page 2.9
During the Month
Keep the Rental Register Correct
1. If a tenant’s rent changes, change the tenant’s
records accordingly.
2. If a charge is incorrect, correct it.
3. Keep adjustment slips for documentation with
daily status. Print a Receivables Detail report
for any adjustments that need to be tracked.
Track Late Charges
At the time that tenants become delinquent:
1. Check late charge rates (Setup screen, Late
Charge Rate tab).
2.
Apply late charges (Charges screen, Late
Charges tab).
3. Print late charge bills (Billing Menu screen)
4. Print delinquent notices (or create them via mail
merge) (Billing Menu screen).
Process Move Outs
1. Move out tenant and change to Z account for
holding (Tenant Edit/Review screen, Move Out
button).
a. Receivables changes the unit to a Z unit.
b.
Receivables changes the tenant’s future
rent to zero.
c. If it’s tied to Occupancy and Rent Calculation, Receivables automatically moves
a copy of the tenant’s record to history,
changes the transaction code to 6, and creates an eTrans record. If Occupancy and
Rent Calculation isn’t tied in, you must do
this manually.
d. Receivables marks the unit as vacant and
begins accruing PHAS vacancy days.
2. Determine all charges and post them. This may
take you into next month, but this is not a problem. Posted future charges remain inactive until monthly initialization activates them, at which
time they will accrue normally.
WinTen Tenant Accounts Receivable • 11/14/2003 Edition • Program Basics • Page 2.10
3. Transfer/refund the tenant’s security and pet
deposits after posting all charges (Tenant Edit/
Review screen, Deposit Info tab, Pet Deposit or
Security Deposit button).
a. Pay all balances possible.
b. If deposit money remains after you’ve applied the deposit to all outstanding charges,
create an entry in Accounts Payable (“Payables”) for a refund.
c. For the Payables entry, use the tenant’s new
address (if known) or last known address (if
you have no forwarding address).
d. Print the refund check from Payables: credit
account 1111.1, debit account 1122.
e. If a user error occurs during the procedure,
use the Reverse Deposit Transfer/Refund
function on the Payments menu.
Transfer Tenants Between Units
When transferring a tenant from one unit to another (Tenant Edit/Review screen, Main Info tab,
Transfer Tenant button), remember that the new
unit must be vacant and in a condition to accept a
new tenant.
Process Utilities
1. Review utility allowances.
2. Check charge rates.
3. Enter meter readings.
4. Print and review new meter reading reports.
5. Print next month’s utility bills.
Process Work Orders
1.
Enter each work order with its appropriate
PHAS code.
2. Complete each work order (add date completed
and tenant charge).
3. If WorkOrder and Receivables are set up to
work with one another, WorkOrder automatically copies tenant charges to the Service1
database.
4. Print work order bills (Billing Menu screen).
WinTen Tenant Accounts Receivable • 11/14/2003 Edition • Program Basics • Page 2.11
Process Rent Changes and Updates from
Occupancy and Rent Calculation
1.
Make all necessary changes in Occupancy
and Rent Calculation’s Tenant Detail screen:
income, assets, expenses, and household
members.
2. Enter the date on which the tenant’s rent change
will take effect on the Main tab of the Tenant
Detail screen in Occupancy and Rent Calculation.
3. Occupancy and Rent Calculation automatically
calculates TTP and tenant rent.
4. Print a Form HUD-50058 or Form HUD-50059
for the tenant.
Process Move-Ins
Remember to pro-rate charges, if applicable.
Collection Loss Payments (Payments Menu
screen, Payments with Receipt and Charge Off
functions)
Process Future Billing (Billing Menu screen)
1. Be certain all balance and future charges are
correct. The program will automatically bring
in work order charges from the Service1 database, based on the dates chosen.
2. Print future all-in-one bills.
WinTen Tenant Accounts Receivable • 11/14/2003 Edition • Program Basics • Page 2.12
At the End of the Month
1. Be certain you have entered all payments.
2. Process the final Bank Deposit report and make
the corresponding deposit.
3.
Print the final Deposit Log for Non-Dwelling
Rental Income.
4. Prepare the final Monthly Rental Register report.
a. Check it for errors.
b. Correct all errors.
c. Print it one last time once it is correct, answering “Yes” when Receivables asks you if
you want to post to the General Ledger.
5. Print all other required reports:
a. All Receipts in Receipt Number Order
b. Payments Without Receipt
c. Promissory Note/Retro Rent Listing
d. Receivables Detail Listing
e. Future Charges/Rent Listing
f. Link Report
6. Perform the pre-initialization procedure as described in the Initialization chapter.
7. Perform the initialization procedure as described
in the Initialization chapter.
8. Print all-in-one bills.
9. Start the new month.
At the End of the Calendar Year
Charge off tenants.
Perform end-of-month procedures as described
above.
During initialization, clear YTD rent receivable totals.
WinTen Tenant Accounts Receivable • 11/14/2003 Edition • Program Basics • Page 2.13
PLANNING QUESTIONS
Before you begin using the Tenant Accounts Receivable program, there are a few questions that
you should answer to ensure smooth and organized
data management. These questions address both
program setup and agency procedures.
Number of Projects
Identify the projects your agency controls with a
simple numerical index (1, 2, 3...).
Identify the position that each project occupies on
your agency’s rental register.
This information will assist you in setting up projectbased accounting procedures. For more information on project-based accounting, see the explanation and diagram in the Setup chapter.
Ledger Account Numbers
Identify the General Ledger account in which each
project accrues income credits (3110, 3690...).
Identify the General Ledger account in which each
project accrues receivable items (1122...).
For more information on General Ledger account
numbers, see the WinTen Master Setup and WinTen General Ledger program manuals.
Master Unit Database
Identify each unit with a unique unit number.
Identify the status (PHAS status) and condition
(available, under modernization, etc.) of each unit.
Late Charges
Determine your agency’s policies for late charges.
Determine the formulas used to calculate any of
the following rate charge types that your agency
uses:
• flat rate
• percentage of late payment
• conditional
• daily rate
WinTen Tenant Accounts Receivable • 11/14/2003 Edition • Program Basics • Page 2.14
Utilities and Meter Readings
Determine the utilities (water, gas, electricity) for
which your agency bills tenants (“active” utilities).
Decide whether your agency bases utility allowance tables on number of bedrooms per unit or
number of members per household. Calculate the
utility allowance tables and utility rates.
Determine the active utilities for which your agency
performs its own meter readings.
Decide whether your agency takes meter readings in unit number order (101, 102, 103, 104...)
or in read order (the order in which the units are
arranged on the street). For more information on
read order, see the explanation and diagram in
the Setup chapter. If your agency takes readings
in read order, determine the read order for each
project.
WinTen Tenant Accounts Receivable • 11/14/2003 Edition • Program Basics • Page 2.15
MAIN MENU
This screen is the starting point for using each of
the Tenant Accounts Receivable functions. This
manual details each function in its respective chapter.
WinTen Tenant Accounts Receivable • 11/14/2003 Edition • Program Basics • Page 2.16
SETUP
The first time you run Tenant Accounts Receivable,
the first option you should select from the Main
Menu is Setup. All WinTen programs have Setup
functions. The settings in the Setup screen control
the program environment, and you can change
many aspects of the program’s operation through
these settings. Be careful to enter the proper information, as inaccurate settings can cause Receivables to function in an unexpected manner.
The individual in charge of your WinTen programs
should periodically review each program’s Setup to
ensure that it is still correct. Access to the Setup
screen should be restricted through the Tenmast
Security program after the initial settings have been
entered in order to prevent accidental changes to
the settings.
To use the Setup functions, click the Setup button
or press <S> at the Main Menu.
WinTen Tenant Accounts Receivable • 11/14/2003 Edition • Setup • Page 3.1
SETUP SCREEN
The Setup screen has six tabs: Default Settings,
Projects, Utilities, Master Units, Late Charge Rate,
and Special System Functions. It always opens on
the Default Settings tab, as shown below.
Default Settings Tab
The Default Settings tab contains your agency’s
identifying and addressing information, as well as
general settings that control how the program operates. It has six sub-tabs along its bottom edge:
Primary Settings, Additional Settings, Security/Pet
Deposit, Grievance, Delinquent Notice Info, and
Delinquent Notice Memo. It always opens on the
Primary Settings sub-tab, as shown below.
WinTen Tenant Accounts Receivable • 11/14/2003 Edition • Setup • Page 3.2
Default Settings Tab Controls
Color Settings Button
Clicking this button opens the Color dialog box.
By clicking on a color, you can set the background
color of the Receivables screens. Note that some
parts of some screens may remain unchanged so
they remain readable.
Default Settings Tab Other Functions
Electronic Payment File Setup
Select this option to open the Electronic Payment
File Setup sub-screen. For more information on
this sub-screen and electronic payment file processing, see Appendix D: Electronic Payment File
Processing.
Exclude Charges to be Refunded
Select this function if you want to exclude specific
charge types from the “balance to be refunded”
calculations that the program performs when you
perform a refund on a tenant’s total balance. The
Select Charge Types to Exclude from Refund dialog box opens. Use the standard WinTen controls
to edit the settings in this dialog box. Check the
box next to each charge type that you want to exclude from the refund calculations.
Hint: Color Settings
A color setting, like any other setting, is only applied to the
current data area. Many agencies use this feature to colorcode their data areas so users can tell at a glance what
data area they’re currently using.
Maintain Caseworkers
This command opens the Maintain Caseworkers
sub-screen. This sub-screen enables you to add,
edit, and delete individual caseworker records. For
more information on this sub-screen, see the end
of this chapter.
Maintain Management Codes
This command opens the Maintain Management
Codes sub-screen. This sub-screen enables you
to edit the management codes that Receivables
uses. For more information on this sub-screen,
see the end of this chapter.
WinTen Tenant Accounts Receivable • 11/14/2003 Edition • Setup • Page 3.3
Primary Settings Sub-Tab
The Primary Settings sub-tab contains your
agency’s identifying and addressing information,
user-defined charge fields, directory settings, and
fiscal year information. Use the standard WinTen
controls to edit the data on this sub-tab and save or
cancel your changes.
Primary Settings Sub-Tab Data Fields
Organization Name
This is the name of your agency as it should appear
on billing statements and official HUD reports.
Address
This is your agency’s street address.
City, State, Zip
This three fields are your agency’s city, state, and
zip code.
Phone
This is your agency’s phone number as it should
appear on billing statements.
WinTen Tenant Accounts Receivable • 11/14/2003 Edition • Setup • Page 3.4
Fax
This is your agency’s fax number as it should appear on billing statements.
Miscellaneous Tenant Charges
The Tenant Accounts Receivable program enables
you to configure five tenant charges for whatever
purposes you desire. These five fields are for you
to enter the names of these charges. Your agency
can use these charges for anything from lawn care
to cable TV to move-out cleanup.
Hint: Miscellaneous Tenant Charge #2
If your agency uses the Daily Statement of Operations
(DSO) report generated by Receivables, you must set Miscellaneous Tenant Charge #2 to “Court Costs” for the DSO
to print properly. If your agency does not use the DSO, you
may ignore this requirement.
NOTE: Do not leave the Miscellaneous Tenant
Charge fields blank. This may cause some reports to be improperly formatted.
Directory Settings
Ledger
If your agency uses the WinTen General Ledger
program and you want to post tenant charges to
it, this is the full path to the directory in which the
program should post these charges. Normally, this
is the same directory in which Receivables data is
stored. Leave this field blank to stop any postings
to the General Ledger from Receivables.
Post deposits to Check Reconciliation and
Ledger
If you want to post deposit transactions to both the
Check Reconciliation program and the General
Ledger program, check this box.
Hint: Posting to the General Ledger
If you are using this option, you must set the General Ledger program to gather data from “Other Directories.” If you
do not set this option, General Ledger will not retrieve data
from Receivables.
Include adjustments when posting to Ledger
If you want to post adjustment transactions to the
General Ledger, check this box.
Payables
If your agency uses the WinTen Accounts Payable program and you want to create invoices in
Payables for tenant refunds, this is the full path to
the directory in which the Payables data is located.
Normally, this is the same directory in which Receivables data is stored. Leave this field blank to
stop Payables invoice creation from Receivables.
Use mailing address for Payables refunds
If you check this box, the program uses each
tenant’s mailing address (not his physical address)
when creating invoices in the Accounts Payable
program for tenant refunds.
WinTen Tenant Accounts Receivable • 11/14/2003 Edition • Setup • Page 3.5
Receivables
Month
This is the current month. Receivables automatically updates this field whenever you initialize into
a new month.
Year
This is the current calendar year. Receivables automatically updates this field whenever you initialize into a new year.
Rental Register Options
The Rental Register Options fields control the format in which the program prints the Rental Register
report.
Print Using 2 Lines
Check this box if you want the Rental Register to
use two lines for each tenant’s details. Leave it
unchecked if you want each tenant’s details to occupy one line.
Field to Put on First Line
This drop-down selection box enables you to specify which unique data field to include on the first line
of each tenant’s record: Unit # or Account #.
Search Screen Options
Default View
This is the default “view” option that will be selected
whenever you enter the Browse Tenants screen.
Default Ordered By
This is the default sort order that will be selected
whenever you enter the Browse Tenants screen.
Previous Balances
Do Not Allow Edit of Previous Balances on
Tenant Screen
If this box is checked, users cannot edit tenants’
previous balance values on the Tenant Detail
screen. They must use the Payment Wizard to edit
this data.
Hint: Editing Previous Balances
Tenmast strongly recommends that you check this box. It
ensures that any changes to a tenant’s previous balances
will be recorded for audit purposes.
WinTen Tenant Accounts Receivable • 11/14/2003 Edition • Setup • Page 3.6
Additional Settings Sub-Tab
The Additional Settings sub-tab enables you to
configure the manner in which Tenant Accounts
Receivables functions during daily operations. The
top area of the sub-tab contains a set of check
boxes for turning certain options on and off, and
a pair of drop-down selection boxes for specifying
print modes for bills and receipts. The bottom area
contains miscellaneous function information. Use
the standard WinTen controls to edit the data on
this sub-tab and save or cancel your changes.
WinTen Tenant Accounts Receivable • 11/14/2003 Edition • Setup • Page 3.7
Additional Settings Sub-Tab Data Fields
Bills
Use Billing Sequential Numbers
If you want Receivables to print an index number
on each bill, check this box. Bill index numbers are
sequential numbers that the program can place on
each printed bill to assist you with record-keeping.
They do not apply to any financial tracking or accounting.
Print Grievance on Notices
If you want Receivables to print the grievance
statement (see the Grievance tab for more information) on each bill, check this box. If this box is
checked, the Grievance tab of the Setup screen is
available.
Use 1st of Following Month for Notice Date
When you print billing notices, Receivables prints
a date on each notice. Check this box if you want
Receivables to mark billing notices with the first
day of the next month. Uncheck this box if you
want Receivables to mark billing notices with the
day on which you printed them.
Use Mailing Address for Billing
If you want Receivables to use tenant mailing addresses when printing billing notices, check this
box. Leave this box blank if you want Receivables
to use tenant unit addresses.
Select Billing Statements
This drop-down selection box enables you to specify the format in which the program prints bills.
Utilities
Apply Unused Utility Allowance to Balance as
a Credit
Check this box if you want to continue posting utility charges to tenants’ accounts if utility allowances
are greater than utility amounts used. This will
cause affected utility charges to be less than zero
(credits). If you want to ignore utility credits, leave
this box unchecked.
Apply Utility Charges/Credit Less Than a Dollar
Check this box if you want to continue posting
utility charges and credits to tenants’ accounts if
the amounts are less than $1.00. If you want to
ignore charges less than $1.00, leave this box unchecked.
WinTen Tenant Accounts Receivable • 11/14/2003 Edition • Setup • Page 3.8
Apply Utility Credits but Zero Utility Charges
If you check this box, on initialization every month,
Receivables will set all outstanding utility charges
to zero. It will apply all outstanding utility credits
toward the tenant’s utility charges for the following
month.
NOTE: You must also check the Apply Unused
Utility Allowance to Balance as a Credit box for
this function to work properly.
Round Utility Charges to Whole Dollar
If you want the program to round all utility charges
and credits to the nearest dollar, check this box.
Leave it unchecked if you want the program to retain cent amounts.
Bring In Future Utility Charges for Move-Outs
If you want Receivables to automatically post future
utility charges to tenant accounts on move-outs,
check this box. If you want to post such charges
manually, leave this box unchecked.
Receipts
Multiple People Take Rent on Same Workstation
Check this box if your agency has a workstation
on which more than one employee takes rent payments. This will allow users to change their initials
when taking payments without having to exit Receivables and re-enter it.
Use Mailing Address for Receipts
If you want Receivables to use tenant mailing addresses when printing payment receipts, check this
box. Leave this box blank if you want Receivables
to use tenant unit addresses.
Do NOT Print HA Information on Receipt
If you check this box, the program will not print your
agency’s identifying information on receipts.
Use Payment Wizard
If you check this box, the program uses the Payment Wizard to record payments.
Apply Payments to Rent FIRST
If you check this box, the program applies payments to rent charges before applying them to any
other charges or deposits.
Select Receipt Type
This drop-down selection box enables you to specify the format in which the program prints receipts.
WinTen Tenant Accounts Receivable • 11/14/2003 Edition • Setup • Page 3.9
Use Cash Drawer with 4-Inch Receipt Printer
If your agency has a cash drawer attached to its
receipt printer, check this box. This option is only
available if the Select Receipt Type field is set to
“Use 4” (roll paper) Receipt Printer (Star).”
Use 4-Inch Receipt Printer Without Print Delay
If your agency uses a receipt printer as a network
printer, or as a local printer with a print buffer, check
this box. If you do not use a receipt printer at all,
or if you use one as a local printer with no buffer,
leave this box unchecked. This option is only available if the Select Receipt Type field is set to “Use
4” (roll paper) Receipt Printer (Star).”
Other Options
Work Order Bills Automatically Posted
If your agency has the WinTen WorkOrder program
and you want Receivables to automatically post
completed work order charges to tenants’ accounts
at monthly initialization, check this box. If you want
to manually post such charges, or if you do not
have WorkOrder, leave this box unchecked.
Bring In Work Order Charges for Move Outs
If your agency has the WinTen WorkOrder program
and you want Receivables to automatically pull
work order charges from WorkOrder on move-outs,
check this box. If you want to manually record such
charges, or if you do not have WorkOrder, leave
this box unchecked.
Home Ownership Monthly Rental Charge
This is the amount of homeownership tenant TTP
that will be applied toward each tenant’s actual rent
each month. The remaining portion of the TTP will
go into that tenant’s homeownership escrow account.
Additional Text for Billing Statements
This is a short (60-character) text field which the
program prints on all billing statements.
Additional Text for Receipts
This is a short (60-character) text field which the
program prints on all receipts.
WinTen Tenant Accounts Receivable • 11/14/2003 Edition • Setup • Page 3.10
Security/Pet Deposit Sub-Tab
The Security/Pet Deposit sub-tab enables you to
select the manner in which the program calculates
security and pet deposits during a move-in. The
Occupancy and Rent Calculation program will also
read this information. Each calculation has three
options. Select the radio button that corresponds
to the desired option and enter the required data,
if any, in the appropriate fields. Use the standard
WinTen controls to edit the data on this sub-tab and
save or cancel your changes.
WinTen Tenant Accounts Receivable • 11/14/2003 Edition • Setup • Page 3.11
Percentage of Rent
If you choose to use a percentage of rent to determine the deposit, a data field appears below the
radio buttons. Enter the percentage in this field.
Table
If you choose to use a table to determine the deposit, a table appears below the radio buttons for
the applicable range (0 through 5 bedrooms, or 1
through 5 pets). Enter the flat amounts for each
value in the appropriate fields.
Individual Basis
If you choose to determine deposits on an individual basis, or if your agency has a formula which
goes by neither percentage nor flat rate, you must
enter deposit amounts in individual tenant records.
Hint: How Tables Work
During the move-in process, the program asks a question
about how many pets the tenant has. It reads the unit description from the Master Unit database to determine how
many bedrooms the unit has.
WinTen Tenant Accounts Receivable • 11/14/2003 Edition • Setup • Page 3.12
Grievance Sub-Tab
If you check the Print Grievance on Notices box on
the Additional Settings sub-tab, the Grievance subtab becomes available. This sub-tab contains five
lines of up to 60 characters each. When Receivables prints billing notices, any text in these fields
will be printed on the notices. Use the standard
WinTen controls to edit the data on this sub-tab and
save or cancel your changes.
WinTen Tenant Accounts Receivable • 11/14/2003 Edition • Setup • Page 3.13
Delinquent Notice Info Sub-Tab
The Delinquent Notice sub-tab enables you to set
up the standard delinquent notice that Receivables
prints out for tenants who are late on any payment
to your agency. This sub-tab’s layout mimics that
of an actual delinquent notice. The two yellow (light
gray in the images in this manual) areas of the subtab are where the program will print the tenant-specific delinquency data. Use the standard WinTen
controls to edit the data on this sub-tab and save or
cancel your changes.
WinTen Tenant Accounts Receivable • 11/14/2003 Edition • Setup • Page 3.14
Delinquent Notice Info Sub-Tab Data Fields
If this balance is not paid in full within ___
days
This is the number of days that your agency’s policies give delinquent tenants for payment before an
eviction notice is served.
a ___ day notice to vacate will be issued to
you.
This is the number of days that your agency’s policies give delinquent tenants to vacate a unit after
an eviction notice is served.
Name
This is the name of the individual whose signature
appears at the bottom of each delinquent notice.
Title
This is the title of the individual whose signature
appears at the bottom of each delinquent notice.
WinTen Tenant Accounts Receivable • 11/14/2003 Edition • Setup • Page 3.15
Delinquent Notice Memo Sub-Tab
The Delinquent Notice Memo sub-tab is a free-form
document that you can edit, much as you would
edit a file in a word processing program. This document will appear at the end of every delinquent
notice that you print from Receivables. This subtab’s toolbar mimics that of Microsoft Word or Corel
WordPerfect.
WinTen Tenant Accounts Receivable • 11/14/2003 Edition • Setup • Page 3.16
Projects Tab
The Projects tab enables you to set up your agency’s project-based accounting for Receivables.
HUD requires every agency to use project-based
accounting. An accounting project has a set of
General Ledger account numbers, which the WinTen programs use for recording all financial transactions that involve units in that project.
The top portion of this tab contains a table of all of
the projects that are set up in the program. The
bottom portion of the tab contains a table of the
individual account numbers that are set for the selected project. Use the standard WinTen controls
to edit the data on this tab and save or cancel your
changes.
WinTen Tenant Accounts Receivable • 11/14/2003 Edition • Setup • Page 3.17
Project-Based Accounting
Project-based accounting is a method of accounting for public housing authorities. In project-based
accounting, you group your units into projects
according to their geographic locations. This is
because a unit’s location - its neighborhood - determines its maintenance and utility costs. These
accounting projects won’t necessarily match up to
HUD project numbers on a one-for-one basis. If
a single HUD project has units in three different
neighborhoods, those units will be split up among
three different accounting project numbers, one for
each neighborhood.
How It Works
Let’s say that the Tenmast City Housing Authority
operates in a city with three neighborhoods: Applehill, Bayberry, and Chestnut (Figure 1).
When the agency first opened its doors, it got HUD
funding under the project KY877P001. Using this
funding, it built units in the Applehill and Bayberry
neighborhoods (Figure 2).
A few years later, the agency got more HUD funding under project KY877P002. It used this to build
some units in the Chestnut area (Figure 3).
A few more years down the road, the agency got
yet more HUD funding, this time under project
KY877P003. It built another set of units in Chestnut, across the street from the first set in that neighborhood (Figure 4).
When it comes time to set up project-based accounting for the agency, their administrators look at
a map to see which units they have where. They
have units from project 001 in the Applehill and
Bayberry neighborhoods, and units from projects
002 and 003 in the Chestnut area (Figure 5).
Project-based accounting takes location into account before it factors in HUD project number. In
the case of the units from KY877P001, they’re located in two separate neighborhoods: Applehill and
Bayberry. This places those units in two separate
accounting projects: 1 and 2 (Figure 6).
The units from KY877P002 are all in the same
neighborhood, Chestnut. This places them in accounting project 3 (Figure 6).
The units from KY877P003 are also all in the same
neighborhood, Chestnut - right across the street
from those in KY877P002. However, because they
were built under a different HUD project, they’re
also in a separate accounting project: 4 (Figure 6).
Hint: Project-Based Accounting Summary
Yes, it’s confusing.
If two developments have the same HUD project number
but are located in different neighborhoods, they have two
different accounting project numbers.
If two developments have different HUD project numbers
and are located in different neighborhoods, they have two
different accounting project numbers.
If two developments have different HUD project numbers
and are located in the same neighborhood, they have two
different accounting project numbers.
If two developments have the same HUD project number
and are located in the same neighborhood, they have the
same accounting project number.
WinTen Tenant Accounts Receivable • 11/14/2003 Edition • Setup • Page 3.18
1: Tenmast City
Bayberry
Applehill
2: Initial Construction under KY877P001
Chestnut
Bayberry
Applehill
Chestnut
3: Construction under KY877P002
4: Construction under KY877P003
Bayberry
Applehill
Chestnut
Bayberry
Applehill
Chestnut
5: HUD Project Numbers
KY877P001
Bayberry
Applehill
Chestnut
6: Project-Based Accounting
Accounting Project 1
KY877P003
Accounting Project 2
KY877P002
Bayberry
Applehill
Chestnut
Accounting Project 3
Accounting Project 4
WinTen Tenant Accounts Receivable • 11/14/2003 Edition • Setup • Page 3.19
Adding a New Accounting Project
When you click the Add button, a dialog box opens
that asks if you want to duplicate an existing set of
project account numbers. Click Yes if you want to
copy the project account numbers you’ve already
set up in a different project to this new project.
Click No if you want to enter a completely new set
of account numbers. When you choose either option, the Add a Project dialog box opens.
If you clicked Yes, the Add a Project dialog box
appears as it is shown to the right. Use the Project drop-down selection box to select the project
whose account numbers you want to copy to this
new project. Enter the Project Code number in the
data field and click OK. The Add a Project dialog
box closes and the program returns to the Projects
tab.
If you clicked No, the Add a Project dialog box
appears with its top half blank. Enter the Project
Code number in the data field and click OK. The
Add a Project dialog box closes and the program
returns to the Projects tab.
Projects Tab Data Fields
Project Code
This is the three-digit identifying code for the currently selected project.
Project Name
This is the official name of the project.
Hint: Adding Your First Accounting Project
When you add your first accounting project, you don’t have
any sets of account numbers to duplicate, so the program
doesn’t ask you if you want to duplicate a new set. The
Add a Project dialog box only enables you to enter the new
project code.
HUD Project Number
This is the HUD project number that applies to
the units in this accounting project. This number
should reflect the projects set up in the Occupancy
and Rent Calculation program.
Total Units in Project
This is the total number of units in this accounting
project.
Description
This is the type of account whose number you are
setting. You cannot edit this field.
Fund ID
This is the General Ledger to which the selected
account for the selected project should post.
Account Number
This is the number of the account to which to post.
Amount
This is the amount that will be posted to the selected account the next time you run the Post function
in Receivables. You cannot edit this field.
Hint: Other Fund IDs
If a project is posting to fund IDs other than the General
Ledger (e.g. data areas other than your primary accounting data area), the postings will not appear on your journal
reports from Receivables. You must go to the General
Ledger program to retrieve this data.
WinTen Tenant Accounts Receivable • 11/14/2003 Edition • Setup • Page 3.20
Utilities Tab
The Utilities tab contains setup information on tenant utility charges. It has three sub-tabs: Utility
Setup, Allowance Tables, and Rate Tables. The
Utilities tab always opens on the Utility Setup subtab, as shown below.
Utility Setup Sub-Tab
The Utility Setup sub-tab contains general setup
information on tenant utility charges and how Receivables records them. Use the standard WinTen
controls to edit the data on this sub-tab and save or
cancel your changes.
WinTen Tenant Accounts Receivable • 11/14/2003 Edition • Setup • Page 3.21
Utility Setup Sub-Tab Data Fields
Active Utilities
If a utility is “active,” your agency tracks meter
readings for that utility and uses allowance tables
to calculate excess usage and charges. Check the
box next to each utility that should be active: Electricity, Gas, and/or Water.
NOTE: An “inactive” utility isn’t subject to
meter readings and a varying monthly charge.
Instead, your agency applies a flat monthly
charge regardless of tenant usage. You can enter such a flat charge on an individual tenant’s
Tenant Summary screen. For more information
on setting repeating flat utility charges for a
tenant, see the Tenant Actions chapter of this
manual.
Use new utility calculation which calculates
utilities based on # of persons in unit?
If your agency bases utility calculations on number
of residents in a unit, check this box. If your agency
bases utility calculations on number of bedrooms in
a unit, uncheck this box.
Do you use read order?
If your agency uses read order for entering meter
reading data, check this box. If your agency enters
meter reading data in unit number order, leave this
box unchecked.
Read order is a method of data entry which enables you to enter meter readings in the order in
which you took them in the field. For example, if
you start on one side of a street and go down that
side of the street, taking readings from each unit in
turn, then come back up the other side of the street,
you aren’t going to be recording your readings in
the order of the unit numbers. See the diagram
below for an example:
Start Here
Read 1st
Read 2nd
Read 3rd
Read 4th
Read 5th
101
103
105
107
109
Elm Street
102
104
106
108
110
Read 10th
Read 9th
Read 8th
Read 7th
Read 6th
WinTen Tenant Accounts Receivable • 11/14/2003 Edition • Setup • Page 3.22
In this example, the read order is 101, 103, 105,
107, 109, 110, 108, 106, 104, 102, which is nothing like the numerical order of the unit numbers. If
you use read order data entry for meter readings,
you can specify each unit’s position in the meter
reading order. You can do this on the Master Units
tab of the Setup screen. In the above example,
unit 101 would have read order 1, unit 103 would
have read order 2, and so on. When you begin the
process by which you enter meter reading data, the
program will prompt you for each unit’s data in read
order rather than unit number order.
Do you use a handheld computer for meter
readings?
If your agency uses handheld computers and the
Tenmast Meter Readings software for taking meter
readings, check this box.
Do you want meter reading schedules split
into projects when created?
This option is only available if your agency uses
handheld computers and the Tenmast Meter Readings software. If you check this box, the Meter
Readings software enables you to split a monthly
meter reading schedule into multiple schedules,
one for each project. If you leave this box unchecked, the program only produces one meter
reading schedule, which contains all units regardless of their project assignments.
Hint: Schedules Split by Project
If you want to use this option (or stop using this option), you
must send your data packs to Tenmast to be reconfigured.
Please contact our Marketing department at (877) 8366278 or [email protected] for more information.
Do you read your meters quarterly?
If your agency takes quarterly meter readings
(90 days apart), check this box. If your agency
takes monthly meter readings, leave this box unchecked.
Future utility allowances will be read from the
table for:
This is the month whose utility allowances (in the
appropriate utility allowance table from the Allowance Tables sub-tab) should apply to future utility
charges. Whenever you perform monthly initialization of Receivables, the program advances this setting by one month.
This is the allowance that appears in the Due in
30 column on the Charges tab of the Tenant Detail
screen.
WinTen Tenant Accounts Receivable • 11/14/2003 Edition • Setup • Page 3.23
Allowance Tables Sub-Tab
The Allowance Tables sub-tab enables you to
add, edit, and delete utility allowance tables. An
allowance table is a table which cross-references
a unit’s bedroom size with the current month to
determine what a tenant’s current utility allowance
is. You must have at least one allowance table for
every utility for which you take readings (e.g. every
utility which is set as “active” on the Utility Setup
sub-tab).
When you first enter the Allowance Tables sub-tab,
it displays a table which contains the unique identifying codes for each existing utility allowance table.
When you add a new table or edit an existing one,
the sub-tab changes to display the detailed information for the selected table. Use the standard
WinTen controls to edit the data on this sub-tab
and save or cancel your changes.
Hint: Alternate Allowance Tables
Most agencies use unit bedroom size to determine utility
allowances. Some, however, use the number of residents
in a household instead. If your agency uses this alternate
method, you must check the Use New Utility Calculation
box on the Utility Setup tab. If you have selected this option, the Allowance Tables tab functions in a different manner from that described here.
For more information on utility allowance tables which use
household size, see Appendix A: Special Utility Calculations.
WinTen Tenant Accounts Receivable • 11/14/2003 Edition • Setup • Page 3.24
Adding a Utility Allowance Table
When you click the Add button, the Utility Allowance
Add dialog box opens. Enter a unique identifying
code (up to three characters) for the new utility allowance table and select the radio button which
corresponds to the utility to which this table will
apply. Click the OK button. The program creates
a blank utility allowance table and the Allowance
Tables sub-tab changes to display the detailed information for this table.
Editing a Utility Allowance Table
When the Allowance Table sub-tab enters edit
mode, it changes to display the detailed information for the selected utility allowance table. The set
of three radio buttons in the top right corner of the
sub-tab indicates the utility to which this allowance
table applies. The primary area of the sub-tab contains a set of data fields for each possible combination of month and bedroom size. Use the standard
WinTen controls to edit the data on this sub-tab and
save or cancel your changes.
Hint: This table’s identifying code isn’t what I entered!
When you create a new utility allowance table, the program
adds a two-letter prefix to the identifying code you entered.
This prefix is EA for an electrical allowance table, GA for a
gas allowance table, or WA for a water allowance table.
Do not use the EA/GA/WA prefix as part of your code in
the Master Unit screen. Just use the identifying code you
entered.
WinTen Tenant Accounts Receivable • 11/14/2003 Edition • Setup • Page 3.25
Rate Tables Sub-Tab
The Rate Table sub-tab enables you to edit utility
rate charges for each accounting project that is set
up on the Projects tab. The left side of the sub-tab
contains a table of all projects which have utility
rates set up. The right side contains the detailed
information for the currently selected project’s utility rates. Use the standard WinTen controls to edit
the data on this sub-tab and save or cancel your
changes.
WinTen Tenant Accounts Receivable • 11/14/2003 Edition • Setup • Page 3.26
Adding a New Project’s Utility Rates
When you click the Add button, the Project ID dropdown selection box appears above the utility rates
table. Select the project to which these rates will
apply.
Editing a Project’s Utility Rates
The table on the right side of the sub-tab contains
the current and next month’s rates for each utility
type that is set as “active” on the Utility Setup subtab.
The program can calculate rates differently for Due
Now And Due in 30 amounts. During monthly initialization, Receivables rolls these values forward
just like rent charges.
WinTen Tenant Accounts Receivable • 11/14/2003 Edition • Setup • Page 3.27
Master Units Tab
The Master Units tab contains a table of every
unit in your agency’s Master Unit database. The
Master Unit database is the core listing of all public
housing units that your agency controls.
To sort the table by unit number or project number, click the appropriate Sort By radio button. To
search for a specific unit, enter its unit number in
the Search For Unit Number field.
Editing a Unit
To edit a unit’s detailed data, select it in the table
and click the Edit/Review button. The Master Unit
Maintenance sub-screen opens on that unit.
Adding a New Unit
To add a new unit record, click the Add Unit button.
The New Unit Information dialog box opens. Select
the project in which this unit is located and enter
the unit’s unique identifying number. Click OK.
The Master Unit Maintenance sub-screen opens
on a new unit record.
WinTen Tenant Accounts Receivable • 11/14/2003 Edition • Setup • Page 3.28
Master Unit Maintenance Sub-Screen
The Master Unit Maintenance screen contains the
detailed information on a single unit in the Master
Unit database. This screen has four tabs: Master
Unit Main, Inspection Status, Events, and Utilities.
It always opens on the Master Unit Main tab, as
shown below.
Master Unit Main Tab
The Master Unit Main tab of the Master Unit Maintenance sub-screen contains general information
on the location and condition of the selected unit.
Use the standard WinTen controls to edit the data
on this tab and save or cancel your changes.
WinTen Tenant Accounts Receivable • 11/14/2003 Edition • Setup • Page 3.29
Master Unit Main Tab Controls
Change Condition Button
When you click the Change Condition button, the
Condition of this Unit data field becomes a dropdown selection box with seven options. This
enables you to change the condition of the unit.
Select the correct condition for the unit and click
the Save button to save your change or the Cancel
button to cancel it. The following list details the
available condition options:
A: Available to be rented (or currently rented).
R: Resident property in unit.
M: Unit under modernization plan.
P: Unit vacant due to market conditions.
D: Unit deprogramming/demolition.
E: Unit vacant due to legal conditions.
I: Unit vacant for other reasons.
For detailed definitions and examples of these conditions, see Appendix B: PHAS Events.
Change Status Button
When you click the Change Status button, the Current Status of this Unit data field becomes editable.
This enables you to change the status of the unit.
Enter the status condition for the unit and click the
Save button to save your change or the Cancel button to cancel it. The following list details the available status options:
V: Vacant.
O: Occupied.
E: Occupied by an employee of your agency.
N: Non-dwelling unit.
Change Modernization Date Button
When you click the Change Modernization Date
button, the Date Unit Was Added to Approved
Modernization Plan data field becomes editable.
This enables you to change the unit’s modernization date. Enter the modernization date for the unit
and click the Save button to save your change or
the Cancel button to cancel it.
Add Event Sequences Button
When you click the Add Event Sequences button,
the PHAS Event Creation dialog box opens. This
dialog box enables you to add a new PHAS event
to the unit’s cumulative event record.
WinTen Tenant Accounts Receivable • 11/14/2003 Edition • Setup • Page 3.30
PHAS Event Creation Dialog Box
The PHAS Event Creation dialog box enables you
to add a new PHAS event to the unit’s cumulative
event record. Enter the appropriate data for the
event and click OK to save the event or Cancel to
cancel event entry.
For a more thorough discussion of PHAS events,
see Appendix B: PHAS Events.
PHAS Event Creation Dialog Box Data Fields
Move Out (Event Beginning Date)?
This is the date on which the event began (the last
tenant in the unit moved out).
Move In (Event Ending Date)?
This is the date on which the event ended (a new
tenant moved into the unit).
Lease Termination for Event?
This is the date on which the lease of the last tenant in the unit expired.
What is the condition of the unit?
This drop-down selection box enables you to specify the condition code that applies to the unit. For
a discussion of the available condition codes and
their definitions, see Appendix B: PHAS Events.
Event complete?
If the event is complete, check this box.
Unit Type
This set of radio buttons enables you to specify
whether the unit is a tenant-occupied unit, an employee-occupied unit, or a non-dwelling unit.
WinTen Tenant Accounts Receivable • 11/14/2003 Edition • Setup • Page 3.31
Master Unit Main Tab Data Fields
Unit Address
This is the street address of the unit, including
apartment number.
City, State, Zip
These three fields are the city, state, and zip code
portions of the unit’s address.
Date of Last Move In for this Unit
This is the lease date of the current tenant (or of the
last tenant to occupy this unit).
Date of Last Move Out for this Unit
This is the move out date of the last tenant to occupy this unit (or the lease expiration date of the
current occupant).
Bedrooms
This is the number of bedrooms that the unit has.
Disable/Handicap Accessible
If this unit has disabled/handicapped accessibility
features (e.g. wheelchair ramps), check this box.
Condition of this Unit
This is the unit’s current condition. You cannot edit
this field normally; you must use the Change Condition toolbar button.
Date Condition/Status Changed
This is the date on which the unit’s condition or
status last changed. You cannot edit this field; the
program automatically updates it.
Current Status of this Unit
This is the unit’s current status. You cannot edit
this field normally; you must use the Change Status
toolbar button.
PIC Unit Type
This is the unit’s type, as specified for PIC data
purposes.
Family # Occupied
This is the total number of families that have occupied this unit since it was constructed.
Read Order
This is internal utility record data from the Tenant
Accounts Receivable program. You cannot edit
this field.
Util Code: Ele/Gas/Wtr
These are the utility allowance table codes for electricity, gas, and water which apply to this unit.
Paint Date
This is the date on which the unit was last painted.
WinTen Tenant Accounts Receivable • 11/14/2003 Edition • Setup • Page 3.32
Date Unit was Added to Approved Modernization Plan
This is the date on which the unit was added to a
modernization plan, if applicable. You cannot edit
this field normally; you must use the Change Modernization Date toolbar button.
Head of Household Information
The Head of Household Information data fields are
demographic information on the head of the household that is currently living in the unit (or last lived
in the unit).
Elderly
If the head of household is elderly, check this box.
Disable/Handicapped
If the head of household is disabled or handicapped, check this box.
Race/Ethnicity
This is a two-character field for reporting the race
and ethnicity of the head of the household residing
in the unit. The first character is for race and the
second character is for ethnicity. These are the
same codes that are used on Form HUD-50058.
First Character:
1: White
2: Black/African American
3: American Indian/Alaska Native
4: Asian
5: Native Hawaiian/Other Pacific Islander
6: Multi-Racial
Second Character:
1: Hispanic
2: Non-Hispanic
Income Level
This drop-down selection box enables you to specify the tenant’s income level: L(ow), V(ery low), or
E(xtremely low).
WinTen Tenant Accounts Receivable • 11/14/2003 Edition • Setup • Page 3.33
Inspection Status Tab
The Inspection Status tab of the Master Unit Maintenance sub-screen contains data on the unit’s
recent inspection history. If your agency uses the
WinTen Public Housing Inspections program, the
Tenant Accounts Receivable program can automatically update this information from the databases maintained by the Occupancy and Rent Calculation program. If you do not use PH Inspections,
you can edit this data manually. Use the standard
WinTen controls to edit the data on this tab and
save or cancel your changes.
WinTen Tenant Accounts Receivable • 11/14/2003 Edition • Setup • Page 3.34
Inspection Status Tab Data Fields
Date of Last Inspection
This is the date on which the unit was last inspected.
Date Vacant Unit Referred to Maintenance for
Fix Up
This is the date of the work order issued to refurbish the unit after its last occupants moved out.
Date Maintenance Returned Vacant Unit to Occupancy
This is the date the abovementioned work order
was completed.
Unit Inspected Using UPCS Standards
If the last inspection of this unit used the UPCS
(Uniform Physical Condition Standards) inspection
protocol, check this box.
Unit Met UPCS Standards When Inspected
If the unit met the UPCS standards at its last inspection, check this box.
WinTen Tenant Accounts Receivable • 11/14/2003 Edition • Setup • Page 3.35
Events Tab
The Events tab of the Master Unit Maintenance
sub-screen displays a summary of all PHAS
events for the unit. This information is used by
both the Tenant Accounts Receivable program and
the PHAS program to calculate the PHAS vacancy
information for this unit.
You cannot edit the data on this tab. If you click the
Edit button, the Event Information Edit sub-screen
opens. This sub-screen enables you to review and
edit the individual records that make up the vacancy
days shown in the table. For more information on
the Event Information Edit sub-screen and PHAS
event records, see Appendix B: PHAS Events.
WinTen Tenant Accounts Receivable • 11/14/2003 Edition • Setup • Page 3.36
Utilities Tab
The Utilities tab of the Master Unit Maintenance
sub-screen displays a complete record of all meter
readings for this unit during vacancy (if your agency tracks it). You cannot edit the data on this tab.
However, you can click the Print button to print it.
WinTen Tenant Accounts Receivable • 11/14/2003 Edition • Setup • Page 3.37
Late Charge Rate Tab
The Late Charge Rate tab enables you to set up
your agency’s late payment charges. You may
have up to three different late charges, each of
which applies after a different period of nonpayment, and/or a daily late charge. Use the standard
WinTen controls to edit the data on this tab and
save or cancel your changes.
WinTen Tenant Accounts Receivable • 11/14/2003 Edition • Setup • Page 3.38
Late Charge Rate Tab Data Fields
Continue to apply late charges to Z accounts?
A Z account is an account for a tenant who has
moved out. If you want late charges to apply to Z
accounts (to apply after the tenant has moved out),
check this box.
Apply late charges to only those who owe
rent?
If you want late charges to only apply to tenants
who owe late rent, check this box. If you want late
charges to apply to tenants who have unpaid balances for charges other than rent (utilities, maintenance fees, etc.), leave this box unchecked.
Apply late charges to current and prior balances?
If you want late charges to apply to both previous
months’ outstanding debts and those of the current
month, check this box. If you want late charges
to only apply to current debts, leave this box unchecked.
Late Charges
The first three late charges you can set up are periodic late charges. This means that they come into
effect after a given period has passed. The last
late charge you can set up is a daily late charge.
A daily late charge accrues for every day that the
tenant has an outstanding debt.
Select Type
The Select Type set of radio buttons enables you to
specify whether the late charge is a flat rate, a percentage of the total debt, or conditional upon the
amount of the debt. The data fields which appear
to the right of these radio buttons are dependent on
this setting.
After The... Day
This is the day of the month on which the late
charge comes into effect. If you do not want this
rent charge record to have any effect, enter “32” in
this field.
Flat Rate Late Charges
If you select the Flat Rate radio button, a single
data field appears to the right of the After the... Day
field. This is the dollar amount of the late charge,
regardless of the amount of the debt.
WinTen Tenant Accounts Receivable • 11/14/2003 Edition • Setup • Page 3.39
Percentage Late Charges
If you select the Percentage radio button, a single
data field appears to the right of the After the... Day
field. This is the percentage by which the program
will multiply a tenant’s rent or total balance debt to
determine his late charge.
Conditional Late Charges
If you select the Conditional radio button, a single
long data field appears to the right of the After the...
Day field. This data field contains the formula which
determines the tenant’s late charge. This equation
basically says, “if the tenant’s debt matches this
set of criteria, his late charge is this; otherwise, it’s
something else.”
CAUTION
If you use a conditional late charge, you must call Tenmast
Training & Support for assistance with the formula. This
formula uses program internal data to calculate a late
charge.
Daily Late Charges
A daily late charge can only be flat rates or conditional. It can’t be a percentage because the tenant may pay a portion of the amount due, which
would cause the late charge to fluctuate. If you
use a daily late charge, the Maximum Late Charge
Value data field appears. This is the maximum late
charge that a tenant can accrue through daily late
charges.
WinTen Tenant Accounts Receivable • 11/14/2003 Edition • Setup • Page 3.40
Special System Functions Tab
The Special System Functions tab enables you
to use six special processes for maintaining your
databases.
CAUTION
All six of the functions available on this tab can cause permanent loss of critical data if applied incorrectly. They are
primarily intended for use immediately after a new program
installation or during the process of converting MS-DOSbased program data to WinTen program data. Do not use
any of these functions unless specifically instructed to do
so by Tenmast Training & Support personnel.
WinTen Tenant Accounts Receivable • 11/14/2003 Edition • Setup • Page 3.41
Re-Create Master Unit Database from
Tenants
This function erases your agency’s Master Unit
database and rebuilds it from the current tenant
database.
Post/Unpost Future Work Orders
This function unposts (erases) all outstanding future work order charges in Receivables, including
those that were entered by hand without a corresponding work order. It then creates a new work
order charge in the Service1 database.
Recalculate PHAS Vacancy Totals
Totals of vacancy days can become invalid in the
same manner as fiscal year end dates can. Click
the Recalculate button to initiate the process by
which Receivables checks its vacancy total data
against other WinTen programs.
When you click the Recalculate button, a confirmation dialog box opens that asks if you want to
continue with recalculation. Click Yes to continue
or No to abort the process.
If you click Yes, the recalculation process continues. This may take several seconds to several
minutes, depending on the speed of your computer
and the amount of information in Receivables’ databases.
If the program finds problems with the data during
its calculations, a print preview screen appears
with the Invalid PHAS Events report. This report
displays all PHAS events in the program’s database which have invalid event records. This report
enables you to diagnose and resolve problems with
your PHAS event records which would otherwise
interfere with proper calculation of vacancy days.
Hint: PHAS Event Records and Fixing Errors
When you close the print preview screen, a dialog
box appears that alerts you that recalculation is
complete. Click OK to close all associated dialog
boxes and return to the Special System Functions
tab.
For more information on PHAS event records and how to
edit them, see the Appendix B: PHAS Events. For more
information on the possible error messages in the Invalid
PHAS Events report and how to fix the errors, see Appendix C: Fixing Invalid PHAS Event Records.
If there are no problems with your data, the print
preview screen with the Invalid PHAS Events report does not appear. The program recalculates
vacancy days and opens the alert dialog box.
WinTen Tenant Accounts Receivable • 11/14/2003 Edition • Setup • Page 3.42
Edit the Cumulative Rent Receivable
Data
When you click the Edit button, the Add/Edit Cumulative Data Records sub-screen opens. This
sub-screen enables you to edit your agency’s cumulative receivables data, which is a continuous
record of all receivables transactions. For more
information, see Appendix D: Cumulative Rent Receivable Data.
Make All Future Utility Charges a Recurring Monthly Charge
When you click the Repeat Utility button, the bottom section of the Special System Functions tab
changes to display the following information:
This function enables you to set any utility for which
your agency does not take meter readings to be a
recurring monthly charge for all tenants. Select the
project for which this should take effect and check
the box next to the utility or utilities to which the
recurring charge should apply. Click OK to save
this recurring charge or Cancel to cancel it. If you
click OK, all tenants in the selected project receive
a recurring monthly charge for the selected utility or
utilities. This charge is equal to the current setting
of each tenant’s future utility charge for the appropriate utility.
Recalculate HUD 51234 Information
This function recalculates all totals for the HUD51234 report.
WinTen Tenant Accounts Receivable • 11/14/2003 Edition • Setup • Page 3.43
Maintain Caseworkers Sub-Screen
The Maintain Caseworkers sub-screen enables
you to add, edit, and delete caseworker records.
Caseworker records allow you to associate a specific caseworker with each tenant in Receivables’
database. The top portion of this sub-screen contains a table of all caseworkers who are currently
in the database, while the bottom portion of the
sub-screen contains the detailed information for
the currently selected caseworker.
Edit the data on this sub-screen and save or cancel
your changes with the standard WinTen controls.
WinTen Tenant Accounts Receivable • 11/14/2003 Edition • Setup • Page 3.44
Maintain Caseworkers Sub-Screen Controls
Change Caseworker Code Button
This button opens the Change Caseworker Code
dialog box. This dialog box enables you to edit
the selected caseworker’s unique identifying code.
When you change a caseworker code, the program
updates its databases, changing that waiting list
code to its new value in every record associated
with that code.
Maintain Caseworkers Sub-Screen Data
Fields
Caseworker Code
This is the caseworker’s unique identifying code. It
can be up to 10 characters long. You cannot edit
this field normally; to change it, click the Change
Caseworker Code button.
First & Last Name
These fields are the caseworker’s first and last
name.
Work Phone
This is the caseworker’s work phone number.
Mobile Phone
This is the caseworker’s cellular phone number.
Pager Phone
This is the caseworker’s pager number.
Home Phone
This is the caseworker’s home phone number.
E-mail Address
This is the caseworker’s e-mail address.
WinTen Tenant Accounts Receivable • 11/14/2003 Edition • Setup • Page 3.45
Maintain Management Codes Sub-Screen
Management codes are user-defined codes for
sorting and filtering tenant records. You can attach
a single management code to any tenant record.
This enables you to sort tenant records by management code, and to filter reports so they only
show tenants with a selected management code.
Edit the data on this sub-screen and save or cancel
your changes with the standard WinTen controls.
WinTen Tenant Accounts Receivable • 11/14/2003 Edition • Setup • Page 3.46
Maintain Management Codes Sub-Screen
Controls
Change Management Code Button
This button opens the Change Management Code
dialog box. This dialog box enables you to edit
the selected management code’s unique identifier. When you change a management code, the
program updates its databases, changing that
management code to its new value in every tenant
record that has that code.
Management Code Tab Data Fields
Management Code
This is the unique identifier of the selected management code (up to 10 characters).
Description
This is a brief (40-character) description of the selected management code.
WinTen Tenant Accounts Receivable • 11/14/2003 Edition • Setup • Page 3.47
WinTen Tenant Accounts Receivable • 11/14/2003 Edition • Setup • Page 3.48
TENANT ACTIONS
Most of your work with Tenant Accounts Receivable will involve maintaining tenant records. The
functions that allow you to work with this data are
grouped together in the Tenant Actions area of the
program. To reach this area, click the Tenant button or press <T> at the Main Menu.
WinTen Tenant Accounts Receivable • 11/14/2003 Edition • Tenant Actions • Page 4.1
TENANT SEARCH SCREEN
The first screen that appears when you enter the
Tenant Actions area is the Tenant Search screen.
This screen contains a table of all of the tenants in
the Receivables database. From this screen, you
can add or move in a new tenant or review and edit
the data for an existing tenant record.
WinTen Tenant Accounts Receivable • 11/14/2003 Edition • Tenant Actions • Page 4.2
Tenant Search Screen Controls
View
This drop-down selection box enables you to filter the tenants who are currently displayed in the
table. “Tenants in Possession” are those who are
currently living in your agency’s public housing
units. “Z Account Tenants” are those who have
moved out but still owe your agency money. “History Tenants” are those who have moved out and
whose accounts are closed. “Charge Off Tenants”
are those whose accounts have been closed and
your agency has written off as losses.
Hint: EPF?
The EPF Acct # column is visible in the table only if you
are using Receivables’ EPF (“Lockbox”) function. For more
information on this function, refer to Appendix D.
Ordered By
This drop-down selection box determines the order
in which the tenant records are displayed in the
table.
Search For
This data field enables you to search for a specific
tenant record. Enter the target of your search in
this data field and click the Go button. The program searches whichever set of fields you have
selected with the Ordered By control and highlights the first record in the table that matches your
search target.
Add/Move In Button
Click this button to add or move in a new tenant.
This process is described in more detail on the following pages.
Edit/Review Button
Click this button to review and/or edit the currently
selected tenant. This opens the Tenant Edit/Review screen on that tenant’s record.
Adding or Moving In a Tenant
To add a new tenant (or to move in a tenant who
has a record in the WinTen Occupancy and Rent
Calculation program), click the Add/Move In button
on the Tenant Search screen. A dialog box opens
that asks you if you are moving this tenant in from
Occupancy and Rent Calculation. Click the appropriate button to continue.
WinTen Tenant Accounts Receivable • 11/14/2003 Edition • Tenant Actions • Page 4.3
Moving in a Tenant from the Occupancy and Rent Calculation Program
If you are moving in a tenant who has an existing
record in Occupancy and Rent Calculation, a dialog box opens that informs you that moving in this
tenant will not update the tenant’s PIC or TRACS
records. Click OK to close this dialog box and continue.
Next, a dialog box opens that contains a table of
every tenant in Occupancy and Rent Calculation’s
database. Select the tenant you are moving in, then
click OK to close this dialog box and continue.
The Pick a Vacant Unit dialog box opens. This dialog box contains a table of every vacant unit in the
Master Unit database. Select the unit into which
the tenant is moving, then click OK to close this
dialog box and continue.
A confirmation dialog box opens that asks you if the
selected unit is correct. Click Yes to continue, or
No to return to the Pick a Vacant Unit dialog box.
WinTen Tenant Accounts Receivable • 11/14/2003 Edition • Tenant Actions • Page 4.4
If you click Yes, the Tenant Move In sub-screen
opens. This sub-screen contains information on
the certification status of the tenant who you are
moving in and the status of the unit into which you
are moving him. Enter the move-in date and click
OK.
A dialog box opens that asks you if you want to
move the tenant in with prorated charges. Click
Yes to move the tenant in with prorated charges or
No to continue with the move-in process without
applying prorated charges.
If you click Yes, the Prorated Rent Charges dialog
box opens. This dialog box displays the prorated
rent to which the tenant is subject. Change this
value, if necessary, and click OK to close this dialog box and continue.
A dialog box opens that asks you if the tenant has
any pets. Click the appropriate button to continue.
If you click Yes and the program is set up for pet deposits to be based on number of pets, the Number
of Pets dialog box opens. Enter the number of pets
that the tenant has and click OK.
A dialog box opens that asks you to enter the current meter readings for the unit into which the tenant is moving. Enter the current readings and click
OK.
When you click OK in the last dialog box, all dialog
boxes associated with the move-in process close
and the Tenant Edit/Review screen opens to the
new tenant’s information.
WinTen Tenant Accounts Receivable • 11/14/2003 Edition • Tenant Actions • Page 4.5
Moving in a Tenant not from the Occupancy and Rent Calculation Program
If you are moving in a tenant who has no record
in Occupancy and Rent Calculation, a dialog box
opens that asks you for basic information on this
tenant. Enter the tenant’s Social Security number,
first name, and last name. Select the radio button
that corresponds to the tenant’s type: active (a new
tenant) or inactive (a new “Z” holding account for
someone who isn’t currently a resident but may still
owe your agency money). Click OK to continue.
The Pick a Vacant Unit dialog box opens. This dialog box contains a table of every vacant unit in the
Master Unit database. Select the unit into which
the tenant is moving, then click OK to close this
dialog box and continue.
A confirmation dialog box opens that asks you if the
selected unit is correct. Click Yes to continue, or
No to return to the Pick a Vacant Unit dialog box.
WinTen Tenant Accounts Receivable • 11/14/2003 Edition • Tenant Actions • Page 4.6
If you click Yes, the Tenant Move In sub-screen
opens. This sub-screen contains information on
the certification status of the tenant who you are
moving in and the status of the unit into which you
are moving him. Enter the move-in date and click
OK.
If the program is set up to calculate security deposits or pet deposits as a percentage of the tenant’s
rent, the Future Rent dialog box opens. Enter the
tenant’s future rent amount and click OK.
A dialog box opens that asks you if the tenant has
any pets. Click the appropriate button to continue.
If you click Yes and the program is set up for pet deposits to be based on number of pets, the Number
of Pets dialog box opens. Enter the number of pets
that the tenant has and click OK.
A dialog box opens that asks you to enter the current meter readings for the unit into which the tenant is moving. Enter the current readings and click
OK.
When you click OK in the last dialog box, all dialog
boxes associated with the move-in process close
and the Tenant Edit/Review screen opens to the
new tenant’s information.
WinTen Tenant Accounts Receivable • 11/14/2003 Edition • Tenant Actions • Page 4.7
TENANT EDIT/REVIEW SCREEN
The Tenant Edit/Review screen contains all of Tenant Accounts Receivables’ data for one tenant.
This data is spread among seven tabs. The Tenant
Data, Deposit/Repay, Charges, Utilities, Details,
and Work Orders tabs are always available. In
addition, if you are running Tenmast’s MS-DOSbased Public Housing Inspections program, the Inspections tab is available. The Tenant Edit/Review
screen always opens on the Tenant Data tab, as
shown below. The tenant’s name, project number,
unit number, and SSN are always shown above the
tabs, regardless of the current tab seleced.
Hint: “Z”
A “Z” in front of a unit number indicates that the tenant has
moved out of that unit. We refer to such accounts as “Z
accounts.”
Tenant Data Tab
The Tenant Data tab contains general information
on the tenant’s family and financial assistance
status. It also enables you to use several special
functions through the toolbar buttons. Use the
standard WinTen controls to edit the data on this
tab and save or cancel your changes.
WinTen Tenant Accounts Receivable • 11/14/2003 Edition • Tenant Actions • Page 4.8
Tenant Data Tab Controls
Change Social Security Number Button
When you click this button, the SSN field becomes
editable. Enter your changes to the tenant’s Social
Security number, then click the Save button to save
your changes or the Cancel button to cancel them.
Move Out Button
Clicking this button initiates the process by which
you record a tenant’s move-out. For more information on this process, see the section on Moving a
Tenant Out at the end of this chapter.
Transfer Tenant Button
Clicking this button initiates the process by which
you record a tenant’s move from his current unit to
another vacant and available unit. For more information on this process, see the section on Transferring a Tenant at the end of this chapter.
Special Message Edit Button
When you click this button, the Special Message
data field becomes editable. Enter your changes
to this tenant’s special message and click the Save
button to save your changes or the Cancel button
to cancel them.
Mark Tenant for Deletion Button
When you click this button, the program marks the
tenant for deletion during the monthly initialization
process. A red indicator box appears in the top
right corner of the tab, showing that this tenant has
been marked for deletion.
Unmark Tenant for Deletion Button
When you click this button, the program unmarks
the tenant for deletion and removes the “Delete
End of Month” indicator from the tab.
Charge Off Edit Field Button
When you click this button, the Charge Off data
field becomes editable. Enter your changes to this
field and click the Save button to save your changes or the Cancel button to cancel them.
NOTE: Under most circumstances, you should
not need to use the Charge Off Edit function.
This is only necessary if a problem occurred
with the actual charge off.
Show Inspections Button
Click this button to open the Browse Inspections
sub-screen, described at the end of this chapter.
The Browse Inspections sub-screen enables you
to view inspections performed on this tenant’s unit.
This button is available only if you are running the
WinTen Public Housing Inspections program.
WinTen Tenant Accounts Receivable • 11/14/2003 Edition • Tenant Actions • Page 4.9
Mailing Address Button
The Mailing Address button opens the Review/Edit
Mailing Address dialog box. This dialog box contains a set of data fields for the tenant’s mailing address, if this differs from his physical address. Use
the standard WinTen controls to edit the data on
this dialog box and save or cancel your changes.
Phone Numbers Button
The Mailing Address button opens the Review/
Edit Phone Numbers dialog box. This dialog box
contains a set of data fields for additional phone
numbers for the tenant. Use the standard WinTen
controls to edit the data on this dialog box and save
or cancel your changes.
Tenant Data Tab Data Fields
Most of the following data is required when a user
creates a tenant record in the Occupancy and Rent
Calculation program.
NOTE: Data fields marked with an asterisk (*)
are those which Receivables draws from Occupancy and Rent Calculation when you move
in a tenant.
First, Last Name *
These two fields are the tenant’s first and last
name.
Special Message
The Special Message field is for alerts that anyone
who edits this tenant’s information needs to see.
It is limited to 20 characters. You cannot edit this
field normally; you must use the Special Message
Edit button.
NOTE: The Special Message field is not visible
if you have not entered anything in it. When
you click the Special Message Edit button, it
becomes visible and editable.
Street
This is the tenant’s street address.
City, State, Zip
This is the tenant’s city, state, and zip code.
Mgmt Code
This drop-down selection box enables you to set
the tenant’s management code, if applicable.
Caseworker *
This drop-down selection box enables you to specify the tenant’s assigned caseworker.
WinTen Tenant Accounts Receivable • 11/14/2003 Edition • Tenant Actions • Page 4.10
Account # *
This is the tenant’s Receivables account number.
EPF Account #
This is the tenant’s EPF (lockbox) account number.
This field is visible only if the EPF function is turned
on in Setup.
Phone *
This is the tenant’s home phone number.
Account Balance Data Fields
TAR Bal Date
This is the date on which the tenant last paid his account in full (paid to a zero balance). The program
updates this field every time the tenant makes a
payment and his account balance goes to zero or
becomes a credit.
YTD Paid Off
This is the total amount of rent the tenant has paid
to date in the current calendar year.
Charge Off
This is the amount which your agency has “charged
off,” or identified as an uncollectable debt, from this
tenant’s account. You cannot edit this field; the
program fills it in automatically when you charge
off a tenant.
Future Rent *
This is the tenant’s rent charge for the next month.
Date Data Fields
Admission Date *
This is the date on which the tenant was admitted
to your agency’s subsidized housing program.
Lease Date
This is the date on which the tenant’s lease went
into effect. The program fills in this field when you
move or transfer the tenant into a unit.
Paint Date
This is the date on which your agency last painted
the unit. The program fills in this field from the
Master Unit database.
Next Insp Date
This is the next date on which the tenant’s unit will
be inspected.
Next Insp Time
This is the time at which the tenant’s unit will be
inspected.
Terminated
This is the date on which the tenant’s lease terminated, if it has yet. The program fills in this field
when you move the tenant out.
WinTen Tenant Accounts Receivable • 11/14/2003 Edition • Tenant Actions • Page 4.11
Household Data Fields
Bedrooms
This is the number of bedrooms in the tenant’s
unit.
Family Size *
This is the total number of people in the tenant’s
household.
Minors *
This is the number of minors in the tenant’s household.
Income *
This is the household’s annual income.
Income Level *
This is the household’s income level: Low, Very
low, or Extremely low.
Race/Ethnicity
When you edit this field, it changes to a pair of
drop-down selection boxes. The first one enables
you to specify the tenant’s race according to HUD’s
standard classification codes:
1: White
2: Black/African American
3: American Indian/Alaska Native
4: Asian
5: Native Hawaiian/Other Pacific Islander
6: Multi-Racial
The second drop-down selection box enables you
to specify the tenant’s ethnicity according to HUD’s
standard classification codes:
1: Hispanic
2: Non-Hispanic
When you are not editing this field, it displays a
two-digit number composed of the above codes.
Elderly
If the tenant is elderly, check this box.
Late Charge Exempt
If the tenant should not be subject to late charges
for past due rent, utility, or other bills, check this
box. If this box is checked, Receivables will not
automatically post late charges to this tenant’s account or include this tenant in lists of delinquent
accounts.
FSS Participant
If the tenant is an FSS (Family Self-Sufficiency)
participant, check this box.
Home Ownership
If the tenant is enrolled in your agency’s Home
Ownership program, check this box.
WinTen Tenant Accounts Receivable • 11/14/2003 Edition • Tenant Actions • Page 4.12
Deposit/Repay Tab
The Deposit/Repay Tab contains information on
the tenant’s security and pet deposits, promissory
note, and repayment agreement. If the tenant is
a home ownership participant, as indicated on the
Tenant Data tab, it also contains information on the
tenant’s home ownership escrow accounts. Use
the standard WinTen controls to edit the data on
this tab and save or cancel your changes.
WinTen Tenant Accounts Receivable • 11/14/2003 Edition • Tenant Actions • Page 4.13
Deposit/Repay Tab Controls
Refund Pet Deposit Button
When you click the Refund Pet Deposit button, the
Pet Deposit Transfer/Refund sub-screen opens.
For more information on this sub-screen, see the
following pages.
Hint: Why refund a pet deposit?
The Refund Security Deposit function enables
you to refund a pet deposit along with a security
deposit during a move-out. Typically, you will
only need to refund a pet deposit by itself if a
household loses a pet.
Partial Security Deposit Refund Button
When you click the Partial Security Deposit Refund
button, the Partial Security Deposit Transfer/Refund sub-screen opens. For more information on
this sub-screen, see the following pages.
Move Out Security Deposit Transfer/Refund
When you click the Move Out Security Deposit
Transfer/Refund button, the Security Deposit Interest dialog box opens. The program calculates the
amount of interest, if any, that the tenant’s security
deposit has accrued, using information from the
Projects tab of the Setup screen. Enter any changes to this amount and click OK. The dialog box
closes and the Security Deposit Transfer/Refund
sub-screen opens. For more information on this
sub-screen, see its section later in this chapter.
WinTen Tenant Accounts Receivable • 11/14/2003 Edition • Tenant Actions • Page 4.14
Deposit/Repay Tab Data Fields
Security/Pet Deposit and Home Ownership Data
Fields
The security deposit and pet deposit data fields on
the Deposit/Repay Tab are arranged in a table. Security deposit, pet deposit, and balance values are
shown in separate columns. Each row of data has
the same meanings across all three columns.
If the tenant is a home ownership participant, two
additional columns are available on the right side of
the screen. These contain the data for the tenant’s
escrow accounts for down payment and home purchase.
Previous Balance
This is the amount that the tenant has paid as a
deposit or put into escrow.
Payments
This is the payment that the tenant has made this
month.
Interest
These fields are reserved for future enhancements
to Tenant Accounts Receivable. They currently
have no effect.
Transferred
This is the amount that your agency has refunded
to the tenant or applied toward to any move out
charges.
Ending Balance
This is the sum of the Previous Balance and Payments fields, minus the Transferred field.
Standard Deposit
This is the normal amount of the deposit that the
tenant would owe if no extenuating circumstances
applied.
Amount Owed
This is the difference between the Amount Paid to
Date and Standard Deposit fields.
Net Rent
This is the tenant’s net rent.
WinTen Tenant Accounts Receivable • 11/14/2003 Edition • Tenant Actions • Page 4.15
Promissory Note Repayment Agreement Data
Fields
If the tenant has an outstanding promissory note,
the following fields are visible. To edit the tenant’s
promissory note data, click the Promissory Note
button on the Charges tab.
Start Date
This is the date on which the tenant’s promissory
note was created.
Remaining Balance
This is the tenant’s remaining balance to pay
against the promissory note.
Monthly Payment
This is the tenant’s monthly payment toward the
promissory note.
Current Balance
This is the tenant’s current balance due on the
promissory note.
Rem Bal + Cur Bal
This is the sum of the tenant’s remaining balance
and current balance.
Retroactive Rent Agreement Data Fields
If the tenant has an outstanding retroactive rent
agreement, the following fields are visible. To edit
the tenant’s retro rent data, click the Retro Rent
Repayment Agreement button on the Charges tab.
Start Date
This is the date on which the tenant’s retroactive
rent agreement was created.
Remaining Balance
This is the tenant’s remaining balance to pay
against the retro rent agreement.
Monthly Payment
This is the tenant’s monthly payment toward the
retro rent agreement.
Current Balance
This is the tenant’s current balance due on the retro
rent agreement.
Rem Bal + Cur Bal
This is the sum of the tenant’s remaining balance
and current balance.
WinTen Tenant Accounts Receivable • 11/14/2003 Edition • Tenant Actions • Page 4.16
Pet Deposit Transfer/Refund Sub-Screen
The Pet Deposit Transfer/Refund sub-screen displays a table of all outstanding charges which the
tenant owes your agency. This sub-screen enables you to apply the tenant’s pet deposit toward
those charges or to refund it to the tenant, using the
toolbar buttons.
WinTen Tenant Accounts Receivable • 11/14/2003 Edition • Tenant Actions • Page 4.17
Pet Deposit Transfer/Refund Sub-Screen
Controls
Refund Pet Deposit Without Applying to the
Tenant’s Account Button
If you want to refund the pet deposit to the tenant
without applying it to any outstanding charges the
tenant has, click this button. The Pet Deposit Transfer Amount dialog box opens. Enter the amount
that you want to refund, up to the full amount of the
deposit, and click OK. The Pet Deposit Transfer
Amount dialog box closes and a dialog box opens
that reminds you to issue the refund.
Hint: Why would I issue a partial pet deposit refund?
Mrs. Witherspoon has two cats, Fluffy and Cookie. Fluffy
tragically passes away. Mrs. Witherspoon now has one cat
remaining, so she doesn’t need to have a two-cat deposit.
Thus, you should refund her the difference between a twocat deposit and a one-cat deposit.
Apply Deposit to Tenant’s Account Button
If you want to apply part of all of the tenant’s pet
deposit to his outstanding charges, click this button. The Pet Deposit Transfer Amount dialog box
opens. Enter the amount that you want to refund
to the tenant and click OK. The dialog box closes
and the Pet Deposit Transfer/Refund sub-screen
enters edit mode. In the Current Payment column,
enter the remaining amount of the pet deposit to
apply to each outstanding charge. Click the Save
button to save these changes or the Cancel button
to cancel them. The Pet Deposit Transfer/Refund
sub-screen closes and the program returns to
the Deposit/Repay Tab of the Tenant Edit/Review
screen.
WinTen Tenant Accounts Receivable • 11/14/2003 Edition • Tenant Actions • Page 4.18
Partial Security Deposit Transfer/Refund SubScreen
The Partial Security Deposit Transfer/Refund subscreen displays a table of all outstanding charges
which the tenant owes your agency. This subscreen enables you to apply part of the tenant’s
security deposit toward those charges or to refund
it to the tenant, using the toolbar buttons.
WinTen Tenant Accounts Receivable • 11/14/2003 Edition • Tenant Actions • Page 4.19
Partial Security Deposit Transfer/Refund
Sub-Screen Controls
Refund Deposit Without Applying to the Tenant’s Account Button
If you want to refund the security deposit to the tenant without applying it to any outstanding charges
the tenant has, click this button. The Security
Deposit Transfer Amount dialog box opens. Enter
the amount that you want to refund, up to the full
amount of the deposit, and click OK. The Security
Deposit Transfer Amount dialog box closes and
a dialog box opens that reminds you to issue the
refund.
Apply Deposit to Tenant’s Account Button
If you want to apply part of all of the tenant’s security deposit to his outstanding charges, click this
button. The Security Deposit Transfer Amount dialog box opens. Enter the amount that you want to
refund to the tenant and click OK. The dialog box
closes and the Security Deposit Transfer/Refund
sub-screen enters edit mode. In the Current Payment column, enter the remaining amount of the security deposit to apply to each outstanding charge.
Click the Save button to save these changes or the
Cancel button to cancel them. The Security Deposit Transfer/Refund sub-screen closes and the
program returns to the Deposit/Repay Tab of the
Tenant Edit/Review screen.
WinTen Tenant Accounts Receivable • 11/14/2003 Edition • Tenant Actions • Page 4.20
Security Deposit Transfer/Refund Sub-Screen
The Security Deposit Transfer/Refund sub-screen
displays a table of all outstanding charges which
the tenant owes your agency. This sub-screen
enables you to apply the tenant’s security deposit
toward those charges or to refund it to the tenant.
WinTen Tenant Accounts Receivable • 11/14/2003 Edition • Tenant Actions • Page 4.21
Applying and Refunding a Security
Deposit
To apply a tenant’s security deposit toward any outstanding charges and refund the remainder, click
the Edit button. In the Current Payment column,
enter the amount of the security deposit to apply
against each given charge. When you are done,
click the Save button.
Hint: What if I want to refund the whole deposit?
If you don’t want to apply any of the security deposit against
the tenant’s charges (or if the tenant doesn’t have any outstanding charges at all), click the Edit button, then click the
Save button without making any changes.
The Mailing Address dialog box opens. Enter the
address to which to mail the refund check and click
OK.
The Mailing Address dialog box closes and a dialog
box opens to remind you to issue the refund. Click
OK.
The reminder dialog box closes and a confirmation
dialog box opens that asks you if you want the program to create a record in the Accounts Payable
program.
If you click Yes, a print preview screen opens with
the tenant’s final Move Out statement. Print this
statement, then click the Close button to close the
print preview screen and return to the Deposit/
Repay Tab.
Hint: Why would I not want to create a Payables
record?
In most instances, you will want to create a record in Payables. This is actually two records: a vendor record (a record of the tenant to whom you’re paying the refund) and an
invoice record (a record of the refund payment). There are
two circumstances under which you should click “No” when
the program asks if you want to create a Payables record:
1. You have already issued the refund through Payables.
2. Your agency is holding the tenant’s deposit or absorbing
it into its own accounts. This generally occurs if a tenant
moves out without providing you with notice.
WinTen Tenant Accounts Receivable • 11/14/2003 Edition • Tenant Actions • Page 4.22
Charges Tab
The Charges tab contains the tenant’s complete
charge information. It contains several functions
that allow you to edit the tenant’s account.
NOTE: Tenant Accounts Receivable is an automated system that adjusts each tenant’s
account during monthly initialization. Under
most circumstances, you should not need to
edit previous or last month’s balances. If such
a balance is incorrect, edit the current charges
to adjust the balance accordingly.
Hint: Where’s the rest of it?
The Charges tab is laid out in a spreadsheet (table) format
that is wider than the screen. A horizontal scroll bar is located on the bottom of this tab. Use this scroll bar to move
left and right to view all of this tab’s data.
WinTen Tenant Accounts Receivable • 11/14/2003 Edition • Tenant Actions • Page 4.23
Charges Tab Controls
Edit Last Month’s Previous Balance Button
When you click this button, the Last Month’s Previous Balance (Last MO/PB) column becomes editable. Make your changes and save or cancel them
with the standard WinTen controls. If you save
changes, Receivables recalculates this entire tab’s
data.
Edit Previous Charges Button
When you click this button, the Previous Balance
(Prev Bal) column becomes editable. Make your
changes and save or cancel them with the standard WinTen controls. If you save changes, Receivables recalculates this entire tab’s data.
CAUTION
You should not use the Edit Last Month’s Previous Balance
or Edit Previous Charges functions after your agency’s
first month of using Tenant Accounts Receivable. If you
edit either of these items, your changes will not transfer
to the General Ledger, because Receivables has already
reported the previous month’s data to the ledger and closed
out the Receivables Journal for that month. Such changes
will result in the General Ledger being out of balance.
If you need to edit a previous balance or previous charges,
make a manual journal entry in the General Ledger module
as soon as you make the changes in Receivables. For
more information on manual journal entries, see the Enter Manual Transactions chapter of the General Ledger
manual.
Edit Current Charges Button
When you click this button, the Charges column
becomes editable. Make your changes and save
or cancel them with the standard WinTen controls.
If you save changes, Receivables records a transaction for the tenant and then recalculates this
entire tab’s data.
Edit Future Charges Button
When you click this button, the screen scrolls right
to display the Future Charges (Future Chgs) column and its associated data. The future charges
and repeating charges data becomes editable.
Make your changes and save or cancel them with
the standard WinTen controls. If you save changes, Receivables recalculates this entire tab’s data.
Hint: How do I set up a repeating charge?
Click the Edit Future Charges button. Select one of the five
user-defined charges in the bottom five rows of the table.
Check the Repeating check box. Enter the starting and
ending months for this repeating charge (to have a yearround repeating charge, enter “1” and “12”) and the amount
of the charge.
WinTen Tenant Accounts Receivable • 11/14/2003 Edition • Tenant Actions • Page 4.24
Edit Promissory Note/Retro Rent Fields Button
When you click this button, if the tenant has a
promissory note and/or a retro rent repayment
agreement, the charge fields for the current month
become editable. Make your changes and save or
cancel them with the standard WinTen controls. If
you save changes, Receivables recalculates this
entire tab’s data.
Promissory Note (Payment Agreement) Button
and Retro Rent Repayment Agreement Button
When you click either of these buttons, the Promissory Note/Retro Rent Agreement Menu dialog box
opens. This dialog box enables you to create, edit,
or delete a promissory note or retro rent repayment agreement, depending on which button you
clicked.
Promissory Notes and Retro Rent
Agreements
Promissory notes and retroactive rent repayment
(retro rent) agreements are both legally binding
contracts wherein a tenant agrees on a payment
schedule for settling a debt which is too large for
him to pay in one lump sum.
A retro rent agreement deals with retroactive
rent changes. These typically occur when a tenant doesn’t notify your agency of a change in his
income status until several months after the fact.
His new income causes an increase in his monthly
rent payment, but this change applies retroactively
for every month since his income went up. Thus,
he suddenly has several months of partially unpaid
rent. If this total is too much for him to pay in one
payment, he can enter into a retro rent agreement
with your agency and pay back a given amount
each month.
Hint: How do I tell if I need a retro rent agreement?
First, determine the amount the tenant owes your agency.
If this amount is within reason for immediate payment,
don’t bother with a retro rent agreement - just add it as a
current charge. However, if you can’t reasonably demand
that the tenant pay immediately, you will need a retro rent
agreement. Your agency should determine its own policies
regarding reasonable payment amounts.
A promissory note deals with similar situations for
anything except retroactive rent changes. Maintenance fees for major repairs and getting behind on
regular rent payments are the two most common
causes of large tenant debts.
CAUTION
Promissory notes and retroactive rent agreements are
legally binding contracts. Only use these functions if your
agency and the tenant agree to a payment contract in writing.
WinTen Tenant Accounts Receivable • 11/14/2003 Edition • Tenant Actions • Page 4.25
Promissory Note/Retro Rent Agreement Menu
Dialog Box
This dialog box contains six options for managing promissory notes and retro rent agreements.
Depending on whether you clicked the Promissory
Note (Payment Agreement) button or the Retro
Rent Repayment Agreement button, these functions affect the tenant’s promissory note data or his
retro rent agreement data.
Create Agreement
The Create button starts the Promissory Note
Creation Wizard or the Retroactive Rent Agreement Creation Wizard, depending on which button
you clicked on the Charges tab. If you clicked the
Promissory Note (Payment Agreement) button,
the Promissory Note Creation Wizard starts. If
you clicked the Retro Rent Repayment Agreement
button, the Retroactive Rent Agreement Creation
Wizard starts. The wizard guides you through the
steps of creating the new repayment agreement.
For more details on these wizards, see the Task
Wizards chapter of this manual.
Transfer Existing Balance to Agreement
The Transfer button starts the Promissory Note
Transfer Wizard or the Retroactive Rent Agreement Transfer Wizard, depending on which button
you clicked on the Charges tab. If you clicked the
Promissory Note (Payment Agreement) button,
the Promissory Note Transfer Wizard starts. If
you clicked the Retro Rent Repayment Agreement
button, the Retroactive Rent Agreement Transfer
Wizard starts. The wizard guides you through the
steps of transferring the tenant’s existing balances
to the new repayment agreement.
For more details on these wizards, see the Task
Wizards chapter of this manual.
Edit Monthly Charge on Agreement
The Edit button starts the Edit Monthly Agreement
Charge wizard. This wizard guides you through
the process of editing the tenant’s monthly payment amount.
For more details on this wizard, see the Task Wizards chapter of this manual.
WinTen Tenant Accounts Receivable • 11/14/2003 Edition • Tenant Actions • Page 4.26
Remove Agreement
The Remove button starts the Agreement Removal
wizard. This wizard guides you through the process of deleting a repayment agreement.
For more details on this wizard, see the Task Wizards chapter of this manual.
NOTE: If you delete a promissory note or retro
rent agreement that you created using the Create button, the program deletes the agreement.
If you delete a promissory note or retro rent
agreement that you created using the Transfer button, the program returns the charges in
question to the tenant’s account.
Bring In Agreement to Current Charges
The Current button deletes an existing promissory
note or retro rent agreement and moves its remaining balance to the tenant’s current promissory
note or retro rent agreement charges. When you
click this button, a confirmation dialog box opens
that asks if you’re certain you want to transfer the
agreement’s full outstanding balance to current
charges. Click Yes to confirm the transfer or No to
cancel it. The dialog box closes and the program
returns to the Charges tab.
Print Repayment Agreement
The Print button opens the standard WinTen printer
control dialog box, which enables you to print a
copy of the repayment agreement (Form HUD56146).
WinTen Tenant Accounts Receivable • 11/14/2003 Edition • Tenant Actions • Page 4.27
Utilities Tab
The Utilities tab contains the data on the selected
tenant’s utility consumption and charges. It has
two sub-tabs: Main Utilities and Supplemental Meter Readings. The Utilities tab always opens on the
Main Utilities sub-tab, as shown below.
Hint: Editing the Utilities Tab
Under most circumstances, you do not need to edit the
data on this tab. Receivables automatically fills in the data
fields during monthly initialization, using data entered on
the Charges screen (for more information, see the Charges
chapter of this manual).
WinTen Tenant Accounts Receivable • 11/14/2003 Edition • Tenant Actions • Page 4.28
Main Utilities Sub-Tab
The Main Utilities sub-tab contains data on the
tenant’s utility charges for electricity, gas, and water. The left side of the tab contains the tenant’s
current charges (those for last month’s meter readings, which are due in the current billing period).
The right side contains the tenant’s future charges
(those for this month’s meter readings, which are
due in the next billing period). Use the standard
WinTen controls to edit the data on this sub-tab and
save or cancel your changes.
Main Utilities Sub-Tab Controls
Edit Meter Read Dates Button
When you click this button, the Old Meter Read
Date and Meter Read Date fields become editable.
Make your changes to these dates and click the
Save button to save your changes or the Cancel
button to cancel them.
Recalculate Allowances and Charges Button
Click this button to recalculate the tenant’s Due in
30 Days utility data.
Main Utilities Sub-Tab Data Fields
Unit Size
This is the number of bedrooms that the tenant’s
unit has. Receivables draws this data from the
Master Unit database.
Read Order
This is the unit’s read order assignment, if it has
one. Receivables draws this data from the Master
Unit database.
Family Size
This is the number of members in the tenant’s family. Receivables draws this data from the Tenant
Data tab.
Utility Code
These three fields are the codes for the utility allowance tables assigned to this unit for gas (G:),
electricity (E:), and water (W:).
Old Meter Read Date
This is the meter reading date for the readings
whose charges are due in the current billing period
(Due Now).
Meter Read Date
This is the meter reading date for the readings
whose charges are due in the next billing period
(Due in 30).
WinTen Tenant Accounts Receivable • 11/14/2003 Edition • Tenant Actions • Page 4.29
New Readings
This is the meter reading for the utility in question
for the corresponding reading date.
Old Readings
This is the meter reading for the utility in question
for the previous read date.
Amount Used
This is the number of units of the utility that the tenant used during the reading period (Old Readings
minus New Readings).
Allowance
This is the tenant’s utility allowance for the utility in
question, based on the allowance table assigned
to this unit.
Excess
This is the number of units of the utility that the tenant used in excess of his utility allowance (Amount
Used minus Allowance).
Charge for Excess
This is the dollar amount that the tenant owes for
the billing period in question. This is dependent on
the rate set for this utility on the Rate Tables tab of
the Utilities tab of the Setup screen.
Comments
This is an 80-character text field for brief comments
about this tenant’s utilities (e.g. “meter behind
bush,” “beware of dog”).
WinTen Tenant Accounts Receivable • 11/14/2003 Edition • Tenant Actions • Page 4.30
Supplemental Meter Readings Sub-Tab
The Supplemental Meter Readings sub-tab contains the data for supplemental meter readings.
Supplemental meter readings are those which
your agency performs when a tenant moves out,
moves in, or transfers between units, or when a
utility company replaces a meter in the middle of
a billing period. Use the standard WinTen controls
to edit the data on this sub-tab and save or cancel
your changes.
The Supplemental Meter Readings tab is the same
as the Main Utilities tab, with the addition of one
data field. The Due In ___ Days data field enables
you to specify when the utility usage recorded on
this tab is due. Enter “00” if it is due in the current
billing period or “30” if it is due in the next billing
period.
WinTen Tenant Accounts Receivable • 11/14/2003 Edition • Tenant Actions • Page 4.31
Details Tab
The Details tab contains a complete record of all
transactions involving this tenant. Tenant Accounts
Receivable records every change in a tenant’s financial data in a perpetual record. The top portion
of this tab displays a table of these transactions:
click the Display Mode button (see right) to switch
between all transactions and the current month’s
transactions. The table lists these transactions
in chronological order, including date, description,
and charges. The bottom portion of the tab contains the details on the currently selected transaction.
You cannot edit the data on the Details tab.
Details Tab Print Options
When you click the Print or Print Preview button on
the Details tab, the program prompts you to enter
a range of dates and to select a summary report
or a detail report. The program then produces the
Receivables Details Report for the current tenant.
This report displays all transactions recorded for
the tenant within the selected date range. A summary report displays the data on the top half of this
tab, while a detail report displays the data on the
bottom half of the tab.
WinTen Tenant Accounts Receivable • 11/14/2003 Edition • Tenant Actions • Page 4.32
Work Orders Tab
The Work Orders tab contains records on all work
orders that your agency performed on this tenant’s
unit over the past two months. Each work order
record includes a summary of the work performed
and the charges which the tenant incurred for the
work. The bottom area of the tab contains a table
of all work orders performed for this tenant in the
last two months. The top area of the tab contains
detailed information on the currently selected work
order. Use the standard WinTen controls to edit
the data on this sub-tab and save or cancel your
changes.
NOTE: If your agency uses the WinTen WorkOrder program, Receivables will automatically
import work order data from that program. If
your agency does not use WorkOrder, this tab
will not automatically contain work order data.
You will need to add each work order’s record
manually.
WinTen Tenant Accounts Receivable • 11/14/2003 Edition • Tenant Actions • Page 4.33
Adding a Work Order
When you click the Add button, the tab changes to
display a single data field and two buttons. Enter
a unique identifying number for the work order you
are adding and click OK. The tab returns to its
usual appearance and you can edit the data for this
work order as you normally would.
Work Orders Tab Controls
Post to Future Charges Button
The Post to Future Charges button enables you to
post the work order to future charges (apply it to the
tenant’s charges for the next billing period).
When you click this button, the Work Order Dates
dialog box opens. Enter the due date for this
charge and click OK. The dialog box closes and
the program returns to the Work Orders tab.
UnPost Button
The UnPost button enables you to unpost the work
order.
When you click this button, a confirmation dialog
box appears that asks you if you are certain you
want to unpost the work order.
If you click Yes, a dialog box appears that informs
you that you must re-bill and re-post the work order.
Click OK. The program removes the work order’s
charges from the tenant’s future charges. The dialog box closes and the program returns to the Work
Orders tab.
WinTen Tenant Accounts Receivable • 11/14/2003 Edition • Tenant Actions • Page 4.34
Work Orders Tab Data Fields
Work Order #
This is the number of the work order. You cannot
edit this field.
Unit #
This is the number of the unit on which your agency
performed the work. This is the same as the tenant’s unit number unless the tenant has just transferred to a new unit. You cannot edit this field.
Start Date
This is the date on which your agency began the
work order.
Date Complete
This is the date on which your agency completed
the work order.
Due Date
This is the date on which the tenant’s charges for
the work order are due. The program automatically fills in this field when you post the work order
charges to the tenant’s account.
Tenant Charge
This is the charge that the tenant has incurred for
this work order.
NOTE: If a work order has no tenant charges,
Receivables will delete that work order record.
Billed
If your agency has billed the tenant for this work
order (printed work order bills or future all-in-one
bills), check this box.
Posted
If you have posted the charges for this work order
to the tenant account, a check appears in this box.
You cannot edit this data field.
Work Done
This is a four-line, 40-character-per-line description
of the work done for this work order.
WinTen Tenant Accounts Receivable • 11/14/2003 Edition • Tenant Actions • Page 4.35
Inspections Tab
If your agency uses the Tenmast DOS-based Inspections programs, the Inspections tab displays
inspections information for this unit. If your agency
does not use these programs, this tab is not available.
WinTen Tenant Accounts Receivable • 11/14/2003 Edition • Tenant Actions • Page 4.36
Moving a Tenant Out
To begin the move out process, click the Move Out
button on the Tenant Data tab.
When you click the Move Out button, the program
inserts a “Z” in front of the tenant’s unit number.
This serves as an identifier that tells the program
that the tenant is no longer living in that unit (and
your agency can move someone else into the unit)
but the tenant’s account needs to remain open.
Once the program has changed the tenant’s unit
number, the Move Out Information dialog box
opens. Select the unit’s condition from the dropdown selection box, enter the move out date and
the date on which the tenant’s lease terminates,
and click OK.
If the tenant’s unit has any active utilities, the Input
Meter Readings for Move Out/Transfer dialog box
opens. Enter the final meter readings for the unit.
This enables Receivables to calculate the tenant’s
final utility charges. Click OK to continue.
When you click OK, Receivables makes all database changes necessary to record the move out.
These include:
• marking the unit as vacant in the Master Unit database
• creating the first PHAS event for unit vacancy
• applying prorated rent and utility charges to the
tenant’s account
• creating an eTrans record for 50058 submission
to record the move out
When Receivables has recorded all move out-related database changes, a standard WinTen print
control dialog box opens. This enables you to print
the move out statement (and utility move out statement, if the unit has active utilities).
CAUTION
Do not cancel out of the print control dialog box without
printing the move out statement. This is the only opportunity you have to print it.
WinTen Tenant Accounts Receivable • 11/14/2003 Edition • Tenant Actions • Page 4.37
Transferring a Tenant
To begin the transfer process, click the Transfer
Tenant button on the Tenant Data tab. The Move
Out Information dialog box opens. Select the condition of the unit from which the tenant is moving
out from the drop-down selection box, enter the
transfer date, and click OK.
When you click OK, the Pick a Vacant Unit dialog
box opens. Select the unit into which the tenant is
transferring and click OK.
A dialog box opens that asks you to confirm the unit
into which the tenant is transferring. Click Yes to
continue or No to select another unit.
When you click Yes, the Tenant Move In sub-screen
opens. Enter the move-in date and click OK.
WinTen Tenant Accounts Receivable • 11/14/2003 Edition • Tenant Actions • Page 4.38
A dialog box opens that asks if you want to update
the tenant’s mailing address with his new unit address. If the tenant will receive mail at his new unit,
click Yes. If the tenant will receive mail elsewhere
(a PO box, for example), click No.
A dialog box opens that asks if you want to prorate
the current rent charge. Click the appropriate button.
If the tenant’s new unit has any active utilities, the
Input Meter Readings for Move Out/Transfer dialog
box opens. Enter the current meter readings for
the new unit and click OK.
If the tenant’s old unit has any active utilities, the
Input Meter Readings for Move Out/Transfer dialog
box opens. Enter the final meter readings for the
old unit and click OK.
When you click OK, Receivables makes all database changes necessary to record the move out.
These include:
• marking the old unit as vacant in the Master Unit
database
• creating the first PHAS event for the old unit’s
vacancy
• applying prorated rent and utility charges to the
tenant’s account
• creating an eTrans record for 50058 submission
to record the transfer
• moving the tenant into the new unit
• marking the new unit as occupied
• closing out the PHAS vacancy event for the new
unit
When Receivables has recorded all move out-related database changes, a standard WinTen print
control dialog box opens. This enables you to print
the move out statement (and utility move out statement, if the unit has active utilities).
CAUTION
Do not cancel out of the print control dialog box without
printing the move out statement. This is the only opportunity you have to print it.
WinTen Tenant Accounts Receivable • 11/14/2003 Edition • Tenant Actions • Page 4.39
HISTORY EDIT/REVIEW SCREEN
The History Edit/Review screen contains all of Tenant Accounts Receivables’ data for one tenant in
the historical database. This data is spread among
four tabs: Tenant Data, Deposit/Repay, Charges,
and Details. This screen always opens on the Tenant Data tab, as shown below.
All of the elements of the History Edit/Review
screen are identical to those of the corresponding
elements of the Tenant Edit/Review screen, with
the following exception:
Tenant Data Tab Controls
Move Tenant to Charge Off Database Button
This button enables you to move the tenant from
the history database to the charge off database.
When you click this button, the Charge Off Date
dialog box opens. Enter the charge off date for the
tenant (the date on which your agency wrote off all
of the tenant’s outstanding charges as uncollectable) and click OK.
WinTen Tenant Accounts Receivable • 11/14/2003 Edition • Tenant Actions • Page 4.40
CHARGE OFF EDIT/REVIEW SCREEN
The Charge Off Edit/Review screen contains all of
Tenant Accounts Receivables’ data for one tenant
in the charged off database. This data is spread
among four tabs: Main Info, Deposit/Repay, Charges, and Details. This screen always opens on the
Main Info tab, as shown below.
All of the elements of the Charge Off Edit/Review
screen are identical to those of the corresponding
elements of the Tenant Edit/Review screen.
WinTen Tenant Accounts Receivable • 11/14/2003 Edition • Tenant Actions • Page 4.41
Browse Inspections Sub-Screen
When you click the Show Inspections button on the
Tenant Data tab of the Tenant Edit/Review screen,
the Browse Inspections sub-screen opens. This
sub-screen contains a table of all inspections that
have been performed on the selected tenant’s unit.
To view the detailed record of one, select it and
click the View button. This opens the Inspection
Detail sub-screen.
WinTen Tenant Accounts Receivable • 11/14/2003 Edition • Tenant Actions • Page 4.42
Inspection Detail Sub-Screen
The Inspection Detail sub-screen contains the detailed records of one selected inspection. This subscreen is divided into four tabs: Unit Info, Inspect,
Deficiencies, and Notes. It always opens on the
Unit Info tab, as shown below.
You cannot edit the data on the Inspection Detail
sub-screen. To edit an inspection’s record, use the
Public Housing Inspections program.
Unit Info Tab
The Unit Info tab contains identifying information
on the tenant, his unit, and the selected inspection
record.
WinTen Tenant Accounts Receivable • 11/14/2003 Edition • Tenant Actions • Page 4.43
General Tab Data Fields
Inspector
This is the name of the inspector who performed
this inspection.
Insp. Protocol
This is the inspection protocol used for the inspection.
Tenant
This is the name of the tenant.
Unit
This is the tenant’s unit number.
Property
These fields are the address of the tenant’s unit.
Phone Number
This is the tenant’s phone number.
Last Inspection
This is the date of the last previous inspection performed on this unit.
Status
This is the inspection’s status: OD (Observed Deficiencies) or NOD (No Observed Deficiencies).
Requested
This is the date on which the inspection was requested.
Scheduled Date
This is the date on which the inspection was scheduled.
Inspection Date
This is the date on which the inspection was actually performed.
Followup Date
This is the date on which a followup visit or inspection was scheduled, if applicable.
WinTen Tenant Accounts Receivable • 11/14/2003 Edition • Tenant Actions • Page 4.44
Inspect Tab
The Inspect tab contains the detailed information on all inspectable items in the unit, based on
the protocol used for the inspection. To view the
detailed records for a single area or room, select
that area and click the View button. This opens
the Inspection Items sub-screen, described on the
facing page.
WinTen Tenant Accounts Receivable • 11/14/2003 Edition • Tenant Actions • Page 4.45
Inspection Items Sub-Screen
The Inspection Items sub-screen contains the detailed inspection items for one selected area.
The inspection items are presented in a “tree” list
format. To expand (open) one branch of the tree,
click on the [+] symbol next to its item name. To
collapse (close) an expanded branch of the tree,
click on the [-] symbol. Use the Collapse and Expand buttons to expand or collapse all branches at
once.
WinTen Tenant Accounts Receivable • 11/14/2003 Edition • Tenant Actions • Page 4.46
Deficiencies Tab
The Deficiencies tab contains the detailed information on any deficiencies that were found during
the inspection and the dates on which they were
recorded as having been corrected.
WinTen Tenant Accounts Receivable • 11/14/2003 Edition • Tenant Actions • Page 4.47
Notes Tab
The Notes tab contains a table of all note entries
that the inspector made on the inspection. To view
one, select it in the table and click the View button.
This opens the View Inspection Notes subscreen,
which contains the text of the selected note.
WinTen Tenant Accounts Receivable • 11/14/2003 Edition • Tenant Actions • Page 4.48
CHARGES, UTILITIES, AND CALCULATIONS
At its heart, the Tenant Accounts Receivable program handles two basic aspects of tenant data
management: how much tenants owe your agency
and how they settle those debts. The Charges
screen deals with the first of these. It enables you
to manage and record the various types of charges
that tenants can incur (with the exception of rent,
which the program accrues during monthly initialization). To enter the Charges screen, click the
Charges button or press <C> at the Main Menu.
WinTen Tenant Accounts Receivable • 11/14/2003 Edition • Charges, Utilities, and Calculations • Page 5.1
CHARGES SCREEN
The Charges screen is the central point from which
you can record tenant charges in batches. It has
six tabs: Late Charges, Repeating Charges, Meter
Readings, Utility Recalculations, Handheld Schedules, and Bring Work Orders Current. Some of
these tabs may not be available, depending on the
options that you have set on the Setup screen. The
Charges screen always opens on the Late Charges
tab, as shown below.
Late Charges Tab
The Late Charges tab enables you to use a single
function to apply late charges to the account of every tenant who is delinquent in payments.
Hint: Daily Late Charges
If your agency uses daily late charges (as set up on the
Late Charge Rate tab of the Setup screen), you must use
this function every business day.
WinTen Tenant Accounts Receivable • 11/14/2003 Edition • Charges, Utilities, and Calculations • Page 5.2
Applying Late Charges
To apply late charges, enter the effective date for
the late charges in the data field and click the Apply
Late Charges button.
A dialog box appears that asks you to confirm your
intent to apply late charges. Click Yes to continue
or No to cancel the process.
If you click Yes, a dialog box appears that informs
you that the program is now applying late charges
to tenant accounts. Click OK to continue.
When you click OK, the upper portion of the Late
Charges tab changes to display a running progress
report on late charge application, showing each
tenant’s name as the program updates his account.
When the program is finished, a dialog box opens
that informs you that the process is complete. Click
OK to close all associated dialog boxes and return
to the Late Charges tab.
WinTen Tenant Accounts Receivable • 11/14/2003 Edition • Charges, Utilities, and Calculations • Page 5.3
Repeating Charges Tab
The Repeating Charges tab enables you to set
up a repeating charge for any of the program’s
five miscellaneous tenant charges (defined on the
Default Settings tab of the Setup screen). A repeating charge is a charge that your agency assesses
against each tenant’s account every month.
CAUTION
Repeating charges that you set from this tab apply to every
tenant in the selected project. To set or remove a repeating
charge for an individual tenant, edit that tenant’s record on
the Charges tab of the Tenant Edit/Review screen (see the
Tenant Actions chapter for more details).
WinTen Tenant Accounts Receivable • 11/14/2003 Edition • Charges, Utilities, and Calculations • Page 5.4
Setting a Repeating Charge
To set a repeating charge, select the charge to repeat using the set of five radio buttons. Enter the
dollar amount of the charge, the starting and ending months for the period during which the charge
will apply, and the project to whose residents the
charge will apply in the appropriate fields. Then
click the Apply Repeating Charges button.
Hint: Year-Round Repeating Charges
The best way to set a year-round repeating charge is to
set the starting and ending month to the same month. You
can also set the starting month to January and the ending
month to December, but Receivables will give you a harmless, yet annoying, error message during December-January initialization if you do this.
A dialog box appears that asks you to confirm your
intent to apply a repeating charge. Click Yes to
continue or No to cancel the process.
If you click Yes and Receivables is currently operating in a month to which this repeating charge applies, a dialog box opens that asks you if you want
to apply this charge to the current month’s tenant
charges. Click the button that corresponds to the
appropriate option.
If you click Yes, the upper portion of the Repeating
Charges tab changes to display a running progress
report on late charge application, showing each
tenant’s name as the program updates his account.
When the program is finished, a dialog box opens
that informs you that the process is complete. Click
OK to close all associated dialog boxes and return
to the Repeating Charges tab.
WinTen Tenant Accounts Receivable • 11/14/2003 Edition • Charges, Utilities, and Calculations • Page 5.5
Meter Readings Tab
The Meter Readings tab enables you to enter meter readings from tenant units. The program uses
these readings and its utility settings to determine
tenant utility charges.
NOTE: The Meter Readings tab is only available
if Receivables is set up to record tenant usage
of one or more utilities (on the Utilities tab of
the Setup screen).
WinTen Tenant Accounts Receivable • 11/14/2003 Edition • Charges, Utilities, and Calculations • Page 5.6
Entering Meter Readings
To enter a meter reading, check the appropriate
check boxes (Electric, Gas, and/or Water) for the
utilities whose readings you want to enter. Enter
the date of the reading in the data field. Select the
appropriate unit from the table of units at the bottom of the tab.
If your agency uses the Tenmast Handheld Meter
Readings program, click the Handheld Meter Reading Input button. The program automatically posts
the data from the handheld unit to each tenant’s
account. For more information, see the Tenmast
Handheld Meter Readings manual.
If your agency does not use the Tenmast Handheld
Meter Readings program, click the Manual Meter
Reading Input button to begin the data entry process. This opens the Input Meter Readings Manually sub-screen. This sub-screen’s appearance
varies, depending on whether the unit you selected
is occupied or vacant.
WinTen Tenant Accounts Receivable • 11/14/2003 Edition • Charges, Utilities, and Calculations • Page 5.7
Manual Readings for an Occupied Unit
If you selected manual meter reading input for an
occupied unit, the Input Meter Readings Manually sub-screen opens, appearing as shown below.
Use the standard WinTen controls to edit the data
on this sub-screen and save or cancel your changes. When you are done entering meter readings,
click the Exit button to return to the Meter Readings
tab.
Input Meter Readings Manually Sub-Screen
Data Fields
Old Meter Read Date
This is the date of the last meter reading.
Meter Read Date
This is the date of the meter reading whose results
you are now recording.
New Readings
This is the meter reading for the utility in question
for the current reading date.
Old Readings
This is the meter reading for the utility in question
for the last read date.
Comments
This is a short (60-character) field for recording
comments on the reading.
WinTen Tenant Accounts Receivable • 11/14/2003 Edition • Charges, Utilities, and Calculations • Page 5.8
Manual Readings for a Vacant Unit
If you selected manual meter reading input for a vacant unit, the Input Meter Readings Manually subscreen opens, appearing as shown below. Use
the standard WinTen controls to edit the data on
this sub-screen and save or cancel your changes.
When you are done entering meter readings, click
the Exit button to return to the Meter Readings
tab.
Input Meter Readings Manually Sub-Screen
Data Fields
Readings
This is the meter reading for the utility in question
for the current reading date.
Old Readings
This is the meter reading for the utility in question
for the last read date.
Comments
This is a short (60-character) field for recording
comments on the reading.
WinTen Tenant Accounts Receivable • 11/14/2003 Edition • Charges, Utilities, and Calculations • Page 5.9
Utility Recalculations Tab
The Utility Recalculations tab enables you to update current tenant utility information throughout
Receivables’ databases. When you run a recalculation function, the program recalculates the
selected values for every tenant, based on current
meter readings and utility allowance tables. Normally, you should use these functions only when
you change your utility allowance tables.
Hint: Tenant Recalculation Tab?
If Receivables is not set up to record any utility usage (on
the Setup screen), this tab’s name is “Tenant Recalculation”
and its appearance is radically different. See the end of this
chapter for more information on this tab.
WinTen Tenant Accounts Receivable • 11/14/2003 Edition • Charges, Utilities, and Calculations • Page 5.10
Recalculating
To recalculate, select the radio button that corresponds to the type of recalculation you want to
perform and click the Recalculate button.
Read Future Utility Allowances from Tables
Use this option if you have changed the program’s
utility tables and need to recalculate all tenants’
accounts for their new future allowances. Receivables reads all tenants’ Due in 30 Days amounts
using the utility allowances from the next month’s
table.
Hint: Utility Allowance Tables
Remember, utility allowance tables are located on the
Allowance Tables sub-tab of the Utilities tab of the Setup
screen.
Recalculate the Tenant/Utility Database
Use this option if you suspect there are calculation errors in the current or Due in 30 tenant utility
charges. Receivables recalculates every tenant’s
utility charges using the following formulas:
Amount Used = New Readings – Old Readings
Excess = Amount Used – Allowance
Charge for Excess = Excess x Utility Rate
BOTH: Read Utilities and Recalculate
Use this option if you want to perform both recalculation functions at once. Tenmast recommends this
option. Receivables reads the allowance tables for
the future month and recalculates every tenant’s
utility charges using the formulas described
above.
When you click the Recalculate button, the middle
portion of the Utility Recalculations tab changes to
display a running progress report on recalculation,
showing each tenant’s name as the program updates his account.
When the program is finished, a dialog box opens
that informs you that the process is complete. Click
OK to close all associated dialog boxes and return
to the Utility Recalculations tab.
WinTen Tenant Accounts Receivable • 11/14/2003 Edition • Charges, Utilities, and Calculations • Page 5.11
Handheld Schedules Tab
The Handheld Schedules tab enables you to create meter reading schedules. A meter reading
schedule is a file which you can download into a
handheld computer and use to take meter readings
in a given sequence.
NOTE: The Handheld Schedules tab is only
available if Receivables is set up for use with
the Tenmast Handheld Meter Readings program (on the Utilities tab of the Setup screen).
It displays units in unit number or read order,
based on the options selected in Setup.
WinTen Tenant Accounts Receivable • 11/14/2003 Edition • Charges, Utilities, and Calculations • Page 5.12
Creating a Handheld Schedule
To create a handheld schedule, select the first and
last units that the schedule should encompass from
the Starting Point and Ending Point lists. If you
want to create a schedule for all units, check the
ALL check box in the center of the tab.
When you have selected the correct range of units,
click the Create Schedule button.
The program creates the necessary data files for
the schedule. When this process is complete, a
dialog box appears that informs you of this fact.
Click OK to close the dialog box and return to the
Handheld Schedules tab.
Once you have created the schedule, you can
transfer it to your handheld unit. For more information on this process, see the manuals for your
Tenmast Handheld Meter Readings program and
your handheld unit.
WinTen Tenant Accounts Receivable • 11/14/2003 Edition • Charges, Utilities, and Calculations • Page 5.13
Bring Work Orders Current Tab
The Bring Work Orders Current tab enables you to
post the charges for completed work orders to the
appropriate tenants’ accounts. This function only
works if your agency uses the WinTen WorkOrder
module.
Normally, Receivables and WorkOrder share the
Service1 database (for more information on Service1, see the Program Overview chapter). This
enables Receivables to post tenant work order
charges to those tenants’ accounts during monthly
initialization. This results in tenants being billed for
work order charges during the billing period after
the one in which the work order was completed.
Occasionally, you may need to bypass this process
and post work order charges to tenant accounts in
the current billing period. The Bring Work Orders
Current function does this by pulling every pending
work order charge from the Service1 database.
CAUTION
We do not recommend using this function. This posts all
existing work orders to current charges.
WinTen Tenant Accounts Receivable • 11/14/2003 Edition • Charges, Utilities, and Calculations • Page 5.14
Bringing Work Orders Current
To import all current work order charges from the
Service1 database, enter the effective date in the
data field in the middle of the tab. The program will
import all pending charges for work orders which
were completed on or before this date. Then click
the Bring Work Order Charges to Current button.
A print preview screen opens with a report on all
work orders that will be posted to current charges.
Review and print this report, then click the Close
button to continue.
The top portion of the Bring Work Orders Current
tab changes to display a running progress report
on the process, showing each tenant’s name as the
program updates his account.
When the program is finished, a dialog box opens
that informs you that the process is complete. Click
OK to close all associated dialog boxes and return
to the Bring Work Orders Current tab.
WinTen Tenant Accounts Receivable • 11/14/2003 Edition • Charges, Utilities, and Calculations • Page 5.15
Tenant Recalculation Tab
If your agency does not track meter readings for
any utilities, the Tenant Recalculation tab replaces
the Utility Recalculations tab. This tab enables you
to recalculate tenant charges. This function is primarily for use if errors are present in tenant charge
totals.
WinTen Tenant Accounts Receivable • 11/14/2003 Edition • Charges, Utilities, and Calculations • Page 5.16
Recalculating
To recalculate, click the Recalculate button.
The middle portion of the Tenant Recalculation tab
changes to display a running progress report on
recalculation, showing each tenant’s name as the
program updates his account.
When the program is finished, a dialog box opens
that informs you that the process is complete. Click
OK to close all associated dialog boxes and return
to the Tenant Recalculation tab.
WinTen Tenant Accounts Receivable • 11/14/2003 Edition • Charges, Utilities, and Calculations • Page 5.17
WinTen Tenant Accounts Receivable • 11/14/2003 Edition • Charges, Utilities, and Calculations • Page 5.18
PAYMENTS
AND CREDITS
At its heart, the Tenant Accounts Receivable program handles two basic aspects of tenant data
management: how much tenants owe your agency
and how they settle those debts. The Payments
Menu screen deals with latter of these. It enables
you to manage and record the various actions
involving payments and credits that can affect
tenants’ accounts. To enter the Payments Menu
screen, click the Payments button or press <P> at
the Main Menu.
WinTen Tenant Accounts Receivable • 11/14/2003 Edition • Payments and Credits • Page 6.1
PAYMENTS MENU SCREEN
The Payments Menu screen is the central point
from which you can manage all tenant payments,
credits, and related actions and transactions. It
has eleven menu buttons, each of which accesses
a specific function.
WinTen Tenant Accounts Receivable • 11/14/2003 Edition • Payments and Credits • Page 6.2
TAKE A PAYMENT
A payment with receipt is a tenant payment (cash,
check, or money order) of a charge for which you
will issue a receipt. Almost all tenant payments will
be of this type. To take a payment with receipt,
click the Payment w/ Receipt button.
A payment without receipt is identical to a payment
with receipt, except that the program does not a
print a receipt, nor does it ask if the receipt printed
correctly. All other procedures are exactly as described in the following section. To take a payment
without receipt, click the Payment w/o Receipt button.
When you start the payment process, if you are
taking a payment with receipt, a standard Print
dialog box opens. Set the printing options for the
receipt and click OK.
Hint: How do I void a payment without receipt?
Because a payment without receipt has no receipt number,
it doesn’t show up on the Void Receipt screen (see below).
To void it, take a payment for the negative amount of the
initial payment.
Hint: Payment Wizard
If you have enabled the Payment Wizard in Setup, the Payment with Receipt and Payment without Receipt functions
are radically different from those presented in this chapter.
Please refer to Appendix E for details on this wizard and
how to use it to process payments.
The Tenant Search screen opens (see the Tenant Actions chapter for more details on the Tenant
Search screen). Select the tenant whose payment
you are taking and click the Take a Payment button. The Payments screen opens.
WinTen Tenant Accounts Receivable • 11/14/2003 Edition • Payments and Credits • Page 6.3
PAYMENTS SCREEN
The Payments screen contains a table of the
tenant’s current charges. The toolbar buttons on
this screen allow you to take several types of payments. When you have finished taking payments,
click the Exit button to return to the Payments
Menu screen or the Search button to return to the
Tenant Search screen.
WinTen Tenant Accounts Receivable • 11/14/2003 Edition • Payments and Credits • Page 6.4
Take a Full Payment
A full payment is one payment for the total amount
of all the tenant’s charges. To take a full payment,
click the Full Payment button.
The Payment Window dialog box opens. Enter the
amount that the tenant is paying by cash, check,
and/or money order in the appropriate data field(s)
and click the Save button.
The program records the payment and prints the
receipt. Once the printer is finished, a dialog box
opens that asks if the receipt printed correctly.
Click the appropriate button.
If you click Yes, the dialog box closes and the program returns to the Payments screen.
If you click No, the program voids the transaction,
then closes the dialog box and returns to the Payments screen. You must re-enter the transaction
from the beginning.
WinTen Tenant Accounts Receivable • 11/14/2003 Edition • Payments and Credits • Page 6.5
Take a Partial Payment
A partial payment is a payment which only pays
some of the tenant’s charges. To take a partial
payment, click the Partial Payment button.
The Current Payment column of the Payments
screen becomes editable. Enter the amount of
payment that the tenant is making for each charge
in the appropriate row and click the Save button.
The Payment Window dialog box opens. Enter the
amount that the tenant is paying by cash, check,
and/or money order in the appropriate data field(s)
and click the Save button.
The program records the payment and prints the
receipt. Once the printer is finished, a dialog box
opens that asks if the receipt printed correctly.
Click the appropriate button.
If you click Yes, the dialog box closes and the
program returns to the Payments screen. If you
click No, the program voids the transaction, then
closes the dialog box and returns to the Payments
screen.
WinTen Tenant Accounts Receivable • 11/14/2003 Edition • Payments and Credits • Page 6.6
Review the Tenant’s Future Charges
The Payments screen enables you to review the
tenant’s future charges for the next month. To do
this, click the Future Charges button.
The Payments screen changes to display a different table. This table includes data on the tenant’s
future (next billing period) charges, as well as balances for charges that are over 30 or over 60 days
old. When you are done reviewing this data, click
the Current Payments button to return the screen
to its original appearance.
WinTen Tenant Accounts Receivable • 11/14/2003 Edition • Payments and Credits • Page 6.7
Take a Security/Pet Deposit Payment
To take a tenant’s security or pet deposit, click the
Security/Pet Deposit Payment button.
The Security/Pet Deposit Payment dialog box
opens. Enter the amount(s) that the tenant is paying for his security and/or pet deposit and click the
Save button.
The Payment Window dialog box opens. Enter the
amount that the tenant is paying by cash, check,
and/or money order in the appropriate data field(s)
and click the Save button.
The program records the payment and prints the
receipt. A dialog box opens that asks if the receipt
printed correctly. Click the appropriate button.
If you click Yes, the dialog box closes and the
program returns to the Payments screen. If you
click No, the program voids the transaction, then
closes the dialog box and returns to the Payments
screen.
WinTen Tenant Accounts Receivable • 11/14/2003 Edition • Payments and Credits • Page 6.8
Take a Payment for Escrow Accounts
If the tenant is set up for home ownership (on the
Main Info tab of the Tenant Edit/Review screen),
you can take a payment for his home ownership
escrow account. To do this, click the Take a Payment for Escrow Accounts button.
The Home Ownership Down Payments dialog box
opens. Enter the payment(s) the tenant is making
to his down payment and/or purchase account(s)
and click the Save button.
The Payment Window dialog box opens. Enter the
amount that the tenant is paying by cash, check,
and/or money order in the appropriate data field(s)
and click the Save button.
The program records the payment and prints the
receipt. A dialog box opens that asks if the receipt
printed correctly. Click the appropriate button.
If you click Yes, the dialog box closes and the
program returns to the Payments screen. If you
click No, the program voids the transaction, then
closes the dialog box and returns to the Payments
screen.
WinTen Tenant Accounts Receivable • 11/14/2003 Edition • Payments and Credits • Page 6.9
Transfer Payments
If you have taken one or more payments from a
tenant in the current month, you can transfer these
payments between the tenant’s charges. To do
this, click the Transfer Payments button.
The Current Payment column of the Payments
screen becomes editable. If you have taken any
payments for this month, they appear in the Payments MTD column.
Edit the Current Payment column to transfer payments between charges. The total of the column
must equal zero when you are finished. Click the
Save button.
Hint: Example of Transferring Payments
In the screen shown below, the tenant has a $30 credit
in rent charges, a $40 late charge, and a $20 cable TV
charge. If you want to apply the credit so it covers the entire cable TV charge and part of the late charge, enter -30
in the Rent field, 20 in the Cable TV field, and 10 in the Late
Charge field. -30, 20, and 10 add to zero, so the tenant’s
account is still in balance.
WinTen Tenant Accounts Receivable • 11/14/2003 Edition • Payments and Credits • Page 6.10
VOID A RECEIPT
To void a receipt and its corresponding payment,
click the Void button.
The Void Receipt screen opens. This screen contains a table of all receipts for payments taken in
the current month.
Select the receipt you want to void and click the
Void button.
A dialog box opens that asks you to confirm your
intention to void the receipt. Click Yes to continue
or No to abort the process.
If you click Yes, the program voids the payment and
marks its receipt as voided.
WinTen Tenant Accounts Receivable • 11/14/2003 Edition • Payments and Credits • Page 6.11
RUN BATCH RECEIPTS
The batch receipt function records full payments
and prints receipts for every tenant in a selected
project. To use this function, click the Batch button.
CAUTION
Hint: Why would I want to run batch receipts?
There is no “batch undo” function for batch receipts. If
you run this function in error, you must void each receipt
individually.
The most common use of the batch receipt function is
for elderly high-rise buildings. The agency does a batch
receipt run at the end of the month, when Social Security
checks arrive. Agency personnel then go door-to-door to
collect rent payments and issue receipts. Afterward, users
can void individual receipts for any tenants who didn’t make
full payments.
The Batch Receipts dialog box opens. Select the
project for which you want to run batch receipts and
the order in which you want to run them, then click
OK.
A dialog box opens that reminds you that you are
about to post payments and prepare receipts for
every tenant in the selected unit. It asks you if you
want to continue. Click Yes to continue or No to
cancel.
If you click Yes, a standard Print dialog box opens.
Select the printer to which you want to send receipts and click OK.
The program runs through a rather long print routine. When it is finished, a dialog box opens that
informs you that the process is complete. Click OK
to return to the Payments Menu screen.
WinTen Tenant Accounts Receivable • 11/14/2003 Edition • Payments and Credits • Page 6.12
RECORD A DEPOSIT TICKET
A deposit ticket is a record of every transaction
whose payments are being deposited in your
agency’s bank account. Typically, a deposit ticket
covers every payment taken in a specific range of
dates. To record a deposit ticket and post its deposit amounts to the General Ledger and Check
Reconciliation programs, click the Deposit Ticket
button. This starts the Process Deposit Ticket
wizard.
Process Deposit Ticket Wizard
The Process Deposit Ticket wizard controls the
process of recording a bank deposit in Receivables, General Ledger, and Check Reconciliation.
Step One
Enter the range of dates whose transactions the
deposit includes.
If this deposit only includes the payments taken by
a specific cashier, enter that employee’s initials in
the Cashier Initials field. Otherwise, leave it blank.
Select the projects whose payments are included
in this deposit.
Click the Start button to proceed to Step Two.
WinTen Tenant Accounts Receivable • 11/14/2003 Edition • Payments and Credits • Page 6.13
Step Two
Select the order in which to sort the Deposit Ticket
Detail report.
Click the Next button to print the report.
A standard print preview screen opens with the
Deposit Ticket Detail report. Review and print this
report, then click the Close button to close the print
preview screen.
A dialog box opens that asks if the report matches
the deposit ticket you have prepared. If you click
Yes, the wizard proceeds to Step Three. If you
click No, the wizard halts and the program returns
to the Payments Menu screen.
Step Three
Select the bank account into which the deposit is
being made and the date on which the deposit is
being made.
Click the Finish button to post the deposit to General Ledger and Check Reconciliation.
When the process is complete, a dialog box opens
that gives you the deposit’s ticket number and total
amount. Click OK to return to the Payments Menu
screen.
WinTen Tenant Accounts Receivable • 11/14/2003 Edition • Payments and Credits • Page 6.14
RECORD NON-DWELLING INCOME
Some agencies use units for non-dwelling, revenue-generating operations (e.g. laundry rooms with
coin-operated washers and dryers). Receivables
enables you to record income from these operations. To do so, click the Non-Dwelling button.
The Non-Dwelling Income screen opens on its
Income Records tab. This tab contains a table
of all non-dwelling income records for the current
month.
WinTen Tenant Accounts Receivable • 11/14/2003 Edition • Payments and Credits • Page 6.15
Recording Non-Dwelling Income
To record non-dwelling income, click the Add button. The program creates a blank record in the
table. Enter the appropriate data in the data fields
and click the Save button.
Source
This is the source of the non-dwelling income.
Amount
This is the dollar amount of the non-dwelling income.
Document Number
This is the tracking number of any official document
that directly relates to the income in question - for
example, a check or purchase order number. If the
income is in cash, enter “cash” in this field.
Description
This is a short (30-character) description of the
income.
Income Records Tab Controls
Clear Non-Dwelling Deposit Log Button
Receivables keeps a running total of all non-dwelling income transactions, known as the non-dwelling deposit log. The program uses this data to
produce a report on all such transactions. To clear
this log, click the Clear Non-Dwelling Deposit Log
button.
NOTE: Clearing the deposit log does not destroy Receivables’ permanent records of the
transactions. It only erases a “scratch paper”
record of recent deposits. Most agencies clear
their deposit logs on a daily or weekly basis.
Void a Payment Button
To void a non-dwelling income record, select it in
the table and click the Void a Payment button.
A dialog box opens that asks you to confirm your
intention to void the payment. Click Yes to continue
with the process or No to abort it.
If you click Yes, the program marks the transaction
as voided, then returns to the Non-Dwelling Income
screen.
WinTen Tenant Accounts Receivable • 11/14/2003 Edition • Payments and Credits • Page 6.16
Producing Reports on Non-Dwelling Income
The Non-Dwelling Reports tab of the Non-Dwelling
Income screen has two available reports:
Payment Listing
This report lists all non-dwelling income payments
that your agency took during the selected range of
dates.
Deposit Log
This report lists all non-dwelling income payments
that are currently in the deposit log and were taken
within the selected range of dates.
Select the report you want to produce, enter the
starting and ending dates for the time period it
should cover, and click the Print or Print Preview
buttons.
WinTen Tenant Accounts Receivable • 11/14/2003 Edition • Payments and Credits • Page 6.17
CHARGE OFF A TENANT
Charging off is the process by which an agency
writes off a former tenant’s debts because they are
uncollectable. This usually occurs when a tenant
moves out without notifying the agency. You can
only charge off a tenant who (1) has moved out, (2)
has no security deposit, and (3) has not had any
financial activity in the current month. To charge off
a tenant who meets these criteria, click the Charge
Off button.
The Tenant Search screen opens (see the Tenant Actions chapter for more details on the Tenant
Search screen).
Select the tenant who you are charging off and
click the Charge Off Tenant button. The Charge
Off a Tenant screen opens.
WinTen Tenant Accounts Receivable • 11/14/2003 Edition • Payments and Credits • Page 6.18
Charge Off a Tenant Screen Controls
Charge Off Tenant Full Amount Button
To charge off a tenant’s entire outstanding account,
click the Charge Off Tenant Full Amount button.
A dialog box opens that asks you to confirm your intent to charge off the tenant. Click Yes to continue
or No to abort the process.
If you click Yes, the program records the charge off
and moves the tenant from the database of current
tenants to the database of charged off tenants. A
dialog box opens to inform you when the process is
complete. Click OK to return to the Tenant Search
screen.
Partial Amount Charge Off Button
To charge off part of a tenant’s outstanding account, click the Partial Amount Charge Off button.
The Current Payment column of the Charge Off
a Tenant screen becomes editable. In each data
field with an outstanding charge, enter the amount
you want to write off, then click the Save button.
A dialog box opens that asks you to confirm your intent to charge off the tenant. Click Yes to continue
or No to abort the process.
If you click Yes, the program records the charge
off. A dialog box opens to inform you when the process is complete. Click OK to return to the Tenant
Search screen.
WinTen Tenant Accounts Receivable • 11/14/2003 Edition • Payments and Credits • Page 6.19
ISSUE A REFUND
Occasionally, tenants may have credits in their
accounts for which you need to issue refunds. To
issue a refund to a tenant, click the Other Refund
button.
NOTE: This function does not allow you to refund a security or pet deposit. To refund either
of these deposits, use the appropriate buttons
on the Deposit Info tab of the Tenant Edit/
Review screen. For more information on these
functions, see the Tenant Actions chapter.
The Refund Other Than Security Deposit dialog
box opens. You can issue a refund to all qualified
tenants individually, all qualified tenants in a batch,
or a single tenant, and you can refund all credit balances or just rent balances. Select the options you
want and click OK.
WinTen Tenant Accounts Receivable • 11/14/2003 Edition • Payments and Credits • Page 6.20
Issue a Refund to a Selected Tenant
If you choose to issue a refund to a single tenant,
the Tenant Search screen opens (see the Tenant
Actions chapter for more details on the Tenant
Search screen).
Select the tenant to whom you are issuing a refund
and click the Give Refund button. The Refund
Other Than Security Deposit screen opens.
WinTen Tenant Accounts Receivable • 11/14/2003 Edition • Payments and Credits • Page 6.21
Issue a Full Refund
To issue a full refund to the selected tenant, click
the Refund button.
A dialog box opens that asks you to confirm the
issuance of the refund to the tenant. Click Yes to
continue or No to cancel the refund.
If you click Yes, the program records the refund,
then returns to the Payments Menu screen. If your
agency has the WinTen Accounts Payable module tied to Receivables, Receivables creates an
invoice in Payables for the refund. If you are not
running Payables in conjunction with Receivables,
you must issue the refund manually.
Issue a Partial Refund
To issue a partial refund to the selected tenant,
click the Partial Refund button.
The Current Payment column of the Refund Other
Than Security Deposit screen becomes editable.
In each data field with an credit value, enter the
amount you want to refund as a negative value,
then click the Save button.
A dialog box opens that asks you to confirm the
issuance of the refund to the tenant. Click Yes to
continue or No to cancel the refund.
If you click Yes, the program records the refund,
then returns to the Payments Menu screen. If your
agency has the WinTen Accounts Payable module tied to Receivables, Receivables creates an
invoice in Payables for the refund. If you are not
running Payables in conjunction with Receivables,
you must issue the refund manually.
Issue a Refund to All Eligible Tenants
If you choose to issue refunds to all eligible tenants individually, the Refund Other Than Security
Deposit screen opens for the first eligible tenant.
Follow the procedures described in the previous
section for issuing full or partial refunds to a single
tenant. The only difference is that after you issue
the refund, the program remains on the Refund
Other Than Security Deposit screen rather than
returning to the Payables Menu screen. Use the
Next and Previous buttons to move between the
records of eligible tenants and issue refunds as
needed. When you are done, click the Exit button
to return to the Payments Menu screen.
WinTen Tenant Accounts Receivable • 11/14/2003 Edition • Payments and Credits • Page 6.22
Issue a Batch Refund
(Process Batch Refunds Wizard)
If you choose to issue refunds to all eligible tenants in a batch, the Process Batch Refunds Wizard
opens. This wizard controls the process of issuing
refunds to all eligible tenants at once.
Step One
Select the projects whose tenants you want to issue refunds to.
Click the Next button to proceed to Step Two.
Step Two
Select the order in which you want to process the
tenants receiving refunds.
Click the Next button.
WinTen Tenant Accounts Receivable • 11/14/2003 Edition • Payments and Credits • Page 6.23
A standard print preview screen opens with the
Tenant Refund Listing report. Review and print this
report, then click the Close button to close the print
preview screen.
CAUTION
If you are not using the Accounts Payable program, you
must print this report now in order to have a list of the refunds that the program is processing.
A dialog box opens that asks if you want to continue processing the refunds. If you click Yes, the
wizard proceeds to Step Three. If you click No, the
wizard returns to Step Two.
Step Three
Click the Next button to process all refunds that appeared on the Tenant Refund Listing report.
When you click Finish, the program creates an invoice in the Accounts Payable program for each refund. When this process is complete, the program
returns to the Payments Menu screen.
WinTen Tenant Accounts Receivable • 11/14/2003 Edition • Payments and Credits • Page 6.24
REVERSE A REFUND
On occasion, you may need to reverse a refund.
To do this, click the Reverse Security/Pet button
(if the refund was a security deposit or pet deposit
refund) or the Reverse Other Refund button (if the
refund was any other type). The procedure for reversing either type of refund is the same.
CAUTION
Reversing a refund using this procedure does not void any
invoice in the WinTen Accounts Payable module. It only
voids transactions in Receivables’ details database. You
must manually void Payables invoices in that program. For
more information, see the Accounts Payable manual.
The Tenant Search screen opens (see the Tenant Actions chapter for more details on the Tenant
Search screen). Select the tenant whose refund
you are reversing and click the Reverse Refund
button.
The Reverse Refund screen opens. Click the Save
button to reverse the refund. The program records
the reversal and returns to the Tenant Search
screen.
WinTen Tenant Accounts Receivable • 11/14/2003 Edition • Payments and Credits • Page 6.25
IMPORT
AN ELECTRONIC PAYMENT FILE
To import an electronic payment file (EPF), click the
Import EPF button. For more information on this
process, refer to Appendix D: Lockbox Collections.
WinTen Tenant Accounts Receivable • 11/14/2003 Edition • Payments and Credits • Page 6.26
REPORTS
Information needs to be summarized and presented in an easy-to-understand form so the reader can
make informed decisions. The Reports screen is
where Tenant Accounts Receivable turns all of its
data into meaningful reports. To enter this screen,
click the Reports button or press <R> at the Main
Menu.
WinTen Tenant Accounts Receivable • 11/14/2003 Edition • Reports • Page 7.1
REPORTS SCREEN
The Reports screen is divided into five tabs: Tenant
Accounting, Tenant Management, Quick Lists, Utility Meter Readings, and Labels/Mail Merge. The
first four tabs enable you to produce printed reports
on certain aspects of Receivables’ operations. The
last one enables you to produce a mail merge file
(for producing mass mailings using a word processing program) or a set of tenant mailing labels.
The Reports screen always opens on the Tenant
Accounting tab, as shown on the following page.
Producing a Report
To produce a report, select its radio button. Set all
of the formatting options for the report, then click
the Print or Print Preview button.
If you click the Print button, a standard WinTen print
control dialog box opens. Select the printing options for the report and click OK.
If you click the Print Preview button, a print preview
screen opens with the selected report. Review the
report from this screen and close it when you are
finished.
Green Bar Reports
Many reports have a “Print Using Green-Bar format” option. If you want to print the report to a dotmatrix printer loaded with green bar paper, check
this box.
WinTen Tenant Accounts Receivable • 11/14/2003 Edition • Reports • Page 7.2
Tenant Accounting Tab
The Tenant Accounting tab contains reports on tenant financial activity, such as recent payments or
outstanding debts. It is divided into two sub-tabs:
Payments and Registers/Delinquent/Additional.
The Tenant Accounting tab always opens on the
Payments sub-tab, as shown below.
Tenant Accounting Tab Controls
Clear Deposit Log Button
The deposit log tracks payments for charges and
deposits. After you have run and balanced a Bank
Deposit report and made the deposit, use this function to mark all payments in the log as deposited.
CAUTION
Typically, your agency uses the deposit log to balance its
cash drawer. This involves printing the log, then balancing
the drawer, then clearing the log. Do not take any payments
between the time you print the log (see Receipt/Deposit below) and the time you clear it. If you do, these deposits will
remain in Receivables’ permanent records, but they will not
appear on the deposit log the next time you print it.
Hint: Clearing the Deposit Log
Clearing the deposit log does not destroy Receivables’ permanent records of the transactions. It only marks records
as deposited. Most agencies clear their deposit logs on a
daily or weekly basis.
WinTen Tenant Accounts Receivable • 11/14/2003 Edition • Reports • Page 7.3
Payments Sub-Tab
The Payments sub-tab enables you to run the
Receipt/Deposit reports. This family of reports is
interconnected, and you can print more than one of
them in the same print run. Check the boxes that
correspond to the reports you want to run, then select your formatting options on the right side of the
screen and print or preview the reports normally.
All six reports have the same set of formatting options. You can produce each report for a selected
range of dates, and group the data by project or by
the initials of the user who entered the transaction.
You can select either current or history reports, and
you can produce the report to cover all projects or
one specified projects.
WinTen Tenant Accounts Receivable • 11/14/2003 Edition • Reports • Page 7.4
Available Reports
Payments With Receipt
The Payments with Receipt report includes all
matching payments taken since the last monthly
initialization for which your agency issued a receipt.
You must choose whether the report will include
voided or un-voided payments.
Payments Without Receipt (Current Only)
The Payments without Receipt report includes all
matching payments for which your agency posted
payments and did not issue a receipt.
Bank Deposit (Current Only)
This is a transaction log of all payments that your
agency has taken since the last time the bank deposit log was cleared. This report is used to balance your agency’s cash drawer.
All Receipts in Receipt Number Order
This report lists all matching receipts in the order in
which they were processed. You must select payments with receipts, payments without receipts, or
history receipts.
Summary Receipt Report
This is a summary report of all receipts within the
selected period, with tenant name and account
number.
Summary Receipt Report with EPF Account
This is a summary report of all receipts within the
selected period, with tenant name and EPF (“lockbox”) account number. This report is available only
if you are using the EPF (“Lockbox”) functions.
WinTen Tenant Accounts Receivable • 11/14/2003 Edition • Reports • Page 7.5
Registers/Delinquent/Additional Sub-Tab
The Registers/Delinquent/Additional sub-tab contains three families of reports: Tenant Registers,
Delinquent Reports, and Additional Reports. Use
the set of radio buttons on the left side of the
screen to select the report you want to produce.
The right side of the screen changes to display the
formatting options for the currently selected report.
WinTen Tenant Accounts Receivable • 11/14/2003 Edition • Reports • Page 7.6
Available Reports
Tenant Register Reports
Monthly Rental Register
The monthly rental register lists all charges and
balances for all tenants’ accounts for the current
Receivables month. You can print this report in order of tenant account number, tenant last name, or
unit number. The report can be a summary report
(which shows totals by project) or a detail report
(which shows data for each individual tenant). You
can include all tenants in all of your agency’s projects, or all tenants in one selected project.
After you print or preview this report, a dialog box
appears that asks you if you want to post receivables to the General Ledger now. Click Yes to post
all transactions from the report to the General Ledger or No to not post.
Monthly Rental Register Balance Report
This report is the same as the Monthly Rental
Register report, but also includes pet and security deposit transactions. It combines charges and
breaks down payments into details.
Security/Pet Deposit Listing
This report lists each tenant’s current balances
for security and pet deposits. You can print this
report in order of tenant account number, tenant
last name, or unit number, and you can include all
tenants in all projects or all tenants in one selected
project.
Future Charges/Rent Listing
This report displays each tenant’s future (due next
billing period) charges. You can print this report in
order of tenant account number, tenant last name,
or unit number. You can include all tenants in all
projects or all tenants in one selected project. You
can also include all tenants regardless of Z account status, or only those who are or are not Z
accounts.
Credit (Negative) Rent Listing
This report displays the current balance of each
tenant account that has a balance less than zero
(credit balance) for rent. You can print this report in
order of tenant account number, tenant last name,
or unit number, and you can include all tenants in
all projects or all tenants in one selected project.
WinTen Tenant Accounts Receivable • 11/14/2003 Edition • Reports • Page 7.7
Promissory Note Listing
This report displays the account status of each tenant who has a promissory note in effect. You can
include all tenants in all projects or all tenants in
one selected project.
Retro Rent Listing
This report displays the account status of each
tenant who has a retroactive rent repayment (retro
rent) agreement in effect. You can include all tenants in all projects or all tenants in one selected
project.
Delinquent Reports
Delinquent Accounts
This report lists all tenant accounts that have a current balance due that is greater than zero. You can
print this report in order of tenant account number,
tenant last name, or unit number. The report can
be a summary report (which shows totals by project) or a detail report (which shows data for each
individual tenant). You can include all tenants in
all of your agency’s projects, or all tenants in one
selected project. Finally, you can choose to only
include tenants who owe rent, or tenants who owe
any charge.
Aged Delinquent Accounts
This report lists all tenant accounts that have a balance greater than zero that is past due by 30 or
more days. You can print this report in order of tenant account number, tenant last name, or unit number. The report can be a summary report (which
shows totals by project) or a detail report (which
shows data for each individual tenant). You can
include all tenants in all of your agency’s projects,
or all tenants in one selected project.
’Z’ Accounts ONLY
This report lists all tenant accounts that are ‘Z’ accounts (accounts of tenants who have moved out)
and that have a balance greater than zero. You
can print this report in order of tenant account number, tenant last name, or unit number. The report
can be a summary report (which shows totals by
project) or a detail report (which shows data for
each individual tenant). You can include all tenants
in all of your agency’s projects, or all tenants in one
selected project.
WinTen Tenant Accounts Receivable • 11/14/2003 Edition • Reports • Page 7.8
Non ‘Z’ Accounts
This report lists all tenant accounts that are not
‘Z’ accounts and that have a balance greater than
zero. You can print this report in order of tenant
account number, tenant last name, or unit number.
The report can be a summary report (which shows
totals by project) or a detail report (which shows
data for each individual tenant). You can include
all tenants in all of your agency’s projects, or all
tenants in one selected project.
Additional Reports
Daily Statement of Operations (DSO)
The DSO contains a summary of all transactions
(payments, refunds, adjustments, security and pet
deposits, charge offs, etc.) that occurred on the
selected date.
NOTE: If no transactions occurred on a given
date (for example, a Saturday when no one was
in your office), that date will not be an available
option for this report.
Normally, the program creates the DSO from a log
file. In the event of a problem, check the Recreate
the DSO Report check box to make the program
build the DSO from Receivables journal entries.
This method of creating the report takes substantially longer than the normal way, but it also avoids
the possibility that an incorrect log file could produce an incorrect report.
NOTE: We do not recommend that you use
the Recreate the DSO Report option without
assistance from Tenmast Training & Support
personnel.
WinTen Tenant Accounts Receivable • 11/14/2003 Edition • Reports • Page 7.9
HUD-52295 Tenant Accounts Receivable (TAR)
Form HUD-52295 is the official HUD Tenant Accounts Receivable report. You have the option to
produce the final Form HUD-52295 or the detail
worksheet that shows all of the calculations used
to fill in HUD-52295. You can run this report for
any completed month (e.g. you cannot run the report for the month in which Receivables is currently
operating).
If you select the detail worksheet option, you must
specify a period ending month and year for the
worksheet.
If you select the Form HUD-52295 option and click
the Print or Print Preview buttons, the TAR Report
Specifications dialog box opens. This dialog box
contains several options for formatting Form HUD52295:
• Fiscal Year Beginning Date: This is the beginning
date of the fiscal year in which the selected reporting period falls.
• Project: Select the project whose receivables activity the report should cover, or leave the dropdown selection box blank for all projects.
• Type of Program: Select the appropriate housing
program type to print on the report.
• Print Individual Reports: Select whether each
project’s data should be printed individually, or
whether all projects’ data should be lumped together.
• Report Period Ending: Select the month and year
that the report should cover.
• Percentage Analysis: Fill in the appropriate data
from your agency’s previous two years’ HUD52295 reports.
WinTen Tenant Accounts Receivable • 11/14/2003 Edition • Reports • Page 7.10
Complete Totals
This report displays complete totals for all receivable items for your agency. You can include all of
your agency’s projects, or one selected project.
This is a “here and now” report - it shows your
agency’s receivable item totals as they are at the
time you run the report.
If you choose to print the report for all projects,
you can print each project on an individual page or
lump all projects’ data together.
Payment History for One Unit
This report contains all payments for a selected
unit that your agency took within the selected
range of dates. The program subtotals this report
by Payments with Receipt, Payments without Receipt, and Payments in History.
Promissory Note Journal Entries for Ledger
This report contains all promissory note transactions that have been posted to the General Ledger
within the selected range of dates.
Retroactive Rent Journal Entries for Ledger
This report contains all retroactive rent repayment
transactions that have been posted to the General
Ledger within the selected range of dates.
RCV Journal Listing from General Ledger
This report contains all receivables transactions
that have been posted to the General Ledger within
the selected range of dates. You can choose for the
report to cover all ledger accounts or one selected
account. You can print the report in debit/credit
(two-column) format or in one-column format.
WinTen Tenant Accounts Receivable • 11/14/2003 Edition • Reports • Page 7.11
Tenant Management Tab
The Tenant Management tab contains two sets
of reports: Miscellaneous Reports and PHAS Reports. The right side of the tab contains the formatting options for the currently selected report, and its
appearance changes depending on which report is
currently selected.
WinTen Tenant Accounts Receivable • 11/14/2003 Edition • Reports • Page 7.12
Available Reports
Miscellaneous Reports
Directory Listings
This report lists all tenants, along with their unit
numbers, account numbers, and phone numbers.
You can sort the report by unit number, account
number, or tenant last name, and you can produce
the report for all projects or for one selected project. If you produce the report for all projects, you
can group tenants into sub-lists by projects or leave
them in one large list.
NOTE: Because this report includes account
numbers, we recommend against distributing it
to tenants as an internal telephone directory.
Income Level Distribution
This report lists all tenants, along with their income
levels (Low, Very Low, or Extremely Low), number
of bedrooms in their units, and gross incomes. Receivables groups the report by income levels. You
can produce the report for all projects or for one
selected project.
Dependents (minors) in Household
This report lists all tenants, along with their unit
numbers, account numbers, family sizes, and
numbers of minors in their households. You can
sort the report by account number, last name, unit
number, or unit bedroom size.
Link Report from 50058/59
This report lists all tenants who are in the 58 Link
database. For more information on the 58 Link
database, see the Program Overview chapter. You
can sort the report by tenant name, unit number,
Social Security number, account number, or effective date of the link entry. The report can cover all
link records with effective dates in the next month,
all link records in the database, or all link entries
with effective dates within a specified range of
dates.
WinTen Tenant Accounts Receivable • 11/14/2003 Edition • Reports • Page 7.13
Receivables Details
When you select this option, the entire Tenant Management tab changes to the appearance shown
below (this report has a lot of options). The Receivables Detail report contains details of every transaction of the selected types that occurred within the
selected range of dates. Check the boxes next to
the transaction types you want to include on the
report, or check the All box. You can produce the
report for all projects or one selected project, and
for all tenants within the selected project(s) or for
one selected tenant.
Year-to-Date Rent Paid
This report lists all tenants, along with their unit
numbers, account numbers, and rent paid in the
current fiscal year. You can produce the report for
all projects or for one selected project.
Number of Times Unit Was Occupied
This report lists all units and the number of families
that have occupied them (drawn from the Master
Unit database). It also contains each unit’s address, condition, and status. You can produce the
report for all projects or for one selected project.
WinTen Tenant Accounts Receivable • 11/14/2003 Edition • Reports • Page 7.14
HUD-51234 Report on Occupancy
Form HUD-51234 is the official HUD Report on Occupancy for Public and Indian Housing. You have
the option to produce the final Form HUD-51234 or
the detail worksheet that shows all of the calculations used to fill in HUD-51234. You must specify
a period ending month and year for the report or
worksheet.
Promissory Note Details
When you select this option, the entire Tenant Management tab changes to the appearance shown
below (this report has a lot of options). The Promissory Note Details report contains details of every
promissory note transaction of the selected types
that occurred within the selected range of dates.
Check the boxes next to the transaction types you
want to include on the report, or check the All box.
You can produce the report for all projects or one
selected project, and for all tenants within the selected project(s) or for one selected tenant.
WinTen Tenant Accounts Receivable • 11/14/2003 Edition • Reports • Page 7.15
Retroactive Rent Details
When you select this option, the entire Tenant
Management tab changes to the appearance
shown below (this report has a lot of options). The
Retroactive Rent Details report contains details of
every retro rent transaction of the selected types
that occurred within the selected range of dates.
Check the boxes next to the transaction types you
want to include on the report, or check the All box.
You can produce the report for all projects or one
selected project, and for all tenants within the selected project(s) or for one selected tenant.
WinTen Tenant Accounts Receivable • 11/14/2003 Edition • Reports • Page 7.16
Prior Monthly Initialization Reports
Every time you initialize Receivables into a new
month, the program stores a list of the changes
made to every tenant record. This report shows
all of those changes for the initialization that ended
the selected month and year.
PHAS Reports
These reports are identical to those produced by
the WinTen PHAS module.
Cumulative Rent Receivable
This report shows the monthly rent receivable totals
for the selected fiscal year and time period, broken
down by month. Each month’s data includes beginning rent receivable, total rent charges, total
payments for rent, charge off of rent charges, and
ending rent receivable figures.
Cumulative Rent Receivable Detail Worksheet
This report is a more detailed form of the Cumulative Rent Receivable report, described above. The
Detail Worksheet breaks down financial transactions by individual tenant.
If you check the Print Instructions box, the program prints a page containing the HUD standard
instructions for these calculations after it prints the
report.
Cumulative Unit Vacancy
This report covers total vacancy days for each
PHAS condition code for the selected range of
dates. It includes total number of units and unit
days vacant for each month and the total number
of unit turnovers.
Cumulative Reportable Elapsed Days
This report is a summary of all reportable down
time, make ready time, lease up time, and excluded days for the selected range of dates.
WinTen Tenant Accounts Receivable • 11/14/2003 Edition • Reports • Page 7.17
PHAS Event Fiscal Year Vacancy Totals
This report details the actual vacancy events for the
selected reporting period. Vacancy events are all
transactions that involve a unit between move-out
and move-in. This report is the worksheet for the
Cumulative Unit Vacancy report. You can choose
for the report to include data on a specific project or
all projects, and for a specific unit or all units.
PHAS Event Reportable Elapsed Days
This report is a detailed listing of all reportable down
time, make ready time, and lease up time elapsed
days. In its full form (all units for all projects), this
report is the worksheet for the Cumulative Reportable Elapsed Days report. You can choose for the
report to include data on a specific project or all
projects, and for a specific unit or all units.
NOTE: Only event sequences completed in the
current fiscal year (no matter when they started) will appear on this report.
WinTen Tenant Accounts Receivable • 11/14/2003 Edition • Reports • Page 7.18
Quick Lists Tab
The Quick Lists tab contains five reports, which
are quick lists of different items in Receivables’
databases. The right side of the tab contains the
formatting options for the currently selected report,
and its appearance changes depending on which
report is currently selected.
WinTen Tenant Accounts Receivable • 11/14/2003 Edition • Reports • Page 7.19
Available Reports
Charged Off Tenants
The Charged Off Tenants report details all tenants
who were charged off between the selected dates.
The report can be a summary report (which shows
totals by project) or a detail report (which shows
data for each individual tenant), and it can cover all
projects or one specified project.
History Tenants
The History Tenants report details all tenants who
were moved out (leases terminated) between the
selected dates. The report can be a summary
report (which shows totals by project) or a detail
report (which shows data for each individual tenant), and it can cover all projects or one specified
project.
Master Units
The Master Units report details all units in the Master Unit database. The report can cover all projects
or one specified project, and it can include only
vacant units or all units.
Work Orders in Service1
This report lists all work orders in the Service1
database that were completed between the selected dates. You can sort the report by work order
number or by tenant Social Security number. For
more information on the Service1 database and
how Tenant Accounts Receivable interacts with
the WinTen WorkOrder module, see the Program
Overview chapter.
Tenant Listing
This report lists all tenants in a selected list of
projects, along with their SSNs, account numbers,
caseworkers, and management codes. You can
filter the report by management code and/or caseworker, and sort it by account number, last name,
unit number, or SSN.
WinTen Tenant Accounts Receivable • 11/14/2003 Edition • Reports • Page 7.20
Utility Meter Readings Tab
The Utility Meter Readings tab enables you to produce a report on meter reading activity. All of the
options on this tab relate to this report. Select the
utility that the report covers, the reading to which it
applies, and the manner in which to sort it. Choose
a project or leave the drop-down selection box
blank for all projects.
NOTE: If you choose for the report to cover
supplemental meter readings, you must also
specify the utility reading type it covers: vacant
unit readings, current readings, or readings
whose charges are due in 30 days.
WinTen Tenant Accounts Receivable • 11/14/2003 Edition • Reports • Page 7.21
Labels/Mail Merge Tab
The Labels/Mail Merge tab enables you to create
mailing labels or mail merge files for all tenants or
a selected group of tenants. The tab is divided into
two areas. The top area, Tenant Labels, enables
you to select the set of information from which to
generate the labels or file. The bottom area, Select
a Label Type, enables you to specify whether you
are generating a specific size of mailing label, a
mail merge file, or a custom size of mailing label.
WinTen Tenant Accounts Receivable • 11/14/2003 Edition • Reports • Page 7.22
Tenant Labels
Select the radio button that corresponds to the address you want to use: Physical Address (unit address) or Mailing Address. Select the radio button
that corresponds to the order in which to print the
labels or include the data in the file: tenant name,
tenant account number, unit number, or project
number.
If you are generating labels or a mail merge file for
all tenants, select the All Tenants radio button.
If you are generating labels or a mail merge file for
a specific group of tenants, select the Only Those
for a Criterion radio button. The controls to the
right of this radio button become active. These
enable you to choose the criterion by which you
want to filter your tenants (admission date, base
rent, account number, ethnicity, and so forth) and
the value against which you want to check them.
For example, you can filter your tenants so that you
only print mailing labels for those who have a rent
charge that’s over 30 days past due and greater
than $25.
The primary control for determining the criterion
by which to filter tenants is the topmost drop-down
selection box. This enables you to choose from virtually every data field in the tenant database. The
controls beneath the primary criterion selection
field change depending on what filtering criterion
you have selected.
The leftmost control is a drop-down selection box
which enables you to choose the “operator” to use.
A database operator is a mathematical expression, like “equal to “ (=) or “greater than” (>), that
performs a comparison between two things. This
enables you to specify how you are checking individual tenants against the filtering criterion. To
continue the above example, you would set this to
“>,” which is the symbol for “greater than,” if you
only wanted tenants with a 30-day-past-due rent
charge greater than a certain amount.
The rightmost control is a data field that lets you
enter the value against which you are checking every tenant record. Again, to continue the above example, you would set this to “25” if you only wanted
tenants with a 30-day-past-due rent charge greater
than $25.
WinTen Tenant Accounts Receivable • 11/14/2003 Edition • Reports • Page 7.23
Select a Label Type
The set of radio buttons in this area of the tab
enables you to specify the type of labels or mail
merge file that you are creating.
If you want to print to a laser printer, using sheets
of labels, select the Avery 5160 or Avery 5197 radio
button, depending on which size of labels you are
using. You must use label sheets that conform to
one of these sizes or the program will not line up
the addresses with the labels correctly.
If you want to print to a dot-matrix printer, select
the Dot Matrix Printer Labels radio button. The
four data fields in the bottom right corner of the
tab become usable. Enter the width and height
of the labels and the left and top margins that the
program should use to print them. Note that these
values are in hundredths of an inch. For example,
if the labels are four inches wide, enter “400” in the
Width field.
If you want to create a mail merge file that word
processing programs like Microsoft Word can use,
select the Create Mail Merge File radio button.
When you “print” this selection, you do not actually
send anything to your printer. Instead, the program
opens a standard Windows file save dialog box and
asks you where you want to save your mail merge
file. Select a location and file name and save the
file.
Hint: Mail Merge Files
It’s best to choose a name by which you can easily identify
your mail merge file. You should also save it in a place
where you can find it again when you need to use it for a
mail merge operation.
WinTen Tenant Accounts Receivable • 11/14/2003 Edition • Reports • Page 7.24
BILLING
Tenant Accounts Receivable allows you to print billing notices to be mailed to tenants. You can print
billing notices for rent, utilities, or other services, or
for a combination thereof. The Billing Menu screen
is the area of the program that contains these functions. To access this screen, click the Billing button
or press <B> at the Main Menu.
WinTen Tenant Accounts Receivable • 11/14/2003 Edition • Billing • Page 8.1
BILLING MENU SCREEN
The Billing Menu screen allows you to produce billing notices for selected groups of tenants. The left
side of the screen contains the list of available billing notices. The right side of the screen contains
the formatting options for the currently selected
billing notice.
WinTen Tenant Accounts Receivable • 11/14/2003 Edition • Billing • Page 8.2
Printing Billing Notices
To produce a billing notice, select its radio button.
Set all of the formatting options for the bills, then
click the Print or Print Preview button.
If you click the Print button, a standard WinTen print
control dialog box opens. Select the printing options for the bills and click OK.
If you click the Print Preview button, a print preview
screen opens with the selected bills. Review the
bills from this screen and close it when you are
finished.
Standard Formatting Options
The following options are available for all billing
notices:
Print Bills Using Laser Printers
Normally, Receivables prints one bill per page.
This is because most Tenmast clients use dot-matrix printers to print bills. On a dot-matrix printer,
each bill is a separate page, so the program sends
a form feed command to the printer after each bill.
Some clients use laser printers to produce their
bills. These clients use pre-perforated 8.5”x11”
laser billing forms. On each form, they print three
bills, then tear the form along the perforations to
separate those bills. For this to work properly,
Receivables needs to be told “print three bills on
one sheet of paper” so it doesn’t send a form feed
command after printing the first bill. To use this
option, check the Print Bills Using Laser Printers
check box.
Due Date
This is the due date for the bills.
WinTen Tenant Accounts Receivable • 11/14/2003 Edition • Billing • Page 8.3
Available Bills
Excess Gas Bills
Excess gas bills are bills for tenants whose natural gas usage for the month has exceeded their
monthly utility allowances. You can sort these bills
by tenant last name, unit number, tenant Social Security number, tenant account number, project and
unit, or project and tenant last name. You can print
bills for one selected project, for all projects, or for
one selected unit.
Excess Electric Bills
Excess electric bills are bills for tenants whose
electricity usage for the month has exceeded their
monthly utility allowances. You can sort these bills
by tenant last name, unit number, tenant Social Security number, tenant account number, project and
unit, or project and tenant last name. You can print
bills for one selected project, for all projects, or for
one selected unit.
Excess Water Bills
Excess water bills are bills for tenants whose water
usage for the month has exceeded their monthly
utility allowances. You can sort these bills by tenant last name, unit number, tenant Social Security
number, tenant account number, project and unit,
or project and tenant last name. You can print bills
for one selected project, for all projects, or for one
selected unit.
Combined Utility Bills
Combined utility bills are bills that combine all three
utility charges (gas, electricity, and water). You can
sort these bills by tenant last name, unit number,
tenant Social Security number, tenant account
number, project and unit, or project and tenant last
name. You can print bills for one selected project,
for all projects, or for one selected unit.
WinTen Tenant Accounts Receivable • 11/14/2003 Edition • Billing • Page 8.4
Late Charge Bills
Late charge bills are bills for tenants who have late
charge balances. You can sort these bills by tenant last name, unit number, tenant Social Security
number, tenant account number, project and unit,
or project and tenant last name. You can print bills
for one selected project, for all projects, or for one
selected unit.
All-in-One Bills
All-in-one bills are bills for tenants who have any
outstanding charges at all. These bills are due and
payable now. You can sort these bills by tenant last
name, unit number, tenant Social Security number,
tenant account number, project and unit, or project
and tenant last name. You can print bills for one
selected project, for all projects, or for one selected
unit. You can include credit accounts, zero balance accounts (those with no outstanding charges,
in which case the tenant will receive a billing statement which has a message to this effect) and/or Z
accounts.
Future All-in-One Bills
Future all-in-one bills are bills for tenants who have
any future charges due. These bills show what will
be due at the first of the next month. You can sort
these bills by tenant last name, unit number, tenant
Social Security number, tenant account number,
project and unit, or project and tenant last name.
You can print bills for one selected project, for all
projects, or for one selected unit. You can include
credit accounts, zero balance accounts (those with
no outstanding charges, in which case the tenant
will receive a billing statement which has a message to this effect) and/or Z accounts.
WinTen Tenant Accounts Receivable • 11/14/2003 Edition • Billing • Page 8.5
Delinquent Notices
Delinquent notices are bills for tenants who have
outstanding past due charges. You can sort these
bills by tenant last name, unit number, tenant Social
Security number, tenant account number, project
and unit, or project and tenant last name. You can
print bills for one selected project, for all projects,
or for one selected unit. You can print delinquent
notices for tenants who owe late charges, who owe
rent, or who owe anything.
Delinquent notices print one per page (8.5” x 11”).
They follow the format defined on the Setup screen
(Default Settings tab, Delinquent Notice sub-tab;
see the Setup chapter for more information).
You can also use this option to create a mail merge
file (see the Reports chapter for more information
on mail merge files). If you check the Create Mail
Merge dialog box and print delinquent notices, the
Mail Merge File Selection dialog box opens. Select
the directory in which to save the mail merge file,
specify a file name, and click the Save button.
Services Bills (must choose a specific unit)
Services bills are for billing individual tenants who
have received specific services from your agency.
You must enter the unit number to which the charge
applies and a brief (up to 50 characters) description of the service. The tenant must have a current
work order charge for a bill to print.
Hint: What are services bills for?
In general, services bills can apply to any action that would
require a work order. Most agencies which use services
bills are those which don’t use the WinTen WorkOrder program. You can also use services bills for administrative
fees or other miscellaneous billable items.
WinTen Tenant Accounts Receivable • 11/14/2003 Edition • Billing • Page 8.6
Repayment Agreement Bills
Repayment agreement bills are bills for tenants
who have repayment agreements (promissory
notes or retroactive rent repayment agreements)
in effect. You can sort these bills by tenant last
name, unit number, tenant Social Security number,
tenant account number, project and unit, or project
and tenant last name. You can print bills for one
selected project, for all projects, or for one selected
unit. You can include zero balance accounts (those
with no outstanding charges, in which case the tenant will receive a billing statement which has a
message to this effect) and/or Z accounts.
Security/Pet Deposit Bills
Security/pet deposit bills are for tenants who have
any outstanding security deposit or pet deposit
charges. You can sort these bills by tenant last
name, unit number, tenant Social Security number,
tenant account number, project and unit, or project
and tenant last name. You can print bills for one
selected project, for all projects, or for one selected
unit.
Work Order
Work order are bills for tenants who have any outstanding charges at all. You can sort these bills by
unit number, tenant account number, work order
number, or tenant Social Security number. You can
print bills for one selected project, for all projects, or
for one selected unit.
WinTen Tenant Accounts Receivable • 11/14/2003 Edition • Billing • Page 8.7
WinTen Tenant Accounts Receivable • 11/14/2003 Edition • Billing • Page 8.8
POST
TO LEDGER
The WinTen General Ledger module is the central
collection point for all of your agency’s financial
data. The process by which Tenant Accounts Receivable shares the financial data it records with
General Ledger is called posting. When you post,
Receivables writes all of the transaction records it’s
accrued since the last initialization to a file which
General Ledger reads and incorporates into its own
databases. To start the posting process, click the
Post button or press <O> at the Main Menu.
WinTen Tenant Accounts Receivable • 11/14/2003 Edition • Post to Ledger • Page 9.1
Posting
When you start the posting process, the Post Receivables to General Ledger screen opens. This
screen contains a table of every General Ledger
account that is subject to a transaction. Click the
Post button to post these transactions or the Cancel button to cancel the procedure and return to the
Main Menu.
If you click the Post button, the program posts
each transaction to the General Ledger. When this
process is done, the Post Receivables to General
Ledger screen closes and the program returns to
the Main Menu.
WinTen Tenant Accounts Receivable • 11/14/2003 Edition • Post to Ledger • Page 9.2
TASK WIZARDS
The Tenant Accounts Receivable program allows
you to handle tenant data in many ways. This
chapter describes the wizards that the program
uses to handle common data management tasks.
WinTen Tenant Accounts Receivable • 11/14/2003 Edition • Task Wizards • Page 10.1
Promissory Note Creation Wizard/
Retroactive Rent Agreement Creation Wizard
The Promissory Note Creation Wizard controls
the process of adding a new promissory note for
a selected tenant. This wizard is available through
the Create Agreement function on the Promissory Note/Retro Rent Agreement Menu dialog
box, which opens when you click the Promissory
Note button on the Charges tab of the Tenant Edit/
Review screen.
The Retroactive Rent Agreement Creation Wizard
controls the process of adding a new promissory
note for a selected tenant. This wizard is available through the Create Agreement function on
the Promissory Note/Retro Rent Agreement Menu
dialog box, which opens when you click the Retro
Rent Repayment Agreement button on the Charges tab of the Tenant Edit/Review screen.
These two wizards are identical in every way,
except that the Promissory Note Creation Wizard
enables you to add any of the tenant’s outstanding charges to the repayment agreement, while the
Retroactive Rent Agreement Creation Wizard only
enables you to add outstanding rent charges to the
repayment agreement.
Step One
The wizard displays a table of outstanding charges
on the tenant’s account. In the Amount to Apply
column, enter the amount of each charge to apply
to the repayment agreement.
NOTE: If you are aware of charges that the tenant has incurred but have not yet been entered
in the tenant’s account (e.g. an exceptionally
expensive work order), you can enter them in
the appropriate fields now. You do not have to
enter repayment amounts that correspond to
the current account balances.
Click the Start button to proceed to Step Two.
WinTen Tenant Accounts Receivable • 11/14/2003 Edition • Task Wizards • Page 10.2
Step Two
Enter the tenant’s monthly payment amount.
Enter the date on which the repayment agreement
will take effect.
Click the Next button to proceed to Step Three.
Step Three
If you want to print Form HUD-56146, check the
appropriate check box.
Click the Next button to proceed to Step Three.
Step Four
Review the repayment agreement summary. If you
need to make any changes, click the Back button
to return to the appropriate step and edit the data
as needed. If everything is correct, click the Finish button to save the repayment agreement in the
tenant’s record.
If you chose to print Form HUD-56146, a standard
WinTen print control dialog box opens. Select your
printer options and click OK to print Form HUD56146.
WinTen Tenant Accounts Receivable • 11/14/2003 Edition • Task Wizards • Page 10.3
Promissory Note Transfer Wizard/
Retroactive Rent Agreement Transfer Wizard
The Promissory Note Transfer Wizard controls the
process of transferring an existing account balance
to a new promissory note for a selected tenant.
This wizard is available through the Transfer Existing Balance to Agreement function on the Promissory Note/Retro Rent Agreement Menu dialog
box, which opens when you click the Promissory
Note button on the Charges tab of the Tenant Edit/
Review screen.
The Retroactive Rent Agreement Creation Wizard
controls the process of transferring an existing
account balance a new promissory note for a selected tenant. This wizard is available through the
Transfer Existing Balance to Agreement function
on the Promissory Note/Retro Rent Agreement
Menu dialog box, which opens when you click the
Retro Rent Repayment Agreement button on the
Charges tab of the Tenant Edit/Review screen.
These two wizards are identical in every way,
except that the Promissory Note Transfer Wizard
enables you to add any of the tenant’s outstanding charges to the repayment agreement, while the
Retroactive Rent Agreement Transfer Wizard only
enables you to add outstanding rent charges to the
repayment agreement.
Step One
The wizard displays a table of outstanding charges
on the tenant’s account. In the Amount to Apply
column, enter the amount of each charge to apply
to the repayment agreement.
Click the Start button to proceed to Step Two.
WinTen Tenant Accounts Receivable • 11/14/2003 Edition • Task Wizards • Page 10.4
Step Two
Enter the tenant’s monthly payment amount.
Enter the date on which the repayment agreement
will take effect.
Click the Next button to proceed to Step Three.
Step Three
If you want to print Form HUD-56146, check the
appropriate check box.
Click the Next button to proceed to Step Three.
Step Four
Review the repayment agreement summary. If you
need to make any changes, click the Back button
to return to the appropriate step and edit the data
as needed. If everything is correct, click the Finish button to save the repayment agreement in the
tenant’s record.
If you chose to print Form HUD-56146, a standard
WinTen print control dialog box opens. Select your
printer options and click OK to print Form HUD56146.
WinTen Tenant Accounts Receivable • 11/14/2003 Edition • Task Wizards • Page 10.5
Edit Monthly Agreement Charge Wizard
The Edit Monthly Agreement Wizard controls the
process of editing the monthly charge of a tenant’s
existing repayment agreement. This wizard is
available through the Edit Monthly Charge on
Agreement function on the Promissory Note/Retro
Rent Agreement Menu dialog box, which opens
when you click the Promissory Note or Retro Rent
Repayment Agreement button on the Charges tab
of the Tenant Edit/Review screen.
Step One
Enter the tenant’s new monthly charge.
Click the Start button to proceed to Step Two.
Step Two
Review the repayment agreement summary. If you
need to make any changes, click the Back button
to return Step One and edit the data as needed. If
everything is correct, click the Finish button to save
the repayment agreement change in the tenant’s
record.
WinTen Tenant Accounts Receivable • 11/14/2003 Edition • Task Wizards • Page 10.6
Agreement Removal Wizard
The Agreement Removal Wizard controls the process of removing a repayment agreement from a
tenant’s account. This wizard is available through
the Remove Agreement function on the Promissory Note/Retro Rent Agreement Menu dialog box,
which opens when you click the Promissory Note
or Retro Rent Repayment Agreement button on the
Charges tab of the Tenant Edit/Review screen.
Step One
If the repayment agreement was created (not transferred), you have the option to remove all charges
that were created. If you want to do so, check the
appropriate check box.
Click the Start button to proceed to Step Two.
Step Two
Review the repayment agreement summary. If you
need to make any changes, click the Back button
to return Step One and edit the data as needed. If
everything is correct, click the Finish button to remove the repayment agreement from the tenant’s
record.
WinTen Tenant Accounts Receivable • 11/14/2003 Edition • Task Wizards • Page 10.7
WinTen Tenant Accounts Receivable • 11/14/2003 Edition • Task Wizards • Page 10.8
REINDEX
This function rebuilds the indexes that Tenant Accounts Receivable uses to search for specific records within its databases. Index files are similar
to a library’s card catalog — they tell the computer
the location of the data for which you are searching. Indexing databases is safe to do at any time
— it does not need to be done at a specific time
of the month or the year. To initiate the indexing
process, clicking the Index button or press <I> at
the Main Menu.
WinTen Tenant Accounts Receivable • 11/14/2003 Edition • Reindex • Page 11.1
When to Reindex
Occasionally, index files can become corrupted.
This means that such a file’s data is no longer
complete, and it may not be in a form that Receivables can read. The most common indicator of a
corrupted index file comes when you search for a
record that you know is present and the program
does not find it. Reindexing solves this problem
by going through each database and rebuilding the
index file for it.
CAUTION
You must make sure that no one else is using Receivables
before using this feature. Reindexing rewrites files, which
can cause damage to the data within those files if they are
already open when Receivables attempts to index them.
When to Pack
While you are reindexing, you also have the option to pack Receivables’ databases. Packing is a
process by which the program removes all blank or
deleted entries from its databases, thereby reducing the size of the files.
CAUTION
Tenmast recommends that you do not perform packing unless specifically instructed to do so by Tenmast Training &
Support personnel. Packing permanently removes deleted
records. Once you have packed, data that the packing
process erases will be irrevocably gone.
WinTen Tenant Accounts Receivable • 11/14/2003 Edition • Reindex • Page 11.2
When you select Index, a dialog box appears that
asks you to confirm your intent to reindex. It also
reminds you that all other users must be out of
Receivables at this time. Click Yes to continue or
No to abort the procedure and return to the Main
Menu.
If you click Yes, the Index and Pack Databases
dialog box opens. It has eight check boxes, four
of which are grayed out (disabled) when the dialog
box opens, and two buttons.
If you want to reindex a selected database, check
the corresponding box. This enables the second
check box. If you want to pack the records for the
selected database as well, check the second box.
When you have selected your options, click the OK
button to proceed or the Cancel button to abort indexing process and return to the Main Menu.
If you click OK, a dialog box appears that provides
a graphical representation of Receivables’ progress
through the indexing process. When the process
is complete, all associated dialog boxes close and
the process returns to the Main Menu.
WinTen Tenant Accounts Receivable • 11/14/2003 Edition • Reindex • Page 11.3
WinTen Tenant Accounts Receivable • 11/14/2003 Edition • Reindex • Page 11.4
PERIODIC REPORTS
AND INITIALIZATION
Tenant Accounts Receivables is designed to manage a vast amount of financial data. To assist you
in maintaining proper audit records and keeping
track of your agency’s financial status, Receivables
offers several daily and monthly financial reports
which you can process and print as needed. To
use these reports, or to perform monthly initialization, click the Periodic button or press <E> at
the Main Menu. This opens the Periodic Reports
Screen.
WinTen Tenant Accounts Receivable • 11/14/2003 Edition • Periodic Reports and Initialization • Page 12.1
PERIODIC REPORTS SCREEN
The Periodic Reports screen contains a selection
of periodic financial reports which provide you with
information about your agency’s daily and monthly
financial operations. This screen is divided into two
tabs: Daily and Monthly. On each tab, the left side
contains a set of radio buttons which correspond to
the reports available on that tab, and the right side
contains the formatting options for the currently
selected report.
WinTen Tenant Accounts Receivable • 11/14/2003 Edition • Periodic Reports and Initialization • Page 12.2
Producing a Report
To produce a report, select its radio button. Set all
of the formatting options for the report, then click
the Print or Print Preview button.
If you click the Print button, a standard WinTen print
control dialog box opens. Select the printing options for the report and click OK.
If you click the Print Preview button, a print preview
screen opens with the selected report. Review the
report from this screen and close it when you are
finished.
Daily Tab
The Daily tab contains reports on Receivables’ financial activity on a single selected day or range
of dates.
Available Reports
Recommended Reports
Recommended reports are reports that you should
run at the close of each business day and store in
a notebook or file folder for audit purposes.
Bank Deposit
The Bank Deposit Report accounts for all cash
payments (cash, checks, and money orders) that
have been recorded in Receivables in a specified
range of dates. At the end of the day, compare this
report to the Bank Deposit report. If the reports
match, all payments that have been deposited in
the bank were also recorded in Receivables and
vice versa.
Use the Select Projects set of check boxes to
include payments for any combination of projects. Use the Group By drop-down selection box
to group the report by all payments in a specific
project or all payments taken by a specific cashier.
Use the Select Payments and Select Cashier Initials drop-down selection boxes to filter the report
on a specific payment type and/or transactions
recorded by a specific cashier. Use the Report Period set of date fields to specify the range of dates
that the report covers.
WinTen Tenant Accounts Receivable • 11/14/2003 Edition • Periodic Reports and Initialization • Page 12.3
Payment Summary
This report shows the detailed transaction records
of each transaction on the Bank Deposit report. It
is otherwise identical to the Bank Deposit report in
terms of uses and report formatting options.
Adjustment Summary
The Adjustment Summary accounts for all account
adjustments that have been recorded in Receivables in a specified range of dates.
Use the Select Projects set of check boxes to
include adjustments for any combination of projects. Use the Group By drop-down selection box
to group the report by all adjustments in a specific
project or all adjustments recorded by a specific
user. Use the Select Cashier Initials drop-down
selection box to filter the report on adjustments
recorded by a specific user. Use the Report Period
set of date fields to specify the range of dates that
the report covers.
WinTen Tenant Accounts Receivable • 11/14/2003 Edition • Periodic Reports and Initialization • Page 12.4
Research Reports
Research reports provide you with a more in-depth
look at the data contained in the recommended reports. Run research reports as needed to view and
verify this data.
Applied Payment
This report is similar to the Bank Deposit report,
and has identical formatting options, but shows the
tenant account charge to which each payment was
applied.
Applied Adjustment
This report is similar to the Account Summary
report, and has identical formatting options, but
shows the tenant account charge to which each
adjustment was applied.
WinTen Tenant Accounts Receivable • 11/14/2003 Edition • Periodic Reports and Initialization • Page 12.5
Monthly Tab
The Monthly tab contains reports on Receivables’
financial activity in the current month. It also
contains the Initialization button, which starts the
monthly initialization procedure.
Monthly reports are used to show that all payments, adjustments, security deposits, repayment
agreements, and re-certifications have been correctly entered into the program before you initialize
Receivables into the next month. Many of these
reports show all account activity that will be posted
to the General Ledger.
WinTen Tenant Accounts Receivable • 11/14/2003 Edition • Periodic Reports and Initialization • Page 12.6
Available Reports
Recommended Reports
Recommended reports are reports that you should
run at the close of each business day and store in
a notebook or file folder for audit purposes.
Rental Register
This report lists all Receivables activity for the current month. The report’s totals represent all ledger
activity for the Tenant Accounts Receivable account in General Ledger (typically account number
1122).
Use the Select Projects set of check boxes to include adjustments for any combination of projects.
Use the Select Tenants drop-down selection box to
filter the report by a specific group of tenants. Use
the Order By drop-down selection box to select the
order in which the report is sorted.
Deposit Register
This report lists all security deposit and pet deposit
activity for the current month. The report’s totals
represent all ledger activity for the deposit account
(typically account number 2114).
Use the Select Projects set of check boxes to include adjustments for any combination of projects.
Retro Rent Register
This report lists all retroactive rent repayment
agreement activity for the current month. The
report’s totals represent all ledger activity for the
retroactive rent repayment account (typically account number 1122.RR).
Use the Select Projects set of check boxes to include transactions for any combination of projects.
Use the Group By drop-down selection box to group
the report by all transactions in a specific project or
all transactions recorded by a specific cashier. Use
the Select Payments and Select Cashier Initials
drop-down selection boxes to filter the report on a
specific payment type and/or transactions recorded
by a specific cashier. Use the Report Period set
of date fields to specify the range of dates that the
report covers.
WinTen Tenant Accounts Receivable • 11/14/2003 Edition • Periodic Reports and Initialization • Page 12.7
Promissory Note Register
This report lists all promissory note activity for
the current month. The report’s totals represent
all ledger activity for the promissory note account
(typically account number 1122.PN).
Use the Select Projects set of check boxes to include adjustments for any combination of projects.
Use the Order By drop-down selection box to select the order in which the report is sorted.
Complete Totals
This report is a one-page executive summary of the
Rental, Deposit, Retro Rent, and Promissory Note
registers. Many agencies use the Complete Totals
report as a handout at monthly board meetings to
show all account activity for the month.
Use the Select Projects set of check boxes to include totals for any combination of projects. Check
the Print Projects Separately check box to print
each selected project’s totals on a separate page.
Future Charges/Rent List
This report shows the charges that will be posted
to tenant accounts when you initialize into the next
month.
Use the Select Projects set of check boxes to include charges that will be posted in any combination of projects. Use the Select Tenants drop-down
selection box to filter the report by a specific group
of tenants. Use the Order By drop-down selection box to select the order in which the report is
sorted.
WinTen Tenant Accounts Receivable • 11/14/2003 Edition • Periodic Reports and Initialization • Page 12.8
ORC Changes
This report lists all rent certification changes that
will be brought into Receivables from Occupancy
and Rent Calculation when you initialize into the
next month.
Use the Order By drop-down selection box to select the order in which the report is sorted. Use the
Effective Date Range to filter the rent changes by
their effective date: the next month, all regardless
of date, or all that will take effect within a specified
range of dates.
Research Reports
Research reports provide you with a more in-depth
look at the data contained in the recommended reports. Run research reports as needed to view and
verify this data.
Charge Analysis
The Charge Analysis report shows the current
month’s charges by tenant. This report provides
the full charge detail of each tenant, expanding on
the data provided in the Rental Register. Where
the Rental Register compresses some similar
charges into one category, this report breaks down
each individual charge.
Use the Select Projects set of check boxes to include charges that will be posted in any combination of projects. Use the Select Tenants drop-down
selection box to filter the report by a specific group
of tenants. Use the Order By drop-down selection box to select the order in which the report is
sorted.
Credit Analysis
The Credit Analysis report shows the current
month’s account credits by tenant. Credits are
broken down by category: tenant payments,
charge adjustments, charge offs, refunds, deposit
transfers, and repayment agreements. This report
is useful for verifying the payment section of the
Rental Register.
Use the Select Projects set of check boxes to
include charges that will be posted in any combination of projects. Use the Order By drop-down
selection box to select the order in which the report
is sorted.
WinTen Tenant Accounts Receivable • 11/14/2003 Edition • Periodic Reports and Initialization • Page 12.9
Applied Payment
The Applied Payment report shows how each cash
payment was applied to the charges in the tenant’s
account.
Use the Select Projects set of check boxes to
include payments for any combination of projects. Use the Group By drop-down selection box
to group the report by all payments in a specific
project or all payments taken by a specific cashier.
Use the Select Payments and Select Cashier Initials drop-down selection boxes to filter the report
on a specific payment type and/or transactions
recorded by a specific cashier. Use the Report Period set of date fields to specify the range of dates
that the report covers.
Applied Adjustment
The Applied Adjustment report shows how each
adjustment was applied to the charges in the
tenant’s account.
Use the Select Projects set of check boxes to
include payments for any combination of projects. Use the Group By drop-down selection box
to group the report by all payments in a specific
project or all payments taken by a specific cashier.
Use the Select Payments and Select Cashier Initials drop-down selection boxes to filter the report
on a specific payment type and/or transactions
recorded by a specific cashier. Use the Report Period set of date fields to specify the range of dates
that the report covers.
WinTen Tenant Accounts Receivable • 11/14/2003 Edition • Periodic Reports and Initialization • Page 12.10
INITIALIZATION
Because of the way accounting works, Receivables only works with the records for one month
at a time. When Receivables is in a given month,
it only handles transactions that occur within that
month. Because many agencies don’t always finish recording a month’s transactions until after that
month has ended on the calendar, Receivables
doesn’t automatically move itself to the next month.
It waits until a user tells it, “okay, you’re done with
this month, now close the books on it and open
them for the next month.” This process of closing one month and opening the next one is known
as initialization. To initialize, click the Initialization
button on the Monthly tab of the Periodic Reports
screen.
Hint: Before you initialize...
Before initialization, you should have printed each of the
recommended monthly reports so you can go over them
and make sure all your data is correct.
WinTen Tenant Accounts Receivable • 11/14/2003 Edition • Periodic Reports and Initialization • Page 12.11
Initialization Menu Dialog Box
When you click the Initialization button, the Initialization Menu dialog box opens. This dialog box enables you to select the two steps of the initialization
process: pre-initialization and actual initialization.
Pre-initialization enables you to review your data
to ensure that everything is correct for the month
you’re about to close.
WinTen Tenant Accounts Receivable • 11/14/2003 Edition • Periodic Reports and Initialization • Page 12.12
Pre-Initialization
If you click the Step 1 button on the Initialization
Menu dialog box, the Pre-Initialization Selections
sub-screen opens. This sub-screen enables you
to set your options for the pre-initialization data
processing and report printing procedures. Select
the options you want, then click the Begin PreInitialization button to begin the pre-initialization
procedure.
CAUTION
The pre-initialization process is designed to help you
ensure that all of your data is correct before you initialize
Receivables into a new month. Initializing with incorrect
data can be very costly in terms of time spent correcting
errors. Please go over each report that the pre-initialization process produces and check it for errors. You can run
the pre-initialization process as many times as you need
to before running the actual initialization process, and we
strongly recommend that you take full advantage of this
capability.
WinTen Tenant Accounts Receivable • 11/14/2003 Edition • Periodic Reports and Initialization • Page 12.13
Pre-Initialization Options
Pre-Initialization Report
The pre-initialization report can contain all tenants,
or only those whose rent and/or addresses have
changed in the last month. Select the radio button
that corresponds to the option you want.
Pre-Initialization Report Sort Order
The program can sort the pre-initialization report in
order of tenant name, unit number, tenant Social
Security number, tenant account number, project
number and unit number, or project number and
account number. Select the radio button that corresponds to the option you want.
Project
You can run the pre-initialization process for one
specific project, or for all projects. If you want to
limit it to one project, use the drop-down selection
box to select the project. We recommend running
the process for all projects.
Rent Changes from Occupancy and Rent Report Sort Order
The pre-initialization process includes a report on
all tenant rent changes that will be imported from
the Occupancy and Rent Calculation module. The
program can sort this report in order of tenant
name, unit number, tenant Social Security number,
tenant account number, or effective date. Select
the radio button that corresponds to the option you
want.
Rental Register and Futures Report
The pre-initialization process includes the Rental
Register and Futures reports. The program can
sort these reports in order of tenant account number, tenant name, or unit number. Select the radio
button that corresponds to the option you want.
WinTen Tenant Accounts Receivable • 11/14/2003 Edition • Periodic Reports and Initialization • Page 12.14
When you click the Begin Pre-Initialization button,
a standard print preview screen opens with the
Monthly Register report. Review this report on the
screen, or click the Print button to print it. When
you are done with the Monthly Register report, click
the Close button to close the print preview screen
and continue with pre-initialization.
NOTE: Tenmast strongly recommends that you
print each available report in the pre-initialization sequence.
WinTen Tenant Accounts Receivable • 11/14/2003 Edition • Periodic Reports and Initialization • Page 12.15
When you close the Monthly Register report, the
Post Receivables to General Ledger sub-screen
opens. This screen contains a table of every General Ledger account that is subject to a transaction.
Click the Post button to post these transactions or
the Cancel button to cancel the procedure and return to the Main Menu.
If you click the Post button, the program posts
each transaction to the General Ledger. When this
process is done, a dialog box opens that informs
you that posting is complete. Click OK to close the
Post Receivables to General Ledger screen and
continue with the pre-initialization process.
WinTen Tenant Accounts Receivable • 11/14/2003 Edition • Periodic Reports and Initialization • Page 12.16
When you finish posting (or cancel posting), a
standard print preview screen opens with the Receivables Transaction Journal report. Review this
report on the screen, or click the Print button to
print it. When you are done with the Receivables
Transaction Journal report, click the Close button
to close the print preview screen and continue with
pre-initialization.
Hint: Deja Vu?
This report has two parts. When you close the first part, the
second one opens. The first part is the permanent Receivables Transaction Journal from the WinTen General Ledger
module. The second part is the temporary journal to which
Receivables posts.
If your agency performs meter readings, a dialog
box opens that tells you which month’s utility allowance table the program will use to set up future
utility charges during initialization. If this is correct,
click Yes to continue with pre-initialization. If it is
not correct, click No to cancel the rest of pre-initialization, then go to the Setup screen and change
the month setting on the Utilities tab (see the Setup
chapter for more information).
WinTen Tenant Accounts Receivable • 11/14/2003 Edition • Periodic Reports and Initialization • Page 12.17
If you click Yes, the Work Order Dates dialog box
opens. This dialog box asks you for the latest
date for which the program should post work order
charges to tenant accounts. Enter the correct date
in the data field and click OK to continue with preinitialization.
When you finish with the Work Order Dates dialog
box, a standard print preview screen opens with
the Pre-Initialization report. Review this report on
the screen, or click the Print button to print it. When
you are done with the Pre-Initialization report, click
the Close button to close the print preview screen
and continue with pre-initialization.
WinTen Tenant Accounts Receivable • 11/14/2003 Edition • Periodic Reports and Initialization • Page 12.18
When you finish with the Pre-Initialization report,
a standard print preview screen opens with the
Pre-Initialization Future Charges report. Review
this report on the screen, or click the Print button to
print it. When you are done with the Pre-Initialization Future Charges report, click the Close button
to close the print preview screen and continue with
pre-initialization.
When you finish with the Pre-Initialization Future
Charges report, the program returns to the Initialization Menu dialog box.
WinTen Tenant Accounts Receivable • 11/14/2003 Edition • Periodic Reports and Initialization • Page 12.19
Initialization
If you click the Step 2 button on the Initialization
Menu dialog box, a warning dialog box opens.
This dialog box informs you that initialization is a
very memory-intensive process, and recommends
that you reboot your workstation before continuing
so that a maximum amount of system resources
will be available for the process. If you have not
rebooted your workstation, click the Cancel button
and shut it down. Wait 60 seconds, then restart
your workstation and return to the Initialization process. If you have rebooted your workstation, click
OK to continue with initialization.
WinTen Tenant Accounts Receivable • 11/14/2003 Edition • Periodic Reports and Initialization • Page 12.20
If you click OK, the Monthly Initialization subscreen opens. Select the version of the Rental
register you want to print and the order in which
you want to apply rent changes from Occupancy
and Rent Calculation, then click the Begin Initialization button to begin initialization or the Cancel
button to cancel it.
CAUTION
Once you begin the initialization process, you cannot stop
it until it is complete.
If you click the Begin Initialization button, a dialog
box opens that asks you to confirm your intent to
initialize. Click Yes to continue or No to cancel.
WinTen Tenant Accounts Receivable • 11/14/2003 Edition • Periodic Reports and Initialization • Page 12.21
If your agency performs meter readings, a dialog
box opens that tells you which month’s utility allowance table the program will use to set up future
utility charges during initialization. If this is correct,
click Yes to continue with initialization. If it is not
correct, click No to cancel the rest of initialization,
then go to the Setup screen and change the month
setting on the Utilities tab (see the Setup chapter
for more information).
If you click Yes, the Work Order Dates dialog box
opens. This dialog box asks you for the latest
date for which the program should post work order
charges to tenant accounts. Enter the correct date
in the data field and click OK to continue with initialization.
If you use daily late charges, the program processes all outstanding work orders for the new month.
A dialog box opens that asks you if you want to
apply the daily late charge at the end of the month.
Click the button that corresponds to your choice.
WinTen Tenant Accounts Receivable • 11/14/2003 Edition • Periodic Reports and Initialization • Page 12.22
A standard print preview screen opens with the
Monthly Rental Register report. Review this report
on the screen, or click the Print button to print it.
When you are done with the Monthly Rental Register report, click the Close button to close the print
preview screen and continue with pre-initialization.
NOTE: Tenmast strongly recommends that you
print each available report in the initialization
sequence.
A dialog box opens that asks if you want to clear
year-to-date rents during initialization. Click the
button that corresponds to your choice.
Hint: When should I clear year-to-date rents?
Typically, you should only clear year-to-date rents if you are
initializing from December to January.
WinTen Tenant Accounts Receivable • 11/14/2003 Edition • Periodic Reports and Initialization • Page 12.23
The Post Receivables to General Ledger subscreen opens. This screen contains a table of
every General Ledger account that is subject to
a transaction. Click the Post button to post these
transactions or the Cancel button to cancel the procedure and continue with initialization.
WinTen Tenant Accounts Receivable • 11/14/2003 Edition • Periodic Reports and Initialization • Page 12.24
When you finish posting (or cancel posting), a
standard print preview screen opens with the Receivables Transaction Journal report. Review this
report on the screen, or click the Print button to
print it. When you are done with the Receivables
Transaction Journal report, click the Close button
to close the print preview screen and continue with
initialization.
Hint: Deja Vu?
This report has two parts. When you close the first part, the
second one opens. The first part is the permanent Receivables Transaction Journal from the WinTen General Ledger
module. The second part is the temporary journal to which
Receivables posts.
WinTen Tenant Accounts Receivable • 11/14/2003 Edition • Periodic Reports and Initialization • Page 12.25
When you are finished with the Receivables Transaction Journal report, the program returns to the
Monthly Initialization sub-screen. The bottom area
of this screen displays a running status report on
the initialization process.
WinTen Tenant Accounts Receivable • 11/14/2003 Edition • Periodic Reports and Initialization • Page 12.26
When the program is done updating its databases,
a dialog box opens that asks if you want to run the
new Monthly Rental Register report with the new
month’s charges and balances. Click the button
that corresponds to your choice.
If you click Yes, a standard print preview screen
opens with the Monthly Rental Register report. Review this report on the screen, or click the Print button to print it. When you are done with the Monthly
Rental Register report, click the Close button to
close the print preview screen and continue with
initialization.
WinTen Tenant Accounts Receivable • 11/14/2003 Edition • Periodic Reports and Initialization • Page 12.27
When you are finished with the Monthly Rental
Register report, a standard print preview screen
opens with the Monthly Initialization report. Review
this report on the screen, or click the Print button to
print it. When you are done with the Monthly Initialization report, click the Close button to close the
print preview screen continue with initialization.
WinTen Tenant Accounts Receivable • 11/14/2003 Edition • Periodic Reports and Initialization • Page 12.28
A dialog box opens that asks if you want to update
the retroactive rent agreement information in Occupancy and Rent Calculation. Click the button that
corresponds to your choice.
NOTE: This is not an automatic function due
to differences in housing authority policies
regarding retro rent agreements. You must
manually choose for Receivables to update the
agreements.
A dialog box opens that informs you that the initialization process is complete. Click OK to close all
associated dialog boxes and screens and return to
the Main Menu.
WinTen Tenant Accounts Receivable • 11/14/2003 Edition • Periodic Reports and Initialization • Page 12.29
WinTen Tenant Accounts Receivable • 11/14/2003 Edition • Periodic Reports and Initialization • Page 12.30
INDEX
Setup 3.38
B
M
Bills 8.1
Printing 8.3
Setup 3.8
C
Caseworkers
Setup 3.3, 3.44
Charges 4.23, 5.1
Late 5.2
Repeating 5.4
Charge Off Tenant 6.18
Check Reconciliation 3.5
Color 3.3
Credits 6.1
Cyclical Actions 2.8
D
Deposit 4.13
Pet
Setup 3.11
Record Ticket 6.13
Refund 4.17, 4.19, 4.21
Security
Setup 3.11
Taking 6.8
Transfer 4.17, 4.19, 4.21
E
Electronic Payment FIle 3.3
Electronic Payment File
Import 6.26
EPF. See Electronic Payment File
G
General Ledger 2.1, 3.5
Posting 9.1
H
Household 4.12
I
Initialization 12.1, 12.11, 2.13
Inspections 4.42
MS-DOS-based Program 4.36
Public Housing (program) 2.3
Installation. See Planning Questions
L
Labels 7.22
Late Charges
Mail Merge 7.22
Main Menu 2.16
Management Codes
Setup 3.3, 3.46
Master Unit Manager 2.3, 3.28
Meter Reading
Schedules 5.12
Setup 3.22
Meter Readings 5.6
Supplemental 4.31
Monthly Actions. See Cyclical Actions
Move In 4.4
Move Out 4.37
N
Navigation 2.5
Non-Dwelling Income 6.15
O
Occupancy and Rent Calculation 2.2
Overview 2.1
Navigation 2.5
P
Payments 6.1
Deposit 6.8
Escrow 6.9
Non-Dwelling Income 6.15
Receipts
Run Batch 6.12
Void 6.11
Taking 6.3
Transfer 6.10
Void Receipts 6.11
Pet Deposit
Setup 3.11
PHAS 2.3
Planning Questions 2.14
Posting. See General Ledger, Posting
Project
Setup 3.17
Project Number
Setup 3.17
Promissory Note 4.25
Public Housing Inspections 2.3
R
Receipts
Setup 3.9
WinTen Tenant Accounts Receivable • 11/14/2003 Edition • Index • Page i.1
Refund
Issue 6.20
Reverse 6.25
Reindex 11.1
Rental Register
Setup 3.6
Reports 7.1
Pediodic
Monthly 12.6
Periodic 12.1
Daily 12.3
Quick Lists 7.19
Tenant Accounting 7.3
Tenant Management 7.12
Utility Meter Readings 7.21
Retro Rent Agreement 4.25
S
Security Deposit
Setup 3.11
Setup 3.1
Bills 3.8
Caseworkers 3.3, 3.44
Color 3.3
Deposit
Pet 3.11
Security 3.11
Electronic Payment File 3.3
EPF. See Setup, Electronic Payment File
Late Charges 3.38
Management Codes 3.3, 3.46
Meter Reading 3.22
Planning Questions 2.14
Projects 3.17
Project Numbers 3.17
Receipts 3.9
Rental Register 3.6
Units 3.28
Utilities 3.8, 3.21
Allowances 3.24
Utility
Rates 3.26
Work Orders 3.10
U
Unit
Setup 3.28
Utilities 4.28, 5.1
Recalculations 5.10, 5.16
Setup 3.8
Utility
Allowances
Setup 3.24
Rates
Setup 3.26
Setup 3.21
W
Wizards 10.1
Agreement Removal 10.7, 4.27
Edit Monthly Agreement Charge 10.6, 4.26
Payment 6.3
Setup 3.9
Process Batch Refunds 6.23
Process Deposit Ticket 6.13
Promissory Note Creation 10.2, 4.26
Promissory Note Transfer 10.4, 4.26
Retroactive Rent Agreement Creation 10.2, 4.26
Retroactive Rent Agreement Transfer 10.4, 4.26
WorkOrder 2.4, 4.33
Import from WorkOrder Program 5.14
Make Current 5.14
Setup 3.10
T
Tenants 4.1
Charges 4.23
Charge Off 6.18
Charge Off Records 4.41
History Records 4.40
Household 4.12
Move In 4.4
Move Out 4.37
Search 4.2
Transfer 4.38
Utilities 4.28
Transfer 4.38
WinTen Tenant Accounts Receivable • 11/14/2003 Edition • Index • Page i.2
APPENDIX A: SPECIAL UTILITY CALCULATIONS
The Allowance Tables setup function (the Allowance Tables sub-tab of the Utilities tab of the Setup
screen) allows you to set up utility allowance tables. Normally, these tables are based on the number of bedrooms in a unit. However, Receivables
also supports utility allowance tables based on the
number of residents in a household. To use this
option, check the Use New Utility Calculation check
box on the Utility Setup sub-tab of the Utilities tab.
The Allowance Tables sub-tab’s appearance and
functionality changes to support this option.
When you first enter the Allowance Tables sub-tab,
it displays a table which contains the unique identifying codes for each existing utility allowance table.
When you add a new table or edit an existing one,
the sub-tab changes to display the detailed information for the selected table. Use the standard
WinTen icons to edit the data on this sub-tab and
save or cancel your changes.
CAUTION
If your agency uses this option for calculating utility allowances, you must base all of the following settings on a utility
audit conducted by an energy consulting firm. Contact your
local utility company for details.
In addition, you may need assistance from a Tenmast
Training & Support Specialist to perform the calculations
required to set up this option. Do not change any of the
data on this sub-tab unless Tenmast personnel have instructed you to do so.
WinTen Tenant Accounts Receivable • 11/14/2003 Edition • Special Utility Calculations • Page A.1
Adding a Utility Allowance Table
When you click the Add icon, the Utility Allowance
Add dialog box opens. Select the project to which
the new utility allowance table applies, then enter a
unique identifying code (up to three characters) for
it. Click the OK button. The program then creates
a blank utility allowance table and the Allowance
Tables sub-tab changes to display the detailed information for this table.
Editing a Utility Allowance Table
When the Allowance Table sub-tab enters edit
mode, it changes to display the detailed information for the selected utility allowance table.
WinTen Tenant Accounts Receivable • 11/14/2003 Edition • Special Utility Calculations • Page A.2
Allowance
Fields
Tables
Sub-Tab
Data
Heat Base
These are the base heating allowances for each
month of the year, as determined by the utility audit.
Unit Code
This is an optional field that you can use to classify
unit types. Each unit code corresponds to a letter
(A through T), which you can use to reference unit
types for individual households. Refer to the utility
audit for recommended unit codes.
GCR (HCF/FD)
GCR stands for Gas Consumption Rate, and
FD stands for Fahrenheit Day. These fields are
the gas consumption rates for each unit code (A
through T), based on hundreds of cubic feet of gas
per Fahrenheit day.
EFBR (kWh/FD)
EFBR stands for Electric Furnace Blower Rate, and
kWh/FD stands for KiloWatt-Hour per Fahrenheit
Day. These fields are the electric furnace energy
consumption rates for each unit code (A through T),
based on kilowatt-hours per Fahrenheit day.
Units of Water per Person per Day Allowance
This is the water allowance per resident per day. If
your agency reads water consumption in gallons,
this field should be 60 (the HUD standard). If your
agency uses another unit for water consumption,
this field should be the appropriate value here.
Non-Heat Gas
This is the allowance rate for gas used for purposes
other than heating. This allowance has two components: a base rate and a per-resident factor.
Non-Heat Elec
This is the allowance rate for electricity used for
purposes other than heating. This allowance has
two components: a base rate and a per-resident
factor.
Cooling
This is the allowance rate for cooling utilities. This
allowance has two components: a base rate and a
per-resident factor.
Summer
This is the allowance rate for summer-only utilities.
This allowance has two components: a base rate
and a per-resident factor.
WinTen Tenant Accounts Receivable • 11/14/2003 Edition • Special Utility Calculations • Page A.3
WinTen Tenant Accounts Receivable • 11/14/2003 Edition • Special Utility Calculations • Page A.4
APPENDIX B: PHAS EVENTS
The core purpose of the PHAS functions in Receivabls is to collect and interpret unit vacancy data for submission to HUD. The program accomplishes this through analyzing changes to unit status known as PHAS
events. This chapter examines the theory and practice of PHAS events.
Basic Principles of Event Tracking
Every time a unit’s condition or status changes in
a manner that affects the unit’s vacancy status,
a PHAS event occurs. This includes old tenants
moving out, new tenants moving in, or an unoccupied unit undergoing maintenance or being used
for a purpose other than tenant habitation.
The end result of all of this record-keeping is a
set of reports that your agency submits to HUD to
show HUD how long units are remaining vacant
before new tenants move into them, and why that
vacancy time is occurring. Naturally, because HUD
is paying your agency to run these units, HUD likes
to see as little vacancy time as possible. This
ensures that the federal government is getting its
money’s worth from your agency’s funding.
Hint: PHAS
This appendix and the following Appendix C provide only
cursory explanations of the calculations involved in PHAS
reporting. For a more complete overview of the PHAS reporting process, please refer to the WinTen PHAS user’s
manual.
The PHAS program summarizes each PHAS event
in an event record. A complete set of event records
that begins with a tenant moving out and ends with
a tenant moving in is called an event sequence.
Because HUD requires vacancy tracking by days
per month, an event sequence that begins in one
month and ends in another must be split between
those months. To do this, whenever a new month
begins, the PHAS program closes out an existing
event on the first day of the new month and begins
a new event of the same type on the same day.
WinTen Tenant Accounts Receivable • 11/14/2003 Edition • PHAS Events • Page B.1
Event Record Terminology
The following terms describe individual pieces of
information in an event record.
Official HUD Definitions
Vacancy Days
Vacancy days are the total days in your agency’s
fiscal year in which a unit is not “Under Lease.”
HUD calculates total vacant days from the actual
move out date or legal expiration date of the immediate past lease, whichever is later, to the date that
the next tenant’s lease takes effect. If the unit is
not leased as of the last day of the reporting fiscal
year, the total vacant days are calculated from the
actual move out date or legal expiration date of the
immediate past lease, whichever is later, to the last
day of the reporting fiscal year.
Legal Expiration of the Lease
This assumes a month-to-month lease, and is,
by default, no later than the last day of the current month. If your agency is not using a month
to month lease, this is the date the unit became
vacant or the date your agency became aware of
the unit becoming vacant. This is defined in HUD
7460.5G, page 2-13.
Down Time
Down time is the total number of days that a unit is
vacant from the actual move out date or legal expiration date of the immediate past lease, whichever
is later, to the date that your agency refers the unit
to your Maintenance department for repair of any
deficiencies that were found during the move-out
inspection.
Down time is only counted in a reporting year if the
unit is reoccupied during that year. If a unit is not
reoccupied until a later year, all down time days
are counted against the year in which the unit was
reoccupied. For example, if a tenant moves out in
December 2001 but the unit isn’t referred to Maintenance until January 2002, the entire down time
total for that period is reported for your agency’s
2002 fiscal year.
Time that the unit spends under a capital funds
plan or another exemption is not counted as down
time.
Make Ready Time (Maintenance Time)
Make ready time, also known as maintenance time,
is the total number of days that a unit is vacant from
the date the unit was referred to Maintenance (the
ending date of the unit’s down time) to the time that
Maintenance reported that repairs were completed
Hint: What does today count as?
For the purposes of the PHAS program, any day that a
unit’s condition changes is counted as a day for the condition to which the unit is changing. The one exception to this
rule is a day for which a lease is in effect on the unit.
Confused? Us, too. Try using these simple rules of
thumb:
• If your agency could legally charge someone rent for that
day, it doesn’t count as a vacancy day. This includes every
day up to and including the day on which the old tenant’s
lease expires. This also includes every day on and after
the new tenant’s lease takes effect.
• Assuming that a day is a legal vacancy day (a lease isn’t
in effect at any time during that day), use the condition in
which the unit was in when your office closed for the day to
determine what its condition is. If a unit is sent to maintenance on June 1, it doesn’t matter if maintenance got the
work order at 8:01 a.m. or 4:59 p.m. — if the unit was in
maintenance at the end of business on that day, June 1
counts as a maintenance day.
WinTen Tenant Accounts Receivable • 11/14/2003 Edition • PHAS Events • Page B.2
and the unit was ready for occupancy again.
Make ready time is only counted in a reporting year
if the unit is reoccupied during that year. If a unit
is not reoccupied until a later year, all make ready
time is counted against the year in which the unit
was reoccupied. For example, if a unit is referred to
Maintenance in December 2001 but Maintenance
doesn’t finish with it until January 2002, the entire
make ready time total for that period is reported for
your agency’s 2002 fiscal year.
Time that the unit spends under a capital funds
plan or another exemption is not counted as make
ready time.
Occupancy or Lease Up Time
Occupancy or lease up time is the total number of
days that a unit is vacant from the date that Maintenance completed repairs on it (the ending date of
the unit’s make ready time) to the actual move in
date of the next tenant.
Occupancy or lease up time is only counted in a
reporting year if the unit is reoccupied during that
year. If a unit is not reoccupied until a later year, all
occupancy or lease up time is counted against the
year in which the unit was reoccupied. For example, if Maintenance finishes with a unit in December
2001 but a new tenant doesn’t move in until January 2002, the entire occupancy or lease up time
total for that period is reported for your agency’s
2002 fiscal year.
Time that the unit spends under a capital funds
plan or another exemption is not counted as occupancy or lease up time.
WinTen Tenant Accounts Receivable • 11/14/2003 Edition • PHAS Events • Page B.3
Tenmast Definitions
Event
An event is a record that signifies a change made
to a unit, whether it is a condition change, a status
change, or the beginning of a new receivables
month.
Event Sequence
An event sequence is a series of events involving
one unit, from move out to move in. All events
within this time period make one event sequence.
Event Types (Condition Codes)
The PHAS program supports ten types of events,
or condition codes. Each of the following ten definitions is a condition code that corresponds to a
PHAS reportable event:
MO
Move Out. Tenant has moved out.
ND
Non-Dwelling. Unit is being used for purposes
other than housing, such as a maintenance shop, a
police sub-station, or a day care facility.
EM
Employee occupied. Unit is occupied by an employee of your agency.
CA
The unit is available for rental or is currently occupied. In the PHAS event world, this almost always
indicates that the unit is available for rental.
CR
The unit is unavailable for rental because the last
resident left property in the unit. This only applies
if state law requires the property to remain in the
unit and only applies for the time limit given by state
law. In most cases, this is used when the unit has
been sealed due to an eviction.
Days during which the unit falls under a CR condition are considered exempt from reporting, though
they are still vacancy days.
CD
The unit is unavailable for rental because the unit
has been added to an approved deprogramming
plan. This includes a plan to demolish or dispose
of the unit.
Days during which the unit falls under a CD condition are considered exempt from reporting, though
they are still vacancy days.
Hint: “Exempt from Reporting”
Vacancy days that are exempt from reporting are days that
HUD won’t penalize your agency for. Six of the condition
codes indicate exempt vacancy days. Generally speaking,
if the unit is vacant because of legal or physical reasons
beyond your agency’s control, HUD understands this, considers it an exempt day, and won’t penalize your agency
for it.
WinTen Tenant Accounts Receivable • 11/14/2003 Edition • PHAS Events • Page B.4
CM
The unit is vacant as a result of action under an
approved modernization plan. This includes Comp
Grant, CIAP, capital funds, or other modernization
plans. You must enter the date of modernization
approval on the Master Unit Main tab of the Master Unit Maintenance screen before entering a CM
event.
Days during which the unit falls under a CM condition are considered exempt from reporting, though
they are still vacancy days.
CP
The unit is vacant due to changing market conditions. HUD 7460.5G, page 2-10, paragraph
3 defines this as “HA’s in communities that are
undergoing dramatic population loss or economic
dislocations that experience resulting vacancies.”
The Form HUD-50072 Instruction Guidebook defines changing market conditions as “related to
declining population, no waiting list, competitive
housing stock... or particular problems matching a
certain bedroom size with a segment of the available population.”
Days during which the unit falls under a CP condition are considered exempt from reporting, though
they are still vacancy days.
CI
The unit is vacant due to other reasons outside
your agency’s control. These include natural disasters (flood, tornado, hurricane, earthquake, volcanic eruption, plague of locusts, comet striking the
planet), casualty damage, or any litigation or court
orders that directly involve an insurance claim.
For purposes of this condition code, a natural disaster only applies to an area where the president
or governor has issued a declaration or proclamation of the disaster, and its time frame is limited to
the one specified in the declaration or proclamation
— if the declaration/proclamation ends, so does
the CI condition.
Likewise, casualty damage is limited to the time
an insurance claim is pending — as soon as the
insurance company agrees to pay, the CI condition
ends, even if your agency hasn’t actually received
the check yet.
Hint: What is casualty damage?
Casualty damage is any insurance claim on the unit that
doesn’t involve a presidential or governor’s declaration or
proclamation of a natural disaster.
Days during which the unit falls under a CI condition are considered exempt from reporting, though
they are still vacancy days.
WinTen Tenant Accounts Receivable • 11/14/2003 Edition • PHAS Events • Page B.5
CE
The unit is vacant due to legal conditions that do
not directly involve an insurance claim (insurance
claims and related legal action are covered under
the CI condition code). This may be due to litigation
that directly involves the unit, such as a court order.
It also applies if a government agency has sealed
the unit — for example, a police crime scene seal.
This code also covers units that are vacant because
they are in conditions that make habitation illegal.
Such conditions include high or unsafe levels of
hazardous or toxic materials or structural decay or
damage that renders the unit uninhabitable.
Finally, this code also includes specific orders from
a legally empowered government agency, such as
the local health department or the Environmental
Protection Agency.
Days during which the unit falls under a CE condition are considered exempt from reporting, though
they are still vacancy days.
CAUTION
Some condition codes have complicated definitions and
require HUD approval before being used. This is because
all C- codes except CA are exempt from vacancy totals,
and thus can affect your agency’s PHAS scores. Be sure
you refer to the applicable regulations and obtain proper
approval where necessary.
WinTen Tenant Accounts Receivable • 11/14/2003 Edition • PHAS Events • Page B.6
Examples of Event Sequences
Under the most basic normal circumstances, an
event sequence consists of the following steps:
• tenant moves out of unit
• unit is referred to maintenance for VFW (Vacancy
Fix-up Work order)
• unit maintenance is completed, unit is returned to
ready status (“referred to occupancy”)
• new tenant moves into unit
More complex versions of this scenario are possible, with condition changes and/or status changes
for the unit occurring between move out and move
in. The rest of this chapter examines common
ways in which the PHAS rules are applied to create
events and event sequences.
Example 1: Normal Scenario
(move out date and lease termination dates are the same)
In the Real World
In the PHAS Event World
A tenant’s lease expires on May 27. He moves out
on that day.
The tenant moves out on May 27, starting the
event. The lease also terminates on May 27, so
the lease termination date is the same as the event
start date. The 27th is the last day of occupancy,
so it doesn’t count as a vacancy day.
The unit is referred to maintenance for a VFW on
May 28.
The unit is referred to maintenance on May 28.
This occurs on the first day the unit is vacant, so
there is no down time. At the end of the day on the
28th, the unit is in maintenance, so the 28th counts
as maintenance (make ready) time.
Maintenance finishes the VFW and refers the unit
to occupancy on May 29. It’s now ready for a new
tenant.
Maintenance finishes with the unit on May 29,
taking one day to complete the work. The unit’s
elapsed maintenance time is 1 day. The unit is now
referred back to occupancy. At the end of the day
on the 29th, the unit is in occupancy, so the 29th
counts as occupancy/lease up time.
On the 30th, the unit is still in occupancy, so the
30th counts as occupancy/lease up time.
A new tenant moves in on May 31. The unit is occupied again.
A new tenant moves into the unit on May 31. The
unit is now occupied again. The 31st is a move-in
day, so it doesn’t count as a vacancy day.
The unit has a total of 3 vacancy days: 1 for maintenance and 2 for occupancy or lease up.
WinTen Tenant Accounts Receivable • 11/14/2003 Edition • PHAS Events • Page B.7
Example 2: Normal Scenario
(move out date and lease termination dates are the same)
In the Real World
In the PHAS Event World
A tenant’s lease expires on May 30. He moves out
on that day.
The tenant moves out on May 30, starting the
event. The lease also terminates on May 30, so
the lease termination date is the same as the event
start date. The 30th is the last day of occupancy,
so it doesn’t count as a vacancy day.
The unit is referred to maintenance for a VFW on
May 31.
The unit is referred to maintenance on May 31.
This occurs on the first day the unit is vacant, so
there is no down time. At the end of the day on the
31st, the unit is in maintenance, so the 31st counts
as maintenance (make ready) time.
While the unit is being worked on by Maintenance,
a new month begins. The Tenant Accounts Receivable program is initialized into that new month.
A new month begins. Tenant Accounts Receivable is initialized into the new month. Because
PHAS event tracking is monthly, the original event
is closed out with an ending date of June 1 (the
first day of the new month). A new event is begun
with a June 1 start date (see the Event Complete
column in the example above: the first event is not
marked as complete, indicating that the sequence
isn’t over yet). When the original event is closed
out, the program calculates vacancy days through
the end of that event. Because the unit has been
in maintenance one day so far (referred on May
31, event ended on June 1), it now has one maintenance day.
Maintenance finishes the VFW and refers the unit
to occupancy on June 1. It’s now ready for a new
tenant.
Maintenance finishes with the unit on June 1, taking
one day to complete the work. The unit’s elapsed
maintenance time for the new event is 0 days (but
remember, it still has one maintenance day already
logged from the original event). The unit is now referred back to occupancy. At the end of the day on
the 1st, the unit is in occupancy, so the 1st counts
as occupancy/lease up time.
On the 2nd and 3rd, the unit is still in occupancy, so
those days count as occupancy/lease up time.
A new tenant moves in on June 4. The unit is occupied again.
A new tenant moves into the unit on June 4, three
days after the unit was referred back to occupancy.
The 4th is a move-in day, so it doesn’t count as a
vacancy day.
The unit has a total of 4 vacancy days: 1 for maintenance and 3 for occupancy or lease up.
WinTen Tenant Accounts Receivable • 11/14/2003 Edition • PHAS Events • Page B.8
Example 3: Normal Scenario
(move out date before lease termination date)
In the Real World
In the PHAS Event World
A tenant’s lease is about to expire on May 31. He
moves out a day early, on May 30.
The tenant moves out on May 30, starting the
event. However, the lease does not terminate until
May 31. This means that the 31st is the last day
of occupancy for PHAS reporting purposes, and
anything that occurs through the end of that day
doesn’t count for vacancy purposes.
The unit is referred to maintenance for a VFW on
May 31.
The unit is referred to maintenance on May 31.
This occurs on the first day the unit is vacant, so
there is no down time. The 31st is the last day of
occupancy, so it doesn’t count as a maintenance
(make ready) day, even though the unit is in maintenance at the end of the 31st.
While the unit is being worked on by Maintenance,
a new month begins. The Tenant Accounts Receivable program is initialized into that new month.
A new month begins. Tenant Accounts Receivable
is initialized into the new month. Because PHAS
event tracking is monthly, the original event is
closed out with an ending date of June 1 (the first
day of the new month). A new event is begun with
a June 1 start date.
When the original event is closed out, the program
calculates vacancy days through the end of that
event. The unit has zero vacancy days so far,
because the 31st is the last day of occupancy. Vacancy tracking will start on the 1st.
Maintenance finishes the VFW and refers the unit
to occupancy on June 1. It’s now ready for a new
tenant.
Maintenance finishes with the unit on June 1. The
unit’s elapsed maintenance time for the new event
is 0 days (remember, May 31 didn’t count as anything because it was the day of lease termination).
The unit is now referred back to occupancy. At the
end of the day on the 1st, the unit is in occupancy,
so the 1st counts as occupancy/lease up time.
On the 2nd and 3rd, the unit is still in occupancy, so
those days count as occupancy/lease up time.
A new tenant moves in on June 4. The unit is occupied again.
A new tenant moves into a the unit on June 4, three
days after the unit was referred back to occupancy.
The 4th is a move-in day, so it doesn’t count as a
vacancy day.
The unit has a total of 3 vacancy days, all of which
are occupancy or lease up days.
WinTen Tenant Accounts Receivable • 11/14/2003 Edition • PHAS Events • Page B.9
Example 4: Scenario with Condition Changes
(move out date and lease termination dates are the same)
In the Real World
In the PHAS Event World
The tenant is evicted on May 30, starting the event.
The lease also terminates on May 30, so the lease
termination date is the same as the event start
date.
A move out event occurs on May 30, the same day
as the lease terminates. The 30th is the last day of
occupancy, so it doesn’t count as a vacancy day.
When the tenant is evicted, the unit is sealed with
all of his property in it. Under state law, this is
property that cannot be removed from the unit for
a given period of time, so the unit can’t be rented
again.
Because there is property in the unit, the unit’s
initial condition following the move out is CR.
This requires an event beginning on the 30th to
set that condition. Because the unit’s condition is
CR, there will eventually be a condition change
to CA when the property is removed and the unit
becomes available for rental again. However, it
hasn’t happened yet.
While the housing authority is waiting for the
property to become legally removable, the unit is
referred to maintenance on the day after the move
out (May 31).
While the housing authority is waiting for the property to be removed, the unit is referred to maintenance on May 31. This occurs on the first day the
unit is vacant, so there is no down time. At the end
of the day on the 31st, the unit is in maintenance,
so the 31st counts as maintenance (make ready)
time.
While the unit is being worked on by maintenance,
a new month begins. The Tenant Accounts Receivable program is initialized into that new month.
A new month begins. Tenant Accounts Receivable is initialized into the new month. Because
PHAS event tracking is monthly, the original event
is closed out with an ending date of June 1 (the
first day of the new month). A new event is begun
with a June 1 start date. When the original event
is closed out, the program calculates vacancy days
through the end of that event. Because the unit
has been in maintenance one day so far (referred
on May 31, event ended on June 1), it now has one
maintenance day.
Maintenance personnel take one day to complete
the VFW, working around the property which is still
in the unit. They finish the job on June 1. However,
because the property isn’t legally removable yet,
the unit still can’t be rented out.
Maintenance finishes with the unit on June 1, taking
one day to complete the work. The unit’s elapsed
maintenance time for the new event is 0 days (but
remember, it still has one maintenance day already
logged from the original event). Maintenance refers the unit back to occupancy. At the end of the
day on the 1st, the unit is in occupancy, so the 1st
counts as occupancy/lease up time. However, because there is still property in the unit, it can’t be
rented again yet - its condition is still CR.
WinTen Tenant Accounts Receivable • 11/14/2003 Edition • PHAS Events • Page B.10
On June 2, the housing authority is legally able to
remove the property. It is moved to the agency’s
own on-site storage facility. With the removal of the
property, the unit can now be rented again.
Once the property is removed, the unit can now
be rented (maintenance already finished the VFW
work order and the unit has been referred back to
occupancy). The unit’s condition changes to CA.
When this occurs, the previous CR event is closed
out. That CR event accrues one occupancy or
lease up day, for the day of June 2.
On the 3rd, the unit is still in occupancy, so the 3rd
counts as occupancy/lease up time.
A new tenant moves in on June 4. The unit is occupied again.
A new tenant moves into a the unit on June 4, two
days after the CA event began. This ends the CA
event. The 4th is a move-in day, so it doesn’t count
as a vacancy day.
The unit has a total of 4 vacancy days: 1 for maintenance and 3 for occupancy or lease up.
WinTen Tenant Accounts Receivable • 11/14/2003 Edition • PHAS Events • Page B.11
Example 5: Scenario with Condition Changes
(move out date and lease termination dates are the same)
In the Real World
In the PHAS Event World
A tenant’s lease is about to expire on May 31. He
is evicted a day early, on May 30.
The tenant moves out on May 30, starting the
event. However, the lease does not terminate until
May 31. This means that the 31st is the last day
of occupancy for PHAS reporting purposes, and
anything that occurs through the end of that day
doesn’t count for vacancy purposes.
When the tenant is evicted, the unit is sealed with
all his property in it. Under state law, this is property that cannot be removed from the unit for a given
period of time, so the unit can’t be rented again.
Because there is property in the unit, the unit’s
initial condition following the move out is CR.
This requires an event beginning on the 30th to
set that condition. Because the unit’s condition
is CR, there will eventually be a condition change
to CA when the property is removed and the unit
becomes available for rental again. However, it
hasn’t happened yet.
While the housing authority is waiting for the property to be removed, the unit is referred to maintenance on the day after the move out (May 31).
While the housing authority is waiting for the property to be removed, the unit is referred to maintenance on May 31. This occurs on the first day the
unit is vacant, so there is no down time. The 31st
is the last day of occupancy, so it doesn’t count as
a maintenance (make ready) day, even though the
unit is in maintenance at the end of the 31st.
While the unit is being worked on by Maintenance,
a new month begins. The Tenant Accounts Receivable program is initialized into that new month.
A new month begins. Tenant Accounts Receivable
is initialized into the new month. Because PHAS
event tracking is monthly, the original event is
closed out with an ending date of June 1 (the first
day of the new month). A new event is begun with
a June 1 start date. The program has zero vacancy
days so far, because the 31st is the last day of occupancy. Vacancy tracking will start on the 1st.
Maintenance personnel take one day to complete
the VFW, working around the property which is still
in the unit. They finish the job on June 1. However,
because the property isn’t legally removable yet,
the unit still can’t be rented out.
Maintenance finishes with the unit on June 1. The
unit’s elapsed maintenance time for the new event
is 0 days (remember, May 31 didn’t count as anything because it was the day of lease termination).
The unit is now referred back to occupancy. However, because there is still property in the unit, it
can’t be rented again yet - its condition is still CR.
At the end of the day on June 1, the unit is in occupancy. June 1 counts as occupancy/lease up
time.
WinTen Tenant Accounts Receivable • 11/14/2003 Edition • PHAS Events • Page B.12
On June 2, the housing authority is legally able to
remove the property. It is moved to the agency’s
own on-site storage facility. With the removal of the
property, the unit can now be rented again.
Once the property is removed, the unit can now
be rented (maintenance already finished the VFW
work order and the unit has been referred back to
occupancy). The unit’s condition changes to CA.
When this occurs, the previous CR event is closed
out. That CR event accrues one occupancy or
lease up day, for the day of June 2.
On the 3rd, the unit is still in occupancy, so the 3rd
counts as occupancy/lease up time.
A new tenant moves in on June 4. The unit is occupied again.
A new tenant moves into a the unit on June 4, two
days after the CA event began. This ends the CA
event. The 4th is a move-in day, so it doesn’t count
as a vacancy day.
The unit has a total of 3 vacancy days, all of which
are occupancy or lease up days.
WinTen Tenant Accounts Receivable • 11/14/2003 Edition • PHAS Events • Page B.13
Example 6: Scenario with Multiple Condition Changes
(move out date and lease termination date are the same)
In the Real World
In the PHAS Event World
A tenant is evicted on May 30. The lease also terminates on May 30, so the lease termination date
is the same as the move-out date.
A move out event occurs on May 30, the same day
as the lease terminates. The 30th is the last day of
occupancy, so it doesn’t count as a vacancy day.
When the tenant is evicted, the unit is sealed with
all his property in it. Under state law, this is property that cannot be removed from the unit for a given
period of time, so the unit can’t be rented again.
Because there is property in the unit, the unit’s
initial condition following the move out is CR.
This requires an event beginning on the 30th to
set that condition. Because the unit’s condition
is CR, there will eventually be a condition change
to CA when the property is removed and the unit
becomes available for rental again. However, it
hasn’t happened yet.
While the housing authority is waiting for the property to be removed, the unit is referred to maintenance on the day after the move out (May 31).
While the housing authority is waiting for the property to be removed, the unit is referred to maintenance on the 31st. This occurs on the first day the
unit is vacant, so there is no down time. At the end
of the day on the 31st, the unit is in maintenance,
so the 31st counts as maintenance (make ready)
time.
While the unit is being worked on by Maintenance,
a new month begins. The Tenant Accounts Receivable program is initialized into that new month.
A new month begins. Tenant Accounts Receivable is initialized into the new month. Because
PHAS event tracking is monthly, the original event
is closed out with an ending date of June 1 (the
first day of the new month). A new event is begun
with a June 1 start date. When the original event
is closed out, the program calculates vacancy days
through the end of that event. Because the unit
has been in maintenance one day so far (referred
on May 31, event ended on June 1), it now has one
maintenance day.
Early on the morning of June 1, the unit is struck
by a meteorite, which punches a hole in the roof.
The unit still has property in it, but it’s now sustained damage from a source outside the housing
authority’s control which makes it uninhabitable.
The unit is still in maintenance, but maintenance
is now working on the hole in the roof, which takes
precedence over the VFW.
When the unit becomes uninhabitable due to circumstances outside the housing authority’s control,
its condition changes from CR to CI. The previous
CR event is closed out with an ending date of June
1 and a new CI event begins with a start date of
June 1. The unit is still in maintenance at the end
of the day on June 1, so June 1 counts as a maintenance (make ready) day.
WinTen Tenant Accounts Receivable • 11/14/2003 Edition • PHAS Events • Page B.14
On June 2, the housing authority is legally able to
remove the property. It is moved to the agency’s
own on-site storage facility. With the removal of
the property, the unit could now be rented again, if
it weren’t still in maintenance for roof repairs.
Later on June 2, maintenance finishes patching the
roof. The unit is now technically inhabitable again.
They resume work on the VFW.
Once the property is removed, the unit could now
be rented — if it weren’t still in maintenance for
roof repairs. Its condition remains CI. June 1 still
counts as a maintenance (make ready) day.
Now that the roof repairs are completed, the unit
is technically available. Even though maintenance
is still working on the VFW, there are no conditions
(property in unit, meteorite hole in unit’s roof) that
make the unit non-rentable. The CI event is closed
out with an ending date of June 2. A CA event
begins with a start date of June 2. At the end of
the day on June 2, the unit is still in maintenance,
so the 2nd counts as a maintenance (make ready)
day.
On June 3, maintenance finishes the VFW. The
unit is referred back to occupancy.
The unit is in occupancy at the end of the day on
June 3, so the 3rd counts as an occupancy/lease
up day.
A new tenant moves in on June 4. The unit is occupied again.
A new tenant moves in on June 4. This ends the
CA event. The 4th is a move-in day, so it doesn’t
count as a vacancy day.
The unit has a total of 4 vacancy days: 3 for maintenance and 1 for occupancy or lease up.
WinTen Tenant Accounts Receivable • 11/14/2003 Edition • PHAS Events • Page B.15
Example 7: Scenario with Multiple Condition Changes
(move out date before lease termination date)
In the Real World
In the PHAS Event World
A tenant’s lease is about to expire on May 31. He
is evicted on May 20.
The tenant moves out on May 20, starting the
event. However, the lease does not terminate until
May 31. This means that the 31st is the last day
of occupancy for PHAS reporting purposes, and
anything that occurs through the end of that day
doesn’t count for vacancy purposes.
When the tenant is evicted, the unit is sealed with
all his property in it. Under state law, this is property that cannot be removed from the unit for a given
period of time, so the unit can’t be rented again.
Because there is property in the unit, the unit’s
initial condition following the move out is CR.
This requires an event beginning on the 20th to
set that condition. Because the unit’s condition
is CR, there will eventually be a condition change
to CA when the property is removed and the unit
becomes available for rental again. However, it
hasn’t happened yet.
While the housing authority is waiting for the property to be removed, the unit is referred to maintenance two days after the move out (May 22).
While the housing authority is waiting for the property to be removed, the unit is referred to maintenance on the 22st. Under normal circumstanes,
the 21st would count as a day of down time. However, because the last day of occupancy hasn’t
happened yet, the unit isn’t yet subject to vacancy
tracking.
The unit is in maintenance from the 22nd to the
31st. None of these days count for vacancy tracking purposes because they occur before or on the
last day of occupancy.
While the unit is being worked on by Maintenance,
a new month begins. The Tenant Accounts Receivable program is initialized into that new month.
A new month begins. Tenant Accounts Receivable is initialized into the new month. Because
PHAS event tracking is monthly, the original event
is closed out with an ending date of June 1 (the
first day of the new month). A new event is begun
with a June 1 start date. When the original event
is closed out, the program calculates vacancy days
through the end of that event. However, there are
no vacancy days to record so far, because nothing that happened through the end of the 31st was
subject to vacancy tracking.
WinTen Tenant Accounts Receivable • 11/14/2003 Edition • PHAS Events • Page B.16
Early on the morning of June 1, the unit is struck
by a meteorite, which punches a hole in the roof.
The unit still has property in it, but it’s now sustained damage from a source outside the housing
authority’s control which makes it uninhabitable.
The unit is still in maintenance, but maintenance
is now working on the hole in the roof, which takes
precedence over the VFW.
When the unit becomes uninhabitable due to circumstances outside the housing authority’s control,
its condition changes from CR to CI. The previous
CR event is closed out with an ending date of June
1 and a new CI event begins with a start date of
June 1. The unit is still in maintenance at the end
of the day on June 1, so June 1 counts as a maintenance (make ready) day.
On June 2, the housing authority is legally able to
remove the property. It is moved to the agency’s
own on-site storage facility. With the removal of
the property, the unit could now be rented again, if
it weren’t still in maintenance for roof repairs.
Once the property is removed, the unit could now
be rented — if it weren’t still in maintenance for
roof repairs. Its condition remains CI. June 1 still
counts as a maintenance (make ready) day.
Later on June 2, maintenance finishes patching the
roof. The unit is now technically inhabitable again.
They resume work on the VFW.
Now that the roof repairs are completed, the unit
is technically available. Even though maintenance
is still working on the VFW, there are no conditions
(property in unit, meteorite hole in unit’s roof) that
make the unit non-rentable. The CI event is closed
out with an ending date of June 2. A CA event
begins with a start date of June 2. At the end of
the day on June 2, the unit is still in maintenance,
so the 2nd counts as a maintenance (make ready)
day.
On June 3, maintenance finishes the VFW. The
unit is referred back to occupancy.
The unit is in occupancy at the end of the day on
June 3, so the 3rd counts as an occupancy/lease
up day.
A new tenant moves in on June 4. The unit is occupied again.
A new tenant moves in on June 4. This ends the
CA event. The 4th is a move-in day, so it doesn’t
count as a vacancy day.
The unit has a total of 4 vacancy days: 3 for maintenance and 1 for occupancy or lease up.
WinTen Tenant Accounts Receivable • 11/14/2003 Edition • PHAS Events • Page B.17
Example 8: Scenario with Condition Change that Crosses Months
(move out date and lease termination date are the same)
In the Real World
In the PHAS Event World
On August 1 of the previous year, a unit is approved
for modernization. However, as there is a tenant in
the unit, no action is taken at this time.
A tenant moves out on May 30, the day his lease
terminates.
The tenant moves out on May 30, starting the
event. The lease also terminates on May 30, so
the lease termination date is the same as the event
start date. The 30th is the last day of occupancy,
so it doesn’t count as a vacancy day.
As soon as the tenant moves out, the unit becomes
eligible for modernization.
When the tenant moves out, the unit becomes eligible for modernization. This initiates a CM event
which begins on the day of the move out.
The unit hasn’t been referred to maintenance yet,
so May 31 counts as a day of down time.
While the unit is waiting for a referral to maintenance, a new month begins. The Tenant Accounts
Receivable program is initialized into June.
A new month begins. Tenant Accounts Receivable
is initialized into the new month. Because PHAS
event tracking is monthly, the original CM event is
closed out with an ending date of June 1 (the first
day of the new month). A new CM event is begin
with a June 1 start date.
On June 1 through 3, the unit is still waiting for a referral to maintenance. It accrues three more days
of down time.
The unit is referred to maintenance on June 4.
Maintenance begins modernization.
Maintenance receives the modernization work
order on June 4. June 4 is the first day of a long
series of days that count as maintenance (make
ready) time.
While the unit is undergoing modernization, a new
month begins. The Tenant Accounts Receivable
program is initialized into July.
A new month begins. Tenant Accounts Receivable
is initialized into the new month. Because PHAS
event tracking is monthly, the June CM event is
closed out with an ending date of July 1 (the first
day of the new month). A new CM event is begin
with a July 1 start date. Every day from June 4
through June 30 counts as maintenance (make
ready) time.
WinTen Tenant Accounts Receivable • 11/14/2003 Edition • PHAS Events • Page B.18
Maintenance finishes with the modernization work
on July 11. They begin working on last-minute
cleanup, which is effectively a VFW for them.
On July 11, maintenance finishes modernization
of the unit. This ends the CM event (finally!). The
CM event is closed out with an ending date of July
11. July 1 through 10 are counted as maintenance
(make ready) days. A new event begins with a start
date of July 11. Because there are no conditions
in effect that make this unit uninhabitable, the new
event is CA. (However, remember that it hasn’t
technically undergone any VFW time yet.)
Maintenance finishes the post-modernization
cleanup on July 12. The unit is referred back to
occupancy.
Maintenance finishes with the unit on July 12, taking one day to complete the work. July 11 counts
as one last maintenance (make ready) day.
A new tenant moves in on July 18. The unit is occupied again.
A new tenant moves into the unit on July 18. July
12 through 17 count as occupancy or lease up
days. July 18 is a move-in day, so it doesn’t count
as a vacancy day.
The unit has a total of 48 vacancy days: 4 days
of downtime, 38 days of maintenance time, and 6
days of occupancy or lease up time.
WinTen Tenant Accounts Receivable • 11/14/2003 Edition • PHAS Events • Page B.19
Example 9: Scenario with Condition Change that Crosses Months
(move out date before lease termination date)
In the Real World
In the PHAS Event World
On August 1 of the previous year, a unit is approved
for modernization. However, as there is a tenant in
the unit, no action is taken at this time.
Nothing occurs at this time.
A tenant’s lease is about to expire on May 31. He
moves out on May 3.
The tenant moves out on May 3, starting the event.
However, the lease does not terminate until May
31. This means that the 31st is the last day of
occupancy for PHAS reporting purposes, and
anything that occurs through the end of that day
doesn’t count for vacancy purposes.
As soon as the tenant moves out, the unit becomes
eligible for modernization.
When the tenant moves out, the unit becomes eligible for modernization. This initiates a CM event
which begins on the day of the move out.
A new month begins. Tenant Accounts Receivable
is initialized into the new month. Because PHAS
event tracking is monthly, the original CM event is
closed out with an ending date of June 1 (the first
day of the new month). A new CM event is begin
with a June 1 start date.
On June 1 through 3, the unit is still waiting for a
referral to maintenance. It accrues three days of
down time.
The unit is referred to maintenance on June 4.
Maintenance begins modernization.
Maintenance receives the modernization work
order on June 4. June 4 is the first day of a long
series of days that count as maintenance (make
ready) time.
While the unit is undergoing modernization, a new
month begins. The Tenant Accounts Receivable
program is initialized into July.
A new month begins. Tenant Accounts Receivable
is initialized into the new month. Because PHAS
event tracking is monthly, the June CM event is
closed out with an ending date of July 1 (the first
day of the new month). A new CM event is begin
with a July 1 start date. Every day from June 4
through June 30 counts as maintenance (make
ready) time.
WinTen Tenant Accounts Receivable • 11/14/2003 Edition • PHAS Events • Page B.20
Maintenance finishes with the modernization work
on July 11. They begin working on last-minute
cleanup, which is effectively a VFW for them.
On July 11, maintenance finishes modernization
of the unit. This ends the CM event (finally!). The
CM event is closed out with an ending date of July
11. July 1 through 10 are counted as maintenance
(make ready) days. A new event begins with a start
date of July 11. Because there are no conditions
in effect that make this unit uninhabitable, the new
event is CA. (However, remember that it hasn’t
technically undergone any VFW time yet.)
Maintenance finishes the post-modernization
cleanup on July 12. The unit is referred back to
occupancy.
Maintenance finishes with the unit on July 12, taking one day to complete the work. July 11 counts
as one last maintenance (make ready) day.
A new tenant moves in on July 18. The unit is occupied again.
A new tenant moves into the unit on July 18. July
12 through 17 count as occupancy or lease up
days. July 18 is a move-in day, so it doesn’t count
as a vacancy day.
The unit has a total of 47 vacancy days: 3 days
of downtime, 38 days of maintenance time, and 6
days of occupancy or lease up time.
WinTen Tenant Accounts Receivable • 11/14/2003 Edition • PHAS Events • Page B.21
WinTen Tenant Accounts Receivable • 11/14/2003 Edition • PHAS Events • Page B.22
FIXING
APPENDIX C:
INVALID PHAS EVENT RECORDS
Whenever you recalculate vacancy days (from
the Special System Functions tab of the Setup
screen), Receivables checks all of your PHAS
event records for errors. If it detects any errors, it
opens a print preview screen with the Invalid PHAS
Event Report. This report details all errors that the
program found.
This appendix summarizes the possible error messages in the Invalid PHAS Event Report, shows an
example of actual event record data that contains
the error in question, and describes the easiest
way to fix each error.
WinTen Tenant Accounts Receivable • 11/14/2003 Edition • Fixing Invalid PHAS Event Records • Page C.1
Invalid PHAS Event Records Report
The Invalid PHAS Event Records report allows users and Tenmast Training & Support personnel to
locate and correct event errors. You can run the
report from either the WinTen Tenant Accounts Receivable or the WinTen PHAS program. In either
program, the procedure for running the report is the
same. From the Main Menu, click the Setup button. Go to the Special System Functions tab of the
Setup screen and click the Recalculate PHAS Vacancy Totals button. The program will recalculate
all vacancy totals. When this process is complete,
a print preview screen opens with the Invalid PHAS
Event Records report.
NOTE: If the program does not find any errors
during the recalculation process, the Invalid
PHAS Event Records report will not appear.
WinTen Tenant Accounts Receivable • 11/14/2003 Edition • Fixing Invalid PHAS Event Records • Page C.2
Editing Event Sequences
To open the Event Information Edit sub-screen,
click the Edit toolbar button on the Events tab of
the Master Unit Maintenance screen.
When you edit a field on the Event Information Edit
sub-screen, the data in the corresponding column
on the Events tab will change to match that data:
Events Tab
Event Information Edit Sub-Screen
Event Type
Event Type
Event Start Date
Begin Date
Lease Term Date
Actual Lease Termination Date
Refer To Maint
Date Unit Referred to Maintenance
Refer To Occ
Date Unit Returned from Maintenance
Event End Date
End Date
Maint Pend
Maintenance Continued in Other Event (Check Box)
Event Cmplt
Event Complete (Check Box)
Hint: Editing Event Dates
Before editing event dates, you should attempt to determine the correct date. You can check the tenant records to
verify this information or have your agency determine the
correct date. Remember that on a Move Out record, the
event start date is always the actual date the tenant moved
out and the event end date is always the date that a new
tenant moved in.
WinTen Tenant Accounts Receivable • 11/14/2003 Edition • Fixing Invalid PHAS Event Records • Page C.3
Errors Found on the Invalid PHAS Event Record Report
Event Ending Date is Before Event
Beginning Date
This error occurs when an event’s ending date is
a date that is prior to the same event’s beginning
date.
The Fix:
Edit the Event End Date to be the same month as
the Event Start Date:
The corrected event sequence should look like
this:
WinTen Tenant Accounts Receivable • 11/14/2003 Edition • Fixing Invalid PHAS Event Records • Page C.4
Work Order Dates Do Not Match
Properly
When the Maintenance Continued in Other Event
check box is checked in an event record, the Date
Unit Returned from Maintenance date of that event
must be the same as the Date Unit Referred to
Maintenance date of the next event.
The Fix:
Edit the Refer to Occ field on the first record to
match the Refer To Maint field on the next record:
The corrected event sequence should look like
this:
WinTen Tenant Accounts Receivable • 11/14/2003 Edition • Fixing Invalid PHAS Event Records • Page C.5
Beginning Date is not Equal to the
Previous Ending Date
Events in the same event sequence should “flow”
together smoothly. The event ending date of one
event should be the same as the start date of the
next event. This error occurs when the ending and
beginning dates of two sequential records don’t
match.
The Fix:
Edit the Event End Date field on the second event
to match the Event Start Date of the third Event:
The corrected event sequence should look like
this:
WinTen Tenant Accounts Receivable • 11/14/2003 Edition • Fixing Invalid PHAS Event Records • Page C.6
Ending Date Must Have Same Month
as Beginning Date When Complete
When the Event Complete check box is checked
in an event record, that event’s beginning date
and ending date must occur in the same month.
Depending on the Move In date, this event can
be corrected by changing the Event End Date to
the same month as the Event Start Date, or a new
event can be created with a start date of the Event
End Date and the Event Completed flag set on the
new event.
The Fix:
Edit the Event End Date to be the same month as
the Event Start Date:
The corrected event sequence should look like
this:
WinTen Tenant Accounts Receivable • 11/14/2003 Edition • Fixing Invalid PHAS Event Records • Page C.7
Another Fix:
You could also add a new event record with the
Event End Date of the first event having the same
date as the Event Start Date of the third record.
This would depend on the actual move in date of
next tenant. Your agency should be able to provide
you with the actual move in date.
WinTen Tenant Accounts Receivable • 11/14/2003 Edition • Fixing Invalid PHAS Event Records • Page C.8
Ending Date Past the First Day of the
Next Month
Because PHAS event tracking works on a monthly
basis, events that span multiple months are given
break points at the first day of every new month.
This error occurs if an event has an ending date
that is later than the first day of the month after the
event began.
The Fix:
Edit the Event End Date of the first event to be the
same as the Event Start Date of the second event
record.
The corrected event sequence should look like
this:
WinTen Tenant Accounts Receivable • 11/14/2003 Edition • Fixing Invalid PHAS Event Records • Page C.9
Missing Move Out Record
There is no Move Out Record for the event sequence. In this case, delete the duplicated record.
The Fix:
Since all of the dates in this event are exactly the
same as the previous event, delete the event.
The corrected event sequence should look like
this:
The Other Fix:
If the event record is not a duplicate you will need
to add a Move Out record for the event sequence.
WinTen Tenant Accounts Receivable • 11/14/2003 Edition • Fixing Invalid PHAS Event Records • Page C.10
Sequence is Marked Complete with
No Event Ending Date
The event sequence has been marked as complete
(the Event Complete check box is checked in the
event record), but there is no event ending date
entered in the record.
The Fix:
Edit and add the correct Event End Date to complete the sequence.
The corrected event sequence should look like
this:
WinTen Tenant Accounts Receivable • 11/14/2003 Edition • Fixing Invalid PHAS Event Records • Page C.11
Move Out Record in the Middle of Another Sequence
There is a second move out (MO) record in the
middle of an event sequence. This has two possible causes. The first is that there actually is a
MO record in the middle of the event sequence. In
this case, you should either delete it or change the
event type. The second possible cause is that the
previous event sequence was not completed (or
was not marked as completed) before a new event
sequence was started.
The Fix:
Since all of the dates in this event are exactly the
same as the previous event, delete the event.
The corrected event sequence should look like
this:
WinTen Tenant Accounts Receivable • 11/14/2003 Edition • Fixing Invalid PHAS Event Records • Page C.12
The Other Fix:
Or your sequence could look like this with the same
error:
Set the Event Completed flag.
The corrected event sequence should look like
this:
WinTen Tenant Accounts Receivable • 11/14/2003 Edition • Fixing Invalid PHAS Event Records • Page C.13
Open Event Sequence - Beginning
Date Older than 60 Days
This error message indicates that an event has a
start date more than 60 days before the current
system date and does not have an ending date.
The Fix:
Edit and add the correct Event End Date.
The corrected event sequence should look like
this:
WinTen Tenant Accounts Receivable • 11/14/2003 Edition • Fixing Invalid PHAS Event Records • Page C.14
Invalid PHAS Event Record on a Unit
that Has Been Deleted
If a unit has been added to an approved deprogramming plan, it could still have event records
even if the unit has been deleted from the Master
Unit database. To correct the event sequences, the
unit must be temporarily added back into the system. If the Tenant Accounts Receivable program is
set up in this data area, the unit must be added in
the Receivables program. Your agency should not
delete any Deprogrammed Unit until the end of the
Fiscal Year. However, it does happen.
The Fix:
To add a unit back into the Master Unit data base,
in the Setup Menu under the Master Units tab, select any unit then select add from the Master Unit
Main tab.
Select the correct project from the drop down list,
and then enter the unit number.
WinTen Tenant Accounts Receivable • 11/14/2003 Edition • Fixing Invalid PHAS Event Records • Page C.15
The event sequence only recognizes the Project
number and Unit number; fortunately, you will not
need to fill in the correct address for the unit. The
address, city-state and zip code fields must be filled
in, but any character and numeric combination will
work, (you will have to use characters in the character field and numbers in the numeric field).
NOTE: When you add the unit back in, the system automatically adds an “MO” event record
to mark the unit coming back online. You must
delete this event.
After correcting the event sequence, return to the
Master Unit Main tab and delete the unit.
WinTen Tenant Accounts Receivable • 11/14/2003 Edition • Fixing Invalid PHAS Event Records • Page C.16
Printing and Comparing Elapsed Days Reports After All Errors Have Been Corrected
When you have corrected all errors from the Invalid
PHAS Event Records report, and you can recalculate the vacancy totals without getting the Invalid
PHAS Events report, you are ready to move on to
the final step in the event correction process.
Cumulative Reportable Elapsed Days
and PHAS Event Reportable Elapsed
Days Reports
You now need to print and compare the Cumulative Reportable Elapsed Days report to the PHAS
Event Reportable Elapsed Days report.
In PHAS, go to the Reports screen, or in Tenant Accounts Receivable, go to the Tenant Management
tab of the Reports screen. Print the Cumulative
Elapsed Days and PHAS Event Reportable Elpased Days reports for the same date range.
WinTen Tenant Accounts Receivable • 11/14/2003 Edition • Fixing Invalid PHAS Event Records • Page C.17
Comparing Reports
Compare the Cumulative Reportable Elapsed
Days report to the Event Reportable Elapsed Days
report. Verify that the detailed information matches
the cumulative totals. The Form HUD-50072 is
printed from cumulative totals, but needs to match
the detail information for audit purposes.
If the totals do not match, you may have a problem
with the data or the program. In such an event,
contact Tenmast Training & Support at (877) 3595492 or [email protected].
On the following page, the totals you need to compare are labeled for reference.
Compare the totals labeled 1, 2, and 3 on the Cumulative Reportable Elapsed Days report to the
corresponding totals labeled 1, 2, and 3 on the
Event Reportable Elapsed Days report.
Total 1
On the Cumulative Reportable Elapsed Days report, we are comparing the total Elapsed Days to
the total Vacant Days minus the Excluded Vacant
Days on the Event Reportable Elapsed Days report.
Total 2
On the Cumulative Reportable Elapsed Days report, we are comparing the sum of Total Vacant
Days exempted for Modernization and Total Vacant
Days exempted or other reasons to the Excluded
Vacancy days on the Event Reportable Elapsed
Days report.
Total 3
On the Cumulative Reportable Elapsed Days report, we are comparing the Total Number of Turnaround days to the Total Vacant Days on the Event
Reportable Elapsed Days report.
When you can complete the recalculation process
without receiving the Invalid PHAS Event Records
report, and the Reportable Elapsed Days report
matches the Event Reportable Elapsed Days report, then the numbers on Form HUD-50072 are
correct.
WinTen Tenant Accounts Receivable • 11/14/2003 Edition • Fixing Invalid PHAS Event Records • Page C.18
WinTen Tenant Accounts Receivable • 11/14/2003 Edition • Fixing Invalid PHAS Event Records • Page C.19
WinTen Tenant Accounts Receivable • 11/14/2003 Edition • Fixing Invalid PHAS Event Records • Page C.20
ELECTRONIC
APPENDIX D:
PAYMENT FILE PROCESSING
This appendix details the electronic payment file
processing (“lockbox”) function of Tenant Accounts
Receivable.
The basic electronic payment file concept involves
rent collection through a bank rather than through
the housing authority. Every month, the agency
sends each tenant a rent statement with an attached remittance coupon (billing statement). This
remittance coupon includes the tenant’s unique account number and monthly charges.
The tenant pays the rent charges at a participating
regional bank by giving the bank his rent payment
with the remittance coupon. The bank deposits
the payment directly into the housing authority’s
account and enters the payment information into
its collection system. The bank’s collection system
then generates an electronic payment file (EPF)
that includes the account numbers and collected
amounts of each tenant who has paid his rent
through the bank. The bank then transmits this file
to the housing authority via email attachment.
Once it receives the EPF, the housing authority
imports the data into Tenant Accounts Receivable.
The import function updates each tenant’s account
with his payment information.
Hint: What about partial payments and overpayments?
The system can handle partial payments and overpayments. It automatically applies each payment to the
tenant’s open balances, based on the settings selected in
EPF setup.
WinTen Tenant Accounts Receivable • 11/14/2003 Edition • Electronic Payment File Processing • Page D.1
EPF SETUP
From the Default Settings tab of the Setup screen,
open the Other Functions menu and select the
Electronic Payment File Setup option. This opens
the Electronic Payment File Setup sub-screen.
WinTen Tenant Accounts Receivable • 11/14/2003 Edition • Electronic Payment File Processing • Page D.2
Electronic Payment File Setup Sub-Screen
The Electronic Payment File Setup sub-screen
controls the electronic payment file import functions of Receivables. It has two tabs: Electronic
Payment File Settings and Address Information.
This sub-screen always opens on the Electronic
Payment File Settings tab, as shown below.
Electronic Payment File Settings
Tab
The Electronic Payment File Settings tab contains
the setup information required for Receivables to
import EPFs correctly. Use the standard WinTen
icons to edit the data on this tab and save or cancel
your changes.
WinTen Tenant Accounts Receivable • 11/14/2003 Edition • Electronic Payment File Processing • Page D.3
Electronic Payment File Settings Tab Data
Fields
Default File Name
This is the default name of the EPF files from your
participating bank.
Default File Extension
This is the default extension of EPF files from your
participating bank.
Default File Directory
This is the file directory on your network where you
store the received EPF.
HA Bank Account
This is the account number of the bank account
into which payments in the EPF are deposited
when received at the bank.
Bank Initials
These are the “user” initials under which the Tenmast programs should record and post all EPF
transactions. The program uses these to sort and
filter receipt reports.
Hint: File Names
Complete file names are generally composed of eight or
fewer characters, a period, and three characters. The
characters before the period are typically referred to as the
file name, and those after the period are the extension. For
example, if your bank sends EPFs named “HA-PMT.EPF,”
the file name is “HA-PMT” and the file extension is “EPF.”
Apply Payment to Rent First
Check this box if the program should apply payments received in EPFs to rent charges first. If this
box is not checked, the program applies payments
to all other charges before applying them to rent
charges.
Electronic Payment File Has a Header Line
Check this box if the EPF file has an identifying or
administrative (not transaction data) header line.
Electronic Payment File Has a Footer Line
Check this box if the EPF file has an identifying or
administrative (not transaction data) footer line.
File Specifications
Each line of the EPF contains the complete data for
one tenant’s payment transaction, and the bank’s
computers arrange it in a certain way. The File
Specifications fields tell Receivables how this data
is presented so that Receivables can read the file
correctly.
These are the mandatory fields that Receivables
must read from each line of the file when it imports
the EPF. It will ignore all other fields. Contact your
financial institution to obtain the file specifications
for their EPFs, then enter the starting position and
length of each field as defined. If you need further
assistance with interpreting your bank’s EPF specifications, contact Tenmast.
Hint: What are file specifications?
EPFs are ASCII (plain text) files. Each line in an EPF contains the complete data on one rent payment transaction.
The line consists of multiple items of data, strung together
without spaces or commas. The only way to tell where one
data field ends and the next one begins is to know the starting and ending positions of each field. This is what the File
Specifications fields provide.
WinTen Tenant Accounts Receivable • 11/14/2003 Edition • Electronic Payment File Processing • Page D.4
Address Information Tab
The Address Information tab contains the destination information for billing statements sent out for
use with EPF payment collection. Use the standard WinTen icons to edit the data on this tab and
save or cancel your changes.
Remit To Information
These data fields hold the address of the location
where payments are collected for EPF processing
(typically, the local bank branch).
Billing Inquiry Information
These data fields hold the contact information for
the office to which tenants or the collecting bank
should send billing inquiries. If you leave these
fields blank, the program uses the default agency
address information from the Default Settings tab
of the Setup screen.
WinTen Tenant Accounts Receivable • 11/14/2003 Edition • Electronic Payment File Processing • Page D.5
IMPORTING
AN
EPF
To import an EPF, click the Payments button or
press <P> at the Main Menu. The Payments Menu
screen opens.
On the Payments Menu screen, click the Import
EPF button. This starts the Process Electronic
Payments wizard.
WinTen Tenant Accounts Receivable • 11/14/2003 Edition • Electronic Payment File Processing • Page D.6
Process Electronic Payments Wizard
Step One: Import Electronic Payments File
Click the Start button to begin the file import process. The Select Electronic Payment File to Import
dialog box opens. This is a standard Windows file
selection dialog box. Select the EPF that you want
to import and process and click Open. The program returns to the Process Electronic Payments
wizard.
If there is a problem with the EPF, a standard
Windows print preview screen opens with a report
detailing each record that could not be processed.
The program will skip these records and will continue with the process, importing only the records
that did not have errors. If you receive this report,
review it, then click the Close button to close the
print preview screen and return to the wizard.
Click the Next button to continue to Step Two.
WinTen Tenant Accounts Receivable • 11/14/2003 Edition • Electronic Payment File Processing • Page D.7
Step Two: Validate Imported Electronic Records
When you proceed to Step Two, the program goes
through each record in the EPF you selected and
checks it for validity. This ensures that each account number is valid and that the selected file has
not been imported before.
If the process finishes with errors, a standard WinTen print preview screen opens with the Electronic
Payments Validation Errors Listing report. This
report details each record in the EPF in which the
program had errors.
If the process finishes with no errors, a dialog box
opens to tell you that each record passed. Click
OK to close this dialog box.
Click the Next button to continue to Step Three.
Step Three: Print Pre-Posting Report
When you proceed to Step Three, a standard
WinTen print preview screen opens with the Electronic Payments Pre-Posting Report. Review this
report, then click the Print icon to print it. When you
are done, click the Close button to close the print
preview screen and return to the Process Electronic Payments wizard.
Click the Next button to continue to Step Four.
Step Four: Post Electronic Payments
When you proceed to Step Four, Receivables
posts each electronic payment transaction to its
corresponding tenant record. When the process is
complete, a dialog box opens to tell you that each
record has been posted. Click OK to close this
dialog box.
Click the Next button to continue to Step Five.
Step Five: Print Posted Electronic Payments
Report
When you proceed to Step Five, a standard WinTen print preview screen opens with the Posted
Electronic Payments Report. Review this report,
then click the Print icon to print it. When you are
done, click the Close button to close the print preview screen and exit the wizard.
WinTen Tenant Accounts Receivable • 11/14/2003 Edition • Electronic Payment File Processing • Page D.8
Balancing Your EPF
If the bank sends you a report along with the EPF,
you can balance the bank’s report against the Payments Without Receipt report (run the report and
filter the report by the initials you specified in EPF
setup). You can then check the report totals in Receivables against the report from the bank. These
totals should match unless an error occurred during the import process.
Hint: Posted Electronic Payments Report
You can also use the Posted Electronic Payments Report to
balance with, either with or without a report from the bank.
If the bank does not send you a report, you can
still balance by using the Payment Without Receipt
report by initials. This total will match a bank total
deposit slip.
WinTen Tenant Accounts Receivable • 11/14/2003 Edition • Electronic Payment File Processing • Page D.9
WinTen Tenant Accounts Receivable • 11/14/2003 Edition • Electronic Payment File Processing • Page D.10
USING
APPENDIX E:
THE PAYMENT WIZARD
In the 1/15/2003 version of WinTen Tenant Accounts Receivable, Tenmast released the Payment
Wizard. This is a new function in Receivables that
simplifies the data entry process for processing tenant payments. Because this is a significant change
to the way the program’s interface handles a daily
part of your agency’s operations, we are phasing in
its introduction.
For the next few months, you will have the option
of using the new Payment Wizard or the current
method of taking a payment – we will support both
functions simultaneously, and you will be able to
switch back and forth until you are comfortable with
the Wizard.
This appendix shows you how to set up your agency’s Receivables program to use the Wizard, and
how to use the Wizard to record payments.
WinTen Tenant Accounts Receivable • 11/14/2003 Edition • Using the Payment Wizard • Page E.1
SETTING UP
THE PAYMENT
WIZARD
To turn on the payment wizard, go into the Setup
screen of Receivables. Select the Additional Settings sub-tab of the Default Settings tab. Edit the
data on this sub-tab and check the Use Payment
Wizard box.
If you ever want to turn off the payment wizard, return to this sub-tab and uncheck the Use Payment
Wizard box.
Hint: Apply Payments to Rent First?
If you check the Apply Payments to Rent First box (directly
below the Use Payment Wizard box), the program applies
payments to rent before applying them to any other charges. If this box is unchecked, the program applies payments
in the order in which charges are displayed on the Charges
tab of the Tenant Edit/Review screen.
WinTen Tenant Accounts Receivable • 11/14/2003 Edition • Using the Payment Wizard • Page E.2
USING
THE PAYMENT
WIZARD
To take a payment with the Payment Wizard, click
the Payments button or press <P> at the Receivables Main Menu. This opens the Payments Menu
screen.
On the Payments Menu screen, click the Payment
button if you want to take a payment with a receipt.
If you are taking a payment without a receipt, click
the Payment W/O Receipt button.
The Tenant Search screen opens. Select the tenant whose payment you are taking, then press
<Alt+P> or click the Take a Payment button. This
starts the Payment Wizard.
This is the point at which the process changes
from the one with which you were previously
familiar.
WinTen Tenant Accounts Receivable • 11/14/2003 Edition • Using the Payment Wizard • Page E.3
Payment Wizard: Step One
Step One of the Payment Wizard allows you to enter the data on the payment you are taking.
The Tenant group of data fields at the top of the
screen is not editable. These fields show you the
identifying information of the tenant whose payment you are taking.
The Payment Type set of radio buttons allows you
to select the type of payment you are taking: a regular payment, a security or pet deposit payment, or
a balance transfer. If the tenant is a Section 8 homeownership participant, you also have the option
to take a home ownership escrow payment.
If you check the Adjustment box, the program records the transaction you are entering as a noncash item. This new feature enables you to use
the Payment Wizard to make manual adjustments
to tenant balances.
The column of data fields in the middle of the
screen displays the tenant’s current and future
balances and outstanding pet and security deposit
charges. The Expected Due Now field totals the
charges that are currently due for the selected payment type. You cannot edit these fields.
The column of data fields on the right side of the
screen identifies the payment you are taking. It
includes user initials (editable only if the program
is set up for multiple users to take payments on
the same workstation) and payment date. It also
includes separate fields for you to enter cash,
check, and money order payment amounts and a
brief (20-character) description line to enter check
or money order numbers. The non-editable Total
Tendered field below these fields totals the payments that you have entered.
When you have entered all payment information,
click the Start button or press <Page Down> to
proceed to Step Two.
WinTen Tenant Accounts Receivable • 11/14/2003 Edition • Using the Payment Wizard • Page E.4
Payment Wizard: Step Two
Step Two of the Payment Wizard applies the payments you took in Step One to the tenant’s specific
balances according to the default payment application settings that you specified in Setup. This
screen’s functionality varies slightly, depending on
which payment type you selected in Step One.
As in Step One, the Tenant group of data fields at
the top of the screen is not editable. These fields
show you the identifying information of the tenant
whose payment you are taking.
The set of four data fields immediately below the
Tenant fields is not editable. These fields summarize information about the payment you are applying as entered in Step 1. You can edit the applied
payment amounts in the table; the value in the Total
Applied field changes if you change any of the payment amounts.
WinTen Tenant Accounts Receivable • 11/14/2003 Edition • Using the Payment Wizard • Page E.5
Regular Payments
If you selected the Regular Payment payment type
in Step 1, the table in the middle of the screen summarizes the tenant’s current and future balances
and the payment amounts that the program automatically applied to each charge. You can edit the
values in the Payment column of the table if you
want to change the default payment applications.
Before you click Next, confirm that the Total Applied
and Total Tendered fields are equal.
Pet/Security Deposit Payments
If you selected the Pet/Security Deposit payment
type in Step 1, the table in the middle of the screen
summarizes the tenant’s deposit balances and the
payment amounts that the program is applying automatically to each deposit. You can edit the values in the Payment column of the table if you want
to change the default payment allocations.
Before you click Next, confirm that the Total Applied
and Total Tendered fields are equal.
Homeownership Payments
If you selected the Homeownership Payment payment type in Step 1, the table in the middle of the
screen summarizes the tenant’s balances and the
payment amounts that the program is applying automatically to each balance. You can edit the values in the Payment column of the table if you want
to change the default payment allocations.
Before you click Next, confirm that the Total Applied
and Total Tendered fields are equal.
WinTen Tenant Accounts Receivable • 11/14/2003 Edition • Using the Payment Wizard • Page E.6
Transfer Balances
If you selected the Transfer Balances payment type
in Step 1, the table in the middle of the screen summarizes the tenant’s current and future balances in
all categories.
If you have taken one or more payments from a
tenant in the current month, you can transfer these
payments between the tenant’s charges. To do
this, edit the values in the Payment column.
NOTE: For a balance transfer transaction, the
Total Applied field must equal zero when you
are done (i.e. all balance changes must sum to
zero).
When you have applied the payment to the tenant’s
charges, click the Next button or press <Page
Down> to proceed to Step Three.
WinTen Tenant Accounts Receivable • 11/14/2003 Edition • Using the Payment Wizard • Page E.7
Payment Wizard: Step Three
Step Three of the Payment Wizard allows you to
review and confirm the payment information you
have entered before the program saves it.
If you are taking a payment but will not generate a
receipt from the program, enter the receipt number
for a manual receipt in the Receipt Number field
which appears below the Description field. If you
are taking a payment and will generate a receipt
from the program, the program assigns the receipt
number automatically.
If you need to make any corrections to the payment
transaction, click the Back button or press <Page
Up> to return to the previous steps. Otherwise,
click the Print button to save the transaction and
print the receipt. If you are not printing a receipt,
click the Finish button.
WinTen Tenant Accounts Receivable • 11/14/2003 Edition • Using the Payment Wizard • Page E.8