1
WODE USER MANUAL
PAG 4 OF 34
Your own WODE
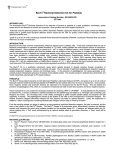
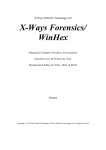
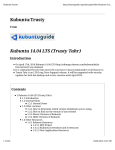
1- Display LCD
The LCD display on the front of WODE-VerticalStand is the main interface of your WODE-Jukebox. Through the display you are able to receive feedback on the current status of your
device at all times.
2- Joystick
The 5-way Joystick (up, down, right, left, center) on the front of the WODE-VerticalStand, is
used for browsing the menu and making selections.
3- Status-LEDs
On the front of the WODE-VerticalStand there are 3 status LED, starting from the top:
[Led3] – USB-power status led : when lit , it shows that the correct power is supplied on the
USB-Host port.
[Led2] – I/O activity status led : shows the activity status of WODE-Wii bus communications.
[Led1] – Upgrading status led : only shows the activity status during the updating procedure of WODE firmware.
1
2
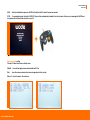
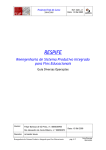
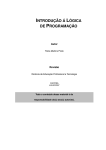
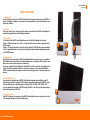
4- USB Host port
The USB port on the right side of WODE-VerticalStand allows to connect every compatible
USB 2.0 device; the connection can either be direct way or through a USB hub, which enables you to connect many devices at same time.
The power supplied by the USB-Host is about 500mA, which is sufficient for operation of a
single, directly connected USB device; it will be necessary to use a powered USB hub
with its own external power supply in order to have enough power to use more than one
device.
5- Slot SD/SDHC card
The card slot on the right side of WODE-VerticalStand supplies the possibility to use SD/
SDHC memory cards. In particular, ISO loading is supported by the use of SD/SDHC cards
with formatted to one of the following file systems: FAT16/32, WBFS, NTFS, EXT3FS, HFS+ .
You can update the firmware of WODE through SD/SDHC card. The only file system supported for that operation is FAT16/32.
6- USB-power cable
The USB Y-cable on the rear side of the WODE-VerticalStand is use to supply power to the
LCD backlight display and to the USB Host port.
www.wodejukebox.com
3
4
5
6
WODE USER MANUAL
PAG 5 OF 34
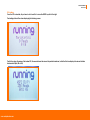
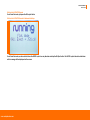
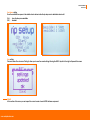
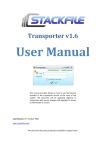
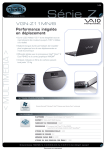
Starting up: “ WODE Loading …” screen
When your console is turned on, the LCD display will show the “WODE JUKEBOX loading…..” screen.
This loading screen is very important, because it confirms that the BOOT LOADER of the WODE is working and is initializing. The boot loader is a micro software
that loads the firmware of WODE or – in case the firmware is damaged – it will look for an update file to restore the firmware in the SD/SDHC card slot.
It’s important to keep in mind that the firmware update file can be uploaded to WODE only through a SD/SDHC memory card(not included), inserting the card in
the slot of the WODEVerticalStand. The SD/SDHC card’s filesystem must be either FAT16 or FAT32. The file containing the update must be named “update.bin”.
If the screen “WODE JUKEBOX loading” does not appear, please refer to the section “Troubleshooting” at the end of this manual.
www.wodejukebox.com
WODE USER MANUAL
PAG 6 OF 34
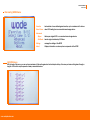
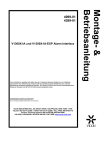
Discovering WODE menu:
Favorites
- fast selection of user-defined game favorites, up to a maximum of 8 choices
Select Game - select ISO loading from a connected mass storage device
Advanced
- Ripper
- Backup an original DVD to a connected mass storage device
- Flat Wode - launch original and backup DVD discs
FAVORITES menu
Settings
- manage the settings of the WODE
About
- Displays information on various system components of the WODE
With the help of this menu, you can set up a maximum of 8 favourite games for fast and simple start up; this saves you from scrolling down through a
long list of ISOs which may be present on many connected devices.
www.wodejukebox.com
WODE USER MANUAL
PAG 7 OF 34
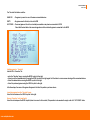
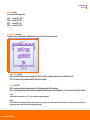
The “Favorites”slot status could be:
NAME ISO
– The game is present on one of the mass connected devices
EMPTY
– No game saved in this slot, so the slot is FREE
NOT FOUND – The saved game on this slot is not actually accessible on any device connected to WODE.
Check that the hard disk or the mass storage device that contains the game is connected to the WODE.
Adding a game to “ Favorites”
Add an ISO to “Favorites” list:
• enter the “Favorites” menu, moving the WODE-Joystick to the right.
• Select one of the 8 available slots by moving the WODE-Joystick to the right again. You’ll be taken to a menu screen showing all the connected devices.
• Select the desired device moving the WODE-Joystick to the right.
• Select the preferred game moving the WODE-Joystick to the right.
After these steps, the name of the game will appear in the list at the position you have chosen.
Launching a game from the “ Favorites” menu
Select the slot and move the WODE-Joystick to the right.
Remove “Favorites” entry from the list:
Select the slot and press the WODE-Joystick [down is incorrect in this context]. This operation is also needed to empty a slot with “ NOT FOUND” status.
www.wodejukebox.com
WODE USER MANUAL
PAG 8 OF 34
The number near the menu line “Favorites” shows the total amount of the slots used among the available ones [ex “Favorites (2/8)” = 2 slot assigned on 8 available].
Select Game menu
Through this menu the user can browse through all devices connected to the WODE and read the [?infinite?] partitions.
The menu shows two numbers in the selection, the first indicating the number of devices/partitions recognized by the WODE, whereas the second number indicates the total amount of valid ISOs present on the devices.
www.wodejukebox.com
WODE USER MANUAL
PAG 9 OF 34
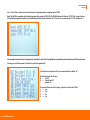
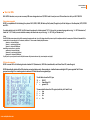
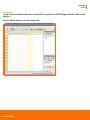
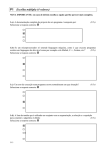
In the ” Select Game” section you will see the amount of devices/partitions recognized by the WODE.
[Note] The WODE is compatible with the following types of file systems: FAT, FAT32, NTFS, WBFS(Wii Backup File System) , EXT3FS, HFS+. In order that your
ISOs would be recognized correctly, they will need to be fixed in a folder with name “ISO” in the root of your mass archive (“x:\ISO\filename.iso “ )
In this example the directory shows 3 peripherals: ram1, mmcblk0p1 e sda1 with on the right side the recognized file-system and the amount of ISOs present shown.
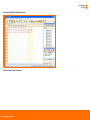
Choosing one of the lines present, it will switch to a list of recognized ISOs.
On the left of every name the ISO type is represented by two letters “XX”.
The first letter shows the ISO type:
W = Wii ISO
G = GameCube ISO
I
= generic ISO
The second letter shows the ISO region ( valid only for the W and G ISOs):
J
= Jap
U
= Usa
E
= Eur
K
= Kor
www.wodejukebox.com
WODE USER MANUAL
PAG 10 OF 34
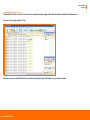
ISO Loading:
Once the ISO is selected, all you have to do to load it is to move the WODE-Joystick to the right.
The loading status will be shown displaying the following screen:
The first line shows the name of the loaded ISO, the second shows the amount of packets transferred , while the third one displays the amount of data
transferred in KByte [KB or KiB].
www.wodejukebox.com
WODE USER MANUAL
PAG 11 OF 34
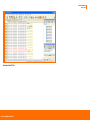
Unload/Eject an ISO:
It’s possible to unload an ISO at all times by pressing the Wii’s eject button.
A screen will then shows a message to confirm the successful completion.
A screen with a list of the previously explored ISOs will appear.
from which you can get back in order to explore other devices/partitions simply moving the WODE-Joystick to the left.
www.wodejukebox.com
WODE USER MANUAL
PAG 12 OF 34
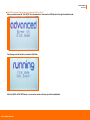
ADVANCED menu
Trough this menu you can access to the DVD-drive features of your WODE.
In the “Ripper(x)” sub-menu you can build an ISO from an original disc and store it on any mass storage device connected.
The number inside the brackets shows the amount of partitions available for WRITE by WODE.
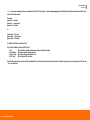
Ripper [Rip-setup sub-menu] (ISO maker from Original disk)
The ISO built from your original disc inserted can be customized trough the settings in the
“rip-setup” menu:
ODD {DVD-status} (Empty/Ready):
[Empty] - no disk inserted in the drive
[Ready] - disk inserted and ready for rip
Start:
start rip procedure
Output device (No RW Disk/device-name):
[No RW Disk] -
no “write-enabled” mass storage device detected
[device-name] - destination device selected
www.wodejukebox.com
WODE USER MANUAL
PAG 13 OF 34
To select the destination device where the backup ISO is stored, you can use the usual screen used to select the mass-storage devices connected; the
screen will show only the “writeenabled” devices by WODE.
WODE can write on mass-storage devices with FAT, NTFS and EXT3FS file-system.
The file-system type of each partition is show by the last letter located on the right side of the deviceID:
[F] - FAT16/32
[N] -NTFS
[X] -EXT3FS
WODE will look for an “ISO” folder on the mass-storage device, if the folder is not found, WODE will create it. The ISO will be create in a sub-directory of
“ISO” according to this struct and convention about the name: ./iso/TitleID_GameName/TitleID.ext.
For example, the rip of “Donkey Kong Jungle Beat” disc will be done like that:
./iso/R49P01_DONKEY_KONG_JUNGLE_BEAT_WII/R49P01.iso
Target format (.iso/.wbfs) :
[.iso] -
the disc-image will be done in STANDARD-ISO format
[.wbfs] -
the disc-image will be done in WBFS-file format
Trough this option you can select the disc-image file format. The two formattings available are: “Standard-ISO” and “.wbfs”.
The Standard-ISO disc-image is a 1:1 copy of data stored on the disk inserted into your console, without any kind of data compression. The final resulting
ISO file will have a size of 4.7GB for a single-layer disk or a size of 8.5GB for a dual-layer disk.
The WBFS disc-image format is a compressed type of disc-image data, with the advantage of less filesystem space occupation thanks to an advanced
ad-hoc algorithm of data-compression that removes all dummy data present in all original disc images.
www.wodejukebox.com
WODE USER MANUAL
PAG 14 OF 34
Note: If your mass-storage device is formatted to the FAT16/32 file-system , the discimages bigger than 4GB will be split in different files due to the structural limit of this file-system.
Example:
game.iso -- first part
game.is1 -- second part
game.is2 -- third part
or
game.wbfs -- first part
game.wbf1 -- second part
game.wbf2 -- third part
On EXT3FS or NTFS file-system the ISOs.
Rip
(All/No Update/Game Only/BCA Only):
[All] -
Rip of full disc, update partition and channel installer included
[No Update] - Rip of disc without update partition
[Game Only] - Rip of disc with game partition only
[BCA Only] -
Rip of 64byte BCA disc data
The BCA disc data will be saved in a HEX formatted file for each disc placed into the same folder as the disc-image, named according to the ISO but with
“.bca” file extension.
www.wodejukebox.com
WODE USER MANUAL
PAG 15 OF 34
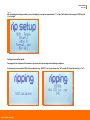
Ripping…
After completing the setting procedure you can start ripping by moving the square brackets “[ ]” on the “Start” label and by moving the WODE-Joystick
(->) to the right.
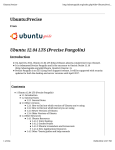
The Rip procedure will be started:
The progress of the rip process will be showed on the screen with a percentage meter indicating completion.
On the screen you can read the TitleID of the inserted disc (e.g.: “RSPP01”), the rip type chosen (e.g.:“All”) and the ISO output file format (e.g.: “iso”).
www.wodejukebox.com
WODE USER MANUAL
PAG 16 OF 34
Rip complete…
The time needed to complete the ripping process depends on the size of the inserted original disc and the selected options. For example, writing to a
FAT16/32 file-system is faster than on NTFS.
Here a rip example of the same disc on different file-system.
RHTE54 – Manhunt 2
RHTE54 – Manhunt 2
RHTE54 – Manhunt 2
RHTE54 – Manhunt 2
RHTE54 – Manhunt 2
RHTE54 – Manhunt 2
File-system Ripped Format ISO size
Time
NTFS
NTFS
EXT3
EXT3
EXT3
EXT3
1h 24m
1h 54m
0h 21m
0h 27m
0h 18m
0h 23m
All
All
All
All
All
All
.wbfs
.iso
.wbfs
.iso
.wbfs
.iso
3.526.656 Kb
4.589.824 Kb
3.526.656 Kb
4.589.824 Kb
3.526.656 Kb
4.589.824 Kb
When the rip process has successfully completed a message will be shown on the screen and the disc will be automatically ejected from the drive.
www.wodejukebox.com
WODE USER MANUAL
PAG 17 OF 34
Rip failed…
If an error occurs during the rip process, a message will be displayed and the process will be stopped.
This might happen due to one of the following reasons:
·
• Disc not recognized
·
• insufficient space on the destination device
·
• unrecoverable error related to disc reading (disc scratched or unreadable)
www.wodejukebox.com
WODE USER MANUAL
PAG 18 OF 34
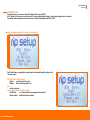
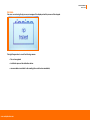
Flat-WODE sub-menu (Supports the use of original and backup discs)
Move your selection over the “FLAT-WODE” line in the main menu , then move the WODEJoystick to the right to enable this mode.
The following screen will confirm you entered in FLAT-Wode
When the WODE is in FLAT-WODE mode, you can use the console with every type of Wiicompatible disc.
www.wodejukebox.com
WODE USER MANUAL
PAG 19 OF 34
Exit from the FLAT-WODE mode
To exit from this mode, just press the Wii’s eject button.
Exit from the FLAT-WODE mode in Autoload at startup
To exit from this mode you have to hold down the WODE-Joystick on any direction and tap the Wii-Eject button. The WODE-Joystick has to be hold down
until a message will be displayed on the screen.
www.wodejukebox.com
WODE USER MANUAL
PAG 20 OF 34
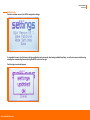
Settings menu
This menu contains access to the WODE configuration settings.
It’s important to keep in mind that every setting’s modification has to be saved; after having modified the settings, you will have to proceed with saving,
selecting the corresponding line and moving the WODE-Joystick to the right.
The following screen should appear:
www.wodejukebox.com
WODE USER MANUAL
PAG 21 OF 34
Wii Region setting
Set your Wii console’s region here.
[JAP]
[USA]
[EUR]
[KOR]
-
-
-
-
console JAP – NTSC-J
console USA - NTSC
console EUR - PAL
console KOR - NTSC
Game Patching sub-menu
Through this menu you can enable or disable different options on ISO and disc execution mode.
Region-Patch (ON/OFF)
[ON] - load any ISOs/discs of every region area (JAP, USA, PAL o KOR), overriding the region-lock (up until Wii firmware 4.1).
[OFF] - the console will only be able to load ISO/discs of its own region.
Updates (NO/YES)
[NO] - Override any automatic update request of the Wii system before the ISO/disc loading.
[OFF] - Only the update requests of the Wii system compatible with the Wii’s region will be prompted for (e.g.: A PAL console will install only PAL updates))
[Nota1]:
Select the option “Region-patch” and “ OFF” in order to make the update request appear.
[Nota2]:
Some ISOs/discs require an updated version of the Wii’s system menu to run correctly; if your console does not have a valid update, you could have issues (e.g.: Black screen
after booting a game or issues with the ISO/disc during the game session).
www.wodejukebox.com
WODE USER MANUAL
PAG 22 OF 34
Wode Settings sub-menu
Auto Load setting
This menu item allows you to choose the startup mode of the WODE at power-on.
[OFF] - disable, when the initialization has finished, the screen will show the WODE main menu.
[FLAT] - after the boot process, WODE goes directly in Flat-WODE mode
To go back to the main menu, hold down the WODE-Joystick in any direction and tap the Wii-Eject button; hold down the WODE-joystick until the main
menu is displayed.
www.wodejukebox.com
WODE USER MANUAL
PAG 23 OF 34
[LAST] - After the initialization sequence, WODE will load the last ISO used in the previous session.
[CFG] - On complete bootup, the built-in WODE-TV-Menu will be automatically loaded in the disc-channel; it allows you to manage the WODE and
your games with a GameCube-Joystick on your TV.
+
Display iso-name setting
Choose ISO label view mode in the list menu.
[TitileID] -show official game name stored inside the ISO file
[File] - show file name as stored on the mass storage device’s file-system
[File.ext] -show file name + file extension
www.wodejukebox.com
WODE USER MANUAL
PAG 24 OF 34
Free Space setting
Show the available free space in the details of each device inside the rip-setup menu’s destination device list.
[On] - show the free space available
[Off] - disabled
Save setting
This menu item of the sub-menu “Settings” allows you to save the current settings. Moving the WODE-Joystick to the right will present this screen:
About
In this section of the menu you can inspect the current version of each WODE software component.
www.wodejukebox.com
WODE USER MANUAL
PAG 25 OF 34
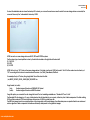
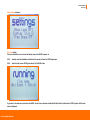
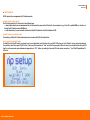
Updating the firmware of the WODE
To update the WODE you need a memory card of the SD/SDHC type? (not included), formatted with the FAT/FAT32 file system. Download the latest available firmware update at http://www.WODEjukebox.com/download.php, copy the file “update.bin” from the downloaded archive on your SD/SDHC memory card’s root (e.g.: x:\update.bin ). Insert your SD/SDHC memory card into the SD-slot located on the right side of the WODE-VerticalStand and turn on the
console.
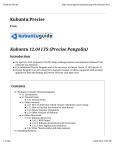
Afterwards you will see the screen” WODE Jukebox Loading….” on the LCD display and right after that the “WODE updating...” screen, which will be present on
the LCD display until the update procedure has finished.
After the update completed the WODE system will reboot.
To check for the correct execution of the update, select “about” from the main menu.
[Note]:
There’s not an update for every single component of the WODE in each firmware update package; please
refer to the “releases.txt” file in the update package to learn more about the updated components and
their versions.
www.wodejukebox.com
WODE USER MANUAL
PAG 26 OF 34
Your own ISOs
With WODE-Jukebox, now you can use every USB mass-storage device or SD/SDHC card to load your own ISOs and have fun with your Wii CONSOLE.
File-system supported
WODE is compatible with the following file-systems: FAT16/FAT32, WBFS (Wii Backup File System) [Thought only with the filetype not the filesystem], NTFS, EXT3FS
and HFS+ .
To enable detection by the WODE, the ISOs have to be placed in a folder named “ISO” in the root of your mass-storage device (e.g.: “x:\ISO\filename.iso”).
Inside the “\ISO” folder you can maintain as many sub-directories as you like (e.g.: “x:\ISO\Wii_iso\filename.iso”)
[Note]:
The FAT/FAT32 file-systems have a limit of 4GB concerning the maximum file size. If your ISO is bigger than 4GB you have to split it in multiple smaller files. For example a 4.7GB size Wii standard ISO file
can be split in two or more file with “.isX” extension, where the “X” is the number to identify the part number.:
game.iso – first part [2GB size]
game.is1 – second part [2GB size]
game.is2 – third part [370MB size]
same thing can be done on .wbfs files :
game.wbfs – first part [2GB size]
game.wbf1 – second part [2GB size]
game.wbf2 – third part [370MB size]
To split your file you may want to use the HJ-Split freeware utility, download here: http://www.freebyte.com/hjsplit/
ISO formats supported:
WODE can read ISOs with following formats: standard-ISO (filename.iso), WBFS-file (namefile.wbfs) and GameCube ISO (namefile.gcm).
WODE automatically detects all the ISOs stored on connected devices and - after an analysis - classifies them according the ISO type recognized. The ISOs are
grouped according to the massstorage device and each ISO label shows the recognized type:
The first letter shows the ISO type:
W = Wii ISO
G = GameCube ISO
I
= generic ISO
The second letter shows the ISO region (valid only for W and G Isos):
J
= Jap
U
= Usa
E
= Eur
K
= Kor
www.wodejukebox.com
WODE USER MANUAL
PAG 27 OF 34
BCA Support
WODE supports the management of BCA data requests.
Read BCA data built-in the ISO
The BCA data read into ISO can be do in two different way
• read 64 Bytes data from an hexadecimal file with the same file-name as the ISO but with .bca extension; (e.g.: if the ISO is called NSMB.iso, the file containing the BCA data has to be NSMB.bca).
• as an alternative you can manually insertion the 64Byte BCA data into the ISO at address 0x100.
Read BCA data in the disks backup
The reading of 64 Byte BCA data from backup discs are done at 0x100 disc data offset.
How to get the 64-byte BCA data.
To obtain the 64-byte BCA data, you need to use your original disc. Insert the disc into your Wii’s DVD-drive, go to the “Ripper” menu, choose the destination partition, select the option “Rip BCA Only” then move the selection to “start” and start the procedure. When it’s done, you should find the 64-byte BCA
Hex file on the previously selected mass-storage device’s “ISO” folder, according to the usual ISO folder name convention: “./iso/TitleID_GameName/TitleID.bca” .
www.wodejukebox.com
WODE USER MANUAL
PAG 28 OF 34
Creating a file.bca
To create a file.bca in hexadecimal format that can be read by WODE, you need to have an HEX EDITOR program (like WinHex, UltraEdit, Free Hex
Editor Neo, …).
After you’ve started the program, you only need to create a new file.
www.wodejukebox.com
WODE USER MANUAL
PAG 29 OF 34
Now insert the 64Byte BCA data you have.
Save the file with “.bca” extension.
www.wodejukebox.com
WODE USER MANUAL
PAG 30 OF 34
Adding the BCA data into the ISO
To add 64 Byte BCA data into the ISO it’s need to use a hexadecimal editor program [Hex Editor] (like WinHex, UltraEdit, Free Hex Editor Neo, …).
Once the tool is running, open the ISO file
Place the cursor at the offset 0x100 and from this point start inserting the 64bytes BCA data in you would like to include.
www.wodejukebox.com
WODE USER MANUAL
PAG 31 OF 34
Now save the ISO file.
www.wodejukebox.com
WODE USER MANUAL
PAG 34 OF 34
WODE does not detect the USB device connected
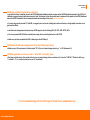
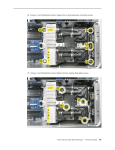
•[check that the ribbon cable that connects the WODE-MainBoard (installed inside the console) and the WODE–SlaveBoard (present in the WODE-VerticalStand) is properly inserted in both side connectors. Note: The blue part on the ribbon cable have to be placed to the upside on the WODE-MainBoard
and on the WODE-SlaveBoard it has to be placed towards the external part of the card.) {see [Pic 1] and [Pic 2]}
•[if you are using an usb-powered 2,5” Hdd-USB, we suggest you to use the usb-cable given from the constructor or an high quality usb-cable, no longer more than 40cm]
•[check the mass-storage device file-system type; WODE supports only the following FAT16/32, NTFS, WBFS, EXT3FS, HFS+]
•[try to use a powered USB-HUB with an external power supply when connecting the device to the WODE]
•[make sure you have connected both USB Y-cable plugs to the Wii-USB port]
WODE detect the USB mass-storage device but no any ISO showing in the list
•[Make sure your ISOs was placed in a folder named “ISO” in the root of mass-storage device (e.g.: “x:\ISO\filename.iso” )]
WODE hang after few seconds you come in “Select ISO” or Favorites” menu
•(that issue could be due to a file-system stucts errors on any mass-storage device connected; to fix it use the “CHKDSK /F” Windows’s utility (e.g.
“x:\chkdsk k: /F”) or a similar tool present on your PC enviroment)
For more troubleshooting visit the official support board at www.wodejukebox.org
www.wodejukebox.com