1
Anti-virus for UNIX File Servers
Administrator Manual
© Doctor Web, 2015. All rights reserved
This document is the property of Doctor Web. No part of this document may be reproduced, published or
transmitted in any form or by any means for any purpose other than the purchaser's personal use
without proper attribution.
TRADEMARKS
Dr.Web, SpIDer Mail, SpIDer Guard, CureIt!, CureNet!, AV-Desk and the Dr.WEB logo are trademarks
and registered trademarks of Doctor Web in Russia and/or other countries. Other trademarks, registered
trademarks and company names used in this document are property of their respective owners.
DISCLAIMER
In no event shall Doctor Web and its resellers or distributors be liable for errors or omissions, or any loss
of profit or any other damage caused or alleged to be caused directly or indirectly by this document, the
use of or inability to use information contained in this document.
Dr.Web Anti-virus for UNIX File Servers
Version 10.1.0
Administrator Manual
11/3/2015
Doctor Web Head Office
2-12A, 3rd str. Yamskogo polya
Moscow, Russia
125124
Web site: www.drweb.com
Phone: +7 (495) 789-45-87
Refer to the official web site for regional and international office information.
Doctor Web
Doctor Web develops and distributes Dr.Web® information security solutions which provide
efficient protection from malicious software and spam.
Doctor Web customers can be found among home users from all over the world and in
government enterprises, small companies and nationwide corporations.
Dr.Web antivirus solutions are well known since 1992 for continuing excellence in malware
detection and compliance with international information security standards. State certificates
and awards received by the Dr.Web solutions, as well as the globally widespread use of our
products are the best evidence of exceptional trust to the company products.
We thank all our customers for their support and devotion to the Dr.Web products!
4
Table of Contents
Document Conventions
7
Introduction
9
About this Product
10
Main Functions
10
Program Structure
11
Quarantine Directories
14
Files Permissions and Privileges
15
Operation Modes
16
Testing Solution Operation
19
System Requirements
20
Licensing
22
Key File
Installing and Removing Solution
24
25
Upgrading to Newer Version
25
Installation Procedure
27
Installing Universal Package
27
Installing in Graphics Mode
28
Installing from Command Line
34
Custom Installation
38
Installing from Dr.Web Repository
40
Adjusting SELinux Policies
41
Product Files Location
43
Removing Solution
Removing Universal Package
44
44
Removing in Graphics Mode
45
Removing from Command Line
48
Removing Product Installed from Repository
Getting Started
51
52
Integration with Samba File Server
53
Integration with Novell Storage Services
55
Quick Guide
56
Solution Components
59
Administrator Manual
5
Dr.Web ConfigD
59
Operation Principles
59
Command-Line Arguments
60
Configuration Parameters
61
Dr.Web Scanning Engine
64
Operation Principles
64
Command-Line Arguments
65
Configuration Parameters
67
Dr.Web File Checker
69
Operation Principles
69
Command-Line Arguments
70
Configuration Parameters
70
SpIDer Guard
73
Operation Principles
73
Command-Line Arguments
75
Configuration Parameters
75
SpIDer Guard for SMB
79
Operation Principles
79
Command-Line Arguments
81
Configuration Parameters
81
SpIDer Guard for NSS
86
Operation Principles
86
Command-Line Arguments
87
Configuration Parameters
88
Dr.Web Updater
92
Operation Principles
92
Command-Line Arguments
93
Configuration Parameters
94
Dr.Web ES Agent
98
Operation Principles
98
Command-Line Arguments
99
Configuration Parameters
99
Dr.Web HTTPD
102
Operation Principles
102
Command-Line Arguments
103
Configuration Parameters
103
Administrator Manual
6
Managing Product Operation via Web Interface
106
Component Management
107
Threats Management
107
Settings management
109
Dr.Web Ctl
113
Command-Line Call Format
113
Usage Examples
129
Configuration Parameters
130
Dr.Web Network Checker
130
Operation Principles
130
Command-Line Arguments
131
Configuration Parameters
132
Dr.Web ClamD
134
Operation Principles
134
Command-Line Arguments
135
Configuration Parameters
136
Integration with External Applications
139
Dr.Web SNMPD
140
Operation Principles
141
Command-Line Arguments
142
Configuration Parameters
142
Integration with SNMP Monitoring Systems
145
Appendices
153
Appendix A. Types of Computer Threats
153
Appendix B. Fighting Computer Threats
156
Appendix C. Contacting Support
158
Appendix D. Configuration File
159
File Structure
159
Parameter Types
160
Appendix E. Known Errors
163
Appendix F. Building Kernel Module for SpIDer Guard
171
Appendix G. Building VFS SMB Module for Samba
173
Index
175
Administrator Manual
Document Conventions
Document Conventions
The following conventions and symbols are used in this manual:
Convention
Description
Bold
Names of buttons and other elements of the graphical user interface (GUI),
and required user input that must be entered exactly as given in the guide.
Green and bold
Names of Dr.Web products and components.
Green and underlined
Hyperlinks to topics and webpages.
Monospace
Code examples, input to the command line and application output.
Command-line commands, which are entered via a keyboard (in the terminal
or terminal emulator), are marked with the command prompt character $ or #
in the current manual. The character indicates the privileges required for
execution of the specified command. According to the standard convention for
UNIX-based systems
$ - indicates that the command can be executed with user rights.
# - indicates that the command can be executed with superuser (usually
root) privileges. To elevate the privileges, use su or sudo commands.
Italic
Placeholders which represent information that must be supplied by the user.
For command-line input, it indicates parameter values.
CAPITAL LETTERS
Names of keys and key sequences.
Plus sign ('+')
Indicates a combination of keys. For example, ALT+F1 means to hold down
the ALT key while pressing the F1 key.
Exclamation sign
A warning about potential errors or any other important comment.
The following terms will be used without explanation hereinafter:
Convention
Complete form
EPM
ESP Package Manager (package manager)
FQDN
Fully Qualified Domain Name
FS
File System
GNU
GNU (GNU is Not Unix) project
HTML
HyperText Markup Language
HTTP
HyperText transfer Protocol
HTTPS
HTTP via SSL
ID
Identifier
IP
Internet Protocol
LKM
Linux Kernel Module
MBR
Master Boot Record
NSS
Novell Storage Services
OID
(SNMP) Object ID
OS
Operating System
PAM
Pluggable Authentication Modules
RPM
Red Hat Package Manager
RRA
Round-Robin Archive
Administrator Manual
7
Document Conventions
Convention
Complete form
RRD
Round-Robin Database
SMB
Server Message Block (file access protocol)
SNMP
Simple Network Management Protocol
SP
Service Pack
SSH
Secure SHell
SSL
Secure Sockets Layer
URL
Unified Resource Locator
VBR
Volume Boot Record
Administrator Manual
8
Introduction
Introduction
Thank you for purchasing Anti-virus Dr.Web for UNIX File Servers. It offers reliable protection
from various types of computer threats using the most advanced virus detection and neutralization
technologies.
This manual is intended to help users of computers running under OS GNU/Linux family and other
UNIX-like OSes, such as Solaris and FreeBSD, install and use Anti-virus Dr.Web for UNIX File
Servers 10.1.0 (Dr.Web for UNIX File Servers hereinafter).
If Dr.Web for UNIX File Servers 6.0.2 is already installed on your computer and you wish to upgrade
the solution to version 10.1.0, do the steps of the upgrade procedure.
Convention for paths to product files
The product described in the present document is designed for operation in different UNIX-based
operating system. Real paths to product files depend on the operating system installed on the user's
computer. For notational convenience, the following conventions are used:
<opt_dir> — directory where main product files reside (including executable files and libraries).
<etc_dir> — directory where the configuration file and a key file reside.
<var_dir> — directory where supporting and temporary product files reside.
Real paths corresponding to the conventions in different operating systems are given in the table
below.
Operating system
GNU/Linux
FreeBSD
Solaris
Convention
Real path
<opt_dir>
/opt/drweb.com
<etc_dir>
/etc/opt/drweb.com
<var_dir>
/var/opt/drweb.com
<opt_dir>
/usr/local/libexec/drweb.com
<etc_dir>
/usr/local/etc/drweb.com
<var_dir>
/var/drweb.com
<opt_dir>
The paths are the same as for GNU/Linux.
<etc_dir>
<var_dir>
For space considerations, examples given in the present document use paths for GNU/Linux OS. In
some places of the document, where it is possible, examples contain real paths for all of the OSes.
Administrator Manual
9
About this Product
About this Product
Dr.Web for UNIX File Servers is an anti-virus solution designed to protect servers running under
UNIX-like OSes (GNU/Linux, Solaris and FreeBSD) from viruses and another types of malicious
software, and to prevent distribution of the threats designed for all popular operating systems including
mobile platforms.
The core components of the program (anti-virus engine and virus databases) are not only extremely
effective and resource-sparing, but also cross-platform, which allows Dr.Web specialists to create
reliable anti-virus solutions for protection of computers and mobile devices running under prevalent
operating systems from viruses and other threats targeting various platforms. By the present time,
besides Dr.Web for UNIX File Servers, Doctor Web has developed different anti-virus solutions for
UNIX-family OSes and for the other platforms: IBM OS/2, Novell NetWare, OS X and Windows.
Moreover, there are anti-virus solutions designed for protection of mobile devices operating under
Android, Symbian, iOS and Windows Mobile operating systems.
Components of Dr.Web for UNIX File Servers are constantly updated and virus databases are
supplemented with new signatures to ensure up-to-date protection. Moreover, heuristic analysis
methods are used for providing additional protection against unknown viruses.
Main Functions
Main functions Dr.Web for UNIX File Servers provides you with the following features:
1. Detection and neutralization of malicious programs (for example, viruses, including those that
infect mail files and boot records, Trojans, mail worms) and unwanted software (for example,
adware, joke programs, dialers).
The product uses several malware detection methods simultaneously:
signature analysis, which allows detection of known threats
heuristic analysis, which allows detection of threats that are not present in virus databases
Note that the heuristics analyzer may raise false alarms. Thus, objects that contain threats
detected by the analyzer are considered "suspicious". It is recommended to quarantine such files
and send them for analysis to Doctor Web Virus laboratory. For details on methods used to
neutralize threats, refer to Appendix B. Fighting Computer Threats.
Scanning at user's request can be performed in two modes: Full scan (scan of all file system
objects) and custom scan (scan of selected objects: directories or files that satisfy specified
criteria). Moreover, the user can start a separate scan of volume boot records and executables that
ran processes that are currently active. In the latter case, if a malicious executable is detected, it is
neutralized and all processes run by this file are forced to terminate.
2. Monitoring access to files of
File system in the OS. Monitors file events and attempts to run executables. This feature
allows to detect and neutralize malware at an attempt to infect the server's file system.
Samba shared directories. Monitors read and write operations of local and remote users of
the file server. This feature allows to detect and neutralize malware at an attempt to save the
malicious program to storage, which prevents its distribution over the network.
NSS (Novell Storage Services) volumes. Monitors write operations of the NSS file storage
users. This feature allows to detect and neutralize malware at an attempt to save the malicious
program to NSS storage, which prevents its distribution over the network.
Administrator Manual
10
About this Product
Note that the function of file system monitoring is available only for OSes of GNU/Linux family, and
the function of Novell Storage Service volumes monitoring is available only for Novell Open
Enterprise Server SP2 based on SUSE Linux Enterprise Server 10 SP3 and newer. For other
supported OSes the corresponding monitoring components are not included in the distribution.
3. Reliable isolation of infected or suspicious objects. Such objects are moved to a special
storage, quarantine, to prevent any harm to the system. When moved to quarantine, objects are
renamed according to special rules and, if necessary, they can be restored to their original location
only at user request.
4. Automatic updating of Dr.Web virus databases and of the anti-virus engine to support high
level of protection against malware.
5. Collection of statistics on virus events, logging threat detection events. Notification on detected
threats over SNMP to external monitoring systems and to the central protection server (if the suite
operates in central protection mode).
6. Operation in central protection mode (when connected to the central protection server, such
as Dr.Web Enterprise Server or as a part of Dr.Web AV-Desk service). This mode allows
implementation of a unified security policy on computers within the protected network. It can be a
corporate network, a private network (VPN), or a network of a service provider (for example, a
provider of Internet service).
Program Structure
Dr.Web for UNIX File Servers is a suite composing several components each of which has an
individual set of functions. Components included in Dr.Web for UNIX File Servers are listed below.
Specification
Description
Dr.Web ConfigD
Configuration daemon Dr.Web for UNIX File Servers, which performs
the following functions:
Starts and stops suite components depending on the settings.
Automatically restarts components if a failure in their operation occurs.
Starts components at request of other components. Informs active
suite components when another component starts or shuts down.
Uniformly stores information on license keys and settings and provides
this data to other suite components. Receives adjusted settings and
license keys from authoritative components of Dr.Web for UNIX File
Servers. Notifies other components on changes in license keys and
settings.
Executable file: drweb-configd
Internal name output to the log file: ConfigD
Dr.Web Virus-Finding Engine
Anti-virus engine. The main component of the anti-virus protection.
Implements algorithms to detect viruses and malicious programs as well as
algorithms to analyze suspicious behavior (by using signature and heuristic
analysis).
Executable file: drweb32.dll
Internal name output to the log file: CoreEngine
Dr.Web Scanning Engine
Scanning engine. The component which loads anti-virus engine Dr.Web
Virus-Finding Engine and virus databases. Transmits content of files and
disk boot records to anti-virus engine for scanning at request of other
Dr.Web for UNIX File Servers components. Queues files that are
waiting for scanning. From the point of view of other Dr.Web for UNIX
File Servers components, this is a service of anti-virus scanning.
Can operate under the control of Dr.Web ConfigD and in standalone
Administrator Manual
11
About this Product
Specification
Description
mode.
Executable file: drweb-se
Internal name output to the log file: ScanEngine
Dr.Web virus databases
Automatically updated database used by anti-virus engine. The database
contains information for detection of malware and curing of known viruses.
Dr.Web File Checker
The component which scans file system objects and manages quarantined
files. Receives scanning tasks from other Dr.Web for UNIX File Servers
components. Searches file system directories according to a received task,
transmits files for scanning to Dr.Web Scanning Engine and notifies
components on scanning progress. Removes infected files, moves them to
quarantine,
restores
them
from
quarantine,
and
manages
quarantine directories. Creates and updates cache that store information
on scanned files to lessen the frequency of repeated file scanning.
Executable file: drweb-filecheck
Internal name output to the log file: FileCheck
SpIDer Guard
Linux file system monitor. Operates in background mode and controls file
operations (such as creation, opening, closing, running) in GNU/Linux
file systems. It sends the file scanning component requests to scan new or
changed files as well as executables of programs when they are run.
SpIDer Guard is included only in the distributions designed for
GNU/Linux OSes.
Executable file: drweb-spider
Internal name output to the log file: LinuxSpider
SpIDer Guard for SMB
Samba shared directories monitor. Operates in background mode and
monitors file system operations (such as creation, opening, closing, read
and write operations) in directories of Samba SMB server file storages.
Sends the file scanning component content of new or modified files for
scanning. Integration with the file server is performed via VFS SMB
modules that operate on Samba server side.
Executable file: drweb-smbspider-daemon
Internal name output to the log file: SMBSpider
SpIDer Guard for NSS
NSS volumes monitor (Novell Storage Services). Operates on
background mode and controls file system operations (such as creation,
opening, closing and write operations) on NSS volumes that are mounted
on the file system. Sends the file scanning component content of new or
modified files for scanning.
SpIDer Guard for NSS is included only in the distributions
designed for GNU/Linux OSes. The component can operate
only on Novell Open Enterprise Server SP2 based on SUSE
Linux Enterprise Server 10 SP3 and newer.
Executable file: drweb-nss
Internal name output to the log file: NSS
Dr.Web ES Agent
Central protection agent. Maintains suite operation in centralized and
mobile modes. Provides communication between the suite and the central
protection server, received license key file, updates to the virus databases
Administrator Manual
12
About this Product
Specification
Description
and components. Sends the server information on the components
included in Dr.Web for UNIX File Servers ans their state as well as
statistics of virus events.
Executable file: drweb-esagent
Internal name output to the log file: ESAgent
Dr.Web Network Checker
Agent for distributed file scanning. Allows to receive/transmit files for
scanning from/to remote hosts. For that purpose, remote hosts must
feature an installed and running Dr.Web Anti-virus for UNIX-based
operating systems. Agent allows automatic distribution of scanning load
among remote hosts by reducing load on hosts with a large number of
scanning tasks (for example, on mail servers, file servers, Internet
gateways).
For security reasons, files are transmitted over SSL.
Executable file: drweb-netcheck
Internal name output to the log file: NetCheck
Dr.Web HTTPD
Web interface for Dr.Web for UNIX File Servers management. You can
access the interface via web browser on a local or remote host. In-built
web interface enables the product to use neither third-party web servers
(such as httpd Apache) nor remote administration tools, such as
Webmin.
For security reasons, files are transmitted over HTTPS.
Executable file: drweb-httpd
Internal name output to the log file: HTTPD
Dr.Web Ctl
Tool for managing Dr.Web for UNIX File Servers from the command
line.
Allows to start file scanning, view quarantined objects, start a virus
database update procedure, connect and disconnect the suite to the
central protection server, view and configure suite parameters.
Executable file: drweb-ctl
Internal name output to the log file: Ctl
Dr.Web Updater
Update component. Downloads updates to virus databases and anti-antivirus engine from Doctor Web servers (both as scheduled and at the
user's request).
Executable file: drweb-update
Internal name output to the log file: Update
Dr.Web SNMPD
SNMP agent. Designed for integration of Dr.Web for UNIX File Servers
with external monitoring systems over SNMP. Such integration allows to
control states of suite components and collect statistics on threat detection
and neutralization. Supports SNMP v2с and v3.
Executable file: drweb-snmpd
Internal name output to the log file: SNMPD
Dr.Web ClamD
Component emulating interface of the anti-virus daemon clamd, which is
a component of ClamAV® anti-virus. Allows all applications that support
ClamAV® to transparently use Dr.Web for UNIX File Servers for
anti-virus scanning.
Executable file: drweb-clamd
Internal name output to the log file: СlamD
Administrator Manual
13
About this Product
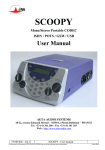
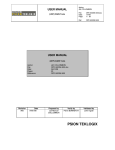
Structure of the Dr.Web for UNIX File Servers suite and interaction with external applications are
illustrated on the picture below.
Picture 1. Structure of Dr.Web for UNIX File Servers suite
In this scheme, the following notations are used:
– Dr.Web for UNIX File Servers as a whole and external applications together with systems
which are not included in the solution.
– Components that are included in Dr.Web for UNIX File Servers engine. Other product
components use the engine as a service that performs anti-virus checks.
– Service components designed to perform particular anti-virus protection functions (for
example, scanning file system objects, updating virus databases, establishing connection to
central protection servers, managing operation of the suite).
– Components that provide the user with the interface for Dr.Web for UNIX File Servers
management.
– Quarantine as a set of file system directories which store isolated malicious files.
For details on the components, refer to Solution Components.
Quarantine Directories
Quarantine directories serve for isolation of files that pose a threat to system security and cannot be
currently cured. Such threats are those that are unknown to Dr.Web for UNIX File Servers (that is, a
virus is detected by the heuristic analyzer but the virus signature and method to cure are absent in the
databases) or those that caused an error during scanning. Moreover, a file can be quarantined at user
request if the user selected this action in the list of detected threats or specified this action in settings
as reaction to this threat type.
When a file is quarantined, it is renamed according to special rules. Renaming of isolated files prevents
their identification by users or applications and complicates access to them in case of attempt to bypass
quarantine management tools implemented in Dr.Web for UNIX File Servers. Moreover, when a file
is moved to quarantine, the execution bit is reset to prevent an attempt to run this file.
Quarantine directories are located in
user home directory (if multiple user accounts exist on the computer, a separate quarantine
Administrator Manual
14
About this Product
directory can be created for each of the users);
root directory of each logical volume mounted to the file system.
Dr.Web quarantine directories are always named as .com.drweb.quarantine and are not created
until the Quarantine action is applied. At that, only a directory required for isolation of a concrete
object is created. When selecting a directory, the file owner name is used: search is performed upwards
from the location where the malicious object resides and if the owner home directory is reached, the
quarantine storage created in this directory is selected. Otherwise, the file is isolated in the quarantine
created in the root directory of the volume (which is not always the same as the file system root
directory). Thus, any infected file moved to quarantine always resides on the volume, which provides
for correct operation of quarantine in case several removable data storages and other volumes are
mounted to different locations in the system.
Users can manage objects in quarantine from the command line using Dr.Web Ctl utility. Every action
is applied to the consolidated quarantine; that is, changes affect all quarantine directories available at
the moment.
Operation with quarantined objects is allowed even if no active license is found. However, isolated objects
cannot be cured in this case.
Files Permissions and Privileges
To scan objects of the file system and neutralize threats, Dr.Web for UNIX File Servers (or rather
the user under whom it runs) requires the following permissions:
Action
Required permissions
Listing all detected threats
Unrestricted. No special permission required.
List archive contents
Unrestricted. No special permission required.
(only corrupted or malicious
elements)
Moving to quarantine
Unrestricted. The user can quarantine all infected files regardless of read or
write permissions on them.
Removing a threat
User must have write permission on the deleted file.
Curing
Unrestricted. The permissions and owner of a cured file remain the same.
If deletion is applied to the file while curing, it is removed from the system
regardless of the permissions that the user has on the file.
Restoring a file from quarantine
The user must have permissions to read the file and to write to the restore
directory.
Deleting a file from quarantine
The user must have write permissions to the file that was moved to
quarantine.
To enable operation of the command-line management tool with superuser privileges, you can use the
su command, which allows to change the user, or the sudo command, which allows to execute a
command as another user.
Note that Dr.Web Scanning Engine scanning engine cannot check file which size exceeds 4 Gbytes
(on attempt to scan such files, the following error message displays: "File too large").
Administrator Manual
15
About this Product
Operation Modes
Anti-virus Dr.Web for UNIX File Servers can operate both in standalone mode and as a part of an
anti-virus network managed by a central protection server. Operation in central protection mode does
not require installation of additional software or Dr.Web for UNIX File Servers reinstallation or
removal.
In standalone mode, the protected computer is not connected to an anti-virus network and its
operation is managed locally. In this mode, configuration and license key files reside on local disks
and Dr.Web for UNIX File Servers is fully controlled from the protected computer. Updates to
virus databases are received from Doctor Web update servers.
In central protection mode, protection of the computer is managed by the central protection
server. In this mode, some functions and settings of Dr.Web for UNIX File Servers can be
adjusted in accordance with the general (corporate) anti-virus protection policy implemented on the
anti-virus network. The license key file used for operating in enterprise mode is received from the
central protection server. The key file stored on the local computer, if any, is not used. Statistics on
virus events is sent to the central protection server. Updates to virus databases are also received
from the central protection server.
In mobile mode, Dr.Web for UNIX File Servers receives updates from Doctor Web update
servers, but operation of Dr.Web for UNIX File Servers is managed with the local settings. The
used key file is received from the central protection server.
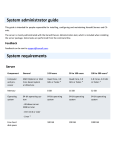
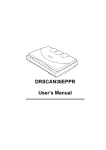
Central protection concept
Doctor Web solutions for central protection use client-server model (see the picture below).
Workstations and servers are protected by local anti-virus components (herein, Dr.Web for UNIX File
Servers) installed on them, which provides for anti-virus protection of remote computers and allows
connection between the workstations and the central protection server.
Administrator Manual
16
About this Product
Central protection server
Network based on TCP, NetBIOS
Dr.Web anti-virus network
administrator
Management via HTTP/HTTPS
Protected computer or
server
Transmitting updates via HTTP
Doctor Web update server
Picture 2. Logical structure of the Anti-Virus Network
Local computers are updated and configured from the central protection server. The stream of
instructions, data and statistics in the anti-virus network goes also through the central protection
server. The volume of traffic between protected computers and the central server can be quite sizeable,
therefore solutions provide options for traffic compression. To prevent leak of sensitive data or
substitution of software downloaded onto protected computers, encryption is also supported.
All necessary updates are downloaded to the central protection server from Doctor Web update
servers.
Local anti-virus components are configured and managed from the central protection server according
to commands received from anti-virus network administrators. Administrators manage central
protection servers and topology of anti-virus networks (for example, validate connections to the central
protection server from remote computers) and configure operation of local anti-virus components when
necessary.
Administrator Manual
17
About this Product
Local anti-virus components are not compatible with anti-virus products of other companies or anti-virus
solutions of Dr.Web if the latter do not support operation in Central protection mode (for example,
version 5.0 of Dr.Web for UNIX File Servers). Installation of two anti-virus programs on the same
computer can cause a system crash and loss of important data.
Please note that the current version of the Dr.Web for UNIX File Servers suite is not fully implements
the central protection mode: central protection server cannot manage operation settings of the product
components and cannot send scan tasks for the suite.
Connecting to Anti-Virus Network
Dr.Web for UNIX File Servers can be connected to an anti-virus network using the esconnect
command of the command-line management tool Dr.Web Ctl.
Verification of central protection server requires use of public encryption keys, that is, each server is
supplied with a unique public key. By default, central protection agent Dr.Web ES Agent does not allow
connection to the server unless you provide a file containing a public key for authentication of the used
server. Such public key file should be obtained from the administrator of your anti-virus network serviced
by the server to which you want to connect Dr.Web for UNIX File Servers.
If Dr.Web for UNIX File Servers is a part of the anti-virus network, you can switch solution operation
between mobile and enterprise modes. The operation mode option is managed with the
configuration parameter MobileMode of Dr.Web ES Agent. Note that operation can switch to mobile
mode only if it is allowed in the central protection server settings.
Disconnecting from Anti-Virus Network
Dr.Web for UNIX File Servers can be disconnected from the anti-virus network using the
esdisconnect command of the command-line management tool Dr.Web Ctl.
Administrator Manual
18
About this Product
Testing Solution Operation
The EICAR ( European Institute for Computer Anti-Virus Research) Test helps testing performance of
anti-virus programs that detect viruses using signatures. This test was designed specially so that users
could test reaction of newly-installed anti-virus tools to detection of viruses without compromising
security of their computers.
Although the EICAR test is not actually a virus, it is treated by the majority of anti-viruses as if it were
a virus. On detection of this "virus", Dr.Web anti-virus products report the following: EICAR Test
File (Not a Virus!). Other anti-virus tools alert users in a similar way. The EICAR test file is a
68-byte COM-file for MS DOS/Windows OS that outputs the following line on the console when
executed:
EICAR-STANDARD-ANTIVIRUS-TEST-FILE!
The EICAR test contains the following character string only:
X5O!P%@AP[4\PZX54(P^)7CC)7}$EICAR-STANDARD-ANTIVIRUS-TEST-FILE!$H+H*
To create your own test file with the "virus", you may create a new file with the line mentioned above.
If Dr.Web for UNIX File Servers operates correctly, the EICAR test file is detected during a file
system scan regardless of the scan type and the user is notified on the detected threat: EICAR Test
File (Not a Virus!).
Administrator Manual
19
System Requirements
System Requirements
You can use Dr.Web for UNIX File Servers on a computer that meets the following requirements:
Specification
Requirement
Platform
Both 32-bit (IA-32, x86) and 64-bit (x86-64, x64, amd64) Intel platforms are
supported.
Hard disk space
Minimum 1 GB of free disk space of the volume where Dr.Web for UNIX File Servers
are located.
Operating system
GNU/Linux (kernel 2.6.37 or newer and library glibc 2.13 or newer), FreeBSD or
Solaris for platforms Intel x86/amd64. Note that the system must use PAM.
For systems operating on 64-bit platforms, support of 32-bit applications must be enabled
(probably, additional libraries must be installed for this, see below).
Tested operating system distributions are listed below.
Other
The following valid network connections:
Valid Internet connection to enable updates for virus databases and Dr.Web for UNIX
File Servers components.
When operating in central protection mode, connection to the server on the local network
is enough; connection to the Internet is not required.
Tested operating system distributions
The product was tested on the following distributions:
GNU/Linux (for 32- and 64-bit platforms):
Linux distribution name
Linux
Required additional libraries for 64-bit OS
version
Version
Debian
7.8, 8.0, 8.1
libc6-i386
Fedora
20, 21
glibc.i686
Ubuntu
12.04, 14.04,
14.10, 15.04
libc6-i386
CentOS
5.11, 6.6, 7.1
glibc.i686
Red Hat Enterprise Linux
5.11, 6.6, 7.1
glibc.i686
SUSE
Linux
Server
11 SP3, 12
Enterprise
—
Other GNU/Linux distributions that meet the above-mentioned requirements have not been tested
for compatibility with Dr.Web for UNIX File Servers but may be supported. If a compatibility
issue occurs, contact technical support on the official website at http://support.drweb.com/request/.
FreeBSD:
Version
9.3, 10.1
Required additional libraries for 64-bit OS version
—
Solaris:
Version
10 u11
Required additional libraries for 64-bit OS version
—
Administrator Manual
20
System Requirements
Please note that for FreeBSD and Solaris, the product can be installed only from universal package.
The SpIDer Guard and SpIDer Guard for NSS monitoring components are included only in the
distributions designed for GNU/Linux OSes.
On Debian, Fedora, Mint, and Ubuntu, SpIDer Guard uses the fanotify monitoring interface by
default. On CentOS and Red Hat Enterprise Linux, the component uses a special loadable kernel
module, which is supplied completely assembled with the product.
If necessary, you can build a loadable kernel module manually by using the supplied source codes for
any GNU/Linux-based operating systems with kernel 2.6.x and newer.
Additional Packages
X Window System graphics subsystem and any window manager – to enable startup of the GUI
programs for product installation and removal in graphics mode.
xterm or xvt terminal emulator – to start in graphics mode the product installer or uninstaller,
designed for the command line, and for automatic starting of the interactive setup script during the
GUI installation.
For correct operation with user privileges, PAM must be installed in the operating system.
For convenient work with Dr.Web for UNIX File Servers in the command line, you can enable
command auto-completion in the used command shell (if disabled).
Supported File Servers
Samba File Service
For integration with Samba file service, the installed and configured file server Samba 3.0 and newer
is required.
The SpIDer Guard for SMB monitor uses a special VFS SMB module for the integration with the
Samba server. With SpIDer Guard for SMB, several versions of this module which are built for
various versions of Samba are supplied. However, the supplied versions of the VFS SMB module may be
incompatible with the version of Samba installed on your file server. It may occur, for example, if the
Samba server uses the CLUSTER_SUPPORT option.
In case of incompatibility of the VFS SMB module with the Samba server, the corresponding
message is show n during the Dr.Web for UNIX File Servers product installation. In this case, build
the VFS SMB module for your Sambа server from the supplied source codes manually (including the
compatibility with the CLUSTER_SUPPORT option if necessary).
The procedure of building the VFS SMB module from the supplied source codes is described in
Appendix G.
NSS File Service
For integration with NSS file service, the installed and configured Novell Open Enterprise Server
SP2 based on the operating system SUSE Linux Enterprise Server 10 SP3 or newer (11 SP1, SP2) is
required.
If you encounter any problem with installation of additional packages and components, refer to User
Manuals for the used distribution of the operating system.
Administrator Manual
21
Licensing
Licensing
Permissions to use Dr.Web for UNIX File Servers are granted by the license purchased from Doctor
Web company or from Doctor Web partners. License parameters determining user rights are set in
accordance with the License agreement which the user accepts during product installation. The
license agreement contains information on the user and the vendor as well as usage parameters of the
purchased product, including:
List of components licensed to the user
License period
Other restrictions (for example, number of computers on which the purchased Dr.Web for UNIX
File Servers is allowed for use).
For evaluation purposes users may also activate demo period. After successful activation, demo period
provides users with full functionality of the solution for the whole activated period.
Each Doctor Web product license has a unique serial number associated with a special file stored on
the user computer. This file regulates operation of Dr.Web for UNIX File Servers components in
accordance with the license parameters and is called a license key file. Upon activation of a demo
period, a special key file, named a demo key file, is automatically generated.
If a license or a demo period are not activated on the computer, Dr.Web for UNIX File Servers
components are blocked. Moreover, updates to virus databases and components cannot be downloaded
from Doctor Web update servers. But you can activate the product by connecting it to the central
protection server as a part of the anti-virus network administered by the enterprise or Internet service
provider. In this case, operation of Anti-virus and updating are managed by the central protection
server.
Please note that the current version of the Dr.Web for UNIX File Servers suite is not fully implements
the central protection mode: central protection server cannot manage operation settings of the product
components and cannot send scan tasks for the suite.
Purchasing and Registering Licenses
After a license is purchased, updates to product components and virus databases are regularly
downloaded from Doctor Web update servers. Moreover, if the customer encountered any issue when
installing or using the purchased product, they can take advantage of technical support service provided
by Doctor Web or Doctor Web partners.
You can purchase any Dr.Web product as well as obtain a product serial number either on the
online store or from our partners. For details on license periods and license types, visit the Doctor
Web official website at http://www.drweb.com/.
License registration is required to prove that you are a legal user of Dr.Web for UNIX File Servers
and activate the solution functions including virus database updating. It is recommended to register the
product and activate the license once installation completes. A purchased license can be activated on
the Doctor Web official website at http://products.drweb.com/register/.
During activation, it is required to enter the serial number of the purchased license. The serial number
is supplied with the product or via email when purchasing or renewing the license online.
Administrator Manual
22
Licensing
If you have used Dr.Web for UNIX File Servers in the past, you may be eligible for a 150-day
extension to your new license. To enable the bonus, enter your registered serial number or provide the
license key file.
If you have several licenses for using Dr.Web for UNIX File Servers on several servers, but choose to
use the product only on one server, you can specify this and, hence, license validity period will be
automatically extended.
Obtaining Demo License
A demo period for your copy of the product can be obtained on the Doctor Web official website at
https://download.drweb.com/demoreq/biz/. After you select the product and fill the registration form,
you will receive an email with a serial number or key file for Dr.Web for UNIX File Servers
activation.
Another demo period for the same computer can be obtained after a certain time period.
Subsequent Registration
If a key file is lost but the existing license is not expired, you must register again by providing the
personal data you specified during the previous registration. You may use a different email address. In
this case, the key file will be sent to the newly specified address.
The number of times you can request a key file is limited. One serial number can be registered no more
than 25 times. If requests in excess of that number are sent, no key file will be delivered. To receive a
lost key file, contact technical support, describe your problem in detail, and state personal data you
entered upon serial number registration. The license key file will be sent by email.
If the key file is sent by email, you need to install it manually.
Administrator Manual
23
Licensing
Key File
The key file is a special file stored on the local computer. It corresponds to the purchased license or
activated demo period for Dr.Web for UNIX File Servers. The file contains information on the
provided license or demo period and regulates usage rights in accordance with it.
The key file has .key extension and is valid if satisfies the following criteria:
License or demo period is not expired.
Demo period or license applies to all anti-virus components required by the product.
Integrity of the key file is not violated.
If any of the conditions are violated, the license key file becomes invalid.
During Dr.Web for UNIX File Servers operation, the key file must reside in the default <etc_dir>
directory (etc/opt/drweb.com for Linux) and have the drweb32.key name.
Components of Dr.Web for UNIX File Servers regularly check whether the key file is available and
valid. The key file is digitally signed to prevent its editing. So, the edited key file becomes invalid. It is not
recommended to open your key file in text editors in order to avoid its accidental invalidation.
If no valid key file (license or demo) is found, or if the license is expired, operation of the anti-virus
components is blocked until a valid key file is installed.
It is recommended to keep the license key file until it expires, and use it to reinstall Dr.Web for UNIX
File Servers or install it on a different computer. In this case, you must use the same product serial
number and customer data that you provided during the registration.
Key File Installation
If you have a key file corresponding to the valid license for the product (for example, if you obtained
the key file by email or if you want to use Dr.Web for UNIX File Servers on another server), you can
activate the solution by specifying the path to the key file.
For that purpose:
1. Unpack the key file if archived
2. Do one of the following:
Copy the key file to the <etc_dir> directory and rename the file to drweb32.key
In the Dr.Web for UNIX File Servers configuration file, specify the key file path as the
KeyPath parameter value.
3. If required, restart drweb-configd component by sending it the SIGHUP signal.
You can also use the following command:
# drweb-ctl cfset Root.KeyPath </path/to/key/file>
In this case, the key file will not be copied to the <etc_dir> directory and will remain in its original
location.
For details on conventions used for <opt_dir>, <etc_dir>, and <var_dir>, refer to Introduction.
Administrator Manual
24
Installing and Removing Solution
Installing and Removing Solution
This section describes how to install, update, and remove Dr.Web for UNIX File Servers 10.1.0. Also
in this section you can find description of how to upgrade the product, if Dr.Web for UNIX File
Servers 6.0.2 is already installed on your computer.
These procedures can be performed only by a user with administrative privileges (root superuser). To
elevate privileges, use the su command (change the current user) or the sudo command (execute the
specified command with the privileges of another user).
Please note that for FreeBSD and Solaris, the product can be installed only from universal package.
Upgrading to Newer Version
Introductory remarks
Please note that your version of Dr.Web for UNIX File Servers should be upgraded the same way as
it was used during the installation:
If the current version was installed from the repository, an upgrade requires updating program
packages from the repository.
If the current version was installed from the distribution, an upgrade requires installation of another
distribution of the new version.
To identify how the product version was installed, check whether the solution executable directory
<opt_dir>/bin/ contains remove.sh delete script. If so, the current version was installed from the
universal package; otherwise, it was installed from the repository.
Please note that for FreeBSD and Solaris, the product can be installed only from universal package.
For details on conventions used for <opt_dir>, <etc_dir>, and <var_dir>, refer to Introduction.
If you cannot update the product the way you installed it initially, remove your current version of
Dr.Web for UNIX File Servers, and then install a new version using any convenient method.
Installation and removal procedures for previous Dr.Web for UNIX File Servers versions are the
same as installation and removal described in the current manual for version 10.1.0. For additional
information, see User manual for your current version of Dr.Web for UNIX File Servers.
Note that Dr.Web for UNIX File Servers 10.1.0 cannot operate under the central protection server.
Thus, if you need Dr.Web for UNIX File Servers to operate under the management of the server, do
not perform the upgrade. Otherwise, after you upgrade the product, you will need to obtain a license
key file and manage its operation locally, for example, by using the included management interface.
Installing universal package for an upgrade
Install Dr.Web for UNIX File Servers 10.1.0 from the installation file. During the installation, you are
prompted to automatically remove the older version installed from the distribution.
If several Dr.Web server products 6.0.2 are installed on your server (for example, a product for file
servers, for mail servers, and for Internet gateways), you need to select only the following packages
for removal, in order to keep other server products that will not be upgraded (for mail servers, and for
Internet gateways) fully functional:
drweb-file-servers-doc
Administrator Manual
25
Installing and Removing Solution
drweb-samba-web
drweb-smbspider
Upgrading from the repository
Note that you cannot upgrade Dr.Web for UNIX File Servers 6.0.2 to 10.1.0 from the repository if
your server features several Dr.Web server products 6.0.2 (for example, a product for file servers, for
mail servers, and for Internet gateways). In this case, install the new version of Dr.Web for UNIX File
Servers to a separate machine.
For updating your current Dr.Web for UNIX File Servers version, installed from the Doctor Web
repository, in dependence of packages type, do the following:
In case of using RPM packages (yum):
1. Remove all packages of the current version using the command
# yum remove drweb*
This command will prompt you to remove all installed Dr.Web packages. Therefore it should be
used carefully, if you have installed several Dr.Web products on your workstation.
2. Change the used repository (from the package repository of your current version to the package
repository 10.1.0).
You can find the name of the repository in the Installing from Dr.Web Repository section. For
details on how to change repositories, refer to help guides of the used operating system
distribution.
3. Install the new Dr.Web for UNIX File Servers version using the command
# yum install drweb-file-servers
For an additional information, refer to chapters Removing and Installing product packages using the
Dr.Web repository (to parts, corresponding to OS and packages manager which are used).
In case of using DEB packages (apt-get):
1. Change the used repository (from the package repository of your current version to the package
repository 10.1.0).
2. Update the product using the following commands:
# apt-get update
# apt-get dist-upgrade
Please note that for OS Ubuntu 14.04 (64-bit version), the apt-get dist-upgrade command may
fail. In this case use the aptitude package manager (to upgrade the product, issue the
aptitude dist-upgrade command).
Key file transfer
Regardless of the selected method to upgrade product, the license key file is installed to the default
location for new version of the product.
If any problem occurs during automatic installation of the key file, you can install it manually.
If a valid license key file is lost, contact Doctor Web technical support.
Administrator Manual
26
Installing and Removing Solution
Installation Procedure
To install Dr.Web for UNIX File Servers, do one of the following:
1. Download the installation file with the universal package for UNIX systems from the Doctor Web
official website. The package is supplied with installers (both graphical and console) started
depending on the environment.
2. Download the native packages from the corresponding package repository of Doctor Web.
Please note that for FreeBSD and Solaris, the product can be installed only from universal package.
Regardless of the selected way to install Dr.Web for UNIX File Servers, after the installation
completes, you need either to activate the license, or install the key file if obtained, or connect the
product to the central protection server. For details, refer to Licensing.
Until you do that, anti-virus protection is disabled.
Installing Universal Package
Dr.Web for UNIX File Servers is distributed as an installation file nameddrweb-file-servers
_<version>~<OS>_<platform>.run, where <version> is a line that contains the version and
data of product release, <OS> - type of UNIX-like OS, and <platfrom> is a platform for which the
product is intended (x86 for 32-bit platforms and amd64 for 64-bit platforms). For example:
drweb-file-servers_10.1.0.1-1409012000~linux_x86.run
Note that the installation file name corresponding to the above-mentioned format is referred to as
<file_name>.run.
To install Dr.Web for UNIX File Servers components
1. If you do not have the installation file containing the universal package, download it from the
official Doctor Web website: https://download.drweb.com/.
2. Save the installation file to the hard disk drive of the computer.
3. Allow the installation file to execute, for example, using the following command:
# chmod +x <file_name>.run
4. Execute the installation file using the following command:
# ./<file_name>.run
or use the standard file manager of the graphical shell for both changing file properties and
running the file.
This runs an integrity check of the archive, after which the archived files are unpacked to a
temporary directory and an install program is started. If the user does not have root privileges, the
install program attempts to elevate its privileges and requires the root password (sudo is used). If
the attempt fails, installation process aborts.
Administrator Manual
27
Installing and Removing Solution
If the path to the temporary directory in the file system has not enough free space for the unpacked
files, the installation process is aborted and an appropriate message is displayed. In this case,
change the value of the TEMPDIR system environment variable so that it points to a directory with
enough free space and repeat the installation. You can also use the --target option (for more
details, see Custom Installation chapter).
Depending on the environment where the distribution is started, one of the following installation
programs runs:
Installation Wizard for graphics mode
Installer for command-line mode
At that, the installer for command-line mode is automatically started if the Installation Wizard for
graphics mode fails to start.
5. Follow the prompts of the installer.
Note that if the used Linux distribution features SELinux, the installation process can be interrupted by
the security subsystem. If such situation occurs, set SELinux to the (Permissive) mode. To do this,
enter the following command:
# setenforce 0
and restart the installer.
After the installation completes, configure SELinux security policies to enable correct operation of antivirus components of the solution.
All unpacked installation files are deleted once the installation process completes.
After installation in the desktop graphical shell completes, the Dr.Web group is displayed on the
application menu. This item contains item Remove Dr.Web components to delete the product.
If required, use custom installation of product components (for example, to resolve errors that occurred
during Dr.Web for UNIX File Servers operation).
Installing in Graphics Mode
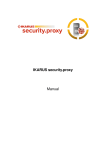
After the installation program for graphics mode starts, a window of the Installation Wizard displays.
The welcome page shows packages of the product that are included in the distribution and can be
installed via the Wizard.
Administrator Manual
28
Installing and Removing Solution
Picture 3. Welcome page
To start installation of Dr.Web for UNIX File Servers, click Next. If you choose not to install the
product and exit the Wizard, click Cancel.
1. In the first step, select the type of the installation by using the switch button. If the Dr.Web for
UNIX File Servers item is selected, all packages included in Dr.Web for UNIX File Servers will
be automatically installed. If the Custom Configuration item is selected, you will be prompted to
select required components manually in step 2. Otherwise, the Wizard will proceed to step 3.
Picture 4. Selection of the installation type
After you select the installation type, click Next. If you choose not to install the product and exit the
Wizard, click Cancel.
2. If in the first step you selected Custom Configuration, the next screen will prompt you to select
packages for installation. By clicking Select all, you can select all of the components at once; by
clicking Select none—clear the selection. Note that selection of a package means automatic
selection of other packages on which this package is dependent. Similarly, deselection of a package
means automatic deselection of all packages that depend on it.
Picture 5. Selection of packages to be installed
Administrator Manual
29
Installing and Removing Solution
After you select required components, click Next. If you choose not to install the product and exit
the Wizard, click Cancel.
3. The next page of the Wizard displays the list of product packages that will be installed on your
computer.
Picture 6. Confirming the list of components to be installed
To confirm your selection, click Next. To cancel the installation and exit the Wizard, click Cancel.
To edit the list of the components to be installed, click Back. Note that clicking the Back button
opens the windows with listed components (step 2) regardless of the installation type that you
selected in step 1.
3. In the next step, read the text of the Dr.Web License agreement and information about copyright
on the installed Dr.Web for UNIX File Servers components (including copyright on third-party
components). To view the text of the License agreement and information on copyright, select the
corresponding tab. The Select language drop-down list allows to select the language for the
Dr.Web License Agreement.
Administrator Manual
30
Installing and Removing Solution
Picture 7. Viewing the License agreement and copyright information
To start installation of the product packages, accept the terms of the license agreement (for this,
use the Accept and install switch) and click Next. Note that if you select Cancel installation and
click Next, the Installation Wizard will exit as the terms of the License agreement were not
accepted. You can also click Cancel to end the installation process and exit the Wizard.
4. After you accept the terms of the License agreement, unpacking of packages and copying files to
your computer will start.
Picture 8. Installation of the product packages
5. After program files are successfully copied and all required changes to the system files are made,
you will see the Run interactive postinstall script option below the installation log. Select this
option if you want to start an interactive script for product setup. You can skip this step and
configure the product later. Then click Next. If the Run interactive postinstall script option was
selected, an interactive setup script will run (see below). When execution of the script completes,
the final page of the wizard opens. If the option was not selected, the Wizard will proceed to its final
page.
Administrator Manual
31
Installing and Removing Solution
If xterm terminal emulator is not present in the system, the interactive setup script cannot be started
automatically. In this case, start the script manually after the installation process completes (the script
file drweb_smbspider_configure.sh resides in the <opt_dir>/share/drweb-smbspidermodules/ directory).
6. In the last step, the final page of the Wizard opens and displays the results of Dr.Web for UNIX
File Servers installation.
Picture 9. Final page
To exit the Wizard, click Close. If the installation process failed due to an error, the final page of the
Wizard will display an appropriate message. If so, exit the Wizard by clicking Close. Remove the
problems, which caused this error, and start installation again.
7. After the installation completes, an appropriate message displays and informs on how to manage
product operation (the text of the message is duplicated in the terminal emulator, if it is open).
Picture 10. Text message
Interactive setup script
Interactive setup script allows automatic integration of Dr.Web for UNIX File Servers and Samba
file server and helps to specify the list of shared directories monitored by monitor SpIDer Guard for
SMB.
If you wish to configure integration, enter y or yes as the answer to the question "Do you want to
continue?". If you enter n or no, execution of the script will end.
Administrator Manual
32
Installing and Removing Solution
Picture 11. Running the interactive setup script
If a valid key file is not available on your computer in the standard product directory, the script will
offer you to specify the path to the valid key file. Otherwise, this step will be automatically skipped.
Picture 12. Specifying path to key file
To skip this step, enter 0. Later, you can install the key file manually. If a valid key file is available on
your computer, specify the path to it and press ENTER. The file will be copied to the standard product
directory.
Next, allow or deny modification of the smb.conf configuration file of the Samba server and confirm
that the installation script found the right path to the Samba server. Otherwise, specify the correct
path.
Administrator Manual
33
Installing and Removing Solution
Picture 13. Determination of the used Samba server and its configuration file
Select shared directories, managed by Samba, that must be monitored by SpIDer Guard for SMB. For
that, follow the instructions of the script:
If you specify the number of a shared directory that is not marked with [X], this directory is to be
monitored; otherwise, it is excluded from monitoring.
If you enter A or All, all available shared directories will be added for monitoring; if you enter N or
None, all shared directories will be excluded from monitoring.
Picture 14. Selection of shared directories for monitoring
To finish the selection and save the changes to the configuration file, enter 0, Q, or Quit.
After that, all changes are saved to the configuration file. Additionally, the required version of the VFS
SMB library module will be determined and the corresponding link will be added to the Samba server
directory.
Picture 15. Completion of the script operation
After you finish adjusting the settings, press ENTER to end execution of the script.
Installing from Command Line
Once the program for command-line installation starts, the command prompt displays on the screen.
1. To start the installation process, enter Yes or Y in response to the "Do you wish to continue?"
question. If you choose not to install Anti-virus on your computer, enter No or N. In this case, the
installation will be canceled.
Administrator Manual
34
Installing and Removing Solution
Picture 16. Command prompt to install the product
2. Next, choose the installation type: all components of Dr.Web for UNIX File Servers or only a set
of required Dr.Web components (the Custom Configuration menu item).
Picture 17. Selection of the installation type
To select the required installation type, enter the corresponding number of the menu item and press
ENTER.
3. If you selected Custom Configuration in the previous step, you are prompted to select packages
included in the distribution. Otherwise, the installer proceeds to the License agreement (step 4).
Administrator Manual
35
Installing and Removing Solution
Picture 18. Selection of packages to be installed
To select a package to be installed, enter the number corresponding to its position on the list. To
select all packages at once, enter A or All; to deselect all packages at once, enter N or None. Note
that selection of a package means automatic selection of other packages on which it is dependent.
Similarly, deselection of a package means automatic deselection of all packages that depend on it.
To proceed to installation of the packages, enter I or Install. To end the installer, enter 0, Q, or
Quit.
4. After that, you need to view the terms of the Dr.Web License agreement, which is displayed on the
screen. Press ENTER to line down or SPACEBAR to page down the text. Note that options to line up
or page up the License agreement text are not provided.
Picture 19. License Agreement page
5. After you read the License agreement text, you will be prompted to accept the terms. Enter Yes or
Y if you accept the terms of the Dr.Web License agreement. If you refuse to accept them, type No
or N. In the latter case, the installer will exit.
Administrator Manual
36
Installing and Removing Solution
Picture 20. Accepting the License Agreement terms
6. After you accept the terms of the License Agreement, installation automatically starts. During the
procedure, information about the installation process, including the list of installed components, will
be displayed on the screen.
Picture 21. Installation process
7. After the installation successfully completes, interactive setup script is automatically started. After it
finishes its operation, an appropriate message will be displayed on the screen, informing you on how
to manage operation of the product.
Administrator Manual
37
Installing and Removing Solution
Picture 22. Installation complete message
If an error occurs, a message describing the error is displayed on the screen and then the installer
exits. When the installation process fails due to an error, remove the problems that caused this error
and start an installation again.
Custom Installation
Unpacking installation file
If you choose to install only certain product components, unpack the installation file
<file_name>.run without running an installation program. For that, specify the --noexec
command-line parameter as follows:
$ ./<file_name>.run --noexec
After the command is executed, a nested directory <file_name> appears in the current directory.
You can also specify the following command-line parameters when launching the run-file:
-keep — instructs to unpack product installation files of the <file_name> directory to the current
one (and not to /tmp), which prevents automatic deletion of files after the installation completes.)
--target <path_to_directory> — instructs to unpack product installation files of the
<file_name> directory to the specified one. Note that the unpacked files will be automatically
detected after the installation completes unless you specify one of the following parameters: -noexec or --keep.
For a full list of command-line parameters that can be specified for an installation file, type the
following command:
$ ./<file_name>.run --help
Custom Installation
Installation directory contains packages of all Dr.Web for UNIX File Servers components and
supporting files. The package of every component <component_name> contains two files:
<component_name>.install and <component_name>.remove. These files are command scripts.
The first script is used to install the component, the second script—to remove the component. Names of
Administrator Manual
38
Installing and Removing Solution
all packages containing components of Dr.Web for UNIX File Servers are started with the drweb.
prefix.
In general, the archive contains the following packages:
Package
Content
drweb-bases
Files of anti-virus engine Dr.Web Virus-Finding Engine and Dr.Web
virus databases
drweb-boost
Boost framework libraries
drweb-clamd
Files of Dr.Web ClamD component
drweb-common
Main configuration file drweb.ini, libraries, documentation, and directory
structure
During the installation, drweb user and drweb group are created.
drweb-configd
Files of Dr.Web ConfigD и Dr.Web Ctl
drweb-epm10.1.0-libs
Supporting libraries for installation program
drweb-epm10.1.0-uninst
Supporting libraries for uninstallation program
drweb-esagent
Files of Dr.Web ES Agent component
drweb-filecheck
Files of Dr.Web File Checker component
drweb-file-servers-doc
PDF documentation for the solution
drweb-file-servers
Root meta-package of the solution
drweb-httpd
Files of Dr.Web HTTPD component and management web interface
drweb-icu
Unicode and internationalization supporting libraries
*
drweb-libs
Common libraries of the solution
drweb-netcheck
Files of Dr.Web Network Checker component
drweb-nss
Files of SpIDer Guard for NSS component
drweb-openssl
OpenSSL framework libraries
drweb-protobuf
Protobuf framework libraries
drweb-se
Files of Dr.Web Scanning Engine component
drweb-smbspider-daemon
Files of SpIDer Guard for SMB component (SMB monitoring daemon)
drweb-smbspider
Files of SpIDer Guard for SMB component
drweb-smbspider-modules
Files of SpIDer Guard for SMB component (VFS SMB modules)
drweb-smbspider-modulessrc
Files of SpIDer Guard for SMB component (VFS SMB module source
codes)
drweb-snmpd
Files of Dr.Web SNMPD component
drweb-spider
Files of SpIDer Guard component
drweb-spider-kmod
Files of SpIDer Guard component (loadable kernel module for LKM mode)
drweb-update
Files of Dr.Web Updater component
drweb-wt
Wt framework libraries (used by management web interface)
*)
Versions for 64-bit systems include two packages: drweb-libs and drweb-libs32 that contain
libraries for 64-bit and 32-bit components accordingly.
To start installation of a component, run the corresponding installation file from the console (or via a
console emulator — terminal for the graphics mode).
Administrator Manual
39
Installing and Removing Solution
Installation scripts can be run only by a user with administrative privileges (root superuser). To elevate
privileges, use the su command (change the current user) or the sudo command (execute the specified
command with other user privileges).
When installing any component, all dependencies are automatically resolved, that is, if another
component is required for installation, its presence in the system is checked and the required
component is automatically installed if it is missing.
If it is necessary to run a program for installing the whole suite, run the automatic installation script
from the unpacked directory by typing the following command:
$ ./install.sh
Installing from Dr.Web Repository
Dr.Web for UNIX File Servers native packages are stored in the official Dr.Web repository at http://
repo.drweb.com/drweb/. After you add the Dr.Web repository to the list of those used by your
operating system package manager, you can install the product from native packages as you install any
other programs from the operating system repositories. Required dependencies are automatically
resolved.
All commands, mentioned below, for connecting repositories, import of digital signature keys, installation,
and removal of packages, must be performed with administrative (root) privileges. To elevate the
privileges, use the su command (change the current user) or the sudo command (execute the specified
command with other user privileges).
Please note that for FreeBSD and Solaris, the product can be installed only from universal package.
Debian, Mint, Ubuntu (apt)
The repository for these operating systems is digitally signed. To enable correct operation, import a
digital signature key using the following command:
wget -O - http://repo.drweb.com/drweb/drweb.key | apt-key add -
or
curl http://repo.drweb.com/drweb/drweb.key | apt-key add -
To connect the repository, add the following line to the /etc/apt/sources.list file:
deb http://repo.drweb.com/drweb/debian 10.1.0 non-free
Besides that, you can obtain the key automatically and connect to the repository of version 10.1.0 via
downloading and installing a special DEB packet. Link to download the package: http://
repo.drweb.com/drweb-repo10.deb.
To install Dr.Web for UNIX File Servers from the repository, use the following commands:
apt-get update
apt-get install drweb-file-servers
You can also use alternative package managers (for example, Synaptic or aptitude) to install the
product. Moreover, it is recommended to use alternative managers, such as aptitude, to solve a
package conflict if it occurs.
Red Hat Enterprise Linux, Fedora, CentOS (yum)
Add the file with the content mentioned below to the /etc/yum.repos.d directory:
Administrator Manual
40
Installing and Removing Solution
For 32-bit version
[drweb]
name=DrWeb - 10.1.0
baseurl=http://repo.drweb.com/drweb/el5/10.1.0/i386/
gpgcheck=1
enabled=1
gpgkey=http://repo.drweb.com/drweb/drweb.key
For 64-bit version
[drweb]
name=DrWeb - 10.1.0
baseurl=http://repo.drweb.com/drweb/el5/10.1.0/x86_64/
gpgcheck=1
enabled=1
gpgkey=http://repo.drweb.com/drweb/drweb.key
Besides that, you can connect to the repository of version 10.1.0 via downloading and installing a
special RPM packet. Link to download the package: http://repo.drweb.com/drweb-repo10.rpm.
To install Dr.Web for UNIX File Servers from the repository, use the following command:
yum install drweb-file-servers
You can also use alternative package managers (for example, PackageKit or Yumex) to install the
product.
Adjusting SELinux Policies
If the used GNU/Linux distribution features SELinux (Security-Enhanced UNIX), you may need
to configure SELinux security policies to enable correct component operation (for example, operation
of the scanning engine) after they are installed.
1. Universal package installation issues
If SELinux is enabled, installation from the installation file (.run) can fail because an attempt to
create the drweb user, under which Dr.Web for UNIX File Servers components operate, can be
blocked.
In case of failure, check the SELinux operation mode with the getenforce command. The command
outputs one of the following:
Permissive—protection is active but a permissive strategy is used: actions that violate the
security policy are not denied but information on the actions is logged.
Enforced—protection is active and restrictive strategy is used: actions that violate security
policies are blocked and information on the actions is logged.
Disabled—SELinux is installed but not active.
If SELinux is operating in Enforced mode, change it to Permissive for the period while the product
is being installed. For that purpose, use the setenforce 0 command, which temporarily (until the
next reboot) enables Permissive mode for SELinux.
Note that regardless of the operation mode enabled with the setenforce command, restart of the
operating system returns SELinux operation to the mode specified in the SELinux settings (file with
SELinux settings usually resides in the /etc/selinux directory).
After the product installation successfully completes, enable Enforced mode for SELinux again before
Administrator Manual
41
Installing and Removing Solution
starting the product. For that, use the setenforce 1 command.
2. Operation issues
In some cases, when SELinux is enabled, certain auxiliary Dr.Web for UNIX File Servers modules
(for example, drweb-se and drweb-filecheck) cannot start. If so, object scanning and file system
monitoring become unavailable.
119 and 120 errors can also indicate an attempt to start the product on 64-bit version of the operating
system if the 32-bit application support library is missing (see System Requirements).
SELinux messages are registered in the system log. In general, when audit daemon is used on the
system, the audit log file is /var/log/audit/audit.log. Otherwise, messages on blocked
operations are saved to the general log file located in /var/log/messages.
If auxiliary modules do not function because they are blocked by SELinux, compile special security
policies for them.
Note that certain Linux distributions do not feature the utilities mentioned below. If so, you may need to
install additional packages with the utilities.
To create required policies
1. Create a new file with the SELinux policy source code (.te file). This file defines restrictions
applied to the module. The policy source code can be specified in one of the following ways:
1) Using the audit2allow utility, which is the simplest method. The utility generates
permissive rules from messages on access denial in system log files. You can set to search
messages automatically or specify a path to the log file manually.
Note that you can use this method only if Dr.Web for UNIX File Servers violated SELinux
security policies and these events are registered in the audit log file. If not, wait for such an
incident to occur or force-create permissive policies by using the policygentool utility (see
below).
The audit2allow utility resides in the policycoreutils-python or policycoreutilsdevel package (for RedHat Enterprise Linux, CentOS, Fedora operating systems
depending on the version) or in the python-sepolgen package (for Debian, Ubuntu OSes).
Please note that for Fedora 20 it is required to install additionally the checkpolicy package,
otherwise the audit2allow utility returns an error.
Example usage:
# grep drweb-se.real /var/log/audit/audit.log | audit2allow -M drweb-se
In the given example, the audit2allow utility performs a search in the audit.log file to
find access denial messages for drweb-se module.
The following two files are created: policy source file drweb-se.te and the drweb-se.pp
policy module ready to install.
If no security violation incidents are found in the system audit log, the utility returns an error
message.
In most cases, you do not need to modify the policy file created by the utility. Thus, it is
recommended to go to step 4 for installation of the drweb-se.pp policy module. Note that
the audit2allow utility outputs invocation of the semodule command. By copying the
output to the command line and executing it, you complete step 4. Go to step 2 only if you
Administrator Manual
42
Installing and Removing Solution
want to modify security policies which were automatically generated for Dr.Web for UNIX
File Servers components.
2) Using the policygentool utility. For that purpose, specify name of the module operation
with which you want to configure and the full path to the executable file.
Note that the policygentool utility, included in the selinux-policy package for RedHat
Enterprise Linux and CentOS Linux OS, may not function correctly. If so, use the
audit2allow utility.
Example of policy creation via policygentool:
o For drweb-se:
# policygentool drweb-se /opt/drweb.com/bin/drweb-se.real
o For drweb-filecheck:
# policygentool drweb-filecheck /opt/drweb.com/bin/drweb-filecheck.real
You will be prompted to specify several common domain characteristics. After that, three files
that determine the policy are created for each of the modules:
<module_name>.te, <module_name>.fc and <module_name>.if.
2. If required, edit the generated policy source file <module_name>.te and then use the
checkmodule utility to create a binary mapping of the local policy source file (.mod file).
Note that to ensure success of the command, the checkpolicy package must be installed in the
system.
Example usage:
# checkmodule -M -m -o drweb-se.mod drweb-se.te
3. Create an installed policy module (.pp file) with the use of the semodule_package utility.
Example:
# semodule_package -o drweb-se.pp -m drweb-se.mod
4. To install the created policy module, use the semodule utility
Example:
# semodule -i drweb-se.pp
For details on SELinux operation and configuration, refer to the documentation for the used Linux
distribution.
Product Files Location
After installation of Dr.Web for UNIX File Servers, its files reside in the /opt, /etc, and /var
directories of the file system.
Structure of the used directories :
Directory
Content
<etc_dir>/
Common configuration file and product key file
/etc/init.d/
Managing startup script for configuration daemon Dr.Web ConfigD
Administrator Manual
43
Installing and Removing Solution
Directory
Content
<opt_dir>/
Main product directory
bin/
Executable files of all product components (except for Dr.Web Virus-Finding
Engine)
include/
Header files of used libraries
lib/
Used libraries for 32- and 64-bit platforms
lib64/
man/
Files for man help system
share/
Supporting product files
doc/
Product documentation (readme files and license agreement texts)
drweb-bases/
Files of Dr.Web virus databases (source files supplied during installation)
scripts/
Supporting script files
<var_dir>/
Supporting and temporary product files
bases/
Files of Dr.Web virus databases (up-to-date version)
cache/
Cache of updates
drl/
Lists of servers used for updates
lib/
Anti-virus engine Dr.Web Virus-Finding Engine as a dynamic
drweb32.dll and settings for operating in central protection mode
update/
Directory where updates are temporarily stored during their download
library
For details on the directory notation, refer to Introduction.
Removing Solution
Depending on the method of Dr.Web for UNIX File Servers installation, you can remove the suite in
one of the following ways:
1. Starting the uninstall program to remove the universal package distribution (for graphics or
command-line mode, depending on the environment).
2. Deleting packages installed from the Doctor Web repository via the package system manager.
Please note that after removal of Dr.Web for UNIX File Servers, you need to manually delete the link
to VFS SMB Dr.Web from Samba directories and edit the configuration file of Samba (smb.conf) by
removing the following line from parameter sections: vfs objects = smb_spider (where
smb_spider is the name of the symbolic link to VFS SMB Dr.Web).
Removing Universal Package
You can remove Dr.Web for UNIX File Servers, installed from the distribution with the
universal package for UNIX systems via the application menu of the desktop environment or via the
command line.
Administrator Manual
44
Installing and Removing Solution
Removing program via application menu
On the application menu, click the Dr.Web item and select Remove Dr.Web components. Removal
program will start.
Removing program via command line
To remove Anti-virus, run the remove.sh script, which resides in the <opt_dir>/bin directory.
Thus, to start the procedure, for example, in Linux OS, use the following command:
# /opt/drweb.com/bin/remove.sh
Then an uninstall program starts (either in graphics or command-line mode, depending on the
environment).
To start the uninstall program directly from the command line, use the following command (in Linux
OS):
# /opt/drweb.com/bin/uninst.sh
Removal of Dr.Web for UNIX File Servers is described in the following chapters:
Removing in Graphics Mode
Removing from Command Line
Removing in Graphics Mode
Once the Removal wizard starts in graphics mode, its welcome page is displayed informing you on
product packages that can be removed with the Wizard.
Picture 23. Welcome page
To select Dr.Web packages for removal, click Next. If you choose not to remove the product, you can
terminate the operation of the Wizard by clicking Cancel.
1. In the first step, you will be prompted to select product packages to be removed. Two modes are
available for the removal: basic and advanced. In basic mode, all products of Dr.Web, installed on
your computer and available for removal, are displayed. If you select a product on the list, all
packages of this product will be automatically selected for removal and if they are not used by
other Dr.Web products installed on your computer. In the advanced mode, all packages of Dr.Web
are displayed; so, you can select only those packages that you want to remove. Click Select all if
you want to select all list items for removal (installed products or packages, depending on the
mode). Click Select none is you want to deselect all list items.
Administrator Manual
45
Installing and Removing Solution
Picture 24. Selection of products for removal in basic mode
Picture 25. election of products for removal in advanced mode
To switch to advanced mode, select Advanced view; to switch back to basic mode, deselect this
option. Note that selection of a package for removal leads to automatic selection of all packages
that depend on this package. Similarly, deselection of a package leads to deselection of all packages
on which this package is dependent. After selecting all required products or packages, click Next to
proceed to confirmation of the removal. To terminate the operation of the Wizard, click Cancel.
Be careful when selecting packages for removal in advanced mode: removal of some package can
cause problems in operation of all installed Dr.Web that use files from this package.
If you removed a package by mistake, use the installer in Custom configuration mode and install
this package again.
2. In the next step, the list of Dr.Web to be removed are displayed.
Administrator Manual
46
Installing and Removing Solution
Picture 26. Removal confirmation
To confirm the removal, click Next. To edit this list, click Back. If you choose not to remove the
packages and terminate the operation of the Wizard, click Cancel.
3. After you confirm the removal of Dr.Web, the process starts.
Picture 27. Removal process
To close the Removal Wizard after it deletes all files, click Close.
Administrator Manual
47
Installing and Removing Solution
Picture 28. Completion of the removal
Removing from Command Line
Once the removal program for command-line mode starts, the command prompt is displayed on the
screen.
1. To start removal, enter Yes or Y in response to the "Do you wish to continue?" question. To exit the
removal program, type No or N. In this case, removal will be canceled.
Picture 29. Command prompt to uninstall the product
2. After that, a list of installed Dr.Web components is output.
Administrator Manual
48
Installing and Removing Solution
Picture 30. Viewing the list of components and selecting the components for removal
3. To continue the removal, select the components to be deleted. For selecting a certain component,
enter its number in the list. Note that all packages depending on a selected package are also
automatically selected for removal.
To select all listed components, type All or A instead of a component number.
To reject selection of the packages, type None or N instead of a component number.
To cancel removal, type 0, Q or Quit instead of a component number. If so, the removal
program exits.
After you select the components to be removed, type Remove or R to start the process.
5. On the next page, view the list of packages selected for removal and confirm the action by typing
Yes or Y. If you choose not to delete the components, exit the removal program by typing No or N.
Picture 31. Component removal confirmation
6. After removal of the selected components starts, messages about the removal process are output in
Administrator Manual
49
Installing and Removing Solution
the screen and logged.
Picture 32. Uninstallation log
7. After the process completes successfully, the removal program displays an appropriate message on
the screen and exits.
Picture 33. Removal complete message
Administrator Manual
50
Installing and Removing Solution
Removing Product Installed from Repository
All commands mentioned below for package removal require administrative (root) privileges. To elevate
the privileges, use the su command (change the current user) or the sudo command (execute the
specified command with the privileges of another user).
Debian, Mint, Ubuntu (apt)
To remove the root metapackage of Dr.Web for UNIX File Servers, enter the following command:
apt-get remove drweb-file-servers
To remove all installed Dr.Web packages, enter the following command (in some operating systems, a
'*' character must be escaped: '\*'):
apt-get remove drweb*
To automatically remove all packages that are no longer used, enter also the following command:
apt-get autoremove
Note special aspects of removal using the apt-get command:
1. The first mentioned version of the command removes only the drweb-file-servers package; all
other packages that could be automatically installed to resolve dependencies remain in the system.
2. The second mentioned version of the command removes all packages which name starts with
"drweb" (standard name prefix for Dr.Web products). Note that this command removes all packages
with this prefix, not only those of Dr.Web for UNIX File Servers.
3. The third mentioned version of the command removes all packages that were automatically installed to
resolve dependencies of other packages and are no longer necessary (e.g., due to their removal). Note
that this command removes all packages that are not used, not only those of Dr.Web for UNIX File
Servers.
You can also use alternative managers (for example, Synaptic or aptitude) to remove packages.
Red Hat Enterprise Linux, Fedora, CentOS (yum)
To remove all installed Dr.Web packages, enter the following command (in some operating systems, a
'*' character must be escaped: '\*'):
yum remove drweb*
Note special aspects of removal using the yum command:
This version of the command removes all packages which name starts with "drweb" (standard name
prefix for Dr.Web products). Note that this command removes all packages with this prefix, not only
those of Dr.Web for UNIX File Servers.
You can also use alternative managers (for example, PackageKit or Yumex) to remove packages.
Administrator Manual
51
Getting Started
Getting Started
1. To start using the installed Dr.Web for UNIX File Servers, obtain and install a key file.
2. Integrate the product with file services (instruction for Samba, instruction for NSS).
3. Check what components are running and enable additional components that are disabled by default
if they are necessary for protection of your server (for example, SpIDer Guard monitor, Dr.Web
ClamD component or Dr.Web SNMPD SNMP agent, depending on the distribution). Note that you
may also need to perform other actions apart from enabling the additional components, for
example, adjust their default configuration. To view the list of installed and running components and
their settings, use one of the following:
The tool for command-line management Dr.Web Ctl (use drweb-ctl appinfo, drweb-ctl
cfshow and drweb-ctl cfset commands)
Managing web interface Dr.Web for UNIX File Servers (by default, you can access it via a
web browser at https://127.0.0.1:4443/).
Administrator Manual
52
Getting Started
Integration with Samba File Server
The SpIDer Guard for SMB monitor uses a special VFS SMB module for the integration with the
Samba server. With SpIDer Guard for SMB, several versions of this module which are built for
various versions of Samba are supplied. However, the supplied versions of the VFS SMB module may be
incompatible with the version of Samba installed on your file server. It may occur, for example, if the
Samba server uses the CLUSTER_SUPPORT option.
In case of incompatibility of the VFS SMB module with the Samba server, the corresponding
message is show n during the Dr.Web for UNIX File Servers product installation. In this case, build
the VFS SMB module for your Sambа server from the supplied source codes manually (including the
compatibility with the CLUSTER_SUPPORT option if necessary).
The procedure of building the VFS SMB module from the supplied source codes is described in
Appendix G.
To integrate Dr.Web for UNIX File Servers with the Samba file server, do the following:
1. In the directory with Samba VFS modules (the default directory in Linux is /usr/lib/samba/
vfs), create a symbolic link smb_spider.so that refers to the module VFS SMB Dr.Web
corresponding to the used Samba.
The VFS SMB modules, which are supplied by Dr.Web, reside in the product libraries directory:
<opt_dir>/lib/samba – for 32-bit platforms
<opt_dir>/lib64/samba – for 64-bit platforms
The module files have the following pattern name: libsmb_spider.so.<ver>, where <ver>
is the version of Sambа interacting with the module.
For example, /opt/drweb.com.lib/samba/libsmb_spider.so.3.6.0 file is for Samba
3.6.0, operating on Linux OS designed for 32-bit platform.
2. In the Samba configuration file smb.conf (the default Linux directory is /etc/samba), create
sections for the shared directories. Such section is as follows:
[<share_name>]
comment = <any_comment>
path = </directory/to/be/protected/>
vfs objects = smb_spider
writeable = yes
browseable = yes
guest ok = yes
public = yes
where <share_name> is any name of the shared resource and <any_comment> is an arbitrary
line with a comment (optional). The object's name specified in vfs objects must be the same
as the name of the symbolic link (here smb_spider).
After that, this directory will be monitored by SpIDer Guard for SMB. Interaction between
SpIDer Guard for SMB and VFS SMB module will be performed via UNIX socket /
<samba_chroot_path>/var/run/.com.drweb.smb_spider_vfs. By default, the path to this UNIX
socket is specified in the SpIDer Guard for SMB settings and in the settings of the VFS SMB
module.
3. If you need to change the path to the socket, specify the new path both in the settings of
SpIDer Guard for SMB (the SmbSocketPath parameter) and in the configuration file of
Samba smb.conf. For that, add the following line to the [<share_name>] section:
smb_spider:socket = <path_to_socket>
where <path_to_socket> must be an absolute path to the UNIX socket relative to the root
Administrator Manual
53
Getting Started
directory, specified for Samba by using chroot.
4. If required, you can use ExcludedPath and IncludedPath parameters to exclude paths to
objects located in the protected shared directories or to include them in SpIDer Guard for SMB
checks. You can specify paths to directories or paths to files. If you specify a directory, all content
of the directory is skipped or scanned. Note that the IncludedPath parameter takes
precedence over the ExcludedPath parameter, that is, if the same object (file or directory) is
included in both parameter values, this object will be checked.
5. If you need to specify personal scanning settings (different from the default settings for all
modules) for this shared directory, set a tag -identifier for the VFS SMB module that controls this
directory:
smb_spider:tag = <share_name>
Then specify personal settings to control the shared directory in SpIDer Guard for SMB settings
as a separate section [SMBSpider.Share.<share_name>].
To add new section with a tag <share_name> by command-line tool Dr.Web Ctl, it is
necessary
to
use
the
command
drweb-ctl
cfset
SmbSpider.Share.<share_name>.<parameter> <value>.
Example:
# drweb-ctl cfset SmbSpider.Share.DepartFiles.OnAdware Quarantine
This
command
adds
to
the
configuration
file
the
additional
section
[SMBSpider.Share.DepartFiles]. The section will contain all parameters for the shared
directory, and values for the all parameters, beside OnAdware parameter, which is specified in
the command, will equal to values of the corresponding parameters from the common
[SMBSpider] section.
After all settings are adjusted, restart both Samba and SpIDer Guard for SMB. It is recommended to
restart SpIDer Guard for SMB by restarting the suite Dr.Web for UNIX File Servers. For that,
restart the configuration daemon Dr.Web ConfigD.
To avoid conflicts between SpIDer Guard for SMB and SpIDer Guard, which may occur when
scanning files in shared Samba directories, it is recommended to additionally configure SpIDer Guard
by performing one of the following:
add shared Samba directories to the exclusion scope (specify these directories in ExcludedPath
parameter)
add the Samba process (smbd) to the list of ignored processes (specify smbd in ExcludedProc
parameter).
Scripts to support integration
For convenient integration of Dr.Web for UNIX File Servers withe the file server Samba, the
product is supplied with special setup scripts. They are located in the product directory (Linux default
directory is /opt/drweb.com), in the share/drweb-smbspider-modules subdirectory:
Script file
Function
drweb_smbspider_configure.sh
Interactive script that allows to change Samba configuration file
smb.conf in the dialog window (the script adds shared directories
described in the file to monitoring).
update-links.sh
The script that adds/updates the link to module VFS SMB Dr.Web in
the Samba directory.
vfs-versions.sh
Auxiliary script that determines the version of module VFS SMB
Dr.Web; used by the script update-links.sh
Administrator Manual
54
Getting Started
The update-links.sh script automatically runs once Dr.Web for UNIX File Servers is installed. If
required, you can run it manually. The rweb_smbspider_configure.sh script run automatically
only if you install the product from universal package, and it is recommended to be run after completes
installation of the product from Dr.Web repository. It can be run several times, when it is necessary to
enable or disable monitoring of certain directories. The script saves the original (unmodified) copy of
the Samba configuration file smb.conf by adding the .drwebsave extension to its name.
Integration with Novell Storage Services
To integrate Dr.Web for UNIX File Servers with Novell Storage Services volumes, specify values
for parameters that are in the [NSS] section of the configuration file:
in the NssVolumesMountDir, specify the path to the file system directory, where NSS volumes are
mounted (the defaukt directory is /media/nss).
In the ProtectedVolumes parameter, specify names of NSS volumes that are on the
NssVolumesMountDir mount point and must be protected. If the parameter is empty, all volumes
in the NssVolumesMountDir directory are protected.
If required, you can use ExcludedPath and IncludedPath parameters to exclude paths to
objects located in the protected volumes or to include them in SpIDer Guard for NSS checks. You
can specify paths to directories or paths to files. If you specify a directory, all content of the
directory is skipped or scanned. Note that the IncludedPath parameter takes precedence over
the ExcludedPath parameter, that is, if the same object (file or directory) is included in both
parameter values, this object will be checked.
After all necessary changes are done, restart SpIDer Guard for NSS. For that purpose, it is
recommended to restart the suite Dr.Web for UNIX File Servers by restarting configuration daemon
Dr.Web ConfigD.
Administrator Manual
55
Quick Guide
Quick Guide
How to connect Dr.Web for UNIX File Servers to Samba
Follow the instructions provided in the Integration with Samba File Server section.
How to connect Dr.Web for UNIX File Servers to Novell Storage Services
Follow the instructions provided in the Integration with NSS Volumes section.
How to restart Dr.Web for UNIX File Servers
Use the script to manage the configuration daemon Dr.Web ConfigD. Startup, stop, and restart of
the daemon causes the startup, stop, and restart of Dr.Web for UNIX File Servers.
The default directory for the script to manage operation of Dr.Web ConfigD is /etc/init.d. The
name of the script is drweb-configd. It has the following parameters:
Parameter
Description
start
Instructs to start Dr.Web ConfigD if it is not running. Upon its startup, Dr.Web ConfigD
runs all required modules of Dr.Web for UNIX File Servers.
stop
Instructs to shut down Dr.Web ConfigD if it is running. When finishing its operation,
Dr.Web ConfigD shuts down all Dr.Web for UNIX File Servers modules.
restart
Instructs to restart (shut down and start) Dr.Web ConfigD. Dr.Web ConfigD shuts down
and then start all modules of Dr.Web for UNIX File Servers. If Dr.Web ConfigD is not
running, the parameter has the same effect as start.
condrestart
Instructs to restart Dr.Web ConfigD only if it is running.
reload
Instructs to send Dr.Web ConfigD HUP signal if the component is running. Dr.Web
ConfigD forwards this signal to all Dr.Web for UNIX File Servers modules. The
parameter is used to make all component reread their configuration.
status
Instructs to output the current state of Dr.Web ConfigD to the console.
To restart (or start if not running) Dr.Web for UNIX File Servers use the following command:
# /etc/init.d/drweb-configd restart
How to connect to the anti-virus network server
To connect Dr.Web for UNIX File Servers to the central protection server, ask your anti-virus
network administrator for the address of the central protection server and the public key file. You may
also need additional parameters, such as the host's identifier and password or identifiers of the main
and tariff groups.
Then, use the command esconnect of the tool for the solution management from the command line
Dr.Web Ctl.
For connection, use the --Key option and specify the path to the server's public key file or use the -WithoutKey option if you want to allow the central protection agent to establish a server connection
without authentication. Moreover, you can specify the --WrongKey option to allow the server
connection if the public key does not match the open key on the server.
You can additionally specify the host's identifier and password for authentication on the server by using
the --Login and --Password parameters. In this case, connection to the server will be established
only if you specify a correct identifier/password pair. If the parameters are not specified, connection to
the server will be established only if it is approved on the server (automatically or by the administrator
of the anti-virus network, regardless of the server settings).
Administrator Manual
56
Quick Guide
Moreover, you can use the --Newbie option (connect as a new user). If this mode is allowed on the
server, then after this connection is approved, the server automatically generates a unique identifier/
password pair, which will be further used for connection of this agent to the server. Note that in this
mode the central protection server generates a new account for the host even if this host already has
another account on the server.
A standard example of the command instructing Dr.Web for UNIX File Servers to connect to the
central protection server:
# drweb-ctl esconnect <server_address> --Key /path/to/server_public_key_file
After connection to the central protection server is established, the suite operates in central protection
mode or in mobile mode, depending on the permissions set on the server and the value of the
configuration parameter MobileMode of Dr.Web ES Agent. To allow unconditional use of mobile
mode, set the parameter value to On. For operation on central protection mode, set the parameter
value to Off.
A standard example of the command instructing Dr.Web for UNIX File Servers change enterprise to
mobile mode:
# drweb-ctl cfset ESAgent.MobileMode On
If the used central protection server does not support or forbids mobile mode, adjusting the
MobileMode parameter cannot switch operation of Dr.Web for UNIX File Servers to mobile mode.
How to disconnect from the central protection server
To disable the enterprise mode and switch operation of the suite to standalone mode, use the
command esdisconnect of the tool for the solution management from the command line Dr.Web
Ctl:
# drweb-ctl esdisconnect
For successful operation of the suite in standalone mode, a valide license key file is required.
Otherwise, anti-virus functions of the product will be blocked after the operation is switched to
standalone mode.
How to activate the product
1. Register on the official website of Doctor Web at http://products.drweb.com/register/.
2. Check the email that you specified during the registration for an archive (or download the archive
from the website after you finished the registration). The archive contains a valid license key file.
3. Install the key file.
How to add a new shared directory
1. Edit the configuration file of the Samba server smb.conf by adding a section describing the
shared directory. The section of the shared directory must be as follows:
[<share_name>]
comment = <any_comment>
path = </directory/to/be/protected/>
vfs objects = smb_spider
writeable = yes
browseable = yes
guest ok = yes
public = yes
where <share_name> is any name of the shared resource and <any_comment> is an arbitrary
line with a comment (optional).
Administrator Manual
57
Quick Guide
2. If you need to specify scanning settings for the added shared directory and these settings differ
from the default SpIDer Guard for SMB settings, use 3 and 4 items of the instruction given in the
Integration with Samba File Server section.
3. Restart the Samba server and Dr.Web for UNIX File Servers.
How to add a new protected NSS volume
1. Specify the name of the volume, which is to be protected, in the ProtectedVolumes parameter
(in the [NSS] section of the configuration file). If the parameter value is empty, all volumes in the
directory specified in NssVolumesMountDir are protected.
2. Restart Dr.Web for UNIX File Servers.
How to upgrade the product
If you installed the product from native packages for your OS from the repository, start the upgrade
procedure for your package manager (for example, by executing the following commands
sequentially: apt-get update and apt-get upgrade for the package manager apt with root
privileges). For more information, refer to documentation on your OS.
If you installed the product from the universal package (the .run file), download an upgraded
version of the distribution and install it. During the installation procedure, all outdated components
are replaced to their upgraded versions from the repository. The adjusted configuration of the
product remains the same.
Administrator Manual
58
Solution Components
Solution Components
The section contains description of Dr.Web for UNIX File Servers components. For each of them,
you can find information about the functions, operation principles, and parameters stored in the
configuration file of the suite.
Dr.Web ConfigD
Configuration daemon Dr.Web ConfigD is the core component of Dr.Web for UNIX File Servers. It
provides for central storage of configuration for all suite components, as well as manages operation of
all components and organizes trusted data exchange between them.
Operation Principles
Main functions
1. Starts and stops suite components depending on the settings. Automatically restarts components if a
failure in their operation occurs. Starts components at request of other components. Informs active
suite components when another component starts or shuts down.
2. Provides for a centralized access of all components to configuration settings. Provides special
components with interface for centralized management of configuration parameters. Notifies all
required components about changes in configuration.
3. Provides components with information from the used license key file. Receives new license
information from special components. Notifies running components on changes in license data or in
configuration parameters.
Configuration daemon Dr.Web ConfigD is always started with root privileges. It runs other
components of Dr.Web for UNIX File Servers and communicates with them via a preliminarily open
socket. The daemon receives connection from other components via an information socket (publicly
available) and a management socket (available only for components with root privileges). Loads
configuration parameters and license data from files or delivers them from the used central protection
server via the central protection agent Dr.Web ES Agent, as well as substitute correct default values
for configuration parameters. Thus, by the moment when any component starts or SIGHUP signal is
sent, the configuration daemon has an integral and consistent set of parameters for Dr.Web for UNIX
File Servers.
Upon receipt of SIGHUP signal, the configuration management daemon rereads configuration
parameters and license data. If required, the daemon sends all components notifications instructing
them to reread their configuration. Upon receipt of SIFTERM signal, the daemon shuts all components
down and only after that finishes its own operation. The maximum time to stop the monitor is 40
seconds. The daemon also removes all temporary files of components after they are shut down.
Communication principles
1. All components use only those configuration parameters and license data, which they received from
the configuration daemon Dr.Web ConfigD on their startup.
2. The daemon provides the scheme of collecting messages from all controlled components to an
integrated journal. All information output by a component to the error stream stderr is collected by
the daemon and written to the general journal of the suite with a mark indicating what component
output this.
3. When shutting down, the controlled components return an exit code. If the code differs from 101,
102, or 103, the configuration daemon restarts this component. Thus, abnormal termination of a
component triggers its restart and registration of an error message from stderr in the suite journal.
Administrator Manual
59
Solution Components
o If a component exits with code 101, the component will be started again only after license
parameters are changed. Thus, if a component cannot operate because of license restriction, it
terminates its operation and outputs code 101 to stderr.
o If a component exits with code 102, the component will be started again only after configuration
parameters change. Thus, if a component cannot operate because of its configuration, it
terminates its operation and outputs code 102 to stderr. The configuration daemon will attempt
to start the component again only after any parameters are changed.
o Components started by configuration daemon at request can terminate their operation when idle
and output code 103. Such components are scanning engine Dr.Web Scanning Engine and
file checking component Dr.Web File Checker.
o If new parameter values received by a component from configuration daemon cannot be applied
"on the fly" (that is, component restart is required), the component exits with code 0. If so,
Dr.Web ConfigD restarts the component.
o If a component cannot connect to configuration daemon or a communication protocol error
occurs, the component outputs an appropriate message to stderr and exits with code 1.
4. Signal exchange:
o Configuration daemon sends the component SIGHUP signal, which instructs to change
parameters of configuration.
o Configuration daemon sends the component SIGTERM signal, which instructs the component to
terminate operation in 30 seconds.
o SIGKILL signal is sent by configuration daemon to trigger force termination of components
which failed to shut down within 30 seconds after they received a SIGTERM signal.
Command-Line Arguments
To run a configuration daemon Dr.Web ConfigD, type the following command in the command line:
$ <opt_dir>/bin/drweb-configd [options]
Configuration daemon Dr.Web ConfigD can process the following options:
Short form
Long form
-h
--help
Arguments
Description: instructs to output short help information to the console about command-line parameters and exit.
-v
--version
Description: instructs to output information on the module version and exit.
-c
--config
<path to file>
Description: instructs to use the specified configuration file.
-d
--daemonize
Description: instructs to run the component as daemon; that is, without access to terminal.
-p
--pid-file
<path to file>
Description: instructs to use the specified PID file.
Example:
$ /opt/drweb.com/bin/drweb-configd -d -c /etc/opt/drweb.com/drweb.ini
Administrator Manual
60
Solution Components
The command runs Dr.Web ConfigD as daemon which uses the following configuration file: /etc/
opt/drweb.com/drweb.ini.
Notes about startup
To support performance of the suite, the component must be run as daemon. In standard mode,
Dr.Web ConfigD is run upon operation startup and has a standard management script located in /
etc/init.d.
Configuration Parameters
The daemon Dr.Web ConfigD uses configuration parameters which are specified in [Root] section of
the integrated configuration file of Dr.Web for UNIX File Servers.
The section contains the following parameters:
DefaultLogLevel =
{logging level}
Defines default verbosity level of event logging for all Dr.Web for UNIX File
Servers modules.
The parameter value is used if another value is not specified in the
configuration of another module.
Default value:
DefaultLogLevel = Notice
LogLevel =
{logging level}
Logging level for configuration daemon Dr.Web ConfigD.
Log =
{log type}
Logging method of configuration daemon and logging method of those
modules for which another value of this parameter is not specified.
Default value:
LogLevel = Notice
Note that upon its initial startup, before the configuration file is read,
configuration daemon uses the following values of the parameter:
As a daemon (if run with the -d option)—SYSLOG:Daemon
Otherwise — Stderr
Default value:
Log = Syslog:Daemon
PublicSocketPath =
{path to file}
Path to the public communication socket for interaction between Dr.Web for
UNIX File Servers.
Default value:
PublicSocketPath = /var/run/.com.drweb.public
AdminSocketPath =
{path to file}
Path to the administrative communication socket for interaction between
Dr.Web for UNIX File Servers.
Default value:
AdminSocketPath = /var/run/.com.drweb.admin
CoreEnginePath =
{path to file}
Path to the dynamic library of the anti-virus engineDr.Web Virus-Finding
Engine.
Default value:
CoreEnginePath = <var_dir>/lib/drweb32.dll
For Linux:
CoreEnginePath = /var/opt/drweb.com/lib/drweb32.dll
For FreeBSD:
Administrator Manual
61
Solution Components
CoreEnginePath = /var/drweb.com/lib/drweb32.dll
For Solaris:
CoreEnginePath = /var/opt/drweb.com/lib/drweb32.dll
VirusBaseDir =
{path to directory}
Path to the directory with virus database files.
Default value:
VirusBaseDir = <var_dir>/bases
For Linux:
VirusBaseDir = /var/opt/drweb.com/bases
For FreeBSD:
VirusBaseDir = /var/drweb.com/bases
For Solaris:
VirusBaseDir = /var/opt/drweb.com/bases
KeyPath =
{path to file}
Path to the key file
Default value:
KeyPath = <etc_dir>/drweb32.key
For Linux:
KeyPath = /etc/opt/drweb.com/drweb32.key
For FreeBSD:
KeyPath = /usr/local/etc/drweb.com/drweb32.key
For Solaris:
KeyPath = /etc/opt/drweb.com/drweb32.key
CacheDir =
{path to directory}
Path to the cache directory (used both for cache of updates and for cache of
checked files).
Default value:
CacheDir = <var_dir>/cache
For Linux:
CacheDir = /var/opt/drweb.com/cache
For FreeBSD:
CacheDir = /var/drweb.com/cache
For Solaris:
CacheDir = /var/opt/drweb.com/cache
TempDir =
{path to directory}
Path to the directory with temporary files
RunDir =
{path to directory}
Path to the directory with PID files and files of communication sockets.
VarLibDir =
{path to directory}
Path to the library directory.
Default value:
TempDir = /tmp
Default value:
RunDir = /var/run
Default value:
VarLibDir = <var_dir>/lib
For Linux:
VarLibDir = /var/opt/drweb.com/lib
For FreeBSD:
VarLibDir = /var/drweb.com/lib
For Solaris:
Administrator Manual
62
Solution Components
VarLibDir = /var/opt/drweb.com/lib
VersionDir =
{path to directory}
The parameter is not used.
DwsDir =
{path to directory}
The parameter is not used.
Default value:
VersionDir =
Default value:
DwsDir = <var_dir>/dws
For Linux:
DwsDir = /var/opt/drweb.com/dws
For FreeBSD:
DwsDir = /var/drweb.com/dws
For Solaris:
DwsDir = /var/opt/drweb.com/dws
HtmlTemplatesDir =
{path to directory}
The parameter is not used.
Default value:
HtmlTemplatesDir = <var_dir>/html
For Linux:
HtmlTemplatesDir = /var/opt/drweb.com/html
For FreeBSD:
HtmlTemplatesDir = /var/drweb.com/html
For Solaris:
HtmlTemplatesDir = /var/opt/drweb.com/html
MailTemplatesDir =
{path to directory}
The parameter is not used.
Default value:
MailTemplatesDir = <var_dir>/mail
For Linux:
HtmlTemplatesDir = /var/opt/drweb.com/mail
For FreeBSD:
MailTemplatesDir = /var/drweb.com/mail
For Solaris:
MailTemplatesDir = /var/opt/drweb.com/mail
AdminGroup =
{group name | GID}
Group of users with administrative privileges for Dr.Web for UNIX File
Servers management. These users, along with root, can elevate privileges
of Dr.Web for UNIX File Servers components to superuser privileges.
Default value:
AdminGroup =
TrustedGroup =
{group name | GID}
The parameter is not used.
DebugIpc =
{boolean}
Indicates whether detailed IPC messages are included in the log file on debug
level (LogLevel = DEBUG); that is whether events about interaction of
configuration daemon Dr.Web ConfigD and other components are
registered.
Default value:
TrustedGroup =
Default value:
DebugIpc = No
Administrator Manual
63
Solution Components
Dr.Web Scanning Engine
Dr.Web Scanning Engine scanning engine is designed to search viruses and other malicious objects
in files and boot records ( MBR — Master Boot Record, VBR — Volume Boot Record) of disk devices. The
component loads the anti-virus engine Dr.Web Virus-Finding Engine into memory and starts it as
well as loads Dr.Web virus databases used by the engine for threats detection.
The scanning engine operates in daemon mode, as a service which receives scanning requests from
other Dr.Web for UNIX File Servers components.
Operation Principles
The component operates as a service which receives requests to scan file system objects (files and boot
disk records) from Dr.Web for UNIX File Servers components. It also queues scanning tasks and
scans requested objects by using Dr.Web Virus-Finding Engine. If a threat is detected and the
scanning task instructs to cure threats, the scanning engine attempts to cure it if this action can be
applied to the scanned object. The picture below shows the operation scheme of Dr.Web Scanning
Engine scanning engine.
Picture 34. Component operation scheme
The scanning engine, the anti-virus engine Dr.Web Virus-Finding Engine, and the virus databases
form one unit and cannot be separated: the scanning engine downloads virus databases and provides
the operation environment for the cross-platform anti-virus engine Dr.Web Virus-Finding Engine.
The virus databases and the anti-virus engine are updated by the special module Dr.Web Updater
that is included in the product but this module is not part of the scanning engine. The module is run by
the configuration daemon Dr.Web ConfigD periodically or forcefully, if such command is sent by the
user. Moreover, if Dr.Web for UNIX File Servers operates in enterprise mode, virus databases and
anti-virus engine are performed by the central protection agent Dr.Web ES Agent (it is not shown in
the abovementioned scheme) which interacts with the central protection server and receives the
updates.
Scanning engine can operate both under management of the configuration daemon Dr.Web ConfigD
and in standalone mode. In the former case, the daemon runs the engine and ensures that virus
databases are up to date. In the latter case, engine startup and updating of virus databases is
performed by an external application that uses the engine. Dr.Web for UNIX File Servers
Administrator Manual
64
Solution Components
components that process tasks to scan files (indicated as "Client module" in the scheme) use the same
interface as external applications do.
Received tasks are automatically distributed into queues with different priorities: high, normal and low.
Selection of the queue depends on the component that created a task: for example, tasks created by a
file system monitor receive high priority as response time is important for monitoring. The scanning
engine computes statistics of its operations, including the number of all tasks received for scanning and
the queue length. As the average load rate, the scanning engine uses the average length of queues per
second. This rate is averaged for the last minute, last 5 minutes and last 15 minutes.
Anti-virus engine Dr.Web Virus-Finding Engine supports signature analysis (signature-based
detection of threats) and other methods of heuristics and behavioral analysis designed for detection of
a potentially dangerous object based on machine instructions other attributes of malicious code.
Heuristic analysis cannot guarantee highly reliable results and may commit type I or type II errors: omit
viruses or raise false alarms.
Thus, objects detected by the heuristics analyzer are treated as "suspicious ".
It is recommended to move suspicious objects to quarantine. After virus databases are updated, such
files can be scanned using signature analysis. Keep the virus databases up to date in order to avoid
errors of the II type.
Dr.Web Virus-Finding Engine allows to scan and cure both files and packed objects or objects in
different containers (such as archives, email messages, etc.).
Command-Line Arguments
To run the scanning engine Dr.Web Scanning Engine from the command line, type the following
command:
$ <opt_dir>/bin/drweb-se [options]
Dr.Web Scanning Engine can process the following options:
Short form
Long form
-h
--help
Arguments
Description: instructs to output short help information about command-line parameters to the console and exit.
-v
--version
Description: instructs to output information on the module version and exit
Additional options (they are the same as configuration file parameters and substitute them when required):
--Socket
<address>
Description: socket address used by Dr.Web Scanning Engine. It can be specified as a file path (UNIX socket)
or as an <IP address:port> pair; at that, if you need to use a network interface by default, type the asterisk
character ('*').
Examples:
--Socket /var/opt/drweb.com/ipc/.se
--Socket 127.0.0.1:1000
--Socket *:1000
--EnginePath
<path to file>
Description: path to the library of Dr.Web Virus-Finding Engine.
Administrator Manual
65
Solution Components
--VirusBaseDir
<path to directory>
Description: path to the directory with virus database files.
--TempDir
<path to directory>
Description: path to the directory with temporary files.
--Key
<path to file>
Description: path to the license key file.
--MaxForks
<number>
Description: maximum allowed number of child processes, which can be started by Dr.Web Scanning Engine
during scanning.
--WatchdogInterval
<time interval>
Description: frequency with which Dr.Web Scanning Engine checks whether child processes are operable and
stops those processes that stopped responding.
--ShellTrace
Description: turn on the shell tracing (log detailed information on file scanning performed by Dr.Web VirusFinding Engine).
--LogLevel
<logging level>
Description: level of detail at which operation of Dr.Web Scanning Engine is logged. Allowed values:
DEBUG — the most verbose logging level. All messages and debug information are registered.
INFO — all messages are registered.
NOTICE — all error messages, warnings, and notifications are registered.
WARNING — all error messages and warnings are registered.
ERROR — only error messages are registered.
--Log
<destination>
Description: method for logging module messages. Allowed values:
Stderr[:ShowTimestamp] — messages are output to a standard error stream stderr.
Additional option ShowTimestamp prescribes to add a time stamp to every message.
Syslog[:<facility>] — messages are transmitted to the system logging servicesyslog.
Additional option <facility> is used to specify a level at which syslog registers messages. The following
values are possible:
o DAEMON — messages of daemons
o USER — messages of user processes
o MAIL — messages of mail programs
o LOCAL0 — messages of local processes 0
...
o LOCAL7 — messages of local processes 7.
<path> — path to the file where all messages are registered.
Examples:
--Log /var/opt/drweb.com/log/se.log
--Log Stderr:ShowTimestamp
--Log Syslog:DAEMON
Example:
Administrator Manual
66
Solution Components
$ /opt/drweb.com/bin/drweb-se -c /etc/opt/drweb.com/drweb.ini --MaxForks=5
This command starts an instance of Dr.Web Scanning Engine, instructs it to use the /etc/opt/
drweb.com/drweb.ini configuration file, and sets the limit to start no more than 5 child scanning
processes.
Notes about startup
When necessary, any number of scanning engine Dr.Web Scanning Engine instances can be started.
The instances provide client applications (not only Dr.Web for UNIX File Servers components) with
the scanning service. If the parameter Dr.Web for UNIX File Servers SeFixedSocketPath (in the
section [ScanEngine]), is specified, one the scanning engine instances will be always running
(started by configuration daemon Dr.Web ConfigD). The instances of the scanning engine started
directly from the command line, will operate in standalone mode without establishing connection to the
configuration daemon, even if it is running.
To scan files at request, use the command-line command-line tool for the solution management from
the command line Dr.Web Ctl (it is run by drweb-ctl command).
Configuration Parameters
The component uses configuration parameters which are specified in [ScanEngine] section of the
integrated configuration file of Dr.Web for UNIX File Servers.
This section stores the following parameters:
LogLevel =
{logging level}
Logging level for Dr.Web Scanning Engine.
If the parameter is not specified, the DefaultLogLevel
parameter value from [Root] section is used.
Default value:
LogLevel = Notice
Log =
{log type}
Logging method for Dr.Web Scanning Engine.
ExePath =
{path to file}
Path to the executable of Dr.Web Scanning Engine.
Default value:
Log = Auto
Default value:
ExePath = <opt_dir>/bin/drweb-se
For Linux:
ExePath = /opt/drweb.com/bin/drweb-se
For FreeBSD:
ExePath = /usr/local/libexec/drweb.com/bin/
drweb-se
For Solaris:
ExePath = /opt/drweb.com/bin/drweb-se
FixedSocketPath =
{path to file}
Path to the socket file of the fixed Dr.Web Scanning Engine
instance.
If this parameter is specified, configuration daemon Dr.Web
ConfigD checks that a scanning engine instance is running and is
available to all clients via this socket.
Default value:
FixedSocketPath =
Administrator Manual
67
Solution Components
MaxForks =
{integer}
Maximum allowed number of child processes run by Dr.Web
Scanning Engine, which can be run simultaneously.
Default value:
MaxForks =
Automatically determined as twice the number of available CPU
cores; or 4, if the resulting number is less than 4.
WatchdogInterval =
{time interval}
Rate at which Dr.Web Scanning Engine checks whether child
processes are operable in order to detect processes that stopped
responding ("watchdog").
Default value:
WatchdogInterval = 1.5s
IdleTimeLimit =
{time interval}
Maximum time that the component can remain idle. If the
specified value is exceeded, the component shuts down.
Minimum value — 10s.
If the FixedSocketPath parameter is running, this setting is
ignored (the component does not finish its operation after the time
interval expires).
Default value:
IdleTimeLimit = 1h
Administrator Manual
68
Solution Components
Dr.Web File Checker
The component of file checking Dr.Web File Checker is designed for checking files and folders in the
file system. It is used by other components of Dr.Web for UNIX File Servers for checking file system
objects. Moreover, this component also performs a function of a quarantine manager by managing
content of directories where isolated files are located.
Operation Principles
The component is designed to provide access to file system objects (files, folders, boot records). They
are started with superuser (root) privileges.
It indexes all checked files and directories and saves all data on checked objects to a special cache to
avoid repeated check of objects that were already checked and were not modified since that (in this
case, if a request to check such object is received, the previous check result, retrieved from cache, is
returned). The component operation scheme is shown in the picture below.
Picture 35. Component operation scheme
When a request to check a file system object is received from Dr.Web for UNIX File Servers
components, it checks whether this object requires scanning. If so, a scanning task is generated for
scanning engine Dr.Web Scanning Engine. If the scanned object contained a threat, Dr.Web File
Checker neutralizes it (deletes or quarantines) if this action was specified by the client component that
initiated the scanning. Scanning can be initiated by various product components (for example, SpIDer
Guard for SMB monitor).
During scanning, the component generates and sends the client component a report with scan results
and applied actions, if any.
Apart from the standard scanning method, the following special methods are available for internal use:
The "flow" scanning method. A component that uses this scanning method initializes detection and
neutralization parameters only once. These parameters will be applied to all future requests for file
check coming from the component. This method is used by SpIDer Guard monitor.
The "proxy" scanning method. A component that uses this scanning method scans files without
applying any actions (including event logging) to detected threats. Necessary actions must be
applied by the component that initiated the scanning process. This method is used by SpIDer
Guard for SMB monitor and Dr.Web ClamD component.
Files can be scanned with the "flow" and "proxy" scanning methods by Dr.Web Ctl utility (launched by
the drweb-ctl command) using the flowscan and proxyscan commands. However, for the
Administrator Manual
69
Solution Components
standard scanning on demand, it is recommended to use the scan command.
The component collects statistics on scanned files averaging the number of files scanned per second in
the last minute, 5 minutes, 15 minutes.
Command-Line Arguments
To run Dr.Web File Checker, type the following command in the command line:
$ <opt_dir>/bin/drweb-filecheck [options]
Dr.Web File Checker can process the following options:
Short form
Long form
-h
--help
Arguments
Description: instructs to output short help information about command-line parameters to the console and exit.
-v
--version
Description: instructs to output information on the module version and exit
Example:
$ /opt/drweb.com/bin/drweb-filecheck --help
This command outputs short help information on Dr.Web File Checker.
Notes about startup
The component cannot be run directly from the command line of the operating system in standalone
mode. It is run automatically by configuration daemon Dr.Web ConfigD when a scanning task is
received from Dr.Web for UNIX File Servers components.
To scan files at request, use the command-line command-line tool for the solution management from
the command line Dr.Web Ctl (it is run by drweb-ctl command).
Configuration Parameters
The component uses configuration parameters which are specified in [FileCheck] section of the
integrated configuration file of Dr.Web for UNIX File Servers.
This section stores the following parameters:
LogLevel =
{logging level}
Logging level for file checking component Dr.Web File Checker.
If the parameter value is not specified, the
DefaultLogLevel from [Root] section is used.
value
of
Default value:
LogLevel = Notice
Log =
{log type}
Logging method for file checking component
Checker.
Dr.Web File
Default value:
Log = Auto
ExePath =
{path to file}
Path to the executable of Dr.Web File Checker.
Administrator Manual
70
Solution Components
Default value:
ExePath = <opt_dir>/bin/drweb-filecheck
For Linux:
ExePath = /opt/drweb.com/bin/drweb-filecheck
For FreeBSD:
ExePath = /usr/local/libexec/drweb.com/bin/
drweb-filecheck
For Solaris:
ExePath = /opt/drweb.com/bin/drweb-filecheck
DebugClientIpc =
{boolean}
Indicates whether detailed IPC messages are included in the log
file on debug level (LogLevel = DEBUG).
Default value:
DebugClientIpc = No
DebugScan =
{boolean}
Indicates whether detailed IPC messages, received during a file
check, are included to the log file on debug level (LogLevel =
DEBUG).
Default value:
DebugScan = No
DebugFlowScan =
{boolean}
Indicates whether detailed messages about scanning of files by
"flow" method are included in the log file on debug level
(LogLevel = DEBUG). This method is used by SpIDer Guard
monitor.
Default value:
DebugFlowScan = No
DebugProxyScan =
{boolean}
Indicates whether detailed messages about monitoring of files by
"proxy" method are included in the log file on debug level
(LogLevel = DEBUG). This method is used by SpIDer Guard
for SMB monitor and Dr.Web ClamD component.
Default value:
DebugProxyScan = No
DebugCache =
{boolean}
Indicates whether detailed messages about cached check results
are included in the log file on debug level (LogLevel = DEBUG).
Default value:
DebugCache = No
MaxCacheSize =
{size}
Maximum allowed size of cache to store data on scanned files.
If 0 is specified, caching is disabled.
Default value:
MaxCacheSize = 50MB
RescanInterval =
{time interval}
Period of time during which a repeated check of file content is not
performed if results of the previous check are stored in cache
(period while the stored information is considered up-to-date).
If 0 is specified, file are always checked at request.
Default value:
RescanInterval = 1s
IdleTimeLimit =
{time interval}
Maximum time that the component can remain idle. If the
Administrator Manual
71
Solution Components
specified value is exceeded, the component shuts down.
Minimum value — 10s.
Default value:
IdleTimeLimit = 30s
Administrator Manual
72
Solution Components
SpIDer Guard
Linux file system monitor SpIDer Guard is designed for monitoring file activity on GNU/Linux file
system volumes. The module operates in daemon mode and controls main file system events related to
modification (file creation, opening, closing). When such event is intercepted, the monitor checks
whether the file was modified and, if so, the module generates a task for component Dr.Web File
Checker to initiate scanning of the modified file by scanning engine Dr.Web Scanning Engine.
Moreover, the file system monitor SpIDer Guard detects attempts to run programs form their
executable files. If a program in an executable file is detected malicious, all processes started from this
executable file are forcibly terminated.
The component is included only in the distributions designed for GNU/Linux OSes.
Operation Principles
The file system monitor SpIDer Guard can operate in both user space ( user mode) and Linux kernel
space (via LKM — Linux kernel module). It is recommended to use automatic mode ( auto), which will
allow the module to define the best operation mode on startup, as not all Linux kernel versions
support fanotify used when the monitor operates in user mode. If the module cannot support the
specified integration mode, the module exits after startup. If the auto mode is selected, the modules
attempts to use the user mode and then — LKM mode. If neither of these two modes can be used, the
module exits.
When new or modified files are detected, the monitor sends component Dr.Web File Checker a task
to scan these files. The component then initiates their scanning by scanning engine Dr.Web Scanning
Engine. The operation scheme is shown in the picture below.
Picture 36. Component operation scheme
Administrator Manual
73
Solution Components
To define file system objects that must be monitored, SpIDer Guard uses two configuration
parameters:
IncludedPath — paths to be monitored ("monitoring scope").
ExcludedPath — paths to be excluded from monitoring ("exclusion scope").
Thus, only those files are monitored which paths are specified in the IncludedPath parameter and
not specified in the ExcludedPath parameter. If a path is specified in both parameters, the
IncludedPath parameter takes precedence over the other parameter: the objects are monitored by
Samba file system monitor SpIDer Guard (for details on the algorithm to define objects included or
excluded from monitoring, see below).
Example:
Let us assume that the lists contain the following paths:
IncludedPath = /a, /b/c, /d/file1
ExcludedPath = /b, /d/file1, /b/c/file2
Then the file system monitor SpIDer Guard will monitor access to:
o all files in the /a directory
o all files in the /b/c directory except for file2
o /d/file1
With these settings, the monitor does not control operations with other files.
Note that specifying /b path in the ExcludedPath list is syntactically valid, but has no effect: files in
this directory are not monitored anyway as this path is not within the monitoring scope specified in
the IncludedPath list.
Specifying exclusion in the ExcludedPath list can be useful when, for example, some files are
frequently modified, which results in constant repeated scanning of these files and, thus, can increase
system load. If it is known with certainty that frequent modification of files in a directory is not caused
by a malicious program but is due to operation of a trusted program, you can add the path to this
directory or add these files to the list of exclusions. In this case, the file system, monitor SpIDer
Guard stops responding to modification of these objects, even if they are within the monitoring scope.
Moreover, you can add a program to the list of trusted programs (ExcludedProc configuration
parameter). In this case, file operations of this program will not cause scanning even if the modified or
created files are monitored.
The file system monitorSpIDer Guard automatically detects mounting and demounting of new file
system volumes (for example, on USB flash drives, CD/DVD, RAID arrays) and adjusts the list of
monitored objects, if required.
Defining whether an object is monitored
To define whether a file system object is to be monitored, the file system monitor SpIDer Guard,
when detecting a file operation, does the following:
1. Gets information on the process that performed the file operation. If the executable path of this
process (name of the executable file and its full path) is specified in the ExcludedProc list, the
modified object is not within the monitoring scope and will not be scanned; the procedure ends.
2. Otherwise, the monitor gets the full path to the modified object.
3. This path is checked if it is specified in the IncludedPath or ExcludedPath lists.
4. If the path coincides with one of the items in the IncludedPath list, the object is scanned; the
procedure ends.
5. If the path coincides with one of the items in the ExcludedPath list, the operation is ignored and
the object is not scanned; the procedure ends.
Administrator Manual
74
Solution Components
6. If the path is not specified in any of the lists, the path is changed to another path which is one level
up.
7. If this result path is empty, the procedure ends. Otherwise, the procedure goes to step 3.
The procedure continues until the result path of an iteration coincides with an item of either
IncludedPath or ExcludedPath, or until the system root directory is reached.
Command-Line Arguments
To run the file system monitor SpIDer Guard from the command line, type the following command:
$ <opt_dir>/bin/drweb-spider [options]
SpIDer Guard can process the following options:
Short form
Long form
-h
--help
Arguments
Description: instructs to output short help information about command-line parameters to the console and exit.
-v
--version
Description: instructs to output information on the module version and exit
Example:
$ /opt/drweb.com/bin/drweb-spider --help
This command outputs short help information on SpIDer Guard file system monitor.
Notes about startup
The component cannot be run directly from the command line of the operating system in standalone
mode. It is run automatically on operating system startup by configuration daemon Dr.Web ConfigD.
To start or stop component operation, you can use the command-line tool for the solution management
Dr.Web Ctl started by drweb-ctl command).
Configuration Parameters
The component uses configuration parameters which are specified in [LinuxSpider] section of the
integrated configuration file of Dr.Web for UNIX File Servers.
The section contains the following parameters:
LogLevel =
{logging level}
Logging level for the file system monitor SpIDer Guard.
If the parameter is not specified, the DefaultLogLevel
parameter value from [Root]section is used.
Default value:
LogLevel = Notice
Log =
{log type}
Logging method for the file system monitor SpIDer Guard.
ExePath =
{path to file}
Path to the executable of SpIDer Guard.
Default value:
Log = Auto
Default value:
ExePath = <opt_dir>/bin/drweb-spider
Administrator Manual
75
Solution Components
For Linux:
ExePath = /opt/drweb.com/bin/drweb-spider
Start =
{boolean}
Indicates whether it is required to run SpIDer Guard on the
Dr.Web for UNIX File Servers startup.
Default value:
Start = Yes
ExcludedPath =
{path to file or directory}
Path to the object which must be excluded from monitoring. You
can specify a directory or file path. If a directory is specified, all
directory content will be excluded.
Note that symbolic links here have no effect as only the direct path
to a file is analyzed when scanning.
You can specify a list as the parameter value. The values on the
list must be separated with commas and enclosed in quotation
marks. The parameter can be specified more than once in the
section (in this case, all its values are combined into one list).
Default value:
ExcludedPath = "/proc", "/sys"
IncludedPath =
{path to file or directory}
Path to the object which must be monitored and scanned upon
any file event. You can specify a directory or file path. If a
directory is specified, all directory content will be scanned, if the
paths are not specified in the ExcludedPath list.
Note that symbolic links here have no effect as only the direct path
to a file is analyzed when scanning.
Note that this parameter takes precedence over ExcludedPath
parameter of the same section; that is, if the same object (file or
directory) is specified in both parameter values, this object will be
scanned upon any file event.
You can specify a list as the parameter value. The values on the
list must be separated with commas and enclosed in quotation
marks. The parameter can be specified more than once in the
section (in this case, all its values are combined into one list).
Default value:
IncludedPath = /
ExcludedProc =
{path to file}
List of processes that are excluded from monitoring. If a file
operation was initiated by one of the processes specified here, the
modified or created file will not be scanned.
You can specify a list as the parameter value. The values on the
list must be separated with commas and enclosed in quotation
marks. The parameter can be specified more than once in the
section (in this case, all its values are combined into one list).
Default value:
ExcludedProc =
Mode =
{LKM|FANOTIFY|AUTO}
Operation mode of the file system monitor SpIDer Guard.
Allowed values:
LKM — Operation in operating system kernel mode (LKM for
GNU/Linux)
FANOTIFY — Operation in user mode
AUTO — The best operation mode is set automatically.
Note that changing of this parameter value should be done with
Administrator Manual
76
Solution Components
the highest caution as not all kernels of GNU/Linux operating
systems work correctly with SpIDer Guard in different modes.
It is strongly recommended to set this parameter value to AUTO,
as in this case the best mode will be selected for integration with
the file system manager on startup. At that, the module will
attempt to enable FANOTIFY mode and, on failure — LKM. If
none of the modes can be set, the module exits.
Default value:
Mode = AUTO
OnKnownVirus =
{action}
Action applied by Dr.Web for UNIX File Servers to a known
threat (virus, etc.) detected by using signature analysis during the
scanning initiated by SpIDer Guard.
Allowed values:
Cure, Quarantine, Delete
Default value:
OnKnownVirus = Cure
OnIncurable =
{action}
Action applied by Dr.Web for UNIX File Servers to an incurable
threat (that is, an attempt to apply Cure failed) detected during
the scanning initiated by SpIDer Guard.
Allowed values:
Quarantine, Delete
Default value:
OnIncurable = Quarantine
OnSuspicious =
{action}
Action applied by Dr.Web for UNIX File Servers to an unknown
threat (or suspicious objects) detected by using heuristic analysis
during the scanning initiated by SpIDer Guard.
Allowed values:
Report, Quarantine, Delete
Default value:
OnSuspicious = Quarantine
OnAdware =
{action}
Action applied by Dr.Web for UNIX File Servers to adware
detected during the scanning initiated by SpIDer Guard.
Allowed values:
Report, Quarantine, Delete
Default value:
OnAdware = Quarantine
OnDialers =
{action}
Action applied by Dr.Web for UNIX File Servers to a dialer
program detected during the scanning initiated by SpIDer Guard.
Allowed values:
Report, Quarantine, Delete
Default value:
OnDialers = Quarantine
OnJokes =
{action}
Action applied by Dr.Web for UNIX File Servers to a joke
program detected during the scanning initiated by SpIDer Guard.
Allowed values:
Report, Quarantine, Delete
Administrator Manual
77
Solution Components
Default value:
OnJokes = Report
OnRiskware =
{action}
Action applied by Dr.Web for UNIX File Servers to riskware
detected during the scanning initiated by SpIDer Guard.
Allowed values:
Report, Quarantine, Delete
Default value:
OnRiskware = Report
OnHacktools =
{action}
Action applied by Dr.Web for UNIX File Servers to a hacktool
detected during the scanning initiated by SpIDer Guard.
Allowed values:
Report, Quarantine, Delete
Default value:
OnHacktools = Report
ScanTimeout =
{time interval}
Timeout for scanning of one file at request received from SpIDer
Guard.
If the value is set to 0, time to scan a file is not limited.
Default value:
ScanTimeout = 30s
HeuristicAnalysis =
{On | Off}
Indicates whether heuristic analysis is used for detection of
unknown threats during the file scanning initiated by SpIDer
Guard. Heuristic analysis provides higher detection reliability but,
at the same time, it increases time of virus scanning.
Action applied to threats detected by heuristic analyzer is specified
as the OnSuspicious parameter value.
Allowed values:
On — instructs to use heuristic analysis when scanning.
Off — instructs not to use heuristic analysis.
Default value:
HeuristicAnalysis = On
PackerMaxLevel =
{integer}
Maximum nesting level when scanning packed objects. All objects
at a deeper nesting level are skipped during the file scanning
initiated by SpIDer Guard.
If the value is set to 0, nested objects are not scanned.
Default value:
PackerMaxLevel = 8
ArchiveMaxLevel =
{integer}
Maximum nesting level when scanning archives. All objects at a
deeper nesting level are skipped during the file scanning initiated
by SpIDer Guard.
If the value is set to 0, nested objects are not scanned.
Default value:
ArchiveMaxLevel = 0
MailMaxLevel =
{integer}
Maximum nesting level when scanning email messages and
mailboxes. All objects at a deeper nesting level are skipped during
the file scanning initiated by SpIDer Guard.
Administrator Manual
78
Solution Components
If the value is set to 0, nested objects are not scanned.
Default value:
MailMaxLevel = 0
ContainerMaxLevel =
{integer}
Maximum nesting level when scanning other containers (for
example, HTML pages). All objects at a deeper nesting level are
skipped during the file scanning initiated by SpIDer Guard.
If the value is set to 0, nested objects are not scanned.
Default value:
ContainerMaxLevel = 8
MaxCompressionRatio =
{integer}
Maximum compression ratio of scanned objects (ratio between the
uncompressed size and compressed size). If the ratio of an object
exceeds the limit, this object is skipped during the file scanning
initiated by SpIDer Guard.
The compression ratio must be at least equal to 2.
Default value:
MaxCompressionRatio = 500
SpIDer Guard for SMB
SpIDer Guard for SMB is a monitor of shared file system directories used by SMB file server Samba.
This component is designed to monitor actions applied to files in Samba shared directories. It operates
as a resident monitor and controls basic actions in the protected file system (creation, opening, closing,
and read or write operation). Once the component intercepts such operation, it checks whether the file
was modified and if so, a task to scan the file is created and sent to the file scanner Dr.Web File
Checker. If the file requires scanning, Dr.Web File Checker initiates the scanning by scanning engine
Dr.Web Scanning Engine.
To avoid conflicts between SpIDer Guard for SMB and SpIDer Guard, which may occur when
scanning files in shared Samba directories, it is recommended to additionally configure SpIDer Guard
by performing one of the following:
add shared Samba directories to the exclusion scope (specify these directories in ExcludedPath
parameter)
add the Samba process (smbd) to the list of ignored processes (specify smbd in ExcludedProc
parameter).
The SpIDer Guard for SMB monitor uses a special VFS SMB module for the integration with the
Samba server. With SpIDer Guard for SMB, several versions of this module which are built for
various versions of Samba are supplied. However, the supplied versions of the VFS SMB module may be
incompatible with the version of Samba installed on your file server. It may occur, for example, if the
Samba server uses the CLUSTER_SUPPORT option.
In case of incompatibility of the VFS SMB module with the Samba server, build the VFS SMB module
for your Sambа server from the supplied source codes manually (including the compatibility with the
CLUSTER_SUPPORT option if necessary).
The procedure of building the VFS SMB module from the supplied source codes is described in
Appendix G.
Operation Principles
SpIDer Guard for SMB operates as daemon (usually it is started by configuration daemon Dr.Web
Administrator Manual
79
Solution Components
ConfigD on system startup). After startup, the component operates as a server to which special plugins are connected (VFS SMB modules) that operate on the Samba server side and monitors user
activity in shared directories. When a new or modified file is found on a volume, the monitor instructs
Dr.Web File Checker to scan the file. Monitor operation scheme is shown in the picture below.
Picture 37. Component operation scheme
If a file scanned at request of the monitor is infected with an incurable threat or with a threat for which
"Block" action is specified, the monitor instructs the VFS SMB module controlling the corresponding
shared directory to block this file (that is, to prevent users from reading, editing, and running the file).
A text file is also created next to the blocked object, if this setting is not disabled. The created file
describes the reason why the object was block. It is necessary to avoid the "unexpected disappearance"
of the file to which the action "Delete" or "Move to quarantine" was applied. Thus, it prevents
users from multiple attempts to recreate the moved or deleted file. Moreover, this text file also notifies
the user that the computer may be infected with a malicious program. If informed on this, the user can
start anti-virus scanning of the computer and neutralize local detected threats.
You can disable monitoring of the specified files and directories stored in controlled shared directories
of the Samba server. It can be useful when, for example, some files are frequently modified, which
results in constant repeated scanning of these files and, thus, can increase system load. If it is known
with certainty that frequent modification is typical for these files in the storage, it is recommended to
add them to the list of exclusions. In this case, the monitor stops responding to modification of these
objects and their scanning is not initiated.
To distinguish between directories that are to be monitored and the exclusions, the Samba shared
directories monitor SpIDer Guard for SMB uses two configuration parameters:
IncludedPath — paths to be monitored ("monitoring scope").
ExcludedPath — paths to be excluded from monitoring ("exclusion scope").
Normally, as the monitoring scope, the monitor uses the entire shared directory. If you specify different
monitoring and exclusion scopes, only those files in shared directory are monitored which paths are not
specified in the ExcludedPath parameter or specified in the IncludedPath parameter. If a path is
specified in both parameters, the IncludedPath parameter takes precedence over the other one: the
objects are monitored by the Samba shared directories monitor SpIDer Guard for SMB. Thus, use
the IncludedPath parameter to add some files and directories for monitoring if they are residing in
the exclusion scope.
You can specify different protection parameters for different Samba shared directories monitored by
SpIDer Guard for SMB, including different monitoring and exclusion scope as well as reaction to
detected threats. For that purpose, in the configuration section of SpIDer Guard for SMB specify
individual settings for VFS SMB modules that control shared directories.
Administrator Manual
80
Solution Components
Command-Line Arguments
To run Samba shared directories monitor SpIDer Guard for SMB from the command line, type the
following command:
$ <opt_dir>/bin/drweb-smbspider-daemon [options]
SpIDer Guard for SMB can process the following options:
Short form
Long form
-h
--help
Arguments
Description: instructs to output short help information to the console about command-line parameters and exit.
-v
--version
Description: instructs to output information on the module version and exit
Example:
$ /opt/drweb.com/bin/drweb-smbspider-daemon --help
This command outputs short help information on SpIDer Guard for SMB monitor.
Notes about startup
The component cannot be run directly from the command line of the operating system in standalone
mode. It is run automatically on operating system startup by configuration daemon Dr.Web ConfigD.
To start or stop the component, you can use the command-line tool for the solution management
Dr.Web Ctl started by drweb-ctl command).
Configuration Parameters
The component uses configuration parameters which are specified in [SMBSpider] section of the
integrated configuration file of Dr.Web for UNIX File Servers.
The section contains the following parameters:
LogLevel =
{logging level}
Logging level for SMB directories monitor SpIDer Guard for
SMB.
If the parameter is not specified, the DefaultLogLevel
parameter value from [Root]section is used.
Default value:
LogLevel = Notice
Log =
{log type}
Logging method for SMB directories monitor SpIDer Guard for
SMB.
Default value:
Log = Auto
ExePath =
{path to file}
Path to the executable of SpIDer Guard for SMB.
Default value:
ExePath = <opt_dir>/bin/drweb-smbspider-daemon
For Linux:
ExePath = /opt/drweb.com/bin/drweb-smbspiderdaemon
For FreeBSD:
Administrator Manual
81
Solution Components
ExePath = /usr/local/libexec/drweb.com/bin/
drweb-smbspider-daemon
For Solaris:
ExePath = /opt/drweb.com/bin/drweb-smbspiderdaemon
Start =
{boolean}
Indicates whether it is required to run SpIDer Guard for SMB on
the suite startup.
Default value:
Start = Yes
SambaChrootDir =
{path to directory}
Path to the root directory of SMB file storage (overrides by the file
server via chroot).
Used as a prefix substituted at the beginning of all paths to files
and directories residing in the file storage and describes the path
relative to the root of the local file system.
If not specified, the path to the file system root / is used.
Default value:
SambaChrootDir =
[*]
ExcludedPath =
{path to file or directory}
Path to the object which must be skipped during scanning. You
can specify a directory or file path. It is also possible to use file
masks (which contain question marks ? and asterisks * as well as
character classes [ ], [! ], [^ ]).
If a directory is specified, all directory content will be skipped.
You can specify a list as the parameter value. The values on the
list must be separated with commas and enclosed in quotation
marks. The parameter can be specified more than once in the
section (in this case, all its values are combined into one list).
Default value:
ExcludedPath =
[*]
IncludedPath =
{path to file or directory}
Path to the object which must be scanned. You can specify a
directory or file path. It is also possible to use file masks (that
contain question marks ? and asterisks * as well as character
classes [ ], [! ], [^ ]).
If a directory is specified, all directory content will be scanned.
Note that this parameter takes precedence over ExcludedPath
parameter of the same section; that is, if the same object (file or
directory) is specified in both parameter values, this object will be
scanned.
You can specify a list as the parameter value. The values on the
list must be separated with commas and enclosed in quotation
marks. The parameter can be specified more than once in the
section (in this case, all its values are combined into one list).
Default value:
IncludedPath =
[*]
AlertFiles =
{boolean}
Indicates whether a text file is created next to an object blocked
by SMB directory monitor as malicious. The created file describes
the reason why the object was block.
Created
files
are
named
as
<blocked_object_name>.drweb.alert.txt
follows:
Allowed values:
Yes — Files are created.
Administrator Manual
82
Solution Components
No — Files are not created.
Default value:
AlertFiles = Yes
[*]
OnKnownVirus =
{action}
Action applied by Dr.Web for UNIX File Servers to a known
threat (virus, etc.) detected by using signature analysis during the
scanning initiated by SpIDer Guard for SMB.
Allowed values:
Block, Cure, Quarantine, Delete
Default value:
OnKnownVirus = Cure
[*]
OnIncurable =
{action}
Action applied by Dr.Web for UNIX File Servers to an incurable
threat (that is, an attempt to apply Cure failed) detected during
the scanning initiated by SpIDer Guard for SMB.
Allowed values:
Block, Quarantine, Delete
Default value:
OnIncurable = Quarantine
[*]
OnSuspicious =
{action}
Action applied by Dr.Web for UNIX File Servers to an unknown
threat (or suspicious objects) detected by using heuristic analysis
during the scanning initiated by SpIDer Guard for SMB.
Allowed values:
Pass, Block, Quarantine, Delete
Default value:
OnSuspicious = Quarantine
[*]
OnAdware =
{action}
Action applied by Dr.Web for UNIX File Servers to adware
detected during the scanning initiated by SpIDer Guard for
SMB.
Allowed values:
Pass, Block, Quarantine, Delete
Default value:
OnAdware = Pass
[*]
OnDialers =
{action}
Action applied by Dr.Web for UNIX File Servers to a dialer
program detected during the scanning initiated by SpIDer Guard
for SMB.
Allowed values:
Pass, Block, Quarantine, Delete
Default value:
OnDialers = Pass
[*]
OnJokes =
{action}
Action applied by Dr.Web for UNIX File Servers to a joke
program detected during the scanning initiated by SpIDer Guard
for SMB.
Allowed values:
Pass, Block, Quarantine, Delete
Default value:
OnJokes = Pass
Administrator Manual
83
Solution Components
[*]
OnRiskware =
{action}
Action applied by Dr.Web for UNIX File Servers to riskware
detected during the scanning initiated by SpIDer Guard for
SMB.
Allowed values:
Pass, Block, Quarantine, Delete
Default value:
OnRiskware = Pass
[*]
OnHacktools =
{action}
Action applied by Dr.Web for UNIX File Servers to a hacktool
detected during the scanning initiated by SpIDer Guard for
SMB.
Allowed values:
Pass, Block, Quarantine, Delete
Default value:
OnHacktools = Pass
[*]
BlockOnError =
{boolean}
Indicates whether SpIDer Guard for SMB blocks access to a file
if an attempt to cure it resulted in an error.
Allowed values:
Yes — block access to a file.
No — access to a file is not blocked.
Default value:
BlockOnError = Yes
[*]
ScanTimeout =
{time interval}
Timeout for scanning one file initiated by SpIDer Guard for
SMB.
If the value is set to 0, time to scan a file is not limited.
Default value:
ScanTimeout = 30s
[*]
HeuristicAnalysis =
{On | Off}
Indicates whether heuristic analysis is used for detection of
unknown threats during the scanning initiated by SpIDer Guard
for SMB. Heuristic analysis provides higher detection reliability
but, at the same time, it increases time of virus scanning.
Action applied to threats detected by heuristic analyzer is specified
as the OnSuspicious parameter value.
Allowed values:
On — instructs to use heuristic analysis when scanning.
Off — instructs not to use heuristic analysis.
Default value:
HeuristicAnalysis = On
[*]
PackerMaxLevel =
{integer}
Maximum nesting level when scanning packed objects. All objects
at a deeper nesting level are skipped during the scanning initiated
by SpIDer Guard for SMB.
If the value is set to 0, nested objects are not scanned.
Default value:
PackerMaxLevel = 8
[*]
ArchiveMaxLevel =
{integer}
Maximum nesting level when scanning archives. All objects at a
deeper nesting level are skipped during the scanning initiated by
SpIDer Guard for SMB.
Administrator Manual
84
Solution Components
If the value is set to 0, nested objects are not scanned.
Default value:
ArchiveMaxLevel = 0
[*]
MailMaxLevel =
{integer}
Maximum nesting level when scanning email messages and
mailboxes. All objects at a deeper nesting level are skipped during
the scanning initiated by SpIDer Guard for SMB.
If the value is set to 0, nested objects are not scanned.
Default value:
MailMaxLevel = 8
[*]
ContainerMaxLevel =
{integer}
Maximum nesting level when scanning other containers (for
example, HTML pages). All objects at a deeper nesting level are
skipped during the scanning initiated by SpIDer Guard for SMB.
If the value is set to 0, nested objects are not scanned.
Default value:
ContainerMaxLevel = 8
[*]
MaxCompressionRatio =
{integer}
Maximum compression ratio of scanned objects (ratio between the
uncompressed size and compressed size). If the ratio of an object
exceeds the limit, this object is skipped during the scanning
initiated by SpIDer Guard for SMB.
The compression ratio must be at least equal to 2.
Default value:
MaxCompressionRatio = 500
SmbSocketPath =
{path to file}
Path to the socket file which enables interatcion between SpIDer
Guard for SMB and VFS SMB modules. The path is always
relative and is a supplement for the path specified as the
ChrootPath. parameter value.
Default value:
SmbSocketPath = var/run/
.com.drweb.smb_spider_vfs
ActionDelay =
{time interval}
Delay time between the moment when a threat is detected and
the moment when SpIDer Guard for SMB applies the action
specified for this threat type.
During this time period, the file is blocked.
Default value:
ActionDelay = 24h
MaxCacheSize =
{size}
Size of cache used by VFS SMB modules to store data on scanned
files in monitored shared Samba directories.
If 0 is specified, data is not cached.
Default value:
MaxCacheSize = 10mb
Customizing scanning settings
You can specify a different tag for each VFS SMB module which monitors each shared directory
(storage). You can do it in the configuration file of SMB server Samba (typically, this is smb.conf file.
Unique tags for VFS SMB modules in smb.conf file are specified as follows:
smb_spider:tag = <someTag>
Administrator Manual
85
Solution Components
where <someTag> is a unique tag assigned to a VFS SMB module by Samba SMB server for a shared
directory.
If a VFS SMB module has a unique tag <someTag>, you can create a separate section in the
configuration file of Dr.Web for UNIX File Servers in addition to [SMBSpider]. The created section
will store all configuration parameters for scanning a particular storage protected by this VFS SMB
module.
This section must be named as [SMBSpider.Share.<someTag>].
Sections created for VFS SMB modules can contain parameters indicated with asterisk "[*]" in the
above mentioned table. Other parameters cannot be specified in such individual sections as the
parameter values configure operation of all VFS SMB modules operating with SMB directories monitor
SpIDer Guard for SMB.
VFS SMB module uses parameter values from the general section [SMBSpider] if these parameters
are not specified in the individual section [SMBSpider.Share.<someTag>], created for this
module. Thus, if no individual section, indicated with a tag, is created, all VFS SMB modules use the
same parameters for monitoring shared directories. If you delete some parameter from the
[SMBSpider.Share.<someTag>] section, the parameter value for this section (and for the
corresponding shared directory with <someTag>) will be taken from the "parent" parameter with the
same name from the general [SMBSpider] section; the default parameter value is not used in this
case.
To add new section for the Samba shared directory with a tag <someTag> by command-line tool
Dr.Web
Ctl,
it
is
necessary
to
use
the
command
drweb-ctl
cfset
SmbSpider.Share.<someTag>.<parameter> <value>.
Example:
# drweb-ctl cfset SmbSpider.Share.DepartFiles.OnAdware Quarantine
This
command
adds
to
the
configuration
file
the
additional
section
[SMBSpider.Share.DepartFiles]. The section will contain all parameters for the shared directory,
indicated with asterisk "[*]" in the above mentioned table. Values for the all parameters, beside
OnAdware parameter, which is specified in the command, will equal to values of the corresponding
parameters from the common [SMBSpider] section.
SpIDer Guard for NSS
NSS volumes monitor SpIDer Guard for NSS is designed for monitoring file activity on NSS (Novell
Storage Services) file system volumes. The component operates in daemon mode and controls main
file system events related to modification (creation, opening, closing). When such event is intercepted,
the monitor checks whether the file content was modified and, if so, the monitor generates a task for
Dr.Web File Checker to scan the modified content.
The component is included only in the distributions designed for GNU/Linux OSes. It can operate only
on Novell Open Enterprise Server SP2 based on SUSE Linux Enterprise Server 10 SP3 and newer.
Operation Principles
SpIDer Guard for NSS operates as a daemon (usually it is started by configuration daemon Dr.Web
ConfigD on system startup). This monitor controls only the volumes which are specified in the settings
(NssVolumesMountDir and ProtectedVolumes parameters). The monitor does not detect
automatically, when a new NSS file system volume is mounted or unmounted. When a new or modified
Administrator Manual
86
Solution Components
file is found on a volume, the monitor instructs Dr.Web Scanning Engine core component to scan the
file. Another feature of this monitor is that it manages its own, separate, quarantine for threats
detected on NSS volumes. The monitor operation scheme is shown in the picture below.
Picture 38. Component operation scheme
NSS volumes monitor has the following feature: if a threat is detected in a file upon its copying (to a
protected volume or within an NSS volume), SpIDer Guard for NSS marks only the copy of the infected
file. The threat in the original file will not be detected. This file will be considered safe until an attempt to
access this (original) file is performed or until it is modified if the file resides on an NSS volume.
If Quarantine action is specified for some threat type in NSS volumes monitor settings, the object
containing a threat of this type will be placed to quarantine again on attempt to restore this object from
quarantine to an NSS volume. For example, the following default settings
NSS.OnKnownVirus = Cure
NSS.OnIncurable = Quarantine
move all incurable objects to quarantine. At that, when any incurable object is restored from quarantine
to an NSS volume, this object is automatically returned to quarantine.
If required, you can disable SpIDer Guard for NSS monitoring of certain files or directories. It can be
useful when, for example, files in some directory are frequently modified, which results in constant
repeated scanning of these files and, thus, can increase system load. If it is known with certainty that
frequent modification of files in a directory is not caused by a virus but is due to operation of a trusted
program, you can add the path to this directory or these files to the list of exclusions. In this case, the
NSS volume monitor SpIDer Guard for NSS stops responding to modification of these objects.
Command-Line Arguments
To run NSS volumes monitor SpIDer Guard for NSS from the command line, type the following
command:
$ <opt_dir>/bin/drweb-nss [options]
SpIDer Guard for NSS can process the following options:
Short form
Long form
-h
--help
Arguments
Administrator Manual
87
Solution Components
Description: instructs to output short help information about command-line parameters to the console and exit.
-v
--version
Description: instructs to output information on the module version and exit
Example:
$ /opt/drweb.com/bin/drweb-nss --help
This command outputs short help information on SpIDer Guard for NSS.
Notes about startup
The component cannot be run directly from the command line of the operating system in standalone
mode. It is run automatically on operating system startup by configuration daemon Dr.Web ConfigD.
To start or stop component operation, you can use the command-line tool for the solution management
Dr.Web Ctl started by drweb-ctl command).
Configuration Parameters
The component uses configuration parameters which are specified in [NSS] section of the integrated
configuration file of Dr.Web for UNIX File Servers.
The section contains the following parameters:
LogLevel =
{logging level}
Logging level for SMB directories monitor SpIDer Guard for
NSS.
If the parameter is not specified, the DefaultLogLevel
parameter value from [Root] section is used.
Default value:
LogLevel = Notice
Log =
{log type}
Logging method for SMB directories monitor SpIDer Guard for
NSS.
Default value:
Log = Auto
LogProtocol =
{boolean}
Indicates whether protocol messages are registered in the log file
of NSS volumes monitor SpIDer Guard for NSS.
Allowed values:
Yes — messages are registered.
No — messages are not registered.
Default value:
LogProtocol = No
ExePath =
{path to file}
Path to the executable of SpIDer Guard for NSS.
Default value:
ExePath = <opt_dir>/bin/drweb-nss
For Linux:
ExePath = /opt/drweb.com/bin/drweb-nss
Start =
{boolean}
Indicates whether it is required to run SpIDer Guard for NSS on
the Dr.Web for UNIX File Servers startup.
Administrator Manual
88
Solution Components
Default value:
Start = Yes
NssVolumesMountDir =
{path to directory}
Path to the file system directory where NSS file system volumes
are mounted.
Default value:
NssVolumesMountDir = /media/nss
ProtectedVolumes =
{volume name}
Names
of
NSS
file
system volumes
mounted
NssVolumesMountDir and protected by the suite.
on
If no value is specified, all volumes in NssVolumesMountDir
must be protected.
You can specify a list as the parameter value. The values on the
list must be separated with commas and enclosed in quotation
marks. The parameter can be specified more than once in the
section (in this case, all its values are combined into one list).
Default value:
ProtectedVolumes =
ExcludedPath =
{path to file or directory}
Path to the object which must be skipped during scanning. You
can specify a directory or file path.
If a directory is specified, all directory content will be skipped.
You can specify a list as the parameter value. The values on the
list must be separated with commas and enclosed in quotation
marks. The parameter can be specified more than once in the
section (in this case, all its values are combined into one list).
Paths in the list must be relative to NssVolumesMountDir path.
Default value:
ExcludedPath =
IncludedPath =
{path to file or directory}
Path to the object which must be scanned. You can specify a
directory or file path.
If a directory is specified, all directory content will be scanned.
Note that this parameter takes precedence over ExcludedPath
parameter of the same section; that is, if the same object (file or
directory) is specified in both parameter values, this object will be
scanned.
You can specify a list as the parameter value. The values on the
list must be separated with commas and enclosed in quotation
marks. The parameter can be specified more than once in the
section (in this case, all its values are combined into one list).
Paths in the list must be relative to NssVolumesMountDir path.
Default value:
IncludedPath =
OnKnownVirus =
{action}
Action applied by Dr.Web for UNIX File Servers to a known
threat (virus, etc.) detected by using signature analysis during the
scanning initiated by NSS volumes monitor.
Allowed values:
Cure, Quarantine, Delete
Default value:
OnKnownVirus = Cure
Administrator Manual
89
Solution Components
OnIncurable =
{action}
Action applied by Dr.Web for UNIX File Servers to an incurable
threat (that is, an attempt to apply Cure failed) detected during
the scanning initiated by NSS volumes monitor.
Allowed values:
Quarantine, Delete
Default value:
OnIncurable = Quarantine
OnSuspicious =
{action}
Action applied by Dr.Web for UNIX File Servers to an unknown
threat (or suspicious objects) detected by using heuristic analysis
during the scanning initiated by NSS volumes monitor.
Allowed values:
Report, Quarantine, Delete
Default value:
OnSuspicious = Quarantine
OnAdware =
{action}
Action applied by Dr.Web for UNIX File Servers to adware
detected during the scanning initiated by NSS volumes monitor.
Allowed values:
Report, Quarantine, Delete
Default value:
OnAdware = Report
OnDialers =
{action}
Action applied by Dr.Web for UNIX File Servers to a dialer
detected during the scanning initiated by NSS volumes monitor.
Allowed values:
Report, Quarantine, Delete
Default value:
OnDialers = Report
OnJokes =
{action}
Action applied by Dr.Web for UNIX File Servers to a joke
program detected during the scanning initiated by NSS volumes
monitor.
Allowed values:
Report, Quarantine, Delete
Default value:
OnJokes = Report
OnRiskware =
{action}
Action applied by Dr.Web for UNIX File Servers to riskware
detected during the scanning initiated by NSS volumes monitor.
Allowed values:
Report, Quarantine, Delete
Default value:
OnRiskware = Report
OnHacktools =
{action}
Action applied by Dr.Web for UNIX File Servers to a hacktool
(tool for remote administration, Trojan, etc.) detected during
scanning initiated by NSS volumes monitor.
Allowed values:
Report, Quarantine, Delete
Default value:
OnHacktools = Report
Administrator Manual
90
Solution Components
OnError =
{action}
Action applied by Dr.Web for UNIX File Servers to files that
caused an error during the scanning initiated by NSS volumes
monitor.
Allowed values:
Report, Quarantine, Delete
Default value:
OnError = Report
ScanTimeout =
{time interval}
Timeout for scanning one file initiated by NSS volumes monitor.
If the value is set to 0, time to scan a file is not limited.
Default value:
ScanTimeout = 30s
HeuristicAnalysis =
{On | Off}
Indicates whether heuristic analysis is used for detection of
unknown threats during the scanning initiated by NSS volumes
monitor. Heuristic analysis provides higher detection reliability but,
at the same time, it increases time of virus scanning.
Action applied to threats detected by heuristic analyzer is specified
as the OnSuspicious parameter value.
Allowed values:
On — instructs to use heuristic analysis when scanning.
Off — instructs not to use heuristic analysis.
Default value:
HeuristicAnalysis = On
PackerMaxLevel =
{integer}
Maximum nesting level when scanning packed objects. All objects
at a deeper nesting level are skipped during the scanning initiated
by NSS volumes monitor.
If the value is set to 0, nested objects are not scanned.
Default value:
PackerMaxLevel = 8
ArchiveMaxLevel =
{integer}
Maximum nesting level when scanning archives. All objects at a
deeper nesting level are skipped during the scanning initiated by
NSS volumes monitor.
If the value is set to 0, nested objects are not scanned.
Default value:
ArchiveMaxLevel = 0
MailMaxLevel =
{integer}
Maximum nesting level when scanning email messages and
mailboxes. All objects at a deeper nesting level are skipped during
the scanning initiated by NSS volumes monitor.
If the value is set to 0, nested objects are not scanned.
Default value:
MailMaxLevel = 8
ContainerMaxLevel =
{integer}
Maximum nesting level when scanning nested objects. All objects
at a deeper nesting level are skipped during the scanning initiated
by NSS volumes monitor.
If the value is set to 0, nested objects are not scanned.
Default value:
ContainerMaxLevel = 8
Administrator Manual
91
Solution Components
MaxCompressionRatio =
{integer}
Maximum compression ratio of scanned objects (ratio between the
uncompressed size and compressed size). If the ratio of an object
exceeds the limit, this object is skipped during the scanning
initiated by NSS volumes monitor.
The compression ratio must be at least equal to 2.
Default value:
MaxCompressionRatio = 500
If Quarantine action is specified for some threat type in NSS volumes monitor settings, the object
containing a threat of this type will be placed to quarantine again on attempt to restore this object from
quarantine to an NSS volume. For example, the following default settings
NSS.OnKnownVirus = Cure
NSS.OnIncurable = Quarantine
move all incurable objects to quarantine. At that, when any incurable object is restored from quarantine
to an NSS volume, this object is automatically returned to quarantine.
Dr.Web Updater
The update component Dr.Web Updater is designed for receiving all available updates for virus
databases and anti-virus engine Dr.Web Virus-Finding Engine from Doctor Web update servers.
If Dr.Web for UNIX File Servers operates in enterprise mode, the updates are received from the
central protection server (for example, from Dr.Web Enterprise Server); at that, all updates are
received from the server via component Dr.Web ES Agent and Dr.Web Updater is not used for
downloading updates.
Operation Principles
The component is designed to establish connections to update servers of Doctor Web for checking for
updates to virus databases and anti-virus engine Dr.Web Virus-Finding Engine. The lists of update
servers are stored in a special file (the file is signed to prevent modification).
If the suite is not connected to the central protection server or is connected to the server in mobile
mode, Dr.Web Updater is automatically started by the configuration daemon. Startup is performed at
periods specified in the settings. The component can be also started by the configuration daemon if the
appropriate command is received from a user (unscheduled update). The component operation scheme
is shown in the picture below.
Administrator Manual
92
Solution Components
Picture 39. Component operation scheme
When updates become available on the server, they are downloaded to the <var_dir>/cache
directory (for Linux — var/opt/drweb.com/cache), after that they are moved to the working
directory of Dr.Web for UNIX File Servers.
Command-Line Arguments
To run Dr.Web Updater, type the following command in the command line:
$ <opt_dir>/bin/drweb-update [options]
Dr.Web Updater can process the following options:
Short form
Long form
-h
--help
Arguments
Description: instructs to output short help information about command-line parameters to the console and exit.
-v
--version
Description: instructs to output information on the component version and exit
Example:
$ /opt/drweb.com/bin/drweb-update --help
This command outputs short help information on Dr.Web Updater.
Notes about startup
The component cannot be run directly from the command line of the operating system in standalone
mode. It is run automatically on operating system startup by configuration daemon Dr.Web ConfigD.
To receive updates to virus databases and anti-virus engine from the update servers of Doctor Web,
you can send a request to use the command-line tool for the solution management Dr.Web Ctl (is
started by drweb-ctl command).
Administrator Manual
93
Solution Components
Configuration Parameters
The component uses configuration parameters which are specified in [Update] section of the
integrated configuration file of Dr.Web for UNIX File Servers.
The section contains the following parameters:
LogLevel =
{logging level}
Logging level for Dr.Web Updater.
If the parameter value is not specified, the
DefaultLogLevel from [Root] section is used.
value
of
Default value:
LogLevel = Notice
Log =
{log type}
Logging method for Dr.Web Updater.
ExePath =
{path to file}
Executable path of Dr.Web Updater.
Default value:
Log = Auto
Default value:
ExePath = <opt_dir>/bin/drweb-update
For Linux:
ExePath = /opt/drweb.com/bin/drweb-update
For FreeBSD:
ExePath = /usr/local/libexec/drweb.com/bin/
drweb-update
For Solaris:
ExePath = /opt/drweb.com/bin/drweb-update
UpdateInterval =
{time interval}
The frequency to check for updates available for virus databases
and anti-virus engine. This is a time period between a previous
successful update (initiated automatically or manually) and the
next attempt to perform an update.
Default value:
UpdateInterval = 30m
RetryInterval =
{time interval}
Frequency of repeated update attempts if the previous update
failed.
The parameter can have a value of 1m to 30m.
Default value:
RetryInterval = 3m
MaxRetries =
{integer}
Number of repeated attempts to perform an update (at the rate
specified in RetryInterval) if the previous attempt failed.
If the value is set to 0, repeated attempts are not made (the next
update will be performed after the time period specified in
UpdateInterval).
Default value:
MaxRetries = 3
Proxy =
{connection string}
Parameters that configure connection to the proxy server used by
Dr.Web Updater to connect to Doctor Web update servers (for
example, if direct connections to external servers is prohibited by
the security policies of your network).
Administrator Manual
94
Solution Components
If the parameter value is not specified, the proxy server is not
used.
Allowed values:
<connection string> — Proxy server connection string. The
string has the following format (URL):
[<protocol>://][<user>:<password>@]<proxyhost>:<port>
where
<protocol> — Type of the used protocol (in the current
version, only http is available).
<user> — Name of the user for connection to proxy.
<password> — Password for connection to proxy.
<proxyhost> — Address of the host where the proxy
operates (IP address or domain name).
<port> — Used port.
The <protocol> and <user>:<password> parameters can be
absent. The address of proxy <proxyhost>:<port> is
obligatory.
If the user name (<user>) or password (<password>) contains
the following characters: '@', '%' or ':', these characters must
be changed to the following codes: "%40", "%25", and "%3A"
respectively.
Examples:
1. In the configuration file:
Connection to proxy on host proxyhost.company.org
using port 123:
Proxy = proxyhost.company.org:123
Connection to proxy on host 10.26.127.0 using port 3336
over http: protocol as user "legaluser" with password
"passw":
Proxy = http://legaluser:[email protected]:3336
Connection to proxy on host 10.26.127.0 using port 3336
"[email protected]" with password ''passw%123:":
Proxy = user%40company.com:passw%25123%
[email protected]:3336
2. Using command drweb-ctl cfset for specifying the same
parameters:
drweb-ctl cfset Update.Proxy proxyhost.company.org:123
drweb-ctl cfset Update.Proxy http://
legaluser:[email protected]:3336
drweb-ctl cfset Update.Proxy user%40company.com:passw%
25123%[email protected]:3336
Default value:
Proxy =
ExcludedFiles =
{file name}
Name of the file that is not updated by Dr.Web Updater.
You can specify a comma-separated list as the parameter value.
The parameter can be specified more than once in the section.
In this case, values in the list must be separated with commas and
enclosed in quotation marks:
ExcludedFiles = "file1", "file2"
It is recommended to specify one value per line: in this case,
quotation marks can be omitted:
Administrator Manual
95
Solution Components
ExcludedFiles = file1
ExcludedFiles = file2
Default value:
ExcludedFiles = drweb32.lst
NetworkTimeout =
{time interval}
Network operation timeout for updating.
This parameter is useful when a connection is temporarily lost: if
the connection is established again before the time-out expires,
the interrupted updating process will be continued.
Specifying the time out value larger than 75s has no effect as the
connection is closed by TCP timeout. The minimum allowed value
is 5s.
Default value:
NetworkTimeout = 60s
BaseDrlPath =
{path to file}
Path to the used signed file that contains the list of update servers
and is used by the updating component
Default value:
BaseDrlPath = <var_dir>/bases/update.drl
For Linux:
BaseDrlPath = /var/opt/drweb.com/bases/
update.drl
For FreeBSD:
BaseDrlPath = /var/drweb.com/bases/update.drl
For Solaris:
BaseDrlPath = /var/opt/drweb.com/bases/
update.drl
BaseCustomDrlPath =
{path to file}
Path to the used signed file that contains an additional list of
update servers and is used by the updating component
Default value:
BaseCustomDrlPath = <var_dir>/drl/custom.drl
For Linux:
BaseCustomDrlPath = /var/opt/drweb.com/drl/
custom.drl
For FreeBSD:
BaseCustomDrlPath = /var/drweb.com/drl/
custom.drl
For Solaris:
BaseCustomDrlPath = /var/opt/drweb.com/drl/
custom.drl
BaseUpdateEnabled =
{boolean}
Indicator that shows whether or not updating of virus databases is
allowed.
Allowed values:
Yes — updating is allowed and will be performed.
No — updating is not allowed and will not be performed.
Default value:
BaseUpdateEnabled = Yes
VersionDrlPath =
{path to file}
Path to the used signed file that contains the list of update servers
and is used by the updating components of Dr.Web for UNIX
File Servers.
Administrator Manual
96
Solution Components
Default value:
VersionDrlPath =
VersionUpdateEnabled =
{boolean}
Indicator that shows whether or not updating of Dr.Web for
UNIX File Servers components is allowed.
Allowed values:
Yes — updating is allowed and will be performed.
No — updating is not allowed and will not be performed.
Default value:
VersionUpdateEnabled = No
DwsDrlPath =
{path to file}
The parameter is not used.
Default value:
DwsDrlPath = <var_dir>/dws/update.drl
For Linux:
DwsDrlPath = /var/opt/drweb.com/dws/update.drl
For FreeBSD:
DwsDrlPath = /var/drweb.com/dws/update.drl
For Solaris:
DwsDrlPath = /var/opt/drweb.com/dws/update.drl
DwsCustomDrlPath =
{path to file}
The parameter is not used.
Default value:
DwsCustomDrlPath = <var_dir>/dws/custom.drl
For Linux:
DwsCustomDrlPath = /var/opt/drweb.com/dws/
custom.drl
For FreeBSD:
DwsCustomDrlPath = /var/drweb.com/dws/
custom.drl
For Solaris:
DwsCustomDrlPath = /var/opt/drweb.com/dws/
custom.drl
DwsUpdateEnabled =
{boolean}
RunAsUser =
{UID | user name}
The parameter is not used.
Default value:
DwsUpdateEnabled = Yes
Name of the user whose privileged are used for running the
updating component. The user name can be specified as the user's
UID or as the user's login. If the user name consists of numbers, it
is specified with the name: prefix, for example:
RunAsUser = name:123456
If a user name is not specified, the component terminates with an
error after the startup.
Default value:
RunAsUser = drweb
Administrator Manual
97
Solution Components
Dr.Web ES Agent
Central anti-virus protection agent Dr.Web ES Agent is designed for connecting Dr.Web for UNIX
File Servers to the central protection server (for example, to Dr.Web Enterprise Server).
When Dr.Web for UNIX File Servers is connected to the central protection server Dr.Web ES
Agent, the license key file is synchronized according to key files stored on the central protection server.
Moreover, Dr.Web ES Agent sends to the central protection server statistics on virus events, list of the
running components and their status.
Dr.Web ES Agent also updates virus databases of Dr.Web for UNIX File Servers directly from the
connected central protection server bypassing the update component Dr.Web Updater.
Operation Principles
Dr.Web ES Agent establishes connection fileto the central protection server (for example, to Dr.Web
Enterprise Server), which allows the network administrator to implement common security policy
within the network, in particular, configure the same scanning settings and reaction on threat detection
for all network stations and servers. Moreover, the central protection server also performs a role of an
internal update server on the network, as it stores up-to-date virus databases, components (in this
case, updating is performed via Dr.Web ES Agent, Dr.Web Updater component is not used).
When connecting Dr.Web ES Agent to the central protection server, the agent ensures receipt of upto-date settings for program components and license key file, which are then transmitted to
configuration daemon Dr.Web ConfigD for applying them to managed components. Moreover, the
component also receives tasks to scan file system objects on the station (including scheduled tasks).
Please note that the current version of the Dr.Web for UNIX File Servers suite is not fully implements
the central protection mode: central protection server cannot manage operation settings of the product
components and cannot send scan tasks for the suite.
Dr.Web ES Agent collects and sends the server statistics on detected threats and applied actions. The
operation scheme is shown in the picture below.
Picture 40. Component operation scheme
Administrator Manual
98
Solution Components
To connect Dr.Web ES Agent to the central protection server, the password and identifier of the host
are required, as well as the public encryption key file, which is used by the server for authentication.
Instead of the host identifier, you can specify the identifier of the main and tariff groups where the
station is to be included. For required identifiers and public key file, contact the administrator of your
anti-virus network.
Moreover, if this option is allowed on the server, you can connect a file server host as a "newbie". In
this case, after the administrator confirms the request to connect, the central protection server
automatically generates an identifier and a password, and sends them to the Agent for future
connections.
It is possible (but not recommended) to allow the Agent Dr.Web ES Agent to connect to the central
protection server without using a server public key or using an invalid key. For details, refer to the
description of esconnect command of Dr.Web Ctl utility.
Command-Line Arguments
To run a central protection agent Dr.Web ES Agent type the following command in the command line:
$ <opt_dir>/bin/drweb-esagent [options]
Dr.Web ES Agent can process the following options:
Short form
Long form
-h
--help
Arguments
Description: Instructs to output short help information to the console about command-line parameters and exit.
-v
--version
Description: Instructs to output information on the module version and exit
Example:
$ /opt/drweb.com/bin/drweb-esagent --help
This command outputs short help information on the central protection agent Dr.Web ClamD.
Notes about startup
The component cannot be run directly from the command line of the operating system in autonomous
mode. It is run automatically by configuration daemon Dr.Web ConfigD when required (usually on
operating system startup). To connect Dr.Web for UNIX File Servers with the central protection
server, you can use the command-line tool for the solution management Dr.Web Ctl started by
drweb-ctl command).
Configuration Parameters
The component uses configuration parameters which are specified in [ESAgent] section of the
integrated configuration file of Dr.Web for UNIX File Servers.
The section contains the following parameters:
LogLevel =
{logging level}
Logging level for Dr.Web ES Agent.
If the parameter value is not specified, the
DefaultLogLevel from [Root] section is used.
value
of
Default value:
LogLevel = Notice
Administrator Manual
99
Solution Components
Log =
{log type}
Logging method of Dr.Web ES Agent.
ExePath =
{path to file}
Path to the executable of Dr.Web ES Agent.
Default value:
Log = Auto
Default value:
ExePath = <opt_dir>/bin/drweb-esagent
For Linux:
ExePath = /opt/drweb.com/bin/drweb-esagent
For FreeBSD:
ExePath = /usr/local/libexec/drweb.com/bin/
drweb-esagent
For Solaris:
ExePath = /opt/drweb.com/bin/drweb-esagent
DebugIpc =
{boolean}
Indicates whether detailed IPC messages are included in the log
file on debug level (LogLevel = DEBUG) such as such as
interaction between Dr.Web ES Agent and configuration daemon
Dr.Web ConfigD).
Default value:
DebugIpc = no
MobileMode =
{On | Off | Auto}
Indicates whether the suite can operate in mobile mode when
connected to central protection server.
Allowed values:
On — instructs to use mobile mode if it is allowed by central
protection server (that is, perform updates from update servers
of Doctor Web via Dr.Web Updater component).
Off — instructs not to use mobile mode and continue
operation in central protection mode (updates are always
received from the central protection server).
Auto — instructs to use mobile mode, if allowed by central
protection server, and perform updates both from update
servers of Doctor Web via Dr.Web Updater and from
central protection server, depending on which connection is
available and which connection quality is higher.
Note that behavior of this parameter depends on server
permissions: if mobile mode is not allowed on the used server, this
parameter has no effect.
Default value:
MobileMode = Auto
Discovery =
{On | Off}
Indicates whether the agent is allowed to receive discovery queries
from the network inspector built in the central protection server
(discovery requests are used by the inspector to check the
structure and state of the anti-virus network).
Allowed values:
On — allow the agent to receive and process discovery
requests.
Off — forbid the agent to receive and process discovery
requests.
Note that this parameter takes precedence over the settings of the
central protection server: if the parameter value is set to Off, the
agent does not receive discovery requests even if this option is
Administrator Manual
100
Solution Components
enabled on the server.
Default value:
Discovery = On
Administrator Manual
101
Solution Components
Dr.Web HTTPD
Web interface for anti-virus management Dr.Web HTTPD is a web interface for managing Dr.Web for
UNIX File Servers operation without using external web servers (such as httpd Apache) and tools
for remote administration, like Webmin.
For security reasons, interaction with clients is performed via a secure HTTPS protocol (HTTP over SSL).
Thus, OpenSSL must be installed in the system (by default, the component uses version of OpenSSL,
that is included in the distribution kit of Dr.Web for UNIX File Servers).
Operation Principles
Dr.Web HTTPD performs functions of a simplified web server. It does not require additional
installation of a full web servers (such as Apache) as well as a service for administration Webmin.
Moreover, the component can operate on the same host with other servers without interruption to their
operation.
The server of the web interface services requests received via HTTPS at the network interface specified
in the settings, which allows using it regardless of operation of the standard web server interface (if it is
used on the same host). The operation scheme is shown in the picture below.
Picture 41. Component operation scheme
Dr.Web HTTPD forms control instructions for configuration daemon of Dr.Web for UNIX File
Servers, Dr.Web File Checker component and SpIDer Guard for NSS monitor, based on
commands received via the web interface.
For details on how to manage the product via the web interface provided by Dr.Web HTTPD, refer to
the corresponding section.
Administrator Manual
102
Solution Components
Command-Line Arguments
To run the web interface for Anti-virus management Dr.Web HTTPD from the command line, type the
following command:
$ <opt_dir>/bin/drweb-httpd [options]
Dr.Web HTTPD can process the following options:
Short form
Long form
-h
--help
Arguments
Description: instructs to output short help information to the console about command-line parameters and exit.
-v
--version
Description: instructs to output information on the module version and exit.
Example:
$ /opt/drweb.com/bin/drweb-httpd --help
This command outputs short help information on the server of the web interface Dr.Web HTTPD.
Notes about startup
The component cannot be run directly from the command line of the operating system in standalone
mode. It is run automatically by configuration daemon Dr.Web ConfigD when required (usually on
operating system startup). If the component is running, you can enable management of Dr.Web for
UNIX File Servers components by establishing an HTTPS connection to an address listened by the
component using any standard browser.
Moreover, to manage component operation, use the command-line tool for managing the solution from
the command line Dr.Web Ctl (it is run by drweb-ctl command).
Configuration Parameters
The component uses configuration parameters which are specified in [HTTPD] section of the
integrated configuration file of Dr.Web for UNIX File Servers.
The section contains the following parameters:
LogLevel =
{logging level}
Logging level for the server of the management interface Dr.Web
HTTPD.
If the parameter value is not specified, the
DefaultLogLevel from [Root] section is used.
value
of
Default value:
LogLevel = Notice
Log =
{log type}
Logging method for the server of the management interface
Dr.Web HTTPD.
Default value:
Log = Auto
ExePath =
{path to file}
Path to the executable of Dr.Web HTTPD.
Default value:
ExePath = <opt_dir>/bin/drweb-httpd
Administrator Manual
103
Solution Components
For Linux:
ExePath = /opt/drweb.com/bin/drweb-httpd
For FreeBSD:
ExePath = /usr/local/libexec/drweb.com/bin/
drweb-httpd
For Solaris:
ExePath = /opt/drweb.com/bin/drweb-httpd
Start =
{boolean}
Indicates whether it is required to run Dr.Web HTTPD on the
Dr.Web for UNIX File Servers startup.
Default value:
Start = Yes
ListenAddress =
{address}
Socket (IP address and port) listened by Dr.Web HTTPD, which
is waiting for client connections.
Default value:
ListenAddress = 127.0.0.1:4443
ServerSslCertificate =
{path to file}
Path to the file with the server certificate used by the web
interface server for communication with other hosts via HTTPS.
This file is generated automatically during component installation.
Default value:
ServerSslCertificate = <etc_dir>/certs/serv.crt
For Linux:
ServerSslCertificate = /etc/opt/drweb.com/
certs/serv.crt
For FreeBSD:
ServerSslCertificate = /usr/local/etc/
drweb.com/certs/serv.crt
For Solaris:
ServerSslCertificate = /etc/opt/drweb.com/
certs/serv.crt
ServerSslKey =
{path to file}
Path to the private key file used by the server of web interface for
communication with other hosts via HTTPS.
This file is generated automatically during component installation.
Default value:
ServerSslKey = <etc_dir>/certs/serv.key
For Linux:
ServerSslKey = /etc/opt/drweb.com/certs/
serv.key
For FreeBSD:
ServerSslKey = /usr/local/etc/drweb.com/certs/
serv.key
For Solaris:
ServerSslKey = /etc/opt/drweb.com/certs/
serv.key
DhPath =
{path to file}
Path to the file which contains parameters of the Diffie–Hellman
key exchange method. These parameters are used by the
managing web interface for communication with clients via HTTPS.
This file is generated automatically during component installation.
Default value:
DhPath = <etc_dir>/certs/dh.pem
Administrator Manual
104
Solution Components
For Linux:
DhPath = /etc/opt/drweb.com/certs/dh.pem
For FreeBSD:
DhPath = /usr/local/etc/drweb.com/certs/dh.pem
For Solaris:
DhPath = /etc/opt/drweb.com/certs/dh.pem
DocumentRoot =
{path to directory}
Path to the directory which stores static website content used by
the server of the managing web interface (root directory, same as
htdocs directory for httpd).
Default value:
DocumentRoot = <opt_dir>/share/drweb-httpd/www
For Linux:
DocumentRoot = /opt/drweb.com/share/drwebhttpd/www
For FreeBSD:
DocumentRoot = /usr/local/libexec/drweb.com/
share/drweb-httpd/www
For Solaris:
DocumentRoot = /opt/drweb.com/share/drwebhttpd/www
AppRoot =
{path to directory}
Path to directory with working files of the web interface managing
server.
Default value:
AppRoot = <opt_dir>/share/drweb-httpd
For Linux:
AppRoot = /opt/drweb.com/share/drweb-httpd
For FreeBSD:
AppRoot = /usr/local/libexec/drweb.com/share/
drweb-httpd
For Solaris:
AppRoot = /opt/drweb.com/share/drweb-httpd
AccessLogPath =
{path to file}
Path to the file where all HTTP requests from client to the web
interface server are registered.
If not specified, HTTP requests are not registered.
Default value:
AccessLogPath =
Administrator Manual
105
Solution Components
Managing Product Operation via Web Interface
Managing web interface Dr.Web for UNIX File Servers allows you to perform the following:
1. View statuses of Dr.Web for UNIX File Servers components (for example, SpIDer Guard for
SMB monitor), as well as start and stop their operation.
2. View status of updates and start an updating process manually, if required.
3. View the list of detected threats and manage quarantined objects (via Dr.Web File Checker
component).
4. Edit settings of Dr.Web for UNIX File Servers.
Web Interface System Requirements
Correct operation of the web interface is guaranteed for the following web browsers:
Internet Explorer (version 8 and above)
Mozilla Firefox (version 25 and above)
Google Chrome (version 30 and above).
Accessing the Web Interface
To access the web interface, type an address of the following type in the browser address bar
https://<host_with_drweb>:<port>/
where <host_with_drweb> is the IP address or the name of the host where the product including
Dr.Web HTTPD and <port> is the port in this host listened by Dr.Web HTTPD. To access a product
component which operates on the local host, use IP address 127.0.0.1 or the name localhost. By
default, the <port> is 4443.
Thus, to access the web interface on the local host by default, enter in the browser address bar the
following URL
https://127.0.0.1:4443/
After a connection to the managing server is established, the startup page opens and displays an
authentication form. To access management functions, fill in the authentication form by specifying the
login and password of a user who has administrative privileges on the host where the suite operates.
Main menu
At the top of the web interface pages, you can find the main menu that provides you with the following
options:
Main — opens the main page which displays the full list of Dr.Web for UNIX File Servers and
their status.
Threats — opens the page which displays all detected threats. In this section, you can manage
detected threats (for example, move infected objects to quarantine, rescan the system, cure or
delete malicious objects).
Settings — opens a page with Dr.Web for UNIX File Servers component settings installed on the
server.
Help — opens a new browser tab with help information on the installed product components.
Sign out — ends the current web interface session.
Administrator Manual
106
Solution Components
Component Management
You can view a list of components included in Dr.Web for UNIX File Servers and manage their
operations on the Main page.
Listed product components can be divided into two groups: main components, which monitor threats,
and service components, which provide correct operation of the suite.
The table below contains description of the components that monitor the file system (the component
set depends on the solution type that you use). For each component, the following information is
included:
1. Component name. Click the name to open the component settings page.
2. Component state. State of the component is illustrated by an icon (switch) and a note on the
current component's state. To start or suspend component operation, click the switch. If an
operation error occurs, click Error to open a window with detailed information. The component state
can be indicated with one of the following icons:
— the component is disabled and is not used.
— the component is enabled and works correctly.
— the component is enabled but is not working due to an error.
3. Average load. For each component, the average numbers of files processed per second within the
last minute, 5 minutes, 15 minutes are specified (in a format of three numbers separated by a
forward slash "/").
To display a tooltip, place the cursor over the icon
.
Below the table, which provides information on monitoring components, you may find a list of service
components (such as the scanning engine, the file scanning component, etc.). For each service
component, its state and operational statistics. To open the component settings page, click the name of
a required component.
The bottom of the page displays whether the virus database is up to date and license information. To
force a virus database update, click Update. To renew your license, click Upload (you will be
prompted to upload a valid key file).
Threats Management
You can view the list of detected threats and manage the reaction to them on the Threats page.
This page contains a full list of threats detected by Dr.Web for UNIX File Servers components. On
the left, you can see a menu which allows filtering the threats by category:
All — show all detected threats (including both active and quarantined threats).
Active — show only active threats; that is, detected but yet to be neutralized.
Blocked — show all blocked threats (that is, threats that were not neutralized but the infected
objects containing them were blocked (only for file storages monitored by SpIDer Guard for
SMB).
Quarantined — show threats that were isolated in quarantine.
Errors — show threats that were not processed due to an error.
On the right side of the category, the menu displays a number of detected threats that fall into this
category. Active threats are indicated in bold on the menu. To display threats of a required category,
click its name on the menu.
Administrator Manual
107
Solution Components
For each threat, the following information is listed:
File — name of the file that contains a malicious object (file path is not specified).
Ow ner — name of the user who owns the infected file.
Component — name of the Dr.Web for UNIX File Servers component that detected the threat.
Threat — name of the threat that was detected in the file (as defined in the classification of Doctor
Web).
For an object selected in the list, the following information is displayed:
Name of the threat (displayed as a link that opens the page of Dr.Web virus library with the threat
description).
File size, in bytes.
Name of the component that detected the threat.
Date and time when the threat was detected.
Date and time when the threat was last modified.
Name of the user who owns the infected file.
Name of the group that includes the file owner.
Name of the user who quarantined the file (only for file storages monitored by SpIDer Guard for
SMB).
File identified in quarantine (if the file was quarantined).
Full path that points to the original file location (where the file was located at the moment of threat
detection).
To select an object in the list, click the corresponding list item. For multiple selection, click the boxes in
the corresponding strings. To select all objects or cancel the selection, click the box in the File field in
the threat list header.
To apply actions to objects selected in the list, click the corresponding button on the toolbar, which is
located directly above the threat list. The toolbar contains the following buttons (note that some of
them can be unavailable depending on the type of selected threats):
— instructs to cure selected files.
— instructs to quarantine selected files.
— instructs to restore selected files from quarantine to their original location.
— instructs to remove selected files.
— instructs to apply an additional action to selected files (available actions are
specified in the drop-down list):
Ignore — instructs to ignore the threats detected in selected files and
remove the threats from the list.
Download — instructs to save the files on the local computer.
Administrator Manual
108
Solution Components
Note that managing of threats detected on NSS volumes requires SpIDer Guard for NSS to be started.
If Quarantine action is specified for some threat type in SpIDer Guard for NSS settings, the object
containing a threat of this type will be placed to quarantine again on attempt to restore this object from
quarantine to an NSS volume. For example, the default settings of the monitor move all incurable objects
to quarantine. At that, when any incurable object is restored from quarantine to an NSS volume, this
object is automatically returned to quarantine.
You can also filter displayed threats based on the search query. To filter unnecessary threats out and
display only those that correspond to the query, use the search box. The box is displayed on the right
side of the toolbar and is marked with
. To filter the threat list, enter a word in the search box. All
threats that do not have the entered word in their name or description, will be hidden (the case of the
text has no effect). To clear search results and display the unfiltered list, click
delete the word.
in the search box and
Settings management
You can view and change current configuration parameters of components, included in Dr.Web for
UNIX File Servers and listed on the main page. For that, open the Settings page.
On the left of the page, the menu is displayed, which contains names of all suite components allowing
adjustment of their settings. To view and adjust the settings of a component, click its name on the
menu. The name of the currently viewed component is highlighted in bold.
If a component has sections with advanced settings apart from the section with main settings (for
example, such sections are present in the configuration of ClamAV® interface module Dr.Web ClamD
and contain individual parameters for scanning clients that use a particular connection address), then
an icon indicating that you can expand/collapse additional sections is displayed. If the icon is as follows
, additional sections are hidden. If the icon is as follows , additional sections are displayed on the
menu, one per line. To expand/collapse the list of additional sections, click the appropriate icon next to
the name of the required component.
Additional sections are marked with
name on the menu.
. To view or edit parameters of an additional section, click its
To add a new subsection for a component, if allowed, click
to the right of the component's name.
In the appeared window, specify a unique name (tag) for the new subsection and click OK. To close
the window without creating a subsection, click Cancel.
To delete a subsection for a component, if allowed, click
to the right of the subsection's name
(tag). In the appeared window, confirm that you want to delete the subsection and click OK. To
close the window without deleting a section, click No.
On the top of the settings page, you can see the menu that allows to change the view mode. The
following modes are available:
All — show the table with all component configuration parameters that can be viewed and adjusted.
Modified — show the table with component configuration parameters that have values different
from the default ones.
Ini Editor — show a text editor with component configuration parameters that have values
different from the default ones. The displayed text has the same format as the configuration file
(parameter = value pairs).
You can also filter displayed parameters based on the search query. To filter unnecessary parameters
out and display only those that correspond to the query, use the search box. The box is displayed on
the right side of the menu and is marked with
. To filter the parameter list, enter a word in the
Administrator Manual
109
Solution Components
search box. All parameters that do not have the entered word in their description, will be hidden (the
case of the text has no effect). To clear the search results and display the unfiltered list, click
search box and delete the word.
in the
Parameters can be filtered out only when they are displayed in tabular form (in All and Modified
modes).
Viewing and editing component settings in tabular form
When viewing parameters in tabular form (All and Modified modes), each table row contains the
parameter description (on the left) and the current value (on the right). For Boolean parameters (those
that have only two available values: "Yes" and "No"), the indicator is displayed as a value (on-position
means "Yes", off-position — "No").
When you select to view all parameters (not only those that were changed), the adjusted values are
indicated in bold.
The complete parameter list is split into groups (such as Main, Advanced, etc.). To collapse or expand
the group, click the corresponding head. When a group is collapsed and its parameters are not
displayed in the table, the following icon appears on the left of the group name . When a group is
expanded and the parameters are displayed in the table, the following icon appears on the left of the
group name .
To adjust a parameter, click its current value in the table (for a Boolean parameter — change the
indicator's position). If a parameter has a set of predefined values, they will all appear as a drop-down
list after you click the current value. If a parameter has a numeric value, an edit box will appear after
you click the current value. Specify a required value and press ENTER. The picture below shows
examples of how to change parameter values (note that the component set in the picture can differ
from the one supplied to you). All changes in parameter values are applied immediately.
Administrator Manual
110
Solution Components
Picture 42. Component settings in tabular form.
If a parameter has a string value or it has no predefined values, a pop-up window appears after click
the current value. If the parameter has a list of values, they are shown in a multiline edit box (one
value per line) as shown in the picture below. To edit the listed values, change, delete or add required
lines in the edit box.
Picture43. Value list editing
After you adjusted a parameter value, click Save to apply the changes and close the window or click
Cancel to close the window without applying or saving the changes.
Viewing and editing component settings in a text editor
When viewing parameters in Ini Editor mode, they are displayed of the configuration file format (as
parameter = value pairs), where parameter is the parameter name specified directly in the
Administrator Manual
111
Solution Components
component settings section of the configuration file. In this mode, only those parameters are displayed
that have values different from the default ones (that is, parameters which values are indicated in bold
in the All table). The picture below shows how parameters are displayed in a text editor.
Picture 44. Simple text editor
To make required changes, edit the text in a text editor according to the rules of how to edit a
configuration file (edit only the section which contains settings of the component highlighted on the
left). When necessary, you can specify any parameter available for the component. In this case, the
default parameter values changes to the value you enter in the editor.
After you adjusted a parameter value, click Save to apply the changes or click Cancel to discard them.
If you click Save, the text is validated: the program checks whether all parameters are existent and valid.
In case of an error, the appropriate message is displayed.
For details on the configuration file, its structure, and features important for specifying parameter values,
refer to Appendix D.
Additional Information
Configuration parameters of SpIDer Guard.
Configuration parameters of SpIDer Guard for NSS.
Configuration parameters of SpIDer Guard for SMB.
Configuration parameters of Dr.Web ClamD.
Configuration parameters of Dr.Web File Checker.
Configuration parameters of Dr.Web Scanning Engine.
Configuration parameters of Dr.Web Network Checker.
Configuration parameters of Dr.Web SNMPD.
Administrator Manual
112
Solution Components
Dr.Web Ctl
You can manage operation of Dr.Web for UNIX File Servers from the command line with the help of
a special command-line tool — Dr.Web Ctl (drweb-ctl).
You can do the following actions from the command line:
Start scanning file system objects including boot records and files of running processes
Start updating virus databases
View and change parameters of Dr.Web for UNIX File Servers configuration
View status of Dr.Web for UNIX File Servers components and statistics on detected threats
View quarantine and manage quarantined objects (via Dr.Web File Checker component)
Connect to the central protection server or disconnect from it
User commands for Anti-virus management can have an effect only if Dr.Web ConfigD
configuration daemon is running (by default, it is automatically run on system startup).
Note that some control commands require superuser privileges.
To elevate privileges, use the su command (change the current user) or the sudo command (execute the
specified command with other user privileges).
The Dr.Web Ctl tool supports auto-completion of commands for managing Anti-virus operation if this
option is enabled in the used command shell. If the command shell does not allow auto-completion, you
can configure this option. For that purpose, refer to the instruction manual for the used OS distribution.
Command-Line Call Format
1. Format of the utility call
The call format for the command-line tool which manages Dr.Web for UNIX File Servers operation is
as follows:
$ drweb-ctl [<general options> | <command> [<argument>] [<command options>]]
where:
<general options> — options that can be applied on startup when the command is not
specified or can be applied for any command. Not mandatory for startup.
<command> — command to be performed by Dr.Web for UNIX File Servers (for example, start
scanning, output the list of quarantined objects).
<argument> — command argument. Depends on the specified command. Can be missing for
certain commands.
<command options> — options managing command operation. Can be missing for certain
commands.
2. General options
The following general options are available:
Option
Description
-h,
--help
Show summary help information and exit.
For information on a certain command, enter the following:
Administrator Manual
113
Solution Components
Option
Description
drweb-ctl -h <command> or drweb-ctl <command> -h
-v,
--version
Show information on the module version and exit
-d,
--debug
Instructs to show debug information upon execution of the specified command.
Has no effect if a command is not specified. To invoke a command, enter the following:
drweb-ctl -d <command>
3. Commands
Commands to manage Dr.Web for UNIX File Servers can be divided into the following groups:
Anti-virus scanning commands
Commands to manage updates and operation in Central protection mode
Configuration management commands
Commands to manage detected threats and quarantine
Information commands
3.1. Anti-virus scanning commands
The following commands to manage anti-virus scanning are available:
Command
Description
scan <path>
Function
Start checking the specified file or directory via Dr.Web File Checker component.
Arguments
<path> — path to the file or directory which is selected to be scanned.
This argument can be missing if the --stdin or --stdin0 option is specified.
To specify several files that satisfy a certain criterion, use the find utility (see the
examples) and the --stdin or --stdin0 options.
Options
-a [--Autonomous] — Start a separate instance of Dr.Web Scanning Engine
scanning engine and file checking module Dr.Web File Checker for scan and
terminate their operation after the scanning task completes. Note that threats
detected during autonomous scanning are not displayed in the common threat list
that is output by threats command (see below).
--stdin — Get list of paths to scan from the standard input string (stdin).
Paths in the list must be separated by the new line character ('\n').
--stdin0 — Get list of paths to scan from the standard input string (stdin).
Paths in the list must be separated by the NUL character ('\0').
Note that templates are not allowed when specifying paths for either of these
options.
Recommended usage of the --stdin and --stdin0 options is processing a path
list (generated by an external utility, for example, find) in the scan command (see
examples).
--Report <BRIEF|DEBUG> — specify the type of scanning results reports.
Allowed values:
BRIEF — brief report.
DEBUG — detailed report.
Default value: BRIEF
Administrator Manual
114
Solution Components
Command
Description
--ScanTimeout <number> — specify timeout to scan one file, in ms.
If the value is set to 0, time to scan a file is not limited.
Default value: 0
--PackerMaxLevel <number> — set the maximum nesting level when scanning
packed objects.
If the value is set to 0, nested objects are skipped during scanning.
Default value: 8
--ArchiveMaxLevel <number> — set the maximum level of nesting when
scanning archives (zip, rar, etc.).
If the value is set to 0, nested objects are skipped during scanning.
Default value: 8
--MailMaxLevel <number> — set the maximum level of nesting when scanning
email messages (pst, tbb, etc.).
If the value is set to 0, nested objects are skipped during scanning.
Default value: 8
--ContainerMaxLevel <number> — set the maximum level of nesting when
scanning containers of other types (HTML and others).
If the value is set to 0, nested objects are skipped during scanning.
Default values: 8
--MaxCompressionRatio <ratio> — set the maximum compression ratio for
scanned objects.
The ratio must be at least equal to 2.
Default value: 3000
--HeuristicAnalysis <On|Off> — enable or disable heuristics analysis.
Default value: On
--OnKnownVirus <action> — action applied to a threat detected using signature
analysis.
REPORT, CURE, QUARANTINE, DELETE.
Default value: REPORT
--OnIncurable <action> — action applied on failure to cure a detected threat
or if a threat is incurable.
Allowed values: REPORT, QUARANTINE, DELETE.
Default value: REPORT
--OnSuspicious <action> — action applied to a threat detected using heuristics
analysis.
Allowed values: REPORT, QUARANTINE, DELETE.
Default value: REPORT
--OnAdware <action> — action applied to adware.
Allowed values: REPORT, QUARANTINE, DELETE.
Default value: REPORT
--OnDialers <action> — action applied to dialers.
Allowed values: REPORT, QUARANTINE, DELETE.
Default value: REPORT
--OnJokes <action> — action applied to joke programs.
Administrator Manual
115
Solution Components
Command
Description
Allowed values: REPORT, QUARANTINE, DELETE.
Default value: REPORT
--OnRiskware <action> — action applied to potentially dangerous programs
(riskware).
Allowed values: REPORT, QUARANTINE, DELETE.
Default value: REPORT
--OnHacktools <action> — action applied to hacktools.
Allowed values: REPORT, QUARANTINE, DELETE.
Default values: REPORT
bootscan
Function
<disk drive> | ALL Start checking boot records on the specified disks via Dr.Web File Checker
component. Both MBR and VBR records are scanned.
Arguments
<disk drive> — path to a block file of the disk device, which boot record is to be
scanned.
If you specify ALL, all boot records of all available disks are scanned.
Mandatory argument.
Options
a [--Autonomous] — start a separate instance of Dr.Web Scanning Engine
scanning engine and file checking module Dr.Web File Checker for scanning and
terminate their operation after the scanning task completes. Note that threats
detected during autonomous scanning are not displayed in the common threat list
that is output by threats command (see below).
--Report <BRIEF|DEBUG> — specify the type of scanning results reports.
Allowed values:
BRIEF — brief report.
DEBUG — detailed report.
Default value: BRIEF
--ScanTimeout <number> — specify timeout to scan one file, in ms.
If the value is set to 0, time to scan one file is not limited.
Default value: 0
--HeuristicAnalysis <On|Off> — enable or disable heuristics analysis.
Default value: On
--Cure <Yes|No> — enable or disable attempts to cure detected threats.
If the value is set to no, only notification is output.
Default value: No
--ShellTrace — enable output of additional debug information when scanning a
boot record.
procscan
Function
Start checking executable files containing code of currently running processes via
Dr.Web File Checker component. If a malicious executable file is detected, it is
neutralized and all processes run by this file are forced to terminate.
Arguments
No.
Options
Administrator Manual
116
Solution Components
Command
Description
a [--Autonomous] — start a separate instance of Dr.Web Scanning Engine
scanning engine and file checking module Dr.Web File Checker for scanning and
terminate their operation after the scanning task completes. Note that threats
detected during autonomous scanning are not displayed in the common threat list
that is output by threats command (see below).
--Report <BRIEF|DEBUG> — specify the type of scanning results reports.
Allowed values:
BRIEF — brief report.
DEBUG — detailed report.
Default value: BRIEF
--ScanTimeout <number> — specify timeout to scan one file, in ms.
If the value is set to 0, time to scan one file is not limited.
Default value: 0
--HeuristicAnalysis <On|Off> — enable or disable heuristics analysis.
Default value: On
--PackerMaxLevel <number> — set the maximum nesting level when scanning
packed objects.
If the value is set to 0, nested objects are skipped during scanning.
Default value: 8
--OnKnownVirus <action> — action applied to a threat detected using signature
analysis.
REPORT, CURE, QUARANTINE, DELETE.
Default value: REPORT
--OnIncurable <action> — action applied on failure to cure a detected threat
or if a threat is incurable.
Allowed values: REPORT, QUARANTINE, DELETE.
Default value: REPORT
--OnSuspicious <action> — action applied to a threat detected using heuristics
analysis.
Allowed values: REPORT, QUARANTINE, DELETE.
Default value: REPORT
--OnAdware <action> — action applied to adware.
Allowed values: REPORT, QUARANTINE, DELETE.
Default value: REPORT
--OnDialers <action> — action applied to dialers.
Allowed values: REPORT, QUARANTINE, DELETE.
Default value: REPORT
--OnJokes <action> — action applied to joke programs.
Allowed values: REPORT, QUARANTINE, DELETE.
Default value: REPORT
--OnRiskware <action> — action applied to potentially dangerous programs
(riskware).
Allowed values: REPORT, QUARANTINE, DELETE.
Default value: REPORT
Administrator Manual
117
Solution Components
Command
Description
--OnHacktools <action> — action applied to hacktools.
Allowed values: REPORT, QUARANTINE, DELETE.
Default value: REPORT
Note that if a threat is detected in an executable file, Dr.Web for UNIX File
Servers terminates all processes started from the file.
netscan <path>
Function
Start
distributed
scanning
of
the
specified
file
or
folder
(via
agent for distributed scanning Dr.Web Network Checker). If connections to other
hosts with Dr.Web Anti-virus Solution are not found, a local scanning is
performed (similar to scan command).
Arguments
<path> — path to the file or directory which is selected to be scanned.
Options
--Report <BRIEF|DEBUG> — specify the type of scanning results reports.
Allowed values:
BRIEF — brief report.
DEBUG — detailed report.
Default value: BRIEF
--ScanTimeout <number> — specify timeout to scan one file, in ms.
If the value is set to 0, time to scan one file is not limited.
Default value: 0
--HeuristicAnalysis <On|Off> — enable or disable heuristics analysis.
Default value: On
--PackerMaxLevel <number> — set the maximum nesting level when scanning
packed objects.
If the value is set to 0, nested objects are skipped during scanning.
Default value: 8
--ArchiveMaxLevel <number> — set the maximum level of nesting when
scanning archives (zip, rar, etc.).
If the value is set to 0, nested objects are skipped during scanning.
Default value: 8
--MailMaxLevel <number> — set the maximum level of nesting when scanning
email messages (pst, tbb, etc.).
If the value is set to 0, nested objects are skipped during scanning.
Default value: 8
--ContainerMaxLevel <number> — set the maximum level of nesting when
scanning containers of other types (HTML and others).
If the value is set to 0, nested objects are skipped during scanning.
Default values: 8
--MaxCompressionRatio <ratio> — set the maximum compression ratio for
scanned objects.
The ratio must be at least equal to 2.
Default value: 3000
--Cure <Yes|No> — enable or disable attempts to cure detected threats.
If the value is set to no, only notification is output.
Administrator Manual
118
Solution Components
Command
Description
Default value: No
flowscan <path>
Function
Start scanning the specified file or directory via Dr.Web File Checker component
using "flow" method (used by SpIDer Guard monitor).
For scanning on demand it is recommended to use the scan command.
Arguments
<path>—path to the file or directory which is selected to be scanned.
Options
--ScanTimeout <number> — specify timeout to scan one file, in ms.
If the value is set to 0, time to scan one file is not limited.
Default value: 0
--HeuristicAnalysis <On|Off> — enable or disable heuristics analysis.
Default value: On
--PackerMaxLevel <number> — set the maximum nesting level when scanning
packed objects.
If the value is set to 0, nested objects are skipped during scanning.
Default value: 8
--ArchiveMaxLevel <number> — set the maximum level of nesting when
scanning archives (zip, rar, etc.).
If the value is set to 0, nested objects are skipped during scanning.
Default value: 8
--MailMaxLevel <number> — set the maximum level of nesting when scanning
email messages (pst, tbb, etc.).
If the value is set to 0, nested objects are skipped during scanning.
Default value: 8
--ContainerMaxLevel <number> — set the maximum level of nesting when
scanning containers of other types (HTML and others).
If the value is set to 0, nested objects are skipped during scanning.
Default values: 8
--MaxCompressionRatio <ratio> — set the maximum compression ratio for
scanned objects.
The ratio must be at least equal to 2.
Default value: 3000
--OnKnownVirus <action> — action applied to a threat detected using signature
analysis.
REPORT, CURE, QUARANTINE, DELETE.
Default value: REPORT
--OnIncurable <action> — action applied on failure to cure a detected threat
or if a threat is incurable.
Allowed values: REPORT, QUARANTINE, DELETE.
Default value: REPORT
--OnSuspicious <action> — action applied to a threat detected using heuristics
analysis.
Allowed values: REPORT, QUARANTINE, DELETE.
Default value: REPORT
Administrator Manual
119
Solution Components
Command
Description
--OnAdware <action> — action applied to adware.
Allowed values: REPORT, QUARANTINE, DELETE.
Default value: REPORT
--OnDialers <action> — action applied to dialers.
Allowed values: REPORT, QUARANTINE, DELETE.
Default value: REPORT
--OnJokes <action> — action applied to joke programs.
Allowed values: REPORT, QUARANTINE, DELETE.
Default value: REPORT
--OnRiskware <action> — action applied to potentially dangerous programs
(riskware).
Allowed values: REPORT, QUARANTINE, DELETE.
Default value: REPORT
--OnHacktools <action> — action applied to hacktools.
Allowed values: REPORT, QUARANTINE, DELETE.
Default value: REPORT
proxyscan <path>
Function
Start scanning the specified file or directory via Dr.Web File Checker component
using "proxy" method (used by SpIDer Guard for SMB monitor and Dr.Web
ClamD component). Note that threats detected during this scanning method are not
added to the general list of detected threats output by threats command (see
below).
For scanning on demand it is recommended to use the scan command.
Arguments
<path> — path to the file or directory which is selected to be scanned.
Options
--Report <BRIEF|DEBUG> — specify the type of scanning results reports.
Allowed values:
BRIEF — brief report.
DEBUG — detailed report.
Default value: BRIEF
--ScanTimeout <number> — specify timeout to scan one file, in ms.
If the value is set to 0, time to scan one file is not limited.
Default value: 0
--HeuristicAnalysis <On|Off> — enable or disable heuristics analysis.
Default value: On
--PackerMaxLevel <number> — set the maximum nesting level when scanning
packed objects.
If the value is set to 0, nested objects are skipped during scanning.
Default value: 8
--ArchiveMaxLevel <number> — set the maximum level of nesting when
scanning archives (zip, rar, etc.).
If the value is set to 0, nested objects are skipped during scanning.
Default value: 8
Administrator Manual
120
Solution Components
Command
Description
--MailMaxLevel <number> — set the maximum level of nesting when scanning
email messages (pst, tbb, etc.).
If the value is set to 0, nested objects are skipped during scanning.
Default value: 8
--ContainerMaxLevel <number> — set the maximum level of nesting when
scanning containers of other types (HTML and others).
If the value is set to 0, nested objects are skipped during scanning.
Default values: 8
--MaxCompressionRatio <ratio> — set the maximum compression ratio for
scanned objects.
The ratio must be at least equal to 2.
Default value: 3000
rawscan <path>
Function
Start "raw" scanning of the specified file or directory using scanning engine Dr.Web
Scanning Engine directly without use of the component for checking files Dr.Web
File Checker. Note that threats detected during "raw" scanning are not added to
the general list of detected threats output by threats command (see below).
For scanning on demand it is recommended to use the scan command.
Arguments
<path> — path to the file or directory which is selected to be scanned.
Options
--ScanEngine <path> — path to UNIX socket of the scanning engine Dr.Web
Scanning Engine. If not specified, an autonomous instance of scanning engine is
started (it is shut down after scanning completes).
--Report <BRIEF|DEBUG> — specify the type of scanning results reports.
Allowed values:
BRIEF—brief report.
DEBUG—detailed report.
Default value: BRIEF
--ScanTimeout <number> — specify timeout to scan one file, in ms.
If the value is set to 0, time to scan one file is not limited.
Default value: 0
--PackerMaxLevel <number> — set the maximum nesting level when scanning
packed objects.
If the value is set to 0, nested objects are skipped during scanning.
Default value: 8
--ArchiveMaxLevel <number> — set the maximum level of nesting when
scanning archives (zip, rar, etc.).
If the value is set to 0, nested objects are skipped during scanning.
Default value: 8
--MailMaxLevel <number> — set the maximum level of nesting when scanning
email messages (pst, tbb, etc.).
If the value is set to 0, nested objects are skipped during scanning.
Default value: 8
--ContainerMaxLevel <number> — set the maximum level of nesting when
scanning containers of other types (HTML and others).
Administrator Manual
121
Solution Components
Command
Description
If the value is set to 0, nested objects are skipped during scanning.
Default values: 8
--MaxCompressionRatio <ratio> — set the maximum compression ratio for
scanned objects.
The ratio must be at least equal to 2.
Default value: 3000
--HeuristicAnalysis <On|Off> — enable or disable heuristics analysis.
Default value: On
--Cure <Yes|No> — enable or disable attempts to cure detected threats.
If the value is set to no, only notification is output.
Default value: No
--ShellTrace — enable output of additional debug information when scanning a
boot record.
cloudscan <path>
Function
Start scanning of the specified file or directory using information on threats from
Dr.Web Cloud service.
Not implemented. For scanning on demand use the scan command.
Arguments
<path> — path to the file or directory which is selected to be scanned.
Options
--Report <BRIEF|DEBUG> — specify the type of scanning results reports.
Allowed values:
BRIEF — brief report.
DEBUG — detailed report.
Default value: BRIEF
--ScanTimeout <number> — specify timeout to scan one file, in ms.
If the value is set to 0, time to scan one file is not limited.
Default value: 0
--PackerMaxLevel <number> — set the maximum nesting level when scanning
packed objects.
If the value is set to 0, nested objects are skipped during scanning.
Default value: 8
--ArchiveMaxLevel <number> — set the maximum level of nesting when
scanning archives (zip, rar, etc.).
If the value is set to 0, nested objects are skipped during scanning.
Default value: 8
--MailMaxLevel <number> — set the maximum level of nesting when scanning
email messages (pst, tbb, etc.).
If the value is set to 0, nested objects are skipped during scanning.
Default value: 8
--ContainerMaxLevel <number> — set the maximum level of nesting when
scanning containers of other types (HTML and others).
If the value is set to 0, nested objects are skipped during scanning.
Default values: 8
Administrator Manual
122
Solution Components
Command
Description
--MaxCompressionRatio <ratio> — set the maximum compression ratio for
scanned objects.
The ratio must be at least equal to 2.
Default value: 3000
--HeuristicAnalysis <On|Off> — enable or disable heuristic analysis.
Default value: On
--Cure <Yes|No> — enable or disable attempts to cure detected threats.
If the value is set to No, only notification is output.
Default value: No
--ShellTrace — enable output of additional debug information when scanning a
boot record.
3.2. Commands to manage updates and operation in Central protection mode
The following commands for managing updates and operation in Central protection mode are available:
Command
Description
update
Function
Instruct the updating component to download and install updates to virus databases and
components from Doctor Web update servers or terminate an updating process if
running.
The command has no effect if Dr.Web for UNIX File Servers is connected to the
central protection server.
Arguments
No.
Options
--Stop — terminate the currently performed updating process.
esconnect
<server>[:port]
Function
Connect Dr.Web for UNIX File Servers to the specified central protection server (for
example, Dr.Web Enterprise Server). For details, refer to the Operation Modes.
Arguments
<server> — IP address or network name of the host on which the central protection
server is operating. The argument is mandatory.
<port> — name of the port used by the central protection server. The argument is
optional. Specify the argument only if the central protection server uses a nonstandard port.
Options
--Key <path> — path to the public key file of the central protection server to which
Dr.Web for UNIX File Servers is connected.
--Login <ID> — login (workstation identifier) used for connection to the central
protection server.
--Password <password> — password for connection to the central protection server.
--Group <ID> — identifier of the group to which the workstation is added on
connection.
--Rate <ID> — identifier of the tariff group applied to a workstation when it is
included in one of the central protection server groups (can be specified only together
with the --Group option).
Administrator Manual
123
Solution Components
Command
Description
--Compress <On|Off> — enables (On) or disables (Off) force compression of
transmitted data. When not specified, usage of compression is determined by server.
--Encrypt <On|Off> — enables (On) or disables (Off) force encryption of
transmitted data. When not specified, usage of encryption is determined by server.
--Newbie — connect as a "newbie" (get a new account on the server).
--WithoutKey — allows connection to the server without using the public key.
--WrongKey — allows connection to the server even if the specified public key is
wrong.
The --Key and --WithoutKey options are mutually exclusive. One of these options
must be specified in the command.
Note that this command requires drweb-ctl to be started with superuser privileges.
esdisconnect
Function
Disconnect Dr.Web for UNIX File Servers from the central protection server and
switch its operation to standalone mode.
The command has no effect if Dr.Web for UNIX File Servers is in standalone mode.
Arguments
No.
Options
No.
Note that this command requires drweb-ctl to be started with superuser privileges.
3.3. Configuration management commands
The following commands to manage configuration are available:
Command
Description
cfset
<section>.<parameter>
<value>
Function
Change the active value of the specified parameter in the current
configuration.
Note that an equal sign is not allowed.
Arguments
<section> — name of the configuration file where the parameter
resides. The argument is mandatory.
<parameter> — name of the parameter. The argument is mandatory.
<value> — new value that is to be assigned to the parameter. The
argument is mandatory.
The following format is used to
<section>.<parameter> <value>
specify
the
parameter
value
For description of the configuration file, refer to the Appendix D, or to the
man documentation drweb.ini(5).
Options
-a [--Add] — do not substitute the current parameter value but add the
specified value to the list (allowed only for parameters that can have several
values, specified as a list).
-e [--Erase] — do not substitute the current parameter value but remove
the specified value from the list (allowed only for parameters that can have
several values, specified as a list).
-r [--Reset] — reset the parameter value to the default. At that,
<value> is not required in the command and is ignored if specified.
Administrator Manual
124
Solution Components
Command
Description
Options are not mandatory. If they are not specified, the current parameter
value (or the list of ones if several values are specified) are substituted with
the specified value.
For the -r option, a special syntax to invoke the cfset command is used:
cfset <section>.* -r
In this case, all parameters of the specified section are reset to defaults.
If you specify -r option for sections containing individual parameters of
Dr.Web ClamD component connection points and for shared directories for
SpIDer Guard for SMB monitor, the parameter value in the individual
section will be changed to the value of its "parent" parameter having the
same name in the general component settings section.
If it is necessary to add a new section containing individual parameters for a
connection point <point> of Dr.Web ClamD or for a Samba
shared directory with the <tag>, use the following command:
cfset
ClamD.Endpoint.<point>.<parameter>
<value>,
for
example:
cfset
ClamD.Endpoint.Point1.ClamdSocket
127.0.0.1:3344
cfset
SmbSpider.Share.<tag>.<parameter>
<value>,
for
example:
cfset
SmbSpider.Share.DepartFiles.OnAdware
Quarantine
Note that cfset command requires drweb-ctl to be started with superuser
privileges.
cfshow
[<section>[.<parameter>
]
Function
Output parameters of the current configuration.
The command to output parameters is specified as follows
<section>.<parameter> = <value>. Sections and parameters of noninstalled components are not output.
Arguments
<section> — name of the configuration file section, which parameters
are to be output. The argument is optional. If not specified, parameters of
all configuration file sections are output.
<parameters> — name of the output parameter. The argument is
optional. If not specified, all parameters of the section are output.
Otherwise, only this parameter is output. If a parameter is specified
without the section name, all parameters with this name from all of the
configuration file sections are output.
Options
--Uncut — output all configuration parameters (not only those used with
the currently installed set of components). If the option is not specified, only
parameters used for configuration of the installed components are output.
--Ini — output parameter values in the INI file format: at first, the section
name is specified in square brackets, then the section parameters listed as
<parameter> = <value> pairs (one pair per line).
3.4. Commands to manage detected threats and quarantine
The following commands for managing threats and quarantine are available:
Command
Description
threats
[<command> <object>]
Function
Apply the specified action to detected threats by their identifiers. Type of the
action is configured with the specified command option.
Administrator Manual
125
Solution Components
Command
Description
If the action is not specified, output information on detected but not neutralized
threats.
Arguments
No.
Options
-f [--Follow] — wait for new messages about new threats and output the
messages once they are received (interrupt waiting with ^C).
--Cure <threat list> — attempt to cure the listed threats (threat
identifiers are specified as a comma-separated list).
--Quarantine <threat list> — move the listed threats to quarantine
(threat identifiers are specified as a comma-separated list)
--Delete <threat list> — delete the listed threats (threat identifiers are
specified as a comma-separated list).
--Ignore <threat list> — ignore the listed threats (threat identifiers are
specified as a comma-separated list).
If it is required to apply the command to all detected threats, specify all instead
of <threat list>.
For example, the following command
drweb-ctl threats --Quarantine all
moves all detected malicious objects to quarantine.
quarantine
[<command> <object>]
Function
Apply an action to the specified object in quarantine.
If not specified, the following information is output: object identifier in
quarantine and brief information on source files.
Arguments
No.
Options
--Delete <object> – Delete the specified object from quarantine.
Note that objects are deleted from quarantine permanently.
--Cure <object> – Try to cure the specified object in quarantine.
Note that even if the object is successfully cured, it will stay in quarantine. To
retrieve the cured object from quarantine, use the --Restore command.
--Restore <object> – Restore the specified object from quarantine to the
original location.
Note that this operation may require that drweb-ctl is started with
superuser privileges. The object can be restored even if it contains a threat.
As an <object> specify the object identifier in quarantine. To apply the
command to all quarantined objects, specify all as an <object>.
For example, the following command
drweb-ctl quarantine --Restore all
restores all objects from quarantine.
nss_threats
Function
Apply the specified action to detected on NSS volumes threats by their
identifiers. Type of the action is configured with the specified command option.
If the action is not specified, output information on detected but not neutralized
threats.
Arguments
No.
Options
Administrator Manual
126
Solution Components
Command
Description
-f [--Follow] — wait for new messages about new threats and output the
messages once they are received (interrupt waiting with ^C).
--Cure <threat list> — attempt to cure the listed threats (threat
identifiers are specified as a comma-separated list).
--Quarantine <threat list> — move the listed threats to NSS quarantine
(threat identifiers are specified as a comma-separated list)
--Delete <threat list> — delete the listed threats (threat identifiers are
specified as a comma-separated list).
--Ignore <threat list> — ignore the listed threats (threat identifiers are
specified as a comma-separated list).
If it is required to apply the command to all detected threats, specify all instead
of <threat list>.
For example, the following command
drweb-ctl nss_threats --Quarantine all
moves all detected malicious objects to NSS quarantine.
Note that this command requires SpIDer Guard for NSS to be started.
nss_quarantine
Function
Apply an action to the specified object in NSS quarantine.
If not specified, the following information is output: object identifier in NSS
quarantine and brief information on source files.
Arguments
No.
Options
--Delete <object> – Delete the specified object from NSS quarantine.
Note that objects are deleted from quarantine permanently.
--Cure <object> – Try to cure the specified object in NSS quarantine.
Note that even if the object is successfully cured, it will stay in quarantine. To
retrieve the cured object from quarantine, use the --Restore command.
--Rescan <object> – Rescan the specified object in NSS quarantine.
Note that even if rescanned object will clean, it will stay in quarantine. To
retrieve the cured object from quarantine, use the --Restore command.
--Restore <object> – Restore the specified object from NSS quarantine to
the original location.
Note that this operation may require that drweb-ctl is started with
superuser privileges. The object can be restored even if it contains a threat.
--TargetDir <path> – Restore the object which is specified in --Restore
option, to the specified directory, instead of its original location.
This option can be used only together with--Restore option.
As an <object> specify the object identifier in NSS quarantine. To apply the
command to all quarantined objects, specify all as an <object>.
For example, the following command
drweb-ctl nss_quarantine --Restore all
restores all objects from NSS quarantine.
Note that this command requires SpIDer Guard for NSS to be started.
Administrator Manual
127
Solution Components
If Quarantine action is specified for some threat type in SpIDer Guard for NSS settings, the object
containing a threat of this type will be placed to quarantine again on attempt to restore this object from
quarantine to an NSS volume by the nss_quarantine command. For example, the following default
settings
NSS.OnKnownVirus = Cure
NSS.OnIncurable = Quarantine
move all incurable objects to quarantine. At that, when any incurable object is restored from quarantine
to an NSS volume by the nss_quarantine command, this object is automatically returned to
quarantine.
3.5. Information Commands
The following information commands are available:
Command
Description
appinfo
Function
Output information on active Dr.Web for UNIX File Servers modules.
Arguments
No.
Options
-f [--Follow] — wait for new messages on module status change and output them once
such a message is received (interrupt waiting with ^C).
baseinfo
Function
Output information on the current version of the Dr.Web Virus-Finding Engine and status of
virus databases.
Arguments
No.
Options
No.
license
Function
Output information on the active license.
Arguments
No.
Options
No.
stat
Function
Output statistics on operation of components that process files (^C or q interrupts the statistics
display) or on operation of network scanning agent Dr.Web Network Checker. The statistics
output includes:
Name of the component that initiated scanning
PID of the component
Average number of files processed per second in the last minute, 5 minutes, 15 minutes
Percentage usage of the scanned files cache
Average number of scan errors per second.
For a distributed scanning agent, the following information is output:
List of local components that initiated scanning
List of remote hosts that received files for scanning
List of remote hosts that sent files for scanning
Administrator Manual
128
Solution Components
Command
Description
For local clients of the distributed scanning agent , their PID and name are specified; for remote
clients — address and port of the host.
For both clients — local and remote — the following information is output:
Average number of files scanned per second
Average number of sent and received bytes per second
Average number of errors per second
Arguments
No.
Options
-n [--netcheck] — output statistics on operation of the distributed scanning agent.
Usage Examples
Usage Examples for Dr.Web Ctl (drweb-ctl):
1) Start scanning of the /home directory with default parameters:
$ drweb-ctl scan /home
2) Scan paths listed in the daily_scan file (one path per line, a vertical bar character (|):
$ drweb-ctl scan --stdin < daily_scan
3) Scan listed paths separated with the NUL character:
$ find -print0 | drweb-ctl scan --stdin0
4) Start scanning the boot record on the sda disk:
$ drweb-ctl bootscan /dev/sda
5) Output all parameters from the [Root] section of the active configuration:
$ drweb-ctl cfshow Root
6) Set 'No' as the Start parameter value in the [LinuxSpider] section (this parameter value
disables SpIDer Guard — monitor of the file system in Linux OS):
# drweb-ctl cfset SMBSpider.Start No
Note that superuser privileges are required to perform this action. To elevate the privileges, you
can use the sudo command, as shown in the following example:
$ sudo drweb-ctl cfset SMBSpider.Start No
Example usage of the find utility to select files for scanning (the drweb-ctl scan --stdin
command):
1) Scan all files in all directories, starting from the root directory, on the same partition of the file
system:
$ find / -xdev -type f | drweb-ctl scan --stdin
2) Scan all files in all directories, starting from the root directory, except files residing in the /var/
log/messages and /var/log/syslog directories:
$ find / -type f ! -path /var/log/messages ! -path /var/log/syslog | drweb-ctl
scan –stdin
Administrator Manual
129
Solution Components
3) Scan all files of the root user in all directories, starting from the root directory:
$ find / -type f -user root | drweb-ctl scan --stdin
4) Scan files of the root and admin users in all directories, starting from the root directory:
$ find / -type f \( -user root -o -user admin \) | drweb-ctl scan --stdin
5) Scan files of users with UID in the range 1000 - 1005 in all directories, starting from the root
directory:
$ find / -type f -uid +999 -uid -1006 | drweb-ctl scan --stdin
6) Scan files in all directories, starting from the root directory, with a nesting level not more than five:
$ find / -maxdepth 5 -type f | drweb-ctl scan --stdin
7) Scan files in a root directory ignoring files in subdirectories:
$ find / -maxdepth 1 -type f | drweb-ctl scan --stdin
8) Scan files in all directories, starting from the root directory, with following all symbolic links:
$ find -L / -type f | drweb-ctl scan --stdin
9) Scan files in all directories, starting from the root directory, without following symbolic links:
$ find -P / -type f | drweb-ctl scan --stdin
10) Scan files created not later than July 3, 2013 in all directories, starting with the root directory:
$ find / -type f -newermt 2013-07-03 | drweb-ctl scan --stdin
Configuration Parameters
The command-line tool Dr.Web Ctl does not have a parameter section in the integral configuration file
of Dr.Web for UNIX File Servers. It uses parameters specified in the [Root] section.
Dr.Web Network Checker
Dr.Web Network Checker is an agent designed for distributed scanning for threats. The component
creates connection between hosts with installed Dr.Web for UNIX File Servers for receiving and
sending files via network, which provides for distributed scanning. The component organizes automatic
distribution of scanning tasks (by transmitting file content over the network) to all available hosts
connection to which is configured. The component balances the load between the hosts caused by
scanning tasks.
If there are no configured connections to remote hosts, the component uses only the local Dr.Web
Scanning Engine.
To secure communication between agents of scanning via network, you need to configure a connection
over SSL. Note that an installed OpenSSL is required for this purpose (by default, the component uses
version of OpenSSL, that is included in the distribution kit of Dr.Web for UNIX File Servers).
Operation Principles
Dr.Web Network Checker allows to establish connection between one host and a set of other hosts
which have Dr.Web for UNIX File Servers (or other Dr.Web for UNIX servers solution version
Administrator Manual
130
Solution Components
10.1 or above) installed on them. This will provide for a distributed file scanning. To create and
configure a "scanning cluster", the component runs an instance of the distributed scanning agent
Dr.Web Network Checker on each host that is to be included in the cluster.
On each of the hosts within the cluster, Dr.Web Network Checker enables automatic distribution of
scanning tasks by sending all available hosts data to scan. At that, the agent balances the load caused
by file scanning. The load balancing is based on the amount of available resources (that is, the number
of child scanning processes of Dr.Web Scanning Engine on the host). The agent also considers the
queue of files waiting for scanning. Data received for scanning over the network are transmitted to the
scanning engine Dr.Web Scanning Engine, as it is shown in the picture below.
Picture 45. Component operation scheme
Any host within a "scanning cluster" can be both a client sending files for scanning and a server
receiving files for scanning from other hosts. If required, Dr.Web agent for distributed scanning can be
configured so as to assign a host only one role and set it to perform either the functions of the server
or the functions of the scanning client.
On a local host, scanning can be started both at user's command specified via the command-line
management tool and at requests received from some product components, for example, Dr.Web
ClamD component, which provides the interface of clamd daemon included in ClamAV®. That is why
the scheme contains an abstract "Client scanning module". Note that such modules use the Dr.Web
Network Checker agent for transmitting files to be scanned, even if Dr.Web Scanning Engine is
located at the local host.
Command-Line Arguments
To run the agent for distributed scanning Dr.Web Network Checker from the command line, use the
following command:
$ <opt_dir>/bin/drweb-netcheck [options]
Dr.Web Network Checker can process the following options:
Short form
Long form
-h
--help
Arguments
Description: instructs to output short help information about command-line parameters to the console and exit.
Administrator Manual
131
Solution Components
-v
--version
Description: instructs to output information on the module version and exit
Example:
$ /opt/drweb.com/bin/drweb-netcheck --help
This command outputs short help information on Dr.Web Network Checker.
Notes about startup
The component cannot be run directly from the command line of the operating system in autonomous
mode. It is run automatically by configuration daemon Dr.Web ConfigD when required (usually on
operating system startup). To start scanning via network, you can use the command-line tool for the
solution management Dr.Web Ctl started by drweb-ctl command). If there are no configured
connections to remote hosts, the local scanning will be started.
Configuration Parameters
The component uses configuration parameters which are specified in [NetCheck] section of the
integrated configuration file of Dr.Web for UNIX File Servers.
The section contains the following parameters:
LogLevel =
{logging level}
Logging level for the
Network Checker.
distributed
scanning
agent
Dr.Web
If the parameter is not specified, the DefaultLogLevel
parameter value from [Root]section is used.
Default value:
LogLevel = Notice
Log =
{log type}
Logging method for the distributed scanning agent Dr.Web
Network Checker.
Default value:
Log = Auto
ExePath =
{path to file}
Path to the executable of Dr.Web Network Checker.
Default value:
ExePath = <opt_dir>/bin/drweb-netcheck
For Linux:
ExePath = /opt/drweb.com/bin/drweb-netcheck
For FreeBSD:
ExePath = /usr/local/libexec/drweb.com/bin/
drweb-netcheck
For Solaris:
ExePath = /opt/drweb.com/bin/drweb-netcheck
LoadBalanceUseSsl =
{boolean}
The indicator which determines whether a secure SSL connection
is used for connection to other hosts.
Allowed values:
Yes—instructs to use SSL
No—instructs not to use SSL
Default value:
LoadBalanceUseSsl = No
Administrator Manual
132
Solution Components
LoadBalanceSslCertificate =
{path to file}
Path to the file with the server certificate used by the distributed
scanning agent for communication with other hosts via a secure
SSL connection.
Default value:
LoadBalanceSslCertificate =
LoadBalanceSslKey =
{path to file}
Path to the private key file used by the distributed scanning agent
for communication with other hosts via a secure SSL connection.
Default value:
LoadBalanceSslKey =
LoadBalanceSslCa =
{path to file}
Path to the file with the root certificate which authenticates
certificates used by the "scanning cluster" agents when
exchanging data via SSL.
Default value:
LoadBalanceSslCa =
LoadBalanceServerSocket =
{address}
Socket (IP address and port) which is listened on the station by
the distributed scanning agent for receiving files to check sent by
remote stations (if the station can operate as a scanning server).
Default value:
LoadBalanceServerSocket =
LoadBalanceAllowFrom =
{IP address}
IP address of a remote station from which the distributed scanning
agent can receive files to check (as a scanning server).
If the parameter is empty, removed files cannot be received for
scanning (the station does not operate as a scanning server).
You can specify a list as the parameter value. The values in the list
must be separated with commas and enclosed in quotation marks.
The parameter can be specified more than once in the section (in
this case, all its values are combined into one list).
Default value:
LoadBalanceAllowFrom =
LoadBalanceSourceAddress =
{IP address}
IP address of an interface used on the station by the distributed
scanning agent for transferring files for their remote check (if the
station operates as a scanning server and has several network
interfaces).
If an empty value is specified, the network interface automatically
selected by the OS kernel is used.
Default value:
LoadBalanceSourceAddress =
LoadBalanceTo =
{address}
Socket (IP address or port) of a remote station to which the
distributed scanning agent can send files to check (as a network
scanning client).
If the parameter value is empty, local files cannot be transferred
for a remote check (the station does not operate as a network
scanning client).
You can specify a list as the parameter value. The values in the list
must be separated with commas and enclosed in quotation marks.
The parameter can be specified more than once in the section (in
this case, all its values are combined into one list).
Default value:
LoadBalanceTo =
Administrator Manual
133
Solution Components
LoadBalanceStatusInterval =
{time interval}
Time interval between when the station sends information about
its
workload
to
all
scanning
clients
(specified
in
LoadBalanceAllowFrom parameter).
Default value:
LoadBalanceStatusInterval = 1s
SpoolDir =
{path to directory}
File system directory used to store files sent over the network for
scanning and received by the distributed scanning agent.
Default value:
SpoolDir = /tmp/netcheck
LocalScanPreference =
{fractional number}
Relative weight (priority) of the station used when a station for a
file check is selected (a local file or a file received over the
network).
If the relative weight of the local station is greater than the
weights of all stations available as scanning servers, files are
scanned locally.
Default value:
LocalScanPreference = 1
IdleTimeLimit =
{time interval}
Maximum time that the component can remain idle. If the
specified value is exceeded, the component shuts down.
Minimum value — 10s.
If the LoadBalanceAllowFrom parameter is running, this
setting is ignored (the component does not finish its operation
after the time interval expires).
Default value:
IdleTimeLimit = 30s
RunAsUser =
{UID | user name}
Name of the user whose privileged are used for running the
component for distributed scanning service. The user name can be
specified as the user's UID or as the user's login. If the user name
consists of numbers, it is specified with the name: prefix, for
example:
RunAsUser = name:123456
If a user name is not specified, the component terminates with an
error after the startup.
Default value:
RunAsUser = drweb
Dr.Web ClamD
Interface module ClamAV® Dr.Web ClamD is a component emulating for Dr.Web for UNIX File
Servers the interface of anti-virus daemon clamd, which is the core component of anti-virus product
Clam AntiVirus (ClamAV®) from Sourcefire, Inc. This interface allows external applications, which
support operation with ClamAV® to use Dr.Web for UNIX File Servers for anti-virus scanning.
Operation Principles
The component is designed to check both content of files in the local file system and streams of data
transmitted by a client application via socket. Such checks are performed by the component at a client
application request. Moreover, the component can check content of files for which an open descriptor
was transmitted via the socket. If a client application transmitted only a file path, the component sends
Administrator Manual
134
Solution Components
the scanning task to the component of file checking Dr.Web File Checker; otherwise, the component
transmits data, received via the socket, to network scanning agent Dr.Web Network Checker, as
shown in the picture below.
Picture 46. Component operation scheme
By default, the component is not automatically run upon Dr.Web for UNIX File Servers startup. To
enable starting of the component, it is necessary to set Yes value for the Start parameter and define
at least one connection point for client applications. After that, the component starts waiting for
external application requests to scan files or data streams. In the component settings, you can
configure several connection points for client applications and adjust different scan settings for each of
the points, if required.
Detected threats cannot be neutralized by Dr.Web for UNIX File Servers; the client application
receives only scan results. Thus, a detected threat should be neutralized by a client application.
Command-Line Arguments
To run Dr.Web ClamD, type the following command in the command line:
$ <opt_dir>/bin/drweb-clamd [options]
Dr.Web ClamD can process the following options:
Short form
Long form
-h
--help
Arguments
Description: instructs to output short help information to the console about command-line parameters and exit.
-v
--version
Description: instructs to output information on the module version and exit
Example:
$ /opt/drweb.com/bin/drweb-clamd --help
Administrator Manual
135
Solution Components
This command outputs short help information on Dr.Web ClamD.
Startup notes
The component cannot be run directly from the command line of the operating system in standalone
mode. It is run automatically by configuration daemon Dr.Web ConfigD when required (usually on
operating system startup).
Configuration Parameters
The component uses configuration parameters which are specified in [CLAMD] section of the
integrated configuration file of Dr.Web for UNIX File Servers.
The section contains the following parameters:
LogLevel =
{logging level}
Logging level for Dr.Web ClamD.
If the parameter value is not specified, the
DefaultLogLevel from [Root] section is used.
value
of
Default value:
LogLevel = Notice
Log =
{log type}
Logging method
ExePath =
{path to file}
Path to the executable of Dr.Web ClamD.
Default value:
Log = Auto
Default value:
ExePath = <opt_dir>/bin/drweb-clamd
For Linux:
ExePath = /opt/drweb.com/bin/drweb-clamd
For FreeBSD:
ExePath = /usr/local/libexec/drweb.com/bin/
drweb-clamd
For Solaris:
ExePath = /opt/drweb.com/bin/drweb-clamd
Start =
{Boolean}
The component must be run by a configuration daemon Dr.Web
ConfigD.
Default value:
Start = Yes
Endpoint.<tag>.ClamdSocket =
{IP address | UNIX socket}
Defines a connection point with the name <tag> and socket (IPv4
address or address of UNIX socket) for clients that need to check
files for threats.
For one connection point <tag>, several sockets can be specified.
For that, specify the parameter several times with the same prefix
Endpoint.<tag>.
Default value:
Endpoint.<tag>.ClamdSocket =
[Endpoint.<tag>.]ReadTimeout =
{time interval}
Sets the maximum time to wait for data from client.
If Endpoint.<tag> prefix is specified, the parameter is
considered defined for the <tag> point; otherwise, it is considered
defined for all points which do not have another value of this
Administrator Manual
136
Solution Components
parameter specified for them.
Default value:
[Endpoint.<tag>.]ReadTimeout = 5s
[Endpoint.<tag>.]
StreamMaxLength =
{size}
Sets the maximum size of data which can be received from client
(for transmitting data to scan as a stream of bytes).
If Endpoint.<tag> prefix is specified, the parameter is
considered defined for the <tag> point; otherwise, it is considered
defined for all points which do not have another value of this
parameter specified for them.
Default value:
[Endpoint.<tag>.]StreamMaxLength = 25mb
[Endpoint.<tag>.]ScanTimeout =
{time interval}
Sets the maximum time to scan one file (or one portion of data)
received from client.
If Endpoint.<tag> prefix is specified, the parameter is
considered defined for the <tag> point; otherwise, it is considered
defined for all points which do not have another value of this
parameter specified for them.
Default value:
[Endpoint.<tag>.]ScanTimeout = 30s
[Endpoint.<tag>.]
HeuristicAnalysis =
{On | Off}
Indicates whether heuristic analysis is used for scanning.
If Endpoint.<tag> prefix is specified, the parameter is
considered defined for the <tag> point; otherwise, it is considered
defined for all points which do not have another value of this
parameter specified for them.
Default value:
[Endpoint.<tag>.]HeuristicAnalysis = On
[Endpoint.<tag>.]
PackerMaxLevel =
{integer}
Sets the maximum nesting level of packed objects that can be
scanned.
If Endpoint.<tag> prefix is specified, the parameter is
considered defined for the <tag> point; otherwise, it is considered
defined for all points which do not have another value of this
parameter specified for them.
Default value:
[Endpoint.<tag>.]PackerMaxLevel = 8
[Endpoint.<tag>.]
ArchiveMaxLevel =
{integer}
Sets the maximum nesting level of archives that can be scanned.
If Endpoint.<tag> prefix is specified, the parameter is
considered defined for the <tag> point; otherwise, it is considered
defined for all points which do not have another value of this
parameter specified for them.
Default value:
Endpoint.<tag>.]ArchiveMaxLevel = 8
[Endpoint.<tag>.]MailMaxLevel =
{integer}
Sets the maximum nesting level of mail files that can be scanned.
If Endpoint.<tag> prefix is specified, the parameter is
considered defined for the <tag> point; otherwise, it is considered
defined for all points which do not have another value of this
parameter specified for them.
Administrator Manual
137
Solution Components
Default value:
[Endpoint.<tag>.]MailMaxLevel = 8
[Endpoint.<tag>.]
ContainerMaxLevel =
{integer}
Sets the maximum nesting level of objects in containers that can
be scanned.
If Endpoint.<tag> prefix is specified, the parameter is
considered defined for the <tag> point; otherwise, it is considered
defined for all points which do not have another value of this
parameter specified for them.
Default value:
[Endpoint.<tag>.]ContainerMaxLevel = 8
[Endpoint.<tag>.]
MaxCompressionRatio =
{integer}
Sets the maximum compression ratio for packed objects.
If Endpoint.<tag> prefix is specified, the parameter is
considered defined for the <tag> point; otherwise, it is considered
defined for all points which do not have another value of this
parameter specified for them.
Default value:
[Endpoint.<tag>.]MaxCompressionRatio = 500
Special aspects of component configuration
Parameters marked by an optional prefix [Endpoint.<tag>.] can be grouped. Each group defines a
connection point (endpoint) with a unique <tag>, the identifier of which is used by clients to connect
to the module. All scanning parameters that are included in one group define parameters that are
applied for scanning data of clients which connected to this point. If the parameter is specified without
Endpoint.<tag> prefix, it sets the value for all connection points. If you delete some parameter from
section of some connection point, the parameter value for this point will be taken from the
corresponding "parent" parameter with the same name (without the Endpoint.<tag> prefix); the
default parameter value is not used in this case.
The ClamdSocket parameter must be specified with Endpoint.<tag> prefix as it defines both a
listening socket and a group (connection point) where this socket is bound.
Example:
Let us assume that we need to have two connection points. The first one is for group of external
applications (servers) named servers1 and the second one is for group of servers named
servers2. At that, servers from the first group can be connected only via a UNIX socket and servers
from the second group—via both a UNIX socket and network connection. Moreover, heuristic analysis
is disabled by default, but it must be used for servers from the servers2 group. The following
example shows how to configure this.
1) In the configuration file:
[ClamD]
HeuristicAnalysis = Off
[ClamD.Endpoint.servers1]
ClamdSocket = /tmp/srv1.socket
[ClamD.Endpoint.servers2]
ClamdSocket = /tmp/srv2.socket
ClamdSocket = 127.0.0.1:1234
HeuristicAnalysis = On
Administrator Manual
138
Solution Components
2) Via the command-line tool Dr.Web Ctl:
#
#
#
#
#
drweb-ctl
drweb-ctl
drweb-ctl
drweb-ctl
drweb-ctl
cfset
cfset
cfset
cfset
cfset
ClamD.HeuristicAnalysis Off
ClamD.Endpoint.servers1.ClamdSocket /tmp/srv1.socket
ClamD.Endpoint.servers2.ClamdSocket /tmp/srv2.socket
-a ClamD.Endpoint.servers2.ClamdSocket 127.0.0.1:1234
ClamD.Endpoint.servers2.HeuristicAnalysis On
Both ways have an equal effect but if you edit the configuration file, you will also need to apply the
changed settings by sending a SIGHUP signal to drweb-configd module.
Integration with External Applications
The interface that emulates the one of the anti-virus daemon clamd (included in ClamAV) allows
Dr.Web ClamD to communicate with any external application which can be connected to this antivirus daemon.
The table below shows examples of applications that can use clamd for anti-virus scans:
Product
Integration
File services
FTP server
ProFTPd
clamd usage:
Scan of files uploaded to the server via FTP.
Integration requirements:
Build ProFTPd with an additional module mod_clamav.
Links to documentation:
ProFTPd documentation:http://www.proftpd.org/docs/
Description and source codes of mod_clamav: https://github.com/jbenden/mod_clamav
In the settings of the component which communicates directly with Dr.Web ClamD as with the antivirus daemon, specify the clamd connection address as the path to the UNIX socket or to the TCP
socket listened by Dr.Web ClamD at one of the endpoints created in the socket configuration.
1. Example of how to connect ProFTPd to Dr.Web ClamD:
1. Configure Dr.Web ClamD:
[ClamD.Endpoint.ftps]
ClamdSocket = 127.0.0.1:3310
2. Configure ProFTPd:
ClamAV on
ClamServer 127.0.0.1
ClamPort 3310
Administrator Manual
139
Solution Components
Dr.Web SNMPD
Dr.Web SNMP agent (Dr.Web SNMPD) is designed for integration of Dr.Web for UNIX File
Servers suite and systems of monitoring via SNMP. Such integration will allow to control operational
status of Dr.Web for UNIX File Servers as well as collect statistics on detected and neutralized
threats. The agent provides monitoring systems and SNMP managers with the following information:
State of any suite
Number of detected threats of certain types (according to the Dr.Web classification)
List of detected threats
Moreover, the agent sends SNMP trap notifications upon detection of a threat and upon failures in
neutralization of detected threats. The agent supports SNMP protocol of version 2c and 3.
Description of the information which can be sent by the agent is stored in a special section of MIB
(Management Information Base) created by Dr.Web. In the MIB section, defined by Dr.Web, the
following information is specified:
1. Format of SNMP trap notifications on detected threats. The notification includes:
File name (path to the file) where the threat was detected
Name of the infected object
Threat type
Threat name
Name of the component that requested the scan during which the threat was detected.
2. Format of SNMP trap notifications on unsuccessful attempt to neutralize a threat. The notification has
the same fields as an SNMP trap notification on a detected threat and one additional threat with
description of the occurred error.
3. Operation statistics and states of the suite components:
a) Counters of detected threats
Known viruses
Suspicious Objects
Adware
Joke programs
Dialers
Riskware
Hacktools
Table with threat information (name, number of detections)
b) Counters of suite errors
4. Information on component states:
PID
State
Last modified time
Last modified code.
Administrator Manual
140
Solution Components
Operation Principles
By default, the component is run automatically upon Dr.Web for UNIX File Servers startup. When
run, the component structures data according to the structure described in MIB Dr.Web and waits for
requests to receive data from external SNMP managers. The component receives information on the
status of the program components and notifications on detected threats directly from the
configuration daemon Dr.Web ConfigD, as shown in the picture below.
Picture 47. Component operation scheme
Threats can be detected by the scanning engine during the scanning initiated by Dr.Web for UNIX
File Servers components; thus, the scheme contains an abstract "client scanning module". On threat
detection, the appropriate count (of this threat type) is incremented by one and all SNMP managers
that can receive notifications get an SNMP trap notifying on the detected threat.
Integration with the system SNMP agent
To enable correct operation of Dr.Web SNMP agent if the main system SNMP agent snmpd (netsnmp) already operates on the server, configure transmission of SNMP requests through the Dr.Web
MIB branch from snmpd to Dr.Web SNMPD. For that purpose, edit the snmpd configuration file
(usually for Linux the file is as follows: /etc/snmp/snmpd.conf), by adding the following string:
proxy -v <ver> -c <community> <host>:<port> <MIB branch>
where
<ver> - used SNMP version (2c, 3);
<community> - "community string" used by Dr.Web SNMPD.
<host>:<port> - address listened by Dr.Web SNMPD.
<MIB branch> - OID of the MIB branch. OID contains description of variables and traps used by
Dr.Web (.1.3.6.1.4.1.29690).
When using settings of Dr.Web SNMP agent. The added string is as follows, by default:
proxy -v 2c -c public localhost:50000 .1.3.6.1.4.1.29690
Note that as port 161 is used by the main system SNMP agent snmpd in this case, it is required to
specify another port for Dr.Web SNMPD in the ListenAddress parameter (in this example, 50000).
Administrator Manual
141
Solution Components
Command-Line Arguments
To run Dr.Web SNMP agent from the command line, type the following command:
$ <opt_dir>/bin/drweb-snmpd [options]
Dr.Web SNMPD can process the following options:
Short form
Long form
-h
--help
Arguments
Description: instructs to output short help information to the console about command-line parameters and exit.
-v
--version
Description: instructs to output information on the module version and exit
Example:
$ /opt/drweb.com/bin/drweb-snmpd --help
This command outputs short help information on Dr.Web SNMP agent.
Notes about startup
The component cannot be run directly from the command line of the operating system in standalone
mode. It is run automatically by configuration daemon Dr.Web ConfigD when required (usually on
operating system startup).
Configuration Parameters
The component uses configuration parameters which are specified in [SNMPD] section of the
integrated configuration file of Dr.Web for UNIX File Servers.
The section contains the following parameters:
LogLevel =
{logging level}
Logging level for Dr.Web SNMP agent.
If the parameter is not specified, the DefaultLogLevel
parameter value from [Root] section is used.
Default value:
LogLevel = Notice
Log =
{log type}
Logging method for Dr.Web SNMP agent.
ExePath =
{path to file}
Path to the executable of Dr.Web SNMPD.
Default value:
Log = Auto
Default value:
ExePath = <opt_dir>/bin/drweb-snmpd
For Linux:
ExePath = /opt/drweb.com/bin/drweb-snmpd
For FreeBSD:
ExePath = /usr/local/libexec/drweb.com/bin/
drweb-snmpd
For Solaris:
ExePath = /opt/drweb.com/bin/drweb-snmpd
Administrator Manual
142
Solution Components
Start =
{Boolean}
The component must be run by the configuration daemon
Dr.Web ConfigD.
Default value:
Start = Yes
ListenAddress =
{address}
Address (IP address and port) listened by Dr.Web SNMPD, which
is waiting for client connections (SNMP managers).
Note that interaction with snmpd requires a specified port,
different from the standard port (161), and snmpd must be
configured for proxying.
Default value:
ListenAddress = 127.0.0.1:161
SnmpVersion =
{V2c | V3}
The used SNMP protocol version ( SNMPv2c or SNMPv3).
V3EngineId =
{string}
Identifier (string) of Engine ID for SNMPv3 (according to RFC3411)
TrapReceiver =
{address list}
List of addresses (IP address and port) where Dr.Web SNMPD
sends SNMP trap after Dr.Web for UNIX File Servers
components detected a threat.
Default value:
SnmpVersion = V2c
Default value:
V3EngineId = 800073FA044452574542
Addresses must be separated with commas.
Default value:
TrapReceiver =
V2cCommunity =
{string}
The string "SNMP read community" for authentication of SNMP
managers (SNMPv2c protocol) when Dr.Web MIB variables are
accessed for reading.
The parameter is used if SnmpVersion = V2c
Default value:
V2cCommunity = public
V3UserName =
{string}
The user name for authentication of SNMP managers (SNMPv2c
protocol) when Dr.Web MIB variables are accessed for reading.
The parameter is used if SnmpVersion = V3
Default value:
V3UserName = noAuthUser
V3Auth =
{SHA(<pwd>) | MD5(<pwd>) | None}
Method to authenticate SNMP managers (SNMPv2c protocol)
when Dr.Web MIB variables are accessed for reading.
Allowed values:
SHA(<PWD>) — SHA hash of the password is used (<PWD>
strings).
MD5(<PWD>) — MD5 hash of the password is used (<PWD>
strings).
None — authentication is disabled.
where <PWD> is a plain text password.
The parameter is used if SnmpVersion = V3
Administrator Manual
143
Solution Components
When specifying the parameter value from the command line, you
may need to escape the brackets by using the slash mark \ in
some shells.
Example:
1. Value of the parameter in the configuration file:
V3Auth = MD5(123456)
2. Specifying the parameter value from the command line via
command drweb-ctl cfset:
drweb-ctl cfset SNMPD.V3Auth MD5\(123456\)
Default value:
V3Auth = None
V3Privacy =
{DES(<secret>) |
AES128(<secret>) | None}
Method to encrypt SNMP messages (SNMPv3 protocol).
Allowed values:
DES(<secret>) — DES encryption algorithm is used.
AES128(<secret>) — AES128 encryption algorithm is used.
None — SNMP-messages are not encrypted.
where <secret> is a secret key shared by the manager and the
agent (plain text).
The parameter is used if SnmpVersion = V3
When specifying the parameter value from the command line, you
may need to escape the brackets by using the slash mark \ in
some shells.
Example:
1. Value of the parameter in the configuration file:
V3Privacy = AES128(supersecret)
2. Specifying the parameter value from the command line via
command drweb-ctl cfset:
drweb-ctl cfset SNMPD.V3Privacy AES128\(supersecret\)
Default value:
V3Privacy = None
Administrator Manual
144
Solution Components
Integration with SNMP Monitoring Systems
Dr.Web SNMP agent can perform functions of a data provider for any monitoring system that uses
SNMP protocol version 2c or 3. The list of available data and their structure are provided in the
description file MIB Dr.Web DrWeb-Snmpd.mib, supplied with the product and residing in the
<opt_dir>/share/drweb-snmpd/mibs directory.
For easy configuration, the module is supplied with templates of settings for popular monitoring
systems:
Cacti
Munin
Nagios
Zabbix
Customization templates for monitoring systems reside in the <opt_dir>/share/drweb-snmpd/
connectors directory.
Integration with Cacti monitoring system
Cacti monitoring system uses object descriptions and object counts that are imported from templates
for displaying statistics on application operation on hosts and network equipment. Thus, templates for
all required counts are prepared at first, and then the count templates are bound, as objects, to the
graph templates. Then the graph templates are assigned to data host templates. Thus, the template of
a host (or network equipment) is the root template and it describes the host added to Cacti for
monitoring; this means that all count lists and predefined templates, which data are included in
collected statistics, become available for the host.
To include Dr.Web SNMPD to the Cacti monitoring system, the <opt_dir>/share/drweb-snmpd/
connectors/cacti directory contains a ready-to-use XML file cacti_host_template_drweb.xml
with a template description of the monitored host that features installed Dr.Web solution.
This template file provides for connection of the host to the monitoring system and collection of
statistics on detection of various threats and on file scanning. This template can also be imported to
Cacti as well as be modified or used as the basis for creating new templates.
Connecting a host to Cacti
In the present instruction, it is assumed that the Cacti monitoring system is already deployed on the
monitoring server and the monitored host features an installed and functioning (it is possible for the
component to function in proxy mode together with snmpd).
1. In the Cacti web interface, import the host template cacti_host_template_drweb.xml (for
that, click Console –> Import Templates, specify path to the template file, and click Import). If
the import was successful, its results will contain the list of imported objects (DrWeb Host
template).
2. Add the host that is to be monitored to the Devices list of Cacti web interface (Console –>
Devices –> Add). As the host template, you can select the DrWeb Host template imported in the
previous step. When adding the host, assign it an identifier (for example, DrWeb-Device), specify
the host's network address (FQDN or IP address) and correct SNMP parameters: version, port, read
community, and other (depending on the protocol version). Click Save. The added host will appear
on the Devices list of the Cacti web interface.
3. For the added device, create graphs that demonstrate operation of Dr.Web on the host. Select
Console –> New Graphs, then select the monitored host from the device list (DrWeb-Device in
the example), specify the graphs type — Graph Template Based. Then select the check boxes of
available counts from the imported template. Click Create.
4. Make sure that new data sources were created in the previous step. For that, select Console –>
Administrator Manual
145
Solution Components
Data Sources. This page must contain the following data sources:
DrWeb-Device-adware counter *
DrWeb-Device-dialers counter
DrWeb-Device-hacktools counter
DrWeb-Device-jokes counter
DrWeb-Device-known viruses counter
DrWeb-Device-riskware counter
DrWeb-Device-suspicios counter
DrWeb-Device-filecheck scanned bytes
*)
DrWeb-Device, in this case — name of the device added in step 2.
It is recommended to make sure that for every data source a corresponding RRA archive RDD Tool
was added. For that, click the source and then click Turn On Data Source Debug Mode. This
shows the command of generating a data source and results of its execution.
5. By selecting Console –> Graph Management, activate these graphs. You can view graphs that
were already built by clicking the name of the required graph. If it is not displayed, click Turn On
Graph Debug Mode to view the command of creating the graph and its execution result. Select
the following graphs on the list:
DrWeb filecheck scan statistic
DrWeb found malware
In the Choose an action field, select Place on a Tree (Default Tree) and click Go.
6. To view graphs, which were built, click graphs. Note that the results must appear 10 minutes after
data sources were added. At that, creation of graphs and data sources can be still incomplete before
the first SNMP polling (about 5 minutes after the device was added).
If required, you can extend the set of data sources and corresponding graphs. For that, add a new data
source generated from the system SNMP — Generic OID Template. In the generation settings, specify
OID of the required count. Then add the received Data Template as an object to other graph
templates.
The basic configuration of Cacti does not support collection and display of SNMP traps and does not
support notification on different events. To enable support for both these functions, install the
corresponding plug-ins.
Configuration of the SNMP trap plug-in to enable Dr.Web SNMPD notifications is similar to configuration
of SNMP trap for any other source.
For official documentation on configuration of the Cacti monitoring system, refer to http://
docs.cacti.net/manual:088.
Integration with Munin monitoring system
The Munin monitoring system includes the central server (master) munin, which collects statistics
from clients munin-node residing locally on the monitored hosts. At request of the server, each
monitoring client collects data about monitored host operation by starting plug-ins that provide data
transferred to the server.
To enable connection between Dr.Web SNMPD and the Munin monitoring system, a ready-to-use
plug-in drweb is supplied. The plug-in resides in the <opt_dir>/share/drweb-snmpd/
connectors/munin/plugins directory. This plug-in collects data required for construction of the
following two graphs:
Number of detected threats
File scan statistics
Administrator Manual
146
Solution Components
The plug-in supports SMNP protocols 1, 2c, and 3. Based on this template plug-in, you can create any
other plug-ins to poll for the status of Dr.Web for UNIX File Servers components via Dr.Web
SNMPD. This plug-in represents a set of plug-ins as one plug-in returns data for only one graphic, as it
is seen by Munin.
In the <opt_dir>/share/drweb-snmpd/connectors/munin directory, the following files are
located.
File
Description
plugins/drweb
The munin-node plug-in used for polling Dr.Web
SNMPD via SNMP.
plugin-conf.d/drweb.cfg
The munin-node
configuration template
establishing connection to Dr.Web SNMPD
for
Connecting a host to Munin
In the present instruction, it is assumed that the Munin monitoring system is already deployed on the
monitoring server and the monitored host features an installed and functioning (it is possible for the
component to function in proxy mode together with snmpd), munin-node, and snmpget (net-snmp
package).
1) Monitored host configuration
Copy drweb file to the directory with plug-in libraries munin-node <munin_lib_plugins>
Create two symbolic links in the <munin_plugins> directory with munin-node plug-ins
<munin_plugins>/drweb_malware -> <munin_lib_plugins>/drweb
<munin_plugins>/drweb_scanstat -> <munin_lib_plugins>/drweb
Copy the drweb.cfg file to the munin-node configuration path /etc/munin/munin-node
and edit the parameters for connecting drweb plug-ins and Dr.Web SNMPD:
[drweb_*]
user root
group root
env.SNMP_WALK_COMMAND snmpwalk -c public -v 2c localhost:161
Adjust these parameters by assigning them actual values (matching the configuration of Dr.Web
SNMPD). The given example uses default values.
In the munin-node.conf configuration file, specify a regular expression to include all IP
addresses of hosts that are allowed to connect to munin-node for receiving the values of
monitored parameters, for example:
allow ^10\.20\.30\.40$
In this case, only the IP address 10.20.30.40 is allowed to receive host parameters.
Restart munin-node (for example, by using service munin-node restart command).
The paths <munin_lib_plugins> and <munin_plugins> depend on the operating system. In
Debian/Ubuntu operating systems, these paths are as follows: /usr/share/munin/plugins
and /etc/munin/plugins respectively.
Administrator Manual
147
Solution Components
2) Munin server (master) configuration
Add the address and identifier of the monitored host to the Munin configuration file munin.conf,
which is located, by default, in /etc (in Debian/Ubuntu operating systems: /etc/munin/
munin.conf:
[<ID>;<hostname>.<domain>]
address <host IP address>
use_node_name yes
where <ID> is the displayed host's identifier, <hostname> is the name of the host, <domain> is the
name of the domain, <host IP address> is the IP address of the host.
Integration with Zabbix monitoring system
File templates, required for establishing connection between Dr.Web SNMPD and the Zabbix
monitoring system, are residing in the <opt_dir>/share/drweb-snmpd/connectors/zabbix
directory.
File
Description
zbx_drweb.xml
Template for description of the monitored host that
features installed Dr.Web solution.
snmptt.drweb.zabbix.conf
Configuring SMNP trap SMNP handler snmptt
Template for description of the monitored host features
Description of counts ("Items", according to the terminology of Zabbix). By default, the template
is set to be used with SNMP v2.
The set of predefined graphs: number of scanned files and distribution of detected threats by
their type.
Connecting a host to Zabbix
In the present instruction, it is assumed that the Zabbix monitoring system is already deployed on the
monitoring server and the monitored host features an installed and functioning Dr.Web SNMPD (it is
possible for the component to function in proxy mode together with snmpd). Moreover, if you want to
receive SNMP trap notifications from the monitored host (including notification on threats detected by
Dr.Web for UNIX File Servers), install the net-snmp package on the monitoring server (standard
tools snmptt and snmptrapd are used).
1. In the Zabbix web interface, on the Configuration –> Templates tab import the template of
the monitored host from the <opt_dir>/share/drweb-snmpd/connectors/zabbix/
zbx_drweb.xml directory.
2. Add the monitored host to the appropriate list (at Hosts –> Create host). Specify correct
parameters of the host and settings of the SNMP interface (they must match the settings of
drweb-se and snmpd on the host).
The Host tab:
Host name: drweb-host
Visible name: DRWEB_HOST
Groups: select Linux servers
Agent interfaces: specify IP address and port of Dr.Web SNMPD (127.0.0.1 and
10050 by default).
Snmp interfaces: Click add specify the IP address and port listened at snmptrapd on the
host where Zabbix is installed (see below, 127.0.0.1 and 161 by default).
The Templates tab:
Administrator Manual
148
Solution Components
Click Add, check DRWEB, click select.
The Macros tab:
Macro: {$SNMP_COMMUNITY}
Value: specify "read community" for SNMP V2c (by default, public).
Click Save.
Note: The {$SNMP_COMMUNITY} macro can be specified directly in the host template.
By default, the imported DRW EB template is configured for SNMP v2. If you want to use another
version of SNMP, edit the template accordingly on the appropriate page.
3. After the template is bound to the monitored host, if the settings are specified correctly, the
Zabbix monitoring system will start to collect data for counts (items) of the template; the
collected data will be displayed on the Monitoring –> Latest Data and Monitoring –>
Graphs tabs.
4. A special item drweb-traps is used for collecting SNMP traps from Dr.Web SNMPD. The log pf
received SNMP trap notifications is available on the Monitoring –> Latest Data –> drwebtraps –> history page. To collect notifications, Zabbix uses standard tools snmptt and
snmptrapd from the net-snmp package. For details on how to configure the tools for receiving
SNMP trap notifications from Dr.Web SNMPD, see below.
5. If necessary, you can configure a trigger that will change its state upon receipt of an SNMP trap
notification from Dr.Web SNMPD. Changing its state can be used as an event source for
generation appropriate notifications. The example below shows an expression for configuration of
a trigger; the expression is specified in the trigger expression field:
({TRIGGER.VALUE}=0 & {DRWEB:snmptrap[.*\.1\.3\.6\.1\.4\.1\.29690
\..*].nodata(60)}=1 )|({TRIGGER.VALUE}=1 & {DRWEB:snmptrap[.*\.1\.3\.6\.1\.4\.1
\.29690\..*].nodata(60)}=0)
An event is triggered (the value is set to 1) if the log of SNMP trap notifications from Dr.Web
SNMPD was updated within a minute. If the log was not updated within the next minute, the
value of the trigger is set to 0 again).
Configuring receipt of SNMP traps for Zabbix
1. On the monitored host in Dr.Web SNMPD settings (SNMPD.TrapReceiver), specify an
address to be listened by snmptrapd on the host where Zabbix operates, for example:
SNMPD.TrapReceiver = 10.20.30.40:162
2. In the configuration file of snmptrapd (snmptrapd.conf), specify the same address and an
application for processing received SNMP traps (in this example, snmptthandler, snmptt
component):
snmpTrapdAddr 10.20.30.40:162
traphandle default /usr/sbin/snmptthandler
3. The snmptthandler component saves received SNMP trap notifications to the file on the disk in
accordance with the specified format, which corresponds to the regular expression set in the host
template for Zabbix (item drweb-traps). The format of the saved notification is specified in
the
<opt_dir>/share/drweb-snmpd/connectors/zabbix/
snmptt.drweb.zabbix.conf file. The file must be copied to /etc/snmp.
4. Moreover, the path to the format files must be specified in the snmptt.ini file:
Administrator Manual
149
Solution Components
[TrapFiles]
# A list of snmptt.conf files (this is NOT the snmptrapd.conf file).
# The COMPLETE path and filename. Ex: '/etc/snmp/snmptt.conf'
snmptt_conf_files = <<END
/etc/snmp/snmptt.conf
/etc/snmp/snmptt.drweb.zabbix.conf
END
After that, restart snmptt if it was started in daemon mode.
5. In the configuration file of the Zabbix server (zabbix-server.conf), specify (or check if they
are already specified) the following settings:
SNMPTrapperFile=/var/log/snmptt/snmptt.log
StartSNMPTrapper=1
where /var/log/snmptt/snmptt.log is a log file used by snmptt to register information on
received SNMP trap notifications.
For official documentation on Zabbix, refer to https://www.zabbix.com/documentation/.
Integration with Nagios monitoring system
Files with configuration examples, required for establishing connection between Dr.Web SNMPD and
the Nagios monitoring system, are residing in the <opt_dir>/share/drweb-snmpd/connectors/
nagios directory.
File
Description
nagiosgraph/rrdopts.conf-sample
Example of the RRD configuration file
objects/drweb.cfg
Configuration file describing drweb objects
objects/nagiosgraph.cfg
The configuration file of the component for graph
plotting used by Nagiosgraph
plugins/check_drweb
The script for collecting data from the host where
Dr.Web is installed
plugins/eventhandlers/
submit_check_result
Script for processing SNMP traps
snmp/snmptt.drweb.nagios.conf
Configuring SMNP trap SMNP handler snmptt
Connecting a host to Nagios
In the present instruction, it is assumed that the Nagios monitoring system is already deployed on the
monitoring server, including configuration of the web server and the graphical tool Nagiosgraph, and
the monitored host features an installed and functioning Dr.Web SNMPD (it is possible for the
component to function in proxy mode together with snmpd). Moreover, if you want to receive SNMP
trap notifications from the monitored host (including notification on threats detected by Dr.Web for
UNIX File Servers), install the net-snmp package on the monitoring server (standard tools snmptt
and snmptrapd are used).
In the current manual, the following path conventions are used (real paths depend on the operating
system and Nagios installation):
<NAGIOS_PLUGINS_DIR>
nagios/plugins
— directory with Nagios plug-ins, for example: /usr/lib64/
<NAGIOS_ETC_DIR> — directory with Nagios settings, for example: /etc/nagios
<NAGIOS_OBJECTS_DIR>
objects
— directory with Nagios objects, for example: /etc/nagios/
<NAGIOSGRAPH_DIR> — Nagiosgraph directory, for example: /usr/local/nagiosgraph
Administrator Manual
150
Solution Components
<NAGIOS_PERFDATA_LOG> — file where Nagios records results of service check (must be the
same as the perflog file from <NAGIOSGRAPH_DIR>/etc/nagiosgraph.conf). Records from
this file are read by the <NAGIOSGRAPH_DIR>/bin/insert.pl script and are recorded to the
corresponding RRA archives RRD Tool.
Configuring Nagios:
1. Copy the check_drweb file to the <NAGIOS_PLUGINS_DIR> directory and the drweb.cfg file
to the <NAGIOS_OBJECTS_DIR> directory.
2. Add hosts with Dr.Web that are to be monitored to the drweb group. On the hosts Dr.Web
SNMPD must be running. By default, only localhost is added to this group.
3. If required, edit the check_drweb command which contains instruction to contact Dr.Web
SNMPD on drweb hosts via the snmplwalk tool:
snmpwalk -c public -v 2c $HOSTADDRESS$:161
specify the correct version of SNMP protocol and parameters (such as "community string" or
authentication parameters) as well as the port. The $HOSTADDRESS$ variable must be included
in the command (as this variable is later substituted by Nagios to the correct host address when
the command is automatically invoked). OID is not required in the command. It is also
recommended to specify the command together with the full path to the executable file (usually /
usr/local/bin/snmpwalk).
4. Connect DrWeb objects in the <NAGIOS_ETC_DIR>/nagios.cfg configuration file by adding
the following string to the file:
cfg_file= <NAGIOS_OBJECTS_DIR>/drweb.cfg
5. Add RRD Tool settings for DrWeb graphics from the rrdopts.conf-sample file to the
<NAGIOSGRAPH_DIR>/etc/rrdopts.conf file.
6. If Nagiosgraph is yet to be configured, do the following steps for its configuration:
Copy the nagiosgraph.cfg file to the <NAGIOS_OBJECTS_DIR> directory and edit the
path to the insert.pl script in the process-service-perfdata-for-nagiosgraph
command; for example, as follows:
$ awk '$1 == "command_line" { $2 = "<NAGIOSGRAPH_DIR>/bin/insert.pl"
}{ print }' ./objects/nagiosgraph.cfg > <NAGIOS_OBJECTS_DIR>/
nagiosgraph.cfg
Connect this file in the <NAGIOS_ETC_DIR>/nagios.cfg configuration file by adding the
following line to it:
cfg_file=<NAGIOS_OBJECTS_DIR>/nagiosgraph.cfg"
7. Check values of Nagios parameters in the <NAGIOS_ETC_DIR>/nagios.cfg configuration file:
Administrator Manual
151
Solution Components
check_external_commands=1
execute_host_checks=1
accept_passive_host_checks=1
enable_notifications=1
enable_event_handlers=1
process_performance_data=1
service_perfdata_file=/usr/nagiosgraph/var/rrd/perfdata.log
service_perfdata_file_template=$LASTSERVICECHECK$||$HOSTNAME$||$SERVIC
EDESC$||$SERVICEOUTPUT$||$SERVICEPERFDATA$
service_perfdata_file_mode=a
service_perfdata_file_processing_interval=30
service_perfdata_file_processing_command=process-service-perfdata-fornagiosgraph
check_service_freshness=1
enable_flap_detection=1
enable_embedded_perl=1
enable_environment_macros=1
Configuring receipt of SNMP traps for Nagios
1. On the monitored host in Dr.Web SNMPD settings (SNMPD.TrapReceiver), specify an
address to be listened by snmptrapd on the host where Nagios operates, for example:
SNMPD.TrapReceiver = 10.20.30.40:162
2. Check for existing the <NAGIOS_PLUGINS_DIR>/eventhandlers/submit_check_result
script, which will be invoked when SNMP trap is received. If the script is missing, copy the
submit_check_result file to this location from <opt_dir>/share/drweb-snmpd/
connectors/nagios/plugins/eventhandlers/. In this file, change the path specified in
the CommandFile parameter. It must have the same value as the command_file parameter in
the <NAGIOS_ETC_DIR>/nagios.cfg file.
3. Copy the snmptt.drweb.nagios.conf file to the /etc/snmp/snmp/ directory. In this file,
change the path to the submit_check_result; for example, by using the following command:
$ awk '$1 == "EXEC" { $2 = <NAGIOS_PLUGINS_DIR>/eventhandlers/
submit_check_result }{ print}' ./snmp/snmptt.drweb.nagios.conf > /etc/
snmp/snmp/snmptt.drweb.nagios.conf
4. Add the /etc/snmp/snmptt.drweb.nagios.conf
string to the /etc/snmp/
snmptt.drweb.nagios.conf file. After that, restart snmptt if it was started in daemon
mode.
After all required configuration files of Nagios are added and edited, run Nagios in debug mode by
using the following command:
# nagios -v <NAGIOS_ETC_DIR>/nagios.cfg
Upon receipt of this command, Nagios will check for configuration errors. If no error is found, Nagios
can be restarted as usual (for example, by using the service nagios restart command).
For official documentation on Nagios, refer to http://www.nagios.org/documentation/.
Administrator Manual
152
Appendices
Appendices
Appendix A. Types of Computer Threats
Herein, the term “ threat” is defined as any kind of software potentially or directly capable of inflicting
damage to a computer or network and compromising the user's information or rights (that is, malicious
and other unwanted software). In a wider sense, the term "threat" may be used to indicate any type of
potential danger to the security of the computer or network (that is, vulnerabilities that can result in
hacker attacks).
All of the program types stated below have the ability to endanger the user’s data or confidentiality.
Programs that do not conceal their presence (e.g. spam distribution software and various traffic
analyzers) are usually not considered as computer threats, although they can become threats under
certain circumstances.
Computer Viruses
This type of computer threats is characterized by the ability to implement its code into other objects.
Such implementation is called infection. In most cases, the infected file becomes a virus carrier itself
and the implemented code does not necessarily match the original. Most viruses are intended to
damage or destroy data in the system.
In Doctor Web classification, viruses are divided by the type of objects which they infect:
File viruses infect files of the operating system (usually executable files and dynamic libraries)
and are activated when the infected file is launched.
Macro-viruses are viruses that infect documents used by Microsoft® Office and some other
applications supporting macro commands (usually, written in Visual Basic). Macro commands are
a type of implemented programs (macros) written in a fully functional programming language. For
instance, in Microsoft® Word macros can automatically initiate upon opening (closing, saving, etc.)
a document.
Script viruses are created using script languages and usually infect other scripts (e.g. service
files of an operating system). They are also able to infect other file formats that allow execution of
scripts and thus take advantage of scripting vulnerabilities in web applications.
Boot viruses infect boot records of diskettes and partitions or master boot records of fixed disks.
They require very little memory and remain ready to continue performing their tasks until a
system roll-out, restart or shut-down occurs.
Most viruses have some kind of protection against detection. Protection methods are being constantly
improved and ways to overcome them are constantly being developed. All viruses may also be classified
according to the type of protection that they use:
Encrypted viruses cipher their code upon every infection to hamper their detection in a file,
boot sector or memory. All copies of such viruses contain only a small common code fragment
(the decryption procedure) that can be used as a virus signature.
Polymorphic viruses also encrypt there code, but besides that they also generate a special
decryption procedure that is different in every copy of the virus. This means that such viruses do
not have byte signatures.
Stealth viruses perform certain actions to disguise their activity and thus conceal their presence
in an infected object. Such viruses gather the characteristics of an object before infecting it and
then plant these “dummy” characteristics that mislead the scanner searching for modified files.
Administrator Manual
153
Appendices
Viruses can also be classified according to the programming language in which they are written (in
most cases, it is Assembler, high-level programming languages, script languages, etc.) or according to
affected operating systems.
Computer Worms
Worms have become a lot more widespread than viruses and other types of computer threats recently.
Like viruses, they are able to reproduce themselves and spread their copies, but they do not infect
other programs and files (that is, they do not need host files to spread). A worm infiltrates a computer
from a worldwide or local network (usually via an attachment to an email) and distributes its functional
copies to other computers in the network. It can begin distributing itself either upon a user’s action or
in an automatic mode choosing which computers to attack.
Worms do not necessarily consist of only one file (the worm’s body). Many of them have an infectious
part (the shellcode) that loads into the main memory (RAM) and then downloads the worm’s body as
an executable file via the network. If only the shellcode is present in the system, the worm can be
deleted by simply restarting the system (at which the RAM is erased and reset). However, if the worm’s
body infiltrates the computer, then only an anti-virus program can cope with it.
Worms have the ability to cripple entire networks even if they do not bear any payload (i.e. do not
cause any direct damage) due to their intensive distribution.
In Doctor Web classification, worms are divided by the method of distribution:
Net worms distribute their copies via various network and file-sharing protocols.
Mail worms spread themselves using email protocols (POP3, SMTP, etc.).
Chat worms use protocols of popular messengers and chat programs (ICQ, IM, IRC, etc.).
Trojan Programs (Trojans)
This type of computer threats cannot reproduce itself or infect other programs. A Trojan substitutes a
program that is used a lot and performs its functions (or imitates its operation). At the same time, it
performs some malicious actions in the system (damages or deletes data, sends confidential
information, etc.) or makes it possible for hacker to access the computer without permission, for
example, to harm the computer of a third party.
A Trojan’s masking and malicious facilities are similar to those of a virus. A Trojan may even be a
component of a virus. However, most Trojans are distributed as separate executable files (through fileexchange servers, removable data carriers or email attachments) that are launched by users or system
tasks.
It is very hard to classify Trojans due to the fact that they are often distributed by viruses or worms and
also because many malicious actions that can be performed by other types of threats are ascribed to
Trojans only. Here are some Trojan types which are distinguished as separate classes in Doctor Web:
Backdoors are Trojans that make it possible for an intruder to log on into the system or obtain
privileged functions bypassing any existing access and security measures. Backdoors do not infect
files, but they write themselves into the registry modifying the registry keys.
Rootkits are used to intercept system functions of an operating system in order to conceal
themselves. Besides, a rootkit can conceal processes of other programs (e.g. other threats),
registry keys, folders and files. It can be distributed either as an independent program or as a
component of another malicious program. There are two kinds of rootkits according to the mode
of operation: User Mode Rootkits (UMR) that operate in user mode (intercept functions of the user
mode libraries) and Kernel Mode Rootkits (KMR) that operate in kernel mode (intercept functions
on the level of the system kernel, which makes it harder to detect).
Keyloggers are used to log data that users enter by means of a keyboard. The aim of this is to
steal personal information (i.e. network passwords, logins, credit card data, etc.).
Clickers redirect hyperlinks to certain addresses in order to increase traffic of websites or
perform DDoS attacks.
Administrator Manual
154
Appendices
Proxy Trojans provide anonymous Internet access through a victim's computer.
Trojans may also perform other malicious actions besides those stated above, for example, change the
start page in a web browser or delete certain files. However, other actions can also be performed by
other types of threats (viruses and worms).
Hacktools
Hacktools are programs designed to assist the intruder with hacking. The most common among them
are port scanners that detect vulnerabilities in firewalls and other components of computer protection
system. Besides hackers, such tools are used by administrators to check security of their networks.
Occasionally, common software that can be used for hacking and various programs that use social
engineering techniques are designated as among hacktools as well.
Adware
Usually, this term refers to a program code implemented into freeware programs that force display of
advertisements to users. However, sometimes such codes can be distributed via other malicious
programs and show advertisements in web browsers. Many adware programs operate with data
collected by spyware.
Jokes
Like adware, this type of minor threats can not be used to inflict any direct damage to the system. Joke
programs usually just generate messages about errors that never occurred and threaten to perform
actions that will lead to data loss. Their purpose is to frighten or annoy users.
Dialers
These are special programs that are designed to scan a range of telephone numbers and find those
where a modem answers. These numbers are then used to mark up the price of telephoning facilities or
to connect the user to expensive telephone services.
Riskware
Riskware programs are not only those that can accidentally damage or delete data, but also ones that
can be used by crackers or some malicious programs to do harm to the system. Among such programs
are various remote chat and administrative tools, FTP-servers, etc.
Suspicious Objects
These are possible computer threats detected by the heuristic analyzer. Such objects can potentially be
any type of threat (even unknown to IT security specialists) or turn out safe in case of a false detection.
Suspicious objects should be sent for analysis to the Doctor Web Virus Laboratory.
Administrator Manual
155
Appendices
Appendix B. Fighting Computer Threats
The Dr.Web Anti-virus solutions use several malicious software detection methods simultaneously,
and that allows them to perform thorough checks on suspicious files and control software behavior.
Detection Methods
Signature analysis
The scans begin with signature analysis which is performed by comparison of file code segments to the
known virus signatures. A signature is a finite continuous sequence of bytes which is necessary and
sufficient to identify a specific virus. To reduce the size of the signature dictionary, the Dr.Web Antivirus solutions use signature checksums instead of complete signature sequences. Checksums
uniquely identify signatures, which preserves correctness of virus detection and neutralization. The
Dr.Web virus databases are composed so that some entries can be used to detect not just specific
viruses, but whole classes of threats.
Origins Tracing
On completion of signature analysis, the Dr.Web Anti-virus solutions use the unique Origins
Tracing™ method to detect new and modified viruses which use the known infection mechanisms.
Thus, Dr.Web users are protected against such threats as notorious blackmailer
Trojan.Encoder.18 (also known as gpcode). In addition to detection of new and modified viruses,
the Origins Tracing™ mechanism allows to considerably reduce the number of false triggering of the
heuristics analyzer. Objects detected using the Origins Tracing™ algorithm are indicated with the
.Origin extension added to their names.
Execution emulation
The technology of program code emulation is used for detection of polymorphic and encrypted viruses,
when the search against checksums cannot be applied directly, or is very difficult to be performed (due
to the impossibility of building secure signatures). The method implies simulating the execution of an
analyzed code by an emulator – a programming model of the processor and runtime environment. The
emulator operates with protected memory area (emulation buffer), in which execution of the analyzed
program is modelled instruction by instruction. However, none of these instructions is actually executed
by the CPU. When the emulator receives a file infected with a polymorphic virus, the result of the
emulation is a decrypted virus body, which is then easily determined by searching against signature
checksums.
Heuristic analysis
The detection method used by the heuristics analyzer is based on certain knowledge (heuristics) about
certain features (attributes) than might be typical for the virus code itself, and vice versa, that are
extremely rare in viruses. Each attribute has a weight coefficient which determines the level of its
severity and reliability. The weight coefficient can be positive if the corresponding attribute is indicative
of a malicious code or negative if the attribute is uncharacteristic of a computer threat. Depending on
the sum weight of a file, the heuristics analyzer calculates the probability of unknown virus infection. If
the threshold is exceeded, the heuristic analyzer generates the conclusion that the analyzed object is
probably infected with an unknown virus.
The heuristics analyzer also uses the FLY-CODE™ technology, which is a versatile algorithm for
extracting files. The technology allows making heuristic assumptions about the presence of malicious
objects in files compressed not only by packagers Dr.Web is aware of, but by also new, previously
unexplored programs. While checking packed objects, Dr.Web Anti-virus solutions also use
structural entropy analysis. The technology detects threats by arranging pieces of code; thus, one
database entry allows identification of a substantial portion of threats packed with the same
polymorphous packager.
As any system of hypothesis testing under uncertainty, the heuristics analyzer may commit type I or
type II errors (omit viruses or raise false alarms). Thus, objects detected by the heuristics analyzer are
Administrator Manual
156
Appendices
treated as "suspicious".
While performing any of the abovementioned checks, the Dr.Web Anti-virus solutions use the most
recent information about known malicious software. As soon as experts of Doctor Web Virus
Laboratory discover new threats, the update for virus signatures, behavior characteristics and
attributes is issued. In some cases updates can be issued several times per hour. Therefore even if a
brand new virus passes through the Dr.Web resident guards and penetrates the system, then after an
update the virus is detected in the list of processes and neutralized.
Actions
To avert computer threats, Dr.Web products use a number of actions that can be applied to malicious
objects. A user can leave the default settings, configure which actions to apply automatically, or choose
actions manually upon every detection. Below is a list of possible actions:
Ignore — instructs to skip the detected threat without performing any other action.
Report — instructs to inform on the detected threat without performing any other action.
Block — instructs to block all attempts to access the infected file.
Cure is an action that can only be applied to major threats (viruses, worms and Trojans). It implies
deletion of malicious code from infected objects as well as recovery of their structure and operability
to the state in which it was before the infection if possible. Sometimes malicious objects are made of
malicious code only (for example, Trojans or functional copies of computer worms) and for such
objects to cure the system means to remove the whole object completely. Not all files infected by
viruses can be cured, but curing algorithms evolve all the time.
Quarantine (Move to Quarantine) is an action when the detected threat is moved to a special
directory and isolated from the rest of the system.
Delete is the most effective action for averting computer threats. It can be applied to any type of
computer threat. Note that deletion will sometimes be applied to certain objects for which the Cure
action was selected. This will happen in cases if the object consists of only malicious code and have
no useful information (for example, curing a computer worm implies deletion of all its functional
copies).
Administrator Manual
157
Appendices
Appendix C. Contacting Support
Technical support webpage of Doctor Web is located at http://support.drweb.com/.
If you encounter any issues installing or using company products, take advantage of the following
Doctor Web support options:
Download and review the latest manuals and guides at http://download.drweb.com/
Read the frequently asked questions at http://support.drweb.com/
Browse Dr.Web Official Forum at http://forum.drweb.com/
If you have not found solution for the problem, you can request direct assistance from Doctor Web
Technical Support by filling in the web form in the corresponding section of the support site at http://
support.drweb.com/.
For regional office information, visit the official Doctor Web website at http://company.drweb.com/
contacts/moscow.
Administrator Manual
158
Appendices
Appendix D. Configuration File
Configuration parameters of all Dr.Web for UNIX File Servers components are managed by a special
coordinating daemon Dr.Web ConfigD. These parameters are stored in the drweb.ini file, which
default directory is etc_dir ( for Linux: /etc/opt/drweb.com).
The text configuration file stores only those parameters which values differ from the defaults. If a
parameter is absent in the configuration file, its default value is used.
For details on conventions for <opt_dir>, <etc_dir>, and <var_dir>, refer to Introduction.
You can view the list of all available parameters, including those that are absent in the configuration file
and have default values, by using the following command:
drweb-ctl cfshow
You can change any parameter value in one of the two following ways:
1. Specify the parameter in the configuration file (by editing the file in any text editor) and send
SIGHUP signal to the configuration daemon (drweb-configd) in order to apply the changes.
2. Type this command in the command line
drweb-ctl cfset <section>.<parameter> <new_value>
Note, that this command can be executed only if the management tool Dr.Web Ctl is run with root
privileges. To gain root privileges, use su or sudo command.
For details on the cfshow and cfset command syntax of the console management tool Dr.Web Ctl
(drweb-ctl module), refer to Dr.Web Ctl section.
File Structure
The configuration file has the following structure:
File content is divided into named sections. Possible names of these sections are strictly predefined
and cannot be changed. The section name is specified in square brackets and is similar to the
component name Dr.Web for UNIX File Servers, which uses the section parameters (except for
[Root] section, which stores all parameters of the configuration daemon Dr.Web ConfigD).
The ';' or '#' characters in the configuration file indicate the beginning of a comment—all text
following the characters is skipped by modules Dr.Web for UNIX File Servers while reading
configuration parameters.
One line of the file can contain only one parameter value. The general format of specifying the value
is as follows (white spaces before and after an equal sign '=' are ignored):
<Parameter name> = <Value>
All parameter names are strictly predefined and cannot be changed.
All section and parameter names are case-insensitive. Parameter values, except for names of
directories and files in paths (for UNIX-like OS) are also case-insensitive.
Order in which sections are specified in the file and order in which parameters are specified in the
section are of no importance.
Parameter values in the configuration file can be enclosed in quotation marks, and must be enclosed
in quotation marks if they have white spaces
Administrator Manual
159
Appendices
Some parameters can have a list of values. If so, the values are either separated with commas or
specified several times in different lines of the configuration file. In the former case, white spaces
around a comma are ignored. If a white space character is a part of a parameter value, the
character must be enclosed in quotation marks.
Example of how to specify several values for one parameter:
1) As a comma-separated list:
Parameter = Value1, Value2,"Value 3"
2) In different lines of the configuration file:
Parameter = Value2
Parameter = Value1
Parameter = "Value 3"
Note that the order in which parameter values are specified is of no importance.
If a parameter can have more than one values, it is designated explicitly. So, if this is not explicitly
designated in the current manual or within the comments in the configuration file, the parameter
can have only one value.
For description of the configuration file sections, see description of Dr.Web for UNIX File Servers
components.
Parameter Types
Configuration parameters can be of the following types:
Address — network connection address specified as <IP address>:<port> pair of values. In some
cases, the <port> value can be omitted (if so, it is specified in the parameter description).
Boolean — flag used as an indicator. Such parameters can have either Yes or No as values.
Integer — parameter value can be a non-negative integer as a value.
Fractional number — parameter value can be a non-negative number with a fractional part.
Time interval — parameter value can be a time interval, consisting of a non-negative integer
and a suffix (letter), which stands for a time unit. The following suffixes can be used:
o w — weeks(1w = 7d)
o d — days (1d = 24h)
o h — hours (1h = 60m)
o m — minutes (1m = 60s)
o s — seconds.
If the suffix is omitted, the interval is considered as in seconds. For the time interval, expressed in
seconds, it is allowed to specify milliseconds after a point (but no more than three digits after the
separator, for example, 0.5s = 500 milliseconds). It is possible to specify several time intervals in
different time units. In this case, the resulting interval is counted as a sum of intervals (in fact, a
time interval is always converted to milliseconds before the value is written to configuration).
In general terms, any time an interval can be represented as an expression of this form:
N1wN2dN3hN4mN5[.N6]s, where N1, ..., N6 is a number of corresponding time unites included in this
interval. For example, a year (365 days) can be represented as follows (all records are equal):
365d, 52w1d, 52w24h, 51w7d24h, 51w7d23h60m, 8760h, 525600m, 31536000s.
The examples below show you how intervals of 30 minutes, 2 seconds, 500 milliseconds
can be specified:
1. In the configuration file:
UpdateInterval = 30m2.5s
Administrator Manual
160
Appendices
2. Using command drweb-ctl cfset:
drweb-ctl cfset Root.UpdateInterval 1802.5s
3. Via a command-line parameter (for example, for the module drweb-se):
drweb-se --WatchdogInterval 1802.5
Size — parameter value can be the size of an object (file, buffer, cash, and so on), consisting of a
non-negative integer and a suffix, which stands for a unit. The following suffixes can be used:
o mb — megabytes (1mb = 1024kb)
o kb — kilobytes (1kb = 1024b)
o b — bytes.
If the suffix is omitted, the size is considered as in bytes. It is possible to specify several sizes in
different units. In this case, the resulting size is counted as their sum (in fact, a size value is always
converted to bytes).
path to a directory (file) — parameter value can be a string, which is a path to a
directory (file). Note that the file path must be ended with the file name.
In UNIX-like operating systems, all directory and file names are case-sensitive.
If it is not explicitly designated in a parameter description, paths cannot contain masks with special
characters (?, *).
Logging level — the level at which Dr.Web for UNIX File Servers events are logged. The
parameter of this type can have the following values:
o DEBUG — the most verbose logging level. All messages and debug information are registered.
o INFO — all messages are registered.
o NOTICE — all error messages, warnings, and notifications are registered.
o WARNING — all error messages and warnings are registered.
o ERROR — only error messages are registered.
Log type — parameter value defines how Dr.Web for UNIX File Servers performs logging (its
logging method). The parameter of this type can have the following values:
o Stderr[:ShowTimestamp] — messages are output to a standard error stream stderr
(used only for drweb-configd module).
Additional option ShowTimestamp prescribes to add a time stamp to every message.
o Auto — logging method is defined automatically according to the configuration daemon
Dr.Web ConfigD. This value is specified for all components except for the configuration
daemon and is used as a default value.
o Syslog[:<facility>] — messages are transmitted to the system logging service syslog.
Additional option <facility> is used to specify a level at which syslog registers messages.
The following values are possible:
DAEMON — messages of daemons
USER — messages of user processes
MAIL — messages of mail programs
LOCAL0 — messages of local processes 0
...
LOCAL7 — messages of local processes 7
o <path> — path to the file where all messages are registered
Administrator Manual
161
Appendices
Example of how to specify the parameter value:
1. In the configuration file:
Log = Stderr:ShowTimestamp
2. Using command drweb-ctlcfset:
drweb-ctl cfset Root.Log /var/opt/drweb.com/log/general.log
3. Via a command-line parameter (for example, for the module drweb-se):
drweb-se --Log Syslog:DAEMON
action — action performed by Dr.Web for UNIX File Servers upon detection of certain threats
or upon another event. The following values are possible:
o Report — instructs only to notify on threat detection without performing any other action.
o Block — instructs to block all attempts to access the infected file without modifying it.
o Cure — instructs to attempt to cure the threat (that is, remove only malicious content).
o Quarantine — instructs to move the infected file to quarantine.
o Delete — instructs to delete the infected file.
Some of the actions can be applied only upon certain events (for example, a "scanning error" event
cannot trigger Cure action). Allowed actions are always listed in the parameter description of the
action type.
Other parameter types and their possible values are specified in the description of these parameters.
Administrator Manual
162
Appendices
Appendix E. Known Errors
If the occurred error is not present in this section, it is recommended to contact technical support. Be
ready to name the error code and describe steps to reproduce the issue.
To identify the error, we recommend you to configure logging to a separate file and enable output of
extended information to the log. For that, execute the following commands:
# drweb-ctl cfset Root.Log <path/to/separate/log/file>
# drweb-ctl cfset Root.DefaultLogLevel DEBUG
To return to the default logging method and verbosity level, execute the following commands:
# drweb-ctl cfset Root.Log -r
# drweb-ctl cfset Root.DefaultLogLevel -r
Errors determined by code
Error message: Feature not implemented.
Error code: x65
Description: one of the Dr.Web for UNIX File Servers components cannot be in operation as it is
requested to perform a function which is not implemented in the current version.
Resolving the error:
Restore software defaults. For that purpose
1. Clear the contents of <etc_dir>/drweb.ini file It is recommended to back up the file
before starting the procedure. For example:
# cp /etc/opt/drweb.com/drweb.ini /etc/opt/drweb.com/drweb.ini.save
# echo "" > /etc/opt/drweb.com/drweb.ini
2. Execute the command
# service drweb-configd restart
to restart Dr.Web for UNIX File Servers.
If the error persists, contact technical support and be ready to name the error code.
Error message: Invalid DRL file
Error code: x90
Description: updating cannot be performed as Dr.Web Updater detected integrity violation or cannot
find a signed file with the list of update servers.
Resolving the error:
Install drweb-bases and drweb-dws, components (packages) separately and then start an
update.
If the error persists, remove Dr.Web for UNIX File Servers and then install it again on the
system and restart the update.
For details on how to install and remove the product or product components, refer to the
Installation Procedure and Removing Solution.
If the error persists, contact technical support and be ready to name the error code.
Administrator Manual
163
Appendices
Error message: Invalid compressed file.
Error code: x92
Description: Dr.Web Updater detected integrity violation or cannot find the archive file received from
the update server.
Resolving the error:
Restart the update after some time.
If the error persists, contact technical support and be ready to name the error code.
Error message: Proxy authentication error.
Error code: x93
Description: Dr.Web Updater failed to connect to an update server as was not authenticated on the
proxy server used for receiving updates.
Resolving the error:
Check and correct parameters of the used proxy server (username and password used for
authentication).
If an error persists, change the proxy server or do not use proxy for connections.
If the error persists, contact technical support and be ready to name the error code.
Error message: No update servers available.
Error code: x94
Description: Dr.Web Updater cannot connect to any of the update servers.
Resolving the error:
Check whether the network connection is established and verify the connectivity. Make sure that
your computer is connected to the Internet.
If Internet connection is allowed only via proxy, configure the use of proxy for receiving updates.
If a proxy server is used, check and adjust the parameters used for the connection to proxy.
If the error persists, contact technical support and be ready to name the error code.
Error message: File format is unknown or unsupported.
Error code: x95
Description: Updates cannot be received as key file integrity is violated.
Resolving the error:
Install the key file from the backup. If you cannot find the backup, contact technical support to
obtain it.
If the error persists, contact technical support and be ready to name the error code.
Administrator Manual
164
Appendices
Error message: License is already expired.
Error code: x96
Description: updates cannot be received as the used license is expired.
Resolving the error:
Purchase a new license and activate the product.
If you are sure that the licensed period is not expired, contact technical support and be ready to name
the error code.
Error message: Network operation timed out.
Error code: x97
Description: Dr.Web Updater cannot receive the updates because connection was lost.
Resolving the error:
Check whether the network connection is established and verify the connectivity. Make sure that
your computer is connected to the Internet.
If a proxy server is used, check and adjust the parameters used for the connection to proxy.
If an error persists, change the proxy server or do not use proxy for connections.
If the error persists, contact technical support and be ready to name the error code.
Error message: Invalid DRL file
Error code: x98
Description: A file with updates received by Dr.Web Updater has a checksum that is not equal to
expected.
Resolving the error:
Restart the update after some time.
If the error persists, contact technical support and be ready to name the error code.
Error message: Invalid demo key file.
Error code: x99
Description: Updates cannot be received as demo key file integrity is violated or its use is not
authorized.
Resolving the error:
Purchase a license and activate the product.
If you are sure that the demo key file is valid, contact technical support and be ready to name the error
code.
Error message:Key file is blocked.
Error code: x100
Administrator Manual
165
Appendices
Description: Updates cannot be received as the used key file is blocked by Doctor Web.
Resolving the error:
Purchase a license and activate the product.
If you are sure that the used key file is valid, contact technical support and be ready to name the error
code.
Error message: Invalid configuration.
Error code: x102
Description: One of Dr.Web for UNIX File Servers components cannot be in operation due to
incorrect configuration settings.
Resolving the error:
SpIDer Guard: the specified operation mode is not supported by the operating system.
Execute the command
# drweb-ctl cfset LinuxSpider.Mode AUTO
to switch the operation of SpIDer Guard to automatic mode.
If the error persists, manually build and install the loadable kernel module to be used by SpIDer
Guard.
Note that operation of SpIDer Guard and of the loadable kernel module is guaranteed only on the
tested UNIX distributives (see System Requirements).
Other components:
Restore software defaults. For that purpose
1. Clear the contents of <etc_dir>/drweb.ini file It is recommended to back up the file
before the procedure. For example:
# cp /etc/opt/drweb.com/drweb.ini /etc/opt/drweb.com/drweb.ini.save
# echo "" > /etc/opt/drweb.com/drweb.ini
2. Execute the command
# service drweb-configd restart
to restart Dr.Web for UNIX File Servers.
If the error persists, contact technical support and be ready to name the error code.
Error message: Invalid executable file
Error code: x104
Description: An executable file of one of Dr.Web for UNIX File Servers components is unavailable or
corrupted.
Resolving the error:
Install the package with the necessary component:
o drweb-spider if the executable file of SpIDer Guard is invalid
o drweb-update if the executable file of Dr.Web Updater is invalid
Administrator Manual
166
Appendices
If the error persists or you cannot detect which executable file is invalid, remove Dr.Web for
UNIX File Servers and then install it again on the system.
For details on how to install and remove the product or product components, refer to the
Installation Procedure and Removing Solution.
If the error persists, contact technical support and be ready to name the error code.
Error message: invalid core engine file.
Error code: x105
Description: Dr.Web for UNIX File Servers cannot operate because the executable file of the
dynamic library for the anti-virus engine Dr.Web Virus-Finding Engine is unavailable or corrupted.
Resolving the error:
Update virus databases.
If the error persists, install the drweb-bases package containing virus databases and anti-virus
engine executable file.
If the error persists, remove Dr.Web for UNIX File Servers and then install it again.
For details on how to install and remove the product or product components, refer to the
Installation Procedure and Removing Solution.
If the error persists, contact technical support and be ready to name the error code.
Error message:No virus databases.
Error code: x106
Description: Dr.Web for UNIX File Servers cannot protect your computer because virus databases
are unavailable or corrupted.
Resolving the error:
Updatevirus databases.
If the error persists, install the drweb-bases package containing virus databases and anti-virus
engine executable file.
If the error persists, remove Dr.Web for UNIX File Servers and then install it again.
For details on how to install and remove the product or product components, refer to the
Installation Procedure and Removing Solution.
If the error persists, contact technical support and be ready to name the error code.
Error message: Incompatible software detected.
Error code: x109
Description: One of Dr.Web for UNIX File Servers components cannot be in operation as an
incompatible software is detected.
Resolving the error:
Disable or reconfigure the software so as to prevent any interference in Dr.Web for UNIX File
Servers operation.
If the error persists, contact technical support and be ready to name the error code.
Administrator Manual
167
Appendices
Error message: ScanEngine is not available.
Error code: x119
Description: Cannot check files as drweb-se module is missing or failed to start. This module is used
for searching malicious objects.
Resolving the error:
Execute the command
$ drweb-ctl rawscan /
If the output contains message Error: No valid license provided, the valid key file is
not available. Register the product and purchase the license. If you have the license, check that
the key file is placed to the valid directory and install it if necessary.
If you use 64-bit version of the operating system, make sure that 32-bit application support
libraries are installed (see System Requirements) and, if necessary, install them. After installing
the library, restart Dr.Web for UNIX File Servers by the following command
# service drweb-configd restart
If your operating system uses SELinux, configure the security policy for drweb-se module (see
Adjusting SELinux Policies).
Execute the command
# drweb-ctl cfshow ScanEngine.ExePath
If the output string differs from ScanEngine.ExePath
execute the following command:
=
<opt_dir>/bin/drweb-se,
# drweb-ctl cfset ScanEngine.ExePath <opt_dir>/bin/drweb-se
If the error persists, install drweb-se component (package) separately.
If the error persists, remove Dr.Web for UNIX File Servers and then install it again.
For details on how to install and remove the product or product components, refer to the
Installation Procedure and Removing Solution.
If the error persists, contact technical support and be ready to name the error code.
Error message: FileCheck is not available.
Error code: x120
Description: Cannot check files as a Scanner component drweb-filecheck, used for this function, is
missing.
Resolving the error:
If you use 64-bit version of the operating system, make sure that 32-bit application support
libraries are installed (see System Requirements) and, if necessary, install them.
If your operating system uses SELinux, configure the security policy for drweb-filecheck
module (see Adjusting SELinux Policies).
Execute the command
# drweb-ctl cfshow FileCheck.ExePath
If the output string differs from FileCheck.ExePath
filecheck, execute the following command:
=
<opt_dir>/bin/drweb-
Administrator Manual
168
Appendices
# drweb-ctl cfset FileCheck.ExePath <opt_dir>/bin/drweb-filecheck
If the error persists, install drweb-filecheck component (package) separately.
If the error persists, remove Dr.Web for UNIX File Servers and then install it again.
For details on how to install and remove the product or product components, refer to the
Installation Procedure and Removing Solution.
If the error persists, contact technical support and be ready to name the error code.
Error message: NetCheck is not available.
Error code: x123
Description: Cannot control Internet access as drweb-netcheck is missing or failed to start. The
module is used for a check of downloaded files.
Resolving the error:
Execute the command
# drweb-ctl cfshow NetCheck.ExePath
If the output string differs from NetCheck.ExePath = <opt_dir>/bin/drweb-netcheck,
execute the following command:
# drweb-ctl cfset NetCheck.ExePath <opt_dir>/drweb-netcheck
If the error persists, install drweb-netcheck component (package) separately.
If the error persists, remove Dr.Web for UNIX File Servers and then install it again.
For details on how to install and remove the product or product components, refer to the
Installation Procedure and Removing Solution.
If the error persists, contact technical support and be ready to name the error code.
Errors without codes
Symptoms:
Web browser cannot establish connection to Dr.Web management web interface; components of the
Dr.Web solution are not on the list of running processes, which is output by the command
ps ax | grep drweb); attempt to execute any drweb-ctl <command>, except for drwebctl rawscan, results in one of the following errors:
Error: connect: No such file or directory: "<path>/.com.drweb.public"
or
Error: connect: Connection refused: "<path>/.com.drweb.public".
Description:
Dr.Web for UNIX File Servers cannot start as the configuration daemon Dr.Web ConfigD is not
available.
Resolving the error:
Execute the command
# service drweb-configd restart
to restart Dr.Web ConfigD and Dr.Web for UNIX File Servers.
If the command returns an error or has no effect, install the drweb-configd package.
Administrator Manual
169
Appendices
Also note that this may mean that PAM authentication is not used in the system. If so, please install
and configure PAM (the product cannot operate correctly without PAM).
If the error persists, remove Dr.Web for UNIX File Servers and then install it again.
For details on how to install and remove the product or product components, refer to the
Installation Procedure and Removing Solution.
If the error persists, contact technical support.
Administrator Manual
170
Appendices
Appendix F. Building Kernel Module for SpIDer Guard
If the operating system does not support the fanotify monitoring interface, SpIDer Guard uses a
special loadable module operating in kernel space.
By default, SpIDer Guard is supplied with a completely built loadable kernel module for the CentOS
and Red Hat Enterprise Linux OSes, version 5.10 and 6.5, as these systems do not support
fanotify. Moreover, you can build a loadable kernel module manually using the source codes
supplied in atar.bz2 archive.
The loadable kernel module, used by SpIDer Guard, is intended for operation with Linux kernels 2.6
and newer.
The archive with source codes is located in the share/drweb-spider-kmod/src subdirectory of
the Dr.Web for UNIX File Servers base directory <opt_dir> (for Linux: /opt/drweb.com). The
archive's name is as follows: drweb-spider-kmod-<version>-<date>.tar.bz2.
The drweb-spider-kmod directory also contains the check-kmod-install.sh test script. Run the
script to check whether the used OS supports kernel versions included in the product. If not, a message
prompting to manually build the module displays on the screen.
If the drweb-spider-kmod directory is absent, install the drweb-spider-kmod package manually
(from the Dr.Web Repository or by custom installation from the universal package, depending on the
way of the product installation).
To build the loadable kernel module manually from the source codes, administrative (root) privileges are
required. For that purpose, you can use the su command to switch to another user or thesudo command
to build the module as a different user.
To build kernel module
1. Unpack the archive with source codes to any directory. For example, the following command
# tar -xf drweb-spider-kmod-<version>-<date>.tar.bz2
unpacks the source codes to the created directory. This directory has the archive's name and is
created in the same location where the archive resides.
2. Go to the created directory and execute the following command:
# make
If an error occurs during make command execution, resolve the issue see below) and restart
compilation.
3. After successful command execution, enter the following commands:
# make install
# depmod
4. After the kernel module is successfully compiled and registered on the system, perform additional
configuration of SpIDer Guard. Set the component to operate with the kernel module by executing
the following command:
# drweb-ctl cfset LinuxSpider.Mode LKM
It is also possible to specify AUTO instead of LKM. In the latter case, SpIDer Guard will attempt to
use kernel module and the monitoring interface fanotify. For details, type the following
command:
Administrator Manual
171
Appendices
$ man drweb-spider
Possible build errors
While the make command is being executed, errors may occur. If so, check the following:
To ensure successful building of the module, Perl and GCC are required. If they are missing on the
system, install them.
On certain OSes, you may need to install the kernel-devel package before starting the
procedure.
On certain OSes, the procedure can fail because the path to the directory with source codes was
incorrectly defined. If so, specify the make command with the KDIR=/path/to/kernel/source/
codes parameter. Typically, the source codes are located in the /usr/src/kernels/
<kernel_version> directory. Note that the kernel version returned by the uname -r command
can differ from the directory name <kernel_version>!
Administrator Manual
172
Appendices
Appendix G. Building VFS SMB Module for Samba
If it is detected during the product installation that the Samba version used on your file server is
incompatible with all the supplied versions of the VFS SMB modules for SpIDer Guard for SMB, you
need to build the VFS SMB module manually using the supplied source codes.
The source codes of the VFS SMB module for SpIDer Guard for SMB are supplied in the additional
package named drweb-smbspider-modules-src. The package contains a drweb-smbspider10.1.0.src.tar.gz archive with the source codes. This archive is placed into /usr/src/ directory.
If the archive is absent in this directory, install the package with the source codes manually (from the
Dr.Web Repository or by custom installation from the universal package, depending on the way of the
product installation).
Beside the source codes of the VFS SMB module, you also need the source codes of Samba installed
on your file server. If you do not have the source codes, download them from the developer's source,
for example https://www.samba.org/samba/download/. To determine which version of the Samba is
installed on your file server, use the following command:
$ smbd -V
To build the VFS SMB module for SpIDer Guard for SMB, the source codes of the actual version of
Samba installed on your server must be used. Otherwise, correct operation of the SpIDer Guard for
SMB is not guaranteed.
To build the module manually from the source codes, administrative (root) privileges are required. For
that purpose, you can use the su command to switch to another user or thesudo command to build the
module as a different user.
To build the VFS SMB module
1. Unpack the archive with the VFS SMB module source codes to any directory. For example, the
following command
# tar -xf drweb-smbspider-10.1.0.src.tar.gz
unpacks the source codes to the created directory. This directory has the archive's name and is
created in the same location where the archive resides.
2. Determine the version of Samba installed on your server and download its source codes if
necessary.
3. Determine if the version of Samba installed on your server uses the CLUSTER_SUPPORT option. To
do that, use the following command:
$ smbd -b | grep CLUSTER_SUPPORT
If the output contains the CLUSTER_SUPPORT string, the version of Samba installed on your server
uses the CLUSTER_SUPPORT option.
4. Go to the directory with the Samba source codes, configure (./configure) and then build it
(make). When configuring, define the correct value for the CLUSTER_SUPPORT option according to
the Samba installed on your server. To learn to configure and build Samba, refer to developer's
official documentation, for example at https://www.samba.org/samba/docs/.
Note that building Samba from the source codes is necessary only for the correct building of the
VFS SMB module in the next step. You do not have to replace Samba already installed on your
server with the new binaries built from the source codes.
Administrator Manual
173
Appendices
5. When you have successfully built Samba, go to the directory with the VFS SMB module source
codes and issue the following command:
# ./configure --with-samba-source=<path_to_dir_with_Samba_src> && make
where <path_to_dir_with_Samba_src> is the path to the directory where Samba was built in
the previous step.
6. When you have successfully built the VFS SMB module, copy the libsmb_spider.so binary file
from the .libs subdirectory (created while building) to the directory for the VFS modules of the
installed Samba (by default, for Linux, it is /usr/lib/samba/vfs) and rename it to
smb_spider.so. To do that, use the following command:
# cp ./.libs/libsmb_spider.so /usr/lib/samba/vfs/smb_spider.so
7. After copying of the built VFS SMB module, you can delete the directories were the VFS SMB
module and the Samba were built.
8. After that, it is necessary to complete integration between Dr.Web for UNIX File Servers and
the Samba server the way it is described in the corresponding chapter of the Administrator Manual.
Please note that in this case, in the first step of the integration, it is not necessary to create the
smb_spider.so symbolic link in the directory of the VFS modules of the installed Samba.
Administrator Manual
174
175
Index
Dr.Web SNMPD
[
140
Dr.Web Updater
[ClamD] section
136
[ESAgent] section
drweb-clamd
99
[FileCheck] section
drweb-configd
70
[HTTPD] section
[NSS] section
drweb-ctl
103
75
drweb-esagent
132
drweb-httpd
67
69
102
drweb-netcheck
81
drweb-nss
130
86
[SNMPD] section
142
drweb-se
[Update] section
94
drweb-smbspider-daemon
A
About
10
64
drweb-snmpd
140
drweb-spider
73
drweb-update
Anti-virus installation
Appendicies
129
98
drweb-filecheck
88
[ScanEngine] section
[SMBSpider] section
59
113
drweb-ctl usage examples
[LinuxSpider] section
[NetCheck] section
92
134
79
92
27
E
153
appendix
EICAR
computer threat types
19
153
fighting computer threats
156
F
fighting computer threats
B
Files permissions
Building kernel module
171
Building VFS SMB module
Functions
156
15
10
173
G
C
Get new version
Command-line management
Components
113
11
25
52
Graphical installer
computer threats
153
Configuration file
159
Configuration parameters
Console installer
28
Graphics uninstaller
159
34
Console uninstaller
Conventions
Getting Started
45
H
How to
56
48
I
7
Custom Installation
38
Installation from .run package
Installation from distribution
D
Installation from native packages
Dr.Web ClamD
Dr.Web ConfigD
Dr.Web Ctl
27
27
134
Installation from universal packages
59
Installation methods
113
98
Dr.Web File Checker
Dr.Web HTTPD
Installing anti-virus
69
27
25
Installing from Dr.Web Repository
102
27
27
Installation Procedure
Dr.Web ES Agent
40
40
Integration with client applications of ClamAV clamd
Dr.Web Network Checker
130
Integration with NSS
Dr.Web Scanning Engine
64
Integration with Samba
139
55
53
Administrator Manual
176
Index
Integration with SNMP monitoring systems
Introduction
Isolation
9
145
SELinux security
SMB Directories Monitor
14
K
24
Key file management
Known Errors
79
SNMP monitoring systems
SpIDer Guard
Key file
41
22
73
SpIDer Guard for NSS
86
SpIDer Guard for SMB
79
Standalone mode
163
16
Starting command-line tool
Starting uninstaller
L
Structure
License key file
145
24
44
11
Subsequent Registration
License management
22
Linux File System Monitor
113
System Requirements
22
20
73
T
M
Tasks
management via web browser
Mobile mode
Modules
16
106
10
Technical support
158
Testing Anti-virus
19
11
Monitoring systems
U
145
Uninstalling Anti-virus
N
Upgrade
NSS Volumes Monitor
44
25
86
O
Operating systems
Operation modes
20
16
P
permissions
15
Product files
43
Q
Quarantine
14
Quarantine directory
Quick Guide
14
56
R
Registration
22
Removing Anti-virus
25, 44
Removing from repository
Removing native packages
Removing uninstaller
51
51
44
S
SELinux configuration
SELinux problems
41
41
Administrator Manual
© Doctor Web, 2015