1
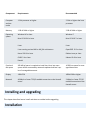
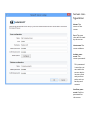
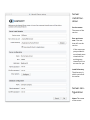
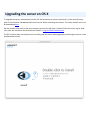
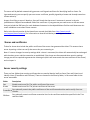
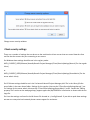
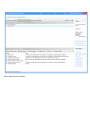
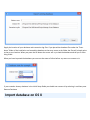
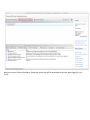
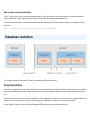
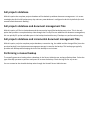
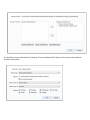
System administrator guide
This guide is intended for people responsible for installing, configuring and maintaining Hansoft Servers and Clients.
The server is mainly administrated with the Hansoft Server Administration tool, which is included when installing
the server package. Some tasks are performed from the command line.
Feedback
Feedback can be sent to [email protected].
System requirements
Server
Component
General
2-50 users
50 to 100 users
100 to 500 users*
Computer
and processor
AMD Opteron or Intel
Core based system
architecture
Quad Core, 3.0
GHz or faster.*
Quad Core, 3.0
GHz or faster.*
4-8 Cores, 3.0 GHz
or faster.*
8 GB
16 GB
32 GB
64-bit operating
system
64-bit operating
system
64-bit operating
system
100 GB
200 GB
1000 GB
Memory
Operating
system
64-bit operating system
- Windows server
2008 or later
- OS X 10.6 or later
- Linux *
Free hard
disk space
Hard disk
performace
I/O Subsystem capable of 2000 random IOP/s
I/O Subsystem capable of 2000 random IOP/s
I/O Subsystem capable of 2000 random IOP/s
Network
Connection with
100 Mbit/s or
higher upload
bandwidth
Connection with
100 Mbit/s or
higher upload
bandwidth
Connection with
100 Mbit/s or
higher upload
bandwidth
Other
For e-mail notifications, access to an
SMTP server is necessary
*) Component: For team sizes exceeding 500 users, please contact: [email protected].
*) Computer and processor: If several databases are going to be hosted on the same server additional cores can
be beneficial.
*) Tested on the following Linux distributions:
l
l
l
l
l
l
Red Hat 5.9 and 6.4
CentOS 5.9 and 6.4
Debian Lenny and Wheezy
Fedora 18 and 19
Ubuntu 12.04 and 13.04
OpenSUSE 12.3
When running a virtualized environment CPU resources can be over-provisioned to account for utilization spikes
during user logins.
Note that a large database may require a more powerful setup than is implied by the number of users in the
table above. For example, a 50 GB database used by 200 users may require 16 GB of memory for optimal performance.
Client
Component
Requirements
Recommended
Computer
and processor
1 GHz processor or higher
2 GHz or higher dual core
processor
Memory
1 GB of RAM or higher
2 GB of RAM or higher
Operating
system
Windows XP or later
Windows 7
Mac OS X 10.6 or later
Mac OS X 10.7 or later
Linux
Linux
Linux running on Intel x86 or x86_64 architecture
OpenSUSE 12.3 or later
Kernel 2.6.18 or later
Debian Lenny or later
GLIBC 2.4 or later
Ubuntu 12.04 or later
libuuid
Free hard
disk space
200 MB of space is required to install the client, but more
space will be consumed by automatic updates and local copies of managed documents
10 GB free space for managed documents
Display
1280×720
1600×1200 or higher
Network
48 Kbit/s or faster TCP/IP enabled connection to the Hansoft
server
2 Mbit/s or faster TCP/IP
enabled connection to the
Hansoft server
Installing and upgrading
This chapter describes how to install and what to consider before upgrading.
Installation
Download the installation package for your operating system and launch the installer. The process of launching and
executing the server installation will differ depending on the operating system. To learn more about each specific
installation process please consult one of the following guides.
Installing the server on Windows
Installing the server on OS X
Installing the server on Linux
Setting the license
Your initial license will be delivered by email. To set your license, refer to Licenses: Setting the license manually
If this is a first time install, make sure to read these manual pages detailing information related to server setup.
Logs and E-mail notifications.
Hansoft server on Windows
Installing the server on Windows
To install the Hansoft Server start by downloading the server installer from our website. Run the installer and
install the program where you want the database files to be located.
During the installation a guide will let you configure your administrator password and create a database.
Server configuration
Name The
name of the
server
Port The port
that will be used
by the server
Hostname The
server address
Admin password The
server password
This password
is used to connect with the
server administrator client
and perform
tasks such as
backup and
restore.
Confirm password Confirm
password for
the server
Database configuration
Name The name of the database
Admin password The password for the administrator of the database
This password will let you log in with the client and perform administrative tasks such as creating users and projects.
Confirm password Confirm password for the administrator
Upgrading the server on Windows
To upgrade the server, download the installer for the desired server version and install it in the same directory
path as the old server. Do not uninstall the old server before launching the installer. The latest Hansoft server can
be downloaded here.
Check the server log for any problems after the installation has finished (see Chapter 2: Logs and Email Notifications).
The Windows installer does not require you to manually stop the service when upgrading. Restarting the service is
also handled automatically.
Hansoft on Mac OS X
Installing the server on OS X
To install the Hansoft server on Mac OS X, first download the .dmg installation file from the Hansoft website.
Once you have saved the dmg file on your hard drive, double-click it and follow the instructions.
During the installation a guide will let you configure your administrator password and create a database.
Server
install location
Service name
The name of the
service.
Run service as
user The user
that will run the
service.
If the username
you provided is
not already associated with an
existing user,
Hansoft will create one for you.
Install directory
The directory in
which you install
the server.
Server configuration
Name The name
of the server
Port The port
that will be used
by the server
Hostname The
server address
Admin password
The server password
This is the password used to
login to the
server administrator client
and is used to
perform administrative tasks
such as backup
and restore.
Confirm password Confirm
password for the
server
Table Column Outside Table:
Table Section Outside Table:
Table Row Outside Table:
Table Cell Outside Table: Database configuration
Table Row Outside Table:
Table Cell Outside Table: Name The name of the database.
Table Row Outside Table:
Table Cell Outside Table: Admin password The password for the Administrator user of the database. This password is used to login to the Hansoft client and perform administrative actions for this database.
Table Row Outside Table:
Table Cell Outside Table: Confirm password Confirm password for the database.
Upgrading the server on OS X
To upgrade the server, download the installer for the desired server version and install it in the same directory
path as the old server. Do not uninstall the old server before launching the installer. The latest Hansoft server can
be downloaded here.
Run the installer and install to the same location you have the old server installed. Check the server log for problems after the installation has finished (see Chapter 2: Logs and Email Notifications).
The OS X installer does not require you to manually stop the service when upgrading. Restarting the service is also
handled automatically.
Follow the instructions provided by the dialog box to complete the server upgrade.
Hansoft server on Linux
Installing the server Linux
To install the Hansoft server on a Linux-based OS, start by downloading the installation package from the Hansoft
website.
Run the installation and when asked, install the program where you want the database files to be located. You can
later move the database, backup and transaction log location. The default location is however under the server program directory. /opt is a common install location for optional software on Linux.
Installation process break-down
The following actions are performed by the installer.
-Creates a server state
-Creates a database
-Creates user and group to run as unless they already exists
-Registers server as a system service allowing it to start at boot
-Starts the service
Interactive setup
Note that in this example we are installing version 7.1580 of the Hansoft server for Linux.
Start by extracting the contents of the zip file
unzip "Hansoft Server 7.1580 Linux2.6 x64.zip"
Once you have extracted the package at a desired location, navigate to the Hansoft server directory.
Run the -Install command from the HPMServer.
./HPMServer -Install
Non-interactive setup
If you do not wish to install interactively, for example when using an installation script, you can add these commands after -Install in order to pre-define some or all settings.
-ServerName <name>
-ServerHostname <name>
-Port <port>
-ServerAdminPassword <password>
-DatabaseName <name>
-DatabaseAdminPassword <password>
-SMTPServer <server address>
-SMTPPort <port>
Name of server.
Hostname server is accessed through.
Port server should listen to.
The password for the server administrator client.
Create database with name.
Password for 'Administrator' in created database.
Email notifications SMTP server.
Email server port.
-EmailFromName <name>
-EmailFrom <email address>
-EmailSubject <subject>
-EmailToEmail <target address>
-Service <name>
-RunAsUser <name>
-RunAsGroup <name>
Name appearing as from on emails.
Email address appearing on the emails sent from the server.
Subject of email notifications.
Email to send notifications to.
The unique name of the service.
The user to run the service as.
The group to run the service as.
Check the server log for any problems after the installation has finished (see Chapter 2: Logs and Email Notifications).
Upgrading the server Linux
Download the server version you wish to upgrade to. The latest Hansoft server can be downloaded here.
Before you attempt to upgrade the Hansoft server make sure that you backup and stop the active service. Follow
these steps to ensure that the upgrade procedure is executed correctly.
1.Backup and stop
To backup the database and stop the service you should run:
./HPMServer -BackupAndStop
Backs up all databases and stops the service. Should be run before upgrades to reset transaction logs.
2.Installation
Note that in this example we are installing version 7.1580 of the Linux server.
Unzip the package into the directory were you installed the old server and let it overwrite the outdated files.
unzip "Hansoft Server 7.1580 Linux2.6 x64.zip"
Select [A]ll to replace all old files.
3.Upgrade
Run the -Upgrade command through the HPMServer.
./HPMServer -Upgrade
This will fix file permissions.
4.Starting the service
Run the -StartService command through the HPMServer to start up the service.
./HPMServer -StartService
Hansoft client
The Hansoft client can be installed from http://www.hansoft.com/get-hansoft. Other deployment options are possible, see "Client deployment" below.
Hansoft client does not require administration rights to run. The client does require write access to the user's
home directory.
System Requirements
Component
Computer and processor
Memory
Operating system
Requirement
1 GHz processor or higher
256 MB of RAM or higher
Windows XP or later
Mac OS X 10.6 or later
Linux
OpenSUSE 12.3 or later
Debian Lenny or later
Free hard disk space
Display
Other
Network
*Linux specific
Ubuntu 12.04 or later
200 MB
1280×720 or higher on computer running Hansoft Project Manager Server Administrator
For e-mail notifications access to a SMTP server without SSL requirement in necessary
1 Mbit/s connection for hosting client access
Linux running on Intel x86 or x86_64 Architecture
Kernel 2.6.18 or later
GLIBC 2.4 or later
libuuid
Client deployment
There are four ways in which the Hansoft client can be deployed to users:
1. Standard installation: The client can be installed on a user's machine the same as any other software
2. Network installation: The client can be installed on a network share accessible to all users
3. VM installation: The client can be installed on a virtual machine on a user's machine
4. Remote: The client can be used over terminal services or similar
The most common deployment method is a standard installation (#1). In this situation the Hansoft client on the
user's machine will automatically upgrade or downgrade to match the version of the server the client is connecting
to. Hansoft is capable of connecting to servers running different versions from a single client installation.
A network installation (#2) can be used in situations where you want to have one common installation for all users.
The Hansoft client fully supports running from a shared folder - the automatic upgrade and downgrade mechanism fully handles this situation. If the shared network location is read only for users Hansoft will download any
alternate versions required to a user local directory to allow the user to connect to servers running versions other
than the version of the client installed on the network share.
The Hansoft client works well in VMs such as Parallels and VMWare (#3). Ensure that the VM is setup to meet the
system requirements of the Hansoft client (see System requirements in the Hansoft user manual).
Hansoft also works over services such as Terminal Services, although performance will not be ideal.
Document management local storage
When the user wants to read or edit a document in document management that document must be downloaded to
the user's machine. The location of downloaded documents can be set in the user's personal settings. Consult the
Hansoft user manual for more information on how to set this.
The default location of the local storage for document management is as follows:
Platform Location
Operating system
Location
Windows
The folder "My Documents\Hansoft" in the user's home directory.
OS X
The folder "Documents/Hansoft" in the user's home directory.
Linux
The folder "Documents/Hansoft" in the user's home directory.
When users are going to be offline and unable to contact the server and still want to be able to read documents
they can copy the documents to the local storage. Users can also check documents out before going offline to be
able to edit them while offline.
Hansoft will never delete files that are in the document management system from the local storage so it might
grow large with time. It is safe to delete these files as long as none of them are checked out. Check from the user's
client if it has any files are checked out before deleting this folder.
Administrative tasks
This chapter contains descriptions of common administrative tasks you might perform during the operation of
Hansoft Server.
Server command line
Windows
Command line
-AddService <Service Name>
-AddServiceIfNotAdded <Service Name>
-RemoveService <Service Name>
-StartService <Service Name>
-StopService <Service Name>
-RunAsProgram
-Service <Service Name>
-Version
Description
Adds the current executable to the system as a service.
Adds the current executable to the system as a service if a service
with the same name does not exist.
Removes the program from the system server list.
Attempts to start the service.
Attempts to stop the service.
Runs the server as a usual program in the background.
Starts the program as a service. Only used by the system.
Displays the program version.
-ResetAdminPassword
-OverridePort <Port>
-CreateConfig <Configuration File>
-UploadDumps <Email Address>
-ConfigGUI
-BackupAllDatabases
-BackupAndStop
Resets the admin password.
Overrrides the port used for this server during this session.
Creates an initial configuration. The parameters are as follows: CreateConfig ServerName ServerAdminPassword ServerPort
bCreateDatabase [DatabaseName DatabaseAdminPassword].
Uploads crash dumps to Hansoft support, the email address is the
address you wish support to contact you with.
Runs the initial configuration.
Stops listening for connections, gracefully logs out all users and then
does a backup of all online databases. Used during upgrades on Windows systems. If you have run this command you need to restart the
service to accept connections again.
The same as -BackupAllDatabases, but additionally stops service after
all databases have finished backing up. Should be run before upgrades
to reset transaction logs.
-CreateConfig Creates a initial configuration from a text file.
The file can contain the following key-value pairs:
ServerName "<ServerName>"
ServerPassword "<Password>"
ServerPort "<Port>"
ServiceName "<ServiceName>"
DatabaseHostname "<Hostname>"
DatabaseName "<Name>"
DatabasePassword "<Password>"
Optional.
Required. Password for server administrator.
Optional.
Optional.
Optional.
Optional.
Required. Password for database administrator.
To configure the server email functionality the file should also contain the following pairs:
Email_OutgoingServer "<Hostname>"
Email_FromName "<Name>"
EmailSubject "<subject>"
EmailToEmail "<target address>"
Email_FromEmail "<Address>"
Email_Subject "<Subject>"
Email_SendTo "<Addresses>"
Email_Authentication "<0/1>"
Email_UserName "<Username>"
Outgoing email server hostname.
Email Address appearing as from on emails.
Subject of email notifications.
Sender name.
Sender address.
Subject of email.
Recipients. Seperate multiple entries by comma, semicolon or space.
Authentication: 0 = Disable, 1 = Enable.
Email username.
Email_Password "<Password>"
Email_SecurityProtocol "<0/1/2>"
Email_EmailLog "<0/1>"
Email_SendTestEmail "<0/1>"
Email_OutgoingPort "<Port>"
Email password.
Protocol: 0 = None, 1 = SSL, 2 = TLS.
Log outgoing emails: 0 = Disable, 1 = Enable.
Send test email when starting up: 0 = Disable, 1 = Enable.
Port number.
Mac OS X
Command line
-AddService <Service Name>
-AddServiceIfNotAdded <Service Name>
-RemoveService <Service Name>
-StartService <Service Name>
-StopService <Service Name>
-RunAsProgram
-Service <Service Name>
-Uninstall <Service Name>
-Version
-ResetAdminPassword
-OverridePort <Port>
-CreateConfig <Configuration File>
-RunAsUser
-RunAsGroup
-BackupAllDatabases
-BackupAndStop
Description
Adds the current executable to the system as a service.
Adds the current executable to the system as a service if a service
with the same name does not exist.
Removes the program from the system server list.
Attempts to start the service.
Attempts to stop the service.
Runs the server as a usual program in the background.
Starts the program as a service. Only used by the system.
Backs up the database, stops the service and removes the service from
the system.
Displays the program version.
Resets the admin password.
Overrides the port used for this server during this session.
Creates an initial configuration.
The user to run the service as.
The group to run the service as.
Stops listening for connections, gracefully logs out all users and then
does a backup of all online databases. Used during upgrades on Windows systems. If you have run this command you need to restart the
service to accept connections again.
The same as -BackupAllDatabases, but additionally stops service after
all databases have finished backing up. Should be run before upgrades
to reset transaction logs.
-CreateConfig Creates a initial configuration from a text file.
The file can contain the following key-value pairs:
ServerName "<ServerName>"
ServerPassword "<Password>"
ServerPort "<Port>"
ServiceName "<ServiceName>"
DatabaseHostname "<Hostname>"
DatabaseName "<Name>"
DatabasePassword "<Password>"
Optional.
Required. Password for server administrator.
Optional.
Optional.
Optional.
Optional.
Required. Password for database administrator.
To configure the server email functionality the file should also contain the following pairs:
Email_OutgoingServer "<Hostname>"
Email_FromName "<Name>"
EmailSubject "<subject>"
EmailToEmail "<target address>"
Email_FromEmail "<Address>"
Email_Subject "<Subject>"
Email_SendTo "<Addresses>"
Email_Authentication "<0/1>"
Email_UserName "<Username>"
Email_Password "<Password>"
Email_SecurityProtocol "<0/1/2>"
Email_EmailLog "<0/1>"
Email_SendTestEmail "<0/1>"
Email_OutgoingPort "<Port>"
Outgoing email server hostname.
Email Address appearing as from on emails.
Subject of email notifications.
Sender name.
Sender address.
Subject of email.
Recipients. Seperate multiple entries by comma, semicolon or space.
Authentication: 0 = Disable, 1 = Enable.
Email username.
Email password.
Protocol: 0 = None, 1 = SSL, 2 = TLS.
Log outgoing emails: 0 = Disable, 1 = Enable.
Send test email when starting up: 0 = Disable, 1 = Enable.
Port number.
Linux
Command line
-AddService <Service Name>
-AddServiceIfNotAdded <Service Name>
-RemoveService <Service Name>
-StartService <Service Name>
-StopService <Service Name>
-RunAsProgram
Description
Adds the current executable to the system as a service.
Adds the current executable to the system as a service if a service
with the same name does not exist.
Removes the program from the system server list.
Attempts to start the service.
Attempts to stop the service.
Runs the server as a usual program in the background.
-Service <Service Name>
-Uninstall <Service Name>
-Install <Service Name>
-Upgrade
-Version
-ResetAdminPassword
-OverridePort <Port>
-CreateConfig <Configuration File
-UploadDumps <Email Adress>
-BackupAllDatabases
-BackupAndStop
Starts the program as a service. Only used by the system.
Backs up the database, stops the service and removes the service from
the system.
Installs service interactively in console.
Fixes file permissions after upgrade.
Displays the program version.
Resets the admin password.
Overrrides the port used for this server during this session.
Creates an initial configuration using a configuration file.
Uploads crash dumps to Hansoft support, the email address is the
address you wish support to contact you with.
Stops listening for connections, gracefully logs out all users and then
does a backup of all online databases. Used during upgrades on Windows systems. If you have run this command you need to restart the
service to accept connections again.
The same as -BackupAllDatabases, but additionally stops the service
after all databases have finished backing up. Should be run before
upgrades to reset transaction logs.
After the -Install Command:
-ServerName <name >
-ServerHostname <name>
-Port <port>
-ServerAdminPassword <password>
-DatabaseName <name
-DatabaseAdminPassword <password>
-SMTPServer <server address>
-SMTPPort <port>
-EmailFromName <name>
-EmailFrom <email address>
-EmailSubject <subject>
-EmailToEmail <target address>
-Service <name>
-RunAsUser <name>
-ServerName <name>
Name of server.
Hostname server is accessed through.
Port server should listen to.
The password for server administrator client.
Create database with name.
Password for 'Administrator' in created database.
Email notifications SMTP server.
Email server port.
Name appearing as from on emails.
Email Address appearing as from on emails.
Subject of email notifications.
Email to send notifications to.
The unique name of the service.
The user to run the service as.
Name of server.
-CreateConfig Creates a initial configuration from a text file.
The file can contain the following key-value pairs:
ServerName "<ServerName>"
ServerPassword "<Password>"
ServerPort "<Port>"
ServiceName "<ServiceName>"
DatabaseHostname "<Hostname>"
DatabaseName "<Name>"
DatabasePassword "<Password>"
Optional.
Required. Password for server administrator.
Optional.
Optional.
Optional.
Optional.
Required. Password for database administrator.
To configure the server email functionality the file should also contain the following pairs:
Email_OutgoingServer "<Hostname>"
Email_FromName "<Name>"
EmailSubject "<subject>"
EmailToEmail "<target address>"
Email_FromEmail "<Address>"
Email_Subject "<Subject>"
Email_SendTo "<Addresses>"
Email_Authentication "<0/1>"
Email_UserName "<Username>"
Email_Password "<Password>"
Email_SecurityProtocol "<0/1/2>"
Email_EmailLog "<0/1>"
Email_SendTestEmail "<0/1>"
Email_OutgoingPort "<Port>"
Outgoing email server hostname.
Email Address appearing as from on emails.
Subject of email notifications.
Sender name.
Sender address.
Subject of email.
Recipients. Seperate multiple entries by comma, semicolon or space.
Authentication: 0 = Disable, 1 = Enable.
Email username.
Email password.
Protocol: 0 = None, 1 = SSL, 2 = TLS.
Log outgoing emails: 0 = Disable, 1 = Enable.
Send test email when starting up: 0 = Disable, 1 = Enable.
Port number.
Hansoft Server Administrator
The Hansoft Server Administrator is used to remotely administrate the project server. The program is installed with
the server installation and is optionally installed with the client installation.
To start the Server Administrator use the shortcut created in the start menu, or use the following command from
the command line:
Windows
HPMClient.exe -AdminServer
OS X
open -a Hansoft --args -AdminServer
Linux
./Hansoft -AdminServer.
The program will ask you to fill in the address of the server you want to connect to. This address is either the IP
address of the server or a hostname.
The password that you are asked to supply is the server administrator password that you set during installation of
the server. If you skipped the initial setup guide the default password is "hpmadm". You should change the default
password as quickly as possible if you didn't supply a password during setup.
Remote access
There are a number of ways to allow users to use Hansoft remotely from home or outside of your local network.
The easiest way is to allow users to connect to the server directly over the Internet. All communication after the
syncing process is finished is handled with 256-bit AES encryption with a key created from the users password. To
allow users to connect to the server over the Internet you need to forward the server port to the Hansoft Server
machine. The default port is 50256 and can be configured in the Server Administrator.
If you want more secure communication you could let the user connect over a VPN connection.
It is also possible to run the Hansoft Client in a Terminal Server environment. Performance will not be optimal and
it is recommended to allow users to connect directly to the server instead
Security
The topic of computer security is a complex and technical one. If you are at all unsure about any of the information
provided below please do not hesitate to contact Hansoft support [email protected].
Protection of project data
During normal operation the Hansoft client will hold portions of the Hansoft database in memory. When the client
is disconnected from the server (for example by the user logging out) the client will save a cache of the database
that it holds to disk. This cache is stored on the users hard drive encrypted with AES-256. The encryption key used is
provided by the server and is not stored on the users machine. This means that once a user logs out of Hansoft on
their machine any information in the Hansoft projects they are a member of is not available to anyone but that
user.
Any documents that the user may have downloaded from a Hansoft project are not encrypted.
Connection security
When a Hansoft client connects to a server the following steps take place to ensure the security of the connection:
1) Client connects to the server using SSL (provided by the industry standard OpenSSL library)
1.1) The server proves its identity to the server via its X.509 certificate.
1.2) The client decides whether or not to trust the server by either presenting the certificate to the
user or by validating the certificate against the trust store of the client.
1.3) The server can optionally require the client to provide its own certificate to allow the server to
verify the identity of the client.
2) Once a secure connection is made and both the client and server are satisfied with the identity of the other the
connection transitions into an AES-256 encrypted connection in CBC mode using the same encryption key as was
negotiated during the SSL connection process.
All communication between the server and client occurs over this secured connection.
A number of settings on both the server and client machines can be used to control aspects of the connection process. These settings are diskussed in the sections "Server security settings" and "Client security settings" below.
Certificates
Hansoft supports X.509 Base64 encoded DER certificates.
The server will by default automatically generate a self signed certificate for identifying itself to clients. For
improved security you can specify your own server certificate, possibly signed by a known and already trusted certificate authority.
As part of verifying a server's identity a client will check that the server's hostname is present in the subjectAltName or subjectCommonName field of the certificate. If you generate your own server certificate ensure
that you include the DNS entry for each databases hostname in the subjectAltName field to avoid hostname mismatch validation errors when clients connect.
Refer to the Security section of the Hansoft user manual (available from http://www.hansoft.com/support/documentation/) for information on how the validation process appears in the client.
Shares and certificates
Tickets for shares also include the public certificate of the server that generated the ticket. This ensures that a
server importing a ticket can verify the server they are connecting to.
Note: If a server changes its security settings while a share is connected, the ticket will automatically be exchanged
with the other server and the connection re-established. If the shares are disconnected when security settings
change you will be required to generate the ticket again (which will now contain the new certificate of the server)
and re-import it.
Server security settings
There are four folders that contain certificates that are used to identity itself to clients (Cert and Private) and
identify clients (TrusedCerts and CRLStore). These are located in the Security folder, in the same folder as the
server executable.
Folder
Cert
Private
Description
Should contain one file: The public certificate of the server
Should contain one file: The private certificate of the server
Can optionally contain the public certificates of the certificate authorities used to verify client cerTrustedCerts
tificates
Can optionally contain certificate revocation lists for the certificate authorities specified in the TrusCRLStore
tedCerts folder.
If you have Hansoft running in an environment where you do not want the "downloading of new versions of the client to outdated clients when they connect" you can disable this feature via the Security Options dialog in the Server
Administrator Client.
You can also control whether or not you wish to allow insecure connections from out of date SDKs from within the
Security Options dialog. By default insecure connections from out of date SDKs are allowed.
The Hansoft server administrator client.
Change server security window.
Client security settings
There are a number of settings that can be set on the machine the client runs on that can control how the client
verifies that the servers they are connecting to are secure.
On Windows these settings should be set in the registry under:
HKEY_CURRENT_USER/Software/Hansoft/Hansoft Project Manager/Client/SecuritySettings/Normal (For the regular
client)
or
HKEY_CURRENT_USER/Software/Hansoft/Hansoft Project Manager/Client/SecuritySettings/ServerAdmin (For the
server admin client)
On OS X these settings should be set in the "se.hansoft.Hansoft Project Manager.plist" file in the Library/Preferences folder in the users home folder. Settings for the regular client use the "Client.SecuritySettings.Normal." prefix. Settings for the server admin client use the "Client.SecuritySettings.ServerAdmin." prefix. Consult the "Editing
property lists" section on the web page http://support.apple.com/kb/HT4850 for information on how to edit the settings file.
On Linux the settings are found in the INI format file located at ~/.config/Hansoft. If you wish to push these settings
out over an enterprise level network please contact support for assistance.
Registry Key
Value/Description
AllowUserTrustDecisions
Value of 1: should Hansoft be unable to determine whether a certificate presented to it by a server can be trusted, the user will be
shown the certificate sent by the server. The user will be able to decide
whether to continue with the connection. This setting also determines
whether a user can choose to connect to a server that has identified
itself as a Hansoft server that pre-dates certificate authentication support.
Value of 0: the user is not able to make decisions on certificate trust. If
Hansoft is unable to verify a certificate, the connection will fail.
This is enabled by default.
UserCanStoreTrustedCertificates
This key is only applicable if AllowUserTrustDecisions has a value of 1.
Value of 0: the user is not permitted to allow Hansoft to remember certificates that they have manually trusted in the past.
Value of 1: The user is permitted to allow Hansoft to remember certificates that they have manually trusted in the past. This list can be
managed from the Connect options UI within the Hansoft client.
This is enabled by default.
VerificationDepth
A value ranging between 0 and 9. This determines the limit up to which
depth certificates in a chain are used during the verification procedure.
If the certificate chain is longer than allowed, the certificates above the
limit are ignored.
PublicCertificate
String consisting of the public certificate used by the client.
PrivateKey
String consisting of the private key used by the client.
CertificateAuthorityCertificate
String consisting of the public certificate of the certificate authority
used by the client to verify certificates presented by Hansoft servers.
It is also possible to supply a path to the public certificate of the certificate authority. This value should be added as a registry key named CertificateAuthorityPath
CertificateRevocationList
String consisting of the certificate revocation list of the certificate
authority used by the client.
It is also possible to supply a path to the CRL file. This value should be
added as a registry key named CertificateRevocationListPath
ValidateHostNameMatchesSAN
A value of 1 indicates that the client should validate that the certificate
is valid for the hostname that is being connected to.
This is enabled by default.
AllowUserToIgnoreValidationErrors
A value of 1 indicates that the user is allowed to ignore validation
errors such as hostname mismatches and expired certificates.
This is enabled by default.
Database files
Import database files
Import database on Windows
Moving a database
You may want to move databases between servers, or maybe move a database from a trial server installation. To
do this, locate where the original server was installed and copy the directory for the database you want to move.
Before copying it is recommended to install the same version of the server that you are going to install on the new
machine to minimize the risk of incompatibilities. Also make sure to stop the Hansoft Server service before you
copy the database to make sure you get a consistent copy using:
-StopService <Service Name>
The default location for the databases is:
C:\Program Files\Hansoft\Project Manager Server\Databases\
Once you have the database copied, install a server on the new machine (if you don't have a server installed).
When the configuration guide starts you may either run through it, or skip it and configure everything manually. If
you run through the configuration guide let it create a dummy database that can later be deleted.
Now put the copied database directory either under the Databases directory in the directory where you installed
the server, or in a place of your choosing (see Choosing where to put the different database files).
When you have the database files where you want them, start Hansoft Server Administrator from the shortcut in
the start menu and connect to the server (see Hansoft Server Administrator).
If this is a newly installed server, start by changing the license to the license supplied by email.
Now press Import Existing Database . Supply the name of the database that will be presented to the user when logging in to a server.
Server administrator window.
Supply the location of your database and transaction log files. If you placed the database files under the "Databases" folder of the installation and named the database to the same name as the folder the files will already point
to the correct location. When you press the OK button the server will try to load the database and tell you if something failed.
When you have imported the database you must set the state to Online before any users can connect to it.
If you created a dummy database in the Initial Setup Guide you should now remove it by selecting it and then press Remove Database
Import database on OS X
Moving a database
You may want to move databases between servers, or maybe move a database from a trial server installation. To
do this, locate where the original server was installed and copy the directory for the database you want to move.
Before copying it is best to install the same version of the server that you are going to install on the new machine
to minimize the risk of incompatibilities. Also make sure to stop the Hansoft Server service before you copy the
database to make sure you get a consistent copy. The default location for the databases would be:
/Applications/Hansoft Server/Databases
Once you have the database copied, install a server on the new machine (if you don't have a server installed).
When the configuration guide starts you may either run through it, or skip it and configure everything manually. If
you run through the configuration guide let it create a dummy database that can later be deleted.
Now put the copied database directory either under the "Databases" directory in the directory where you installed
the server, or in a place of your choosing (see Choosing where to put the different database files).
When you have the database files where you want them, start Hansoft Server Administrator and connect to the
server (see Hansoft Server Administrator).
If this is a newly installed server, start by changing the license to the license supplied by email.
Now press Import Existing Database . Supply the name that will be presented to the user when logging in to a
server.
Supply the location of your database and transaction log files. If you placed the database files under the "Databases" folder of the installation and named the database to the same name as the folder the files will already point
to the correct location. When you press the OK button the server will try to load the database and tell you if something failed.
When you have imported the database you must set the state to Online before any users can connect to it.
If you created a dummy database in the Initial Setup Guide you should now remove it by selecting it and then press Remove Database s
Set server user permission
"User" in this case is not an account associated with a real life person, but instead refers to a system operation.
More specifically it gives Hansoft the privilege of editing and executing the database file.
You can also set user permission by using this command:
chown –R hansoft:hansoft [HansoftServerDir]/Databases/[DatabaseName]
Importing database files on Linux
Moving a database
You may want to move databases between servers, or maybe move a database from a trial server installation. To
do this, locate where the original server was installed and copy the directory for the database you want to move.
Before copying it is best to install the same version of the server that you are going to install on the new machine
to minimize the risk of incompatibilities.
Also make sure to stop the Hansoft Server service before you copy the database to make sure you get a consistent
copy.
Once you have the database copied, install a server on the new machine (if you don't have a server installed).
When the configuration guide starts you may either run through it, or skip it and configure everything manually. If
you run through the configuration guide let it create a dummy database that can later be deleted.
Now put the copied database directory either under the "Databases" directory in the directory where you installed
the server, or in a place of your choosing (see Choosing where to put the different database files).
When you have the database files where you want them, start Hansoft Server Administrator and connect to the
server (see Hansoft Server Administrator).
If this is a newly installed server, start by changing the license to the license supplied by email.
Now press Import Existing Database . Supply the name that will be presented to the user when logging in to a
server.
Supply the location of your database and transaction log files. If you placed the database files under the Databases
folder of the installation and named the database to the same name as the folder the files will already point to the
correct location. When you press the OK button the server will try to load the database and tell you if something
failed.
When you have imported the database you must set the state to Online before any users can connect to it.
If you created a dummy database in the Initial Setup Guide you should now remove it by selecting it and then press Remove Database
Set server user permissions
"User" in this case is not an account associated with a real life person, but instead refers to a system operation.
More specifically it gives Hansoft the privilege of editing and executing the database file.
To allow the server user to communicate with and edit the database file you need to run this command from the
terminal.
chown –R hansoft:hansoft [HansoftServerDir]/Databases/[DatabaseName]
Database isolation
This image illustrates the level of isolation achieved by different solutions
Project Isolation
If security or regulatory constraints are placed on you regarding the storage of project information you can choose
to control the isolation of project data by the way in which you deploy projects across Hansoft databases and servers.
A Hansoft server can host one or more databases. Each database is stored in it is own file and a single database can
contain one or more projects. Thus each project within a database is stored in the same file on disk.
If you require a higher level of isolation between different projects you have two choices:
1. Use one database per project, with one server hosting all databases.
2. Use one server per database and one database per project. Each server can then be moved to a separate physical machine if desired.
With #1 a user connecting to your server will be presented with a list of databases so they can select which database they wish to connect to. A user can open a new connection to another database if they require access to more
than one database. It is important to note that the names of databases available on a server will be visible to all
users connecting to a server.
#2 provides the highest level of isolation between projects - especially if you use a separate physical machine per
server.
If you have further questions regarding isolation please contact Hansoft support at
[email protected].
Sharing users
A common way to facilitate account management is to use Hansoft Shares. Shares allow two servers to be configured to exchange information between them. The information that is shared can be limited to user account
information, thus you can
maintain project information isolation between servers while centralizing user account management. You can read
more about shares in the Hansoft shares management guide available at http://www.hansoft.com/support/documentation/.
Delegation
If you are concerned with isolation at a more operational level (e.g. you wish to limit access to certain portions of a
project to a limited group of users) you may wish to consider using the delegation feature of Hansoft. This provides
a lower level of physical security than splitting projects across servers or databases but allows for higher granularity control. You can read more about delegation in the Hansoft user guide under the Projects-More important
functions-Delegation and limited visibility section available athttp://www.hansoft.com/support/documentation/.
Choosing where to put the database files
The data is safest if the database file, transaction log and the backup files are all put on separate physical discs.
The backup directory can be put on a networked directory, but the main database and transaction log should be located on local discs to minimize the risk for corrupted data.
Logs and E-mail notifications
The Hansoft Server supports reporting events to log files and via email based on their severity. The log files can be
found under the Logs directory of your server installation.
Logs and SMTP settings
You configure the amount of logging you want with the Server Administrator by clicking the logging options button
under the Settings heading. By default all events are logged to the log file while critical errors and important messages are sent by email as well. Before you can receive any emails, you need to set up the email settings by clicking the "Email options" button. The only way the Project Server is able to send emails is by connecting to a SMTP
server.
You can configure server logs and email notifications through the Hansoft Server Administrator client.
To allow the Hansoft server to send you important logs by e-mail, you first need to configure the SMTP options.
Access the SMTP configuration window by clicking "E-mail Options", located at the bottom right of the screen.
Through this windows you can customize the SMTP options.
Licenses
Hansoft is licensed by the number of users that can be created on a server. If you have several databases on the
same server they share the same license. User licenses can be freely moved between databases by deleting users
in one database and creating them in another. A license can also include a number of modules enabling features
such as time reporting.
License delivery
Every month licenses are delivered either directly to the server by TCP/IP connection or by e-mail. You will receive
an e-mail towards the end of each month stating that your license is about to expire.
Note: This does not signify the termination of your subscription but merely acts as a heads up, informing you that
the license will soon be updated. The license key is usually delivered on the first day of business every month unless
you are connected to the license server, in which case the update will be received automatically without the need of
manual input.
A 15 day grace period is added to the expiry date to account for connection and communication disruptions. To
make the delivery as smooth as possible it is recommended that the server is allowed to connect to our license
server. To do so it needs to be able to connect to ls.hansoft.se on TCP/IP port 50129. If you prefer your licenses by
email you can turn off the license server connection feature in the Administrator by clicking Change license options
under the Settings heading and unchecking Connect to license server to retrieve new licenses .
Setting the license manually
The license can be set either using the Server Administrator or with the Hansoft Client. To change the license with
the Server Administrator click Upgrade/change license under the License heading. Simply copy/paste the license
data from the email you received. If you do not want the project managers to be able to change the license with
the Hansoft Client you can change their permissions by clicking the database in the Server Administrator and pressing Change Settings and unchecking Allow project managers in this database to change the server license .
Crash reports
Whenever an unrecoverable error occurs in the Hansoft server a crash dump is automatically generated.
Hansoft takes these occurrences very seriously. To aid us in diagnosing and solving the problem as quickly as possible we ask that customers send these dumps to us.
This can be done in two ways:
The dump files can be emailed to [email protected].
The dumps can be uploaded to us directly via the server command line:
HPMServer -UploadDumps <YourEmailAddress>
We will keep in contact with you regarding the error and will notify you when we have identified and fixed it.
Backup and recovery
The Hansoft server has built in support for scheduled backups as well as means to allow direct backup of the database files.
Built in backups can be scheduled in the Server Administrator Client by selecting a database and pressing Backup
settings . It is recommended that you enable automatic backups and minimally let the project database be backed
up once a day. This will allow you to easily recover from accidental deletes and changes of project data. The
default setting when a database is created or the server is installed is to backup using this method. You will need to
either change the automatic backup setting or complement with another backup method to have full backup of the
document management storage as well.
Scheduled backup tasks
There are five different options when creating a scheduled backup task:
l
l
l
l
l
No backup, only integrity checking
Only reset transaction log (cannot be recovered)
Full projects database
Full projects database and document management files
Full projects database and incremental document management files
No backup, only integrity checking
The purpose of this option is to check that the database is in a good shape. If the integrity check fails, an email is
sent (if the server is configured to do that) to the server administrator.
The default option for a new database is to do a backup once per day. This backup setup does not perform an integrity check of the database after the backup has been done. The reason for this is to minimize the interruption that a
backup execution can cause to the users that at the same time are logged in to the database. The scheduled
backups can therefore be complemented with a task that only performs the integrity check.
In addition it is possible for any scheduled backup task to do an integrity check upon completion.
Only reset transaction log (cannot be recovered)
Every time the server is restarted or the database is put online from a previous offline state, the server has to go
through the transaction log. If database backups are performed infrequently, the transaction log can be large and
make the server startup time longer. This option resets the transaction log without performing a backup.
Full projects database
With this option the complete projects database will be backed up without document management. It is recommended to do this kind of backup every day and every new database is configured to do this by default (the task
named Default Automatic Backup ).
Full projects database and document management files
With this option, all files in the database and the transaction log will be backed up every time. This is the only
option that provides a complete backup. Note though that if many files are added to the document management,
this can quickly fill up the available space in the backup location directory if backups are performed every day.
Full projects database and incremental document management files
With this option, only the complete project database, transaction log, the added and the changed files (since the
previous backup) from the document management storage is saved to the backup. This backup type typically
provides safe backups while keeping the size of the backups to a minimum.
Performing a manual backup
To manually generate a backup select a database in the Server Administrator and press Backup Now . Select the
type of backup you want to perform and press OK to start the backup. Check the log file for any errors.
You can customize the schedule backup tasks through the Hansoft Server Administrator.
Click "Backup settings" to open a window displaying the currently scheduled backup tasks.
It is possible to create new tasks by clicking the "Create scheduled task" button. You can also edit and delete
already existing tasks.
Recovery
Make sure to make a copy any corrupt files before starting recovery. The files may be instrumental in recovering
data later. If you need to recover files from corrupt document management storage without having a backup available contact [email protected] for assistance or access to tools for doing this.
Recovering from automatic backups
If you are using scheduled backup tasks, you can recover from them with the help of the Server Administrator client. Select the database you want to recover and take it offline by pressing Online/Offline State . When the database is offline, press Restore . You can either provide the path manually to the backup directory or select a backup
found in the backup directory in the Found backups drop down.
Make sure that the directory is in the context of the server running the service if you provide it manually. You can
select what you want to restore from the backup. If you only restore the project database the current document
management storage will be left in its current state. This can be important because often you might only want to
restore the project database to recover from an accidental deletion or change.
Recovering from live backup
To recover from a live backup, stop the service and copy the database and transaction log to the database directory. If you only want to recover the project database or only the document management portion of the backup,
copy the database and transaction log to the same directory and provide that directory manually to the Restore
From Backup dialog as described above in Recovering from automatic backups.