1
© 2009-2011 Doctor Web. All rights reserved.
This document is the property of Doctor Web. No part of this
document may be reproduced, published or transmitted in any form
or by any means for any purpose other than the purchaser's personal
use without proper attribution.
TRADEMARKS
Dr.Web, the Dr.WEB logos, SpIDer Guard are trademarks and
registered trademarks of Doctor Web in Russia and/or other countries.
Other trademarks, registered trademarks and company names used in
this document are property of their respective owners.
DISCLAIMER
In no event shall Doctor Web and its resellers or distributors be liable
for errors or omissions, or any loss of profit or any other damage
caused or alleged to be caused directly or indirectly by this document,
the use of or inability to use information contained in this document.
Dr.Web® Desktop Security Suite for Linux
Version 6.0.2
User Manual
25.11.2011
Doctor Web Head Office
2-12A, 3rd str. Yamskogo polya
Moscow, Russia
125124
Web site: www.drweb.com
Phone: +7 (495) 789-45-87
Refer to the official web site for regional and international office
information.
Doctor Web
Doctor Web develops and distributes Dr.Web® information
security solutions which provide efficient protection from malicious
software and spam.
Doctor Web customers can be found among home users from all
over the world and in government enterprises, small companies
and nationwide corporations.
Dr.Web antivirus solutions are well known since 1992 for
continuing excellence in malware detection and compliance with
international information security standards. State certificates and
awards received by the Dr.Web solutions, as well as the globally
widespread use of our products are the best evidence of
exceptional trust to the company products.
We thank all our customers for their support and
devotion to the Dr.Web products!
4
Table of Contents
Document Conventions
7
Chapter 1. Introduction
8
1.1 About Dr.Web Anti-Virus for Linux
8
Chapter 2. Installation and Removal
10
2.1 System Requirements
11
2.2 Compatibility with Linux Distributions
12
2.3 Package files location
13
2.4 Installation from Distribution Package for UNIX
systems
15
2.4.1 Using GUI Installer
19
2.4.2 Using Console Installer
23
2.5 Removal of Distribution Package for UNIX
Systems
26
2.5.1 Using GUI Uninstaller
28
2.5.2 Using Console Uninstaller
31
2.6 Installation from Native Packages
33
2.7 Obtaining Key Files
37
Chapter 3. Getting Started with Dr.Web
Anti-Virus for Linux
39
3.1 Starting and Quitting Anti-virus
40
3.2 Updating Anti-virus
41
3.3 Constant Anti-virus Protection
42
3.4 OS protected by SELinux
44
3.5 Scanning System On Demand
46
User Manual
5
3.5.1 Eliminate Threats
3.6 Getting Help
Chapter 4. Advanced Use
49
51
52
4.1 Viewing Results
52
4.2 Managing Quarantine
54
4.3 Configuring Schedules
57
4.4 Configuring Automatic Actions
59
4.5 Excluding Files from Scanning
61
4.6 Configuring Notifications
63
4.7 Simultaneous use of Dr.Web Anti-Virus for
Linux by several users
64
4.8 Configuring Operation Mode
65
4.9 Using License Manager
67
4.9.1 License Key File
67
4.9.2 Registration and Renewal of License
68
4.10 Central Anti-virus Protection
75
4.10.1 Configuring Central Protection Mode
78
4.10.2 Creating New Account on the Central
Protection Server
81
4.10.3 Configuring Components via Web Interface of
the Central Protection Server
83
4.10.4 Configuring Standalone Mode
84
4.10.5 Additional Settings for Standalone Mode
85
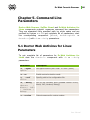
Chapter 5. Command Line Parameters
86
5.1 Doctor Web Antivirus for Linux Parameters
86
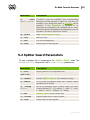
5.2 SpIDer Guard Parameters
87
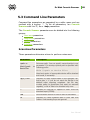
5.3 Command Line Parameters
88
User Manual
6
Appendices
96
Appendix A. Types of Computer Threats
96
Appendix B. Fighting Computer Threats
102
Appendix C. Contacting Support
105
User Manual
Document Conventions
Document Conventions
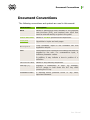
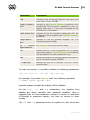
The following conventions and symbols are used in this manual:
Convention
Description
Bold
Names of buttons and other elements of the graphical
user interface (GUI), and required user input that
must be entered exactly as given in the guide.
Green and bold
Names of Dr.Web products and components.
Green and
underlined
Hyperlinks to topics and web pages.
Monospace
Code examples, input to the command line and
application output.
Italic
Placeholders which represent information that must be
supplied by the user. For command-line input, it
indicates parameter values.
In addition, it may indicate a term in position of a
definition.
CAPITAL LETTERS
Names of keys and key sequences.
Plus sign ('+')
Indicates a combination of keys. For example,
ALT+F1 means to hold down the ALT key while
pressing the F1 key.
Exclamation mark
A warning about potential errors or any other
important comment.
User Manual
7
Chapter 1. Introduction
Chapter 1. Introduction
Thank you for purchasing Dr.Web® Desktop Security Suite for
Linux (hereinafter the Dr.Web Anti-Virus for Linux). It offers
reliable protection from various types of computer threats using the
most advanced virus detection and neutralization technologies.
This manual is intended to help users of computers running GNU/
Linux install and use Dr.Web Anti-Virus for Linux 6.0.2.
1.1 About Dr.Web Anti-Virus for Linux
Dr.Web Anti-Virus for Linux is an anti-virus solution designed to
help users of computers running GNU/Linux protect their machines
from viruses and other types of threats.
The core components of the program (anti-virus engine and virus
databases) are not only extremely effective and resource-sparing,
but also cross-platform, which allows specialists in Doctor Web to
create outstanding anti-virus solutions for different operating
systems. Components of Dr.Web Anti-Virus for Linux are
constantly updated and virus databases are supplemented with new
signatures to assure up-to-date protection. Also, a heuristic analyzer
is used for additional protection against unknown viruses.
User Manual
8
Chapter 1. Introduction
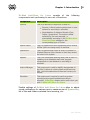
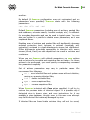
Dr.Web Anti-Virus for Linux consists of the
components each performing its own set of functions:
Component
Description
Scanner
This virus-detection component is used for:
following
Express, full and custom system scan on user
demand or according to schedule.
Neutralization of detected threats (Cure,
Delete, Quarantine). The action is either
selected by the user manually, or
automatically according to the Dr.Web AntiVirus for Linux settings for the
corresponding type of threat.
SpIDer Guard
This is a resident anti-virus component which checks
all files (which are being used) in real time.
Quarantine
This is a special folder which is used for isolation of
infected files and other threats so that they cannot
do harm to the system.
Updater
This is an automated updating utility that is used for
updating virus databases and other program
components on user demand or according to
schedule.
License Manager
This component is used to simplify management of
key files, it allows to receive demo and license key
files, view information about them and renew your
license.
Scheduler
This component is required to perform system
scanning and program updates according to
schedule. Scheduler remains active even when you
quit Dr.Web Anti-Virus for Linux.
Flexible settings of Dr.Web Anti-Virus for Linux allow to adjust
sound notifications for various events, maximum size of Quarantine,
list of files and folders excluded from scanning, etc.
User Manual
9
Chapter 2. Installation and Removal
Chapter 2. Installation and Removal
Below you can find detailed description of Dr.Web Anti-Virus for
Linux solution installation and deinstallation procedures for UNIX
systems. Administrator (root) privileges are necessary to perform all
these operations.
You must carefully uninstall all packages of earlier product versions
(delivered in rpm or deb formats) from any previous installations.
Dr.Web Anti-Virus for Linux solution distribution package for
UNIX systems is delivered in EPM format (script-based distribution
package with installation and removal scripts and standard install/
uninstall GUIs) designed to use with ESP Package Manager (EPM).
Please note, that all these scripts belong only to EPM-package itself,
not to any of the components of Dr.Web Anti-Virus for Linux.
Installation, deinstallation and upgrade procedures for Dr.Web
Anti-Virus for Linux solution can be carried out in the following
ways:
via install/uninstall GUIs;
via install/uninstall console scripts.
During installation dependencies are supported, i.e. if for successful
installation of any component some other components must be
previously installed (e.g., drweb-daemon package requires
drweb-common and drweb-bases packages to be previously
installed), then they will be installed automatically.
If you install Dr.Web Anti-Virus for Linux solution to the
computer, where some other Dr.Web products have been
previously installed from EPM-packages, then at every attempt to
remove some modules via uninstall GUI you will be prompted to
remove absolutely all Dr.Web modules, including those from other
products.
User Manual
10
Chapter 2. Installation and Removal
Please, pay special attention to the actions you perform and
selections you make during deinstallation to avoid accidental
removal of some useful components.
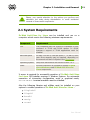
2.1 System Requirements
Dr.Web Anti-Virus for Linux can be installed and run on a
computer which meets the following minimum requirements:
Component
Requirement
CPU
Fully compatible with the system of commands of x86
processor in 32-bit and 64-bit modes. In 64-bit
systems a support of 32-bit applications must be
enabled.
Hard disk space
At least 154 MB of free disk space + 70 MB for each
user. More capacity may be required, depending on
the amount and size of objects in the Quarantine.
Operating system
GNU/Linux distributions with kernel version 2.6.x.
Other
Internet connection is required to update Dr.Web
virus databases and Dr.Web Anti-Virus for
Linux components.
X server is required for successful operation of Dr.Web Anti-Virus
for Linux. GUI installer requires X Window System. For automatic
execution of interactive configuration script in graphical mode,
xterm or xvt terminal emulator must be installed.
Also the following libraries and utilities must be installed on your
system to enable operation of Dr.Web Anti-Virus for Linux :
libglade2
libgtk2
base64
unzip
crond
User Manual
11
Chapter 2. Installation and Removal
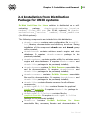
2.2 Compatibility with Linux
Distributions
Dr.Web Anti-Virus for Linux solution is compatible with x86 and
x86-64 Linux distributions.
Operability of
distributions:
the
complex
has
been
tested
on
following
ALT Linux versions 4 - 6 (32-bit), versions 5-6 (64-bit);
Arch Linux (64-bit);
ASPLinux versions 12 - 14 (32-bit);
Debian versions 3.1 - 6 (32-bit), versions 4-6 (64-bit);
Fedora 14 (64-bit);
Gentoo;
Mandriva Linux versions 2009, CS4 (32-bit), 2010.x (64-bit);
Mandrake 10;
openSUSE versions 10.3-11 (32/64-bit);
PCLinuxOS 2010;
Red Hat Enterprise Linux (RHEL) versions 4 - 6 (32-bit),
versions 5 - 6 (64-bit);
Suse Linux Enterprise Server versions 9 - 11 (32 -bit), versions
10-11 (64-bit);
Ubuntu versions 7.04 - 11.04;
Other distributions that meet above requirements are also
supported but were not tested. If you have any compatibility issues
with your Linux distribution, please contact technical support at
http://support.drweb.com/request/.
User Manual
12
Chapter 2. Installation and Removal
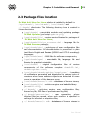
2.3 Package files location
Dr.Web Anti-Virus for Linux solution is installed by default to
/opt/drweb/, /etc/drweb/, /var/drweb/ and
~/.drweb/ directories. The following directory tree is created in
these directories:
/opt/drweb/ - executable modules and updating package
Dr.Web Updater (perl script update.pl);
/opt/drweb/lib/ - various service libraries for packages of
Dr.Web Anti-Virus for Linux;
/opt/drweb/lib/ru_scanner.dwl - language file for
Dr.Web Scanner package;
/opt/drweb/doc/ - prototypes of user configuration files
and documentation. All documentation is presented in plain
text files in English and Russian (KOI8-R and UTF-8 encodings)
languages;
/opt/drweb/man/ - MAN files for software components;
/opt/drweb/epm/ - executable file, language file and
libraries for graphical uninstaller;
/etc/drweb/ - original configuration files of various
components of the software complex: drweb32.ini,
drweb-spider.conf;
/etc/drweb/drweb-spider/templates/ - templates
of notifications generated and dispatched to various types of
receivers when some malicious objects are detected or some
errors in operation of the daemon occur;
/var/drweb/bases/*.vdb - databases of known viruses;
/var/drweb/lib/ - antivirus engine as a loadable library
(drweb32.dll);
~/.drweb/ - anti-virus engine, user configuration files,
license key file, PID files of processes and log files;
~/.drweb/quarantine/ - user quarantine, where
infected files are moved, when such reaction is specified in
settings for infected or suspicious files;
~/.drweb/bases/*.vdb - databases of known viruses in
User Manual
13
Chapter 2. Installation and Removal
user home directory.
For 64-bit systems lib64 subdirectory is created in /opt/
drweb/. It contains libraries necessary for operation of 64-bit
modules.
User Manual
14
Chapter 2. Installation and Removal
2.4 Installation from Distribution
Package for UNIX systems
Dr.Web Anti-Virus for Linux solution is distributed as a selfextracting
package
drweb-workstations_[version
number]~linux_x86.run (for 32-bit systems) or drweb-
workstations_[version
number]~linux_amd64.run
(for 64-bit systems).
The following components are included into this distribution:
drweb-common: contains main configuration file drweb32.
ini, libraries, documentation and directory structure. During
installation of this component drweb user and drweb group
will be created;
drweb-bases: contains antivirus search engine and virus
databases. It requires drweb-common package to be
previously installed;
drweb-updater: contains update utility for antivirus search
engine and virus databases. It requires drweb-common and
drweb-libs packages to be previously installed;
drweb-daemon: contains Dr.Web Daemon executable files
and its documentation. It requires drweb-bases and
drweb-libs packages to be previously installed;
drweb-scanner: contains Dr.Web Scanner executable
files and its documentation. It requires drweb-bases and
drweb-libs packages to be previously installed;
drweb-libs: contains libraries common for all software
components;
drweb-epm6.0.2-libs: contains libraries for graphical
installer and uninstaller. It requires drweb-libs package to
be previously installed;
drweb-epm6.0.2-uninst: contains files for
graphical uninstaller. It requires drweb-epm6.0.2-libs
package to be previously installed;
drweb-cc: contains Dr.Web Antivirus for Linux
executable files, necessary libraries and documentation. It
User Manual
15
Chapter 2. Installation and Removal
requires drweb-spider, drweb-scanner and drwebupdater packages to be previously installed;
drweb-boost147: contains libraries used by Dr.Web
Antivirus for Linux and Dr.Web Spider simultaneously. It
requires drweb-libs package to be previously installed;
drweb-agent:
contains
Dr.Web
Control
Agent
executable files, necessary libraries and documentation. It
requires drweb-boost147 and drweb-common packages
to be previously installed;
drweb-agent-es: contains files required to run Dr.Web
Agent in central protection mode. It requires drwebagent, drweb-updater and drweb-scanner to be
previously installed;
drweb-monitor: contains Dr.Web Monitor executable
files, necessary libraries and documentation. It requires
drweb-boost147 and drweb-common packages to be
previously installed;
drweb-spider: contains Dr.Web Spider executable files,
necessary libraries and documentation. It requires drwebboost147 and drweb-daemon packages to be previously
installed.
In distributions for 64-bit systems two other packages are included:
drweb-libs and drweb-libs32. They contain libraries for 64bit components and 32-bit components correspondingly.
To install all the components of Dr.Web Anti-Virus for Linux
solution automatically you may use either console (CLI) or the
default file manager of your GUI-based shell. In the first case allow
the execution of the corresponding self-extracting package with
the following command:
# chmod +x drweb-workstations_[version number]~linux_x86.run
and then run it:
# ./drweb-workstations_[version number]~linux_x86.run
As a
result
drweb-workstations_[version
number]
User Manual
16
Chapter 2. Installation and Removal
~linux_x86 directory will be created, and install GUI will be
initialized. If startup has been performed without root privileges,
then install GUI will try to gain appropriate privileges by itself.
If the install GUI has failed to start, then interactive install script will
be automatically initialized in console.
If you want only to extract the content of the package without
starting install GUI, use --noexec command line parameter:
# ./drweb-workstations_[version number]~linux_x86.run --noexec
After you extract the content, you may initialize install GUI and
continue setup using the following command:
# drweb-workstations_[version number]~linux_x86/install.sh
Or if you want to use console installer, you may run corresponding
script with the following command:
# drweb-workstations_[version number]~linux_x86/setup.sh
During the installation the following processes take place:
original configuration files are recorded to the /etc/drweb/
software/conf/ directory with the following names:
<configuration_file_name>.N;
operational copies of configuration files are placed to the
corresponding directories of the installing software;
other files are installed. If in the corresponding directory file
with the same name already exists (e.g. after inaccurate
removal of previous versions of the packages), it will be
overwritten with the new file, and its copy will be saved as
<file_name>.O. If some <file_name>.O file already exists in
this directory, it will be replaced with the new file of the same
name.
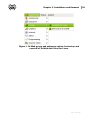
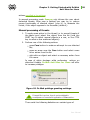
After installation is finished in Applications menu a Dr.Web group
will appear, expanding to the submenu with options for startup and
removal of Dr.Web Anti-Virus for Linux solution.
User Manual
17
Chapter 2. Installation and Removal
Figure 1. Dr.Web group and submenu option for startup and
removal of Dr.Web Anti-Virus for Linux.
User Manual
18
Chapter 2. Installation and Removal
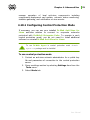
2.4.1 Using GUI Installer
1. When you run install GUI with the following command:
# drweb-workstations_[version number]~linux_x86/install.sh
setup program window appears.
Figure 2. Welcome screen
Navigation is performed with Back and Next buttons. Setup
can be aborted at any moment by clicking Cancel button.
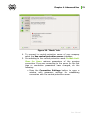
2. In the current version of the program you can choose only
one installation type: typical configuration of Dr.Web AntiVirus for Linux with all the components selected by default.
User Manual
19
Chapter 2. Installation and Removal
Figure 3. Install Type screen
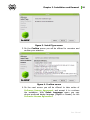
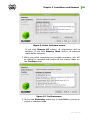
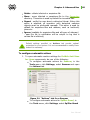
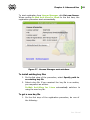
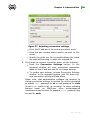
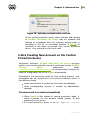
3. On the Confirm screen you will be offered to overview and
confirm your selection.
Figure 4. Confirm screen
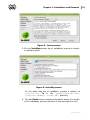
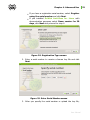
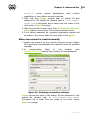
4. On the next screen you will be offered to take notice of
Software License Agreement and accept it to continue
the installation. With Select Language menu you may
choose preferred display language (English or Russian) for the
Software License Agreement.
User Manual
20
Chapter 2. Installation and Removal
Figure 5. License screen
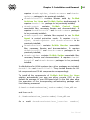
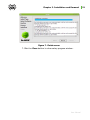
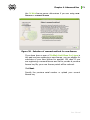
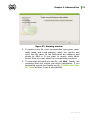
5. On the Installing screen log of installation process is output
in real-time mode.
Figure 6. Installing screen
At the same time log of installation process is written to
install.log file in the drweb-workstations_
[version number]~linux_x86 directory.
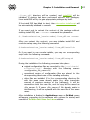
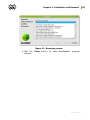
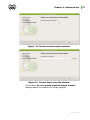
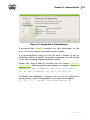
6. The last Finish screen contains information about the results
of the installation process (whether it was successful or not).
User Manual
21
Chapter 2. Installation and Removal
Figure 7. Finish screen
7. Click the Close button to close setup program window.
User Manual
22
Chapter 2. Installation and Removal
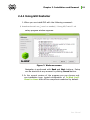
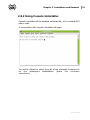
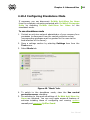
2.4.2 Using Console Installer
Console installer will be initialized automatically, if the install GUI fails
to start.
After initialization a conversation with console installer will begin.
If you want to install Dr.Web Anti-Virus for Linux, specify Y or
Yes in the input line (values are case insensitive) and press ENTER.
Otherwise enter N or No.
User Manual
23
Chapter 2. Installation and Removal
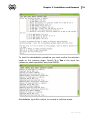
On the next screen you will be offered to take notice of Software
License Agreement. To browse through the text of the
Software License Agreement use the SPACEBAR key.
User Manual
24
Chapter 2. Installation and Removal
To continue the installation you must accept the Software
License Agreement. Specify Y or Yes in the input line and press
ENTER. If you enter N or No, installation will be terminated.
After the acceptance of the Software License Agreement
installation process will be started. Installation log will be output to
console in real-time mode.
If console installer has failed to start automatically (for example,
because it was unable to gain appropriate privileges), then you may
try to start it manually with root privileges, using the following
command:
# drweb-workstations_[version number]~linux_x86/setup.sh
User Manual
25
Chapter 2. Installation and Removal
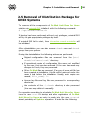
2.5 Removal of Distribution Package for
UNIX Systems
To remove all the components of Dr.Web Anti-Virus for Linux
solution via uninstall GUI, initialize it with the following command:
# /opt/drweb/remove.sh
If startup has been performed without root privileges, uninstall GUI
will try to gain appropriate privileges by itself.
If uninstall GUI fail to start, then interactive console uninstaller will
be initialized.
After deinstallation you can also remove drweb user and drweb
group from your system.
During the deinstallation the following actions are performed:
Original configuration files are removed from the / etc/
drweb/software/conf/ directory.
If operational copies of configuration files were not modified
by the user, they are also removed. If the user has made any
changes to them, they are preserved.
Other Dr.Web files are removed. If a copy of some old file has
been created at installation, this file will be restored under the
name it had before the installation. Usually, such copies are
named [file_name].O .
License key files and log files are preserved in corresponding
directories.
the contents of the ~/.drweb directory is also preserved
(the user may delete it manually).
For operation according to schedules Dr.Web Anti-Virus for Linux
turns to user cron. At startup and after registration of Dr.Web
Anti-Virus for Linux an entry is made into the user crontab
about periodicity of Updater operation. It looks like the following:
User Manual
26
Chapter 2. Installation and Removal
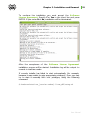
*/30 * * * * sh -c "(/home/user/.drweb/crontabcheck.sh /opt/drweb/scripts/drweb-cc/update.sh
2>&1)>>/home/user/.drweb/crontab-updater.log"
Scanner schedule entry to the crontab will made only after the
corresponding function is enabled in Settings section of Dr.Web
Anti-Virus for Linux. It may look like the following:
0 9 * * * sh -c "(DISPLAY=:0.0 /home/user/.
drweb/crontab-check.sh
/opt/drweb/scripts/
drweb-cc/start-scanning.sh 2>&1)>>/home/user/.
drweb/crontab-scan.log"
When you uninstall the Dr.Web Anti-Virus for Linux,
corresponding entries in the user crontab are not removed
automatically and have to be deleted manually.
User Manual
27
Chapter 2. Installation and Removal
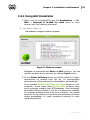
2.5.1 Using GUI Uninstaller
1. When you run uninstall GUI using the Applications -> Dr.
Web -> Removal of Dr.Web for Linux menu or from
console with the following command:
# /opt/drweb/remove.sh
deinstallation program window appears.
Figure 8. Welcome screen
Navigation is performed with Back and Next buttons. You can
quit the program at any moment by clicking Cancel button.
2. On the Select Software screen you will be offered to select
components for removal from the list. All corresponding
dependencies will be selected for deinstallation automatically.
If you installed Dr.Web Anti-Virus for Linux solution to the
computer, where some other Doctor Web products have
been previously installed from EPM-packages, then absolutely
all modules will be included in the list of components available
for removal, including those from other products. Pay special
attention to the actions you perform and selections you make
during deinstallation to avoid accidental removal of some
useful components.
User Manual
28
Chapter 2. Installation and Removal
Figure 9. Select Software screen
If you click Remove All button, all components will be
selected. If you click Remove None button, all selection
marks will be removed.
3. When you select everything you consider necessary, you will
be offered to overview and confirm all the choices made on
the Confirm screen.
Figure 10. Confirm screen
4. On the last Removing screen log of deinstallation process is
output in real-time mode.
User Manual
29
Chapter 2. Installation and Removal
Figure 11. Removing screen
5. Click the Close button to close deinstallation program
window.
User Manual
30
Chapter 2. Installation and Removal
2.5.2 Using Console Uninstaller
Console uninstaller will be initialized automatically, if the uninstall GUI
fails to start.
A conversation with console uninstaller will begin.
You will be offered to select from list all the necessary components
for the subsequent deinstallation (follow the on-screen
instructions).
User Manual
31
Chapter 2. Installation and Removal
To start the deinstallation procedure you must confirm the selection
made on the previous stage. Specify Y or Yes in the input line
(values are case insensitive) and press ENTER.
Deinstallation log will be output to console in real-time mode.
User Manual
32
Chapter 2. Installation and Removal
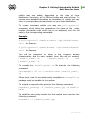
2.6 Installation from Native Packages
All packages are located in the Dr.Web official repository http://
officeshield.drweb.com/drweb/. Once you have added the
repository to the package manager of your system, you can install,
update or remove necessary packages like any other program from
repository. All dependencies will be resolved automatically.
All commands below for adding repositories, importing keys,
installing and removing packages must be ran with administrator
(root) privileges.
Debian, Ubuntu (apt)
Debian repository is signed by the digital key. For correct operation
you need to import the key with command
wget -O - http://officeshield.drweb.com/drweb/drweb.key | aptkey add -
or
curl http://officeshield.drweb.com/drweb/drweb.key | apt-key
add -
To add the repository to you system, add the following line to /
etc/apt/sources.list file:
deb http://officeshield.drweb.com/drweb/debian stable non-free
To install Dr.Web Anti-Virus for Linux issue commands:
apt-get update
apt-get install drweb-cc
To remove Dr.Web Anti-Virus for Linux issue command:
apt-get remove drweb-cc
Alternatively, you can use graphical manager (e.g. Synaptic) to
User Manual
33
Chapter 2. Installation and Removal
install or remove the packages.
ALT Linux, PCLinuxOS (apt-rpm)
To add the repository to you system, add the following line to /
etc/apt/sources.list file:
32-bit version:
rpm http://officeshield.drweb.com/drweb/altlinux stable/i386
drweb
64-bit version:
rpm http://officeshield.drweb.com/drweb/altlinux stable/x86_64
drweb
To install Dr.Web Anti-Virus for Linux issue commands:
apt-get update
apt-get install drweb-cc
To remove Dr.Web Anti-Virus for Linux issue command:
apt-get remove drweb-cc
Alternatively you can use graphical manager (e.g. Synaptic) to install
or remove the packages.
Mandriva (urpmi)
Download repository key from http://officeshield.drweb.com/
drweb/drweb.key and save it on disk. Then, import the key with
command
rpm --import <path to repository key>
Open the following file:
http://officeshield.drweb.com/drweb/drweb-i386.urpmi-media
or
User Manual
34
Chapter 2. Installation and Removal
http://officeshield.drweb.com/drweb/drweb-x86_64.urpmi-media
and you will be offered to add repository to the system.
Alternatively, you can add the repository using console with
command
urpmi.addmedia drweb http://officeshield.drweb.com/drweb/mandriva/stable/
i386/
or
urpmi.addmedia drweb http://officeshield.drweb.com/drweb/
mandriva/stable/x86_64/
To install Dr.Web Anti-Virus for Linux issue commands:
urpmi.update drweb
urpmi drweb-cc
To remove Dr.Web Anti-Virus for Linux issue command:
urpme drweb-cc
Alternatively, you can use graphical manager (e.g. rpmdrake) to
install or remove the packages.
Red Hat Enterprise Linux, Fedora, CentOS (yum)
Add the file with following content to /etc/yum.repos.d
directory
32-bit version:
[drweb]
name=DrWeb - stable
baseurl=http://officeshield.drweb.com/drweb/el5/
stable/i386/
gpgcheck=1
enabled=1
User Manual
35
Chapter 2. Installation and Removal
gpgkey=http://officeshield.drweb.com/drweb/drweb.key
64-bit version:
[drweb]
name=DrWeb - stable
baseurl=http://officeshield.drweb.com/drweb/el5/
stable/x86_64/
gpgcheck=1
enabled=1
gpgkey=http://officeshield.drweb.com/drweb/drweb.key
To install Dr.Web Anti-Virus for Linux issue command:
yum install drweb-cc
To remove Dr.Web Anti-Virus for Linux issue command:
yum remove drweb-cc
Alternatively, you can use graphical manager (e.g. PackageKit,
Yumex) to install or remove the packages.
Zypper package manager (SUSE Linux)
To add the repository, run the following command:
zypper ar -t YUM http://officeshield.drweb.com/drweb/el5/stable/i386/ drweb
or
zypper ar -t YUM http://officeshield.drweb.com/drweb/el5/stable/x86_64/
drweb
To install Dr.Web Anti-Virus for Linux issue commands:
zypper refresh
zypper install drweb-cc
To remove Dr.Web Anti-Virus for Linux issue command:
User Manual
36
Chapter 2. Installation and Removal
zypper remove drweb-cc
Alternatively, you can use graphical manager (e.g. YaST) to install or
remove the packages.
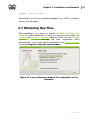
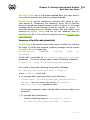
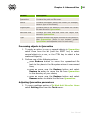
2.7 Obtaining Key Files
After installation, you need to register Dr.Web Anti-Virus for
Linux to confirm legitimacy of using the anti-virus and unlock the
updating and constant protection features. When you run Dr.Web
Anti-Virus for Linux for the first time, registration starts
automatically. You can also launch registration from License Manager
by clicking Register using the serial number.
Figure 12. License Manager window for registration of the
software.
User Manual
37
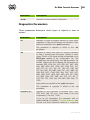
Chapter 2. Installation and Removal
Select the necessary option and click Continue:
Column
Description
Demo version No serial number is needed because the demo key file is
for 30 days
used for evaluation purposes and has a short term of
usage.
Register
You will need to specify the serial number which is included
using
the with the program.
serial number
Specify path Select this option if you already have a valid key file
to an existing present on the computer.
key file
If you select one of the first two options, you will be asked to
specify your personal information (name, e-mail address, country and
city of residence). This information is used only by Doctor Web to
generate the key file and is not passed on to anyone else. The key
file which you will receive will contain this information for
identification purposes. For more information, see Registering Antivirus.
If no valid license or demo key file is found, Dr.Web Anti-Virus
for Linux components are blocked. You can access License
manager only in order to register the product and receive a key file.
User Manual
38
Chapter 3. Getting Started with Dr.Web
Anti-Virus for Linux
Chapter 3. Getting Started with
Dr.Web Anti-Virus for Linux
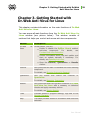
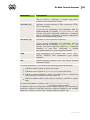
This chapter contains information on the main functions of Dr.Web
Anti-Virus for Linux.
You can access all main functions from the Dr.Web Anti-Virus for
Linux window (see picture below). This window consists of
sections that helps you control and access anti-virus components:
Section
Dr.Web
Linux
Descriptions
for In this section, you can:
Enable or disable the SpIDer Guard resident
anti-virus
component.
For
details,
see
Constant Anti-virus Protection.
Review information about the last update and
start an update manually if necessary. For
details, see Updating Anti-virus.
Open the Scanner, Quarantine or Results
section.
Scanner
Lets you access the main on-demand anti-virus scanning
component.
For details, see Scanning System On Demand.
Quarantine
Lets you access
Quarantine.
and
control the
contents
of
For details, see Managing Quarantine.
Results
Lets you access and view operation statistics of Dr.Web
Anti-Virus for Linux with a summary on detected
threats and apply necessary actions.
For details, see Viewing Results.
Tools
Provides access to program settings, logs and to the
License Manager
Help
This menu provides access to information and reference
materials.
User Manual
39
Chapter 3. Getting Started with Dr.Web
Anti-Virus for Linux
Figure 13. Main program window.
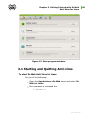
3.1 Starting and Quitting Anti-virus
To start Dr.Web Anti-Virus for Linux
Do one of the following:
Open the Applications->Dr.Web menu and select Dr.
Web for Linux.
Run command in command line:
$ drweb-cc
User Manual
40
Chapter 3. Getting Started with Dr.Web
Anti-Virus for Linux
At start Dr.Web Anti-Virus for Linux adds itself to the autoload
list. So if you shut down your system without exiting the Dr.Web
Anti-Virus for Linux, then it will be started automatically after
you power on your system.
To quit Dr.Web Anti-Virus for Linux:
Right-click the Dr.Web Antivirus icon
area and select Quit.
in the notification
When you quit Dr.Web Anti-Virus for Linux, the SpIDer
Guard and Scheduler components remain active. The former is a
resident anti-virus monitor which checks all files in real time mode
each time they are accessed, and the latter starts the scanning and
updating processes according to schedule (for more details, see
Adjusting Schedules).
Each user can run and use its own copy of Dr.Web Anti-Virus for
Linux,
and
all
this
copies
will
operate
simultaneously and independently.
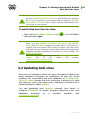
3.2 Updating Anti-virus
New types of computer threats with new concealment features are
being constantly developed by malefactors all over the world.
Updating the components and virus databases of Dr.Web AntiVirus for Linux ensures that your protection is always up to date
and ready for those new threat types. Updating is performed by a
special component called Updater.
You can periodically start Updater manually (see below) or
configure Scheduler to update program components and virus
databases
according
to
a
specified
schedule
(see
Configuring Schedules).
User Manual
41
Chapter 3. Getting Started with Dr.Web
Anti-Virus for Linux
To start Updater manually
Do one of the following
In the Updater section of the Dr.Web Anti-Virus for
Linux main window, click Update.
Right-click the Dr.Web Antivirus icon
notification area and select Update.
in the
3.3 Constant Anti-virus Protection
Constant anti-virus protection is carried out via a resident
component called SpIDer Guard that checks all files accessed by
the user or other programs in the system in real time. By default, it
is enabled as soon as you install and register Dr.Web Anti-Virus for
Linux. Whenever a threat is detected, SpIDer Guard displays a
warning and applies actions according to the anti-virus preferences
(see Configuring Automatic Actions).
To enable or disable SpIDer Guard
Do one of the following
In the SpIDer Guard section of the main window, click
Enable or Disable.
Right-click the Dr.Web Antivirus icon
in the
notification area and select and select the Enable or
Disable item.
Be extremely cautious when using this option! While SpIDer
Guard functions are disabled, avoid connecting to the Internet and
check all removable media using Scanner before accessing.
When you exit Dr.Web Anti-Virus for Linux SpIDer Guard
memorizes its last state (whether it was enabled or disabled) and
restores it at the next start of Dr.Web Anti-Virus for Linux. So if
the user disables the SpIDer Guard before exiting Dr.Web Anti-
User Manual
42
Chapter 3. Getting Started with Dr.Web
Anti-Virus for Linux
Virus for Linux, then it will remain disabled after the next start of
the software complex and must be enabled manually.
SpIDer Guard monitor implements scanning with rights of user,
that started it. Considering this situations, when file or directory
access is denied can appear because of lack of rights. In that case
message about access denying would be written to report. To
avoid this situation,you can exclude certain files and folders from
scanning by SpIDer Guard and set up the maximum time for
scanning one file in the anti-virus preferences (see Excluding Files
from Scanning).
Increase of inotify subsystem limit
SpIDer Guard file monitor uses inotify kernel module for real-time
file check. If inotify limit exceeds, following message will be written
to SpIDer Guard's system log:
drweb-spider:
exceeded
WARNING:
inotify
limit
is
Inotify limit is specified by fs.inotify.max_user_watches
parameter. To see its current value, execute following command:
# sysctl -a | grep 'fs.inotify.max_user_watches'
As a result of execution following string will be displayed:
fs.inotify.max_user_watches = <digit>
where <digit> - inotify limit.
To increase limit temporary execute the following:
# sudo sysctl fs.inotify.max_user_watches=<digit>
<digit> has to be more than current fs.inotify.
max_user_watches parameter value.
In this case, parameter value will take effect until you restart your
computer.
To increase limit permanently:
1. Add the following string to /etc/sysctl.conf:
fs.inotify.max_user_watches = <digit>
User Manual
43
Chapter 3. Getting Started with Dr.Web
Anti-Virus for Linux
2. To accept changes, restart your computer or execute
comand:
# sysctl -p
Administrator (root) privileges are necessary to perform all these
operations.
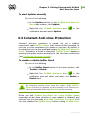
3.4 OS protected by SELinux
If your operating system is protected by SELinux, you may
encounter the following error after an attempt to launch Dr.Web
Scanner and scan system for viruses:
Figure 14. Scanner error
To set up successful operation of Dr.Web Scanner and Dr.Web
Daemon components in OS protected by SELinux, you must
compile politics for operation with corresponding modules drwebscanner and drweb-daemon.
Please note, that templates used in compilation of modules for
User Manual
44
Chapter 3. Getting Started with Dr.Web
Anti-Virus for Linux
politics may vary widely, depending on the type of Linux
distribution, its version, set of SELinux politics and user settings. To
receive more detailed information on compilation of politics you may
refer to corresponding documentation on your Linux distribution.
To create necessary politics you may use policygentool
command, which takes two parameters: the name of the policy
module (interaction with which has to be adjusted) and the full
path to the corresponding executable.
Example:
# policygentool drweb-scanner /opt/drweb/drweb.
real - for Scanner.
# policygentool drweb-daemon /opt/drweb/drwebd.
real - for Daemon.
You will be prompted to enter a few common domain
characteristics, and for each module three files will be created:
[module_name].te,
[module_name].if.
[module_name].fc
and
To compile the [module_name].te file execute the following
command:
checkmodule -M -m -o module-name [module_name].
te
Please note, that for successful policy compilation a checkpolicy
package must be installed to the system.
To compile a required policy execute the following command:
semodule_package -o [module_name].pp -m modulename
To install the new policy module into the module store execute the
following command:
semodule -i [module_name].pp
User Manual
45
Chapter 3. Getting Started with Dr.Web
Anti-Virus for Linux
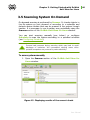
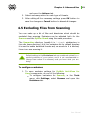
3.5 Scanning System On Demand
On-demand scanning is performed by Scanner. It checks objects in
the file system on your demand or according to a schedule and
detects various threats that may be present in the system though
inactive. It is necessary to run a system scan periodically using the
Scanner section of the Dr.Web Anti-Virus for Linux window.
You can start scanning manually (see below) or configure
Scheduler to scan the system according to a specified schedule
(see Configuring Schedules).
Process load increases during scanning which may lead to rapid
discharge of batteries. We recommend starting scans when
portable computers are powered by mains electricity.
To scan system manually
1. Open the Scanner section of the Dr.Web Anti-Virus for
Linux window.
Figure 15. Displaying results of the current check.
User Manual
46
Chapter 3. Getting Started with Dr.Web
Anti-Virus for Linux
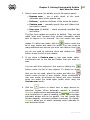
2. Select a scan mode (for details, see the file system pane):
Express scan – run a quick check of the most
vulnerable parts of the system only.
Full scan – perform a full scan of the entire file system.
Custom scan – manually specify files and folders that
you want to check.
User scan (if added) – check previously specified files
and folders.
The first three modes are present by default. They are also
called "scan sets" because they contain information about
sets of objects to be scanned. You can create user scan
modes. To add a new mode, click the
button under the
list of scan modes and name the mode. You can create as
many additional scan sets as you want and delete those that
you do not need by selecting them and clicking the
button under the list of scan modes.
3. If you chose a Custom scan or user scan mode, select
checkboxes next to the files and folders that you want to
scan.
You can add other objects to the scan by clicking the
button under the list of scan objects. To delete an object
that you do not need, select the object and click the
button under the list of scan objects. When configuring a
user scan mode, all settings are saved and then restored
when you select the mode again (unlike when using the
Custom scan mode).
4. Click the
button to select how to apply actions for
detected threats. When automatic reaction is enabled,
Scanner applies actions automatically as specified in the antivirus preferences. In case of handling threats rights shortage
automatic actions will not be applied. You can handle this
threats manually, increased privileges previously. By default,
Scanner allows you to select necessary action manually for
each detected threat.
User Manual
47
Chapter 3. Getting Started with Dr.Web
Anti-Virus for Linux
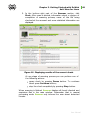
5. In the bottom right part of the Scanner section, click
Start. After scan is started, information about a degree of
completion of scanning process, name of the file being
checked at the moment and some statistical information are
displayed.
Figure 16. Displaying results of the current check.
At any stage of scanning process you can perform one of
the following actions:
pause check by pressing Pause button. To continue
check press Continue button;
stop the check completely by pressing Stop button.
When scanning is finished Scanner displays all found infected and
suspicious files in the main window. Remember that in manual
processing mode Scanner only informs the user about detected
threats.
User Manual
48
Chapter 3. Getting Started with Dr.Web
Anti-Virus for Linux
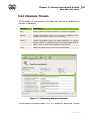
3.5.1 Eliminate Threats
In the middle of the window the table with the list of all detected
threats is displayed:
Column
Description
File
Specify paths to detected infected or suspicious objects
Details
Contain information about the threat is displayed (for
example, type of a threat or a virus name).
Action
Contain information about the action applied to a certain
infected object is displayed (if the corresponding field is
empty, then no action was applied to this object).
Time
Display the date when the threat was detected
Figure 17. Displaying detected threats.
In automatic processing mode Scanner applies to detected threats
User Manual
49
Chapter 3. Getting Started with Dr.Web
Anti-Virus for Linux
actions specified in its settings.
In manual processing mode Scanner only informs the user about
detected threats. After scan is finished you may try to restore
proper functionality of infected object (cure it), or eliminate the
threat, if the object appears to be incurable (delete it).
Manual processing of threats
1. To apply some action to the threat (or to several threats of
the same type) select the object from the list (hold the
SHIFT key to select several objects in a row, or the CTRL
key to select a few scattered objects).
2. Perform one of the following actions:
press Cure button to make an attempt to cure infected
file;
press an arrow near the Cure button and select some
other action from the list.
right-click an object and select a necessary action from
the menu.
In case of rights shortage while performing actions on
detected threats, Dr.Web Anti-Virus for Linux will offer
to increase privileges:
Figure 18. Dr.Web privilege granting settings.
If target file is a virus, then it can be deleted in
consequence of successful application of Cure action.
There exist the following limitations on certain types of
User Manual
50
Chapter 3. Getting Started with Dr.Web
Anti-Virus for Linux
actions:
suspicious objects cannot be cured;
moving, renaming or deletion of objects that are not
files (e.g. boot sectors) is not allowed;
none of the actions can be applied to a separate file in
the archive or a container and to the part of mail
message. In this case action is applied to the whole
object (archive, container or mail message).
Suspicious files which were moved to Quarantine may be
sent to the Doctor Web anti-virus department for
analysis. You may use a special contact form at http://vms.
drweb.com/sendvirus for this purpose.
3. After action is applied, Dr.Web Anti-Virus for Linux adds a
correspondent entry to the Action column about the
results of the operation.
4. To return to the main Scanner window press New
scanning button.
3.6 Getting Help
To get help about the program you can use Doctor Web Help.
To access Dr.Web Help
Click Help in the menu bar and then select your topic of
interest.
If you cannot find a solution for your problem or necessary
information about Dr.Web Anti-Virus for Linux, you can request
direct assistance from Technical Support.
User Manual
51
Chapter 4. Advanced Use
Chapter 4. Advanced Use
This chapter contains information on performing more advanced
tasks with Dr.Web Anti-Virus for Linux and adjusting its settings.
Using additional features you will be able to:
view anti-virus check results;
process suspicious and incurable objects, moved to the special
Quarantine directory during anti-virus check;
specify a shedule for automatic scan and update of Doctor Web
virus databases;
specify actions to be applied to detected threats during regular
automatic scan;
specify exclusions for scan;
set up notifications about system events.
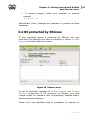
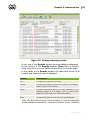
4.1 Viewing Results
Dr.Web Anti-Virus for Linux collects statistics on malicious objects
and other threats, detected on your computed during regular
check performed by the Scanner or SpIDer Guard file monitor. In
the Results section you may view this statistics and delete old
entries, if necessary.
Viewing statistics
To view statistics on operation of Dr.Web Anti-Virus for Linux,
select Results option in the menu bar.
User Manual
52
Chapter 4. Advanced Use
Figure 19. Viewing scanning results.
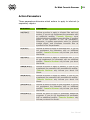
At the top of the Results window general statistics is displayed.
At the bottom of the Results window Clear button is located.
Using this button you can delete all data from the Results page.
In the middle of the Results window the table with the list of all
possible and obvious threats is displayed:
Column
Description
File
Contains the path and file name.
Details
Contains information about the threat (for example,
name or type of the threat).
Action
Contains information about the action applied to the
detected object. If it is empty, then no action was
applied yet (see below for more information).
Date
Contains the date when the threat was detected.
When Dr.Web Anti-Virus for Linux operates in central protection
mode, statistics is sended to central protection server. Statistics
User Manual
53
Chapter 4. Advanced Use
can be transmited:
By using Clear button. In this case all data from Result
page will be deleted. Report about threats detected
during the scan and actions applied on them can be
sended to central protection server only once per scan
session. It means that when you press the Clear
button before threats being handled manualy, only
information about detected threats and automatically
applied actions will be sended to server.
According to central protection server's schedule.
4.2 Managing Quarantine
Quarantine allows you to isolate detected malicious or suspicious
objects that cannot be cured from the rest of the system in case
you need them. Curing algorithms are being constantly improved,
therefore these objects may become curable after one of the
updates.
You can view and manage the contents of Quarantine using the
Quarantine section of the main window (see picture below).
The following types of files are stored in Quarantine:
1. Temporary files, marked with
icon. This is backup copies of
infected and suspicious files, for which Treat action had been
chosen. Also this type includes files deleted according to
corresponding settings (Delete action) that alllows to restore
file from it's copies if necessary;
2. Permanent files, marked with
. This type include infected
and suspicious files moved to Quarantine according to
corresponding settings (Move action). As curing algorithms
improve constantly, these files can be successfully cured later.
Files of the first type are stored in Quarantine for a limited period
of time (it is specified in settings). When storage period expires,
they are removed from Quarantine and permanently deleted. Also
they are deleted (overwritten with new files), if there is no more
free space left in Quarantine. Files of the second type can be
deleted only by user intervention (Delete action).
User Manual
54
Chapter 4. Advanced Use
By default Quarantine is located at .drweb subdirectory of user
home directory.
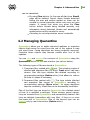
Viewing objects in Quarantine
To proceed to Quarantine window select Quarantine option in
the menu bar.
Figure 20. Quarantine window.
At the top of the Quarantine window general statistics on objects
stored in Quarantine and amount of disc space allocated to them is
displayed.
In the middle of the Quarantine window the table with the list of
objects in the Quarantine is displayed:
User Manual
55
Chapter 4. Advanced Use
Column
Description
Quarantine
Contains the path and file name.
Status
Contains information about the threat (for example,
name or type of the threat).
Original path
Contains path to the directory from which the certain
file was moved to Quarantine
Date and Time
Contains the date and time when the object was
moved to Quarantine.
Type
Specifies whether the object is stored in the system or
user Quarantine (there is one common system
Quarantine and separate ones for each user).
Processing objects in Quarantine
1. To apply an action to one or several objects in Quarantine
select them from the list (hold the SHIFT key to select
several objects in a row, or the CTRL key to select a few
scattered objects).
2. Perform one of the following actions:
press Restore button to move the quarantined file
back to the place in the file system where it was moved
from;
press an arrow near the Restore button and select
Restore to action to move the file from Quarantine
to the directory of your choice;
press an arrow near the Restore button and select
Remove action to delete the file from Quarantine.
Adjusting Quarantine parameters
1. To open a settings section of Dr.Web Anti-Virus for Linux
select Setting item from the Tools menu.
User Manual
56
Chapter 4. Advanced Use
Figure 21. Quarantine settings.
2. Select Quarantine tab.
3. Select a Save copies of deleted files check box to enable
preservation of deleted infected files in Quarantine.
Deselect this check box to allow permanent deletion of
infected objects and disable a possibility to restore them
from Quarantine. Quarantined copies of deleted files have
icon.
4. Specify limits for a storage period for objects in Quarantine
and for a size of Quarantine itself.
When you specify a size of the Quarantine, it does not
reserve any disk space. So even if you allow Quarantine
to use 100% of free space on the partition, current size of
the Quarantine will be equal to the total size of
quarantined files.
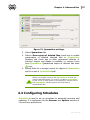
4.3 Configuring Schedules
Scheduler is used to set up schedules for automatic scanning and
updating. It is configured via the Scanner and Update sections of
the anti-virus preferences.
User Manual
57
Chapter 4. Advanced Use
To configure scheduled scans
1. In the Tools menu, click Setting, select Scanner and open
the Scheduler tab.
2. Select the checkbox at the top, select checkboxes next to
the files and folders that you want to scan specify the time
and interval between scanning sessions in days.
Figure 22. "Schedule" tab for a Scanner.
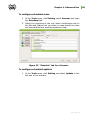
To configure scheduled updates
1. In the Tools menu, click Setting and select Update in the
left part of the window.
User Manual
58
Chapter 4. Advanced Use
Figure 23. "Updates" tab.
2. Select one of the following options:
Automatic – update with the recommended default
interval.
Update every – specify an interval for updating.
Disable updates – disable automatic updates, select .
When operating in this mode, remember to manually
update Dr.Web Anti-Virus for Linux regularly.
4.4 Configuring Automatic Actions
You can specify actions to be applied to various types of computer
threats automatically, if manual processing of detected malicious
objects appears to be disabled. You can set different automatic
reaction for Scanner and SpIDer Guard.
For various types of threats you can specify one of the following
actions:
Cure (available only for infected files) - try to cure the object
infected with known virus. If it turns out to be impossible to
cure this file, then an action for incurable files is applied. This
action is used by default for infected files.
User Manual
59
Chapter 4. Advanced Use
Delete - delete infected or suspicious file.
Move - move infected or suspicious file to the Quarantine
directory. This action is used by default for incurable files.
Report - notify the user about a detected threat. When this
action is selected, all operation with detected malicious
objects must be performed manually. This action is used by
default for suspicious files and riskware, such as hacktools,
jokes etc.
Ignore (available for suspicious files and all types of riskware)
- pass the file (a notification will be output to log that a
certain file is infected).
Default settings specified on Actions tab provide optimal
protection for your system. It is not recommended to modify them
unless it is necessary.
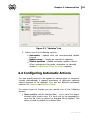
To configure automatic actions
1. To open automatic reaction settings for Dr.Web Anti-Virus
for Linux components, do one of the following:
To configure automatic actions for Scanner, in the
Tools menu, click Settings, select Scanner and open
the Actions tab.
Figure 24. "Actions" tab for a Scanner
To configure automatic actions for SpIDer Guard, in
the Tools menu, click Settings, select SpIDer Guard
User Manual
60
Chapter 4. Advanced Use
and open the Actions tab.
2. Select necessary action for each type of threats.
3. After editing all the necessary settings press OK button to
save the changes or Cancel button to discard all changes.
4.5 Excluding Files from Scanning
You can make up a list of files and directories which should be
excluded from scanning. Exclusions can be adjusted both for the
Scanner and the SpIDer Guard using the same procedure.
The Quarantine directory (usually it is /.drweb subdirectory in
the user home directory) is in the exclusions list by default because
it is used to isolate detected threats and, as access to it is blocked,
there is no use scanning it.
Default settings in the Exclusions tab are considered optimal for a
perfect protection of your system, and it is not recommended to
change them unless it is necessary and you know what you are
doing.
To configure exclusions
1. To open exclusion settings for Dr.Web Anti-Virus for
Linux components, do one of the following:
To configure exclusions for Scanner, in the Tools
menu, click Settings, select Scanner and open the
Exclusions tab.
User Manual
61
Chapter 4. Advanced Use
Figure 25. "Exclusions" tab for a Scanner.
To configure exclusions for SpIDer Guard, in the Tools
menu, click Settings, select SpIDer Guard and open
the Exclusions tab.
By default, the Quarantine folders are excluded from scans
of both components, because they are used to isolate
detected threats and, as access to it is blocked, there is no
use scanning it.
2. If necessary, modify notification the list of exclusions:
To add a file or folder to the list, click the
button and select the object. To change selection
press
.
To exclude archives of all types from scanning, disable
flag Scan archives.
For SpIDer Guard, you can also specify a time limit for
scanning one file, so the resident monitor does not
"hang up" scanning corrupted files.
For Scanner, you can also configure displaying of
unchecked files in the scan results.
3. After editing all the necessary settings press OK button to
save the changes or Cancel button to discard all changes.
User Manual
62
Chapter 4. Advanced Use
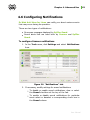
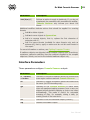
4.6 Configuring Notifications
Dr.Web Anti-Virus for Linux can notify you about various events
that may occur during its operation.
There are two types of notifications:
On-screen messages displayed by SpIDer Guard.
Sound alerts that are used both by Scanner and SpIDer
Guard.
To configure Scanner notifications
1. In the Tools menu, click Settings and select Notifications
item.
Figure 26. "Notifications" tab.
2. If necessary, modify settings for sound notifications:
To disable or enable sound notifications, clear or select
the Sound checkbox at the top of the tab.
To enable or disable sound notifications for particular
event select or deselect a corresponding check box in
the Sound column.
User Manual
63
Chapter 4. Advanced Use
To assign a particular sound for an event, select the
event and pick a sound from the Sound list. To add
another sound to the list, click Choose and select a
sound file. You can also specify a special command for
playback and a time interval during the day for which
sound alerts will be enabled. To playback the selected
file press Play sound
button
3. If necessary, modify settings for on-screen notifications:
Use the slider to set the time for messages to remain
on the screen after they are reviewed.
To disable or enable on-screen notifications, clear or
select the Notify checkbox at the top of the tab.
To enable or disable on-screen notification for particular
event select or deselect a corresponding check box in
the Notify column.
4.7 Simultaneous use of Dr.Web
Anti-Virus for Linux by several users
On the same computer different users can start and use their
separate copies of Dr.Web Anti-Virus for Linux, and all these
copies will operate simultaneously and independently.
When any user starts the Dr.Web Anti-Virus for Linux for the
first time, in user home directory (in ~/.drweb) the following files
and directories are created:
copy of the main configuration file drweb32.ini, where
user settings for Doctor Web Scanner will be stored;
copies of configuration files for SpIDer Guard and Dr.Web
Antivirus for Linux components (drweb-spider.conf
and drweb-cc.conf
correspondingly), where their
settings for a specific user will be stored;
symbolic link to the license key file /opt/drweb/drweb32.
key (whether there exists this file or not). If this file exists at
the specified location, it will be available for all users by
default, otherwise the user will be offered to get license key
User Manual
64
Chapter 4. Advanced Use
file via the License Manager;
symbolic link to the Doctor Web Engine /var/drweb/
lib/drweb32.dll. Updater module may replace this
symbolic link with the real drweb32.dll file later on, after
some regular update;
sockets for SpIDer Guard and Dr.Web Antivirus for Linux;
directories where user virus databases and temporary files will
be stored, and the Quarantine directory.
When Dr.Web Anti-Virus for Linux operating in central
protection mode, complex settings are the same for all users.
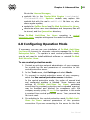
4.8 Configuring Operation Mode
If necessary, you can use your installation of Dr.Web Anti-Virus
for Linux to connect to corporate networks managed by Dr.Web
Enterprise Suite . To operate in such central protection mode,
you do not need to install additional software or uninstall Dr.Web
Anti-Virus for Linux.
To use central protection mode
1. Contact an anti-virus network administrator of your company
for a public key file and parameters of connection to the
central protection server.
2. In the Tools menu, click Settings and select Mode.
3. To connect to central protection server of your company,
select the Use central protection server checkbox.
In the central protection mode, the option of manual start
and configuring updates is blocked. Some features and
settings of Dr.Web Anti-Virus for Linux, particularly
concerning the constant protection and on-demand scanning,
may be modified and blocked for compliance with the
company security policy. A key file for operation in this mode
is received from central protection server. Your personal key
file is not used.
4. On switching to the central protection mode Dr.Web AntiVirus for Linux restores parameters of the previous
connection. If you are connecting to the server for the first
User Manual
65
Chapter 4. Advanced Use
time or connection parameters have changed, do the
following:
Enter the IP address of the central protection server
provided by administrator of anti-virus network.
Enter the port number that is used to connect to the
server.
Drag the public key file to the settings window, or
double-click the public key area and browse to select
the file.
As an option, enter the authentification parameters:
station ID, which is assigned to your computer for
registration at the server, and password. The entered
values are saved with Keychain system. Therefore, you
need not enter them again when reconnecting to the
server.
To use standalone mode
1. In the Tools menu, click Settings and select Mode.
2. To switch to the standalone mode, clear the Use central
protection server checkbox.
On switching to this mode, all settings of Dr.Web Anti-Virus
for Linux are unlocked and restored to their previous or
default values. You can once again access all features of antivirus.
3. For correct operation in standalone mode, Dr.Web AntiVirus for Linux requires a valid personal key file. The key
files received from central protection server cannot be used
in this mode. If necessary, you can receive or update a
personal key file with License Manager.
User Manual
66
Chapter 4. Advanced Use
4.9 Using License Manager
License Manager is a component that simplifies management of
your key files (see License Key File). You should install a key file
after installation because it unlocks updating, constant protection
and on-demand scanning features. If you have not received a key
file or it has expired, you can use License Manager to get a new
one.
To open License Manager
In the Tools menu, click License Manager.
The License Manager window displays details of your current key
file and provides you the following license management options:
Column
Description
Demo version No serial number is needed because the demo key file is
for 30 days
used for evaluation purposes and has a short term of
usage.
Register
You will need to specify the serial number which is included
using
the with the program.
serial number
Specify path Select this option if you already have a valid key file
to an existing present on the computer.
key file
4.9.1 License Key File
Use rights for Dr.Web Anti-Virus for Linux are regulated by a
special file called the key file. The key file contains the following
information:
Duration of the anti-virus license
List of components a user is allowed to use
Other restrictions (for example, the number of users allowed
to use the application)
User Manual
67
Chapter 4. Advanced Use
The key file has the .key extension and it can be received at first
launch of Dr.Web Anti-Virus for Linux via the License Manager:
For evaluation purposes you can use a demo key file. The
demo key file provides full functionality of the main anti-virus
components, but has a limited term of usage.
To get a license key file, you will need the product's serial
number. You can purchase any Dr.Web anti-virus product or
the serial number for it via our partners or the online store.
The key file is delivered as a file with the .key extension or as a ZIP
archive containing such file.
The parameters of the key file which specify the user’s rights are
set in accordance with the License agreement. The file also
contains information on the user and seller of the anti-virus.
License key file is digitally signed to prevent its editing. Edited
license key file becomes invalid. It is not recommended to open
your license key file in text editors to avoid its accidental corruption.
When the license key file expires, to) continue using Dr.Web AntiVirus for Linux you have to get a new key file and replace the old
one with it (see Registration and Renewal of License).
4.9.2 Registration and Renewal of License
By default, the key file should be located in the /home/<user
name>/.drweb. Dr.Web Anti-Virus for Linux verifies the file
regularly. Do not edit or otherwise modify the file to prevent the
license from compromise.
If no valid license or demo key file is found or a license expires, all
components are blocked until you renew the license or get a new
one.
License Manager helps you register the use of Dr.Web AntiVirus for Linux by installing a previously received license from file,
or obtaining a new license via the Internet using the registration
procedure.
User Manual
68
Chapter 4. Advanced Use
To start registration from License Manager, click Get new license.
When running Dr.Web Anti-Virus for Linux for the first time, the
registration procedure start automatically.
Figure 27. License Manager main window.
To install existing key files
1. On the first step of the procedure, select Specify path to
an existing key file.
2. Select a key file. If you received the key file in an archive,
you may select an archive.
Dr.Web Anti-Virus for Linux automatically switches to
using the new key file.
To get a new key file
1. On the first step of the registration procedure, do one of
the following:
User Manual
69
Chapter 4. Advanced Use
If you have a registration serial number, select Register
using the serial number and click Next.
If you installed Dr.Web Anti-Virus for Linux with
demonstration purposes, select Demo version for 30
days, click Next and proceed to step 4.
Figure 28. Registration Type screen
2. Enter a serial number to receive a license key file and click
Next.
Figure 29. Enter Serial Number screen
3. After you specify the serial number or upload the key file,
User Manual
70
Chapter 4. Advanced Use
the Dr.Web license server determines if you are using new
license or renewal licence
Figure 30. Selection of renewal method for new license
If you have been a user of Dr.Web Anti-Virus for Linux in
the past and are registering a new license, you are eligible for
extension of your new license for another 150 days. If you
are registering a renewal license and fail to provide a previous
license key file, your new license period will be reduced.
Click Next.
Specify the previous serial number or upload your current
license key
User Manual
71
Chapter 4. Advanced Use
Figure 31. Previous serial number window
Figure 32. Current licence key file window
If you select do not specify previous licence number
warning about the absence of rebate appears.
User Manual
72
Chapter 4. Advanced Use
Figure 33. Warning window
4. To receive a key file, enter personal data (your given name,
family name, and e-mail address), select the country and
enter the city name. All the fields listed are obligatory and
should be filled in. If you want to receive news about
Doctor Web by e-mail, select the corresponding checkbox.
5. To download and install your key file, click Next. Usually, this
procedure does not require your active participation. If you
successfully receive your license key file, Dr.Web Anti-Virus
for Linux will start to use it automatically.
User Manual
73
Chapter 4. Advanced Use
Figure 34. Registration Finish window
If download fails, Updater provides you with information on the
error. Check you Internet connection and try again.
It is recommended to keep the key file until it expires. If you reinstall the product or install it on several computers, you will be able
to use the previously registered license key file.
Please note, that in case of receiving key file through using the
serial number, following warning may appears on startup:
ERROR: Dr.Web ® Updater: key file not found !
See Dr.Web ® Updater log file for details.
To disable this notification, comment out the line in /etc/cron.d/
drweb-update, which is responsible for the startup of Updater:
# */30 * * * * drweb /opt/drweb/update.pl
User Manual
74
Chapter 4. Advanced Use
Subsequent Registration
If a key file is lost, you should register again. In this case, input the
personal data which you provided during the previous registration.
You may use a different e-mail address. In this case, the key file will
be sent to the address specified.
When recovering a demo key file, you will receive the same key
file as during the previous registration. Demo key files for the
same computer cannot be received more often then once in 4
months.
The number of requests for a key file receipt is limited. One serial
number can be registered not more than 25 times. If more requests
are sent, the key file will not be delivered. In this case, to receive a
lost key file, contact Technical Support describing your problem in
detail, stating your personal data input during the registration and
the serial number.
4.10 Central Anti-virus Protection
Solutions for central protection from Doctor Web help automate
and simplify configuring and managing information security of
computers within logical structures (for example, company
computers that access each other from both inside and outside of
company's local networks). Protected computers are united in an
anti-virus network which security is monitored and managed from
central sever by administrators. Connection to centralized anti-virus
systems guarantees high level of protection while requiring minimum
efforts from end-users.
Logical Structure of Anti-virus Networks
Solutions for central protection from Doctor Web use client-server
model.
Workstations and
servers are
protected
by
local
anti-virus
User Manual
75
Chapter 4. Advanced Use
components (agents, or clients; herein, Dr.Web Anti-Virus for
Linux) installed on them, which provides for anti-virus protection of
remote computers and ensures easy connection to central
protection server.
Local computers are updated and configured from central server.
The stream of instructions, data and statistics in the anti-virus
network goes also through the central protection server. The
volume of traffic between protected computers and the central
server can be quite sizeable, therefore solutions provide options for
traffic compression. To prevent leak of sensitive data or substitution
of software downloaded onto protected computers, encryption is
also supported.
All necessary updates are downloaded to central protection server
from Dr.Web Global Update System servers.
Local anti-virus components are configured and managed from
central protection server according to commands from anti-virus
network administrators. Administrators manage central protection
servers and topology of anti-virus networks (for example, validate
connections to central protection server from remote computers)
and configure operation of local anti-virus components when
necessary.
User Manual
76
Chapter 4. Advanced Use
Central
Server
Protection
Anti-virus Network
Administrator
TCP, IPX, NetBIOS network
Transfer of
HTTP
updates
via
Protected computer
Dr.Web GUS
Figure 35. Logical structure of anti-virus networks.
Central Protection Solutions
Dr.Web® Enterprise Suite
Dr.Web® Enterprise Suite is a complex solution for corporate
networks of any size that provides reliable protection of
workstations, mail and file servers form all types of modern
computer threats. This solution also provides diverse tools for antivirus network administrators that allow them to keep track and
User Manual
77
Chapter 4. Advanced Use
manage operation of local anti-virus components including
components deployment and update, network status monitoring,
statistics gathering, and notification on virus events.
4.10.1 Configuring Central Protection Mode
If necessary, you can use your installed Dr.Web Anti-Virus for
Linux anti-virus solution to connect to corporate networks
protected with Dr.Web® Enterprise Suite. To operate in such
central protection mode, you do not need to install additional
software or uninstall Dr.Web Anti-Virus for Linux.
To run Dr.Web Agent in central protection mode drwebagent-es package must be installed.
To use central protection mode
1. Contact an anti-virus network administrator for a public key
file and parameters of connection to the central protection
server.
2. Open a settings section by selecting Settings item from the
Tools menu.
3. Select Mode tab.
User Manual
78
Chapter 4. Advanced Use
Figure 36. "Mode" tab.
4. To connect to central protection server of your company
select the Use central protection server checkbox.
5. On switching to the central protection mode Dr.Web AntiVirus for Linux restores parameters of the previous
connection. If you are connecting to the server for the first
time or connection parameters have changed, do the
following:
Press the Connection Settings button to open a
window with parameter settings for establishing
connection with the central protection server.
User Manual
79
Chapter 4. Advanced Use
Figure 37. Adjusting connection settings.
Enter the IP address of the central protection server.
Enter the port number that is used to connect to the
server.
Specify the public key file by double-clicking the public
key area and browsing to select the required file.
6. If you want to connect to another server, do the following:
Press the Connection Settings button. In the
appeared window set new connection parameters
similar to item 5 and and click OK to change settings
To confirm new settings, re-open Connection Settings
window. In the appeared window click OK. After this,
new connection settings will take effect.
Please note, that administrative privileges are required to
change connection settings. In general, you will be prompted
to specify root password for su or user password for sudo
(if user sudo profile is set up correctly). In some operating
systems based on GNU/Linux other mode/password
combinations may be used: for example, root password may
be used for sudo.
User Manual
80
Chapter 4. Advanced Use
Figure 38. Selecting authentication method.
In the central protection mode, some features and settings
of Dr.Web Anti-Virus for Linux may be modified and
blocked for compliance with the company security policy or
according to the list of purchased services. A key file for
operation in this mode is received from central protection
server. Your personal key file is not used.
4.10.2 Creating New Account on the Central
Protection Server
Interaction between Dr.Web Anti-Virus for Linux anti-virus
solution and central protection server is performed via the Dr.Web
Control
Agent
component.
When
connection with the server is set up, all corresponding changes are
made to configuration file of the Agent automatically.
According to the connection policy for new working stations, new
workstation can be connected to the central protection server in
two different ways:
when new account is created by the server automatically;
when corresponding account is created by administrator
manually.
If new account is created automatically
1. When Agent is first started in central protection mode, it
sends a request for the account details (station ID and
password) to the server.
2. If central protection server is set to Approve access
User Manual
81
Chapter 4. Advanced Use
mode, system administrator must confirm
registration of new station via web interface.
3. After first start Agent records hash of station ID and
password to the special file (default path is /var/drweb/
agent/pwd). Encryption key is made from the name of the
host where Agent is running.
4. Data from this file is used every time Dr.Web Anti-Virus for
Linux solution connects to the central protection server.
5. If you delete password file, repeated registration request will
be made to the server after the next start of the Agent.
manually
When new account is created manually
1. Create new account on the central protection server: station
ID is generated automatically and password must be specified
manually.
2. In
corresponding
fields
of
the
window
with
connection settings specify login (station ID) and password.
Figure 39. Adjusting connection settings.
Agent records the hash of the station ID and password to the
special file (default path is /var/drweb/agent/pwd).
Encryption key is made from the name of the host, where
Agent is running.
User Manual
82
Chapter 4. Advanced Use
3. Data from this file is used every time Dr.Web Anti-Virus for
Linux solution connects to the central protection server.
4. If you delete password file, the registration must be
performed once again.
4.10.3 Configuring Components via Web
Interface of the Central Protection Server
Anti-virus networks operated by Dr.Web Enterprise Security
Suite provide for centralized configuring of anti-virus packages on
workstations and allows:
to set the configuration parameters of anti-virus programs;
to schedule tasks on workstations;
launch scanning the computer independently of schedule
settings;
to update workstations, also after an updating error, in this
case the error state will be reset.
Every time Dr.Web Anti-Virus for Linux starts, Agent requests
and receives configuration of Dr.Web for Linux software complex
components and Dr.Web SpIDer Guard resident anti-virus
component from the central protection server. So, configuration of
this components can be performed via web interface of the central
protection server.
Please pay your attention that Dr.Web Anti-Virus for Linux in
the terminology of Dr.Web Enterprise Suite is denoted as Dr.
Web Scanner for Linux.
If the user have sufficient privileges to change settings of Dr.Web
Scanner and Dr.Web SpIDer Guard components, than all changes
made via the Dr.Web Anti-Virus for Linux interface will be
automatically exported to the central protection server.
The configuration of workstations can be modified even when they
are temporarily disconnected from the Server. These changes will
be accepted by the workstations as soon as they are reconnected
to the Server.
User Manual
83
Chapter 4. Advanced Use
4.10.4 Configuring Standalone Mode
If necessary, you can disconnect Dr.Web Anti-Virus for Linux
from the corporate networks protected with Dr.Web® Enterprise
Suite by switching Dr.Web Anti-Virus for Linux to the
standalone mode.
To use standalone mode
1. Contact an anti-virus network administrator of your company for a
permission to disconnect from the central protection server
(corresponding privileges must be granted to the user via the
web-interface of the server).
2. Open a settings section by selecting Settings item from the
Tools menu.
3. Select Mode tab.
Figure 40. "Mode" tab.
4. To switch to the standalone mode, clear the Use central
protection server checkbox.
5. On switching to this mode all settings of Dr.Web Anti-Virus for
Linux are unlocked. You can once again access all features of
anti-virus including those of configuring and running updates
manually and managing SpIDer Guard.
User Manual
84
Chapter 4. Advanced Use
Please note, that for correct operation in standalone mode, Dr.
Web Anti-Virus for Linux requires a valid personal key file. The
key files received from central protection server cannot be used
in this mode. If necessary, you can receive or update a personal
key file with License Manager.
4.10.5 Additional Settings for Standalone Mode
When settings for establishing connection with the central
protection server are adjusted, configuration files of some Dr.Web
Anti-Virus for Linux components (Dr.Web Monitor and Dr.Web
Agent) are modified. Corresponding files: monitor.conf and
agent.conf - are stored in the /etc/drweb/ directory.
For the Dr.Web Monitor:
In [Monitor] section of the configuration file value of
RunAppList parameter is changed: Agent module is added to
the list of modules started by Monitor (AGENT value).
For the Dr.Web Agent:
In
[EnterpriseMode] section of the configuration file
UseEnterpriseMode parameter value is changed to Yes, host
name of the central protection server is specified in ServerHost
parameter and port number is specified in ServerPort parameter.
So, when Dr.Web Anti-Virus for Linux is switched to
Standalone mode, it may become necessary to change manually
values of those parameters. To restore default values specify
RunAppList
=
AGENT
(or
leave
it
empty),
UseEnterpriseMode = No, ServerHost = 127.0.0.1,
ServerPort = 2193.
To disable Monitor change the value of ENABLE variable from 1
to 0 in the /etc/drweb/drweb-monitor.enable file.
User Manual
85
Dr.Web Console Scanner
Chapter 5. Command Line
Parameters
Doctor Web Scanner, SpIDer Guard and Dr.Web Antivirus for
Linux components support numerous command line parameters.
They are separated from specified path by white space and are
prefixed by hyphen «-». To get complete list of parameters, start
the corresponding component (drweb, drweb-spider or
drweb-cc) with -h or --help parameters.
5.1 Doctor Web Antivirus for Linux
Parameters
To get complete list of parameters for Dr.Web Antivirus for
Linux start the drweb-cc component with -h or --help
parameters.
Parameter
-a, --agent
Description
= Set agent location (with "local:" or "unix:" prefix)
<path>
-e, --es
-c,
--conf
Enable central protection mode.
= Specify path to the configuration file.
<file>
--debug = Set up log verbosity level (possible values: Errors,
<Errors
| Alerts, Info, Verbose, Debug).
Alerts | Info
| Verbose |
Debug>
-d,
-v, --version
Output component's version number.
User Manual
86
Dr.Web Console Scanner
Parameter
Description
-s,
--scan If paths for scan are specified, then corresponding
<path1 path2> directories will be scanned. If paths for scan are not
specified, then directories listed in schedule will be
scanned. If the Scheduler is disabled or no
directories are selected in the schedule list for scan,
then the Scanner will initialize and immediately stop its
operation (for lack of objects for check).
-g, --guard
Start Dr.Web SpIDer Guard.
-t, --tray
Hide to a tray.
-f, --fork
Run in the background.
-h, --help
Output help on the program.
5.2 SpIDer Guard Parameters
To get complete list of parameters for SpIDer Guard, start the
drweb-spider component with -h or --help parameters.
Parameter
Description
-c, --conf =
Specify path to the configuration file.
<path to file>
-r, --restart
Restart SpIDer Guard, if it is already running.
-s, --stdout
Do not enter the daemon mode and continue output
operation log to stdout.
-d, --debug
= Set up log verbosity level. Possible values are taken
<level>
from an interval [0...10], where: 0 - quiet, 2 - error,
4 - alert, 6 - info, 8 - verbose, 10 - debug.
-i, --idle
SpIDer Guard will not check files.
-v, --version
Output component's version number.
-h, --help
Output help on the program.
User Manual
87
Dr.Web Console Scanner
5.3 Command Line Parameters
Command line parameters are separated by a white space and are
prefixed with a hyphen '-'. To list all parameters, run Console
Scanner with the -?, -h or -help parameters.
The Console Scanner parameters can be divided into the following
groups:
Scan area parameters
Diagnostics parameters
Action parameters
Interface parameters
Scan Area Parameters
These parameters determine where to perform a virus scan:
Parameter
<path> or
[disk://]<path
device file>
Description
Sets scan path. You can specify several paths in one
parameter. If in startup options path is specified with
to following prefix:
disk://<path to device file>
then boot sector of appropriate device will be checked
and cured, if necessary.
-@[+]<file>
Instructs to scan objects listed in the specified file.
Add a plus '+' if you do not want the list-file to be
deleted when scanning completes. List file may
contain paths to directories that must be scanned
regularly, or list of files to be checked only once.
--
Instructs to read list of objects to scan from the
standard input (STDIN).
-sd
Sets recursive search for files to scan in subfolders.
-fl
Instructs to follow symbolic links to both files and
folders. Links causing loops are ignored.
User Manual
88
Dr.Web Console Scanner
Parameter
Description
-mask
Instructs to ignore masks for filenames.
Diagnostics Parameters
These parameters determine which types of objects to scan for
viruses:
Parameter
Description
-al
Instructs to scan all objects defined by scan paths
regardless of their file extension and structure. Scan
paths are specified in the -path parameter.
This parameter is opposite in effect to the -ex
parameter.
-ex
Instructs to search scan paths for threats presented
by files of certain types and ignore objects of other
types. The list of file types should be specified in the
FileTypes variable of the configuration file. The
configuration file is defined by the -ini parameter. By
default, objects with the following file extensions are
scanned: EXE, COM, DLL, SYS, VXD, OV?, BAT, BIN,
DRV, PRG, BOO, SCR, CMD, 386, FON, DO?, XL?,
WIZ, RTF, CL*, HT*, VB*, JS*, INF, PP?, OBJ, LIB,
PIF, HLP, MD?, INI, MBR, IMG, CSC, CPL, MBP, SH,
SHB, SHS, SHT*, CHM, REG, XML, PRC, ASP, LSP,
MSO, OBD, THE*, NWS, SWF, MPP, OCX, VS*, DVB,
CPY, BMP, RPM, ISO, DEB, AR?, ZIP, R??, GZ, Z,
TGZ, TAR, TAZ, CAB, LHA, LZH, BZ2, MSG, EML, 7Z,
CPIO.
Scan paths are specified in the -path parameter.
This parameter is opposite in effect to the -al
parameter.
-ar[d|m|r][n]
Instructs to scan contents of archives (ARJ, CAB,
GZIP, RAR, TAR, ZIP, etc.), both simple (*.tar) and
compressed (*.tar.bz2, *.tbz).
If you do not supplement the parameter with an
additional d, m or r modifier, Console Scanner only
informs you about detected malicious or suspicious
User Manual
89
Dr.Web Console Scanner
Parameter
Description
files in archives. Otherwise, it applies appropriate
actions to avert detected threats.
-cn[d|m|r][n]
Instructs to scan contents of files containers (HTML,
RTF, PowerPoint).
If you do not supplement the parameter with an
additional d, m or r modifier, Console Scanner only
informs you about detected malicious or suspicious
files in containers. Otherwise, it applies appropriate
actions to avert detected threats.
-ml[d|m|r][n]
Instructs to scan contents of mail files.
If you do not supplement the parameter with an
additional d, m or r modifier, Console Scanner only
informs you about detected malicious or suspicious
elements of mail files. Otherwise, it applies
appropriate actions to avert detected threats.
-upn
Scan executable files packed with LZEXE, DIET,
PKLITE, EXEPACK with compression type output
disabled
-ha
Enables heuristic analyser that help detect possible
unknown threats.
For some parameters, you can use the following additional modifiers:
Add d to delete objects to avert the threat
Add m to move objects to Quarantine to avert the threat
Add r to rename objects to avert the threat (that is, replace the
first character of the file's extension with '#')
Add n to disable output of the archive, container, mail file or packer
type
For more information on actions, see Fighting Computer Threats.
If malicious objects are detected within complex objects such as archives,
containers, packed or mail files, then the reaction is applied to the complex
object as a whole, and not to the included malicious object only.
User Manual
90
Dr.Web Console Scanner
Action Parameters
These parameters determine which actions to apply to infected (or
suspicious) objects:
Parameter
Description
-cu[d|m|r]
Defines an action to apply to infected files and boot
sectors. If you do not supplement the parameter with
an additional modifier, Console Scanner cures
infected objects and deletes incurable files (if another
action is not specified in the -ic parameter).
Otherwise, it applies appropriate action to infected
curable object, and processes incurable files as
specified in the -ic parameter.
-ic[d|m|r]
Defines an action to apply to incurable files. If you do
not supplement the parameter with an additional
modifier, Console Scanner only informs you about
the threat.
-sp[d|m|r]
Defines an action to apply to suspicious files. If you
do not supplement the parameter with an additional
modifier, Console Scanner only informs you about
the threat.
-adw[d|m|r|i]
Defines an action to apply to adware. If you do not
supplement the parameter with an additional modifier,
Console Scanner only informs you about the
threat.
-dls[d|m|r|i]
Defines an action to apply to dialers. If you do not
supplement the parameter with an additional modifier,
Console Scanner only informs you about the
threat.
-jok[d|m|r|i]
Defines an action to apply to joke programs. If you do
not supplement the parameter with an additional
modifier, Console Scanner only informs you about
the threat.
-rsk[d|m|r|i]
Defines an action to apply to potentially dangerous
programs. If you do not supplement the parameter
with an additional modifier, Console Scanner only
informs you about the threat.
User Manual
91
Dr.Web Console Scanner
Parameter
Description
-hck[d|m|r|i]
Defines an action to apply to hacktools. If you do not
supplement the parameter with an additional modifier,
Console Scanner only informs you about the
threat.
Additional modifiers indicate actions that should be applied for averting
threats:
Add d to delete objects.
Add m to move objects to Quarantine.
Add r to rename objects, that is, replace the first character of
extension with '#'.
Add i to ignore threats (available for minor threats only such as
adware etc), that is, apply no action and do not list such threats in
the report.
For more information on actions, see Fighting Computer Threats.
If malicious objects are detected within complex objects such as archives,
containers, packed or mail files, then the reaction is applied to the complex
object as a whole, and not to the included malicious object only.
Interface Parameters
These parameters configure Console Scanner output:
Parameter
Description
-v, -version,
--version
Instructs to output information about the product and
scan engine versions and exit Console Scanner.
-ki
Instructs to output information about the license and
its owner (in UTF8 encoding only).
-go
Instructs to run Console Scanner in batch mode
when all questions implying answers from a user are
skipped and all decisions implying a choice are taken
automatically. This mode is useful for automatic
scanning of files, for example, during a daily (or
weekly) check of the hard drive.
-ot
Instructs to use the standard output (STDOUT).
-oq
Disables information output.
User Manual
92
Dr.Web Console Scanner
Parameter
Description
-ok
Instructs to list all scanned objects in the report and
mark "clean" object with Ok.
-log=[+]<path to
file>
Instructs to log Console Scanner operations in the
specified file. The file name is mandatory to turn on
logging. Add a plus '+' if you want to append the log
file instead of overwriting it.
-ini=<path to file> Instructs to use the specified configuration file. No
configuration file is supplied with Console Scanner
by default.
-lng=<path to
file>
Instructs to use the specified language file. The
default language is English.
-a = <Control
Agent address>
Run Scanner in central protection mode.
-ni
Disables the use of the configuration file for setting
up scanning options. Console Scanner is configured
with parameters from the command line only.
-ns
Disables interruption of scanning process including the
use of interruption signals (SIGINT).
--only-key
Nothing but key file is received from the Control
Agent at start.
You can use hyphen «-» postfix to disable the following parameters:
-ar -cu -ha -ic -fl -ml -ok -sd -sp
For example, if you start Scanner with the following command:
$ drweb -path <path> -haheuristic analysis (enabled by default) will be disabled.
For the -cu, -ic and -sp parameters, the negative form
disables any action specified with additional modifiers, that is,
negative form of these parameters instruct to report on detection
of infected or suspicious objects, but take no actions to avert
threats.
The -al and -ex parameters have no negative for, but cancel one
User Manual
93
Dr.Web Console Scanner
another.
By default (if Scanner configuration was not customized and no
parameters were specified) Scanner starts with the following
parameters:
-ar -ha -fl- -ml -sd
Default Scanner parameters (including scan of archives, packed files
and mailboxes, recursive search, heuristic analysis, etc.) is sufficient
for everyday diagnostics and can be used in typical cases. You can
also use hyphen «-» postfix to disable some parameters, as it was
explained above.
Disabling scan of archives and packed files will significantly decrease
antivirus protection level, because in archives (especially, selfextracting) enclosed in e-mail attachments viruses are distributed.
Office documents potentially susceptible to infection with macro
viruses (Word, Excel) are also dispatched via e-mail in archives and
containers.
When you run Scanner with default parameters, no cure actions
and no actions for incurable and suspicious files are taken. For these
actions to be performed, you must specify corresponding command
line parameters explicitly.
Set of actions parameters may vary in particular cases. We
recommend the following:
cu - cure infected files and system areas without deletion,
moving or renaming infected files;
icd - delete incurable files;
spm - move suspicious files;
spr - rename suspicious files.
When Scanner is started with Cure action specified, it will try to
restore the previous state of infected object. It is possible only if
detected virus is known virus, and cure instructions for it are
available in virus database, though even in this case cure attempt
may fail if infected file is seriously damaged by virus.
If infected files are found inside archives they will not be cured,
User Manual
94
Dr.Web Console Scanner
deleted, moved or renamed. To cure such files you must manually
unpack archives to the separate directory and instruct Scanner to
check it.
When Scanner is started with action Delete specified, it will delete
all infected files from disk. This option is suitable for incurable
(irreversibly damaged by virus) files.
Action Rename makes Scanner replace file extension with a
certain specified extension («*.#??» by default, i.e. first extension
symbol is replaced with «#» symbol). Enable this parameter for files
of other OS (e.g., DOS/Windows) detected heuristically as
suspicious. Renaming helps to avoid accidental startup of executable
files in these OS and therefore prevents infection by possible virus
and its further expansion.
With action Move enabled Scanner will move infected or suspicious
files to the quarantine directory.
User Manual
95
Appendices
Appendices
Appendix A. Types of Computer Threats
Herein, the term "threat" is defined as any kind of software
potentially or directly capable of inflicting damage to a computer or
network and compromising the user's information or rights (that is,
malicious and other unwanted software). In a wider sense, the
term "threat" may be used to indicate any type of potential danger
to the security of the computer or network (that is, vulnerabilities
that can result in hacker attacks).
All of the program types stated below have the ability to endanger
the user’s data or confidentiality. Programs that do not conceal their
presence (e.g. spam distribution software and various traffic
analyzers) are usually not considered as computer threats, although
they can become threats under certain circumstances.
In Doctor Web classification, all threats are divided according to the
level of severity into two types:
Major threats – classic computer threats that may perform
destructive and illegal actions in the system on their own
(erase or steal important data, crash networks, etc.). This
type of computer threats consists of software that is
traditionally referred to as malware (malicious software), that
is, viruses, worms and Trojans.
Minor threats – computer threats that are less dangerous
than major threats, but may be used by a third person to
perform malicious activity. Also, mere presence of minor
threats in the system indicates its low protection level. Among
IT security specialists this type of computer threats is
sometimes referred to as grayware or PUP (potentially
unwanted programs) and consists of the following program
types: adware, dialers, jokes, riskware, hacktools.
User Manual
96
Appendices
Major threats
Computer Viruses
This type of computer threats is characterized by the ability to
implement its code into other objects. Such implementation is called
infection. In most cases, the infected file becomes a virus carrier
itself and the implemented code does not necessarily match the
original. Most viruses are intended to damage or destroy data in the
system.
In Doctor Web classification, viruses are divided by the type of
objects which they infect:
File viruses infect files of the operating system (usually
executable files and dynamic libraries) and activate upon
launching of the infected file.
Macro-viruses are viruses that infect documents used by
Microsoft® Office and some other applications supporting
macro commands (usually, written in Visual Basic). Macro
commands are a type of implemented programs (macros)
written in a fully functional programming language. For
instance, in Microsoft® Word macros can automatically initiate
upon opening (closing, saving, etc.) a document.
Script viruses are created using script languages and usually
infect other scripts (e.g. service files of an operating system).
They are also able to infect other file formats that allow
execution of scripts and thus take advantage of scripting
vulnerabilities in Web applications.
Boot viruses infect boot records of diskettes and partitions
or master boot records of fixed disks. They require very little
memory and remain ready to continue performing their tasks
until a system roll-out, restart or shut-down occurs.
Most viruses have some kind of protection against detection.
Protection methods are being constantly improved and ways to
overcome them are constantly being developed. All viruses may also
be classified according to the type of protection that they use:
Encrypted viruses cipher their code upon every infection to
hamper their detection in a file, boot sector or memory. All
User Manual
97
Appendices
copies of such viruses contain only a small common code
fragment (the decryption procedure) that can be used as a
virus signature.
Polymorphic viruses also encrypt there code, but besides
that they also generate a special decryption procedure that is
different in every copy of the virus. This means that such
viruses do not have byte signatures.
Stealth viruses perform certain actions to disguise their
activity and thus conceal their presence in an infected object.
Such viruses gather the characteristics of an object before
infecting it and then plant these “dummy” characteristics that
mislead the scanner searching for modified files.
Viruses can also be classified according to the programming language
in which they are written (in most cases, it is Assembler, high-level
programming languages, script languages, etc.) or according to
affected operating systems.
Computer Worms
Worms have become a lot more widespread than viruses and other
types of computer threats recently. Like viruses, they are able to
reproduce themselves and spread their copies, but they do not
infect other programs and files (that is, they do not need host files
to spread). A worm infiltrates a computer from a worldwide or local
network (usually via an attachment to an e-mail) and distributes its
functional copies to other computers in the network. It can begin
distributing itself either upon a user’s action or in an automatic
mode choosing which computers to attack.
Worms do not necessarily consist of only one file (the worm’s
body). Many of them have an infectious part (the shellcode) that
loads into the main memory (RAM) and then downloads the worm’s
body as an executable file via the network. If only the shellcode is
present in the system, the worm can be deleted by simply
restarting the system (at which the RAM is erased and reset).
However, if the worm’s body infiltrates the computer, then only an
anti-virus program can cope with it.
Worms have the ability to cripple entire networks even if they do
not bear any payload (i.e. do not cause any direct damage) due to
their intensive distribution.
User Manual
98
Appendices
In Doctor Web classification, worms are divided by the method of
distribution:
Net worms distribute their copies via various network and filesharing protocols.
Mail worms spread themselves using e-mail protocols (POP3,
SMTP, etc.).
Chat worms use protocols of popular messengers and chat
programs (ICQ, IM, IRC, etc.).
Trojan Programs (Trojans)
This type of computer threats cannot reproduce itself or infect
other programs. A Trojan substitutes a program that is used a lot
and performs its functions (or imitates its operation). At the same
time, it performs some malicious actions in the system (damages or
deletes data, sends confidential information, etc.) or makes it
possible for hacker to access the computer without permission, for
example, to harm the computer of a third party.
A Trojan’s masking and malicious facilities are similar to those of a
virus. A Trojan may even be a component of a virus. However, most
Trojans are distributed as separate executable files (through fileexchange servers, removable data carriers or e-mail attachments)
that are launched by users or system tasks.
It is very hard to classify Trojans due to the fact that they are often
distributed by viruses or worms and also because many malicious
actions that can be performed by other types of threats are
ascribed to Trojans only. Here are some Trojan types which are
distinguished as separate classes in Doctor Web:
Backdoors are Trojans that make it possible for an intruder
to log on into the system or obtain privileged functions
bypassing any existing access and security measures.
Backdoors do not infect files, but they write themselves into
the registry modifying the registry keys.
Rootkits are used to intercept system functions of an
operating system in order to conceal themselves. Besides, a
rootkit can conceal processes of other programs (e.g. other
threats), registry keys, folders and files. It can be distributed
either as an independent program or as a component of
User Manual
99
Appendices
another malicious program. There are two kinds of rootkits
according to the mode of operation: User Mode Rootkits
(UMR) that operate in user mode (intercept functions of the
user mode libraries) and Kernel Mode Rootkits (KMR) that
operate in kernel mode (intercept functions on the level of
the system kernel, which makes it harder to detect).
Keyloggers are used to log data that users enter by means
of a keyboard. The aim of this is to steal personal information
(i.e. network passwords, logins, credit card data, etc.).
Clickers redirect hyperlinks to certain addresses in order to
increase traffic of Web sites or perform DDoS attacks.
Proxy Trojans provide anonymous Internet access through a
victim's computer.
Trojans may also perform other malicious actions besides those
stated above, for example, change the start page in a Web browser
or delete certain files. However, other actions can also be
performed by other types of threats (viruses and worms).
Minor Threats
Hacktools
Hacktools are programs designed to assist the intruder with hacking.
The most common among them are port scanners that detect
vulnerabilities in firewalls and other components of computer
protection system. Besides hackers, such tools are used by
administrators to check security of their networks. Occasionally,
common software that can be used for hacking and various
programs that use social engineering techniques are designated as
among hacktools as well.
Adware
Usually, this term refers to a program code implemented into
freeware programs that force display of advertisements to users.
However, sometimes such codes can be distributed via other
malicious programs and show advertisements in Web browsers.
Many adware programs operate with data collected by spyware.
User Manual
100
Appendices
Jokes
Like adware, this type of minor threats can not be used to inflict
any direct damage to the system. Joke programs usually just
generate messages about errors that never occurred and threaten
to perform actions that will lead to data loss. Their purpose is to
frighten or annoy users.
Dialers
These are special programs that are designed to scan a range of
telephone numbers and find those where a modem answers. These
numbers are then used to mark up the price of telephoning facilities
or to connect the user to expensive telephone services.
Riskware
These programs were not intended as computer threats, but can
potentially cripple or be used to cripple system security due to
certain features and, therefore, are classified as minor threats.
Riskware programs are not only those that can accidentally damage
or delete data, but also ones that can be used by crackers or some
malicious programs to do harm to the system. Among such
programs are various remote chat and administrative tools, FTPservers, etc.
Suspicious Objects
These are possible computer threats detected by the heuristic
analyzer. Such objects can potentially be any type of threat (even
unknown to IT security specialists) or turn out safe in case of a false
detection.
Suspicious objects should be sent for analysis to the Dr.Web Virus
Laboratory.
User Manual
101
Appendices
Appendix B. Fighting Computer Threats
There are many methods of detecting and averting computer
threats. All Dr.Web products combine these methods for the
most reliable protection of computers and networks using flexible
user-friendly settings and comprehensive approach towards security
assurance.
Detection methods
Signature checksum scanning
This method is a type of signature analysis. A signature is a
continuous finite byte sequence unique to a certain computer
threat. If a signature from the virus database is found in a program's
code which is being scanned, then a detection occurs.
Signature checksum scanning implies comparison of signature
checksums rather then signatures themselves. This helps to reduce
the size of the virus databases considerably and maintain reliability of
traditional signature analysis.
Execution emulation
The program code execution emulation method is used to detect
polymorphic and encrypted viruses in cases when implementation of
signature checksum analysis is impracticable or extremely difficult
(due to impossibility of extracting a reliable signature from a sample).
This is how the method is performed: an emulator, which is a
software model of the CPU, simulates execution of an analyzed
code sample; instructions are executed in protected memory space
(emulation buffer) and are not passed on to the CPU for actual
execution; when an infected file is processed by the emulator, the
result is a decrypted virus body, which can be easily defined via
signature checksum analysis.
Heuristic analysis
Heuristic analysis is used to detect newly created unknown
User Manual
102
Appendices
computer threats, whose byte signatures have not yet been added
to virus databases. Operation of the heuristic analyzer is based on
defining and calculating the summary weight of certain features
which are either typical for computer threats or, on the contrary,
very rarely found in them. These features are characterized by their
weight (a figure which defines the importance of a feature) and
sign (positive sign means that the feature is typical for computer
threats; negative means that the feature is not relevant for them).
If the sum of these features for an object exceeds a certain
operation threshold, the heuristic analyzer concludes that the
object may be a threat and defines it as suspicious.
As with other hypothesis checking systems, heuristic analysis
assumes the possibility of false positives (that is, type I errors when
a threat is overlooked) and false negatives (that is, type II errors of
a false detection).
Origins Tracing™
Origins Tracing™ is a unique non-signature threat detection
algorithm developed by Doctor Web and used only in Dr.Web
products. Combined with traditional signature-based scanning and
heuristic analysis, it significantly improves detection of unknown
threats. The .Origin extension is added to names of objects
detected using the Origins Tracing algorithm.
Actions
To avert computer threats, Dr.Web products use a number of
actions that can be applied to malicious objects. A user can leave
the default settings, configure which actions to apply automatically,
or choose actions manually upon every detection. Below is a list of
possible actions:
Cure is an action that can only be applied to major threats
(viruses, worms and Trojans). It implies deletion of malicious
code from infected objects as well as recovery of their
structure and operability to the state in which it was before
the infection if possible. Sometimes malicious objects are
made of malicious code only (for example, Trojans or
functional copies of computer worms) and for such objects to
User Manual
103
Appendices
cure the system means to remove the whole object
completely. Not all files infected by viruses can be cured, but
curing algorithms evolve all the time.
Quarantine (Move to Quarantine) is an action when the
detected threat is moved to a special folder and isolated from
the rest of the system. This action is preferable in cases when
curing is impossible and for all suspicious objects. It is
recommended to send copies of such files to the Dr.Web
Virus Laboratory for analysis.
Delete is the most effective action for averting computer
threats. It can be applied to any type of computer threat.
Note that deletion will sometimes be applied to certain
objects for which the Cure action was selected. This will
happen in cases if the object consists of only malicious code
and have no useful information (for example, curing a
computer worm implies deletion of all its functional copies).
Rename is an action when the extension of an infected file is
changed according to a specified mask (by default, the fist
character of the extension is replaced with #). This action
may be appropriate for files of other operating systems (such
as MS-DOS® or Microsoft® Windows®) detected heuristically
as suspicious. Renaming helps to avoid accidental startup of
executable files in these operating systems and therefore
prevents infection by a possible virus and its further
expansion.
Ignore is an action applicable to minor threats only (that is,
adware, dialers, jokes, hacktools and riskware) that instructs
to skip the threat without performing any action or displaying
information in report.
Report means that no action is applied to the object and the
threat is only listed in results report.
User Manual
104
Appendices
Appendix C. Contacting Support
Support is available to customers who have purchased a commercial
version of Dr.Web products. Visit Doctor Web Technical Support
website at http://support.drweb.com/.
If you encounter any issues installing or using company products,
take advantage of the following Doctor Web support options:
Download and review the latest manuals and guides at http://
download.drweb.com/
Read the frequently asked questions at http://support.drweb.
com/
Look for the answer in Dr.Web knowledge database at
http://wiki.drweb.com/
Browse Dr.Web official forum at http://forum.drweb.com/
If you have not found solution for the problem, you can request
direct assistance from Doctor Web Technical Support by filling in
the web-from in the corresponding section of the support site at
http://support.drweb.com/.
For regional office information, visit the official Doctor Web
website at http://company.drweb.com/contacts/moscow.
User Manual
105
© 2009-2011 Doctor Web