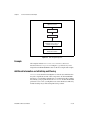
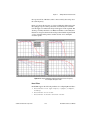
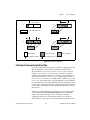
1
Computer-Based Instruments NI-SCOPE Software User Manual For Your National Instruments High-Speed Digitizer NI-SCOPE Software User Manual June 2001 Edition Part Number 322808A-01 Support Worldwide Technical Support and Product Information ni.com National Instruments Corporate Headquarters 11500 North Mopac Expressway Austin, Texas 78759-3504 USA Tel: 512 794 0100 Worldwide Offices Australia 03 9879 5166, Austria 0662 45 79 90 0, Belgium 02 757 00 20, Brazil 011 284 5011, Canada (Calgary) 403 274 9391, Canada (Montreal) 514 288 5722, Canada (Ottawa) 613 233 5949, Canada (Québec) 514 694 8521, Canada (Toronto) 905 785 0085, China (Shanghai) 021 6555 7838, China (ShenZhen) 0755 3904939, Denmark 45 76 26 00, Finland 09 725 725 11, France 01 48 14 24 24, Germany 089 741 31 30, Greece 30 1 42 96 427, Hong Kong 2645 3186, India 91805275406, Israel 03 6120092, Italy 02 413091, Japan 03 5472 2970, Korea 02 596 7456, Malaysia 603 9596711, Mexico 5 280 7625, Netherlands 0348 433466, New Zealand 09 914 0488, Norway 32 27 73 00, Poland 0 22 528 94 06, Portugal 351 1 726 9011, Singapore 2265886, Spain 91 640 0085, Sweden 08 587 895 00, Switzerland 056 200 51 51, Taiwan 02 2528 7227, United Kingdom 01635 523545 For further support information, see the Technical Support Resources appendix. To comment on the documentation, send e-mail to [email protected]. Copyright © 2001 National Instruments Corporation. All rights reserved. Important Information Warranty The media on which you receive National Instruments software are warranted not to fail to execute programming instructions, due to defects in materials and workmanship, for a period of 90 days from date of shipment, as evidenced by receipts or other documentation. National Instruments will, at its option, repair or replace software media that do not execute programming instructions if National Instruments receives notice of such defects during the warranty period. National Instruments does not warrant that the operation of the software shall be uninterrupted or error free. A Return Material Authorization (RMA) number must be obtained from the factory and clearly marked on the outside of the package before any equipment will be accepted for warranty work. National Instruments will pay the shipping costs of returning to the owner parts which are covered by warranty. National Instruments believes that the information in this document is accurate. The document has been carefully reviewed for technical accuracy. In the event that technical or typographical errors exist, National Instruments reserves the right to make changes to subsequent editions of this document without prior notice to holders of this edition. The reader should consult National Instruments if errors are suspected. In no event shall National Instruments be liable for any damages arising out of or related to this document or the information contained in it. EXCEPT AS SPECIFIED HEREIN, NATIONAL INSTRUMENTS MAKES NO WARRANTIES, EXPRESS OR IMPLIED, AND SPECIFICALLY DISCLAIMS ANY WARRANTY OF MERCHANTABILITY OR FITNESS FOR A PARTICULAR PURPOSE. CUSTOMER’S RIGHT TO RECOVER DAMAGES CAUSED BY FAULT OR NEGLIGENCE ON THE PART OF NATIONAL INSTRUMENTS SHALL BE LIMITED TO THE AMOUNT THERETOFORE PAID BY THE CUSTOMER. NATIONAL INSTRUMENTS WILL NOT BE LIABLE FOR DAMAGES RESULTING FROM LOSS OF DATA, PROFITS, USE OF PRODUCTS, OR INCIDENTAL OR CONSEQUENTIAL DAMAGES, EVEN IF ADVISED OF THE POSSIBILITY THEREOF. This limitation of the liability of National Instruments will apply regardless of the form of action, whether in contract or tort, including negligence. Any action against National Instruments must be brought within one year after the cause of action accrues. National Instruments shall not be liable for any delay in performance due to causes beyond its reasonable control. The warranty provided herein does not cover damages, defects, malfunctions, or service failures caused by owner’s failure to follow the National Instruments installation, operation, or maintenance instructions; owner’s modification of the product; owner’s abuse, misuse, or negligent acts; and power failure or surges, fire, flood, accident, actions of third parties, or other events outside reasonable control. Copyright Under the copyright laws, this publication may not be reproduced or transmitted in any form, electronic or mechanical, including photocopying, recording, storing in an information retrieval system, or translating, in whole or in part, without the prior written consent of National Instruments Corporation. Trademarks CVI™, LabVIEW™, Measurement Studio™, National Instruments™, NI™, ni.com™, PXI™, and RTSI™ are trademarks of National Instruments Corporation. Product and company names mentioned herein are trademarks or trade names of their respective companies. WARNING REGARDING USE OF NATIONAL INSTRUMENTS PRODUCTS (1) NATIONAL INSTRUMENTS PRODUCTS ARE NOT DESIGNED WITH COMPONENTS AND TESTING FOR A LEVEL OF RELIABILITY SUITABLE FOR USE IN OR IN CONNECTION WITH SURGICAL IMPLANTS OR AS CRITICAL COMPONENTS IN ANY LIFE SUPPORT SYSTEMS WHOSE FAILURE TO PERFORM CAN REASONABLY BE EXPECTED TO CAUSE SIGNIFICANT INJURY TO A HUMAN. (2) IN ANY APPLICATION, INCLUDING THE ABOVE, RELIABILITY OF OPERATION OF THE SOFTWARE PRODUCTS CAN BE IMPAIRED BY ADVERSE FACTORS, INCLUDING BUT NOT LIMITED TO FLUCTUATIONS IN ELECTRICAL POWER SUPPLY, COMPUTER HARDWARE MALFUNCTIONS, COMPUTER OPERATING SYSTEM SOFTWARE FITNESS, FITNESS OF COMPILERS AND DEVELOPMENT SOFTWARE USED TO DEVELOP AN APPLICATION, INSTALLATION ERRORS, SOFTWARE AND HARDWARE COMPATIBILITY PROBLEMS, MALFUNCTIONS OR FAILURES OF ELECTRONIC MONITORING OR CONTROL DEVICES, TRANSIENT FAILURES OF ELECTRONIC SYSTEMS (HARDWARE AND/OR SOFTWARE), UNANTICIPATED USES OR MISUSES, OR ERRORS ON THE PART OF THE USER OR APPLICATIONS DESIGNER (ADVERSE FACTORS SUCH AS THESE ARE HEREAFTER COLLECTIVELY TERMED “SYSTEM FAILURES”). ANY APPLICATION WHERE A SYSTEM FAILURE WOULD CREATE A RISK OF HARM TO PROPERTY OR PERSONS (INCLUDING THE RISK OF BODILY INJURY AND DEATH) SHOULD NOT BE RELIANT SOLELY UPON ONE FORM OF ELECTRONIC SYSTEM DUE TO THE RISK OF SYSTEM FAILURE. TO AVOID DAMAGE, INJURY, OR DEATH, THE USER OR APPLICATION DESIGNER MUST TAKE REASONABLY PRUDENT STEPS TO PROTECT AGAINST SYSTEM FAILURES, INCLUDING BUT NOT LIMITED TO BACK-UP OR SHUT DOWN MECHANISMS. BECAUSE EACH END-USER SYSTEM IS CUSTOMIZED AND DIFFERS FROM NATIONAL INSTRUMENTS' TESTING PLATFORMS AND BECAUSE A USER OR APPLICATION DESIGNER MAY USE NATIONAL INSTRUMENTS PRODUCTS IN COMBINATION WITH OTHER PRODUCTS IN A MANNER NOT EVALUATED OR CONTEMPLATED BY NATIONAL INSTRUMENTS, THE USER OR APPLICATION DESIGNER IS ULTIMATELY RESPONSIBLE FOR VERIFYING AND VALIDATING THE SUITABILITY OF NATIONAL INSTRUMENTS PRODUCTS WHENEVER NATIONAL INSTRUMENTS PRODUCTS ARE INCORPORATED IN A SYSTEM OR APPLICATION, INCLUDING, WITHOUT LIMITATION, THE APPROPRIATE DESIGN, PROCESS AND SAFETY LEVEL OF SUCH SYSTEM OR APPLICATION. Conventions The following conventions are used in this manual: <> Angle brackets that contain numbers separated by an ellipsis represent a range of values associated with a bit or signal name—for example, DBIO<3..0>. » The » symbol leads you through nested menu items and dialog box options to a final action. The sequence File»Page Setup»Options directs you to pull down the File menu, select the Page Setup item, and select Options from the last dialog box. This icon denotes a note, which alerts you to important information. This icon denotes a tip, which alerts you to advisory information. attribute Attribute is used as a generic name for attributes and properties bold Bold text denotes items that you must select or click on in the software, such as menu items and dialog box options. It also denotes parameters or structures. digitizer Digitizer is the generic name used for National Instruments oscilloscopes and digitizers. Examples of digitizers include the NI 5102, NI 5112, NI 5911, and NI 5620. function The term function is used as a generic name for functions, VIs, and operations. italic Italic text denotes variables, emphasis, a cross reference, or an introduction to a key concept. This font also denotes text that is a placeholder for a word or value that you must supply. monospace Text in this font denotes text or characters that you should enter from the keyboard, sections of code, programming examples, and syntax examples. This font is also used for the proper names of disk drives, paths, directories, programs, subprograms, subroutines, device names, functions, operations, variables, filenames and extensions, and code excerpts. monospace italic Italic text in this font denotes text that is a placeholder for a word or value that you must supply. Contents Chapter 1 Introduction to NI-SCOPE Getting Started with NI-SCOPE ....................................................................................1-1 Related Documentation..................................................................................................1-1 Programming in Different Application Development Environments (ADEs) ..............1-2 Creating an Application with LabVIEW.........................................................1-2 LabVIEW 5.0 Examples ...................................................................1-2 LabVIEW 5.1 Examples ...................................................................1-2 LabVIEW 6.0 and Later Examples ...................................................1-3 Creating an Application with Microsoft Visual C and C++...........................1-3 Microsoft Visual C and C++ Examples ............................................1-3 Microsoft Visual C Examples ...........................................................1-4 Measurement Studio C++ Examples ................................................1-4 Creating an Application with LabWindows/CVI ............................................1-5 LabWindows/CVI Examples ............................................................1-5 Creating an Application in Visual Basic .........................................................1-5 Microsoft Visual Basic Examples.....................................................1-6 Chapter 2 NI-SCOPE Tutorial Chapter Requirements....................................................................................................2-1 Step 1—Initialize a Session ...........................................................................................2-2 What Is a Session?...........................................................................................2-2 How Do You Create a Session? ......................................................................2-2 LabVIEW Example—Initializing a Session....................................................2-2 C Example—Initializing a Session..................................................................2-2 Notes on Example .............................................................................2-2 Step 2—Configure Your Acquisition ............................................................................2-3 LabVIEW Example—Configuring Your Acquisition.....................................2-3 LabWindows/CVI Example—Configuring Your Acquisition........................2-3 Step 2 Alternative—Use Configuration Functions to Set Up Your Acquisition ..........................................................................2-3 Step 3—Acquire the Data ..............................................................................................2-4 LabVIEW Example—Acquiring the Data.......................................................2-4 Notes on Parameter ...........................................................................2-4 C Example—Acquiring the Data.....................................................................2-4 Notes on Parameters..........................................................................2-5 © National Instruments Corporation v NI-SCOPE Software User Manual Contents Step 4—Include Error Information ............................................................................... 2-5 LabVIEW Example—Including Error Information ........................................ 2-5 C Example—Including Error Information ...................................................... 2-6 Step 5—Close the Session............................................................................................. 2-6 LabVIEW Example—Closing the Session ..................................................... 2-6 C Example—Closing the Session ................................................................... 2-6 Chapter 3 Common Functions and Examples Basic Functions—Initializing, Closing, and Error Handling ........................................ 3-1 Example .......................................................................................................... 3-2 Additional Information on Initializing and Closing........................................ 3-2 Configuring an Acquisition ........................................................................................... 3-3 Configuration Example ................................................................................... 3-5 Configuring the Acquisition Type .................................................................. 3-5 Configuring the Vertical Settings ................................................................... 3-5 Configuring the Horizontal Settings ............................................................... 3-8 Triggering Functions and Parameters ............................................................. 3-9 Immediate Triggering ....................................................................... 3-9 Software Triggering.......................................................................... 3-9 Hysteresis Triggering ....................................................................... 3-10 Edge Triggering ................................................................................ 3-12 Window Triggering .......................................................................... 3-12 Digital Triggering ............................................................................. 3-13 Common Trigger Parameters............................................................ 3-13 Acquiring Data—Reading Versus Fetching.................................................................. 3-16 Reading and Fetching Examples..................................................................... 3-16 Fetching Data .................................................................................................. 3-18 Declaring a Waveform Array (Except LabVIEW)........................... 3-18 Initiating an Acquisition ................................................................... 3-19 Waiting for the Data Acquisition...................................................... 3-19 Retrieving Data................................................................................. 3-20 Advanced Fetching Options ............................................... 3-22 Self-Calibrating Your Digitizer..................................................................................... 3-23 Calibration Example ....................................................................................... 3-23 Types of Calibration........................................................................................ 3-23 Low-Level Tweaking—Attributes and Attribute Functions ......................................... 3-24 Accessing Attributes ....................................................................................... 3-24 Utility Functions............................................................................................................ 3-25 NI-SCOPE Software User Manual vi ni.com Contents Chapter 4 Making Waveform Measurements Fetching Scalar and Array Measurements—Overview of Functions ............................4-1 Using Attributes in Waveform Measurements ................................................4-2 Fetching Statistics from Waveform Measurements ........................................4-2 Processing Data before Performing Waveform Measurements ......................4-3 Making Scalar Measurements........................................................................................4-3 Scalar Measurement Example .........................................................................4-4 Scalar Measurement Concepts ........................................................................4-5 Reference Levels...............................................................................4-5 Last-Acquisition Histogram Method ..................................4-6 Measuring Reference-Level Crossings .............................................4-7 Time Histogram Overview................................................................4-8 Creating Time Histograms..................................................4-10 Time Histogram Example (LabVIEW Only) .....................4-10 Types of Time Histogram Measurements ..........................4-10 Voltage Histogram Overview ...........................................................4-11 Creating Voltage Histograms .............................................4-12 Voltage Histogram Example (LabVIEW Only) .................4-12 Types of Voltage Histogram Measurements ......................4-12 Making Array Measurements ........................................................................................4-12 Array Measurement Example..........................................................................4-13 Array Measurement Concepts .........................................................................4-13 Smoothing Windows Overview ........................................................4-13 The Problem—Finite Sampling Records Creates Truncated Waveforms.........................................4-14 Spectral Leakage.................................................................4-14 FFT without Spectral Leakage ...........................................4-15 FFT with Spectral Leakage.................................................4-16 The Solution—Smoothing Windows..................................4-17 Types of Window Measurements .......................................4-18 Digital Filtering Overview ..............................................................................4-20 Types of Filters .................................................................................4-20 Infinite Impulse Response (IIR) Versus Finite Impulse Response (FIR) Filters ...........................................4-21 Truncating Data with IIR Filters ........................................4-22 Types of IIR Filters Available in NI-SCOPE .....................4-23 FIR Filters...........................................................................4-27 Types of FIR Filters in NI-SCOPE.....................................4-28 © National Instruments Corporation vii NI-SCOPE Software User Manual Contents Chapter 5 Tasks and Examples Increasing Sampling Speed with RIS ............................................................................ 5-1 RIS Example ................................................................................................... 5-1 How RIS Works .............................................................................................. 5-1 How Oversampling Factors Increase Effective Sample Rates ......... 5-2 Using Averaging to Minimize Noise with RIS ................................ 5-3 Why TDC Values Need to be Random ............................................ 5-5 Making a Multiple-Record Acquisition......................................................................... 5-5 Multiple-Record Example............................................................................... 5-5 Fetching Multiple-Record Acquisitions.......................................................... 5-6 Saving Data to Disk Example........................................................................................ 5-7 Continuously Acquiring Data........................................................................................ 5-7 How Continuous Acquisition Works .............................................................. 5-8 Fetching Continuous Acquisition Data ........................................................... 5-9 When To Use Continuous Acquisition ........................................................... 5-10 Acquiring Records Larger than Available Memory ......................... 5-10 Fetching Triggered Records while Other Records Are Being Acquired ....................................................................... 5-11 Acquiring More Records Than Fit in Digitizer Memory ................. 5-11 Fetching the Most Recent Data ........................................................ 5-12 Acquiring Waveforms at Hardware-Timed Intervals ....................... 5-12 Getting Accurate Timing Data with Time Stamps ........................................................ 5-13 Time Stamps Example .................................................................................... 5-13 How Time Stamps Work................................................................................. 5-13 Synchronizing Multiple Digitizers ................................................................................ 5-14 PLL Synchronization (Except the NI 5102) ..................................... 5-14 Sample Clock Synchronization (5102)............................................. 5-16 Slave Trigger Propagation Delay ..................................................... 5-16 Acquiring Data in Different Modes—Normal and Flexible Resolution ....................... 5-19 Flexible Resolution Mode and Example .......................................... 5-19 Normal Mode (All NI Digitizers) ..................................................... 5-19 NI-SCOPE Software User Manual viii ni.com Contents Chapter 6 Advanced Topics Coercions .......................................................................................................................6-1 Vertical Parameters .........................................................................................6-1 Horizontal Parameters .....................................................................................6-2 Triggering ........................................................................................................6-4 Performance ...................................................................................................................6-4 NI 5911, NI 5112, and NI 5620 Memory Usage.............................................6-4 NI 5102 Memory Usage ..................................................................................6-5 LabVIEW Memory Usage...............................................................................6-5 Waveform Measurement Performance............................................................6-5 Appendix A Digitizer Basics Appendix B Features Supported by Device Appendix C Technical Support Resources Glossary Index © National Instruments Corporation ix NI-SCOPE Software User Manual 1 Introduction to NI-SCOPE Thank you for buying a National Instruments (NI) digitizer, which includes NI-SCOPE. NI-SCOPE is both the application programming interface (API) and driver that controls your digitizer. NI-SCOPE is compliant with the IVI-Scope instrument driver class specification. Getting Started with NI-SCOPE 1. Note Install NI-SCOPE along with your digitizer. See Where to Start with Your NI Digitizer for step-by-step instructions. Be sure to install NI-SCOPE before you install your digitizer. 2. Begin programming your digitizer: • For examples and programming help in LabVIEW, LabWindows/CVI, Microsoft Visual C++ (MSVC), and Microsoft Visual Basic, refer to the Programming in Different Application Development Environments (ADEs) section later in this chapter. • For a tutorial on using NI-SCOPE, read Chapter 2, NI-SCOPE Tutorial. • For a complete list of functions and instructions on using them, see Chapter 3, Common Functions and Examples. • For information on scalar and array measurements, see Chapter 4, Making Waveform Measurements. Related Documentation • The NI-SCOPE Function Reference Help is the Windows help file whose default location is Start»Programs»National Instruments» NI-SCOPE»NI-SCOPE Function Reference Help. Refer to this file for information on functions, attributes, and parameters for LabWindows/CVI, C, and Visual Basic programmers. • The NI-SCOPE VI Reference Help File provides detailed explanations of NI-SCOPE VIs, properties, and parameters for LabVIEW. © National Instruments Corporation 1-1 NI-SCOPE Software User Manual Chapter 1 Introduction to NI-SCOPE • Where to Start with Your NI Digitizer explains how to install and configure your digitizer. • The NI-SCOPE Quick Reference Guide is the two-color card that came with your digitizer. Programming in Different Application Development Environments (ADEs) This section explains the basics of programming in the following ADEs: LabVIEW (5.0 or later), LabWindows/CVI (5.0 or later), Microsoft Visual C++ (MSVC), and Microsoft Visual Basic. Information for finding and using examples for each ADE are also included. Creating an Application with LabVIEW To begin programming in LabVIEW, do the following: 1. Open an existing or new LabVIEW VI. 2. Build your application. • LabVIEW 6.0—To find NI-SCOPE-specific VIs, make sure you are on the block diagram screen. Then open the NI-SCOPE palette by going to Instrument I/O»Instrument Drivers»NI-SCOPE. • LabVIEW 5.X—To find NI-SCOPE-specific VIs, make sure you are on the block diagram screen. Then open the NI-SCOPE palette by going to Instrument Drivers»NI-SCOPE. LabVIEW 5.0 Examples The examples are located in the niScopeExamples.llb library in the LabVIEW\examples\Instr\directory. These examples are also available in the NI-SCOPE portion of the LabVIEW functions palette. LabVIEW 5.1 Examples The examples are located in LabVIEW6\examples\Instr\ niScopeExamples. These examples are also available in the NI-SCOPE portion of the LabVIEW functions palette. There are several forms of help available for these examples. You can find an overall description of the purpose of the example by going to Windows» Show VI Information. For help on individual front-panel controls, activate the LabVIEW help window by selecting Help»Show Help, and place the NI-SCOPE Software User Manual 1-2 ni.com Chapter 1 Introduction to NI-SCOPE cursor over the control you want more information on. For help on NI-SCOPE VIs, place the cursor over the VI with the show help window activated. LabVIEW 6.0 and Later Examples The examples are located in LabVIEW6\examples\Instr\ niScopeExamples. These examples are also available in the NI-SCOPE portion of the LabVIEW functions palette. There are several forms of help available on these examples. You can find an overall description of the purpose of the example by going to File»VI Properties and selecting Documentation. For help on individual front-panel controls, activate the LabVIEW help window by selecting Help»Show Context Help, and place the cursor over the control you want more information on. Creating an Application with Microsoft Visual C and C++ To develop an NI-SCOPE application, follow these general steps: 1. Open an existing or new Visual C++ project to manage your application code. 2. Create files of type .c (C source code) or .cpp (C++ source code), and add them to the project. Make sure you include the NI-SCOPE header file, niscope.h, as shown in your source code files: #include "niscope.h" 3. Add the include directory and lib\msc directories from the \vxipnp directory. To build the examples, the INCLUDE and LIB search paths may need to be modified to find niscope.h and niscope_32.lib (Tools»Options»Directories or Project»Settings). 4. Build your application. Microsoft Visual C and C++ Examples There are two sets of examples for Visual C++: • The first set (vxipnp\winxx\Niscope\Examples\c\console directory) are C-based console applications that illustrate the NI-SCOPE function calls but have no provision for data display. • The second set (vxipnp\winxx\Niscope\Examples\c\ MStudioC++) are C++ examples. They use Microsoft Foundation Classes (MFC) along with Measurement Studio tools for Visual C++. To compile these examples, you need these tools. © National Instruments Corporation 1-3 NI-SCOPE Software User Manual Chapter 1 Introduction to NI-SCOPE The source code for these examples is documented, so you can change the code to fit your needs. Microsoft Visual C Examples The C examples were built and tested using Microsoft Visual C++ 5.0 with service pack 3.0. These examples are console based with no graphical interface. To build the examples in Microsoft Visual C++ 5.0 using the Microsoft NMAKE utility, do the following: 1. Go to vxipnp\winxx\NISCOPE\Examples\c\console. 2. Run the VCVARS32.BAT batch file (located in the \bin directory of the MSVC compiler) to set up the environment variables for command line usage if they are not already set. You may need to increase the initial environment size of the DOS box to accommodate the added environment variables. 3. To build an example, run the following: nmake /f examplename.mak The executable will be built to the debug subdirectory by default. To build the examples in Microsoft Visual C++ 5.0 using the Microsoft Developer Studio workspace, do the following: 1. Go to vxipnp\winxx\NISCOPE\Examples\c\console. 2. Open the project workspace file (.dsw) that launches Developer Studio. 3. Add the include directory and lib\msc directories from the \vxipnp directory. To build the examples, the INCLUDE and LIB search paths may need to be modified to find niscope.h and niscope_32.lib (Tools»Options»Directories or Project»Settings). 4. Build the example. Measurement Studio C++ Examples The Visual C++ examples were built and tested using Microsoft Visual C++ 6.0 and the Measurement Studio 1.0 tools for Visual C++. If you do not have both of these installed, the C++ examples are also shipped as executables that you can view and use, but not modify. You can build the examples by doing the following: NI-SCOPE Software User Manual 1. Go to vxipnp\winxx\NISCOPE\Examples\c\MStudioC++. 2. Open the project workspace file (.dsw) that launches Developer Studio. 1-4 ni.com Chapter 1 Introduction to NI-SCOPE 3. Add the include directory and lib\msc directories from the \vxipnp directory. To build the examples, the INCLUDE and LIB search paths may need to be modified to find niscope.h and niscope_32.lib (Tools»Options»Directories or Project»Settings). 4. Build the example. Creating an Application with LabWindows/CVI To develop an NI-SCOPE application, follow these general steps: 1. Open an existing or new source file (.c). 2. Include the NI-SCOPE header file, niscope.h, as such in your source code files: #include "niscope.h" 3. Go to instrument»load, and choose niscope.fp. This file is also available in vxipnp\winxx\Niscope. 4. Add your source file to the project. 5. Build your application. LabWindows/CVI Examples Open the project file for the example you want to run. The project files are in cvi\samples\NISCOPE. The source code for these examples is heavily documented, and all input and output values are documented to facilitate changing the code to perform different acquisitions. To find documentation for functions used in the examples, double click niScope.fp, select the function or function class you need more information on, and click the Help button. Note If the niScope.fp file does not appear in the project, you can locate it in vxipnp\winxx\Niscope. Creating an Application in Visual Basic To get started in Visual Basic, do the following: 1. 2. Open an existing or new project (.vbp). Find examples at vxipnp\winxx\Niscope\examples\ VisualBasic 3. Go to Projects»References, and select National Instruments Scope. 4. Build your application. © National Instruments Corporation 1-5 NI-SCOPE Software User Manual Chapter 1 Introduction to NI-SCOPE Microsoft Visual Basic Examples The Visual Basic examples use an evaluation version of the NI Measurement Studio ActiveX UI controls. The examples were built and tested using Microsoft Visual Basic 5.0. For each example, there is a project file (.vbp) that launches Developer Studio. If you have problems getting the examples to load or run, perform the following steps: 1. Be sure the NI-SCOPE reference is loaded (go to Project»References, and load \bin\niscope_32.dll from the \vxipnp directory). 2. Be sure the National Instruments Measurement Studio UI controls are loaded (go to Project»Components, and load cwui.ocx from the Windows system directory). 3. Install Service Pack 3 for Microsoft Visual Studio. The source code for these examples is heavily documented, and all input and output values are documented to facilitate changing the code to perform different acquisitions. The evaluation version of the Measurement Studio UI controls is limited to 5 minutes of continuous use. NI-SCOPE Software User Manual 1-6 ni.com 2 NI-SCOPE Tutorial This chapter is a tutorial for beginning NI-SCOPE users that demonstrates how to program your digitizer. By the end of the chapter, you should have created an application that acquires and displays data. Using this example, you can then customize it for use in your own applications. You can find the example discussed in this chapter with the other examples that ship with NI-SCOPE. The name of this example is Getting Started. For example locations, see the Programming in Different Application Development Environments (ADEs) section in Chapter 1, Introduction to NI-SCOPE. Note Chapter Requirements To successfully build the application, you need to have installed NI-SCOPE. You also need to install LabVIEW or a C compiler, such as LabWindows/CVI. The LabVIEW and C examples documented in this chapter assume that you have a rudimentary understanding of your ADE. If you are unfamiliar with your ADE, please consult an introductory text on the ADE before you read this chapter. NI-SCOPE provides the same functionality in two different formats— as virtual instruments (VIs) in LabVIEW and as functions in traditional programming languages. For simplicity, both are referred to as functions in this chapter. © National Instruments Corporation 2-1 NI-SCOPE Software User Manual Chapter 2 NI-SCOPE Tutorial Step 1—Initialize a Session Since you can have multiple digitizers connected to your computer, you have to tell NI-SCOPE which one to communicate with. To do this, you must begin each application by opening a session to the digitizer. What Is a Session? A session is like a phone line. It establishes a connection between your digitizer and your application. After this connection is established, your digitizer can transmit data to your application. How Do You Create a Session? You create a session with the Initialize function. The Initialize function returns a handle. This handle then allows you to communicate with your digitizer any other function calls in your application. LabVIEW Example—Initializing a Session C Example—Initializing a Session niScope_init ("DAQ::1", VI_TRUE, VI_TRUE, &vi); Notes on Example • NI-SCOPE Software User Manual When you run your application, you must find the device number assigned by Measurement & Automation Explorer (MAX) in the front-panel control for the resource name. If you have one digitizer installed in your computer, the resource name will remain the default: DAQ::1. If you have multiple digitizers, find the device number for your digitizer by launching MAX and going to Devices and Interfaces. 2-2 ni.com Chapter 2 NI-SCOPE Tutorial • Setting the ID Query parameter to TRUE verifies that the digitizer you initialize is a type that NI-SCOPE supports. NI-SCOPE automatically performs this check, so setting this parameter is not necessary. • Setting the Reset Device parameter to TRUE resets your digitizer during initialization. Step 2—Configure Your Acquisition After you have opened a session to your digitizer, you need to configure your application. For instance, you might want to be able to set input parameters (also known as controls and constants in LabVIEW) such as the vertical range, minimum sample rate, and triggering options. For this basic example, we use the Auto Setup function to configure your digitizer. This function senses the input signal and automatically configures many of the instrument settings. It automatically sets the vertical range, sample rate, minimum record length, and trigger levels. LabVIEW Example—Configuring Your Acquisition LabWindows/CVI Example—Configuring Your Acquisition niScope_AutoSetup (vi); Step 2 Alternative—Use Configuration Functions to Set Up Your Acquisition If you want to customize sample rates, change triggers, or alter the offset, you will need to use the Configuration functions such as Configure Vertical and Configure Horizontal Timing instead of Auto Setup. Refer to the Configuring an Acquisition section in Chapter 3, Common Functions and Examples, for more information on using these functions. © National Instruments Corporation 2-3 NI-SCOPE Software User Manual Chapter 2 NI-SCOPE Tutorial Step 3—Acquire the Data There are two kinds of functions, Read and Fetch, that acquire data. For simplicity, this example uses the Read function. To find out more about Read versus Fetch functions, see the Acquiring Data—Reading Versus Fetching section in Chapter 3, Common Functions and Examples. LabVIEW Example—Acquiring the Data Notes on Parameter The Channel Name input parameter specifies the channel that NI-SCOPE will acquire data from. C Example—Acquiring the Data This example includes additional functions and parameters not needed in LabVIEW. You need to call niScope_ActualRecordLength to get the actual record length that NI-SCOPE uses in order to create enough space for the waveform array. NI-SCOPE can then initiate the acquisition and fetch the data with niScope_Read. After the fetching the data, you will need to pass a pointer to extract and plot the acquired data. Depending on your ADE, how you do this will vary. // Get the actual number of samples to be acquired niScope_ActualRecordLength (vi, &actualRecordLength); // Get the number of waveforms available for the // given channelList niScope_ActualNumWfms (vi,channelList, &numWfm); // Allocate space for the waveform information wfmInfoPtr = malloc (sizeof (struct niScope_wfmInfo) * numWfm); NI-SCOPE Software User Manual 2-4 ni.com Chapter 2 NI-SCOPE Tutorial // Allocate space for the waveform array wfmPtr = malloc (sizeof (ViReal64) * actualRecordLength * numWfm); // Check if allocations succeeded if (!wfmPtr|| !wfmInfoPtr) return NISCOPE_ERROR_INSUFFICIENT_MEMORY; // Read the data (Initiates an acquisition and fetches // the data) niScope_Read (vi, channelList, timeout, actualRecordLength, wfmPtr, wfmInfoPtr); Notes on Parameters The channelList parameter specifies the channel that NI-SCOPE will acquire data from. The wfmInfoPtr parameter returns the values needed to display a waveform. Relative Initial X is the time of the first point in the waveform. The value is with respect to the trigger and is in seconds. X Increment is the length of time between points in the waveform in seconds. The WfmPtr parameter is a buffer into which NI-SCOPE stores the waveform it reads. The units for the individual array elements are volts. Step 4—Include Error Information The Error Handler function translates error codes into explanations to help you debug your application. ♦ LabVIEW—Make sure that you have wired the Error In and Error Out parameters for each VI in your application, so the VI will not execute if there is an error. The Error Description parameter displays messages for any errors encountered when running the application. LabVIEW Example—Including Error Information © National Instruments Corporation 2-5 NI-SCOPE Software User Manual Chapter 2 NI-SCOPE Tutorial C Example—Including Error Information // The handleErr macro checks the return value of a // function and jumps to the Error: label Error: // Free all the allocated memory if (wfmInfoPtr) free (wfmInfoPtr); if (waveformPtr) free (waveformPtr); // Display messages if (error != VI_SUCCESS) niScope_errorHandler (vi, error, errorSource, errorMessage); // Intrepret the error else strcpy(errorMessage, "Acquisition successful!"); Step 5—Close the Session This last step closes the session and deallocates any resources the session used. It is important to close the session because it releases any temporary buffers that were created to transfer data between the digitizer and the host memory. LabVIEW Example—Closing the Session C Example—Closing the Session // Close the session if(vi) niScope_close(vi); NI-SCOPE Software User Manual 2-6 ni.com Common Functions and Examples 3 This chapter offers an overview of the NI-SCOPE functions and the basic programming steps needed to use these functions in your own application. NI-SCOPE provides the same functionality in two formats—in LabVIEW as VIs and as functions in traditional programming languages. For simplicity, both are referred to as functions throughout this chapter. If you are new to NI-SCOPE, you should read Chapter 2, NI-SCOPE Tutorial, before you use this chapter. Note Basic Functions—Initializing, Closing, and Error Handling For any application you write, you need to first open a session to establish communication with your digitizer by using Initialize. When your program finishes, you then need to close the session with Close. You should also include Error Handler, which translates any error codes into detailed explanations. © National Instruments Corporation 3-1 NI-SCOPE Software User Manual Chapter 3 Common Functions and Examples Initialize Opens a session Configure Acquire data Error Handler Translates error code to a textual error message Close Closes the session Figure 3-1. Basic Programming Flow Example All examples include Initialize, Error Handler, and Close functions. The Getting Started example is a good choice if you are inexperienced with NI-SCOPE because it is the least complicated example. Additional Information on Initializing and Closing Initialize sets the driver and digitizer to a known state. This function may take a significant amount of time compared to all other NI-SCOPE functions, so you should not include it in a loop when repeatedly acquiring data. Ideally, your program should call Initialize one time. If the reset parameter is set to TRUE, your digitizer resets to the default state. This may include resetting relays and resetting time stamp counters. NI-SCOPE Software User Manual 3-2 ni.com Chapter 3 Common Functions and Examples Close is essential for freeing resources, including deallocating memory, destroying threads, and freeing operating system resources. Every session that you initialize should be closed, even if an error occurs during the program. While debugging your application, it is common to abort execution before you reach Close. While this should not cause problems, it is not recommended. Error Handler returns a 32-bit error code. For additional information on error handling as well as a list of error codes, consult your NI-SCOPE Function Reference Help or your NI-SCOPE VI Reference Help. Configuring an Acquisition Use the Configuration functions to set up your acquisition. These functions allow you to set triggers, input impedance, DC offset, vertical range, sampling rate, and much more. NI-SCOPE can also automatically configure your device settings with the Auto Setup function. © National Instruments Corporation 3-3 NI-SCOPE Software User Manual Chapter 3 Common Functions and Examples Initialize Opens a session No Have NI-SCOPE automatically configure the settings? Yes Configure Acquisition Configures how digitizer acquires data Configure Vertical Configures the vertical subsystem like range Auto Setup Automatically configures the digitizer by measuring the signals applied to both channels Configure Horizontal Timing Configures horizontal subsystem Configure Trigger Configures edge, hysteresis, digital, or other trigger types Acquire data with Read or Fetch functions Error Handler Close Figure 3-2. Configuring an Acquisition NI-SCOPE Software User Manual 3-4 ni.com Chapter 3 Common Functions and Examples Configuration Example The Configured Acquisition example demonstrates using the Configuration functions. This example supports most of the functionality of NI-SCOPE, so you can experiment with your digitizer. Configuring the Acquisition Type Some NI digitizers support different acquisition types, such as normal and flexible resolution. You set the acquisition type with the Configure Acquisition function. The different acquisition types change the processing of the data that is returned. In normal mode, the digitizer acts like a traditional instrument, measuring voltage waveforms. With flexible resolution mode, the digitizer uses an advanced averaging algorithm to increase the resolution of data at lower sample rates. These types are fully explained in the Acquiring Data in Different Modes—Normal and Flexible Resolution section of Chapter 5, Tasks and Examples. There is also digital downconverter (DDC) mode, which mixes, filters, and decimates the sampled data in hardware, allowing you to zoom in on a band of frequencies much narrower than the Nyquist band of the analog-to-digital converter (ADC). The lower sample rate means that signals of longer duration can be stored in the same amount of memory. Not all digitizers support DDC or flexible resolution mode. See Appendix B, Features Supported by Device. Note By default, the acquisition type parameter is set to normal, and you can omit this function if you do not wish to change it. Configuring the Vertical Settings Both Configure Vertical and Configure Chan Characteristics affect settings that may be different for each channel. Therefore, you may call each of these functions twice, changing the channel name parameter between 0 and 1. If you want to set these parameters to the same value for multiple channels, use a channel list such as 0,1. Configure Vertical is necessary in almost every program because it allows you to enable a channel. By default, all channels on the digitizer are disabled. To acquire data, you must enable a channel either with Configure Vertical or a Read function. As a convenience, Read functions automatically enable the channels passed into them. © National Instruments Corporation 3-5 NI-SCOPE Software User Manual Chapter 3 Common Functions and Examples Configure Vertical adjusts the vertical range for your digitizer. This is the full-scale (peak-to-peak) voltage range at the input to the digitizer. For example, a 10 V vertical range means the digitizer can measure a signal between –5 V and 5 V. The signal will be clipped if it exceeds this range, which means the analog-to-digital converter (ADC) is saturated, so all values above 5 V or below –5 V will be mapped to exactly 5 V or –5 V respectively. For optimum resolution, you should choose the smallest vertical range that avoids clipping. For example, if your signal is 2 Vpp and your vertical range is 10 Vpp, you are only using one fifth of the range of the ADC. With an 8-bit digitizer, you have 256 unique voltage levels, but if you only use one fifth of the range, you will only have 51 unique voltage levels. This will result in a noisy signal from the quantization of the ADC. The vertical offset parameter in the Configure Vertical function adjusts the middle of your vertical range. For example, if you set the vertical offset to 2 V with a vertical range of 10 V, your signal must be between –3 V and 7 V. Vertical offset allows you to adjust the range when analyzing signals with a DC offset. By centering the vertical offset on the DC level of your signal, you can use a smaller vertical range and optimize the resolution of your measurement. 1.25 V 1V 1V –1 V 0.75 V Offset = 0 V Range = 2.5 V Resolution = 2.5 V =. 10 mV 256 Offset = 1 V Range = 0.5 V Resolution = 0.5 V =. 2 mV 256 Figure 3-3. Vertical Offset When you need to measure a small AC signal on top of a large DC component, you can use AC coupling. You set this with the vertical coupling parameter in the Configure Vertical function. AC coupling rejects any DC component in your signal before it is digitized. Activating AC coupling inserts a capacitor in series with the input. NI-SCOPE Software User Manual 3-6 ni.com Chapter 3 Common Functions and Examples When changing the vertical range or coupling on your digitizer, the input stage takes a finite time to settle. When switching from AC to DC coupling, the settling time is about 0.5 ms. When switching coupling from DC to AC, returned data is accurate about 20 time constants after switching to AC. For a 1× probe, this is about 15 ms, while a probe with a 10× attenuation takes 150 ms. The NI 5911 has a lower AC coupling cutoff frequency, so it will take about 68 ms to settle with a 1× probe and 680 ms with a 10× probe. NI-SCOPE does not provide the delay to account for settling time; therefore, acquisitions immediately following a coupling change may yield incorrect data. However, the vertical range and coupling are set immediately when you call Configure Vertical, so inserting a delay in your program before calling Initiate Acquisition or Read allows the input stage to completely settle. Calling Reset or Init also resets the coupling to the default value. Probe attenuation scales your data to compensate for the attenuation of the probe. The voltage measured by the digitizer is multiplied by the probe attenuation parameter in the Configure Vertical function. Notice that the vertical range parameter is the voltage range you desire after the probe compensation scaling. For example, if your probe attenuation is 10 and your vertical range is 10 V, the digitizer is set to measure a 1 Vpp signal. The data returned with the fetch function is 10 Vpp. Configure Chan Characteristics allows configuration of the less common vertical parameters. The input impedance parameter allows you to switch between 50 Ω and 1 MΩ input impedance, depending on your digitizer. See Appendix B, Features Supported by Device, to find out the input impedance your digitizer supports. The allowed vertical ranges may be fewer for low input impedance settings, since the amount of power dissipated through the 50 Ω resistor quickly increases. Generally, you want to match the input impedance of your digitizer and your source, so if you measure a signal from a 50 Ω output function generator, you should set the digitizer for 50 Ω input. Impedance matching becomes much more important with higher frequency signals to avoid reflections of the signal that may distort your measurements. Alternatively, if you probe a circuit, it is best to use the high impedance setting on the digitizer to avoid changing the characteristics of the circuit. To protect the 50 Ω resistor, a thermal sensing circuit will open the input if the power dissipation is too high. If this occurs, a warning will be returned from all Read, Fetch, and Status functions. The circuit will try to reset itself when Read, Fetch, or Status functions are called. Some digitizers also support the detection of an ADC overload. This works the same as the 50 Ω overload detection circuit described previously. © National Instruments Corporation 3-7 NI-SCOPE Software User Manual Chapter 3 Common Functions and Examples The max input frequency parameter sets the –3 dB cutoff frequency for a hardware analog filter. Setting this parameter to zero uses the full bandwidth of the digitizer. The filter attenuates signals greater than the cutoff frequency, which is useful for minimizing high-frequency noise when sampling at lower rates. For example, if you sample at 100 MS/s, you can resolve frequencies up to 50 MHz according to the Nyquist theorem. Any noise in your signal above 50 MHz, such as harmonics of your input signal, will be aliased onto a frequency below 50 MHz. The solution is to filter this noise before the signal is digitized. See Appendix B, Features Supported by Device, to find out the valid –3 dB bandwidth your digitizer supports. This hardware filter is not available in all digitizers. Configuring the Horizontal Settings The Horizontal Timing parameters apply to both channels of the digitizer. That means both channels must sample the same amount of data at the same rate. Some digitizers support multiple records. This feature is discussed in the Making a Multiple-Record Acquisition section of Chapter 5, Tasks and Examples. Multiple records allow you to acquire multiple, triggered waveforms very quickly. To find out if your digitizer supports multiple records, see Appendix B, Features Supported by Device. The num records parameter in the Configure Horizontal Timing function allows you to configure a multi-record acquisition. For a single record acquisition, this parameter is set to 1. The sample rate is the frequency at which digitized samples are stored specified in samples per second. This parameter is rounded up to the next legal sampling rate that your device supports. If the enforce realtime parameter is set to TRUE, the sampling rate must be set lower than the maximum real-time sampling rate of the digitizer, so data can be digitized at the requested rate. By setting the enforce realtime parameter to FALSE, NI-SCOPE allows you to specify sampling rates higher than the maximum real-time sampling rate of the digitizer. When you do this, NI-SCOPE enters random interleaved sampling (RIS) mode, where it acquires multiple waveforms at the maximum real-time sampling rate and reconstructs a periodic waveform. RIS is discussed thoroughly in the Increasing Sampling Speed with RIS section of Chapter 5, Tasks and Examples. For additional information on how sample rates and record lengths can be coerced in NI-SCOPE, refer to Chapter 6, Advanced Topics. NI-SCOPE Software User Manual 3-8 ni.com Chapter 3 Common Functions and Examples The min record length is the minimum number of samples to store for each record in the acquisition. This parameter may also be rounded up. NI-SCOPE maintains a constant time per record, which is the min record length divided by the requested sampling rate. Since the sampling rate is rounded up to a legal value, the min record length may also be rounded up. This resulting actual record length may be fetched by calling Actual Record Length. Similarly, you can call Sample Rate to find the true sample rate used or Actual Sample Mode to determine if NI-SCOPE is using RIS or real-time sampling. The reference position parameter determines the number of pretrigger versus posttrigger points that are stored. It is specified as a percent of the record, from 0 to 100. For example, a 0% reference position means that you will have the actual record length points stored after the trigger occurs, while 100% reference position means that all the samples are stored before the trigger. Triggering Functions and Parameters There are several kinds of triggering you can use with NI-SCOPE. Each kind of triggering uses a different Configure Trigger function. Immediate Triggering Immediate triggering means that the digitizer triggers itself. There is no external signal that stops the acquisition. Immediate triggering is the default option. Therefore, you can omit this function if you never change triggering modes. Software Triggering Software triggering means that the digitizer starts acquiring data when you call Initiate Acquisition. It is triggered when you call Send SW Trigger. Remember that the digitizer continues to store posttrigger samples after the software trigger, so you still need to wait for the acquisition to complete after the trigger. You can do this by setting the timeout parameter in a Fetch function to a positive value. Notice that you cannot use the Read function for software triggering; you must use the Initiate Acquisition coupled with a Fetch function. Note Not all digitizers support software triggering. See Appendix B, Features Supported by Device. © National Instruments Corporation 3-9 NI-SCOPE Software User Manual Chapter 3 Common Functions and Examples Initialize Opens a session Configure Trigger SW Configures your application Initiate Acquisition Begins acquiring pretrigger data Send SW Trigger Sends a command to trigger your digitizer Fetch Polls the digitizer until the acquisition is complete and retrieves the data Error Handler Translates error code to a textual error message Close Closes the session Figure 3-4. Software Triggering Flowchart Hysteresis Triggering Hysteresis triggering eliminates incorrect triggers due to noisy signals. For example, if your signal contains two rising edges of different amplitudes, you can use hysteresis triggering to trigger on one of the edges. And though NI-SCOPE uses a default amount of hysteresis for edge triggering, which NI-SCOPE Software User Manual 3-10 ni.com Chapter 3 Common Functions and Examples is typically 2.5% of the vertical range, you can override that value by setting your own hysteresis values. The Configure Trigger Hysteresis function allows you to choose the trigger coupling, trigger level, hysteresis value, and trigger slope. Hysteresis triggering is possible on all analog trigger channels, such as 0, 1, or NISCOPE_VAL_EXTERNAL, the external trigger channel. A positive slope hysteresis trigger is generated when the signal crosses below the voltage specified by the trigger level parameter minus the hysteresis parameter and then crosses the trigger level. Trigger Level Trigger Level – Hysteresis Value Trigger Figure 3-5. Positive Slope Hysteresis Triggering A negative slope hysteresis trigger is generated when a signal crosses above the voltage specified by the trigger level parameter plus the hysteresis value and then crosses the trigger level. Trigger Level + Hysteresis Value Trigger Level Trigger Figure 3-6. Negative Slope Hysteresis Triggering © National Instruments Corporation 3-11 NI-SCOPE Software User Manual Chapter 3 Common Functions and Examples Edge Triggering An edge trigger occurs when a signal crosses a trigger threshold you specify. The slope can be specified as either positive (on the rising edge) or negative (on the falling edge) to the trigger. Figure 3-7 shows edge triggers. Trigger Level Negative Edge Trigger Positive Edge Trigger Figure 3-7. Edge Triggering Edge triggering is possible on all analog trigger channels, such as 0, 1, or NISCOPE_VAL_EXTERNAL. Window Triggering A window trigger occurs when a signal either enters or leaves a window you specify with the window mode parameters in the Configure Trigger Window function. High Level Low Level Trigger Trigger Figure 3-8. Entering Window Triggers NI-SCOPE Software User Manual 3-12 ni.com Chapter 3 Common Functions and Examples High Level Low Level Trigger Trigger Figure 3-9. Leaving Window Triggers Window triggering is possible on all analog trigger channels, such as 0, 1, or NISCOPE_VAL_EXTERNAL. Digital Triggering A digital trigger occurs on either a rising edge or falling edge of a digital signal. Digital triggering is only possible on the RTSI lines, PFI lines, and the PXI Star Trigger line. Common Trigger Parameters The Trigger Holdoff parameter sets the minimum time (in seconds) between one trigger and the start of the next record. If the holdoff time is less than the time to acquire the posttrigger samples, it has no effect. Keep in mind that the hardware has a minimum holdoff value as specified in your hardware user manual. © National Instruments Corporation 3-13 NI-SCOPE Software User Manual Chapter 3 Common Functions and Examples Trigger Holdoff Trigger Holdoff Trigger Level Digitized Waveform Digitized Waveform = Trigger Accepted = Trigger Rejected Figure 3-10. Trigger Holdoff with an Edge Trigger and 50% Reference Position Trigger holdoff is not supported by all digitizers. Some digitizers allow only trigger holdoff or trigger delay at any given time. See Appendix B, Features Supported by Device, to find out if your digitizer supports trigger holdoff. Note ♦ NI 5102—An end of acquisition signal triggers the holdoff. All triggers are then rejected in hardware for the time you specify (800 ns to 6.71 s in 400 ns increments). Holdoff will then be applied again at the next end of acquisition. See your NI 5102 User Manual for additional information. The trigger delay parameter sets the time in seconds from when the trigger occurs to when the digitizer actually triggers. For example, setting a 1 second trigger delay means the digitizer continues to acquire pretrigger samples for 1 second after it is triggered. The posttrigger samples occur after the delayed trigger. NI-SCOPE Software User Manual 3-14 ni.com Chapter 3 Common Functions and Examples Acquired Waveform Trigger Delay 50% Reference Position Trigger Figure 3-11. Trigger Delay with a Positive-Sloped Edge Trigger Trigger delay is not supported in all digitizers. Some digitizers allow only trigger holdoff or trigger delay at any given time. See Appendix B, Features Supported by Device, to find out if your digitizer supports trigger delay. Note The trigger coupling parameter can be either AC or DC, and it works much like the vertical coupling parameter. When AC is selected, NI-SCOPE rejects the DC component of the trigger signal. When triggering on channel 0 or channel 1 of your digitizer, the input signal is immediately coupled based on the vertical coupling parameter. Therefore, if the vertical coupling parameter is set to AC coupling, triggering coupling is useless since the DC component is already removed In the NI 5102 and NI 5911, trigger coupling applies only to the external trigger channel. When using the analog input channels (channels 0 and 1) as the trigger source, the trigger coupling is the same as the input coupling and is specified by calling the Configure Vertical function. Note © National Instruments Corporation 3-15 NI-SCOPE Software User Manual Chapter 3 Common Functions and Examples Acquiring Data—Reading Versus Fetching You can either acquire data by calling a Read function or a Fetch function. The Read functions are the easy way to acquire data from your digitizer. They initiate an acquisition, wait for it to complete, and retrieve the data. They do not return until the entire operation is complete. Fetch functions require an additional function to initiate the acquisition. Fetch functions, however, offer several advantages: • They allow you to fetch binary data instead of the slower-to-acquire scaled voltage data. • They allow you to do other computations while you wait for the digitizer to acquire data. Read functions will efficiently sleep, so the processor is not being used during the wait. However, you could write a program to make better use of this time. • They allow a software trigger, in which you initiate the acquisition to start acquiring data and later send a software trigger. See the Fetching Data section for additional information on using Fetch functions. Reading and Fetching Examples The Getting Started example uses a Read function. Most examples use Fetch functions, but the Binary Acq example provides the least complicated source code. NI-SCOPE Software User Manual 3-16 ni.com Chapter 3 Common Functions and Examples Initialize Opens a session Configure Configures your application; you can use AutoSetup instead Actual Record Length Finds the actual number of points your digitizer will acquire Fetch Read Acquire data Initiate Initiates data acquistion Read Initiates acquisition, waits for it to complete, and retrieves data Fetch Polls digitizer until acquisition is complete and retrieves data Error Handler Close Figure 3-12. Acquiring Data with Read or Fetch Functions © National Instruments Corporation 3-17 NI-SCOPE Software User Manual Chapter 3 Common Functions and Examples Fetching Data These are the main steps involved in fetching data: 1. Declaring a waveform array (except in LabVIEW) 2. Initiating the acquisition 3. Waiting for the acquisition 4. Retrieving data from your digitizer to your host computer These steps are discussed in the next section. Declaring a Waveform Array (Except LabVIEW) If you are programming in C or Visual Basic, you need to declare a waveform array in your program. This array allocates space for the data that will be acquired with a Fetch function. LabVIEW users do not need to declare a waveform since it is handled in the Fetch call. As discussed in Chapter 6, Advanced Topics, NI-SCOPE coerces up the min record length specified with the Configure Horizontal Timing function. You can retrieve the actual number of samples acquired by the digitizer by calling niScope Actual Record Length. As a convenience, NI-SCOPE provides the Actual Num Wfms function when declaring your waveform array. It returns the number of waveforms that are available for fetching, according to the formula: numWaveforms = NR × NC × AT where NR is the number of records, NC is the number of channels, AT is the number of waveforms for the current acquisition type. AT equals one unless you are operating in DDC (NI 5620 only), in which case it equals two. Using the Actual Num Wfms function allows your program to handle switching between different acquisition types (such as normal or flexible resolution), channel lists, and minimum record lengths without altering the fetching code. The waveform array is a single dimension with a size equal to the number of waveforms to fetch times the number of points to fetch in each NI-SCOPE Software User Manual 3-18 ni.com Chapter 3 Common Functions and Examples waveform. For example, if you are fetching scaled voltage data in a C program, your code may look like the following: ViReal64 *wfmPtr; ViInt32 actualRecordLength, numWfms; niScope_ActualRecordLength (vi, &actualRecordLength); niScope_ActualNumWfms (vi, channelList, &numWfms); wfmPtr = malloc (sizeof(ViReal64) * actualRecordLength * numWfms); You also need to declare a niScope_WfmInfo structure to hold the relevant constants that describe each waveform. You need one structure for each fetched waveform, and the syntax will look like this: struct niScope_wfmInfo *wfmInfoPtr; wfmInfoPtr = malloc (sizeof(struct niScope_wfmInfo) * numWfms); Initiating an Acquisition The Initiate Acquisition function tells the digitizer to start acquiring data. During this function, the hardware is programmed with the configuration that you have chosen, and the digitizer begins sampling data and storing it to onboard memory. First, the digitizer samples the requested number of pretrigger points, ignoring any triggers that may occur. After the requested number of pretrigger points are stored, the digitizer waits for a trigger. While waiting, it continues to sample and store data into the circular, onboard memory. The trigger signals the digitizer to sample the exact number of posttrigger samples that you requested. After the posttrigger points are stored, the digitizer either stops sampling data or restarts this process for the next record. The digitizer stores the memory location of the first posttrigger sample. This allows it to calculate where the first pretrigger sample is located in memory when you fetch the waveform. Waiting for the Data Acquisition After the acquisition is initiated, you will typically use a Fetch function with a positive timeout parameter to sleep while the digitizer acquires the data. The Fetch function polls the digitizer while waiting for the data to be acquired, and it returns the requested data when it is available. If the data is not acquired within the time specified with the timeout parameter, NI-SCOPE returns an error. Alternatively, you could use the Acquisition Status function, or the Records Done or Points Done attributes, to determine when the data is © National Instruments Corporation 3-19 NI-SCOPE Software User Manual Chapter 3 Common Functions and Examples available. Using these low-level functions allows you to do other operations while the digitizer is busy. However, using the Fetch function to wait for the data is easier to use, and it efficiently sleeps while waiting for the acquisition. Digitizers that support continuous acquisition allow fetching while the acquisition is still in progress. When a positive timeout is specified, the Fetch function will only wait for the requested data, not the entire acquisition. Furthermore, digitizers supporting continuous acquisition allow you to call a Fetch function with a timeout value of zero, which fetches all the currently available data without waiting. In this case, the actual number of samples fetched from the digitizer is returned in the wfmInfo structure as discussed in the next section. See the Continuously Acquiring Data section in Chapter 5, Tasks and Examples, for more details. NI-SCOPE supports one high-level function, Read, that combines the Initiate Acquisition and Fetch functions into one call. This function is suitable for most applications, but it does not support fetching binary (non-scaled) waveforms, software triggering, or continuous acquisition. You can use Read to acquire and fetch some data, followed by a call to a Fetch function to retrieve more data. If you would like to stop your digitizer before it finishes, use Abort. If your device supports continuous acquisition, you can fetch all the data that was acquired before you called Abort. However, if the trigger has not occurred in the record that the digitizer is currently acquiring, the trigger point will be invalid. Retrieving Data Fetching data refers to the process of transferring the acquired waveform from the digitizer memory to the host computer memory. This is generally done with direct memory access (DMA), which copies the binary data from the digitizer extremely quickly. Usually, the binary data is scaled to voltage during the fetch and stored in as a 64-bit floating point number. One or more waveform arrays are returned from each Fetch function, which allow you to display, analyze, or store the acquired data. NI-SCOPE offers one method to fetch many types of data. This means that one function can fetch normal acquisitions, multi-record acquisitions, and continuous fetching acquisitions. In C and Visual Basic, there are four Fetch functions, one for each data type that may be returned. In LabVIEW, there are several Fetch functions that allow fetching either one or several waveforms with either a waveform cluster output or a two-dimensional NI-SCOPE Software User Manual 3-20 ni.com Chapter 3 Common Functions and Examples array output for each data type. However, once you understand a single fetch function, the others work similarly. The Fetch functions all take a comma delimited list of channels to fetch, and the number of samples (numSamples) to fetch for each waveform that is returned. If the acquisition finishes and the specified numSamples have not been acquired, the Fetch functions will return all the available data. The waveform info output lists the actual number of samples fetched. In LabVIEW, setting the numSamples parameter to –1 will fetch the actual record length, specified when you configure the acquisition. Otherwise, the actual record length may be determined by calling Actual Record Length. Fetch functions return multiple waveforms, based on the number of channels in the channel list, the number of records, and the acquisition type. In C and Visual Basic, there is a pointer to a 1D array that contains all the waveforms sequentially, where the first waveform starts at the zeroth index, the second waveform starts at the numSamples index, the third waveform starts at two times the numSamples index, and so on. In LabVIEW, NI-SCOPE supports single waveform versions and multiple waveform versions. The cluster versions output either one cluster containing timing information and the waveform or an array of clusters. The array versions output either a single array with one waveform or a two-dimensional array with multiple waveforms. The order of the returned data follows these rules: • If the acquisition type returns two waveforms, they are directly next to each other. See the help text for the specific acquisition type for further information. • If multiple channels are specified, the channel’s data is returned in the order of the list. • If multiple records are specified, all Record 0 waveforms are returned before any Record 1 waveforms. The most common situation is fetching two channels of data during a normal, single-record acquisition. In this case, the two waveforms are ordered the same as the channel list. See the Making a Multiple-Record Acquisition section in Chapter 5, Tasks and Examples, and the various acquisition mode sections for more details about fetching data in these situations. Remember, you can always call a Fetch function repeatedly to fetch each waveform separately. © National Instruments Corporation 3-21 NI-SCOPE Software User Manual Chapter 3 Common Functions and Examples In addition to returning waveforms, Fetch functions return an array of wfmInfo structures—one for each waveform returned. The structure contains information about the waveform, including timing and scaling information. The waveform info structure contains the necessary timing information for plotting and analyzing an acquired waveform. The x increment is the time, in seconds, between two samples. The relative initial x is the time, in seconds, of the first point in the waveform with respect to the trigger. If you acquire pretrigger samples, this value will be negative. The trigger time is very accurate and has much higher resolution than the sample period since it uses a time-to-digital conversion (TDC) circuit. Using the relative initial x scale, the trigger will always occur at time equals zero. In LabVIEW, the Fetch functions that return a cluster contain the relative initial x value and the x increment. Wiring that cluster directly to the graph will plot the waveform versus time. The absolute initial x parameter is only supported on devices with continuous acquisition. See Chapter 5, Tasks and Examples, for a discussion of continuous acquisition. The waveform info structure also contains the gain and offset scaling factors that allow you to convert binary data to voltage. Often, you need to maximize the speed of the application while acquiring data. Fetching binary data saves time since it avoids the scaling operation and uses significantly less memory (1 byte instead of 8 bytes per sample). However, you probably want to scale the binary values to a voltage at a later time. To do this, use the gain factor and offset values from the waveform info structure in the following formula: Voltage Value = Gain × Binary Value + Offset Advanced Fetching Options NI-SCOPE supports several attributes for advanced fetching operations. Two of these attributes are general purpose, allowing you to fetch only a portion of the acquired waveforms. The Fetch Offset attribute is the offset in samples from which to start fetching samples. It may be negative. The Fetch Relative To attribute specifies what the retrieval offset is relative to. All digitizers support fetching relative to pretrigger and trigger. The pretrigger sample is the first pretrigger point requested with the Configure Horizontal Timing function. This is the typical (and default) method since it allows fetching the exact data requested with the configuration function. Fetching relative to the trigger means the first posttrigger sample is the first one fetched. Digitizers supporting continuous acquisition have several other options for the relative to attribute, as covered in Chapter 5, Tasks and Examples. NI-SCOPE Software User Manual 3-22 ni.com Chapter 3 Common Functions and Examples Self-Calibrating Your Digitizer Over time, measurement accuracies drift, meaning that your digitizer will eventually take measurements less accurately than the specifications state. To correct for these errors, you need to calibrate your device. Initialize Opens a session Cal Self Calibrate Self-calibrates your digitizer Error Handler Includes error handling Close Closes the session Figure 3-13. Calibrating Your Digitizer Calibration Example See the calibrate example for code that you can use to self-calibrate your digitizer. Types of Calibration To calibrate your digitizer, you can either choose internal calibration or external calibration. Internal calibration, or self-calibration, involves updating the calibration constants with a software function. Figure 3-13 shows you how to internally calibrate your device. External calibration also updates the calibration constants, but it uses an external voltage source such as a highly accurate oscilloscope calibrator. However, because precision sources are very expensive, metrology laboratories or NI usually performs external calibration. You can return your device to NI for external calibration. Consult your digitizer user manual for recommended calibration frequency. © National Instruments Corporation 3-23 NI-SCOPE Software User Manual Chapter 3 Common Functions and Examples Low-Level Tweaking—Attributes and Attribute Functions Attributes—which are typically called properties in LabVIEW—serve as a base for parameters. For instance, the Minimum Number Points parameter in the Configure Horizontal Timing function is actually built on the Horizontal Minimum Number of Points, Horizontal Minimum Sample Rate, Horizontal Number of Records, and Horizontal Record Reference Position attributes. Because attributes and attribute functions require additional code and include limited error checking, you should generally avoid using attributes except in a couple of cases: • There m.nctions and parameters do not. Accessing Attributes In LabVIEW, you can find attributes in the NI-SCOPE property node. To access them, do the following: 1. Open a property node. • LabVIEW 6.0 or later—Make sure you are on the block diagram screen. Then go to the NI-SCOPE palette at Instrument I/O»Instrument Drivers»NI-SCOPE, and drag the Property Node icon to your diagram. • LabVIEW 5.X—Make sure you are on the block diagram screen. Then go to the NI-SCOPE palette at Instrument Drivers» NI-SCOPE, and drag the Property Node icon to your diagram. 2. Right-click the property node icon, and choose Select IVI Class» niScope. The top portion of your property node should now have niScope written on it. Alternatively, you can just wire in an NI-SCOPE session handle. 3. Left-click the property node, and choose the attribute you want to use. For channel-based attributes, you need to set the Active Channel attribute first to specify which channel you want the attribute set on. 4. Repeat step 3 to add additional attributes. Refer to the NI-SCOPE Function Reference Help or the NI-SCOPE VI Reference Help for a complete listing of available attributes. NI-SCOPE Software User Manual 3-24 ni.com Chapter 3 Common Functions and Examples Attributes are used frequently when making waveform measurements. See Chapter 4, Making Waveform Measurements, for additional information on waveform measurements. Note In C and Visual Basic, attributes are accessed with Set Attribute and Get Attribute functions. Consult your NI-SCOPE Function Reference Help for specific attribute functions. Utility Functions These functions perform various tasks such as resetting your digitizer and returning the revision number of NI-SCOPE and the instrument firmware. These functions also can help you start or stop the output of a square wave for probe compensation. © National Instruments Corporation 3-25 NI-SCOPE Software User Manual 4 Making Waveform Measurements This chapter describes how to fetch data from your digitizer using scalar or array waveform measurements, instead of time-domain waveforms. Scalar measurements refer to calculations such as rise time and frequency that produce a single value from time-domain data. Array measurements, on the other hand, transform the time-domain data into a new waveform, such as a fast Fourier transform (FFT) amplitude spectrum. Fetching Scalar and Array Measurements— Overview of Functions Scalar and array measurements are fetched with the Fetch Measurement, Fetch Measurement Stats, and Fetch Array Measurement functions. These functions are similar to Fetch functions discussed in the Acquiring Data—Reading Versus Fetching section in Chapter 3, Common Functions and Examples. The channel list and timeout parameters are identical. However, instead of returning waveforms, they return either the specified scalar measurement or the specified array measurement. In LabVIEW, versions exists that fetch either a single measurement or an array of measurements. The C and Visual Basic versions return an array of measurement results, just as the Fetch functions can return an array of waveforms. The order of the returned results is the same as in the Fetch functions. C and Visual Basic users will probably dynamically declare memory for the measurement results using code such as the following. Notice that this sample uses the Actual Meas Wfm Size function to query how many samples are available in the resulting array measurement. ViConstString channelList = "0,1"; ViReal64 *results; niScope_ActualNumWfms (vi, channelList, &numWfms); © National Instruments Corporation 4-1 NI-SCOPE Software User Manual Chapter 4 Making Waveform Measurements results = malloc (sizeof (ViReal64) * numWfms); niScope_FetchMeasurement (vi, channelList, timeout, NISCOPE_VAL_RISE_TIME, results); ViReal64 *measWfm; struct niScope_wfmInfo *measWfmInfo; niScope_ActualMeasWfmSize (vi, NISCOPE_VAL_FFT_AMP_SPECTRUM_DB, &measWfmSize); measWfm = malloc (sizeof (ViReal64) * measWfmSize * numWfms); measWfmInfo = malloc (sizeof (struct niScope_wfmInfo) * numWfms); niScope_FetchArrayMeasurement (vi, channelList, timeout, NISCOPE_VAL_FFT_AMP_SPECTRUM_DB, measWfmSize, measWfm, measWfmInfo); Using Attributes in Waveform Measurements By default, the Fetch Measurement functions use the entire acquired waveform for the analysis. However, all the fetching attributes apply when determining what data is used for the measurement. In addition to the normal fetch attributes such as Fetch Relative To and Fetch Offset, the Fetch Meas Num Samples attribute allows you to specify the number of samples fetched for performing the measurement. By default, this attribute is –1, which fetches the actual record length. This attribute is the same as the numSamples parameter in the other fetch functions. Fetching Statistics from Waveform Measurements The Fetch Measurement Stats function returns the current measurement result as well as statistics for this measurement over multiple acquisitions. Every time you fetch a measurement, NI-SCOPE keeps a history of the measurement values. This allows NI-SCOPE to compute the mean, standard deviation, minimum, and maximum value of each scalar measurement. To clear the statistics history, use the Clear Waveform Measurement Stats function. NI-SCOPE Software User Manual 4-2 ni.com Chapter 4 Making Waveform Measurements Processing Data before Performing Waveform Measurements Often, the time-domain data returned from a digitizer requires processing before measurements are done. To do this, register an array measurement as a processing step by using the Add Waveform Processing function. At the time of registering the processing step, the entire set of waveform measurement attributes are cached. Then when a measurement function is called, the processing measurements are completed with this cached set of parameters. The resulting processed waveform is used with the current set of measurement attributes to compute the scalar or array measurement result during a fetch function. This allows streaming together of measurements. For example, if you register add channels and a Bessel filter as processing steps, fetching a frequency measurement actually gives you the frequency of the filtered summation of two channels. You can fetch the processed waveform by calling the Fetch Array Measurement function with an array measurement of NONE. The processing steps only need to be added a single time during your program. Use the Clear Waveform Processing function to eliminate any previously configured processing steps. Remember, you can call the Fetch Measurement functions multiple times during the same acquisition to fetch different measurements. They can also be used with the Read and Fetch functions for retrieving the raw waveform. Making Scalar Measurements Scalar measurements are measurements on waveforms that produce a single value result. For instance, you could use a scalar measurement to find the voltage amplitude or the median voltage of an acquisition. For a complete list of scalar measurements available, see the NI-SCOPE Function Reference Help or the NI-SCOPE VI Reference Help. © National Instruments Corporation 4-3 NI-SCOPE Software User Manual Chapter 4 Making Waveform Measurements Initialize Configure Initiate Initiates data acquistion Fetch Measurement Polls digitizer until data is available, fetches the waveform, and performs the scalar measurement Error Handler Close Figure 4-1. Scalar Measurement Flowchart Scalar Measurement Example See the Measurement Library example for sample code you can use to create your own application. This example demonstrates fetching scalar measurements and statistics. The Advanced Measurement Library example shows you how to fetch a scalar measurement on a processed waveform. NI-SCOPE Software User Manual 4-4 ni.com Chapter 4 Making Waveform Measurements Scalar Measurement Concepts This section covers some key concepts that you need to understand in order to make scalar measurements. Reference Levels Reference levels are high, low, and mid-range values that you set to take rise time, fall time, width negative, width positive, duty cycle positive, and duty cycle negative measurements. Use the channel-based attributes to set the reference levels. See the Low-Level Tweaking—Attributes and Attribute Functions section in Chapter 3, Common Functions and Examples, for an overview of attributes, and refer to the NI-SCOPE Function Reference Help or the NI-SCOPE VI Reference Help file for specific attributes. The reference levels are generally configured in terms of the percentage of the waveform you acquire. By default, the low value is 10% of the waveform, the mid level is 50%, and the high value is 90%. You can customize how NI-SCOPE configures the percentages used for the reference levels with the Percentage Method attribute. This attribute uses any of the following constants: • Min Max—This method uses the measurement’s voltage minimum and voltage maximum as 0% and 100%. These algorithms find the absolute minimum and maximum in the waveform, which is useful for sine waves and triangle waves where the histogram method does not work. • Low High—This method uses the measurement’s voltage low and voltage high as 0% and 100%. The voltage low is the voltage of the histogram bin with the most hits below 40% of the waveform’s voltage peak-to-peak value. The voltage high is the voltage of the histogram bin with the most hits above 60% of the waveform’s voltage peak-to-peak value. These measurements use the last-acquisition histogram method to find the most common high and low voltages, which is useful for ignoring the preshoot and overshoot on a square wave. • Base Top—The voltage base and voltage top measurements correspond to 0% and 100% with this method. These measurements use the last-acquisition histogram method if the most common histogram bin contains a substantial number of the total points. Otherwise, it returns the absolute minimum and maximum values in the waveform. This is a useful default value for most waveform types. © National Instruments Corporation 4-5 NI-SCOPE Software User Manual Chapter 4 Making Waveform Measurements You can also configure the reference levels in terms of voltage with the Ref Level Units attribute. Last-Acquisition Histogram Method This method is used by the voltage low and voltage high measurements for computing the extrema of a waveform. This method is useful for ignoring overshoot or preshoot in a square waveform. In this method, a voltage histogram is created from the most recent acquisition. The limits of this histogram are set by the minimum and maximum voltages of the acquisition. NI-SCOPE then counts how many samples fall into each bin of the histogram. The resolution is defined by the Last Acquisition Histogram Size attribute, which is 256 bins by default. You can fetch the histogram array using the Fetch Array Measurement function, with Last Acquisition Histogram constant specified as the array measurement function. The following illustrations show an example of a square wave and its resulting histogram. Notice in the histogram that the voltage low and voltage high measurements correspond to the middle value of a bin with the maximum number of hits in the lower 40% or upper 40% respectively. Voltage Max Voltage High Voltage Low Voltage Min Figure 4-2. Sampled a Square Wave NI-SCOPE Software User Manual 4-6 ni.com Making Waveform Measurements Hits Chapter 4 Min Lo Lower 40% searched for max hits to determine voltage low Hi Max Upper 40% searched for max hits to determine voltage high Figure 4-3. Histogram from Square Wave Measuring Reference-Level Crossings All scalar measurements involving time use the concept of reference-level crossings, which occur when the waveform voltage crosses the reference level. Linear interpolation accurately estimates the crosspoint times, but noise can create a higher number of level crossings. To minimize the impact of noise, you can create a hysteresis window around crosspoints. To count a crossing, the signal must start outside this window and then pass through the window to the crosspoint. A crossing will not be counted again until the signal passes outside the window and then passes through the window to © National Instruments Corporation 4-7 NI-SCOPE Software User Manual Chapter 4 Making Waveform Measurements the crosspoint. The following figure shows an exaggerated example of digital hysteresis, where the dots are the real crosspoints after eliminating the spurious crosspoints caused by noise. The dots indicate the crosspoints counted for the measurement. Reference Level Vertical Hysteresis × Range Percent Hysteresis = Window Size 100 Figure 4-4. Digital Hysteresis Example Time Histogram Overview Time histograms bin data samples based on their time from the trigger. Only data that falls in a defined voltage range and time window is included in the histogram. Data is added to the histogram over multiple acquisitions, which make time histograms useful for analyzing frequency or pulse-width jitter. Figures 4-5 and 4-6 demonstrate how a time histogram might be used. Multiple pulses are acquired, where an edge trigger is used to align the rising edges of the pulse. A time histogram is configured to define a window around the falling edges of each pulse—the shaded region in the diagram. Notice that the voltage levels are set so only the waveform edges are included. This is necessary, or the histogram would always be perfectly uniform. Every sample on the falling edge is added to the time histogram, shown in the second diagram. In this example, the first and third acquisitions both have a falling edge at the same time, while the second acquisition is later. The histogram captures this statistical information. NI-SCOPE Software User Manual 4-8 ni.com Chapter 4 Making Waveform Measurements Time Histogram High Volts Trigger Time Histogram Low Volts Acquisition 3 Acquisition 2 Acquisition 1 Time Histogram Low Time Time Histogram High Time Hits Figure 4-5. Time-Domain Waveform Measured by the Oscilloscope/Digitizer Low Time High Time Figure 4-6. Corresponding Time Histogram © National Instruments Corporation 4-9 NI-SCOPE Software User Manual Chapter 4 Making Waveform Measurements Creating Time Histograms To create a time histogram, you must use attributes and follow these general steps: 1. Set the size of the histogram with the Measurement Time Histogram Size attribute. The default is 256 bins. 2. Set the time limits for the histogram. Use the attributes Measurement Time Histogram Low Time for the beginning time and Measurement Time Histogram High Time for the ending time. These values are set during the first measurement after the histogram’s history is cleared. 3. Set the voltage limits for the acquisition. The voltage limits are set with the attributes Measurement Time Histogram Low Volts and Measurement Time Histogram High Volts. These values can change every acquisition. 4. Call the Clear Waveform Measurement Stats function to erase the histogram’s history between acquisitions. Time Histogram Example (LabVIEW Only) See the Time Histogram example for sample code you can use to create your own application. Types of Time Histogram Measurements You can obtain a number of different scalar measurements from any time histogram. For instance, you can use NI-SCOPE constants to find the number of hits, mean, standard deviation, median, mode, and other values. See your NI-SCOPE Function Reference Help or your NI-SCOPE VI Reference Help file for additional information on these constants. NI-SCOPE Software User Manual 4-10 ni.com Chapter 4 Making Waveform Measurements Voltage Histogram Overview Voltage histograms eliminate the time information from multiple acquisitions by sorting each point in the waveform into the proper voltage bin. This is useful for analyzing the statistical amplitude variations of signals. See the following figures for an example of a voltage histogram. Voltage Histogram High Volts Voltage Histogram Low Volts Hits Figure 4-7. Time-Domain Waveform Sampled Low Volts High Volts Figure 4-8. Corresponding Voltage Histogram Notice that the higher amplitude pulse occurs twice, while the lower amplitude pulse occurs once. © National Instruments Corporation 4-11 NI-SCOPE Software User Manual Chapter 4 Making Waveform Measurements Creating Voltage Histograms To create a voltage histogram, you must use attributes and follow these general steps: 1. Set the size of the histogram with the Measurement Voltage Histogram Size attribute. The default is 256 bins. 2. Set the limits of the voltage histogram with the Measurement Voltage Histogram Low Volts and Measurement Voltage Histogram High Volts attributes. 3. Call the Clear Waveform Measurement Stats function to erase the histogram’s history. Voltage Histogram Example (LabVIEW Only) See the Voltage Histogram example for sample code you can use to create your own application. Types of Voltage Histogram Measurements You can obtain a number of different scalar measurements from any voltage histogram. For instance, you can use NI-SCOPE constants to find the number of hits, mean, standard deviation, median, mode, and other values. See your NI-SCOPE Function Reference Help or the NI-SCOPE VI Reference Help file for additional information on these constants. Making Array Measurements Array measurements are measurements on waveforms that result in an array of values such as an FFT amplitude spectrum. This section covers some key concepts needed to make array measurements. For a complete list of array measurements available, see the NI-SCOPE Function Reference Help or the NI-SCOPE VI Reference Help. NI-SCOPE Software User Manual 4-12 ni.com Chapter 4 Making Waveform Measurements Initialize Configure Initiate Begins acquiring pretrigger data Fetch Array Measurement Error Handler Close Figure 4-9. Array Measurement Flowchart Array Measurement Example See the Advanced Waveform Measurement example for sample code you can use to create your own application. The Digital Filtering and Windowing examples for LabVIEW also use array measurements. Array Measurement Concepts This section covers some key concepts that you need to understand to make array measurements. Smoothing Windows Overview Smoothing windows are a simple means of minimizing spectral leakage associated with truncated waveforms. © National Instruments Corporation 4-13 NI-SCOPE Software User Manual Chapter 4 Making Waveform Measurements The Problem—Finite Sampling Records Creates Truncated Waveforms In practical signal-sampling applications, you can obtain only a finite record of the signal. This finite sampling record results in a truncated waveform that has different spectral characteristics from the original continuous-time signal. These discontinuities produce leakage of spectral information, resulting in a discrete time spectrum that is a smeared version of the original continuous time spectrum. Spectral Leakage When you use the discrete Fourier transform (DFT) or FFT to find the frequency content of a signal, it is assumed that the data that you have is a periodically repeating waveform. Take a look at the following figure. The first period shown is the one sampled. Notice that the waveform has not completed an entire cycle, which creates a discontinuity when the waveform is repeated to produce the periodic waveform. One Period Discontinuity Time Figure 4-10. Discontinuities Created by Periodically Extending a Waveform Discontinuities happen when you sample a noninteger number of cycles. These artificial discontinuities turn up as very high frequencies in the spectrum of the signal that were not present in the original signal. These frequencies could be much higher than the Nyquist frequency and will be aliased somewhere between 0 and fs/2, where fs is your sampling rate. The spectrum you get by using a FFT, therefore, is not the actual spectrum of the original signal, but a smeared version. It appears as if the energy at one frequency has leaked out into all the other frequencies. This phenomenon is known as spectral leakage. NI-SCOPE Software User Manual 4-14 ni.com Chapter 4 Making Waveform Measurements FFT without Spectral Leakage Figure 4-11 shows a sine wave sampled from an NI 5102 and its corresponding FFT amplitude spectrum in decibels. The time-domain waveform has an integer number of cycles (namely 10), so the assumption of periodicity does not create any discontinuities. Figure 4-11. No Spectral Leakage © National Instruments Corporation 4-15 NI-SCOPE Software User Manual Chapter 4 Making Waveform Measurements FFT with Spectral Leakage In Figure 4-12, you see the spectral representation when you sample a noninteger number of cycles of the time waveform (namely 10.5). The periodic extension of this signal creates a discontinuity similar to Figure 4-10. Notice how the energy is now spread over a wide range of frequencies, so the relative height difference between the FFT peak amplitude and the neighboring bins is reduced. This smearing of the energy is spectral leakage. Figure 4-12. Spectral Leakage NI-SCOPE Software User Manual 4-16 ni.com Chapter 4 Making Waveform Measurements The Solution—Smoothing Windows Leakage exists because the finite time record of the input signal creates discontinuities when the waveform is extended. The greater the amplitude of these discontinuities, the greater the spectral leakage. A simple way to avoid this is to use smoothing windows when applying an FFT on finite-length data. You can use smoothing windows to reduce the amplitude of the discontinuities at the boundaries of each period. This technique multiplies the time record by a finite length window whose amplitude varies smoothly and gradually towards zero at the edges. This is shown in Figure 4-13, in which the original time signal in Figure 4-12 is windowed using a Hanning window. As you can see in Figure 4-14, the FFT of this data is significantly less noisy than the non-windowed FFT shown in Figure 4-12. Figure 4-13. Time Signal © National Instruments Corporation 4-17 NI-SCOPE Software User Manual Chapter 4 Making Waveform Measurements Figure 4-14. FFT with Hanning Window Applying a smoothing window to a signal in the time domain requires multiplying the signal by the window function. Because multiplication in the time domain is equivalent to convolution in the frequency domain, the spectrum of the windowed signal is a convolution of the spectrum of the original signal with the spectrum of the window. Thus, smoothing windows change the shape of the signal in the time domain (compare Figure 4-12 with Figure 4-13), as well as affecting the spectrum that you see (notice that the peak width increased when the smoothing window was applied). Types of Window Measurements Choosing the correct window requires some prior knowledge of the signal that you are analyzing. The following table shows the different types of windows and the signal types they are appropriate for. NI-SCOPE Software User Manual 4-18 ni.com Chapter 4 Window Signal Making Waveform Measurements Type and Description Applications Rectangular (no window) Transient signals that are shorter than the length of the window; truncates a window to within a finite time interval Order tracking, system analysis (frequency response measurements) with pseudorandom excitation, separation of two tones with frequencies very close to each other, but with almost equal amplitudes Hanning Transient signals that are longer than the length of the window General-purpose applications, system analysis (frequency response measurements) with random excitation Hamming Transient signals that are longer than the length of the window; a modified version of the Hanning window that is discontinuous at the edges Often used in speech signal processing Blackman Transient signals; similar to Hanning and Hamming windows but adds one additional cosine term to reduce ripple General-purpose applications Triangle Window that is the shape of a triangle No special applications Flat Top Has the best amplitude accuracy of all the windows but comes at the expense of frequency selectivity Accurate single tone amplitude measurements when there are no nearby frequency components In cases in which you do not have sufficient prior knowledge of the signal, you may need to experiment with different windows to find the best one. Note © National Instruments Corporation 4-19 NI-SCOPE Software User Manual Chapter 4 Making Waveform Measurements Digital Filtering Overview Analog filter design is one of the most important areas of electronic design, but it is often reserved for specialists because it requires advanced mathematical knowledge and understanding of the processes involved in the system affecting the filter. With the digital filters in NI-SCOPE, however, you do not have to be a design expert. NI-SCOPE handles all the design issues, computations, memory management, and actual filtering internally. Although digital filters have advantages over analog filters, they have disadvantages such as floating-point precision limitations, numerical instability, quantization noise, and frequency warping. Types of Filters Filters alter or remove unwanted frequencies. Depending on the frequency range that they either pass or attenuate, they can be classified into the following types: • A lowpass filter passes low frequencies, but rejects (or attenuates) high frequencies. To specify the cut-off frequency, use the Measurement Filter Cutoff Frequency attribute. • A highpass filter passes high frequencies, but attenuates low frequencies. To specify the cut-off frequency, use the Measurement Filter Cutoff Frequency attribute. • A bandpass filter passes a certain band of frequencies. To specify the bandpass filter, use the Measurement Filter Center Frequency attribute and the Filter Width attribute, where the cut-off frequencies are the center frequency ± one-half width. • A bandstop filter attenuates a certain band of frequencies. To specify the bandstop filter, use the Measurement Filter Center Frequency attribute and the Measurement Filter Width attribute, where the cut-off frequencies are the center frequency plus or minus one-half width. An ideal filter has a gain of one (0 dB) in the passband so that the amplitude of the signal neither increases nor decreases. The stopband (SB) corresponds to that range of frequencies that do not pass through the filter at all and are rejected (attenuated). NI-SCOPE Software User Manual 4-20 ni.com Frequency Amplitude Frequency fc Highpass fc Lowpass Making Waveform Measurements Amplitude Amplitude Amplitude Chapter 4 Frequency fc1 fc2 Bandpass Frequency fc1 fc2 Bandstop Figure 4-15. Ideal Filter Infinite Impulse Response (IIR) Versus Finite Impulse Response (FIR) Filters Another way to classify filters is by impulse response. An impulse response is the response of a filter to an input that is an impulse (x[0] = 1 and x[i] = 0 for all i ≠ 0). The FFT of the filtered impulse response is known as the frequency response of the filter. The frequency response of a filter tells you what the output of the filter is going to be at different frequencies. In other words, it tells you the gain of the filter at different frequencies. For an ideal filter, the gain should be 1 in the passband and 0 in the stopband. So, all frequencies in the passband are passed as is to the output, but there is no output for frequencies in the stopband. If the impulse response of the filter falls to zero after a finite amount of time, it is known as an FIR filter. However, if the impulse response exists indefinitely, it is known as an IIR filter. Whether the impulse response is finite (that is, whether the filter is FIR or IIR) depends on how the output is calculated. The basic difference between FIR and IIR filters is that for FIR filters, the output depends only on the current and past input values, whereas for IIR filters, the output depends not only on the current and past input values, but also on the past output values. The advantage of digital IIR filters over FIR filters is that IIR filters usually require fewer coefficients to perform similar filtering operations. Thus, IIR filters execute much faster and do not require extra memory, because they execute in place. The disadvantage of IIR filters is that the phase response is nonlinear. If the application does not require phase information, such as amplitude spectrum analysis, IIR filters may be appropriate. You should use FIR filters for those applications requiring linear phase responses. © National Instruments Corporation 4-21 NI-SCOPE Software User Manual Chapter 4 Making Waveform Measurements Truncating Data with IIR Filters Since IIR filters depend on the output and the input, there is a transient response at the beginning of the filtered data that is invalid, due to the assumptions made at the beginning boundary condition. This is due to the assumption that negative indices in the general IIR difference equation are zero. This response is illustrated in Figure 4-16. NI-SCOPE IIR filters will remove the user-defined transient portion by deleting the first input size times the Measurement Filter Transient Waveform Percent attribute divided by 100 from the beginning of the filtered data array. This feature is useful when using a combination of processing steps, so the result of an IIR filter excluding the transient portion may be the input of another measurement. Unfortunately, the length of the transient response depends on both the filter order and the input waveform, and it may require some trial and error to determine the proper setting for the Measurement Filter Transient Waveform Percent attribute. Transient Steady State Original Signal Filtered Signal Figure 4-16. Transient Waveforms and IIR Filters NI-SCOPE Software User Manual 4-22 ni.com Chapter 4 Making Waveform Measurements Types of IIR Filters Available in NI-SCOPE NI-SCOPE includes Butterworth, Chebyshev, and Bessel IIR filters. You can fetch filtered data by calling Fetch Array Measurement. Butterworth Filters NI-SCOPE supports the following attributes for configuring Butterworth filters: • Measurement Filter Type—lowpass, highpass, bandpass, bandstop • Measurement Filter Order • Measurement Transient Waveform Percent A smooth response at all frequencies and a monotonic decrease from the specified cutoff frequencies characterize Butterworth filters. These filters are maximally flatthe ideal response of unity in the passband and zero in the stopband. The half power frequency or the –3 dB down frequency corresponds to the specified cutoff frequencies. Butterworth filters do not always provide a good approximation of the ideal filter response because of the slow rolloff between the passband (the portion of interest in the spectrum) and the stopband (the unwanted portion of the spectrum). The advantage of Butterworth filters is a smooth, monotonically decreasing frequency response. The steepness of the transition is proportional to the filter order, so higher order Butterworth filters approach the ideal lowpass filter response. Figure 4-17 shows the response of a lowpass Butterworth filter. In the figure, the sampling frequency is normalized to 1.0, and the cutoff frequency is 0.25. © National Instruments Corporation 4-23 NI-SCOPE Software User Manual Chapter 4 Making Waveform Measurements Figure 4-17. Impulse Magnitude and Phase Response Versus Frequency for a Lowpass Butterworth Filter Chebyshev Filters NI-SCOPE supports the following attributes for configuring Chebyshev filters: • Measurement Filter Type—lowpass, highpass, bandpass, bandstop • Measurement Filter Order • Measurement Passband Filter Ripple in dB • Measurement Transient Waveform Percent These filters minimize peak error in the passband by accounting for the maximum absolute value of the difference between the ideal filter and the filter response you want (the maximum tolerable error in the passband). Chebyshev filters have an equiripple magnitude response in the passband, monotonically decreasing magnitude response in the stopband, and a sharper rolloff than Butterworth filters. The cutoff frequency for Chebyshev filters is defined as the end of the passband. For example, if you specify a lowpass filter with 1 dB ripple, the passband response from 0 Hz to the cutoff frequency will have 1 dB ripple. At the cutoff frequency, NI-SCOPE Software User Manual 4-24 ni.com Chapter 4 Making Waveform Measurements the response will be 1 dB down, and it is monotonically decreasing above the cutoff frequency. Figure 4-18 shows the response of a lowpass Chebyshev filter. Notice that the equiripple response in the passband is constrained by the maximum tolerable ripple error and that the sharp rolloff appears in the stopband. The advantage of Chebyshev filters over Butterworth filters is that Chebyshev filters have a sharper transition between the passband and the stopband with a lower order filter. This produces smaller absolute errors and higher execution speeds. Figure 4-18. Impulse Magnitude and Phase Response Versus Frequency for a Lowpass Chebyshev Filter Bessel Filters NI-SCOPE supports the following attributes for configuring Bessel filters: • Measurement Filter Type—lowpass, highpass, bandpass, bandstop • Measurement Filter Order • Measurement Transient Waveform Percent © National Instruments Corporation 4-25 NI-SCOPE Software User Manual Chapter 4 Making Waveform Measurements You can use Bessel filters to reduce nonlinear phase distortion inherent in all IIR filters. In higher order filters and those with a steeper rolloff, this condition is more pronounced, especially in the transition regions of the filters. Bessel filters have maximally flat response in both magnitude and phase. Furthermore, the phase response in the passband of Bessel filters, which is the region of interest, is nearly linear. Like Butterworth filters, Bessel filters require high-order filters to minimize the error and, for this reason, are not widely used. You can also obtain linear phase response using FIR filter designs. Figure 4-19 shows a plot of the response of a lowpass Bessel filter with a sampling frequency normalized to 1.0 and a cutoff frequency of 0.25. Notice that the response is smooth at all frequencies, as well as monotonically decreasing in both magnitude and phase. In addition, notice that the phase in the passband is nearly linear. For Bessel filters, the cutoff frequency specifies the passband, or the region of linear phase response. Figure 4-19. Impulse Magnitude and Phase Response Versus Frequency for a Lowpass Bessel Filter NI-SCOPE Software User Manual 4-26 ni.com Chapter 4 Making Waveform Measurements FIR Filters Finite impulse response (FIR) filters are digital filters that have a finite impulse response. FIR filters are also known as nonrecursive filters, convolution filters, or moving-average (MA) filters because you can express the output of a FIR filter as a finite convolution: n–1 yi = ∑h k ⋅ x i –k k=0 where x represents the input sequence to be filtered, y represents the output filtered sequence, and h represents the FIR filter coefficients. The most important characteristics of FIR filters are the following: • They can achieve linear phase because of filter coefficient symmetry in the realization. • They are always stable. • The filtering function is performed using the convolution and, as such, generally allows associating a delay with the output sequence of (n-1)/2, where n is the number of filter coefficients and is called the filter taps. The simplest method for designing linear-phase FIR filters is the window design method. To design an FIR filter by windowing, you start with an ideal frequency response, calculate its impulse response, and then truncate the impulse response to produce a finite number of coefficients. The truncation of the ideal impulse response results in the effect known as the Gibbs phenomenon-oscillatory behavior near abrupt transitions (cutoff frequencies) in the FIR filter frequency response. You can reduce the effects of the Gibbs phenomenon by smoothing the truncation of the ideal impulse response using a smoothing window. By tapering the FIR coefficients at each end, you can diminish the height of the side lobes in the frequency response. This method widens the main lobe, however, resulting in a wider transition region at the cutoff frequencies. The selection of a window function, then, is similar to the choice between Chebyshev and Butterworth IIR filters in that it is a trade-off between side lobe levels near the cutoff frequencies and width of the transition region. © National Instruments Corporation 4-27 NI-SCOPE Software User Manual Chapter 4 Making Waveform Measurements Types of FIR Filters in NI-SCOPE NI-SCOPE supports the following attributes for configuring FIR filters: • Measurement Filter Type—lowpass, highpass, bandpass, bandstop • Measurement Filter Taps • Measurement Filter Window—none, Hanning, Hamming, triangle, flat top, or Blackman The window type you choose impacts the data you acquire. See the following images of the same signal. In Figure 4-20, a FIR Filter with a Hanning response window is applied to the signal. In Figure 4-21, a FIR filter with no window is applied to the same signal, which has been normalized to 1.0 with a cutoff frequency of 0.25. Figure 4-20. FIR Filter with Hanning Window NI-SCOPE Software User Manual 4-28 ni.com Chapter 4 Making Waveform Measurements Figure 4-21. FIR Filter with No Window © National Instruments Corporation 4-29 NI-SCOPE Software User Manual 5 Tasks and Examples This chapter takes you through some common digitizer tasks. Each task refers you to an example that ships with NI-SCOPE. Use these examples as the basis for your own application. To find the location of examples for your ADE, including LabVIEW, C, and Visual Basic, refer to the Programming in Different Application Development Environments (ADEs) section in Chapter 1, Introduction to NI-SCOPE. Increasing Sampling Speed with RIS Random Interleaved Sampling (RIS) is a form of Equivalent Time Sampling (ETS) that increases apparent sample rates of repetitive signals by combining several triggered waveforms. Since the trigger time occurs randomly between two samples, the digitizer samples different points in the waveform on consecutive acquisitions. By combining these waveforms, you can achieve RIS sample rates that are up to 25 times higher than the ADC sample rate on your digitizer. RIS Example See the Random Interleaved Sampling example for sample code that you can use in your own application. To get RIS to work, you need to set the Enforce Realtime parameter to FALSE in the Configure Horizontal Timing function. This allows you to configure the sampling rate higher than the maximum real-time sampling rate of your digitizer, using the same function. How RIS Works Each waveform trigger occurs at some time randomly distributed between two samples. The digitizer can measure the time from the trigger to the next sample, commonly called the time-to-digital conversion (TDC), extremely accurately—with hundreds of times more resolution than the sample period of the digitizer. With these TDC measurements, NI-SCOPE can combine multiple waveforms, aligned at the trigger time, to simulate a faster sampling rate for repetitive signals. © National Instruments Corporation 5-1 NI-SCOPE Software User Manual Chapter 5 Tasks and Examples How Oversampling Factors Increase Effective Sample Rates When the digitizer is in RIS mode, the legal sample rates become multiples of the maximum real-time sampling rate. These multiples are the oversampling factor. For example, the NI 5112 has a 100 MS/s maximum real-time sampling rate, so the RIS sampling rates are the oversampling factor times 100 MS/s, where the oversampling factor is two, three, four, and so on. If you specify 300 MS/s for your sampling rate, the oversampling factor is three. Each TDC value is between zero and the sampling period, so a 100 MS/s digitizer has TDC values between 0 and 10 ns. This time span is divided into a number of bins equal to the oversampling factor. For instance, an oversampling factor of three means there is one TDC bin from 0 to 3.33 ns, another from 3.33 to 6.67 ns, and another from 6.67 to 10 ns. To reconstruct a waveform, there must be at least one TDC value in each bin. Figure 5-1 shows an example RIS acquisition with an oversampling factor of three. Each of the subfigures shows the aligned trigger time of the waveforms followed by the three TDC bins, where the combined width of the three bins is the real-time sample period of the digitizer. In Figure 5-1A, the first waveform has a TDC value that falls in bin number 1, while Figure 5-1B shows that next waveform falling into bin 3. Figure 5-1C shows that due to the randomness of the TDC value, there is another sampled waveform that falls in bin 1. NI-SCOPE will not fetch this waveform from the digitizer since that bin already is filled. In Figure 5-1D, there is a waveform in bin 2. At this point, each bin is full, so NI-SCOPE returns the three waveforms sampled at the maximum real-time rate as one evenly sampled waveform with a sampling rate three times greater. NI-SCOPE Software User Manual 5-2 ni.com Chapter 5 A. Bin 1 Bin 2 Bin 3 B. Bin 1 Bin 2 Bin 3 Acquisition 1 Acquisition 1 Acquisition 2 Trigger Time of Each Waveform Trigger Time of Each Waveform C. Bin 1 Bin 2 Bin 3 D. Bin 1 Tasks and Examples Bin 2 Bin 3 Acquisition 1 Acquisition 2 Acquisition 4 Acquisition 1 Acquisition 2 Acquisition 3 Trigger Time of Each Waveform Trigger Time of Each Waveform Figure 5-1. RIS with an Oversampling Factor of Three Using Averaging to Minimize Noise with RIS At a minimum to complete an RIS acquisition, the number of TDC values must be equal to the oversampling factor. However, this does not guarantee a cleanly reconstructed signal. Figure 5-2 shows three acquisitions of a perfectly linear edge. Notice in Figure 5-2A that the sample in bin number 1 is extremely close to its right bin edge, while the sample in bin number 2 is near its left edge. When NI-SCOPE returns the RIS waveform, the samples are coerced to the middle of each bin to produce an evenly sampled waveform. Figure 5-2B shows how NI-SCOPE would return the RIS waveform, with evenly spaced samples. © National Instruments Corporation 5-3 NI-SCOPE Software User Manual Chapter 5 Tasks and Examples Noise is avoided in RIS waveforms by averaging multiple waveforms in each bin during the RIS algorithm. The number of averages in each bin can be specified with the RIS Num Averages attribute of NI-SCOPE. Figure 5-2C shows the acquisition using two averages. Notice that twice as many waveforms are required now. Figure 5-2D shows the returned waveform from the averaged RIS acquisition. The higher the number of averages, the smaller the effect of coercing the time of samples. Therefore, it is generally important to use some amount of averaging with RIS. Unfortunately, increasing the amount of averaging increases the minimum number of waveforms necessary to reconstruct the RIS waveform and therefore, the time it takes to do an acquisition. A. Bin 1 B. Bin 2 Bin 3 Bin 2 Bin 3 Acquisition 1 Acquisition 2 Acquisition 3 Acquisition 1 Acquisition 2 Acquisition 3 Trigger Time of Each Waveform C. Bin 1 Bin 1 Trigger Time of RIS Waveform D. Bin 2 Bin 3 Bin 1 Bin 2 Bin 3 Acquisition 1 Acquisition 2 Acquisition 3 Acquisition 4 Acquisition 5 Acquisition 6 Acquisition 1 Acquisition 2 Acquisition 3 Trigger Time of Each Waveform Trigger Time of RIS Waveform Figure 5-2. RIS Averaging NI-SCOPE Software User Manual 5-4 ni.com Chapter 5 Tasks and Examples Why TDC Values Need to be Random When using RIS, remember that the TDC value is completely random— the hardware does not adjust anything to ensure an even distribution of TDC values. If the TDC is the same from two acquisitions, the digitizer has effectively sampled the same places on the repetitive waveform, so no information has been gained. Therefore, for RIS to work, there needs to be a suitable random distribution of TDC values, which requires a non-deterministic number of waveforms. While it can take forever to receive a suitable set of waveforms (with different TDC values), in practice you rarely need to wait long. Furthermore, NI-SCOPE employs multi-record acquisitions and continuous acquisition (when possible) to optimize reconstructing the waveform while the acquisition is in progress. Sometimes an RIS acquisition will time out and not complete. If increasing the timeout does not work, you may need to self-calibrate the digitizer. Note Making a Multiple-Record Acquisition Some NI digitizers support multiple-record acquisitions, which allow you to capture multiple, triggered waveforms without software intervention. NI-SCOPE stores each additional record in separate memory records on the digitizer. See Appendix B, Features Supported by Device, for a listing of digitizers that support multiple-record acquisitions. The main benefit of including multiple-record acquisitions is that you can acquire numerous triggered waveforms quickly. Multi-record acquisitions allow hardware rearming of the digitizer before the data is fetched. Therefore, the rearm time, or the time when the digitizer is not ready for a trigger, is extremely small, often from 1 to 100 µs, depending on the record length and the digitizer. This allows you to capture data if the triggers occur 100 µs apart, or if they occur many days apart. Multiple-Record Example For an introduction to multiple-record acquisitions, see the Multi Record example. To include a multiple-record acquisition, simply use the Configure Horizontal Timing function in your application, setting the number of records parameter to the number of records you want to acquire. NI-SCOPE acquires an additional record each time a trigger is accepted until all the requested records have been stored in memory. For an advanced look at using multiple records in an acquisition that can fetch data continuously, see the Multi Record Fetch Forever example. © National Instruments Corporation 5-5 NI-SCOPE Software User Manual Chapter 5 Tasks and Examples Continuous acquisition is not supported by all digitizers. See Appendix B, Features Supported by Device. Fetching Multiple-Record Acquisitions You use the same Fetch functions as discussed in the Acquiring Data—Reading Versus Fetching section of Chapter 3, Common Functions and Examples, for retrieving multiple-record acquisitions. However, two additional attributes are available for specifying which records to retrieve. The Fetch Record Number attribute is the zero-based index of the first record to fetch, and the Fetch Number of Records attribute specifies how many records to fetch. By default, the Fetch Number of Records is –1, which means fetch all the records (starting at the Fetch Record Number). As discussed in the Acquiring Data—Reading Versus Fetching section in Chapter 3, Common Functions and Examples, the Fetch functions wait for specified number of samples to be acquired when the timeout parameter is positive. During a multiple-record acquisition, they wait for the requested number of samples in each record. Since the number of records attribute defaults to –1 (or all the records), Fetch functions will wait for all the specified number of samples in all the records. Fetching multiple records with a single Fetch function requires understanding the order of the returned waveforms. As discussed in the Acquiring Data—Reading Versus Fetching section, all record 0 waveforms come before all record 1 waveforms. For example, fetching data with a channel list of “0,1” for three records will result in the following order: 1. Channel 0 Record 0 2. Channel 1 Record 0 3. Channel 0 Record 1 4. Channel 1 Record 1 5. Channel 0 Record 2 6. Channel 1 Record 2 For C and Visual Basic users, the waveforms are all packed into a one-dimensional array. It is declared using code such as the following: // Set numWfms to 6, since the acquisition is for // 2 channels times 3 records. niScope_ActualNumWfms (vi, "0,1", &numWfms); // Fetch the coerced record length niScope_ActualRecordLength (vi, &actualRecordLength); NI-SCOPE Software User Manual 5-6 ni.com Chapter 5 Tasks and Examples // Declare memory for the waveforms and //waveform info structs wfm = malloc (sizeof (ViReal64) * actualRecordLength * numWfms); wfmInfo = malloc (sizeof (struct niScope_wfmInfo) * numWfms); The first waveform starts at wfm[0], the second waveform at wfm[actualRecordLength], and so on. For LabVIEW users, the waveforms are returned in either a twodimensional array or an array of clusters that include timing information. In both cases, you can use the index array function to extract the waveform of interest. It is also possible to fetch each record individually. This requires setting the Fetch Number of Records parameter to 1. Then, in a loop you will need to set the Fetch Record Number attribute to the zero-based index of the record you want to fetch and call one of the fetch functions. Saving Data to Disk Example The Save to Disk example demonstrates how to write data to a file on your computer. Digitizers that support continuous acquisition can use the similar Stream to Disk example (LabVIEW only) to write data to a file while it is being acquired. Continuously Acquiring Data Continuous acquisition is the ability to transfer data from the digitizer to the host computer memory while the digitizer is still acquiring data. This allows the following applications: • Acquiring a record that is larger than available onboard memory • Fetching triggered records, while other records are being acquired • Acquiring more records than fit in the digitizer's memory • Efficiently acquiring the most recent data • Acquiring waveforms at hardware-timed intervals © National Instruments Corporation 5-7 NI-SCOPE Software User Manual Chapter 5 Tasks and Examples How Continuous Acquisition Works NI digitizers contain a large amount of onboard memory, generally 16 or 32 MB per channel. This memory is divided into individual records when acquiring data. For example, if you are acquiring two records, the 16 MB of memory is divided into two 8 MB records. Each record is treated as a circular buffer. When the digitizer starts acquiring data, the samples are placed in the beginning of the buffer. The digitizer acquires the requested number of pretrigger samples—that is, the actual record length times the reference position divided by 100. After the pretrigger samples are complete, the digitizer waits for a trigger. While waiting, the digitizer continues to acquire and store data. This data is placed in the circular buffer, so after the buffer is filled, the digitizer starts overwriting data at the beginning. If a trigger never occurs, the digitizer waits for a trigger forever. After the trigger occurs, the digitizer samples the requested number of posttrigger samples, and the record is complete. If another record is requested, the digitizer restarts the acquisition, moving to the next record in memory. Continuous acquisition refers to the digitizer’s ability to fetch data from the digitizer’s circular buffer to your host computer’s memory while it is acquiring data. As shown in the Figure 5-3, when you call Initiate Acquisition, the digitizer starts acquiring data into its circular buffer (Figure 5-3A). You can then use a Fetch function to send the first chunk of data to the host computer while the digitizer continues to acquire more samples (Figure 5-3B). When the circular buffer is filled on the digitizer, it starts to overwrite the data at the beginning of the buffer (Figure 5-3C). Ideally, you have already copied and saved the data that is being overwritten in the host computer. If you do not send a trigger, your digitizer continues to acquire data forever or until you call Abort, Reset, or Close. NI-SCOPE Software User Manual 5-8 ni.com Chapter 5 Tasks and Examples Circular Buffer A. B. Host Computer Memory C. D. Empty Buffer Reading Data into Buffer Untransferred Data Transferred Data Transferring Data into Host Memory Figure 5-3. Continuous Acquisition Fetching Continuous Acquisition Data No special configuration is necessary for continuous acquisition programs. The only difference is how the data is fetched. The Fetch functions discussed in the Acquiring Data—Reading Versus Fetching section in Chapter 3, Common Functions and Examples, all work for continuous acquisition, but additional attributes are available to specify what data to fetch. In particular, the Fetch Relative To attribute supports values of Read Pointer, Now, and Start in addition to the standard Trigger and Pretrigger values. These allow specifying different locations within the record from which to start fetching. When fetching data continuously, there is always the possibility that the data has been overwritten in the onboard memory before you attempt to fetch it. NI-SCOPE will return an error in this situation. Another caveat with fetching data continuously is that the relative initial x value returned in the waveform info structure is not valid until the trigger occurs. Often, the trigger never occurs during continuous acquisitions. However, the waveform info structure also contains an absolute initial x value, which is a free running timestamp counter on the © National Instruments Corporation 5-9 NI-SCOPE Software User Manual Chapter 5 Tasks and Examples digitizer. This value is discussed in the Getting Accurate Timing Data with Time Stamps section of this chapter. Additional status information about your acquisition is available by using the Fetch Points Done and Fetch Records Done attributes. The points done is the number of samples available in the record specified by the Fetch Record Number attribute, starting at the Fetch Offset attribute that is relative to the Fetch Relative To attribute. NI-SCOPE also supports a Points Backlog attribute that is the points done minus the read pointer position. This is the number of samples that have not been fetched when performing a continuous acquisition. When To Use Continuous Acquisition There are a variety of continuous acquisition tasks, as detailed in the following sections. Acquiring Records Larger than Available Memory The standard use of continuous acquisition is to fetch a record that is larger than the available memory on the digitizer. Because the data is fetched as it is acquired, the digitizer memory can be overwritten. At slow sampling rates, you can fetch data forever by setting up an acquisition that is never triggered and repeatedly fetching. At faster sampling rates, the host computer may not be able to fetch as fast as the digitizer samples data. If the data that is being fetched has been overwritten, NI-SCOPE returns an error message from the Fetch function. See the Fetch in Chunks example to see how a waveform can be reconstructed with the data from multiple fetch calls. Look at the Fetch Forever example to benchmark how much data you can acquire at a given sampling rate before the data is overwritten. To accomplish fetching a record that is larger than memory, set the Fetch Relative To attribute to Read Pointer. This positions the beginning of the fetch operation at the start of the record when you initiate a new acquisition. After every fetch, the read pointer is incremented to be the sample after the last sample retrieved. Therefore, you can repeatedly fetch relative to the read pointer, with a retrieval offset of zero, to acquire a single, infinite record. If you specify a positive timeout with the Fetch function, it will wait for the requested number of samples. Alternatively, specifying a timeout of zero will acquire the number of samples currently available (up to a maximum of the numSamples parameter). The waveform info structure returns the NI-SCOPE Software User Manual 5-10 ni.com Chapter 5 Tasks and Examples actual number of samples fetched. Using a timeout of zero will achieve slightly better performance since the digitizer's status is queried less often. A separate read pointer is stored for each channel, so you can alternate fetching different channels. The read pointer is also reset to zero when you fetch from a different record. Fetching Triggered Records while Other Records Are Being Acquired Fetching records continuously can greatly speed up applications that have a very slow trigger rate. If you are acquiring at 100 MS/s, but you only receive a trigger once every second, you can completely fetch each record as soon as it is acquired. This is accomplished by fetching each record individually. As mentioned in the Making a Multiple-Record Acquisition section, you can set the Fetch Num Records attribute to 1 and increment the Fetch Record Number attribute for each record you want to fetch. Then, using a positive timeout with any of the Fetch functions will cause your digitizer to wait only for the next record to be acquired before it returns the waveform. For lower level control, NI-SCOPE supports the Records Done attribute that you can poll to determine the current status of your acquisition. Acquiring More Records Than Fit in Digitizer Memory During typical multi-record operation, each buffer in memory must be large enough to contain all the pretrigger and posttrigger samples. If 1,000 points are requested with Configure Horizontal Timing, each record in memory must be at least 1,000 points; otherwise NI-SCOPE returns an error. Typically, all the records are required to fit in memory, so you can wait until the entire acquisition is finished before fetching anything. However, in certain cases, you may want to acquire more records than would fit in the onboard memory. When this is done, the records in memory are also circular. That means if you configure four records and only three will fit in memory, the fourth record overwrites the first record. Ideally, you will have time to fetch the first record to your host computer memory before it is overwritten. © National Instruments Corporation 5-11 NI-SCOPE Software User Manual Chapter 5 Tasks and Examples To fetch more records than fit in memory, set the boolean attribute Enable More Records Than Memory to TRUE and configure the desired number of records with the Configure Horizontal Timing function. You must fetch the records individually as discussed in the previous section. If the record you are attempting to fetch has been overwritten, an error is returned. There is a limit to the total number of records that may be acquired. Each record requires up to 64 bytes of page-locked memory. Windows 2000 and NT will crash without warning if too much memory is page-locked at any given time. The actual amount of page-locked memory depends on the amount of physical memory and the number of other devices being used in your host computer. Feel free to configure as many records as you need, but save your work first. Fetching the Most Recent Data Another application of continuous acquisition is fetching a few of the most recent points. This technique is useful if you want chunks of non-triggered data with the same configuration parameters. It avoids the software overhead necessary to reconfigure the acquisition, and your program never needs to wait for the data to be acquired. To do this, initiate an infinite acquisition—one that never triggers. This can be accomplished by configuring software triggering. When you want the most recent points, you can call a Fetch function with the Fetch Relative To attribute set to now. This specifies that the offset is from the last sample acquired by the digitizer. Therefore, the Fetch Offset attribute must be set to the negated number of samples you want. Acquiring Waveforms at Hardware-Timed Intervals Setting the Fetch Relative To attribute to start sets the starting fetch position to be the first sample acquired by the digitizer. If the trigger happens immediately, the first point sampled by the digitizer would equal the first pretrigger point. However, this is generally not true since the digitizer usually has to wait for a trigger. While it waits, it continues to sample data, possibly forever. As it samples data into the circular, onboard memory, the original data will eventually be overwritten. As in other cases, if you attempt to fetch data that is overwritten an error is returned. A typical use of fetching relative to start is to acquire non-triggered waveforms at precise intervals. You can use the digitizer sample clock to precisely time the duration between waveforms. Suppose you want 500 points every millisecond, while sampling at 100 MS/s. You can set NI-SCOPE Software User Manual 5-12 ni.com Chapter 5 Tasks and Examples the Fetch Relative To attribute to Start at the beginning of your program. Then, for every iteration of a loop, call a Fetch function to retrieve 500 samples, and increment the Fetch Offset attribute by 100,000 samples. Since 100,000 samples are acquired every millisecond when sampling at 100 MS/s, this program is effectively using the sample clock to precisely time the interval between acquired waveforms. Getting Accurate Timing Data with Time Stamps NI digitizers use a free running timing clock to accurately record the time of an event. On the NI 5112, this clock is 25 MHz, while the NI 5620 uses a 32 MHz clock. NI-SCOPE creates accurate time records by aligning the NI-TIO clock to the sample clock on your device. This time record is a time stamp. With time stamps, you can correlate multiple records or even multiple acquisitions. You can, for instance, determine the amount of time between acquisitions. Not all digitizers support time stamps. See Appendix B, Features Supported by Device. Note Time Stamps Example The Time Stamps example uses time stamps to compute a histogram of the time between triggers. You can use this example to calculate the minimum time required between records. How Time Stamps Work NI-SCOPE returns time stamps with every Fetch function, if the digitizer supports them, in the waveform info structure. This structure contains both absolute initial x and relative initial x parameters. The absolute initial x parameter is the time of the first point in the waveform in units of seconds, and it has a resolution of the maximum real-time sampling period of the digitizer (such as 10 ns for a 100 MS/s digitizer). This time is valid between records and entire acquisitions, provided the clock is not reset. The relative initial x parameter is supported by all digitizers. It is the time between the first point in your waveform and the trigger, so the trigger always occurs at time equals zero. It includes the interpolated TDC. This conversion measures when the trigger occurs between two samples. It has a resolution of about 80 ps, but the accuracy of the trigger is around 2 ns. Keep in mind that the relative initial x value is not valid until a trigger © National Instruments Corporation 5-13 NI-SCOPE Software User Manual Chapter 5 Tasks and Examples occurs when using continuous acquisition. To compute an absolute trigger time that includes the TDC value, use the following formula: Absolute Trigger Time = Absolute Initial X – Relative Intitial X The time stamp counter is 48 bits, running at 25 MHz or 32 MHz. Therefore, it is possible that it could roll over if it runs for 130 days or 101 days respectively. If this occurs, NI-SCOPE returns a warning. The counter is reset by calling Reset, Abort, or Close. You can also reset it with the Initialize function with the reset parameter set to TRUE or by performing an RIS acquisition. Time stamps only work in normal mode for the NI 5620. In DDC mode, the time stamp counter is not valid. Synchronizing Multiple Digitizers NI digitizers support two types of synchronization, depending on the device type. The NI 5102 uses a shared sample clock and system clock. All other NI digitizers use a phase-locked loop (PLL) technique to synchronize to a common 10 MHz clock. The procedure to synchronize devices is similar in both cases, but the signals represent different things. Due to this, you can only partially synchronize NI 5102s with other digitizers. See the Sample Clock Synchronization (NI 5102) section later in this chapter for an explanation of how to do this. PLL Synchronization (Except the NI 5102) See the 5112 Synchronization, 5911 Synchronization, and 5620 Synchronization examples for sample code you can use to synchronize these devices. The PLL synchronization technique includes three major steps: 1. NI-SCOPE Software User Manual Phase lock all digitizers to the same clock source. This ensures that the sampling rates on the different devices are derived from the same source. Even small differences between clocks (50 parts per million) can lead to multiple sample errors when sampling at high rates. In the PXI chassis, it is best to configure all the devices to input the PXI 10 MHz clock as their input clock source, using the Configure Clock function. PCI boards will use the same function to configure the master to output its clock source on a digital RTSI or PFI line, while the slave is configured to receive this clock. 5-14 ni.com Chapter 5 Tasks and Examples 2. To align the clock dividers on different devices, set both the master and slave to receive the same clock synchronization pulse. This signal allows the digitizers to sample at nearly the same time. More importantly, the difference in sampling time is repeatable. This feature is especially noticeable at slow sampling rates. Both the master and slave need to be configured with the same clock synchronization pulse source, as specified with Configure Clock. The master generates the clock synchronization pulse that both devices use to synchronize their clocks. 3. Generally, use an external event (like an analog edge trigger) to trigger the master. The master then routes a digital trigger to the slave. To route a trigger signal, use the Configure Trigger Output function and choose a digital line source. In the PXI chassis, you can choose the PXI Star Trigger line, which is a matched-length digital line from the star trigger controller slot (slot 2) to all other slots in the chassis. Otherwise, use a RTSI or PFI line for routing the trigger. The trigger signal is routed until you explicitly disable the routing by calling Reset or by using the Configure Trigger Output function to route none to that digital line. This allows routing the same trigger to multiple destinations. The slave must be configured to digitally trigger on the signal, using the Configure Trigger Digital function with a positive slope. All slaves must initiate an acquisition with a call to Initiate Acquisition before it is called on the master. You cannot use the Read function for multi-device operation because it initiates an acquisition and fetches the waveform in one call. The Read function does not return until the acquisition is completed, so the master would never get armed. You do not have to sample the devices at the same rate, but the master sample rate should be equal to or less than the slowest sample rate of all the slaves. The slaves need to complete their pretrigger samples before the master sends a digital trigger to avoid a timeout error on the slave. © National Instruments Corporation 5-15 NI-SCOPE Software User Manual Chapter 5 Tasks and Examples Sample Clock Synchronization (NI 5102) See the 5102 Synchronization example for details about synchronizing two NI 5102 digitizers. The NI 5102 allows sharing of the system 20 MHz timebase clock as well as the sample clock. Using the Configure Clock function, you should configure the master to output its clock source to a digital RTSI or PFI line, and the slave should receive the 20 MHz clock source on the same line. The PXI 10 MHz backplane clock is not supported for the NI 5102. By sharing the system clock, you can configure the devices to sample at different rates. However, you must ensure that the slave finishes its pretrigger samples before the master sends a digital trigger to avoid a timeout error on the slave. For the NI 5102, the clock sync pulse source parameter in the Configure Clock function refers to the ADC scan clock instead of the one-time synchronization pulse. It is not required to connect the scan clock between the master and slaves. Often, just sending a digital trigger from the master to the slaves is sufficient. However, by sharing the sample clock, you ensure a consistent time between samples on each device. If the master is configured to send its ADC scan clock to the slaves, all the digitizers should be configured to sample at the same rate. All the slaves must initiate an acquisition by calling Initiate Acquisition before it is called on the master. You cannot use Read functions for multi-device operation because they initiate an acquisition and fetch the waveform in one call. The Read function does not return until the acquisition is completed, so the master would never get armed. Refer to the Master/Slave Operation section in Chapter 4, Hardware Overview, of the NI 5102 User Manual for additional information regarding multi-device operation. You can use Configure Clock to satisfy all the connection requirements. When you set the master enable to TRUE on the master, NI-SCOPE adjusts pretrigger and posttrigger sample requirements. Slave Trigger Propagation Delay The slave always triggers 40 to 120 ns after the master due to propagation delays of the digital trigger through digital logic parts. This is a constant delay for the master to output a digital trigger, the trigger to propagate along the wire to the slave, and the slave to actually trigger. This delay is shown in Figure 5-4 near the end of this section. In Figure 5-4A, the master NI-SCOPE Software User Manual 5-16 ni.com Chapter 5 Tasks and Examples and slave are shown sampling the exact same triangle waveform, but the slave triggers at a different point in the waveform due to the slave trigger propagation delay. NI-SCOPE returns a relative initial x value that is the time between the first point in the waveform and the trigger. The relative initial x trigger assigns the trigger time equal to zero on both the slave and master. If you plot the two waveforms on the same graph using the relative initial x time, you will see the constant trigger delay, as in Figure 5-4B later in this section. These plots are incorrectly aligned, since the triggers did not actually occur at the same time. Since the trigger propagation delay is constant, you can calibrate this value to improve synchronization between devices. By applying the same signal (with the same cable length) to both devices, you can measure the delay between when the master triggers and when the slave triggers. This delay is only a function of the digital circuitry between the devices, and it can be used to correct the slave’s relative initial x value to properly align the waveforms in time. Figure 5-4C shows a plot where the slave’s relative initial x value is adjusted by the slave trigger propagation delay value. Now the triggers are correctly aligned, but notice that the slave and master have acquired a slightly different segment of the waveform so the beginning and ending samples are not aligned. The NI 5112 supports an attribute, the Slave Trigger Delay, that allows you to tell NI-SCOPE the calibrated delay. This delay is used to adjust the slave’s trigger point. Using this feature, the fetched data from both devices is from the same time period, so both the starting samples and the trigger align properly as in Figure 5-4D. Notice that an earlier window of data from the slave is being fetched, assuming these points exist. If the trigger delay specified is larger than the actual trigger calibration delay, these points may not have been sampled, and the synchronization correction will not work, so measure this delay carefully. Each device has default constants stored in the EEPROM for synchronizing over the Star Trigger Line, or any of the RTSI or PFI lines. See the 5112 Synchronization example, which illustrates how to fetch the default calibration from NI-SCOPE and apply the trigger delay to the slave using Slave Trigger Delay. © National Instruments Corporation 5-17 NI-SCOPE Software User Manual Chapter 5 Tasks and Examples B. A. Trigger Propagation Delay Master Analog Trigger Relative Initial X Slave Digital Trigger Aligned Slave and Master Triggers at Time = 0 D. C. Master Trigger Aligned with NI-SCOPE's Adjusted Slave Trigger Master Trigger Aligned with Adjusted Slave Trigger Figure 5-4. Synchronizing Signals to Compensate for Trigger Delay Propagation NI-SCOPE Software User Manual 5-18 ni.com Chapter 5 Tasks and Examples The NI 5102 and NI 5911 may have some amount of non-constant trigger jitter between the master and slaves, generally 0 to 1 sample or 0 to 40 ns, respectively. This jitter is due to a hardware design that synchronizes the trigger signal with a system clock before routing it out. You cannot correct for this jitter with the trigger delay technique. However, you can still use the constant trigger delay calibration to improve the synchronization between digitizers. Acquiring Data in Different Modes—Normal and Flexible Resolution This section covers the two primary acquisition modes—flexible resolution and normal. Flexible resolution is available only in selected digitizers. Flexible Resolution Mode and Example In flexible resolution mode, your digitizer trades lower sampling rates for higher resolution. In this mode, the digitizer only supports a subset of the available sampling rates. The available rates are enumerated in the user manual for your digitizer. See the Flex Res example for sample code that you can use in your own application. Not all digitizers support flexible resolution. See Appendix B, Features Supported by Device. Note Flexible resolution mode works by maintaining the maximum sampling rate with the digitizer and by adding dithering to the signal. Then a sigma-delta converter intelligently averages the neighboring data points to achieve higher resolution. Flexible resolution mode is useful for high-resolution applications, such as spectral measurements. There are two caveats for flexible resolution mode. First, if your signal is clipped for a short time between samples, the averaged result will be extremely deceptive. Therefore, NI-SCOPE returns a data invalid warning if clipping is detected in flexible resolution mode. Second, if your signal is aliased in flexible resolution mode, it will not be displayed accurately. Be careful to set your sampling rate to be at least twice as high as your input signal frequency. Normal Mode (All NI Digitizers) Oscilloscope (or normal) mode is the default mode. In this mode, the flexible resolution capability of the digitizer is turned off, and no processing is applied to the digitized data. © National Instruments Corporation 5-19 NI-SCOPE Software User Manual 6 Advanced Topics This chapter explains several advanced topics intended for experienced users of NI-SCOPE. Coercions NI-SCOPE allows you to configure your digitizer programatically. However, the hardware may not support the exact value for some parameters that you specify. Instead of returning an error and forcing your program to be highly device specific, NI-SCOPE may coerce (or round) some input parameters to the next higher or lower value that your digitizer supports. Some of these coercions may result in deceptive behavior. In most cases, the exact value of the parameter can be queried from NI-SCOPE. Below is a discussion of the coercions of common NI-SCOPE parameters and attributes. Vertical Parameters In the Configure Vertical function, vertical range is coerced to the next higher valid vertical range for your digitizer. You can determine the actual value with a Binary Fetch function. Tip With the NI 5911 and NI 5102, it is easier to use the Vertical Range attribute to determine the coerced value. This attribute will not give the coerced value with the NI 5112. The gain scale factor is the volts/binary value. Therefore, if you use the Fetch Binary 8 function, the actual vertical range is the gain scale factor times 256, with 256 being the number of binary values in an 8-bit number. If this vertical range is set higher than the maximum vertical range of the digitizer, NI-SCOPE returns an error. In the Configure Vertical function, vertical offset is rounded to the nearest valid value, and it can also be obtained from the vertical offset output of the Binary Fetch function or from the Vertical Offset attribute. © National Instruments Corporation 6-1 NI-SCOPE Software User Manual Chapter 6 Advanced Topics Probe attenuation is applied exactly as specified. Therefore, if you select a 1.234 probe attenuation, your data is the voltage measured multiplied by 1.234. NI-SCOPE adjusts your vertical range based on the probe attenuation parameter, so the resulting voltage after the probe attenuation scaling is within the range specified. For instance, if your probe attenuation is 10 and your vertical range is 10 V, the digitizer is set to measure a 1 Vpp signal. The data returned with the Fetch function is 10 Vpp. The max input frequency parameter in the Configure Channel Characteristics function enables or disables analog filters on your digitizer. Its value is coerced up to the next legal value. However, if this parameter is set to 0, it is coerced to the maximum input frequency (the full bandwidth) for your digitizer. If this value is set higher than the maximum input frequency of the digitizer, NI-SCOPE returns an error. input impedance and vertical coupling are not coerced. These parameters return an error if the value is not legal for your digitizer. Horizontal Parameters The horizontal timing parameters are all inter-related to comply with the IVI-Scope specification. These parameters all appear in the Configure Horizontal Timing function. The fundamental theory is that your time per record is a constant number during an acquisition. This is accomplished with the following parameter coercions: The min sample rate parameter is coerced up to the next available sample rate that the digitizer supports. Notice that the available sample rates change based on the acquisition type (such as normal and Flex Res). The actual sampling rate may be retrieved with the Sample Rate function. This information is also returned by the Fetch function, with the x increment parameter, which is one divided by the actual sampling rate. If the sample rate parameter is set higher than the maximum, NI-SCOPE returns an error. If the enforce realtime parameter is set to FALSE, the digitizer enters RIS mode when the sampling rate exceeds the maximum realtime sampling rate of the device. In RIS mode, the sampling rate is coerced up to a multiple of the maximum real-time sampling rate. The min record length is coerced so that the time per record is constant. The formula is the following: Min Rec Length Actual Rec Length = ----------------------------------------- × Actual Sample Rate Min Sample Rate NI-SCOPE Software User Manual 6-2 ni.com Chapter 6 Advanced Topics You can find the actual record length by calling the Actual Record Length function. You can retrieve this value any time after you call Configure Horizontal Timing. Keep in mind that the amount of memory required on the digitizer is generally higher than the actual record length. This is discussed in the NI 5911, NI 5112, and NI 5620 Memory Usage section of this chapter. The reference position is rounded to the nearest sample. The relative initial x parameter from the Fetch function can be used to determine the actual reference position. If you fetch relative to the pretrigger, and the offset is zero, the initial x value is the first pretrigger point to the trigger. Therefore, the actual reference position is the following: Actual Samp Rate Actual Ref Position = Relative Initial X × -------------------------------------------Actual Rec Length The following C code shows how NI-SCOPE accomplishes timing coercions: // Convert minimum sample rate into its corresponding // time-per-record value timePerRecord = minRecordLength / minSampleRate; if (minSampleRate <= maxRealTimeSampleRate) { // For real-time, normal acquisitions, sample rate // is an integer divisor of max sample rate int divisor = (int) floor (maxRealTimeSampleRate / minSampleRate); actualSampleRate = maxRealTimeSampleRate / divisor; } else { //In RIS, sample rate is a multiple of //max sample rate int overSamplingFactor = (int) ceil (minSampleRate / maxRealTimeSampleRate); actualSampleRate = overSamplingFactor * maxRealTimeSampleRate; } actualRecordLength = (int) ((timePerRecord * actualSampleRate) + 0.5); © National Instruments Corporation 6-3 NI-SCOPE Software User Manual Chapter 6 Advanced Topics Triggering The trigger level, low level, high level, and hysteresis parameters found in the Configure Trigger functions are all coerced to the nearest valid value. Typically the hardware will use an 8-, 10-, or 12-bit DAC to set the trigger levels. The exact values cannot be queried for these parameters. Performance This section details how the NI 5911, NI 5112, NI 5620, and NI 5102 use memory. It also explains how NI-SCOPE processes waveform measurements. NI 5911, NI 5112, and NI 5620 Memory Usage Currently, NI-SCOPE creates a separate buffer in the driver that is page locked for the direct memory access (DMA) transfer. The data is then copied into your buffer during the Fetch function. The DMA buffer is 4 bytes per sample for the NI 5911, 1 byte per sample for the NI 5112, and 2 bytes per sample for the NI 5620. This buffer is useful for several reasons: • The hardware does not support fetching from any address. Therefore, NI-SCOPE may fetch several points at the beginning of the DMA buffer that you have not requested, and the size of the DMA is larger than the number of points requested. These extra points are accounted for in NI-SCOPE, so you can seamlessly fetch from any point offset. • Windows 2000 and NT place a limit on the amount of memory that may be page locked at any given time. Therefore, NI-SCOPE breaks fetches larger than 1 million points into smaller fetches. • NI-SCOPE offers performance improvements for repeated measurements because it maintains the page-locked buffer instead of creating, page locking, and deleting this buffer every acquisition. However, this buffer increases memory usage. Calling Close releases all the allocated memory in NI-SCOPE. NI-SCOPE Software User Manual 6-4 ni.com Chapter 6 Advanced Topics NI 5102 Memory Usage When acquiring very large record sizes (greater than 1,000,000 samples) with the PCI-5102, AT-5102, and PXI-5102, keep in mind the host computer memory requirements. You can use the following formula to estimate the amount of required RAM: Req. Memory (Bytes) = Rec. Length × Num. Enabled Chans. × 4 + Rec. Length Of this required memory, you must keep at least Record Length × Number of Channels Enabled × 2 available for page locking because this is the buffer into which the waveform will be transferred using direct memory access (DMA). For example, 8,000,000 samples with both channels enabled would require approximately 72 MB of virtual memory, with at least 32 MB of that available as free RAM, which can be page locked. Calling Close releases all the allocated memory in NI-SCOPE. LabVIEW Memory Usage LabVIEW users must take into account any additional buffers that might be allocated if plotting the data. Directly fetching floating point data is not advised with large record sizes because each value in the returned waveform buffer requires 8 bytes instead of 1 byte. Instead, use niScope Fetch Binary 8, and convert the binary values to floating point later as needed. Waveform Measurement Performance NI-SCOPE offers a wide assortment of analysis routines, such as rise time or frequency calculations. These routines are done in NI-SCOPE, not the hardware. When a measurement is requested, a temporary buffer of double-precision floating point values is created in NI-SCOPE. This buffer is the size of the floating-point waveform being fetched from the digitizer. During the first measurement, the waveform is moved (via DMA) from the digitizer, converted to floating point, and stored in this temporary buffer. The measurement is computed and the value is returned, but the temporary buffer is not deleted. It is cached in the driver, so the next measurement can be quickly computed without refetching the data. Furthermore, any temporary results are cached in the driver. For example, if you request the period measurement, NI-SCOPE goes through a significant algorithm to compute the answer. After it finishes, NI-SCOPE stores the result. Then, © National Instruments Corporation 6-5 NI-SCOPE Software User Manual Chapter 6 Advanced Topics if you request the frequency measurement, NI-SCOPE can simply return 1 divided by the period without any further computations. The cached results are cleared for every new acquisition, or more specifically, when you call Initiate Acquisition or Read. The cache is also cleared if any of the fetching or measurement attributes are changed, such as the Relative To, Offset, or Record Number. Currently, NI-SCOPE maintains up to two separate temporary buffers for the waveform measurement library. These buffers are for channel 0 and channel 1 waveforms. These buffers are only declared when necessary, but they are not deleted until you call the Close function (or until NI-SCOPE unloads). NI-SCOPE Software User Manual 6-6 ni.com A Digitizer Basics This appendix explains basic information you need to understand about making measurements with digitizers, including important terminology. Understanding Digitizers To understand how digitizers work, you should be familiar with the Nyquist theorem and how it affects analog bandwidth and the sample rate. You should also understand terms including vertical sensitivity, analog-to-digital converter (ADC) resolution, record length, and triggers. Nyquist Theorem The Nyquist theorem states that a signal must be sampled at least twice as fast as the bandwidth of the signal to accurately reconstruct the waveform; otherwise, the high-frequency content will alias at a frequency inside the spectrum of interest (passband). An alias is a false lower frequency component that appears in sampled data acquired at too low a sampling rate. Figure A-1 shows a 5 MHz sine wave digitized by a 6 MS/s ADC. The dotted line indicates the aliased signal recorded by the ADC at that sample rate. t Figure A-1. Sine Wave Demonstrating the Nyquist Frequency The 5 MHz frequency aliases back in the passband, falsely appearing as a 1 MHz sine wave. To prevent aliasing in the passband, a lowpass filter limits the frequency content of the input signal above the Nyquist rate. © National Instruments Corporation A-1 NI-SCOPE Software User Manual Appendix A Digitizer Basics Analog Bandwidth Analog bandwidth describes the frequency range (in Hertz) in which a signal can be digitized accurately. This limitation is determined by the inherent frequency response of the input path, which causes loss of amplitude and phase information. Analog bandwidth is the frequency at which the measured amplitude is 3 dB below the actual amplitude of the signal. This amplitude loss occurs at very low frequencies if the signal is AC coupled and at very high frequencies regardless of coupling. When the signal is DC coupled, the bandwidth of the amplifier will extend all the way to the DC voltage. Figure A-2 illustrates the effect of analog bandwidth on a high-frequency signal. The result is a loss of high-frequency components and amplitude in the original signal as the signal passes through the instrument. +2 V +1 V 0V a b c a b Bandwidth c +1/2 V 0V –1/2 V –1 V –2 V Input Signal Instrument Measured Signal Figure A-2. Analog Bandwidth NI-SCOPE Software User Manual A-2 ni.com Appendix A Digitizer Basics Sample Rate Sample rate is the rate at which a signal is sampled and digitized by an ADC. According to the Nyquist theorem, a higher sample rate produces accurate measurement of higher frequency signals if the analog bandwidth is wide enough to let the signal to pass through without attenuation. A higher sample rate also captures more waveform details. Figure A-3 illustrates a 1 MHz sine wave sampled by a 2 MS/s ADC and a 20 MS/s ADC. The faster ADC digitizes 20 points per cycle of the input signal compared with 2 points per cycle with the slower ADC. In this example, the higher sample rate more accurately captures the waveform shape as well as frequency. 1µ = Sample Rate 2 MS/s = Sample Rate 20 MS/s Figure A-3. 1 MHz Sine Wave Sample © National Instruments Corporation A-3 NI-SCOPE Software User Manual Appendix A Digitizer Basics Vertical Sensitivity Vertical sensitivity describes the smallest input voltage change the digitizer can capture. This limitation is because one distinct digital voltage encompasses a range of analog voltages. Therefore, a minute change in voltage at the input might not be noticeable at the output of the ADC. This parameter depends on the input range, gain of the input amplifier, and ADC resolution; it is specified in volts per LSB. Figure A-4 shows the transfer function of a 3-bit ADC with a vertical range of 5 V having a vertical sensitivity of 5/8 V/LSB. Range 0-5 V 111 110 101 100 011 010 001 000 0 5 V Voltage Fluctuations in This Region Will Be Unnoticed Figure A-4. Transfer Function of a 3-Bit ADC ADC Resolution ADC resolution limits the accuracy of a measurement. The higher the resolution (number of bits), the more accurate the measurement. An 8-bit ADC divides the vertical range of the input amplifier into 256 discrete levels. With a vertical range of 10 V, the 8-bit ADC cannot resolve voltage differences smaller than 39 mV. In comparison, a 12-bit ADC with 4,096 discrete levels can resolve voltage differences as small as 2.4 mV. NI-SCOPE Software User Manual A-4 ni.com Appendix A Digitizer Basics Record Length Record length refers to the amount of memory dedicated to storing digitized samples for postprocessing or display. In a digitizer, record length limits the maximum duration of a single-shot acquisition. For example, with a 1,000-sample buffer and a sample rate of 20 MHz, the duration of acquisition is 50 µs (the number of points multiplied by the acquisition time/point or 1,000 × 50 ns). With a 100,000-sample buffer and a sample rate of 20 MHz, the duration of acquisition is 5 ms (100,000 × 50 ns). Triggering Options One of the biggest challenges of making a measurement is to successfully trigger the signal acquisition at the point of interest. Since most high-speed digitizers actually record the signal for a fraction of the total time, they can easily miss a signal anomaly if the trigger point is set incorrectly. NI digitizers are equipped with sophisticated triggering options. See the Triggering Functions and Parameters section of Chapter 3, Common Functions and Examples, for information on the triggering options available in NI-SCOPE. Making Accurate Measurements For accurate measurements, you should use the right settings when acquiring data with your digitizer. Knowing the characteristics of the signal in consideration helps you to choose the correct settings. Such characteristics include: • © National Instruments Corporation Peak-to-peak value—This parameter, in units of volts, reflects the maximum change in signal voltage. If V is the signal voltage at any given time, then Vpk-to-pk = Vmax –Vmin. The peak-to-peak value affects the vertical sensitivity or gain of the input amplifier. If you do not know the peak-to-peak value, start with the largest input range, and decrease it until the waveform is digitized using the maximum dynamic range without clipping the signal. Refer to the specifications for your digitizer for the maximum input range. Figure A-5 shows how different ranges affect the resolution of the signal you acquire. A-5 NI-SCOPE Software User Manual Appendix A Digitizer Basics +127 LSB 0 LSB +7 LSB –7 LSB –128 LSB A. Input Range 10 V, Number of LSBs = 15.36 (600 mV/10 V × 256 LSBs = 15.36 LSB) +127 LSB +76 LSB 0 LSB –76 LSB –128 LSB B. Input Range 1 V, Number of LSBs = 153.6 (600 mV/1 V × 256 LSBs = 153.6 LSB) +153 LSB +127 LSB Acquired Signal 0 LSB –128 LSB –154 LSB C. Input Range 500 mV, Number of LSBs = 307.2 (600 mV/500 mV × 256 LSBs = 307.2 LSB) Figure A-5. Dynamic Range of an 8-Bit ADC with Three Different Gain Settings and a 600 mV Peak-to-Peak Input Signal • NI-SCOPE Software User Manual Source impedance—Most digitizers and digital storage oscilloscopes (DSOs) have a 1 MΩ input resistance in the passband. If the source impedance is large, the signal will be attenuated at the amplifier input and the measurement will be inaccurate. If the source impedance is unknown but suspected to be high, change the attenuation ratio on your probe and acquire data. In addition to the input resistance, all digitizers, DSOs, and probes present some input capacitance in parallel with the resistance. This capacitance can interfere with your measurement in much the same way as the resistance does. A-6 ni.com Appendix A Digitizer Basics • Input frequency—If your sample rate is less than twice the highest frequency component at the input, the frequency components above half your sample rate will alias in the passband at lower frequencies, indistinguishable from other frequencies in the passband. If the signal’s highest frequency is unknown, you should start with the digitizer’s maximum sample rate to prevent aliasing and reduce the digitizer’s sample rate until the display shows either enough cycles of the waveform or the information you need. • General signal shape—Some signals are easy to capture by ordinary triggering methods. A few iterations on the trigger level finally render a steady display. This method works for sinusoidal, triangular, square, and saw tooth waves. Some of the more elusive waveforms, such as irregular pulse trains, runt pulses, and transients, may be more difficult to capture. Figure A-6 shows an example of a difficult pulse-train trigger. +V 5V 1 2 3 4 Trigger Level t Hold-off Hold-off 1 and 3 = Trigger Accepted 2 and 4 = Trigger Ignored Figure A-6. Difficult Pulse Train Signal Ideally, the trigger event should occur at condition one, but sometimes the instrument may trigger on condition two because the signal crosses the trigger level. You can solve this problem without using complicated signal processing techniques by using trigger hold-off, which lets you specify a time from the trigger event to ignore additional triggers that fall within that time. With an appropriate hold-off value, the waveform in Figure A-6 can be properly captured by discarding conditions two and four. © National Instruments Corporation A-7 NI-SCOPE Software User Manual Appendix A Digitizer Basics • NI-SCOPE Software User Manual Input coupling—On many digitizers, you can configure the input channels to be DC coupled or AC coupled. DC coupling allows DC and low-frequency components of a signal to pass through without attenuation. In contrast, AC coupling removes DC offsets and attenuates low frequency components of a signal. This feature can be exploited to zoom in on AC signals with large DC offsets, such as switching noise on a 12 V power supply. Refer to the specifications for your digitizer for input limits that must be observed regardless of coupling. A-8 ni.com B Features Supported by Device This appendix lists the main digitizer-specific features in NI-SCOPE. Your digitizer user manual provides additional information on many of these features. Table B-1. NI-SCOPE Features Supported by Device Feature NI 5102 NI 5112 NI 5911 NI 5620 3 dB Bandwidth 0 to 15 MHz 0 to 100 MHz or 0 to 20 MHz (Analog Filter) 0 to 100 MHz 5 to 25 MHz Acquisition Arm — PFI<1..2>, RTSI<0..6> — PFI1, RTSI<0..6> Normal Normal Normal, Flex Res Normal, DDC Continuous Acquisition — √ — √ DC Offset — √ — — Digital Triggers √ √ √ √ Analog Edge Triggers √ √ √ — External Trigger Channel Impedance 1 MΩ 1 MΩ, 50 Ω — — Hysteresis Triggers √ √ √ — Immediate Triggers √ √ √ √ AC, DC AC, DC AC, DC AC Only 1 MΩ 1 MΩ, 50 Ω 1 MΩ 50 Ω — √ — — ±5 V ±25 V ±10 V ±1 V (+ +10 dBm) Acquisition Modes Input Coupling Input Impedance Master-Slave Trigger Delay Corrections Maximum Input Range © National Instruments Corporation B-1 NI-SCOPE Software User Manual Appendix B Features Supported by Device Table B-1. NI-SCOPE Features Supported by Device (Continued) Feature NI 5102 NI 5112 NI 5911 NI 5620 Max Real-Time Rate 20 MHz 100 MHz 100 MHz 64 MHz Maximum RIS Rate 1 GS/s 2.5 GS/s 1 GS/s — Multiple Records — √ √ √ Probe Compensation √ √ √ — PXI Star Trigger Line PXI-5102 Receive Only PXI-5112 Only — PXI-5620 Receive Only — PFI<1..2>, RTSI<0..6> — — 20 MHz 10 MHz 10 MHz 10 MHz RIS Timing Complete Complete None Software Triggers — √ √ √ Time Stamps — √ — √ From End of Acquisition From Trigger From Trigger — — √ — — Trigger Output Events Start Trigger, Stop Trigger, End of Acq. Stop Trigger, End of Record Stop Trigger Stop Trigger Trigger Source Ch0, Ch1, TRIG, PFI <1..2>, RTSI <0..6> Ch0, Ch1, TRIG, PFI <1..2>, RTSI <0..6> Ch0, PFI <1..2>, RTSI <0..6> PFI1, RTSI <0..6>, PXI Star √ √ √ — Record Arm Ref. Clock Frequency Self Calibration Trigger Holdoff Trigger Delay Window Triggers NI-SCOPE Software User Manual B-2 ni.com Technical Support Resources C Web Support NI Web support is your first stop for help in solving installation, configuration, and application problems and questions. Online problem-solving and diagnostic resources include frequently asked questions, knowledge bases, product-specific troubleshooting wizards, manuals, drivers, software updates, and more. Web support is available through the Technical Support section of ni.com. NI Developer Zone The NI Developer Zone at ni.com/zone is the essential resource for building measurement and automation systems. At the NI Developer Zone, you can easily access the latest example programs, system configurators, tutorials, technical news, as well as a community of developers ready to share their own techniques. Customer Education NI provides a number of alternatives to satisfy your training needs, from self-paced tutorials, videos, and interactive CDs to instructor-led hands-on courses at locations around the world. Visit the Customer Education section of ni.com for online course schedules, syllabi, training centers, and class registration. System Integration If you have time constraints, limited in-house technical resources, or other dilemmas, you may prefer to employ consulting or system integration services. You can rely on the expertise available through our worldwide network of Alliance Program members. To find out more about our Alliance system integration solutions, visit the System Integration section of ni.com. © National Instruments Corporation C-1 NI-SCOPE Software User Manual Appendix C Technical Support Resources Worldwide Support NI has offices located around the world to help address your support needs. You can access our branch office Web sites from the Worldwide Offices section of ni.com. Branch office Web sites provide up-to-date contact information, support phone numbers, e-mail addresses, and current events. If you have searched the technical support resources on our Web site and still cannot find the answers you need, contact your local office or NI corporate. Phone numbers for our worldwide offices are listed at the front of this manual. NI-SCOPE Software User Manual C-2 ni.com Glossary Prefix Meaning Value p- pico- 10 –12 n- nano- 10 –9 µ- micro- 10 – 6 m- milli- 10 –3 k- kilo- 10 3 M- mega- 10 6 G- giga- 10 9 Numbers/Symbols – minus Ω ohm % percent + plus ± plus or minus ∑ summation > greater than A ADE application development environment API application programming interface asynchronous (1) hardware—a property of an event that occurs at an arbitrary time, without synchronization to a reference clock (2) software—an action or event that occurs at an unpredictable time with respect to the execution of a program © National Instruments Corporation G-1 NI-SCOPE Software User Manual Glossary B bandwidth the range of frequencies present in a signal, or the range of frequencies to which a measuring device can respond bit one binary digit, either 0 or 1 buffer temporary storage for acquired or generated data (software) bus The group of conductors that interconnect individual circuitry in a computer. Typically, a bus is the expansion vehicle to which I/O or other devices are connected. Examples of PC buses are the PCI bus, AT bus, and EISA bus. byte Eight related bits of data, an 8-bit binary number. Also used to denote the amount of memory required to store one byte of data. C calibration a means of verifying and adjusting the accuracy of a device channel pin or wire lead to which you apply or from which you read the analog or digital signal compiler A software utility that converts a source program in a high-level programming language, such as C/C++, Visual Basic (version 5.0), or Borland Delphi, into an object or compiled program in machine language. Compiled programs run 10 to 1,000 times faster than interpreted programs. CPU central processing unit D DDC see digital downconverter default value A default parameter value recorded in the driver. In many cases, the default input of a control is a certain value (often 0) that means use the current default setting. device A plug-in board, card, or pad that can contain multiple channels and conversion devices. Some examples include the NI 5911, NI 5102, and NI 5112. NI-SCOPE Software User Manual G-2 ni.com Glossary DFT discrete Fourier transform digital downconverter A DSP that selects only a narrow portion of the frequency spectrum, thereby eliminating unwanted data before it is transferred into memory digital trigger A TTL level signal having two discrete levels—a high and a low level DLL Dynamic-link library. A software module in Microsoft Windows containing executable code and data that can be called or used by Windows applications or other DLLs. Functions and data in a DLL are loaded and linked at run time when they are referenced by a Windows application or other DLLs. DMA direct memory access. A method by which data can be transferred to/from computer memory from/to a device or memory on the bus while the processor does something else. DMA is the fastest method of transferring data to/from computer memory. driver software that controls a specific hardware device such as a DAQ board or a GPIB interface board E EEPROM electronically erasable programmable read-only memory—ROM that can be erased with an electrical signal and reprogrammed extrema the minimum and maximum values F FFT fast Fourier transform filtering a type of signal conditioning that allows you to attenuate unwanted portions of the signal you are trying to measure FIR finite impulse response—a non recursive digital filter with linear phase G gain the factor by which a signal is amplified, sometimes expressed in decibels GUI graphical user interface © National Instruments Corporation G-3 NI-SCOPE Software User Manual Glossary H Hz hertz I ID identification IDE Integrated Development Environment interrupt a computer signal indicating that the CPU should suspend its current task to service a designated activity interrupt latency the delay between the time hardware asserts an interrupt and when the interrupt service routine is activated L LabVIEW Laboratory virtual instrument engineering workbench. A graphical programming API. library a file containing compiled object modules, each comprised of one of more functions, that can be linked to other object modules that make use of these functions M master/slave Type of network connection in which a request is transmitted to one or more destination nodes, and those nodes send a response back to the requesting node. In industrial applications, the responding (slave) device is usually a sensor or actuator, and the requesting (master) device is usually a controller. MB megabytes of memory memory buffer see buffer N Nyquist theorem NI-SCOPE Software User Manual A theorem that a signal must be sampled at least twice as fast as the bandwidth of the signal in order to accurately reconstruct the waveform and avoid aliasing. G-4 ni.com Glossary P passband the range of frequencies which a device can properly propagate or measure PC personal computer PCI Peripheral Component Interconnect peak to peak A measure of signal amplitude. The difference between the highest and lowest levels of the signal. PLL phase locked loop posttriggering the technique used on a device to acquire a programmed number of samples after trigger conditions are met pretriggering the technique used on a DAQ board to keep a continuous buffer filled with data, so that when the trigger conditions are met, the sample includes the data leading up to the trigger condition Q quantization noise Noise introduced when a signal is digitized. There is always quantization noise because the resolution of the ADC is finite. R RAM random access memory resolution The smallest signal increment that can be detected by a measurement system. Resolution can be expressed in bits, in proportions, or in percent of full scale. For example, a system has 12-bit resolution, one part in 4,096 resolution, and 0.0244% of full scale. ROM read-only memory RTSI Real-Time System Integration (bus). The NI timing bus that connects devices directly, by means of connectors on top of the boards, for precise synchronization of functions. © National Instruments Corporation G-5 NI-SCOPE Software User Manual Glossary S s seconds S samples S/s samples per second—used to express the rate at which a DAQ device samples an analog signal self-calibrating a property of a device that has an extremely stable onboard reference and calibrates its own A/D and D/A circuits without manual adjustments by the user slave see master/slave synchronous (1) hardware—a property of an event that is synchronized to a reference clock (2) software—a property of a function that begins an operation and returns only when the operation is complete T TDC time-to-digital conversion throughput rate the data, measured in bytes/s, for a given continuous operation, calculated to include software overhead transfer rate the rate, measured in bytes/s, at which data is moved from source to destination after software initialization and set up operations; the maximum rate at which the hardware can operate U UI user interface V V NI-SCOPE Software User Manual volt G-6 ni.com Index A LabVIEW 5.1 examples, 1-2 to 1-3 LabVIEW 6.0 and later examples, 1-3 LabWindows/CVI, 1-5 Microsoft Visual Basic, 1-5 to 1-6 Microsoft Visual C and C++, 1-3 to 1-5 Measurement Studio C++ examples, 1-4 to 1-5 Visual C and C++ examples, 1-3 to 1-4 Visual C examples, 1-4 array measurements, 4-12 to 4-29 digital filtering, 4-20 to 4-29 FIR filters characteristics, 4-27 IIR filters versus FIR filters, 4-21 purpose and use, 4-27 types of FIR filters available, 4-28 to 4-29 IIR filters IIR filters versus FIR filters, 4-21 truncating data, 4-22 types of IIR filters available, 4-23 to 4-26 overview, 4-20 types of filters, 4-20 example, 4-13 flowchart (figure), 4-13 function overview, 4-1 to 4-3 overview, 4-12 smoothing windows, 4-13 to 4-19 FFT with Hanning window (figure), 4-18 FFT with spectral leakage, 4-16 FFT without spectral leakage, 4-15 finite sampling records create truncated waveforms, 4-14 reducing discontinuity amplitude, 4-17 to 4-18 Abort function, 3-20 acquiring data. See also fetching data. C example, 2-4 to 2-5 continuous data acquisition, 5-7 to 5-13 advantages, 5-7 basic principles, 5-8 to 5-9 fetching data, 5-9 to 5-10 fetching most recent data, 5-12 fetching triggered records during multiple-record acquisition, 5-11 more records than will fit in memory, 5-11 to 5-12 records larger than available memory, 5-10 to 5-11 waveform acquisition at hardware-timed intervals, 5-12 to 5-13 when to use, 5-10 to 5-13 flexible resolution mode, 5-19 LabVIEW example, 2-4 multiple-record acquisition, 5-5 to 5-7 example, 5-5 to 5-6 fetching, 5-6 to 5-7 normal (oscilloscope) mode, 5-19 Acquisition Status function, 3-19 Actual Meas Wfm Size function, 4-1 Actual Num Wfms function, 3-18 Actual Record Length function, 6-3 ADC resolution, A-4 Add Waveform Processing function, 4-3 alias, A-1 analog bandwidth, A-2 application development LabVIEW, 1-2 to 1-3 LabVIEW 5.0 examples, 1-2 © National Instruments Corporation I-1 NI-SCOPE Software User Manual Index Measurement Passband Filter Ripple in dB, 4-24 Measurement Time Histogram High Time, 4-10 Measurement Time Histogram High Volts, 4-10 Measurement Time Histogram Low Time, 4-10 Measurement Time Histogram Low Volts, 4-10 Measurement Time Histogram Size, 4-10 Measurement Transient Waveform Percent Bessel filters, 4-25 Butterworth filters, 4-23 Chebyshev filters, 4-24 Measurement Voltage Histogram High Volts, 4-12 Measurement Voltage Histogram Low Volts, 4-12 Measurement Voltage Histogram Size, 4-12 overview, 3-24 Percentage Method, 4-5 Points Backlog, 5-10 Ref Level Units, 4-6 RIS Num Average, 5-4 Slave Trigger Delay, 5-17 using in waveform measurements, 4-2 Vertical Offset, 6-1 AutoSetup function, 2-3 spectral leakage, 4-14 time signal (figure), 4-17 types of window measurements, 4-18 to 4-19 attributes, 3-24 to 3-25 accessing, 3-24 to 3-25 Enable More Records Than Memory, 5-12 Fetch Meas Num Samples, 4-2 Fetch Number of Records, 5-6 Fetch Offset, 3-22, 4-2, 5-10, 5-12 Fetch Points Done, 5-10 Fetch Record Number, 5-6, 5-10, 5-11 Fetch Records Done, 5-10, 5-11 Fetch Relative To, 3-22, 4-2, 5-9, 5-12 fetching scalar and array measurements, 4-2 Last Acquisition Histogram Size, 4-6 Measurement Filter Center Frequency, 4-20 Measurement Filter Cutoff Frequency, 4-20 Measurement Filter Order Bessel filters, 4-25 Butterworth filters, 4-23 Chebyshev filters, 4-24 Measurement Filter Taps, 4-28 Measurement Filter Transient Waveform Percent, 4-22 Measurement Filter Type—lowpass, highpass, bandpass, bandstop Bessel filters, 4-25 Butterworth filters, 4-23 Chebyshev filters, 4-24 FIR filters, 4-28 Measurement Filter Width Frequency, 4-20 Measurement Filter Windows-none, Hanning, Hamming, triangle, flat top, or Blackman, 4-28 NI-SCOPE Software User Manual B bandpass filters, 4-20 bandstop filters, 4-20 Bessel filters, 4-25 to 4-26 Blackman window signal (table), 4-19 Butterworth filters, 4-23 to 4-24 I-2 ni.com Index C triggering functions and parameters, 3-9 to 3-15 coercions, 6-4 common trigger parameters, 3-13 to 3-15 digital triggering, 3-13 edge triggering, 3-12 hysteresis triggering, 3-10 to 3-11 immediate triggering, 3-9 software triggering, 3-9 to 3-10 window triggering, 3-12 to 3-13 vertical settings, 3-5 to 3-8 Configure Acquisition function, 3-5 Configure Chan Characteristics function, 3-7 to 3-8, 6-2 Configure Horizontal Timing function acquiring more records than will fit in memory, 5-11, 5-12 advanced fetching options, 3-22 coercions, 6-2 configuring horizontal settings, 3-8 to 3-9 Configure Vertical function, 3-5 to 3-7, 6-1 configuring acquisitions LabVIEW example, 2-3 LabWindows/CVI example, 2-3 using Configuration functions, 2-3 continuous data acquisition, 5-7 to 5-13 advantages, 5-7 basic principles, 5-8 to 5-9 fetching data, 5-9 to 5-10 most recent data, 5-12 fetching triggered records during multiple-record acquisition, 5-11 more records than will fit in memory, 5-11 to 5-12 records larger than available memory, 5-10 to 5-11 waveform acquisition at hardware-timed intervals, 5-12 to 5-13 when to use, 5-10 to 5-13 C examples acquiring data, 2-4 to 2-5 closing the session, 2-6 including error information, 2-6 initializing sessions, 2-2 to 2-3 Microsoft Visual C and C++ Measurement Studio C++ examples, 1-4 to 1-5 steps for, 1-3 Visual C and C++ examples, 1-3 to 1-4 Visual C examples, 1-4 calibrating digitizers example, 3-23 types of calibration, 3-23 Chebyshev filters, 4-24 to 4-25 Clear Waveform Measurement Stats function creating time histogram, 4-10 creating voltage histogram, 4-12 fetching statistics from waveform measurements, 4-2 processing data before performing waveform measurements, 4-3 Close function additional information, 3-3 basic programming flow (figure), 3-2 examples, 3-2 closing sessions, 2-6 coercions, 6-1 to 6-4 horizontal parameters, 6-2 to 6-3 triggering, 6-4 vertical parameters, 6-1 to 6-2 Configuration functions, 3-3 to 3-15 acquisition type, 3-5 basic programming flow (figure), 3-4 Configured Acquisition example, 3-5 horizontal settings, 3-8 to 3-9 © National Instruments Corporation I-3 NI-SCOPE Software User Manual Index input coupling, A-8 input frequency, A-7 peak-to-peak value, A-5 source impedance, A-6 to A-7 Nyquist theorem, A-1 record length, A-5 sample rate, A-3 synchronizing multiple digitizers, 5-14 to 5-19 PLL synchronization, 5-14 to 5-15 sample clock synchronization, 5-16 slave trigger propagation delay, 5-16 to 5-19 triggering options, A-5 vertical sensitivity, A-4 documentation conventions used in manual, iv related documentation, 1-1 to 1-2 conventions used in manual, iv creating applications. See application development. customer education, C-1 D data acquisition. See acquiring data. developing applications. See application development. digital filtering, 4-20 to 4-29 bandpass filters, 4-20 bandstop filters, 4-20 FIR filters characteristics, 4-27 IIR filters versus FIR filters, 4-21 purpose and use, 4-27 types of FIR filters available, 4-28 to 4-29 highpass filters, 4-20 ideal filter (figure), 4-21 IIR filters IIR filters versus FIR filters, 4-21 truncating data, 4-22 types of IIR filters available, 4-23 to 4-26 lowpass filters, 4-20 overview, 4-20 types of filters, 4-20 digital triggering, 3-13 digitizers ADC resolution, A-4 analog bandwidth, A-2 basic principles, A-1 to A-5 making accurate measurements, A-5 to A-8 difficult pulse train signal (figure), A-7 dynamic range of 8-bit ADC (figure), A-6 general signal shape, A-7 NI-SCOPE Software User Manual E edge triggering, 3-12 Enable More Records Than Memory attribute, 5-12 Equivalent Time Sampling (ETS), 5-1 Error Handler function basic programming flow (figure), 3-2 examples, 3-2 including error information, 2-5 to 2-6 C example, 2-6 LabVIEW example, 2-5 external calibration, 3-23 F Fetch Array Measurement function, 4-1, 4-3 Fetch function advantages, 3-16 examples, 3-16 programming flowchart (figure), 3-17 I-4 ni.com Index processing data before performing waveform measurements, 4-3 using attributes in waveform measurements, 4-2 FIR (finite impulse response) filters characteristics, 4-27 IIR filters versus FIR filters, 4-21 purpose and use, 4-27 types of FIR filters available, 4-28 to 4-29 with Hanning window (figure), 4-28 with no window (figure), 4-29 flat top window signal (table), 4-19 flexible resolution mode, 5-19 functions Abort function, 3-20 Acquisition Status, 3-19 Actual Meas Wfm Size, 4-1 Actual Num Wfms, 3-18 Actual Record Length, 6-3 Add Waveform Processing, 4-3 attributes, 3-24 to 3-25 accessing, 3-24 to 3-25 overview, 3-24 AutoSetup, 2-3 Clear Waveform Measurement Stats creating time histogram, 4-10 creating voltage histogram, 4-12 fetching statistics from waveform measurements, 4-2 processing data before performing waveform measurements, 4-3 Close additional information, 3-3 basic programming flow (figure), 3-2 examples, 3-2 Configuration functions, 3-3 to 3-15 acquisition type, 3-5 basic programming flow (figure), 3-4 Configured Acquisition example, 3-5 Fetch Meas Num Samples attribute, 4-2 Fetch Measurement function, 4-1 Fetch Measurement Stats function, 4-1, 4-2 Fetch Number of Records attribute, 5-6 Fetch Offset attribute advanced fetching options, 3-22 continuous data acquisition, 5-10 fetching most recent data, 5-12 waveform measurements, 4-2 Fetch Points Done attribute, 5-10 Fetch Record Number attribute, 5-6, 5-10, 5-11 Fetch Records Done attribute, 5-10, 5-11 Fetch Relative to attribute acquiring waveforms at hardware-timed intervals, 5-12 advanced fetching options, 3-22 continuous data acquisition, 5-9 waveform measurements, 4-2 fetching data, 3-18 to 3-23. See also acquiring data. advanced fetching options, 3-22 to 3-23 declaring waveform array, 3-18 to 3-19 Fetch Offset attribute, 3-22 Fetch Relative to attribute, 3-22 initiating an acquisition, 3-19 multiple-record acquisition, 5-6 to 5-7 order of returned data, 3-21 retrieving data, 3-20 to 3-22 returning multiple waveforms, 3-21 to 3-22 steps for, 3-18 types of Fetch functions, 3-20 waiting for data acquisition, 3-19 to 3-20 waveform info structure, 3-22 fetching scalar and array measurements, 4-1 to 4-3 fetching statistics from waveform measurements, 4-2 overview of functions, 4-1 to 4-2 © National Instruments Corporation I-5 NI-SCOPE Software User Manual Index returning multiple waveforms, 3-21 to 3-22 steps for, 3-18 types of Fetch functions, 3-20 waiting for data acquisition, 3-19 to 3-20 waveform info structure, 3-22 fetching scalar and array measurements, 4-1 to 4-3 fetching statistics from waveform measurements, 4-2 overview of functions, 4-1 to 4-2 processing data before performing waveform measurements, 4-3 using attributes, 4-2 Initialize additional information, 3-2 basic programming flow (figure), 3-2 examples, 3-2 InitiateAcquisition, 3-19 Read examples, 3-16 Initiate Acquisition and Fetch functions combined in, 3-20 overview, 3-16 programming flowchart (figure), 3-17 purpose and use, 3-20 self-calibrating digitizers, 3-23 utility functions, 3-25 horizontal settings, 3-8 to 3-9 triggering functions and parameters, 3-9 to 3-15 vertical settings, 3-5 to 3-8 Configure Acquisition, 3-5 Configure Chan Characteristics, 3-7 to 3-8, 6-2 Configure Horizontal Timing acquiring more records than will fit in memory, 5-11, 5-12 advanced fetching options, 3-22 coercions, 6-2 configuring horizontal settings, 3-8 to 3-9 Configure Vertical, 3-5 to 3-7, 6-1 Error Handler basic programming flow (figure), 3-2 examples, 3-2 including error information, 2-5 to 2-6 C example, 2-6 LabVIEW example, 2-5 Fetch advantages, 3-16 examples, 3-16 programming flowchart (figure), 3-17 Fetch Array Measurement, 4-1, 4-3 Fetch Measurement, 4-1 Fetch Measurement Stats, 4-1, 4-2 fetching array measurements, 4-1 to 4-3 fetching data, 3-18 to 3-23 advanced fetching options, 3-22 to 3-23 declaring waveform array, 3-18 to 3-19 Fetch Offset attribute, 3-22 Fetch Relative to attribute, 3-22 initiating an acquisition, 3-19 order of returned data, 3-21 retrieving data, 3-20 to 3-22 NI-SCOPE Software User Manual H Hamming window signal (table), 4-19 Hanning window signal (table), 4-19 highpass filters, 4-20 horizontal parameters for coercions, 6-2 to 6-3 hysteresis triggering, 3-10 to 3-11 negative slope (figure), 3-11 positive slope (figure), 3-11 I-6 ni.com Index I LabWindows/CVI application development examples, 1-5 steps for, 1-5 configuring acquisitions (example), 2-3 Last Acquisition Histogram Size attribute, 4-6 last-acquisition histogram method, 4-6 to 4-7 lowpass filters, 4-20 IIR (infinite impulse response) filters Bessel filters, 4-25 to 4-26 Butterworth filters, 4-23 to 4-24 Chebyshev filters, 4-24 to 4-25 IIR filters versus FIR filters, 4-21 truncating data, 4-22 immediate triggering, 3-9 Initialize function additional information, 3-2 basic programming flow (figure), 3-2 examples, 3-2 initializing sessions, 2-2 to 2-3 C example, 2-2 to 2-3 LabVIEW example, 2-2 InitiateAcquisition function, 3-19 input coupling, A-8 input frequency, A-7 internal calibration, 3-23 M measurement accuracy, A-5 to A-8 difficult pulse train signal (figure), A-7 dynamic range of 8-bit ADC (figure), A-6 general signal shape, A-7 input coupling, A-8 input frequency, A-7 peak-to-peak value, A-5 source impedance, A-6 to A-7 Measurement Filter Center Frequency attribute, 4-20 Measurement Filter Cutoff Frequency attribute, 4-20 Measurement Filter Order attribute Bessel filters, 4-25 Butterworth filters, 4-23 Chebyshev filters, 4-24 Measurement Filter Taps attribute, 4-28 Measurement Filter Transient Waveform Percent attribute, 4-22 Measurement Filter Type—lowpass, highpass, bandpass, bandstop attribute Bessel filters, 4-25 Butterworth filters, 4-23 Chebyshev filters, 4-24 FIR filters, 4-28 Measurement Filter Width Frequency attribute, 4-20 Measurement Filter Windows-none, Hanning, Hamming, triangle, flat top, or Blackman attribute, 4-28 L LabVIEW application development, 1-2 to 1-3 LabVIEW 5.0 examples, 1-2 LabVIEW 5.1 examples, 1-2 to 1-3 LabVIEW 6.0 and later examples, 1-3 steps for, 1-2 examples acquiring data, 2-4 closing the session, 2-6 configuring acquisitions, 2-3 including error information, 2-5 initializing sessions, 2-2 time histograms, 4-10 voltage histograms, 4-12 memory usage, 6-5 © National Instruments Corporation I-7 NI-SCOPE Software User Manual Index Microsoft Visual C and C++. See also C examples. application development, 1-3 to 1-5 examples Measurement Studio C++ examples, 1-4 to 1-5 steps for, 1-3 Visual C and C++ examples, 1-3 to 1-4 Visual C examples, 1-4 multiple-record acquisition, 5-5 to 5-7 example, 5-5 to 5-6 fetching, 5-6 to 5-7 Measurement Passband Filter Ripple in dB attribute, 4-24 Measurement Studio C++ examples, 1-4 to 1-5 Measurement Time Histogram High Time attribute, 4-10 Measurement Time Histogram High Volts attribute, 4-10 Measurement Time Histogram Low Time attribute, 4-10 Measurement Time Histogram Low Volts attribute, 4-10 Measurement Time Histogram Size attribute, 4-10 Measurement Transient Waveform Percent attribute Bessel filters, 4-25 Butterworth filters, 4-23 Chebyshev filters, 4-24 Measurement Voltage Histogram High Volts attribute, 4-12 Measurement Voltage Histogram Low Volts attribute, 4-12 Measurement Voltage Histogram Size attribute, 4-12 memory, 6-4 to 6-6 LabVIEW memory usage, 6-5 limitations in continuous data acquisition more records than will fit in memory, 5-11 to 5-12 records larger than available memory, 5-10 to 5-11 NI 5102 memory usage, 6-5 NI 5911, NI 5112, and NI 5620 memory usage, 6-4 waveform measurement performance, 6-5 to 6-6 Microsoft Visual Basic application development, 1-5 to 1-6 examples, 1-6 NI-SCOPE Software User Manual N NI 5102 features supported by device (table), B-1 to B-2 memory usage, 6-5 NI 5112 features supported by device (table), B-1 to B-2 memory usage, 6-4 NI 5620 features supported by device (table), B-1 to B-2 memory usage, 6-4 NI 5911 features supported by device (table), B-1 to B-2 memory usage, 6-4 NI Developer Zone, C-1 NI-SCOPE creating applications LabVIEW, 1-2 to 1-3 LabWindows/CVI, 1-5 Microsoft Visual Basic, 1-5 to 1-6 Microsoft Visual C and C++, 1-3 to 1-5 I-8 ni.com Index overview, 3-16 programming flowchart (figure), 3-17 purpose and use, 3-20 record length, A-5 rectangular window signal (table), 4-19 Ref Level Units attribute, 4-6 reference levels for scalar measurements, 4-5 to 4-6 last-acquisition histogram method, 4-6 to 4-7 Percentage Method attribute, 4-5 reference-level crossings, 4-7 to 4-8 retrieving data. See fetching data. RIS Num Average attribute, 5-4 RIS (Random Interleaved Sampling), 5-1 to 5-5 averaging for minimizing noise, 5-3 to 5-4 basic principles, 5-1 oversampling factors for increasing effective sample rates, 5-2 to 5-3 random TDC values required, 5-5 RIS example, 5-1 features supported by device (table), B-1 to B-2 getting started, 1-1 tutorial, 2-1 to 2-6 acquiring data, 2-4 to 2-5 closing a session, 2-6 configuring acquisitions, 2-3 including error information, 2-5 to 2-6 initializing a session, 2-2 to 2-3 normal (oscilloscope) mode, 5-19 Nyquist theorem, A-1 O oscilloscope (normal) mode, 5-19 oversampling, 5-2 to 5-3 P peak-to-peak value description, A-5 dynamic range of 8-bit ADC (figure), A-6 Percentage Method attribute, 4-5 Base Top constant, 4-5 Low High constant, 4-5 Min Max constant, 4-5 performance. See memory. phase-locked loop (PLL) synchronization, 5-14 to 5-15 PLL synchronization, 5-14 to 5-15 Points Backlog attribute, 5-10 S sample clock synchronization, 5-16 sample rate 1MHz sine wave (figure), A-3 definition, A-3 sampling speed, increasing with RIS, 5-1 to 5-5 averaging for minimizing noise, 5-3 to 5-4 basic principles, 5-1 oversampling factors for increasing effective sample rates, 5-2 to 5-3 random TDC values required, 5-5 RIS example, 5-1 Save to Disk example, 5-7 R Random Interleaved Sampling (RIS). See RIS (Random Interleaved Sampling). Read function examples, 3-16 Initiate Acquisition and Fetch functions combined in, 3-20 © National Instruments Corporation I-9 NI-SCOPE Software User Manual Index source impedance, A-6 spectral leakage. See smoothing windows. statistics, fetching from waveform measurements, 4-2 Stream to Disk example, 5-7 synchronizing multiple digitizers, 5-14 to 5-19 PLL synchronization, 5-14 to 5-15 sample clock synchronization, 5-16 slave trigger propagation delay, 5-16 to 5-19 system integration, by National Instruments, C-1 scalar measurements, 4-3 to 4-12 example, 4-4 flowchart (figure), 4-4 function overview, 4-1 to 4-3 last-acquisition histogram method, 4-6 to 4-7 overview, 4-3 reference levels, 4-5 to 4-6 last-acquisition histogram method, 4-6 to 4-7 Percentage Method attribute, 4-5 reference-level crossings, 4-7 to 4-8 time histogram overview, 4-8 to 4-10 voltage histogram overview, 4-11 to 4-12 self-calibrating digitizers, 3-23 session closing, 2-6 creating, 2-2 definition, 2-2 initializing, 2-2 to 2-3 C example, 2-2 to 2-3 LabVIEW example, 2-2 signal shape difficult pulse train signal (figure), A-7 general signal shape, A-7 Slave Trigger Delay attribute, 5-17 slave trigger propagation delay, 5-16 to 5-19 smoothing windows, 4-13 to 4-19 FFT with Hanning window (figure), 4-18 FFT with spectral leakage, 4-16 FFT without spectral leakage, 4-15 finite sampling records create truncated waveforms, 4-14 reducing discontinuity amplitude, 4-17 to 4-18 spectral leakage, 4-14 time signal (figure), 4-17 types of window measurements, 4-18 to 4-19 software triggering, 3-9 to 3-10 NI-SCOPE Software User Manual T TDC (time-to-digital conversion) definition, 5-1 oversampling factors, 5-2 random values required, 5-5 technical support resources, C-1 to C-2 time histograms, 4-8 to 4-10 corresponding time histogram (figure), 4-9 creating, 4-9 LabVIEW example, 4-10 overview, 4-8 time-domain waveform measured by oscilloscope/digitizer (figure), 4-9 types of measurements, 4-10 time stamps basic principles, 5-13 to 5-14 example, 5-13 time-to-digital conversion (TDC) definition, 5-1 oversampling factors, 5-2 random values required, 5-5 triangle window signal (table), 4-19 triggering functions and parameters, 3-9 to 3-15 coercions, 6-4 I-10 ni.com Index time-domain waveform sampled (figure), 4-11 types of measurements, 4-12 common trigger parameters, 3-13 to 3-15 trigger coupling, 3-15 trigger delay, 3-14 to 3-15 Trigger Holdoff, 3-13 to 3-14 digital triggering, 3-13 edge triggering, 3-12 hysteresis triggering, 3-10 to 3-11 immediate triggering, 3-9 software triggering, 3-9 to 3-10 window triggering, 3-12 to 3-13 triggering options, A-5 tutorial for NI-SCOPE, 2-1 to 2-6 acquiring data, 2-4 to 2-5 closing a session, 2-6 configuring acquisitions, 2-3 including error information, 2-5 to 2-6 initializing a session, 2-2 to 2-3 W waveform acquisition Fetch function for returning multiple waveforms, 3-21 to 3-22 using hardware-timed intervals, 5-12 to 5-13 waveform array, declaring, 3-18 to 3-19 waveform info structure, 3-22 waveform measurements, 4-1 to 4-29 array measurements, 4-12 to 4-29 digital filtering overview, 4-20 to 4-29 example, 4-13 flowchart (figure), 4-13 overview, 4-12 smoothing windows overview, 4-13 to 4-19 fetching scalar and array measurements, 4-1 to 4-3 fetching statistics from waveform measurements, 4-2 overview of functions, 4-1 to 4-2 processing data before performing waveform measurements, 4-3 using attributes in waveform measurements, 4-2 performance considerations, 6-5 to 6-6 scalar measurements, 4-3 to 4-12 example, 4-4 flowchart (figure), 4-4 last-acquisition histogram method, 4-6 to 4-7 overview, 4-3 reference levels, 4-5 to 4-6 reference-level crossings, 4-7 to 4-8 U utility functions, 3-25 V Vertical Offset attribute, 6-1 vertical parameters for coercions, 6-1 to 6-2 vertical sensitivity definition, A-4 transfer function of A-bit ADC (figure), A-4 Visual Basic. See Microsoft Visual Basic. Visual C and C++. See Microsoft Visual C and C++. voltage histograms, 4-11 to 4-12 corresponding voltage histogram (figure), 4-11 creating, 4-12 LabVIEW example, 4-12 overview, 4-11 © National Instruments Corporation I-11 NI-SCOPE Software User Manual Index time histogram overview, 4-8 to 4-10 voltage histogram overview, 4-11 to 4-12 Web support from National Instruments, C-1 window triggering, 3-12 to 3-13 entering (figure), 3-12 leaving (figure), 3-13 Worldwide technical support, C-2 NI-SCOPE Software User Manual I-12 ni.com