1
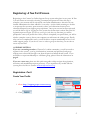
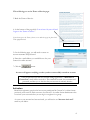
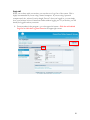
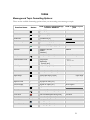
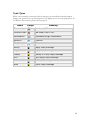
CancerCare Online: Online Support Groups User Guide V.8.17-06 TABLE OF CONTENTS CANCERCARE ONLINE USER GUIDE ...................................................................................................3 ABOUT CANCERCARE ONLINE: BROWSE THE WELCOME FOLDER........................................4 REGISTERING: A TWO PART PROCESS..............................................................................................5 REGISTRATION: PART I............................................................................................................................... 5 Create Your Profile............................................................................................................................... 5 Activation .............................................................................................................................................. 6 REGISTRATION: PART II.............................................................................................................................. 6 First Time Logging In ........................................................................................................................... 7 Log in .................................................................................................................................................... 7 Complete the Survey ............................................................................................................................. 7 Request to Join a Group ....................................................................................................................... 8 GENERAL USE OF CANCERCARE ONLINE.........................................................................................5 LOGGING IN .............................................................................................................................................. 10 BROWSING/NAVIGATION .......................................................................................................................... 10 REQUESTING MEMBERSHIP TO A GROUP .................................................................................................. 11 BEING ACTIVE IN A GROUP ...................................................................................................................... 13 Accessing your group: ........................................................................................................................ 13 Reading Posts: .................................................................................................................................... 14 Reply to a Post .................................................................................................................................... 14 Create a New Topic/New Folder: ....................................................................................................... 16 Report this to a Moderator.................................................................................................................. 17 INDEX ..........................................................................................................................................................21 MESSAGE AND TOPIC FORMATTING OPTIONS: ......................................................................................... 21 SMILEYS ................................................................................................................................................... 23 TOPIC PROPERTIES ................................................................................................................................... 23 TOPIC TYPES ............................................................................................................................................ 24 2 CancerCare Online User Guide Welcome to CancerCare’s Online Community ‘Quick Reference’ User Guide. This user guide was written to help you become familiar with our online community bulletin board software. Within this guide, you will find information on the basic functions of the program, including: • • • • • • • Browsing the Welcome Folder Registering (creating an account) – for new users Logging In Requesting Membership to a group Participating in a group Posting a New Topic Replying to a Message Unsubscribing from a group Logging Out Please read through this guide before participating in an online group – the simple instructions, pictures, and notes were written to make the group experience easier and more comfortable right from the start. If you would like to, please feel free to print a copy of the guide for future reference. Quick Reference Card – We have also created a quick reference card that contains all of the information contained in this manual on one page (front and back). It is a handy tool to keep near your computer for reference while you are working within the group space. You can find a downloadable copy of the Quick Reference card within the Welcome Folder in the section: Downloading our Support Group Manual & reference Card. If you have any questions about the program, the registration and assessment process, or your groups, please contact the online support group team at: [email protected]. Thank you, Online Client Services Team CancerCare 275 Seventh Avenue New York, NY 10001 1-800-813-HOPE 3 About CancerCare Online: Browse the Welcome Folder Anyone who comes to CancerCare Online can browse our Welcome/Instructions folder. You do not need to register in order to view its contents. Please use this folder to learn more about: • • • • • • What you can expect of your online support group Group Participation Guidelines The group registration and assessment process How to use the bulletin board software How to contact CancerCare directly What to do in case of a technical problem 1. Go to http://supportgroups.cancercare.org 2. On the homepage, click the link: Welcome/Group Instructions The main page of the Welcome Folder appears 3. Click the link: Welcome to CancerCare’s Online Support Groups 4. On the next page, browse the topics available. Click the topic you would like to learn more about. 4 Registering: A Two Part Process Registering to the CancerCare Online Support Group system takes place in two parts. In Part I you will create an account by choosing a username and password. Once this step is complete, your account will be activated by our Online Administrator. Activation by our internal administrator has been added for your safety—via this initial screening we are able to stop many fake accounts, spam accounts, robots, and solicitations that may have otherwise disrupted your support group experience. Once your account has been activated, you will be able to log in. Logging in to the system for the first time is where Part II of the registration process begins. As soon as you log in (only the very first time) you will be prompted to enter your profile data. Once you have completed your profile data, you will be asked to complete a survey about your computer use and interest in online groups. Finally, after you have completed the survey you will be able to request membership in one of our online support groups. If you choose *not* to select a group at that time, you can choose one at any later visit. ***PLEASE NOTE*** If you are a returning member of CancerCare’s online community, you will not need to register for the system – your log in information (username and password) and group requests were successfully brought over from the previous bulletin board system. If you would like to request membership to a different group, please follow the instructions on page 9. If you are a new user, please use this quick-start guide to help navigate the registration, activation, and membership requests processes. If you experience any trouble with the system, please feel free to contact [email protected]. Registration: Part I Create Your Profile 1. Go to http://supportgroups.cancercare.org 2. Click 5 This will bring you to the Terms of Service page. 3. Read the Terms of Service. 4. At the bottom of the page click “I am at least 18 years old, and I agree to the Terms of Service.” If you do not agree to the Terms of Service, or are under the age of 18, please click on the appropriate link. 5. On the following page, you will need to create an account username and password. 6. Enter the e-mail address you would like use for your CancerCare online account. 7. Click the button. A screen will appear notifying you that you have successfully created an account. ***In the email account that was entered during registration a, “Welcome to CancerCare” email will be received*** This email will contain your username and password, and alert you to the fact that your account is currently inactive. Activation Brand new registrants, people who have never participated in CancerCare’s online forums previously, must wait for their account to be activated. An online forum administrator has to activate your account before you can log in or register for a group. As soon as your account has been activated, you will receive an “Account Activated” email in your Inbox. 6 Registration Part II First Time Logging In Only after you’re account has been activated by an administrator, will you be able to log in to CancerCare Online. The first time you log in after creating an account you will be asked to complete your profile information as part of the registration process. Log in Each time you come to CancerCare Online you will be asked to log in. 1. Please go to the online forums at http://supportgroups.cancercare.org 2. Enter your username and password. 3. By clicking the dropdown arrow and clicking one of the options, select the length of your session (i.e. how long you would like to remain logged in for). *Please Note* if you are using a shared computer, do not use the “forever” option. 4. Click Login. Complete Your Profile Information 1. Enter the information into the form – this will be the information associated with your account. 2. Click the button. A screen will appear notifying you that you have successfully submitted your profile information. Click the “Continue to the next step of registration” link to continue with the registration process. 7 _________________________________________________________________ Complete the Survey After clicking the “Continue to the next step of registration” link, a survey will appear. 1. On the Survey page that appears, enter your answers to the questions. 2. At the bottom of the page click . You will be brought to a thank you screen. Click the “Request a support group membership” link within the thank you screen to request membership to a group. Request to Join a Group Once you have clicked the “Request a support group membership” link, you will be brought to the Usergroups screen. This page will show all of your current and pending memberships, as well as a list of all of the available groups that you are not currently a member of. 1. Click the dropdown arrow under the section labeled: Available Groups 2. From the list of available groups, select the one the best describes your current situation or needs. 3. With the appropriate group selected, click information about the group. to see more 4. More information about the group appears on the View Usergroup page. You will see the name of the CancerCare Social worker who will be moderating the group. 8 5. Click the link “Request to Join” if you would like to request membership to this group or click the Back button to navigate back to the Available Groups List. 6. If you clicked, “Request to Join”, a thank you screen will appear. This puts you on a ‘Pending list’ for a group. ***PLEASE NOTE:*** All profiles and membership requests are reviewed by a CancerCare social worker during the assessment process. Only approved members are admitted into groups. If you are approved for a group, an email notification with the subject, “Support Group Request Approved” will be sent to your email account Anyone who does not see their group on the support groups homepage immediately after receiving the “Your request has been approved” email, can click the Refresh button on the toolbar to update the screen. 9 General Use of CancerCare Online Logging In Each time you come to CancerCare Online you will be asked to log in. 1. Please go to online forums at http://supportgroups.cancercare.org 2. Enter your username and password. 3. By clicking the dropdown arrow and clicking one of the options, select the length of your session (i.e. how long you would like to remain logged in for). *Please Note* if you are using a shared computer, do not use the “forever” option. 4. Click the Login button Browsing/Navigation You can navigate throughout CancerCare Online by using the series of tabs that appears near the top of all screens. Depending on whether or not you are logged in, you will see different options available on this series of tabs. **Please Note** You need to be a registered, activated community member in order to log in. For more information about registration, please see page 5. Not Logged In: • Home – homepage • Help – FAQs and information • Search – search for posts • Login – Log in to the system • Register – Create a new account/register Logged In: • Home – Homepage • Help – FAQs and information • Search – Search for posts • Profile – Change your personal/profile information • Support Groups – Look at your current and pending subscriptions or request to join a new group • Log out – Log out of the system. 10 Requesting Membership to a Group During your registration you will had the ability to request membership to a group that you would like to participate in. If you have chosen not to do this, or are a returning member, please follow these instructions to request membership to a group at any time. 1. Log in 2. On top of the screen, click the Support Groups tab The “Usergroups” page appears. This page will show all of your current and pending memberships, as well as a list of all of the available groups that you are not currently a member of. 7. Click the dropdown arrow under the section labeled Available Groups 8. From the list of available groups, select the one the best describes your current situation or needs. 9. With the appropriate group selected, click group. to see more information about the 10. More information about the group appears on the View Usergroup page. You will see a short description of the group, and the name of the CancerCare Social worker who will be moderating the group 11. Click the link “Request to Join” if you would like to request membership to this group or click the Back button to navigate back to the Available Groups List. If you clicked, Request to Join, a thank you screen will appear. This puts you on a ‘Pending list’ for a group. ***PLEASE NOTE:*** All profiles and membership requests are reviewed by a CancerCare social worker during the assessment process. Only approved members are admitted into groups. 11 If you are approved for a group, an email notification with the subject, “Your request has been approved” will be sent to your email account Anyone who does not see their group immediately after receiving the “Your request has been approved” email, can click the Refresh button on the toolbar to update the screen. 12 Being Active in a Group After you receive the email stating that you have been subscribed to the group, you will be able to enter the group you requested to read messages, reply to messages, and create topics. Accessing your group: 1. Now when you log in, you will see your group available to you on the homepage. **If you do not see your group immediately, try hitting the refresh button on your toolbar. 2. Click on the name of the group you are subscribed to. 3. All of the topic folders for your group appear. These are topic folders. Click on the topic folder’s name to read the posts it contains. More information about each topic folder These icons show the ‘Topic type’ – see page 23 for more info 4. To read the contents of a topic folder, click the topic name. All of the posts will appear. 13 Reading Posts: The individual messages inside of a group are called posts. You can read the posts inside of their topic folders. 1. Open a topic folder by clicking its name. Oldest 2. Posts appear stacked. Read the contents/conversation from top to bottom Page Navigation 3. At the bottom right of the there may be indicator for Pages – if there is a page 2 or beyond, click on the number to view it. Newest Reply to a Post When you ‘Reply,’ you are replying to the entire conversation, not necessarily an individual post. Your reply will go the very bottom of the post list, indicating that it is the newest addition to the conversation. 1. Open a topic folder. 2. Read the posts. 3. Click the button at the very top or bottom of the thread. 14 The Message Creation/Reply to Post screen appears Formatting options Text Box: Write your post here Shows the most recent posts from the group that you are replying to 4. Format the post (see the Index for a description of the various the formatting options) Post Preview 5. Click Post or Preview If you click preview, you will your post above the text box with all of the formatting showing. Review it for mistakes and make changes within the text box. When you are satisfied, click Post. 15 Create a New Topic/New Folder: 1. On the main page of the group, click the button. The Start New Topic screen appears. 2. Name the Topic 3. Format the contents of the message. You MUST name your topic. This will be what appears in the topic list in the group space Write your topic intro here You can indicate what type of topic this will be (happy, sad, question, etc) by selecting from this list of icons. See Index for full descriptions. Options 4. Click Post or Preview Topic Preview If you click preview, you will your post above the text box with all of the formatting showing. Review it for mistakes and make changes within the text box. When you are satisfied, click Post. 16 Spell Check! The spell check feature allows you to check your spelling before you post your reply or new topic to the group space. *This is important because there is no editing of posts allowed once you have hit “submit”*. 1. Within the group space, click Reply or New Topic to open the message creation pane. 2. Type the entirety of your message 3. Click Spell Check The Spell Check window appears The first misspelled word in the post will appear highlighted. In the Change To: box, the program’s suggestion for spelling will appear. Other possible words/spellings will appear listed in the Suggestions box. 4. Either type the correct spelling into the Change To: box, or select the correct spelling from the Suggestions: box. 5. Click: • • • • Change –changes the single instance of the misspelled word Change All – changes every instance of the misspelled word in the post. Ignore – ignores this instance of word Ignore All – ignores every instance of the word After you click the button of your choice for this word, the next misspelled word will be highlighted. 6. Repeat steps 4-5 until entire message has been checked. 7. When complete the Spell Check complete dialog will appear, click OK. You will be returned to your Post. 8. On your message, click Post. 17 Report this to a Moderator At some point, there may be a post within your group space that you want to bring to the group moderator’s attention. You may be concerned about the content of the post, the author of the post, or you may think something within the post is offensive. If this happens, use the “Report to moderator” function, located on every post within a group. This function generates an email to the moderator and allows you to include a note explaining what about the post made you want to report it. 1. Enter your group 2. Open a topic 3. Read the posts 4. On the post you want to report, click the link “Report to moderator” 5. On the next screen, write an explanation of why you wanted to report the post. 6. Click Send Print The print function in CancerCare online allows you to print the entirety of a topic thread for posterity or reference. By using the print function built within the program, the posts will be reformatted into an easy-toread print version. 1. Within any thread, click Print. A second window opens showing you the “Print Preview” of the thread 2. Within this second window, go to the File Menu 3. Click Print Please Note: CancerCare’s online support groups are private and subscription only in order to protect its members and their anonymity. Please do not share the contents of your support group with other parties. 18 Update Your Profile Information If you change your email address, change your mailling address, or generally something changes in your situation, you can update your CancerCare Online Support Groups’ profile so that it remains current. **Please Note**If you change email addresses, you *must* update your profile to reflect the new address or your will not receive topic and post notifications from your group. 1. While you are logged in to CC Online, click the Profile tab on the navigation bar A profile summary screen appears 2. To view your entire profile, click the link under Modify Profile for: Modify Your Extended Profile. Your Extended Profile appears 3. Change/Update any information that is available 4. When you are satisfied, click Save Extended Profile 19 Log out When you are done with your session, you can choose to Log Out of the system. This is highly recommended if you are using a shared computer. If you are using a personal computer and, also, selected “session length: Forever” when you logged in, you can simply close your browser or leave CancerCare Online without logging out. If you do this, you will already be logged in when you return. 1. From anywhere in the program – go to the upper left corner. Click the tab labeled Log Out or click the Log Out button in the upper right corner. 20 Index Message and Topic Formatting Options: These are the available formatting options when you are creating a new message or topic. Function Name Button How it shows in the Message Creation Window How it shows in your post Bold [b]bold[/b] bold Italicized [i]italicized[/i] italicized Underline [u]underline[/u] underline Strikethrough [s]strikethrough[/s] strikethrough Glow [glow=red,2,50]glow[/glow] g g o w glllo ow w Shadow [shadow=red,left] shadow [/shadow] shadow Marquee [move]move[/move] Moves left to right Preformatted Text [pre]Simple Machines Forum[/pre] Simple Machines Left Align [left]left align[/left] left align Centered [center]centered[/center] Right Align [right]right align[/right] Right-to-Left * [rtl]right to left![/rtl] Left-to-Right * [ltr]left to right![/ltr] centered right align !right to left left to right! Horizontal Rule [hr] Font Size [size=10pt]font size[/size] font size Font Face [font=Verdana]font face[/font] font face [color=Red]red[/color] red Insert Table [table][/table] * Insert Table Row [table][tr][/tr][/table] * Font Color Dropdown 21 Insert Table Column [table][tr][td] content [/td][/tr][/table] content Superscript [sup]superscript[/sup] superscript Subscript [sub]subscript[/sub] subscript Insert Quote [quote]quote[/quote] Quote quote [quote author=author]quote[/qu ote] Insert List Quote from: author quote [list] [li]SMF[/li] [li]YaBB SE[/li] [/list] • • SMF YaBB SE [list] [o]circle [O]circle [0]circle [*]disc [@]disc [+]square [x]square [#]square [/list] o o o • • circle circle circle disc disc square square square 22 Smileys Name Image (click to insert) Code (type to insert) Smiley :) Wink ;) Cheesy :D Grin ;D Angry >:( Sad :( Shocked :o Cool 8) Huh ??? Roll Eyes ::) Tongue :P Embarrassed :-[ Lips Sealed :-X Undecided :-\ Kiss :-* Cry :'( Topic Properties These icons (located in the far left column next to a topic name) will change depending on the topic status. Topic you have posted in Locked Topic Normal Topic Sticky Topic Hot Topic (More than 15 replies) Poll Very Hot Topic (More than 25 replies) 23 Topic Types When you are creating a new topic and/or message you can indicate its mood purpose (happy, sad, question, etc.) by choosing an icon to display next to it in the group space. To see where to choose these, please refer to page 16. Name Image Meaning Thumbs Up Good news/I like… Thumbs Down Bad news/I don’t like… Exclamation Exclamation/High Importance Question Question Idea/Lamp Idea Smiley Happy topic/message Angry Angry topic/message Cheesy Cheesy or Funny topic/message Grin Very happy topic/message Sad Sad topic/message Wink Playful topic/message 24