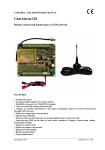
1
UPTEC F10037 Examensarbete 30 hp 9 Juni 2010 Java Application for Analysis of Lightweight Constructions in Cruise Vessels Erik Hedin Johannes Lundsten Abstract Java Application for Analysis of Lightweight Constructions in Cruise Vessels Erik Hedin and Johannes Lundsten Teknisk- naturvetenskaplig fakultet UTH-enheten Besöksadress: Ångströmlaboratoriet Lägerhyddsvägen 1 Hus 4, Plan 0 Postadress: Box 536 751 21 Uppsala Telefon: 018 – 471 30 03 Telefax: 018 – 471 30 00 Hemsida: http://www.teknat.uu.se/student In 2002 an amendment was added to the International Convention for the Safety of Life at Sea (SOLAS) which opened up for shipbuilders to replace steel with lightweight materials in the superstructures. However, SOLAS requires equal fire safety compared to ships with steel superstructures. LASS-c is a cross-organizational project with the aim to find a method to build cruise ships with part of the superstructure made in lightweight materials. As a part of the LASS-c project the purpose of this thesis has been to develop an application in Java (FISPAT). The tool has been designed to find fire sensitive areas in structures such as cruise vessels. A second aim with the thesis has been to evaluate the cruise ship Norwegian Gem with respect to fire sensitive areas. In FISPAT the user can make a model of a structure. The model is built up by rooms, networks and devices. With the model, FISPAT can simulate fire spread and the effects on the networks included in the model. The user can then analyze the results to find fire sensitive parts. One of the main results in this thesis is the tool itself together with this report which also serves as a manual to FISPAT. An evaluation of Norwegian Gem was also made which points to some critical parts of the ship. One example is the main water supply pipe to the sprinklers which has no redundant systems and all sectioning valves are manually operated, hence it is vulnerable to faults. The electrical feed to the three pump units is also a vulnerable point on the vessel. The pumps have redundant electrical networks, but the wires are drawn on the same paths, making it possible to take out both systems with one fire. Handledare: Lars Strandén Ämnesgranskare: Olle Eriksson Examinator: Tomas Nyberg ISSN: 1401-5757, UPTEC F10037 Table Of Contents 1. Introduction ........................................................................................................................ 6 1.1. Background .................................................................................................................. 6 2. 1.1.1. Regulations ........................................................................................................... 6 1.1.1. LASS .................................................................................................................... 6 1.1.2. LASS-c ................................................................................................................. 6 1.1.3. FISPAT................................................................................................................. 7 1.2. Purpose ........................................................................................................................ 7 1.3. Approach ..................................................................................................................... 7 1.4. Scope ........................................................................................................................... 7 Method ............................................................................................................................... 7 2.1. FISPAT Development Work Process .......................................................................... 7 2.2. 3. 4. 5. 6. Analyzing the Norwegian Gem ................................................................................... 8 Terminology ....................................................................................................................... 8 Model ............................................................................................................................... 10 4.1. Constituents ............................................................................................................... 10 4.1.1. Rooms................................................................................................................. 10 4.1.2. Networks ............................................................................................................ 11 4.1.3. Devices ............................................................................................................... 12 4.1.4. Redundancy ........................................................................................................ 14 4.2. Simulation Principles ................................................................................................. 14 4.3. Limitations ................................................................................................................. 15 4.4. FISPAT Properties ..................................................................................................... 15 4.4.1. Fire and Smoke Spread ...................................................................................... 15 4.4.2. Fault Injection .................................................................................................... 15 4.4.3. Simulation Setup Parameters ............................................................................. 16 Program Structure and Technical Solutions ..................................................................... 17 5.1. FISPAT GUI .............................................................................................................. 17 5.2. File Handler ............................................................................................................... 17 5.3. Simulator ................................................................................................................... 17 5.4. Vessel......................................................................................................................... 18 5.5. Exception and Calculation ......................................................................................... 18 Graphical User Interface .................................................................................................. 18 6.1. Menu .......................................................................................................................... 18 6.2. Vessel Model Setup Tab ............................................................................................ 18 6.3. Graphical Representation .......................................................................................... 20 6.3.1. Menu................................................................................................................... 21 6.3.2. Text Area and Buttons........................................................................................ 22 6.3.3. Mouse Interaction:.............................................................................................. 22 6.3.4. 6.4. Network Creator ........................................................................................................ 25 6.5. Network Delete .......................................................................................................... 28 6.6. Device Creator ........................................................................................................... 28 6.7. Device Delete ............................................................................................................ 29 6.8. Simulate Tab .............................................................................................................. 29 6.9. Exhaustive Simulations Tab ...................................................................................... 31 6.10. 7. 8. Graphical Explanation ........................................................................................ 24 Exhaustive Results Tab .......................................................................................... 35 Analyzing Exhaustive Simulation Results ....................................................................... 36 Verification of FISPAT .................................................................................................... 37 8.1.1. Test 1 – One room initially on fire ..................................................................... 38 8.1.2. Test 2 – One Network Initially Non-Functioning .............................................. 38 8.1.3. Test 3 – One Device Initially Non-Functioning ................................................. 39 8.2. Results ....................................................................................................................... 39 8.2.1. Test 1 – One Room Initially On Fire .................................................................. 39 8.2.2. Test 2 – One Network Initially Non-Functioning .............................................. 40 8.2.3. Test 3 – One Device Initially Non-Functioning ................................................. 40 8.3. Verification Conclusions ........................................................................................... 41 9. FISPAT Conclusions ........................................................................................................ 41 10. FISPAT Discussion .......................................................................................................... 42 11. Norwegian Gem Analysis ................................................................................................ 42 11.1. Simulations ............................................................................................................ 43 12. Norwegian Gem Analysis Results.................................................................................... 44 13. Norwegian Gem Conclusions........................................................................................... 44 14. Norwegian Gem Discussion ............................................................................................. 45 14.1. Potential Improvements to the Norwegian Gem .................................................... 45 14.2. Improvements of the Analysis ............................................................................... 45 15. Final Conclusions ............................................................................................................. 45 16. References ........................................................................................................................ 45 Appendix 1. User Guide………………………………………………………………………46 Appendix 2. Work Process Example………………………………………………………… 50 Appendix 3. Java Packages and Classes…………………………………...………………… 52 Preface This part of the LASS-c project is made as a master thesis in Engineering Physics at Uppsala University, Sweden. The focus is on Java programming and the thesis has been carried out on SP Technical Research Institute of Sweden in Borås. Our intention is that the resulting Java tool FISPAT can be developed further by the contribution of others. It can also be used on other structures than cruise vessels and possible within other areas where networks and dependencies between them exist. This paper is divided two main parts; a Java application for fire spread analysis (FISPAT) and the use of it on the vessel Norwegian Gem. The paper has the following chapters: 1. Introduction : Background to the project. 2. Method: Explanation of the work process. 3. Terminology: Explanatory dictionary. 4. Model: How a real vessel is translated to be used in the program and policies used in the simulations. 5. Program Structure and Technical Solutions: Describes the program structure and optimization solutions for simulations. 6. Graphical User Interface: A thorough description of the GUI. 7. Analyzing Exhaustive Simulation Results: Guide for interpretation of the simulation results. 8. Verification of FISPAT: An example to verify the functionality of FISPAT. Chapters 9-10 concern the Java application FISPAT: 9. FISPAT Conclusions: The achievements with the Java application. 10. FISPAT Discussion: Future improvements to the tool. Chapters 11-14 concern the analysis of the Norwegian Gem: 11. Norwegian Gem Analysis: The construction of the vessel and what simulations are performed. 12. Norwegian Gem Analysis Results: Results from the analysis in previous chapter. 13. Norwegian Gem Conclusions: Findings from the analysis. 14. Norwegian Gem: Future improvements to the analysis and to the vessel itself. 15. Final Conclusions: Concluding words. 16. References: Sources used. Appendix 1. User Guide: Installation of the program and how to create input files. Appendix 2. Work Process Example: A brief guide how to use FISPAT. It is advised to look it through before using the program for the first time. Appendix 3. Java Packages and Classes: Short descriptions of Java classes in FISPAT. 5 1. Introduction 1.1. Background 1.1.1. Regulations The superstructure of passenger vessels has previously been regulated to steel structures, this primarily due to steels resistance to fire and heat. In 2002 an amendment to the International Convention for the Safety of Life at Sea (SOLAS) was issued which deregulates the use of steel in the construction of passenger vessels. This amendment opens up the possibility to use new light weight materials like aluminum and sandwich composite provided it can be shown that the new materials can maintain the same level of fire resistance as a steel construction. (International Maritime Organization, 2009) 1.1.1. LASS LASS was a project started in 2005 with the aim to investigate “Lightweight construction applications at sea” (LASS). The project involved twenty different companies and organizations and the purpose was to develop techniques for using lightweight materials in vessel construction to increase the efficiency of marine transport. LASS focused on five existing vessels and one offshore living quarters and worked on solution to build corresponding objects with aluminum or composite materials. (Hertzberg, 2009, p. 7) The main advantages of using lightweight materials are: The weight reduction allows more passengers and cargo to be loaded which makes the routes more profitable The lowered centre of gravity makes the vessels more stable (Hertzberg, 2009, p. 7) Unfortunately there are also drawbacks from using these materials: Combustible (composite) Less structural strength at high temperatures. Aluminum loses strength at 200°C and the composite material used in the LASS project softens at ~100°C compared to steel that deforms at 400-500°C. (Hertzberg, 2009, p. 24) These two drawbacks have a potential effect on the fire resistance of a vessel, which required fire safety engineering to be included in the LASS project. (Hertzberg, 2009, p. 7) The LASS project was terminated in 2008 and the final report was published by Tommy Hertzberg in 2009. However, the LASS project spawned a follow up project LASS-c. 1.1.2. LASS-c LASS-c is an ongoing project coordinated by Tommy Hertzberg at SP fire technology and is a continuation of the LASS project and with similar aim as in the LASS project. The object studied in LASS-c is the Norwegian Gem, a cruise ship with a passenger capacity of 2384 passengers finished in 2006 by Meyer Werft. Focus when studying the Norwegian Gem is the possibility to construct a similar cruise ship where the steel in the top 5 decks are replaced with lightweight materials. This would reduce the weight per cabin allowing more cabins and hence more passengers per cruise. 6 1.1.3. FISPAT FISPAT was announced as a master thesis within the LASS-c project in 2009 and was started in January 2010. The aim was to develop a tool as a part of the fire resistance analysis of the Norwegian Gem in Java programming language. The master thesis was conducted at SP Electronics in collaboration with SP Fire Technology. 1.2. Purpose There are two main purposes of this thesis. The first part is to develop an application in Java that can find fire sensitive parts of a structure by simulating fire spread. The second part is to use this tool and evaluate Norwegian Gem to detect weak points in the extinguishing system and the fire spread prevention and mitigation. 1.3. Approach To prevent hazardous fires at sea, it is crucial to thoroughly analyze the risks derived from changing parts of the building material. The purpose of the FISPAT tool is to find areas of the Norwegian Gem that are particularly sensitive to fire. FISPAT is a simulation tool that can be used to examine the fire spread in complex structures like cruise vessels. The model used in FISPAT is built up by specifying rooms, different types of networks and devices. After FISPAT setup is made the simulation is run until the state is stable and evaluation can then take place. Redundant networks and devices can afterwards be added and new simulations can be done to examine how the status of the networks and devices are changed. Thus, by setting up different scenarios the FISPAT tool can be used to find which design is the best. If the user is in doubt, a worst case scenario should be applied in the model and setup at simulation; e.g. that rooms can spread fire to all their neighbors. This will result in the worst outcome possible given the initial conditions. 1.4. Scope This project will focus on modeling the Norwegian Gem cruise vessel and finding fire sensitive parts. Hence, only the parts of the vessel that are related to fire spread will be of importance such as rooms, sprinkler systems, electrical networks and pumps. The FISPAT tool is used for evaluation of the Norwegian Gem design. 2. Method To be able to reach the aims of this project it was divided into two main parts: Develop FISPAT as a tool for analyzing structures Analyze the Norwegian Gem 2.1. FISPAT Development Work Process A number of requirements and a chronological work process were defined for the creation of FISPAT. 1. Define the model principles (see section 4.1) The model principles had been defined in a general sense and given in a work specification at the start of the thesis work. However, the definitions had to be examined and manifested. 2. Define the simulation principles (see section 4.2 and 4.3) 7 Some of the simulation limitations and the general approach were already defined beforehand in the work specification. The simulation principles and limitations were more properly defined and extended. 3. Determine the properties of FISPAT (see section 4.4) This was partly done before the implementation in Java and partly done continuously throughout the programming process. 4. Implement tool in Java and create a user interface (see chapters 5, 6 and 7) The bulk of the time in this master thesis was used to implement the tool in Java and creating an interface for the user. 5. Test and verify the accuracy of FISPAT simulations (see chapter 8) After the implementation was done testing of the simulation results was conducted. The development of FISPAT was done in Java using NetBeans IDE1 and the graphical user interface (GUI) was designed by using the NetBeans GUI builder. 2.2. Analyzing the Norwegian Gem The aim of analyzing the Norwegian Gem was to identify weak points in the fire extinguishing system and the fire spread prevention and mitigation. This part of the project was also divided into several tasks performed chronologically. 1. Identify and gather relevant information To be able to perform a full analysis, information about all networks relevant to fire spread was needed. This included water networks, electrical networks, ventilation systems and more. The information needed was held by Meyer Werft in form of building plans. Mayer Werft was contacted and the plans were acquired. 2. Use the information to create a model of Norwegian Gem with FISPAT The plans containing the room structure and water networks were decoded and put into a FISPAT model. However ventilation networks have not yet been included to the FISPAT model of Norwegian Gem. 3. Analyze Norwegian Gem by performing simulations with FISPAT Simulations were made of the modeled Norwegian Gem and analyses of the results. However, all networks were not included in the simulations so a full analysis has not been conducted. 3. Terminology Apparatus Sub-class of devices with pumps, electric control units and other. Control Options Policies used in the simulations. Two are defined; If ventilation spreads fire or smoke If water networks are set non-functioning by fire. Corridor 1 A subtype of room. Has identical properties as Room (see below) except its color in the Graphical Representation. The purpose of defining corridors is to make the Graphical Representation easier to comprehend. More information about the Netbeans IDE can be found at netbeans.org 8 Dependence Defines how the functionality of networks and devices are affected by each other. Can be one-way (e.g. a water network depending on the electric network via a pump) or two-way (e.g. a computer depending on an electric network but also controls this). Device Models dependencies between networks. There are two main types of devices; Apparatus and Sectioning devices. Fire Indicates fire and smoke. Fire cannot be present without smoke. FISPAT FIre SPread Analysis Tool. LASS Lightweight Construction Applications at Sea. Norwegian Gem Cruise vessel owned by the American Norwegian Cruise Company. Network Allows a resource to be distributed within the vessel. A network can be one of the following types; electric power (E), water (W), ventilation (V), pneumatic (P), hydraulic (H), control network (C). Properly Connected Device All networks a device depends on and affects have their end or start positions inside the device symbol (a proper definition can be found in section 4.1.3). Redundancy Duplication of a network or device where only one is required. Room Part of the Vessel Model that represents a room in the vessel. Sectioning device In real life separates the functionality of two or more sections of a network. However, in FISPAT the sections are instead considered as separate networks connected via the sectioning device. If one of the networks is non-functioning, the other(s) will not automatically be non-functioning if there is a functioning sectioning device between them. However, if the sectioning device is nonfunctioning, a fault in one network will spread to the other(s). If the Sectioning device is included in ventilation networks, its function is to prevent fire and smoke to spread between the networks. If the sectioning device is nonfunctioning, fire and smoke will be able to spread. Setup The initial state of a simulation that is used with the Vessel Model to perform a simulation. Fire spreading neighbors, smoke spreading neighbors, initial status of the rooms, networks and devices are all specified in the setup. As is the control options. Simulation By using a particular setup with the Vessel Model a simulation can be performed. The initial state of the simulation is specified in the setup and the result state is the state of the Vessel Model after that the simulation has been performed. SOLAS Safety of Life at Sea 9 SP Technical Research Institute of Sweden. Status For a room, the status is either fire, smoke or neither. For networks and devices the status is either functioning or non-functioning. Vessel Model The data structure representing a vessel. It contains rooms, networks and devices. Vinnova Swedish government agency that provides research funding. 4. Model FISPAT uses a model representation of a vessel (Vessel Model) to perform simulations of a fire spread. The Vessel Model contains rooms, networks and devices. By changing simulation setups for the defined rooms, networks and devices, it is possible to find the most critical combinations that cause severe damage of the vessel. The initial condition of a simulation is defined by the user in the simulation setup. This can be done in a text file that is loaded in the program (not recommended) or in the graphical user interface (see chapter 6). The Vessel Model is discussed in section 4.1 and the simulation prerequisites are discussed in section 4.2. 4.1. Constituents The FISPAT tool uses a model of the vessel called the Vessel Model to perform simulations. This Vessel Model is made up by three different parts; rooms, networks and devices. 4.1.1. Rooms All rooms are modeled as cubicles and each cubicle belongs to a deck. The corners of a cubicle are represented by positive integers in a three dimensional space (x, y, z). All room walls, ceiling and floor need to be parallel to one axis of the coordinate system. This means that two adjacent corners only will have one coordinate that differs. The lowest z-coordinate indicates on which deck the room is present; hence this coordinate differs by one between two adjacent decks. The floor of one deck is the ceiling of the deck below and vice versa. The x and y coordinates are also integers and their corresponding units can be chosen freely (but the same for all rooms). Any other room shape than cubical is constructed by linking several cubicles (sub-rooms) together. This allows for a room to have a more complex structure. A room, or sub-room, cannot overlap another. Neighbors are identified in FISPAT and not explicitly by the user. For two rooms to be neighbors they need to be either on the same deck or on adjacent decks. If on the same deck, one wall of each room needs to overlap one wall of the other (see Figure 1, object 1 and 2). If two rooms only have corners in common they are not considered neighbors (see Figure 1, object 1 and 3). If the rooms are located on adjacent decks, one room needs to have a corner within the other room as seen from above to be a neighbor (see Figure 1, object 1 and 4). It is not enough for the rooms to just have edges in common (see Figure 1, object 1 and 5). 10 2 5 1 4 3 Figure 1: 1, 2 and 3 are on the same deck while 4 and 5 are on an adjacent deck. 1 is neighbor to 2 and 4. 1 is not a neighbor to 3 and 5 since they have no overlapping surfaces. Source: Own. Each room has a unique ID which can be a string or a number, however all linked rooms have the same main ID and are separated by “-“ in the form “room ID-subroom ID”. These subrooms will automatically have the same fire and smoke status unless the user specifically sets them to be non-spreading neighbors. This is applicable when there are fire doors between rooms. The status of a room is one of Fire (indicating that smoke is also present) Smoke No fire and no smoke Apart from this the neighbors to whom the room spread fire and to whom it spread smoke to is defined in each simulation setup. The spreading neighbors are chosen by the user from the list of identified neighbors in the Graphical Representation (see section 6.3). To summarize, a room is defined by its ID Corners Fire spreading neighbors Smoke spreading neighbors Status 4.1.2. Networks There are six types of networks represented in FISPAT: electric power water ventilation hydraulic pneumatic control (computerized or not) All networks are defined by their type and their 3-d paths and are physically present in a set of rooms. The path of a network can only change in one direction at a time, meaning that the 11 path is either in the x-, y- or z-direction. The placement of a network, with respect to rooms, is the same as in reality; however, the actual placement of networks within rooms does not need to be the same as in reality. All networks can depend on apparatus to function or considered to be independent. The dependencies are specified in the apparatus (see section 4.1.3). If one network depends on several apparatus of the same kind, these apparatus are interpreted as being redundant and only one of them needs to function for the network to function. However, if a network depends on several different kinds of apparatus, these are all interpreted as being needed for the functionality of the network (unless there are redundant devices of one type). For the network to function, at least one apparatus of each apparatus type needs to function. The status of a network is either functioning or non-functioning. A non-functioning network can never, during the simulation, be set as functioning again. There are three ways for a functioning network to become non-functioning: One of the rooms in which the network is present is set on fire One of the apparatus on which it depends is set to non-functioning. This is not enough if there are redundant apparatus of the same type, in which case all of the redundant apparatus need to be non-functioning. The user sets the network to be non-functioning initially in a simulation. Note that even though the network is present in a burning room it can be set functioning by the user at setup. The user must be very careful so that this is not done unintentionally. A ventilation network is set to have both an inlet and an outlet in all rooms it goes through as a consequence of the worst case scenario that is used throughout the simulation. The direction of air flow in a ventilation network is ignored i.e. the worst case scenario is used. Once fire or smoke is present in the ventilation network it will spread to all rooms where the ventilation network is present (unless a room is explicitly chosen not to spread). 4.1.3. Devices Devices are split up in two main categories: Apparatus and Sectioning devices. The status of a device is either functioning or non-functioning. A non-functioning device can never, during the simulation, be set as functioning again. If the device depends on several networks of the same kind, these are interpreted as being redundant. The device will function as long as one of the input networks of each type is functioning. If a device depends on different kinds of networks, these network types are all interpreted as being needed for the functionality of the device. As long as one of the networks of each type is functioning, so is the device. This is to model redundant input networks. Any type of device can be set to depend or affect any type of network; there is no in-program check for the dependencies with respect to type of device and type of network. There are three ways for a device to be non-functioning: The room in which the device is present is set on fire One of the networks on which it depends is set non-functioning. This is not enough if there are redundant networks of the same type, in which case all of the redundant networks of one type need to be non-functioning The user sets the device to be non-functioning initially in a simulation. Devices are specified by the user either in a text-file (see Appendix 1) or can be built graphically in FISPAT (see section 6.3.3). 12 The positions of devices and networks in a room are not significant for the results of simulations in FISPAT. However in the Graphical Representation of the Vessel Model the user is forced to put networks that affects or depends on a device in contact2 with the device. If a device has contact with all networks that it affects or depends on, it is properly connected. Devices are used to model dependencies between networks and can hence both affect and depend on networks. A device can depend on or affect the following types of networks (note that there is no in-program check for this): Network Electricity Water Ventilation Device can depend on network Yes No No Hydraulic Pneumatic Control Yes Yes Yes Device can affect network Yes Yes Yes, but only Sectioning device Yes Yes Yes There are two categories of devices; apparatus and sectioning devices. Apparatus: The type of the apparatus is defined by the user and can be one of: Pump Electric Control Unit Other An apparatus is used to model a dependency between different networks. E.g. a water network can be dependent on an electrical network via an electric pump. Sectioning Devices: Sectioning devices are used for making it possible to isolate two or more networks from each other. A functioning sectioning device prevents a fault in one network to spread to the other network. An example of a sectioning device is a valve on a water network which can prevent a wide spread loss of water pressure in case of a leak. The networks handled by the sectioning device must be of the same type. A sectioning device used in ventilation networks works in a slightly different way. A functioning sectioning device between two ventilation networks will prevent smoke (and fire if the user has set ventilation networks to spread fire using the control options) from spreading past the sectioning device including to the room where the sectioning device is present. A sectioning device can itself be dependent on one or more input networks as in the case of a remotely controlled, electrical valve which is dependent on electricity and control networks. If electricity or control network connected to the sectioning device is faulty the sectioning 2 Contact is defined as DChebyshev(D,Ne) ≤ L which is the area that’s covered by the device symbol in the graphical representation. L= / 14 D = Device position. Ne= Closest network endpoint 13 device becomes faulty i.e. it cannot function as a sectioning device any more (it becomes transparent). The effect of this will only be visible when one of the connected networks becomes non-functioning. In that case the other will be set as non-functioning as well. 4.1.4. Redundancy Redundant networks and apparatus can be modeled in FISPAT. To model redundant networks, two or more networks need to be created. If a network has redundant inputs that it depends on, e.g. a water network that has two pumps, these pumps are created as two separate pumps that both affect the water network. As long as one of these redundant pumps is working, so is the network (unless the network is set non-functioning by other means, see section 4.1.2). If all the redundant apparatus are set non-functioning, the network will also be non-functioning. There is no upper limit on how many redundant apparatus a network can depend on. The same holds for a device. If the device depends on several networks of the same type, these networks are redundant inputs to the device. As long as one of the redundant networks is functioning, so is the device. However, if all the redundant inputs are non-functioning, the device will be non-functioning. There is no upper limit on how many redundant networks a device can depend on. 4.2. Simulation Principles In general a conservative approach is taken in the simulations. A worst-case scenario is implemented where the following modeling aspects apply: Once fire is present in a room, it will not be put out during the simulation. When fire is present, so is smoke. There cannot be fire without smoke; however smoke can be present in a room without fire. Fire is spread from one room to another if they are specified as fire-spreading neighbors. In this case smoke will also be spread. Smoke is also spread from one room to another if they are specified as smokespreading neighbors. In this case fire will not be spread. Fire door is modeled by setting the rooms on both sides to be fire spreading neighbors (an open fire door) or by setting the rooms not to be fire spreading neighbors (a closed fire door). A conservative approach is used; if a room is burning the result is that all networks and devices present in that room will be non-functioning. However, water networks can be set as fire resistant by the user (the network will not be set as non-functioning because it is present in a room containing fire). The setting will apply on all water networks in the model, they cannot be individually set as fire resistant. While fire damages networks and devices and makes them non-functioning, smoke does not affect networks and devices. A contained fire can be modeled by setting the room to not be able to spread fire to its neighbors. To analyze parts of a room, these parts can be modeled as virtual sub-rooms by dividing one room into several. Note that one room cannot comprise another room, i.e. rooms cannot overlap. If a fire can spread outside rooms e.g. at the outside of a vessel it can be modeled as adding an extra room representing the exterior of the vessel. 14 For water the only networks considered are those that are used for handling fire. For example, water networks for washing are not included. Fire and smoke are not spread via networks except ventilation. For ventilation networks, all rooms in which they are present are, by default, assumed to have both air inlet and outlet. This implies that once smoke is present in the ventilation network, all rooms will contain smoke (if not stopped by a functioning sectioning device). In the same way if ventilation networks are set to spread fire then once fire is present in a ventilation network it will spread to all rooms containing the network (if not stopped by a functioning sectioning device). Modeling of a room without air in-/outlet is done by excluding the room from the ventilation network. This only affects the selected room and allows the other rooms where the network is present to spread smoke/fire. For ventilation networks, the direction of air flow is ignored. A functioning sectioning device on a ventilation network will prevent smoke (and fire if the user has set ventilation networks to spread fire) from spreading past the sectioning device including to the room where the sectioning device is present. Manual control of devices is not modeled in FISPAT. For a network to exist it must be present in at least two rooms (a network completely located in a single room is not significant) 4.3. Limitations The following aspects are not considered in the simulation: Notion of time, only a start and an end state. The pace of the fire spread. Internal content of a room, i.e. all rooms will instantly be considered fully on fire once in contact with fire in accordance with the worst-case scenario approach. Probabilities of events. Recovery. Once an event has occurred it cannot be reversed. Fire fighting capability. Human interaction. The number of casualties. Also, the networks and devices in a room can be set functioning by the user even though the room is on fire. The user must be very careful so that this is not done unintentionally. 4.4. FISPAT Properties 4.4.1. Fire and Smoke Spread Fire and smoke spread is done in the simulations in FISPAT which means that fire and smoke spread cannot be evaluated until a simulation is performed. If a sub-room is set burning in the Graphical Representation (see section 6.3), the fire will spread to the other sub-rooms in the simulation and not directly in the Graphical Representation. The resulting state of the Vessel Model can be examined once a simulation is done. 4.4.2. Fault Injection Apart from simulating fire spread, FISPAT can be used to perform fault injection in the Vessel Model. In that case no room is set on fire; instead fault injection is done by setting one or several networks and/or devices as non-functioning. When the initial state is simulated, the spread of the fault can be analyzed in the resulting state. By performing exhaustive 15 simulations with this kind of fault injection one can determine which networks and/or devices that are most critical. Redundant networks and devices can then be added to the Vessel Model to see if the construction can be made more robust and tolerable to faults. 4.4.3. Simulation Setup Parameters FISPAT supports non-exhaustive (single run) simulations where the user specifies the initial state of the Vessel Model. FISPAT also supports exhaustive simulations where the user specifies the required parameters (see below) and then FISPAT models and simulates all possible initial states. Non-Exhaustive Setup For a non-exhaustive setup, the following parameters can be set: Room Parameters Fire status Smoke status Fire spreading neighbors Smoke spreading neighbors Network Parameters (per contained network) Functioning/Non-functioning Device Parameters (per contained device) Functioning/Non-functioning Control Options If water networks are damaged by fire If ventilation networks spreads fire or only smoke Exhaustive Setup To do exhaustive simulations a number of parameters can be specified in addition to those specified in a non-exhaustive simulation. The setup parameters that can be specified are: Number of rooms initially burning Number of networks initially non-functioning Number of devices initially non-functioning Other binary control options are: If water networks are damaged by fire If ventilation networks spreads fire or only smoke If the status of a Vessel Model constituent is manually set in the setup, this constituent will be the same for all simulations. When the number of parameters is chosen, FISPAT performs the required simulations with all possible combinations of the specified parameters. The simulations can in turn be analyzed to find the most critical setups. The criteria for storing results are given by the user and all need to be met for a simulation to be saved. The criteria are: Number of rooms burning Number of rooms containing smoke but no fire Number of non-functioning networks Number of non-functioning devices Number of non-functioning apparatus Number of non-functioning sectioning devices 16 To save computation time a reduction of simulations is done before the exhaustive simulations. Initial setups that produce the same results are eliminated. But because of the simulations strict deterministic nature, these eliminated initial setups are easily reconstructed (see chapter 7). 5. Program Structure and Technical Solutions The FISPAT tool is built up by six main packages (see Figure 2) with a number of subpackages. All classes in FISPAT are briefly explained in Appendix 3. GUI Calculation Vessel Simulation File Handler Exception Figure 2: The packages in FISPAT. The three red packages and the GUI package are the essential packages in FISPAT while the orange packages are peripheral. Source: Own. 5.1. FISPAT GUI An interface that controls and governs the program, all user actions are made through the GUI and all program results are displayed through the GUI. The GUI package contains the classes used to display and interact with vessel models. This package has been developed to a large extent using Netbeans GUI Builder. 5.2. File Handler The file handler package handles input files and writing networks, devices and setups to output files. FISPAT only handles .txt- files. 5.3. Simulator The simulator package handles the fire simulations in FISPAT. The simulations are deterministic and go on until the status of all rooms, networks and devices do not change. The two kinds of simulations, exhaustive and non-exhaustive, are handled separately. The non-exhaustive simulations are not optimized; the non-exhaustive class is instead programmed to be informative to the user and saves text information that is displayed. In the exhaustive simulations class, optimized code is vital. In FISPAT the optimization is done by: Reducing the number of simulations – By identifying initial setups that produce the same outcome the amount of simulations can be reduced. This is done by identifying rooms in the Vessel Model that will produce the same results if it is initially burning and reducing all but one of those initial setups from the simulations. Using localization – By reusing rather than cloning the objects used in the simulations the degree of localization is increased. This is done by the use of parameter sets that 17 determines initial setup and applying it on the same Vessel Model throughout the exhaustive simulation instead of producing a new Vessel Model for each simulation. Use of parallel threads – FISPAT creates as many simulating threads as there are available processors. To prevent the different threads from simulating the same parameter setup a synchronized getNextParameterSet() method is used to feed the different threads with unique setups. Store as little information as possible – Only the parameter setup is stored to make storing as effective as possible. 5.4. Vessel Hold the Vessel Model constituents; rooms, networks and devices and their respective subclasses. Vessel contains the building blocks of the vessel model according to the model description above. 5.5. Exception and Calculation Contains three exception classes used throughout FISPAT. Determines how many simulations that are needed for the exhaustive simulations. This is done by calculating binomial coefficients (see section 6.9 for the calculations). 6. Graphical User Interface This chapter explains all parts of the GUI. Each sub-chapter starts with a short introduction followed by a screenshot and detailed information about the user interactions. 6.1. Menu The menu at the top of the main window is used for basic program operations. This menu is the same for all tabs. Help: Contains How to Use, user manual of FISPAT. About: Information about the version number and the development of FISPAT. Exit FISPAT: Exits the program. If networks or devices have been created and not saved, a warning message is displayed. 6.2. Vessel Model Setup Tab This tab is shown once the program is started. It allows the user to load the files with the Vessel Model, i.e. room file, network file and device file. The format is described in Appendix 3. 18 Figure 3: Vessel Model Setup tab. Source: Own. Read Files: File With Rooms: Press Browse to select the file containing the room information. File With Networks: Press Browse to select the file containing the network information. If a network file is loaded but should not be used to build the Vessel Model, press the Delete All Rooms, Networks and Devices button to start over. If this text field is left blank, no networks will be loaded. File With Devices: Press Browse to select the file containing the device information. If a device file is loaded but should not be used to build the Vessel Model, press the Delete All Rooms, Networks and Devices button to start over. If this text field is left blank, no devices will be loaded. Build Vessel Model Builds a Vessel Model with the room, network and device files specified. If any of the files is corrupt (incorrect syntax, references to networks or rooms not defined etc) an error message is shown in the information text area. If networks and devices have been loaded once but should not be present in a new loaded Vessel Model, the button Delete All Rooms, Networks and Devices can be pressed and the new files can be loaded. Show Vessel Model 19 Opens a “pop-up” with a visual representation of the Vessel Model with the rooms, networks and devices loaded by the user (see section 6.3). Vessel Model Information: Get Number of Rooms, Networks and Devices Displays the number of rooms, networks and devices in the present Vessel Model. Delete All Rooms, Networks and Devices Deletes everything built so the user can build a new Vessel Model. This does not need to be done to build a new Vessel Model, but it resets the file selection fields if the user wants to create a Vessel Model without devices or networks and devices. Clear Text Area Clears the text area with information about the Vessel Model. 6.3. Graphical Representation The Graphical Representation is used to set the initial state of a new simulation, but also to get a graphical view of the initial and end states of a finished simulation. This frame can be invoked in different ways and shows a graphical representation of the Vessel Model. It can be one of three types: Edit Vessel: invoked by “Show Vessel Model” in Vessel Model Setup tab or “Edit Item” in the Simulate tab. Initial Vessel: invoked by ”Show Initial Vessel” in the Simulate tab or Exhaustive Results tab. Resulting Vessel: invoked by “Show Resulting Vessel” in the Simulate tab or the Exhaustive Results tab or by double-clicking one of the results in the Exhaustive Results list. If the frame is an “Edit Vessel” the user can create simulations by setting up the initial state and then queue the simulation. Only one Edit Vessel frame can be open at a time. If the frame is an Initial or Resulting Vessel interaction in the frame is limited to actions that show information. Multiple frames of these kinds can be open at the same time, allowing the user to compare different initial and resulting states. An extra feature when viewing an exhaustive simulation Resulting Vessel is the possibility to highlight all burning rooms that share the same fire origin (see chapter 7). 20 Figure 4: Graphical Representation of the Edit Vessel type. Source: Own. 6.3.1. Menu File Save: The present networks and devices are saved separately to the specified files. Load: Networks and devices are loaded separately from the specified files. The loaded networks and devices are set as functioning. Close Frame: Closes the current Vessel Model frame. Setup Set All As Functioning: Sets all rooms as non-burning and not containing smoke. All networks and devices are set as functioning. Reset Vessel Model to Loaded: Reloads the rooms, networks and devices files specified in the Vessel Model Setup tab. If there has been changes made to the Vessel Model, these will not be saved before the files are reloaded. Save Setup: Saves the setup of the current Vessel Model (not the Vessel Model itself). The pathway to the files with rooms, networks and devices are stated in the header of this saved file. The user specifies the filename to be saved in a pop-up browser. The saved Vessel Model setup file is editable if it is saved here and can hence be modified later by loading the setup file. 21 Load Setup: Loads txt file with a Vessel Setup previously saved. The user must make sure to choose a file with corresponding rooms, network and devices or this action might corrupt the results. The file to load is chosen by the user in a pop-up browser. If the setup file is editable it will be loaded into the current Vessel Model in the Graphical Representation. If the loaded setup is a resulting Vessel Model setup it will be opened in a new window where the result can be examined. Help Graphical Explanation: Shows a scheme of the colors and symbols used in the Graphical Representation. Help Documentation: Displays the help files. 6.3.2. Text Area and Buttons Info Text Area: Contains information about the Vessel Model that is currently displayed. It contains information about how many rooms that are burning and how many that contains smoke, which networks and devices that are non-functioning along with information from and to which files Vessel Model setups are loaded and saved. Deck to Show: Allows the user to select which deck to show. Zoom In/Out: Zooms the displayed Vessel Model. Queue Simulation: Saves the current setup as an initial simulation state in the list in the Simulate tab (see section 6.10). If there are badly connected devices, an error message is displayed and no simulation is queued. Go To Simulations: Brings the Simulate tab into focus. Perform Exhaustive Simulations: Brings the Exhaustive Simulations tab into focus where the user can perform exhaustive simulations on the Vessel Model in the Graphical Representation. If there are badly connected devices, an error message is displayed and these errors need to be resolved before exhaustive simulations can be undertaken. Control Options Water Network Non-Functioning by Fire: Fire will make water networks nonfunctioning if this box is ticked. Ventilation Spreads Fire: Ventilation will spread fire if this is selected. If this box is deselected, only smoke will be spread through the ventilation. 6.3.3. Mouse Interaction: Wheel scrolled: Zooms in and out. Disabled if the shift or ctrl key is pressed. Left button: Pans the Vessel model while pressed and dragged. Right button: Invokes a pop-up menu where the setup of the clicked room can be altered. The room can be set as burning or containing smoke and it can be set to 22 spread fire or smoke between its neighbors. Sub-rooms are automatically identified as fire spreading neighbors. The functionality of the present networks and devices can also be set and their dependencies are shown. The “Go To” option will appear when a network depends on a device. When clicked, the chosen device will be in focus of the image. Note that the device might not be in the middle of the image if it is located close to an edge of the Vessel Model. When interacting with a room containing a ventilation network the exclude room option is available under /present networks/ the ventilation network. If this option is selected, the ventilation network will not spread smoke or fire to the room and vice versa. Ctrl + left button pressed and dragged: Draws a network. When the mouse button is released, a pop-up menu appears with the options “New Network”, “Extend Network” and “Branch Network”. Choosing a network option will invoke the Network Creator frame (see section 6.4) which allows the drawn network to be created. Ctrl + left clicked: Invokes a menu with the option “New Device”. Choosing “New Device” will invoke the Device Creator frame (see section 6.6) which allows creation of a device where the mouse button was pressed. Shift + left button clicked: If on a device will invoke Device Creator and the dependencies of the device can be altered. If in a room with a network endpoint, this network coordinate can be deleted as well as the whole network. If there are many endpoints in the room, the endpoint closest to the mouse can be edited. Shift + left button pressed and dragged: If on a device lets the user move the device around. If in a room with a network endpoint, this endpoint can be moved to a new position or deleted. When the mouse button is released, an option menu that asks “Save” or “Cancel” will show. Apart from above options, the endpoint or the whole network can be deleted if these options are chosen in the pop-up menu. 23 6.3.4. Graphical Explanation Figure 5. Graphical Explanation of the colors and symbols used in FISPAT. Source: Own. Rooms: Green: Indicates that there is no fire or smoke in the room. Dark Green: Indicates that there is no fire or smoke and that the room extends through several decks. Light Green: Indicates that there is no fire or smoke and that the room is defined as a corridor by the user in the input file. Orange + Fire Icon: Indicates that the room was initially set on fire by the user. Red: Indicates that fire was spread to the room during a simulation. Gray: Indicates that there is smoke but no fire in a room. Yellow: Only shows when viewing an exhaustive simulation result. When the mouse pointer is on a burning room all rooms sharing the same fire origin is turned yellow. 24 Blue Arrows: The room extends to deck above (↑ up arrow) or below (↓ down arrow). Circle: Network continues on the deck above. Cross: Network continues on the deck below. Circle and cross: Network continues above and below. Networks: Color: Indicates the type of network (see Figure 5). Double dashed: Network initially set non-functioning by the user at setup or initially in a simulation. Single dashed: Network non-functioning as a consequence of presence in a burning room or dependency on non-functioning devices. Devices: Bow-tie: Sectioning device. Square: Apparatus. Yellow: Badly connected. The device is not properly connected or lacks network that it depends on or affects. Sectioning devices must affect at least two networks and all need to be of the same type. The yellow color has precedence over the other colors so any other color indicates that the device is properly connected. Brown: Functioning device. Magenta: Device initially set as non-functioning at setup. Black: Device set non-functioning as a consequence of dependence on nonfunctioning networks or presence in a burning room. Arrow towards a device: the device depends on the network. Arrow away from device: the device affects the network. 6.4. Network Creator The Network Creator is used to build new networks and to extend and branch existing ones. This window is invoked in the Graphical Representation by holding down ctrl while dragging the mouse with the left button pressed (see section 6.3.3). The action draws a network parallel to the x- and y-axis between two coordinates (i.e. L-shaped) in the Graphical Representation of the Vessel Model. When the user is satisfied with the drawn network, the left mouse button is released and the user selects whether the new path should extend or branch an existing networks or be a new network. For a network to have a path built up by more than two lines it can be extended several times which allows for more complex paths than a single L-shape. 25 Figure 6. The Network Creator is used to build new networks and to extend or branch existing ones. Source: Own. Network ID: Depending on the network type chosen, the program will suggest an ID that is the first possible of the chosen type according to the following convention: w -water e -electric v -ventilation h -hydraulic p -pneumatic c -control The type of the new network is determined in the Network Type combo box (see Network type below). The number following the letter is the lowest available ID of that network type. If electrical networks with ID:s “e1” and “e2” exist, the ID “e3” will be suggested. However, the ID can be chosen by the user to be any combination of A-Z and 0-9, e.g. to comply with a blueprint. A warning will show if the ID is already occupied by another network. When a network is saved, the ID can only be changed by editing the text file (if networks are saved). However, editing the network ID in the text file might corrupt the device file if that is not edited accordingly. If Extend Network or Branch Network is chosen, the Network ID will be the same as the network chosen in the scrollbar and cannot be changed. Invert Path: Changes the direction of the network path drawn in the Graphical Representation. If the network is painted in the x-direction at the top, this button will paint it the other way around ( will become ). If any part of the network will be outside the vessel, a message is displayed and the operation is not undertaken. 26 To Deck Above/Below: Extends the end of the new network to the deck/decks selected. New Network: Creates a new network with the path drawn by the user in the Graphical Representation when the window was invoked. The type of network can be chosen in the type scrollbar and the network ID can be edited in Network ID. The possible geometries of new networks are limited by the drawing function in the Graphical Representation. Some limitation can be bypassed by the branch and extend functions, this is done by once again holding down ctrl while dragging the mouse with the left mouse button pressed. When the mouse button is released, this window is invoked and the network can be extended or branched. Extend Network: Can only be used if the room where the new network starts contains an endpoint of an existing network. The existing networks that have an endpoint in that room will show in the scrollbar. If a network that spreads over several floors should be extended in one of the intermediate floors, Extend Network must be used. Branch Network: Is used to branch an existing network. The existing network must be located in the room where the drawn network starts, i.e. the user needs to start the drawing of the new network part in a room where the existing network to branch is located. All the networks in the room will show in the scrollbar and the network to branch can be selected. The new branch will start from the closest part of the existing network that is perpendicular to the new part. Even though the user did not start the new network path exactly on the network to branch, the program will make sure it does. Network Type Scrollbar: Depending on if the added network is new, extended or branched, the scrollbar will show different alternatives. If Extend or Branch Network is chosen, the headline will be changed to “Network To Extend/Branch”. If New Network is chosen, the type of network to build is chosen in the scrollbar. If Extend Network is chosen, networks with an end- or start-coordinate in the present room can be chosen here. The network that should be extended is chosen. If Branch Network is chosen, all the networks present in the room will show and the desired network to branch can be chosen. Depends On: The devices that the network is to depend on are selected in this list. When branching or extending a network the user can not edit this list, this must be done when editing the involved devices (see section 6.6). When creating a new network, the devices that the network depends on are selected in this list. Only devices that are present in the room where the network is are displayed. To select more than one device or to deselect, hold down Ctrl while clicking the left mouse button. To create a double dependence the network is selected to depend on and affect the same device. In this way, the functionality of the network and the selected device will depend on each other. Affects: Similar to Depends On. Here the devices that depend on the network are selected. When branching or extending a network the user can not edit this list, this must be done when editing the involved devices (see section 6.4). 27 When creating a new network the devices the network affects can be edited in this list. Only devices that are present in the room where the network is present are displayed. To select more than one device or to deselect, hold down Ctrl while clicking the left mouse button. Save: Saves the network to the present Vessel Model. See section 6.3.1 on how to save the networks to file. Cancel: Cancels the network creation and returns to the Graphical Representation. 6.5. Network Delete If a network is created by mistake, hold down shift and click the left mouse button close to a network endpoint. Choose “Delete Network” in the pop-up menu. 6.6. Device Creator The Device Creator frame is used to create new devices and to change dependencies of present devices. This frame can be invoked in two ways: By holding down ctrl and then clicking the left mouse button where the new device should be located in the Graphical Representation. By holding down shift while clicking the left mouse button on an existing device in the Graphical Representation. This allows for editing an existing device. Figure 7. The Device Creator is used to build new devices and to edit existing ones. Source: Own. Type of Device: The type of the device to build is chosen in the scrollbar. If device type Other is chosen this will be saved as other. Device ID: Depending on the device type chosen, the program will suggest an ID that is the first possible of the chosen type. If Pumps with ID:s “pump1” and “pump2” exist the ID “pump3” will be suggested. However the ID can be chosen by the user to be any combination of A-Z and 0-9, e.g. to comply with a blueprint. A warning will show if the ID is already occupied by another device. 28 Depends On: The networks that the device depends on are selected in this list. To select more than one network or to deselect, hold down Ctrl while clicking the left mouse button. Networks present in the same room as the device are listed together with the networks that the device depends on even though these are not in the same room as the device. If different types of networks are chosen, all those network types need to function for the device to function. Affects: The networks that the device affects are selected in this list. To select more than one network or to deselect, hold down Ctrl while clicking the left mouse button. Networks present in the same room as the device are listed together with networks that are previously selected to be affected by the device. For sectioning devices, the networks whose functionalities are sectioned are selected and at least two networks need to be chosen as affected by the sectioning device. These networks need to be of the same type. Save: Saves the device to the present Vessel Model. See section 6.3.1 on how to save devices to file. Cancel: Cancels the device creation and returns to the Graphical Representation. 6.7. Device Delete If a device is created by mistake it can be deleted by holding down shift while clicking the device with the left mouse button. Choose “Delete Device” in the pop-up menu. 6.8. Simulate Tab The second tab in the main frame is called Simulate. Here single simulations can be executed and the initial and resulting states can be viewed. The initial state can also be edited further. It is also possible to retrieve and view the end and initial state of all finished simulations. 29 Figure 8: Simulate tab in FISPAT where single simulations can be run and examined. Source: Own. Simulation Queue: A list of all simulations that have been queued in the Graphical Representation. Simulation ID: An ID to keep track of the simulations; the number indicates the order in which the simulation was added to the list. Status: Pending/Simulated, indicates if the simulation has been simulated or is pending. Water Option: Yes/No. Indicates if water networks are damaged by fire (a control option). Ventilation Option: Yes/No. Indicates if ventilation networks spread fire (a control option). Simulate Item: Runs the selected simulation in the list. When the simulation is done, the status will change to “Simulated”. Edit Item: Loads the initial state of the simulation to the Graphical Representation, allowing the user to further manipulate it and queue new simulations. Note that the 30 initial state of the chosen simulation will not change; the state will only be used to queue new simulations originating from this. Simulate All: Simulates all pending simulations in the list. When the simulations are done, their status will change one by one from “Pending” to “Simulated”. Delete Item: Deletes the selected simulation. No files are saved from this simulation; the simulation is deleted. Delete All: Deletes all the queued simulations from the Simulation Queue list. Simulation Result: Text Area: Contains information about the selected simulation. If the simulation is done, the text area presents information about the initial and resulting Vessel Model states. If the simulation is not yet run it only presents information about the initial state. Show Resulting Vessel: Shows a Graphical Representation of the resulting state of the selected simulation. Show Initial Vessel: Shows a Graphical Representation of the initial state of the selected simulation. Clear Text Area. Clears the Simulation Result text area with information about the highlighted simulation. Save Setup: Shows a browser where the user can specify a file and save the initial state. The file names used to build the Vessel Model are included in the file header, as is the result statistics from the Simulation result text area for the specific simulation. This setup can later be loaded from the menu in the Graphical Representation. 6.9. Exhaustive Simulations Tab In the third tab in the main frame exhaustive simulations are set up. Here the user can run large numbers of simulations and identify the most interesting initial states. This tab uses the Vessel Model displayed in the editable Graphical Representation (if no editable Graphical Representation is displayed the model that was initially loaded in Vessel Model Setup is used). The rooms that are set as initially burning in the Graphical Representation will be set as burning in all simulations performed within the exhaustive simulations. Similarly, all networks and devices set as non-functioning in the Graphical Representation will be kept as non-functioning throughout all simulations in the exhaustive run. When all criteria in this tab are set, the program run all simulations that match the setup criteria and save all the initial states that meet the save criteria. Initial parameters are set for limiting the amount of simulations for efficiency reasons and limiting the amount of results displayed in the exhaustive results tab (see section 6.10). 31 Figure 9 Exhaustive Simulations Tab in FISPAT. Source: Own. Initial Parameters: The initial parameters determine the amount of initially burning rooms and initially non-functioning networks and devices. The initially burning rooms slider represents the sum of all rooms being on fire in each simulation, including those set manually by the user in the Graphical Representation. The same holds for networks and devices initially non-functioning. The sliders are automatically updated when rooms, networks and devices are set as burning or non-functioning in the Graphical Representation. Rooms Initially Burning: The total number of initially burning rooms is set. Rooms set as initially on fire in the Graphical Representation will be set as initially burning in all simulations. Networks Initially Non-Functioning : Total amount of initially non-functioning networks in the simulations. Networks set as non-functioning in the graphical interface will be non-functioning in all simulations. Devices Initially Non-Functioning : Same function as the network slider but for devices. It determines the amount of initially non-functioning devices. As the 32 network slider it also includes the devices set as non-functioning in the graphical interface and is updated automatically. Number of Simulations Needed: Gives an approximation of the number of simulations needed for covering all possible setups corresponding to the Initial Parameters given. The number of simulations is: where: n1 = R – Rb k1 = Rs –Rb n2 = N – Nf k2 = Ns – Nf n3 = D – Df k3 = Ds – Df R = Number of rooms in the Vessel Model Rb = Number of rooms set as initially burning in the Graphical Representation Rs= Rooms Initially Burning value N = Number of networks in the Vessel Model Nf = Number of networks set as initially non-functioning Ns = Networks Initially Non-Functioning value D = Number of devices in the Vessel Model Df = Number of devices set as initially non-functioning Ds = Devices Initially Non-Functioning value The time for finishing an exhaustive simulation is approximately proportional to the number of simulations. This is useful if the user wants to approximate the time for an exhaustive simulation. The number turns red when it exceeds 109 (written as 1E9 in the text field) indicating that the number of simulations probably is too high for completion in a reasonably amount of time on a personal computer. Save Criteria: The criteria for a simulation to be saved are specified here. A simulation needs to meet all the criteria otherwise it will not be saved. When a simulation meets these criteria it is saved and can be viewed in the exhaustive results tab. The criteria are: Number of burning rooms Number of rooms with only smoke Number of non-functioning networks Number of non-functioning devices Number of non-functioning sectioning devices Number of non-functioning apparatus If the number of non-functioning devices criterion is specified, the non-functioning sectioning devices and non-functioning apparatus criteria are disabled and vice versa. Thus the device criterion and sectioning device/ apparatus criteria are mutually exclusive. If all corresponding numbers in the resulting vessel of a simulation are equal or greater than the criteria the simulation is saved in a list in the Exhaustive Results tab. 33 Rooms Burning: The number of burning rooms the simulation result needs to have for it to be saved. Rooms With Smoke: The number of rooms with only smoke the simulation result needs to have for it to be saved. Non-Functioning Networks: The number of non-functioning networks the simulation result needs to have for the simulation to be saved. Non-Functioning Devices: The number of non-functioning devices the simulation result needs to have for the simulation to be saved. If this slider is used, NonFunctioning Sectioning Devices slider and Non-Functioning Apparatus slider will be set as not used (see Figure 4) Non-Functioning Sectioning Devices: The number of non-functioning sectioning devices the simulation result needs to have for the simulation to be saved. If this slider is used, so is the Non-Functioning Apparatus, while the Non-Functioning Devices slider will be set as not used (see Figure 4). Non-Functioning Apparatus :The number of non-functioning devices the simulation result needs to have for the simulation to be saved. If this slider is used, so is the Non-Functioning Sectioning Devices, while the Non-Functioning Devices slider will be set as not used (see Figure 4). Run Exhaustive Simulations: Set Maximum Number Of Outputs: Maximum number of results to be saved from the exhaustive simulations. If there are more simulations that meet the criteria, the exhaustive simulations are stopped and a message is shown in the Results text field. Note that there can be more severe setups than the ones represented in the results as a consequence of that not all simulations are executed. To run all simulations, increase the save criteria and/or the maximum number of outputs. Run Simulations: Executes the exhaustive simulation. Makes an automatic check of all devices to see that they are properly connected. If any device is not properly connected the user receives a warning about these devices and the simulation is not started. Cancel: Cancels the running exhaustive simulation even though not all simulations are performed. However, all results up until the cancellation are presented in the exhaustive results tab and can be trusted. Progress Bar: Updates when another one percent of the simulations is done. If the mouse is held over this bar it says how many percent of the simulations are done. The text above the bar is updated when the exhaustive simulation is started, finished or cancelled. Results: Text Area: Information about the running exhaustive simulation is displayed. Go To Results: The Result tab is set in focus. 34 Clear Text Area: Clears the text area. 6.10. Exhaustive Results Tab The fourth tab in the main frame is called Exhaustive Results. In this tab the results from an exhaustive simulation are viewed. Here it is possible to retrieve and view the initial and resulting states of all finished simulations from an exhaustive simulation. Figure 10. Exhaustive Results tab where the results from exhaustive simulations can be viewed and saved. Source: Own. Show Resulting Vessel: Shows a Graphical Representation of the resulting state of the highlighted simulation. Save Resulting State: Invokes a browser that lets the user save the resulting Vessel Model state. The resulting state can be loaded in the Graphical Representation using load setup. To interpret the resulting state, please refer to chapter 7. Clear Exhaustive Results: Clears the results table. 35 7. Analyzing Exhaustive Simulation Results When performing exhaustive simulations, FISPAT reduces the simulations that would produce the same results. This is done for two reasons; reduce total simulation time and reduce the number of results that need to be analyzed by the user. When viewing the exhaustive simulation results the user is potentially viewing the results of several different initial setups. Because fire spread between rooms are commutative and deterministic it doesn’t matter in which room, of the burning rooms in the end state, the fire started in. Thus, if the fire started in any of the rooms ending up burning, the end state would be the same, and this end state is saved only once. If there are multiple initial fires in separate parts (i.e. different groups of rooms) of the Vessel Model, any combination of one initial fire in each of the separate parts would produce the same result. This fact is used by FISPAT to reduce the number of simulations. When viewing the Graphical Representation of a result this fact is shown by making all burning rooms with the same fire origin as yellow when the mouse pointer is on a burning room (see Figure 11). When the mouse pointer leaves the rooms that are burning then the color is turned back to red. Figure 11: The Graphical Representation of an exhaustive simulations result. The yellow rooms are burning and have the same origin of fire. The red rooms are also burning but have a different origin of fire. Source: Own. All combinations of an initial fire in a yellow room and an initial fire in a red room would produce the results shown in Figure 11. If all possible ways to produce the results would be presented one by one this would generate an amount of results that would not be significant. By presenting it this way the user only has to analyze one Graphical Representation where all results are presented. To reproduce the end state with a single initial setup the user needs to set one or more initial fires in each separate burning area and set the same devices and networks that were initially non-functioning as non-functioning in the new single simulation. 36 8. Verification of FISPAT During the development of FISPAT there has been continuous testing to verify that the methods work the way they are supposed to. Apart from testing the methods and the GUI, the simulations have been tested so they can be trusted. To verify that FISPAT works according to the requirement specification a simple Vessel Model was created and analyzed (see Figure 12). This simple Vessel Model can also be analyzed manually which suits it well for studying and verifying the program. By performing exhaustive simulations on it and also analyzing it manually the results are verified. The simulations have been performed to verify that: The simulations have been exhaustive, i.e. all possible setups have been used. No simulation has been performed multiple times. Simplifications have been made by the program according to section 4.4.3. The expected outcome and the results are coherent. Figure 12. The Graphical Representation of the Vessel Model used in the verification. Source: Own. The Vessel Model consists of: 8 rooms in one deck o 2 rooms are linked together as sub-rooms (R4-1, R4-2) o R1 and R2 are set to be smoke spreading neighbors 7 networks o 2 control c1 in R2 and R4-1 c2 in R5 o 2 electrical 37 e1 in R2, R3, R4-2 and R6 e2 in R4-3 and R6 o 1 hydraulic h1 in R1 and R3 o 2 water w1 in R5 and R6 w2 in R1, R4-2 and R5 4 devices: o 1 pump (pump1) in R5 o 1 Electric Control Unit (cu1) in R2 o 1 other (other1) in R3 o 1 sectioning device (SD1) in R5 Three exhaustive simulation tests were performed and the results analyzed to verify that they agree with the manual tests. 8.1.1. Test 1 – One room initially on fire One room initially on fire and all networks and devices functioning. This test was done to see that only one of the three sub-rooms was initially set on fire and that they spread fire between each other. Expected Outcome Room set Rooms on fire burning R1 R1 R2 R2 R3 R3 R4 R4-1, R4-2 R5 R5 R6 R6 R7 R7 Rooms containing smoke R2 R1 - Non-Functioning Networks h1, w2 c1, e1, h1 e1, h1 e1, e2, h1, w1, w2 c2, w1, w2 e1, e2, h1, w1, w2 c1, e1, h1 Non-Functioning Devices cu1, other1 other1 pump1, other1, SD1 SD1 pump1, other1, SD1 CU1, other1 Table 1. Expected outcome of test 1. 8.1.2. Test 2 – One Network Initially Non-Functioning One network is set non-functioning initially in the exhaustive simulation. This test is to verify that fault injection is handled satisfactory. Expected Outcome No rooms are expected to be on fire or containing smoke in this simulation. Network initially nonNon-Functioning Non-Functioning Devices functioning Networks c1 c1, e1, h1 cu1, other1 c2 c2 SD1 e1 e1, h1 other1 e2 e2 h1 h1 w1 w1, w2 SD1 w2 w2 Table 2. Expected outcome of test 2 where one network is set non-functioning initially. 38 8.1.3. Test 3 – One Device Initially Non-Functioning One device is set non-functioning initially in the exhaustive simulation. This test is to verify that fault injection is handled satisfactory. Expected Outcome No rooms are expected to be on fire or containing smoke in this simulation. Device initially nonNon-Functioning Non-Functioning Devices functioning Networks pump1 w1, w2 pump1, SD1 cu1 e1, h1 cu1, other1 other1 h1 other1 SD1 SD1 Table 3. Expected outcome of test 3 where one device is set non-functioning initially. 8.2. Results 8.2.1. Test 1 – One Room Initially On Fire The outcome of test 1 is presented in Table 4. The outcome of R7 set on fire is presented in Figure 13. Room set Rooms Rooms containing Non-Functioning Non-Functioning on fire burning smoke Networks Devices R1 R1 R2 h1, w2 R2 R2 R1 c1, e1, h1 cu1, other1 R3 R3 e1, h1 other1 R4 R4-1, R4-2 e1, e2, h1, w1, w2 pump1, other1, SD1 R5 R5 c2, w1, w2 SD1 R6 R6 e1, e2, h1, w1, w2 pump1, other1, SD1 R7 R7 c1, e1, h1 CU1, other1 Table 4. The result from test 1 where one room was set on fire initially. 39 Figure 13. Initial fire in room R7. Control network c1 is non-functioning as a consequence of fire and the fault is spread through the Vessel Model. Source: Own. 8.2.2. Test 2 – One Network Initially Non-Functioning No rooms were on fire or contained smoke after the simulations. Network initially nonNon-Functioning Non-Functioning Devices functioning Networks c1 c1, e1, h1 cu1, other1 c2 c2 SD1 e1 e1, h1 other1 e2 e2 h1 h1 w1 w1, w2 SD1 w2 w2 Table 5. Results from test 2 where one network was set non-functioning initially. 8.2.3. Test 3 – One Device Initially Non-Functioning No rooms were on fire or contained smoke after the simulations. Device initially nonNon-Functioning Non-Functioning Devices functioning Networks pump1 w1, w2 pump1, SD1 cu1 e1, h1 cu1, other1 other1 h1 other1 SD1 SD1 Table 6. Results from test 3 where one device was set non-functioning initially. 40 8.3. Verification Conclusions From the simulations above, the results and the expected outcomes are identical for all three tests. All possible setups were used in the simulations which prove that the exhaustive simulations really are exhaustive. No possible setup is lost. It is also found that FISPAT simplifies and reduces the number of parameters when that is expected. In test 1, only one of the two sub-rooms (R4-1, R4-2) is set on fire initially. This shows that the required optimization is made and that no excessive simulations are made. All networks and devices in the burning room gets non-functioning and also the networks and devices that depend on any of these. From test 2 it is verified that the devices that depend on the network initially non-functioning are also set non-functioning. It is also verified that the fault propagates to the next level and so on: For example, a fault in c1 propagates to the control unit and on to the electrical network and the devices that depends on it. Test 3 also verifies that the fault injection works properly and propagates through the Vessel Model until the statuses of its parts are static. By these comparisons it can be stated that FISPAT identifies all different setups and works properly. 9. FISPAT Conclusions One of the main results achieved in this master thesis is the Java application FISPAT. With FISPAT the user can model a structure with networks and devices and then simulate fire spread as a part of finding sensitive areas of the structure. FISPAT is a user friendly program; when the room structure is put into the program it is an easy process to graphically add/edit networks and devices by drawing in the graphical representation. Vessel models and specific setups can be saved and loaded which makes it easy for the user to try different layouts of networks and devices in a structure and investigate ways to improve safety in the structure. An important feature in FISPAT is the support for exhaustive simulations. With exhaustive simulation the user can fast and easy simulate millions of initial setups with great speed. The results can be filtered and sorted by the user which makes the results easily accessible. FISPAT exhaustive simulations are useful not only when simulating fire spread. The exhaustive simulations can be used to find the most critical networks and devices in a structure. This is done by simulating with networks/devices initially non-functioning and without initial fires. A part of FISPAT is the user manual incorporated in this report, which is a detailed description of all the functions supported by FISPAT. 41 10. FISPAT Discussion Under the course of the development of FISPAT and the analysis of the Norwegian Gem improvements to FISPAT have been considered but not implemented. These are improvements to the function and user friendliness of the tool. Improvements in FISPAT could be made regarding: Implement sprinkler usage that puts out fire Allow more complex room structures than cuboids Not counting sub-rooms as individual rooms Allow translation of CAD drawings or similar directly to FISPAT without using text files as input files Allow the status of rooms, networks and devices to be excluded in exhaustive simulations, i.e. the room/network/device is never set as initially burning/nonfunctioning when making exhaustive simulations. Insert more categories to sort exhaustive results, e.g. rooms containing functioning water networks Find new areas where FISPAT could be used Adjust FISPAT to be used for buildings or other contexts 11. Norwegian Gem Analysis The drawings of the Norwegian Gem were used to build a Vessel Model to be used in FISPAT. The networks and the devices together with their dependencies are shown in Figure 14. The Vessel Model built consists of 1312 rooms, 23 networks and 17 devices. The rooms are located on 7 decks, each divided into 6 sections in compliance with the drawings. The Norwegian Gem has three pump units that make sure that the pressure in the main water system is correct at all times. The main water system feeds water to different systems that handle the sprinklers; there is one sprinkler system per section and two floors. From deck 10 to 15 there are a total of 14 sprinkler systems that are fed by the main water system. All these systems depend on the main water system to function and are separated from it by a sectioning device. The pump units are each fed by two redundant electrical systems; one main and one emergency electrical system. The main electrical systems origin in the switchboard room and the emergency electrical systems origin in the emergency switchboard room. These systems each have three separate wiring to feed the pump units. Each pump unit is functioning as long as one of the two redundant electrical systems is functioning. 42 Main Electrical System Emergency Electrical System Pump Unit 2 Pump Unit 1 Pump Unit 3 Main Water System Sectioning Device Sectioning Device Water Supply Section 10-4 Water Supply Section 11-4, 12-4 Figure 14. The networks and devices on the Norwegian Gem and their dependencies. Source: Own. Only decks 10 to 15 are analyzed in this project since these are the decks where lightweight materials might be introduced. The pump units are however located on deck 1. In analyzing the Norwegian Gem, decks 1-9 are lumped together in an imagined deck 9 that represents all essential parts on those decks. Multiple exhaustive simulations were performed to analyze the results of different initial states, such as burning rooms and non-functioning networks and devices. 11.1. Simulations Different exhaustive simulations were performed and their objectives were for: One room set burning o Finding the most critical room One network non-functioning o Find essential network for the water supply system Two rooms set burning independent of each other o To find combination of rooms that are sensitive to fire 43 12. Norwegian Gem Analysis Results One room set burning The room where all wiring is drawn on deck 9 was found to be most critical to fire. When this room was set on fire initially, 21 networks and all 17 devices became non-functioning. Since no water network is present in this room, it doesn’t matter if the Control Option “Water Network Non-Functioning By Fire” was selected or deselected. When the switchboard room or the emergency switchboard room was set burning, the three electrical networks were non-functioning independent of selected Control Options. Rooms where the main water system is present are very sensitive to fire if water networks are set to become non-functioning by fire. If one of these rooms is set on fire, all other water supply systems become non-functioning as a consequence of lost water supply. When fire affects water networks, the rooms where the pump units are located are also sensitive to fire; 17 networks and 15 devices became non-functioning if one of these rooms were set on fire. One network non-functioning The most crucial network is the main water pipe. If this network is non-functioning, all of the sprinkler water supply systems will also become non-functioning. No other network causes this kind of damage to the Vessel Model. Two rooms set burning independent of each other Since the room on deck 9 is very sensitive to fire, it doesn’t matter which other room that is set burning in combination with this. Two separate fire origins don’t impair the water supply to the sprinklers more than only one fire origin in the cable room on deck 9. 13. Norwegian Gem Conclusions The main water pipe is very sensitive for the functionality of the other water networks. If this pipe is somehow non-functioning, no sprinkler heads will receive water to extinguish fire. This means that, if water networks are set non-functioning by fire, then all rooms where the main water pipe is present are sensitive to fire and should have extensive protection and smoke detectors to allow a fire to be detected early. The main electrical system and the emergency system is drawn closely together making the electrical feed to the pump units sensitive. A fire in the room where the wires are present results in a failure of all three pipes causing the main water pipe to lose all of its pressure and functionality. Another risk is that all valves sectioning the water networks are manually operated. If these valves are not closed, a leak in one of the sprinkler water supply systems could drain the water in the main water pipe and cause the sprinkler system to be non-functioning. 44 14. 14.1. Norwegian Gem Discussion Potential Improvements to the Norwegian Gem Potential improvements in the Norwegian Gem could be to divide the main water pipe into several water systems sectioned by sectioning devices. If one pump unit would feed water to sections 2 and 3 and two pump units feed water to the other sections, the whole sprinkler supply system could be made more robust. Running simulations on this configuration show that a fault in one of these networks would not spread to the others as long as the sectioning device is functioning. In the analyzing of the Norwegian Gem, only the networks closely related to fire fighting is modeled, such as water and electrical feed to the pumps. Ventilation networks are not modeled and their capability to spread fire is hence not taken into account. The exact paths of the networks on the first deck are not introduced into the Vessel Model which might reflect in the results. 14.2. Improvements of the Analysis When analyzing the Norwegian Gem some information from the ship drawings was not used. If this information was to be added to the analysis an improvement of the analysis can be achieved. The following information could be added to the analysis of Norwegian Gem: Analyze the drawings more thoroughly to allow additional networks to be used in the Vessel Model e.g. ventilation Introduce all decks into the Vessel Model 15. Final Conclusions This thesis resulted in a Java application FISPAT that has proven to be a very powerful tool to examine and analyze complex structures and dependencies. This tool can be used to rapidly perform exhaustive analyses on systems that cannot be comprehended manually. By introducing a model into the tool, weaknesses can be found before a construction goes from a drawing to an actual building and in turn save a lot of resources and make constructions safer. In working with FIPAT we have developed deep knowledge in the Java programming language as well as working in a larger organization to reach a common goal. As we wrote in the preface of this thesis; we hope that the tool will continue to develop and that it can raise the opportunity for others to do their thesis with FISPAT as the starting ground. Finally we would like to thank Lars Strandén at SP Technical Research Institute of Sweden for in-depth analysis and thoughtful comments in the making of the thesis. 16. References Hertzberg, T. (2009). LASS, Lightweight Construction Applications at Sea. Borås: SP Technical Research Institute of Sweden. International Maritime Organization. (den 1 June 2009). International Convention for the Safety of Life at Sea (SOLAS). Hämtat från International Maritime Organizations Website: http://www.imo.org/conventions/contents.asp?topic_id=257&doc_id=647 den 18 May 2010 45 Appendix 1. User Guide a. Installation FISPAT requires Java Runtime Environment3. The FISPAT tool has been tested for Java Version 6 update 20 and might not function well with previous Java versions. The tool has only been tested on Windows XP SP3 and might not function correctly on other operating systems such as Mac OS X. These files are distributed with FISPAT and are needed for the program to work properly: \Fire Spread Analysis Tool.jar \Images\Fireicon.png \Images\Fispaticon.png \Images\Networkicon.png \Images\Dependency.png \Help Files\Simulate.txt \Help Files\Version.txt \Help Files\Input Files.txt \Help Files\Simulation Setup.txt \Help Files\Vessel Representation.txt \Help Files\Copyright.txt b. Input Files White space can be used in all input files between type, ID, coordinates etc. to make the files more easy to read. However white space cannot be used in an ID. The // notation can be used in the beginning of a line to insert comments. That line is only used by the user to insert comments and will not be read by FISPAT to load information. Line feeds can be used between rooms, networks and devices to make the files easier to read. However, line feeds cannot be used in the middle of a line of information. For practical and safe handling of input files the following rules should be followed: Create and modify Room File by editing Create and modify Network File and Device File graphically. Comments could be added manually by editing. Handle Setup File via Graphical User Interface. Comments could be added manually by editing. i. Room File To build a set of rooms in a Vessel Model, browse a txt-file with the room information in the Vessel Model Setup tab (see section 6.2). When the desired rooms, networks and devices files are loaded the Vessel Model is built by pressing the Build Vessel Model button. The rooms text file syntax is: RoomID;(x1,y1,z1)(x2,y2,z2) For FISPAT to separate rooms and corridors in the Graphical Representation, corridors can be specified in the text file. A corridor will get a different color than a room but is the same in all other senses. Its format is: Corridor;RoomID;(x1,y1,z1)(x2,y2,z2) 3 Java Runtime Environment can be found at java.com 46 RoomID: The room ID must be unique for all rooms and include A-Z and 0-9 without whitespace or other characters. The room is identified as a corridor if “Corridor;” is specified before its ID. If a room ID already exists, an error message is displayed when the Vessel Model is built. If the room is one of several sub-rooms, "roomID-subroomID" can be used to link together the sub-rooms. These sub-rooms are automatically set to be fire spreading neighbors. Coordinates: (x1,y1,z1)(x2,y2,z2) are the coordinates of two opposite corners of the room; the lower south west and the upper north east corners. North is pointing in the positive y direction, east is the positive x direction and up is in the positive z direction. The z-coordinate of the first corner is the deck to which the room belongs; hence the z-coordinate differs by one between two adjacent decks. The coordinates need to be positive, e.g.: Room1;(0,0,0)(3,3,1) Room2-1;(3,0,0)(6,3,1) Room2-2;(6,0,0)(8,7,1) Corridor;SouthCorridor;(0,3,0)(9,4,1) Note that: 0 ≤ x1 < x2 0 ≤ y1 < y2 0 ≤ z1 < z2 All rooms are rectangular cuboids. Any other shape needs to be constructed by linking several rooms. The algorithm identifies neighboring rooms by their coordinates. Comments can be inserted in the file by putting // in the beginning of a line. ii. Network File To load and build a set of networks from file, browse networks information file in the Vessel Model Setup tab (see section 6.2). When the desired rooms, networks and devices files are loaded the Vessel Model is built by pressing the Build Vessel Model button. Note that networks and devices files can be left blank if no networks or devices are to be built. The Vessel Model has to contain rooms before networks can be built. The networks text file syntax is: Type; NetworkID; (x11,y11,z11)(x12,y12,z12)… (x1n,y1n,z1n)| (x21,y21,z11)(x22,y22,z22)… (x2n,y2n,z2n) Type: Specifies the type of network with a string. Supported network types are: Water Electric Ventilation Control Hydraulic Pneumatic Any other string as type will generate an error. NetworkID: The unique ID of the network. Can include A-Z and 0-9 without white-space or other characters. If a network ID already exists, an error message is displayed when the Vessel Model is built. 47 Coordinates: (x11,y11,z11)(x12,y12,z12)… (x1n,y1n,z1n) are the coordinates of the network path. (x11,y11,z11) is the start position, (x12,y12,z12)… (x1(n-1),y1(n-1),z1(n-1)) are the coordinates of every corner while (x1n,y1n,z1n) is the end-coordinate. The z-coordinate is the deck to which the network coordinate belongs. The coordinates can only change in one direction at a time meaning the paths are either in the x-, y- or z-direction. If the path changes in more than one direction between two following coordinates, an error message is shown when the Vessel Model is built. That is also the case if a coordinate is on a deck where there is no room. Branch: The “|” denotes a network branch. A branch needs to be defined when the network has three or more paths from a given point. When creating a network that branch, the network needs to be divided into several stretches see Figure 15. Figure 15: Creating the network to the left is done by creating two stretches. Source: Own. When creating a part of network that branch, the main stretch (blue dots in Figure 15) of the network is defined as described above. When creating the branch of the network (red dots) the coordinate sequence has to start with the branching coordinate (upper red dot) which is the same as the middle coordinate of the blue stretch. The entire network is created by writing all stretches coordinate sequences on a single line delimited by “|”. iii. Device File To load and build a set of devices from file, browse the device file in the Vessel Model Setup tab (see section 6.2). When the desired rooms, networks and devices files are loaded the Vessel Model is built by pressing the Build Vessel Model button. Note that networks and devices files can be left blank if no networks or devices are to be built. Both rooms and networks files need to be loaded if a device file is to be loaded. The device text file syntax is: Type; DeviceID; (x1,y1,z1);(AN1, AN2, …, ANn)|(DN1, DN2, …,DNn) Type: The type of the device can be one of following “Sectioning Device” “Apparatus” o “Pump” o “Electric Control Unit” o “Other” If the text type equals anything else, the device will be built as “other”. DeviceID: The unique ID of the device. Can include A-Z and 0-9 without white-space or other characters. If a device ID already exists, an error message is displayed when the Vessel Model is built. Coordinates: (x1,y1,z1) is the coordinate of the device. The z-coordinate is the deck to which the device belongs. If the coordinate is not present in a room, an error message is displayed when the Vessel Model is built. 48 Affects Networks: (AN1, AN2, …, ANn) are the ID:s of the n number of networks whose functionalities depend on the device. To define redundancy, the same network depends on two or more devices of the same type. For sectioning devices, the networks whose functionalities are separated are specified here. Depends On Networks: (DN1, DN2, …, DNm) are the ID:s of the m number of networks that the device depends on to function. iv. Setup File The setup file is used to load the status of the Vessel Model. It also contains the control options that were used when the file was saved. This file contents cannot be manually edit but its contents is explained here. However, comments can be inserted at editing by // notation in the beginning of the commented line. First there is a comment area with date and type of Vessel Model used for the saved setup file. Information about how many rooms that were burning or smoking, number of nonfunctioning networks and devices are also shown. Also the names of the files used to build the Vessel Model are saved. This information is for the user but is not used by FISPAT to load setup information. The setup loaded into FISPAT is the control options, the status of the rooms, networks and devices and the fire and smoke spreading neighbors. Note that currently set fire and smoke spreading neighbors in the Vessel Model will still be present. The loaded fire and smoke spreading neighbors will be added to those already existing. 49 Appendix 2. Work Process Example This is an example of the work process using FISPAT. It is advised that you look it through before using the program for the first time. Steps might be skipped once you are familiar with FISPAT. Setting Up the Vessel Model 1. Define the room structure in a text file. 2. Load the file in the Vessel Model Setup tab under “File With Rooms”. Press Build Vessel Model. 3. Look at the Graphical Representation of the room structure by clicking the Show Vessel Model button in the Vessel Model Setup tab. Make sure the room structure is correct and that all floors can be viewed. Check that the neighbors are correct for some rooms. 4. Create the networks either in a text file (not recommended) or in the Graphical Representation of the Vessel Model (save them as a text file if they are to be used in a later session). 5. Make sure the networks go through the correct rooms and that they are of the correct type. Put the start/end point of a network close to the start/ end point of another network if they are to affect or depend on the same device (see Figure 16). In this way, the device can be put above the network end points and be correctly connected upon creation. Figure 16: a) Networks before the sectioning device is added and b) when the sectioning device has been added. The dependency arrows are added automatically when the sectioning device is chosen to affect and depend on networks in the Device Creator. Source: Own. 6. Create the devices either in a text file (not recommended) or in the Graphical Representation of the Vessel Model (save them as a text file if they are to be used in a later session). 7. Make sure the devices are in the correct rooms and that they are of the correct type. Also make sure the devices depend on and affect the correct networks. This can be done by checking the dependency arrows (see Figure 16) or by holding down shift while clicking the device with the left mouse button. Click Edit Device in the pop-up menu. 8. Set up fire and smoke spreading neighbors in the Graphical Representation. Perform Single Simulations 9. Perform single simulations by setting one or several rooms on fire as well as networks and devices non-functioning. Click the Queue Simulation button. Queue a couple of simulations and press Go To Simulations. 10. Select a simulation and press Simulate Item. Press Show Resulting Vessel and make sure the resulting Vessel Model is satisfying. Do this with all queued simulations. Perform Exhaustive Simulations 50 11. When the single simulations are performed, go to the Graphical Representation of the Vessel Model and set up the initial state that should be used in the exhaustive simulations. 12. Press Perform Exhaustive Simulations to go to the Exhaustive Simulations tab and specify the initial parameters and the save criteria. Run simulations and make sure you get results. If there are no, or too many, results change the save criteria and try again. 13. Go to results and sort them by different categories by clicking the top of the table. 14. Identify the parameters that cause the worst result by looking at the resulting Graphical Representation. 51 Appendix 3. Java Packages and Classes This chapter contains brief explanations to the packages and classes in FISPAT. a. Calculation i. BinomialCoefficient A class with two static methods that is used to determine the number of simulation needed when performing exhaustive simulations by calculating binomial coefficients. b. Exception All classes in this package extends java.lang.Exception and are thrown in case of access of forbidden data. i. EmptyCoordinateException This exception is used by DrawVessel when the user clicks outside where he is supposed to. ii. FaultInFileException This exception is used by Parser. iii. FaultInStructureException Is used throughout the application as a generic exception. c. FileHandler i. Parser Reads and writes networks, devices and setups from file, also reads rooms from file. Uses java.io.StreamTokenizer for reading files. d. GUI All classes in this package extends javax.swing.JFrame and are part auto generated by netbeans GUI Builder except ResultTable and JFrameNew. i. FISPATGUI Contains main(String[] args, partly auto generated by the netbeans GUI Builder. This class governs the main frame GUI. ii. JFrameNew An interface for JFrameNewNetwork and JFrameNewDevice, has one class: setIDLabel. iii. JFrameNewDevice This frame is used when editing or creating devices in JFrameVessel. iv. JFrameNewNetwork This frame is used when editing or creating networks in JFrameVessel. v. JFrameVessel Invoked in FISPATGUI. This frame contains the graphical representation of the Vessel. It allows the user to interact with the vessel model as described in 6.3. vi. ResultTable Extends javax.swing.JTable. This class is used by FISPATGUI to show the tables in simulate tab and exhaustive results tab. vii. GUI.GraphicalRepresentation Contains all classes involved in the graphical representation of the Vessel Model. Also contains the class that handles the help dialog. 52 viii. DrawVessel Extends javax.swing.JPanel, contains the override method paintComponent (Graphics d). This class displays a vessel model in a JPanel. It transforms pixel coordinates in the panel to vessel model coordinates for interaction with the graphical representation. ix. JDialogHelp Extends javax.swing.JDialog. This class is invoked by FISPATGUI and shows the help section. x. JFrameColorScheme Extends javax.swing.JFrame and part auto generated by netbeans GUI Builder. Invoked by JFrameVessel, shows the symbol explanation in explained in 6.3.4. xi. Pallette Stores colors, dashes and strokes as final statics used by DrawVessel and JFrameColorScheme. e. GUI.Listeners All classes in this package implements java.awt.event.ActionListener except TableListener and KeyListener. i. AlterCoordinatesActionListener A listener used on the popup menu that appears when the user alters the path of a network. The popup menu has the options Save, Cancel, Delete Coordinate and Delete Network which this class handles. ii. CreateNetworkListener This listener is used on the popup menu that appears when the user wants to create a new network or a new device. It handles the chosen option by invoking JFrameNewNetwork or JFrameNewDevice or resets if the user clicked on cancel. iii. DeviceListener This listener handles options from the devices submenus when the user has right clicked on room. The options are: Set Damaged, Go To, Edit, Delete and Cancel. iv. LabelListener Implements KeyListener. Invokes setIDLabel() in JFrameNewNetwork or JFrameNewDevice if an ID is typed in the JFrame. v. NetworkMenuListener This listener handles options from the network submenus when the user has right clicked on room. The options are: Set Damaged and exclude room if the network is a Ventilation object. vi. NonFunctioningByFire Listener added to the checkboxes with control options in JFrameVessel. Creates a new Control Options object if any of the checkboxes are checked/unchecked and passes the Control Options to JFrameVessel that set the to the Vessel Model. vii. TableListener Implements MouseListener. Listener added to the result table in simulate tab. Runs the double clicked simulation. f. Simulation This package contains classes that handle the single and exhaustive simulations. 53 i. ExhaustiveSimulationResults This class is used by the ExhaustiveSimulator objects simulating in parallel to store results through static synchronized storing methods. ii. ExhaustiveSimulator This object makes a copy of a input Vessel object and uses parameters from an input Parameter object to perform simulations until there are no parameters left or the output maximum has been reached or the user have pressed cancel. After a simulation ExhaustiveSimulator checks the resulting Vessel with the input saving criteria and calls ExhaustiveSimulatorResults with the parameter set. iii. Parameters Used by several ExhaustiveSimulator objects simultaneously. The ExhaustiveSimulators can get a parameter set through the synchronized getNextParameterSet() method. The parameter set is a 2D integer matrix (int[][]), with ones and zeroes. The length of each row and the amount of ones on each row is determined by input parameters. The Parameters object creates this matrix by creating one Permutator object per matrix row. Every time getNextParameterSet() is called Parameters combine the next parameter set by calling nextPermutation on one of the Permutator objects. Parameters combine the Permutators object in a way that all possible parameter sets are created. iv. Permutator A Permutator object is used to create a parameter array with ones and zeroes. The array length and the amount of ones are determined by input parameters. The Permutator object returns a parameter array and creates the next when getNextPermutation() is called. g. Vessel This package contains the basic classes of the Vessel Model and also has three subpackages; Coordinate (appendix h), Devices (appendix i) and Networks (appendix j). i. ControlOptions Control Option objects contains two booleans. One indicates if water networks are damaged by fire the other if Ventilation networks spreads fire. ii. Room Room objects consist of two Coordinates, fire status, smoke status and references to all neighbors, fire spreading neighbors, smoke spreading neighbors, present networks and present devices. Room also has a room color and a default room color. iii. Vessel Vessel objects consist of references to all Room, Network and Devices objects. It also has Room, Network and Devices arrays only used when performing exhaustive simulations. h. Vessel.Coordinate This package only contains one class. 54 i. Coordinate Contains x,y and z coordinates. Coordinate objects are immutable. i. Vessel.Devices This package handles the devices in the Vessel Model. VesselDevice is extended by the other. i. VesselDevice Vessel Device is an abstract class that contains Device ID, Device Coordinate, if it is functioning, if it was initially functioning and in what room it is in. All Devices in FISPAT is an instance of a class that extends Vessel Device (the other classes in this package). Contains four abstract methods. ii. Apparatus Extends Vessel Device, has no override or extra methods. iii. Generator Extends Apparatus, overrides cloneDevice(). Has no extra methods. iv. Pump Extends Apparatus, overrides cloneDevice(). Has no extra methods. v. SectioningDevice Extends Vessel Device has a few overridden methods. j. Vessel.Networks This package handles the networks in the Vessel Model. VesselNetwork is extended by the other classes. i. VesselNetwork Abstract class that contains Network ID, array with DrawLists, neworkColor, Rooms the network is present in, SectioningDevices the network depend on, Apparatus the network depend on and Devices the network affects. Also if the network is damaged and if it was initially damaged. All networks have to be an instance of VesselNetwork. ii. Electric Extends VesselNetwork. iii. Hydraulic Extends Electric. iv. Pneumatic Extends Electric. v. Ventilation Extends VesselNetwork. Also contains an array with Rooms that are in the path of the Ventilation but excluded from the fire/smoke spread of the ventilation. Caontains a Boolean spreadsFire. vi. Water Extends VesselNetwork. Contains a Boolean damagedByFire. vii. DrawMap Every network has a drawmap which is represent the path of the network. The drawmap consists of a list of DrawLists, each representing a branch of the network, and methods for altering and retrieving information of the network path. 55 viii. DrawList Represents a branch of the network, contains a list of coordinates. All DrawMaps contains at least one DrawList object. All methods altering a DrawList is protected and designed to be used solely by the DrawMap class. 56