1
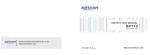
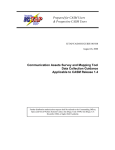
DP770 Digital Portable Radio
Instruction Manual
Instruction Manual
DP770
Digital Portable Radio
We are very grateful for your purchasing KIRISUN brand two-way radios produced
by Kirisun Communications Co., Ltd.
We believe KIRISUN two-way radio, which always incorporates the latest
technology, can bring great convenience to your life and work.
We also believe that the quality and function of KIRISUN two-way radio can meet
your demands for reliable communication.
II
DP770 Digital Portable Radio
III
Instruction Manual
DP770 Digital Portable Radio
Instruction Manual
Notice to user
◆ Copyright
Kirisun and our authorized partners own the intellectual property of all the parts of this product (include
accessories). Any design and materials may not be modified, copied, extracted or translated without the
authorization of Kirisun or its authorized parities.
Due to the update or modification of the product, Kirisun owns the right to change the specifications of software and
hardware described in this manual without further notice. Specifications and information contained in this manual
are for reference only.
◆ Safety Information
Compliance with RF Exposure Standards
Your radio is designed and tested to comply with a number of national and international standards and guidelines
(listed below) regarding human exposure to radio frequency electromagnetic energy. This radio complies with the
IEEE and ICNIRP exposure limits for occupational/controlled RF exposure environment at operating duty factors of
up to 50% transmitting. In terms of measuring RF energy for compliance with the IEEE and ICNIRP exposure limits,
your radio radiates measurable RF energy only while it is transmitting (during talking), not when it is receiving
(listening) or in standby mode.
II
DP770 Digital Portable Radio
Instruction Manual
Your radio complies with the following of RF energy exposure standards and guidelines
Institute of Electrical and Electronic Engineers (IEEE) C95.1-1992
Institute of Electrical and Electronic Engineers (IEEE) C95.1-1999 Edition
International Commission on Non-Ionizing Radiation Protection (ICNIRP) 1998
◆ Operating Instructions to control RF Exposure
To decrease your exposure and ensure compliance with the occupational/controlled environment exposure limits,
please always adhere to the following procedures.
1. Transmit no more than the rated duty factor of 50% of the time. To transmit, press the PTT button, and to listen,
release the PTT button.
2. Keep your radio in a vertical position in front of the face with the microphone 5cm away from your mouth while
transmit.
3. When worn on your body, keep the antenna 2.5cm away from you body while transmit.
4. Do not transmit when the radio is not equipped with an antenna. Transmitting without an antenna may damage
the product and result RF discomfort.
◆ Using the designated accessories
Use the antenna, battery, adapter or charger supplied or sold by Kirisun only, or otherwise it causes damage to the
III
DP770 Digital Portable Radio
Instruction Manual
product.
If you want to purchase or replace the accessories, please contact your local dealer or Kirisun.
◆ Area restrictions
1. To avoid of the problems caused by electromagnetic interference or electromagnetic compatibility, turn off the
radio in any facilities where posted notices instruct you to do so, such as hospital and other health care facilities.
Turn off the radio when on board an aircraft, if instructed to do so.
2. In the vehicle with an air bag, do not place the radio in the area over an air bag or in the air bag deployment area.
3. Turn off the radio before entering any area with a potentially explosive atmosphere or blasting caps.
4. Do not operate the radio, disassemble or charge the battery in the potentially flammable and explosive
atmosphere (such as gas station, coal gas station, etc.).
5. Do not place the radio under the direct sunlight or near the area with heating devices.
6. Do not place the radio in the area with great dust, moisture or drips, or on the unstable surface.
◆ Operating Attentions
Antenna
Do not use any portable radio that has a damaged antenna. If a damaged antenna comes into contact with your
skin, a minor burn can result.
Batteries
IV
DP770 Digital Portable Radio
Instruction Manual
All batteries can cause property damage and/or bodily injury, such as burns, if a conductive material such as
jewelry, keys, or beaded chains touches exposed terminals. The conductive material may complete an electrical
circuit (short circuit) and become quite hot. Excessive care in handling any charged battery, particular when placing
it inside a pocket, purse, or other container with metal objects. To reduce the potentially damage, do not expose the
battery in the fire, or disassemble and extrude the battery.
To realize the best performance of the battery, change the battery once a year.
Maintenance
Do not disassemble the radio by yourself. This product can only be maintained by the professional technicians.
Contact us or your local dealer for help if you want to re-develop or modify the radio.
V
DP770 Digital Portable Radio
Instruction Manual
Contents
1
2
2.1
2.2
2.3
2.4
2.5
2.6
3
3.1
3.2
3.3
3.4
3.5
3.6
4
4.1
4.2
4.3
4.4
4.5
4.6
5
5.1
Unpacking and Checking ......................................................................................... 1
Preparing Your Radio for Use.................................................................................. 2
Installing the Battery ................................................................................................ 2
Removing the Battery .............................................................................................. 3
Installing the Antenna .............................................................................................. 3
Installing the Audio Accessory/Programming Cable ................................................ 3
Installing the Belt Clip .............................................................................................. 3
Getting Started......................................................................................................... 4
Basic Operation ....................................................................................................... 6
Powering ON/OFF ................................................................................................... 6
Adjust the Volume/Channel ..................................................................................... 7
PTT Key................................................................................................................... 7
Menu Operation ....................................................................................................... 7
Icon Indication.......................................................................................................... 8
LED Indicator ........................................................................................................... 9
Transmitting and Receiving a Call ......................................................................... 10
Initiate a Call to the Default Contact ...................................................................... 10
Selecting a Contact and Initiate a Call ................................................................... 10
Manual Dial and Initiate a Call ............................................................................... 10
Receiving and Answering the Call ......................................................................... 10
Selecting a Zone.................................................................................................... 11
Switching between Digital and Analog Channels................................................... 11
Text Message ........................................................................................................ 12
Writing and Sending a Text Message .................................................................... 12
VI
DP770 Digital Portable Radio
5.2
5.3
6
6.1
6.2
6.3
6.4
6.5
7
7.1
7.2
7.3
8
8.1
8.2
9
9.1
9.2
9.3
9.4
9.5
9.6
9.7
10
VII
Instruction Manual
Sending a Quick Text Message ............................................................................. 13
Receiving Text Messages...................................................................................... 13
Emergency............................................................................................................. 14
Sending an Emergency Alarm ............................................................................... 14
Sending an Emergency Alarm with Call................................................................. 15
Sending an Emergency Alarm with Voice to Follow............................................... 15
Receiving an Emergency Alarm............................................................................. 16
Exiting an Emergency Alarm.................................................................................. 17
Call Logs................................................................................................................ 17
Viewing Recent Calls ............................................................................................. 18
Store ID to Contact List.......................................................................................... 18
Delete a Call from the Call List .............................................................................. 18
Common Settings .................................................................................................. 19
Radio Settings ....................................................................................................... 19
Radio Information .................................................................................................. 23
Advanced Functions .............................................................................................. 24
Radio Check .......................................................................................................... 24
Call Alert ................................................................................................................ 25
Radio Stun/Revive ................................................................................................. 26
Radio Kill/Active..................................................................................................... 28
Remote Monitor ..................................................................................................... 29
Scan....................................................................................................................... 30
GPS ....................................................................................................................... 33
Troubleshooting ..................................................................................................... 34
DP770 Digital Portable Radio
1
Instruction Manual
Unpacking and Checking
Please unpack carefully and check all the items listed in the following table before discarding
the packing material. If any damage or loss occurs during shipment, please contact your
dealer.
ITEM
1
QUANTITY
Two-way radio
1
Antenna
1
Battery
1
Belt Clip
1
Charger
1
Power Adapter
1
Instruction Manual
1
Two-way radio
Power Adapter
Battery
Antenna
Charge
Belt Clip and Screws
DP770 Digital Portable Radio
2
Instruction Manual
Preparing Your Radio for Use
Charging battery process is as follows:
Plug the adapter into the suitable AC socket, and connect the
adapter with the charger base. Then the Green LED lights on.
Place the battery or the radio with battery into the charger, then
Red LED lights on and starts charging the battery. When
completed, the Green LED will light. The charging period of empty
battery is less than 5 hours.
Note:
z For best performance, please charge the new battery at least for 14 to 16 hours before initial
use.
z KB-77B Li-on battery of Kirisun is applicable to this radio.
z Do not recharge the battery if it is not in low battery status; otherwise, it will affect the battery’s
life and performance.
2.1
Installing the Battery
Match the battery pack with the two slots on the back of the radio, and
push the battery forward along the slots until a click is heard.
2
DP770 Digital Portable Radio
2.2
Instruction Manual
Removing the Battery
Press the battery latch upside slightly, and pull the battery back until it is
separated from the radio.
Note:
Do not short-circuit the battery terminals.
Do not disassemble the battery casing by yourself.
2.3
Installing the Antenna
Set the antenna in its receptacle and turn clockwise to fasten it.
To remove it, please rotate it counter-clockwise.
2.4
Installing the Audio Accessory/Programming Cable
Align the plug with accessory jack, and fasten the screw.
2.5
Installing the Belt Clip
Align the screw holes on the belt clip, which is located on the back of the
radio, and fasten them with the screwdriver. To remove the belt clip, loosen
3
DP770 Digital Portable Radio
Instruction Manual
the screws.
2.6
Getting Started
A.
B.
Antenna
Volume/Channel Knob
4
DP770 Digital Portable Radio
C.
D.
E.
F.
G.
H.
I.
J.
K.
Instruction Manual
Rotate the knob to adjust the volume.
Short press the key, the function of the knob switches from adjusting the volume to changing the
channel.
LCD Display
160*128, 65K colors, 1.8 TFT LCD.
Universal Connector for accessories
Connect USB programming cable, earphone or some other accessories.
Top Key (TK)
Programmable, default: short press to enable emergency alarm, long press to exit emergency
alarm.
LED Indicator
Side Key 1 (SK1)
Programmable, default: none.
PTT Key
Side Key 2 (SK2)
Programmable, default: none.
Left Key
Press the key to select the items shown at the bottom left of the screen.
Dial Key
Press the key to send the data or text messages.
5
DP770 Digital Portable Radio
Instruction Manual
L. 4-way Navigation Key
M. Right Key
Press the key to select the items shown at the bottom right of the screen.
N. ON/OFF/Hookoff Key
Return back to the standby screen. Long press the key to turn on/off the radio.
O. Numeric keypad
P. MIC
Q. Speaker
3
3.1
Basic Operation
Powering ON/OFF
In the power OFF status, long press the ON/OFF key to turn on the radio. The
LCD displays Kirisun Logo, then the backlight turns on automatically and a
beep sound is heard.
In the power ON status, long press the ON/OFF key until Powering off screen
exists.
6
DP770 Digital Portable Radio
3.2
Instruction Manual
Adjust the Volume/Channel
After the radio power on, rotate the volume knob clockwise to increase radio
volume or counter-clockwise to decrease the volume.
Short press the key, the knob function switches from adjusting the volume to
changing the channel. If there is no operation for a period, the radio will
automatically return to the volume adjustment function.
3.3
PTT Key
There are two functions for the PTT key:
(1) During a call, press the PTT key to transmit to other radios in the call.
(2) While a call is not in progress, press the PTT key to make a new call.
Note:
z
During a call, press and hold down PTT to speak.
z
Release the PTT will let the radio enter receiving status.
z
You can’t press the PTT to speak when others are talking.
3.4
Menu Operation
(1) In standby mode, press
(2) Press
7
key to enter the main menu.
key to navigate one specific menu item.
DP770 Digital Portable Radio
(3) Press
(4) Press
(5) Press
3.5
Instruction Manual
key to select and enter this menu item.
key to return to the previous menu or return to the standby screen.
key to return to the standby screen.
Icon Indication
Signal strength indication (RSSI)
The number of bars indicates the received signal strength. Four bars are the strongest.
This icon is only displayed during receiving.
Battery indication
Indicates the battery’s remaining capacity.
High power
Low power
Speaker is muted.
There is new message/unread message.
Message inbox is full.
Keypad is locked.
Emergency alarm mode.
Encryption is enabled.
Man down is enabled.
8
DP770 Digital Portable Radio
Instruction Manual
Alarm clock is active.
Talk-around mode is active for repeater mode; or the current channel is direct mode.
GPS feature is available and the radio is receiving valid GPS data.
GPS feature is available, and has got valid location information.
Scanning is in process.
Scanning stops on a non-priority channel.
Scanning stops on a priority channel.
ID Type:
Private call.
Group call.
All call.
Menu:
This item is selected.
This item is not selected.
3.6
LED Indicator
Red LED lights on: Radio is transmitting.
Green LED lights on: Radio is receiving (voice, short message, or data) or there is an activity on the
channel.
9
DP770 Digital Portable Radio
Instruction Manual
Orange LED lights on: The radio is in the call hang time period, you can press PTT to talk back while
the orange LED lights on.
Orange LED flashes: Radio is in emergency status; or there is a missed call / incoming call alert; or
the radio is scanning.
Red LED flashes: Radio is receiving emergency alarm.
4
4.1
Transmitting and Receiving a Call
Initiate a Call to the Default Contact
In the home screen, hold down the PTT key to initiate a call to the default contact which has be set
for the current channel in CPS software. The contact can be set to private call, group call, or all call
by CPS.
4.2
Selecting a Contact and Initiate a Call
You can also make a call via contacts. Enter contact list menu and select one specific contact, then
hold down PTT to initiate a call.
4.3
Manual Dial and Initiate a Call
You can also make a call by "Manual Dial". Enter the "Contacts" menu and then enter "Manual Dial"
sub-menu, directly enter contacts’ ID number, and press PTT key to initiate a call.
4.4
Receiving and Answering the Call
10
DP770 Digital Portable Radio
Instruction Manual
Procedure:
When a call is received in the standby mode:
1) Green LED indicator lights on.
2) The call type (private call icon
, group call icon
, all call icon
), alias or ID and incoming
is displayed on the LCD.
call icon
3) Voice will be heard.
4) You can hold down PTT to call back to current contact within the hang time duration.
Note:
To receive a group call, your radio must be configured as part of that group. (Dealer set it via CPS).
You cannot respond to an All Call.
4.5
Selecting a Zone
A Zone is a group of channels exhibiting the same property, allowing users quickly switch from a
channel group to a different channel group. The radio can be set to have up to 248 zones, each with
a maximum of 128 channels.
You may select a zone through the following way:
key to enter the main menu.
1)
Press
2)
3)
Select
zone item and enter the zone menu.
Use "up/down" key to select your desired zone.
4.6
Switching between Digital and Analog Channels
11
DP770 Digital Portable Radio
Instruction Manual
Each channel can be configured as a digital channel or an analog channel. Rotate the channel knob
to switch between digital and analog channels.
When switching from a digital channel to an analog channel, some functions are unavailable, which
may include short message, GPS, and etc.
5
Text Message
DP770 can send / receive short messages. The maximum number of characters for short message
is 300.
5.1
Writing and Sending a Text Message
key to enter the main menu.
1)
Press
2)
3)
4)
Messages" item and enter the Message menu.
Select "
Select "New Message", enter the Edit menu.
In the short message Edit menu:
a) The cursor shows the current edit position.
b) Enter the text content from the keyboard.
c)
d)
e)
f)
Press
key to move the cursor to left and right.
Press "#" to switch "input methods", Press "*" to switch capital letter and lower case.
Press "1" to enter punctuation in Non-digital mode.
Press the "delete" key to delete a character before the cursor.
12
DP770 Digital Portable Radio
Instruction Manual
5)
6)
key to confirm.
After a short message editing is finished, press
Select "Send" to enter the contact selection screen.
7)
8)
9)
10)
Select the target contact, press
key to send.
If the message has been sent, a tone sounds and the display shows "success".
If the message has not been sent, a low tone sounds and the display shows "fail".
The display go back to the Text Message menu.
5.2
Sending a Quick Text Message
DP770 supports a maximum of 10 Quick Text Messages. While Quick Text Messages are
predefined, you can also edit each message before sending it.
1)
Press
2)
3)
Messages" item and enter the Message menu.
Select "
Select "New Message" to enter the Edit menu.
4)
5)
In Short message Editing menu, Press
Select "Quick Text";
6)
Select a predefined shortcut message from the list, press
5.3
key to enter the main menu.
key to confirm.
key to go back to the Edit menu.
Receiving Text Messages
When your radio receives a short message, LCD indicates a new message received, and the status
bar shows unread message icon " ".
13
DP770 Digital Portable Radio
Instruction Manual
You can enter "Inbox" to read a short message through the main menu.
6
Emergency
In case of danger, you can send an emergency alarm / emergency call to ask for help from your
companion or control centre. You can send the emergency call at any time, even when your radio is
in receiving status.
The radio supports the following three emergency alarm modes:
1) Emergency alarm only;
2) Emergency alarm with call;
3) Emergency alarm with voice to follow.
For each emergency mode, there are four emergency status indication types:
1) Alarm only—in emergency mode, emergency alarm tone will sound on the radio.
2) Regular—the radio transmits the emergency alarm, with audio and LED indication.
3) Silent—the radio sends out the emergency alarm, without any audio and the LED indication.
Even when the radio receives the answer, its speaker is mute until the PTT key is pressed.
4) Silent with voice—the radio sends out the emergency alarm and is able to receive an incoming
call, without any audio or visual indicators, until you press the PTT key to initiate, or respond to
the call.
6.1
1)
Sending an Emergency Alarm
Press the key programmed as "Emergency On" and the LCD displays
. The LCD will display
14
DP770 Digital Portable Radio
2)
3)
4)
Instruction Manual
alarm group alias/ID, the emergency alarm icon
and this icon
.
When an emergency alarm acknowledgment is received, the radio’s LCD will display
"Emergency Alarm Successful".
Or if not received, and the retry times is over, the LCD indicates that "Emergency Alarm Failed".
The radio exits Emergency Alarm mode, and return to the standby screen.
6.2
Sending an Emergency Alarm with Call
This feature allows you to send an emergency alarm to another radio. Once acknowledgement, both
radios can communicate with each other on the emergency channel by holding down the PTT.
Procedure:
1) Press the emergency on button.
2)
3)
4)
5)
The LCD displays
icon, alarm group alias/ID, the emergency alarm icon , and outgoing
.
icon
When an emergency alarm acknowledgment is received, the LCD shows "Emergency Alarm
Successful".
Press PTT to make a call. Release PTT to listen.
You can press "Emergency Off" button to exit emergency mode. The radio will return to standby
screen.
6.3
Sending an Emergency Alarm with Voice to Follow
This feature allows you to send emergency alarm to others, upon acknowledgement, the
microphone of the radio will be automatically activated without pressing PTT.
15
DP770 Digital Portable Radio
Instruction Manual
Procedure:
1) Press the emergency on button.
2)
3)
4)
5)
icon, alarm group alias/ID, the emergency alarm icon . and outgoing
The LCD displays
.
icon
When an emergency alarm acknowledgment is received, the LCD will show "Emergency Alarm
Successful".
The microphone of the radio will be automatically activated without pressing PTT until Hot Mic
duration expires. Press the PTT to transmit again.
You can press "Emergency Off" button to exit emergency mode. The radio will return to standby
screen.
Note:
z If your radio Emergency Alarm type is set to be Silent or Silent with Voice, there is no audio and
indicators in Emergency Alarm mode.
z If your radio Emergency Alarm mode is set to be Emergency Alarm with Call, the two sides can
communicate with each other on the current Emergency channel.
z If your radio Emergency Alarm mode is set to be Emergency Alarm with Voice to follow, this will
let you communicate with others without needing to press PTT. This status of Mic automatically
switching on is called "Hot Mic Status". (Dealers can set this status by CPS)
6.4
Receiving an Emergency Alarm
If you enable "Emergency Alarm Indication" for a specific channel, your radio can receive the
16
DP770 Digital Portable Radio
Instruction Manual
emergency alarm on the current channel, or otherwise, the alarm is neglected.
To receive an emergency alarm, your radio must be set to be a member of a group (add your radio
into the group call list).
1)
When receiving an emergency alarm, the icon
2)
The caller’s alias/ID, the icon , and the emergency alarm type icon display on the LCD. The
radio’s alarm alert tone sounds periodically, and the Red LED flashes quickly. If you press any
key, the tone and LED indicator will disappear.
6.5
displays on the LCD screen.
Exiting an Emergency Alarm
Your radio will exit the emergency alarm mode in the following conditions:
1) In emergency alarm mode only, and receive the acknowledgement, or press PTT.
2) Or Emergency alarm retry times are over, and no acknowledgement is received.
3) Or Press the button programmed as "Emergency off".
7
Call Logs
Your radio keeps track of all recent outgoing, answered, and missed private calls. Call Logs only
save the private calls and do not save group calls, all calls. You can view and manage the Call Logs
through LCD menu.
17
DP770 Digital Portable Radio
7.1
Instruction Manual
Viewing Recent Calls
to enter the main menu in standby screen.
1)
Press
2)
3)
4)
5)
6)
Call Logs" sub-menu.
Enter "
Select and enter recording lists (Dialed Calls\ Answered Calls\ Missed Calls).
Select your desired records.
Select "Detail" to view details of this record.
You can make a call with the contact of this record if you press PTT.
7.2
1)
2)
3)
4)
7.3
Store ID to Contact List
Select the desired record in the call list.
Select "Save" and enter "Add Contact" screen.
Enter the contact name.
Select "OK" to save the contact.
Delete a Call from the Call List
Delete all Records in the List
1)
Press
2)
3)
4)
Enter "
Call Logs" menu.
Select and enter your desired lists (Dialed Calls\ Answered Calls\ Missed Calls).
Select "Delete All ".
to the main menu in standby screen.
18
DP770 Digital Portable Radio
5)
Select "OK" to delete all the records of the list.
Delete a single Record
1)
2)
3)
Select the target record in the call list.
Select "Delete".
Select "OK" to delete this record.
8
Common Settings
8.1
Radio Settings
Setting Language
You can switch the display language of the radio.
1)
Press
to the main menu in standby screen.
2)
3)
4)
Enter "
Setting" menu.
Select "Radio Setting".
Enter the "Language" sub-menu to switch language.
Tone Settings
You can enable / disable the tone, and can adjust the tone volume.
19
Instruction Manual
DP770 Digital Portable Radio
Instruction Manual
to the main menu in standby screen.
1)
Press
2)
3)
4)
5)
¾
¾
¾
¾
¾
¾
¾
Enter "
Setting" menu.
Select "Radio Setting".
Select "Tone Setting".
Select "Tone Switch" to turn on / off the tone and "Tone Volume" to adjust the tone volume.
"Disable All", turn off all tones.
"Enable All", turn on all tones.
"Calling", turn on/off call tone.
"Private Call Tone", turn on/off Private Call Tone.
"Group Call Tone", turn on/off Group Call Tone.
"Keypad", turn on/off Keypad Tone.
"Message", turn on/off Message Tone.
Power Level Setting
You can set high / low power for each channel.
1)
Press
2)
3)
4)
Enter the "
Settings" menu.
Select "Radio Setting" sub-menu.
Select "Power Level" setting.
to the main menu in standby screen.
20
DP770 Digital Portable Radio
5)
Instruction Manual
Switching "high" / "low" power to set the new power level.
Squelch Level Setting
You can adjust the radio's squelch level to filter out useless calls under weak signal.
1)
Press
to the main menu in standby screen.
2)
3)
4)
5)
Enter the "
Settings" menu.
Select "Radio Setting".
Select "Squelch Level" setting.
Switch to the desired squelch level.
Vibration Setting
You can enable and disable vibration function.
to the main menu in standby screen.
1)
Press
2)
3)
4)
¾
¾
¾
Enter the "
Settings" menu.
Select "Radio Setting".
Select "Vibrate" to turn on / off the vibration.
"Disable All" to disable all the vibration.
"Enable All" to enable all the vibration.
"Call Alert", turn on/off call alert vibration.
21
DP770 Digital Portable Radio
¾
¾
¾
¾
Instruction Manual
"Calls", turn on/off call vibration.
"Messages", turn on/off message vibration.
"Emergency In ", turn on/off Emergency In vibration.
"Alarm Clock", turn on/off alarm clock Vibration.
Keypad Lock Setting
You can lock the keypad to prevent misuse.
Lock the Keypad Manually
1)
Press
to the main menu in standby screen.
2) Enter the "
Settings" menu.
3) Select "Radio Setting".
4) Select "Keypad Lock" setting.
5) Select "Lock Keypad", and LCD display shows "OK".
Lock the Keyboard Automatically
1) Select "Auto Lock" in the "Keypad Lock" setting.
2) Select the delay time of auto lock.
3) If you do not operate the keypad during the delay period, the keyboard will be locked
automatically.
Lock the Keyboard Shortcuts
Long Press "*" key will lock the keyboard in any screen.
22
DP770 Digital Portable Radio
Unlock the keypad
1)
2)
to select "unlock" under Keypad lock mode.
Press
Press "*" to unlock the keypad.
LED Indications
You can turn on / off the LED indications according to your request.
1)
Press
to the main menu in standby screen.
2)
3)
4)
Enter the "
Settings" menu.
Select "Radio Setting".
Select "LED Indications" to turn on / off LED.
VOX
You can enable / disable VOX function.
to the main menu in standby screen.
1)
Press
2)
3)
4)
Settings" menu.
Enter the "
Select "Radio Setting".
Select "VOX Setting" to enable / disable VOX.
8.2
Radio Information
23
Instruction Manual
DP770 Digital Portable Radio
Instruction Manual
You can get device information of your radio via the menu.
to the main menu in standby screen.
1)
Press
2)
3)
Enter the "
Settings" menu.
Select "Radio Info" to view of the Radio ID, serial number, firmware version, hardware version,
CPS version, and so on.
9
Advanced Functions
9.1
Radio Check
This function is used to check whether the radio is active in the system or not, while the checked
radio user cannot detect it. Except the LED flashes, there is no audible or visual notification on the
checked radio. The checked radio silently sends back an acknowledgement to the checking radio.
Sending a Radio Check
1)
Press
2)
3)
4)
5)
Enter the "
Contacts" menu.
Select the "Contact Lists", select desired private call contact.
Select "Radio Check".
The desired ID/alias displays on the LCD, indicating that the radio check command is sending,
and the red LED indicator lights on.
Wait for the acknowledgement.
6)
to the main menu in standby screen.
24
DP770 Digital Portable Radio
Instruction Manual
7)
If the checked radio is active in the system and sends acknowledgement, the transmitter’s LCD
displays "Radio Check Success", or otherwise "Radio Check Failed".
Note:
z
During the radio waiting for acknowledgement period after "Radio Check" command being sent
z
out, the radio can terminate the command and exit "Radio Check" mode by pressing
key.
Or if the retry times of sending "Radio Check" command reach its maximum times, the radio will
automatically exit this mode and displays " Radio Check Failed ".
9.2
Call Alert
Call alert function allows you to ask another user to call back.
Receiving and Answer the Call Alert
1) When the "call alert decode" is enabled and receiving a call alert, the radio will automatically
answer the call.
2) The LCD displays "Call Alert" with the caller’s alias/ID.
3) The call alert tone will sound periodically, and the orange LED flashes.
4) Press the PTT key to call back the caller, or press other keys to neglect the call alert.
Sending a Call Alert
1)
Press
25
to enter the main menu in standby screen.
DP770 Digital Portable Radio
2)
3)
4)
5)
6)
7)
Instruction Manual
Contacts" menu.
Enter the "
Select the "Contact Lists", select the desired private call contact.
Select "Call Alert".
The desired ID/alias displays on the LCD, indicating that the call alert is sending out, and the
red LED lights on.
Wait for the acknowledgement.
If the acknowledgement is received, the LCD displays "Call Alert Successful", or otherwise
displays "Call Alert Failed".
Note
z During the radio waiting for the acknowledgement period after the "Call Alert" command being
z
9.3
sent out, the radio will terminate the command and exit "Call Alert" mode by pressing
key.
Or if the retry times of sending "Call Alert" command reach its maximum times, the radio will
automatically exit this mode and displays "Call Alert Failed".
Radio Stun/Revive
This function allows you to send the "Radio Stun/Revive" command to Stun/Revive another radio.
The stunned radio can’t make or receive calls. The radio can only be revived again by an authorized
administrator radio, which can send the "Radio Revive" command to the stunned radio. After revived,
the radio can work as normally as before. This function is used to prevent unauthorized usage of the
radios or any usage of the lost radios.
26
DP770 Digital Portable Radio
Instruction Manual
Receiving a Radio Stun/Revive
After receiving the "Stun/Revive" command correctly, the radio will automatically reply "Successful
ACK". Otherwise it will reply "Failed ACK" information.
The stunned radio stays on the standby screen, only displaying the channel alias, group alias, and
"Status of Stunned" information. The stunned radio can only receive “Radio Revive” command. In
addition, it will neglect all of the keyboard operations except ON/OFF key operation.
If the stunned radio has been revived successfully, it will go back to the normal work status from
stunned status.
Sending a Radio Stun/Revive
1)
Press
2)
3)
4)
5)
Contacts" menu.
Enter the "
Select the "Contact Lists", select the desired private call contact.
Select "Radio Stun/Revive".
The desired ID/alias displays on the LCD, indicating that the "Radio Stun/Revive" command is
sending out, and the red LED lights on.
Wait for the acknowledgement.
If the successful ACK is received, the LCD displays "Disable/Enable Request Successful".
Otherwise it will display "Disable/Enable Request Failed".
6)
7)
Note:
27
to the main menu in standby screen.
DP770 Digital Portable Radio
z
z
9.4
Instruction Manual
During the radio waiting for the acknowledgement period after the "Radio Stun/Revive"
command being sent out, the radio can terminate the command and exit "Radio Stun/Revive"
key.
mode by pressing
Or if the retry times of sending "Radio Stun/Revive" command reach its maximum times, the
radio will automatically exit this mode and displays "Disable/Enable Request Failed".
Radio Kill/Active
This function allows you to send the "Radio Kill" command to kill another radio. The killed radio will
delete the main programmed parameters and power off automatically, and it can’t work even if
power on again.
The killed radio only can be activated by authorized dealer or manufacturer.
This function is used to prevent any usage of the lost radios and illegal reading of programming
parameters.
Note:
z Once the radio is killed, the programmed parameters will be lost, and the radio can’t work again.
z The killed radio only can be activated by authorized dealer or manufacturer.
Receiving a Radio Kill
After receiving the "Kill" command correctly, the radio will automatically reply "Successful ACK".
Otherwise it will reply "Failed ACK" information.
28
DP770 Digital Portable Radio
Instruction Manual
The killed radio will delete the configured parameters and power off automatically.
Sending a Radio Stun/Revive
1)
Press
2)
3)
4)
5)
Enter the "
Contacts" menu.
Select the "Contact Lists", select the desired private call contact.
Select "Radio Kill".
The desired ID/alias displays on the LCD, indicating that the "Radio Kill" command is sending
out, and the red LED lights on.
Wait for the acknowledgement.
If the successful ACK is received, the LCD displays "Radio Kill Successful". Otherwise it will
display "Radio Kill Failed".
6)
7)
9.5
to the main menu in standby screen.
Remote Monitor
This function is used to turn on the microphone of a target radio. There is no visible or audible
indication on the target radio. You can use this function to remote monitor any audio activities
around the target radio.
Sending a Remote Monitor
to enter the main menu in standby screen.
1)
Press
2)
3)
4)
Contacts" menu.
Enter the "
Select the "Contact Lists", select the desired private call contact.
Select "Remote Monitor".
29
DP770 Digital Portable Radio
5)
6)
7)
8)
Instruction Manual
The desired ID/alias displays on the LCD, indicating that the remote monitor command is
sending out, and the Red LED lights on.
Wait for the acknowledgement.
If the successful ACK is received, the LCD displays "Monitor Successful". Otherwise it will
display "Monitor Failed".
If the "Remote Monitor" command is successful, the radio starts receiving audio from the
desired radio for the programmed duration of CPS.
Note
z During the radio waiting for the acknowledgement period after the "Remote Monitor" command
being sent out, the radio can terminate the command and exit "Remote Monitor" mode by
z
9.6
key.
pressing
Or if the retry times of sending "Remote Monitor" command reach its maximum times, the radio
will automatically exit this mode and displays "Remote Monitor Failed".
Scan
Scan feature allows you to receive voice / data from different channels. The radio supports up to 128
scan list, each having 16 channels at its maximum. The radio supports analog, digital, or mixed
analog/digital mode scanning. You can have different scan lists for different channels.
You can add, delete channels in the scan list, or set the priority channels by editing the scan list.
Viewing Scan List
30
DP770 Digital Portable Radio
Instruction Manual
1)
Press
2)
3)
Enter the " Scan" menu.
Select "Scan List" to view the members in Scan List ( Represents priority channel 1,
Represents priority channel 2,
Represents non-priority channels).
to enter the main menu in standby screen.
Note
z
A scan list may contain two priority channels at most and each priority can have a channel. If
priority channels are not set, the corresponding entry of LCD will not be displayed.
Adding a Scan Channel
1) Select "Add" in "Scan List".
2) In the available channel list, select the desired channel, and add to the scan list.
Deleting a Scan Channel
1) Select a desired channel in "Scan List".
2) Select "Delete" to delete the desired channel from the scan list.
Editing the Priority Channel
1) Select desired channel in "Scan List".
2) Select "Setting priority channel 1" to set the desired channel as priority channel 1.
3) The setting process of priority channel 2 is the same as priority channel 1.
Start and Stop Scanning
31
DP770 Digital Portable Radio
1)
Press
Instruction Manual
to enter the main menu in standby screen.
2) Enter the "
Scan" menu.
3) Switch to start and stop scanning.
Note
z During scanning process, radio can only receive data (short message, GPS, telemetry or PC
data) and digital signaling on the selected channel.
Respond to Transmission during Scanning
During scanning, when the channel activity is detected, the radio will stay on the current channel.
Residence time period in the current channel is called “scan dwell time”.
1) Keep the microphone 1 to 2 inches distance from the lip.
2) Press PTT during the scan dwell time period, and the red LED will light.
3) Wait for the "call allow tone" to finish (if enabled), speak against the microphone.
4) Release PTT if you finish talking or want to listen to others.
5) If you do not respond within the scan dwell time period, the radio will go back scanning next
channel.
Delete a Nuisance Channel
If interference or noise continually appears in a channel, you can press the "nuisance channel
32
DP770 Digital Portable Radio
Instruction Manual
delete" key to temporarily remove the channel from the scan list.
Note
z You can’t delete all of the priority channels and the selected channel at the same time. And you
can’t delete the last channel in the scan list. That is, for any scan list, there should be at least
two channels. Otherwise the radio can’t enter scan status.
9.7
GPS
If "GPS" feature is enabled on your radio, it can display the location information. And it can also
provide location updates to the location application server.
View Location Information
to enter the main menu in standby screen.
1)
Press
2)
3)
GPS " menu.
Enter the "
Select "Position Information" to view Date\Time\Latitude\Longitude\Satellites information.
33
DP770 Digital Portable Radio
10
Instruction Manual
Troubleshooting
No.
Problem
Causes and Solutions
1
The radio cannot
be powered on.
A.The battery may be used up. Recharge it or change the battery to try again.
B.The power ON/OFF key may suffer from poor contact. Clear the metal dome
with alcohol and try again.
C.The power binding post isn’t connected with battery. Re-install it and try
again.
D.The power is connected inversely which leads to the power protective tube
F901 open. Replace the protective tube F901 and try again.
2
You
cannot
communicate with
other members
A.The frequency settings may be different from others. Set your TX/RX
frequencies to be the same as others.
B.The CTCSS/CDCSS signaling may be different from others. Set your
CTCSS/CDCSS signaling to be the same as others.
C.Your place may be too far away from the others, beyond the radio’s
coverage area.
34
DP770 Digital Portable Radio
3
The radio cannot
receive signals
Instruction Manual
A.The antenna may get looser or may be improperly installed. Re-install the
antenna.
B.The frequency settings may be different from others. Set your TX/RX
frequencies to be the same as others.
C. Your place may be too far away from the others, beyond the radio’s
coverage area.
4
During
5
receiving,
A.Check whether the volume is smallest or not. If so, increase the volume.
LED is green but
no voice.
B.Check whether the speaker is broken or not. If so, change the speaker.
GPS cannot locate
A. Check whether the antenna is GPS+UHF dual band or not. If not, use a
your position.
GPS+UHF dual band antenna to replace the old one.
B. Check whether the GPS setting is correct or not. If not, set it correctly.
C. Maybe there is some other RF interference around the radio’s place. Go to
an open sky place and try again.
CPS programming
failed.
6
35
A.Connection between the radio and PC is not good enough. Check and try
again.
B.Earphone interface board has poor contact with external programming
cable. If so, change the Earphone interface board.