1
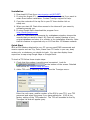
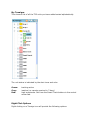
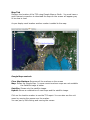
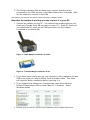
M1 Fleet Help Need Help? Tramigo 24 hour (Monday-Friday +8 GMT) Support: Email [email protected] or search Skype for tramigosupport or call +63 2889 3577 Tramigo Sales: [email protected] Tramigo Orders: [email protected] Check for program updates at www.tramigo.net/M1FLEET/ Contents Need Help?.......................................................................................... 1 Contents ............................................................................................. 1 System Requirements ........................................................................... 2 M1 Fleet Functions ............................................................................... 4 Installation .......................................................................................... 5 Quick Start .......................................................................................... 5 Main Application Screen ........................................................................ 7 My Tramigos........................................................................................ 8 Right Click Options ............................................................................ 8 Searching ......................................................................................... 9 Alerts ..............................................................................................10 Control Center Tab ..............................................................................13 Smart Track.....................................................................................13 Breadcrumb Trail ..............................................................................14 Tracking ..........................................................................................14 Safety .............................................................................................14 Reports Tab........................................................................................16 Filtering reports................................................................................17 Map Display .....................................................................................17 Report Icons ....................................................................................18 Map Tab.............................................................................................20 Tramigo Settings Tab...........................................................................21 Main Menu Options ..............................................................................22 Status Bar ..........................................................................................25 FAQ ...................................................................................................25 Exporting Data....................................................................................27 Troubleshooting ..................................................................................28 Modem Set-up – Siemens TC65/TC35 ....................................................29 EDGE USB Modem Setup ......................................................................33 Modem Set-up – USB Modems ..............................................................35 Production Setup Tips ..........................................................................36 M1 Modems ........................................................................................37 Application Change Log ........................................................................37 March 22, 2010 ................................................................................37 December 29,2009 ...........................................................................37 October 1,2009 ................................................................................38 August 25,2009................................................................................38 August 18,2009................................................................................38 August 5, 2009 ................................................................................39 July 31, 2009 ...................................................................................39 June 11, 2009 ..................................................................................39 May 23, 2009...................................................................................39 March 24, 2009 ................................................................................40 February 27, 2009 ............................................................................40 February 13, 2009 ............................................................................40 February 05, 2009 ............................................................................41 January 27, 2009 .............................................................................41 Nov 15, 2008 Beta............................................................................41 August 27, 2008...............................................................................42 August 11, 2008...............................................................................42 July 1, 2008.....................................................................................42 System Requirements • • • • • • • • • Tramigo T22 unit(s) to be tracked. Microsoft .NET Framework 2.0 Service Pack 1 Operating System: Microsoft Windows 2000, XP, Vista Intel processor 2 GHz or higher Color Monitor with video card that supports 1280x1024 screen resolution is recommended for production systems 250 Mb free hard disk space 150 Mb free RAM (System should have 1Gb RAM) for Google Maps 550 Mb free RAM (System should have 2Gb RAM) for Google Earth Internet connection (minimum DSL 384 kbps) • • • • • • Internet Explorer v6 or higher or Firefox 3.0 or higher MDAC (Microsoft Data Access Component) v2.6 or higher Sound card and speaker (if you are monitoring alerts) GSM Modem – Siemens TC65 (Quad Band) or TC35 (Dual Band – EGSM900/GSM1800) with GSM antenna. Complete list here SIM card for the Modem. Must have SMS enabled. Google Earth v4.2 installed (if required) - To use Google Earth then change the Map Tool setting in SettingsÆApplicationÆMap Tool. M1 Fleet Functions M1 Fleet replaces the Tramigo tracking functions of our M1 PC product. From your PC you can easily track your Tramigos and display their location on a map. 1. Google Maps/Earth Tramigo’s location is displayed using Google Maps or Google Earth. Users can chose to view maps, satellite pictures or both. You can also display all of your Tramigos locations at the same time. 2. Alerts High priority reports from your Tramigos are highlighted and can also activate an audible alert sound when using in a monitoring center. 3. Live Tracking By pressing one button you can plot the selected Tramigo’s location on the map. The map is updated as new location reports are received. 4. Smart Track By pressing one button you can turn on several tracking options quickly to closely track stolen vehicles or expensive cargo. The unit icon changes red so you can see at a glance your important vehicles. 5. Breadcrumb Trails See the places that your Tramigo has travelled during a trip or several trips over a day, week, or month. 6. Report Access All reports are stored in a Microsoft Access database and can be easily imported into Excel or other PC applications. 7. Control Center From the Control center tab you can set all the main reporting options for each Tramigo with a few mouse clicks. Trip, Speed, Alarm, Zone, Distance, Sensor, and Time reports are easier to use. Installation 1. Download M1 Fleet from www.tramigo.net/M1FLEET/ 2. If using the August 27th version then export your reports if you want to retain them before installation. Contact Tramigo support for help. 3. Copy the contents of the zip file to your PC then double click on setup.exe. 4. When you start M1 Fleet allow access to the internet if your security software prompts you. 5. If using Google Earth download the program from http://earth.google.com/ 5. When M1 Fleet starts and prompts for a database migration choose the records that you want to retain. M1 Fleet will create a backup of your original database and store it in a folder in the installation directory. Note that this feature is supported only on M1 Fleet Nov 15 Release onwards. Quick Start With a GSM Modem attached to your PC you can send FIND commands and receive reports such as Trip, Zone, Alarm from T22 units in your car, boat, motorcycle, or whatever you decide to track. You can also display these reports on a map using Google Maps or Google Earth. To track a T22 follow these simple steps: 1. Check that the modem is working and connected. Look for at the bottom of the screen. Detailed instructions for modem setup are here. 2. Add a T22 unit by selecting Add New from the Tramigos menu. Enter the unit name, mobile number of the SIM in your T22, your T22 password and select the group if you have added one. 0000 is the factory setting of the T22 password. The T22 will be added to the My Tramigos list and will appear grey. M1 sends some configuration commands and registers M1 as a user of the T22 with Owner authority. 3. When you are registered you will receive an SMS from the T22 and the icon will turn green. 4. Now you can turn on some tracking options in the Control Center tab. This will send SMS to your Tramigo to configure the reporting. 5. The SMS reports can be viewed on the Reports tab, and you double click on the report line to display the location on the map. Main Application Screen M1 is shipped with sample reports shown in the My Tramigos list. The tabs on the right are used to view the reports and maps and to control the reporting. The status bar on the bottom shows the modem status and the application activity. My Tramigos This shows a list of all the T22 units you have added sorted alphabetically. The unit status is indicated by the alert icons and color. Green: Grey: Red: tracking active inactive (no reports received in 7 days) high importance. Set from the Smart Track buttons in the control center tab. Right Click Options Right clicking on a Tramigo icon will provide the following options: Find - Sends a FIND command Find Near – Sends a command to find the 5 nearest places Send message - You can enter any T22 command and send it to the Tramigo. Re-Register - This sends commands to the unit to register as the owner. Delete - Deletes the T22 from the list. This does not delete the reports, so if you delete a T22 by mistake just re-add it and your reports are restored. Clear Alerts - Clears the alert. Right clicking on a group icon will provide the following options: Add Group – Adds a group to the list. To move a Tramigo to the group use the Tramigo Settings tab. Rename – Renaming the group. Delete – Deletes the group. Find - Sends a FIND command to all Tramigos in the Group Find Near – Sends a command to find the 5 nearest places to all Tramigos in the Group Send message - You can enter any T22 command and send it to all Tramigos in the group. Icons at top of Tramigo list. To display multiple vehicles on a map use the check box at the left side of each Tramigo. Click on the globe icon to display the Tramigo’s that are selected. Beside the Globe is a select all or none icon. Searching The search icon can be used to find a specific Tramigo. You can enter partial names or phone numbers and the results are displayed in a list that you can select from by double left clicking Alerts The alert indicator icon will be shown whenever one or more Tramigo received alert messages. Clicking on this button will show a screen containing the list of all Tramigos with active alerts. The live tracking icon can be turn off/on. When live tracking is on and a location message arrived from any selected Tramigo (checked Tramigo) it will be automatically plotted in the map. Keep the map tab open to watch the progress of Alerts When an Alert is received the Tramigo icon will change and an alarm will sound. To clear the alert right click on the Tramigo icon and select clear alerts. indicates an alert was triggered You configure the Alert handling in SettingsÆApplication. When checked the following reports will signal an Alert You can also change the sounds and interval of the alarm (in seconds) Control Center Tab The control center tab is used to set the reporting options. Each T22 user controls their own reporting so you have to turn on the reports you want to receive in M1. See the T22 User manual for a complete list of commands and reports. Smart Track Smart Track lets you quickly configure reporting in critical situations with the push of a button. When activated the unit icon will turn red. You can edit the commands that are sent by each Smart Track button and change the icons displayed. To activate select a Tramigo and press the button. The indicator light will turn green and M1 will send the commands to the Tramigo and the vehicle icon is set to red. When you press the button a second time, a set of commands are sent to set the configuration back to normal. M1 Fleet provides 3 sample Smart Track functions to get you started: Stolen: Used when a vehicle is stolen. Turns off sleep mode and activates automatic Find reporting. Immobilize: Used in countries where immobilization is allowed. You need to add the commands in production. The default command is just the Version command to prevent accidental immobilization while testing. Monitor: Used for valuable cargo or whenever detailed tracking is needed. Turns on Trip and Distance commands. This is a good option for the breadcrumb trail. Note: The Apply and Cancel buttons at the bottom of the screen do not apply to Smart Track – once you press a smart track buttons the commands are immediately sent to the Tramigo you have selected. Breadcrumb Trail To activate turn on Trip Start, Trip reporting, and Periodic Find with a Distance of 1km. Now your will receive reports when a trip starts and ends, and plot locations every 1km. To view the Breadcrumb Trail simply click on the Trip End report. Note that with locations 1 km apart your trip will not reflect exactly the route taken, but can highlight the areas Tramigos are travelling in. Tracking Trip: Turns on/off reporting at the end of a Trip Trip Start: Sends a report at the start of a Trip Periodic Find: Distance: Sends a Location report every x km/mi selected. Minimum 1 km/mile. In version 1.40 firmware you can select as small as 0.5 km/mile. Time: Sends a Location report every x minutes, based on the time selected. Minimum is 1 munute. Buttons: Trip Now Requests the last Trip report if the unit is parked or the Trip in progress if the unit is moving Find: Requests the current location Safety Zone Activates the Zone report. A Zone is a circle around the location (either current or named) with a radius based on the parameter. When the T22 crosses this circle a Zone report is sent. Power Activates the Power report. When the battery reaches 20% capacity then a report is sent. Sensor Activates the Sensor report. When the sensor is turned on or off you will receive a report. This feature requires v1.40 or higher T22 firmware, and an optional external sensor. Example is a flood indicator used in boats or basements. You can use any type of sensor that works like a switch. Speed Activates the Speed report. When the speed limit set is exceeded then a report is sent. Ignition Activates the Ignition report. A report is sent each time the ignition is turned on or off. Alarm Arms the Alarm report. When the motion sensor detects movement or if the vehicle has moved more than 100m a report is sent, and the Alarm is turned off. Note the Alarm report has to be reactivated after an alarm. This is to avoid excessive text messages. Reports Tab Shows a formatted list of the reports that have been received. Double clicking on the report icon or the globe icon at the left will display the location on the map screen. Reports that are without coordinates (note that coordinates are not shown in the report screen) can not be show on the map. Reports are updated automatically as they are received from your Tramigos. Reports are sorted with the newest at the top of the screen. They are added as they are received by M1 and not sorted by the report date. M1 modifies the report for easier viewing on the screen. To see the actual T22 report just move the mouse over the report. You use the page control to quickly move through the pages Filtering reports M1 Fleet provides several ways to filter the report list. Exclude Info reports filters out the Tramigo command responses Show All will display all the reports Show Only Alerts will only show reports that are listed as Alerts in Application Settings Show Reports Between Date filters the reports by the date range you chose. Click on Search to activate this filter. To remove date filtering uncheck the box. Map All Trips in this Date will show all breadcrumb trails between for the date range on a map Export will export the data to MS Excel. Trip Summary will show a dialog showing summary of all trips from a selected period. The globe icon indicates that the report can be shown on a map. The copy icon is used to copy the report contents to the clipboard. Map Display To see the current location you just need to double click on the report row. To see multiple Tramigos at once use the check boxes on the My Tramigos list then click on the globe icon. To see a breadcrumb trail follow the instructions in You can also configure the mapping options in SettingsÆApplication You can select either Google Maps or Google Earth You can select which markers are used by Google Maps only This option changes the colour of the breadcrumb trail Show Marker Information – This option when checked will automatically show the information of the marker on the map without clicking it. Report Icons Each icon represents a different type of report. Double left clicking shows the location on the map if coordinates are turned on. Icon Report Info Alarm – Reports when the motion sensor is activated or when the Tramigo has moved more than 100m. Find – Reports last known location of your Tramigo. Find Near shows the closest landmarks Ignition – Shows when the ignition is turned on and off SOS – Reports when someone has pressed the SOS button Trip – Reports statistics when a trip ends. Power – Reports when the Tramigo detects low power in the battery Sensor – Reports when the sensor is activated (requires T22 v1.40 firmware loaded) Speed – Reports when the speed limit is exceeded Zone – Reports when the Tramigo crosses a Zone boundary Info – Various informational reports, such as command responses Map Tab Displays the location of the T22 using Google Maps or Earth. You must have a good internet connection to download the maps or the screen will appear grey or be slow to load. As you display each location another marker is added to the map: Google Maps controls Clear Map Markers: Removes all the markers on the screen Map: Shows the Google Map. In some countries where maps are not available the Satellite image is better Satellite: Shows only the satellite image. Hybrid: Shows a combination of road maps and the satellite image. Click on the location marker to see the T22 report. You can also see the unit name by moving the mouse over the marker. You can pan by left clicking and moving the mouse. Tramigo Settings Tab Displays the settings for the unit. Get Info will update the information by sending a Version command to the T22. Tramigo Properties Name: Phone: Unit name This is the phone number of the SIM installed in the T22 unit. Do not enter your modem phone number! Changing the phone number will automatically re-register the Tramigo. Password: T22 Unit password IMEI: IMEI number of the unit. Use the GET button to fill this. Icon: Determines the icon used in the unit list. Group: Determines the group the Tramigo belongs to. Tramigo Configuration Use the GET INFO button to fill these fields. Location Directory Version: Shows which LD is loaded in the unit. Language File Version: Shows which LF is loaded in the unit Firmware Version: Shows which firmware is loaded in the unit Main Menu Options From the main screen the following menu options are available: File Exit the program Tramigos Add New - is used for adding Tramigo units that you want to monitor. Sort - re sorts the Tramigo list in alphabetical order. Add Group – adds a new group to the list. Smart Track Commands You can change the icon, name, and commands for each Smart Track button. You add a set of commands that are sent when the feature is turned on, and another set sent when turned off. The commands should Note you can only send up to 5 commands in one SMS to a T22. You separate the commands with the > symbol. Example: Trip,on>Find,1 The immobilize commands are left blank to prevent accidental sending while testing the system. In a production environment you would add the proper commands. Scheduled Commands You can set M1 Fleet to send commands to your T22’s based on hourly, daily, weekly, or monthly interval. Application Alert Reports – you can select which report types trigger an alert Language File for Reports – set the language that your T22 reports are using. This allows M1 to determine the report type. The file name should match the LF you see in Tramigo Settings. Application Language – set the language for M1 Fleet Maximum No. of Reports to Display – allows you to change the number of reports per page on the Reports tab Alarm Chime – allows you to select the alarm sound. Alarm sound can be set to silent. Alarm Interval – allows you to select the time between alarm sounds in seconds. Map Tool – select either Google Maps or Google Earth (requires installation of Google Earth – http://earth.google.com/ ) Marker Type– use either Google or Tramigo icons in Google Maps only Trip Path Color – select the color of the Breadcrumb trail Logo – allows you to change the M1 logo on the main screen Logo Background – allows you to change the M1 logo side background on the main screen. Splash Screen Image – allows you to change the image that appears when M1 starts. Image is 300x500x24 Start M1 Fleet when Windows starts – allows you to automatically start M1 Fleet when Windows starts Modem – You can change the modem settings here. Only COM port normally needs to be changed. See modem setup for more information. Connect Modem – will try to connect to the modem Tools Export All Devices and Reports – will export all devices and report to a preformatted Excel file ready for printing. Database Check – will show a dialog while database reports are being check for integrity. Database Backup – will show a dialog to change the schedule of the backup. By default backup is done Daily every 11:59 pm. Note: To restore a database backup, close M1 Fleet. Go to Start -> Tramigo -> Utilities -> M1 Fleet Database Restore. RESTORING DATABASE WILL OVERWRITE YOUR EXISTING DATA. Help Send Application Log to Tramigo Support – this will send the M1 Fleet logs and M1 Help – shows this file About – shows program version Status Bar Left side shows status of the GSM modem and right side shows the current activity in the system. Click on right side of the status bar for a complete activity list. FAQ How many vehicles can I add? There is no limit set to the number of vehicles you can add, however you should limit the number of incoming SMS as the modem can only handle between 10-20 concurrent SMS before it will bog down. If setting automatic find reports, then space them out to reduce load on the modem. Also used the distance find to reduce the load when Tramigo’s are not moving. Can I use a phone as a modem? Phones are not suitable as an SMS modem because they are hard to keep running over long periods of time. Phone chargers are not designed to be plugged in for weeks, so for M1 Fleet use the Siemens modems we recommend. They will run for months without a problem. How do I see the breadcrumb trail? 1. Turn on periodic find, either time or distance 2. Turn on trip reporting 3. Gather trip and location reports 4. Double click on a Trip report to see the trail on the map. Why M1 Fleet is not receiving trip reports? Most probable cause is faulty ignition wiring setup. You will immediately notice this when you have periodic find and after a certain trip you always have a stopped report instead of parked. Why does in M1 Fleet Control Center settings different from actual device settings? This scenario usually happens when a user change settings in M1 Fleet and the sms command to turn on or off specific settings to actual T22 was not yet receive or was never sent at all. You can sync the settings of your T22 by clicking the button Get Info in the Control Center Tab. I am receiving errors when exporting to excel. Check for updates using Windows Update. Some excel bugs were discovered when Windows / Microsoft Office is not updated. Why does nothing display in What’s New? Possible causes: You have no internet connection, or you replied No when your firewall software asked to allow M1 Fleet to connect to the internet. You may have an office firewall blocking access. Why are my Maps not displaying? Possible causes: No or slow internet connection. Google maps site blocked by administrator (firewall) – try visiting maps.google.com to check. Coordinates not in report – re-register T22 to turn on coordinates. I deleted a Tramigo by mistake – what do I do? Just re-add the Tramigo and your old reports will still be listed. I see SMS received but there are no reports to view? M1 will only add a report if the phone numbers match. Check that the phone number in the Tramigo Settings tab matches the phone number of the incoming SMS. It could also be SPAM SMS that the system received. To see the raw SMS in the database see the section on Exporting Data Google Maps or Earth which one should I use? Google Maps is best if Google has good quality maps for your area. You can check by looking here: http://gmapssamples.googlecode.com/svn/trunk/mapcoverage_filtered.html Google Earth is best if you need to work offline sometimes since you can set the map cache larger to store your maps for offline use. Google Earth maps are also updated before Google Maps. You can also use your own street overlays. Note Google Earth uses more system resources, but is normally faster than Google Maps. Exporting Data You can use the Export button in the Reports tab to produce a readable Excel file. For advanced applications all the data is stored in a Microsoft Access database that can be opened in MS Access or Excel. The table names are: Name Contents Messages All incoming SMS Devices T22 units DeviceGroups Group names Reports Report types and their alert status Outbound All outgoing SMS Modem Modem Settings ApplicationConfig Application Settings ApplicationLanguage List of Languages ApplicationResources All the strings – used for translation How to copy the T22 reports into Excel: 1. In Excel select FileÆOpen then select Access Databases in the Files of type dropdown. 2. Select Document and Settings\All Users\Application Data\Tramigo\M1 Fleet\”latest version no” for XP or ProgramData\Tramigo\M1 Fleet\”latest version no”. 3. Select the Messages table to see all reports 4. All reports are copied into your spreadsheet. Newest reports are at the bottom. Troubleshooting M1 Fleet does not start on Vista and only shows Splashscreen. This usually occurs when Vista cache old configuration file after an upgrade of M1 Fleet from previous version. To clear this old configuration file: - go to the installation directory by default c:\program files\tramigo\tramigo m1 fleet - if an old configuration file is existing, you will see in the toolbar below the file path a button called Compatibility Files, click on it and it will open a folder where your old configuration files are. Manually delete everything in it. - Start m1 fleet. Modem Not Connected. Check that the modem is plugged in and on and connected to the GSM network. Unplug and plug in the USB cable. Check that the port is visible in Microsoft Device Manager. Note USB ports can change number after re-booting your PC. If you get port in use message then reboot your PC. If you have Bluetooth ports on your Laptop then disable them if unneeded. For USB modems check that there is no port conflicts in Windows Device Manager. Try changing the memory type to Modem only in SettingsÆModem Advanced tab. You can also try lowering the Baud rate. Report ICONS are all the blue Info icon. If the language of the reports is not English then you need to set the Report Language File in SettingsÆApplication. You should select the same Language file that is loaded in your T22. T22 Not Responding. Check that the T22 is awake and the GSM is working (try calling the number from your phone). Check that the phone number is correct. Check if the T22 responds from your phone. Check the format of the phone number with the number you added as they have to match and many operators use the country code (+63…) but a few use a local format (01234). Messages received but not displayed. Check that the phone number in vehicle settings tab is the same as the incoming SMS. You can also see the actual content of the incoming SMS in the M1 Fleet.mdb database. You may be receiving advertising messages that have not been sent by your Tramigos. Map not available for my report. There is no globe icon and clicking on the report icon does nothing. This is because the report does not have coordinates and you can check my moving your mouse over the report line. Example of coordinates: T22: Moving, at Kenya National Archives, Central, Nairobi, KE, 1.28489, 36.82590, N with speed 31 km/h, 12:17 Jun 1 If you re-register your Tramigo then M1 Fleet will send the commands to turn on the coordinates Map Not Displaying. Check your internet connection. If the What’s New tab does not show the Tramigo web site then Maps will not display. Make sure you replied YES when your internet security asked to allow M1 Fleet to access the internet. If you can see the Tramigo web site but not the maps check with your LAN administrator to make sure Google Maps is not blocked. If there is no administrator check that your browser has java scripts enabled – instructions at: http://support.microsoft.com/gp/howtoscript Password Mismatch message on registration. However the registration worked. M1 sends 2 commands to the unit owner,0000 and owner,yes in case M1 is the first user of the T22. If you are the first owner the T22 prompts you to reply owner,yes to complete registration. This way the registration always works, but you will get the password mismatch if there is already a user defined. Modem Set-up – Siemens TC65/TC35 Before you Start M1 connect the modem make sure it’s working and can connect to the GSM network 1. Put a SIM card in the modem. Make sure there is no PIN code and for pre-paid SIM ensure there are credits loaded. The TC65 and TC35 modems have the same type of SIM holders as your T22. 2. Connect the modem antenna and power cable. 3. The Siemens Modem light will flash every second, and then when connected to the GSM network it will flash slower every 3 seconds. Wait for the modem to connect to the GSM Note: Refer to your Siemens user guide for details in operation of Siemens modem. Now that the modem is working you can connect it to your PC. • Connect the modem to your PC. You connect the modem cable to your serial port (Female 9 pin DB connector on your PC). Start M1 Fleet and you should see M1 check all the COM ports then you will modem connected in the status bar. Figure 1 - Male DB9 pin connector on Cable Figure 2 - Female DB9 pin connector on PC • If you don’t have a serial port on your computer (many laptops only have USB ports) then you need a USB to Serial converter cable. This cable will require a driver installation before you plug it in. • If you ordered you cables from Tramigo then insert the small blue Drivers CD and select USB to Serial Cable V1.1 directory. Select Windows\Install • Double click on the PL-2303 Driver Installer.exe to install the driver. • Connect the modem Cable to your Modem like in the previous step, the Serial to USB cable to the modem cable and your PC USB port. Start M1 Fleet and you should see modem connected in the status bar. Note: Refer to your Manufacturers USB to RS232 cable installation guide for proper installation of the cable. Figure 3 - USB to Serial cable If M1 Fleet does not detect your modem then check the COM port in SettingsÆModem – Select Auto Detect then save. M1 will try to find the correct COM port for you. When M1 finds a modem it will update the Modem Information. If M1 Fleet does not detect your modem, or finds another modem (like a Bluetooth Phone) then you will have to specify the exact COM port in SettingsÆModem • Click on Launch Device Manager then check the Ports section for your Prolific USB-to-Serial Comm Port. Change the COM port from Auto Detect to match the COM port setting in Device Manger. Click Apply and then your modem should show as connected in the status bar. • In this example the port number is COM18 EDGE USB Modem Setup Note: *If the installer prompts you to restart your machine choose no. 1. Click Ok 2. Click Next 3. Click Install 4. After the installation is complete the EDGE Modem will launch its own application. Close this dialog. 5. Go to C:\Program Files\EDGE CARD\EDGE MODEM, delete wireless.exe 6. You are now done! Run M1 Fleet and under Tools> Modem Settings. Change COM port to Auto Detect. Modem Set-up – USB Modems USB modems connect directly to the USB port and usually install software and drivers when you first connect them. They can be difficult to get working because the modem software can tie up the com port preventing M1 Fleet from connecting to the modem 1. Put a SIM card in the modem. Make sure there is no PIN code and for pre-paid SIM ensure there are credits loaded. 2. Follow the instructions from the Modem manufacturer. Connect the modem to your PC and install any required device drivers or software. Verify that you can send SMS with the modem utilities. 3. Shut down the modem software otherwise it will tie up the COM port. Check the COM port number in Device ManagerÆModems 4. In M1 SettingsÆModem menu change the COM port to match your modem. The modem should then show as connected in the status bar. 5. If you have problems connecting you may have to set the Message Memory to Modem or SIM. Once connected try to send and receive a SMS. If you have problems receiving try the SIM setting. Some USB modems will only work this way. Production Setup Tips In a commercial production environment stability is the priority since important reports from your Tramigos can be lost if M1 Fleet is not up and running. Here are some tips to a successful install. Location • Ensure the location has good GSM reception. Poor reception will cause problems sending and receiving SMS. GSM operators can install small transmitters in offices that have poor reception. • Locate the PC in a location where it will remain powered on and unaffected by cleaning staff. The PC should be running 24 hours a day to avoid missing reports. Setup • Use a desktop system with a UPS for the PC and modem. Do not use a laptop or USB modem. USB modems can easily be disconnected by accident. • Screen resolution of 1280x1024 is optimal so you can see all 10 reports on the screen without scrolling. • Screw in the modem cable to the PC and modem. Use a serial port connection only. • The TC65 and TC35 modems have mounting holes so permanently mount the modem. • Add M1 Fleet to the startup, so if the PC is rebooted M1 will automatically start. • Change the password on the T22’s to prevent unauthorized access. • Have a backup system ready in case of hardware problems. • Have a manual process ready in case of serious GSM network problems. Maintenance • Backup the M1 Fleet.mdb database file daily. • Setup the PC to reboot once per week. This is needed to keep MS Windows machines running smoothly. • Use post paid SIM cards to avoid insufficient credit/load problems. Pilot • Start with a 1-10 vehicle pilotsfirst to get things running smoothly. • Perform a stress test prior to the live date to ensure the SMS volume can be handled by the modem. • Add remaining vehicles in the fleet after a successful pilot M1 Modems We have been testing using the Siemens TC65 and TC35 modems and verified they work without problems. These modems and all the needed cables and power supplies can be ordered directly from Tramigo. M1 Fleet has been designed to work with any ETSI 07.05 compliant GSM Modem that supports sending and receiving of SMS in PDU mode but we only support production environments that use Siemens TC65 and TC35 modems. USB modems are convenient but normally have difficulty in running 24 hours a day. Contact [email protected] for more information. Application Change Log March 22, 2010 Note that the database tables have changed so the Aug 27 version M1 Fleet.mdb is not compatible with this version. You must export your Reports table before you install this new version, otherwise you will lose your report history. Fixes & Changes: 1. Added directional icons. 2. Added feature to show marker information immediately. 3. Fixed date problems. 4. Fixed problem on plotting trip reports December 29,2009 Note that the database tables have changed so the Aug 27 version M1 Fleet.mdb is not compatible with this version. You must export your Reports table before you install this new version, otherwise you will lose your report history. Fixes & Changes: 5. Added scheduling features for sending commands to T22. 6. Added backup / restore database features. 7. Fixed wrong ignition icon on some reports. 8. Fixed problem on date format dd/mm/yyyy. 9. Fixed problem when sending to only one t22 with a checked item. 10. Added feature to get actual device settings to match the M1 Fleet control center settings. 11. Fixed some problem when literals are too long to be shown. 12. Support for 64 bit Windows operating systems. October 1,2009 Note that the database tables have changed so the Aug 27 version M1 Fleet.mdb is not compatible with this version. You must export your Reports table before you install this new version, otherwise you will lose your report history. Fixes: 1. Major fixes for parsing reports for other languages. August 25,2009 Note that the database tables have changed so the Aug 27 version M1 Fleet.mdb is not compatible with this version. You must export your Reports table before you install this new version, otherwise you will lose your report history. Fixes: 1. Updated French LF for French Report problem fix regarding accented characters. August 18,2009 Note that the database tables have changed so the Aug 27 version M1 Fleet.mdb is not compatible with this version. You must export your Reports table before you install this new version, otherwise you will lose your report history. Fixes: 1. Fixes for registration of T22 message problem. Message not being sent properly. Caused by changes in modem retrieval. August 5, 2009 Note that the database tables have changed so the Aug 27 version M1 Fleet.mdb is not compatible with this version. You must export your Reports table before you install this new version, otherwise you will lose your report history. Fixes: 1. Changes to modem messages retrieval procedures. 2. Added handling of launching application for Vista with UAC enabled. 3. Added application languages and report language files. 4. French report language update fix. 5. Old Messages received problem fix. 6. Multiple Send Message fix. July 31, 2009 Note that the database tables have changed so the Aug 27 version M1 Fleet.mdb is not compatible with this version. You must export your Reports table before you install this new version, otherwise you will lose your report history. Fixes: 1. Live tracking bug fix. 2. Excel export bug fix. June 11, 2009 Note that the database tables have changed so the Aug 27 version M1 Fleet.mdb is not compatible with this version. You must export your Reports table before you install this new version, otherwise you will lose your report history. Fixes: 1. Bug fixes. May 23, 2009 Note that the database tables have changed so the Aug 27 version M1 Fleet.mdb is not compatible with this version. You must export your Reports table before you install this new version, otherwise you will lose your report history. Fixes: 1. Fixed problems handling negative coordinates. 2. Fixed problems handling reports from other languages. 3. Added automatic Database Checking when Language File settings changed. 4. Added place name for zone. 5. Added other sample reports in other language. 6. Fixed problems in export when filtered by date. 7. Fixed non English translations. March 24, 2009 Note that the database tables have changed so the Aug 27 version M1 Fleet.mdb is not compatible with this version. You must export your Reports table before you install this new version, otherwise you will lose your report history. Fixes: 1. Problems in highlighting landmarks with Russian and English Language from a T22 report. 2. Problems on plotting maps of reports with wrong trip dates. February 27, 2009 Note that the database tables have changed so the Aug 27 version M1 Fleet.mdb is not compatible with this version. You must export your Reports table before you install this new version, otherwise you will lose your report history. Fixes: 1. Settings are incorrect when navigating from various devices in My Tramigo list or messages comes in from other devices. 2. Ability to send password change command. 3. Find, find near, send message, and clear alerts options for multiple checked items. 4. Fixed command format for sending periodic find. 5. Display the Off in combo box time when Periodic find time interval is 0. 6. Database, m1fleetevent.log, kml will now be saved in the Common Application Data. This depends on the operating system: For XP / Windows 2000: • C:\document and settings\all users\application data\tramigo\m1 fleet\”version no” Vista: • C:\ProgramData\tramigo\m1 fleet\”version no” 7. Fix problem where messages in between trip reports have same time producing incorrect trip path. February 13, 2009 Note that the database tables have changed so the Aug 27 version M1 Fleet.mdb is not compatible with this version. You must export your Reports table before you install this new version, otherwise you will lose your report history. Fixes: 8. Fixes for various problems when exporting to Excel. 9. Fixes for problem on checking database. February 05, 2009 Note that the database tables have changed so the Aug 27 version M1 Fleet.mdb is not compatible with this version. You must export your Reports table before you install this new version, otherwise you will lose your report history. Fixes: 1. Fixes for problem when PC not using US English date format. 2. Fixes for problem when filtering reports and trip summary for a single day. January 27, 2009 Note that the database tables have changed so the Aug 27 version M1 Fleet.mdb is not compatible with this version. You must export your Reports table before you install this new version, otherwise you will lose your report history. Changes: 1. Alerted Tramigos can be easily seen by the alert icon. 2. Export report features. 3. Automatic database migration and checking features during upgrade. Note that this feature is supported if upgrading from Nov 15 version onwards. 4. Added live tracking whenever a message comes in. 5. Trip summary available on Reports tab 6. Added configuration for Longitude and Latitude adjustments. 7. Added grouping in My Tramigo. DeviceGroups table added to database. 8. Various bug fixes and improvements. Nov 15, 2008 Beta Note that the database tables have changed so the Aug 27 version M1 Fleet.mdb is not compatible with this version. You must export your Reports table before you install this new version, otherwise you will lose your report history. Changes: 1. Multi Tramigo select added to show latest location of some or all Tramigos at once on the map 2. Breadcrumb Trail feature to display points logged during a trip 3. Removed limits on number of Tramigo’s that can be added to the system. Note that the GSM modem is still a limitation on how many SMS can be sent and received at once. 4. Literals added to support translation. Application Language and ApplicationResources tables added. If you want to add your own language then contact Tramigo support for assistance. 5. Search feature added to search the Tramigo list by name or phone number. 6. Added Application Setting to change M1 graphics for re-branding 7. Splash screen added at program startup. Image is 300x500x24 8. Sensor reporting added for upcoming T22 v1.40 firmware 9. Setting added to limit the number of reports displayed per page. Optimize this for your screen resolution and shape. 10. Application Setting added to automatically start M1 Fleet on reboot of PC 11. Added check for inactive Tramigos. Will run every day at midnight and at application startup time. Tramigo Icon will turn grey if no reports received for 7 days. This limit can be changed in M1Fleet.exe.config <add key="DaysInactiveLimit" value="7"/> 12. Added Application Setting for Google Map markers and Trip path color. 13. Various bug fixes and improvements. August 27, 2008 1. Added Trip start and end to Google Earth. 2. Various bug fixes and improvements. August 11, 2008 1. Added Smart Track configuration. 2. Google Earth support 3. Added page navigation for report tab July 1, 2008 1. Initial Production Release.