1
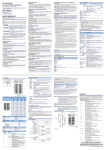
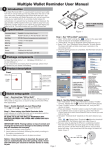
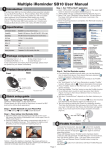
JUNXION BOX
USER MANUAL
Introduction
The STEIM junXion box allows you to connect up to 8 analog sensors, 16 switches and 2
channels of ultrasound to your computer via USB.
The junXion box is a bare printed circuitboard with all necessary electronics on it. It’s up
to you to solder your sensors and switches on the board. This means it is necessary to
have some soldering experience, as mistakes in soldering can cause the junXion box not
to function correctly, and might even break it beyond repair.
It is possible to use multiple junXion boxes at once with the junXion v2 software and a
USB hub.
Aside from soldering experience, it can be very helpful to have some electronics
knowledge. This manual provides the basic information you need to connect your sensors
and switches to the junXion box. For additional information on specific sensors or
customized schematics for certain sensors STEIM refers to the internet.
Specifications
- The STEIM junXion box is a HumanInterfaceDevice (HID-compliant)
- The STEIM junXion box is a lowspeed USB-device (USB1.1, 1Mb/s)
- The junXion box connects to a host computer via a standard USB typeA-typeB
connector.
- A/D conversion 8bit
- Ultrasound distance measuring 12bit
Contents
1
general information and warnings
1.1
1.2
2
general safety warnings
specific issues
PCB connection layout
2.1
2.2
2.3
2.4
3
switch connections
analog sensors connections
ultrasound connections
2.3.1 The transmitter part
2.3.2 The receiver part
2.3.3 The external power supply
visual feedback
Using the junXion box
3.1
3.2
3.3
3.4
Example of connected switch
Example of connected analog sensor
Example of connected ultrasound
3.3.1 Connecting the transmitter
3.3.2 Connecting the receiver board
3.3.3 Connecting the external power supply
Connecting the junXion box to the computer
1.2
GENERAL SAFETY WARNINGS
Read this manual carefully, before using the junXion box.
The junXion box onboard power is derived from the USB-bus. The power is fused so you
don’t have to worry you will blow your USB-bus on your computer.
However, you have to watch out that you do not short the USB bus on the connector
itself.
The device does not contain user serviceable parts. All service work should be done by
STEIM, unless STEIM explicitly tells you to do it yourself.
Besides these precautions you should also take the usual precautions as with all electronic
music equipment (like: avoid to much heat, don't spill any fluids into it, don't use it
underwater, don't put house voltage on the connectors, etc)
Don’t solder on the board, while it is connected to the USB port.
1.3
SPECIFIC SAFETY ISSUES
STEIM should be contacted immediatly if any problem or malfunctioning takes place.
The junXion box can be damaged by making wrong connections between the board and
the sensors.
The voltage on the analog inputs (signal in) should NEVER exceed the range 0-5V.
When the junXion box runs on USB power, the maximum amount of power available is
375mW.
This means that the 8 analog channels can deliver a total of 75mA to the sensors.
The result is that the average maximum current consumption per sensor is 9.3mA.
The powerline (5V USB power) should never be shorted to ground.
Don’t solder on the board, while it is connected to the USB.
When using an external power supply, be sure to first connect the junXion box to the
computer and then turn on / connect the external power supply.
When powering off, first disconnect the external power, then disconnect from the
computer.
The junXion box is HID-compliant, so you can connect it when your computer is already
on.
2.1
Switch Connections
You can connect up to 16 switches to the junXion box.
The switch inputs are on the strips labelled CON6, CON7 en CON8 and are meant to
switch to ground (GND).
CON6: Inputs 1 - 4
CON8: Inputs 5 - 12
CON7: Inputs 13 - 16
CON3: GROUND
You should connect the switch as following:
2.2
Analog Sensor Connections
You can connect up to 8 analog sensors to the junXion box.
The sensor inputs are on the strips labeled CON4 and CON5 and have to be referenced to
5V and GND.
.
CON4: Inputs 1 - 4
CON5: Inputs 5 – 8
CON2: 5 volt
CON3: GND
Note1: Be aware of the fact that you can draw a maximum of 75mA for your sensors.
Note2: When you are not using all the analog inputs and you leave the inputs open, you
create so called ‘floating inputs’. This will cause the junXion box to send out junk data
for these inputs. You can avoid this by connecting the loose inputs to GND.
Typical sensor application can be found in Chapter 4.
You should connect an analog sensor as following:
2.3
Ultrasound Connections
You can connect up to 2 ultrasound transmitters/receivers to the junXion box.
You need an external power supply to make the ultrasound work. (This will be explained
in the next paragraph).
2.3.1 the transmitter part.
The transmitter outputs are CON10 and CON13.
CON13: Channel 1 Tx + GND
CON10: Channel 2 Tx + GND
You should connect an ultrasound transmitter as following:
2.3.2 the receiver part.
The receiver inputs are CON14 and CON11
These inputs expect a stable and rectified echo pulse from the receivers.
To achieve this, STEIM has developed a small circuit board which generates the proper
echo pulse. This board has to be powered with two powersupplies.
CON9: 9V and 5V (see next paragraph)
CON12: 9V and 5V (see next paragraph)
CON14: Channel 1: Rx and GND
CON11: Channel 2: Rx and GND
CON9 and CON12 are equal; they don’t belong to a specific ultrasound channel.
You should connect an ultrasound receiver as following:
For the receiver boards, please contact STEIM. Check the website for more details.
(www.steim.nl)
2.3.3 the external power supply
The external power for the ultrasound can be hooked up using CON15. Without this
external power, the ultrasound will not work.
The external power must be minimum 9V DC and maximum 12V DC.
DO NOT CONNECT THE JUNXION BOX TO AC POWER!!
CON15: External power 9V-12V DC (a 9V battery block will do fine)
The external power input is protected against reverse connecting.
2.4
Visual Feedback
The device has 3 LEDs mounted on the board.
LED1 (green):
LED2 (red:
LED3 (red):
blinks when data is transmitted to hostmachine
USB-power present
External power present
Notes on the green LED:
When the green LED is on instead of blinking, it means that the junXion box is
transmitting data continuesly. This can happen when one or more analog input is floating.
This will not harm the device.
If you want to avoid this, be sure that all analog inputs have a stable input. You can do
this by connecting the (not used) analog inputs to ground (GND).
When you’re using a noisy or sensitive sensor (like an accelerometer), it is unavoidable
to have a continues dataflow.
Notes on the USB power LED:
When this USB-powerLED is off, while the USB is connected to the junxion box you
should disconnect the junXionbox from the USB cable and search for a possible
shortcircuit in your sensor wiring.
Notes on the External power LED:
When the External power LED is off, while the external power is connected and turned
on, you should immediately disconnect the junXion box from the external powersource.
The error will be found in wrong connections with the ultrasound.
3.0
Using the junXion box
Now that you know where to connect your switches, sensors and ultrasound sensors, it is
time to hook up your sensors and switches, connect it to the computer, launch the
junXion program (Macintosh computers only) and play!
3.1 Example of connected switch
3.2 Example of analog sensor connected
A lot of sensors you can use are so called ‘passive’ sensors. This generally means they
behave like variable resistors, called potentiometers. (think of the volume knob on your
audio amplifier).
The potentiometer has 3 leads which you connect to GND, Analog input and 5V.
When you reverse GND and 5V, the turning direction reverses as well.
If you want to hook up a potentiometer to your junXion box, you simply do the
following: See section 4 for more sensors.
3.3 Example of ultrasound connected
3.3.1 Connecting the trasnsmitter
The ultrasound works with a transmitter and a receiver. The receiver must be mounted on
a STEIM ultrasound receiverboard. See next pictures to see how to connect these sensors.
The transmitter part is easy to connect: take ouput Tx and GND. See next picture.
Connection of ultrasound transmitters
3.3.2 Connecting the receiver board
For the receiver board you need to connect four wires. The Rx and GND, together with
the powersupply 5V and 9V. See next picture.
Connection of ultrasound receiver board
3.3.3 Connecting the external power supply
The external power (like a battery) can be easily connected. See next picture.
Connecting the external power
3.4 Connecting the junXion box to the computer
When using switches and analog sensors (no ultrasound):
1) Hook up your sensors and buttons to the junXion box.
2) Turn on your computer and start up the junXion program.
3) Connect the junXion box to the computer using a USB-cable
4) In the junXion program go to ‘file’ and choose ‘rebuild device list’
When you want to quit playing or solder some more sensors/switches to the junXionbox,
you simply unplug the USB cable from the junXion box. Now you can solder your new
sensors/switches to the junXion box.
When you’re ready for the next try, just plug in the USB cable again and rebuild the
device list in the junXion program.
Using external power (for the ultrasound):
1) Hook up your sensors (including the ultrasound) and switches.
2) Turn on your computer and start up the junXion program.
3) Connect the junXion box to the computer using a USB cable
4) Connect and turn on the external power to the junXion box
5) In the junXion program go to ‘file’ and choose ‘rebuild device list’
When you want to quit playing or solder some more sensors/switches on the junXion
box, you first disconnect the external power and then disconnect the USB cable from the
junXion box.
The junXion box is now ready for you to solder on it.
The reason why the USB cable and the external power should be removed in the specified
order is to save battery power. If the USB cable is not connected, while the external
power is turned on, the junXion box will draw much more current from the external
power. This is an important issue when using batteries.