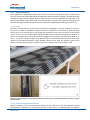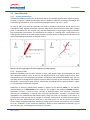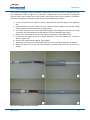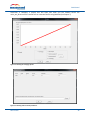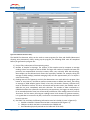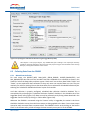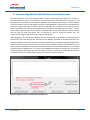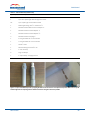
1
Manual ShapeAccelArray Measurand Inc. 2111 Hanwell Rd. Fredericton, NB, Canada E3C 1M7 tel: 506-462-9119 fax: 506-462-9095 Email: [email protected] http://www.measurandgeotechnical.com Copyright © 2013 by Measurand Inc. SAA Manual Notices Measurand shall have no liability for incidental or consequential damages of any kind arising out of the sale, installation, or use of its products. Please read this document and any notes and instructions carefully before proceeding with installation and operation. The information herein is subject to change without prior notification. ShapeAccelArray is covered by patents including: 2472421, 6127672, 6563107, 7296363, WO 02/055958, WO 02/055958, WO 98/41815 and others pending. Measurand Software is copyrighted. Any unauthorized use is strictly prohibited. Important details about proper handling of SAAs are presented in Appendix A. SAAs which are not handled as discussed in the guidelines contained herein and in Appendix A, will not be covered under warranty. Revisions No: 0 March 2013 ii SAA Manual Table of Contents Table of Contents ................................................................................................................. iii List of Figures ....................................................................................................................... vi List of Tables .......................................................................................................................viii 1. Introduction.................................................................................................................... 1 2. Background Theory ......................................................................................................... 2 2.1 Anatomy of an SAA .............................................................................................................2 2.1.1 Segments and Joints ................................................................................................................................3 2.1.1.1 Joints ...............................................................................................................................................3 2.1.1.2 Sensorized Segments and Octets ....................................................................................................3 2.1.1.3 Magnetometers ..............................................................................................................................4 2.1.1.4 Unsensorized segment ....................................................................................................................4 2.1.1.5 Eyelet ..............................................................................................................................................4 2.1.1.6 Overall SAA length ..........................................................................................................................5 2.1.2 Cable ........................................................................................................................................................5 2.1.3 PEX ...........................................................................................................................................................5 2.1.4 X-Marks ....................................................................................................................................................6 2.1.5 On-reel Dots .............................................................................................................................................6 2.1.6 Reel ..........................................................................................................................................................6 2.1.7 Reel Label .................................................................................................................................................7 2.2 How SAAs Work ..................................................................................................................8 2.2.1 2.2.2 3. Position Determination ............................................................................................................................8 Accuracy of SAA .......................................................................................................................................8 Checking SAA Performance Prior to Installation ............................................................ 10 3.1 Connecting the SAA to a Computer .................................................................................... 10 3.1.1 Connecting an SAA to the SAA Field Power Unit ...................................................................................10 3.1.1.1 Connecting an SAA via 4-pin circular connector ...........................................................................10 3.1.1.2 Connecting an SAA via 5-pin terminal block .................................................................................11 3.1.2 Connecting the Computer to the SAA Field Power Unit ........................................................................11 3.2 4. Using SAARecorder to Complete Diagnostic Tests............................................................... 12 Installation ................................................................................................................... 16 4.1 Safety Considerations ........................................................................................................ 16 4.2 Proper Handling of SAA ..................................................................................................... 16 4.2.1 4.2.2 4.2.3 4.3 General Guidelines.................................................................................................................................17 Torsion Control and Joint Care ..............................................................................................................17 Buoyancy Effects During Installation .....................................................................................................17 Supplies Needed for Installing SAA .................................................................................... 18 4.3.1 4.3.2 4.3.3 4.3.4 4.3.5 March 2013 Tools.......................................................................................................................................................18 Reel Stand ..............................................................................................................................................18 Conduit ..................................................................................................................................................19 Chain ......................................................................................................................................................21 SAA Install Kit .........................................................................................................................................21 iii SAA Manual 4.3.6 4.4 PEX and PEX Extension Kit .....................................................................................................................21 Recommended Installation Methods for Vertical to Subvertical Installations ...................... 22 4.4.1 SAA+PVC Installation .............................................................................................................................22 4.4.1.1 Assembling PVC Conduit for SAA+PVC Installation .......................................................................23 4.4.1.2 Pulling the SAA Into the PVC Conduit ...........................................................................................24 4.4.1.3 Extending PEX for an SAA+PVC Installation ..................................................................................25 4.4.1.4 Inserting the SAA+PVC Assembly Into the Borehole .....................................................................27 4.4.1.5 Aligning the X-Mark in the Desired Direction ...............................................................................28 4.4.2 Installing SAA Directly Into a PVC Cased Borehole ................................................................................29 4.4.2.1 Assembling PVC Conduit ...............................................................................................................30 4.4.2.2 Inserting SAA Into a Pre-Cased Borehole ......................................................................................32 4.4.2.3 Extending the PEX for a Pre-Cased Borehole ................................................................................32 4.4.2.4 Aligning the SAA Inside the PVC Conduit ......................................................................................33 4.4.3 Finishing the Installation Process Using the SAA Install Kit ...................................................................33 4.4.4 Backfilling Recommendations ................................................................................................................35 4.4.4.1 Tremie Grouting ............................................................................................................................36 4.4.4.2 Displacement Grouting .................................................................................................................37 4.4.4.3 Staged Grouting ............................................................................................................................37 4.5 Recommended Installation Method for Horizontal Installations ......................................... 37 4.5.1 4.5.2 4.5.3 4.5.4 4.5.5 4.6 5. 6. Preparing the Trench for Horizontal Installation ...................................................................................37 Assembling SAA Conduit for Horizontal Installation ..............................................................................39 Pulling the SAA Into the Conduit ...........................................................................................................40 Closing the PVC Conduit Using the SAA Install Kit .................................................................................40 Backfilling the Trench ............................................................................................................................41 Retrieving SAAs for Re-Use ................................................................................................ 41 Collecting SAA Data Using SAA Recorder ....................................................................... 43 5.1 Getting Started in SAARecorder ......................................................................................... 43 5.2 Recording SAA Data........................................................................................................... 44 5.3 Exporting SAA Data ........................................................................................................... 45 Collecting SAA Data Using a Campbell Scientific Data Logger ........................................ 47 6.1 Hardware Setup ................................................................................................................ 47 6.2 Setting Up the CR1000 Logger ............................................................................................ 51 6.2.1 6.2.2 6.2.3 6.2.4 6.2.5 6.3 Using LoggerNet .....................................................................................................................................51 Creating a Main Program File ................................................................................................................51 Compiling SAA Program Files .................................................................................................................54 Uploading Program Files to the CR1000 ................................................................................................54 Data File Management ..........................................................................................................................57 Collecting Data From the CR1000 ....................................................................................... 58 6.3.1 6.3.2 6.3.3 6.3.4 6.3.5 7. Manual Data Collection .........................................................................................................................58 Automated Data Collection ...................................................................................................................59 Manual Data Conversions ......................................................................................................................61 Automated Data Conversions ................................................................................................................61 Saving Data in Overwrite File Mode ......................................................................................................64 Viewing SAA Data......................................................................................................... 66 March 2013 iv SAA Manual 8. Frequently Asked Questions .......................................................................................... 68 8.1 How do I get calibration files for my SAA? .......................................................................... 68 8.2 How do I check for, and get software updates? .................................................................. 68 8.3 I am having problems connecting my SAA to SAARecorder. How do I check the connection? 68 8.4 How do I diagnose an unresponsive SAA for cable damage? ............................................... 69 8.5 How do I wire the SAAF Connector onto the SAA cable? ..................................................... 70 8.6 How do I check my magnetometers to make sure they are working properly? .................... 70 8.6.1 8.6.2 Checking magnetometer data collected with SAARecorder ..................................................................70 Checking magnetometer data collected with a data logger using SAACR_raw2data ............................71 8.7 How do I check my SAAF for twist? .................................................................................... 71 8.8 Why is my data logger missing samples? ............................................................................ 73 8.9 How do I check data collected using a data logger to make sure it is good? ......................... 73 8.10 I just saved 3 samples of data. Why does SAAView only show one frame? .......................... 73 8.11 Can I shorten my SAA? ...................................................................................................... 73 8.12 How do I turn off or ignore segments? ............................................................................... 73 8.12.1 8.12.2 Data collected using SAARecorder ....................................................................................................73 Data collected using a data logger ....................................................................................................74 A. SAA Life-Extension ........................................................................................................ 75 B. Maximum Cable Lengths for SAAs ................................................................................. 84 C. Marking On-Reel Dots on an SAA .................................................................................. 86 D. Communicating With the SAA Field Power Unit via Wireless pair................................... 87 E. Connecting an SAA to computer running SAASuite using an SAA232 .............................. 88 F. Connecting an SAA to a computer running SAA Suite using an SAA232-5 ....................... 90 G. Connecting an SAA to a computer running SAASuite using the SAAUSB Adapter ............ 93 H. Setting the voltage boost on the SAA232 or SAA232-5 ................................................... 94 I. Materials Used in SAA Install Kit ................................................................................... 95 J. Sample Calculations for Pipe Ovalization in Horizontal Installations .............................. 97 K. Integrating Other Sensors Into the Main Program (Advanced) ....................................... 99 March 2013 v SAA Manual List of Figures Figure 2.1: Anatomy of an SAA. (a) Placement of X-mark and SAA label on the PEX tubing at the near end of the SAA. (b) Placement of the X-mark and eyelet at the far end of the SAA........................................................................2 Figure 2.2: Segments and joints. (a) SAA segments joined into octets. (b) Joint in compression inside clear conduit. (c) Typical joint dimensions............................................................................................................................................3 Figure 2.3: View of SAA with magnetometers in SAARecorder. Magnetometer data is shown with azimuth and magnetic field strength information. .............................................................................................................................4 Figure 2.4: On-reel dots on SAA. (a) On-reel dots placed at factory. (b) Orientation of X-marks versus on-reel dots. ..6 Figure 2.5: SAA placed on a reel for storage. .................................................................................................................7 Figure 2.6: Example of reel label with SAA specifications as per purchase order. .........................................................7 Figure 2.7: (a) Tilt for single segment. (b) Tilts and positions for multiple segments ....................................................8 Figure 3.1. SAAFPU Interface. (A) 4-pin circular connector, (B) 5-pin terminal block, (C) Voltage selector, (D) Auxiliary 4-pin terminal block. .....................................................................................................................................11 Figure 3.2: Options used for connecting the SAAFPU to a computer running SAARecorder. .......................................12 Figure 3.3. SAARecorder SAA startup screen. ..............................................................................................................12 Figure 3.4: Enter the serial number of the SAA connected to the PC ...........................................................................13 Figure 3.5: Diagnostics Tests window in SAARecorder. ...............................................................................................14 Figure 3.6: Voltage / Current Check for 7.3 m SAA with 900 m cable length ..............................................................14 Figure 3.7: Graph for Total Acceleration Check in SAARecorder. .................................................................................15 Table 4.1. Typical weights for reeled SAAs ..................................................................................................................19 Figure 4.1: Examples of reel stands used in SAA installations. Note that the orientation of the reel on the reel stand depends on the type of installation done. For more information refer to Section 4.4. ................................................19 Figure 4.2: PVC conduit used as conduit for SAA. (a) 27 mm ID (1" trade dimension Schedule 40 PVC) electrical conduit with bell ends. (b) End cap. (c) Coupling for conduit without bell ends. .........................................................20 Figure 4.3: Items required to extend PEX on SAA. (A) extra ¾” PEX tubing obtained at plumbing supply store, (B) Measurand PEX couplers and crimp rings, (C) PEX crimping tool. ...............................................................................22 Figure 4.4: Work flow for installing SAA using SAA+PVC installation method .............................................................23 Figure 4.5: Deburring the PVC. (a) Typical PVC deburring tools. (b) Example of deburring, note that both the inside and outside edges are to be deburred. ........................................................................................................................24 Figure 4.6: Pulling SAA into PVC conduit. ....................................................................................................................25 Figure 4.7: Closing the far end of the PVC conduit. .....................................................................................................25 Figure 4.8. Extending PEX for SAA+PVC installations...................................................................................................26 Figure 4.9: Inserting SAA+PVC assembly into borehole using various equipment available on site to support the assembly. .....................................................................................................................................................................27 Figure 4.10: Using hanging fixture to provide support to SAA+PVC ............................................................................28 Figure 4.11: Lifting and aligning the SAA+PVC using the hanging fixture. ..................................................................29 Figure 4.12: Work flow for installing SAA into a pre-cased borehole. .........................................................................30 Figure 4.13: Assembling PVC conduit downhole. .........................................................................................................31 Figure 4.14: Inserting chain into PVC conduit. .............................................................................................................31 Figure 4.15: Inserting SAA into a pre-cased borehole. .................................................................................................32 Figure 4.16: Using the pre-assembled top stack during SAA installation to complete the installation process. .........34 Figure 4.17: Finishing off SAA installation under a protective well head. (a) Attaching flexible conduit to PVC conduit using zip ties. (b) Attaching SAASPD at top of borehole. .............................................................................................34 Figure 4.18 Tremie grouting SAA conduit into a borehole. ..........................................................................................36 Figure 4.19 Horizontal installation of SAA adjacent to train tracks. (a) SAA+PVC placed in trench containing bedding sand and geotextile to wrap around SAA. (b) Survey marker placed at reference end of SAA. Ensure the marker is associated with a known location along the sensorized portion of the SAA. ..............................................................38 Figure 4.20 Work flow for installing horizontal SAAs ..................................................................................................38 Figure 4.21 Trench for installation of horizontal SAA ..................................................................................................39 March 2013 vi SAA Manual Figure 4.22 Reel positions for SAA. (a) Note location of PEX/SAA interface. (b) Make sure all the On-reel dots are in the same position. .......................................................................................................................................................42 Figure 5.1. Program view from SAARecorder showing a single SAA. This view shows three orthographic views of the SAA, plus a fourth perspective view (lower-right corner). ...........................................................................................43 Figure 5.2. Basic Settings Window. It allows the user to view and change the reference point for the SAA (near or far), the amount of averaging to perform, and the modeling mode (2-D or 3-D). ......................................................44 Figure 5.3. Playback / Recording window for recording raw shape array (.rsa) data. The recording can be stopped by closing the Playback / Recording window, pressing the “stop” button in the above window, or selecting 'File | Close Raw Data File' from the main menu. Once the recording has been stopped, a dialog appears prompting you to select a filename for the recorded data. ......................................................................................................................45 Figure 5.4. Selecting file averaging options. ................................................................................................................46 Figure 5.5. Selecting SAA conversion parameters. .......................................................................................................46 Figure 6.1: SAA232 and SAA232-5 for connecting SAA to COM ports on CR1000 loggers. Note the SAA wiring guide on the side panel..........................................................................................................................................................47 Figure 6.2: Wiring diagram for CR1000 with SAA232. .................................................................................................48 Figure 6.3: Wiring diagram for CR1000 with SAA232-5...............................................................................................49 Figure 6.4: Example CR800 & SAA integration using one SAAREG, two SAA232, a CR800 logger, and a Raven XT Wireless Modem. .........................................................................................................................................................50 Figure 6.5: LoggerNet Utilities menu. ..........................................................................................................................51 Figure 6.6: SAACR File Generator utility.......................................................................................................................52 Figure 6.7: SAA232 or SAA232-5 Channel selection. ....................................................................................................53 Figure 6.8: Saving a logger program created using the SAACR File Generator utility. ................................................53 Figure 6.9: Saving and Compiling the SAA logger program. ........................................................................................54 Figure 6.10 Selecting File Control in the LoggerNet Connect utility. ............................................................................55 Figure 6.11: Selecting 'Send' option in ‘File Control’. ...................................................................................................56 Figure 6.12: Selecting ‘Run Options’ when sending files to CR1000 logger. ................................................................56 Figure 6.13: Sending a program to the CR1000. ..........................................................................................................57 Figure 6.14: Specifying the destination of data files using the LoggerNet Setup utility ..............................................58 Figure 6.15: Disabling scheduled data collection.........................................................................................................59 Figure 6.16: Collecting data using the LoggerNet ‘Connect’ utility. ............................................................................60 Figure 6.17: Enabling scheduled data collection. ........................................................................................................60 Figure 6.18. Example of pref_project.txt set-up being completed in Conversion Config utility ...................................61 Figure 6.19: Creating a task using the LoggerNet 'Task Master' Utility. .....................................................................62 Figure 6.20: Configuring task options in Task Master. ................................................................................................63 Figure 6.21: Viewing the status of scheduled tasks in Task Master. ...........................................................................64 Figure 6.22: Switching the "Data File Output" option in the LoggerNet 'Setup' utility to 'Overwrite Existing File'. ....65 Figure 7.1: Selecting an SAA to View in SAAView. .......................................................................................................66 Figure 7.2: Quickview of absolute shape plots for SAA in SAAView. ............................................................................67 Figure 8.1. Software/Calibration Files download window. ..........................................................................................68 Table 8.1 Typical SAA cable resistance values. ............................................................................................................69 Figure 8.2. Pin numbering convention for the 4-pin SAAF Connector. Note the reference point at the top of the connector. ....................................................................................................................................................................69 Figure 8.3 Wiring information for Measurand SAAF connector. .................................................................................70 Figure 8.4. X-marks vs. On-reel dots. X-marks are long straight lines normally found at the near and far end of the SAA. On-reel dots are dots found on every 8 or 10 segments on the SAA. ..................................................................72 Figure C.1. Marking on-reel dots on an SAA ................................................................................................................86 Figure D.1: Adding a timeout in the startup window in SAARecorder. ........................................................................87 Figure E.1: SAA232. The 4-pin green connector connects to the RS232 port of the computer. The 5-pin green connector connects to the SAA. ...................................................................................................................................88 Figure E.2: SAA232-USB cable. This is a USB to serial converter for use with SAA232. The red wire shown above should be connected to a +12 volt supply, and the black wire should be connected to GND of the same supply. ......89 March 2013 vii SAA Manual Figure F.1: SAA232-5. 4-pin green connector connects to RS232 port of computer. 5-pin green connectors connect up to five SAAs. ............................................................................................................................................................90 Figure F.2: ShapeAccelArray Startup window with “Using SAA232-5 Device(s)” option checked for use with one or more SAA232-5 devices. Once all SAA are connected to the SAA232-5 device(s), press the “Search For Serial SAAs” button to select serial ports, etc. .................................................................................................................................91 Figure F.3: Arrays Serial Numbers to Search window. If the SAA serial numbers that you will be using are not already listed in the box at left, then type them into the text field at right and press the “Add” button. Once all SAA serial numbers have been listed, press the OK button. .........................................................................................................92 Figure F.4: SAA232-5 Port Settings window. Choose the serial ports that are connected to the SAA232-5 device(s) and the SAA232-5 port numbers (1 to 5) that are associated with each SAA. Press OK in this window once all selections have been made. .........................................................................................................................................92 Figure G.1: SAAUSB adapter. This adapter allows the user to interface to a single SAA; it appears as a RS-232 serial port on the PC. The SAA is powered from a +12 volt wall mount supply that plugs directly into the SAAUSB. The USB plug end of the SAAUSB should be plugged into the PC before plugging in the SAA and before finally plugging in the +12 volt power supply. ................................................................................................................................................93 Figure H.1. Low voltage warning .................................................................................................................................94 Figure I.1. a) Pre-assembled top fitting stack. b) Tapping the hole for the set-screw in an improvised top fitting stack. Make sure to tap the hole through both the coupling and the conduit to have the strongest connection possible. .......................................................................................................................................................................96 List of Tables Table 4.1. Typical weights for reeled SAAs ..................................................................................................................19 Table 4.2: Material properties and approximate dimensions for chain used to weigh down PVC conduit .................21 Table 4.3 Grout Mix .....................................................................................................................................................35 Table 8.1 Typical SAA cable resistance values. ............................................................................................................69 March 2013 viii SAA Manual 1. Introduction Measurand’s ShapeAccelArray (SAA) is a flexible, calibrated 3D measuring system. It measures 2D and 3D shape and 3D vibration using a compact array of MEMs accelerometers and proven ShapeTape / ShapeRope algorithms. Unlike collections of tilt sensors or arrays of sensors that bend in a single direction, SAAs require no other guides or fixturing. They bend freely, without a preferred axis, in 2 degrees of freedom and may be mounted vertically or horizontally. SAAs also roll up for shipping and storage. SAAs do not significantly extend or compress, and therefore should be oriented perpendicular to the anticipated displacement direction: vertical, horizontal, or in between. Measurements taken with SAAs are taken relative to stable ground, or to a survey point. Gravity measurements by triaxial MEMS accelerometers allow 3D shape to be determined when segments are within 60° of vertical. Otherwise, software must be set to calculate only 2D shape. SAAs can also capture 3D real-time vibrations, such as from earthquakes or pumping of grout. SAAs have been used in many different applications such as: • In-situ monitoring of unstable slopes (SAAF) • Monitoring of civil engineering structures (SAAF) • Monitoring of mines and excavations (SAAF, SAAScan) • Measuring drill-hole shape (SAAScan) • Laboratory research (SAAF, SAAFlex, SAAR) SAAs can be read using data loggers or using computers running specialized Measurand software. This manual covers the background theory of how SAAs work, as well as how to install and use SAAs. Discussion herein covers the use of the SAA field model (SAAF), which is the most commonly used model of SAA. In most cases, the discussion herein applies for the other models of SAA, but there are some differences which must be considered. These differences between SAAF, SAAScan, SAAFlex, and SAAR are discussed in their respective manuals. March 2013 1 SAA Manual 2. Background Theory This chapter is broken down into two major sections: 1) Terminology and what to specify when ordering. 2) How SAA works, and how to maximize repeatability 2.1 Anatomy of an SAA An SAA is an array of sensorized rigid segments separated by flexible joints. Each segment contains 3 MEMS accelerometers which measure tilt along X, Y and Z axes. The accelerometers also provide triaxial measurement of vibration at selected segments. As shown in Figure 2.1, an SAA has the following major components: segments and joints, communication cable, PEX tubing, eyelet, X-marks, on-reel markings, and a label. These are described in more detail below. Figure 2.1: Anatomy of an SAA. (a) Placement of X-mark and SAA label on the PEX tubing at the near end of the SAA. (b) Placement of the X-mark and eyelet at the far end of the SAA. March 2013 2 SAA Manual 2.1.1 Segments and Joints SAAs segments are separated by flexible joints. Figure 2.2a shows internal joint seals. An SAA has two layers of stainless steel braid. Both braids provide twist resistance and pull strength. The outer braid also provides primary protection against abrasion. SAA also has an overall waterproof covering which is for the most part hidden by the outer braid. Care must be taken to prevent the protective coverings of the SAA from being punctured or abraded. For more information regarding SAA handling, see Section 4.2. 2.1.1.1 Joints The layers of braid and the internal joint construction are designed to minimize twisting of the joints. The joints on a SAA are designed to expand under axial compression and contract in extension. Note that joints are non-circular due to the reeling and unreeling process. SAA are meant to be installed inside a 27 mm +/- 1 mm conduit. When pulling the SAAF into the conduit, the typical joint width is 22 mm to 24 mm wide. Once the joints have been snugged into the conduit, the typical joint width is 27 mm +/- 1 mm. This is shown in Figure 2.2b, where the joint is expanded to touch the inside of the clear conduit. For horizontal installations, larger diameter conduit can be used. The SAA will remain at the bottom of the horizontal conduit so long as a low-friction conduit such as PVC or HDPE is used. Figure 2.2: Segments and joints. (a) SAA segments joined into octets. (b) Joint in compression inside clear conduit. (c) Typical joint dimensions. 2.1.1.2 Sensorized Segments and Octets With the exception of one mechanical-only segment at the cable end of the SAA, segments contain accelerometers. Segments are measured joint center to joint center. In standard SAAs, the segment March 2013 3 SAA Manual length is either 305 mm (1’) or 500 mm (1.64’). Each sensorized segment contains MEMS accelerometers. Sensorized segments are organized in groups of eight called octets, as shown in Figure 2.2a. Each octet has one segment which also contains a microprocessor and digital temperature sensor. SAAs that have a number of segments not divisible by eight have one partial “octet” with fewer than eight segments, always located at the far (non-cable) end of the SAA. 2.1.1.3 Magnetometers Any SAA can be ordered with magnetometers installed in selected segments. Magnetometers are electronic compasses that provide accurate X-mark heading (azimuth) data relative to magnetic north. Magnetometers should not be used if the site is not magnetically “clean” (i.e. free of ferrous material or magnetic sources such as strong electrical currents). Magnetometers do not increase the diameter or increase the number of segments in the SAA. The magnetometers are placed in the same segments as MEMS accelerometers. Typically magnetometers are installed near the top, middle, and bottom of the SAA. This is done to provide overall azimuth and relative azimuth along the SAA. Data from the magnetometers are used by Measurand software to reference the SAA data to magnetic north. The data are also used to verify and if necessary correct any twist that might have inadvertently been introduced. This is useful when SAAs are very long (>30 m). Magnetometers are also useful on short SAAs suspended at depth, such as at the end of a long length of PEX. Figure 2.3: View of SAA with magnetometers in SAARecorder. Magnetometer data is shown with azimuth and magnetic field strength information. 2.1.1.4 Unsensorized segment Every SAA contains one unsensorized segment at the cable end of the SAA (see Figure 2.1). This unsensorized segment is used to join the cable to the SAA. The length of the unsensorized portion of the SAA is 130 mm measured from joint center to the PEX. 2.1.1.5 Eyelet In addition to the unsensorized segment at the top of the SAA, there is a short piece of PEX tubing at the bottom of the SAA to which an eyelet is connected (Figure 2.1b). The eyelet is used to pull the SAA into March 2013 4 SAA Manual PVC conduit as discussed in Section 4.4.1. The overall length of this attachment is 50 mm, measured from the far end of the last segment to the far end of the eyelet. 2.1.1.6 Overall SAA length It is important to note that the SAA has both sensorized and unsensorized portions. The overall length of the SAA is therefore not the same as the sensorized length. This is important when deciding what length SAA to purchase. The overall length of the SAA can be determined as shown below: L xLs Lu Le Where: L = Overall length x = Number of segments Ls = Segment length Lu = Unsensorized length at top of SAA = 130 mm Le = Eyelet at bottom of SAA = 50 mm Note: If you are going to install the SAA so that it is entirely underground, you will need to take into account the length of the PEX as well when determining the overall length of the SAA. The shortest PEX length possible is 150 mm. This is the length of hardened cable inside the PEX tubing. This 150 mm section of cable, which cannot be bent, is measured along the PEX starting at the intersection between the top unsensorized segment and the PEX. 2.1.2 Cable The cable attached to the SAA is used to provide power to the instrument and to allow for communications between the SAA and a data logger or computer. Cable length can be quite long due to the digital communication protocol used by SAA. The maximum cable length for a given SAA is determined by the number of segments, the number of magnetometers, if any, and any additional equipment sharing the cable, such as SAAPZ piezometers. Maximum cable length tables for SAAs with no magnetometers or piezometers are presented in Appendix B. 2.1.3 PEX PEX tubing is used in SAA construction to protect the communication cable from damage, to provide a secure way of retrieving the SAA, and to set the azimuth of the SAA if the SAA itself is not visible from the surface. Each SAA comes with 1.5 m (5’) of ¾” PEX attached at the top. If this length is not sufficient to reach the surface or end of a borehole, it is possible to extend the PEX using extra PEX and a Measurand PEX Extension Kit. Clients can either source additional ¾” PEX locally, or buy it directly from Measurand. The PEX couplers provided in the kit are designed to provide a solid mechanical connection to hold the weight of the SAA, and to resist any twist at the PEX connection; something that traditional PEX couplers cannot do. In cases where the PEX tubing is extended beyond 10 m (32’) in length, the PEX will provide only approximate azimuth control. For best results in these cases, it is recommended that magnetometers be March 2013 5 SAA Manual integrated into the SAA, or that the SAA+PVC installation method (see Section 4.4.1) be used, with azimuth control provided by PVC extending to the surface. 2.1.4 X-Marks X-Marks are placed at the top and bottom of the SAA as shown in Figure 2.1. The software calibrated X axis for each sensor is aligned with the X-Marks. Installers often align the X-Mark at the top of a vertical SAA so that it lines up with the expected direction of movement (e.g. downslope for landslide monitoring). The top and bottom X-Marks are also used to verify that the SAA has not been twisted by mishandling. See Chapter 8.7 for more details. 2.1.5 On-reel Dots When an SAA is reeled or unreeled without applying any torsional strain, there is a slight change in heading at each joint due to the helical shape of the winding. The same thing occurs in any cable, hose or rope which is reeled or unreeled. The twist incurred during the reeling process is elastic and will be recovered during the unreeling process. When the SAA is unreeled into a conduit, the outward facing “On-reel state” marks will rotate and no longer be facing at the same azimuth. This is expected and does not indicate that mechanical twist has occurred at the joints. In fact, the joints are resuming their factory-calibrated headings. It should not be confused with mechanical twist, which can remain in the joints as an error, after unreeling. Mechanical twist is a plastic yielding response arising from the application of additional torsional moment, and is to be avoided. On-reel state of the SAA is marked at the factory. If your SAA does not have the on-reel dots as shown in Figure 2.4a, then you should put them on yourself using the procedure shown in Appendix B. Figure 2.4: On-reel dots on SAA. (a) On-reel dots placed at factory. (b) Orientation of X-marks versus on-reel dots. 2.1.6 Reel SAAs are shipped on a wooden reel designed to help make installation and storage of the SAA easier. A typical SAA on its reel is shown in Figure 2.5. The SAA should only be off the reel when it is being used to measure shape. When not in use, it should be placed on its reel for storage, with the joints bent the same way as at the factory. Other treatment can affect the mechanical integrity of the joints. March 2013 6 SAA Manual Figure 2.5: SAA placed on a reel for storage. 2.1.7 Reel Label Each reel is labeled using a standard label as shown in Figure 2.6. The label contains the specifications for the SAA from the customer Purchase Order. Information included are: QA date, SAA serial number, SAA type, segment length, sensorized SAA length, unsensorized SAA length, total SAA length, cable length, whether or not there is an amphenol connector on the SAA, the number of segments with magnetometers, and any special notes. In the example below, a customer has requested a 60 m SAA constructed with 500 mm segments. The customer has also requested that extra X-marks be placed every 2 m. Figure 2.6: Example of reel label with SAA specifications as per purchase order. March 2013 7 SAA Manual 2.2 How SAAs Work 2.2.1 Position Determination The SAA uses MEMS accelerometers to determine the tilt of individual segments with respect to gravity, as shown in Figure 2.7. MEMS accelerometer axes are aligned in software, according to calibration files created during manufacture, to form a consistent orthogonal set for each of X, Y, and Z. For vertical SAAs, chain-wise 3D calculations are made in software to determine the 3D position and orientation of each segment of the SAA. Horizontal SAAs cannot sense movement within the horizontal plane, so calculations are 2D. In either case, data are obtained over a large angular range not possible with conventional inclinometers. The calculations are relative to a starting point, usually taken to be stable ground. The data set for SAA is represented as a polyline in two or three dimensional space, with vertices representing the position of the joint centers. Figure 2.7: (a) Tilt for single segment. (b) Tilts and positions for multiple segments 2.2.2 Accuracy of SAA MEMS accelerometers used in SAAs measure tilt over a 360 degree range. Accelerometers like these have sinusoidal response curve, so they are not equally sensitive at all angles. However when these accelerometers are mounted properly and used in combination with suitable automated math, they can accurately sense tilt throughout all angles of a sphere. When horizontal or near-horizontal, SAA provides data within a vertical plane. When vertical, SAA provides true 3D data for the polyline shown in Figure 2.7. The SAA does not extend or compress. Statements of accuracy should specify whether it applies to the absolute shape (i.e. the polyline specified above), or to deformation of the shape (i.e. the change in the polyline to another polyline). Sometimes “accuracy” is used to mean “accuracy of absolute shape”, and “precision” (sometimes referred to as “repeatability”) is used to mean “accuracy of deformation”. Precision is a measure of the repeatability of a measurement and should include a long time scale. For example, in the case of an inclinometer or SAA precision can be thought of as follows: “How well do my measurements repeat if taken for the same stable object day after day, or year after year?” It is also of interest to know how small a change can be detected when measuring a change (such as the tilt of a borehole). This is referred to as the “resolution” of the instrument. Normally it implies a short measurement timescale, e.g. 24 hours versus a year, a year being more relevant to “precision”. March 2013 8 SAA Manual Based on this definition of precision given above, it can be seen that precision can properly be applied to either the shape or the deformation, so we prefer speaking of “accuracy of absolute shape” and “accuracy of deformation”. In almost all geotechnical applications, it is important to track the deformation. In most cases knowledge of an absolute shape is only needed to understand the borehole or installation variables which can affect deformation monitoring. In these cases the “accuracy of deformation” is more important. The typical accuracy of deformation value given for a 32 m long SAA is 1.5 mm. Although the accuracy degrades for longer SAAs, it does so in relation with the square root of the length of the SAA rather than degrading linearly. For example, a 64 m SAA will have an accuracy of deformation of 2.1 mm, rather than 3.0 mm. Accuracy of deformation can be improved by averaging multiple samples together into a single reading. The accuracy improves in relation to the square root of the number of samples averaged together to produce a single reading. The number of SAA samples used to compute an average reading can range from 100 to 25500. The larger the number of samples the better the accuracy, but computational time also increases. It is recommended for most applications that the averaging interval be set to 1000. SAAs manufactured since March 2010 have “Averaging in Array” capabilities. With AIA technology, the SAA is prompted to take a set number of samples and calculate the average. This results in a much more precise reading. Prior to the emergence of AIA, data were collected from the SAAs and the averaging was done either in the logger or the computer. Before AIA, data loggers could take over 30 minutes to collect readings. AIA allows data samples to be collected much faster than previously available. For example, taking the average of 1000 readings (standard averaging level) will take less than 10 s to output a value from the SAA. March 2013 9 SAA Manual 3. Checking SAA Performance Prior to Installation Prior to installing the SAA, it is desirable to check the performance of the SAA to verify that no damage occurred during shipping. This is done by completing diagnostics check using the SAARecorder application. The SAARecorder application is a free software utility accessible through the SAASuite software package. The SAASuite is free and available for download from the Measurand website at the following address: http://www.MeasurandGeotechnical.com/Software.html. 3.1 Connecting the SAA to a Computer The most frequently used connection solutions for connecting an SAA to SAARecorder are as follows: connecting through an SAA232 or SAA232-5 interface unit, connecting through an SAA Field Power Unit (SAAFPU), or connecting through an SAAUSB adapter. For clarity, the discussion below only deals with connecting using an SAAFPU which is connected to the computer via a USB cable. Instructions for connecting wirelessly through the SAAFPU or via other interfaces are given in the appendices (Appendices D through G). For safe operation of the SAA and SAAFPU, it is recommended that the following connection and disconnection sequences be followed: 3) To Connect: a. Connect the SAA to the SAAFPU (See Section 3.1.1); b. Connect the SAAFPU to the computer via the USB (See Section 3.1.2); c. Open SAARecorder; then d. Search for SAAs in SAARecorder. 4) To Disconnect: a. Turn off SAARecorder to power down the SAA; b. Disconnect the SAAFPU USB cable from the computer; c. Disconnect the SAA from the SAAFPU Note that the sequences are reversed. For ease of use, connection instructions are printed on the SAAFPU panel. 3.1.1 Connecting an SAA to the SAA Field Power Unit Two separate methods have been provided for connecting SAAs to the SAAFPU. The method selected will depend on whether or not a circular connector is attached to the SAA (determined at the time of SAA purchase). 3.1.1.1 Connecting an SAA via 4-pin circular connector For SAAs with a circular connector, connect the SAA directly via the 4-pin circular connector shown in Figure 3.1(A). In order to ensure a good connection, turn the connector until it is finger tight, and make March 2013 10 SAA Manual sure that the gap between the connectors does not exceed 1 mm (0.04”). This may require turning, then pushing, then turning again. 3.1.1.2 Connecting an SAA via 5-pin terminal block SAAs without a circular connector connect to the SAAFPU via the 5-pin terminal block shown in Figure 3.1(B). An SAA cable contains five different wires which are used for power (red and black), communications (white and blue) and shielding (bare wire). These are connected to the terminal block in the order shown on the face plate of the SAAFPU. To open and close the terminal blocks, use a small flathead screwdriver. Prior to connecting the SAAFPU to the computer, make sure that each wire is securely fastened into the block. 3.1.2 Connecting the Computer to the SAA Field Power Unit There are two different methods which can be used to connect a computer running SAARecorder to the SAAFPU. Communication between the SAAFPU can be done either via a wireless pair included with the SAAFPU, or via direct connection via a USB port on the computer (Figure 3.2). More details on the direct USB connection is given below. For more information on the wireless connection, refer to Appendix D. Once the computer is connected to the SAAFPU, SAARecorder will automatically power the SAA upon start-up. Note that the LED located above the 5-pin terminal block connector will light when SAARecorder is attempting to connect to or is connected to the SAA. For more information on how to use SAARecorder, please refer to the SAARecorder Manual found in SAASuite. In order to connect a computer running SAARecorder to the SAAFPU directly via the USB port, connect the serial to USB cable provided with the SAAFPU to the serial port cable on the front facing plate of the SAAFPU. Once this is done, plug the USB connector into a USB port on the computer. The serial connection does not have any screws because it is meant to act as a quick release point in case the cable is snagged or the SAAFPU falls. Figure 3.1. SAAFPU Interface. (A) 4-pin circular connector, (B) 5-pin terminal block, (C) Voltage selector, (D) Auxiliary 4-pin terminal block. March 2013 11 SAA Manual Figure 3.2: Options used for connecting the SAAFPU to a computer running SAARecorder. 3.2 Using SAARecorder to Complete Diagnostic Tests The SAARecorder application is accessible through SAASuite. It can be started by clicking on the “SAARecorder” button in the main screen of SAASuite. Once SAARecorder is started, it may ask for confirmation of using 2-D or 3-D mode, and will then display the startup screen as shown in Figure 3.3. Figure 3.3. SAARecorder SAA startup screen. March 2013 12 SAA Manual In order to do complete diagnostic checks, you will need to go into the main window of SAARecorder. This is done by following the instructions below. Prior to searching for SAAs, make sure that the “Using Serial-to-Ethernet Device” option is checked if you are using a serial to Ethernet (or Wireless Ethernet) converter, such as Lantronix WiBox or the RF416 wireless serial modem. If you are using one or more SAA232-5 devices, make sure that the “Using SAA232_5 Device(s)” option is checked. More details on using these interface devices are provided in Appendices D through G. Once this is done, press the ‘Search For Serial SAAs’ button. After pressing the 'Search For Serial SAAs' button, it may be necessary to wait for up to about one minute for the PC to detect which SAAs are connected. You will be prompted to enter serial numbers for each of the SAA that are being used (see Figure 3.4 below). SAAs equipped with an SAATop (SAAs constructed starting in late 2011 generally have an SAATop) will automatically be added to the “SAA Numbers” field. For SAAs without an SAATop, it will be necessary to enter the serial numbers manually. Click ‘OK’ and SAARecorder will start searching for the SAAs listed. Once in the main widow in SAARecorder, click on Diagnostics | Diagnostic Tests in SAARecorder to access the diagnostic test window (Figure 3.5). At this point it is possible to check the voltage for the SAA by clicking the “Voltage / Current Check”. This will return values for voltage, current level, and temperature at the top of the SAA, as shown in Figure 3.6. Note that this check is only available for SAAs equipped with an SAATop. Figure 3.4: Enter the serial number of the SAA connected to the PC March 2013 13 SAA Manual Figure 3.5: Diagnostics Tests window in SAARecorder. Figure 3.6: Voltage / Current Check for 7.3 m SAA with 900 m cable length March 2013 14 SAA Manual Typically, the voltage at the SAATop should be greater than 8.5V. If the voltage is too low, then the SAA will not return valid results. As shown in Figure 3.6, a warning will be given if the voltage is too low. Low voltages are typically a problem for long SAAs with long cables. In those cases it is recommended that the SAA be connected to an SAA232, an SAA232-5, or an SAA Field Power unit with voltage boost. The method for setting the voltage boost on an SAA232 or SAA232-5 is outlined in Appendix H. For more information on boosting the voltage on an SAAFPU, refer to the SAA Field Power Unit User Manual. When the voltage check has been completed, it is recommended that the total accelerations for the SAA be checked as well. In the Diagnostic Tests window, click on ‘Total Acceleration Check’. A plot showing the total acceleration levels for each segment appears (Figure 3.7). Verify that all values lie between 0.93 G and 1.07 G. If this is not the case, please contact Measurand for further diagnostic support. Figure 3.7: Graph for Total Acceleration Check in SAARecorder. March 2013 15 SAA Manual 4. Installation Installation of an SAA is straightforward if approved conduit is used and twist-prevention steps are followed. In order to make sure that the installation goes as smoothly as possible, it is important to be adequately prepared. This chapter outlines the basic safety considerations during installation, the supplies required during installation, the recommended installation methods for vertical and horizontal SAAs, and the steps for reeling an SAA for later re-use. 4.1 Safety Considerations As with any other job, it is important to think about safety when installing an SAA. The following general safety precautions should be followed: Study the site carefully to anticipate and remedy any safety issues. For example, take precautions to keep the site free of obstructions or slippery areas. Take time to make sure everyone participating in the installation is being safe. Ensure all local codes are met and safety regulations are followed. In addition to the general safety precautions listed above, it is recommended that the following potential hazards be considered: Stainless steel braid on SAAs can puncture the skin or damage the eyes. SAA reels are made of wood and are often sources of splinters. Facets on the reel are attached with staples. Both splinters and staples from the facets can cause punctures or scratches. PVC primer and cement are solvents which should be used in well ventilated areas. Epoxies used in splice kits should be used in well ventilated areas. Be careful when working around electrical conductors and batteries. Batteries can explode or cause serious burns if the terminals are shorted. Do not install SAAs during electrical storms. Because of the potential hazards listed above, it is recommended that the following Personal Protective Equipment (PPE) be worn when installing SAAs: Heavy duty leather or puncture-proof gloves when working with the SAA or SAA reel Safety glasses with side shields Coveralls Steel-toed boots Rubber gloves when working with solvents Nitrile gloves when working with epoxy 4.2 Proper Handling of SAA As with any other instrument, the SAA must be treated with care. Proper handling of the SAA will ensure a long life of the instrument and reliable results. Appendix A contains important details about proper handling of the SAA and SAA reel. These should be reviewed prior to handling the SAA. SAAs which are not handled as discussed in the guidelines below and in Appendix A, will not be covered under warranty. March 2013 16 SAA Manual 4.2.1 General Guidelines Please heed the following guidelines during the installation or retrieval of an SAA: 4.2.2 Store the SAA on its reel when the SAA is not being used for monitoring. To minimize any twisting of the SAA, always go from reel to PVC conduit or from PVC conduit to reel, whether the PVC is on the ground or in a borehole. Keep the joints carefully aligned on the reel; roll it the same way each time. The on-reel dots should line up when properly reeled. Take pictures and notes to make sure you do this properly. Use a reel stand. Inspect the SAA for cuts or other damage before inserting it into the conduit. Remove sharp edges from the conduit before installing the SAA. Always lift the SAA at least 30 cm from the bottom of the conduit before rotating the SAA inside the PVC conduit. When rotating the SAA, pump the SAA up and down 10 cm to minimize friction and twist. Avoid any motions that will apply torque to a joint. The segment you move may not be the one that gets the torque, so think about the mechanical response along the SAA when applying a force or moment to it. DO NOT bend the joints beyond 45⁰. The only time bends greater than 45° are acceptable is when the SAA is stored on its reel. DO NOT pull on the communication cable. Pull on the PEX or the SAA itself. DO NOT exceed the maximum 320 kg force (700 lb) pull strength of the SAA. DO NOT exert more than 22 kg force (50 lb) of compressive force on the SAA when it is outside of conduit DO NOT exert more than 45 kg force (100 lb) on joints in 27 mm ID (1.049”) conduit. DO NOT expose the protective coverings of the SAA to abrasion by dragging the SAA on the ground or running it over sharp edges. DO NOT move the joints more frequently than necessary. Torsion Control and Joint Care Note: When unreeling the SAA into the PVC conduit, allow it to turn freely. This will return the SAA to its factory “straight” state. If you are pulling the SAA into a pre-assembled PVC conduit, use a rope or a connector with a swivel to grab onto the eyelet at the far end of the SAA. As previously discussed in 2.1.1 “Segments and Joints”, the composite joint construction of the SAA is designed to minimize twist. Small amounts of twist will generally be recouped when the SAA is laid out on a smooth, flat surface or installed in a borehole, returning the SAA to a neutral or “factory” state. If the SAA is mishandled it is possible to twist the joints beyond their elastic limits. In this case, the SAA will not return to the factory state when the SAA is inserted into its PVC conduit. The best way ensure and verify a twist free installation is to use the SAA+PVC Installation described in Section 4.4.1. 4.2.3 Buoyancy Effects During Installation A factor which must be considered during installation is the buoyancy of the PVC conduit. If the conduit is held from the top buoyancy typically cause the conduit to bend and form S-curves, making it difficult March 2013 17 SAA Manual to insert the SAA. In order to avoid the issues associated with buoyancy, it is recommended that you use the SAA+PVC Installation described in Section 4.4.1, using the weight of the SAA to keep the conduit straight. If you must install the PVC conduit without the SAA, it is important to weight it down rather than allowing it to float up against a hard stop at the top. It is recommended that the SAA conduit be weighted down using chain. Do not use water to weight down the conduit unless you remove the water before inserting the SAA into the PVC. Though the SAA is built to withstand up to 10 bar of water pressure, it is best not to insert it into a PVC conduit which is full of water. If the conduit is filled with water, pushing the SAA into the water can create hydraulic pressures beyond the limits of the SAA waterproofing. Note: Do not use water to weight down the PVC conduit. Inserting the SAA into a small waterfilled pipe can generate large hydraulic forces, causing a breach of the waterproof coverings. 4.3 Supplies Needed for Installing SAA 4.3.1 Tools When installing an SAA it recommended that the following tools be on hand: Hack saw or key hole saw Exacto knife or box cutter Tapping tools Pipe cutter PEX cutter PVC cement and primer Deburring tools for PVC Screwdrivers Measuring tape Markers Zip ties Duct tape Electrical tape Wire cutters Wire strippers Wire crimpers 4.3.2 Reel Stand Always use a reel stand when reeling or unreeling an SAA. A smooth flow of the SAA into its conduit will ensure minimal twisting and flexing of the SAA joints. If the reel stand is omitted, unreeling and reeling will inevitably be jerky and uncontrolled. A reel stand can easily be constructed using saw horses from the hardware store and a long sturdy metal bar. The weight of an SAA and its reel depend on the length of the SAA and the length of the communication cable attached to the SAA. Table 4.1 gives the weights of reeled SAAs for three common SAA lengths. Make sure that the materials used to construct the reel stand are sturdy enough to support the weight of the reel and SAA. Examples of various reel stands used for SAA installation are shown in Figure 4.1. March 2013 18 SAA Manual Table 4.1. Typical weights for reeled SAAs SAA length (m) Width of reel (m) Weight of SAA and reel (kg) 30 0.4 43 65 0.8 77 100 1.1 113 Note: Weights given above do not include the weight for extra cable. Additional cable will increase the weight, make sure to use sturdy materials for the reel construction. Figure 4.1: Examples of reel stands used in SAA installations. Note that the orientation of the reel on the reel stand depends on the type of installation done. For more information refer to Section 4.4. Note: Reel stands should be able to support at least 227 kg (500 lbs) of weight. It is important that the bar supporting the reel is strong and rigid enough that it will not bend under the weight of the SAA, cable and reel. Schedule 80 1” steel pipe is sufficient. 4.3.3 Conduit The SAA is designed to be installed into a 27 mm ID electrical conduit (Figure 4.2). This conduit is widely available throughout North America, and suitable replacements have been located in other regions. Measurand does not sell conduit for SAA installations. It is recommended that the customer select PVC conduit which either has bell ends or is connected using couplers, as shown in Figure 4.2. Threaded connections are not recommended as they can easily break during installation. The ID for the conduit shall be 27 mm ID +/- 1 mm. If the ID is smaller than 26 mm, you risk the SAA getting stuck. If the ID is larger than 28 mm, the SAA joints may not form a good contact with the conduit leading to reading errors. March 2013 19 SAA Manual Figure 4.2: PVC conduit used as conduit for SAA. (a) 27 mm ID (1" trade dimension Schedule 40 PVC) electrical conduit with bell ends. (b) End cap. (c) Coupling for conduit without bell ends. The approved conduit is normally used for electrical wiring. It can most easily be obtained from electrical supply stores, where it is almost universally available. It is not normally available as a “drilling” supply. Be sure to measure the ID of any conduit before using it. Do not rely on markings. Pipe and tubing sizes may be marked with “trade dimensions”, which can cause further confusion. Please measure! If you have any questions regarding your conduit selection, please contact Measurand. In general, the overall length of the joined PVC should be the same as the overall length of the SAA (see Section 2.1.1.6). Remember to account for the length of the PVC inside the coupler. For example, if the PVC conduit is purchased in lengths of 3 m (10’) and the length of the coupler is 50 mm (2”), the actual length of each section of PVC is 2.95 m (9’10”), so for a 60 m (200’) SAA you will need 21 pieces of PVC conduit, not 20. If the SAA will be installed at depth, you will need extra PVC conduit to bring the cable and extra PEX to the surface. Note: DO NOT install SAAs without a conduit! The conduit is a key component in allowing the SAA to monitor deformations over a long period of time. An end cap is mandatory for the bottom of the conduit, to keep the joints snugged and to prevent water ingress. In cases where the conduit does not have bell ends, you will also need to provide couplings. Examples of both end caps and couplers are shown in Figure 4.2b and Figure 4.2c, respectively. Note: The PVC conduit used for SAA installation is very flexible. Tests have shown that deflection per applied load for the PVC conduit is approximately 10 times greater than for standard inclinometer conduit. To assemble the conduit, you will need to use a PVC primer and cement. The primer helps to soften the PVC making it easier for the PVC Cement to weld the two pieces together. This is particularly helpful in cold weather conditions when the chemical weld reaction may be impacted by the temperature. Selection of the PVC primer and cement depend on the temperature and acceptable setting times. Check the manufacturer’s specifications to find information regarding set times vs. temperature. AllMarch 2013 20 SAA Manual weather quick set cements tend to set in less than 10 minutes for temperatures between -20°C and 30°C (-5°F and 90°F), but you must verify the temperature ratings and set times. Make sure to follow the manufacturer’s instructions for the product you plan to use. Note: It is important to follow the PVC Primer and Cement manufacturer’s recommendations for set times and temperature ratings. The most common cements may fail at low temperatures. Choose products which are suitable to the environment and weather you will be encountering. 4.3.4 Chain Chain can be used to weigh down conduit if the PVC conduit must be installed before the SAA is on site. The chain will pack down inside the PVC conduit, so it is important to buy a length of chain which is longer than the PVC conduit into which it will be inserted. The packing ratio is approximately 1.5:1, so for every 1 m of PVC conduit, you will need 1.5 m of chain. When purchasing chain, look for chain with properties as described in Table 4.2. The chain below is nominal “3/4 inch” chain. If in doubt, fill a 3 m (10’) length of vertical PVC conduit with chain and verify that it can be removed without snagging. Table 4.2: Material properties and approximate dimensions for chain used to weigh down PVC conduit Material Steel Finish: Zinc plating Inside link length: 25 mm (1”) Inside link width: 10 mm (0.4”) Material diameter: 5.5 mm (0.2”) Weight: 0.6 kg/m (0.4 lbs/ft) 4.3.5 SAA Install Kit The SAA Install Kit includes various parts which make preparing for SAA installation more convenient, and which produce a secure installation in less time. The PVC fittings in the kit (referred to as the top stack) surround the PEX at the cable end of the SAA. A blunt-nose setscrew threaded into the fittings holds a vertical SAA at its set azimuth while maintaining axial compression to snug the joints, and provides a secure hold at the cable end of horizontal SAAs. The top stack helps keep surface water out of the 27 mm ID PVC conduit holding the SAA, and help prevent outside forces and moments from being applied to the SAA. Use of the kit replaces the previous method used for compressing the SAA joints inside the conduit (cutting slots, and using gear clamps to secure the SAA). A photo of the top stack is included in Appendix I. Two versions of kit are available: one with selected tools, and one without any tools. The kit is recommended for vertical or horizontal installations. It is possible to make your own installation kit using fittings specific to your conduit. In this case, use the instructions provided in Appendix I as a guideline for materials required to produce your own installation kit. 4.3.6 PEX and PEX Extension Kit The PEX Extension Kit includes 5 PEX couplers with stainless steel braid, 20 PEX crimp rings, and a crimping tool. Clients can either source additional ¾” PEX locally, or buy it directly from Measurand. The PEX couplers provided in the kit are designed to provide a solid mechanical connection to hold the March 2013 21 SAA Manual weight of the SAA, and to resist any twist at the PEX connection; something that traditional PEX couplers cannot do. It is possible to purchase sets of 5 PEX couplers and 20 PEX crimp rings without the crimping tool, contact Measurand for more details. The items required to extend the PEX tubing on the SAA are shown in Figure 4.3. For instructions on when to use a PEX Extension Kit, please refer to Sections 4.4.1.3 and 4.4.2.3. Instruction on how to use the PEX Extension Kit are provided in the PEX Extension Kit Manual included with the kit. Figure 4.3: Items required to extend PEX on SAA. (A) extra ¾” PEX tubing obtained at plumbing supply store, (B) Measurand PEX couplers and crimp rings, (C) PEX crimping tool. 4.4 Recommended Installation Methods for Vertical to Subvertical Installations There are two recommended methods for installing the SAA. The first is the method referred to as SAA+PVC installation. This method is the best way to install an SAA as it will reduce the possibility of twisting the joints. The method requires space to set up the SAA and PVC, so it cannot always be used. The second method involves installing the PVC conduit, then later inserting the SAA. This method will be discussed in detail in “Installing SAA Directly Into a PVC Cased Borehole” in Section 4.4.2. 4.4.1 SAA+PVC Installation Prior to attempting installations of SAA, view the SAA Installation with PVC video at: http://measurandgeotechnical.com/support_saa_tutorial_videos.html. The processes used for SAA+PVC installation are shown in Figure 4.4. March 2013 22 SAA Manual Figure 4.4: Work flow for installing SAA using SAA+PVC installation method 4.4.1.1 Assembling PVC Conduit for SAA+PVC Installation All PVC conduit ends should be kept clean from dust, oil, snow. Look inside the PVC pipes to make sure that no foreign objects are inside the PVC pipe. The edges of conduit over which the SAA is being installed should be smoothed using a deburring tool to prevent abrasion. Note: When using SAA+PVC method, you will have to pull the SAA until at least two segments are out of the bottom of the conduit. This is to help check for twist using the X-Marks on the PEX and at the bottom of the SAA. Glue all the PVC pieces but one. This piece will be added on after the XMarks have been checked. In order to minimize the handling of the SAA+PVC assembly prior to insertion into the borehole, lay out the PVC sections so that the bell ends are away from the borehole. If you are using rope to pull the SAA into the PVC, make sure to pull the rope through all PVC sections before gluing these together. The SAA Install kit includes a wire to enable fishing a rope through each section of PVC. When gluing the PVC using PVC primer and cement, make sure to follow the manufacturer’s instructions for the product you plan to use. Note: It is important to follow the PVC Primer and Cement manufacturer’s recommendations for set times and temperature ratings. The most common cements may fail at low temperatures. Choose products which are suitable to the environment and weather you will be encountering. March 2013 23 SAA Manual Figure 4.5: Deburring the PVC. (a) Typical PVC deburring tools. (b) Example of deburring, note that both the inside and outside edges are to be deburred. It is a good practice to tape the joints of the PVC conduit after gluing them together. This is to make sure that the joints are not pulled apart before fully setting. If you do not need to add any extra PEX to the SAA, glue the bottom part of the top stack included in the SAA Install Kit to the top of the PVC conduit at this time. 4.4.1.2 Pulling the SAA Into the PVC Conduit Prior to pulling the SAA into the PVC make sure that the conduit is straight, this is essential to pulling the SAA into the conduit. At this time, place the SAA reel on the reel stand so that the SAA unreels from the bottom (Figure 4.6a). Once this is done, pull the rope through the eyelet and secure with electrical tape (Figure 4.6b). It is also possible to use a cable fishing tool to pull the SAA. However, if you opt to use one, use a swivel connection between the SAA and the cable fishing tool to allow the SAA to freely rotate during the pulling process. When ready, pull the SAA into the conduit, making sure that there is someone on hand to guide the SAA into the conduit (Figure 4.6c). Keep pulling the SAA until one or two segments are completely out the far end of the conduit (Figure 4.6d). After the SAA is pulled into the conduit, check the X-marks at the near and far ends to make sure that they are aligned, if the X-mark is located on the underside of the SAA, lift the bottom segment to verify the alignment. Do NOT turn the SAA inside the PVC, this could induce twist. Once you have confirmed that there is no twist in the SAA, push a piece of PVC conduit which has been cut to length over the eyelet end of the SAA and glue it in place. Also glue the end cap in place at this time. It is good practice to tape these joints in order to support them while the cement sets. If you need to extend the PEX and are using a PEX extension kit, transfer the X-marks onto the PVC conduit in order to help align the SAA inside the borehole. March 2013 24 SAA Manual Figure 4.6: Pulling SAA into PVC conduit. Figure 4.7: Closing the far end of the PVC conduit. 4.4.1.3 Extending PEX for an SAA+PVC Installation Standard SAAs come with 1.5 m (5’) of PEX tubing attached at the top. In some cases, it may be necessary to extend the PEX tubing. In these cases, it is recommended that the PEX extension be done using the following procedures. When extending the PEX, use the methods described in the PEX Extension Kit Instruction Manual included with the kit. In the case where less than 3 m of PEX is being added, it is recommended that the additional PEX be purchased in straight pieces. When using straight pieces, the X-mark can easily be transferred to the extra PEX piece using a straight edge and an exacto knife. March 2013 25 SAA Manual In most cases, the length of PEX being added is greater than 3 m, and it is easier to use PEX which has been reeled up as shown in Figure 4.3. In this case, it is better not to rely on the PEX for setting the azimuth of the X-mark. Instead, use the PVC conduit, which resists torsion for this purpose. The PEX will still be used to apply axial compression form the top. Please follow this procedure: 1. Lay out and assemble PVC conduit so that it is approximately the same length as the additional PEX. 2. Push the PEX into the PVC conduit. The PVC conduit will help straighten out the PEX tubing, making it easier to feed the SAA cable through the PEX. 3. Use a cable fishing tool to pull the SAA cable through the PEX. Make sure that the crimp rings and coupler are placed between the two pieces of PEX to be attached (Figure 4.8a) 4. Make sure to mark the X-mark on the PVC conduit containing the SAA. (Figure 4.8b) 5. Connect the PEX tubing using the methods described in the PEX Extension Kit Instruction Manual. (Figure 4.8c) 6. Glue the PVC conduit pieces together. (Figure 4.8d) 7. Mark the X-mark on the PVC containing the PEX for later use during the alignment procedure. 8. Attach the bottom half of the top stack included in the SAA Install Kit to the top of the PVC conduit. Figure 4.8. Extending PEX for SAA+PVC installations March 2013 26 SAA Manual 4.4.1.4 Inserting the SAA+PVC Assembly Into the Borehole Prior to inserting the SAA+PVC assembly into a borehole it is a good idea to tighten the set screw in the top stack. If this is done, the SAA will not move inside the PVC during the insertion process. When inserting the SAA+PVC assembly into the borehole, you will need to support the assembly in order to maintain the minimum recommended radius of 3.5 m (11.5’) for 500 mm segments, and 3 m (10’) for 305 mm segments. If a smaller radius is used, it is likely that segments will be bent, which will lead to errors in measurement, and could also damage in-SAA circuitry. Any equipment which can offer two points of support to the SAA+PVC assembly can be used. Examples of on-site equipment are shown in Figure 4.9. These examples include: a) scaffolding, b) bulldozer, and c) drill rig and derrick. The supports should be wide enough or include side posts so that the SAA+PVC cannot slip off sideways. Teamwork and communication are key for making sure that the insertion process goes smoothly. Make sure helpers avoid abrupt pushes and uncoordinated movements. Discuss the sequence with all involved before starting the insertion. Figure 4.9: Inserting SAA+PVC assembly into borehole using various equipment available on site to support the assembly. March 2013 27 SAA Manual For long SAAs (length >50 m or 165’) it is a good idea to use a winch and cable to lower the SAA+PVC assembly. The cable should be attached near the bottom of the assembly to help control the descent of the assembly into the borehole. A tight loop of cable held by a cable clamp and secured to the PVC with gear clamps is recommended. A rope may be used instead of a cable if it is large enough for the load, and abrasion is avoided. Please take precautions to avoid any hand damage from cables or ropes, and falling objects. The hanging fixture supplied in the SAA Install Kit (Figure 4.10) may be used to hold the SAA temporarily at an elevation, should the insertion need to be paused. Note: If the SAA is being inserted into an existing inclinometer conduit, it is recommended that a tremie tube be attached to the SAA+PVC assembly before lowering the assembly into the conduit. Another option is to do displacement grouting. In most cases it is recommended that the borehole into which the SAA will be installed be over-drilled. This way the SAA+PVC assembly can hang in the borehole which will lead to the PVC and SAA being as straight as possible. In order to help support the SAA during the grouting process, fasten the hanging fixture supplied in the SAA Install Kit to the top of PVC (Figure 4.10). Figure 4.10: Using hanging fixture to provide support to SAA+PVC 4.4.1.5 Aligning the X-Mark in the Desired Direction Raise the PVC approximately 30 cm so that it is not sitting on the bottom of the borehole. It should be able to rotate freely in the conduit. Pump it up and down while turning it. If the PVC does not move freely DO NOT FORCE IT! Leave the SAA+PVC as it is and take a reading of its azimuth offset (degrees relative to the intended direction). This offset can be cancelled in the converter or viewer software, to rotate the data to the intended azimuth. March 2013 28 SAA Manual Figure 4.11: Lifting and aligning the SAA+PVC using the hanging fixture. Once the PVC is able to freely rotate, turn the PVC so that the X-mark is pointed in the desired direction (e.g. downslope). Once you have done this, lower the PVC to rest on the hanging fixture. At this point it is possible to complete installation by following the directions outlined in Section 4.4.3. 4.4.2 Installing SAA Directly Into a PVC Cased Borehole In some cases, it is not possible to lay out the PVC on the ground and assemble it for the SAA + PVC installation. In these cases, the PVC will need to be assembled and lowered downhole prior to inserting the SAA. This installation method is susceptible to buoyancy effects and care must be taken to avoid sinuating the PVC prior to installing the SAA. Note: If a PEX extension longer than 3 m (10’) is used from the top of an SAA to surface level, and/or the SAA length is over 10 m, every effort should be made to use the SAA+PVC installation method described in Section 4.4.1. It provides superior azimuth control and no-twist verification. Note: Do not rest the conduit on the bottom of the borehole. In order to make sure to avoid sinuating the PVC conduit, over-drill the borehole at approximately 0.5 m beyond the expected length of the SAA and conduit. Use a hanging fixture such as the one provided in the SAA Install Kit to keep the conduit suspended in the borehole. For assured success in all installations, the 27 mm PVC conduit must be weighted to keep it straight. Two recommended methods for weighting the PVC conduit are: 1. Put the SAA in the PVC before grout is inserted into the borehole. For conduits over 30 m in water, the buoyancy effects may be high enough to make insertion of the SAA into PVC conduit difficult. In these cases, it is recommended that you use the method described below to weight the conduit during the grouting process. 2. If the SAA is not available, use steel chain as described in Section 4.3.4 to completely fill the PVC conduit. Test a 3 m (10’) length of conduit with chain to ensure that the chain will not snag in March 2013 29 SAA Manual the conduit. The chain will pack in the conduit, therefore bring enough chain to overfill the conduit by 50%. Note: Do not use water to weigh down the PVC conduit. The water will make it difficult or impossible to insert the SAA into the PVC since the hydraulic forces will cause the self-snugging joints of the SAA to compress. If the joints block the water egress, the attempt to insert the SAA could lead to hydraulic pressures beyond the pressure ratings of the SAA protective coverings. Once the SAA or chain in is the conduit, it is possible to grout the conduit into the borehole. The most commonly used process for installing the SAA directly into the PVC cased borehole is shown in Figure 4.12. Figure 4.12: Work flow for installing SAA into a pre-cased borehole. 4.4.2.1 Assembling PVC Conduit All PVC pipe ends should be kept clean from dust, oil, and snow. Look inside the PVC pipes to make sure that no foreign objects are inside the PVC pipe. The edges of conduit over which the SAA is being installed should be smoothed to prevent abrasion using a deburring tool as shown in Figure 4.5. When gluing the PVC using PVC primer and cement, make sure to follow the manufacturer’s instructions for the product you plan to use. Note: It is important to follow the PVC Primer and Cement manufacturer’s recommendations for set times and temperature ratings. The most common cements may fail at low temperatures. Choose products which are suitable to the environment and weather you will be encountering. March 2013 30 SAA Manual It is highly recommended that the joints of the PVC conduit be taped after gluing them together. This is to make sure that the joints have enough time to set properly before being inserted into the borehole. The easiest method to use is to assemble the PVC conduit as you lower it into the borehole. Start by gluing and taping the end cap onto the bottom most piece of PVC before inserting it into the borehole. Lower the first piece of PVC conduit then glue the next piece on and tape the joint as shown in Figure 4.13. Due to buoyancy effects, you will need a helper to hold the pieces in place while you work, as shown in Figure 4.13a. Keep adding more conduit, gluing and taping each joint, until you have assembled the required length of conduit. Figure 4.13: Assembling PVC conduit downhole. Glue the bottom part of the top stack included in the SAA Install Kit to the top of the PVC conduit at this time. Note: Use the hanging fixture included in the SAA Install Kit to help keep the conduit off of the bottom of the borehole. It is also possible to use the fixture to apply downward force on the conduit, before the conduit is weighted down with chain or SAA. Insert the chain into the PVC conduit as shown in Figure 4.14. See Section 4.3.4 for chain recommendations. Make sure to insert chain straight down into the conduit. Otherwise you run the risk of causing wear on the PVC fitting at the top. Figure 4.14: Inserting chain into PVC conduit. March 2013 31 SAA Manual Grout the SAA using the mix recommended in Section 4.4.4. Note: The grout will take 24 hours to set. The SAA should be inserted after the grout has set. Do NOT remove the chain from the PVC conduit before 24 hours have passed. 4.4.2.2 Inserting SAA Into a Pre-Cased Borehole Once the grout has set, it is possible to remove the chain from the conduit and proceed with inserting the SAA directly into the conduit. Start by setting the SAA reel on the reel stand so that it unreels from the top, as shown in Figure 4.15. The reel should be placed close to the borehole in order to avoid having too many unsupported segments in the air. Unsupported segments can easily be twisted inadvertently. The insertion should be done by two people, as shown in Figure 4.15. One person guides the SAA into the borehole while the second person controls the rate of descent by carefully handling the reel. It may be necessary to have more helpers when dealing with longer SAAs. Teamwork and communication is key for making sure that the insertion process goes smoothly. Avoid jerking the SAA forward off the reel which will stress the joints. Figure 4.15: Inserting SAA into a pre-cased borehole. 4.4.2.3 Extending the PEX for a Pre-Cased Borehole As discussed earlier, standard SAAs come with 1.5 m (5’) of PEX tubing attached at the top. In some cases, it may be necessary to extend the PEX tubing. In these cases, it is recommended that the PEX extension be done using the following procedures. In the case where less than 3 m of PEX is being added, it is recommended that the additional PEX be purchased in straight pieces. When using straight pieces, the X-mark can easily be transferred to the extra PEX piece using a straight edge and an exacto knife or fine tipped marker. March 2013 32 SAA Manual In most cases, the length of PEX being added is greater than 3 m, and it is easier to use PEX which has been reeled up as shown in Figure 4.3. In this case, it is difficult to place the X-mark on the extra PEX. Instead, it is recommended that the following procedure be used to prepare the PEX connection: 1. Tap an extra set-screw into the top stack included in the SAA Install Kit. The extra set screw should be located on the opposing side of the top stack vis-à-vis the existing set-screw location. This extra set-screw will help provide mechanical support for the SAA during the PEX extension process. 2. Align the X-mark on the SAA so that it is pointed in the desired direction. Follow the directions provided in Section 4.4.2.4. 3. Tighten both set screws in order to hold the SAA in position during the PEX extension process. 4. Connect the extra PEX to the SAA using the procedures outlined in the PEX Extension Kit Instruction Manual. 5. Transfer the X-mark onto the PEX tubing. 6. Making sure to have a good hold of the SAA, loosen the two set screws. 7. Carefully lower the SAA into the PVC conduit making sure not to turn it during the lowering process. 8. Once the SAA touches the bottom of the PVC conduit, seal the conduit using the methods outlined in Section 4.4.3. 4.4.2.4 Aligning the SAA Inside the PVC Conduit In this installation method, the PVC conduit cannot be used to align the SAA so that the X-mark is pointed in the desired direction. Instead the SAA must be moved inside the PVC. Raise the SAA approximately 30 cm so that it is not sitting on the bottom of the conduit. It should be able to rotate freely in the conduit. Pump it up and down while turning. If the SAA does not move freely DO NOT FORCE IT! Leave the SAA as it is and take a reading of the azimuth offset (degrees relative to the intended direction). This offset can be cancelled in the converter or viewer software, to rotate the data to the intended azimuth. Note: If the conduit is sinuated or ovalized, the SAA will not be able to rotate in it freely. In these cases, it is best to mark the X-mark on the conduit and survey its azimuth. The azimuth can then be applied in software so that all movements are shown to act in the same direction. If the SAA is able to rotate freely, turn the SAA so that the X-mark is pointed in the desired direction (e.g. downslope). Remember to pump the SAA up and down as you are turning it to ensure it is free in the conduit. Once you have done this, lower the SAA to rest on the bottom of the PVC conduit. At this point it is possible to complete installation by following the directions outlined in Section 4.4.3. 4.4.3 Finishing the Installation Process Using the SAA Install Kit It is recommended that the SAA Install Kit be used during the installation process. This kit was designed to help make the installation process easier. The kit includes fittings which improve the installation process by providing a more secure way to compress the SAA. If you have followed the steps outlined in Sections 4.4.1 and 4.4.2, the installation should look similar to Figure 4.16a. At this point, in order to finish the installation, you will need to apply compression to the SAA. This will cause the joints to expand and snug into the conduit. In order to complete the installation process, follow the steps outlined below. March 2013 33 SAA Manual 1. Apply downward force of no more than 45 kg (100 lbs) on the PEX and turn the set screw on the top stack to maintain compression and orientation of the SAA within the PVC. (Figure 4.16b) 2. If you have not already done so, mark the X-mark on outside the PVC pipe for future reference. 3. Cut away any excess PEX tubing. (Figure 4.16c) 4. Thread the top portion of the pre-assembled top stack over the cable and screw it into the bottom portion. Tighten the gland at the top of the top stack until the rubber gasket seals the cable. (Figure 4.16d) 5. Run cable to the earth station. Use conduit to protect the cable and to ease cable replacement if required. (Figure 4.17a). Since the PVC conduit containing the SAA has been sealed, it is not necessary for the flexible conduit to cover the entire cable. If the top of the SAA is protected using a well head covering or some other buried structure, it is possible to use zip ties provided in the kit to hold the conduit in place under the protective conduit (Figure 4.17a). It is also possible to do cable splices or attach items such as the SAASPD surge protection device at this point (Figure 4.17b). Figure 4.16: Using the pre-assembled top stack during SAA installation to complete the installation process. Figure 4.17: Finishing off SAA installation under a protective well head. (a) Attaching flexible conduit to PVC conduit using zip ties. (b) Attaching SAASPD at top of borehole. March 2013 34 SAA Manual 4.4.4 Backfilling Recommendations It is recommended that grout be used to backfill around the PVC conduit. Using grout greatly reduces the probability of having voids form between the PVC conduit and the side of the borehole. Sand can be used but it is not recommended since sand can easily get caught and bridge the borehole leaving large voids. It is also possible for sand to migrate out of the borehole due to piping. If sand must for some reason be used, it is highly recommended that care be taken to agitate the sand to break up any bridging. Sand must be added slowly to a water-filled annulus, and it must be agitated starting from the bottom of the borehole using a flexible rod or cable fishing tool. Note: Use grout instead of sand to backfill around the PVC conduit. Sand is harder to place without voids, and could migrate. The grout mix recommended for installation of SAA is given in Table 4.3, below. It is important to use bentonite powder for the mix since bentonite pellets will not incorporate well into the grout. The mix below, results in a very soft grout which will minimize the influence of the grout on the soil displacement measurements. This is particularly important when installing SAAs into large diameter boreholes in which the cross-sectional area of the grout will be large. Table 4.3 Grout Mix Materials Ratio by Weight Portland Cement 1 Water 6.6 Bentonite 0.4 (adjusting as required) When mixing the grout, start by mixing the cement and water first. Do NOT mix the bentonite and water first, or you will not be able to mix the appropriate amount of cement into the grout, or the grout could flash set. Once the cement and water are mixed, add in the bentonite. Mix the bentonite in a bit at a time until the grout mix resembles heavy cream. The consistency is very important, too watery a mix will result in shrinkage and segregation, too thick and it will not be possible to pump the grout. Note: The grout mix given above is a guideline only. It is recommended that you design a grout mix which will have a similar strength and comportment as the soil in which you are installing the SAA. Some shrinkage and settlement of the grout should be expected. It is recommended that the grout be topped up 24 hours following completion of the initial grouting. Several types of grouting methods can be used for SAA installations. The most commonly used methods are: tremie grouting, displacement grouting, and staged grouting. Recommendations of which method to use in various situations are given in following sections. March 2013 35 SAA Manual 4.4.4.1 Tremie Grouting Tremie grouting is used in most installations. It is best suited for use in large diameter boreholes. It is also suitable for use when the SAA conduit is being grouted into a large diameter pre-existing conduit. This method can be used for either SAA+PVC installations or to pre-install the SAA conduit prior to receiving the SAA. However, it is important to make sure that the SAA conduit is weighted down prior to grouting to avoid sinuating the conduit. Note: Tremie grouting will cause the SAA conduit to become buoyant. Make sure that it is properly weighted down using either SAA or chain in order to avoid sinuating the conduit. In tremie grouting, a tube is inserted to the bottom of the borehole and the grouting is done starting from the bottom of the conduit. Grout is pumped into the tremie tube until it starts to appear at the borehole surface (Figure 4.18). The tremie tube is then removed from the borehole, or it may be left in place (“sacrificed”). When tremie grouting is used, it is important to take into consideration the dimension of the tremie tube. Too big and it will not fit in the borehole or casing with the SAA conduit, too small and it will be impossible to pump grout to the bottom of the borehole. In order to make the insertion of the tremie tube easier, it is recommended that it be inserted at the same time as the SAA conduit. Avoid excessive pump pressures when grouting. Figure 4.18 Tremie grouting SAA conduit into a borehole. March 2013 36 SAA Manual 4.4.4.2 Displacement Grouting Displacement grouting should be used when the SAA conduit is being inserted into a small borehole and there is not enough room for both the SAA conduit and a tremie tube. Note: The SAA+PVC installation method must be used when doing displacement grouting. If an empty conduit is placed inside the grout column, the buoyancy effects will make it difficult to fully insert an empty SAA conduit. Timing is also important; the grout should not be placed until the SAA+PVC assembly is ready for insertion. In displacement grouting the amount of grout required to fill the borehole is estimated using the diameter of the borehole and the diameter of the SAA conduit. The grout volume required is then mixed and placed in the borehole. As the SAA conduit is inserted into the borehole, the grout will be displaced upwards, filling the annular space between the borehole and conduit. Prepare the SAA+PVC assembly prior to placing the grout. 4.4.4.3 Staged Grouting In some cases, it is not possible to use the SAA to weight down the conduit during the grouting process. For very long SAAs, the buoyancy effects may be too great to easily resist using chain. In these cases, it may be desirable to use staged grouting. In staged grouting, the SAA conduit is inserted into a borehole along with a tremie tube, and the borehole is grouted in two or three stages. The grout should be allowed to set for 24 to 48 hours prior to doing the next stage. This method is recommended for SAA conduits over 60 m in length which are to be installed prior to receiving the SAA shipment. 4.5 Recommended Installation Method for Horizontal Installations The recommended installation method for horizontal installations is similar to the method outlined in Section 4.4.1 for SAA+PVC installations in vertical boreholes. In this case, the SAA+PVC is placed in a trench and surrounded by bedding sand as shown in Figure 4.19. The purpose of the bedding sand is to protect the SAA from large particles and stones which are commonly found in construction fill material. The work flow for horizontal installations is shown in Figure 4.20. Note: For most horizontal installations the cable end of the SAA is used as the reference point, though the far end can also be used as the reference point. The instructions below assume that the reference end is located at the cable end of the SAA. 4.5.1 Preparing the Trench for Horizontal Installation It is recommended that the SAA be installed into a trench that is at least 300 mm (1’) deep by 300 mm (1’) wide. The depth of the trench needed depends on the particle distribution of the soils surrounding the trench. The SAA is to be surrounded by bedding sand, as shown in Figure 4.21, to protect it from damage and minimize any local effects from large rocks. March 2013 37 SAA Manual Figure 4.19 Horizontal installation of SAA adjacent to train tracks. (a) SAA+PVC placed in trench containing bedding sand and geotextile to wrap around SAA. (b) Survey marker placed at reference end of SAA. Ensure the marker is associated with a known location along the sensorized portion of the SAA. Figure 4.20 Work flow for installing horizontal SAAs Use of a geotextile is recommended in order to provide separation between the common fill and the bedding sand fill. Make sure that the geotextile is wide enough to line the trench and wrap over top of the sand, completely enclosing it at the end of the process. After the geotextile has been placed in the trench, place a layer of bedding sand in the trench. The thickness of the bedding sand layer placed below the SAA depends on the gradation of the subgrade soil. It is recommended that the bedding layer be as thick as the largest particle commonly found in the subgrade. The minimum recommended thickness of the bedding sand placed below the SAA is 150 mm (6”). March 2013 38 SAA Manual Figure 4.21 Trench for installation of horizontal SAA At this point the trench is ready for the placement of the SAA conduit. The conduit can be assembled directly in the trench, or it can be assembled next to the trench and then placed inside the trench before pulling the SAA inside. 4.5.2 Assembling SAA Conduit for Horizontal Installation In horizontal installations, it is sometimes easier to use a larger conduit than the one typically recommended for vertical installations. The larger conduit makes it easier to extract the SAA when the monitoring program is done. It also makes it possible to account for ovalization of the conduit due to the soil load above the SAA. An example of how to calculate pipe ovalization due to live and dead load is presented in Appendix J. Make sure to select the appropriate pipe cross section for your particular site. When assembling SAA conduit, all PVC conduit ends should be kept clean from dust, oil, and snow. Look inside the PVC conduit to make sure that no foreign objects are inside it. The edges of conduit over which the SAA is being pulled should be smoothed with a deburring tool to prevent abrasion, as shown in Figure 4.5. Lay out the SAA conduit either adjacent to the trench in which you are installing the SAA or in the trench itself. If you are using rope to pull the SAA into the PVC, make sure to pull the rope through all conduit sections before gluing these together. The install kit includes a wire to enable fishing a rope through each section. When gluing the PVC using PVC primer and cement, make sure to follow the manufacturer’s instructions for the product you plan to use. Note: It is important to follow the PVC Primer and Cement manufacturer’s recommendations for set times and temperature ratings. The most common Cements may fail at low temperatures. Choose products which are suitable to the environment and weather you will be encountering. Glue the bottom part of the top stack included in the SAA Install Kit to the cable end of the conduit at this time. March 2013 39 SAA Manual 4.5.3 Pulling the SAA Into the Conduit Note: It is not necessary to check for twist on horizontal SAA installations. However, if you plan to re-use the SAA for a vertical installation at a later time it is important to avoid applying any twist. Prior to pulling the SAA into the conduit, place the conduit in the trench. Make sure that the conduit is straight as this is essential to pulling the SAA into the conduit. Place the SAA reel on the reel stand so that the SAA unreels from the bottom (Figure 4.6a). Once this is done, pull the rope through the eyelet and secure with electrical tape (Figure 4.6b). It is also possible to use a cable fishing tool to pull the SAA. However, if you opt to use one, use a swivel connection between the SAA and the cable fishing tool to allow the SAA to freely rotate during the pulling process. When ready, pull the SAA into the conduit, making sure that there is someone on hand to guide the SAA into the conduit (Figure 4.6c). Keep pulling the SAA until one or two segments are completely out the far end of the conduit (Figure 4.6d). After the SAA is pulled into the conduit, check the X-marks at the near and far ends to make sure that they are aligned, if the X-mark is located on the underside of the SAA, lift the bottom segment to verify the alignment. Once you have confirmed that there is no twist in the SAA, push a piece of PVC conduit which has been cut to length over the eyelet end of the SAA and glue it in place. Also glue the end cap in place at this time. 4.5.4 Closing the PVC Conduit Using the SAA Install Kit Either end of the SAA may be used as the reference end in horizontal installations. The SAA should be secured at one end of the conduit, but never at both. There should be at least one 25 mm (1”) or room at the unsecured end. These measures prevent rotation, and allow for some expansion and contraction of both the SAA and PVC. Unlike the SAAs installed vertically, it is not necessary to compress the joints for horizontal SAAs. Ensure that the reference end of the SAA is stationary, placed in a zone where movement is not expected to occur. Once this is done, tighten down the set screw at the reference end. This will stop the SAA from sliding at this end of the conduit. If you wish to enclose the SAA within the SAA conduit, slip the rest of the top stack over the cable and screw the top stack together. Tighten the gland at the top of the top stack until the rubber gasket seals the cable. It is possible to place a survey marker at the reference end of the instrument, as shown in Figure 4.19b. If you do opt to use the survey marker, make sure to place it at the joint between the first sensorized segment and the adjacent unsensorized segment. This will ensure that it corresponds to data at the first vertex of the polyline describing the SAA data relative to the reference end. Any additional survey markers should be placed at known join locations along the sensorized length of the SAA. It is recommended that the cable between the SAA and the logger or measurement point be protected by conduit. The conduit will protect the cable and make it easy to replace in the event of a mechanical March 2013 40 SAA Manual break. It is a good idea to have a rope in the conduit to allow cable to be pulled through. It is also a good idea to have some access points for long runs of cable. 4.5.5 Backfilling the Trench A layer of bedding sand should be placed above the SAA. It is recommended that the bedding sand layer be as thick as the largest particle commonly found in the fill placed above the SAA. The minimum recommended thickness of the bedding sand is 150 mm (6”) placed above the SAA. Once the bedding sand is in place, the geotextile can be wrapped over top of the bedding sand. Edges of the geotextile should overlap at least 150 mm (6”). Following this step, it is possible to place fill over top of the SAA and bedding sand (Figure 4.21). 4.6 Retrieving SAAs for Re-Use Once a monitoring program has been completed, it may be possible to retrieve an SAA and re-use it at another location. SAAs can be removed by hand from a conduit which has undergone deformation in which the minimum bend radius of the conduit is no less than 3.5 m. When retrieving the SAA, it is important to follow the guidelines discussed in Section 4.2 and Appendix A. In particular it is important to make sure to place the SAA on its reel. Do NOT remove the SAA from its conduit and place it on the ground prior to reeling it up. The safest place for the SAA is either the borehole, or its reel. During the manipulation of the SAA, make sure not to exceed bends of 45° at the joints. It is ok for the joints to have bends >45° when they are on the reel. Note: Before placing the SAA on the reel, make sure to check the condition of the reel. The air bubbles on the rungs should be generally intact. If not the SAA could be loose on the reel. If the reel is in need of any repairs, carry them out before retrieving the SAA. The SAA should be placed on a reel the same way each time, matching the factory-reeled condition. Start by rolling the cable and securing it to the reel using zip ties. Then position the PEX as shown in Figure 4.22a. Note that there is a hole in the side of the reel which is used to secure the SAA onto the reel. The hole should line up between the two PEX rings located at the top of the SAA. When placing the SAA on the reel, make sure that the X-mark on the PEX faces straight away from the reel. This will help make sure that the on-reel dots are facing outward. If the on-reel dots are not facing out, then something is wrong. See Figure 4.22b for the appearance of the on-reel dots. Reeling the SAA will take several minutes, since it is necessary to make sure that the joints are not twisted during the process. Make sure that the segments are all lined up neatly as they are placed on the reel, and that the joints are all lined up. Once you have finished placing the SAA on the reel, make sure to secure the SAA to the reel. Note: Make sure you place the SAA on the reel in the same position you took it off. The X-mark on the PEX should be pointed straight out from the reel. The joints should all be neatly arranged and lined up on the reel. March 2013 41 SAA Manual Figure 4.22 Reel positions for SAA. (a) Note location of PEX/SAA interface. (b) Make sure all the On-reel dots are in the same position. At this point you should make sure that the On-reel dots are all pointed in the same direction. If the SAA was reeled properly, these should all be pointing straight up out of the reel, as shown in Figure 4.22b. If the On-reel dots are all oriented in the same direction as shown, then it is possible to either store the SAA or move it to another site for re-use. If the on-reel dots are not oriented in the same direction, it is likely evidence of twist in the SAA. Contact Measurand for assistance if this happens. March 2013 42 SAA Manual 5. Collecting SAA Data Using SAA Recorder SAARecorder can be used to record SAA data manually. This is usually done in cases where readings are taken on an interim basis. It is often helpful during installation to record some data using SAARecorder in order to help with any subsequent troubleshooting. This chapter contains basic instructions on setting up the SAA, recording data, and exporting data in SAARecorder. For more instructions on how to use SAARecorder, please refer to the SAARecorder Software Manual found in SAASuite. 5.1 Getting Started in SAARecorder To collect data using SAA Recorder you will need to connect the SAA to your computer via an interface as discussed in Chapter 3. Once SAARecorder is able to find and communicate with the SAA, the program view shown in Figure 5.1 will open on your computer screen. Figure 5.1. Program view from SAARecorder showing a single SAA. This view shows three orthographic views of the SAA, plus a fourth perspective view (lower-right corner). In the upper left corner, you will find the Basic Settings window (Figure 5.2). The Basic Settings window allows the user to view and change the “Array Reference”, the amount of averaging to perform, whether or not to use the “Averaging-in-Array” (AIA) mode, and the modeling mode (2-D, 3D or Mixed H/V). These settings must be set correctly in order to view the SAA properly in SAARecorder. The “Array Reference” setting allows the user to select which end of the SAA (near (cable) end or far (tip) end) to use as the reference end or starting point for SAA calculations. March 2013 43 SAA Manual Figure 5.2. Basic Settings Window. It allows the user to view and change the reference point for the SAA (near or far), the amount of averaging to perform, and the modeling mode (2-D or 3-D). The “Averaging” setting allows the user to specify how many samples of raw data are averaged on an ongoing basis. The averaging value can be set to anywhere from 1 (i.e. no averaging) to 1000 (i.e. average the last 1000 samples for computing displayed data). Setting the averaging value in SAARecorder does not affect the contents of a raw data file, although it does affect data exports to either SAAView or one of the other text output formats. In most cases it is preferable to use AIA Mode, as described in Section 2.2.2. To use AIA mode, make sure the AIA mode check box is checked. Normally, it is recommended that the averaging level for AIA data collection be set to 1000. Although sometimes, when collecting data in noisy environments where there is some significant vibration, it is preferable to use a higher averaging level. An AIA averaging level of up to 25500 can be used. Calculations for the SAA(s) can be made in one of three possible modes: (i) Near Vertical (3D), (ii) Near Horizontal (2D), and (iii) Mixed H/V mode (Convergence). The near vertical mode is used if all segments of the SAA are greater than 30 degrees relative to the horizontal. The near horizontal (2D) mode is appropriate when no sections of the SAA are inclined more than 60 degrees relative to the horizontal. The mixed (convergence) mode is appropriate when one or more, but not all, segments of the SAA are inclined more than 60 degrees relative to the horizontal. This mode is normally used for SAAs that are being used to monitor circular shapes, such as the circumference of a tunnel. For more information on using the mixed mode, please refer to the SAARecorder Software Manual. 5.2 Recording SAA Data To record SAA data to a "raw shape array" (.rsa) file on your PC, select the 'File | Save Raw Data File' menu option in SAARecorder, or press the Spacebar key. This brings up the recording window shown in Figure 5.3. March 2013 44 SAA Manual Figure 5.3. Playback / Recording window for recording raw shape array (.rsa) data. The recording can be stopped by closing the Playback / Recording window, pressing the “stop” button in the above window, or selecting 'File | Close Raw Data File' from the main menu. Once the recording has been stopped, a dialog appears prompting you to select a filename for the recorded data. Selecting the 'File | Save Raw Data File' menu item saves the raw data as soon as it arrives at the PC. Note: Before starting a long-term recording session, check your Windows Power Management settings to make sure that the computer will not automatically power down the hard drive or go into a reduced power state if left unattended for an extended period of time. 5.3 Exporting SAA Data Raw data recorded in SAARecorder as .RSA files can be converted to a multi_saa_allcart.mat file that can be easily opened in Measurand’s SAAView software. SAAView has many graphical interfaces and options available for viewing SAA data over a long period of time. In order to convert one or more .RSA files to a multi_saa_allcart.mat file which can be opened in SAAView, select the 'File | Export raw data to SAAView' menu item of SAARecorder. Note: The Array Reference and the Modeling Mode settings need to be set to the appropriate settings when exporting to SAAView. You will next be prompted to select the raw data file you wish to export. Once a file has been selected, you will be prompted to select the averaging options for the conversion (Figure 5.4). After the averaging options have been set, you will be prompted to select the SAA conversion parameters (Figure 5.5). For this example, the SAA is horizontal and the reference end is at the cable end or “Near End” of the SAA. As such the “Vertical” and “Ref=Far” boxes are left unchecked. For more information on the options shown in Figure 5.5, please refer to the SAACR_raw2data Manual found in SAASuite. Once the March 2013 45 SAA Manual conversion is complete, a pop-up box will open and show you the location where the multi_saa_allcart.mat file is saved. You can now view the file using SAAView (see Chapter 7). Figure 5.4. Selecting file averaging options. Figure 5.5. Selecting SAA conversion parameters. March 2013 46 SAA Manual 6. Collecting SAA Data Using a Campbell Scientific Data Logger SAA can be configured for use with a CR800, CR1000, or CR3000. For simplicity’s sake, this chapter will only discuss the CR1000. Unless otherwise stated, it can be assumed that everything stated for CR1000 loggers in this chapter applies for CR800 or CR3000 loggers. In order to connect the SAA to the CR1000, you will need to use Measurand’s SAA232 (or SAA232-5) interface device and utilities included in the SAASuite software. The SAA232 interface is necessary to properly cycle power through the SAA and to convert the SAA’s RS485 communication protocol to the RS232 format recognized by the CR1000. The following utilities included in SAASuite are used to configure the logger or convert data collected from the logger into Cartesian data: 1) SAACR File Generator: a utility used to create the program files that will allow the user to collect data from the SAAs sensors; 2) Conversion Config: a utility used to create the conversion preferences file used for automatic data collection; and 3) SAACR_raw2data: a conversion utility that converts the raw data to Cartesian format viewable in SAAView. In cases where a large number of third party vibrating wire sensors will be monitored, a CR1000 or CR3000 is advantageous over a CR800. 6.1 Hardware Setup The CR1000 allows up to 20 SAAs to be connected to a single logger (the CR800 allows for up to 10 SAAs connected via two SAA232-5s). Each COM port on the CR1000 requires a Measurand SAA232 or SAA2325 device (Figure 6.1) to connect an SAA. A wiring guide for connecting the SAA232 to the CR1000 and to the SAA is located on the side of the SAA232 or SAA232-5, as can be seen in Figure 6.1. Wiring diagrams for back panels containing CR1000, an SAAREG, and SAA232 or SAA232-5 are shown in Figure 6.2 and Figure 6.3, respectively. Figure 6.1: SAA232 and SAA232-5 for connecting SAA to COM ports on CR1000 loggers. Note the SAA wiring guide on the side panel. March 2013 47 SAA Manual Figure 6.2: Wiring diagram for CR1000 with SAA232. An example setup using a CR800, 2 SAA232s, and an Airlink Raven XT modem is illustrated in Figure 6.4. If the back panel assembly and wiring has been done by Measurand, you will only need to connect the SAA wires to the SAA232 or one of the SAA232-5 channels. This should be done prior to connecting the power to the logger (i.e. the 4-pin green connector on SAAREG should not be plugged in while you are wiring the SAAs into the SAA232 or SAA232-5). The green connectors can be removed from the SAA232 for easier wiring. When wiring the SAAs to the SAA232 and logger, make sure to note which SAA (serial number) is connected to which SAA232 or SAA232-5 channel (if applicable), and the COM port to which the SAA232 or SAA232-5 is connected. These must match the logger program. March 2013 48 SAA Manual Figure 6.3: Wiring diagram for CR1000 with SAA232-5. March 2013 49 SAA Manual Figure 6.4: Example CR800 & SAA integration using one SAAREG, two SAA232, a CR800 logger, and a Raven XT Wireless Modem. When setting up the earth station, it is a good idea to connect the power after the SAAs are connected to the logger. In order to safely connect the power to the earth station follow the steps outlined below: 1) Make sure fuse from Battery is connected. 2) Connect battery to regulator. 3) Connect the solar panel to the regulator. March 2013 50 SAA Manual Once these steps are completed, make sure that there is a logger program loaded. If there is none, load one and test the SAA and cell modem for functionality. Information on how to create a logger program and load it is provided in the following sections of this chapter. 6.2 Setting Up the CR1000 Logger Note: The CR1000 logger setup can be done prior to taking the earth station in the field for installation, saving time in the field. 6.2.1 Using LoggerNet Setup of the CR1000 to collect SAA data requires a basic understanding of Campbell Scientific’s LoggerNet software. For more information on Campbell Scientifics’s LoggerNet software, visit the Campbell Scientific website to obtain the user manual (http://www.campbellsci.ca/). The LoggerNet toolbar is shown in Figure 6.5. For the purpose of this manual, the following utilities will be used: 1) Setup: Utility used for connecting to or changing connection settings of a Campbell Scientific device (e.g, the CR1000, CR3000, or CR800). This utility is found in the Main Menu. 2) Connect: Utility used for managing device connection and manual data collection. This utility is found in the Main Menu. 3) CRBasic Editor: Editor and compiler used for Campbell Scientific programs. This utility is found in the Program Menu. 4) Task Master: Utility used for automating data collection and conversion. This utility is found in the Main Menu. Figure 6.5: LoggerNet Utilities menu. 6.2.2 Creating a Main Program File Program files for collecting SAA data using the CR1000 can be created using the Measurand SAACR File Generator utility found in SAA Suite (Figure 6.6). March 2013 51 SAA Manual Figure 6.6: SAACR File Generator utility. The SAACR File Generator utility can be used to create programs for SAAs and SAAPZs (Measurand vibrating wire piezometers). When setting up the program, the following fields must be completed before you generate the program file: 1) Project Title: A descriptor of the monitoring setup; 2) Number of Samples to Average: The number of SAA samples used to compute an average reading. Values can range from 100 to 25500. The larger the number of samples the better the precision, but computational time also increases, albeit, very minimally. With AIA technology, data samples can be collected much faster than previously available. For example, taking the average of 1000 readings (standard averaging level) will take approximately 10 s to output a value from the SAA; 3) Reading Interval: The frequency at which SAA observations are made within the program (also known as ‘scan interval’). An SAA can perform measurements at 400Hz (see above), thus taking an average of 1000 samples (typical value) in less than 10 seconds. However, sufficient time must be included to account for other commands and functions within the CR1000, some of which do not occur immediately with each collection. The number of SAAs connected to a CR1000 also affects the collection time. Based on past experience, the logger can work properly for an extended period of time, but will eventually malfunction if the reading interval is less than 10 minutes. For this reason, the minimum reading interval is 10 minutes. For greatest certainty, it is a good idea to increase this by 50%, to allow for circumstances and configurations which we have not yet seen. 4) SAA Table: For each SAA, the following information must be included, (as seen in Figure 6.6): a. SAA232 or SAA232-5 Channel that the SAA is connected to (See Figure 6.7); b. COM port to which the SAA is connected on the CR1000; and c. Serial Number (physically marked on the ‘cable-end’ of the SAA) March 2013 52 SAA Manual Figure 6.7: SAA232 or SAA232-5 Channel selection. 5) Generate CR1/CR3/CR8 File: The main difference between the CR800, CR1000 and CR3000 is the number of COM ports available, and thus the number of SAAs that can be connected to each. To choose the appropriate data logger type, click the “Generate File” button, and select the desired file type in the save screen (Figure 6.8). Enter the desired file name for the main program file and click “Save”. A separate SAA_Include file (see Figure 6.8 for example) will be generated at the same time as the main program file. Both of these files must be loaded onto the logger for the main program file to work properly. Figure 6.8: Saving a logger program created using the SAACR File Generator utility. March 2013 53 SAA Manual 6.2.3 Compiling SAA Program Files Once the main program and the SAA_Include file have been successfully generated, the main program file can be viewed using the LoggerNet ‘CRBasic Editor’. At this time, it is also possible to add other code for instruments or powering the SW12V port on the logger. An example of a program in which additional sensors have been added is provided Appendix K. Once the code has been added, it should be compiled to make sure that there are no errors. To successfully compile the new program, the SAA_Include file generated with the program is also required. The SAA_Include file should be placed in the same directory as the main program to avoid compilation errors. Note that the SAA_Include file will not successfully compile alone, it gets compiled as part of the main program. Once the two files are located within the same directory, it is possible to save and compile the program as illustrated in Figure 6.9. Note: The SAA_Include file is not meant to compile on its own. The SAA_Include file should be placed in the same directory as the main program file. When the main logger program is compiled, the SAA_Include file is referenced and is compiled as well. Compile errors will appear if you attempt to compile the SAA_Include file. Figure 6.9: Saving and Compiling the SAA logger program. Note: When using other sensors with the CR1000, it is advised to add the necessary code to the CR1000 program generated for the SAA rather than trying to integrate the SAA specific program with the other sensors. Appendix K provides examples for integrating other sensors into the program. 6.2.4 Uploading Program Files to the CR1000 Once the program has successfully compiled, both the program file and the SAA_Include file must be uploaded to the CR1000 before the main program is run. This is accomplished in LoggerNet using the March 2013 54 SAA Manual ‘Connect’ utility (Figure 6.10). Right click on the Station of interest and click on ‘File Control’ (the station must be setup using the LoggerNet ‘Setup’ utility). Figure 6.10 Selecting File Control in the LoggerNet Connect utility. Once the File Control window opens, the ‘Send’ option is used to place the SAA_Include file on the CR1000, as illustrated in Figure 6.11. The ‘Run Now’ and ‘Run On Power-up’ options should be deselected when prompted (Figure 6.12) (since the SAA_Include file will not run as a standalone application). Note: The SAA_Include file must be placed on the CR1000 before the main program will run. This is accomplished using ‘File Control’ from the Connect utility. The main program file can be placed in the same way by using the ‘File Control’ and ‘Send’ options. When uploading the main program file, the ‘Run Now’ and ‘Run On Power-up’ options should be selected. Note since the run program options are selected, the main program will compile at this point (Figure 6.13). Alternatively the ‘Save, Compile and Send’ option in the CRBasic Editor can be used. When prompted for Run Options, ‘Run Now’ and ‘Run On Power-up’ should be selected. March 2013 55 SAA Manual Note: If you run the program to test the logger set-up, make sure to remove garbage data from the logger by clicking the ‘Stop Program’ button. When prompted, choose the ‘Clear the Program’ option. When finished setting up on the site, click ‘Run Options’ and select ‘Run Now’ and ‘Run on Power-up’ to start collecting data. To make sure no garbage data is left behind, when prompted select ‘Delete associated data tables created by’. Figure 6.11: Selecting 'Send' option in ‘File Control’. Figure 6.12: Selecting ‘Run Options’ when sending files to CR1000 logger. March 2013 56 SAA Manual Figure 6.13: Sending a program to the CR1000. 6.2.5 Data File Management It is critical that the data files generated by the CR1000 are effectively managed. The output folders for CR1000 data files are specified under the ‘Data Files’ tab in the LoggerNet ‘Setup’ utility (Figure 6.14). By default, the data is stored in the C:\CampbellSci\LoggerNet directory and given a name of “DataloggerName_TableName_#.dat”. It is suggested that the output folder location be changed from this default location to another folder prior to collecting data. It is generally easiest to create a data folder in the C:\Measurand Inc\SAA3D\logger_files\ directory to facilitate automated data conversions later on. An ‘archive_raw’ folder should be created in the data folder for conversion purposes. To change the output file name you will need to select each file in the ‘Tables’ box shown in Figure 6.14 and point it towards the desired output folder individually using the ‘Output File Name’. It is important not to change the table name, but only the folder. For example the Project Information file is saved by default to C:\Campbellsci\LoggerNet\CR1000_PROJECT_INFO.DAT. This can be changed to C:\Measurand Inc\SAA3D\logger_files\Test\ CR1000_PROJECT_INFO.DAT. Note: If you opt to change the output file name, DO NOT change the output table name, only change the folder location. The ‘File Output’ option should be set to “Append to End of File” (Figure 6.14). The CR1000 keeps track of the last record that was successfully sent to the destination folder. If the output file already exists, the new data will be appended to the end of the file. If the file does not exist or has been moved elsewhere, a new file will be created with all records that have not yet been recorded. The ‘Output Format’ should be left at the default ASCII Table Data, Long Header (TOA5). March 2013 57 SAA Manual Figure 6.14: Specifying the destination of data files using the LoggerNet Setup utility Note: Before a new project begins, any CR1000 data files residing in the output file directory should be removed. Otherwise, data from the new project may get concatenated to the existing data file, causing abnormalities in the results. 6.3 Collecting Data From the CR1000 6.3.1 Manual Data Collection For each setup, the PROJECT_INFO, SAAx_DATA, SERIAL_ERRORS, LOGGER_DIAGNOSTICS, and SAA_DIAGNOSTICS data files must be recorded. Data files scheduled to be collected are listed in the ‘Data Files’ tab of the Setup utility and have a green ‘check mark’ next to them. Data Tables “Public” and ”Status” are not required for data collections as they only store one record of data at a time. They are used only for real time viewing. Ensure that these tables are not selected for Scheduled Collection by deselecting the ‘Included for Scheduled collection’ option for that table. Until data collection is properly configured, scheduled data collection should be disabled. This is accomplished by unchecking the ‘Scheduled Collection Enabled’ checkbox in the Schedule tab of the LoggerNet ‘Setup’ utility (Figure 6.15). Data can only be collected now by forcing a data download in the LoggerNet ‘Connect’ utility by clicking on ‘Collect Now’ (Figure 6.16). Whenever the CR1000 is connected using the ‘Connect’ utility in LoggerNet, the station’s clock time should be checked to ensure that valid time stamps are being applied to the data. Correct time stamps cannot be easily recovered from erroneous values. The CR1000’s clock is set by clicking on ‘Set Station Clock’ in the Connect utility, which will assign the time currently set on your PC to the CR1000. March 2013 58 SAA Manual Note: If your PC is using Daylight Savings Time, take care NOT to disrupt the time setting currently employed by the CR1000. If the station clock is adjusted to match Daylight Savings Time on your PC, gaps or overwrites in the data file will occur. Figure 6.15: Disabling scheduled data collection. Once sufficient time has elapsed to ensure that data has been collected from the SAAs (based upon the reading frequency), data can be manually collected by clicking on ‘Collect Now’ in the Connect utility. A summary of the data collected is summarized as illustrated in Figure 6.16. Note: Data is collected based upon scheduled interval, not upon elapsed time since the program was started. If the program is written so that data is collected every 30 minutes and it is 29 minutes after the hour, data will be collected in 1 minute. If it 31 minutes after the hour, data will be collected in 29 minutes. 6.3.2 Automated Data Collection Once the manual data collection process has been tested, the data collection process can be automated by specifying the desired data collection interval in the ‘Schedule’ tab of the LoggerNet ‘Setup’ utility (Figure 6.17). Check the ‘Scheduled Collection Enabled’ checkbox. As long as the destination CR1000 is connected (wired or wirelessly), data will be downloaded to the Output File Directory. The Campbell Scientific Raven X manual provides details of configuring a wireless connection with the CR1000. The Campbell Scientific LoggerNet manual provides details of configuring a connection with the CR1000 using a land line. A trial test should always be conducted before beginning a project to ensure that the system is performing as expected. March 2013 59 SAA Manual Figure 6.16: Collecting data using the LoggerNet ‘Connect’ utility. Figure 6.17: Enabling scheduled data collection. March 2013 60 SAA Manual 6.3.3 Manual Data Conversions It is possible to use the SAACR_raw2data utility to convert SAA data, and data from the following instruments: vibrating wire piezometers, strain gauges, and vibrating wire earth pressure cells. It is also possible to convert multiple SAAs into one long “superset” SAA. In order to use these functionalities you will need to create a site file for the project and place it in the appropriate SAARecorder folder (c:\Measurand Inc\SAARecorder\Calibrations\site\[site filename]). N.B. if the site folder does not exist in the c:\Measurand Inc.\SAARecorder\Calibrations folder, you will need to create it to save your site files there. You will also need to place the calibration files for the other instruments into the appropriate SAARecorder calibrations folder (c:\Measurand Inc\SAARecorder\Calibrations\non_saa_coeffs). For more information on these aspects and how to use the converter, please refer to the SAACR_raw2data Manual. Once the conversion is completed, you will be prompted on whether or not you want to view the data using SAAView. 6.3.4 Automated Data Conversions Automated data conversion requires generating a pref_project.txt file. This can be done in two ways. This first way does not require having any raw data for conversion. In this case, the Conversion Config Utility in SAASuite can be used to generate the pref_project.txt file which contains conversion settings needed when converting data automatically. An example of a simple file set-up is shown in Figure 6.18. Detailed information on the Conversion Config Utility options are provided in the SAASuite Manual. Once the pref_project.txt file has been generated, it is possible to set up the computer to automatically convert the data into a format viewable in SAAView. This is accomplished using the LoggerNet ‘Task Master’ utility. Figure 6.18. Example of pref_project.txt set-up being completed in Conversion Config utility March 2013 61 SAA Manual To add a task in the Task Master, click on the CR1000 of interest, and click the ‘Add After’ button. Under ‘How Task_n Starts’, in the Station Event Type, select the ‘After Successful Call’ Option (Figure 6.19). Figure 6.19: Creating a task using the LoggerNet 'Task Master' Utility. To configure the task, click on the ‘Configure Task’ button. Once the configure screen is open (Figure 6.20), check ‘Execute File’ and browse to C:\Measurand Inc\SAA3D\SAACR_raw2data.exe (or the appropriate folder containing this file). Under ‘Command Line Options’ you must specify the pref_project.txt file that was generated was completed. It should be located in the same directory as the raw data. This entry must be surrounded by double quotation marks (“ ”) since there is a space in the C:\Measurand Inc\ path. This file contains settings necessary for SAACR_raw2data to complete subsequent conversions. Under ‘Start In’, enter C:\Measurand Inc\SAA3D\. Select ‘Run Minimized’ if you don’t want to see the application running when it gets called. Hit ‘Apply’. The Task Master will now automatically convert raw data that is scheduled to be collected using the LoggerNet ‘Setup’ utility. March 2013 62 SAA Manual Figure 6.20: Configuring task options in Task Master. Note: The path name to the pref_project.txt file must be surrounded by double quotation marks since there is a space in C:\Measurand Inc\ Verify that the ‘Pause All Tasks’ check box under the Status tab of the Task Master utility is unchecked, Figure 6.21. The SAACR_raw2data utility will now run upon successful completion of a scheduled data download. A progress bar will now appear after a scheduled data download indicating that the SAACR_raw2data utility is running. If any of the files required by SAACR_raw2data are open while the program is being executed an error message will be generated. Data can be viewed at any point by running SAAView and viewing the most recent data which has already been automatically converted. Note: Any of the files required by SAACR_raw2data (e.g., calibration files, multi_saa_allcart.txt) cannot be open while the process is running. Otherwise an error will be generated. It is also possible to create the pref_project.txt file following a manual conversion of the data. In this case, it is necessary to collect and convert data manually at least once to create the pref_project.txt file. The file is then used in task master as described previously to set up automated conversion. The procedure for automating the data conversion process in this case is: a. b. c. d. Disable scheduled data collection in the LoggerNet ‘Setup’ utility Send program files (both main and SAA_Include) to the CR1000 Set the path for data files in the LoggerNet ‘Setup’ utility Manually download the data from the logger and perform a manual conversion. This will generate the required pref_project.txt file. e. Setup a new task using the Task Master utility (previously described) f. Manually download the data again. g. Enable scheduled data collection at the desired data collection interval. If you do not follow this procedure you run the risk of having data gaps. March 2013 63 SAA Manual Figure 6.21: Viewing the status of scheduled tasks in Task Master. 6.3.5 Saving Data in Overwrite File Mode If data is to be collected over long time periods, eventually the SAA data files will become very large and require an increasing amount of time to process. Once the automated data conversion process has been setup, it is possible to switch the File Output Option to ‘Overwrite Existing File’ (Figure 6.22) for the SAA data files (the PROJECT_INFO, SERIAL_ERRORS, LOGGER_DIAGNOSTICS, and SAA_DIAGNOSTICS files should NOT be changed). The SAACR_raw2data program will recognize that only the most current data is being collected. This data will be appended to the multi_saa_allcart.mat file so that a complete data history is maintained. The multi_saa_allcart.txt file (text file of all Cartesian coordinate records) will no longer be updated in this mode, just the multi_saa_curcart.txt (text file of most recent Cartesian coordinate records). March 2013 64 SAA Manual Figure 6.22: Switching the "Data File Output" option in the LoggerNet 'Setup' utility to 'Overwrite Existing File'. If the SAA Data file is viewed when ‘Overwrite File’ is implemented, only the most recent data records will be contained in the file. March 2013 65 SAA Manual 7. Viewing SAA Data Once data has been converted to multi_saa_allcart.mat format, it can be viewed using SAAView. Complete instructions on how to use SAAView are given in the SAAView Manual, which can be found in the SAASuite. After setting up a monitoring station, it is sometimes helpful to look at the absolute shape of the SAA in the ground. To do this, open SAAView and select the SAA you wish to view (Figure 7.1). To look at the absolute shape of the SAA, click on the ‘QuickView’ button. This will open the window shown in Figure 7.2. The 3D shape of the SAA is plotted on two graphs, the second plot showing the orthogonal view of the first one. It is possible to view the X-Z position data plot and the Y-Z position data plot by clicking the X button at the bottom right of the screen (Figure 7.2). It is also possible to view the X-Y position data plots by clicking on the Z button at the bottom right of the screen. The plots shown in Figure 7.2 contain three solid lines. These are: a blue line representing the initial shape reading of the SAA, a red line representing the latest shape reading, and a black line representing the difference between the initial and latest readings. In order to view intermediate readings, you will need to use the ‘ViewUnfiltered’ or ‘ViewFiltered’ option in the main menu. Complete instructions for the use of SAAView are provided in the SAAView Manual. Figure 7.1: Selecting an SAA to View in SAAView. March 2013 66 SAA Manual Figure 7.2: Quickview of absolute shape plots for SAA in SAAView. March 2013 67 SAA Manual 8. Frequently Asked Questions 8.1 How do I get calibration files for my SAA? Calibration files for SAA are downloaded using SAASuite. To download the files when you buy an SAA, open SAASuite and click on the “Get Software/Calibration Files” button at the bottom of the Main Applications tab. Once in the Software/Calibration Files download window (Figure 8.1), click on the “Download and Install” button next to Calibration Files. Figure 8.1. Software/Calibration Files download window. 8.2 How do I check for, and get software updates? To check for software updates, click on the “Get Software/Calibration Files” button at the bottom of the Main Applications tab in SAASuite. Once the Software/Calibration Files download window is open, look at the far right column to check the software status (Figure 8.1). Software will be listed as either “Up to Date” or “Update Available”. For beta versions of software, the message will remain “Beta Version Available”. To update software utilities, click on the “Download and Install” button next to the software you wish to update. 8.3 I am having problems connecting my SAA to SAARecorder. How do I check the connection? Check the following items: 1) Check which COM port the SAA is connected to. To do this, close all boxes open in SAARecorder and select “Communications | Check available COM ports”. This will show you a list of the serial COM ports currently available. Unplug the USB to serial converter and repeat the action. The list will have decreased by one port, this is the port which the SAA interface is using. Connect the March 2013 68 SAA Manual 2) 3) 4) 5) 6) USB to serial converter to the same USB port and make sure to only select this port when you search for Serial SAAs. Check to make sure that the +12V power is properly connected to the SAA interface. For the SAAUSB, make sure that the +12V power supply is plugged into the SAAUSB and the mains power. For SAA232s or SAA232-5s make sure that the +12V and ground ports on the logger is connected to the red and black pins in the 4 pin connectors. Do not use the SW12V power port to supply power to the SAA since this port could be turned off. If you are using an SAAFPU, make sure that the unit is fully charged using a multimeter. Check that the SAA connector is properly wired and/or seated to the interface. For the 4 pin round SAAF connector, check for cable damage behind the connector. Check to see if the LED on the SAAUSB interface is lit. Check that the driver for the USB to serial converter has been installed and is up to date. If you are not sure, re-install SAARecorder. Once this is done unplug the USB to serial converter and plug it back in to the same port. You may need to reboot your computer for the driver installer to finish the installation. If so, disconnect the SAA and SAA power, unplug the USB to serial converter, and restart the computer. Once finished, make sure to connect the SAA and SAA power as well as the USB to serial converter. Note that it will sometimes take a few minutes for the USB driver to be installed. Check the System Tray at the lower right corner of the Windows Desktop to verify the installation progress. In some cases the USB to serial converter can crash. Try to disconnect the USB to serial converter from the computer, and disconnect the SAA and SAA power from the interface. Wait 5 seconds. Plug the USB to serial converter into the USB port and wait another 5 seconds. Connect the SAA to the interface, then connect the SAA power. Try to search for serial SAAs again. 8.4 How do I diagnose an unresponsive SAA for cable damage? Disconnect the SAA cable from the interface and use an ohmmeter to check the cable for shorts or opens. Typical SAA cable resistance values are given in Table 8.1. The pin numbering convention for the 4-pin SAAF Connector is shown in Figure 8.2 Table 8.1 Typical SAA cable resistance values. Wire Pairing Pin Pairing on 4-pin SAAF Connector Resistance (kΩ) Black to White Ground - 1 4 to 9 Black to Blue Ground - 2 1 to 3 Black to Red Ground - 3 1 to 3 NA < 0.05 Black to Shield Figure 8.2. Pin numbering convention for the 4-pin SAAF Connector. Note the reference point at the top of the connector. March 2013 69 SAA Manual Actual readings will vary, but it is important that they are not under 50 Ω (except for black to shield), which indicates a short, or over 20 kΩ, which indicates an open. If a failure is found with the 4-pin round connector, inspect the wiring inside the connector to make sure that no wires have been broken. 8.5 How do I wire the SAAF Connector onto the SAA cable? Figure 8.3 Wiring information for Measurand SAAF connector. 8.6 How do I check my magnetometers to make sure they are working properly? Note the information provided in this section only applies to SAAs for which optional magnetometers were ordered. 8.6.1 Checking magnetometer data collected with SAARecorder If you are using SAARecorder to collect data, you can view magnetometer data for all of your magnetometer devices by clicking on the 'Data and graphs | Magnetometer data ' menu item. This presents a window that allows you to quickly view heading information and total magnetic field magnitude for each magnetometer. If the devices are functioning correctly and the SAA is not moving, and is either vertical or within 45 degrees of vertical, the X-axis heading values should remain relatively fixed (within +/- 1 degree) and should also agree fairly well (within +/- 5 degrees) with one another, assuming that the twist along the length of the SAA is not excessive. In the absence of any magnetic interference, the magnetic field strength measured by each device should agree with the other devices to within +/- 5%. March 2013 70 SAA Manual 8.6.2 Checking magnetometer data collected with a data logger using SAACR_raw2data If you are converting data logger data using SAACR_raw2data, you will need to: 1. 2. 3. 4. 5. 6. In the "Settings" window of SAACR_raw2data, press the "Advanced (mag)" button. Press Continue. Choose or create a file to which magnetometer data will be saved, ex: magdata.mat. Open the same file you just saved. Press the "Specific Settings" button. Should see an Azimuth vs. Time graph with a single trace of "Change in Azimuth" for each magnetometer. 7. If the SAA is stable (i.e. not being rotated or moved at all, and none of the magnetometers are affected by magnetic interference) then the change in azimuth plots for each magnetometer should remain quite close to 0 degrees. Significant changes from 0 degrees (i.e. more than +/- 1 degrees) would indicate that either (i) the SAA was rotated or (ii) there was some magnetic interference acting upon the magnetometer(s). 8. Check the total magnitude of the magnetic field measured by each magnetometer by clicking on the "tot" button in the top-right corner and looking at the magnitude traces. The value of these traces is calibrated to be 1.0 for the Earth's magnetic field as measured at our factory located in Fredericton, NB, Canada, but will in general be slightly different depending on the strength of the Earth's field at your location. For example, in many parts of South America, the average strength of the Earth's magnetic field is only about half that of the magnetic field strength in Eastern Canada. If the total magnitude measured by one or more magnetometers differs from that of the other magnetometer(s) by more than 10% then it is likely that there is some magnetic interference near the SAA that is adversely affecting one or more of the SAA magnetometers. It is generally advisable to "turn off" any magnetometers that are affected by magnetic interference by right-clicking on their corresponding magnitude trace and then selecting the "Turn Off this mag" option. 9. After the on / off states of the magnetometer devices and a "quiet time" in the magnetometer data have been selected (as described in the "Magnetometers" section of the SAACR_raw2data documentation) the user saves the magnetometer file typically in a subfolder of the main data folder called "magdata". Within this folder is a generated file called "headings.txt" which contains a summary of the heading azimuth angles measured by each magnetometer. These headings are useful for gauging exactly how much the SAA might be twisting. 8.7 How do I check my SAAF for twist? SAAs are delivered on a reel, with dots on the SAA facing out from the reel. This is your assurance that the SAA is properly reeled and will be free of twist. If a reel stand is used and the SAA is unreeled directly from the reel into its conduit while being allowed to rotate within the conduit, it will not be twisted in the conduit. All portions will point at the same azimuth direction. This can be verified by using the X-marks and on-reel dots on the SAA (Figure 8.4). If using SAA+PVC installation methods, then the presence of twist can be checked by looking at the Xmarks on the near and far end of the SAA and verifying that they are both pointing in the same direction. As shown in Figure 8.4, the on-reel dots all face outwards when the SAA has been properly reeled. March 2013 71 SAA Manual Figure 8.4. X-marks vs. On-reel dots. X-marks are long straight lines normally found at the near and far end of the SAA. Onreel dots are dots found on every 8 or 10 segments on the SAA. When the SAA is unwound into its conduit, the on-reel marks will rotate and no longer be facing the same azimuth. This is expected and does not indicate that mechanical twist has occurred. It instead indicates that the joints are returning to their factory calibrated headings. To check for twist in an SAA installed in a pre-cased borehole follow the steps below. 1. Place the SAA reel on a reel stand near the borehole. It should be oriented so that the bottom segment of the SAA can be unreeled directly from the top of the reel into the borehole. 2. Make sure to carefully record the on-reel orientation of the SAA so that it can be returned to the same state with the marks facing out. Photographs are recommended. 3. Unreel the SAA into the borehole from the reel, making sure not to apply torsion to the SAA. Allow the portion going into the borehole to rotate freely. 4. Lift and rotate the SAA to achieve the desired azimuth, but ONLY if it is free to rotate in the hole. If the SAA is not free to rotate at this stage, DO NOT rotate it. If the SAA includes magnetometers, take the azimuth readings using SAARecorder. The readings will be used for comparative purposes only, and not to set the azimuth of the SAA. 5. Lift the SAA part-way out of the borehole using the techniques outlined in Chapter 4. Return the SAA to its original heading and begin to reel the SAA back onto its reel in an exact reversal of the unreeling process. Make sure that any marks on the top part of the SAA face the same way as they faced when the SAA was on the reel. 6. Complete the reeling process taking care to align all the segments carefully next to each other, with the joints all in line with each other. 7. At the end of the reeling process, the on-reel dots should all still face the same direction. If they do not all face the same direction, then twist has been induced. Please review your procedure and consult with Measurand. March 2013 72 SAA Manual 8.8 Why is my data logger missing samples? In most cases, missed samples are due to issues with either the reading interval or logger power. Collecting data from multiple instruments can take a significant amount of time. If the logger is in the process of collecting data when the next sampling interval comes around, it will ignore the new request for samples and complete its current data collection. It will then collect again when it receives another request for samples at the next available interval. In order to avoid this issue, make sure to know how long it takes to collect data from all sensors attached to the logger. See Section 6.2.2 for recommended SAA reading intervals. Note that loggers can collect properly for an extended time, then fail as “housekeeping” functions of the logger accumulate and start competing for logger resources. If the logger power is too low, it can stop functioning. For loggers which are connected to batteries with solar panels, it is sometimes possible for the battery to be recharged enough for the logger to regain power. If the logger program is set to run on Power-Up, it will resume collecting data but there will be gaps in the data. To avoid this issue, make sure to periodically check the Logger Diagnostics table to ensure that the voltage is above 11.5 V. 8.9 How do I check data collected using a data logger to make sure it is good? Use the CRDataChecker utility in SAASuite to verify the raw data files collected using a data logger are good. CRDataChecker provides colour coded graphs of the SAA data vs. time. Instructions for using the CRDataChecker can be found in the CRDataChecker Manual found on the Advanced Applications tab of SAASuite. 8.10 I just saved 3 samples of data. Why does SAAView only show one frame? SAAView has a default filter which will average several readings together and present these in the Filtered view presented at the right hand side of the main SAAView window. In order to view all data, either change the filter using the methods described in the SAAView Manual, or make sure that you are looking at the data in the unfiltered View located at the left of the main SAAView window. 8.11 Can I shorten my SAA? To shorten an SAA it must be sent back to Measurand. Due to the octet structure, the changes to the calibration required when an SAA is shortened, and the waterproofing systems, it is not possible to shorten an SAA yourself. If you need to shorten the SAA consider instead using the “Turn off/Ignore Segments” option available in SAARecorder or SAACR_raw2data. 8.12 How do I turn off or ignore segments? In some cases the SAA in not fully installed into a borehole. In these cases, it is possible to turn off segments and ignore them in the data viewer. 8.12.1 Data collected using SAARecorder To turn off segments in SAARecorder, select 'SAA Setup | Advanced | Turn on/off section of SAA'. This will open a text box in which you can enter the numbers of the segments you wish to turn off. March 2013 73 SAA Manual 8.12.2 Data collected using a data logger In order to turn off segments for data collected using a data logger, you must use SAACR_raw2data. In the Settings window, enter the segment numbers you wish to turn off in the “Turn Segment Off” box. March 2013 74 SAA Manual A. SAA Life-Extension March 2013 75 SAA Manual March 2013 76 SAA Manual March 2013 77 SAA Manual March 2013 78 SAA Manual March 2013 79 SAA Manual March 2013 80 SAA Manual March 2013 81 SAA Manual March 2013 82 SAA Manual March 2013 83 SAA Manual B. Maximum Cable Lengths for SAAs Note: The maximum cable lengths given below are for SAA with no magnetometers or SAAPZ attached to the cable. If you have either of these, contact Measurand for more information on maximum cable length. Table B.1 Maximum Cable Lengths for SAAs with 500 mm (19.7") Segments [email protected] [email protected] [email protected] [email protected] Measurand Cable Measurand Cable Measurand Cable Measurand Cable SKUCAB18 nom SKUCAB18 nom SKUCAB14 order SKUCAB14 order SAA m Cable m SAA m Cable m SAA m Cable m SAA m Cable m 16 1200 16 1200 16 1200 16 1200 20 1000 20 1200 20 1200 20 1200 24 800 24 1100 24 1200 24 1200 28 700 28 1000 28 1200 28 1200 32 600 32 900 32 1200 32 1200 36 550 36 830 36 1200 36 1200 40 500 40 750 40 1200 40 1200 44 450 44 690 44 1110 44 1200 48 400 48 640 48 1000 48 1200 52 350 52 590 52 900 52 1200 56 320 56 550 56 810 56 1200 60 300 60 510 60 730 60 1200 64 270 64 470 64 660 64 1130 68 240 68 430 68 590 68 1040 72 220 72 390 72 530 72 950 76 200 76 360 76 480 76 880 80 170 80 330 80 430 80 810 84 150 84 300 84 380 84 740 88 140 88 280 88 330 88 680 92 120 92 260 92 290 92 620 96 100 96 230 96 250 96 570 100 80 100 210 100 210 100 520 March 2013 84 SAA Manual Table B.2. Maximum Cable lengths for SAA with 305 mm (1') Segments [email protected] [email protected] [email protected] [email protected] Measurand Cable Measurand Cable Measurand Cable Measurand Cable SKUCAB18 nom SKUCAB18 nom SKUCAB14 order SKUCAB14 order SAA ft Cable ft SAA ft Cable ft SAA ft Cable ft SAA ft Cable ft 32 3940 32 3940 32 3940 32 3940 40 3280 40 3940 40 3940 40 3940 48 2620 48 3610 48 3940 48 3940 56 2300 56 3280 56 3940 56 3940 64 1970 64 2950 64 3940 64 3940 72 1800 72 2720 72 3940 72 3940 80 1640 80 2460 80 3940 80 3940 88 1480 88 2260 88 3640 88 3940 96 1310 96 2100 96 3280 96 3940 104 1150 104 1940 104 2950 104 3940 112 1050 112 1800 112 2660 112 3940 120 980 120 1670 120 2390 120 3940 128 890 128 1540 128 2170 128 3710 136 790 136 1410 136 1940 136 3410 144 720 144 1280 144 1740 144 3120 152 660 152 1180 152 1570 152 2890 160 560 160 1080 160 1410 160 2660 168 490 168 980 168 1250 168 2430 176 460 176 920 176 1080 176 2230 184 390 184 850 184 950 184 2030 192 330 192 750 192 820 192 1870 200 260 200 690 200 690 200 1710 March 2013 85 SAA Manual C. Marking On-Reel Dots on an SAA If there are no on-reel dots on your SAA, please make some for your SAA. Place them at every 8 segments for SAAs with 305 mm (1’) segments, or every 10 segments for SAAs with 500 mm segments. This way all the on-reel dots will be placed along one facet of the reel. See Figure C.1 below. Use a straight edge and place a dot on the segment where the straight edge meets the segment surface, as shown below. The marks should all face the same direction. Note that the axial position of the dots on each segment will often vary (See photo in Figure C.1). This is not important. However, it is important that the dots all face the same direction. Figure C.1. Marking on-reel dots on an SAA March 2013 86 SAA Manual D. Communicating With the SAA Field Power Unit via Wireless pair The SAA Field Power Unit comes equipped with a wireless cable replacement feature for use when a wired connection to your PC is inconvenient. The included serial to USB cable, shown in Figure 3.2, can be replaced by a set of two wireless adapters. Note that these adapters work as a pair, and each adapter will only work with its mate. One adapter in the pair is equipped with a 9-pin connector and replaces the Field Unit serial to USB cable. The other adapter is equipped with a USB plug to connect to your PC. These two adapters are "paired" and programmed at the factory and require no user setup. To the PC these adapters look the same as the directly connected cable. A new serial COM port will be installed the first time the SAA Field Power Unit is connected to your PC using the wireless pair. The communication range of the wireless pair is approximately 20 m. When plugging in the USB wireless adapter, wait for the blue LED in the adapter to stop blinking and become solid. This indicates that the connection to the adapter connected to the SAA Field Power Unit has been established. Once the connection has been established, go to SAASuite and open SAARecorder. If the blue LED continues to blink, make sure that the other adapter is properly connected to the serial cable. Because it is possible to have some interference with the wireless communications, it is necessary to add a timeout in SAARecorder. This is done in the SAARecorder Startup by checking the “Using Serialto-Ethernet Device” box (Figure D.1). Once the box is checked, it is possible to modify the timeout from the default 500 ms. The recommended range for the timeout is 200 ms to 500 ms. Figure D.1: Adding a timeout in the startup window in SAARecorder. March 2013 87 SAA Manual E. Connecting an SAA to computer running SAASuite using an SAA232 Single SAA can be connected to Measurand’s SAA232 interface (shown in Figure E.1). The SAA232 incorporates a resettable fuse and surge protection, and automatically applies power to an SAA only when there is serial RS232 data being sent from the PC to the SAA232. It also converts the RS232 communications protocol from a PC serial port to the RS485 communications protocol that the SAA uses. Figure E.1: SAA232. The 4-pin green connector connects to the RS232 port of the computer. The 5-pin green connector connects to the SAA. The following steps should be taken when using the SAA232 converter with an SAA: 1) Connect the SAA to the green 5-pin connector on the SAA232 (Figure E.1). The SAA wiring is as follows: Pin 1: White wire (RS485 A) Pin 2: Blue wire (RS485 B) Pin 3: Red wire (+12 V to SAA) Pin 4: Black wire (GND) Pin 5: Shield Note: If you are using an older SAA, the wiring may use different colors for the RS485 A and B communications wires, please check with Measurand if you are unsure how to connect these wires. March 2013 88 SAA Manual Figure E.2: SAA232-USB cable. This is a USB to serial converter for use with SAA232. The red wire shown above should be connected to a +12 volt supply, and the black wire should be connected to GND of the same supply. 2) If you have to connect using a USB port, you will need Measurand’s SAA232-USB cable as shown in Figure E.2. The green 4-pin connector will connect into the four pin terminal block in the SAA232. Make sure that the USB connector is plugged into an available USB port on the computer that will be running the SAARecorder application. The red wire should be connected to a +12 V power supply, and the black wire should be connected to Ground on the same power supply. 3) If you wish to connect to the SAA232 via a serial port on your computer, connect the PC serial port to the green 4-pin connector on the SAA232, using the following wiring: Pin 1: PC serial port receive (RX) Pin 2: PC serial port transmit (TX) Pin 3: +12 V Power Pin 4: GND (must be connected to both power supply and PC serial port) 4) Go to SAASuite and start SAARecorder. Once the software starts trying to communicate with the SAA, the red LED on the SAA232 should light up. March 2013 89 SAA Manual F. Connecting an SAA to a computer running SAA Suite using an SAA232-5 Multiple SAA can be connected to Measurand’s SAA232-5 converter. A picture of the SAA232-5 is shown in Figure F.1 below. The SAA232-5 works in much the same way as the SAA232 (provides surge protection for the SAA and applies power to a single SAA at a time, converts RS232 to RS485) but it can accept up to five SAAs and connects them all to one serial port on the PC. The SAA232-5 is used to sample one SAA at a time through the same PC serial port. For applications where very fast readings are required, multiple SAA232 or SAAUSB devices should be used instead. Figure F.1: SAA232-5. 4-pin green connector connects to RS232 port of computer. 5-pin green connectors connect up to five SAAs. The following steps should be taken when using the SAA232-5 converter with two or more SAA: 1) Connect each SAA to a green 5-pin connector on the SAA232-5 (Figure F.1), making sure to note which SAA is connected to which SAA232-5 port. The SAA wiring is as follows: Pin 1: White wire (RS485 A) Pin 2: Blue wire (RS485 B) Pin 3: Red wire (+12 V to SAA) Pin 4: Black wire (GND) Pin 5: Shield Note: If you are using an older SAA, the wiring may use different colors for the RS485 A and B communications wires, please check with Measurand if you are unsure how to connect these wires. 2) If you have to connect using a USB port, you will need Measurand’s SAA232-USB cable as shown in Figure E.E.2. The green 4-pin connector will connect into the four pin terminal block in the SAA232. Make sure that the USB connector is plugged into an available USB port on the computer that will be March 2013 90 SAA Manual running the SAARecorder application. The red wire should be connected to a +12 V power supply, and the black wire should be connected to Ground on the same power supply. 3) If you wish to connect to the SAA232 via a serial port on your computer, connect the PC serial port to the green 4-pin connector on the SAA232, using the following wiring: Pin 1: PC serial port receive (RX) Pin 2: PC serial port transmit (TX) Pin 3: +12 V Power Pin 4: GND (must be connected to both power supply and PC serial port) 4) Go to SAASuite and start SAARecorder. When the ShapeAccelArray Startup window appears, make sure that the “Using SAA232-5 Device(s)” checkbox is checked (see Figure F.2) then press the “Search For Serial SAAs” button. Figure F.2: ShapeAccelArray Startup window with “Using SAA232-5 Device(s)” option checked for use with one or more SAA232-5 devices. Once all SAA are connected to the SAA232-5 device(s), press the “Search For Serial SAAs” button to select serial ports, etc. Select the COM port(s) being used with the SAA232-5 device(s) and then click OK. Then add the SAA serial numbers to look for in the “Array Serial Numbers to Search” window (Figure F.3) and press the OK button. An SAA232-5 Port Settings window then appears (Figure F.4), prompting you to choose the serial ports that are connected to the SAA232-5 device(s) and the SAA232-5 port numbers (1 to 5) that are associated with each SAA. Press OK in this window once all selections have been made. SAARecorder will then startup and sample each SAA in turn. The red LED next to each SAA’s 5-pin green connector should turn on when that SAA is powered up and being sampled. March 2013 91 SAA Manual Figure F.3: Arrays Serial Numbers to Search window. If the SAA serial numbers that you will be using are not already listed in the box at left, then type them into the text field at right and press the “Add” button. Once all SAA serial numbers have been listed, press the OK button. Figure F.4: SAA232-5 Port Settings window. Choose the serial ports that are connected to the SAA232-5 device(s) and the SAA232-5 port numbers (1 to 5) that are associated with each SAA. Press OK in this window once all selections have been made. March 2013 92 SAA Manual G. Connecting an SAA to a computer running SAASuite using the SAAUSB Adapter Single SAA can be connected using Measurand’s SAAUSB adapter shown in Figure G.1 below. The SAAUSB adapter appears as a serial port when it is connected to a computer running SAARecorder. Figure G.1: SAAUSB adapter. This adapter allows the user to interface to a single SAA; it appears as a RS-232 serial port on the PC. The SAA is powered from a +12 volt wall mount supply that plugs directly into the SAAUSB. The USB plug end of the SAAUSB should be plugged into the PC before plugging in the SAA and before finally plugging in the +12 volt power supply. The following steps should be taken when using the SAAUSB with an SAA: 1) Mate the data cable from the SAA to the round connector of the SAAUSB. 2) Apply power to the SAA by plugging in the +12 VDC power supply into the power injector plug. 3) Plug the USB plug into an available USB port on the PC where SAARecorder is installed. 4) Start the SAARecorder software to collect data. March 2013 93 SAA Manual H. Setting the voltage boost on the SAA232 or SAA232-5 As of September 2012, SAA232 and SAA232-5 contain a component which allows you to boost voltage from the battery up to an output voltage. This allows long SAAs to have longer runs of cable. In order to adjust the voltage, you need to use a screwdriver to adjust the small screw located on the back of the SAA232 or SAA232-5. Make sure you open the Voltage / Current Check so that you can monitor the voltage at the SAA. Figure H.1 shows the warning that is shown for an SAA with low Voltage. To adjust the voltage, turn the screw until the warning in the Voltage / Current Check disappears. Figure H.1. Low voltage warning March 2013 94 SAA Manual I. Materials Used in SAA Install Kit The materials provided in the SAA Install Kits are outlined in Tables I.1 and I.2. It is possible to create your own install kit specific to your PVC conduit using the list of materials as a guide. The fittings used in the SAA Install Kits are available at most hardware stores or electrical contractor supply stores. To create your own top stack with a set screw, you will need to find some set-screws with O-rings. Get a tapping tool with the same thread as the set-screws. Make sure to place the set-screw through the thickest section of the fittings (Figure I.1). Tap the fitting as shown in Figure I.1. To get the O-rings to sit flush against the conduit you will need to flatten the coupling underneath the set-screw using a file. Table I.1 - SAA Install Kit #1 (with tools) Quantity Item Description 1 Pre-assembled top stack 1 3/4” NPT Liquid-Tight Male Straight Connector 20’ 3/4” Liquid-Tight nonmetallic Conduit 1 Reducing Bushing, NPT ¾” reduced to ½” 1 Schedule 40 PVC Male Terminal Adapter 1” 1 Schedule 40 PVC Female Adapter 1” 1 Schedule 40 PVC Female Adapter ¾” 3 Schedule 40 PVC Coupling 1” 1 6” long Schedule 40 1” PVC Conduit 1 3” long Schedule 40 1” PVC Conduit 1 Gland ½” NPT 1 18-8 SS Sealing Pan Head ¼”-20 1 1” PVC End Cap 6 large Tie Wraps 1 PVC Quick – Set Cement with MSDS 1 PVC Primer with MSDS 1 Teflon Tape 1 3/4” PEX Tubing Cutter 1 Drill / Tap Bit ¼”-20 NC 1 Multi – Screwdriver 1 1” Pipe Clamp – Hanging Fixture 1 22’ cable fishing wire 1 Deburring tool 1 Small flathead screwdriver March 2013 95 SAA Manual Table I.2 - SAA Install Kit #2 (without tools) Quantity Item Description 1 Pre-assembled top stack 1 3/4” NPT Liquid-Tight Male Straight Connector 20’ 3/4” Liquid-Tight nonmetallic Conduit 1 Reducing Bushing, NPT ¾” reduced to ½” 1 Schedule 40 PVC Male Terminal Adapter 1” 1 Schedule 40 PVC Female Adapter 1” 1 Schedule 40 PVC Female Adapter ¾” 3 Schedule 40 PVC Coupling 1” 1 6” long Schedule 40 1” PVC Conduit 1 3” long Schedule 40 1” PVC Conduit 1 Gland ½” NPT 1 18-8 SS Sealing Pan Head ¼”-20 1 1” PVC End Cap 6 large Tie Wraps 1 1” Pipe Clamp – Hanging Fixture Figure I.1. a) Pre-assembled top stack. b) Tapping the hole for the set-screw in an improvised top stack. Make sure to tap the hole through both the coupling and the conduit to have the strongest connection possible. March 2013 96 SAA Manual J. Sample Calculations for Pipe Ovalization in Horizontal Installations NOTE: These are sample calculations given as an example of how to determine the pipe size, stiffness, and burial required. This exercise should be done using the appropriate values for the specific site. Minimum acceptable pipe size (after deflection) is 25 mm ID. Maximum deflection allowed is 5% for electrical conduit. Problem: Want to measure road deflection for a mine haul road using SAA. Can SAA be used and what is the minimum depth of burial. Truck is a CAT 797F mining truck: Two axle truck with 2 front tires, 4 back tires. Loaded truck carries 33% weight in front and 67% weight in back Tire pressure is 600 kPa, but can spike to 900 kPa (131 psi) Assume same pressure in all tires Tire footprint: 1.68 m2 Load per tire = 93 mt Tire width = 55.1”=1.4 m Assume surface course for mine road is made crushed rock compacted to >95% of Proctor E’=3000 psi=20685 kPa Use Modified Iowa Equation to select pipe. We want the conduit to carry the load so that the instrument is safe. Since this is a large tire load, suggest using Schedule 80. Modified Iowa Equation is given below: % Deflection= 0.1(LL+DL)100/(0.149(PS)+0.061E') Where: LL = Live load from tires (psi) DL = Dead load from soil (psi) PS = Pipe stiffness (psi) E’ = Modulus of soil reaction (psi) Option 1: Assume 1.5” Schedule 80 PVC electrical conduit: (from manufacturer specifications) OD=1.9”=48.3 mm ID=1.476”=37.5 mm Pipe stiffness=2911 psi=20070 kPa March 2013 97 SAA Manual Acceptable deflection=5% Assume SAA conduit is within the surface course (i.e. max depth corresponds with top of base course), and maximum LL is combination of 2 back tires at the top of base course. If conduit is located within 1 m of surface DL is approximately 3 psi: % Deflection=(0.1 (131×2+3)100)/(0.149(2911)+0.061(3000))=4.3%±1% Max deflection is 5.3% which is slightly more than 5% recommended for electrical conduit, but ok. Deflection in mm = 2.6 mm, hence does not impact SAA. Option 2: Assume 1.25” Schedule 80: OD=1.66”=42.2 mm, ID=1.278=32.5 mm, PS=3930 psi=27096 kPa % Deflection=(0.1 (131×2+3)100)/(0.149(3930)+0.061(3000))=3.4%±1% Max deflection = 4.4% < 5%, deflection = 1.9 mm, does not impact SAA. NOTE: These are sample calculations only. Actual calculations are the responsibility of the client. March 2013 98 SAA Manual K. Integrating Other Sensors Into the Main Program (Advanced) ** Please contact Measurand if you need assistance in this procedure. The example given below is not exactly how the code looks today, but it is similar. ** When adding additional sensor programming to the main SAA program, conflicts can arise with existing programming. The SAA_Include references COM Ports 1-4. If any of these ports are used for connecting other sensors, then all references to these ports must be commented out of the serial port subroutines in the SAA_Include file. Provided is an example program for a logger that reads data from vibrating wire piezometers, vibrating wire earth pressure cells, and SAAs. Note: The SAA-related code in the following example is not the most recent code. This example is meant to give an idea as to how to add other sensors into the ‘Main Program’. Please consult Measurand for assistance when trying to combine measurements from various sensors into a single program. The SAA data is collected over Scan Interval 1 (1 hour) with an AIA averaging level of 1000. The piezometer and earth pressure data is collected at the same interval. '----------------------------------------------------------------------------------------------------------------------------- -'Campbell Scientific CR1000 Datalogger Program for collecting ShapeAccelArray (SAA) Data 'Program Author: Jason Bond, Measurand Inc. (built upon single array program by Murray Simpson) (c) 2008 'Version History: '1.0: Initial internal release '1.1: 'AVERAGING' added to the PROJECT_INFO file '1.2: 'PROGRAM_VERSION_NUM' added to the PROJECT_INFO file 'Program now contains 2 components to prevent editing of critical code by users: i) SAA_Communicator_Vx_x and ii) SAA_Include_Vx_x '1.3 'Pre-sample added to clear sensor values on first read. 'ScreenObs subroutine added to filter sensor values. 'Code added to accomodate partial octets at the end of an SAA '1.4 'Ability to assign SAAs to any COM port added (instead of requiring sequential use) 'Ability to use RS232 port to hook up additional SAAs added '1.5 'SAA now shutdown and repowered after a CRC, COM or range error 'Check for 0 values added to ScreenObs subroutine 'Dim u,v As Long variables had to be moved outside of ScreenObs subroutine to compile. Problem arose after updating OS on CR1000. '1.6 21 Aug 2009: March 2013 99 SAA Manual 'ScreenObs subroutine removed. Now looked after in SAA3D 'Range Errors removed from SERIAL_ERRORS_FILE 'Code to accomdodate partial octets removed. Now looked after in SAA3D. '1.7 'Various changes made in an attempt to improve computation speed. VERSION NOT RELEASED and changes not implemented 'in subsequent versions due to anticipation of new high resolution SAAs. Historical significance only. 'a)SetSAAPort added to allow switching of SAA baud 'b)CRC check removed 'c) Temperature averaging removed - just one value read in SAA data. GetSAASample modified to allow this. '1.8 A) Addition of alarm notification through email/text: 'a) input of number of masked segments (from the top) 'b) input of tilt alarm in degrees 'c) input of email notification parameters 'd) addition of storage variable for previous readings 'B) Addition of high resolution SAA data collection capabilities 'a) public HIGH_RES_SAA As boolean added 'b) close, open and flush serial port commands added to shut down sequence when data has failed to be acquired. 'Note: When changing the version number, the Include file reference below must be updated and the VERSION_NUM constant in the include file must be modified '1.9 Jan. 27, 2010: 'uses updated include file: CPU:SAA_Include_V1_9.CR1, corrects bug in collection of high res. data from SAA longer than 8 segments. 'Note: When changing the version number, the Include file reference below must be updated and the VERSION_NUM constant in the include file must be modified '2.3 Uses new include file: CPU:SAA_Include_V2_3.CR1 '2.4 Capable of acquiring voltage, current, and top segment temperature from SAATop devices integrated into the top of SAA. Uses new include file: CPU:SAA_Include_V2_4.CR1 '2.5 Nov. 12, 2010: Added acquisition of logger voltage and temperature for diagnostic purposes '2.6 Nov. 29, 2010: Added code for using SAA232_5 device for combining up to 5 SAAs on a single serial port '2.61 Dec. 7, 2010: Fixed bug in 2.6 for 2nd array data data table '2.62 Dec. 13, 2010: Modified to sample some preliminary samples as fast as possible upon powerup before switching to regular scan interval for samples March 2013 100 SAA Manual '2.63 Mar. 10, 2011: Modified to include array serial numbers in SAA diagnostic files. '2.64 Aug. 10, 2011: Modified to use new include file: CPU:SAA_Include_V2_63.CR1 '2.65 Aug. 11, 2011: Modified to use new include file: CPU:SAA_Include_V2_64.CR1 '2.66 Aug. 25, 2011: Modified to provide an error table for each array connected to the datalogger. '2.67 Sept. 27, 2011: Modified to use new include file: CPU::SAA_Include_V2_66.CR1 '2.68 Oct. 7, 2011: Modifieed to use new include file: CPU::SAA_Include_V2_67.CR1, got rid of unused tilt_alarm stuff '3.00 Oct. 20, 2011: Simplified, cleaned up code, uses new include file: CPU::SAA_Include_V3_00.CR1. '3.01 Dec. 5, 2011: Modified to use new include file: CPU::SAA_Include_V3_01.CR1 '3.02 Dec. 12, 2011: Modified to use new include file: CPU::SAA_Include_V3_02.CR1 '3.03 Mar. 05, 2012: Modified to use new include file: CPU::SAA_Include_V3_03.CR1 'DECLARE USER SPECIFIED CONSTANTS (must be modified by user to match application specifications): '----------------------------------------------------------------------------------------------------------------------------- ---'>>>>>>>>>>>>>>> START <<<<<<<<<<<<<<< 'Enter the number of preliminary samples to capture Const NUM_PRELIM_SAMPLES = 5 ' Enter the number of SAAs to be monitored: Const NUM_SAAS = 2 ' Enter the number of PZ strings to be monitored (has to be at least 1 even if there are no PZ strings !!!) Const NUMBER_PIEZO_STRINGS = 0 ' Enter the number of total devices (number of SAAs + PZ strings): Const NUM_DEVICES = 2 ' Enter the number of Earth Pressure Cells (EPC) to be monitored: Const NUM_EPCS = 3 ' Enter the number of piezometer (PZ) to be monitored: Const NUM_PZ3S = 12 '>>>>>>>>>>>>>>> START <<<<<<<<<<<<<<< ' Enter the number of raw data samples to average for each measurement: ' Samples can range from 100-25500 if HIGH_RES_SAA = true; samples are collected at 400 Hz, thus ~64 seconds March 2013 101 SAA Manual are required for NUM_TO_AVG = 25500 (NOTE: HIGH_RES_SAA must be false for older SAAs, sernum < 47100) ' If HIGH_RES_SAA=false, then samples are collected more slowly, and NUM_TO_AVG should be set to between 1 and 100 (typically only used for older SAAs (sernum < 47100). Const NUM_TO_AVG = 1000 ' Enter the maximum number of octets (8 segment units) of any single SAA being used (must be at least 1, even if no SAA octets are present): Const MAX_NUM_OCTETS = 15 ' Enter the maximum number of piezometers per string, must be at least 1, even if no piezometers are used Const MAX_NUM_PIEZOS = 1 ' Enter number of octets for each SAA (each SAA must have an entry): Const SAA1_NUM_OCTETS = 15 Const SAA2_NUM_OCTETS = 15 ' Enter number of piezometers for each Measurand piezometer string (if piezometers are used) ' Const PIEZO1_NUM_PIEZOS = 0 ' Enter COM port number for each SAA (each SAA must have an entry) COM1=1, COM2=2, COM3=3, COM4=4 Const SAA1_COM_PORT = 1 Const SAA2_COM_PORT = 2 ' Enter COM port number for each Measurand piezometer string (if piezometers are used) ' Const PIEZO1_COM_PORT = 1 ' Enter SAA232-5 port number for each SAA (each SAA must have an entry) 1-5 if SAA232-5 port is being used, otherwise enter 0 Const SAA1_232_5_PORT = 0 Const SAA2_232_5_PORT = 0 ' Enter SAA232-5 port number for each Measurand piezometer string (if piezometers are used) 'Const PIEZO1_232_5_PORT = 0 ' Input whether or not SAATop is present (0 = not present, 1 = SAATop is present) --> typically present in SAAs built in 2011 or later Const SAA1_SAATOP = 1 Const SAA2_SAATOP = 1 '>>>>>>>>>>>>>>> END <<<<<<<<<<<<<<< '--------------------------------------------------------------------------------------------------------------------------------'END DECLARE USER SPECIFIED CONSTANTS (must be modified by user to match application specifications): Include "CPU:SAA_Include_V3_03.CR1" 'DECLARE PUBLIC VARIABLES (can be modified by user to match application specifications): March 2013 102 SAA Manual '----------------------------------------------------------------------------------------------------------------------------- ---'>>>>>>>>>>>>>>> START <<<<<<<<<<<<<<< 'Earth Pressure Cell Public Variables Public EPC(NUM_EPCS,6) 'Piezometer Public Variables Public PZ3(NUM_PZ3S,6) Public Result Public Power_Save_Flag As Boolean 'add Public ACC, TEMP, and diagnostic variables for each SAA: 'SAA1: Public SAA1_ACC_VALUES(MAX_NUM_OCTETS,NUM_SENSORS_PER_OCTET) As Float Public SAA1_TEMP_VALUES(MAX_NUM_OCTETS) As Float Public SAA1_SAATOP_VOLTAGE As Float Public SAA1_SAATOP_CURRENT As Float Public SAA1_SAATOP_TEMPERATURE As Float 'SAA2: Public SAA2_ACC_VALUES(MAX_NUM_OCTETS,NUM_SENSORS_PER_OCTET) As Float Public SAA2_TEMP_VALUES(MAX_NUM_OCTETS) As Float Public SAA2_SAATOP_VOLTAGE As Float Public SAA2_SAATOP_CURRENT As Float Public SAA2_SAATOP_TEMPERATURE As Float 'preliminary loop count Public PRELIM_COUNT As Float 'Data Tables 'Project Descriptor Info DataTable(PROJECT_INFO,FIRST_SCAN,-1) Sample(1,PROGRAM_VERSION_NUM,Float) March 2013 103 SAA Manual Sample(1,AVERAGING,Long) Sample(1,PROJECT_NAME,String) Sample(1,NUMBER_SAAS,Long) Sample(NUM_SAAS,NUM_OCTETS_INDEX(),Long) Sample(NUM_SAAS*MAX_NUM_OCTETS,SERIAL_NUMS(),Long) EndTable 'Serial Port Errors: DataTable(SERIAL_ERRORS,True,-1) Sample(1,SERIAL_NUMS(1,1),Long) Sample(1,SERIAL_NUMS(2,1),Long) Sample(NUM_DEVICES,NUM_CRC_ERRORS,Long) Sample(NUM_DEVICES,NUM_COM_ERRORS,Long) EndTable 'Logger Diagnostics: DataTable(LOGGER_DIAGNOSTICS,True,-1) Sample(1,LOGGER_VOLTAGE,Float) Sample(1,LOGGER_TEMPERATURE,Float) EndTable 'SAA Data Table Values (each SAA requires a data table): 'SAA1: DataTable(SAA1_DATA,True,-1) Sample(1,SERIAL_NUMS(1,1),Long) Sample(SAA1_NUM_OCTETS*NUM_SENSORS_PER_OCTET,SAA1_ACC_VALUES(),Float) Sample(SAA1_NUM_OCTETS,SAA1_TEMP_VALUES(),Float) EndTable 'SAA2: DataTable(SAA2_DATA,True,-1) Sample(1,SERIAL_NUMS(2,1),Long) Sample(SAA2_NUM_OCTETS*NUM_SENSORS_PER_OCTET,SAA2_ACC_VALUES(),Float) Sample(SAA2_NUM_OCTETS,SAA2_TEMP_VALUES(),Float) EndTable March 2013 104 SAA Manual DataTable (SAA_DIAGNOSTICS,True,-1) Sample(1,SERIAL_NUMS(1,1),Long) Sample(1,SERIAL_NUMS(2,1),Long) Sample(1,SAA1_SAATOP_VOLTAGE,Float) Sample(1,SAA1_SAATOP_CURRENT,Float) Sample(1,SAA1_SAATOP_TEMPERATURE,Float) Sample(1,SAA2_SAATOP_VOLTAGE,Float) Sample(1,SAA2_SAATOP_CURRENT,Float) Sample(1,SAA2_SAATOP_TEMPERATURE,Float) EndTable ' PZ3 Data Table DataTable(PZ3_DATA, True, -1) Sample(NUM_PZ3S*6, PZ3(), IEEE4) EndTable ' EPC Data Table DataTable(EPC_DATA, True, -1) Sample(NUM_EPCS*6, EPC(), IEEE4) EndTable 'SUBROUTINES '------------------------------------------------------------------------------------------------------------------------'********************************************************************************************* **************************** 'Sub: GetArrayData 'Purpose: gets all of the array data 'Inputs: None '********************************************************************************************* **************************** Sub GetArrayData() Scan(1,sec,0,1)'need this dummy scan to auto-allocate data tables March 2013 105 SAA Manual 'fill in project info table: CallTable PROJECT_INFO Call GetLoggerDiagnostics() CallTable LOGGER_DIAGNOSTICS 'add calls to each SAA and store data in respective tables: '--------------------------------------------------------'SAA1: If HIGH_RES_SAA Call GetHighResSAAData(SAA1_ACC_VALUES,SAA1_TEMP_VALUES,1) Else Call GetSAAData(SAA1_ACC_VALUES,SAA1_TEMP_VALUES,1) EndIf CallTable SAA1_DATA If SAA1_SAATOP>0 Call GetSAATopData(SAA1_SAATOP_VOLTAGE,SAA1_SAATOP_CURRENT,SAA1_SAATOP_TEMPERATURE,1) EndIf TurnOffSAA232_5(1) 'SAA2: If HIGH_RES_SAA Call GetHighResSAAData(SAA2_ACC_VALUES,SAA2_TEMP_VALUES,2) Else Call GetSAAData(SAA2_ACC_VALUES,SAA2_TEMP_VALUES,2) EndIf CallTable SAA2_DATA If SAA2_SAATOP>0 Call GetSAATopData(SAA2_SAATOP_VOLTAGE,SAA2_SAATOP_CURRENT,SAA2_SAATOP_TEMPERATURE,2) EndIf TurnOffSAA232_5(2) CallTable SAA_DIAGNOSTICS 'record serial errors table: CallTable SERIAL_ERRORS March 2013 106 SAA Manual 'turn off outputting of project descriptor info after first run: FIRST_SCAN = false NextScan EndSub Sub GetVWData() Scan(1,sec,0,1)'need this dummy scan to auto-allocate data tables 'Get Piezometer Data SerialOpen (COM4,38400,4,0,0) AVW200 (Result(),COM4,0,200,PZ3(1,1),1,1,NUM_PZ3S,1400,3500,1,_60Hz,1,0) CallTable PZ3_DATA AVW200 (Result(),COM4,0,200,EPC(1,1),1,13,NUM_EPCS,1400,3500,1,_60Hz,1,0) CallTable EPC_DATA SerialClose(COM4) NextScan EndSub 'DEFINE MAIN PROGRAM: '------------------------------------------------------------------------------------------------------------------------- BeginProg 'setup project descriptors: '--------------------------'>>>>>>>>>>>>>>> START <<<<<<<<<<<<<<< ' Enter the Project Title PROJECT_NAME = "Integration Example" '>>>>>>>>>>>>>>> END <<<<<<<<<<<<<<< March 2013 107 SAA Manual NUMBER_SAAS = NUM_SAAS AVERAGING = NUM_TO_AVG PROGRAM_VERSION_NUM = VERSION_NUM HIGH_RES_SAA = true 'declare the serial numbers (each octet) for each SAA: '--------------------------------------'SAA1 - S/N: 50013 nodes 50013 50019 50070 50083 50206 50225 50315 50347 50402 50413 50416 50438 50451 50515 51358 SERIAL_NUMS(1,1) = 50013 SERIAL_NUMS(1,2) = 50019 SERIAL_NUMS(1,3) = 50070 SERIAL_NUMS(1,4) = 50083 SERIAL_NUMS(1,5) = 50206 SERIAL_NUMS(1,6) = 50225 SERIAL_NUMS(1,7) = 50315 SERIAL_NUMS(1,8) = 50347 SERIAL_NUMS(1,9) = 50402 SERIAL_NUMS(1,10) = 50413 SERIAL_NUMS(1,11) = 50416 SERIAL_NUMS(1,12) = 50438 SERIAL_NUMS(1,13) = 50451 SERIAL_NUMS(1,14) = 50515 SERIAL_NUMS(1,15) = 51358 'SAA2 - S/N: 50021 nodes 50021 50226 50246 50440 50550 50557 50563 50565 50570 50968 50969 50982 50996 50998 50039 SERIAL_NUMS(2,1) = 50021 SERIAL_NUMS(2,2) = 50226 SERIAL_NUMS(2,3) = 50246 SERIAL_NUMS(2,4) = 50440 SERIAL_NUMS(2,5) = 50550 SERIAL_NUMS(2,6) = 50557 SERIAL_NUMS(2,7) = 50563 SERIAL_NUMS(2,8) = 50565 March 2013 108 SAA Manual SERIAL_NUMS(2,9) = 50570 SERIAL_NUMS(2,10) = 50968 SERIAL_NUMS(2,11) = 50969 SERIAL_NUMS(2,12) = 50982 SERIAL_NUMS(2,13) = 50996 SERIAL_NUMS(2,14) = 50998 SERIAL_NUMS(2,15) = 50039 'declare the number of octets for each SAA: '------------------------------------------ 'SAA 1: NUM_OCTETS_INDEX(1) = SAA1_NUM_OCTETS 'SAA 2: NUM_OCTETS_INDEX(2) = SAA2_NUM_OCTETS 'declare the com port assignment for each SAA: '--------------------------------------------- 'SAA1: COM_PORT(1) = SAA1_COM_PORT SAA232_5_PORT_INDEX(1) = SAA1_232_5_PORT 'SAA2: COM_PORT(2) = SAA2_COM_PORT SAA232_5_PORT_INDEX(2) = SAA2_232_5_PORT 'initialize COM and CRC errors: NUM_COM_ERRORS = 0 NUM_CRC_ERRORS = 0 'initialize SAATOP parameters SAA1_SAATOP_VOLTAGE=0.0 SAA1_SAATOP_CURRENT=0.0 SAA1_SAATOP_TEMPERATURE=0.0 March 2013 109 SAA Manual SAA2_SAATOP_VOLTAGE=0.0 SAA2_SAATOP_CURRENT=0.0 SAA2_SAATOP_TEMPERATURE=0.0 'declare the SAATop channel of each SAA: '-----------------------------------'SAA1: SAATOP_CHANNEL_INDEX(1) = 0 'SAA2: SAATOP_CHANNEL_INDEX(2) = 0 'initialize power saving flag Power_Save_Flag = True 'make sure modem starts off being on SW12(1) FIRST_SCAN = true 'do preliminary scans first For PRELIM_COUNT=1 To NUM_PRELIM_SAMPLES Call GetVWData() Call GetArrayData() Delay(0,10,2) Next PRELIM_COUNT 'now do actual scan indefinitely '>>>>>>>>>>>>>>> START <<<<<<<<<<<<<<< Scan (1,hr,0,0) '>>>>>>>>>>>>>>> END <<<<<<<<<<<<<<< 'power switching If Power_Save_Flag = True Then March 2013 110 SAA Manual If TimeIntoInterval(0,24,Hr) Then SW12(0) EndIf If TimeIntoInterval(6,24,Hr) Then SW12(1) EndIf Else SW12(1) EndIf ' get VW sensor data Call GetVWData() ' get SAA data Call GetArrayData() NextScan EndProg March 2013 111