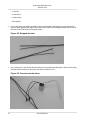
1
RKD User Manual
Tucor, Inc.
518 Wallace Road
Wexford
PA 15090 8642
Phone: 800-272-7472
Phone: 724-935-6850
Fax: 724-935-8233
www.tucor.com
[email protected]
202-230-0001/D
The information in this document may be trademarks or registered trademarks of their respective companies.
All rights reserved. Neither the whole nor any part of the information in this publication may be reproduced in any material form except
with the written permission of Tucor, Inc.
This publication is intended only to assist the reader in the use of the RKD controller. Tucor, Inc. shall not be liable for any loss or
damage arising from the use of any information in this publication, or any error or omission in such information, or any incorrect use
of the product.
1. Introduction ................................................................................................................................... 1
1.1. The Two-wire Technology .................................................................................................... 1
1.2. The Controller ..................................................................................................................... 2
1.3. The Decoders ..................................................................................................................... 2
1.4. Irrigation Features ............................................................................................................... 2
2. System Installation ........................................................................................................................ 5
2.1. Mounting the Controller ....................................................................................................... 5
2.2. Connecting the Controller .................................................................................................... 9
2.2.1. Grounding the Controller ........................................................................................ 10
2.2.2. Connecting Sensors ............................................................................................... 10
3. Operating the Controller ............................................................................................................... 13
3.1. The Display ...................................................................................................................... 13
3.2. Buttons and Controls ......................................................................................................... 14
3.2.1. The Six RKD Modes ............................................................................................... 16
4. Programming the RKD ................................................................................................................. 19
4.1. Basic Controller Configuration ........................................................................................... 19
4.2. Configuring Field Decoders ............................................................................................... 21
4.2.1. Testing a Decoder .................................................................................................. 25
4.2.2. Reading Decoder Configuration .............................................................................. 25
4.3. Configuring Irrigation Programs ......................................................................................... 26
4.3.1. Configuring the Stations ......................................................................................... 27
4.3.2. Setting Water Days ................................................................................................. 29
4.3.3. Setting Start Times ................................................................................................. 30
4.3.4. Adjusting Water Usage (Water Budget or ET) ........................................................... 32
4.3.5. Activating/deactivating a Program ........................................................................... 34
4.3.6. Adding a Booster Pump .......................................................................................... 35
4.3.7. Adding a Master Valve (Supply Pump) ..................................................................... 36
4.3.8. Testing a Program .................................................................................................. 36
5. Running the RKD ........................................................................................................................ 37
5.1. Running RKD in Auto Mode ............................................................................................... 37
5.1.1. Pausing a Running Program ................................................................................... 38
5.1.2. Running Extra stations in Auto Mode ....................................................................... 40
5.1.3. Running Extra Programs in Auto Mode .................................................................... 41
5.2. Running RKD in Manual Mode ........................................................................................... 42
5.3. Alarms ............................................................................................................................. 43
5.3.1. Becoming aware of alarms ..................................................................................... 43
5.3.2. Viewing the alarm list .............................................................................................. 44
6. Troubleshooting from the Controller ............................................................................................... 49
6.1. Testing Decoders .............................................................................................................. 49
6.1.1. Running the "Electrical Test" ................................................................................... 49
6.1.2. Testing Individual decoders ..................................................................................... 50
6.2. Running the "Water Test" ................................................................................................... 51
6.3. Testing Programs .............................................................................................................. 52
6.4. Testing the Two-wire Path .................................................................................................. 52
6.4.1. The Built-in Short Test ............................................................................................ 53
6.5. Increasing Decoder Power ................................................................................................. 55
7. Troubleshooting in the Field .......................................................................................................... 57
7.1. Checking Power and Current Readings .............................................................................. 57
7.1.1. Problems on the Two-wire ....................................................................................... 59
7.2. Dealing with Unstable Decoders ........................................................................................ 60
7.3. Dealing with Failing Decoders ............................................................................................ 61
7.3.1. A Single Decoder Fails ........................................................................................... 61
7.3.2. Several Decoders Fail ............................................................................................ 63
7.4. When there is a Short Circuit in the Field ............................................................................ 65
202-230-0001/D
iii
RKD User Manual
7.4.1. Using the Current Tracker ....................................................................................... 66
7.4.2. Using a Clampmeter .............................................................................................. 68
7.4.3. Locating the Short .................................................................................................. 68
8. Managing Decoders ..................................................................................................................... 73
8.1. Connecting Decoders to the Two-wire Line ......................................................................... 73
8.2. Placing Decoders in the Landscape ................................................................................... 75
9. Advanced Features ...................................................................................................................... 77
9.1. Intelliset ........................................................................................................................... 77
9.2. FloGuard .......................................................................................................................... 77
9.3. FloStack ........................................................................................................................... 77
9.4. Mist Manager ................................................................................................................... 77
A. Adding a Rain Sensor .................................................................................................................. 79
A.1. Setting 10 Minute and Hourly Maximum Rain ..................................................................... 82
B. Adding an ET Device ................................................................................................................... 85
B.1. How ET Works with the RKD ............................................................................................. 85
B.2. Using Historical ET Data ................................................................................................... 89
B.3. Using a Connected Device (Weather Station) ..................................................................... 91
B.4. Checking the Current Aggregated ET and Rain .................................................................. 96
C. Adding a Flow Sensor ................................................................................................................. 99
C.1. Enabling Flow Sensor Input (pulses) .................................................................................. 99
C.2. Configuring for Flow Sensor Input .................................................................................... 100
C.2.1. Selecting Sensor Type .......................................................................................... 100
C.2.2. Setting the Flow Sensor Adjustment ...................................................................... 102
C.2.3. Setting Alarm Thresholds ..................................................................................... 103
C.2.4. Setting Alarm Actions ........................................................................................... 108
C.2.5. Setting Expected Station Flow .............................................................................. 109
C.3. Viewing the Current Flow ................................................................................................ 110
C.4. Inspecting and Toggling Station Status ............................................................................. 111
D. Changing Station Run Sequence ................................................................................................ 113
E. Using Simple Flow Management ................................................................................................ 115
E.1. Configuring for Flow Management ................................................................................... 115
E.2. How the Flow Management Works ................................................................................... 115
E.3. Setting the System Flow Capacity .................................................................................... 115
F. Defining a Custom Irrigation Period ............................................................................................. 117
G. Advanced Irrigation: Misting, Cycle & Soak ................................................................................. 119
G.1. How is This Different from Regular Programs? ................................................................. 119
G.1.1. When the RKD Alters Your Program ...................................................................... 119
G.2. How to Configure for Misting or Cycle & Soak .................................................................. 120
G.3. Things to Keep in Mind ................................................................................................... 123
H. RFA 200 Command Reference ................................................................................................... 125
H.1. System Commands ........................................................................................................ 125
H.2. Decoder Commands ....................................................................................................... 125
H.3. Schedule Commands ..................................................................................................... 125
Glossary ....................................................................................................................................... 127
iv
202-230-0001/D
Chapter 1. Introduction
The RKD is a microprocessor based irrigation control system. A central controller and up to 100 field decoders
comprise a complete system. In addition the controller will accept input from several external sensors in
order to adjust its irrigation to the local weather conditions.
Communication between the controller and the field decoders happens over a two-wire path. Depending
on the signal from the controller, the field decoders each activate or deactivate a valve. The controller signals
to the field decoders based on configurable schedules, eliminating the need for human interaction when the
park, garden or other surroundings need watering - once set up, the RKD runs on its own.
1.1. The Two-wire Technology
The RKD uses two-wire transmission technology to tell the field decoders when to act. This means that
instead of laying out a cable to each individual valve, just one single cable is laid out, and the field decoders
all connect to the same cable:
Figure 1.1. Two-wire layout:
In contrast, this is how the above system would look using a conventional irrigation system that needs a
dedicated cable to each individual valve:
Figure 1.2. Conventional layout:
The two-wire technology has several obvious advantages over a conventional system:
202-230-0001/D
1
The Controller
• Ease of installation: You are only handling one roll of wire.
• Ease of expansion: When you need to add a decoder in the field, you don't have to dig in a new cable
and risk damaging the existing web of cables already in the ground - you simply attach the new decoder
to the existing cable.
• Cost reduction: You save money on expensive copper cable - typically as much as 80 percent compared
to traditional cabling.
1.2. The Controller
The heart of a two-wire system is the controller. This is a microprocessor controlled device that stores your
irrigation programs and sends signals on the two-wire path, telling the individual decoders in the field when
to activate their valve.
In the case of RKD, the controller doubles as a decoder programmer, allowing you to manage the identities
of all decoders in your system.
1.3. The Decoders
Decoders in an RKD system are mainly concerned with two specific commands: "start" and "stop". Depending
on whether they are attached to an irrigation valve, a booster pump relay or a master valve, the decoders
will start and stop the device according to the instructions they get over the two-wire path.
A decoder, the solenoid it is attached to and the valve the solenoid pulls open are all together referred to
as a "station".
1.4. Irrigation Features
Here are the main features that the RKD utilizes to help you automate your irrigation:
• Controls up to 100 field decoders, attached to valves or relays.
• Provides ET corrected irrigation for optimal adjusted water consumption.
• Measures water flow and raises alarms or halts irrigation on unexpected flow.
• Operates over as much as 6000 feet of AWG16 cable.
• Allows for 10 independent irrigation programs. In addition there is a fixed test program that activates all
100 decoders in turn.
• A program can activate up to 100 decoders in named order.
• Each decoder can run for up to 17:59:50 (In fact, you can boost this even further by increasing the "water
budget". Read more in Section 4.3.4, “Adjusting Water Usage (Water Budget or ET)” [page 32]).
• Each program can activate a booster pump in addition to the decoders.
• All programs have 12 start times per day.
• All programs can run simultaneously.
• You configure each program to run on any selection of days in a 14 day period, or on odd/even dates.
2
202-230-0001/D
Irrigation Features
• You can activate one or more valves or programs manually while one or more programs are running, up
to a total of 12 simultaneously running valves.
• A master valve can be selected that will open when any program or decoder is run. You typically assign
master valve status to the valve controlling access to municipal water or pumping decoder.
202-230-0001/D
3
4
Chapter 2. System Installation
Before you start the installation procedure, please make sure that everything is included in your package.
Apart from the manual you're holding, the RKD box should contain the following:
Figure 2.1. RKD Box Contents
• One RKD controller.
• Two keys for the controller cabinet.
• Two mounting pads for the back of the controller cabinet.
• One short current tracker.
The functionality of the first three items is obvious, and as for the current tracker, you will learn more about
that in Section 7.4.1, “Using the Current Tracker” [page 66].
2.1. Mounting the Controller
Though the RKD is designed to resist both rain and direct sun light, you should place it in a friendlier
environment if possible. Installing the RKD inside a utility room or a shed is the perfect solution, but if this
is not possible, try to place it somewhere dry and out of sight.
Furthermore, make sure that you place the controller in a location that meets these requirements:
202-230-0001/D
5
Mounting the Controller
• The controller must have access to 120V AC.
• You must be able to connect the two-wire to the controller at the location.
• To minimize electromagnetic interference, make sure that the controller is placed at least 15 feet away
from any high-draw motors like air conditioners, refrigerators, pool pumps etc.
Once you've designated a suitable location for the controller, you're ready to mount it on the wall - or whatever
vertical surface you have chosen. Here's what you are going to need in order to mount the controller properly:
• Three screws to mount the controller.
Important
The screw heads must have a diameter of at least 3/8 inches, and the screw bodies must be
no wider than 3/16 inches.
• A screw driver that matches the above screws.
• A pen or a marker to mark up where to put the screws.
• If you're mounting the controller on a concrete wall you will need an electric drill and three wall anchors
for the screws.
Before you start mounting the controller you should remove the lower front plate inside the controller cabinet
by twisting the two plastic screws loose with a coin (the screws won't come off but remain attached to the
plate even when twisted loose):
6
202-230-0001/D
Mounting the Controller
Figure 2.2. Front plate removed
Now you're ready to get to work.
Procedure 2.1. Mounting the controller
1.
Place one of the screws in the wall where you want to mount the controller.
Important
The screw must have a space of eight inches to the left of it in order for the controller to fit
on the screw and the cover to be able to open once the controller is on the wall.
You should leave the screw head 1/8 inch out of the wall in order for the controller to fit.
2.
Place the controller on the wall by hooking the centered hole on the back of the controller onto the
screw in the wall.
202-230-0001/D
7
Mounting the Controller
Figure 2.3. Centered hole for wall mounting
If the controller doesn't seem to fit firmly on the screw, take it down, tighten the screw a bit more and
try again. Repeat until the controller seems stable on the screw.
Note
The rubber pads you see on the bottom corners of the controller cabinet above might be
delivered separately for you to assemble.
3.
Make sure the controller is in level.
4.
Use a pen to put marks on the wall through the two holes in the back of the controller cabinet.
8
202-230-0001/D
Connecting the Controller
Figure 2.4. Marking up the mounting holes
5.
If you're placing the controller on a concrete wall, take down the controller, drill out the holes for the
two new screws, possibly put in the wall anchors, and put back the controller on the wall.
6.
Fasten the two last screws in the wall through the holes in the back of the controller cabinet.
Now the controller should be mounted firmly on the wall.
After mounting the controller, it's time to connect the power and two-wire - follow the instructions in the next
section to do this.
2.2. Connecting the Controller
You need to connect two lines to the controller: the power line and the two-wire path.
Warning
The RKD runs on 120V AC and must be installed in compliance with local electrical codes.
Unauthorized installation will void the warranty of the RKD.
202-230-0001/D
9
Grounding the Controller
You connect the two-wire by running it through a hole in the bottom of the controller cabinet and fastening
it to the two-wire terminals (1A-1B) using a flat head screw driver:
Figure 2.5. Connecting the two-wire
There's room for connecting two cables directly to the controller - the other line can be connected to the
terminals labeled 2A-2B. Both wires will receive the same signals when the controller is up and running.
2.2.1. Grounding the Controller
To secure your controller against lightning, you must make sure that the main power supply is grounded,
and/or a ground rod is attached.
If you use a ground rod it must be connected to the screw labeled GND (the green wire from the power
cable is already connected to this):
Figure 2.6. Connecting a ground rod
Warning
You will void the warranty by not grounding your RKD properly - either by connecting the
controller to common and/or by using a ground rod.
2.2.2. Connecting Sensors
The RKD takes input from different sensor types: ET devices, rain sensors, flow sensors and regular auxiliary
alarms. This sections shows you how to connect these sensors to the controller.
10
202-230-0001/D
Connecting Sensors
2.2.2.1. Connecting an ET Device
The RKD supports ET in two ways:
1. "ET Enabled" mode in which the controller just lets an external device tell it when to irrigate and when to
stay passive. In this mode the controller supports two ET devices: WR-7 and WR100i. To make the
controller receive instructions from an ET device, connect the "ET enable A" from the device to the grey
terminals labeled "ET."
2. "ET Pulses" mode where you connect a weather station that continuously tells the controller how much
water is evaporating. Combined with the input from a rain sensor the controller will then on its own figure
out how much to irrigate. Running in this mode you still just connect the weather station to the ET terminals.
Figure 2.7. Connecting an ET device
Important
Be aware of the polarity when you connect devices to the RKD: Connect plus to plus and minus
to minus or you won't see the expected behavior from the connected devices.
You can read a whole lot more about configuring the controller for ET input in Appendix B, Adding an ET
Device [page 85].
2.2.2.2. Connecting a Rain Sensor
You can connect a rain sensor to the RKD via the grey terminals labeled "Rain":
Figure 2.8. Connecting a rain sensor
202-230-0001/D
11
Connecting Sensors
Important
Be aware of the polarity when you connect devices to the RKD: Connect plus to plus and minus
to minus or you won't see the expected behavior from the connected devices.
See Appendix A, Adding a Rain Sensor [page 79] for more details on how to configure the controller to work
with a rain sensor.
2.2.2.3. Connecting an Alarm or Flow Sensor
The grey terminals labeled "Alarm/flow" are intended for either a regular auxiliary alarm or a flow sensor.
You connect either one to the RKD via the grey terminals labeled "Alarm/flow":
Figure 2.9. Connecting an alarm
Important
Be aware of the polarity when you connect devices to the RKD: Connect plus to plus and minus
to minus or you won't see the expected behavior from the connected devices.
See Appendix C, Adding a Flow Sensor [page 99] for more details on how to configure the controller to work
with a flow sensor.
12
202-230-0001/D
Chapter 3. Operating the Controller
It is essential that you feel comfortable with the interface of the RKD before you start configuring decoders,
irrigation programs etc.
This section explains what all the controls are for in the different modes - in Chapter 4, Programming the
RKD [page 19] and Chapter 5, Running the RKD [page 37] you will learn how to actually use the controls
to operate the system.
Figure 3.1. RKD front plate
3.1. The Display
The RKD has a back lit LCD display with two rows of 40 characters. Since the limit is 40 characters per row,
sometimes words are abbreviated, but all messages should still be easy to understand - if in doubt about a
message, consult this manual.
The text layout in the display varies from mode to mode (more about modes in Section 3.2.1, “The Six RKD
Modes” [page 16]), though in several layouts you'll find the current time in the upper right hand corner.
A typical message is the following that is displayed when the RKD is idle, waiting for the next program to
run:
Figure 3.2. A standard display when idling in Auto mode
202-230-0001/D
13
Buttons and Controls
This simply states that the next program to run is program number one, the program's total run time is 17
minutes, and it will run on Tuesday at 09:44 PM, activating two decoders in turn. In the top right you see
the current time.
You will learn all about programs in Section 4.3, “Configuring Irrigation Programs” [page 26].
3.2. Buttons and Controls
Figure 3.3. Controls on the RKD front plate
The controls on the RKD can be divided into five groups:
• Property/action selectors: When configuring an irrigation program, these buttons let you select which
properties of the program you want to edit. In setup/test mode they have different functionality.
Note that when in Program Mode, the functions corresponds to the text on top of the buttons. In Setup/Test
mode the functions corresponds to the text below the buttons.
14
202-230-0001/D
Buttons and Controls
Figure 3.4. Different roles of property/action selectors:
Read more about the different modes in the following section.
• Type selectors: These buttons let you select between programs and stations when in auto or manual
mode.
• Item selectors: These buttons are used in pretty much every mode. They let you scroll up, down and
sideways in the various menus the RKD shows you. In the middle is the ENTER/YES button that is used
for confirmation.
• CANCEL/STOP/NO Button: Is used whenever you need to answer reject a suggestion made by the
controller, or when you need to exit menus.
• Mode selector: This is a selector knob used to switch between the six different modes of the RKD.
When you change to a new mode, allow up to one second before the display reflects the change.
• PAUSE/RESUME/Help Button: This button serves two purposes: It is used to pause and resume running
programs, and it will provide you with short help instructions for most of the options you encounter when
programming the RKD.
For example, if you turn the Mode selector to SETUP/TEST, push the STATION TEST button and then
push the Help button, you'll see the following message in the display:
Figure 3.5. Help text for station test:
When you see arrows in the help text it's an indication that you can use the Item selectors to scroll for
more help text.
202-230-0001/D
15
The Six RKD Modes
Finally there is the line activity indicator which is not really a control - two LEDs that flash green and red
every half second when the outgoing two-wire is active. The line activity indicator offers you an immediate
visual indication of the condition of the two-wire path.
3.2.1. The Six RKD Modes
Looking at the mode selector from left to right, you see six possible modes for the RKD:
Figure 3.6. The mode selector:
3.2.1.1. IRR. OFF
This is short for "Irrigation Off" - practically this means that the connection to the two-wire path is shut down
and no programs will be run. The display will still be lit and you'll see this message:
Figure 3.7. Idling in Irr. Off mode:
3.2.1.2. Manual
In manual mode you can start a program or a single decoder manually.
3.2.1.3. Auto
This is the normal operating position and is probably where your system will spend the most of it's time.
When in auto mode the RKD makes sure that all programs are run according to schedule. Once everything
is configured, you switch the system to auto mode and leave it to do its job.
You also have the option of starting additional valves or programs manually while a program is running in
auto mode. This can be useful if you notice that an area needs a little extra watering but you don't want to
create a new program to take care of it - just turn on the nearest valve for a few minutes.
3.2.1.4. Program
This is the mode you switch to when creating programs - you will learn more about this mode in Section 4.3,
“Configuring Irrigation Programs” [page 26].
16
202-230-0001/D
The Six RKD Modes
3.2.1.5. Setup/Test
This mode lets you set the date and time, configure the controller for various sensor inputs, identify and test
your decoders, and test for shorts on the two-wire path.
3.2.1.6. Advanced
In advanced mode you can configure a lot of settings that you don't have to change in the daily work with
the controller:
• Assign booster pumps to programs
• Configure ET and Rain sensors
• View and change station status and their expected flow
• Configure a flow sensor
• Erase the entire controller's data - in case you're setting up a new system from scratch.
• Select controller language (English and Spanish are supported).
• Enable/disable whether or not to display the line V/mA.
• Adjust the power the controller uses to pull open your valves.
202-230-0001/D
17
18
Chapter 4. Programming the RKD
Like conventional controllers, the RKD must be programmed to control your irrigation. The controller itself
needs to be configured with date, time and language, and in addition, the field decoders need to be configured
and tested. Finally you need to create your irrigation programs, and possibly configure the system for sensor
inputs.
All of this happens at the controller, and this chapter walks you through all the tasks.
4.1. Basic Controller Configuration
The controller will remember date/time for up to two weeks when not connected to a power outlet. Most
likely it will have lost this information when you first receive it, so the very first thing you have to do to get
going is to set the date and time:
Procedure 4.1. Setting date and time for the first time
1.
Turn on the controller. The display will ask you to set the date and time:
Figure 4.1. Controller's first message
2.
Push the ENTER button and you'll see the a display along these lines:
Figure 4.2. Setting the initial date/time
3.
Now use the item selectors to adjust the date/time - up/down changes the values, left/right moves
between the fields.
Note
You don't have to set the week day - the controller will calculate this based on the date you
enter.
4.
When you're happy with the setting, push the ENTER button.
If you need to adjust the date/time later on, follow this procedure:
202-230-0001/D
19
Basic Controller Configuration
Procedure 4.2. Setting the date and time
1.
Turn the mode selector to SETUP/TEST:
Figure 4.3. Mode selector in SETUP/TEST
The display will now look like this:
Figure 4.4. Display message on switch to SETUP/TEST mode
2.
Push the DATE/TIME selector. The button will start blinking and the display will look something like this:
Figure 4.5. Setting date and time
The blinking cursor indicate what you're about to edit. In this example you're about to edit the month
slot which is set to 10 - October.
3.
You change the settings with the up and down item selectors and move between the day, month and
year slots with the left and right item selectors.
4.
Push the ENTER button to save your setting - now the controller will save the date and return to the
default screen for setup/test mode.
Note
The week day will be calculated automatically from the date you choose.
The next thing you should do is to set the language - the controller currently supports English and Spanish:
20
202-230-0001/D
Configuring Field Decoders
Procedure 4.3. Setting the language
1.
Turn the mode selector to ADVANCED:
Figure 4.6. Mode selector in ADVANCED
The display will now look like this:
Figure 4.7. Display message on switch to ADVANCED mode
2.
Select item 1. Select Language and push the ENTER button.
3.
Now use the item selectors to select your language and push the ENTER button. The language is saved
and the display returns to the default for this mode.
Figure 4.8. Selecting the language
4.2. Configuring Field Decoders
The RKD controller doubles as a decoder programmer - you can set the identities of your decoders, change
existing identities and test that a decoder is working before you place it in the field.
Before you can do any of the above, you need to connect the decoder to the controller:
Procedure 4.4. Connecting a decoder to the RKD Controller
1.
Remove the lower front plate of the controller as described in ???
202-230-0001/D
21
Configuring Field Decoders
2.
Turn the mode selector to SETUP/TEST
Figure 4.9. Mode selector in SETUP/TEST
Now the display looks like this:
Figure 4.10. Display message on switch to SETUP/TEST mode
3.
Push the DECODER PROG. button.
Now the RKD disables the two-wire to the field (the LEDs stop blinking), switches to programming mode,
and asks you to connect the decoder you want to manage:
Figure 4.11. Prompting for the decoder to program
Warning
Switching to setup/test mode will stop any irrigation that might be going on - all programs
are exited immediately.
4.
22
Connect the decoder to the programming terminals. The blue wires go in the two right most terminals
and the white wires go to the left, just as illustrated on the label beneath the terminals:
202-230-0001/D
Configuring Field Decoders
Figure 4.12. How to connect a decoder to the controller
5.
Once the decoder has been properly connected, push the ENTER button, and you are ready to name,
rename or test the decoder.
Note
If the decoder was not connected properly or has failed, the controller will tell you that it
could not detect a decoder.
After connecting the decoder to the controller, proceed to assigning an identity to the decoder:
Procedure 4.5. Assigning an identity to a decoder
1.
Follow Connecting a decoder to the RKD Controller [page 21] using the decoder you wish to name.
Now the display will look like this:
Figure 4.13. New decoder connected
If the decoder has already been named, "New" will be replaced with the name of the decoder instead.
2.
Use the item selectors to put the star next to "1. Change ID" and push the ENTER button.
202-230-0001/D
23
Configuring Field Decoders
Figure 4.14. Selecting the Decoder ID:
3.
Now you can use the item selectors to choose a name for the decoder. A decoder can be designated
to one of three different name types:
1. A decoder name - "ST1", "ST2", "ST3"....."ST99", "ST00". 100 decoder names are available (number
100 is called ST00 due to restrictions on the length of the name).
2. A booster pump name - "BO1" or "BO2" are available. Read more about how to use booster pumps
in Section 4.3.6, “Adding a Booster Pump” [page 35].
3. A master valve name - "MV" is the sole master valve name in the system. Read more about how
you use the decoder to control the master valve in Section 4.3.7, “Adding a Master Valve (Supply
Pump)” [page 36].
4. A cut-off valve - "COV" is available. The COV will activate if an "Unscheduled flow" alarm is raised.
You can read more about flow alarms in Appendix C, Adding a Flow Sensor [page 99].
Important
The COV must be a "normally open" valve.
The master valve ID and the two booster pump IDs are available after ST100 when scrolling up with
the item selectors
Use the item selectors to scroll to the name you want to assign to the decoder and push the ENTER
button.
Now you'll be asked to confirm the new name:
Figure 4.15. Confirm Decoder configuration
When you push "Yes" the decoder is configured and verified, and the controller will remind you that it's
a good idea to label the decoder with the assigned ID:
24
202-230-0001/D
Testing a Decoder
Figure 4.16. Decoder configuration done:
4.
If you wish to configure another decoder right away, push the Yes button and use the item selectors to
scroll down and select the Another option.
If you're done configuring, push the CANCEL button to exit the decoder configuration.
Now the decoder is ready to place in the field and get connected to the two-wire.
4.2.1. Testing a Decoder
It's a good idea to test whether a decoder is working before placing it in the field. Follow this procedure to
test a decoder:
Procedure 4.6. Testing a decoder Before Placing it in the Field
1.
Connect the decoder to the controller and switch to SETUP/TEST mode, as described in Connecting a
decoder to the RKD Controller [page 21]
2.
Scroll to "2. Test" and push the ENTER button.
If the decoder is OK, the controller will say "Output for Decoder ST1 OK".
If the decoder fails, the controller will say "Output for Decoder ST1 Failed"
There's nothing you can do to repair a defective decoder - replace it with a new one instead.
4.2.2. Reading Decoder Configuration
In case you need to determine the identity of a decoder that has already been programmed, follow this
procedure:
Procedure 4.7. Detecting the name of a decoder that is already configured
1.
Connect the decoder to the controller and switch to SETUP/TEST mode, as described in Connecting a
decoder to the RKD Controller [page 21]
2.
If the decoder has already been configured, you will see it's name in the display. In the case of "ST25",
the display will look like this:
202-230-0001/D
25
Configuring Irrigation Programs
Figure 4.17. Configured decoder connected
3.
If you wish to reconfigure the decoder, push the ENTER button and select a new name. Otherwise push
the CANCEL button and disconnect the decoder from the sockets.
4.3. Configuring Irrigation Programs
Once your stations are configured and placed in the field, it's time to start configuring the irrigation programs.
The RKD holds 10 programs that can each activate 100 decoders in turn. Each program can run 12 times
a day on odd, even or selected days in a two week period. Additionally, each program can activate a booster
pump and a master valve throughout the duration of the program.
There is also a test program which can not be modified. This program is primarily used to troubleshoot the
system and is described in Section 6.2, “Running the "Water Test"” [page 51].
To start configuring a program, turn the mode selector to PROGRAM.
Important
Throughout this section we will assume that the RKD is in program mode.
Figure 4.18. Mode selector in PROGRAM mode
Now the RKD shows you the configuration for "Program 1". The first time you do this, most settings are
blank, and the display will look like this:
26
202-230-0001/D
Configuring the Stations
Figure 4.19. Program mode
The following sections walk you through everything you need to know in order to customize the 10 programs.
4.3.1. Configuring the Stations
Each of the 10 programs can activate up to 100 stations in turn. The stations are run in turn according to
1
their IDs, starting from ST01, ST02 etc . To configure a program, simply set the run times of each station
to the number of minutes you wish it to run.
Here's an example of an irrigation program:
Station
Run Time
ST01
10min
ST02
5min
ST04
100min
ST16
10min
...
...
...
...
Now let's look at how you configure the individual stations in a program.
Procedure 4.8. Configuring a station in a program
1.
Turn the mode selector to PROGRAM. On a blank controller the display will look like this:
1
If you want the stations to run in a different order than this, you must assign sequence numbers to each station and the sequence
number will determine the order instead.
Read more about sequence numbers in Appendix D, Changing Station Run Sequence [page 113].
202-230-0001/D
27
Configuring the Stations
Figure 4.20. Program Mode
2.
Use the item selectors to scroll to the program you wish to configure a station for.
3.
Now push the RUN TIME button. Say you selected program two - then the RUN TIME button will flash red
and the display look like this:
Figure 4.21. Selecting a station
4.
Use the item selectors to select the station you wish to configure and push the ENTER button.
Now the cursor jumps to the right of the display, allowing you to select the station run time.
Tip
Instead of browsing through the list of available stations with the item selectors you can
use the STATION button to browse only stations with a defined run time. This comes in handy
when modifying run times of an existing program.
Note
A couple of notes on run times:
• Run times longer than four minutes is run in ten second blocks and will be rounded to
the nearest block.
For instance, run times of 00:04:14 and 00:04:18 will both be rounded to 0:04:20.
• Run time shorter than four minutes are not rounded.
• The maximum run time is 17:59:50.
5.
Use the item selectors to select the number of minutes you wish the station to run, and push the ENTER
button to save your setting.
Now the controller returns to the main screen for editing the run time. Say you just set station number
five to run 10 minutes in program two, the display will look like this:
28
202-230-0001/D
Setting Water Days
Figure 4.22. Station setting saved:
Pushing the CANCEL button when adjusting the run time will discard the new run time and keep the
original one, even if this is zero.
Now you can select other stations and repeat steps four and five to determine how they should run in
this program.
6.
Once you have configured all the stations you need and are back at the default position, push the RUN
TIME button to exit the configuration of programs all together.
4.3.2. Setting Water Days
There are three ways to determine which days a program will run.
• On all odd dates (1, 3, 5 etc.)
• On all even dates (2, 4, 6 etc.)
• On selected days in a 14 day cycle.You select the days and the RKD will loop through the 14 day schedule.
To make the configuration as intuitive as possible, the 14 day period always start with the current day.
Procedure 4.9. Setting the water days
1.
Use the item selectors to navigate to the program you wish to adjust the water days for and push the
WATER DAYS button. Now you'll see the following screen:
2.
Use the item selectors to choose between "Odd dates", "Even dates" or "14 day period" and push the
ENTER button.
Note
The definition of an "Odd date" does not include the 31st day in a month because this would
cause the program to run two days in a row (e.g. May 31. and June 1.) The same goes for
February 29. on leap years.
If you select odd or even dates, you are done now, but if you select "14 day period" you need to walk
through the next steps as well.
202-230-0001/D
29
Setting Start Times
3.
Assuming that today is a Sunday, the list of days will start with an "S" and a cursor will be blinking on
top of the first "S":
Figure 4.23. Selecting the water days
4.
Now you can use the item selectors to navigate through the days. The up and down arrows will toggle
the selected day to On/Off. Here's how selecting only Mondays, Wednesdays and Fridays would look
like:
Figure 4.24. Water days example
5.
Once happy with the selection of days, push the WATER DAYS button to save the changes.
4.3.3. Setting Start Times
Each program in the RKD can run up to 12 times per day.
Note
When you set the first start time for a program the controller automatically sets the program as
active (see Section 4.3.5, “Activating/deactivating a Program” [page 34] for details on program
status).
Procedure 4.10. Setting start times
1.
Use the item selectors to navigate to the program you wish to adjust the start times for and push the
START TIMES button.
Now you'll see the following display:
Figure 4.25. Selecting a start time
30
202-230-0001/D
Setting Start Times
Note
If you are using the misting feature of RKD you will also see Cyc and End fields:
Figure 4.26. Selecting a start time with misting
Misting allows you to determine a more complex irrigation scheme where each start time
is repeated a number of times within a specified time frame - it is all explained in detail in
Appendix G, Advanced Irrigation: Misting, Cycle & Soak [page 119]:
2.
Use the item selectors to locate the one of the 12 runs you wish to set a start time for, and push the
ENTER button.
Now the cursor will jump to the right, letting you set the start time:
Figure 4.27. Selecting a start time
3.
Use the item selectors to select the start time and push the ENTER button.
Tip
If you push the up and down arrow at the same time in this field, you will delete the current
start time all together.
4.
Now the controller will return to the default display for setting start times, and you can repeat steps two
and three for all the start times you wish to set.
5.
Once you're all done, push the START TIMES button to return to the main programming mode.
Note
Your start times will be sorted by start time - if the second start time you enter is before the first
one, they will be swapped around next time you browse the list.
Also, if you select another number for your start than the next chronologically available one, the
RKD will save your start with the next chronologically available number anyway. This means
that if you have two starts assigned and assign a third one but to the "6" run slot, this will be
saved as start 3 and appear as such the next time you want to edit the program.
202-230-0001/D
31
Adjusting Water Usage (Water
Budget or ET)
In short, you can say that your start times are sorted by time and their numbers "compressed"
chronologically.
4.3.4. Adjusting Water Usage (Water Budget or ET)
There are two ways of determining how to adjust the amount of water used by an irrigation program:
• Setting the "Water Budget" to a value between 0 and 250 percent. Just as you would expect, this determines
how much water is used. However, since the controller simply tells a station to start or stop, the water
budget doesn't control the water flow as such, but instead it determines the run time.
This means that if you have set up a program to run five decoders for 10 minutes each, this is what will
happen with the water budget set to 100 percent. But if you decrease the water budget to 80 percent,
each decoder will only run eight minutes, and if you set the water budget to 120 percent, each decoder
will run for 12 minutes.
Note
If the water budget is zero, the decoder will not run at all.
• Letting ET adjustment decide how the irrigation should be carried out. This way you tell the RKD how
much water you want the program to provide per day, and then the controller will adjust for any ET and
Rain input it receives. See Appendix B, Adding an ET Device [page 85] for details on how to configure
the controller for ET.
The following two procedures walk you through configuring a program for each of the two options.
Procedure 4.11. Adjusting the water budget
1.
Use the item selectors to select the program you wish to set the water budget for.
2.
Push the Water Budget button. Now you'll see the following display:
Figure 4.28. Choosing method for irrigation adjustment
Note
Please see the note below, On switching between Water Budget and ET
adjustment [page 34].
3.
32
Use the item selectors to choose "Water Budget" and push the Water Budget button. Now you'll see
the following screen:
202-230-0001/D
Adjusting Water Usage (Water
Budget or ET)
Figure 4.29. Adjusting the water budget
4.
Use the item selectors to set the appropriate water budget and push the ENTER button to save the setting
and exit.
Tip
Adjusting the water budget is an easy way to accommodate shifting weather conditions
without having to reconfigure all programs to apply more or less water. Just increase or
decrease the water budget as needed, and the proportions will stay intact.
Procedure 4.12. Adjusting the ET
1.
Use the item selectors to select the program you wish to set the ET for.
2.
Push the Water Budget button. Now you'll see the following display:
Figure 4.30. Choosing method for irrigation adjustment
3.
Use the item selectors to choose "ET" and push the ENTER button. Now you'll see the following display:
Figure 4.31. Setting program ET
Note
Please see the note below, On switching between Water Budget and ET
adjustment [page 34].
202-230-0001/D
33
Activating/deactivating a Program
4.
If you want the program to run before it has received an ET budget from the controller, you can provide
one manually that will then be used as the starting point. Moving on, any ET figure that is received will
be added to what you already entered - thus you can also use this feature to do a one-time adjustment
of the ET. Please read Section B.1, “How ET Works with the RKD” [page 85] to make sure you
understand the ET concept.
Use the item selectors to set your desired ET budget for today.
5.
Push the ENTER button to save your setting.
6.
Programs that use ET adjustment instead of Water Budget adjustment will display the ET value instead
of the Water Budget value in PROGRAM mode:
On switching between Water Budget and ET adjustment
If you have previously set a program to be adjusted by either Water Budget or ET, choosing
the opposite setting will generate one of two warnings:
Figure 4.32. Shifting from ET to Water Budget
Figure 4.33. Shifting from Water Budget to ET
4.3.5. Activating/deactivating a Program
You can toggle the Active/Passive status of each of the 10 programs - only active programs are actually
run. By default, newly created programs are set to Active as soon as you assign the first start time to them.
To toggle a program between Active and Passive:
Procedure 4.13. Toggling the Active/Passive setting
1.
34
Use the item selectors to select the program you wish to toggle active or passive and push the
ACTIVE/PASSIVE button:
202-230-0001/D
Adding a Booster Pump
Figure 4.34. Toggle the Active/Passive setting
2.
Use the item selectors to toggle between Active and Passive mode and push the ACTIVE/PASSIVE to
save your selection and exit to the main display for Program mode.
Note
Making a program passive does not erase the program. In fact, a passive program can still be
run manually. More about this in Section 5.2, “Running RKD in Manual Mode” [page 42] and
Section 5.1.3, “Running Extra Programs in Auto Mode” [page 41].
4.3.6. Adding a Booster Pump
The RKD lets you configure two decoders to activate booster pumps (see Section 4.2, “Configuring Field
Decoders” [page 21] for instructions), and each irrigation program can have one of these booster pumps
associated. Here's how you assign a booster pump to a program:
Procedure 4.14. Assigning a booster pump
1.
Turn the mode selector to ADVANCED mode.
Now the display looks like this:
Figure 4.35. Display message on switch to ADVANCED mode
2.
Push the ENTER button to assign a booster pump to a program.
3.
Use the item selectors to select one of the 10 programs and push the ENTER button.
4.
Now use the item selectors to select between "Non", "BO1" or "BO2":
202-230-0001/D
35
Adding a Master Valve (Supply
Pump)
Figure 4.36. Selecting a booster pump
5.
Once done, push the ENTER button to save the setting.
6.
Now you can repeat steps three and four for to assign booster pumps to more programs, or push the
CANCEL button to return to the main display for Advanced mode.
4.3.7. Adding a Master Valve (Supply Pump)
You might want to have the RKD control the opening of your supply pump when irrigation is active, and shut
it down when irrigation is over.
To achieve this, simply configure one of your decoders to act as the master valve decoder that controls the
supply pump. Check Section 4.2, “Configuring Field Decoders” [page 21] for instructions.
If the dedicated master valve decoder is connected to your two-wire, this will open whenever the system is
irrigating, and close when the system is idle - you don't need to configure anything further to make this work.
4.3.8. Testing a Program
After setting up your programs, you might want to test them without having to wait around for all of them to
actually run.
Since this is the same approach as you would take in a troubleshooting scenario, please refer to Section 6.3,
“Testing Programs” [page 52] in the troubleshooting chapter for instructions.
36
202-230-0001/D
Chapter 5. Running the RKD
Day to day usage of the RKD is pretty simple - the whole point of having a system like this is to automate
the irrigation, so little or no intervention will be needed once your system is up and running.
5.1. Running RKD in Auto Mode
Once your system is configured, turn the mode selector to AUTO mode:
Figure 5.1. AUTO Mode
Now the display will tell you which program will run next:
Figure 5.2. Waiting for a program to run
In this case the next program that will run is number one. It has two stations and will run on Tuesday at
09:44 PM for 40 minutes.
You don't have to do anything more - just leave the controller in AUTO mode and the program will be run
automatically. Once the program starts, the display will tell you what station is running, and the remaining
run time for both the running station and the entire program:
202-230-0001/D
37
Pausing a Running Program
Figure 5.3. Running program
Once this program has finished, the next one in line will appear in the display.
Up to 10 programs can run in parallel.
Tip
You can always get an overview of running programs and stations by using the item selectors:
Use the left/right arrows to select between programs and stations and the up/down arrows to
browse through the items (programs or stations).
5.1.1. Pausing a Running Program
From time to time it may be necessary to pause the irrigation. Here's how you put a running program on
hold:
Procedure 5.1. Pausing a program
1.
Use the item selectors to locate the program you wish to pause, and push the PAUSE/RESUME button.
The response from the controller will vary depending on the status of the program and the number of
programs running:
• If the program you select is the only one running you'll see this display:
Figure 5.4. Confirm pausing a program
• If the program you select is one of several running programs you'll see this display:
38
202-230-0001/D
Pausing a Running Program
Figure 5.5. Confirm pausing one of more programs
• If the program you select is not running but other programs are, you'll see this display:
Figure 5.6. Confirm pausing a program
2.
Push the button that suits your intentions (PAUSE/RESUME or PROGRAM) and the controller will pause the
program(s) and return to the list of programs:
Figure 5.7. Paused program
Once you're ready to resume the program, follow this procedure:
Procedure 5.2. Resuming a paused program
1.
Use the item selectors to locate the program you wish to resume, and push the PAUSE/RESUME button.
Depending on whether one or more programs are paused you'll see different displays, according to
what you did when you paused the program(s)
2.
Push the button you need according to the instructions in the display.
3.
When the program(s) resume(s), the display will look as if the program(s) had just kept running.
Note
The last ten seconds of a program might be re-run, so each pause/resume will potentially
add ten seconds to the total run time for that program.
202-230-0001/D
39
Running Extra stations in Auto Mode
5.1.2. Running Extra stations in Auto Mode
When the RKD is running in auto mode you have the option of manually starting additional stations
simultaneously. This can come in handy if a certain part of the terrain needs a little extra watering but you
don't want to reconfigure a program for just one times sake.
Note
The RKD supports up to 12 simultaneously running stations. This means that if for instance two
programs are running, you can start nine more stations manually.
Procedure 5.3. Running a station manually
1.
Push the STATION button and the following display appears:
Figure 5.8. Selecting station
2.
Use the item selectors to select the station you wish to activate. If you're happy with the suggested run
time, push the ENTER button.
Otherwise push the right arrow of the item selectors to move the cursor to the right to adjust the run
time and then push the ENTER button.
Now the station will start running immediately:
Figure 5.9. Manually activated station:
You can use the item selectors to browse through the list of running stations and programs from this
display.
If you want to run more stations manually, just go through this procedure again for each station you want
to activate.
To stop a manually started station before the end of its run time, use the item selectors to locate it and push
the STOP button.
40
202-230-0001/D
Running Extra Programs in Auto
Mode
Tip
You can always get an overview of running programs and stations by using the item selectors:
Use the left/right arrows to select between programs and stations and the up/down arrows to
browse through the items (programs or stations).
5.1.3. Running Extra Programs in Auto Mode
When the RKD is running in auto mode you have the option of manually starting additional programs in
parallel.
Note
If you select programs that try to start the same station in overlapping periods, the station will
start when the first program asks for it and stop when the last program doesn't need it any more.
So, if program 1 wants to run station 12 from 08:00 to 08:10 and program 2 wants to run that
same station from 08:05 to 08:15, the station will be run from 08:00 to 08:15.
Running a program manually has the advantage that you can select which station should be run first, allowing
you to skip a part of the program.
Procedure 5.4. Running a program manually
1.
Push the PROGRAM button.
Now there will be an arrow next to the program number, indicating that you should select the program
you wish to run:
Figure 5.10. Selecting program
2.
Use the item selectors to pick the desired program and push the right arrow in the item selectors to
move on to select which station should be the first to run:
Figure 5.11. Prompting for first station
3.
Use the item selectors to select the station you wish to start with, and push the ENTER button.
202-230-0001/D
41
Running RKD in Manual Mode
Now the controller will run the selected program, keeping you informed of the status of the program:
Figure 5.12. Manual program execution:
You can browse through the status of running programs with the item selectors.
If you want to run more programs manually, just go through this procedure again for each program you want
to activate.
To stop a manually started program before the end of its run time, use the item selectors to locate it and
push the STOP button.
Tip
You can always get an overview of running programs and stations by using the item selectors:
Use the left/right arrows to select between programs and stations and the up/down arrows to
browse through the items (programs or stations).
5.2. Running RKD in Manual Mode
The RKD allows you to run all programs and stations manually only - not obeying the schedules for the 10
programs. To enable this feature, turn the mode selector to MANUAL:
Figure 5.13. MANUAL mode
Now the controller is ready to run programs or stations manually, and you're prompted to select one of the
two:
42
202-230-0001/D
Alarms
Figure 5.14. Prompting for station or program
From here on, the procedure for running stations is identical to Running a station manually [page 40] and
running programs is explained in Running a program manually [page 41].
Tip
You can manually run programs and stations simultaneously.
5.3. Alarms
When running in AUTO or MANUAL mode, the RKD will react on a number of conditions by raising one or more
alarms.
5.3.1. Becoming aware of alarms
If the RKD has received an alarm, and is in AUTO or MANUAL mode (see Chapter 5, Running the RKD [page 37]
for a description of the two modes), the bottom row of the display will toggle between normal text and the
alarm that has arrived.
For example, if you had a rain alarm at 01:10 PM, your display will toggle between normal mode and alarm
notification:
Figure 5.15. Normal display
Figure 5.16. Toggled display with alarm info
The display will toggle between the two modes in short intervals.
If you had multiple alarms the controller will toggle to a different alarm each time it toggles to notification.
202-230-0001/D
43
Viewing the alarm list
Note
If you had more than three alarms the fourth message in the bottom row of the display will say
that you should visit the alarm list for details - the display will look something like this:
Figure 5.17. Display with notification to visit the alarm list
5.3.2. Viewing the alarm list
To view the list of alarms in the RKD, follow this procedure:
1.
Make sure the controller is running in AUTO or MANUAL mode.
2.
Push the ALARMS button. Now you'll see a scrollable list of the different types of alarms known to the
RKD:
Figure 5.18. Alarm list
Note
If you have an older version of the RKD that has no ALARMS button, you need to push the
WATER DAYS button instead.
In this case there is no Off time for the alarm, meaning that the alarm is still on. Had the alarm ceased
you would see the end time too.
Use the item selectors to scroll through the list. The list contains information on the latest observed
alarms of the 12 known alarm types:
Note
The alarm list will not survive a power failure - if the controller loses power, the list is wiped
clean.
44
202-230-0001/D
Viewing the alarm list
Table 5.1. Alarms in the RKD
Short name in display (Alarm Full name / Description
type)
How to clear alarm (see note
below)
1. Rain
Rain alarm.
Will automatically disappear when
it stops raining.
2. Alarm
Whatever alarm you have
attached to the alarm socket. If
you're using the Alarm socket for
a flow sensor, you won't ever see
this alarm (See Section 2.2.2.3,
“Connecting an Alarm or Flow
Sensor” [page 12])
The alarm stays on as long as the
attached alarm is active, but you
can clear it by viewing the alarm
list.
3. ET
Evapotranspiration alarm.
Will automatically disappear when
the "ET enable" device is no longer
controlling your irrigation.
This will only ever be raised if
you're running in "ET-enabled"
mode. See Section B.1, “How ET
Works with the RKD” [page 85]
for in-depth details about ET.
4. Short
Short alarm
The alarm stays on as long as
there is a short in your system.
You can clear the notification by
viewing the alarm list.
5. High F
High flow alarm
The alarm stays on as long as the
flow is too high. You can clear the
notification by viewing the alarm
list.
6. MPF
Main pump failure
The alarm will be cleared once you
have viewed the alarm list and
acknowledged the alarm.
7. USch F
Unscheduled flow alarm. This
means that too much water is
flowing in your pipes when you're
not irrigating. Such an alarm
indicates that you have a leak.
Stays on as long as the flow is too
high. The cut-off valve (COV) will
be activated, so the alarm will clear
itself, but you can clear the
notification by viewing the alarm
list.
202-230-0001/D
45
Viewing the alarm list
Short name in display (Alarm Full name / Description
type)
8. St. Err
Station error alarm. This means
that one or more stations in the
field have failed, and will only be
raised if you are using a flow
sensor.
How to clear alarm (see note
below)
Stays on until all stations are
labeled OK (see Section C.4,
“Inspecting and Toggling Station
Status” [page 111]). You can clear
the notification by viewing the
alarm list.
Note
This alarm only
concerns flow
related problems not any electrical
errors that may
occur in a station. If
you suspect that a
stations has an
electrical error,
please see
Section 6.1.1,
“Running the
"Electrical
Test"” [page 49].
9. Max St.
Maximum number of stations
reached. This means that a
program tried to start a station
when the maximum number of
stations were already running.
The alarm will be cleared once you
have viewed the alarm list and
acknowledged the alarm.
This alarm can only be triggered
if you have changed the power
adjustment to something higher
than the default value.
46
10. Repeat.
The number of repeats has been The alarm will be cleared once you
reduced in a misting program.
have viewed the alarm list and
This typically happens if ET
acknowledged the alarm.
expands the run time for repeats
and the program can't fit all the
repeats into the configured time
frame. You can read more about
this in Appendix G, Advanced
Irrigation: Misting, Cycle &
Soak [page 119].
11. NW Prg.
A program has not been run
The alarm will be cleared once you
because it was set to start in the have viewed the alarm list and
non-water time window. You can acknowledged the alarm.
read more about the non-water
window in Appendix F, Defining
a Custom Irrigation
Period [page 117].
202-230-0001/D
Viewing the alarm list
Short name in display (Alarm Full name / Description
type)
12. NW Stp.
3.
How to clear alarm (see note
below)
A program was halted because it The alarm will be cleared once you
was running when entering the have viewed the alarm list and
non-water time window. You can acknowledged the alarm.
read more about the non-water
window in Appendix F, Defining
a Custom Irrigation
Period [page 117].
To exit the alarm list push the ALARMS button again, or simply wait about 20 seconds, and the controller
will return to the normal display.
When you have viewed the list of alarms you will no longer be notified in the display about past alarms.
Of course you can always revisit the list.
202-230-0001/D
47
48
Chapter 6. Troubleshooting from the
Controller
6.1. Testing Decoders
This section describes the various ways you can troubleshoot your controller and field decoders.
6.1.1. Running the "Electrical Test"
The RKD has a built-in test that will activate each decoder in turn for just one second in order to check if
they are responding correctly. The decoders must be connected to the solenoids that activate valves in the
landscape, and the test can tell whether the decoders and solenoids are working correctly in conjunction.
Procedure 6.1. Running the decoder test
1.
Turn the mode selector to SETUP/TEST mode:
Figure 6.1. Mode selector in SETUP/TEST
2.
Push the STATION TEST button.
Now you'll be prompted to select the decoder you wish to start from:
Figure 6.2. Select first decoder for decoder test
3.
Use the item selectors to select a decoder and push the ENTER button to start the test.
If the decoder is ok, the display will look something like this:
202-230-0001/D
49
Testing Individual decoders
Figure 6.3. decoder test OK
In this case the decoder pulled a current of 477mA during the "inrush" period, which is when the decoder
is activating the solenoid, and a current of 38mA once the solenoid was open. Numbers in this range
are normal; it takes a larger charge in the "inrush" period to pull the solenoid open, and then a smaller
current to keep it open afterwards.
If the decoder fails, the display will look something like this:
Figure 6.4. decoder test Failed
Note how the current during "inrush" and afterwards are practically the same - the decoder or the
solenoid isn't responding.
Regardless of whether the decoder fails or turns out ok, you move on to testing the next decoder in line
by pushing the ENTER button.
6.1.2. Testing Individual decoders
There are two ways to test if a single decoder is working correctly:
1. If you have physical access to the decoder, you can detach it from the two-wire, take it to the controller
and perform a decoder test as described in Section 4.2.1, “Testing a Decoder” [page 25].
If this test fails, the decoder must be replaced.
2. If you don't have access to the decoder - maybe it's buried in the landscape - you can run the test program
(see Section 6.1.1, “Running the "Electrical Test"” [page 49]). Start the test at the decoder you wish to
test, and then exit it afterwards by turning the mode selector to another mode or pushing the CANCEL
button.
Important
If a decoder fails when running the test, you could be looking at a faulty solenoid. If you want
to be 100 percent sure that the error lies in the decoder, you must bring the decoder to the
controller and perform the test described in Section 4.2.1, “Testing a Decoder” [page 25].
50
202-230-0001/D
Running the "Water Test"
6.2. Running the "Water Test"
The "water test" is a built-in program that will activate all 100 decoder identities in the system in turn. This
way you can walk through the landscape and ensure that all decoders are actually pulling the valves open.
Procedure 6.2. Running the test program
1.
Turn the mode selector to MANUAL mode:
Figure 6.5. Mode selector in MANUAL mode
2.
Push the PROGRAM button, locate the "Test" program (at the end of the list) and push the ENTER
3.
Now you can set the time each valve should be pulled open, and which station you wish to start from.
The interval must be at least 10 seconds.
Figure 6.6. Set the interval time for the "water test"
Once you've set the interval time, push the ENTER button to start the test program.
4.
Once the test program starts running, you'll see each station activated in turn, starting at the station
you chose in the last step:
Figure 6.7. Water test running
202-230-0001/D
51
Testing Programs
Note
All 100 stations identities will be asked to activate in turn - this means that if you don't have
assigned decoders at all identities, you will experience "empty" intervals where no stations
react to the instructions on the two-wire path.
Note
The test will include Master Valves but not Booster Pumps.
Tip
You can pause the test program just as any regular program. This is described in Section 5.1.1,
“Pausing a Running Program” [page 38].
6.3. Testing Programs
The easiest way to test whether a program is running correctly - that is, it activates the correct decoders,
master valves and booster pump relays - is to try to run the program manually. Check out Section 5.2,
“Running RKD in Manual Mode” [page 42] for instructions on how to do this.
Tip
If you don't want to wait the entire program out just to see that everything activates in the right
order, you can decrease the water budget to 1 percent (check Section 4.3.4, “Adjusting Water
Usage (Water Budget or ET)” [page 32] for instructions) before running the program.
This way you can "follow" the program by walking from decoder to decoder in the terrain as
they activate for just one percent of the original run time (at least one minute per decoder).
6.4. Testing the Two-wire Path
When in AUTO or MANUAL mode, the first indication that you might have a short or a fault somewhere on the
two-wire path is that the line activity indicators (the green and red LEDs on the controller) will flicker, be
constantly on, or not lit at all.
If the RKD senses a leak somewhere, the two-wire path will move to 50Hz mode which you'll see as the
LEDs being constantly lit. After a while you'll see an indication in the lower part of the display that a short
occurred:
Figure 6.8. Short notice
If the leak is severe (current more than 600-650mA), the connection to the two-wire path will be closed and
the LEDs will be off.
52
202-230-0001/D
The Built-in Short Test
Note
You can make the controller display voltage and current:
Procedure 6.3. Making the controller display voltage/current
1.
Turn the mode selector to ADVANCED mode:
Figure 6.9. Mode selector in ADVANCED
2.
Select 8. Enable/Disable line V/mA display and push the ENTER button.
3.
Use the item selectors to select Enable and push the ENTER again.
When you return to either AUTO or MANUAL mode, you'll see the line status in the upper right
hand corner:
Figure 6.10. Line status in manual mode
Unfortunately there isn't enough room in the display to list the current with the full "mA"
suffix - only an "m" could fit in.
Note
The display will return to showing the time if you power down the controller.
There are two stages of testing the two-wire for shorts: you can run a built-in short test from the controller,
and if something seems wrong, you can inspect the two-wire in the field, using either a clampmeter or the
current tracker that ships with your RKD.
6.4.1. The Built-in Short Test
If you suspect your system to have a short somewhere in the field, you can validate your suspicion by using
the built-in short test in the controller. This test won't tell you anything you can't see if you've configured the
controller to display voltage and current in the display, but it's the first step in the troubleshooting process:
202-230-0001/D
53
The Built-in Short Test
Procedure 6.4. Running the short test
1.
Turn the mode selector to SETUP/TEST.
Figure 6.11. Mode selector in SETUP/TEST
2.
Push the SHORT TEST button. Now you'll be asked which test mode to run:
Figure 6.12. Select test frequency
If you just want to view the voltage and current without following up with a field test, it doesn't matter
which you choose. But if you want to follow up with the current tracker or a clampmeter in the field,
select the setting for the tool you are going to use.
3.
Inspect the measurements in the display:
• If the two-wire is ok, the voltage will be relatively high (34-35V), and the current relatively low. In a
test setup this is what it looked like:
Figure 6.13. No short on two-wire path
The voltage is 35V and the current is 9mA.
In addition, the line activity indicator LEDs will be constantly lit.
• If there is a short somewhere in the system, the voltage/current relationship is reversed, and you'll
see a relatively high current and lower voltage instead:
54
202-230-0001/D
Increasing Decoder Power
Figure 6.14. Short on two-wire
Now the voltage is 0V and the current is 229mA - something is causing the system to "eat up" a lot
of current.
In addition, if the voltage is very low, the line activity indicator LEDs will both be out.
If you find that there's a short in your system, you should try to locate it, using a clampmeter or the current
tracker that ships with your RKD. Check out Section 7.4, “When there is a Short Circuit in the Field” [page 65]
instructions on doing this.
6.5. Increasing Decoder Power
In case the decoders are not giving out enough power for the valves or pumps to pull open, it is possible to
increase the power.
Important
Increasing the power means that there's no guarantee the RKD will operate as efficiently as
when running in with factory settings.
Procedure 6.5. Adjusting decoder power
1.
Turn the mode selector to ADVANCED mode:
Figure 6.15. Mode selector in ADVANCED mode
2.
Scroll down to 9. Power Adjustment and push the ENTER button. Now you'll be warned about the
consequences of increasing decoder power:
202-230-0001/D
55
Increasing Decoder Power
Figure 6.16. Increasing Decoder Power Warning
Push the ENTER button to proceed - now you'll see the following screen:
Figure 6.17. Selecting Valve Type for Power Adjustment
3.
Scroll to the decoder type you wish to adjust the power for (normal valve, master valve or booster pump),
push the ENTER button and select between these four settings:
• Highest power
• Higher power
• High power
• Normal power
When changing the power setting you can see how may stations can be run at the same time. For
example, when changing the power setting for regular valves to "Highest Power" you can run a maximum
of five simultaneous valves:
Figure 6.18. Setting Valve Power to Maximum
56
202-230-0001/D
Chapter 7. Troubleshooting in the Field
You discover problems with the installation in the field in a number of ways. The following four sections walk
you through how to deal with the most frequent scenarios.
7.1. Checking Power and Current Readings
In a healthy system you should see power and current readings for the two-wire path along these lines:
Idling
Heavy Usage (many decoders
running)
Power
33-35V
31-34V
Current
0-3mA (no decoders attached)
600-650mA
Tip
See Section 6.4, “Testing the Two-wire Path” [page 52] for instructions on how to do power and
current readings in the display of the RKD.
To get a more precise idea of how your current reading should be, you should add the standby usage and
the usage for any running units, using these rules of thumb:
Standby Usage
When idling, all connected decoders will consume around 0.5mA each (this includes master valves and
booster pumps.)
So, for example, 20 connected decoders will consume around 8-13mA and 100 units will consume some
80-130mA. Add to this the standby usage of any other devices connected to the two-wire.
Active Decoders
When active, any decoder, controlling a valve, master valve or booster pump, will consume around
25mA.
This means that when running just one decoder, a master valve and a booster pump on a system with
100 connected units, you may use around 155-205mA.
Note
These numbers are valid for an running with normal power settings - if you change the power
settings as described in Section 6.5, “Increasing Decoder Power” [page 55], the numbers will
change - the higher power settings, the higher current readings.
Here are a couple of practical scenarios and how to deal with them:
If the power reading is below 31V
The field installation is consuming so much power that the RKD has lowered the power on the two-wire,
and you should go locate the problem in the field (Section 7.4, “When there is a Short Circuit in the
Field” [page 65].)
202-230-0001/D
57
Checking Power and Current
Readings
Note
The current reading can be "normal" in this situation (600-650mA or lower) - this is one of
the RKD's safety features.
If the power reading is between 31V and 35V when no stations are running
In this range you must inspect the current to estimate the health of your system.
58
202-230-0001/D
Problems on the Two-wire
Table 7.1. Scenarios with power readings between 31V and 35V
Current
When does your
system fall in this
category?
With 100 connected
State
decoders your current
will be:
Low current
If the current is less than Less than 45mA
(number of decoders *
0.5mA - 5mA)
One or more decoders
are not connected
correctly. Try running the
test program (See
Section 6.1.1, “Running
the "Electrical
Test"” [page 49]).
Normal current
If the current is less than Between 45 and 60mA
(number of decoders *
0.5mA + 10mA)
Everything is fine - the
system is healthy.
High current
If the current is less than Between 60mA and
(number of decoders * 100mA
0.5mA + 50mA)
Problems somewhere on
the two-wire is causing a
10-50mA excess
consumption. This is no
more than the RKD can
handle, but you could be
looking at problems that
dramatically increase
under more moist
conditions - see
Section 7.1.1, “Problems
on the
Two-wire” [page 59].
Excessive current
If the current is higher
than (number of
decoders * 0.5mA +
50mA)
This is a risky situation
that can interfere with the
functionality of the RKD,
and you should locate
the problem in the field
right away. It will typically
be a bad connection or a
cable left open-ended in
the field. Troubleshooting
is identical to when
locating short circuits in
the field (Section 7.4,
“When there is a Short
Circuit in the
Field” [page 65]), but the
current will not be as
excessive as when a
short occurs.
Higher than 100mA
7.1.1. Problems on the Two-wire
It only takes seemingly innocent cracks in the cable insulation or connections to cause big problems: If you
remove the insulation on just 1/3 of an inch on a AWG14 cable (both wires) and immerse the cable in water
202-230-0001/D
59
Dealing with Unstable Decoders
the current can increase by 30mA. If you immerse into salt water the current increases by as much as
170mA.
Obviously this means that just a handful of minor cracks in the insulation can add up to a substantial increase
in the current reading, and the problem in detecting these kinds of problems is that they seem to come and
go, depending on how moist the soil is.
7.2. Dealing with Unstable Decoders
If a decoder seems to fail randomly, typical reasons include:
• The faulty decoder is not connected and placed in the field according to the instructions in Chapter 8,
Managing Decoders [page 73].
• You have increased the power used to activate decoders (see Section 6.5, “Increasing Decoder
Power” [page 55].) This means that you need to lower the number of simultaneously running decoder, or
all decoders might not work as intended, giving a seemingly random problem depending on which schedule
you are running.
• There are leaks in the insulation on your two-wire - when the soil is dry everything works just fine, but
when it gets more moist, decoders seem to fall out randomly. See the previous section (Section 7.1,
“Checking Power and Current Readings” [page 57]) for more details.
• In case you have a loop installation, problems may occur if the loop is broken, as the resistance between
a decoder and the RKD can increase, pushing up the power consumption:
Note
We do not recommend using loop installations since troubleshooting these can be a complex
process.
Normal Loop
60
Loop Broken
202-230-0001/D
Dealing with Failing Decoders
Normal Loop
Loop Broken
The resistance between the decoder and the RKD The resistance between the decoder and the RKD
is 0.75*R
is 3*R
To find out whether your loop is broken, follow this procedure:
1.
Open the loop in one end - if the loop goes all the way back to the RKD, just detach one of the
two-wires on the controller.
2.
Perform an "electrical test" as described in Section 6.1.1, “Running the "Electrical Test"” [page 49].
This will activate each in turn - if you see decoders failing, chances are that they are on a stretch of
the two-wire that has been orphaned by a break of the loop in the field.
3.
If everything is still OK, close the loop and open it in the other (detach the opposite two-wire of the
one you just tried) end and re-run the test.
If the same decoders keep failing, you should look at the instructions in the following section, Section 7.3,
“Dealing with Failing Decoders” [page 61].
7.3. Dealing with Failing Decoders
More often than not, what seems to be a faulty decoder is really a problem on the two-wire between the
decoder and the RKD, since this is the most vulnerable part of your system.
The approach to troubleshooting failing decoders vary a bit depending on whether you just have one, or
several failures - the following two sections talk about each scenario.
7.3.1. A Single Decoder Fails
If the failing decoder has just been installed, did you remember to assign an ID to it? See Section 4.2,
“Configuring Field Decoders” [page 21] for instructions.
If the failing decoder has been known to work, perform the electrical test (Section 6.1.1, “Running the
"Electrical Test"” [page 49]) on the decoder in question and follow these guidelines:
If there's little or no reaction from the decoder
1. Put the RKD in "Short Mode" (see Section 6.4.1,
“The Built-in Short Test” [page 53]), go to the
decoder in the field and perform these tests:
• Check wires and connections between the
two-wire, the decoder and the solenoid (See
Figure 7.1, “Checking Connections” [page 63].)
• Short circuit the two-wire at the decoder and use
either the Current Tracker or a clampmeter to
check if power is still OK - if this is the case, the
problem is in the decoder or solenoid, and not
on the two-wire between the decoder and the
RKD (See Figure 7.2, “Testing the path to a
decoder” [page 63].)
• Detach the solenoid and measure the resistance
of the solenoid itself. Compare this to another
202-230-0001/D
61
A Single Decoder Fails
solenoid of the same type (the resistance is
typically 20-60 ohms.) If the resistance is
significantly higher, try replacing it.
Note
Some solenoids come with a diode
on one of the wires. This is to
indicate that the solenoid is
polarized and the connection of the
wires to the solenoid is significant.
Thus you can try to swap the two
wires around and see if it makes a
difference.
Others will have red and black
wires, indicating the polarity - black
is minus, red is plus.
• Take the decoder to the controller and perform
a direct test before replacing it (see
Section 4.2.1, “Testing a Decoder” [page 25] for
instructions.)
If the decoder fails with to high power reading
• Check the two-wire between the solenoid and the
decoder for cracks in the insulation or bad
connections.
• Detach the solenoid from the decoder and measure
the resistance of the solenoid itself. If the resistance
less than expected, it might be damaged by
lightning or it might have a leak. Try replacing the
solenoid.
• Take the decoder to the controller and perform a
direct test before replacing it (see Section 4.2.1,
“Testing a Decoder” [page 25] for instructions.)
62
202-230-0001/D
Several Decoders Fail
Figure 7.1. Checking Connections
Figure 7.2. Testing the path to a decoder
7.3.2. Several Decoders Fail
Here is a checklist if multiple decoders fail:
• If two decoders are configured with identical IDs (see Section 4.2, “Configuring Field Decoders” [page 21],)
you can get a rather confusing behavior in the system. Imagine the following scenario:
• We consider two decoders, M and N.
• You have configured decoder M to have the ID "ST20".
• Decoder N should have been called "ST21", but by mistake you configured this to be "ST20" as well.
When you:
The following happens:
Because:
Try to activate "ST20"
M and/or N might fail to open.
Since both decoders think they're
"ST20", they'll both try to open. If
you're lucky, there's enough current
202-230-0001/D
63
Several Decoders Fail
When you:
The following happens:
Because:
on the two-wire to pull open both,
but depending on the current and
the resistance in the solenoids, one
or both can fail to open.
Try to activate "ST21"
Both M and N fail to open.
None of the decoders react to
"ST21" since they both think they
are "ST20."
• If you're dealing with a new installation, and the failing decoders seem to be spread randomly in the field,
you could be looking at solenoids with built-in diodes - on this type of solenoid it is significant which one
of the wires in the cables are connected to what (see Section 7.3.1, “A Single Decoder Fails” [page 61]
for more details.)
• If the failing decoders are located on the same dead end branch of your two-wire, chances are that the
connection to the branch is faulty. If all decoders from a point on a branch and outwards fail (decoders 9
and 10 in the illustration below), measure the connection to each decoder until you reach the point of
failure.
Figure 7.3. Checking a branch
If all connections seem ok, the two-wire itself might be damaged - things to look for along the two-wire:
• Any signs of digging in the ground? Wild animals and staff under equal suspicion here.
• Has any other kind of machinery been at work and unknowingly penetrated the two-wire?
• Check all transitions where the cable runs from underground to over ground, from soil to pipes etc.
64
202-230-0001/D
When there is a Short Circuit in the
Field
Important
If you replace a stretch of the two-wire, make sure to remove the old part completely, as the
old piece of cable might interfere with the current in the new cable.
7.4. When there is a Short Circuit in the Field
A "clean" short circuit in the field - direct connection between the two wires in the two-wire path with zero
Ohms resistance - will cause the RKD to put up the following warning:
Figure 7.4. Short notice
Note
In addition to this warning, you'll see that the line activity indicator is constantly lit instead of
blinking as it normally does. If the short is very severe the line activity indicator may stop working
all together (Check out Figure 3.3, “Controls on the RKD front plate” [page 14] if you don't
remember what the line activity indicator is.)
But you can't always be sure that the RKD will be able to detect a short circuit in the field - if the short is in
the far end of the cabling, the controller may just experience it as heavy usage. However, the current reading
will always reveal a short as the current will be significantly higher than normal (Could exceed the expected
value with 100mA or more.)
Typically a short circuit in the field is either a problem with the two-wire itself (cracks in the insulation, bad
connections etc.) or consequences of lightning striking the system, damaging decoders, solenoids or other
electronics attached to the two-wire.
Either way, you'll need either the Current Tracker that ships with the RKD, or a regular clampmeter (current
leakage meter). Both are good troubleshooting tools but have different strengths and weaknesses:
Strengths
Current Tracker
Weaknesses
• Free tool, ships with the RKD
• Requires an additional voltmeter
(a cheap piece of hardware,
• Can measure around the entire
though)
two-wire path or individual wires
in the cable
• No direct association between
readings on the controller and the
• Very sensitive when measuring
readings from the Current Tracker
individual wires
• Little sensitivity when measuring
around the entire two-wire path typically 50-100mA
202-230-0001/D
65
Using the Current Tracker
Strengths
Weaknesses
• Reading depends on the angle
between the Current Tracker and
the two-wire
• Other powered up cables can
affect the reading
• Optimized for 450Hz
troubleshooting mode
Clampmeter (current leakage
meter)
• Can only measure around
• Can not measure around the
individual wires in the two-wire
entire two-wire path
path.
• Relatively expensive (this is why
• Very accurate
a Current Tracker ships as an
alternative)
• Good association between
readings on the controller and • Optimized for 50-60Hz normal
the clampmeter
mode
• Very sensitive - will detect
changes in the range of 1mA
• Doesn't depend on being held in
the right angle
• Not sensitive to other power
cables in the surroundings
7.4.1. Using the Current Tracker
The current tracker is used to inspect the two-wire in the landscape in order to locate shorts. You need
physical access to the two-wire, or at least parts of it, since the current tracker measures directly on the
cable.
66
202-230-0001/D
Using the Current Tracker
Figure 7.5. Current tracker
To use the current tracker you need a voltmeter. The voltmeter must be able to measure up to 200 mV DC
- usually an inexpensive model from your local electric supply store is sufficient.
Procedure 7.1. Locating a short on the two-wire
1.
Follow the first two steps of Running the short test [page 54] and select "Current tracker. (450Hz)".
2.
Connect the current tracker to your voltmeter. Red line to red socket, black line to black socket.
3.
Expect to be measuring somewhere in the range 10-200 mV DC and set the voltmeter accordingly the closest higher setting. Typical settings are 100 or 200 mV.
4.
Now start measuring the two-wire from the controller and out. You measure the two-wire by placing the
cable between the two blades on the current tracker and checking the voltmeter. If the voltmeter shows
nothing, you've passed the point of the short.
Important
If the voltmeter shows nothing, make sure to try placing the blades of the current tracker
in different angles around the cable - the current tracker is direction aware and you need
to try at least a span of 90 degrees around the cable in order to be sure that there's no
signal available:
202-230-0001/D
67
Using a Clampmeter
Figure 7.6. Rotating the current tracker around the two-wire
Ideally, you should rotate the current tracker around the individual wires inside the two-wire - do this if
enough plastic is stripped off the two-wire.
Now you can work your way through the entire two-wire installation to locate the point where you can
no longer pick up the signal. Hereby you should be able to locate precisely where the short is at.
7.4.2. Using a Clampmeter
Instead of the current tracker that ships with the RKD you can use a clampmeter to locate a short.You need
physical access to the two-wire, or at least parts of it, since the clampmeter measures directly on the individual
wires in the cable.
Procedure 7.2. Using a clampmeter for short finding
1.
Follow the first two steps of Running the short test [page 54] and select "Clampmeter (50/60Hz)."
2.
Set the clampmeter to "50 Hz mode" or equivalent. Setting it to "Wide Range" or similar modes might
not work out.
3.
Now start measuring the two-wire from the controller and out. You measure the two-wire by placing the
clampmeter around one of the wires in the two-wire path. When the measurement on the clampmeter
is substantially lower than what you see in the controller display, you've passed the point of the short.
7.4.3. Locating the Short
Before trying to locate the short in your system, make sure you have the following:
• Current Tracker, clampmeter or both.
• An "as-built" drawing (or equivalent knowledge) of the cable layout for the two-wire path. Notably you
need to know of all branches and loops.
68
202-230-0001/D
Locating the Short
The overall rule of thumb when looking for a short is that the current will move from the controller directly
to the short and back. This means that you can "follow the current" and eventually be led to the short:
Figure 7.7. Faulty decoder
Note
If your installation loops back to the RKD you must open the loop, or you won't know which way
the current is running around the loop and troubleshooting will be almost impossible.
Note
We do not recommend using loop installations since troubleshooting these can be a complex
process.
Troubleshooting falls into three phases and the following three procedures explain how you should go about
locating the problem. Walking through each procedure in turn should ensure efficient troubleshooting: Phase
I: Checking for Problems at the Controller [page 69], Phase II: Locating a Faulty Branch in the Field [page 70],
and Phase III: Performing a "Binary Search" on a Faulty Branch [page 71].
Procedure 7.3. Phase I: Checking for Problems at the Controller
1.
Select which which type of probe (Current Tracker or clampmeter) you wish to use for troubleshooting.
See Section 6.4.1, “The Built-in Short Test” [page 53] for instructions.
2.
Measure the current at the point where the two-wire path is connected to the controller. Measure on
both wires in the two-wire path (and the entire two-wire if you're using the Current Tracker.) Note down
your readings as you'll use these for comparison if you need to locate a faulty branch in the field (Phase
II: Locating a Faulty Branch in the Field [page 70].)
• If one of the cables connected to the RKD loops back to the controller, you must open the loop before
measuring.
• If more than one non-looped cable is connected to the RKD, you can already now determine which
cable holds the short - it will be the one with the highest current reading.
Note
When measuring with the Current Tracker, readings on the entire two-wire are way lower
than when measuring on just one of the wires. Thus remember not to compare the two
different types of measurings.
202-230-0001/D
69
Locating the Short
• If more than one non-looped cable seem to hold a short, detach all of them and connect and fix one
cable at a time.
• If there is a significant difference between the reading on the two wires in a two-wire, the one wire
might have a leak to earth or to the chassis of the RKD.
3.
If all readings in the previous step seem OK, or maybe even a bit lower than expected, you could be
looking at at error in the controller itself. To find out if this is the case, detach all two-wire paths connected
to the controller and check the power and current reading: If it is around 32-35V and 0-3mA the controller
is OK - otherwise it is defect.
Procedure 7.4. Phase II: Locating a Faulty Branch in the Field
1.
Measure in Junction 1 (J1.)
• If you get no readings from either branch, the problem is on the part of the two-wire leading back to
the RKD - perform a binary search on this part of the cable (See Phase III: Performing a "Binary
Search" on a Faulty Branch [page 71] for instructions.)
• If your readings on one of the branches are the same as when measuring at the controller (This is
the first thing you do when troubleshooting the two-wire - see instructions in Phase I: Checking for
Problems at the Controller [page 69]) you move on further out one branch at a time, measuring in
every fork you meet (J2, J3, J4 etc.) until you locate the faulty branch.
70
202-230-0001/D
Locating the Short
Important
If you reach a branch that is looped back to the two-wire elsewhere, make sure to open
the loop before measuring, or you won't detect the faulty branch.
• If you have a decoder attached to the junction itself, make sure you measure on that as well, as the
decoder and not the two-wire could be the problem.
• If you get readings on both branches after the junction but they are significantly lower than at the
controller, you have problems on the two-wire on both the stretch from the controller to the junction,
and further out as well. Detach the junction and start by finding the problem on the stretch from the
controller - then attach the junction again and work on each branch.
2.
When you locate the faulty branch, move on and perform a binary search on the branch as explained
in Phase III: Performing a "Binary Search" on a Faulty Branch [page 71].
Procedure 7.5. Phase III: Performing a "Binary Search" on a Faulty Branch
A binary search can help you locate a problem on the two-wire in a structured manner. The concept of a
binary search is this: Find a point on the cable where you know for sure current is running. Find another
point where there is little or no current. Now measure in the middle between these two points. If you measure
current in the middle, you know for sure that there is no problem between the middle and the point where
you know current is running - the problem must be in the other half, and you can now repeat this approach
at the other half.
Looking at the graphic below we imagine that current is running at decoder 1but no current is running at
decoder 25. To start the binary search we measure in the middle, at point A:
1.
You measure in point A and find that the current is running. Now you know that the problem is somewhere
between decoder 12 and 25.
202-230-0001/D
71
Locating the Short
2.
You measure in point B and find no current. This means that you're in the "dead" half of the cable - the
problem is somewhere between decoder 12 and 19.
3.
You measure in point C and find that the current is running. The problem must be between decoder 15
and 19.
4.
You find no current in point D - the problem is narrowed down to between decoder 15 and 17 - just one
more reading will tell you for sure where the problem is.
5.
Since you find the current in E to be OK, the problem must be between decoder 16 and 17.
6.
If you don't want to replace the entire cable between decoders 16 and 17 (it might be a longer stretch,)
you can perform a new binary search on the cable itself, using either a clampmeter or the Current
Tracker.
72
202-230-0001/D
Chapter 8. Managing Decoders
Decoders for the RKD usually come in packs of ten units. Here's what you'll find in a standard package:
Figure 8.1. Contents of a decoder package
• 10 decoders, not configured.
• A pack of connectors.
• A pack of splice tubes.
• A permanent marker to write the decoder names on the decoders when you have configured them (See
Section 4.2, “Configuring Field Decoders” [page 21] for details on configuring decoders).
What you need to do with the decoders is to configure them, test them and connect them to the two-wire
and solenoids in the field.
Testing and configuration is explained in Section 4.2, “Configuring Field Decoders” [page 21] and
Section 4.2.1, “Testing a Decoder” [page 25] - the rest is explained here.
8.1. Connecting Decoders to the Two-wire Line
Proper connections between the two-wire and the decoders in the field are crucial to keep your system
running, so please make sure to follow this procedure thoroughly when connecting decoders:
Procedure 8.1. Hooking a decoder up to the two-wire
1.
Have all accessories ready before connecting a decoder:
202-230-0001/D
73
Connecting Decoders to the
Two-wire Line
• 1 decoder.
• 2 connectors.
• 2 splice tubes.
• Wire stripper.
2.
Cut the two-wire in two where you want to connect the decoder, and strip all four loose ends of the
two-wire. Strip approximately eight inches off the outer cable cover and approximately half an inch off
the inner cover for the best fit in the splice tubes:
Figure 8.2. Stripped two-wire
3.
Use a connector to connect the decoder's blue wires to the black and red stubs of the two-wire. Group
two black with one blue wire. Group two red with the other blue wire:
Figure 8.3. Connect decoder wires.
74
202-230-0001/D
Placing Decoders in the Landscape
4.
Now put the connectors into separate splice tubes and close the tubes firmly. You must push the
connectors all the way to the bottom of the gel in the splice tubes to ensure water proof connections:
Figure 8.4. Putting connectors into splice tubes.
Now you'll use connectors and splice tubes to connect the white wires from the decoder to the solenoid you
want the decoder to activate.
8.2. Placing Decoders in the Landscape
Assuming that your decoders are connected properly to the two-wire using the connectors and splice tubes
that come with your decoders, you can place them pretty much anywhere. Proper made connections are
water proof.
However, when it comes to decoders, dry is better than wet and easily accessible is better then buried in
the ground, so putting the splices in a valve box is by far recommended.
202-230-0001/D
75
76
Chapter 9. Advanced Features
9.1. Intelliset
With the Intelliset feature set you can allow external evapotranspiration (ET) devices to control your irrigation.
Intelliset comes in a couple of flavors:
• Simple ET which allows an external weather station to tell the RKD if it should irrigate today or not.
• Complex ET control which allows the RKD to adjust the irrigation level based on ET data from a weather
station - exact amount of rain and environmental conditions.
• Complex ET control based on historical ET data: you enter the historical ET correction figures for the
entire year and use these to adjust your irrigation throughout the year. You can also use the historical
data as a fall-back mechanism for a connected weather station.
All methods ensure more efficient water consumption than you would see from using a "flat" irrigation scheme
throughout the year.
You can read about Intelliset in Appendix B, Adding an ET Device [page 85].
9.2. FloGuard
FloGuard is the RKD safety system that constantly monitors the controller for potential problems and raises
alarms when needed.
FloGuard will detect things like pipe leaks, faulty decoders, malfunctioning pumps and many other things
that could otherwise go unnoticed and damage your system.
You will also get notifications of "normal" alarms like rain alarms, ET input, short curcuits and any alarms
stemming from your own auxiliary input devices.
You can read about FloGuard in Section 5.3, “Alarms” [page 43].
9.3. FloStack
The FloStack feature set helps you plan and control the flow in your system.
By entering an expected flow for each station and a maximum system flow capacity you can ensure that
the RKD will not try to start more valves than the system can feed.
An extremely handy feature is the "Learn Flow" feature that automatically detects the flow of each station
by running all stations in turn and comparing with measurements from a flow sensor.
You can read about FloStack in Appendix C, Adding a Flow Sensor [page 99] and Appendix E, Using Simple
Flow Management [page 115].
9.4. Mist Manager
With the Mist Manager you can add an extra perspective on running irrigation schedules. Instead of a
program just running one station at a time for a fixed duration, you can break each run into multiple cycles.
202-230-0001/D
77
Mist Manager
Instead of telling the RKD to run a number of stations for three minutes each, you can tell it to run each
station in 18 second time slices 10 times with breaks in between.This adds up to the same water consumption,
but allows the irrigation to sink in between the cycles.
Longer irrigation slots in misting is typically referred to as "Cycle & Soak".
You can read all about the Mist Manager in Appendix G, Advanced Irrigation: Misting, Cycle & Soak [page 119].
78
202-230-0001/D
Appendix A. Adding a Rain Sensor
The RKD can accept input from an external rain sensor and react in three ways:
• Simply stop irrigating if it rains at all.
• Stop irrigating if the rain level exceeds a certain threshold.
• Adjust irrigation based on the amount of rain.
The following procedure walks you through configuring the controller for rain sensor input - it is identical to
parts of the procedure for ET(read more in Configuring ET Input [page 91]):
Procedure A.1. Configuring for a Rain Sensor
1.
Before moving on, make sure you have connected the rain sensor as described in Section 2.2.2.2,
“Connecting a Rain Sensor” [page 11].
2.
Turn the mode selector to SETUP/TEST
Figure A.1. Mode selector in SETUP/TEST
Now the display looks like this:
Figure A.2. Display message on switch to SETUP/TEST mode
3.
Push the SENSORS button. Now you'll see the following display:
202-230-0001/D
79
Figure A.3. Sensor setup menu
4.
Use the item selectors to select 2. Rain and push the ENTER button.
Now the display looks like this:
Figure A.4. Selecting the rain sensor input
5.
Now you can choose between four settings:
Rain gauge (Pulses)
If your rain sensor provides dynamic data in the sense that it sends a pulse for each unit of rain it
detects, select Pulses.
Rain contact (N/O or N/C)
If your rain sensor simply tells the controller whether to irrigate or not (if it's raining or not), you need
to tell the controller if the input is normally open or closed. Whenever the device is in the opposite
mode, the controller will hold its irrigation.
Disabled
Don't use the Rain input.
Use the item selectors to locate the setting you want and if you chose anything but Rain gauge (Pulses),
push the ENTER button to save your selection and the SENSORS button to exit sensor configuration.
If you do chose Rain gauge (Pulses), you need to tell the controller how many inches of rain each
pulse corresponds, so please continue to the next step.
6.
80
Turn the mode selector to ADVANCED
202-230-0001/D
Figure A.5. Mode selector in ADVANCED
Now the display looks like this:
Figure A.6. Display message on switch to ADVANCED mode
7.
Select 4. IntelliSet. Now the display will look like this:
Figure A.7. Intelliset™ Menu
8.
Select 6. Device Setup. Now the display will look like this:
Figure A.8. Intelliset™ Device Setup Menu
9.
Select 2. ET/Rain Setup and then 2. ET and Rain Inch/Pulse settings. Now you'll see something
like this:
202-230-0001/D
81
Setting 10 Minute and Hourly
Maximum Rain
Figure A.9. ET and Rain inch per pulse settings
10. Use the item selectors to set your values and push the ENTER button to save your settings.
A.1. Setting 10 Minute and Hourly Maximum Rain
The RKD allows for two precautions when you experience rain:
• You can set a 10 minutes maximum value. If this value is exceeded during any 10 minute period any
running stations will be halted, running programs will not be allowed to start new stations, and the controller
will raise a rain alarm.
Note
As long as the 10 minute maximum is exceeded, rain measurement is suspended, meaning
that if you run any programs in ET corrected mode, the rain that has fallen during this period
will not be subtracted from the ET figure before adjusting tomorrow's ET budget.
• If it rains intensively for more than an hour you may get so much water that the soil can not benefit from
all of it - the excess water will simply run off the surface. So if you run programs in ET corrected mode,
the controller won't subtract all of the rain from tomorrow's ET figure - it will "cut off" the amount of rain to
subtract at the hourly maximum.
Example: If the hourly maximum is 0,02" and it rains 0,03" per hour for three hours, only 0,06" and not
0,09" will be subtracted from tomorrow's ET budget.
You can read a lot more about ET in Section B.1, “How ET Works with the RKD” [page 85].
Procedure A.2. Setting max. values for 10 Minute and Hourly Rain
1.
Turn the mode selector to ADVANCED
Figure A.10. Mode selector in ADVANCED
Now the display looks like this:
82
202-230-0001/D
Setting 10 Minute and Hourly
Maximum Rain
Figure A.11. Display message on switch to ADVANCED mode
2.
Select 4. IntelliSet. Now the display will look like this:
Figure A.12. Intelliset™ Menu
3.
Select 3. Max Hourly Rain and Rate of Rain from the menu and push the ENTER button. Now you'll
see the following screen:
Figure A.13. Max. Rain Settings
Note
Setting a value to zero is the same as disabling the feature.
4.
Use the item selectors to set the desired values and push the ENTER button to save your settings.
202-230-0001/D
83
84
Appendix B. Adding an ET Device
Evapotranspiration (ET) devices can help the RKD adjust irrigation based on weather conditions. You can
either let an ET device provide daily input on how the irrigation should be adjusted, or you can enter historic
ET data on how the weather usually behaves throughout the year and the controller will adjust its irrigation
accordingly.
Note
Historical ET data acts as "fall back" data for the controller if the communication with a connected
weather station should fail. Thus, you should enter historical ET data even if you are using a
weather stations.
B.1. How ET Works with the RKD
The RKD will receive ET data from an external weather station or from a historical ET report describing the
evaporation throughout the year. Combining this data with the input from a rain sensor and the expected
level of irrigation the controller can calculate exactly how much water to use for irrigation.
Here's a rough breakdown of how ET works with the RKD - the items are in no particular order but should
all be considered when planning for ET adjusted irrigation:
• The controller needs a number of inputs in order to calculate the ET correction:
• Amount of water that have evaporated and transpired (The ET figure)
• Amount of rain fallen (The rain figure)
• How much water the soil can retain (Soil holding)
• How much water is used for irrigation under normal circumstances
• The ET and rain figures are provided by a weather station and a rain sensor - the rest is entered by you
at the controller (if you use historical ET data, this is entered at the controller as well).
• Every day at midnight the controller adds up the ET and rain input it has received and calculates how to
adjust tomorrow's "ET Budget" - the amount of water that the irrigation should provide.
Note
If you use a custom irrigation period, this happens at the start of your irrigation period, which
might not be midnight. Please refer to Appendix F, Defining a Custom Irrigation
Period [page 117] for details.
Let's look at two examples - one where evaporation has exceeded the fallen rain, and one that works the
other way around:
202-230-0001/D
85
How ET Works with the RKD
Example B.1. ET calculation with rain shortage
In this example the fallen rain has not been able to make up for the evaporated water.
• 0,8" of water has evaporated in the last 24 hours.
• 0,4" of rain has fallen in the last 24 hours.
• Your soil holding is set to 0,2".
Now we're short of 0,4" of water since this is the difference between evaporation and fallen rain. Thus the
ET Budget for tomorrow will be adjusted with 0,4".
Since we don't have any excess water, the soil holding value is irrelevant.
Example B.2. ET calculation with excess rain
In this example the relationship is reversed and we have more rain than evaporation - soil holding is the
same.
• 0,4" of water has evaporated in the last 24 hours.
• 0,8" of rain has fallen in the last 24 hours.
• Your soil holding is set to 0,2".
You would think that the ET budget for tomorrow should simply be adjusted with -0,4" because the excess
rain lets us irrigate 0,4" less. However, since the soil is only capable of holding 0,2" we can not benefit
from all of the fallen rain, but only 0,2" of the 0,4". Conclusion: tomorrow's ET budget will be adjusted with
-0,2", meaning that we will not need to irrigate at all. Unless, of course, the ET budget is still positive after
adjusting with -0.2".
In other words: we can never benefit more from fallen rain than the soil is capable of holding back. So
this example will end up with a -0,2" adjustment no matter how much more rain we have had.
• If you don't connect a weather station but let your programs run from historical ET data the controller
simply reads the historical data each midnight, subtracts the rain figure and adds the result to the ET
budget.
Note
If you use a custom irrigation period, this happens at the start of your irrigation period, which
might not be midnight. Please refer to Appendix F, Defining a Custom Irrigation
Period [page 117] for details.
Note
You can still use a local rain sensor to measure fallen rain and have this affect the ET
correction. Soil holding is still a limiting factor on how much we can benefit from fallen rain.
• When the RKD looks at the ET budget and has to figure out how long it has to irrigate, it looks at the "ET
Base" setting (see Step 3 [page 97] for instructions on how to set this value).
A bit of background is needed to understand how this works:
86
202-230-0001/D
How ET Works with the RKD
When the controller is irrigating normally, it is considered to be irrigating at a water budget of 100% (see
Section 4.3.4, “Adjusting Water Usage (Water Budget or ET)” [page 32] for details about water budgets).
In order for the ET figure to make sense to the controller, you need to tell it what the ET figure would be
when running at a 100% water budget, so, if the "ET Base" setting is 1", and today's ET budget says 0,8",
the controller will run at a water budget of 80 percent, meaning that programs will only run 80 percent of
their configured run time.
The tricky part is to make your irrigation programs fit into this model. If the "ET Base" setting is 1.00", you
have to make sure that all your programs are configured to emit exactly 1.00" every day. So you have to
look at how much water is emitted in each zone and adjust run time and number of start times accordingly.
Let's look at an example:
202-230-0001/D
87
How ET Works with the RKD
Example B.3. Fitting a program to ET based irrigation
We assume the following:
• Your "ET Base" setting is 1.00", and today your programs need to provide exactly 1,00" of water (for
simplicity).
• You have four stations you want to run in one program.
• ST1 has an application rate of 0,5" per hour (you'll have to look up these values in the data sheet for
the valve).
• ST2 has an application rate of 1,0" per hour.
• ST3 has an application rate of 1,5" per hour and irrigates an area that is mostly shadowed.
• ST4 has an application rate of 2,0" per hour and irrigates an area that is overly exposed to harsh sun
light.
• The program must run two times per day.
Since your have two start times per day each station should provide 0,50" of water per run. And then you
want to adjust ST3 and ST4 to the local conditions and let ST3 run a bit shorter and ST4 a bit longer.
Table B.1. Irrigation levels per run time
Station Name
Inches per hour
Run time (MM:SS) Water used per run Total daily water
usage
ST1
0,5"
60:00
0,500"
2 x 0,500 = 1,00"
ST2
1,0"
30:00
0,500"
2 x 0,500 = 1,00"
ST3
1,5"
15:00
0,375"
2 x 0,375 = 0,75"
ST4
2,0"
18:45
0,625"
2 x 0,625 = 1,25"
Now, let's say that yesterday it didn't rain a whole lot, so today's ET budget is 1,20" to make up for the
evaporated water. This is 20 percent more than the 1,00" we just tried, and the controller extends all run
times with 20 percent in order to arrive at 1.20":
Table B.2. ET corrected run times
Station Name
Inches per hour
Run time (MM:SS) Water used per run Total daily water
usage
ST1
0,5"
72:00
0,600"
2 x 0,500 = 1,20"
ST2
1,0"
36:00
0,600"
2 x 0,500 = 1,20"
ST3
1,5"
18:00
0,450"
2 x 0,375 = 0,90"
ST4
2,0"
22:30
0,750"
2 x 0,625 = 1,50"
• It is possible to set a minimum ET value that determines whether irrigation will take place at all (see Step
3 [page 97]). There can be several reasons to set a minimum ET value:
• If you only provide an insignificant amount of water, the effect is useless.
88
202-230-0001/D
Using Historical ET Data
• If you have rotating valves, maybe they won't make a complete rotation before their short run time is
over, and you'll get uneven irrigation
But isn't a bit of water better than no water at all? Yes, but take a look at this example to see why setting
a minimum ET can be a good idea:
Example B.4. How minimum ET value works
In this example we assume the following circumstances for the program in question:
• Today's ET budget has been adjusted to 0,4"
• The program has four start times
• The minimum ET value has been set to 0,2" because irrigating less than this gives you an uneven
irrigation and has little effect on the turf.
Each of the four start times can irrigate one fourth of the total ET budget, meaning 0,1". Here's how each
of the four start times will take place:
Table B.3. ET minimum value in effect
Start time #
Action
Explanation
1
No irrigation
The budget is 0,4" and there are four starts left,
meaning that each must provide 0,4/4 = 0,1" which
is below the 0,2" minimum.
2
No irrigation
The budget is 0,4" and there are three starts left,
meaning that each must provide 0,4/3 = 0,13" which
is below the 0,2" minimum.
3
Irrigation
The budget is 0,4" and there are two starts left,
meaning that each must provide 0,4/2 = 0,2" which
equals the 0,2" minimum.
Now the 0,2" that the program provided is subtracted
from the budget, so the budget is now 0,2".
4
Irrigation
The budget is 0,2" and there is one start left that
must provide 0,2/1 = 0,2" which equals the 0,2"
minimum.
Now the ET minimum value has ensured that we got two useful irrigations instead of four uneven irrigations.
The following two sections walk you through configuring the controller for both historical and weather station
ET correction.
B.2. Using Historical ET Data
If you don't have a local weather station you can use historical ET data to correct your irrigation instead.
Before you start this procedure you need to know how much water evaporates every month of the year on a daily basis. Meaning that for each month you'll get to enter a figure that will be used each day that
month.
202-230-0001/D
89
Using Historical ET Data
Procedure B.1. Configuring for Historical ET Data
1.
Turn the mode selector to ADVANCED
Figure B.1. Mode selector in ADVANCED
Now the display looks like this:
Figure B.2. Display message on switch to ADVANCED mode
2.
Select 4. IntelliSet. Now the display will look like this:
Figure B.3. Intelliset™ Menu
3.
Select 6. Device Setup. Now the display will look like this:
Figure B.4. Intelliset™ Device Setup Menu
4.
90
Select 1. ET Input Method. Now the display will look like this:
202-230-0001/D
Using a Connected Device (Weather
Station)
Figure B.5. Intelliset™ Device Input Method
5.
Select Historic and push the ENTER button.
6.
Push the CANCEL button once to go back to the main Intelliset™ menu.
7.
Select 5. Historic Data Settings in the menu and push the ENTER button. Now you'll see the following
screen:
Figure B.6. Entering Historic ET Data
8.
Use the item selectors to browse the months and set the daily ET adjustment for each.
9.
Push the CANCEL button to return to the main Intelliset™ menu.
B.3. Using a Connected Device (Weather Station)
Connecting an ET device on-site gives you the most accurate adjustments as the ET device will monitor
the exact weather condition right where irrigation will take place.
Important
If for some reason your weather stations fails and does not provide any input for the RKD the
controller will fall back on historical ET data and use these instead. The same goes in case of
a power failure - the controller will use the historical data for the part of today that lies before
the power failure, and then use real-time ET data from when it is powered up again.
Bottom line: you should always enter a set of historical ET data even when running with a
connected weather station.
Configuring for ET is a rather lengthy procedure with a lot of steps. Make sure you read Section B.1, “How
ET Works with the RKD” [page 85] before starting this procedure.
Procedure B.2. Configuring ET Input
1.
Before moving on, make sure you have connected the ET device as described in Section 2.2.2.1,
“Connecting an ET Device” [page 11].
202-230-0001/D
91
Using a Connected Device (Weather
Station)
2.
Turn the mode selector to ADVANCED
Figure B.7. Mode selector in ADVANCED
Now the display looks like this:
Figure B.8. Display message on switch to ADVANCED mode
3.
Select 4. IntelliSet. Now the display will look like this:
Figure B.9. Intelliset™ Menu
4.
Select 6. Device Setup. Now the display will look like this:
Figure B.10. Intelliset™ Device Setup Menu
5.
92
Select 1. ET Input Method. Now the display will look like this:
202-230-0001/D
Using a Connected Device (Weather
Station)
Figure B.11. Intelliset™ Device Input Method
6.
Use the item selectors to select Local Weather Station and push the ENTER button.
7.
Select 3. ET Base Setup from the menu and push the ENTER button. Now you'll see the following screen:
Figure B.12. ET Base Setup
8.
Now use the item selectors to determine how many inches of water a program will provide when running
at a 100% water budget. The controller needs this in order to re-calculate run times based on ET
corrections.
Push the ENTER button to save the value.
9.
Push the CANCEL button once to return to the main Intelliset™ menu.
10. Use the item selectors to select 2. ET Limits (Min and Max) and push the ENTER button. Now you'll
see the following screen:
Figure B.13. Minimum and maximum ET
11. Now use the item selectors to determine the two values and push ENTER to save your settings:
• Minimum ET: The ET figure must exceed this value in order for the controller to irrigate at all.
• Maximum ET: If the ET balance for a program exceeds this value, the program will only irrigate to that
limit, and the remaining water will be added to the ET figure for the following day.
12. Turn the mode selector to SETUP/TEST
202-230-0001/D
93
Using a Connected Device (Weather
Station)
Figure B.14. Mode selector in SETUP/TEST
Now the display looks like this:
Figure B.15. Display message on switch to SETUP/TEST mode
13. Push the SENSORS button. Now you'll see the following display:
Figure B.16. Sensor setup menu
14. Use the item selectors to select 1. ET and push the ENTER button.
Now the display looks like this:
Figure B.17. Selecting the ET sensor input
15. Now you can choose between four settings:
ET device (Pulses)
Select this if you use a connected ET device that provides dynamic ET data for the controller.
94
202-230-0001/D
Using a Connected Device (Weather
Station)
ET enabled (N/O or N/C)
If your ET device simply tells the controller whether to irrigate or not, you need to tell the controller
if the input is normally open (N/O) or normally closed (N/C). Whenever the device is then in the
opposite mode, the controller will hold its irrigation.
Disabled
Don't use the ET input.
Use the item selectors to locate the setting you want and if you chose anything but ET device (Pulses),
push the ENTER button to save your selection and the SENSORS button to exit sensor configuration.
If you do chose ET device (Pulses), you need to tell the controller how many inches to subtract from
its irrigation per pulse it receives - please proceed to the next step.
16. Turn the mode selector to ADVANCED
Figure B.18. Mode selector in ADVANCED
Now the display looks like this:
Figure B.19. Display message on switch to ADVANCED mode
17. Select 4. IntelliSet. Now the display will look like this:
Figure B.20. Intelliset™ Menu
18. Select 6. Device Setup. Now the display will look like this:
202-230-0001/D
95
Checking the Current Aggregated
ET and Rain
Figure B.21. Intelliset™ Device Setup Menu
19. Select 2. ET and Rain Inch/Pulse Settings. Now you'll see something like this:
Figure B.22. ET and Rain inch per pulse settings
20. Use the item selectors to set your values and push the ENTER button to save your settings.
B.4. Checking the Current Aggregated ET and Rain
Every now and then you might want to check out how much rain has fallen or how much water has evaporated
- the RKD has a screen that shows you the accumulated values in real time:
Procedure B.3. Reading current aggregated ET and Rain figures
1.
Turn the mode selector to ADVANCED
Figure B.23. Mode selector in ADVANCED
Now the display looks like this:
96
202-230-0001/D
Checking the Current Aggregated
ET and Rain
Figure B.24. Display message on switch to ADVANCED mode
2.
Select 4. IntelliSet. Now the display will look like this:
Figure B.25. Intelliset™ Menu
3.
Select 1. Current Accumulated ET and Rain from the menu and push the ENTER button. Now you'll see
the following screen:
Figure B.26. Accumulated ET and Rain figures
These figures will be reset at midnight when they'll be used to calculate tomorrow's ET budget. Please
see Section B.1, “How ET Works with the RKD” [page 85] for an in-depth explanation of how these
figures are used.
Note
If you use a custom irrigation period, this happens at the start of your irrigation period,
which might not be midnight. Please refer to Appendix F, Defining a Custom Irrigation
Period [page 117] for details.
Tip
If you are running in AUTO mode and want to check the current accumulated values, you
can simply push the WATER BUDGET button and you'll skip right to the above display. You
exit back by pushing the WATER BUDGET button again.
This way you don't have to exit AUTO mode to check the values.
202-230-0001/D
97
98
Appendix C. Adding a Flow Sensor
The RKD can measure the flow of water in your system and react on any unusual situation by quarantining
faulty stations, stacking programs that exceeds the expected flow or even cutting off the water supply
completely if it seems that you have a leak.
This works by letting a flow sensor measure the flow on the main pipe that feeds your system, and connecting
the flow sensor to the RKD.
There are four types of flow alarms - three of which can go off when irrigating and one that is only relevant
when no stations are running:
Table C.1. Alarm Types
Alarm Name
Description
What happens?
High Flow
Rises when your system is using more gallons per
minute than your defined threshold.
All running programs are
stacked.
Flow Deviation
Rises when your flow is deviating more than a certain All running stations are
percentage from the expected flow in any direction. halted.
Unscheduled Flow
Rises when there is a flow even when there shouldn't The Cut Off Valve (COV)
be (when no stations are running). This indicates a is activated for 17:59:50.
leak somewhere on the pipe.
Master Pump Failure
(MPF)
Rises when your flow is below a certain threshold.
The master pump or all
running programs are
stopped, depending on
your configuration (see
Section C.2.4, “Setting
Alarm Actions” [page 108])
Before you can take advantage of the features associated with flow sensor input you have to connect a flow
sensor (described in Section 2.2.2.3, “Connecting an Alarm or Flow Sensor” [page 12]) and configure a few
things in the controller. The following sections walk you through the process.
C.1. Enabling Flow Sensor Input (pulses)
By default flow sensor input is disabled in the RKD. To enable flow sensor input to accept pulses, follow this
procedure:
Note
You can enable flow sensor input even if you haven't attached a physical sensor yet - you just
won't get any reading from it.
Procedure C.1. Enabling flow sensor pulse input in the RKD
1.
Turn the mode selector to SETUP/TEST and push the SENSORS button. Now you'll get a scrollable menu
of options:
202-230-0001/D
99
Configuring for Flow Sensor Input
2.
Use the item selectors to select item number 3. Alarm/Flow and you'll see the default setting for sensor
setup, Flow (Pulses):
3.
Push the ENTER button to save your selection.
Now the RKD is ready to accept input from your flow sensor, but before you can use it to anything meaningful
you need to configure threshold values and actions - read more in the next section.
C.2. Configuring for Flow Sensor Input
In the previous section you enabled the RKD to accept flow sensor input - now you need to configure what
to do with it and this section walks you through the relevant procedures.
C.2.1. Selecting Sensor Type
By telling the RKD which type of sensor you are using, the controller can calibrate the input it receives from
the input terminals. The RKD knows the calibration profiles for five different sensor types - if you're not using
one of these you'll have to skip to the next procedure to perform a manual calibration for your sensor.
Using a known sensor type to enable a built-in profile:
Procedure C.2. Using a built-in calibration profile
1.
Turn the mode selector to ADVANCED, use the item selectors to scroll to item number 3. FloGuard, and
push the ENTER button.
Now you'll see this display:
2.
Select 4. Flow Sensor Setup, and push the ENTER button.
Now you'll see this display:
100
202-230-0001/D
Selecting Sensor Type
3.
Choose 1. Flow Sensor Type by pushing the ENTER button.
Now you'll see this display:
4.
Use the item selectors to select one of the five built-in profiles:
• FS-100
• FS-150
• FS-200
• FS-300
• FS-400
5.
Push the ENTER button to save your selection.
If your sensor doesn't fit any of the built-in profiles you have to enter your own manually:
Procedure C.3. Using a custom calibration profile
1.
Turn the mode selector to ADVANCED, use the item selectors to scroll to item number 3. FloGuard, and
push the ENTER button.
Now you'll see this display:
2.
Select 4. Flow Sensor Setup, and push the ENTER button.
Now you'll see this display:
202-230-0001/D
101
Setting the Flow Sensor Adjustment
3.
Use the item selectors to locate the Custom option and select it by pressing the ENTER button. Now you'll
see the calibration screen:
Note
A bit of background on how calibration affects the calculated flow:
The RKD needs to know the "K factor" and "Offset" values of your sensor, as the actual
flow will be calculated from this formula:
ActualFlow = K * (Pulses + Offset)
About the two values you need to enter:
• The "Offset" value is to correct the input from your sensor.
• The "K" value can be looked up in the data sheet for your sensor.
4.
Use the item selectors to enter your values and push the ENTER button to save your settings.
C.2.2. Setting the Flow Sensor Adjustment
If you want to adjust the overall effect of your flow sensor, you can use the sensor adjustment to multiply
the values from your sensor with anything between 0.00 and 9.99.
This comes in handy if you have a standard sensor that behaves slightly different than the built-in profile
suggests.
Procedure C.4. Adjusting the flow sensor input
1.
Turn the mode selector to ADVANCED, use the item selectors to scroll to item number 3. FloGuard, and
push the ENTER button.
Now you'll see this display:
102
202-230-0001/D
Setting Alarm Thresholds
2.
Select 4. Flow Sensor Setup, and push the ENTER button.
Now you'll see this display:
3.
Choose 2. Flow Sensor Adjustment. Now you'll see the screen for adjusting the flow sensor input:
4.
Use the item selectors to set your adjustment factor.
5.
Push the ENTER button to save your selection.
C.2.3. Setting Alarm Thresholds
For each of the alarms described in Table C.1, “Alarm Types” [page 99] you must set a threshold value,
and you also need to tell the controller for how long the alarm must be on before the controller should take
action.
Note
Setting a threshold to zero will disable the alarm.
This section describes how to enter these settings.
Procedure C.5. Setting the alarm reaction delay
1.
Turn the mode selector to ADVANCED, use the item selectors to scroll to item number 3. FloGuard, and
push the ENTER button.
Now you'll see this display:
202-230-0001/D
103
Setting Alarm Thresholds
2.
Choose 2. Alarm Thresholds and push the ENTER button.
Now you'll see the following display:
3.
Use the item selectors to select 1. Alarm Reaction Delay. Now you'll see the following display:
4.
Use the item selectors to set the reaction time in minutes. The controller won't raise any sensor alarms
until they have been on for this period.
Note
A Master Pump Failure (MPF) will ignore this setting - MPF alarms have a fixed delay of
30 seconds.
5.
Push the ENTER button to save your selection.
Procedure C.6. Setting the high flow threshold
1.
Turn the mode selector to ADVANCED, use the item selectors to scroll to item number 3. FloGuard, and
push the ENTER button.
Now you'll see this display:
2.
104
Choose 2. Alarm Thresholds and push the ENTER button.
202-230-0001/D
Setting Alarm Thresholds
Now you'll see the following display:
3.
Use the item selectors to select 2. High Flow. Now you'll see the following display:
4.
Use the item selectors to set the maximum flow in gallons per minute. If this flow is exceeded the
controller wil raise a high flow alarm.
If this alarm is activated all running programs will be halted, but the next program will be started normally
when it is scheduled. Of course, if the next program also generates a high flow alarm it is halted too.
5.
Push the ENTER button to save your selection.
Procedure C.7. Setting the Flow Deviation
1.
Turn the mode selector to ADVANCED, use the item selectors to scroll to item number 3. FloGuard, and
push the ENTER button.
Now you'll see this display:
2.
Choose 2. Alarm Thresholds and push the ENTER button.
Now you'll see the following display:
3.
Use the item selectors to select 3. Flow Deviation. Now you'll see the following display:
202-230-0001/D
105
Setting Alarm Thresholds
4.
Use the item selectors to set the deviation percentage from expected flow. The controller will raise an
alarm if the flow exceeds or falls short of the expected flow with this many percent.
If this alarm is activated all running stations will be halted and blacklisted (marked as failed). Any
programs that include failed stations will simply skip those stations and run the next one in the program.
To clear a station you need to mark it OK on the controller (see Managing station status [page 112] for
instructions)
You can read more about the expected flow in Section C.2.5, “Setting Expected Station Flow” [page 109].
5.
Push the ENTER button to save your selection.
Procedure C.8. Setting the unscheduled flow threshold
1.
Turn the mode selector to ADVANCED, use the item selectors to scroll to item number 3. FloGuard, and
push the ENTER button.
Now you'll see this display:
2.
Choose 2. Alarm Thresholds and push the ENTER button.
Now you'll see the following display:
3.
106
Use the item selectors to select 4. Unscheduled Flow. Now you'll see the following display:
202-230-0001/D
Setting Alarm Thresholds
4.
Use the item selectors to set the unscheduled flow limit in gallons per minute. This is an alarm that will
be raised only when no stations are running. You may have a minor natural leak of water in your pipes
but here you can set the maximum flow allowed when no stations are running.
If this alarm is activated the cut-off valve (COV) will be activated, and remain on for 999 minutes. It can
be turned off just like any other station (see Section 5.1.2, “Running Extra stations in Auto
Mode” [page 40] for instructions on stopping a station).
Important
In order for this alarm to take effect when raised, you must assign one of your stations to
control a cut-off valve (COV). See Assigning an identity to a decoder [page 23] for
instructions.
Warning
If you turn the mode selector away from AUTO or MANUAL mode the COV will be reset and
the water will no longer be cut off from your system.
5.
Push the ENTER button to save your selection.
Procedure C.9. Setting the master pump failure threshold
1.
Turn the mode selector to ADVANCED, use the item selectors to scroll to item number 3. FloGuard, and
push the ENTER button.
Now you'll see this display:
2.
Choose 2. Alarm Thresholds and push the ENTER button.
Now you'll see the following display:
3.
Use the item selectors to select 5. Master Pump Failure. Now you'll see the following display:
202-230-0001/D
107
Setting Alarm Actions
4.
Use the item selectors to set the minimum flow that must be in your pipe if the master pump is working
correctly.
You can decide whether this alarm should result in all programs to be halted, or all pumps and master
valves should be turned off (see Section C.2.4, “Setting Alarm Actions” [page 108]). The action you
choose will be in effect until the next station gets activated (manually or by a program.)
5.
Push the ENTER button to save your selection.
C.2.4. Setting Alarm Actions
The only flow alarm for which you can decide the action is the master pump failure alarm - you get to decide
whether this should cause all programs to be halted or all pumps and master valves to be shut down.
Procedure C.10. Configuring alarm action for MPF
1.
Turn the mode selector to ADVANCED, use the item selectors to scroll to item number 3. FloGuard, and
push the ENTER button.
Now you'll see this display:
2.
Choose 3. Action Configuration. Now you'll see the following display:
3.
Use the item selectors to choose between:
• Pumps/MVs: All pumps and master valves will be shut down when an alarm goes off. The programs
will still be finished even if the pumps are turned off in order not to interrupt the irrigation schedule
since an MPF alarm will be cleared next time a program has to start.
• Programs: All running programs will be shut down when an alarm goes off.
4.
108
Push the ENTER button to save your selection.
202-230-0001/D
Setting Expected Station Flow
C.2.5. Setting Expected Station Flow
In order to be able to calculate when the current flow is deviating from the expected flow, the RKD needs
to know how much flow you expect each station to pull.
To teach the controller about the expected flow you can either enter a value for each station or run the
automated "learn flow" feature that will assess the flow for each station in turn.
Procedure C.11. Entering expected flow for a station
1.
Turn the mode selector to ADVANCED and select 2. FloStack.
Now you'll see the following display:
Figure C.1. FloStack Menu
2.
Scroll down and select 2. Expected Flow by pushing the ENTER button. Now you'll see a scrollable list
of stations and their expected flow in gallons per minute:
Figure C.2. Expected station flow menu
3.
Use the item selectors to locate the station you wish to configure and push the ENTER button.
4.
Now you can set the expected flow using the item selectors and save your setting by pushing ENTER
again.
If the above procedure seems to tedious there's an easier way - you can let the RKD asses the expected
flow for each station. If you choose this approach the controller will run all stations in turn for a fixed duration,
measure the flow for each of them and save the flow as the expected one.
Procedure C.12. Running the "learn flow" feature
1.
Turn the mode selector to ADVANCED and select 2. FloStack.
Now you'll see the following display:
202-230-0001/D
109
Viewing the Current Flow
Figure C.3. FloStack Menu
2.
Scroll down and select 3. Learn Flow by pushing the ENTER button. Now you'll see the following display:
Figure C.4. Learn flow dialog
3.
Use the item selectors (both up, down, right and left) to choose a station to start from and set the run
time for each station. All stations will be run for the same period of time.
The RKD measures the flow continuously while the station is running the "Learn Flow" feature but only
the last measurement is used. The last measurement is likely to be the most accurate one as the flow
will have stabilized after running for a few minutes.
4.
Push ENTER to start the test. Now you'll see the starting the test at the station you selected (ST1) and
running it for the selected duration (3 minutes):
Figure C.5. Running "Learn Flow"
5.
When a station is done running its measured flow will be stored as the expected flow for that station.
Pushing CANCEL at any time will abort the "learn flow" feature but the stations measured so far are still
saved. This means that you don't have to measure all stations in one sitting - simply re-run the "learn
flow" feature with a new "Start from" setting to finish what you may have been abrupted from earlier.
C.3. Viewing the Current Flow
Given that you have configured your flow sensor correctly, the RKD lets you see the real time flow directly
in the controller display:
110
202-230-0001/D
Inspecting and Toggling Station
Status
1.
Turn the mode selector to ADVANCED, use the item selectors to scroll to item number 3. FloGuard, and
push the ENTER button.
Now you'll see this display:
2.
Select 4. Flow Sensor Setup, and push the ENTER button.
Now you'll see this display:
3.
Select 3. Current Flow Pulses and GPM and you'll see the current system flow in both pulses per
second and gallons per minute:
Note
The RKD can measure correctly up to a flow of 250 pulses per second. If your flow exceeds
pulses per second you should use a sensor that has a higher "water amount per pulse" ratio.
However, a higher frequency is to prefer over a lower one, as it provides the most accurate
measuring, so in an ideal world your frequency closes in on 250 pulses per second without ever
exceeding it.
See Section C.2.1, “Selecting Sensor Type” [page 100] for instructions on how to configure your
flow sensor.
C.4. Inspecting and Toggling Station Status
Stations can be blacklisted if the controller suspects that they are faulty and cause deviations in the expected
flow (see for Setting the Flow Deviation [page 105] details). However, the controller might blacklist an innocent
station since all stations that are running when the deviation takes place are blacklisted. So, to enable these
stations again you need to toggle their status from Failed to OK.
202-230-0001/D
111
Inspecting and Toggling Station
Status
Tip
Since blacklisted stations are simply skipped when running programs that require them, marking
a stations as failed is an excellent way of taking a single station out of use without having to
redo the program all together.
This can be useful if you just need to check or replace the decoder in the field.
This procedure explains how you toggle station status:
Procedure C.13. Managing station status
1.
Turn the mode selector to ADVANCED, use the item selectors to scroll to item number 3. FloGuard, and
push the ENTER button.
Now you'll see this display:
2.
Select 1. Station Status by pushing the ENTER button. Now you'll see a scrollable list of stations and
their status - Failed or OK:
Figure C.6. Station status list menu
3.
If you wish to toggle the status of a station, locate it with the item selectors and push the ENTER button.
Tip
Instead of browsing through the entire list of stations you can use the STATION button to
browse only failed stations.
Using the item selectors again, you can toggle the station between OK and Failed states.
4.
112
Push the CANCEL button to exit the menu.
202-230-0001/D
Appendix D. Changing Station Run
Sequence
Normally stations in a program will be run in the order indicated by their station ID numbers (see Section 4.3,
“Configuring Irrigation Programs” [page 26] for details), but you can circumvent this by assigning sequence
numbers to stations instead.
The typical scenario if when you want to add a station to an existing installation - instead of this station
always being run as the last one due to its high ID number, you can "merge" it into the middle of the pack
by using sequence numbers.
Example D.1. Putting a new station in the middle of the run chain
Consider a scenario where you have 40 stations with ID numbers from 1 to 40 placed in the terrain. You
want to add number 41 but you would like it to be run after station 20 instead of in the end of a program
cycle. To achieve this you would alter the sequence number for ST41 to 21:
Normal run sequence
Run sequence after changing the sequence
number for ST41 to 21
ST1
ST1
ST2
ST2
ST3
ST3
...
...
ST20
ST20
ST21
ST41
ST22
ST21
...
...
ST39
ST38
ST40
ST39
ST41
ST40
If station run sequences are changed, this will show when you are assigning stations to a program - if you
changed the sequence like in the example above, scrolling through the station list you would see ST41
appear right after ST20 in the list.
Note
In all other places (decoder test, expected flow lists etc.) stations are listed according to station
ID and not to run sequence.
The following two procedures show you how to alter and reset station run sequences.
Procedure D.1. Changing the station run sequence
1.
Turn the mode selector to ADVANCED, use the item selectors to scroll to item number 7. Program Station
Run Sequence, and push the ENTER button.
202-230-0001/D
113
Now you'll see this display:
2.
Select 1. Edit and push the ENTER button.
Now you'll see this display:
3.
Use the item selectors to select the station you wish to re-arrange and change its sequence number.
4.
Push the ENTER button to save your sequences.
Procedure D.2. Resetting station run sequences
1.
Turn the mode selector to ADVANCED, use the item selectors to scroll to item number 7. Program Station
Run Sequence, and push the ENTER button.
Now you'll see this display:
2.
Select 2. Reset to factory default and push the ENTER button.
Now you'll see this display:
3.
114
Push the ENTER button to acknowledge that you're resetting the sequence numbers, or CANCEL to exit.
202-230-0001/D
Appendix E. Using Simple Flow
Management
The RKD allows for simple flow management by comparing the current flow to system capacity and preventing
too many stations to run at once.
E.1. Configuring for Flow Management
Setting up your system for flow management only involves two things:
1. Defining the expected flow for your stations as described in Section C.2.5, “Setting Expected Station
Flow” [page 109].
2. Set the maximum system capacity as described in Section E.3, “Setting the System Flow
Capacity” [page 115].
E.2. How the Flow Management Works
Whenever a station is about to start, the RKD will try to determine whether the system has sufficient capacity
to start the station by doing a little calculation. A station can be started if:
(Required Capacity + Capacity in Use) <= Total Capacity
In plain words: the capacity required by the station plus the capacity already used must not exceed the total
system capacity.
The required capacity and the capacity in use is determined from the station flow, whether entered or learned
(see Section C.2.5, “Setting Expected Station Flow” [page 109] for details).
If a station can not be started it will be queued in "pending" state. On the controller this will appear as
"Waiting", just as paused stations. However, pending stations have a higher priority than others next time
the RKD frees some capacity (This is known as the stacking mechanism)
There are a couple of things to keep in mind when using flow management:
• When running in AUTO mode, manually started stations will overrule the flow management and ignore
the higher priority of pending stations. Manually started programs will obey the flow management though.
• The entire concept of flow management is ignored when running in MANUAL mode.
• When pausing a program the RKD will release the capacity to flow management and thus the program
might go into "pending" state when resumed if the capacity is used up by other stations.
E.3. Setting the System Flow Capacity
If you tell the RKD about the flow capacity of your pipes, the controller can automatically queue up stations
that would exhaust the capacity by starting. Here's how you enter the flow capacity at the controller:
1.
Turn the mode selector to ADVANCED and select 2. FloStack.
Now you'll see the following display:
202-230-0001/D
115
Setting the System Flow Capacity
Figure E.1. FloStack Menu
2.
Select 1. System Flow Capacity and you'll see this display:
3.
Use the item selectors to set the system flow capacity and push the ENTER button to save your setting.
Important
Leaving the System Flow Capacity at zero GPM means that the setting won't be used to
correct which stations are started.
116
202-230-0001/D
Appendix F. Defining a Custom Irrigation
Period
You can change the standard irrigation window in the RKD that runs from 12:00 AM to 12:00 AM. This has
two effects:
1. The entire water cycle will start when your irrigation period starts. If this is different from 12:00 AM, please
be aware that:
• Programs will start running on the first start time after your irrigation period starts. This can potentially
lead to a bit of confusion where programs leap into days you wouldn't think they should be running, or
start running before they normally would.
Important
The irrigation period normally starts at midnight, but if you move the start into the PM
window, your period starts earlier. Moving the start into the AM window will start the period
later.
Example F.1. Skewed days with custom irrigation periods
Consider a program with four start times: , 02:00 AM, 05:00 AM, 06:00 PM and 11:00 PM that runs on
odd days.
If your irrigation period starts at 08:00 PM and runs to 08:00 PM, here's how the program could run:
Date
Start time
Action
September 2.
11:00 PM
Runs despite the even date - your
irrigation period has started earlier
than midnight.
September 3.
02:00 AM
Runs as expected.
September 3.
05:00 AM
Runs as expected.
September 3.
06:00 PM
Runs as expected.
September 3.
11:00 PM
Will not run despite the odd date
- your irrigation window has
closed.
...
...
...
• All ET calculations are based on the irrigation period, be it the standard one or your custom period.
2. You can define a "non-water" window by not letting the period span 24 hours. If you define the start to
06:00 PM and the end to 08:00 AM no programs or stations will be started between 08:00 AM and 06:00
PM.
Note
You can still run both stations and programs manually in the non-water window.
202-230-0001/D
117
Programs that try to start in the non-water window will spawn an alarm. And if a program is running when
the non-water window starts the program is halted and an alarm is raised. You can read more about
alarms in Section 5.3, “Alarms” [page 43].
Here is how you actually define the irrigation period at the controller:
Procedure F.1. Configuring the Irrigation Period
1.
Turn the mode selector to ADVANCED, use the item selectors to scroll to item number 5. Irrigation
Period, and push the ENTER button.
Now you'll see this display:
2.
118
Use the item selectors to set the start and end time and push the ENTER button to save your settings.
202-230-0001/D
Appendix G. Advanced Irrigation:
Misting, Cycle & Soak
The RKD lets you go beyond regular irrigation and build misting and "Cycle & Soak" programs.
Important
The basics are the same as when building a regular irrigation program, so make sure to read
Section 4.3, “Configuring Irrigation Programs” [page 26] and pay particular attention to
Section 4.3.3, “Setting Start Times” [page 30] before carrying on here.
G.1. How is This Different from Regular Programs?
Misting and "Cycle & Soak" programs are configured the same way as regular programs (see Section 4.3,
“Configuring Irrigation Programs” [page 26] for a walk-through), except for one point: The program start
times have a more elaborate configuration.
In addition to start time, you configure an end time and a cycle count for how often you want the program
repeated within this time frame. The controller will then "even out" the repeats within your time frame, leaving
identical breaks between them.
So, if the total run time for your program is ten minutes and you configure the program to run three times
between 10:00 AM and 11:00 AM, your program will run at 10:00, 10:25 and 10:50, leaving 15 minute breaks
at 10:10 and 10:35.
The terms "Misting" and "Cycle & Soak" refer to two variants of this concept:
• Misting: typically describes a program that runs its stations for a very short time - run times are in seconds.
• Cycle & Soak: typically describes a program that uses longer run times - measured in minutes.
Both will run a number of cycles per start, whereas a normal program will only run once per start.
G.1.1. When the RKD Alters Your Program
There are a number of scenarios where the RKD will reduce the number of repeats in a program start:
Program was paused
If a program has been paused the RKD will not aggregate the cycles that should have been run in the
pause - these cycles are just ignored and the program continues at the point it would be at had it not
been paused.
Maximum system capacity met
If a program tries to run a cycle when the maximum system capacity is reached, this cycle is just dropped.
ET adjustments
If ET adjustments have dictated that you can irrigate less then normally today, reducing the number of
cycles can be the outcome.
If the number of cycles are reduced, a Repeat alarm is raised. (see Section 5.3, “Alarms” [page 43] for
details)
202-230-0001/D
119
How to Configure for Misting or
Cycle & Soak
G.2. How to Configure for Misting or Cycle & Soak
A misting program will typically run a number of stations for just a few seconds at a time, and then add longer
breaks between the program start times.
Here's an example of a simple misting program:
Station
Run time
ST1
0:00:05
ST2
0:00:08
ST3
0:00:15
ST4
0:00:06
ST5
0:00:08
...
...
Note
Since the RKD will start stations every ten seconds you might experience short breaks between
starts in a misting program. For example you'll see short breaks of between five and two seconds
in the program above.
For run time over four minutes, the end time is aligned to ten second slots too, so for example
a run time of 0:05:13 will run for 0:05:20.
And here's a program that start at various frequencies in different time intervals:
120
202-230-0001/D
How to Configure for Misting or
Cycle & Soak
Table G.1. Full misting program example
Start #
Details
Irrigation will start @
1
Start time: 08:00 AM
• 08:00:00 AM
End time: 09:00 AM
• 08:25:00 AM
Count: 3
• 08:50:00 AM
Repeat duration: 10 minutes
2
3
Start time: 09:00 AM
• 09:00:00 AM
End time: 10:00 AM
• 09:16:40 AM
Count: 4
• 09:33:20 AM
Repeat duration: 10 minutes
• 09:50:00 AM
Start time: 10:00 AM
• 10:00:00 AM
End time: 11:00 AM
• 10:12:30 AM
Count: 5
• 10:25:00 AM
Repeat duration: 10 minutes
• 10:37:30 AM
• 10:50:00 AM
Finally, let's see how you go about creating a misting program on the controller - let's say you want to
configure the first start time in the example program above - here's how you would do it:
The first thing you need to do in order to use the misting features is to enable them:
Procedure G.1. Enabling Misting
1.
Turn the mode selector to ADVANCED, use the item selectors to scroll to item number 10. Mist Manager,
and push the ENTER button.
Now you'll see this display:
2.
Select 1. Ena/Dis Cycle and End Time.
Now you'll see this display:
202-230-0001/D
121
How to Configure for Misting or
Cycle & Soak
3.
Use the item selectors to select Enable and push the ENTER button to save your setting.
And then you're ready to configure the program:
Procedure G.2. Setting the Start Times With Count and End Time
1.
Create your program as explained in Section 4.3, “Configuring Irrigation Programs” [page 26], but when
you get to Section 4.3.3, “Setting Start Times” [page 30], swap that part out for the instructions in this
procedure instead.
2.
Use the item selectors to navigate to the program you wish to adjust the start times for and push the
START TIMES button.
Now you'll see the following display:
Figure G.1. Ready to select start time
3.
Use the item selectors to locate the one of the four runs you wish to set a start time for, and push the
ENTER button.
Now the cursor will jump to the right, letting you set the start time:
Figure G.2. Selecting a start time
4.
Use the item selectors to set the start time to 08:00 AM and push the right arrow to jump to the cycle
field (Cyc).
5.
Use the item selectors to set the count to four and push the right arrow to jump to the end time field
(End).
122
202-230-0001/D
Things to Keep in Mind
Note
As soon as you enter the End field, the controller will set the default end time to (total
run time * count) + start time = 08:04. You must extend the end time in order get the
breaks in between the four cycles:
Figure G.3. Default end time
If you cut the end time shorter, the Cyc field will automatically decrease in order to fit in the
cycles possible before the end time - you'll see it when you have saved the start time.
6.
Set the end time to 09:00 and push the ENTER button to save your settings - now the cycles will be evenly
spread out in the hour between 08:00 and 09:00.
Note
When running this program, the controller still considers the program to be running, even though
it is waiting between two cycles - here's what the display will look like right after the first cycle
in the first run:
Figure G.4. Soaking break
G.3. Things to Keep in Mind
When using misting or cycle & soak programs, there are a number of things to consider that don't apply to
regular programs:
• If you're using ET: Each cycle still obeys the water budget dictated by ET. This means that each cycle
might have to run for so long that the time frame for the start time doesn't have enough room to fit in all
the cycles. In this case the number of cycles is cut down adequately. The "cut out" irrigation is added to
tomorrow's ET figure.
• If you're using a maximum system capacity (see Appendix E, Using Simple Flow Management [page 115]
for details) a cycle might be unable to run if the maximum capacity is reached. If the program is ET
controlled, the "cut out" irrigation is added to tomorrow's ET figure.
202-230-0001/D
123
Things to Keep in Mind
• If you pause a misting program the cycles that should have taken place during the pause are dropped in
order to fit the total number of cycles in the program run time window. If the program is ET controlled, the
irrigation that is lost on this account is added to tomorrow's ET figure.
• You should ensure that flow limits or reaction delay is set to consider the "on/off" nature of misting programs
in order to avoid false alarms. Ideally you should use a separate pipe system without flow sensors for
misting programs. Please see Section C.2.3, “Setting Alarm Thresholds” [page 103] for details on alarm
configuration.
• The RKD can handle up to five station starts within ten seconds, so you should avoid starting more than
five stations at once, or you will start seeing alarms.
124
202-230-0001/D
Appendix H. RFA 200 Command
Reference
This is a list of valid commands you can send the RFA 200 from your radio to the RKD.
The OK and ERROR columns indicate how many beeps you will hear on OK and ERROR respectively.
Normal behavior is two beeps for OK and one beep for ERROR.
The Syntax line tells you how you should enter the commands on the RFA 200. The general rule is that an
instruction starts and ends with two pound signs (#,) and each parameter is separated by one pound sign.
Important
Unfinished commands can be cancelled by pressing pound, star: #*
Once you have finished a command by pressing the pound key twice, you can no longer cancel
the command.
If you enter a command that the does not understand, you will hear one error beep.
H.1. System Commands
Syntax:##Command##
Table H.1. Command Reference
Command
Action
OK
ERROR
00
Stop everything
2
1
10
Stop all schedules
2
1
11
Stop all decoders
2
1
H.2. Decoder Commands
Syntax:##Command#Decoder#Time##
Table H.2. Command Reference
Command
Decoder
Time
Action
OK
ERROR
21
1-60
1-999
Activate
decoder
2
1
22
1-60
0
Deactivate
decoder
2
1
H.3. Schedule Commands
Syntax:##Command##Schedule##
202-230-0001/D
125
Schedule Commands
Table H.3. Command Reference
Command
Schedule
Action
OK
ERROR
31
1-4
Activate schedule
2
1
32
1-4
Deactivate schedule 2
1
33
0, 1-4
0: pause all
2
1
2
1
1-4: pause schedule
34
0, 1-4
0: Resume all
1-4: Resume
schedule
126
202-230-0001/D
Glossary
Cable
Two wires surrounded by insulation.
Two-wire
Synonym for a cable.
Wire
An individual copper wire.
202-230-0001/D
127
128