1
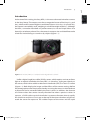
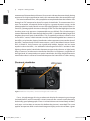
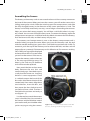
1
2
Chapter 1: Getting Started
Chapter 1: Getting Started
01_Sony NEX7_cz5.indd 2
10/17/12 5:21 PM
Introduction
3
1
Introduction
At the time of this writing, the Sony NEX-7 is the most advanced mirrorless camera
in the Sony lineup. The camera uses the 24-megapixel sensor of the Sony A77 and
A65, which makes it one of highest-resolution cameras in its class. In spite of this,
the camera is remarkably small, weighing in at half the weight of the A77. Although
the NEX-7 cannot be described as a pocket camera, its size and shape allows it to
be easily carried everywhere. Plus, the camera’s compact size and sleek lines make
it look less intimidating to a camera-shy subject (figure 1-1).
Figure 1-1: The Sony NEX-7 is a compact interchangeable lens camera
Unlike a digital single-lens reflex (DSLR) camera, which requires a mirror to direct
light to an optical viewfinder, the Sony NEX-7 is mirrorless. Light goes directly to
the sensor, which drives either an electronic viewfinder (EVF) or a rear LCD screen
(figure 1-2). Both display the image and the effects of the camera settings before
the photographer takes the picture, thereby ensuring that errors in white balance
or exposure can be corrected before the shot is taken. In addition, the absence
of a mirror makes the camera virtually vibration free when a picture is taken. In
contrast, a DSLR with an optical viewfinder is prone to vibration when it rapidly
lifts the mirror and slams it to a stop at the top of the mirror chamber so light can
reach the sensor for exposure. The sudden impact of the mirror and the rapid
01_Sony NEX7_cz5.indd 3
10/17/12 5:21 PM
1
4
Chapter 1: Getting Started
movement of the mechanical shutter’s first curtain vibrate the camera body during
exposure. For high-magnification work, this movement blurs the recorded image.
On some Internet forums, a few people have complained about the inferior view
through an EVF compared to that of an optical viewfinder. To some extent this is
true. For example, the optical finder image has a greater dynamic range, so the
photographer can study details in areas of bright highlights and dark shadows. In
contrast, a photographer who views through an EVF can see the highlights, but the
shadowy areas may appear as impenetrable masses of black. This disadvantage is
counter balanced by the view through the Sony NEX-7’s viewfinder being larger and
brighter than most optical viewfinders. This is especially evident in cameras that
use an APS-C sensor, which includes virtually all interchangeable lens cameras in
the NEX-7 price bracket. Optical viewfinders whose apparent size matches that of
the NEX-7 are found only in full-frame cameras, such as the Nikon D800 or Canon
EOS 5D Mark III. Such cameras are significantly bulkier, heavier, and are more
expensive than the NEX-7. An additional advantage of the EVF is evident in dim
lighting where optical viewfinders become progressively dimmer as light levels
drop. In contrast, an electronic viewfinder maintains its brightness, regardless of
the light level. As compared to an optical viewfinder, the large, bright electronic
viewfinder makes it easier to frame and compose the scene even in a dim setting.
Figure 1-2: Back of Sony NEX-7 camera showing the two viewfinders
For us, the advantage of using an electronic display for composing our image
(on both the EVF and LCD monitor) is that it increases our success rate in obtaining
technically good photographs. Errors in white balance are immediately evident,
and steps can be taken to correct this before the picture is recorded. The same
applies to exposure. With a real-time histogram display and a view of how a given
01_Sony NEX7_cz5.indd 4
10/17/12 5:21 PM
Introduction
5
1
exposure records the subject, it is a simple matter to finely adjust the aperture or
shutter speed for the best exposure. Finally, the electronic displays can provide a
more precise metric for focusing. Because you can selectively enlarge portions of
the image on both the EVF and LCD screens, the increased magnification ensures
that you are precisely focused on your subject. This is especially critical for long
telephoto work where there is little depth of field. Finally, the NEX-7 always provides
an indication of depth of field. The camera displays the image at the working
aperture of the lens, so you can estimate whether the background or foreground
surrounding the subject is rendered sharply or blurred.
In spite of its small size, the Sony NEX-7 is one of the most capable cameras in
its class and can generate professional results. For example, it has one of the highest pixel counts in a compact camera, 24.3 megapixels. This means the sensor can
bring in enough data so you can enlarge your pictures and still have the detail
hold up. We have printed sharp 20 x 30 inch prints without any detail degradation.
Movies vs. Videos
What is the difference? According to dictionary definitions, a movie is a captured
series of pictures in the motion picture industry, and a video is recorded onto videotape or some other recording device for the television industry.
Both of these definitions ignore the camera’s role in capturing the picture.
Although we would rather call moving pictures recorded on a camera a “video,”
Sony has chosen to use the term “movie.” To be consistent with their terminology,
we will use “movie” in reference to the recording of moving pictures with the camera. There may be some cases where industry terminology is so predominate that
we will use “video,” but those will be the exceptions rather than the rule.
The absence of a hinged mirror provides several advantages. Perhaps the most
obvious is automatic focusing when recording movies. Although DSLRs can record
movies, you have to manually lock the mirror up and use the camera’s sensor for
focusing. Being mirrorless, Sony’s automatic focus system does not have this
requirement. Instead, the camera is always available for taking a movie, and all
that is required is pressing the movie button.
Finally, an underappreciated aspect of this technology is the inclusion of an
electronic first curtain shutter. When the sensor is exposed to light, the NEX-7 is
virtually vibration free. Remember, the raising of its mirror and the movement of
its mechanical shutter jars a DSLR. The absence of these two mechanisms ensures
that the NEX-7 can remain stationary during use—an advantage for discriminating photographers who do not want to sacrifice sharpness because of camera
movement.
01_Sony NEX7_cz5.indd 5
10/17/12 5:21 PM
1
6
Chapter 1: Getting Started
Dual Viewing System
The Sony NEX-7 has two electronic displays: an EVF with an eyepiece and the
movable LCD screen on the back of the camera. Most digital camera users are
familiar with the latter. Unlike some early EVFs, the viewfinder of the NEX-7 is
extremely sharp with a good refresh rate. It replaces the optical viewfinder on
DSLRs. There are tremendous advantages of having two electronic displays,
which give the photographer lots of flexibility for framing and composing
a photograph.
The rear LCD screen can be held at arm’s distance and is convenient to use
when the camera is mounted on a tripod. If you have to raise the camera above
your head, you can tilt the LCD downward so you can aim and photograph over
the heads of an intervening crowd of people. Or you can rest the camera on the
ground and tilt the LCD screen upward to view and photograph a low-lying flower
without having to lie down behind the camera.
The EVF, which has an eyepiece, is valuable for working in ambient sunlight
when the intensity overwhelms the view on the rear LCD. It is also convenient when
you can’t disturb your surroundings with the light of the LCD screen, such as at a
school play in a darkened auditorium. In addition, having the camera pressed up
against your face helps steady the camera.
To conserve battery life, the EVF and the LCD screen are designed to work
sequentially. When one is on, the other is off. The viewfinder is enabled when
the camera senses that something, assuming your eye, is close to the eyepiece.
When you move your eye away, the viewfinder turns off and the LCD screen turns
on. You have a choice of how the switch occurs; it can be done either automatically (default) or you can set the camera so that just one of the display modes
is in operation.
There are both advantages and drawbacks to each of the viewing displays. The
Sony NEX-7 has a few differences in how the camera settings are displayed versus
what you see in the viewfinder or on the LCD screen. As you use the camera and
become familiar with its settings and buttons, you will develop personal choices
as to which viewing system works best for you. In chapter 3 we will cover details
about the LCD screen and the viewfinder and discuss how to display information
on each of them.
01_Sony NEX7_cz5.indd 6
10/17/12 5:21 PM
Setting Up Your New Sony NEX-7
7
1
Diopter Adjustment Dial
There is one more thing you need to know about the viewfinder. It has a magnifier that needs to be focused on the screen. To the right of the eyepiece is a small
wheel called the diopter adjustment dial (figure 1-3). Rotate the dial up or down
until the objects in the viewfinder appear maximally sharp.
If you share your camera with others,
they must make sure that the viewfinder
is in focus for their eyes. If you are nearsighted (myopic) and your photographer
partner is farsighted (hyperopic), you
will have to adjust this dial whenever
the two of you use the camera. This dial
ensures that the photographer, whether
nearsighted or farsighted, will have a
Figure 1-3: The diopter adjustment
tack-sharp image in the viewfinder.
dial to the right of the viewfinder
Setting Up Your New Sony NEX-7
When you take your camera out of the box, you will have the following components:
• Camera body: 24.3 effective megapixel Sony NEX-7
• E-mount 18–55mm zoom lens
• Front and rear lens caps
• Lens hood
• Rechargeable InfoLithium (NP-FW50) battery
• Battery charger (BC-VW1)
• Shoulder/neck strap
• USB cable
• Body cap
• Accessory shoe cap
• CD-ROM with Sony software
• Camera manual
Make sure you have everything before you assemble your new camera. First,
fully charge your battery, attach the lens, and insert a memory card on which to
store your pictures and movies. When you are done, you’re ready to start.
01_Sony NEX7_cz5.indd 7
10/17/12 5:21 PM
1
8
Chapter 1: Getting Started
Battery
The supplied InfoLithium (NP-FW50) Lithium-ion battery should be fully
charged before use. Insert the battery into the charger and plug the charger into
an outlet. An LED light should begin to glow. This light provides several signals:
• Steady glow: The battery is charging.
• Rapid flashing (0.15 second intervals): The charging failed, and the battery may
be defective. Remove the battery from the charger and reinsert it. If rapid flashing persists, replace the battery.
• Slow flashing of the amber light (1.5 second intervals): Charging is not occurring,
probably because of too low or too high ambient temperatures (50°F to 86°F).
• Light turns off: The battery is fully charged.
Completely draining a battery of its charge can damage it. Make sure you fully
charge the battery before using it. You will find that the battery may not last for a
full day of shooting, and a spare will come in handy. For the active photographer
it is not a question of whether you will need to buy a spare battery, but when.
A battery does not last forever. As you continue to use the camera, the battery
will progressively hold less charge. Most people make it a general practice to
purchase a spare battery when they buy a camera. We recommend that you use
Sony-certified batteries because noncertified batteries will void your warranty
and may ruin your camera.
Why Use a Certified Battery?
Buying third-party batteries is tempting because they can be less expensive. But
using them is a risky proposition because Sony does not guarantee the quality of
their construction. If the batteries damage your camera during its warranty period,
Sony is not obligated to repair or replace your camera. Under the best conditions
you may be happy with these batteries, so no harm is done. But you can also end
up with a battery that may not hold as much of a charge or may drain too quickly.
Or, in the worst-case scenario, the battery may damage your camera and the
money saved by buying the inexpensive battery will be lost by having to repair or
replace your camera.
01_Sony NEX7_cz5.indd 8
10/17/12 5:21 PM
Memory Card
9
1
Memory Card
You need a memory card to use with this camera. Unlike some point-and-shoot
consumer cameras, there is no internal memory for storing images, so the camera will not operate without a memory card! You may already have a compatible
memory card from a previous camera. You can use another camera’s memory card
for your new Sony NEX-7 as long as it is an SD, SDHC, or SDXC card. If not, you will
have to purchase one. But what should you buy?
The NEX-7 uses a Secure Digital (SD) memory card. These cards, about the size
of a postage stamp, come in many varieties with various memory capacities and
data transfer speeds. They are designated as SD, SDHC, or SDXC, which refer to the
card’s maximum memory capacity. Don’t be too concerned about these designations because it is more important to know the memory capacity of the card (see
the “Memory Cards” box) and its class rating.
You can use any manufacturer’s SD, SDHC, or SDXC memory card of Class 10
or faster for both still pictures and movies. Sony currently sells an SDHC Class 10
card that holds 32 gigabytes (GB) of data for about $100. But you can opt for a 16
GB card (about $60) or an 8 GB card (about $40) instead. The SDXC cards are the
most expensive and can have the highest memory rating. We find the 32 GB cards
to be an economical choice and are perfect for a day of shooting or movie taking.
A potential problem with high-capacity memory cards is that a failure in the card
can result in a tremendous loss of data. For this reason, many photographers use
several smaller-capacity memory cards so that if one goes bad, the loss of pictures
is limited to that one card.
Memory cards are categorized into classes (2, 4, 6, 8, and 10); the higher the
class, the faster the card can receive and record data. The size and class of the
memory card you buy depends on how you will use the camera and how you plan
to maintain the stored pictures and movies. If you plan to take a lot of movies, you
will need a lot of memory with a fast speed rating. Generally, you should select a
Class 10 card if you need to record movies in AVCHD format. We recommend using
at least 8 GB to allow for enough storage space. If you are going to take mainly
still photos, 4 GB should suffice.
Instead of using an SD card, you may decide to use a Sony memory stick card.
They are not as common, and for a given memory capacity they tend to be a bit
more expensive. Note that if you want to record both still pictures and movies on
a Memory Stick PRO Duo, it must be the Mark 2 version. The Memory Stick PRO-HG
Duo records still pictures and movies.
01_Sony NEX7_cz5.indd 9
10/17/12 5:21 PM
1
10
Chapter 1: Getting Started
At the end of each shooting day, get in the habit of downloading the images from
your camera to your computer. After the files are downloaded, erase the images
on the card by using the camera’s Format command. This allows you to start fresh
the next day, minimizing the risk of running out of memory.
Although you can connect your camera to your computer with a cable and
transfer the stored files directly, you can also download the files with a card reader.
Remove the memory card from the camera and insert it into a card reader that is
connected directly to your computer with a USB cable.
Many people keep several memory cards for those occasions when they
will be doing a lot of recording and will not be able to download the contents
to a computer. It’s important to note that memory cards can fail, and having a
backup will ensure that you can resume shooting if your primary card fails. For
our own photography, we tend to use 32 GB Class 10 cards because they provide
plenty of space and speed to accommodate a day’s worth of shooting and
movie recording.
Memory Cards
The Sony NEX-7 user manual tells you approximately how many pictures or movies
you can record on a memory card. The space used depends on the detail within
the images and the file type.
Memory card criteria:
• SD memory card (8 MB to 2 GB)
• SDHC memory card (4 GB to 32 GB)
• SDXC memory card (32 GB to 2 TB)
Additional information:
• An SDHC memory card can be used with equipment that’s compatible with
the SDHC or SDXC memory cards.
• An SDXC memory card can be used only with equipment that’s compatible
with the SDXC memory card.
01_Sony NEX7_cz5.indd 10
10/17/12 5:21 PM
Assembling the Camera
11
1
Assembling the Camera
The battery and memory card sit next to each other and share a compartment on
the base of the camera. When you invert the camera, you will see the cover with a
sliding rectangular switch. Slide the switch to open the compartment, and slide
the fully charged battery in the direction of the arrow painted on its side. The
battery can be fully seated only one way; a set of ridges surrounding the contacts
helps you orient the battery properly. You will hear a solid click when it is properly seated. You can now close the battery cover. To remove the battery, open the
compartment to expose a small blue lever that blocks the removal of the battery.
Push the lever to the side, and the battery will pop out.
The memory card compartment is next to the battery compartment and is
revealed when you open the cover. When you insert the memory card, the end
with the metallic reading bars goes in first. It will lock into position with a click. To
remove it, push the top of the memory card to release the lock, and the card will
pop out for easy removal. If the memory card is defective or if its contacts are dirty,
a NO CARD message will be displayed
in the top left on the LCD screen when
you turn on the camera. If this occurs,
remove the memory card and reinsert
it. The message should go away. If it
doesn’t, the card may be defective
and will have to be replaced.
Next, attach the lens to the camera
body. Remove the rear lens and
camera body caps. Store both caps in
a safe place for future use. Inserting
the lens is a two-step process. There
is a white bump on the barrel of the
lens and a white dot on the rim of the
camera body’s lens mount. Align these
two indicators, insert the lens, and
then rotate the lens clockwise until
you feel and hear a click. The lens is
now locked in position and ready to
use (figure 1-4).
Last but not least, attach the camera
strap. It should always be secured to
the camera and placed either around
your neck or over your shoulder when
Figure 1-4: The camera body without and with
you’re carrying or using the camera.
the lens, showing the white alignment dots
01_Sony NEX7_cz5.indd 11
10/17/12 5:21 PM
1
12
Chapter 1: Getting Started
Protecting the Lens
There are several ways to protect your camera lens against damage. The first and
most obvious is to keep the lens cap on when you are not using your camera.
The second is to use a lens hood when you are shooting to help keep errant objects
from hitting the lens. Another benefit is that the hood increases image contrast
by blocking light from the side of the lens, keeping it from entering the camera.
The third way to protect your camera lens is to use an ultraviolet (UV) filter.
These threaded filters can be screwed onto the lens and serve as a clear optical
lens cap. Sony sells these filters, but if you know the thread diameter of your lens,
you can buy other brands.
The use of a UV filter is controversial. Some claim it’s a good idea, and others
claim the protection is minimal and the filter degrades image quality. There is
an element of truth in both viewpoints. We find inexpensive, off-brand UV filters
to be problematic. Sometimes the optical quality is so bad that it does degrade
performance. To avoid this, we buy and use high-quality filters made by reputable
manufacturers. Filters made by Tiffen, Hoya, and B+W are good and do not degrade
lens performance. You may be surprised at their expense, but considering they are
optically ground, polished, coated disks of glass, their prices are reasonable. We
routinely mount high-quality UV filters on our lenses. Although there is a theoretical chance of losing some image sharpness, it’s so slight that we don’t notice it.
Protecting the LCD Screen
Although the Sony NEX-7 LCD screen is made of a durable material, it can be
scratched. This won’t affect the camera’s ability to take good pictures, but it can
affect your ability to know when you have a great picture or when you need to
improve the focus. We recommend that you purchase an LCD screen protector.
Sony offers them for the NEX-7 at a nominal cost. We purchased their hard plastic
model. It is sticky and is applied directly to the LCD. It comes off easily, so if it gets
scratched you can replace it.
01_Sony NEX7_cz5.indd 12
10/17/12 5:21 PM
Using This Book
13
1
Using This Book
The Sony NEX-7 is a perfect camera for photographers at all levels of expertise. If
you are a beginner who doesn’t know about EV, ISO, or shutter speed, you can just
set the camera to Intelligent Auto mode and take pictures by simply pointing and
shooting. After you learn some basic photographic concepts, you can improve
your images by using the camera’s SCN mode. By matching the SCN icon to the
shooting situation, you are telling the camera how it should fine-tune the camera
settings for shooting that specific type of subject. For instance, when you select
the icon for sports action, the camera will use faster shutter speeds to freeze motion. When you select the macro icon, the camera uses slower shutter speeds and
smaller apertures to achieve greater depth of field.
Eventually, you may decide to override some of the camera settings to take full
advantage of the sensor’s capabilities. This will empower you to more fully leverage digital post-processing on a computer. From there, you can take full control
by setting the camera manually and using your judgment to set the aperture, ISO,
and shutter speed. At this point you may decide that over- or underexposing an
image will impart a mood to the scene. At this level an image is created rather
than recorded. Further, the controls of the NEX-7 can be fully customized. This
will enable you to change the settings without having to go into the camera’s
menu structure. After the camera is customized to your favorite settings, you will
have most of what you need at your fingertips and will need to go into the menu
structure only for special situations.
This book follows the natural progression of learning and using the NEX-7
camera, starting with the automatic modes, progressing through semiautomatic
modes, and finally taking full control of the camera settings. We have covered
additional functions along the way, such as how the camera settings are displayed,
customizing the camera to your style, and utilizing additional camera features.
Beginners can find helpful information in chapter 4, “Automatic Settings”; intermediate photographers can turn to chapter 5, “Taking Control of the Camera”; and
expert photographers can refer to chapter 6, “Manual Operation of the Camera.”
Regardless of your skill or interest level, this is an exciting camera to use.
Learning how to use the NEX-7 is made difficult by the multitude of commands
and features available to you. Rather than try to toss all the information at you at
once, we will take a graded approach. First, we will introduce the most important
features so you can start operating the camera with a minimum of effort. This
will allow you to start taking pictures quickly. In this chapter, we also include a
description of how to navigate through the menus. This will prepare you to use
the camera to its fullest potential.
01_Sony NEX7_cz5.indd 13
10/17/12 5:21 PM