
1
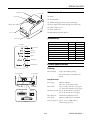
TM-H2000 Product Information Guide
What’s in the Box ...........................................................................................................................
Accessories.....................................................................................................................................
Printer Specifications ......................................................................................................................
Media ..............................................................................................................................................
Reliability.........................................................................................................................................
Safety..............................................................................................................................................
Dimensions .....................................................................................................................................
Dip Switches...................................................................................................................................
Control Panel...................................................................................................................................
Loading Paper .................................................................................................................................
Installing a Ribbon...........................................................................................................................
Testing the Printer ..........................................................................................................................
Removing a Paper Jam ...................................................................................................................
Related Documentation ..................................................................................................................
1
1
1
2
2
2
2
2
3
4
4
4
5
5
EPSON TM-H2000
Roll paper cover
What’s in the Box
Control panel
❏ Printer
Receipt unit
❏ User’s Manual
❏ Small thermal paper roll (for operational testing)
❏ Power supply and AC cable (Energy Star models only)
Manual cutter
❏ Cable connector cover
❏ Power switch cover
❏ ERC-43B (endorsement ribbon)
Front cover
Accessories
Power switch
Control panel
(Power) LED
Option
Model
Part Number
AC adapter (with AC cable)
PS-180
C825343
AC adapter (without AC cable)
PS-180
C825341
AC cable
AC CABLE
205498100
Error LED
Interface boards
UB series
see price sheet
Paper LED
Epson customer display series
DM-D
see price sheet
58 mm paper guide
PG-58II
C32C814622
Slip LED
Feed button
Endorsement ribbon
ERC-43(B)
ERC-43(B)
Franker cartridge
EFC-02
A43S020479
Printer Specifications
Release button
Printing
Print methods:
Customer display
Power supply
receipt: thermal line printing
slip (endorsement): serial impact dot
matrix
Receipt Section
USB interface
Drawer kick-out
Ethernet
Serial
Dot density:
203 dpi × 203 dpi
(dpi = dots per inch [25.4 mm])
Print width:
2.83" (72 mm), 576 dots (3.15" paper)
2.1" (52.5 mm), 420 dots (2.28" paper)
Characters per line: font A: 48, font B: 64 (3.15" paper)
font A: 35, font B: 46 (2.28" paper)
Parallel
Interface
6/12
Print direction:
unidirectional with friction feed
Print speed:
10.2"/sec. (260 mm/sec.) maximum
Paper feed speed:
approx. 7.9"/sec. [200 mm/sec.]
(continuous paper feed)
EPSON TM-H2000 - 1
EPSON TM-H2000
Character sets:
alphanumeric: 95 characters;
international: 37 characters;
extended graphics: 128 × 11 pages
(including a space page)
Reliability
Receipt Printer
Slip/Endorsement Section
Print head life:
150 million pulses, 150 km
Head wire matrix: 9-pin vertical; 1/72" wire pitch
Mechanism:
20 million lines
Print width:
Autocutter:
2 million cuts
MTBF:
360,000 hours
MCBF:
96 million lines
2.80" (71.2mm) max
Characters per line: font A: 25; font B: 33;
endorsement font: 40
Printing direction: Bidirectional, minimum distance printing
Print speed:
Character sets:
Endorsement Printer
Approx 4.0 lps (40-column, 21.1 cpi
with normal head energizing)
alphanumeric: 95 characters;
international: 37 characters;
extended graphics: 128 × 12 pages
(including a space page)
Print head life:
200 million characters
MTBF:
180,000 hours
MCBF:
65 million lines
Safety
Interfaces
Built-in:
USB 2.0 Full-speed
EMI:
Optional:
serial, parallel, USB, Ethernet, and
wireless
Safety Standards:
FCC part15B Subpart B Class A
CAN/CSA-CEI/IEC CISPR 22 Class A
UL60950-1
CAN/CSA C22.2 No.60950-1
(Tested using the PS-180.)
Media
Dimensions
Roll Paper
Paper type:
thermal roll paper
Paper size:
58mm or 80 mm wide
Dimensions
(H × W × D):
Slip Paper
Weight:
Paper type:
normal, pressure-sensitive, or carbon copy
paper
Paper size:
2.68 to 9.06" (W) × 2.68 to 11.69" (L)
[68 to 230 mm (W) × 68 to 297 mm (L)]
7.13" × 6.30" × 10.94"
(181 mm × 160 mm × 278 mm)
approx. 8.82 lb (4.0 kg)
Dip Switches
Serial Interface
Minimum
paper size:
2.68 × 5.98" (68 × 152 mm)
Sheets:
3 parts maximum
Total thickness:
0.0035 to 0.0122" (0.09 to 0.31 mm)
2 - EPSON TM-H2000
6/12
Bank 1
Function
ON
OFF
1
Data reception error
Ignored
Prints “?”
2
Receive buffer capacity
45 bytes
4 KB
3
Handshaking
XON/XOFF
DTR/DSR
4
Word length
7 bits
8 bits
5
Parity check
Yes
No
6
Parity selection
Even
Odd
7 and 8
Transmission speed
See table below
EPSON TM-H2000
Transmission speed
Switch 1-7
Switch 1-8
4800
ON
ON
9600
OFF
ON
19200
ON
OFF
38400
OFF
OFF
Control Panel
LEDs
(Power)
On when the power is on.
Bank 2
Function
ON
OFF
1
Handshaking (BUSY)
Receive buffer
full
Offline or
receive buffer
full
2
Customer display (DM-D)
connection
Connected
Not connected
3 and 4
Print density
See table below
5 and 6
Reserved
Set to OFF (Do not change.)
7
I/F pin 6 reset
Enabled
Disabled
8
I/F pin 25 reset
Enabled
Disabled
Paper
Level
Function
Switch 2-3
Switch 2-4
1
Standard
OFF
OFF
Comes on when roll paper is low or out. Flashes when the
product is performing a self-test.
2
Medium
ON
OFF
3
Dark
OFF
ON
Note: Turn off the product before opening any covers.
Error
Steadily on when the printer is offline. See if a cover is open.
Blinking if there is an error. Turn the printer off for a few
seconds, then turn the printer back on. If still blinking,
contact a dealer or qualified service person.
Slip
Blinks when the printer is ready to receive slip paper. Steadily
on during printing of a slip, and blinks again when slip paper
should be removed.
Parallel Interface
Bank 1
Function
ON
OFF
1
Auto line feed
Always enabled
Always disabled
Buttons
2
Receive buffer capacity
45 bytes
4 KB
Feed
3—8
Reserved
Set to OFF (Do not change.)
Bank 2
Function
ON
OFF
1
Handshaking (BUSY)
Receive buffer
full
Offline or
receive buffer
full
2
Reserved
Set to OFF (Do not change.)
3 and 4
Print density
See table below
5—7
Reserved
Set to OFF (Do not change.)
8
I/F pin 31 reset
Set to ON (Do not change.)
Level
Function
Switch 2-3
Switch 2-4
1
Standard
OFF
OFF
2
Medium
ON
OFF
3
Dark
OFF
ON
Pressing this button once feeds paper by one line. Holding
this button down feeds paper continuously.
Release
Pressing this button releases slip paper or starts a slip paper
self-test.
6/12
EPSON TM-H2000 - 3
EPSON TM-H2000
Loading Paper
Installing a Ribbon
Receipt Section
Note: Be sure to turn on the power before installing the ribbon.
Caution: To avoid injury, do not touch any part of the printer other
than the roll paper when the cover is open.
1. Unpack the ribbon and turn the knob on the ribbon in the
direction marked on the ribbon to remove any slack.
Note: Do not open the paper roll cover when the printer is printing or
feeding paper. Only use paper that meets specifications, and do not
use rolls that have the paper glued onto the core.
2. Turn the printer on.
1. Be sure the printer is not receiving data, then open the roll
paper cover by lifting the two tabs on the roll paper cover
and pushing the cover back.
4. Remove the old ribbon, if this is one.
3. Open the printer’s front cover using the tabs on each side of
the cover.
5. Insert the new ribbon until it clicks into place.
2. Remove the used roll paper core, if there is one, and insert
the roll paper in the direction shown below.
6. Close the printer’s front cover.
Testing the Printer
3. Pull out some paper, and close the roll paper cover.
Receipt Section
4. Tear off the extra paper using the manual cutter.
Follow the steps below to perform a self-test on roll paper:
Slip Section
1. Make sure the printer is off and all the covers are closed.
2. Press and hold the Feed button and turn on the printer. The
printer prints its status and the Paper LED begins flashing.
When inserting slip paper, be sure that the right side of the
paper is against the right side of the paper guide as shown
below.
3. To continue the self-test, press the Feed button.
The self test is complete when *** completed *** is printed.
Slip Section
Follow the steps below to perform a self-test on roll paper:
1. Make sure the printer is off and all the covers are closed.
2. Press and hold the Release button and turn on the printer.
3. When the Slip LED begins flashing, insert a slip.
The self test is complete when *** completed *** is printed.
4 - EPSON TM-H2000
6/12
EPSON TM-H2000
Removing a Paper Jam
Related Documentation
Receipt Section
EPSON TM-H2000 Specifications
EPSON TM-H2000 Developer Guide
Caution: Do not touch the thermal head, because it can be very hot
after printing. Let it cool before you remove the jammed paper.
EPSON TM-H2000 User Guide
1. Turn off the printer.
EPSON TM-H2000 Technical Manual
2. open the roll paper cover by lifting the two tabs on the roll
paper cover and pushing the cover back.
3. Remove the jammed paper.
4. Close the roll paper cover.
Slip Section
1. Turn off the printer.
2. Open the printer’s front cover using the tabs on each side of
the cover.
3. Open the franking unit using the lever at the right of the
franking unit.
4. Remove the jammed paper.
6/12
EPSON TM-H2000 - 5


![Installation Guide: AT-TQ2450 [Rev A] (PDF Version)](http://vs1.manualzilla.com/store/data/005654085_1-f326a5d33793ff2ec849a19a13c1dba6-150x150.png)