1
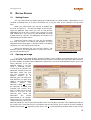
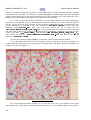
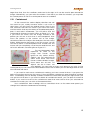
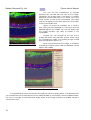
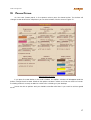
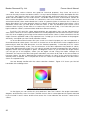
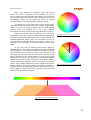
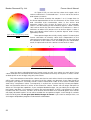
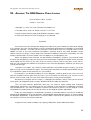
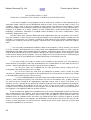
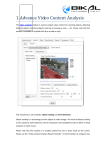
 "!$#
Bendor Research Pty. Ltd.
2
Proxan User's Manual
Table of Contents
I.Acknowledgements and Credits............................................................................................5
II.License..................................................................................................................................7
III.Introduction..........................................................................................................................9
IV.Installation..........................................................................................................................11
V.Getting Started...................................................................................................................13
V.I. Starting Proxan...........................................................................................................13
V.II. Opening an Image.....................................................................................................13
V.III. Containment..............................................................................................................15
VI.Proxan Options..................................................................................................................17
VI.I. Pre-processing Options.............................................................................................18
VI.I.a. Microscope Type................................................................................................18
VI.I.c. Active and Reference Colours............................................................................19
VII.Appendix: The GNU General Public License..................................................................25
List of Figures
Figure V-I Proxan main window............................................................................................13
Figure V-II Open file dialog....................................................................................................13
Figure V-III Image processing window..................................................................................14
Figure V-IV Containment mode control panel.......................................................................15
Figure V-V Containment area................................................................................................15
Figure V-VI Section with curved region of interest...............................................................16
Figure V-VII Curved area of interest after containment........................................................16
Figure VI-I Processing options..............................................................................................17
Figure VI-II Additive and subtractive colour mixing..............................................................18
Figure VI-III Colour selection dialog......................................................................................19
Figure VI-IV Colour selection with HSV representation........................................................20
Figure VI-V HS circle with selected colours..........................................................................21
Figure VI-VI HS circle with acceptance angle.......................................................................21
Figure VI-VII Colour acceptance functions...........................................................................21
Figure VI-VIII Classification of various colours.....................................................................22
Figure VI-IX Colour classification results..............................................................................22
3
I.Acknowledgements and Credits
I.
ACKNOWLEDGEMENTS AND CREDITS
Proxan would never have been written without the following people:
Dr. Krisztina Valter, whose research work gave rise of the original
version of a statistical proximity analysis program for biological features
on microscopic images,
Prof. Jonathan Stone who pursued me to make Proxan general enough
so that it could be released publicly,
Dr. Karen Cullen whose research work called for an extension of the
original program, ultimately resulting in Proxan as it is now,
All my teachers who put real effort into teaching me those morsels of
knowledge that ultimately made the creation of Proxan possible,
All the programmers whose often unrewarded effort created a high
quality, open and free development environment where knowledge is
shared for the common good rather than exploited for the benefit of
the selected few,
My children, who patiently accepted that while writing Proxan I spent
a lot less time with them than either they or I wished.
Thank you all.
The microscopic images used in this document are the courtesy of the
Department of Anatomy and Histology of The University of Sydney and
the Research School of Biological Sciences of The Australian National
University and used with permission.
The Proxan project was funded entirely by Bendor Research Pty. Ltd.
5
II.License
II.
LICENSE
Proxan is released under the Free Software Foundation's GNU General Public License, version
2.0 or any later revisions (at your own discretion) or GPL for short. The entire text of the license can
be found in the Appendix. Still, we explicitly spell it out that there is no guarantee or warranty
associated with Proxan:
Proxan and its documentation are Copyright © 2004, Bendor
Research Pty. Ltd. All rights reserved.
This program is free software; you can redistribute it
and/or modify it under the terms of the GNU General Public
License as published by the Free Software Foundation;
either version 2 of the License, or (at your option) any
later version.
This program is distributed in the hope that it will be
useful, but WITHOUT ANY WARRANTY; without even the implied
warranty of MERCHANTABILITY or FITNESS FOR A PARTICULAR
PURPOSE. See the GNU General Public License for more
details.
You should have received a copy of the GNU General Public
License along with this program; if not, write to the Free
Software Foundation, Inc., 59 Temple Place - Suite 330,
Boston, MA 02111-1307, USA.
IN NO EVENT UNLESS REQUIRED BY APPLICABLE LAW OR AGREED TO
IN WRITING WILL ANY COPYRIGHT HOLDER, OR ANY OTHER PARTY
WHO MAY MODIFY AND/OR REDISTRIBUTE THE PROGRAM AS PERMITTED
ABOVE, BE LIABLE TO YOU FOR DAMAGES, INCLUDING ANY GENERAL,
SPECIAL, INCIDENTAL OR CONSEQUENTIAL DAMAGES ARISING OUT OF
THE USE OR INABILITY TO USE THE PROGRAM (INCLUDING BUT NOT
LIMITED TO LOSS OF DATA OR DATA BEING RENDERED INACCURATE
OR LOSSES SUSTAINED BY YOU OR THIRD PARTIES OR A FAILURE OF
THE PROGRAM TO OPERATE WITH ANY OTHER PROGRAMS), EVEN IF
SUCH HOLDER OR OTHER PARTY HAS BEEN ADVISED OF THE
POSSIBILITY OF SUCH DAMAGES.
7
III.Introduction
III.
INTRODUCTION
Proxan is a software tool to determine if two sets of features on a microscopic image
statistically exhibit a spatial relationship or not.
If you have an image on which two kinds of biological features are marked with different
colours you may want to know whether they are related or not. For example, you have a tissue
sample and you label the cell nuclei to green and attach a red fluorescent marker to a particular
enzyme. Your theory is that the enzyme is somehow related to the nucleus. Since with fluorescent
methods red and green together make yellow, then yellow spots on the image would tell you that
that particular enzyme occurs in the nucleus. (Note that the author of Proxan has no biomedical
background so the examples are probably incorrect from a bio-scientific point of view. Please bear
with me.) If you have a lot of yellow in the nucleus and there is not much red in anywhere else, then
you can be quite sure that the enzyme is indeed concentrated in the nucleus. This is a well-know
method and various tools exist to analyse colocalisation. Scientific papers often show scattergrams
and colour distribution histograms to prove that a biological phenomenon is so strongly connected
to an other that on images they overlap.
This kind of analysis, however, will not show relationships where the biological processes are
related but would not spatially coincide. Using our previous example, if the enzyme in question does
not occupy the nucleus but for some reason it has a high concentration around it then you will not
have yellow on your image so scattergrams will not prove your theory about the relationship, even
though you are right. The enzyme is indeed related to the nucleus, it just doesn't get in. The reason
for the failure to detect the relationship is that colour analysis examines a pixel at a time and does
not even try to locate features on the image. To discover spatial relationships that do not manifest
in actual overlap, you need to employ some other method.
Proxan is a tool for the above mentioned kind of problems. She identifies two kinds of objects
on an image. One set, that Proxan calls the reference objects, is supposedly something that is
inherent in the biological matrix of your image. It can be for example blood vessels, cells in a tissue,
the nuclei from the previous example or even some bacteria. The location of these objects is
considered given, that is, determined by the tissue or sample itself and whether your theory is right
or wrong has no effect on it. The other kind of objects, the active objects in Proxan's terminology,
represent some other biological phenomenon that you marked by staining or with a fluorescent
marker. That can be blood plaques or debris from dead cells or some specific enzyme or
phagocytes congregating around some nasty thing.
What you want Proxan to do is to tell you if there is some spatial correlation between these
objects. Proxan assumes that the active objects, if there is no such correlation, would be evenly
distributed throughout the image (or parts of it that you did not exclude from the analysis).
It is extremely important to understand that if the above assumption is not true, then you can
not use Proxan for analysis because you would get false positive results.
If the assumption, however, is true, then Proxan can tell you if there is a spatial relationship
between the reference and active objects. In particular, Proxan examines the distances between
the reference and active objects and statistically analyses if the distances correspond to a random
distribution of active objects or the locations of the active objects seem to show a correlation to the
locations of the reference objects.
The rest of this manual will explain you how.
9
IV.Installation
IV. INSTALLATION
Installing Proxan requires that you are somewhat familiar with Linux, it is not a click-and-go
affair as yet. If you are not comfortable with terms like shell, directories, command line, being root
and alike, it might be a better idea to ask someone in your IT department to install Proxan for you. If
you decide to do it yourself, here is what you have to do.
First of all, you need to download the source code. It will be a file called proxan-1.0b.tgz. You
save this file in some folder or directory. Then in a shell window you should go into that directory
and type the following:
This command should execute without saying a single word. It extracts Proxan's source code
from the file you downloaded and places it in a new folder called proxan-1.0b. Then you have to
type the following
to go to the new folder. When you are there, you have to build the program, so type:
"!
If you everything is right, you will see the following:
# %$%&%$%'
&%$"($%)
*%+ $&$%'
&%$"( &%$2,
%%-&' ./&%$%!.10$
$%&%$%' + $%&$%'3%%
# %$%&%$%'
+ $%&.4($&'%5)
*%+ $&$%'
+ $%&.4( + $%&.6,%
*%+ $&$%'
%&!87 !&,
9 $%$%'
: '!;
: !
If you see the
, then you managed to build Proxan. If you see an error
message, then
there will be an error log file, with the name of the last file processed but with an 'err' suffix. That is, if
# %$%&%$%' + $%&.4($&'%5<
the process dies while doing the
then there will be a file
+ $&.4($&'%5<!%
explaining what the problem was. Chances are that you will need somebody
to read that file and see what can be done. Nevertheless, that should not happen and Proxan
should compile with no problem. If you succeeded, there is one more step to do:
=
>( + .?@(?&'&"(?%$%
That command will place the Proxan executable into a place where executables (programs)
are stored that are not strictly part of the system but any user of your machine should be able to use
them.
To execute that last command more than likely you have to be root, the unix term for system
administrator. If you do not know how to become root on your machine, then ask the person who
administers your machine to do that last step for you. He or she can also assign Proxan to a menu
entry or a desktop icon for you, if you don't know how to do it.
11
V.Getting Started
V.
GETTING STARTED
V.I.
Starting Proxan
You can start Proxan by simply typing the word 'proxan' in a shell window. Alternatively, if you
created a desktop item or a menu association for it, you just click on the relevant icon or menu
item.
When you start Proxan you will see a window like
the one on Figure V-I . The actual shape of the buttons
might be different from what you see on the picture,
depending on what GTK+ version your machine is using
and what theme you chose for your desktop, but that
should not be a concern. The operation of Proxan is not
affected by the button theme.
Under the Proxan logo you can see the progress
bar. That will inform you about the progress of each
operation that Proxan does. Currently Proxan is not doing
anything, so it is not showing any activity.
Below the progress bar you find the actions. The
leftmost column, the image buttons, if what you have to
be concerned about first.
V.II.
Figure V-I Proxan main window
Opening an Image
If you click on the Open button, Proxan will open a new window, that looks like Figure V-II. The
buttons Create Dir, Delete File and Rename File do create a new directory, delete the file marked in
the Files window or rename the marked file, respectively. The Home and Desktop buttons go to your
home directory or to your
desktop folder, if you are
using a desktop system,
such as KDE or GNOME. The
Directories window show the
directories within the one
you are currently in. By
double
clicking
on
a
directory you can enter into
that directory, or open that
folder, if you like the folder
notation
better.
The
directory called means
the directory or folder that
contains the current one,
that is, it takes you one level
closer to the root of the
directory tree. Since the
directories
are
usually
represented as an upsideFigure V-II Open file dialog
down tree, this is customarily
called traversing up on the
directory hierarchy. The list selection bar above the two windows contains a list of directories above
the current one, using that
list you can traverse up as many levels as you want in one hit, instead of
double-clicking the directory many times. The
in the Directories window refers to the current
13
Bendor Research Pty. Ltd.
Proxan User's Manual
directory, double clicking that will have no noticeable effect. Finally, the Files selection window
itself presents you the files in the directory, sorted in alphabetical order. Please note that all capital
letters come before any of the lower case letters, thus Z.tiff is before a.tiff. If you single click on a
filename, it will be copied to the filename line, under the Selection line.
If you click on OK, then whatever filename is in the bottom filename line will be passed to
Proxan as your image file. You can edit that line by hand, by clicking on it, if you know the name of
the file. If the name of the file contains a slash, it will be interpreted
as
afile
in a directory in the
and you type the
current directory. For
example,
if
you
are
currently
in
/
then
click
OK,
then
Proxan
will
try
to open the file
filename
mystuff/
. On the other hand, if the name in the file selection
line starts with a slash,
as thefull
then
it
will
be
interpreted
filename,
regardless
! of
where
" "you
are.
That is, if you are in and
you
type
! " " then Proxan
and ignore your current
will
look
for
.
directory, If you click on Cancel, nothing happens, Proxan just closes the file selection window.
If you selected a file that is not a TIFF image, Proxan will send you an error message in a
window and do nothing else. If you selected a TIFF image, Proxan will open it and you will get a new
window as shown on Figure V-III.
Figure V-III Image processing window
This is the image processing window. As you can see, most of it is occupied by the image
itself. Proxan tries not to open a window larger than about ¾ of your display area. If the image is
14
V.Getting Started
larger than that, then the scrollbars under and to the right of it can be used to pan around the
image. Alternatively, you can resize the window. Note that if you shrink the window, you may hide
the control panes as well. The control panels are not scrollable.
V.III. Containment
At the moment the various display selections are not
too useful for you, mainly because there is not much to
select from: you only have the original image. There is one
tool, however, that can be useful. If you move the mouse
over the button that says Processing on the Main Mode panel,
press it and select Containment, you will notice that the
control panel changes to what is shown on Figure V-IV . Also,
if you move the cursor over the image, instead of the
pointer you will see a circle that is semi-transparent. Now
move the pointer to the bottom left of the image,
somewhere about the 200µm ruler and press the left mouse
button. While pressing the button move the mouse. You will
see that it leaves a semitransparent trail. Doodle with the
mouse until you completely cover the ruler and the text, but
not much around it, something like on Figure V-V .
The semi-transparent area
represents an area on the
image that Proxan should
ignore for any further activity.
Objects are not searched for
within those areas and when
Proxan creates random images,
Figure V-IV Containment mode control panel
those areas are off limit. No
Figure V-V Containment area
objects can be in them, not
even partially. You can have as many such areas as you wish. On the
control panel you can select from three different brush sizes to allow you to mark large areas as well
as small areas with ease.
If you want to undo some containment marking, you have several choices. If you press the
right mouse button and move the mouse, it then will delete containment areas instead of creating
them. So doodling over an already marked containment area while pressing the right button you
can get rid of that area. If you want to delete all containment areas, you can press the Clear all
button. If you want to revert to the containment areas that were active when you selected the
containment mode, you can click on the Restore button.
Your containment area markings will be committed when on the Main mode panel you
change the mode from Containment to Processing.
15
Bendor Research Pty. Ltd.
Proxan User's Manual
You can use the containment to exclude
artefacts, like you did with the ruler on the image.
Sometimes the image itself is too large, it contains
biological sections that are of no use for you. If the
useful section is more or less rectangular, you might
crop the image but more often than not microscopic
sections are not like that.
Figure V-VI shows an example. Let us assume
that what you are interested in is the blue and red
labelled region in the middle. You can not simply crop
the image because the area of interest is not
rectangular.
Instead, you can exclude all the rest of the
image and leave only that little section active using
the containment mode. The resulting image should
look something like Figure V-VII.
Figure V-VI Section with curved region of interest
When Proxan processes the image, it will ignore
everything except the blue and red labelled curved
stripe in the middle.
Figure V-VII Curved area of interest after containment
It is important that when you process an image you have no empty areas. To understand why
you should know how Proxan processes the statistical data of your image. It will be explained later.
For now it is enough to remember that empty areas of the image should be excluded, using the
confinement tool.
16
VI.Proxan Options
VI. PROXAN OPTIONS
On the main Proxan panel, in the Options column press the Show button. The button will
change to Hide and Proxan will present you an other window, like the one on Figure VI-I.
Figure VI-I Processing options
If you press the Hide button in the main window, the options window will disappear and the
button changes back to Show. Whether the options window is visible or not has no effect on Proxan.
The hiding feature is merely an aide to minimise the cluttering of your desktop.
Proxan has lots of options and you should be familiar with them if you want to achieve good
results.
17
Bendor Research Pty. Ltd.
VI.I.
Proxan User's Manual
Pre-processing Options
VI.I.a. Microscope Type
First, you have to select whether the image you process was taken by a light microscope or
with a fluorescent one. It might sound unreasonable. All in all, an image is an image and it is none
of Proxan's business to know how you got it. It is not so.
If you use fluorescent microscopy, you use a fluorescent marker on the biological
phenomena. The marker will emit light when the microscope's UV light source excites it.
Consequently, if an area of your slide is stained with two markers, both will get excited and emit
light with their characteristic colours. For example, if one marker glows green and the other glows
red, on the colocalisation areas you will see yellow. Fluorescent microscopy uses additive colour
mixing.
Light microscopy uses stains that absorb parts of the visible spectra. If you have a purple stain
it means that it absorbs the middle of the spectra, that is, the green. If you have a stain that looks
yellow, it will absorb the short wavelength end of the spectra, that is, blue. If you then have a slide
where these stains colocalise, the overall image will have a reddish colour, because that is the only
part of the spectra that is not absorbed by either stain. We can also use the fluorescent example's
red and green colours. If your stain is red, it means that it absorbs blue and green. If it is green, then
it absorbs red and blue. So if you apply both, together they absorb all red, green and blue. Thus you
are left with the lack of any light, that is, black.
This method of eliminating certain components of the spectra is called, somewhat mistakenly,
subtractive colour mixing. It is not subtraction what really happens. If you have a stain that
eliminates 80% of the red and the green part of the spectra and an other one that eliminates 80% of
the green and blue part of the spectra, when they are co-localised together they do not absorb
160% of the green light. What the stains do is not subtraction but attenuation, multiplication by a
number between 1 and 0. Nevertheless, the method is called subtractive and thanking to the
logarithmic nature of human vision, if you treat it as if it was subtraction you get quite good results.
That is what printers and photographers do and for that matter, that is what Proxan does.
Figure VI-II shows the result of red and green fluorescent markers and stains overlapping in an
area. It clearly shows how different the end result is. That should explain why it is Proxan's business to
know if you used fluorescent or light microscopy to obtain the image you are going to process.
VI.I.b.
Overlap of red and green fluorescent markers
Overlap or red and green absorbent stains
Figure VI-II Additive and subtractive colour mixing
18
VI.Proxan Options
VI.I.c. Active and Reference Colours
These select the colours of the active and the reference objects on your image. Colour
selection is a very important part of Proxan's operation. When looking at a pixel Proxan has to
decide how much that pixel belongs to a reference object and how much it belongs to an active
object. The only information she has is the colour of the pixel and the two colours you nominate to
be representative for the two kinds of objects.
To nominate a colour, you have to click on the Change button for the reference or active
colour in the Options window.
A new window will be opened where you can change the colour for the relevant object.
Figure VI-III Colour selection dialog
Figure VI-III shows the colour setting dialogue box. You can set the desired colour by moving
the sliders. The Red, Green and Blue sliders change the given component of the colour. The Hue,
Saturation and Value sliders express the same colour in a different form. If you move a slider in either
group, the sliders in the other group will move correspondingly. In the bar below the colour circle
the left hand side is always white and the right hand side shows the colour represented by the
sliders.
If you click on Cancel, then the window will be closed and nothing else will happen. If you
press OK, then the colour set by the sliders will be used for selecting the active or reference colours.
Since colour selection is the first step of identifying the features on your image, we give you a
detailed explanation of how Proxan decides if a pixel belongs to an active object, a reference
object, simultaneously both or none at all.
Colours can be described in many ways. Proxan uses three of them.
At the end of the day, it all goes back to the fact that the human eye has three kinds of
colour receptors. Each kind is most sensitive to a particular wavelength, or colour. Namely, you
have red, green and blue sensitive receptors. Not everything, but almost all colours that you can
see can be synthesised by mixing light of that three colours. Therefore, when using additive colour
mixing it is most convenient to describe the colour or light by giving the intensities of the red, green
and blue light sources. That notation is known as RGB. The most obvious example is the colour TV.
If you use subtractive mixing, such in photography or in printing, you use three kinds of ink that
absorb one of red, green or blue. The resulting dye colours are cyan, magenta and yellow,
respectively. By mixing these you can control what is left from white light and at the end determine
how much red, green and blue reaches the eye. Due to the colour of the dyes it is called the CMY
colour scheme.
19
Bendor Research Pty. Ltd.
Proxan User's Manual
While those colour schemes are good for technical purposes, they have not much in
common the way humans feel about colours. It is very hard to interpret a colour description like this:
“you know, that greenish-yellow, more greenish a bit actually, and kind of dull, like, not that harsh,
and it was sort of dark if you see what I mean”. To handle colours in that “more intuitive” fashion an
other colour description was invented. It is called HSV, from Hue, Saturation and Value. Hue is the
actual perceived colour and indeed the H value of greenish-yellow is between the H values of
green and yellow. If it is more greenish, then its H value is closer to that of green than yellow. S is the
saturation, which tells you how pure or dull the colour is, from the absolute pure colours of the
rainbow down to grey, where there is no colour any more at all. Finally, V for value tells you how
light or dark the colour is, between black and the maximum intensity.
The RGB, CMY and HSV colour representations are equivalent, they can be transformed to
each other. However, the HSV representation has certain properties that the other two lacks. Proxan
uses HSV when mapping your image to the reference and active colour. Colour extraction is the first
step in Proxan's operation and a very important one. To help you to use this feature of the program
efficiently, we explain you how Proxan identifies colours.
On a two-dimensional surface like your screen or a sheet of paper you can not represent a
three dimensional colour space. You have to choose two of the dimensions to be mapped onto a
planar object and the third dimension must be treated separately. Customarily the HSV colour
scheme is represented by a disc. The circumference of the disc represents the possible H values,
with usually red being at the top. Thus, a H value is actually an angle measured from the vertical. 0
degrees means red, 120 degrees is green, 240 degrees is blue. As you increase the angle further,
you will get up to 260 degrees, where you are again at red. Along the radius changes the
saturation, the centre of the disc being zero saturation (no colour at all) and on the circumference
lay pure colours. The disc is painted with maximum intensity, or value, so the centre of the disc is
actually white. Therefore, the V component of the HSV colour is not represented on the disc and is
shown in a separate way.
You are already familiar with the colour selection window. Figure VI-IV shows you the left
hand side of the dialogue box.
Figure VI-IV Colour selection with HSV representation
On the figure you can see the HS circle and the V bar. The H value is the angle measured in
degrees, anticlockwise, from 12 o'clock. The little circle in the HS circle represents the point selected
by the actual H and S values and the line across the V bar indicates the actual V value for the
colour.
20
VI.Proxan Options
When you define the reference and the active
colours to Proxan it determines their position on the HS
circle. It draws two radii through these points. Then it halves
the angular distance between them and that will be the
acceptance angle for the particular colour. It sounds
complicated, but a simple diagram explains it easily.
R
A
On Figure VI-V you see the colour circle, with R and A
representing the reference and active colours, respectively.
Figure VI-VI shows the same colours with the radii passing
through them. The dashed line is the colour midway
between them and α is half of the angle between R and A.
Figure VI-VII shows the circumference of the circle
mapped to a line. The R and A markers represent the points
where their respective radii intersect the circumference. The
shaded trapezoids below show the acceptance level of
any particular H value for reference or active colour, or to
use fuzzy set terminology, the membership functions for R
and A.
As you can see, as colours change from green to
yellowish green, the colour more and more starts to belong
to the reference. From yellowish green to orange the colours
all considered to be reference colours. From orange to red
all colours do still belong to the reference, but they slowly
start to belong to the active objects as well. Red is both
reference and active in the same time. From red to reddishmagenta the colour keeps to mark an active object while in
a lesser and lesser degree it still also indicates a reference
object. From reddish-magenta to pure magenta all colours
belong solely to the active objects and from magenta to
blue the colours decreasingly indicate the presence of an
active object. Colours from blue to green do not indicate
either active or reference objects.
R
Figure VI-V HS circle with selected colours
R
A
α
Figure VI-VI HS circle with acceptance angle
A
Figure VI-VII Colour acceptance functions
21
Bendor Research Pty. Ltd.
On Figure VI-VIII you can see the colour circle again, with 4
colours marked on it, numbered from 1 to 4 as well as the active
and reference colours.
2
R
1
Proxan User's Manual
A
3
4
Figure VI-VIII Classification of various
colours
1
When Proxan classifies the samples 1 to 4, it maps them to
the linear representation of the circumference of the colour circle
and calculates their membership value in the active and
reference colours. This is shown on Figure VI-IX. In our example,
colour 1 will 100% belong to the reference objects, colour 2 will be
100% active and in the same time about 35% reference. Colour 3
indicates an about 45% presence of an active object. Colour 4
does not indicate either active or passive objects and is simply
ignored by Proxan.
These percentages do not fully classify a pixel. For each pixel
Proxan calculates an intensity value that is dependent on the
selected microscope type, the actual brightness of the pixel and
the saturation of the colour. Then, according to the classification
results, the pixel will receive its 'reference' and 'active' value.
R
2
A
3
Figure VI-IX Colour classification results
After the above described process Proxan ends up with two values for each pixel. These
values indicate the calculated active intensity and reference intensity of the pixel. In effect, Proxan
ended up with a new image, using only two colours.
First, if the reference and active colours are close to each other, then the acceptance region
will be very narrow. Consequently, you have to set the colours very precisely if you want Proxan to
recognise your objects. Secondly, Proxan's colour classification works on the colour similarity basis
and not by component values. Consequently, if a pixel has a colour that by human perception
does not resemble either the active or the reference colours, Proxan will not assign that pixel to
either set. This might be a problem, if you use triple labelled images. Say you label your images with
red, green and blue. Your reference colours are red and green. If blue is not present in a pixel,
Proxan works fine. However, if there is a lot of blue and not that much red and green, then Proxan
will simply discard the pixel. Its hue will be outside the acceptance region, even though it contains
both red and green. Do not give triple labelled images to Proxan. If you want to analyse them, use
an image manipulation program to eliminate the third label.
22
VII.Appendix: The GNU General Public License
VII. APPENDIX: THE GNU GENERAL PUBLIC LICENSE
GNU GENERAL PUBLIC LICENSE
Version 2, June 1991
Copyright (C) 1989, 1991 Free Software Foundation, Inc.
59 Temple Place, Suite 330, Boston, MA 02111-1307 USA
Everyone is permitted to copy and distribute verbatim copies
of this license document, but changing it is not allowed.
Preamble
The licenses for most software are designed to take away your freedom to share and change
it. By contrast, the GNU General Public License is intended to guarantee your freedom to share and
change free software -- to make sure the software is free for all its users. This General Public License
applies to most of the Free Software Foundation's software and to any other program whose
authors commit to using it. (Some other Free Software Foundation software is covered by the GNU
Library General Public License instead.) You can apply it to your programs, too.
When we speak of free software, we are referring to freedom, not price. Our General Public
Licenses are designed to make sure that you have the freedom to distribute copies of free software
(and charge for this service if you wish), that you receive source code or can get it if you want it,
that you can change the software or use pieces of it in new free programs; and that you know you
can do these things.
To protect your rights, we need to make restrictions that forbid anyone to deny you these
rights or to ask you to surrender the rights. These restrictions translate to certain responsibilities for you
if you distribute copies of the software, or if you modify it.
For example, if you distribute copies of such a program, whether gratis or for a fee, you must
give the recipients all the rights that you have. You must make sure that they, too, receive or can
get the source code. And you must show them these terms so they know their rights.
We protect your rights with two steps: (1) copyright the software, and (2) offer you this license
which gives you legal permission to copy, distribute and/or modify the software.
Also, for each author's protection and ours, we want to make certain that everyone
understands that there is no warranty for this free software. If the software is modified by someone
else and passed on, we want its recipients to know that what they have is not the original, so that
any problems introduced by others will not reflect on the original authors' reputations.
Finally, any free program is threatened constantly by software patents. We wish to avoid the
danger that redistributors of a free program will individually obtain patent licenses, in effect making
the program proprietary. To prevent this, we have made it clear that any patent must be licensed
for everyone's free use or not licensed at all.
The precise terms and conditions for copying, distribution and modification follow.
23
Bendor Research Pty. Ltd.
Proxan User's Manual
GNU GENERAL PUBLIC LICENSE
TERMS AND CONDITIONS FOR COPYING, DISTRIBUTION AND MODIFICATION
0. This License applies to any program or other work which contains a notice placed by the
copyright holder saying it may be distributed under the terms of this General Public License. The
"Program", below, refers to any such program or work, and a "work based on the Program" means
either the Program or any derivative work under copyright law: that is to say, a work containing the
Program or a portion of it, either verbatim or with modifications and/or translated into another
language. (Hereinafter, translation is included without limitation in the term "modification".) Each
licensee is addressed as "you".
Activities other than copying, distribution and modification are not covered by this License;
they are outside its scope. The act of running the Program is not restricted, and the output from the
Program is covered only if its contents constitute a work based on the Program (independent of
having been made by running the Program). Whether that is true depends on what the Program
does.
1. You may copy and distribute verbatim copies of the Program's source code as you receive
it, in any medium, provided that you conspicuously and appropriately publish on each copy an
appropriate copyright notice and disclaimer of warranty; keep intact all the notices that refer to this
License and to the absence of any warranty; and give any other recipients of the Program a copy
of this License along with the Program. You may charge a fee for the physical act of transferring a
copy, and you may at your option offer warranty protection in exchange for a fee.
2. You may modify your copy or copies of the Program or any portion of it, thus forming a
work based on the Program, and copy and distribute such modifications or work under the terms of
Section 1 above, provided that you also meet all of these conditions:
a) You must cause the modified files to carry prominent notices stating that you
changed the files and the date of any change.
b) You must cause any work that you distribute or publish, that in whole or in part
contains or is derived from the Program or any part thereof, to be licensed as a whole at no charge
to all third parties under the terms of this License.
c) If the modified program normally reads commands interactively when run, you must
cause it, when started running for such interactive use in the most ordinary way, to print or display
an announcement including an appropriate copyright notice and a notice that there is no
warranty (or else, saying that you provide a warranty) and that users may redistribute the program
under these conditions, and telling the user how to view a copy of this License. (Exception: if the
Program itself is interactive but does not normally print such an announcement, your work based on
the Program is not required to print an announcement.)
These requirements apply to the modified work as a whole. If identifiable sections of that work
are not derived from the Program, and can be reasonably considered independent and separate
works in themselves, then this License, and its terms, do not apply to those sections when you
distribute them as separate works. But when you distribute the same sections as part of a whole
which is a work based on the Program, the distribution of the whole must be on the terms of this
License, whose permissions for other licensees extend to the entire whole, and thus to each and
every part regardless of who wrote it.
24
VII.Appendix: The GNU General Public License
Thus, it is not the intent of this section to claim rights or contest your rights to work written
entirely by you; rather, the intent is to exercise the right to control the distribution of derivative or
collective works based on the Program.
In addition, mere aggregation of another work not based on the Program with the Program
(or with a work based on the Program) on a volume of a storage or distribution medium does not
bring the other work under the scope of this License.
3. You may copy and distribute the Program (or a work based on it, under Section 2) in
object code or executable form under the terms of Sections 1 and 2 above provided that you also
do one of the following:
a) Accompany it with the complete corresponding machine-readable source code,
which must be distributed under the terms of Sections 1 and 2 above on a medium customarily
used for software interchange; or,
b) Accompany it with a written offer, valid for at least three years, to give any third
party, for a charge no more than your cost of physically performing source distribution, a complete
machine-readable copy of the corresponding source code, to be distributed under the terms of
Sections 1 and 2 above on a medium customarily used for software interchange; or,
c) Accompany it with the information you received as to the offer to distribute
corresponding source code. (This alternative is allowed only for noncommercial distribution and
only if you received the program in object code or executable form with such an offer, in accord
with Subsection b above.)
The source code for a work means the preferred form of the work for making modifications to
it. For an executable work, complete source code means all the source code for all modules it
contains, plus any associated interface definition files, plus the scripts used to control compilation
and installation of the executable. However, as a special exception, the source code distributed
need not include anything that is normally distributed (in either source or binary form) with the major
components (compiler, kernel, and so on) of the operating system on which the executable runs,
unless that component itself accompanies the executable.
If distribution of executable or object code is made by offering access to copy from a
designated place, then offering equivalent access to copy the source code from the same place
counts as distribution of the source code, even though third parties are not compelled to copy the
source along with the object code.
4. You may not copy, modify, sublicense, or distribute the Program except as expressly
provided under this License. Any attempt otherwise to copy, modify, sublicense or distribute the
Program is void, and will automatically terminate your rights under this License. However, parties
who have received copies, or rights, from you under this License will not have their licenses
terminated so long as such parties remain in full compliance.
5. You are not required to accept this License, since you have not signed it. However, nothing
else grants you permission to modify or distribute the Program or its derivative works. These actions
are prohibited by law if you do not accept this License. Therefore, by modifying or distributing the
Program (or any work based on the Program), you indicate your acceptance of this License to do
so, and all its terms and conditions for copying, distributing or modifying the Program or works based
on it.
25
Bendor Research Pty. Ltd.
Proxan User's Manual
6. Each time you redistribute the Program (or any work based on the Program), the recipient
automatically receives a license from the original licensor to copy, distribute or modify the Program
subject to these terms and conditions. You may not impose any further restrictions on the recipients'
exercise of the rights granted herein. You are not responsible for enforcing compliance by third
parties to this License.
7. If, as a consequence of a court judgment or allegation of patent infringement or for any
other reason (not limited to patent issues), conditions are imposed on you (whether by court order,
agreement or otherwise) that contradict the conditions of this License, they do not excuse you from
the conditions of this License.If you cannot distribute so as to satisfy simultaneously your obligations
under this License and any other pertinent obligations, then as a consequence you may not
distribute the Program at all. For example, if a patent license would not permit royalty-free
redistribution of the Program by all those who receive copies directly or indirectly through you, then
the only way you could satisfy both it and this License would be to refrain entirely from distribution of
the Program. If any portion of this section is held invalid or unenforceable under any particular
circumstance, the balance of the section is intended to apply and the section as a whole is
intended to apply in other circumstances.
It is not the purpose of this section to induce you to infringe any patents or other property right
claims or to contest validity of any such claims; this section has the sole purpose of protecting the
integrity of the free software distribution system, which is implemented by public license practices.
Many people have made generous contributions to the wide range of software distributed through
that system in reliance on consistent application of that system; it is up to the author/donor to
decide if he or she is willing to distribute software through any other system and a licensee cannot
impose that choice. This section is intended to make thoroughly clear what is believed to be a
consequence of the rest of this License.
8. If the distribution and/or use of the Program is restricted in certain countries either by
patents or by copyrighted interfaces, the original copyright holder who places the Program under
this License may add an explicit geographical distribution limitation excluding those countries, so
that distribution is permitted only in or among countries not thus excluded. In such case, this License
incorporates the limitation as if written in the body of this License.
9. The Free Software Foundation may publish revised and/or new versions of the General
Public License from time to time. Such new versions will be similar in spirit to the present version, but
may differ in detail to address new problems or concerns.
Each version is given a distinguishing version number. If the Program specifies a version
number of this License which applies to it and "any later version", you have the option of following
the terms and conditions either of that version or of any later version published by the Free Software
Foundation. If the Program does not specify a version number of this License, you may choose any
version ever published by the Free Software Foundation.
10. If you wish to incorporate parts of the Program into other free programs whose distribution
conditions are different, write to the author to ask for permission. For software which is copyrighted
by the Free Software Foundation, write to the Free Software Foundation; we sometimes make
exceptions for this. Our decision will be guided by the two goals of preserving the free status of all
derivatives of our free software and of promoting the sharing and reuse of software generally.
26
VII.Appendix: The GNU General Public License
NO WARRANTY
11. BECAUSE THE PROGRAM IS LICENSED FREE OF CHARGE, THERE IS NO WARRANTY FOR THE
PROGRAM, TO THE EXTENT PERMITTED BY APPLICABLE LAW. EXCEPT WHEN OTHERWISE STATED IN
WRITING THE COPYRIGHT HOLDERS AND/OR OTHER PARTIES PROVIDE THE PROGRAM "AS IS" WITHOUT
WARRANTY OF ANY KIND, EITHER EXPRESSED OR IMPLIED, INCLUDING, BUT NOT LIMITED TO, THE
IMPLIED WARRANTIES OF MERCHANTABILITY AND FITNESS FOR A PARTICULAR PURPOSE. THE ENTIRE
RISK AS TO THE QUALITY AND PERFORMANCE OF THE PROGRAM IS WITH YOU. SHOULD THE PROGRAM
PROVE DEFECTIVE, YOU ASSUME THE COST OF ALL NECESSARY SERVICING, REPAIR OR CORRECTION.
12. IN NO EVENT UNLESS REQUIRED BY APPLICABLE LAW OR AGREED TO IN WRITING WILL ANY
COPYRIGHT HOLDER, OR ANY OTHER PARTY WHO MAY MODIFY AND/OR REDISTRIBUTE THE
PROGRAM AS PERMITTED ABOVE, BE LIABLE TO YOU FOR DAMAGES, INCLUDING ANY GENERAL,
SPECIAL, INCIDENTAL OR CONSEQUENTIAL DAMAGES ARISING OUT OF THE USE OR INABILITY TO USE
THE PROGRAM (INCLUDING BUT NOT LIMITED TO LOSS OF DATA OR DATA BEING RENDERED
INACCURATE OR LOSSES SUSTAINED BY YOU OR THIRD PARTIES OR A FAILURE OF THE PROGRAM TO
OPERATE WITH ANY OTHER PROGRAMS), EVEN IF SUCH HOLDER OR OTHER PARTY HAS BEEN ADVISED
OF THE POSSIBILITY OF SUCH DAMAGES.
END OF TERMS AND CONDITIONS
27