1
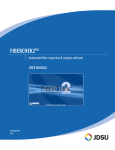
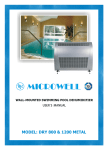
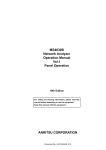
SA3C50A Operation Manual Read this manual before using the equipment. Keep this manual with the equipment. Tokyo Gas Engineering Co., Ltd. For Safety Prior to using this product, please read the “For Safety” section to ensure safe and appropriate usage In this operation manual and product labels, the methods for safely using this product, methods for avoiding danger by users and others, and various cautions are indicated by picture symbols. The degree of danger, potential harm, and urgency in case of incorrect operation are indicated by DANGER, WARNING, and CAUTION. Each of these indications denotes important safety-related items. Be sure to observe these items. The symbols and their meanings are as follows. Degree of Injury/Damage and Corresponding Safety Symbol DANGER WARNING CAUTION This indicates dangerous contents that are very likely to result in serious injury or death for the user if this symbol is ignored, and operation is not performed properly. This indicates contents that could result in serious injury or death for the user if this symbol is ignored, and operation is not performed properly. This indicates contents that could result in injury for the user or physical damage of the product if this symbol is ignored, and operation is not performed properly. Safety Symbols Used on This Product and in This Manual This indicates a prohibited operation. The prohibited operation is indicated symbolically in or near the barred circle. This indicates an obligatory safety precaution. The obligatory operation is indicated symbolically in or near the circle. This indicates warning or caution. The contents are indicated symbolically in or near the triangle. This indicates a note. The contents are described in the box. This indicates that the marked part should be recycled. i For Safety SA3C50A LaserMethane Operation Manual 22 January 2013 (First Edition) 05 April 2013 (Second Edition) All rights reserved. No part of this manual may be reproduced without the prior written permission of the publisher. The contents of this manual may be changed without prior notice. Copyright© 2013, Tokyo Gas Engineering Co., Ltd. Printed in Japan ii For Safety DANGER This product, battery charger, and battery pack do not feature an intrinsically safe design. Never use the product in locations where may contain explosive gas. Do not use a battery pack and a battery charger other than the dedicated battery pack and battery charger for this product. Do not use this product in case of an anomaly such as smoke or strange smell. Continuing to use the product under such conditions may cause fire or electric shock. In case of an anomaly, immediately take the Actions indicated below. Do not use the product if its’ outer body (case) is broken, as this may cause fire or electric shock. Immediately take the Actions indicated below. Do not use the product if water or foreign objects have gotten inside. Continuing to use the product under such conditions may cause fire or electric shock. Immediately take the Actions indicated below. [Actions] • • • • Switch off the power of the product. Remove the battery pack from the main unit. Disconnect the power plug of the battery charger from the power outlet. Contact Customer Service. iii For Safety DANGER Incorrect handling of the battery pack may cause fire, electric shock, or an explosion. Be sure to observe the following points. • • • • • • • • • • iv Do not use a battery pack other than the dedicated battery pack for this product. When inserting the battery pack in the main unit (or battery charger), do so by observing the specified directions. Do not charge the battery pack with a method other than that described in the Operation Manual. Do not store or carry the battery pack together with metal objects such as coins, keys, or chain. Do not dismantle, damage, or heat the outer body (chassis) of the battery pack. Do not throw the battery pack into fire. Do not use, store, or discard the battery pack in a place with high temperature (near a fire, a place exposed to direct sunlight, in a car under the blazing sun, etc.). Do not expose the battery pack to water, oil, or other liquids, and do not use it in locations with high humidity. Do not use the battery pack when it leaks. When not using the product for a long time, remove the battery pack from the main unit. For Safety WARNING Do not disassemble the main unit. This may cause electric shock leading to death, burns, or injury. For internal inspections, adjustments, or repairs, be sure to contact Customer Service. Incorrect use of the battery charger may cause fire or electric shock. Be sure to observe the following points. • • • • • • Do not expose the battery charger to water, oil, or other liquids, and do not use it in locations with high humidity. Do not use the battery charger while its outer body (chassis) is broken. Do not use a damaged AC cord (exposed wires, broken wires, etc.) Do not damage the AC cord, break it, process it, bend it forcefully, pull on it, twist it, roll it up, cover it with heavy objects, fix it with nails or wire, or heat it up. Do not connect the AC cord to a multi-outlet such as a cable tap or a current tap socket. When inserting the power plug of the AC cord to a power outlet or the battery charger, be sure to insert it securely. Do not look at the laser light or direct it toward people while the product is powered, as this may cause harmful exposure and injury. Be sure to observe the following points. • • • Do not cast laser light directly into the eyes. Absolutely never look directly into the laser light. Do not let children handle the product. Never charge the battery pack in locations where may contain explosive gas. v For Safety CAUTION Do not subject the main unit, battery charger, and battery pack to strong shocks or vibrations, because this may cause failure. Do not forcefully push the display or subject it to strong shocks, because this may cause the display screen to break. Do not use the product and battery charger in locations where heat builds up, because this may cause fire. Be sure to observe the following points. • • • Do not charge the unit on soft furnishings (cushions, bedding, furniture etc). Do not cover the product and battery charger with a tablecloth, etc. Do not use the product and battery charger in a location with poor air circulation such as inside a box. Improper use of the battery charger may cause fire or electric shock. Be sure to observe the following points. • • • • If lightning occurs nearby, remove the power plug of the AC adapter from the power outlet and do not use it until the lightning stops. Once charging of the battery pack has been completed, remove the battery pack from the battery charger. When removing the power plug of the AC adapter from the power outlet or the battery charger, be sure to grasp the power plug instead of the AC cord. Do not let the AC cord near thermal appliances. The battery pack becomes hot during charging. Be careful when handling it. Do not keep looking at the detection lamp for a long time. This may cause dazzling, which can possibly cause a secondary accident. In case the detection lamp is unnecessary, this function can be disabled by changing the setting. (See 6. Detecion Lamp of 5.3 Changing Settings) vi For Safety CAUTION If you store the main unit with the battery pack installed for more than two months, the battery in the battery pack will be over-discharged and become unusable. Do not use over-discharged battery because it is not safe. Buy a new battery pack. Regularly charge the battery pack once a month. When using this product, be careful with electrostatic discharge. It is necessary for this product to restart because of the electrostatic discharge. When using the product, be sure to use the strap. Breakage, failure, and foot injury caused by a dropping of the product can be prevented by using the strap. Accurate gas measurement may not be possible in the vicinity of other electric devices or industrial equipment that produces electrical noise. In this case, perform gas measurement with the product a little farther away. Do not use the product in locations where hydrogen sulfide occurs (such as hot springs), or locations with a lot of salt (such as the seacoast), because this may shorten the life of the product. When storing the product, be sure to observe the following points. • • • Do not store the product in extremely hot locations such as inside a car, or in cold locations directly exposed to outside air. Avoid storing the product in locations where it can be exposed to strong vibrations. Storing the battery pack in high temperatures may shorten its life, so store it at 30°C or lower. vii For Safety CAUTION When transporting the main unit and battery charger, be sure to observe the following points. • • When transporting the main unit and battery charger in a car, etc., be sure to protect the product from direct vibrations and shocks. When shipping the main unit, battery pack, or battery charger for repair, etc., place shock absorbing material in the shipping box. Do not direct the guide laser light at the strong light such as the sunlight for a long time. It may damage inside of the product. Do not peel off the security labels on the product. Warranty shall become void by any tampering with the security labels. viii For Safety WARNING Laser Safety The Measurement light beam radiation in this product is classified as Class 1 according to the IEC 60825-1 specifications. The guide light beam radiation is classified as Class 3R according to the IEC 60825-1 specifications. Classes are indicated on the label attached to the top of the product (Refer to “Laser Radiation Markings”). Do not look into the laser guide light directly, because the laser radiation might harm your eyes. Do not use towards other people while the product is powered. The output of the laser guide light can be confirmed with an indication of [LASER] on the display. Class 1 and 3R indicate the danger degree of the laser beam specified below according to IEC 60825-1. Class 1: Laser radiation that is safe under reasonably foreseeable conditions of operation, including the use of optical instruments for intrabeam viewing. Class3R: Lasers that emit in the wavelength range from 302,5 nm to 106 nm where direct intrabeam viewing is potentially hazardous but the risk is lower than for Class 3B lasers, and fewer manufacturing requirements and control measures for the user apply than for Class 3B lasers. The accessible emission limit is within five times the AEL (Accessible Emission Limit) of Class 2 in the wavelength range from 400 nm to 700 nm and within five times the AEL of Class 1 for other wavelengths. ix For Safety Laser Radiation Markings [Front side] [Back side] Specification concerning laser radiation 1. Laser Safety Classifications Based on IEC 60825-1:2007 2. Incorporated laser Specification ■Measurement light beam radiation(Class 1 Laser) ■Measurement light beam radiation ・Maximum output power:10mW or less ・Pulse width:CW ・Pulse width:CW ・Wavelength:1653nm ・Wavelength:1653nm ・Beam extension in collimated beam:8.5mrad or less ・Beam extension in collimated beam:8.5mrad or less ・Embedded laser output level : 60mW or less ■Guide light beam radiation(Class 3R Laser) ■Guide light beam radiation ・Maximum output power:5mW or less ・Pulse width / Pulse period:CW , 100ms / 200ms ・Pulse width / Pulse period:CW , 100ms / 200ms ・Wavelength:532nm ・Wavelength:532nm ・Beam extension in collimated beam:1.5mrad or less ・Beam extension in collimated beam:1.5mrad or less ・Embedded laser output level : 5mW or less CAUTION Use of controls or adjustments or performance of procedures other than those specified herein may result in hazardous radiation exposure. x For Safety WARNING Thank you for cooperating with recycling of the nickel-hydride battery. This product uses a nickel-hydride battery pack. This battery pack includes rare materials such as nickel oxide and hydrogen storage alloys that can be recycled as precious resources. After implementing the safety measures listed below for the used battery pack, contact Customer Service. For the sake of safety, recycle the battery packs that are no longer used after discharging them in procedures as follows. • • • • • • Insert the battery pack in the main unit. Switch on the power of the main unit. Until the empty screen is indicated, leave the main unit (indicating that the battery pack is discharged). Remove the battery pack from the main unit. Tape insulating tape such as vinyl tape on the contact part of the battery pack (to prevent short-circuit accidents caused by the residual electricity in the battery pack). Contact Customer Service and ask for instructions regarding the recycling method. xi For Safety CAUTION Bluetooth Communication Function If either this product or the Android device is placed in a metal case, connection may not be established. After connection is established, if this product or the Android device is placed in a metal case, communication may be disconnected, communication distance become shorter, or each of the devices cannot communicate correctly. Please use this product and the Android device without putting in a metal case. If the Bluetooth function of this product is used near the equipment with the wireless LAN (IEEE802.11b/g), the communication speed of wireless LAN may be degraded. In addition, communication speed between this product and the Android device may also be degraded, or the communication may be disconnected. So in this case, turn off the wireless LAN or please use this product and the Android device away from the equipment with the wireless LAN. The communication distance between this product and the Android device is approximately 10 m. However, it is increased or decreased by the environment of usage or radio wave conditions. The radio wave of 2.4 GHz band used as Bluetooth communication may affect the medical electronic devices. When this product is used at the place that there is medical electronic devices, be careful about the effect to the medical electronic devices. If the divulging of measurement data or information is happened, Tokyo Gas Engineering Co., Ltd. shall not be liable. xii Warranty Tokyo Gas Engineering Co., Ltd. offers a 12-month warranty from date of purchase and provides free repair of any faults arising from manufacturing defects. However, the following cases are not covered by the warranty. • • • • • • • Faults that do not fall within the scope of the warranty listed in the Operation Manual Faults caused by improper operation, use, unautorized modifications, dismantling, or repairs on the part of the customer Faults caused by heavy use that clearly exceeds normal use Faults caused by improper or insufficient maintenance on the part of the customer Unavoidable faults arising from fires, floods, earthquakes, other acts of God, etc. Faults caused by connecting any other products, parts, or consumables other than the specified ones Faults caused by a power supply, usage location, etc., other than the specified ones Among damages that arise from defects in this product, Tokyo Gas Engineering Co., Ltd. shall not be liable for damages and loss of business of the customer that arise from unforeseeable and special circumstances. Inquiries to Tokyo Gas Engineering Co., Ltd. In the case of faults in the product, promptly contact Customer Service listed at the end of this manual. xiii Electromagnetic Interference This product complies with the EC Directive on CE Marking and is targeted for use in industrial environments. Note, however, that if this product is used near a radio or television receiver, reception interference may occur. Also note that the product may be unable to detect gas properly if used near an electrical product or industrial product that generates a strong magnetic field or electrical noise. Notes In Regard To Use Ensure the following points. • • Upon handling this product, please take sufficient precautions against static electricity. Please use this product in an environmemt where sufficient measures are implemented against static electricity. This product is not an intrinsically safe product. Never use the product in location that contain explosive gas. Crossed-out Wheeled Bin Symbol Equipment marked with the Crossed-out Wheeled Bin Symbol complies with the Council Directive 2002/96/EC (the “WEEE Directive”) in the European Union. For products develop in the EU market after August 13, 2005, please contact Tokyo Gas Engineering Co., Ltd. at the end of the product’s useful life to arrange disposal in accordance with your initial contract and local law. xiv Radio law certification This product is certified by the radio law of japan, United States, and Canada only. If you use this product in other countries requiring certification, contact Customer Service or your local sales agent. Trademark acknowledgments Android is owned by the Google Inc. Google and Google Maps are owned by the Google Inc. The Bluetooth logo is owned by the Bluetooth SIG, Inc. and any use of such marks by Tokyo Gas Engineering Co., Ltd. is under license. Other trademarks and trade names are those of their respective owners. TM or ® mark is not specified in this operation manual. xv CE Conformity marking Tokyo Gas Engineering Co., Ltd. affixes the CE Conformity marking on the following product (s) in accordance with the Council Directive 93/68/EEC to indicate that they conform to the EMC and R&TTE Directive of the European Union (EU). CE marking 1. Product Model Model: SA3C50A LaserMethane mini-G and Accessories: SA0Z51A BATTERY PACK SA0Z52A BATTERY CHARGER SA0Z47A AC ADAPTER SET SA0Z44B STRAP (Long type) SA0Z41A PROTECT COVER 2. Applied Directive EMC: Council Directive 2004/108/EC R&TTE: Council Directive 1999/5/EC xvi 3. Applied Standards EMC: Emission: EN61326-1: 2006 Immunity: EN61326-1: 2006 IEC61000-4-2 (ESD) IEC61000-4-3 (EMF) IEC61000-4-4 (Burst) IEC61000-4-5 (Surge) IEC61000-4-6 (CRF) IEC61000-4-8 (RPFMF) IEC61000-4-11 (V dip/short) SA3C50 SA3C50A 50A SA0Z5 SA0Z52A Performance Criteria* – √ √ – – – – – B A B B A A C √ – – – – – *: Performance Criteria A: Normal performance within the specification limits during testing. B: Temporary degradation, or functional loss, which self-recovers during testing. C: Temporary functional loss is allowed, provided that the function is self-recoverable or the operational control can be restored. The power consumption of the AC ADAPTER is 29.70W, which is less than 75W and no limits apply. Therefore it is deemed to comply with EN61000-3-2 without any testing. xvii R&TTE: HEALTH & SAFETY (Article 3.1(a)): EN60950-1:2006 +A11:2009 +A1:2010 +A12:2011 *) EN62479:2010 *) EMC (Article 3.1(b)): EN 301 489-1 V1.9.2 (2011-09) EN 301 489-17 V2.2.1 (2012-09) SPECTRUM (Article 3.2) EN 300 328 V1.7.1 (2006-10) *) *)These standards are applied to the radio modem only. xviii C-Tick Conformity marking Tokyo Gas Engineering Co., Ltd. affixes the C-Tick marking on the following product (s) in accordance with the regulation to indicate that they conform to the EMC framework of Australia/New Zealand. C-Tick marking 1. Product Model Model: SA3C50A LaserMethane mini-G and Accessories: SA0Z51A BATTERY PACK SA0Z52A BATTERY CHARGER SA0Z47A AC ADAPTER SET SA0Z44B STRAP (Long type) SA0Z41A PROTECT COVER 2. Applied Standards EMC: Emission: AS/NZS 2064.1/2 (ISM, Group 1, Class A equipment) xix FCC Regulations This equipment has been tested and found to comply with the limits for a Class B digital device, pursuant to part 15 of the FCC Rules. These limits are designed to provide reasonable protection against harmful interference in a residential installation. This equipment generates, uses and can radiate radio frequency energy and, if not installed and used in accordance with the instructions, may cause harmful interference to radio communications. However, there is no guarantee that interference will not occur in a particular installation. If this equipment does cause harmful interference to radio or television reception, which can be determined by turning the equipment off and on, the user is encouraged to try to correct the interference by one or more of the following measures: • Reorient or relocate the receiving antenna. • Increase the separation between the equipment and receiver. • Connect the equipment into an outlet on a circuit different from that to which the receiver is connected. • Consult the dealer or an experienced radio/TV technician for help. Changes or modifications not expressly approved by the party responsible for compliance could void the user’s authority to operate the equipment. This transmitter must not be co-located or operated in conjunction with any other antenna or transmitter. xx RF Exposure Compliance This equipment complies with FCC radiation exposure limits set forth for an uncontrolled environment and meets the FCC radio frequency (RF) Exposure Guidelines in Supplement C to OET65. This equipment has very low levels of RF energy that it deemed to comply without maximum permissive exposure evaluation (MPE). But it is desirable that it should be installed and operated keeping the radiator at least 20cm or more away from person's body (excluding extremities: hands, wrists, feet and ankles). xxi IC Regulations This device complies with Industry Canada licence-exempt RSS standard(s). Operation is subject to the following two conditions: (1) this device may not cause interference, and (2) this device must accept any interference, including interference that may cause undesired operation of the device. Le présent appareil est conforme aux CNR d'Industrie Canada applicables aux appareils radio exempts de licence. L'exploitation est autorisée aux deux conditions suivantes : (1) l'appareil ne doit pas produire de brouillage, et (2) l'utilisateur de l'appareil doit accepter tout brouillage radioélectrique subi, même si le brouillage est susceptible d'en compromettre le fonctionnement. xxii RF Exposure Compliance This equipment complies with IC radiation exposure limits set forth for an uncontrolled environment and meets RSS-102 of the IC radio frequency (RF) Exposure rules. This equipment has very low levels of RF energy that it deemed to comply without maximum permissive exposure evaluation (MPE). But it is desirable that it should be installed and operated keeping the radiator at least 20cm or more away from person's body (excluding extremities: hands, wrists, feet and ankles). Cet équipement est conforme aux limites d’exposition aux rayonnements énoncées pour un environnement non contrôlé et respecte les règles d’exposition aux fréquences radioélectriques (RF) CNR-102 de l’IC. Cet équipement émet une énergie RF très faible qui est considérée conforme sans évaluation de l’exposition maximale autorisée. Cependant, cet équipement doit être installé et utilisé en gardant une distance de 20 cm ou plus entre le dispositif rayonnant et le corps (à l’exception des extrémités : mains, poignets, pieds et chevilles). xxiii FCC/IC ID Drawing [Back side] xxiv KC 등록정보 본제품은 아래와 같이 등록되어 있읍니다. KC marking 등록번호 : KCC-RMM-A2J-AD0001 신청자명 : 안리츠주식회사 제품명 : LaserMethane mini-G 모델명 : SA3C50A LaserMethane mini-G 제조년월 : 본체라벨에 기재 제조자명 : 안리츠주식회사 제조국 : 일본 위험 해당 무선설비는 전파혼신 가능성이 있으므로 인명안전과 관련된 서비스는 할 수 없습니다 주의 A 급 기기 (업무용 방송통신기자재) 이 기기는 업무용(A 급) 전자파적합기기로서 판매자 또는 사용자는 이 점을 주의하시기 바라며, 가정외의 지역에서 사용하는 것을 목적으로 합니다. xxv The following are the provisions of “Measures for Administration of the Pollution Control of Electronic Information Product” of the People’s Republic of China. They are applicable only in the People’s Republic of China. 关于符合中国《电 电子信息产品污染控制管理办法》的声明 产品中有毒有害物质或元素的名称及含量 部件名称 有毒有害物质或元素 镉 (Cd) 六价铬 [Cr(Ⅵ)] 多溴联苯 (PBB) 多溴二苯醚 (PBDE) × ○ ○ 印刷线路板 (PCA) ○ 汞 (Hg) × 铅 (Pb) × 机壳、支架 (Chassis) × ○ × × ○ ○ 其他(电缆、风扇、 连接器等) (Appended goods) × ○ × × ○ ○ ○:表示该有毒有害物质在该部件所有均质材料中的含量均在 SJ/T 11363-2006 标准规定的限量要求以下。 ×:表示该有毒有害物质至少在该部件的某一均质材料中的含量超出 SJ/T 11363-2006 标准规定的限量要求。 xxvi 环保使用期限 这个标记是根据 2006/2/28 公布的「电子信息产品污染控制管理 办法」以及 SJ/T 11364-2006「电子信息产品污染控制标识要求」 的规定,适用于在中国销售的电子信息产品的环保使用期限。仅 限于在遵守该产品的安全规范及使用注意事项的基础上,从生产 日起算的该年限内,不会因产品所含有害物质的泄漏或突发性变 异,而对环境污染,人身及财产产生深刻地影响。 注)电池的环保使用期限是 5 年。 xxvii About This Manual This operation manual describes how to use and maintain the SA3C50A LaserMethane (hereinafter, this product). Chapter 1 describes “Outline and Principle” and the following sections provide more detailed explanations. Table of Contents 1. Outline and Principle ......................................................... 1 1.1 Outline ...................................................................................... 1 1.2 Principle ................................................................................... 2 2. Introduction .............................................................................. 3 2.1 Checking Package Contents ........................................... 3 3. Nomenclature ......................................................................... 4 3.1 Main unit .................................................................................. 4 3.2 Display ...................................................................................... 5 4. Preparations Before Use ................................................. 6 4.1 Charging Battery Pack ....................................................... 6 4.2 Attaching Strap ..................................................................... 8 4.3 Attaching Battery Pack...................................................... 9 5. Operation Method .............................................................. 10 5.1 Starting Up and Ending.................................................... 10 5.2 Measurement ...................................................................... 12 5.3 Changing Settings.............................................................. 16 5.4 Automatic Calibration ...................................................... 25 5.5 Indicating Residual Power of Battery Pack ............ 26 5.6 Gas test by customer........................................................ 27 5.7 Connect this product with Android device............... 28 6. Error Messages..................................................................... 29 6.1 Explanation of Errors and Measures.......................... 29 7. IN CASE OF TROUBLE ....................................................... 32 7.1 Problems and Solutions .................................................. 32 8. Daily Maintenance ............................................................. 34 8.1 Maintenance Method ....................................................... 34 9. Main Specifications........................................................... 35 9.1 Main Specifications of Main Unit ................................ 35 9.2 Main Specifications of Battery Charger and AC Adapter .................................................................. 37 10. Ordering Information .................................................... 38 10.1 Main Unit and Standard Accessories...................... 38 11. Inquiries ................................................................................. 39 11.1 Customer Service ............................................................ 39 12. Distributor and Manufacture................................... 40 12.1 Distributor........................................................................... 40 12.2 Manufacture ...................................................................... 40 1. Outline and Principle 1. Outline and Principle 1.1 Outline This product is a handheld gas detector for remote detection of methane and methane-containing gases (natural gas or similar). Gas leakage and accumulation within approximately 30 meters can be detected quickly by directing a laser beam at the area to be inspected. The measuring point is illuminated by a green guide light clearly visible, and then the measured value of methane is displayed on the display in real time. With this product, after connecting to the Android phone or tablet device (hereinafter, Android device) with the Bluetooth, you can transfer measured data to the Android device. On the Android device, data storage and graphical display are possible with a dedicated application software. Moreover, working with the GPS (Global Positioning System) function mounted on the Android device, measurement and location data can be displayed on the Google Maps. 1 1. Outline and Principle 1.2 Principle This product is based on Infrared Absorption Spectroscopy using a semiconductor laser for methane detection. The integrated concentration of methane between this product and the target point is measured by transmitting a detection laser beam towards the target point (gas piping, ceiling, wall, floor, ground, etc.) then detecting a fraction of the diffusely reflected beam from that target point. The measured value is expressed by a methane column density (ppmm): the methane concentration (ppm) multiplied by the thickness (m). Above two examples show the same methane column density In addition, this product does not respond in principle to gases other than methane (butane, propane, etc.). This product cannot perform detection in places where detection laser beam cannot reach, such as the opposite side of a wall or underground. 2 2. Introduction 2. Introduction 2.1 Checking Package Contents Remove the main unit and the supplied accessories from the package and make sure that you have received all the items listed below. If there are any missing or damaged items, immediately contact Customer Service. Main unit Main unit: 1 unit Battery pack: 1 pc. Standard Accessories Battery charger: 1 unit AC adapter: 1 unit (AC cord: 1 pc.) Protect cover: 1 pc. Operation manual (this manual): 1 vol. 3 Strap: 1 pc. 3. Nomenclature 3. Nomenclature 3.1 Main unit Detection lamp Display Menu/Enter button ▲▼ buttons Power button Start/Stop button Display/Back button Battery pack fixing screw Battery pack Light receiver Guide light output window Measurement light output window 4 3. Nomenclature 3.2 Display Numeric Mode Connection indicator to Android device Reflection intensity bar Alarm level Maximum measured value during continuous operation Measured value Laser beam output display (displayed when laser beam is on) Sound volume level Battery Mark Meter display of current measurement value Unit (ppmm / vol%m / %LELm) Bluetooth indicator (only displayed when Bluetooth is enabled) Offset indicator displayed when (only offset is enabled and set) Graph Mode Reflection intensity bar Measured value axis Alarm level Laser light output display (displayed when laser light is on) Measured value Sound volume level Battery Mark Bluetooth indicator (only displayed when Bluetooth is enabled) ❖ Measured value graph (most recent values measured over the last 25 seconds) Time axis Unit (ppmm / vol%m / %LELm) Maximum measured value during continuous operation Offset indicator (only displayed when offset is enabled and set) When the remaining battery level is shown in the figure on the right, the power will switch off in approx.15 min. If this symbol appears, recharge the battery pack. (See “4.1 Charging Battery Pack”) 5 4. Preparations Before Use 4. Preparations Before Use 4.1 Charging Battery Pack Charging Method 1. Connect the battery charger, AC adapter, AC cord, and power outlet in the sequence shown below, (1-2-3). Power outlet Battery charger 2. AC adapter AC cord Attach the battery pack so that the corner of the battery pack coincides with the ∆ mark on the battery charger (slide the battery pack securely all the way to the end). ❖ Explanation of LED display of battery charger ・ The orange LED, when lit, indicates that charging is in progress. ・ The green LED, when lit, indicates that charging has been completed. ・ The red LED, when lit, indicates an anomaly. DANGER When the red LED of the battery charger lights up, immediately disconnect the power plug of the battery charger from the power outlet, remove the battery pack from the battery charger, and contact Customer Service. 6 4. Preparations Before Use 3. When charging is completed, remove the battery pack from the battery charger by sliding it out. ❖ Disconnect the power plug of the battery charger from the power outlet after charging is completed. CAUTION The battery pack and the battery charger may become hot during charging. WARNING Use the dedicated battery pack only with the dedicated battery charger. Do not use an AC adapter such as a car charger other than the dedicated one. WARNING Never charge the battery pack in a location with flammable gas. WARNING This product, battery charger, and battery pack does not feature an intrinsically safe design. 7 4. Preparations Before Use Replacement Schedule The battery pack has a service life of approximately 500 cycles*. If the operating time of the product becomes extremely short even though it has been fully charged, this indicates that the battery pack has reached the end of its service life. Replace the battery pack with a new one. * This figure is a guideline based on JIS C8708 test conditions. (The actual number of cycles may differ according to the product and the usage conditions.) 4.2 Attaching Strap Attach the strap See the figure on the right. CAUTION To prevent breaking of the product due to dropping, be sure to use it with your hand through the strap. 8 4. Preparations Before Use 4.3 Attaching Battery Pack Attaching the battery pack to the main unit 1. Attach the battery pack so that the corner of the battery pack coincides with the ∆ mark on the main unit. 2. Tighten the two battery pack fixing screws at the base of the battery pack. Removing the battery pack 1. Loosen the two battery pack fixing screws at the base of the battery pack. 2. Remove the battery pack by pulling it sideways to the ∆ mark on the main unit and then pull it up. CAUTION Two months or more, when you do not use it, please remove a battery pack from a main unit. If a battery pack is kept while connecting with a main unit two months or more, there is a case where a battery pack serves as fault electric discharge, and it becomes impossible to use it. 9 5. Operation Method 5. Operation Method 5.1 Starting Up and Ending Switching on the power 1. Press the Power button for approximately 2 seconds. (The product will emit a beeping sound.) 2. The startup screen appears for a few seconds, followed by the self-test screen, which is also displayed for a few seconds. ❖ The startup time may be longer depending on the temperature. ❖ The self-test is a self-diagnostic test for accurate measurement. ❖ After the startup and self-test, if you set the “1. Enable” in the “8. Startup screen Self-test screen Gas test” on the [SETTINGS] screen, the proceeding screen for the gas test to be performed by the customer will be displayed. (See “5.6 Gas test by customer” for details about the gas test.) 3. Once the measurement preparations have been completed, the numeric mode screen shown on the right is displayed, and the product becomes stand-by state of measurement. ❖ The screen can be switched to the graph mode by pressing the Display/Back button. Numeric mode 10 5. Operation Method Switching off the power 1. Press the Power button for approximately 2 seconds. (The product will emit a beeping sound.) 2. The screen will switch off. WARNING Never use the product in locations that contain explosive gas. This product, battery charger, and battery pack does not feature an intrinsically safe design. 11 5. Operation Method 5.2 Measurement 1. Press the Start/Stop button (red button at the center) and direct the guide light toward the area to be measured. ❖ When the measurement is started, the guide light flashes. If you press the Enter button, you can switch the guide light to continuous light. 2. The measured value is displayed as shown on the screen on the right. ❖ If the measured value is displayed in white, the measurement was done Numeric mode Graph mode accurately. ❖ If the measured value is displayed in gray, it is a reference value (this is a value with low measurement accuracy due to insufficient received light intensity.). ❖ To toggle the screen, press the Display/Back button. (numeric mode ↔ graph mode) 12 5. Operation Method 3. To end measurement, press the Start/Stop button again. ❖ During measurement, the measured and maximum values are displayed every 0.5 seconds, and when measurement ends, the data is kept. ❖ The measurement values displayed in the graph mode are the most recent values measured over the last 25 seconds. ❖ If the reflection intensity bars are not indicated in green, try to increase the sensitivity for example by reducing the measuring distance (until four or more bars are lit). ❖ The unit is provided with functions that give an acoustic alarm and a flashing detection lamp when it detects a column density exceeding a preset threshold. (See “5.3 Changing Settings”) CAUTION In ordinary use, please use this product with the flashing guide light. Under the below zero degree environment, please switch to the continuous gide light. Under the low-temperature environment, the flashing guide light power tends to be lower than that of under the normal temperature environment. CAUTION Under the below zero degree environment, the guide light may be dark for a few minutes after this product is started up. When the guide light is switched to the continuous light after a while, the guide light will reaches at the specified brightness. WARNING Laser beam is on while the “LASER” on the display is lit, never direct the laser beam toward people or look into the laser beam output windows. 13 5. Operation Method WARNING When not using this product, be sure to switch it off. WARNING Never use the product in locations that contain explosive gas. This product, battery charger, and battery pack does not feature an intrinsically safe design. 14 5. Operation Method Notes in methane detection 1. Upon measuring highly reflective material such as metallic material, please be careful with situations as shown in Figure A, where two guide lights (green) are visible caused by reflection, which may cause false alarms by indicating high values regardless of the presence of methane. In such case, please point as shown in Figure B, where only a single guide light (green) can be seen. 【Figure-A:Possibility of a false alarm with high values】 Metallic pipes and similar material When two guide lights (green) are visible, there is a possibility of a false alarm with high values. Bottom part or corner of the wall where metallic or similar material is used. 【Figure-B:To get correct value】 Metallic pipes and similar material When only a single guide light (green) is visible, correct values can be obtained. When only a single guide light (green) is visible, correct values can be obtained. 2. For a PE (polyethylene) pipe with a wall thickness of less than 10mm, please note that you may get wrong measurements if you keep pointing the laser directly at the PE pipe, because laser light penetrates through depending on its thickness. 15 5. Operation Method 5.3 Changing Settings Common operations for changing settings The [SETTINGS] screen can be displayed in the two ways. First way; display the [SETTINGS] screen when from the stand-by. 1. Press the Menu/Enter button when the product is powered on and on stand-by. 2. The [SETTINGS] screen shown on the right will be displayed. 3. Select the item from (1 to 9) with the ▲▼ buttons, and then press the Menu/Enter button. ❖ To return to the measurement standby screen, press the Display/Back button. ❖ During the measurement, the [SETTINGS] screen will not be displayed. ❖ If you don’t do the gas test described below, please select the “8. Gas test” in the [SETTINGS] screen. 16 5. Operation Method Second way; display the [SETTINGS] screen when from the power is off. 1. Press the Power button for approx. 2 seconds with the Menu/Enter button kept pressed. (The product will emit a beeping sound.) 2. The [FUNCTION SELECTION] screen shown on the right will be displayed. 3. Select the [2. Settings] with the ▲▼ buttons. 4. Press the Menu/Enter button. 5. The [SETTINGS] screen will be displayed. 6. Select the item from (1 to 9) with the ▲▼ buttons, and then press the Menu/Enter button. ❖ To return to the [FUNCTION SELECTION] screen, press the Display/Back button in the [SETTINGS] screen. ❖ In the case, from the [SETTINGS] screen, it is not possible to go back to the measurement screen. In order to display the measurement standby screen, please switch off the power, and then switch on. ❖ If you don’t do the gas test described below, please select the “8. Gas test” in the [SETTINGS] screen. 17 5. Operation Method 1. Alarm Level The methane column density level at which an alarm threshold can be set. In the main menu select “1. Alarm level” 1. The [ALARM LEVEL] screen shown on the right will be displayed. (The default setting value is 100 ppmm.) 2. Select a value with the ▲▼ buttons for the 1000’s digit, and then press the Menu/Enter button. ❖ To leave the value as indicated just press the Menu/Enter button or the Display/Back button as is. 3. Likewise, select a value for the 100’s digit, 10’s digit, and 1’s digit. 4. Once the setting for the 1’s digit is completed, the buzzer sounds twice to indicate that the setting has been accepted. 5. Your set value will be displayed on the numeric mode and graph mode screen. ❖ The set value is not be reset even when the power is switched off. ❖ The alarm levels can be set up similarly for the other measuring units. (See “7. UNIT” in this section.) CAUTION Set the [Alarm level] greater than the [Offset value]. If the [Alarm level] is not set greater than the [Offset value], the alarm doesn't sound and the detection lamp doesn't flash even when this product detects methane. See [2. Offset Value] about how to set the [Offset value]. 18 5. Operation Method 2. Offset Value The measured value is displayed in the screen when it exceeds the offset value. In the main menu select “2. Offset value” 1. The [OFFSET VAL.] screen shown on the right will be displayed. (The default setting value is 0 ppmm) 2. Select a value with the ▲▼ buttons for the 100’s digit, and then press the Menu/Enter button. ❖ To leave the value as indicated just press the Menu/Enter button or Display/Back button as is. 3. Likewise, select a value for the 10’s digit, and 1’s digit. 4. Once the setting for the 1’s digit is completed, the buzzer sounds twice to indicate that the setting has been accepted. 5. [OFFSET] is shown on the bottom of the display. ❖ The set value will not be reset when the power is switched off. ❖ The offset values can be set up similarly for the other measuring units. (See “7. UNIT” in this section.) ❖ If you enter the offset values greater than the maximum values, the setting screen is not closed, and the offset value is not set. The maximum values for each measuring unit are shown below. UNIT Maximum Value ppmm 500 vol%m 0.05 100%LELm = 4.4 vol%m 1.1 100%LELm = 5.0 vol%m 1.0 %LELm 19 5. Operation Method 3. Sound Volume Level In the main menu select “3. Sound level” 1. The [SOUND LEVEL] screen shown on the right will be displayed. (The default setting value is 2 (middle).) 2. Adjust the sound volume level with the ▲▼ buttons. 3. Press the Menu/Enter button. 4. The set value will be shown on the bottom of the display. ❖ The set value will not be reset even when the power is switched off. 4. Screen Brightness In the main menu select “4. Display” 1. The [DISPLAY] screen shown on the right will be displayed. (The default setting value is 5.) 2. Adjust the brightness with the ▲▼ buttons. 3. Press the Menu/Enter button. ❖ The set value will not be reset even when the power is switched off. 20 5. Operation Method 5. Display Language In the main menu select “5. Language” 1. The [LANGUAGE] screen shown on the right will be displayed. (The default setting value is “1. English”.) 2. Select the language with the ▲▼ buttons. 3. Press the Menu/Enter button. ❖ The set value will not be reset even when the power is switched off. 6. Detection Lamp The detection lamp flashes when the methane column density is over the set Alarm Level. In the main menu select “6. Detect lamp” 1. The [DETECT LAMP] screen shown on the right will be displayed. (The default setting value is “1. Enable”) 2. Select the enable / disable with the ▲▼ buttons. 3. Press the Menu/Enter button. ❖ The set value will not be reset even when the power is switched off. 21 5. Operation Method 7. Unit In the main menu select “7. Unit” 1. The [Unit] screen shown on the right will be displayed. (The default setting value is “1. ppmm”) 2. Select the unit with the ▲▼ buttons. 3. Press the Menu/Enter button. When the “3. %LELm” is selected in the upper right screen, the [Unit] screen shown on the right will be displayed. The lower explosion limit value indicated by the column density can be selected. 1. Select the unit with the ▲▼ buttons. 2. Press the Menu/Enter button. ❖ The set value will not be reset even when the power is switched off. 22 5. Operation Method 8. Gas test Using the gas cell, you can perform the gas test on this product. For the gas test, you should use our approved gas cell. If you have any questions on the gas cell, contact Customer Service or your local sales agent. About the approved gas cell, contact Customer Service or your local sales agent. About proceeding to the gas test, refer to the “5.6 Gas test by customer” for details. In the main menu select “8. Gas test” 1. The [GAS TEST] screen shown on the right will be displayed. (The default setting is “2. Disable”) 2. Select the Enable/Disable with the ▲▼ buttons. 3. Press the Menu/Enter button. ❖ The set value will not be reset even when the power is switched off. ❖ 23 The gas test is performed at the time of startup. 5. Operation Method 9.Bluetooth With this product, by connecting to the Android device with the Bluetooth, you can transfer measurement data to the Android device. On the Android device, data storage and graphical display are possible with a dedicated application software. About the Android device, the dedicated application software, and the proceeding to connection, contact Customer Service or your local sales agent. In the main menu select ”9. Bluetooth” 1. The [Bluetooth] screen shown on the right will be displayed. (The default setting value is “2. Disable”) 2. Select the Enable/Disable with the ▲▼buttons. 3. Press the Menu/Enter button. 4. Bluetooth logo is shown on the bottom of the display. ❖ The set value will not be reset even when the power is switched off. 24 5. Operation Method 5.4 Automatic Calibration If “SELF TEST FAILURE” is displayed at startup, perform an automatic calibration using the procedure below. 1. After making sure that the power of the product is off, press the Power button for approx. 2 seconds with the Menu/Enter button kept pressed. 2. The [FUNCTION SELECTION] screen shown on the right will be displayed. 3. Select the [1. Auto calibration] with the ▲▼ buttons. 4. Press the Menu/Enter button. 5. Automatic calibration will start, and for 2 to 3 minutes, the [AUTO CALIBRATION] screen shown on the right will be displayed. (The progress status can be checked with the count-down counter at the center of the screen.) 6. Upon completion of automatic calibration, the self-test is executed. The numeric mode screen shown to the right will be displayed, and the product will enter stand-by state of measurement. ❖ If automatic calibration does not complete successfully, it is performed again a second time. (Time until completion will be approx. 4 to 5 minutes.) 25 Numeric mode 5. Operation Method 5.5 Indicating Residual Power of Battery Pack The battery mark shown on the display indicates the battery pack residual power. Battery Mark Much Residual Less When the battery power of the battery pack is lost until this product doesn't operate, the empty screen shown on the right will be displayed, and there will be an alarm. 26 5. Operation Method 5.6 Gas test by customer If you set the “1. Enable” on the “8. Gas test” of the [SETTINGS] screen, when this product is started up, you can perform the gas test on this product. 1. After the startup and the self-test, the [GAS TEST] proceeding screen on the right will be displayed. 2. Follow the proceedings, equip the gas cell, and press the Menu/Enter button. 3. The [Gas TEST] will start, and the performance screen shown on the right will be displayed. 4. The result will be shown. Gas test : OK Gas test : NG ❖ About the proceedings of the gas test, methane concentration, and the approved gas cell, contact Customer Service or your local sales agent. ❖ If the [Gas test : NG] is displayed, contact Customer Service or your local sales agent. ❖ You can change the setting of the gas test on the [SETTINGS] screen from when this product is powered off. About how to change the setting of the gas test on the [SETTINGS] screen, please refer to the “Common operations for changing settings” in the “5.3 Changing Settings”. 27 5. Operation Method 5.7 Connect this product with Android device If you set the “1. Enable” in the “9. Bluetooth” of the [SETTINGS] screen, you can transfer the measurement data to Android device with the Bluetooth. 1. After making sure that the Bluetooth logo is displayed in the bottom of the display. 2. Connect this product to the Android device. ❖ About the Android device, the dedicated application software, and the proceeding to connection, contact Customer Service or your local sales agent. 3. Connection between this product and the Android device is successful, [CONNECT] is displayed on the upper left of the screen. ❖ If [CONNECT] does not appear on the upper left of the screen, this product and the Android device are not connected. ❖ If this product is not connected to the Android device, the measurement data cannot be transferred to the Android device. 28 6. Error Messages 6. Error Messages 6.1 Explanation of Errors and Measures When “OPERATION ERROR” is displayed 1. Switch off the power of the product. 2. (After checking that the power is switched off), switch on the power. 3. If the same error reoccurs, perform automatic calibration after making sure that the power of the product is off. ❖ (See “5.4 Automatic Calibration”) If the same error message is displayed repeatedly, request repair. CAUSE The product is not in a measurement-enabled state. When “SELF TEST FAILURE” is displayed 1. Switch off the power of the product. 2. (After checking that the power is switched off), switch on the power. ❖ If the same error message is displayed repeatedly, perform steps 3 and 4 below. 3. Switch off the power. 4. Perform automatic calibration. (See “5.4 Automatic Calibration”) CAUSE The product does not meet the prescribed measurement capability. 29 6. Error Messages When “AUTO CALIBRATION FAILURE” is displayed 1. Switch off the power of the product. 2. (After checking that the power is switched off), perform automatic calibration. (See “5.4 Automatic Calibration”) ❖ If the same error message is displayed repeatedly, request repair. CAUSE Automatic calibration is not performed correctly. When “PARAMETER ERROR” is displayed 1. Switch off the power of the product. 2. (After checking that the power is switched off), switch on the power. ❖ If the same error message is displayed repeatedly, request repair. CAUSE Abnormal operation parameters When “SYSTEM ERROR” is displayed 1. Switch off the power of the product. 2. (After checking that the power is switched off), switch on the power. ❖ If the same error message is displayed repeatedly, request repair. CAUSE Anomaly in control block 30 6. Error Messages When “Not enough reflection” is displayed • Shorten the distance to the detection point. • Perform measurement from a perpendicular angle rather than a slanting angle against a reflecting object at the detection point. CAUSE Insufficient received light When “Too much reflection” is displayed • Change the detection direction or the angle of the product so that external light such as sunlight does not get in the unit. • Change the detection point so that strong light does not get in the unit. CAUSE Strong light such as sunlight is getting inside the light receiver. This may be caused by an object with extremely high reflection such as a mirror. When “High density gas” is displayed • The detectable range of this product is between 1 ~ 50,000 ppmm. • The full scale is 50,000 ppmm. CAUSE When detecting methane thicker than 50,000 ppmm, this product cannot measure correctly. 31 7. IN CASE OF TROUBLE 7. IN CASE OF TROUBLE 7.1 Problems and Solutions The product does not operate even when the Power button is pressed. • Did you continue pressing until you hear a beep sound? (approx. 2 seconds) (See “5.1 Starting Up and Ending”) • Is the battery pack sufficiently charged? Use a fully charged battery pack. (See “4.1 Charging Battery Pack”) No measurement beep sound is emitted • Has the [SOUND LEVEL] setting been set to off? (See “5.3 Changing Settings”) No alarm of alarm • Has the [ALARM LEVEL] setting been set to a high value? (See “5.3 Changing Settings”) • Has the [SOUND LEVEL] setting been set to off? (See “5.3 Changing Settings”) 32 7. IN CASE OF TROUBLE The battery pack cannot be charged • Is the battery pack correctly attached to the battery charger? (See “4.1 Charging Battery Pack”) • Are the battery charger, AC adapter, AC cord, and power outlet correctly connected? (See “4.1 Charging Battery Pack”) • Is the red LED of the battery charger lit? (See “4.1 Charging Battery Pack”) 33 8. Daily Maintenance 8. Daily Maintenance 8.1 Maintenance Method If the laser beam output window and the light receiver of the product are soiled, gently wipe them clean with a dry soft cloth being careful not to scratch them. 34 9. Main Specifications 9. Main Specifications 9.1 Main Specifications of Main Unit Items Target Gas Specifications Methane (CH4) and methane-containing gases (natural gas and similar) Units ppmm / vol%m / %LELm Detection limits 1 ~ 50,000 ppmm (0 ~ 5.00vol%m) Accuracy of detection ±10 % Detection speed 0.1 seconds Detection distance Battery note 1) 0.5 m ~ 30 m 0.5 m ~ 100 m (using a reflect sheet) Rechargeable nickel metal hydride With Bluetooth connected Approx. 4.5 hours Operating time With Bluetooth disconnected Approx. 5 hours (at 25°C, Display level: 5, flashing guide light) Laser Safety Guide light IEC60825-1 (JIS C6802) Output wavelength: 532nm Output level: 5mW (Class 3R) or less Measurement light Output wavelength: 1653nm Output level: 10mW (Class 1) or less NEVER LOOK INTO THE LASER BEAM External Communication Bluetooth Ver.2.1 +EDR Class2 method Profile:Serial Port Profile note 1) The Accuracy of detection at 100ppmm and 1,000ppmm on the special measurement system. 35 9. Main Specifications Items Specifications EMC Directive EN 61326-1:2006 R&TTE Directive Applicable Standards EN 60950-1:2006 +A11:2009 +A1:2010 +A12:2011 EN 62479:2010 EN 301 489-1 V1.9.2 (2011-09) EN 301 489-17 V2.2.1 (2012-09) EN 300 328 V1.7.7 (2006-10) Operating temperature -17 ~ 50 °C note2) Operating humidity 30 ~ 90 % (No dew condensation) Storage temperature -20 ~ 60 °C Storage humidity 90 % or less Dimensions 70 (W) x 179 (D) x 42 (H) mm Weight 530 g or less (Including Battery Pack) note 2) Under the below zero degree environment, the guide light may be dark for a while after this product is started up. When the guide light is switched to the continuous light after the elapse of approximately 10 minites, the guide light will reaches at the specified brightness. It does not affect the measurement quality. 36 9. Main Specifications 9.2 Main Specifications of Battery Charger and AC Adapter Items Specifications Specified battery Dedicated Battery Pack Charging Time Approx. 4 hrs Operating temperature 5 ~ 35 °C Operating humidity 30 ~ 90 % (No dew condensation) Storage temperature -10 ~ 60 °C Storage humidity 90 % or less AC adapter input voltage 100 ~ 240VAC AC adapter output voltage 12VDC WARNING Never charge the battery pack in a location with flammable gas. WARNING This product, battery charger, and battery pack does not feature an intrinsically safe design. 37 10. Ordering Information 10. Ordering Information 10.1 Main Unit and Standard Accessories ・For EU Model Type Product Name Remarks SA3C50A-B1 SA3C50A LaserMethane mini-G main unit : 1 unit SA0Z51A Battery pack : 1 pc. SA0Z52A Battery charger : 1 unit SA0Z47A AC Adapter Set : 1 unit Set in there is one following SA0Z43A AC Adapter SA0Z45A Power Cable SA0Z44B Strap (Long type) : 1 pc. SA0Z41A Protect cover : 1 pc. Operation manual : 1 vol. - AD-E0012AZ012 ・For Republic of Korea Model Type Product Name Remarks SA3C50A-C1 SA3C50A LaserMethane mini-G main unit : 1 unit SA0Z51A Battery pack : 1 pc. SA0Z52A Battery charger : 1 unit SA0Z44B Strap (Long type) : 1 pc. SA0Z41A Protect cover : 1 pc. Operation manual : 1 vol. - AD-E0012AZ012 38 11. Inquiries 11. Inquiries Direct any questions about the product or reports about problems to Customer Service or to your local sales agent. 11.1 Customer Service Overseas Sales Department Tokyo Gas Engineering Co., Ltd. 4F, Nissei Aroma Square, 5-37-1 Kamata, Ota-ku, Tokyo 144-8721 Japan TEL: +81-3-5480-6831 FAX: +81-3-5480-6838 URL: http://www.tge.co.jp/ 39 12. Distributor and Manufacture 12. Distributor and Manufacture 12.1 Distributor Overseas Sales Department Tokyo Gas Engineering Co., Ltd. 4F, Nissei Aroma Square 5-37-1 Kamata, Ota-ku, Tokyo 144-8721 Japan TEL: +81-3-5480-6831 FAX: +81-3-5480-6838 URL: http://www.tge.co.jp/ 12.2 Manufacture Anrisu Corporation 5-1-1 Onna, Atsugi-shi, Kanagawa, 243-8555 Japan TEL: +81-46-223-1111 URL: http://www.anritsu.com/ 40 12. Distributor and Manufacture 41 Tokyo Gas Engineering Co., Ltd. Overseas Sales Department 4F, Nissei Aroma Square, 5-37-1 Kamata, Ota-ku, Tokyo 144-8721 TEL:+81-3-5480-6831 FAX:+81-3-5480-6838 Management number:AD-E0012AZ012-01