1
Solar Data Technology
SUNNY BEAM with Bluetooth® Wireless Technology
User Manual
SBeamBT-BUS092710 | 98-0013510 | Version 1.0
US
SMA Solar Technology AG
Copyright © 2009 SMA America, Inc. All rights reserved.
No part of this document may be reproduced, stored in a retrieval system, or transmitted, in any form
or by any means, electronic, mechanical, photographic, magnetic or otherwise, without the prior
written permission of SMA America, Inc.
SMA America makes no representations, express or implied, with respect to this documentation or
any of the equipment and/or software it may describe, including (with no limitation) any implied
warranties of utility, merchantability, or fitness for any particular purpose. All such warranties are
expressly disclaimed. Neither SMA America nor its distributors or dealers shall be liable for any
indirect, incidental, or consequential damages under any circumstances.
(The exclusion of implied warranties may not apply in all cases under some statutes, and thus the
above exclusion may not apply.)
Specifications are subject to change without notice. Every attempt has been made to make this
document complete, accurate and up-to-date. Readers are cautioned, however, that SMA America
reserves the right to make changes without notice and shall not be responsible for any damages,
including indirect, incidental or consequential damages, caused by reliance on the material
presented, including, but not limited to, omissions, typographical s, arithmetical s or listing s in the
content material.
The Bluetooth® word mark and logos are registered trademarks owned by Bluetooth SIG, Inc. and
any use of such marks by SMA Solar Technology AG is under license. Other trademarks and trade
names are those of their respective owners.
SMA America, Incorporated
4031 Alvis Court
Rocklin, California 95677-4011
Tel 916.625.0870
Fax 916.625.0871
www.SMA-America.com
User Manual
SBeamBT-BUS092710
3
SMA Solar Technology AG
IMPORTANT SAFETY INSTRUCTIONS
SAVE THESE INSTRUCTIONS
This manual contains important instructions for the SMA Bluetooth® Piggy-Back - system monitoring
unit, that shall be followed during installation and maintenance of the unit.
The SMA Bluetooth Piggy-Back is designed and tested according to international safety requirements,
but as with all electrical and electronic equipment, certain precautions must be observed when
installing and/or operating the SMA Bluetooth Piggy-Back. To reduce the risk of personal injury and
to ensure the safe installation and operation of the SMA Bluetooth Piggy-Back, you must carefully
read and follow all instructions, cautions and warnings in this Installation Guide.
Warnings
A Warning describes a hazard to equipment or personnel. It calls attention to a procedure or
practice, which, if not correctly performed or adhered to, could result in damage to or destruction of
part or all of the SMA equipment and/or other equipment connected to the SMA equipment or
personal injury.
DANGER!
DANGER indicates a hazardous situation which, if not avoided, will result in death or
serious injury.
WARNING!
WARNING indicates a hazardous situation which, if not avoided, could result in death or
serious injury.
4
SBeamBT-BUS092710
User Manual
SMA Solar Technology AG
CAUTION!
CAUTION indicates a hazardous situation which, if not avoided, could result in minor or
moderate injury.
NOTICE!
NOTICE indicates a situation that can result in property damage if not avoided.
User Manual
SBeamBT-BUS092710
5
SMA Solar Technology AG
Other Symbols
In addition to the safety and hazard symbols described on the previous pages, the following symbol
is also used in this Installation Guide:
Information
This symbol accompanies notes that call attention to supplementary information that you
should know and use to ensure optimal operation of the system.
General Warnings
General Warnings
All electrical installations must be done in accordance with the local and National Electrical
Code ANSI/NFPA 70.
Before installing or using the SMA Bluetooth Piggy-Back, read all of the instructions,
cautions, and warnings on the SMA Bluetooth Piggy-Back and the inverter, in this
Installation Guide and the manual of the inverter.
Warranty
The currect guarantee conditions are available at www.SMA-America.com and can be downloaded
or are available on paper from the usual sales channels if required. For warranty coverage, or if you
have questions about the SMA Bluetooth Piggy-Back warranty, contact SMA America at the address,
telephone number or Web site listed on page 3 (to send an E-mail, see the Contact section of the SMA
America Web site).
6
SBeamBT-BUS092710
User Manual
SMA Solar Technology AG
Table of Contents
Table of Contents
1
1.1
1.2
1.3
Notes on this Manual. . . . . . . . . . . . . . . . . . . . . . . . . . . . . 13
Area of Validity. . . . . . . . . . . . . . . . . . . . . . . . . . . . . . . . . . . . . 13
Additional Information . . . . . . . . . . . . . . . . . . . . . . . . . . . . . . . 13
Terminology . . . . . . . . . . . . . . . . . . . . . . . . . . . . . . . . . . . . . . . 13
2
2.1
2.2
Sunny Beam with Bluetooth . . . . . . . . . . . . . . . . . . . . . . . 14
Field of application . . . . . . . . . . . . . . . . . . . . . . . . . . . . . . . . . . 14
Functions . . . . . . . . . . . . . . . . . . . . . . . . . . . . . . . . . . . . . . . . . . 14
3
3.1
3.2
Safety . . . . . . . . . . . . . . . . . . . . . . . . . . . . . . . . . . . . . . . . . 15
Appropriate Usage . . . . . . . . . . . . . . . . . . . . . . . . . . . . . . . . . . 15
Safety Instructions . . . . . . . . . . . . . . . . . . . . . . . . . . . . . . . . . . . 16
4
4.1
4.2
Unpacking. . . . . . . . . . . . . . . . . . . . . . . . . . . . . . . . . . . . . . 17
Packing List . . . . . . . . . . . . . . . . . . . . . . . . . . . . . . . . . . . . . . . . 17
Identifying the Sunny Beam . . . . . . . . . . . . . . . . . . . . . . . . . . . 17
5
5.1
Commissioning . . . . . . . . . . . . . . . . . . . . . . . . . . . . . . . . . . 18
Sunny Beam Controls . . . . . . . . . . . . . . . . . . . . . . . . . . . . . . . . 18
User Manual
SBeamBT-BUS092710
7
Table of Contents
SMA Solar Technology AG
5.2
Initial settings. . . . . . . . . . . . . . . . . . . . . . . . . . . . . . . . . . . . . . . 19
6
6.1
Operation . . . . . . . . . . . . . . . . . . . . . . . . . . . . . . . . . . . . . . 32
Display . . . . . . . . . . . . . . . . . . . . . . . . . . . . . . . . . . . . . . . . . . . 32
6.1.1
Switching on the display/calling up the main menu . . . . . . . . . . . . . . . . . . . 33
6.2
6.3
Menu . . . . . . . . . . . . . . . . . . . . . . . . . . . . . . . . . . . . . . . . . . . . 34
Chart view. . . . . . . . . . . . . . . . . . . . . . . . . . . . . . . . . . . . . . . . . 35
6.3.1
Calling up the chart "Complete PV system". . . . . . . . . . . . . . . . . . . . . . . . . . 35
6.3.2
Calling up the chart "No. of Inverters" . . . . . . . . . . . . . . . . . . . . . . . . . . . . . 37
6.4
6.5
Power and energy display . . . . . . . . . . . . . . . . . . . . . . . . . . . . 39
Symbols in the chart view . . . . . . . . . . . . . . . . . . . . . . . . . . . . . 40
6.5.1
Symbol for the connection quality. . . . . . . . . . . . . . . . . . . . . . . . . . . . . . . . . 41
6.5.2
Battery symbol/Charging the batteries . . . . . . . . . . . . . . . . . . . . . . . . . . . . . 42
6.5.3
Fault and warning symbols . . . . . . . . . . . . . . . . . . . . . . . . . . . . . . . . . . . . . . 43
6.6
6.7
Calling up events . . . . . . . . . . . . . . . . . . . . . . . . . . . . . . . . . . . 44
Sunny Beam alarms . . . . . . . . . . . . . . . . . . . . . . . . . . . . . . . . . 46
6.7.1
Set / disable alarm for faults . . . . . . . . . . . . . . . . . . . . . . . . . . . . . . . . . . . . 47
6.8
Display settings . . . . . . . . . . . . . . . . . . . . . . . . . . . . . . . . . . . . . 47
6.8.1
Changing the contrast. . . . . . . . . . . . . . . . . . . . . . . . . . . . . . . . . . . . . . . . . . 47
6.8.2
Changing the display switch-off . . . . . . . . . . . . . . . . . . . . . . . . . . . . . . . . . . 47
8
SBeamBT-BUS092710
User Manual
SMA Solar Technology AG
6.8.3
Setting the coefficients of balance . . . . . . . . . . . . . . . . . . . . . . . . . . . . . . . . 48
6.9
Data query . . . . . . . . . . . . . . . . . . . . . . . . . . . . . . . . . . . . . . . . 49
6.9.1
Changing the data query frequency . . . . . . . . . . . . . . . . . . . . . . . . . . . . . . . 49
6.9.2
Changing the live query duration . . . . . . . . . . . . . . . . . . . . . . . . . . . . . . . . . 49
6.9.3
Disabling the Overnight Shutdown . . . . . . . . . . . . . . . . . . . . . . . . . . . . . . . . 50
6.10
Service Functions . . . . . . . . . . . . . . . . . . . . . . . . . . . . . . . . . . . 51
6.10.1
Checking the connection quality . . . . . . . . . . . . . . . . . . . . . . . . . . . . . . . . . . 51
6.10.2
Accessing device information . . . . . . . . . . . . . . . . . . . . . . . . . . . . . . . . . . . . 52
6.10.3
Performing an update . . . . . . . . . . . . . . . . . . . . . . . . . . . . . . . . . . . . . . . . . . 53
6.10.4
Resetting the Sunny Beam . . . . . . . . . . . . . . . . . . . . . . . . . . . . . . . . . . . . . . . 55
6.11
System settings . . . . . . . . . . . . . . . . . . . . . . . . . . . . . . . . . . . . . 56
6.11.1
Calling up the list of connected devices . . . . . . . . . . . . . . . . . . . . . . . . . . . . 56
6.11.2
Entering the system password . . . . . . . . . . . . . . . . . . . . . . . . . . . . . . . . . . . . 56
6.11.3
Repeating the system search . . . . . . . . . . . . . . . . . . . . . . . . . . . . . . . . . . . . . 57
6.11.4
Changing the device name . . . . . . . . . . . . . . . . . . . . . . . . . . . . . . . . . . . . . . 58
6.11.5
Adjusting the energy meter when switching devices . . . . . . . . . . . . . . . . . . . 59
6.11.6
Setting the maximum plant power in kWp . . . . . . . . . . . . . . . . . . . . . . . . . . 59
6.12
Country settings . . . . . . . . . . . . . . . . . . . . . . . . . . . . . . . . . . . . 61
6.12.1
Changing the language . . . . . . . . . . . . . . . . . . . . . . . . . . . . . . . . . . . . . . . . 61
6.12.2
Changing the currency . . . . . . . . . . . . . . . . . . . . . . . . . . . . . . . . . . . . . . . . . 62
User Manual
SBeamBT-BUS092710
9
SMA Solar Technology AG
6.12.3
Changing the unit of CO2 avoided. . . . . . . . . . . . . . . . . . . . . . . . . . . . . . . . 62
6.12.4
Changing the Decimal Separator . . . . . . . . . . . . . . . . . . . . . . . . . . . . . . . . . 62
6.12.5
Changing the date format . . . . . . . . . . . . . . . . . . . . . . . . . . . . . . . . . . . . . . . 62
6.12.6
Changing the Timestamp Format. . . . . . . . . . . . . . . . . . . . . . . . . . . . . . . . . . 63
6.13
6.14
6.15
Changing the date and time . . . . . . . . . . . . . . . . . . . . . . . . . . . 63
Activating/deactivating daylight saving time . . . . . . . . . . . . . . 63
Changing the Time Zone. . . . . . . . . . . . . . . . . . . . . . . . . . . . . . 64
7
7.1
7.2
Managing System Data. . . . . . . . . . . . . . . . . . . . . . . . . . . 64
System requirements . . . . . . . . . . . . . . . . . . . . . . . . . . . . . . . . . 65
Copying system data to the computer . . . . . . . . . . . . . . . . . . . 65
7.2.1
CSV format . . . . . . . . . . . . . . . . . . . . . . . . . . . . . . . . . . . . . . . . . . . . . . . . . . 66
8
Menu overview . . . . . . . . . . . . . . . . . . . . . . . . . . . . . . . . . 67
9
9.1
Maintenance and Care . . . . . . . . . . . . . . . . . . . . . . . . . . . 68
Maintenance. . . . . . . . . . . . . . . . . . . . . . . . . . . . . . . . . . . . . . . 68
9.1.1
Replacing the batteries . . . . . . . . . . . . . . . . . . . . . . . . . . . . . . . . . . . . . . . . . 68
9.2
Care . . . . . . . . . . . . . . . . . . . . . . . . . . . . . . . . . . . . . . . . . . . . . 70
10
10.1
Decommissioning . . . . . . . . . . . . . . . . . . . . . . . . . . . . . . . . 70
Decommissioning the Sunny Beam . . . . . . . . . . . . . . . . . . . . . . 70
10
SBeamBT-BUS092710
User Manual
SMA Solar Technology AG
10.2
10.3
Disposing of the Sunny Beam . . . . . . . . . . . . . . . . . . . . . . . . . . 71
Disposing of the batteries . . . . . . . . . . . . . . . . . . . . . . . . . . . . . 71
11
Troubleshooting . . . . . . . . . . . . . . . . . . . . . . . . . . . . . . . . . 72
12
12.1
Technical Data . . . . . . . . . . . . . . . . . . . . . . . . . . . . . . . . . . 75
FCC Compliance Information . . . . . . . . . . . . . . . . . . . . . . . . . . 77
13
13.1
13.2
Accessories . . . . . . . . . . . . . . . . . . . . . . . . . . . . . . . . . . . . . 79
USB plug-in power supply . . . . . . . . . . . . . . . . . . . . . . . . . . . . 79
Replacement batteries. . . . . . . . . . . . . . . . . . . . . . . . . . . . . . . . 79
14
Contact . . . . . . . . . . . . . . . . . . . . . . . . . . . . . . . . . . . . . . . . 80
User Manual
SBeamBT-BUS092710
11
SMA Solar Technology AG
12
SBeamBT-BUS092710
User Manual
SMA Solar Technology AG
Notes on this Manual
1 Notes on this Manual
1.1 Area of Validity
This manual is valid for the Sunny Beam firmware version 1.0 and later.
This manual does not contain any detailed information about the connected products. Detailed
information about the products connected can be found in the user manual of the devices.
1.2 Additional Information
You can find further information on the following subjects in the 'Downloads' area of www.SMAAmerica.com.
• SMA Bluetooth® Wireless Technology
• CO2 factor
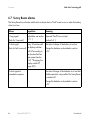
1.3 Terminology
This user manual uses the terminology indicated in the following table.
Type
Example of terminology
Main menu item
Select "Settings".
Submenu item
Select "Settings > Date".
User Manual
SBeamBT-BUS092710
13
Sunny Beam with Bluetooth
SMA Solar Technology AG
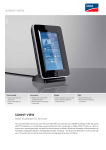
2 Sunny Beam with Bluetooth
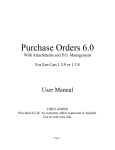
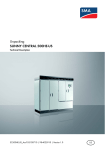
2.1 Field of application
Sunny Beam is a communication device which requests, displays
and saves data from up to 12 inverters in a Bluetooth PV plant.
Communication with the inverters takes place via Bluetooth®
Wireless Technology. The transmitting power corresponds to
Bluetooth Class 1.
Sunny Beam only supports inverters from SMA Solar Technology
that are fitted with Bluetooth. Most SMA Solar Technology inverters
that do not have integrated Bluetooth can be retrofitted with the SMA Bluetooth Piggy-Back.
2.2 Functions
• Processing data from up to 12 inverters
• Connection to the inverters via Bluetooth
• Range of up to 330 ft. in the open space with direct visual contact
• Supports inverters with Bluetooth from SMA Solar Technology:
– Inverters with integrated SMA Bluetooth with software package 2.06 and later
– Inverters with integrated SMA Bluetooth Piggy-Back
• Display of faults and warnings on the integrated display
• Acoustic alarms to indicate faults in the PV plant
• Connection to the computer via the USB connection cable (max. 9.8 ft. cable length)
14
SBeamBT-BUS092710
User Manual
SMA Solar Technology AG
Safety
• Saves the system data in CSV format for at least 100 days as well as up to 25 faults and
warnings. The storage volume depends on the number of inverters. If the memory is full, the old
system data will be overwritten.
• Graphical display of the following data for the complete PV system and for each inverter on the
integrated display:
– Performance today / Performance yesterday
– Energy for the last 31 days / Energy for the last 12 months
– Specific annual yield
– Allowance for the current day and total allowance so far
– CO2 emissions avoided for the present day and total present CO2 emissions avoided.
• Display of the following values for the entire system and for individual inverters:
– Present AC power
– Daily yield (E-Today)
– Energy yield yesterday (E-Yday) when calling up the chart "Power yesterday"
– Total energy yield (E-Total)
3 Safety
3.1 Appropriate Usage
Sunny Beam is only suitable for indoor use. The ambient temperature must be between 32 °F and
+104 °F. The power supply for Sunny Beam may only be provided by rechargeable nickel-metal
hydride batteries (NiMH), type Mignon (AA) with low self-discharge, e.g. Eneloop batteries.
Sunny Beam is only suitable for use with original accessories from SMA Solar Technology or
accessories recommended by SMA Solar Technology.
User Manual
SBeamBT-BUS092710
15
Safety
SMA Solar Technology AG
The Sunny Beam data must not be used for billing purposes.
Data collected by Sunny Beam regarding the power generated by your PV plant may
deviate from the electricity meter.
3.2 Safety Instructions
Please follow all operating and safety precautions in this manual. Failure to follow these instructions
may result in damage to the device and risk of personal injuries.
Notice!
Damage to Sunny Beam caused by leaking batteries. Batteries of the wrong type may leak
into the Sunny Beam and damage the device.
• You must only use rechargeable nickel-metal hydride batteries (NiMH), type Mignon
(AA) with low self-discharge, e.g. Eneloop batteries (see section 13 "Accessories"
(page 79)).
16
SBeamBT-BUS092710
User Manual
SMA Solar Technology AG
Unpacking
4 Unpacking
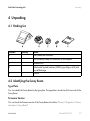
4.1 Packing List
Position
A
B
C
D
Quantity
1
1
1
2
E
1
Name
Sunny Beam with Bluetooth
USB connection cable for connection to the computer
Software DVD
Nickel-metal hydride batteries (NiMH), type Mignon (AA) with
low self-discharge
Manual
4.2 Identifying the Sunny Beam
Type Plate
You can identify the Sunny Beam by the type plate. The type plate is located on the lower side of the
Sunny Beam.
Firmware Version
You can check the firmware version of the Sunny Beam in the Menu "Service > Diagnostics > Device
information > Sunny Beam".
User Manual
SBeamBT-BUS092710
17
Commissioning
SMA Solar Technology AG
5 Commissioning
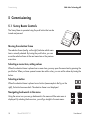
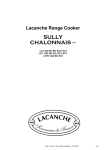
5.1 Sunny Beam Controls
The Sunny Beam is operated using the push button that can be
turned and pressed.
Moving the selection frame
The selection frame (see fig. on the right) indicates which menu
item is currently selected. By turning the push button, you can
move the selection frame to the next menu item or the previous
menu item.
Selecting a menu item, setting values
When the selection frame is placed over a menu item, you may open the menu item by pressing the
push button. When you have opened a menu item with a colon, you can set the values by turning the
button.
Selecting a button
When the selection frame is placed over a button (see example in the fig. on the
right), the button becomes dark. The selection frame is not displayed.
Navigating backwards in the menu
Using the arrow icon you can go backwards in the menu until the main menu is
displayed. By selecting the house icon, you will go straight to the main menu.
18
SBeamBT-BUS092710
User Manual
SMA Solar Technology AG
Commissioning
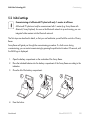
5.2 Initial settings
Commissioning of a Bluetooth PV plant with only 1 master at all times.
A Bluetooth PV plant must only be commissioned with 1 master (e.g. Sunny Beam with
Bluetooth, Sunny Explorer). As soon as the Bluetooth network is up and running, you can
integrate further masters into the Bluetooth network.
The first steps are described in detail, so that you can familiarize yourself with the controls of Sunny
Beam.
Sunny Beam will guide you through the commissioning procedure. If a fault occurs during
commissioning, you can restart commissioning by pressing the push button for about 10 seconds, until
the SMA logo is displayed.
1. Open the battery compartment on the underside of the Sunny Beam.
2. Place the included batteries into the battery compartment of the Sunny Beam according to the
indication.
3. Close the lid of the battery compartment.
4. Press the button.
User Manual
SBeamBT-BUS092710
19
Commissioning
SMA Solar Technology AG
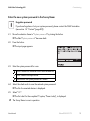
☑ The start screen appears.
5. Press the button.
☑ The page for setting the language appears. This page
appears automatically after 10 seconds.
Setting the language and the country
6. If you want to change the selected language and country, press the button.
☑ The background of the selected language and country becomes dark.
7. Turn the button until the required language and country are displayed.
8. Press the button.
☑ No items remain dark. The language and country have ben set.
9. Move the selection frame to the button ">>" (next) by turning the button.
20
SBeamBT-BUS092710
User Manual
SMA Solar Technology AG
Commissioning
☑ The button ">>" (next) becomes dark.
10. Press the button.
☑ The page for setting the time zone appears.
Setting the time zone
Be sure to set the correct values for date, daylight saving time, time and time zone on the
Sunny Beam. If you reset the time after commissioning, the data associated with the time
difference will be deleted from the inverter. Please note that the time may also be reset if
you change the settings for time zone or daylight saving time.
Confirming the time settings
Due to the extensive time management in your PV plant, the first attempt to change the time
settings may not be successful, if, for example, the time has already been set using Sunny
Explorer. Check the time settings again after commissioning and correct them, if required.
11. To change the time zone, press the button.
☑ The time zone will become dark.
User Manual
SBeamBT-BUS092710
21
Commissioning
SMA Solar Technology AG
12. Turn the button until the required time zone is displayed.
13. Press the button.
☑ No items remain dark. The time zone has been set.
14. Move the selection frame to the button ">>" (next) by turning the button.
☑ The button ">>" (next) becomes dark.
15. Press the button.
☑ The page for setting the date and time appears.
Setting the date
16. Press the button.
☑ The first adjustable digits become dark.
17. Turn the button until the required value is shown.
18. Press the button and repeat the steps until no digits are dark.
To change incorrect values, press the push button until the value that you need to change
becomes dark.
☑ The date has been set.
22
SBeamBT-BUS092710
User Manual
SMA Solar Technology AG
Commissioning
Activating daylight saving time
19. To activate daylight saving time, move the selection frame
to "Daylight saving time:" by turning the button, then press
the button to tick the box.
☑ Daylight saving time is activated.
Setting the time
20. Move the selection frame to "Time" by turning the button.
21. Press the button.
☑ The first adjustable digits become dark.
22. Turn the button until the required value is shown.
23. Press the button and repeat the steps until no digits are dark.
The time will start counting again as soon as no digits in the menu item "Time" are dark.
☑ Time has been set.
24. Move the selection frame to the button ">>" by turning the button.
User Manual
SBeamBT-BUS092710
23
Commissioning
SMA Solar Technology AG
☑ The button becomes dark.
25. Press the button.
☑ The page for searching for systems appears.
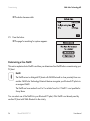
Determining a free NetID
This section explains what a NetID is and how you determine a free NetID before commissioning your
PV plant.
NetID
The NetID serves to distinguish PV plants with SMA Bluetooth in close proximity from one
another. SMA Solar Technology Bluetooth devices recognize your Bluetooth PV plant via
an assigned NetID.
The NetID can be a number from 2 to 9 or a letter from A to F. NetID 1 is not possible for
Sunny Beam.
You can select one of the NetIDs for your Bluetooth PV plant, if this NetID is not already used by
another PV plant with SMA Bluetooth in the vicinity.
24
SBeamBT-BUS092710
User Manual
SMA Solar Technology AG
Commissioning
To check whether there is another PV plant with SMA Bluetooth within the radio range of your device
and which NetID it uses, carry out a system search with Sunny Beam on the installation site for each
device of your Bluetooth PV plant.
Alternatively, you can also determine a free NetID using a laptop with Bluetooth and the program
Sunny Explorer from SMA Solar Technology. For more information on how to do this, please refer to
the Sunny Explorer Help. You can download the program Sunny Explorer from www.SMAAmerica.com free of charge.
The following table lists the functions of the NetIDs. NetID 0 and NetID 1 have special functions.
NetID 1 is the default setting for the inverters and the SMA Bluetooth Repeater when delivered. Sunny
Beam cannot detect any devices with the NetID set to 1.
NetID
0
1
Function
Bluetooth is switched off.
Bluetooth is switched on.
(Condition upon
delivery)
The inverter or the SMA Bluetooth Repeater can only connect to a
maximum of 2 computers with Sunny Explorer from SMA Solar
Technology. A connection to the Sunny Beam is not possible.
Bluetooth is switched on.
2-F
The inverter or the SMA Bluetooth Repeater can interlink with all SMA
Bluetooth products with the same NetID.
Initially leave the devices on the preset NetID 1. Start by determining a free NetID, as
follows.
26. Place the Sunny Beam near a device of your Bluetooth PV plant.
User Manual
SBeamBT-BUS092710
25
Commissioning
SMA Solar Technology AG
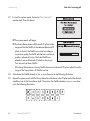
27. To start the system search, the button "Start detection"
must be dark. Press this button.
☑ The system search will begin.
☑ The Sunny Beam detects all Bluetooth PV plants within
range and lists the NetIDs of the detected Bluetooth PV
plants. In the list, the NetIDs are sorted according to
connection quality; the NetID with the best connection
quality is placed at the top. The listed NetIDs are
already in use on Bluetooth PV plants in the vicinity.
You may not use these NetIDs.
– If the Sunny Beam does not list any NetIDs, there are no Bluetooth PV plants within the radio
range of the Sunny Beam. All NetIDs are free.
28. Note down the NetIDs already in use, or cross them out in the following illustration.
29. Repeat the system search with the Sunny Beam for each device in the PV plant and at the desired
installation site of the Sunny Beam itself. Note down the NetIDs already in use, or cross them
out in the following illustration.
26
SBeamBT-BUS092710
User Manual
SMA Solar Technology AG
Commissioning
Sunny Beam cannot detect any devices with the NetID set to 1. Therefore, NetID 1 has already
been crossed out in this illustration.
30. Once the system search has been carried out for all the devices, choose a NetID for your PV
plant which was not displayed by the Sunny Beam.
☑ The free NetID is determined.
31. Set the free NetID on the inverters and available SMA Bluetooth Repeaters, as described in the
respective manual.
32. Commission the inverters and available SMA Bluetooth Repeaters as described in the
respective manual.
Search for your own Bluetooth PV plant
Do not start the Sunny Beam again until you have set the free NetID on the inverters and available
SMA Bluetooth Repeaters and have commissioned these devices.
33. Set up the Sunny Beam at its intended installation site.
34. To search for your Bluetooth PV plants, choose "Repeat search".
You can also start the system search via the menu "Settings > PV plant > New plant search".
☑ The plant search will begin.
User Manual
SBeamBT-BUS092710
27
Commissioning
SMA Solar Technology AG
☑ The Sunny Beam detects all Bluetooth PV plants within
range and lists the NetIDs of the detected Bluetooth PV
plants.
– If the Sunny Beam does not list the NetID of your
Bluetooth PV plant, please refer to section
11 "Troubleshooting" (page 72).
Setting the NetID for your own Bluetooth PV plant
35. Move the selection frame to the NetID of your own
Bluetooth PV plant by turning the button.
36. Press the button.
☑ The Sunny Beam will establish a connection to your
Bluetooth PV plant.
☑ The Sunny Beam then lists the serial numbers of the
detected inverters.
– If not all inverters of your Bluetooth PV plant are listed,
or if inverters from other plants are listed, please refer
to section 11 "Troubleshooting" (page 72).
Selecting the required inverters (only applies when
more than 12 inverters are available)
The Sunny Beam can only manage a maximum of 12 inverters. If your Bluetooth PV plant comprises
more than 12 inverters, you must select the 12 inverters that you want the Sunny Beam to manage.
28
SBeamBT-BUS092710
User Manual
SMA Solar Technology AG
Commissioning
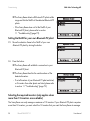
37. Press the button to select the inverters that are to be managed by the Sunny Beam.
selected
not selected
Establish connection to the devices
38. Move the selection frame to "OK" by turning the button.
☑ The field "OK" becomes dark.
39. Press the button.
☑ The Sunny Beam establishes the connection to the selected inverters and retrieves the data.
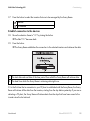
A The start date and end date of the time period from which the Sunny Beam will retrieve data.
B
The date from which the Sunny Beam is retrieving data right now.
If it is the first time that a connection to your PV plant is established with the Sunny Beam, the Sunny
Beam will retrieve all the data from the inverters, starting from the day before yesterday. If you are redetecting a PV plant, the Sunny Beam will retrieve data from the days that have been saved in the
inverter since the last retrieval.
User Manual
SBeamBT-BUS092710
29
Commissioning
SMA Solar Technology AG
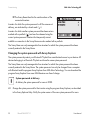
☑ The Sunny Beam then lists the serial numbers of the
connected inverters.
Inverters for which the system password is still the same as at
delivery, are indicated by a check mark ( ).
Inverters for which another system password has been set are
marked with a padlock ( ) and must be released using the
correct system password. Inverters that temporarily cannot
establish a connection to the Sunny Beam are also marked with a padlock.
The Sunny Beam can only manage data from inverters for which the system password has been
correctly entered in the Sunny Beam.
Changing the system password with Sunny Explorer
The system password protects your Bluetooth PV plant from unauthorized access to your device. All
devices belonging to a Bluetooth PV plant must have the same system password.
The Sunny Beam can only manage data from inverters for which the system password has been
correctly entered in the Sunny Beam. The system password can only be changed from a computer
with Bluetooth and the program Sunny Explorer from SMA Solar Technology. You can download the
program Sunny Explorer from www.SMA-America.com free of charge.
System password at delivery
At delivery the system password for users is 0000.
40. Change the system password for the inverters using the program Sunny Explorer, as described
in the Sunny Explorer Help. Notify the system owner of the new system password for users.
30
SBeamBT-BUS092710
User Manual
SMA Solar Technology AG
Commissioning
Enter the new system password in the Sunny Beam
Forgotten password
If you have forgotten or lost your system password, please contact the SMA Serviceline
(see section 14 "Contact" (page 80)).
41. Move the selection frame to "System password" by turning the button.
☑ The field "System password" becomes dark.
42. Press the button.
☑ The input page appears.
43. Enter the system password for users.
Arrow: deletes the character which was entered last.
Cross: cancels the input action.
Check mark: the system password is saved.
44. Select the check mark to save the entered system password.
☑ The list of connected devices is displayed.
45. Select "OK".
☑ The first chart for the complete PV system, "Power today", is displayed.
☑ The Sunny Beam is now in operation.
User Manual
SBeamBT-BUS092710
31
Operation
SMA Solar Technology AG
6 Operation
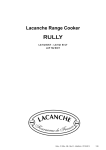
6.1 Display
The Sunny Beam display is divided into two sections. The top section contains the menu and chart
view, the lower section contains the power and energy display.
A Menu and chart view
B
Power and energy display
When the Sunny Beam attempts to establish a connection to the inverters in order to retrieve
the current data, the hourglass appears in the middle of the display.
32
SBeamBT-BUS092710
User Manual
SMA Solar Technology AG
Operation
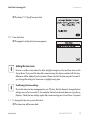
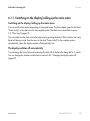
6.1.1 Switching on the display/calling up the main menu
Switching on the display/calling up the main menu
You can switch on the display by pressing or turning the button. The Sunny Beam opens the first chart,
"Power today", in the chart view for the complete system. The chart view is described in section
6.3 "Chart view" (page 35).
You can switch from the chart view to the main menu by pressing the button. After 3 minutes, the Sunny
Beam will always switch from the menu to the chart "Power today" for the complete system
automatically, unless the display switches off automatically first.
The display switches off automatically
To save energy the Sunny Beam will automatically switch off its display after being idle for 1 minute.
You can change this duration as described in section 6.8.2 "Changing the display switch-off"
(page 47).
User Manual
SBeamBT-BUS092710
33
Operation
SMA Solar Technology AG
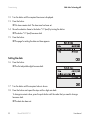
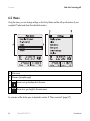
6.2 Menu
Using the menu, you can change settings on the Sunny Beam and the call up information of your
complete PV plant and about the individual inverters.
A Main menu
B
Submenu (example page)
C
Arrow icon: go backwards in the menu.
D
House icon: go straight to the main menu.
An overview of the whole menu is depicted in section 8 "Menu overview" (page 67).
34
SBeamBT-BUS092710
User Manual
SMA Solar Technology AG
Operation
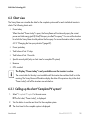
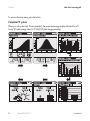
6.3 Chart view
The Sunny Beam can visualize the data for the complete system and for each individual inverter in
charts. The following charts exist:
• Power today
When the chart "Power today" is open, the Sunny Beam will continuously query the current
power and total energy yield (E-Total) This query is called "Live query". You can set the duration
for which the Sunny Beam should perform the live query. For more information refer to section
6.9.2 "Changing the live query duration" (page 49).
• Power yesterday
• Yield values of last 31 days
• Yield values of last 12 months
• Specific annual yield (only as chart view for complete PV system)
• Revenue
• CO2 avoided
The Display "Power today" is only available once the inverter is active.
The current data for the day is not available until the inverter has switched itself on in the
morning. The Sunny Beam will therefore display the data of the previous day in the chart
"Power today" until all the inverters are switched on.
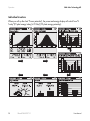
6.3.1 Calling up the chart "Complete PV system"
1. Select "Complete PV system" in the main menu.
☑ The first chart, "Power today", is displayed.
2. Turn the button to see the next chart for the complete system.
☑ The chart view for the complete system is displayed.
User Manual
SBeamBT-BUS092710
35
Operation
SMA Solar Technology AG
To return to the main menu, press the button.
Complete PV system
When you call up the chart "Power yesterday", the power and energy display will switch from "EToday" (PV plant energy today) to "E-Yday" (PV plant energy yesterday).
36
SBeamBT-BUS092710
User Manual
SMA Solar Technology AG
Operation
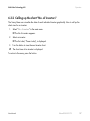
6.3.2 Calling up the chart "No. of Inverters"
The Sunny Beam can visualize the data of each individual inverter graphically. How to call up the
chart view for an inverter:
1. Select "No. of inverters" in the main menu.
☑ The list of inverters appears.
2. Select an inverter.
☑ The first chart, "Power today", is displayed.
3. Turn the button to view the next inverter chart.
☑ The chart view of an inverter is displayed.
To return to the menu, press the button.
User Manual
SBeamBT-BUS092710
37
Operation
SMA Solar Technology AG
Individual inverters
When you call up the chart "Power yesterday", the power and energy display will switch from "EToday" (PV plant energy today) to "E-Yday" (PV plant energy yesterday).
38
SBeamBT-BUS092710
User Manual
SMA Solar Technology AG
Operation
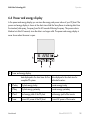
6.4 Power and energy display
In the power and energy display you can view the energy and power values of your PV plant. The
power and energy display is shown in the chart view while the Sunny Beam is retrieving data from
the inverters (data query, live query) and for 60 seconds following the query. The power value is
blanked out after 60 seconds, since the data is no longer valid. The power and energy display is
never shown when the menu is open.
A Power and energy display
data displayed in the chart view for the data displayed in the chart view for
complete PV system:
individual inverters:
B
E-Today
PV plant energy today
Inverter energy today
E-Yday
PV plant energy yesterday
Inverter energy yesterday
C E-Total
Total energy yield of the PV plant
Total energy yield of the inverter
D Power
Current AC power of the PV plant
Current AC power of the inverter
User Manual
SBeamBT-BUS092710
39
Operation
SMA Solar Technology AG
6.5 Symbols in the chart view
The chart view shows date, time and symbols. The symbols are explained in this section.
A Date
B
C
Section 6.13
Time
• Symbol for recent or unread warnings.
Section 6.5.3
• Symbol for recent or unread faults.
• If there are no unread warnings or faults, no symbol will be
displayed.
D Symbol for the connection quality
Section 6.5.1
E
Section 6.5.2
40
Battery symbol which indicates the battery state of charge
SBeamBT-BUS092710
User Manual
SMA Solar Technology AG
Operation
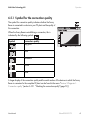
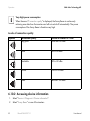
6.5.1 Symbol for the connection quality
The symbol for connection quality indicates whether the Sunny
Beam is connected to a device in your PV plant and the quality of
this connection.
When the Sunny Beam is establishing a connection, this is
indicated by the following symbol:
Symbol
Connection quality
very good
good
Unreliable
Critical
None
A larger display of the connection quality and the serial number of the device via which the Sunny
Beam is connected to the complete PV plant can be found in the menu "Service > Diagnosis >
Connection quality" (section 6.10.1 "Checking the connection quality" (page 51)).
User Manual
SBeamBT-BUS092710
41
Operation
SMA Solar Technology AG
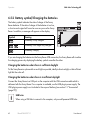
6.5.2 Battery symbol/Charging the batteries
The battery symbol indicates the state of charge of the Sunny
Beam batteries. If the state of charge of the batteries is too low,
a short acoustic signal will sound as soon as you use the Sunny
Beam. In addition, a message will appear on the display.
Symbol
Meaning
The battery is fully charged.
The battery is no longer fully charged.
The battery is empty.
If you are charging the batteries via the Sunny Beam USB connection, the Sunny Beam will visualize
the charging process by displaying the battery symbols one after the other.
Charging the batteries when there is sufficient daylight
Put the Sunny Beam in a place with as much light as possible, ideally in direct sunlight, so that sufficient
light hits the solar cell.
Charging the batteries when there is insufficient daylight
Connect the Sunny Beam to a USB port on the computer with the USB connection cable which is
delivered with the Sunny Beam. If no computer is available, use the USB plug-in power supply. The
USB plug-in power supply is not included in the scope of delivery (see section 13 "Accessories"
(page 79)).
USB hubs
When using a USB hub to connect to the computer, only use self-powered USB hubs.
42
SBeamBT-BUS092710
User Manual
SMA Solar Technology AG
Operation
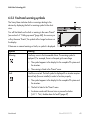
6.5.3 Fault and warning symbols
The Sunny Beam indicates faults or warnings relating to the
devices by displaying the fault or warning symbol in the chart
view.
You will find details on the fault or warning in the menu "Events"
(see section 6.6 "Calling up events" (page 44)). As soon as you
call up the menu "Events", the symbol will no longer be shown on
the display.
If there are no unread warnings or faults, no symbol is displayed.
Symbol
Warning
Meaning
A fault may occur in the foreseeable future. The warning symbol is
displayed if, for example, there is a frequent grid overvoltage.
• The symbol appears in the display for the complete PV system and
the inverters.
Fault
• The warning is listed in the "Events" menu.
A fault has occurred. The fault symbol is displayed if an inverter requires
external help (from an installer) in order to function properly.
• The symbol appears in the display for the complete PV system and
the inverters.
• The fault is listed in the "Events" menu.
• An alarm sounds until the user turns or presses the button
().6.7.1 "Set / disable alarm for faults" (page 47)
User Manual
SBeamBT-BUS092710
43
Operation
SMA Solar Technology AG
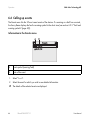
6.6 Calling up events
The Events menu lists the 25 most recent events of the devices. If a warning or a fault has occurred,
the Sunny Beam displays the fault or warning symbol in the chart view (see section 6.5.3 "Fault and
warning symbols" (page 43)).
Information in the Events menu
A
Event symbol (warning/fault)
B
Date of the event
1. Select "Events".
2. Select the event for which you wish to see detailed information.
☑ The details of the selected event are displayed.
44
SBeamBT-BUS092710
User Manual
SMA Solar Technology AG
Operation
Details of an event
A
Event symbol (warning/fault)
B
C
D
E
Date of the event
Event name (warning/fault)
Name or serial number of the device where the event occurred.
• Start time ("since"), if the event has not yet ended or the end time is not known.
• Start time to end time ("from: to:"), if the event has ended.
F
• End time ("to:"), if the event has ended and the start time is unknown.
• Duration of the event in hours : minutes : seconds
G
• "--:--:--", if the event has not yet ended or the duration could not be calculated because the
start time is unknown.
Symbol for faults. Contact your installer.
H
I
Event message
Serial number of the device where the event occurred.
User Manual
SBeamBT-BUS092710
45
Operation
SMA Solar Technology AG
6.7 Sunny Beam alarms
The Sunny Beam has a buzzer which emits an alarm when a "Fault" event occurs or when the battery
state is too low.
Alarm
Repetition
1 long signal
Adjustable, see section The event "Fault" has occurred.
6.7.1 )
(section 6.6 ).
(lasts for 3 seconds)
1 short signal
Every 10 minutes until
(lasts for half a second) the display switches
itself off according to
the duration that has
been preset (section
6.8.2 "Changing the
display switch-off"
(page 47)).
3 short signals in
immediate sequence
Meaning
The state of charge of the battery is too low.
Charge the batteries as described in section
6.5.2 .
The state of charge of the batteries is so low that
reliable operation is impossible. The Sunny Beam
is switched off.
Charge the batteries as described in section
6.5.2
46
SBeamBT-BUS092710
User Manual
SMA Solar Technology AG
Operation
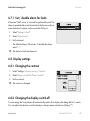
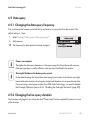
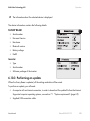
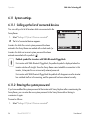
6.7.1 Set / disable alarm for faults
If the event "Fault" occurs, a 3 second long alarm will sound. The
alarm is repeated after a certain interval set by the user until you
press the button, however, not for more than 24 hours.
1. Select "Settings > Alerts".
2. Select "Signal every:".
3. Set the interval.
The default setting is 30 minutes. To disable the alarm,
select "- - -".
☑ The alarm for faults has been set.
6.8 Display settings
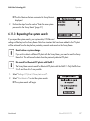
6.8.1 Changing the contrast
1. Select "Settings > Display options > Contrast".
2. Select "Upper contrast" or "Lower contrast".
3. Set the contrast.
☑ The contrast is changed.
6.8.2 Changing the display switch-off
To save energy the Sunny Beam will automatically switch off its display after being idle for 1 minute.
You can adjust the duration or set the display to always remain switched on (Setting "-").
User Manual
SBeamBT-BUS092710
47
Operation
SMA Solar Technology AG
1. Select "Settings > Display options > Display off after:".
2. Set the interval.
☑ The switch-off has been set up.
Power consumption
The longer the display remains switched on, the higher the power consumption of the
Sunny Beam.
6.8.3 Setting the coefficients of balance
The coefficients of balance are used to calculate revenue and CO2 avoided.
Revenue / kWh
The coefficient used for calculating revenue is the earnings per kWh.
CO2 / kWh
The coefficient used for calculating CO2 avoided depends on the energy mix of the location where
the PV plant is installed. You can find out how high the CO2 factor of the location is by asking the
power supplier.
You will find further information on the CO2 factor in the download area of www.SMA.de.
1. Select "Settings > Display options > Coefficients of balance".
2. Select "Revenue / kWh:" or "CO2 / kWh:".
3. Set the coefficient.
☑ The coefficients of balance are now set.
48
SBeamBT-BUS092710
User Manual
SMA Solar Technology AG
Operation
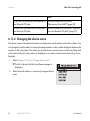
6.9 Data query
6.9.1 Changing the data query frequency
You can change the frequency at which the Sunny Beam is to query data from the inverters. The
default setting is 1 hour.
1. Select "Settings > Data query > Data query every:".
2. Set frequency.
☑ The frequency for data queries has been changed.
Power consumption
The higher the data query frequency is, the more energy the Sunny Beam will consume.
One query per day is usually sufficient, since the data is buffered in the inverter.
Overnight Shutdown for data queries preset
As the default setting, the Sunny Beam data query from inverters is shut down over night,
because the solar inverters do not supply at night and therefore do not generate any data.
If you are using a wind power inverter from SMA Solar Technology, you need to disable
the Overnight Shutdown (section 6.9.3 "Disabling the Overnight Shutdown" (page 50)).
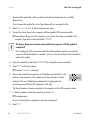
6.9.2 Changing the live query duration
The live query only begins if you call up the chart "Power today" for the complete PV system or for one
of the inverters.
User Manual
SBeamBT-BUS092710
49
Operation
SMA Solar Technology AG
During the live query, the Sunny Beam reads the current values for power and total energy yield
("Power" and "E-Total" on the Sunny Beam power and energy display) at that precise moment. This
way, you can see the current power live and, for example, observe the effect of a passing cloud on
your PV plant.
The values for "E-Today" are not updated during the live query. This data is updated by Sunny Beam
once per hour according to the default setting (section 6.9.1 "Changing the data query frequency"
(page 49)).
You can change the duration of the live query. The default setting is 20 seconds.
1. Select "Settings > Data query > Live query:".
2. Set the interval.
☑ The duration of the live query has been changed.
Power consumption
The longer the duration of the Sunny Beam live query, the more power the Sunny Beam will
consume.
6.9.3 Disabling the Overnight Shutdown
As the default setting, the Sunny Beam data query from inverters is shut down over night, because the
inverters do not supply at night and therefore do not generate any data. Only disable the Overnight
Shutdown if you are using a Windy Boy (wind power inverter from SMA Solar Technology).
1. Select "Settings > Data query > Overnight Shutdown".
2. Remove the check mark from the "active" box.
☑ The Overnight Shutdown is now disabled.
To prevent the batteries from discharging when the overnight shutdown is disabled, connect the Sunny
Beam to the computer using the USB connection cable supplied with the Sunny Beam. The computer
will supply the batteries with power. The computer needs to remain switched on.
50
SBeamBT-BUS092710
User Manual
SMA Solar Technology AG
Operation
Alternatively, you can connect the Sunny Beam to the USB plug-in power supply, which supplies the
batteries with power via a socket. The USB plug-in power supply is not included in the scope of
delivery. You can order the plug-in power supply as an accessory from SMA Solar Technology, see
section 13 "Accessories" (page 79).
6.10 Service Functions
6.10.1 Checking the connection quality
In the menu "Service > Diagnosis > Connection quality", you can check the connection quality of the
connection from the Sunny Beam to the device via which the Sunny Beam is connected to the complete
PV plant.
A
B
C
The connection quality as a symbol
The connection quality in decibel, relating to 1 mW
Serial number of the device with SMA Bluetooth, to which the Sunny Beam is connected.
User Manual
SBeamBT-BUS092710
51
Operation
SMA Solar Technology AG
Very high power consumption
When the menu "Connection quality" is displayed, the Sunny Beam is continuously
retrieving new data from the inverters and will not switch off automatically. The power
consumption of the Sunny Beam is therefore very high.
Levels of connection quality
Symbol
Connection quality
very good
Decibel in relation to 1 mW
more than -68 dBm
good
-82 to -68 dBm
Unreliable
-90 to -82 dBm
Critical
-100 to -90 dBm
None
less than -100 dBm
6.10.2 Accessing device information
1. Select "Service > Diagnosis > Device information".
2. Select "Sunny Beam" or one of the inverters.
52
SBeamBT-BUS092710
User Manual
SMA Solar Technology AG
Operation
☑ The information about the selected device is displayed.
The device information contains the following details:
SUNNY BEAM
• Serial number
• Firmware Version
• Hardware
• Bluetooth version
• Battery voltage
• NetID
Inverter
• Type
• Serial number
• Software package of the inverter
6.10.3 Performing an update
When the Sunny Beam is updated, all the settings and data will be saved.
To perform an update, you will need:
• A computer with an Internet connection, in order to download the update file from the Internet.
Supported computer operating systems, see section 7.1 "System requirements" (page 65).
• Supplied USB connection cable
User Manual
SBeamBT-BUS092710
53
Operation
SMA Solar Technology AG
1. Download the update file, which can be found in the download area of www.SMAAmerica.com.
Do not rename the update file, or the Sunny Beam will not recognize the file.
2. Select "Service > Update" in the Sunny Beam main menu.
3. Connect the Sunny Beam to the computer with the supplied USB connection cable.
☑ Sunny Beam will sign on to the computer as an inverter. Two drives are added to the
computer. One drive contains the folder "UPDATE".
The Sunny Beam must remain connected to the computer until the update is
completed!
Do not unplug the USB connection cable from the Sunny Beam and do not switch the
computer off until the update is complete. If you do so, the Sunny Beam will not be able to
perform the update.
4. Copy the update file to the folder "UPDATE". The existing file can be overwritten.
5. Select "OK" on the Sunny Beam.
☑ The menu "Update" is displayed.
6. Remove the Sunny Beam using the icon "Safely Remove Hardware" in the
taskbar on the computer, as the update cannot be performed correctly
otherwise. The icon "Safely Remove Hardware" as displayed in the
operating system Windows XP is depicted on the right.
The Sunny Beam must remain connected to the computer via the USB connection cable.
7. To start the update, confirm the request by pressing "Yes".
☑ The update starts.
As soon as the update is completed, a message is displayed.
8. Select ">>".
54
SBeamBT-BUS092710
User Manual
SMA Solar Technology AG
Operation
☑ The first chart for the complete PV system, "Power today", is displayed.
9. Unplug the USB connection cable from the computer and the Sunny Beam.
☑ The update is complete.
6.10.4 Resetting the Sunny Beam
Resetting the Sunny Beam will restore the factory settings of the Sunny Beam.
All system data, CSV files and settings on the Sunny Beam are erased when it is
reset!
If required, save the CSV files on your computer, as described in section 7.2 "Copying
system data to the computer" (page 65). After the Sunny Beam is reset, you need to
commission it again.
1. Select "Service > Reset".
2. To perform the reset, confirm the request with "Yes".
☑ The Sunny Beam performs the reset. This may take a few minutes. When the reset is
complete, the Sunny Beam switches itself off.
☑ The reset is complete.
User Manual
SBeamBT-BUS092710
55
Operation
SMA Solar Technology AG
6.11 System settings
6.11.1 Calling up the list of connected devices
You can call up a list of all inverters which are connected to the
Sunny Beam.
1. Select "Settings > PV plant > Devices connected".
☑ The list of connected devices appears.
Inverters for which the correct system password has been
entered in the Sunny Beam are marked with a check mark ( ).
Inverters for which an incorrect system password has been
entered are marked with a padlock ( ).
Padlock symbol for inverters with SMA Bluetooth Piggy-Back
For inverters with SMA Bluetooth Piggy-Back, the padlock symbol is displayed when the
inverter switches off at night. Since the Sunny Beam cannot establish a connection to this
inverter, it interprets this as an incorrectly entered password.
For inverters with SMA Bluetooth Piggy-Back the padlock will disappear once the inverter
has switched itself on in the morning, and the password has been entered correctly.
6.11.2 Entering the system password
If you have modified the system password of the inverter with Sunny Explorer after commissioning the
Sunny Beam, you can enter the new system password in the Sunny Beam without having to
commission it again.
Proceed as follows:
1. Select "Settings > PV plant > Devices connected".
56
SBeamBT-BUS092710
User Manual
SMA Solar Technology AG
Operation
☑ The list of devices that are connected to Sunny Beam is
displayed.
2. Perform the steps from the section "Enter the new system
password in the Sunny Beam" (page 31).
6.11.3 Repeating the system search
If you repeat the system search, your system data, CSV files and
settings will be kept on the Sunny Beam. Data from inverters that have been added to the PV plant
will be retrieved from the day before yesterday onwards and saved on the Sunny Beam.
Reset before a system change
If you wish to detect a different PV plant with the Sunny Beam, you need to reset the Sunny
Beam first. This will erase the data from the previously detected PV plant.
No search for Bluetooth PV plants with NetID 1
The Sunny Beam cannot search for Bluetooth PV plants with the NetID 1. Only NetIDs from
2 to 9 and from A to F are possible.
1. Select "Settings > PV plant > New plant search".
2. Select "Start detection" to start the system search.
☑ The system search will begin.
User Manual
SBeamBT-BUS092710
57
Operation
SMA Solar Technology AG
If
A free NetID is already set on the devices of
your Bluetooth PV plant.
No free NetID has been set on the devices in
your Bluetooth PV plant.
Then
Perform the steps from the section
"Determining a free NetID" (page 24).
Perform the steps from the section "Search for
your own Bluetooth PV plant" (page 27).
6.11.4 Changing the device name
The device names of the detected inverters are displayed as serial numbers on the Sunny Beam. You
can change the serial numbers to a descriptive device name in order to better distinguish between the
inverters on the Sunny Beam. The names you give the devices are only shown on the Sunny Beam and
will not be transferred to the inverters or displayed on any other communication device (e.g. Sunny
Explorer).
1. Select "Settings > PV plant > Change device name".
☑ The list of devices that the Sunny Beam manages is
displayed.
2. Select the serial number or a previously assigned device
name.
58
SBeamBT-BUS092710
User Manual
SMA Solar Technology AG
Operation
☑ The input page appears.
Arrow: deletes the character which was entered last.
Cross: cancels the input action.
Check mark: the entered device name is saved.
3. Delete the serial number or previously assigned device
name using the arrow.
4. Enter a new device name using the characters.
5. To save the device name, select the check mark.
☑ The device name has been changed.
6.11.5 Adjusting the energy meter when switching devices
1. Select "Settings > PV plant > Offset energy meter".
2. Select the new inverter.
3. Set the revenue of the previous inverter.
☑ The energy meter has been adjusted.
6.11.6 Setting the maximum plant power in kWp
The plant power in kWp (kilowatt peak) is the maximum possible performance of the PV plant and
serves to compare PV plants of different sizes with one another. You can find out the value in kWp
from your installer.
User Manual
SBeamBT-BUS092710
59
Operation
SMA Solar Technology AG
The Sunny Beam requires the plant power in kWp to calculate the
specific annual yield (kWh/kWp). The specific annual yield is
one of the charts displayed by the Sunny Beam, depicted to the
right.
The Sunny Beam can display the plant performance for the last
20 years. The more years are included, the more narrow the
columns will be.
Calculating the specific annual yield with the Sunny Beam.
The Sunny Beam calculates the specific annual yield as follows:
• kWh (kilowatt hour) divided by kWp (kilowatt peak)
The Sunny Beam calculates the value for kWh per year by adding the daily power (E-Day)
from the first to the last day of the year:
• E-Day1 + E-Day2 + E-Day3 + all E-Day values until 31 December of the year
The data from January to December is required
The specific annual yield is only representative if data from the whole year is used. If, for
instance, your PV plant has been commisioned with the Sunny Beam in July, there is no data
from the previous months.
1. Select "Settings > PV plant > Plant Power in kWp".
2. Set the plant power in kWp.
☑ The plant power in kWp has been set.
60
SBeamBT-BUS092710
User Manual
SMA Solar Technology AG
Operation
When expanding your Bluetooth PV plant
If your Bluetooth PV plant is to be expanded with more PV modules, you need to set the
new plant power in kWp on the Sunny Beam. The new inverters can be added to the Sunny
Beam by performing a new system search (see section 6.11.3 "Repeating the system
search" (page 57)).
6.12 Country settings
In the menu "Settings > Country settings", you can make country-specific settings.
If you change the country, the settings in the menu items below the line will automatically be adjusted
to the selected country. In addition, you can change the settings manually.
• Country
– Language
– Currency
– CO2 avoided
– Formats
– Decimal separator
– Date format
– Timestamp format
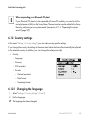
6.12.1 Changing the language
1. Select "Settings > Country settings > Country".
2. Set the language.
☑ The language has been changed.
User Manual
SBeamBT-BUS092710
61
Operation
SMA Solar Technology AG
6.12.2 Changing the currency
1. Select "Settings > Country settings > Currency".
2. Set the currency.
☑ The currency has been changed.
6.12.3 Changing the unit of CO2 avoided
1. Select "Settings > Country settings > CO2 avoided".
2. Set the unit.
☑ The unit of CO2 avoided has been changed.
6.12.4 Changing the Decimal Separator
1. Select "Settings > Country settings > Formats".
2. Select "Decimal separator:" and change the setting.
☑ The decimal separator has been changed.
The decimal separator in the power and energy display (section 6.4 ) on the Sunny Beam cannot be
changed and will always be a point.
6.12.5 Changing the date format
Abbreviations: D= day, M= month, Y= year
1. Select "Settings > Country settings > Formats".
2. Select "Date format" and change the setting.
☑ The date format has been changed.
62
SBeamBT-BUS092710
User Manual
SMA Solar Technology AG
Operation
6.12.6 Changing the Timestamp Format
Possible settings: 12h or 24h (e.g. 6:00 pm or 18:00)
1. Select "Settings > Country settings > Formats".
2. Select "Timestamp format" and change the setting.
☑ The timestamp format has been changed.
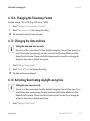
6.13 Changing the date and time
Setting the date and time correctly
Be sure to set the correct values for date, daylight saving time, time and time zone. If you
reset the time after commissioning, the data associated with the time difference will be
deleted from the inverter. Please note that the time may also be reset if you change the
settings for time zone or daylight saving time.
1. Select "Settings > Date & time".
2. Select "Date" or "Time" and change the setting.
☑ The date and time are changed.
6.14 Activating/deactivating daylight saving time
Setting the time zone correctly
Be sure to set the correct values for date, daylight saving time, time and time zone. If you
reset the time after commissioning, the data associated with the time difference will be
deleted from the inverter. Please note that the time may also be reset if you change the
settings for time zone or daylight saving time.
1. Select "Settings > Date & time".
User Manual
SBeamBT-BUS092710
63
Managing System Data
SMA Solar Technology AG
2. Set or remove a checkmark in the box for "Daylight saving time". When there is a checkmark in
the box, daylight saving time is activated. The time settings on the Sunny Beam and on the
inverters will switch to daylight saving time.
☑ Daylight saving time is activated/deactivated.
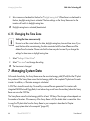
6.15 Changing the Time Zone
Setting the time zone correctly
Be sure to set the correct values for date, daylight saving time, time and time zone. If you
reset the time after commissioning, the data associated with the time difference will be
deleted from the inverter. Please note that the time may also be reset if you change the
settings for time zone or daylight saving time.
1. Select "Settings > Date & time".
2. Select "Time zone" and change the setting.
☑ The time zone is changed.
7 Managing System Data
At the end of each day, the Sunny Beam saves the new total energy yield (E-Total) that the PV plant
has produced. The Sunny Beam saves the total energy yield for the complete PV plant and for each
inverter. In addition, a 10-minute average is calculated.
A CSV file is stored for each day. No monthly or annual files are generated. For inverters with
integrated SMA Bluetooth Piggy-Back, it can take as long as until noon the next day, before the Sunny
Beam can save the CSV files.
The Sunny Beam saves the total energy yield for at least 100 days. The storage volume depends on
the number of inverters. If the memory of the Sunny Beam is full, the oldest data is overwritten. How
to copy the PV plant data from the Sunny Beam to your computer is described in Chapter
7.2 "Copying system data to the computer" (page 65).
64
SBeamBT-BUS092710
User Manual
SMA Solar Technology AG
Managing System Data
Values for daily yield (E-Today) and Power
With a spreadsheet, for example Microsoft® Excel, you can calculate the values for daily
yield and power using the total energy yield (E-Total), which is saved by the Sunny Beam,
with Excel for example.
7.1 System requirements
Supported operating systems for connecting the Sunny Beam to the computer:
• Windows® XP, Windows Vista
• Linux (SUSE, RedHat, Ubuntu, Debian etc.) with support for USB and mass storage devices
• Mac OS® X, 10.3 and later
• Mac OS® classic, 8.6 and later with support for USB
7.2 Copying system data to the computer
The Sunny Beam signs on to the computer as an inverter. This means that you can copy the plant data
onto the computer in the same way as with a USB memory stick.
To copy the system data to the computer, proceed as follows:
1. Connect the Sunny Beam to the computer with the supplied USB connection cable.
☑ Sunny Beam signs on as an inverter. A drive is added to the computer. The drive contains
the folder "SBEAM".
2. Open the "SBEAM" folder and copy the CSV data to the computer.
☑ The system data is now saved on the computer.
User Manual
SBeamBT-BUS092710
65
Managing System Data
SMA Solar Technology AG
7.2.1 CSV format
The CSV files can be opened in Microsoft Excel and used to create charts.
File name
The name of the file is always the date that the data was generated by the inverter. The sequence is
always year, month, date. The separator is a hyphen.
YY-MM-DD = Example: 09-07-15.csv
Data format in the file
Individual data is separated by a semicolon in the file. The decimal separator and the timestamp
format in the files are determined by the country settings. For information on how to change the
decimal separator and the timestamp format, please refer to Chapter 6.12.4 "Changing the Decimal
Separator" (page 62) and Chapter 6.12.6 "Changing the Timestamp Format" (page 63).
66
SBeamBT-BUS092710
User Manual
SMA Solar Technology AG
Menu overview
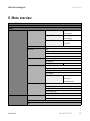
8 Menu overview
Complete PV plant
Inverter
Events
Device Set-up
Display options
Contrast
Upper contrast
Lower contrast
Upper display
Lower display
Revenue / kWh
CO2/kWh
Display off after
Balance coefficients
Alarm
Date & time
Data query
Country settings
PV plant
Service
Diagnosis
Signal every
Date
Daylight saving time
Time
Time zone
Data query every
Live query for
Overnight Shutdown
Country
Language
Currency
CO2 avoided
Formats
active
Decimal separator
Date format
Timestamp format
Connected devices
New plant search
Change the device name
Offset energy meter
Plant power in kWp
Connection quality
Device information
Update
Reset
User Manual
SBeamBT-BUS092710
67
Maintenance and Care
SMA Solar Technology AG
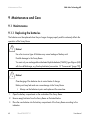
9 Maintenance and Care
9.1 Maintenance
9.1.1 Replacing the batteries
The batteries must be replaced when they no longer charge properly and this adversely affects the
operation of the Sunny Beam.
Notice!
Use of an incorrect type of Batteries may cause leakage of battery acid
Possible damage to the Sunny Beam.
You must only use rechargeable nickel-metal hydride batteries (NiMH), type Mignon (AA)
with low self-discharge, e.g. Eneloop batteries (see section 13 "Accessories" (page 79)).
Notice!
Overcharging of the batteries due to varied states of charge.
Battery acid may leak and can cause damage to the Sunny Beam.
• Always use the batteries in pairs and replace at the same time.
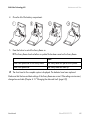
1. Open the battery compartment on the underside of the Sunny Beam.
2. Remove empty batteries from the Sunny Beam as illustrated below.
3. Place the new batteries into the battery compartment of the Sunny Beam according to the
indication.
68
SBeamBT-BUS092710
User Manual
SMA Solar Technology AG
Maintenance and Care
4. Close the lid of the battery compartment.
5. Press the button to switch the Sunny Beam on.
☑ The Sunny Beam checks whether an update file has been saved on the Sunny Beam.
If
There is an update file on the Sunny Beam.
There is no update file.
Then
The Sunny Beam will perform the update.
The Sunny Beam will start up.
☑ The chart view for the complete system is displayed. The batteries have been replaced.
Make sure that the time and date settings of the Sunny Beam are correct. If the settings are incorrect,
change time and date (Chapter 6.13 "Changing the date and time" (page 63)).
User Manual
SBeamBT-BUS092710
69
Decommissioning
SMA Solar Technology AG
9.2 Care
Notice!
Ingress of water during cleaning may cause damage to the Sunny Beam.
The Sunny Beam is not waterproof.
• Protect the Sunny Beam from wet conditions.
Cleaning the Sunny Beam
To clean the Sunny Beam, only use a lightly dampened cloth to prevent the penetration of
moisture. If there is a considerable amount of dirt, you can also use a mild, non-abrasive,
non-corrosive cleaning agent.
10 Decommissioning
10.1 Decommissioning the Sunny Beam
1. Open the battery compartment on the underside of the Sunny Beam.
2. Remove empty batteries from the Sunny Beam as illustrated below.
3. Close the lid of the battery compartment.
70
SBeamBT-BUS092710
User Manual
SMA Solar Technology AG
Decommissioning
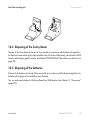
10.2 Disposing of the Sunny Beam
Dispose of the Sunny Beam at the end of its service life in accordance with the disposal regulations
for electronic waste which apply at the installation site at that time. Alternatively, send it back to SMA
America with shipping paid by sender, and labeled "FOR DISPOSAL" (the address can be found on
page 80).
10.3 Disposing of the batteries
Dispose of the batteries at the end of their service life in accordance with the disposal regulations for
batteries which apply at the installation site at that time.
You can order new batteries for the Sunny Beam from SMA America (see Chapter 13 "Accessories"
(page 79)).
User Manual
SBeamBT-BUS092710
71
Troubleshooting
SMA Solar Technology AG
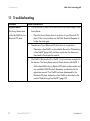
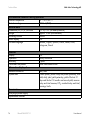
11 Troubleshooting
Problem
System search
The Sunny Beam does
not list the NetID of your
Bluetooth PV plant.
Cause and solution
• Your Bluetooth PV plant has no device within the radio range of your
Sunny Beam.
– Place the Sunny Beam closer to a device of your Bluetooth PV
plant. If this is not possible, use the SMA Bluetooth Repeater to
bridge the radio gap.
• The devices of your Bluetooth PV plant are not in operation.
– Determine a free NetID, as described in the section "Determining
a free NetID" (page 24), and then commission the devices as
described in the respective manual.
• The NetID 0 (Bluetooth off) or NetID 1 may have been assigned to
the devices. The Sunny Beam cannot detect devices with NetID 1.
– Set the free NetIDs of your Bluetooth PV plant on the inverters and
any available SMA Bluetooth Repeaters, as described in the
respective manual. If no NetID has been determined for the
Bluetooth PV plant, determine a free NetID as described in the
section "Determining a free NetID" (page 24).
72
SBeamBT-BUS092710
User Manual
SMA Solar Technology AG
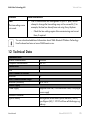
Problem
Devices not found
The Sunny Beam does
not list all the inverters
of your Bluetooth PV
plant.
Troubleshooting
Cause and solution
• For PV plant with many devices, it could take a while for all of the
devices to become integrated in the Bluetooth network.
– Repeat the search.
• The NetID of your Bluetooth PV plant has not been set on the missing
inverters.
– Check whether the NetID of your Bluetooth PV plant has been set
on the inverters and SMA Bluetooth Repeaters, as described in
their respective manuals.
• Sunny Beam was not able to establish a radio connection to the
missing inverters.
The Sunny Beam lists
your inverters as well as
inverters from other
plants.
Radio connection
The radio connection to
the Sunny Beam is
unreliable.
– Check the connection quality of the inverters and SMA Bluetooth
Repeaters, as described in their respective manuals. The
connection quality of each device must be at least good.
• There is another Bluetooth PV plant within the radio range of the
Sunny Beam, which uses the same NetID as your Bluetooth PV plant.
– By determining a free NetID this should not occur. Determine a
free NetID again, as described in the section "Determining a free
NetID" (page 24).
• The Sunny Beam is too far away from your Bluetooth PV plant, or the
radio connection between the Sunny Beam and your Bluetooth PV
plant is subject to interference. Reasons for the interference could be,
for example, walls or ceilings which weaken the radio waves.
– Place the Sunny Beam closer to a device of your Bluetooth PV
plant. If this is not possible, use the SMA Bluetooth Repeater to
bridge the radio gap.
User Manual
SBeamBT-BUS092710
73
Troubleshooting
SMA Solar Technology AG
Problem
Connection to the
computer
Cause and solution
• The message does not affect the functionality or speed of the Sunny
Beam.
The computer displays
a message that the USB
device can perform
better.
Chart view
Gaps or extreme
characteristics in the
chart data.
– You can switch the message off, but then other USB error
messages will not be displayed. Proceed as follows. These steps
describe Windows XP and may be different in other operating
systems. Right-click on "My Computer" and select "Device
Manager". Open the "USB Controller" in the Device Manager.
Right-click on the item "Host Controller". Select "Properties". Select
"Advanced". Tick the box that says "Do not display USB errors".
• There will be gaps displayed in the charts if you changed the time
setting of the Sunny Beam forwards after the PV plant has been
detected by the Sunny Beam. Extreme characteristics will appear, if
you have set the time backward.
The reason for this is that an inverter saves the generated data
together with the current time. The Sunny Beam will retrieve the data
from the inverter and display them.
Padlock symbol (
)
The padlock symbol is
displayed, although the
correct system
password was entered.
74
– Do not change the time settings on the Sunny Beam more often
than necessary.
• For inverters the padlock symbol is displayed when the inverter
switches off at night. Since the Sunny Beam cannot establish a
connection to this inverter, it interprets this as an incorrectly entered
password.
SBeamBT-BUS092710
– As soon as the inverter is switched on in the morning, the padlock
will disappear.
User Manual
SMA Solar Technology AG
Problem
Time
The time settings were
not saved.
Technical Data
Cause and solution
• Due to the extensive time management in your PV plant, the first
attempt to change the time settings may not be successful, if, for
example, the time has already been set using Sunny Explorer.
– Check the time settings again after commissioning and correct
them, if required.
You can download additional information about SMA Bluetooth Wireless Technology
from the download area at www.SMA-America.com.
12 Technical Data
Communication
Inverter communication
Computer communication
Connections
USB
Max. number of devices
Bluetooth
Max. communication range
Bluetooth (outdoors)
Power supply
Power supply
Number of batteries
Type of battery
User Manual
Bluetooth
USB 2.0
12
up to 330 ft.
integrated solar cell, USB connection cable, USB plug-in
power supply
2
Rechargeable nickel-metal hydride batteries (NiMH),
type Mignon (AA), 1.2 V DC with low self-discharge, e.g.
Eneloop.
SBeamBT-BUS092710
75
Technical Data
SMA Solar Technology AG
Environmental conditions during operation
Ambient temperature
32 °F to +104 °F
Protection rating
NEMA 1 (IP20)
General data
Dimensions (W /H /D ) in inches
5/2.95/7.67 (as tabletop device)
Weight
approx. 12 oz. (with batteries)
Mounting location
indoors
Status display
LCD
Software language
German,, English, Spanish, French, Italian, Dutch,
Portuguese, Czech
Features
Display
Operation
Warranty
Certificates and permits
Information displayed
General information
System data
LCD
Rotary Pushbutton
5 years
www.SMA-America.com
Time, date
Current power, power today and power yesterday, total
yield, daily yield, yield yesterday, yield of the last 31
days and the last 12 months and annual yield, revenue
today and total revenue, CO2 avoided today and total,
warnings, faults
Accessories
USB plug-in power supply
Replacement batteries
76
SBeamBT-BUS092710
User Manual
SMA Solar Technology AG
Technical Data
12.1 FCC Compliance Information
SMA system monitoring unit, model SMA Sunny Beam Bluetooth®.
This device complies with Part 15 of the FCC Rules. Operation is subject to the following conditions:
1) This device may not cause harmful interference, and
(2) this device must accept any interference received, including interference that may cause undesired
operation.
NOTE: This equipment has been tested and found to comply with the limits for a Class B digital
device, pursuant to Part 15 of the FCC Rules. These limits are designed to provide reasonable
protection against harmful interference in a residential installation. This equipment generates, uses,
and can radiate radio frequency energy and if not installed and used in accordance with the
instructions, may cause harmful interference to radio communications. However, there is no guarantee
that interference will not occur in a particular installation. If this equipment does cause harmful
interference to radio or television reception, which can be determined by turning the equipment off
and on, the user is encouraged to try to correct the interference by one or more of the following
measures:
• Reorient or relocate the receiving antenna.
• Increase the separation between the equipment and the receiver.
• Connect the equipment into an outlet on a circuit different from that to which the receiver is
connected.
• Consult the dealer or an experienced radio/TV technician for help.
• The user is cautioned that changes or modifications not expressly approved by SMA America,
Inc. could void the user’s authority to operate this equipment.
Contact SMA America for more information.
User Manual
SBeamBT-BUS092710
77
Technical Data
SMA Solar Technology AG
RF-exposure Statement
The SMA Sunny Beam Bluetooth contains a modular transmitter. Thus it must have a separation of at
least 7.87 in. between the antenna and the body of the user or nearby persons, excluding hands,
wrists, feet, and ankles.
78
SBeamBT-BUS092710
User Manual
SMA Solar Technology AG
Accessories
13 Accessories
13.1 USB plug-in power supply
The USB plug-in power supply can be used to connect the Sunny Beam to a socket, to charge the
batteries via the mains instead of using the solar cell.
Order number: BEAM-BT-SUPPLY
Position
A
B
Quantity
1
4
Name
USB plug-in power supply
Adapter
13.2 Replacement batteries
Order number: BEAM-BT-BATTERY
Position
A
User Manual
Quantity
2
Name
Eneloop rechargeable batteries
SBeamBT-BUS092710
79
Contact
SMA Solar Technology AG
14 Contact
If you have technical problems concerning our products, contact the SMA Serviceline. We need the
following information in order to provide you with the necessary assistance:
• Sunny Beam hardware (see section 6.10.2 )
• Sunny Beam firmware version with Bluetooth (see section 6.10.2 )
• Firmware version of the SMA Bluetooth Piggy-Back in the inverter (see SMA Bluetooth PiggyBack manual)
• Inverter type and serial number (see inverter manual)
SMA America, Incorporated
4031 Alvis Court
Rocklin, CA 95677
Tel. +1 916 625 0870
Fax +1 916 625 0871
[email protected]
www.SMA-America.com
80
SBeamBT-BUS092710
User Manual
SMA Solar Technology AG
User Manual
Contact
SBeamBT-BUS092710
81
Contact
82
SMA Solar Technology AG
SBeamBT-BUS092710
User Manual
SMA America, Incorporated
www.sma-america.com