1
Notice: The 1590’s preset thermostat normally has accuracy greater than the thermometer supplied. If the thermometer appears to be off the
desired setting at anytime, it is recommended that the thermostat’s presetting be used on the first setting of eggs. Only if the eggs do not hatch
well should the thermostat be adjusted (refer to poor hatch section on last page). It is suggested that a small number of inexpensive eggs be
used during the first setting to establish the operator’s procedure and the incubators desired operation.
1. CHOOSE A LOCATION:
An incubator or brooder is designed to bring normal room temperature to the desired temperature. Room temperature of 62oF or
below will reduce the temperature in the incubator. The location of the machine is important to successful operation.
- A room temperature from 68 to 78 F is ideal and fresh air without drafts
is necessary.
- Be sure no direct sunlight strikes the incubator and that it sits level.
- A consistent room temperature within a few degrees is best.
2. SETTING UP THE INCUBATOR
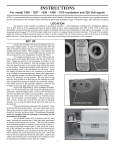
C
Unpack the incubator from the box and set aside the thermometer and wire floor.
Remove the top half from the bottom. The plastic liner should be in the bottom
half where it is to remain. Place the wire floor on top of the liner. Fill the trough
marked ‘C’ in diagram 1 (image at right) with clean water. Place the top over the
bottom. Plug the cord set into the appropriate wall socket. The fan should then
run and the red light on the incubator should be lit. Allow the incubator to warm
up and adjust its temperature for one hour. When the light begins blinking
regularly, the incubator is nearing its set point. The thermometer supplied
maybe used to check the room temperature and to indicate when the incubator
is nearing its operating temperature.
T
DIAGRAM 1
Caution: The thermometer may not be as accurate as the thermostat
and should not be trusted on the first couple of hatches.
3. SETTING THE EGGS
Warm eggs to room temperature. (If the optional automatic egg turner is to be used,
skip this paragraph and see section on AUTOMATIC EGG TURNER.) Do not set
eggs so that some will be hatching while others are still being turned unless a separate
hatching incubator is to be used. Place eggs on the wire floor in the incubator. Let
them lay in a natural manner, which is on their sides with the small end slightly
down. The thermometer may be used by allowing it to rest on top of the eggs so it
can be seen through the window. Eggs should be turned during incubation 2 to 3
times a day. With a pencil mark an “X” on one side and an “O” on the opposite side
of the egg. Turn all eggs so that “X”s appear face up. Next turning period turn all
“O”s face up. Do this until 3 days before eggs are due to hatch.
SETTING THE EGGS WITH AN AUTOMATIC EGG TURNER
(optional accessory)
Place the Automatic Egg Turner (optional) on the wire floor of the incubator and plug in its
motor to electric source. Do not set eggs so that some will be hatching while others are still
being turned unless a separate hatching incubator is to be used. Place eggs in the cups with
the pointed, small end of the egg down ward. Take care to notice if large eggs will hit any part
of the incubator’s top when eggs turn and move them elsewhere if necessary. The Automatic
Egg Turner turns one revolution every 4 hours so the eggs will not appear to have moved
except after many minutes. Eggs should be turned up to about 3 days before the hatch at
which time the Automatic Egg Turner will be removed from the incubator and the eggs are
placed on the wire floor for hatching. It is not recommended that the eggs be allowed to hatch
in the turner as some chicks could be injured and the hatching chicks will soil the turner.