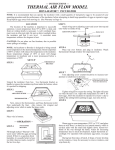
1
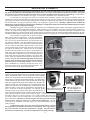
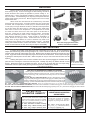
INSTRUCTIONS
For model 1502 - 1527 - 1536 - 1550 - 1570 incubators and 220 Volt equals
NOTE: It is recommended that you operate the incubator with a small quantity of inexpensive eggs to be assured of your operating procedure
and the performance of the incubator before attempting to hatch large quantities of eggs or expensive eggs. (See warranty on page 6)
LOCATION
The location of the incubator is important to successful operation. A thermostatically controlled room temperature between
75oF to 80oF (24oC to 27oC) degrees with fresh air without drafts is ideal. Room temperatures from 55oF to 90oF (13oC to 32oC) are
acceptable but good temperature control in the incubator is obtained when the room temperature is held within a few degrees. A room
temperature that changes 10oF (5oC) from day to night could result in a ½ degree change inside the incubator. The back of the incubator
where the vents are located should be placed no closer to a wall or barrier than 12 inches (30cm) in order to have free air exchange
within the room. Avoid areas of strong sunlight or air ducts that could influence the temperature in the incubator.
SET UP
Unpack the incubator and plug the electrical cord into
the proper voltage socket. If used in countries other than the
USA or Europe the electric plug may have to be removed and a
suitable type plug installed. When plugged in, the incubator fan
will blow air towards the door and the light near the cord set will
shine provided the room temperature is below 94F (34C).
For setting incubators such as the 1502 locate the
turner switch on the upper left outside near the rear of the incubator. Toggle this switch to the momentary on position (it will
have to be held in this position). With the incubator door open,
the trays should be seen to turn slowly while holding the switch
in this position. Releasing the toggle switch will return it to the
center position, which is the off position for the turner. Using
this switch will allow the racks in the incubator to be leveled in
order to install or remove the egg trays. Moving the toggle switch
to the opposite position will cause the toggle to snap in place.
This is the automatic turning position. Be sure that the egg
trays are fully pushed in so that they do not obstruct the racks
from turning before putting the switch in the automatic position.
The switch must be in the automatic position in order for the
incubator to turn the eggs every two hours automatically.
TEST FOR ASSURANCE THAT TURNER IS WORKING: It is recommended that each week the following test be
preformed: Using the toggle switch, run the turner until the trays
are level and return the switch to the ON position. Look to see if
the trays remain level. If not, then re-level so that they remain
level. Put the switch in the ON position. Check the tray level
after 3 hours. If trays are not level then the turner is operating
properly. If no turning has taken place, then timer may need to
be replaced.
There are vent holes in the back of the incubator. Three
at the top and three at the bottom. The outer vents have moveable covers while the center vents have no covers. For normal
operation, the outer vents are closed. Do not cover the center
vents, as constant fresh air exchange is necessary for the
development of the eggs.
The incubator comes with a moisture pan and wick
pads. Normally the moisture pan is filled with water and placed
on the fan shelf between the runners. The wick pad is added
when additional moisture is required usually at time of hatch. If
the optional automatic moisture pan is used, place the tank on
top of the incubator and attach the hose to the moisture pan
nipple. Next thread the shut off clamp on to the hose so that it
will be between the quick disconnect and the tank. Attach the
hose to the tank nipple and fill the tank with water. Depth of the
water in the moisture pan is not important for humidity but may
be adjusted by bending the brass float arm slightly.
Toggle Switch
Humidity Control Vents
Humidity Pan with wick pad
1
The thermometer comes with wicks. The purpose of
the wicks is explained in the HUMIDITY section. The thermometer is placed in the small hole marked THERMOMETER / HYGROMETER on the upper left outside of the incubator. The thermometer should be pushed fully into its hole with the dial portion
on the outside of the incubator. If the hole is snug, avoid twisting
the dial while the probe is in the hole as this could loosen the dial
and move the 100F-calibrated setting. In the unusual event that
the thermometer looses calibration, it can be recalibrated by placing it in a known 100F atmosphere, then hold the base of the
probe at the dial with pliers so that the card may be rotated. Align
the 100F mark under the pointer and then re-tighten the probe.
No. 3018 in Postion
TO REGULATE
Important – do not confuse the word THERMOMETER
(the dial which shows temperature) and THERMOSTAT (electronic or wafer switch that controls heat).
The incubator is equipped with an electronic thermostat, No. 3255, and a mechanical wafer auxiliary thermostat,
No. 3124. The wafer thermostat is a stand-by thermostat
and is not connected to the incubator’s heat system. It is
used whenever the electronic thermostat is to be by-passed
and does not need to be regulated at this time. Store the
wafer and adjusting screw for possible future use. The electronic thermostat will have to be adjusted for the proper temKnob used to
perature before setting the eggs.
regulate operatThe electronic thermostat is regulated by the black
ing thermostat
knob on the left side of the incubator while facing the door.
Arrows next to the knob show direction of turn for increasing
and decreasing the temperature. The knob will make 10 full turns from high to low. The range of the thermostat is from 94oF to 104oF
(34oC to 40oC). The light nearest the cord set is the heater light and it shines when the heater is on. When the temperature in the
incubator is below 94oF (34oC) it will shine most of the time and then begin to blink on and off as it approaches the set point Begin by
turning the knob toward DECREASE until it stops then turn it five complete turns towards INCREASE. Close the vents doors on those
vents that have them in the back of the incubator and close the door to the incubator and latch it with the incubator operating.
Allow the incubator one hour to heat up. If the temperature is above 100oF (37.8oC) after one hour then turn the knob toward
decrease by one turn and recheck in fifteen minutes. One complete turn of the knob is approximately one degree in temperature. If the
temperature is below 100oF (37.8oC) by three degrees or less after one hour, do not adjust the knob but wait at least four hours before
making any adjustment. The walls, water pan and interior of the incubator take time to heat up and for the thermostat to settle to a proper
temperature. THE CORRECT TEMPERATURE FOR MOST EGGS IS 100o F (37.5oC). Mark the knobs pointer against the incubator for
position reference for the proper setting.
It is recommended that the incubator be allowed to run for a day at its set temperature before placing the eggs in the trays.
When many eggs are added, expect the temperature to come back only to within a degree below set point for almost a day. If
temperature has not fully recovered at that time, then make slight adjustments with the control knob. Keep in mind that large corrections
of the control setting can result in over shoot and under shoot of the desired setting. After two weeks, it maybe necessary to turn the
thermostat toward DECREASE in order to maintain proper temperature. This is due to the natural heat of the chicks inside of the shells.
With large eggs such as turkey or goose it may
be necessary to reduce the setting temperature by half a degree after the 3rd week.
In the event of an electronic thermostat failure, the electronic unit can be disconnected inside of the incubator and the heat
system wired to the wafer thermostat. To regulate the wafer thermostat, screw the wing nut
onto the L shaped adjusting screw. Place the
adjusting screw into the hole for the wafer thermostat from the outside and screw it into the
bracket located on the inside. After a few turns,
place the wafer into the bracket inside of the
incubator and screw it onto the end of the adBackup thermostat
justing screw so that it is snug. Adjust the
with wafer installed.
temperature in the same manner as the elec(Use only if electronic
tronic thermostat. The wafer thermostat has
thermostat fails)
o
o
o
o
a range of about 78 F to 110 F (25 C to 44 C).
2
VENTILATION & HUMIDITY
For most eggs such as poultry and game birds, the outer vents should be kept closed, and the incubator’s moisture
pan filled with water until a few days before scheduled hatch. The center vents should be left open at all times. During the
last couple of days, add a wick pad to the water pan to increase humidity and do not change vent settings. This procedure
is simple and works for most locations and eggs. It avoids the complexities of the methods to follow.
It is necessary for the egg to lose some of its moisture during incubation; however, the purpose of supplying water in an
incubator is to prevent excessive drying out of the natural moisture in the egg. The rate of evaporation from the egg is determined by the
type of egg, pore density and size and the humidity of the air. Methods of determining the proper rate of evaporation are by judging the
size of the air sack in the egg, the hygrometer reading, or by weighing the egg with a scale. Humidity is adjusted in the incubator by
adjusting the vents (opening the vents decreases humidity) or changing the surface area of the water (add wick pads to increase
or cover part of the pan to decrease humidity).
Weighing the egg with a very accurate scale is the best way of establishing proper humidity. Most types of eggs should loose
about 12% to 14% of their weight during incubation. Raise humidity if too much weight is being lost, reduce humidity if weight loss is
too little. By using the known weight of the egg before incubation, multiply this number by the desired percentage of weight loss to get
the desired weight loss. Divide this figure by the number of days for incubation and it will yield the average desired weight loss per day.
Compare the desired weight on a given day to the actual weight for that day. The egg maybe +/- one percentage point of the desired percent.
The incubator is supplied with a dial thermometer,
which can be used as a hygrometer. To do this, first establish
the proper setting on the thermostat by using the dial thermometer. Do not move the thermometer to any other location as it
may affect its calibration. The thermometer/hygrometer comes
with two wicks. Wet one of the wicks which is a cloth tube about
6” long. Place the thermometer probe down the center of the
wick by several inches and place the other end of the wick into
the water of the moisture pan. Close the door of the incubator
and allow about 30 minutes for it to return to its temperature of
99.5F, which has already been set on the thermostat. Because
of the evaporation of water from the wick, the thermometer now
reads lower than the 99.5 setting (probably in the 83F to 86F
range). Make any adjustments to humidity as described in the
previous paragraph. Do not use the hygrometer for more than
6 hours as the wick may crust over with minerals from the
water and give an incorrect high reading. Once the humidity
level is established, it is not likely to change very much, so reHygrometer wick installed on
move the wick and return it to the thermometer function. Reprobe and placed in humidity pan
check in the same way for proper hatching levels.
HATCHING
About three days before the expected hatch date move the
eggs from the turning tray(s) and lay them in the hatching tray(s) in their
natural, unsupported position. It is recommended to use a separate
hatcher such as the Model 1550 as temperatures are usually ½ to 1F
degree cooler for hatching with increased humidity. The 1502 incubator has a hatching tray in the bottom, which will allow for hatching eggs
while newer eggs are being turned in the setting trays. If all eggs in the
1502 are to hatch, then the turning trays can be leveled and the eggs
placed on the wire floors of the setting trays. Small chicks such as
OR
Move all eggs set in a
quail may require a cover over the trays similar to the hatching tray
Move eggs that are due to
No. 1502 incubator to a
cover. Covers are not used for large chicks. For hatching, set the
hatch
to
the
hatching
tray
model No. 1550 Hatcher
incubator to 99.5F (37C) and add a wick pad to the moisture pan. A
second pad maybe added to the pan if higher humidity is desired. This
setting should meet the needs of most types of eggs. A hygrometer reading
from 88F to 93F (31C to 34C) is desired. In the 1502 incubator with other eggs
not ready to hatch, lower the temperature ½ F and add one wick pad for the few
days of the hatch. If possible, avoid opening the door during the hatch as this
removes warm, moist air resulting in a slowed or damaged hatch. As soon
as the hatch is completed return the 1502 to its normal temperature and humidity settings.
If eggs hatch a day or two early, decrease the temperature ½ degree
during the entire incubation period on the next setting. If the eggs hatch a
day or two late then increase the temperature ½ degree. For poor hatches
that hatch on expected day, consider an adjustment in humidity settings.
Humidity Pan with wick pad
3
BROODING
Remove chicks to the brooder within 24 hours after hatching as
soon as they are dry. If some of the eggs are late hatching, removal of
chicks should be done quickly as possible to prevent chilling of unhatched eggs. If some eggs appear hatchable, continue the hatch for a
day or two more. Chicks hatching a few days beyond expected date are
usually weak and may not survive. Discard eggs that are over four days
beyond hatch date.
When chicks are removed from the incubator they must have
a place that is warm and dry. A brooder should have one section that
is heated, with a temperature of 100F (37C) for small birds like quail
or 95F (34C) for larger birds like chickens. Maintain this temperature
for the first week and then lower it 5 degrees (F) each week there
after down to normal room temperature. If temperatures are a little
too warm the chicks will move to the cooler parts of the brooder on
their own. Place food on a flat surface near the feeder. Avoid slick
surfaces like cardboard, plastic or flat newspaper as young chicks
have difficulty standing on them. Water should be available in a
proper drinker for the type chicks. Small birds such as quail can
easily drown in large drinkers so rocks or marbles may need to be
used at first if the drinker is not made especially for them. The GQF
catalog has suitable brooders, feeders and drinkers. GQF Vitamins Plus
is also recommended for the first seven days to improve survivability.
G.Q.F. has many types of brooders,
feeders, and waterers available
CLEANING AND SERVICING
If practical, the incubator maybe wiped down with a disinfectant such as Tek-Trol. Even a mild detergent
maybe used and the trays placed in strong sunlight to dry. There is aluminum clean out pan on the floor of the
incubator, which should be cleaned after each hatch. Moisture pans and tanks should also be cleaned from time
to time. Hygrometer wicks and wick pads may begin to turn brown from mineral stains. These maybe used again
by placing the stained portion into the water. Wicks and pads can only be used a few times and then must be
replaced.
Cleaning and repairs in the rear of the incubator can be done by first unplugging the incubator from the
power and then removing the screws from the back panel. Carefully wipe away any feather dust with a moist Tek-Trol, available from G.Q.F.
sponge. Replacement parts are available from GQF. The fan motor is sealed and does not require oiling. can be used to sanitize
incubators and hatchers.
Thermostats and turner parts should give long service but parts are available when needed.
ACCESSORIES
EGG RACK POSITIONERS FOR CABINET INCUBATORS
Plastic egg rack positioners offer the most efficient system for gathering,
spray disinfectant treating and storing of eggs. At time of setting eggs, just
remove loaded egg rack positioners from storage area to the incubator
setting trays.
No. 0243 - SET OF 6 QUAIL EGG RACKS, each No. 1502 setting tray will hold
2 egg racks (248 quail eggs) for a total of 744 eggs per incubator (racks single
stacked). Molded posts on each rack permits double stacking for a total of 1488
No. 0243
No. 0246
quail eggs. (Caution: GQF HATCHING trays hold a maximum of 250 quail eggs).
N o . 0 2 4 5 - S E T O F 6 P H E A S A N T E G G R A C K S , e a c h r a c k h o l d s 5 9 e g g s , f o r a t o t a l o f 3 5 4 e g g s p e r 1 5 0 2 i n c u b a t o r.
No. 0246 - SET OF 6 UNIVERSAL EGG RACKS, each rack holds 45 bantam to chicken sized eggs, for a total of 270 eggs per 1502 incubator.
No. 0248 - SET OF 6 EXTRA-LARGE EGG RACKS, each rack holds 30 extra large eggs (Turkey, Duck, etc.), for a total of 180 eggs per 1502 incubator.
A U T M O TAT I C
INCUBATOR HUMIDITY
Consists of 5 Gal. reserve tank, connecting
hose, with quick disconnect coupling and
constant level humidity pan with 2 humidity
pads, for increased humidity at time of
hatch. For all GQF Cabinet Incubators.
No. 3030 - Automatic Incubator Humidity
No. 4502 - Pkg. 2 Extra Humidity Pads
No. 4510 - Pkg. 10 Extra Humidity Pads
CLEAR ACRYLIC DOOR FOR ALL
CABINET MODEL INCUBATORS
AND HATCHERS
CLEAR ACRYLIC DOOR gives full
frontal view of interior of incubator,
to permit checking of hatching
progress, tray turning, water level, etc.
No. 3065 - Clear Acrylic Door
311/4” x 151/2” x 1/2” - Sold as an accessory
for customer’s installation only.
ORDER ACCESSORIES BY PHONE: 912-236-0651 - OR - ON THE INTERNET AT WWW.GQFmfg.COM
4
GENERAL INCUBATOR OPERATING INSTRUCTIONS FOR SEVERAL SPECIES OF BIRDS
Bobwhite
Quail
Requirements
Incubation period (days) 23-24
Temperature (F)
Cotumix
Quail
Ostrich
17
42-48
Emu
Duck
43-50
100
100
84-86
84-86
70
70
Final day of egg rotation
21
15
38-40
44-46
Temperature during final 3
days of incubation (F)
99.5
99.5
96-96.5 96-96.5
Humidity during final 3 days
90-94
of incubation (wet bulb, F)
90-94
Humidity (wet bulb, F)*
Duck Muscovy Goose Guinea Pheasant Peafowl Chicken, Turkey Chukar
Rheas
35-40
28
35-37
28-34
28
23-28
28-30
100
100
100
100
100
84-86
84-86
86-88
83-85
82-84
83-85
30-33
25
31
25
25
21
25
19
98.5
99.5
99.5
99.5
99
99.5
99.5
90-94
90-94
90-94
90-94
92-95
90-94
96.5-97 96.5-97 96.5-97 100
75
75
Bantam
85-87
88-90
* % Weight loss: Total weight loss from beginning to end of Incubation should be 12%-15% for morst eggs
% Weight Loss = Original wt. - Present wt. x 100%
Average Daily Wt. =
Original wt.
Loss Required
Timer Motor
with switch
No. 3023
Swing Arm No. 3028
Sw
in
Arm g
Ca
m
Timer Cam
Drive Motor
No. 3022
W
E
T
Side
Mounting
Bracket
Mounting Screw
Side
Mounting
Bracket
B
U
L
B
Set Screw
Side View
Foot for mounting to
fan shelf
25
17
21
28
23-24
100
100
100
100
100
80-82
82-86
84-86
25
21
22
15
99.5
99.5
99.5
99.5
99.5
90-94
90-94
90-94
90-94
90-94
85-87 83-85
Original wt. X .14 (Based on 14% total loss)
Incubation Period
DRY BULB TEMPERATURES
Toggle Switch No. 3025
Switch for Drive
Motor No. 3024
Pigeon
CONVERSION OF WET/DRY BULB READINGS TO PERCENT OF
RELATIVE HUMIDITY
Diagram of incubator turner.
Complete turner is item No. 3021
Timer Motor with switch No. 3023
Grouse
Partridge
View from rear
of incubator
T*
E
M
P
E
R
A
T
U
R
E
S
TURNER PROBLEM CHECK LIST
PROBLEM
CHECK FOR:
Turner fails to turn
1—TEST FOR ASSURANCE THAT TURNER IS WORKING as shown on
automatically
Page 1 of Incubator Instructions.
but will turn manually.
2—Remove back of incubator. DO NOT TOUCH ANY PART OF TURNER
WHILE INCUBATOR OR TURNER IS PLUGGED INTO POWER. Check
to see if turner light comes on when switched to Automatic. If not, check for
loose wires or connections at toggle and other switches. Check all slip on
connections for good contact. If Timer Cam marks do not show signs of rotating in 30 minutes or if Timer Switch seems defective, No. 3023 Timer with
Switch will need to be replaced.
Turner fails to turn
1—Check to be sure trays inside have not been pushed all the way to back
on manual or automatic
or some other obstruction that has jammed the trays.
2—Be sure incubator and turner is plugged into outlet that has electric
current and that pilot light is on when switched to automatic.
68
69
70
71
72
73
74
75
76
77
78
79
80
81
82
83
84
85
86
87
88
89
93
91
92
93
94
95
85
90
95
96
97
98
99
100
101
102
41
44
47
50
33
56
60
63
66
70
73
77
80
84
80
92
96
100
31
34
36
39
41
44
47
50
53
55
58
62
65
68
71
74
78
81
85
89
92
96
100
23
25
28
30
32
34
37
39
42
44
47
49
52
35
57
60
63
66
69
72
76
79
82
86
89
93
96
100
22
24
26
28
30
33
35
37
40
42
45
47
50
32
55
58
61
64
67
70
73
76
79
82
86
89
93
96
21
23
25
27
29
31
33
36
38
40
43
45
48
50
53
55
58
61
64
67
70
73
76
79
83
86
89
93
19
2.1
23
25
27
30
32
34
36
38
41
43
46
4
51
53
56
39
61
64
67
70
73
76
79
83
86
89
18
20
22
24
26
23
30
32
34
37
39
41
44
46
48
51
54
56
59
62
65
67
70
73
76
80
83
86
17
19
21
23
25
27
29
31
33
35
37
39
42
44
46
49
51
54
57
59
62
65
68
71
74
77
80
83
16
18
20
21
23
25
27
29
31
33
36
38
40
42
43
47
49
52
54
57
60
62
63
68
71
74
77
80
15
17
18
20
22
24
26
28
30
32
34
36
38
40
43
43
47
50
52
55
57
60
63
65
68
71
74
77
3—Remove back of incubator. DO NOT TOUCH ANY PART OF
NOTE: The above chart is for sea level readings. A general rule of adjustment
would be to add 1 to the percent value shown in the body of the chart for
each 2500 feet of elevation above sea level.
TURNER WHILE INCUBATOR IS PLUGGED INTO POWER. Check for
loose wires, loose connection rods or jammed tray.
Turns constantly when
1—Switch for Drive Motor is loose and has moved away from Swing Arm
switched
Cam. Loosen screws holding Switch, push switch closer to Cam and while
to automatic
holding it closer to Cam, tighten screws. Avoid over tightening as you
*To obtain lower wet bulb readings, recommended for ratite eggs, we
recommend using an inexpensive room dehumidifier, available at Sears,
WW Grainger and other outlets.
could break switch housing.
5
INCUBATION TROUBLESHOOTING CHART
Symptoms
Probable Causes
Many clear eggs. No blood
(Determined by candling, then
broken out appearance)
Slight blood rings
Many dead germs
Pipped eggs not hatching
Hatch non-uniform
Hatching too early
Hatching too late
Sticky Hatch
Cripples and
Malpositions
*Very large, soft-bodied
weak chicks
Mushy chicks. Dead on trays, bad odor
Rough navels
Temperature reading
not constant
Incubator fails to heat
(Continue hatch if begun. Hatch may occur later
than expected because of temperature drop.)
Fan Rattles
Hygrometer reading above 94
o
Suggestions
1. Infertility. Too few males, too many males,
males too old, Inactive, or frozen combs
2. Embryo died early 1-2 days
1. Use young, vigorous males.
2. Do not hold eggs longer than 14 days. Keep at
temperatures of 50°-55°F. in moist atmosphere. Gather often.
3. A. Improper temperature
B. Fumigation
4. Improper care of eggs before setting
3. A. Check accuracy of thermometer, Check thermostat, heating element,
current supply. Check operating temperature against instructions.
B. Do not fumigate at high concentrations during the first 5 days of age.
4. See suggestions (2) above.
5. Temperature too high or too low
6. Improper turning of eggs
7. Improper feeding of flock
8. Breeding (low hatchability inherited)
9. Improper ventilation, insufficient oxygen
5. See suggestion (3) above.
6. Turn two times daily - same time morning & evening
7. Check vitamin and mineral content of breeder mash.
8. Avoid close inbreeding
9. Increase ventilation of incubator and incubator rooms, avoid draft
10.
11.
12.
13.
10. Increase humidity during incubation (wet bulb 82°-86°)
add wick pad last 3 days (wet bulb 90°-92°) during hatching time
11. See (3) above and see “Hatching” page 3
12. See (3) above and see “Hatching” page 3
13. See (3) above and see “Hatching page 3
Insufficient rnoisture
Too much moisture
Too low temperature
Too high temperature
14. Temperature too high
15. Too low moisture
16. Improper turning or setting
17. Hatching trays too smooth
14. See (3) above and see Hatching” page 3
15. See (10) above
16. See (6) above. Set eggs large end up.
17. Use wire bottom trays or crinoline
18. Low average temperature
19. Poor Ventilation
20. Navel infection in incubator
18. See (3) above and see “Hatching” page 3
19. See (9) above
20. Careful cleaning and fumigation of incubator between hatchings.
21. High temperature or wide temperature
variations.
22. Low Moisture
21. See (3) above
22. See (10) above
23. Incubator in unheated room or barn
where temperature varies
24. Improper adjustment of thermostat (can
be caused by someone tampering with
adjusting knob
23. Keep Incubator In room with uniform temperature and where
temperature is never below 50°.
24. Readjust thermostats. Make slight adjustments with adjusting knob
and wait 15 minutes for temperature to stabilize.
25. Thermostat failure
26. Improper setting of thermostat
27. Power failure, incubator unplugged
or poor plug connection
28. Loose wire connection
25. switch to back up thermostat
26. Turn adjusting knob to increase heat until
pilot light comes on.
27. If fan is not running, electricity is not getting to
incubator check fuses and plug connections.
28. Remove back of incubator and check for loose wires.
29. Blade bent
30. End play in motor shaft
29. Remove and straighten blade or replace with
new blade
30. Place block under back legs of Incubator
31. Dry wick on hygrometer
31. Wash calcium deposits from wick or replace with new wick.
Reference
Number
Catalog
Number
1 - POWER CORD...............................No. 3048
2 - PILOT LIGHT....................................No. 3017
3 - ELECTRONIC THERMOSTAT........No. 3255
4 - Aux. THERMOSTAT..........................No. 3124
5 - HEATER GUARD
6 - MOISTURE PAN/PAD(S).................No. 4500
7 - PORCELAIN INSULATOR
8 - HEAT ELEMENT...............................No. 3014
9 - FAN BLADE.......................................No. 3013
10-FAN MOTOR......................................No. 3011
11- TIMER WITH SWITCH....................No. 3023
12-TURNER LIGHT...............................No.3017
13-TURNERTOGGLE SWITCH...........No.3025
Reference
Number
Catalog
Number
14-DRIVE MOTOR.................................No. 3022
15 - AUTOMATIC TURNER.................No. 3021
16 - SWING ARM WITH CAM..............No. 3028
17 - ROLLER Switch for Drive Motor...No. 3024
18 - FAN MOUNT...................................No. 3026
19 - CONNECTING BAR.....................No. 3041
20 - QUAIL EGG POSITIONERS........No. 0205
21 - BACK SUPPORT...........................No. 3042
22 -1502 SET. TRAY - 24.5” x 12.75”...No. 3067
23 -1550 TRAY CVR.-25” x 14.25”......No.3068
24 -1550 HATCH TRAY - 24.5”x14”.....No. 3066
25 -1502 SETTING TRAY RACK/23”..No. 3069
LIMITED WARRANTY
GQF Mfg. Co.. Inc. guarantees against defect for a period of 1 year from date of purchase. Notify GQF Mfg. Co. of any defective Items, giving
catalogue number and name of Item and Just what is wrong with Item. Send copy of invoice showing date of purchase. GQF Mfg. Co. will send
replacement or notify regarding return. Returning of items without written permission will be at owner’s expense.
Whereas GQF Mfg. Co. has no control over usage of equipment supplied, It assumes no responsibility for losses or damage from their equipment
other than replacement of defective parts. No guarantee on hatchablilty of eggs. Do not expose electrical parts to water. Installation of electrical parts
should be done by qualified electrician.
G.Q.F. Manufacturing Company
P.O. Box 1552
Savannah, GA 31402-1552 USA
6