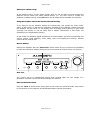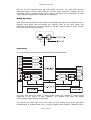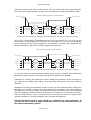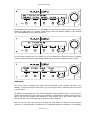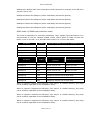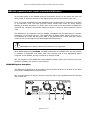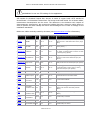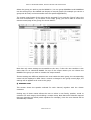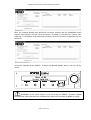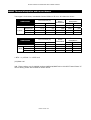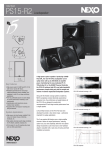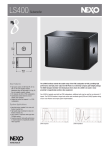
1
NXAMP4x1 & NXAMP4x4
Powered TDcontrollers
Digital Patching Unit
Digital Meters Unit
NXES104 / NXDT104
User Manual v3.1 (LOAD3_23)
FCC INFORMATION (U.S.A.)
1. IMPORTANT NOTICE: DO NOT MODIFY THIS UNIT!
Compliance with FCC regulations does not guarantee that interference will not
This product, when installed as indicated in the instructions contained in this
occur in all installations. If this product is found to be the source of interference,
manual, meets FCC requirements. Modifications not expressly approved by
which can be determined by turning the unit “OFF” and “ON”, please try to
NEXO-SA may void your authority, granted by the FCC, to use the product.
eliminate the problem by using one of the following measures:
2. IMPORTANT:
Relocate either this product or the device that is being affected by the
When connecting this product to accessories and/or another product use only
interference.
high quality shielded cables. Cable/s supplied with this product MUST be used.
Utilize power outlets that are on different branch (circuit breaker or fuse) circuits
Follow all installation instructions. Failure to follow instructions could void your
or install AC line filter/s.
FCC authorization to use this product in the USA.
In the case of radio or TV interference, relocate/reorient the antenna. If the
3. NOTE:
antenna lead-in is 300 ohm ribbon lead, change the lead-in to co-axial type
This product has been tested and found to comply with the requirements listed
cable.
in FCC Regulations, Part 15 for Class “B” digital devices. Compliance with these
If these corrective measures do not produce satisfactory results, please contact
requirements provides a reasonable level of assurance that your use of this
the local retailer authorized to distribute this type of product. If you can not
product in a residential environment will not result in harmful interference with
locate the appropriate retailer, please contact the After Sales department of
other electronic devices. This equipment generates/uses radio frequencies and, if
NEXO-SA, Parc d’Activité du Pré de la Dame Jeanne, B.P. 5, 60128 PLAILLY
not installed and used according to the instructions found in the users manual,
The above statements apply ONLY to those products distributed by NEXO-SA or
may cause interference harmful to the operation of other electronic devices.
its subsidiaries.
* This applies only to products distributed in the United States of America.
IMPORTANT SAFETY INSTRUCTIONS
1 Read these instructions.
provided plug does not fit into your outlet, consult an electrician for
2 Keep these instructions.
replacement of the obsolete outlet.
3 Heed all warnings.
10 Protect the power cord from being walked on or pinched particularly
4 Follow all instructions.
at plugs, convenience receptacles, and the point where they exit from
5 Do not use this apparatus near water.
the apparatus.
6 Clean only with dry cloth.
11 Only use attachments/accessories specified by the manufacturer.
7 Do not block any ventilation openings. Install in accordance with the
12 Unplug this apparatus during lightning storms or when unused for
manufacturer’s instructions.
long periods of time.
8 Do not install near any heat sources such as radiators, heat registers,
13 Refer all servicing to qualified service personnel. Servicing is
stoves, or other apparatus (including amplifiers) that produce heat.
required when the apparatus has been damaged in any way, such as
9 Do not defeat the safety purpose of the polarized or grounding-type
power-supply cord or plug is damaged, liquid has been spilled or
plug. A polarized plug has two blades with one wider than the other. A
objects have fallen into the apparatus, the apparatus has been exposed
grounding type plug has two blades and a third grounding prong. The
to rain or moisture, does not operate normally, or has been dropped.
wide blade or the third prong are provided for your safety. If the
PRECAUTIONS
Please read carefully before proceeding. Please keep this manual in a safe place for future reference.
WARNING
Always follow the basic precautions listed below to avoid the possibility of serious injury or even death from electrical shock, short-circuiting,
damages, fire or other hazards. These precautions include, but are not limited to, the following:
Power supply/Power cord
•
Only use the voltage specified as correct for the device. The required voltage is
printed on the name plate of the device.
• Use only the included power cord.
• Do not place the power cord near heat sources such as heaters or radiators, and do
not excessively bend or otherwise damage the cord, place heavy objects on it, or
place it in a position where anyone could walk on, trip over, or roll anything over it.
• Be sure to connect to an appropriate outlet with a protective grounding connection.
Water warning
• Do not expose the device to rain, use it near water or in damp or wet conditions, or
place containers on it containing liquids which might spill into any openings.
If any liquid such as water seeps into the device, turn off the power immediately and
unplug the power cord from the AC outlet. Then have the device inspected by
qualified NEXO-SA service personnel.
• Never insert or remove an electric plug with wet hands.
If you notice any abnormality
Improper grounding can result in electrical shock.
• If the power cord or plug becomes frayed or damaged, or if there is a sudden loss
Do not open
of sound during use of the device, or if any unusual smells or smoke should appear to
• Do not open the device or attempt to disassemble the internal parts or modify them
from the outlet, and have the device inspected by qualified NEXO-SA service
in any way. The device contains no user-serviceable parts. If it should appear to be
personnel.
malfunctioning, discontinue use immediately and have it inspected by qualified NEXOSA service personnel.
be caused by it, immediately turn off the power switch, disconnect the electric plug
• If this device should be dropped or damaged, immediately turn off the power
switch, disconnect the electric plug from the outlet, and have the device inspected by
qualified NEXO-SA service personnel.
CAUTION
Always follow the basic precautions listed below to avoid the possibility of physical injury to you or others, or damage to the device or other
property. These precautions include, but are not limited to, the following:
Power supply/Power cord
• Remove the electric plug from the outlet when the device is not to be used for
extended periods of time, or during electrical storms.
• When removing the electric plug from the device or an outlet, always hold the plug
itself and not the cord. Pulling by the cord can damage it.
• If you are using the NXAMP4X4, be sure to plug each power cord into separate
branch circuits employing separate service grounds. Plugging into the same circuit
can result in electrical shock.
• To disconnect the NXAMP4X4 from the mains, unplug both power cords.
Location
• When transporting or moving the device, always use two or more people.
Attempting to lift the device by yourself may damage your back, result in other
injury, or cause damage to the device itself.
• Before moving the device, remove all connected cables.
• When setting up the device, make sure that the AC outlet you are using is easily
accessible. If some trouble or malfunction occurs, immediately turn off the power
switch and disconnect the plug from the outlet. Even when the power switch is turned
off, electricity is still flowing to the product at the minimum level. When you are not
using the product for a long time, make sure to unplug the power cord from the wall
AC outlet.
• If this device is to be mounted in an EIA-standard rack, leave the back of the rack
open and make sure that it is at least 10 cm away from walls or surfaces. Also, if this
device is to be mounted with devices that tend to generate heat, such as power
amplifiers, be sure to keep an adequate gap between this device and the heatgenerating devices or install ventilation panels to prevent high temperatures from
developing inside this device.
possibility of panel disfiguration or damage to the internal components.
• Do not place the device in an unstable position where it might accidentally fall over.
• Do not block the vents. This device has ventilation holes at the front/rear to prevent
the internal temperature from becoming too high. In particular, do not place the
device on its side or upside down. Inadequate ventilation can result in overheating,
possibly causing damage to the device(s), or even fire.
• Do not use the device in the vicinity of a TV, radio, stereo equipment, mobile
phone, or other electric devices. Doing so may result in noise, both in the device itself
and in the TV or radio next to it.
Connections
• Before connecting the device to other devices, turn off the power for all devices.
Before turning the power on or off for all devices, set all volume levels to minimum.
• Use only speaker cables for connecting speakers to the speaker jacks. Use of other
types of cables may result in fire.
Maintenance
• Inspect the cooling fans and clean them periodically. Dust and dirt can seriously
degrade the effectiveness of the cooling fan and result in malfunction or fire.
• Remove the power plug from the AC outlet when cleaning the device.
Handling caution
• When turning on the AC power in your audio system, always turn on the device
LAST, to avoid speaker damage. When turning the power off, the device should be
turned off FIRST for the same reason.
• Do not insert your fingers or hands in any gaps or openings on the device (vents…)
• Avoid inserting or dropping foreign objects (paper, plastic, metal, etc.) into any
gaps or openings on the device (vents, etc.) If this happens, turn off the power
Inadequate ventilation can result in overheating, possibly causing damage to the
immediately and unplug the power cord from the AC outlet. Then have the device
device(s), or even fire.
inspected by qualified NEXO-SA service personnel.
• Do not use the device in a confined, poorly-ventilated location. If this device is to be
• Do not use the device for a long period of time at a high or uncomfortable volume
used in a small space other than an EIA-standard rack, make sure that there is
level, since this can cause permanent hearing loss. If you experience any hearing loss
adequate space between the device and surrounding walls or other devices: at least
or ringing in the ears, consult a physician.
10 cm at the sides, 15 cm behind and 40 cm above. Inadequate ventilation can result
in overheating, possibly causing damage to the device(s), or even fire.
• Do not expose the device to excessive dust or vibrations, or extreme cold or heat
(such as in direct sunlight, near a heater, or in a car during the day) to prevent the
• Do not rest your weight on the device or place heavy objects on it, and avoid use
excessive force on the buttons, switches or connectors.
• Do not use this device for any purpose other than driving loudspeakers.
XLR-type connectors are wired as follows (IEC60268 standard): pin 1: ground, pin 2: hot (+) and pin 3: cold (-).
Use only Neutrik NL4 plugs for connecting Speakon connectors.
NEXO-SA cannot be held responsible for damage caused by improper use or modifications to the device or data that is lost or destroyed.
• Always turn the power off when the device is not in use.
• The performance of components with moving contacts, such as switches, volume controls, and connectors, deteriorates over time. Consult qualified NEXO-SA service
personnel about replacing defective components.
• If you do not intend to rack-mount the NXAMP, attach the included rubber feet to the bottom surface of the device.
IMPORTANT NOTICE FOR THE UNITED KINGDOM
Connecting the Plug and Cord
WARNING: THIS APPARATUS MUST BE EARTHED
The wire which is colored GREEN-and-YELLOW must be connected to the terminal in
IMPORTANT. The wires in this mains lead are colored in accordance with the following
the plug which is marked by the letter E or by the safety earth symbol
code:
GREEN or GREEN-and-YELLOW.
GREEN-AND-YELLOW: EARTH
The wire which is colored BLUE must be connected to the terminal which is marked
BLUE : NEUTRAL
with the letter N or colored BLACK.
BROWN : LIVE
The wire which is colored BROWN must be connected to the terminal which is marked
As the colors of the wires in the mains lead of this apparatus may not correspond
with the letter L or colored RED.
or colored
with the colored markings identifying the terminals in your plug proceed as follows:
• This applies only to products distributed in the United Kingdom.
COMPLIANCE INFORMATION STATEMENT (DECLARATION OF CONFORMITY PROCEDURE)
1) This device may not cause harmful interference, and
2) This device must accept any interference received including interference that may cause undesired operation. See user manual instructions if interference to
radio reception is suspected.
* This applies only to products distributed in the United States of America.
EUROPEAN MODELS
Purchaser/User Information specified in EN55103-1 and EN55103-2.
Inrush Current: 16 A
Conforms to Environments: E1, E2, E3 and E4.
This
mark indicates a dangerous electrically live terminal. When connecting an external wire to this terminal, it is necessary either to
have “a person who have received appropriate guidance on handling” make the connection or to use leads or a cord that have been
manufactured in such way that the connection can be made simply and without problem.
TABLE OF CONTENT
TABLE OF CONTENT
FCC INFORMATION (U.S.A.) ............................................................................................................................................ 3
IMPORTANT SAFETY INSTRUCTIONS......................................................................................................................... 3
PRECAUTIONS..................................................................................................................................................................... 3
POWER SUPPLY/POWER CORD ................................................................................................................................................... 4
DO NOT OPEN ............................................................................................................................................................................ 4
WATER WARNING...................................................................................................................................................................... 4
IF YOU NOTICE ANY ABNORMALITY ........................................................................................................................................... 4
POWER SUPPLY/POWER CORD ................................................................................................................................................ 4
LOCATION ................................................................................................................................................................................ 4
CONNECTIONS ......................................................................................................................................................................... 4
MAINTENANCE......................................................................................................................................................................... 4
HANDLING CAUTION ................................................................................................................................................................ 4
IMPORTANT NOTICE FOR THE UNITED KINGDOM................................................................................................ 6
COMPLIANCE INFORMATION STATEMENT (DECLARATION OF CONFORMITY PROCEDURE) .............. 6
EUROPEAN MODELS ......................................................................................................................................................... 6
TABLE OF CONTENT ......................................................................................................................................................... 6
NXAMP VERSUS NX242: WHAT’S NEW? .................................................................................................................... 12
WHAT’S REMAINING THE SAME? .......................................................................................................................................... 12
DSP CORE ............................................................................................................................................................................... 12
LEVEL AND LATENCY .............................................................................................................................................................. 12
SOFTWARE .............................................................................................................................................................................. 12
WHAT’S CHANGED?............................................................................................................................................................... 12
INTEGRATED AMPLIFIER .......................................................................................................................................................... 12
COMPUTING RESOURCES ......................................................................................................................................................... 13
FOUR SEPARATE INPUTS .......................................................................................................................................................... 13
POWER SUPPLY........................................................................................................................................................................ 13
ETHERSOUND™ OPTIONAL BOARD .......................................................................................................................................... 13
DANTE™ OPTIONAL BOARD .................................................................................................................................................... 13
OPTIONAL DMU UNIT ............................................................................................................................................................. 14
OPTIONAL DPU UNIT .............................................................................................................................................................. 14
QUICK START.................................................................................................................................................................... 15
FRONT PANEL DESCRIPTION .................................................................................................................................................. 15
(1) POWER SWITCH .................................................................................................................................................................. 15
(2) AMPLIFIER INDICATORS ..................................................................................................................................................... 15
(3) LCD DISPLAY .................................................................................................................................................................... 16
(4) ENCODER ........................................................................................................................................................................... 16
(5) NAVIGATION BUTTONS (A & B)......................................................................................................................................... 16
(6) VOLUME INDICATORS ........................................................................................................................................................ 16
(7) MUTE BUTTONS ................................................................................................................................................................. 16
(8) SELECT BUTTONS ............................................................................................................................................................... 16
PAGE 6 OF 151
TABLE OF CONTENT
(9) CHANNEL INDICATORS .......................................................................................................................................................17
(10) AIR INTAKES ....................................................................................................................................................................17
(11) SCREW HOLES FOR HANDLES ............................................................................................................................................17
BACK PANELS DESCRIPTION ..................................................................................................................................................18
(1) MAINS CONNECTORS ..........................................................................................................................................................18
(2) BALANCED AUDIO INPUTS WITH LINK.................................................................................................................................18
(3) EXPANSION SLOT ...............................................................................................................................................................19
(4) POWER OUTPUTS ................................................................................................................................................................19
(5) RS-232 PORT .....................................................................................................................................................................19
(6) GPIO PORT ........................................................................................................................................................................20
(7) REAR END MOUNTING HOLES .............................................................................................................................................20
BASIC FUNCTIONS ..................................................................................................................................................................20
RESET ......................................................................................................................................................................................20
SELECTING CABINET FAMILY ...................................................................................................................................................20
SELECT YOUR CABINET SET-UP ................................................................................................................................................21
USING THE AMPLIFIER WITHOUT THE TDCONTROLLER FUNCTIONALITY..................................................................................21
BACK TO DEFAULT ..................................................................................................................................................................21
AUTO SAVE..............................................................................................................................................................................21
ENTER THE DOWNLOAD MODE .................................................................................................................................................21
WHAT’S INSIDE THE CARTON BOX............................................................................................................................22
SETTING-UP ADVICE.......................................................................................................................................................23
EARTH CONNECTION..............................................................................................................................................................23
MAINS SETTING ......................................................................................................................................................................23
MOUNTING THE NXAMP IN A RACK (GROUNDING, SHIELDING & SAFETY ISSUES) ...........................................................24
USING THE NXAMP WITHOUT A RACK ................................................................................................................................26
FUSES......................................................................................................................................................................................26
ELECTROMAGNETIC ENVIRONMENTS ...................................................................................................................................26
ANALOGUE INPUT SIGNAL CABLES ........................................................................................................................................26
NXAMP POWER OUTPUTS WIRING .......................................................................................................................................28
GENERAL DESCRIPTION................................................................................................................................................29
GLOBAL ARCHITECTURE .......................................................................................................................................................29
NXAMP4X1 GLOBAL ARCHITECTURE ....................................................................................................................................29
NXAMP4X4 GLOBAL ARCHITECTURE ....................................................................................................................................29
POWER SUPPLY BLOCK ...........................................................................................................................................................30
ANALOG INPUT BLOCK ............................................................................................................................................................31
CONTROL BLOCK .....................................................................................................................................................................31
POWER AMPLIFIER BLOCKS ......................................................................................................................................................32
POWER OUTPUTS BLOCK ..........................................................................................................................................................32
USER INTERFACE BLOCK..........................................................................................................................................................33
COMMUNICATION BLOCK ........................................................................................................................................................33
EXPANSION SLOT BLOCK .........................................................................................................................................................34
BLOCK DIAGRAM DESCRIPTION ................................................................................................................................36
PATCHING AND ROUTING (1) .................................................................................................................................................37
DELAY & POLARITY INVERSION (2) ......................................................................................................................................37
FACTORY SET-UP DELAY .........................................................................................................................................................37
USER SET-UP DELAY ................................................................................................................................................................37
EQUALISATION & FILTERING................................................................................................................................................37
SUBSONIC AND VHF FILTERING (3).........................................................................................................................................37
EQUALISING WIDEBAND ACOUSTICAL RESPONSE (3) ...............................................................................................................38
USER SET-UP, ARRAY EQ (4) ....................................................................................................................................................38
EQUALISING SINGLE COMPONENT RESPONSE AND NXSTREAM PROCESSING (5) ...................................................................38
PAGE 7 OF 151
TABLE OF CONTENT
CROSSOVER SECTION (6)......................................................................................................................................................... 38
POST PROTECTION EQ AND LOW PASS (27) (28) ...................................................................................................................... 38
GAIN SECTION (29).................................................................................................................................................................. 38
PROTECTIONS ........................................................................................................................................................................ 39
SOURCE SIGNALS FOR PROTECTION ALGORITHMS (25) ............................................................................................................ 39
DISPLACEMENT CONTROL (7) (8) (9)....................................................................................................................................... 39
MECHANICAL STRESS CONTROL (10) (11) ............................................................................................................................... 39
HF DISPLACEMENT CONTROL (12)........................................................................................................................................... 40
HF ACCELERATION CONTROL (13) .......................................................................................................................................... 40
GLOBAL PURPOSE VCEQ (14) ................................................................................................................................................ 40
LOUDSPEAKER PEAK LIMITERS (15) ........................................................................................................................................ 40
TEMPERATURE CONTROL (16) (17) ......................................................................................................................................... 40
INTERCHANNEL REGULATION (19) .......................................................................................................................................... 41
AMPLIFIER PEAK CURRENT LIMITER (20)................................................................................................................................. 41
AMPLIFIER INTEGRATE CURRENT LIMITER (21) ....................................................................................................................... 41
AMPLIFIER PEAK VOLTAGE LIMITER (22)................................................................................................................................. 41
AMPLIFIER SHORT CIRCUIT DETECTOR (24) ............................................................................................................................. 41
MENU DESCRIPTION....................................................................................................................................................... 42
CHANGING CABINET FAMILY ............................................................................................................................................... 43
ADJUSTING VOLUME ............................................................................................................................................................. 44
ADJUSTING DELAY ................................................................................................................................................................ 45
ADJUSTING GAIN ................................................................................................................................................................... 45
ADJUSTING ARRAY EQ ......................................................................................................................................................... 46
ADJUSTING HEADROOM ........................................................................................................................................................ 47
HEADROOM CONCEPT.............................................................................................................................................................. 47
OPTIONS MENU...................................................................................................................................................................... 49
SYSTEM CONFIG ...................................................................................................................................................................... 49
INPUT PATCH .......................................................................................................................................................................... 54
SAVE/RECALL USER SETUPS .................................................................................................................................................... 59
SECURITY ................................................................................................................................................................................ 61
GPIO MODE............................................................................................................................................................................ 62
LOAD MONITOR ...................................................................................................................................................................... 69
MISCELLANEOUS..................................................................................................................................................................... 72
INSTALLATION RECOMMENDATIONS ..................................................................................................................... 79
AUDIO CHAIN RECOMMENDATIONS ..................................................................................................................................... 79
ABOUT « LOUDSPEAKER MANAGEMENT DEVICES » ............................................................................................................... 79
OPERATING SUB’S FED THROUGH AN AUX OUTPUT ............................................................................................................... 79
OPERATION OF MULTIPLE POWERED TDCONTROLLERS .......................................................................................................... 79
SYSTEM ALIGNMENT ............................................................................................................................................................. 79
GEOMETRICAL ALIGNMENT ..................................................................................................................................................... 80
MEASURING AND ALIGNING PHASE IN THE OVERLAPPING REGION ........................................................................................... 80
NXES104 EXPANSION BOARD, REMOTE CONTROL AND ASIO DRIVER ......................................................... 82
NXES104 PHYSICAL DESCRIPTION....................................................................................................................................... 82
(1) ETHERSOUND™ IN PORT .................................................................................................................................................. 83
(2) ETHERSOUND™ NETWORK STATUS LEDS ......................................................................................................................... 83
(3) ETHERSOUND™ OUT PORT .............................................................................................................................................. 83
(4) REMOTE ES100 PORT ........................................................................................................................................................ 83
VARIOUS ETHERSOUND™ DEVICES DESCRIPTION ............................................................................................................... 84
MONO-DIRECTIONAL, NON ES100 DEVICES ............................................................................................................................ 84
BI-DIRECTIONAL, NON ES100 DEVICES ................................................................................................................................... 84
ES100 DEVICES ....................................................................................................................................................................... 84
ES100/SPKR DEVICES .............................................................................................................................................................. 85
ETHERNET ADDITIONAL HARDWARE.................................................................................................................................... 85
PAGE 8 OF 151
TABLE OF CONTENT
HUBS .......................................................................................................................................................................................85
SWITCHES ................................................................................................................................................................................85
WIRELESS LAN.......................................................................................................................................................................85
ETHERNET CABLES ..................................................................................................................................................................86
FIBER OPTIC ............................................................................................................................................................................88
INSTALLATION INSIDE THE NXAMP ....................................................................................................................................88
NXAMP WITH NXES104 REMOTE CONTROL AND MONITORING IN ESMONITOR™ SOFTWARE .......................................88
COMPATIBILITY ISSUES ...........................................................................................................................................................89
THE ES-MONITOR TREE VIEW ..................................................................................................................................................89
THE CONTROL PAGE.................................................................................................................................................................90
(1) VIRTUAL FRONT PANEL ......................................................................................................................................................91
(2) INPUT METERS ....................................................................................................................................................................91
(3) STANDBY BUTTON .............................................................................................................................................................92
(4) DELAY UNIT ......................................................................................................................................................................92
(5) SECURITY LOCK .................................................................................................................................................................92
(6) GROUP ...............................................................................................................................................................................92
(7) CHANNELS NAME ...............................................................................................................................................................93
(8) INPUT PATCH .....................................................................................................................................................................94
(9) OUTPUT METERS ................................................................................................................................................................94
(10) MUTE BUTTON .................................................................................................................................................................94
(11) VOLUME CONTROL ...........................................................................................................................................................94
(12) GAIN CONTROL ................................................................................................................................................................94
(13) DELAY SETTINGS .............................................................................................................................................................94
(14) ARRAYEQ SETTINGS ........................................................................................................................................................95
(15) HEADROOM SETTINGS ......................................................................................................................................................95
(16) AMPLIFIER STATUS ..........................................................................................................................................................95
(17) OVERMUTE ......................................................................................................................................................................95
(18) NOTES ..............................................................................................................................................................................96
(19) ALIAS...............................................................................................................................................................................96
(20) HARDWARE AND FIRMWARE INFORMATION .....................................................................................................................96
(21) ASIO MODE ....................................................................................................................................................................96
(22) SCENE ..............................................................................................................................................................................98
(23) CABINET SETUP ...............................................................................................................................................................99
(24) VIRTUAL FRONT PANEL SIZE ..........................................................................................................................................100
NXAMP AND NXES104 WITH THE ASIO STREAMER .......................................................................................................100
WHAT ARE ASIO / ASIO STREAMER? ...................................................................................................................................100
INSTALLING THE ASIO STREAMER ........................................................................................................................................101
SETTING UP THE NXAMP FOR ASIO MODE ..........................................................................................................................101
SETTING UP THE ASIOCONTROLPANEL ..................................................................................................................................101
SETTING UP THE ASIO HOST .................................................................................................................................................102
NXDT104 EXPANSION BOARD, DANTE™ PATCHING AND REMOTE CONTROL .........................................103
NXDT104 PHYSICAL DESCRIPTION ....................................................................................................................................103
(1) DANTE™ PRIMARY PORT ................................................................................................................................................103
(2) NETWORK PORTS STATUS LEDS......................................................................................................................................104
(3) DANTE™ SECONDARY PORT ...........................................................................................................................................104
(4) REMOTE PORT ..................................................................................................................................................................104
ETHERNET ADDITIONAL HARDWARE ..................................................................................................................................104
HUBS .....................................................................................................................................................................................105
SWITCHES ..............................................................................................................................................................................105
WIRELESS LAN.....................................................................................................................................................................105
ETHERNET CABLES AND FIBER OPTIC .....................................................................................................................................105
INSTALLATION INSIDE THE NXAMP ..................................................................................................................................105
NXAMP WITH NXDT104 CONTROL PAGE IN DANTE™ CONTROLLER .............................................................................107
ROUTING AUDIO INSIDE A DANTE™ NETWORK .....................................................................................................................107
ADVANCED OPTION OF THE DANTE™ CONTROLLER ..............................................................................................................108
DEVICE VIEW ........................................................................................................................................................................109
PAGE 9 OF 151
TABLE OF CONTENT
NXAMP WITH NXDT104 CONTROL PAGE IN ESMONITOR™ SOFTWARE ........................................................................ 111
ENABLING REMOTE CONTROL OF NXAMP WITH NXDT104 IN ESMONITOR™ .................................................................... 112
THE ES-MONITOR TREE VIEW ................................................................................................................................................ 112
THE CONTROL PAGE .............................................................................................................................................................. 113
(1) DANTE ID SETUP ......................................................................................................................................................... 113
MORE INFORMATION ABOUT SETTING UP A DANTE™ NETWORK...................................................................................... 114
DMU DIGITAL METERS UNIT FOR NXAMP............................................................................................................ 115
FRONT PANEL DESCRIPTION ................................................................................................................................................ 115
(1) ANALOG INPUTS WITH LINK ......................................................................................................................................... 115
(2) INPUT VIEW METER ...................................................................................................................................................... 115
(3) NETWORK INPUTS ........................................................................................................................................................ 115
BACK PANEL DESCRIPTION .................................................................................................................................................. 116
(1) NETWORK OUTPUTS ..................................................................................................................................................... 116
(2) ANALOG OUTPUTS ....................................................................................................................................................... 116
(3) GPIO PORT .................................................................................................................................................................. 116
OPERATING THE DPU ......................................................................................................................................................... 116
CONNECTIONS AND START UP................................................................................................................................................ 117
DPU DIGITAL PATCHING UNIT FOR NXAMP......................................................................................................... 119
FRONT PANEL DESCRIPTION ................................................................................................................................................ 119
(1) SPEAKON® 4 POLES OUTPUT ...................................................................................................................................... 119
(2) SPEAKON® 8 POLES OUTPUT ...................................................................................................................................... 119
(3) LCD DISPLAY .............................................................................................................................................................. 119
BACK PANEL DESCRIPTION .................................................................................................................................................. 120
(1) MAINS CONNECTORS ................................................................................................................................................... 120
(2) SPEAKON® 4 INPUTS .................................................................................................................................................. 120
(3) RS232 PORT ................................................................................................................................................................ 121
OPERATING THE DPU ......................................................................................................................................................... 121
CONNECTIONS AND START UP................................................................................................................................................ 121
DPU FRONT PANEL CONNECTORS ROUTING........................................................................................................................... 122
DPU DISPLAYED INFORMATION ............................................................................................................................................ 122
UNUSED FRONT PANEL CONNECTORS .................................................................................................................................... 124
LINKING SEVERAL DPU TOGETHER ....................................................................................................................................... 125
NXWIN4 SOFTWARE FOR NXAMP FIRMWARE UPGRADE................................................................................ 127
WHAT YOU NEED TO UPGRADE YOUR NXAMP.................................................................................................................. 127
SERIAL PORT UPGRADE.......................................................................................................................................................... 127
NETWORK PORT UPGRADE (FROM NXES104 OR NXDT104) ................................................................................................ 128
CONNECT THE COMPUTER TO THE NXAMP ...................................................................................................................... 128
(1) REMOTE ES100 PORT ...................................................................................................................................................... 128
(2) ETHERSOUND™ IN PORT ................................................................................................................................................. 128
(3) RS-232 SERIAL PORT ....................................................................................................................................................... 129
(4) DANTE™ PRIMARY, SECONDARY OR REMOTE PORT ......................................................................................................... 129
PUT THE NXAMP IN DOWNLOAD MODE............................................................................................................................. 129
USING THE NXWIN4 SOFTWARE ......................................................................................................................................... 130
BEGIN THE UPGRADE ............................................................................................................................................................. 131
USING THE CONTROLLER AFTER A FIRMWARE UPDATE ..................................................................................................... 136
CHOOSING A CABINET SETUP ................................................................................................................................................. 136
SELECTING CABINET FAMILY................................................................................................................................................. 136
SELECT YOUR CABINET SET-UP.............................................................................................................................................. 136
NXAMP TECHNICAL SPECIFICATIONS................................................................................................................... 137
NXAMP THERMAL DISSIPATION AND CURRENT DRAWN................................................................................ 138
PAGE 10 OF 151
TABLE OF CONTENT
NXAMP DIMENSIONS ....................................................................................................................................................139
DMU TECHNICAL SPECIFICATIONS ........................................................................................................................140
DPU TECHNICAL SPECIFICATIONS..........................................................................................................................140
DMU DIMENSIONS..........................................................................................................................................................141
DPU DIMENSIONS ...........................................................................................................................................................141
NXES104 & NXDT104 TECHNICAL SPECIFICATIONS...........................................................................................142
APPLICATION NOTE: DRIVING THE SUB FROM THE AUX SEND....................................................................143
WHAT IS THE PHASE RELATION BETWEEN THE AUX AND MAIN OUTPUT OF YOUR DESK? ...................................................143
WHY IT IS UNLIKELY THE AUX AND MAIN HAVE THE SAME PHASE? ...................................................................................143
CONSEQUENCES OF BADLY ALIGNED SYSTEMS ......................................................................................................................143
PRECAUTIONS & CHECK ........................................................................................................................................................144
APPENDIX A: LIST OF SUPPORTED PRESETS (LOAD3_23).................................................................................146
APPENDIX B: HOW IS MEASURED THE AMPLIFIER POWER? .........................................................................147
GENERAL DESCRIPTION OF THE SETUP ...............................................................................................................................147
PRECISION OF THE MEASUREMENT .....................................................................................................................................148
MEASUREMENT METHOD.....................................................................................................................................................148
USABLE MAINS CORD IN EUROPE ............................................................................................................................149
ROHS CERTIFICATE ......................................................................................................................................................150
USER NOTES.....................................................................................................................................................................151
PAGE 11 OF 151
NXAMP VERSUS NX242: WHAT’S NEW?
NXAMP versus NX242: What’s new?
The NXAMP Powered TDcontroller has been designed in order to provide ascendant
compatibility with its predecessor – the NX242 Digital TDcontroller.
What’s remaining the same?
DSP core
The DSP used in the NXAMP are from the same family (same core) than the one used in
NX242 and on the NXTENSION board. Thus algorithms such as EQ will perform exactly the
same on both platforms. However, since LOAD3_01, the firmware uses the full potential of
the NXAMP’s higher computing ressources (see further), leading to discontinuing
simultaneous firmware release for both platforms.
Level and latency
WARNING! Up to LOAD2_54, global delays due to analog to digital and/or digital
to analog as well as global gain were identical on NXAMP on one side and NX242 with 26dB
gain amplifiers on the other side. In LOAD2_55 and above, to minimize global latency
especially for wedge applications, the base latency of the NXAMP has been reduced to its
minimum, thus loosing the compatibility with NX242 family of products. Now with
LOAD3_01 and above, the setups themselves offer different level, EQ, crossover points and
protection algorithm which cannot fit into older hardware like NX242 or NX242ES4.
Software
Basic Menus and functions are more or less the same; only little learning curve is needed
to go from the NX242 to the NXAMP.
LOAD3_23 does not fit other hardware than NXAMP. Please use LOAD2_58 as
latest version for NX242 (with or without NXTENSION) and LOAD2_48 as latest
version for NX241 (with or without NXTENSION-CAI).
Note however, that the NXAMP can’t be flashed with LOADs prior to 2_46, and must always
use NXWIN 4 software embedded with the firmware in the archive file.
What’s changed?
Integrated amplifier
The most notable improvement is the integration of the amplifier module that will simplify
the cabling from the user point of view but also allow a much more efficient integration of
loudspeaker controller with the amplifier needs. Thus the digital controller becomes also an
amplifier controller. This is not simply two units inside the same box, but a powerful use of
the DSP resources for both cabinets and amplifier being driven.
PAGE 12 OF 151
NXAMP VERSUS NX242: WHAT’S NEW?
Computing resources
The DSP resources have been multiply by 3.5 between the NX242ES4 and the NXAMP (so
it means by 7 between the NX242 and the NXAMP). This will ensure that the NXAMP will
have enough DSP resources to deal with many years of algorithm improvements. Other
key components like CPU speed, memory quantities and so on have been also upgraded.
Four separate inputs
The analog input stage now offers 4 separate symmetrical inputs, each on XLR with link
(due to the 3U , on NXAMP4x1, or 4U , on NXAMP4x4 height of the unit, there is plenty of
space for connectors at the back). All the inputs offer considerable 28 dBu headroom
(same than on the NX242). These analog inputs leads to last generation 24 bits converters
running at 48 KHz (like on the NX242-ES4).
Power supply
The NXAMP4x1 Powered TDcontroller uses three separate switch mode power supplies
(SMPS) whereas the NXAMP4x4 uses 5. A first small power supply is used for powering the
TDcontroller digital board, and to initiate the power amp. The other big power supplies are
used for power amplifiers:
• On NXAMP4x1, channels 1 & 2 (on one power supply) and for channel 3 and 4 (on
the other one).
• On NXAMP4x4, each channel has its own large power supply.
These large power supplies are precisely tailored to work around a precise Mains voltage,
so separate model of NXAMP exists for 110 ~ 120 Volts on one side (these are models
NXAMP4x1U and NXAMP4x4U), and for 220 ~ 240 Volts on the other side (these are
models NXAMP4x1C and NXAMP4x4C).
However, a Dual voltage version of the NXAMP4x4 exists to accommodate from both 110 ~
120 Volts and 220 ~ 240 Volts (model NXAMP4x4W). The unit will automatically switch to
the correct mode on startup.
Ethersound™ optional board
The NXAMP is designed to accept the optional NXES104 board witch offers four digital
inputs among a bidirectional 2x 64 channels Ethersound™ ES100 network. This optional
board uses the new NEXO slot which prevents the necessity to open the top panel of the
amplifier for installing the board. NXAMP firmware upgrade can also be performed through
this Ethersound™ port. Finally, the ASIO functionality of the NXES104 allows streaming 4
channels of 24 bits/ 48 KHz audio directly from the Ethernet port of a PC computer.
Dante™ optional board
The NXAMP can also accept the optional NXDT104 board witch offers four digital inputs
from a Dante™ network. This optional board uses also the NEXO slot. NXAMP firmware
upgrade can also be performed through this network card. Finally, the ASIO driver for
Dante™ networks allows streaming 4 channels of 24 bits/ 48 KHz audio directly from the
PAGE 13 OF 151
NXAMP VERSUS NX242: WHAT’S NEW?
Ethernet port of a PC/MAC computer to any number of NXAMP with NXDT104 on the
network.
N.B.: Use LOAD3_22 or better for NXDT104 support in its latest firmware revision.
Optional DMU unit
The DMU (Digital Meters Unit) is an optional 1U device that can be used together with the
NXAMP powered TDcontroller to ease the metering of input channels. This unit provides 8 x
level meters, one per analog input plus one per digital input from slot, plus status LEDs for
network ports.
N.B.: Use LOAD3_11 or better for DMU support.
Optional DPU unit
The DPU (Digital Patching Unit) is an optional 1U device that can be used together with the
NXAMP powered TDcontroller to ease the patching of any Nexo speaker. This unit will
automatically route the amplifier output channels to the correct pins pair of the Speakon 4
or Speakon 8 connectors on its front panel.
N.B.: Use LOAD3_11 or better for DPU support.
PAGE 14 OF 151
QUICK START
Quick Start
This section will allow you to quickly understand the basic functions of this product. If you
already know the previous NEXO digital TDcontrollers, such as NX241 or NX242, you may
be able to use the NXAMP Powered TDcontroller quickly as it has been designed with a
similar user interface. However please devote some attention to reading the user manual.
A better understanding of specific features of the NXAMP Powered TDcontroller will enable
you to operate your system to its full potential.
Front panel description
10
3
8
9
7
6
5
1
2
4
11
NB: NXAMP4X1 is shown here, but NXAMP4X4 is similar, except the model name and the global height of the unit.
(1) Power switch
Put the switch in the upper position to turn the power on. Put it down to power the
amplifier off. Please note that even in the ‘Off’ position, high voltage is still present in some
part of the amplifier, as long as it is connected to mains. Even if it is in the 'Off' position,
the amplifier will consume a minimal current.
If you plan to use remote control to turn the amplifier ‘On’ or ‘Stand-by’, then you must
first turn this power switch to the ‘On’ position. No operation is possible when the power
switch is on the ‘Off’ position.
(2) Amplifier indicators
These Three LEDs above the power switch indicate the status of the amplifier. The two first
LEDs (Power and Stand-by) indicate the power status of the amplifier:
• If both are off, the amplifier is powered off.
• If Power is lit, the amplifier is in use.
• If Stand-by is blinking, the amplifier is in stand-by.
PAGE 15 OF 151
QUICK START
Stand-by mode consumes slightly more current than in Power off mode, but allows the
amplifier to be brought back from Stand-by to power on mode through remote control.
The last LED, ‘Amp Protect’ reflects the protection status of the amplifier. If this LED is lit, it
signifies that the amplifier is reducing or muting one or several outputs due to malfunctions
as overheating, output DC, short circuitry … In combination with other LEDs indicators and
LCD display the cause of the problem will be clearly displayed. Please see further for more
details. Please also note that the Amp Protect LED will light while the amplifiers power
supplies are starting.
(3) LCD display
This large and easily readable 2 x 40 characters display will allow the user to quickly setup
the amplifier. Please note that in stand-by mode the backlight of the LCD remains on even
if nothing is displayed.
(4) Encoder
The default function of the encoder is to adjust the volume of the amplifier. But depending
on the current menu displayed on the LCD, other functions can be affected, such as delay
adjustment or speaker setup selection.
(5) Navigation buttons (A & B)
These two buttons are used most of the time to navigate through the menus. However,
depending on the LCD display, they can be used for a specific purpose.
Anytime, pressing the two buttons simultaneously will instantly enter the “Volume” menu,
allowing the user to adjust the volume for each channel using the encoder.
(6) Volume indicators
These surrounding LEDs will indicate the position of the volume control for each channel,
similar to the position given by analog potentiometers on classical amplifiers. If a channel is
muted, corresponding Mute button will lit red, but the position of the volume control will
blink alternatively for that channel, allowing the user to know what will be the level once
the channel is unmuted.
(7) Mute buttons
Whatever the current menu is, pressing the mute button will set or release the mute of the
chosen channel. The button will turn to red if the channel is muted.
(8) Select buttons
Use the select buttons to choose the channel on which you want to adjust parameters with
the encoder. In most of the menus, the bottom line of the LCD is used to indicate the
cabinet name for each channel. If this name is between brackets, it means that the
channel is selected. Turning the encoder will then have an effect on this channel.
PAGE 16 OF 151
QUICK START
(9) Channel indicators
For each channel, you have three LEDs indicator. The ‘Sense’ LED will light to green when a
certain level of current is detected on the output, meaning that a cabinet is connected and
that some signal is flowing to it. The ‘Protect’ LED will light to yellow if the TDcontroller is
applying a VCEQ protection on that channel (see further for details). The ‘Peak’ LED will
light to red to indicate that the peak limiter is working to protect the amplifier.
(10) Air intakes
The NXAMP uses forced-air cooling. The variable speed cooling fan draws air in from the
front and exhausts it through the rear. Please be sure that you do not block the air intakes
or exhaust vents.
Please be sure not to mix inside the same rack amplifiers with opposite air flow.
(11) Screw holes for handles
These four screw holes are for the optional handles. Fix the handles to the amplifier using
the flat-head screws included with the handles (Screw driver or key TORX X20 is needed).
NB: Separate handle models exist for NXAMP4x1 and NXAMP4x4
PAGE 17 OF 151
QUICK START
Back panels description
7
4
3
1
2
6
5
(1) Mains connectors
This is the mains input for the NXAMP. There is one mains plug on NXAMP4x1 and two
mains plug on NXAMP4x4.
• On NXAMP4x1, the plug is a Powercon 20A for the 100 ~ 120 Volts model (ref.
NXAMP4x1U) and a standard IEC 3 pin for the 220 Volts model (ref. NXAMP4x1C).
• On NXAMP4x4, the plugs are two Powercon 30A for the 100 ~ 120 Volts model (ref.
NXAMP4x4U) or the 110 ~ 120 / 220 ~ 240 Volts model (ref. NXAMP4x4W) and two
Powercon 20A for the 220 Volts model (ref. NXAMP4x4C).
The amplifier requires high-power so that it can demand high current from the AC service.
Connections must be properly rated for reliable operation. See specification part for details.
(2) Balanced audio inputs with link
For each of the four analog audio inputs you will find an XLR3 female input connector, and
also an XLR3 male connector in parallel for sending back the input signal to another unit.
PAGE 18 OF 151
QUICK START
(3) Expansion slot
This slot is used for extra audio inputs and remote control. See further in the manual for
details about the available options.
Since July 2009, all NXAMP4x1s and NXAMP4x4s are shipped with an expansion card fitted
in, the NX-DFLT card. This card prevents output noises when main AC power feeding
NXAMPs is brutally shutdown. NX-DFLT card should always be fitted in when no other
expansion card is used. The “Presence” LED on the NX-DFLT card shows that the card is
running properly. It will light when the amplifier is powered ON (also in Stand-by mode).
(4) Power outputs
Use Neutrik NL4 cable plug into these ports for safely connecting the power amplifier
outputs to the cabinets.
The output routing is always done this way for 4 channels mode:
Speakon A
1+
Speakon B
1+
Speakon C
1+
Speakon D
1+
1-
1-
1-
1-
2+
2+
2+
2+
2-
2-
2-
2-
Please note the symmetry between speakon A/B and C/D. Also you can notice that
Speakon B is always reverse of Speakon A (and same for D and C).
The output routing is always done this way in bridge mode:
Speakon A
1+
Speakon B
1+
Speakon C
1+
Speakon D
1+
1-
1-
1-
1-
2+
2+
2+
2+
2-
2-
2-
2-
Gray lines shows the points of the speakon physically connected to the amplifier output but
unused.
NB: The routing from DSP channels (from 1 to 4 on the front panel) and the output speakon (from A to D on the
back panel) is done automatically regarding setup configuration. See Input Patch menu further in the manual.
(5) RS-232 port
Through this serial port, you can upload a new firmware, which adds new functionalities
and new cabinets’ setups, or connect a NEXO DPU (Digital Patching Unit) device. See
further for details about the update procedure and the DPU connection.
PAGE 19 OF 151
QUICK START
(6) GPIO port
This GPIO port is used for interfacing the amplifier to security system, or to allow a basic
remote control of the unit. NEXO DMU (Digital Meters Unit) device also connects here.
(7) Rear end mounting holes
If the NXAMP is to be rack mounted and transported frequently, be sure to support the
rear end of the unit with mounting hardware that matches the size of the rack used.
Basic functions
Reset
You can reset the unit without powering off by simultaneously depressing buttons A, B &
‘Select CH1’ for 3 seconds at least.
0. FLAT - NO PROTN.
[4 ch amplifier]
~
~
(For 3 seconds)
Selecting cabinet family
PAGE 20 OF 151
~
42. GeoD PA WB
Back1-3 Front2-4
~
Simultaneously depressing A & B buttons at power up or during device RESET accesses the
System Change menu. Keep the A & B Buttons held until Load revision disappears from
screen (approx. 2 seconds). This will allow the selection of any cabinet in any family. Using
the rotary encoder, scroll through the configurations and press B to load the required
settings.
OK
QUICK START
Select your cabinet set-up
In the Options menu, choose Systm Config, and you will be able to choose among the
different set-ups within the same cabinet family. (i.e. you don't have to modify the
amplifier to cabinet wiring). Press All button and all setups will be available for selection.
Using the amplifier without the TDcontroller functionality
If you want to use the amplifier without the TDcontroller, just choose the “FLAT mode”
setup. In this mode, no EQ and no protection is applied to the cabinets. Please note that
the amplifier will still have 0.5 ms analog input to analog output latency in that mode
(warning, this latency is not the same than a NX242 TDcontroller in flat mode, see
introduction for compensating values).
In Flat mode, full amplifier digital protections are still available, and some functionality like
volume control, input patching, mute, delay, gain and ArrayEQ are working. Remote
control can be used as well.
Back to default
Startup the amplifier with the ‘Select CH1’ button down and you will have the possibility
to reset the settings to default (except if the local controls have been locked, see further).
Auto save
The current set-up is automatically saved three seconds after the last change of a
parameter. At power up the last saved settings are restored.
Enter the download mode
Keep the ‘Mute 1’ button down during boot up will enter the download mode. See further
for connection to the computer and download software (Nxwin) description.
PAGE 21 OF 151
WHAT’S INSIDE THE CARTON BOX
What’s inside the carton box
WARNING! The shipping weight of the NXAMP4x1 (U or C version) is nearly 21 Kg
(46 lb). The shipping weight of the NXAMP4x4 (U, C or W version) is nearly 30 Kg (66 lb).
Because of the large size of the carton box it is recommended to manipulate the box with
two persons.
Open the box with care to prevent damage on the content. Inside you will find:
• 1 x NXAMP Quick start guide (32 pages, 7 languages)
• 4 x Rubber pad
• 1 x NXAMP Powered TDcontroller with NX-DFLT card fitted
• 1 x Mains cord (for NXAMP4x1) or 2 x Mains cord (for NXAMP4x4)
• 1 x CD-ROM containing manuals and product brochures for the whole NEXO range.
N.B.: The provided mains cord is Chinese type for NXAMP4x1C or NXAMP4x4C (220 ~ 240
Volts version) and US type for NXAMP4x1U or NXAMP4x4U (100 ~ 120 Volts version) or
NXAMP4x4W (110 ~ 120 / 220 ~ 240 Volts version).
PAGE 22 OF 151
SETTING-UP ADVICE
Setting-Up Advice
Earth connection
WARNING! THIS APPLIANCE MUST BE EARTHED.
The green and yellow wire of the mains cord must always be connected to an installation
safety earth or ground. The earth is essential for personal safety as well as the correct
installation of the system, and is internally connected to all exposed metal surfaces. Any
rack framework into which this unit may be mounted is assumed to be connected to the
same grounding circuit.
Mains setting
NEXO NXAMP Powered TDcontrollers exists under two references for NXAMP4x1 and three
references for NXAMP4x4:
NXAMP Reference
Mains Voltage
Mains current
NXAMP4x1U
100 to 120 Volts
Max 20 Amps
NXAMP4x1C
220 to 240 Volts
Max 10 Amps
NXAMP4x4U
100 to 120 Volts
Max 2x 30 Amps
NXAMP4x4C
220 to 240 Volts
Max 2x 16 Amps
110 to 120 Volts
Max 2x 30 Amps
220 to 240 Volts
Max 2x 16 Amps
NXAMP4x4W
Each model applies to various safety standards only when use with the correct mains
voltage. Therefore, the amplifier won’t start (or will stop working) if the mains voltage is
getting out of the following min and max limits:
NXAMP Reference
Mains Minimum Voltage
Mains Maximum Voltage
NXAMP4x1U or
NXAMP4x4U
60 Volts
150 Volts
NXAMP4x1C or
NXAMP4x4C
150 Volts
288 Volts
PAGE 23 OF 151
SETTING-UP ADVICE
For the NXAMP4x4W this is slightly different; the unit is sensing the mains voltage on
power up, and then will choose to boot either in “110 Volts” mode or “220 Volts” mode.
Once the NXAMP4x4W has startup up in one of the two modes, it will be locked to the
corresponding voltage range till next power up.
NXAMP4x4W Mains settings
Mains Voltage when power up
Mains Minimum Voltage
during use
Mains Minimum Voltage
during use
60 to 140 Volts
60 Volts
150 Volts
140 to 160 Volts
160 to 288 Volts
The NXAMP will not start up
150 Volts
288 Volts
N.B.: for all NXAMP powered TDcontroller, the maximum amplifier output voltage is
proportional to the mains voltage.
Mounting the NXAMP in a rack (Grounding, shielding & safety issues)
The NXAMP Powered TDcontroller is intended for rack mounting. The only accessible part
during use shall be the front panel of the unit. Any space above or under the TDcontroller
shall be obstructed with a blank panel.
The rack is a free grounding and shielding structure and it provides extra shielding.
Therefore, it is desirable that the screws used to fix the NXAMP Powered TDcontroller in the
frame or rack provides an electrical contact between the chassis of the TDcontroller and
the rack.
The primary reason for grounding is safety. Conformance to the applicable requirements of
the authorities having jurisdiction is, of course, mandatory. However, grounding also has
an impact on electromagnetic compatibility. From the EMC point of view, it is desirable to
have a low impedance ground network, as a current flowing in the ground network will
then produce low voltage in the network. A low impedance network can be obtained using
a multipoint ground scheme, with as many closed ground loops as is economically possible.
Because of the amplifier weight, it is mandatory to fix the amplifier both from the front
panel and from the rear ears. The picture bellow shows the dimensions between the rack
holes on the front panel.
PAGE 24 OF 151
SETTING-UP ADVICE
NXAMP4x1 rack holes position
NXAMP4x4 rack holes position
With NXAMP4x1, because of this layout, it is not possible to use some rack rails with 2
holes per rack unit (see picture bellow), because you will loose ½ U of rack space on the
top and bottom of the amplifier. Thus continuous rack rails or with 4 holes per rack unit
should be used.
PAGE 25 OF 151
SETTING-UP ADVICE
Using the NXAMP without a rack
If you do not put the NXAMP into a rack, then it is mandatory to use the four rubber pads
enclosed into the amplifier carton box. These auto adhesive pads should be stuck on each
corner of the bottom of the amplifier. Without these rubber pads, some internal
components can be damaged when there is a shock (for example dropping the amplifier on
a table).
Fuses
The fuses provided in the unit will not blow during normal operation. If one of the
fuses blows it means that the Powered TDcontroller has malfunctioned. This fuse must only
be changed by NEXO certified service personnel. In any case do not replace the fuse with a
non-certified NEXO fuse, as this will invalidate the NEXO warranty.
CAUTION!
This servicing instruction is for use by qualified service personnel only. To reduce the risk of
electric shock, do not perform any servicing other than that contained in the operating
instructions unless you are qualified to do so.
Electromagnetic environments
The emission (this word describes all types of electromagnetic noise radiated by the
equipment) requirements which have been applied to Nexo’s Powered TDcontrollers are the
stringent requirements of the “Commercial and light industrial environment” of the product
family EMC standard for emission.
The immunity (this word describes the ability to cope with electromagnetic disturbance
generated by other items and natural phenomena) requirements that we have considered
exceed those applicable to the “Commercial and light industrial environment” of the
product family EMC standard for immunity. In order to provide a further safety margin, we
recommend that you do not operate the Powered TDcontrollers in the presence of
electromagnetic interference exceeding half of the limits found in this standard.
These two EMC standards are those applicable to pro-audio equipment for the
implementation of the “EMC directive”.
Analogue input signal cables
Analogue signals should be connected to the input ports of the NXAMP Powered
TDcontroller via shielded twisted pair or Starquad cable fitted with XLR connectors on the
NXAMP side. We recommend the use of low transfer impedance cables with a braided
shield and transfer impedance below 10 mΩ/m.
The NXAMP Powered TDcontroller is intended to be used with symmetrical (balanced)
sources (for instance a mixer, see figure bellow). You can see that the TDcontroller
provides a low impedance path between pin 1 of its XLR connectors and its chassis. The
PAGE 26 OF 151
SETTING-UP ADVICE
TDcontroller can sustain high current in pin 1 without degradation of output noise. We
recommend that the sources and loads you use have the same desirable characteristics.
It is sometimes claimed that connecting cable shield at both ends creates ground loops,
and that the current flowing in such loops will produce noise. This is not the case for most
professional audio equipment. In short, there are two kinds of loops in which voltages are
present: the loops formed by signal wires, and the loops formed by grounded conductors,
among which are protective earth conductors (PE) and signal cable shields.
When a cable shield is grounded at both ends, a loop is closed, and the resulting current
causes a reduction of the voltage induced on signal lines. This effect is what the cable
shield is intended to produce, since this is how it protects your signal from magnetic fields.
If you are using an asymmetrical (unbalanced) source (not recommended), it is best to use
a shielded twisted pair and to connect wire 3 of the cable to the shield at the source output
end (see figure bellow).
This technique prevents noise currents flowing on the return path of the signal. (Note that
this is only acceptable for a short cable).
PAGE 27 OF 151
SETTING-UP ADVICE
NXAMP power outputs wiring
NEXO recommends the exclusive use of multi-conductor cables to connect the system: the
cable kit is compatible with all the cabinets, and there is no possible confusion between LF,
MF and HF sections.
Cable choice consists mainly of selecting cables of the correct sectional dimension (size) in
relation to the load resistance and the cable length. Too small a cable section will increase
both its serial resistance and its capacitance; this reduces the electrical power delivered to
the loudspeaker and can also induce response (damping factor) variations.
For a serial resistance less or equal to 4% of the load impedance (damping factor = 25),
the maximum cable length is given by:
Lmax = Z x S S in mm2, Z in Ohm, Lmax in meters
The table below indicates these values, for 3 common sizes.
Load Impedance (Ω)
2
3
4
6
8
12
16
Cable section
Maximum Length (meters)
1,5 mm² (AWG #14)
3
4.5
6
9
12
18
24
2,5 mm² (AWG #12)
5
7.5
10
15
20
30
40
4 mm² (AWG #10)
8
12
16
24
32
48
64
PAGE 28 OF 151
GENERAL DESCRIPTION
GENERAL DESCRIPTION
Global architecture
NXAMP4x1 Global architecture
The diagram bellow shows the global architecture of the NXAMP4x1 amplifier.
NXAMP4x4 Global architecture
The diagram bellow shows the global architecture of the NXAMP4x4 amplifier.
PAGE 29 OF 151
GENERAL DESCRIPTION
Power Supply Block
Power Supply is certainly the most important part of an amplifier. Most of the time, the
Power supply is limiting the power of an amplifier, more than the amplifying circuit itself.
• On NXAMP4x1, two large power supplies are used, one for channel (1 and 2) and
the other for channel (3 and 4).
• On NXAMP4x4, four large power supplies are used, one for each channel.
PAGE 30 OF 151
GENERAL DESCRIPTION
They all are full resonant type with half bridge converter. The ZCS (Zero Current
Switching) design ensures high efficiency and low noise. Moreover, because the two
converters work in opposite phase, some noise is cancelled; this is preferable for both
sound quality and EMC (Electro magnetic compatibility).
Analog Input block
After linking the two XLRs for each channel, the analog input block has an EMC filter and a
precision input buffer that will remove the common noise on the input signal. The
maximum level allowed for the input signal is + 28 dBu (55 Volts peak to peak). The pin
out of the input XLR is given bellow.
Control block
The control block contains several sub-block that are detailed bellow.
The plain lines show the audio or sense signal (sense are voltage or current signal
measured at the output of each amplifier). The dashed lines show the digital
communication signal among several block.
You can see the audio input on the left; there are four analog inputs (from input XLR)
named Analog A, Analog B and so on… and four digital inputs (Digital A, Digital B and so
PAGE 31 OF 151
GENERAL DESCRIPTION
on…) from the expansion slot. These eight signals can be patched inside the DSP to any
channel of processing/amplifying (see further for a block diagram of what is inside the
DSP).
All signals, audio or sense, use 24 bits converters. The CPU can also set up the analog
input and output gain for each channel, thus ensuring that the dynamic range of the
system is always optimized (regarding volume, gain, patch and bridge settings).
Monitoring of the amplifier modules and power supplies (including multiple measurement
such as temperature, voltages, current, integrate current …) are done both by the CPU and
the DSPs.
Power amplifier blocks
The power amplifier part is a custom design to fit the very unique concept of digital
protection of an analog amplifier. On the pure amplification side, it utilizes custom
transistor (thin chip and small thermal resistance), and the well known Yamaha EEEngine
technology, that offers the sonic quality of the conventional class AB amplifier with the
efficiency of the class D.
Power outputs block
The power outputs block is used for current and voltage sensing at the output of the
amplifier. These data will be used by the DSP for protecting both the amplifier and the
NEXO loudspeaker connected. This stage features also a programmable routing unit that
allows using the amplifier in bridge mode on the same speakon pins than in non bridge
mode.
When using the NXAMP Powered TDcontroller in four channels mode, here is the output
routing:
Speakon A
1+
Speakon B
1+
Speakon C
1+
Speakon D
1+
1-
1-
1-
1-
2+
2+
2+
2+
2-
2-
2-
2-
Note the symmetrical structure between channels 1/2 and channels 3/4.
When using the NXAMP Powered TDcontroller in bridge mode, here is the output routing:
Speakon A
1+
Speakon B
1+
Speakon C
1+
Speakon D
1+
1-
1-
1-
1-
2+
2+
2+
2+
2-
2-
2-
2-
Now amplifier channel 1 and 2 works together in bridge mode (channel 2 is marked “CH1-”
above). This is same for channel 3 and 4. The pin-out on the speakon is the same as the
channel 1 and 3 in non bridge mode, thanks to the programmable routing unit (not drawn
here).
PAGE 32 OF 151
GENERAL DESCRIPTION
NB: The routing from DSP channels (from 1 to 4 on the front panel) and the output speakon (from A to D on the
back panel) is done automatically regarding setup configuration. See Input Patch menu further in the manual.
You can see with the gray line on the above drawing that unused pins on output
speakon are shorted together, but are not connected to ground. Therefore be careful as
very high voltage might be present on these unused pins.
User interface block
The user interface block has already been described through the front panel description in
the first part of this document. Please note that all the commands and displays are
available through the ESmonitor™ software by Auvitran, through the Ethersound™ network
(except the mains switch).
Communication block
The communication block regroups the RS232 port (on a sub-D9 plug) and the GPIO port
(on a sub-D25 plug).
The RS232 port is mainly used to upgrade the firmware of the unit from a PC computer, or
to connect a NEXO DPU (Digital Patching Unit). The pin-out is given bellow:
The RxD pin is the “Receive data” pin from the NXAMP point of view. Thus this is an input.
The TxD pin is the “Transmit data” pin from the NXAMP point of view. Thus this is an
output. GND is the ground.
A crossover cable (connecting RxD pin of NXAMP to TxD pin of computer, and so on) is
needed to use this serial port. Please see further the dedicated part of this document on
that subject.
The GPIO port is a Global Purpose Input/Output signals system that can be use for a wide
range of application, including interfacing the NXAMP with security systems and
communication with NEXO DMU (Digital Meters Unit). There are the following signals
available:
• 8 x General purpose output signals from NXAMP (5 Volts signals)
• 5 x General purpose input signals to NXAMP (5 Volts signals)
PAGE 33 OF 151
GENERAL DESCRIPTION
• 4 x 5 Volts outputs
• 8 x GND (ground) signals.
The pin out of these signals is given bellow:
It is mandatory to have a galvanic isolation between these signals and any
another equipment. Thus, either the target equipment should present isolated GPIO
system, or the signal should goes through small signal relays to guarantee that the NXAMP
GPIO will be isolated from the other equipment.
The maximum current available on the GPIO port is the following:
• Maximum 200 mA drawn from the totality of the +5 V outputs.
• Maximum 200 mA drawn from the totality of the GP Outputs, with a maximum of
32 mA for each output.
Expansion slot block
The expansion slot uses unique 80 pins connectors that will allow the user to simply fit an
expansion board into the amplifier. At the moment, there is two expansion boards
available, the NXES104 Ethersound™ board and the NXDT104 Dante™ board.
The NXES104 is compatible with the ES-100 standard, offering full remote control from a
computer running ES monitor by Auvitran application, and 4 channels of 24 bits 48 KHz
audio, from an ES network or from a PC computer through a LAN network using the
Auvitran ASIO streamer technology.
The NXDT104 is compatible with the Dante™ standard, offering full remote control from a
computer running ES monitor by Auvitran application, and 4 channels of 24 bits 48 KHz
audio from another Dante™ device including a PC or Mac computer through a LAN network
using the Dante™ Virtual Soundcard technology.
PAGE 34 OF 151
GENERAL DESCRIPTION
NEXO expansion slot form factor is not compatible with the Yamaha mini-YGDAI
form factor. Thus, Yamaha mini-YGDAI card cannot be fitted inside NXAMP Powered
TDcontroller.
All NXAMP4x1s and NXAMP4x4s are shipped with an expansion card fitted in, the NX-DFLT
card. This card prevents output noises when main AC power feeding NXAMPs is brutally
shutdown (ie power down at the end of the show before NXAMPs are switched off). NXDFLT card should always be fitted in when no other expansion card is used.
PAGE 35 OF 151
BLOCK DIAGRAM DESCRIPTION
Block diagram description
The block diagram bellow shows the global signal path inside the DSPs, for one channel
(identical for all the channels):
The detail of each block numbered is given bellow.
PAGE 36 OF 151
BLOCK DIAGRAM DESCRIPTION
Patching and routing (1)
Basically, any combination of the four XLR analog inputs (numbered A to D on the back
panel) can be patched to each channel of the amplifier. If an expansion board is fitted, the
four added digital input (numbered E to H) can be mixed as well. In this patch section,
digital gain is also added to optimized signal to noise on the audio path.
N.B.: There is no reason why analog and digital input should be in phase, so we
recommend a great care when patching both analog and digital input to the same channel
(it should be done most of the time only as a backup solution, to ensure analog feeding to
the amplifier instantaneously for example if the digital input goes down).
Delay & polarity inversion (2)
Factory set-up delay
Note that each output may contain a small phase adjustment delay at the crossover point.
Also, a polarity inversion may be performed. These adjustments are part of the factory setups and are necessary to time-align the corresponding cabinet that is selected.
User set-up delay
The user can adjust the delay for each channel (see further about the delay menu, or delay
setting from the ESmonitor™). The maximum delay allowed is 66.6 meters per channel.
N.B.: This user delay will be added to the converter latency, DSP buffering latency and
factory set-up delay.
The NXAMP TDcontroller will limit the delay adjustment to a group of channel in specific
case such as:
• Active setups where two different channels are in the same physical cabinet: it is
then impossible to delay one channel without the other one (for example PS15 Active
setup, delay is linked between HF and LF).
• Cardioids setups will also prevent to adjust the delay on one channel only (for
example CD18 setup, delay is linked between front and rear loudspeaker).
• In the particular case of the RS subs in Omni, the two channels of amplifiers
dedicated to RS output are linked also together to prevent setups errors when
cabling directly RS in Omni mode to amplifier outputs.
Equalisation & Filtering
Subsonic and VHF filtering (3)
Low and high-pass filters are used to filter out frequency components that could possibly
degrade the performance of the NXAMP Powered TDcontroller and loudspeakers connected
(depending on the cabinet setup chosen). The filters are optimised to work in conjunction
with overall system response.
PAGE 37 OF 151
BLOCK DIAGRAM DESCRIPTION
The high pass filters are also extremely important as they optimise excursion at very low
frequency which is a very important safety factor. (Therefore do not use set-ups which are
not designed for the cabinet you are using).
Equalising wideband acoustical response (3)
This wideband equaliser section achieves the correction required to obtain a flat system
response, as the cabinets are acoustically designed for maximum efficiency on the whole
frequency range. Active rather than passive attenuation allows the lowering of amplifier
voltages for a given output SPL and therefore increases the maximum SPL achievable with
the same amplifier. Active equalisation also extends system band pass especially at low
frequencies where acoustical performance is limited by cabinet size.
User set-up, Array EQ (4)
For each channel, an Array EQ is currently implemented in the NXAMP. The cut off
frequency of a low-shelving filter (for wideband or LF output) or high-shelving filter (for HF
ouput) is factory tuned for each cabinet set-up. The user has access to the gain of this
filter. The array EQ is tuned in order to reproduce the effect of the bass coupling, allowing
the user to increase or diminish the effect of the stacking (see further about the Array EQ
menu, or Array EQ setting from ESmonitor™).
Equalising single component response and NXSTREAM processing (5)
This equaliser set allows acting on a specific driver after the crossover, rather than on the
wideband section. This allows to EQ one driver without affecting the others (cleaning out of
band response, fine tuning in a crossover…). All the parameters are factory set.
Last generation of NXSTREAM algorithm are also implemented in this section. This process
uses sophisticated DSP program to go beyond the limits of the conventional EQ filtering, to
manipulate for example the phase of the audio signal independently of the amplitude and
so on.
Crossover section (6)
Crossover between different bands is tuned for every set-up of every cabinet. Each
crossover is customized so that each transducer will fit with its neighbor by achieving a
perfect phase alignment. Unconventional, crossover-defined filters are applied, ranging
from 6dB/octave to near infinite slopes according to the type of crossover desired. Time
alignment is also unconventionally achieved, by combining crossover filter group delays
with all-pass and/or frequency dependent delays.
Post protection EQ and low pass (27) (28)
After the Protection block (using VCEQ and VCAs, see bellow), another set of EQ / low pass
filtering is applied to remove some artefacts due to protection algorithm on some speaker
setups.
Gain section (29)
In this section the digital gain is applied to the corresponding channel. This digital gain is
computed by the CPU and depends on the user gain, the setup gain for the channel, and
the optimization of the gain ranging done by the CPU.
PAGE 38 OF 151
BLOCK DIAGRAM DESCRIPTION
The NXAMP TDcontroller will limit the user gain adjustment to a group of channel in specific
case such as cardioids setups (for example on CD18 setup, gain is linked between front
and rear loudspeaker).
Protections
Each channel has its own simulation and protection process. Each audio channel contains a
combination of controlled gain stages (let's call them VCA’s as in our analogue circuitry).
These VCA's are embedded into complex composite structures in order to change their
basic operation into frequency selective attenuation. This operation is similar to that of a
voltage controlled dynamic equaliser (VCEQ).
Each VCEQ and VCA is controlled by the synthesis of several signals issued from the
various detection sections. That synthesis is in fact the envelope of those signals, with an
optimised release and attack time for each VCEQ and VCA (depending on its frequency
range and the cabinet selected).
One or several of the protections below can be used depending on the setup chosen.
Source signals for protection algorithms (25)
Signals coming from amplifier output voltage/ current, processor output, and status from
amplifier are all sources that will lead to protection system implementation.
Displacement control (7) (8) (9)
The amplifier output voltage sense input signal is sent to a shaping filter producing a signal
whose instantaneous amplitude is proportional to the voice coil excursion (this is Global
displacement block (7)). This signal, after rectification, is compared to a preset threshold
matching the maximum usable value, as determined from laboratory measurements. Any
part of the signal exceeding the threshold is sent to the VCEQ control buffer while the
VCEQ acts as an instantaneous limiter (very short attack time) to prevent displacement
from overriding the maximum permissible value.
Another set of VCEQ (this is first displacement block (8)) is used to protect the loudspeaker
from an excessive displacement in the next worst displacement frequency area (this
usually is 3 dB bellow the global displacement protection area). In case of band pass
cabinets, we need another set of VCEQ (this is first displacement band pass block (9)) to
protect from another peak of secondary displacement.
All these VCEQs have separate shaping filter, separate action filters for VCEQ, and separate
Ratio, Attack and Release time.
Mechanical stress control (10) (11)
Whereas some frequency areas are dangerous at high level due to excessive displacement
of the loudspeaker (see above), there is another area where the displacement of the
loudspeaker is minimum, but then the mechanical stress on the cone during large input
signals is maximum.
To protect from overstressing the loudspeaker, VCEQ process can also be used in these
PAGE 39 OF 151
BLOCK DIAGRAM DESCRIPTION
particular area (this is block (10)). As with displacement VCEQ, another set of mechanical
stress VCEQ is needed for band-pass cabinets (this is block (11)).
HF displacement control (12)
In case of passive setups, a channel will deal with several loudspeakers after passing
through the passive filter of the cabinet. That is why, as previous VCEQs deal with LF
loudspeaker, another set of VCEQ is needed to protect HF driver from excessive
displacement.
HF acceleration control (13)
Excessive acceleration on the HF driver can lead to the destruction of the diaphragms.
Another set of VCEQ is added here to protect HF driver from over acceleration.
Global purpose VCEQ (14)
The internal structure of the VCEQs processes inside the DSP allow up to eight different
VCEQ, in case you need extra VCEQing for dynamic EQ or whatever…
Loudspeaker Peak limiters (15)
These “loudspeaker” peak limiters are here to avoid huge amounts of power being sent to
a driver. Each driver is protected in temperature and displacement but there could be other
factors of destruction that cannot be predicted by simulation (especially mechanical
damage to the cone…). Each driver is specified for a certain power handling and a factory
set peak limiter threshold is tuned to avoid any abuse. A two-steps peak limiter is used
here, each with a separate set of threshold, ratio, attack and release.
Temperature control (16) (17)
The sense signal from amplifier output is fed into a shaping filter, each one producing a
signal proportional to the instantaneous current flowing into the voice coil of the
transducer. After rectification, this signal is integrated with attack and release time
constants equivalent to the thermal time constants of the voice coil and chassis, producing
a voltage, which is representative of the instantaneous temperature of the voice coil.
When this voltage reaches the threshold value corresponding to the maximum safe
operation temperature, the VCA or the VCEQ becomes active to reduce the Audio signal
level and limit the effective temperature to fall under the maximum usable value.
In order to avoid detrimental effects induced by very long release time constants coming
from the temperature detection signal (level being reduced for an extended period,
« pumping » effects...), the detection signal is modulated by another voltage integrated
with faster time constants matching the sound level subjective perception. This allows the
controller to reduce the effective operation duration of the temperature limiter and make it
sound more natural, while the efficiency of protection is fully preserved and operation
thresholds are unaffected (kept as high as possible).
In case of passive cabinet, another set of temperature simulation is done to protect the
H.F. driver; this is block (17).
PAGE 40 OF 151
BLOCK DIAGRAM DESCRIPTION
The so-called Physiologic Dynamic Control (see block diagram) is intended to avoid
unwanted effects as a result of a too long attack time constant. By anticipating the
operation of the temperature limiter, it prevents a high level Audio signal appearing
suddenly then being kept up for a period, which is long enough to trigger the temperature
limiter. Without this, a rough and delayed gain variation would result which would be quite
noticeable and unnatural.
The Physio control voltage acts independently on the VCA with its operation threshold
slightly lower (3 dB) that of the temperature limiter and a low compression ratio; its
optimised attack time constant allows it to start operating without any subjectively
unpleasant transient effects.
Interchannel regulation (19)
As described before, each transducer is individually servo-controlled for temperature. This
means in practice that, in case of a potential risk detected, protective operation would only
affect the concerned driver. Your driver will be protected but the overall system tonal
balance could be altered if the different channels are not heating at the same time. In
addition, triggering a temperature protection means that the loudspeaker has already lost
some efficiency (power compression up to 3dB in extreme cases)
The purpose of interchannel regulation is to cancel that effect by linking VCAs together.
When the protection is activated on one channel and reaches a predetermined threshold,
the regulation section begins to correct the balance between the different channels (HF,
MF, and LF) by acting on the concerned VCA.
Amplifier peak current limiter (20)
To prevent over-current on the output of the amplifier, this peak current limiter is
implemented, leading to a separate VCA (block (30)) from the one being used for
loudspeaker protection (block (26)). This protection is implemented here mostly in case of
default of the power supply, and will barely be triggered during normal use, because it is
set up at the limit of what can deliver the power supply of the amplifier.
Amplifier integrate current limiter (21)
This protection which is also triggering a VCA will compute the integration of the current
over time to check that the current drawn by the amplifier will not go above what is
acceptable for the mains. With musical signal should never trigger this protection, mainly
implemented for protection against continuous signal like sine wave and so on.
Amplifier peak voltage limiter (22)
This is a “soft clip” limiter that will reduce the output level though a VCA process to limit
the clipping of the amplifier.
Amplifier short circuit detector (24)
If a short circuit is detected on the output, the amplifier will mute itself, and will release the
mute a few second after automatically. This is shown on the front panel by a blinking of the
peak LED of the concerned channel, together with the “Amp protect” LED.
PAGE 41 OF 151
MENU DESCRIPTION
MENU DESCRIPTION
The diagram bellow shows the internal structure of the menus accessible by the user from
the front panel. Follow the arrow corresponding to the “A” or “B” button for each menu to
enter the next one.
NXAMP Startup
Nothing pressed
Options
A+B pressed
1.Systm Config
2.Input Patch
Choose Cabinet Setup
3.Save/Recall
A
Default Display
B
A
Volume
B
A
Delays
B
A
Gains
B
A
B
A
Array EQ
B
Headroom
A
4.Security
B
5.GPIO Mode
6.Load Monitor
7.Miscellaneous
Default display is the display of the current setup number (each setup has a unique
number inside for each LOAD revision) and setup name (see picture bellow). After two
minutes of inactivity, the display will go back to the default display.
~
0. FLAT - NO PROTN.
[4 ch amplifier]
~
If the current setup does not match any of the provided NEXO setup (i.e. the NXAMP is
running a custom setup) the default display will show the ca binet
selection
for
each
channel.
If a NXDT104 card is fitted into the expansion slot of the NXAMP, then the Dante Id of this
unit will be also displayed in the default screen.
PAGE 42 OF 151
MENU DESCRIPTION
0. FLAT - NO PROTN.
[4 ch amplifier]
Y001
~
~
Changing Cabinet Family
~
42. GeoD PA WB
Back1-3 Front2-4
~
In order to prevent end-user changing between different NEXO systems set-ups during
use, the following procedure is recommended. This procedure has been purposely designed
to avoid any mistakes. It is nevertheless very easy to change set-up among the same
family or between families (see further, “System config”).
OK
Depressing A & B buttons while the NXAMP is starting (this last 2 seconds). At the end of
the boot time, the above screen should appear, while the amplifier part itself starts up (this
last around 11 seconds, and ends when you hear the output relays moving and see the
“Amp Protect” LED shutting down). Please note that you don’t need to wait for the
amplifier to start for choosing your cabinet setup.
You should then see the two up and down arrows surrounded in the above drawing. This
means that you can change the speaker setup by turning the wheel. Select the appropriate
setup by pressing ‘OK’ (button B) or press the button A to go back to current setup
without changes.
N.B.: You can reset the unit without powering off by simultaneously repressing buttons A,
B & SELECT CH1 at the same time for at least 3 seconds.
The setup number is blinking when the currently displayed setup is different from the one
running into the DSP at the moment. Selecting a new family will set all parameters to
factory default settings.
N.B.: The setup number 0 “FLAT –NO PROTN.” is the default setup; it means no EQ (Flat)
and no protection (No Protn.) for the speakers but of course amplifier protections will still
work.
PAGE 43 OF 151
MENU DESCRIPTION
Adjusting Volume
The volume of each channel can be adjusted from the Volume menu (unit is dB). Bellow is
a picture of this menu.
The volume setting for each channel can always be clearly seen from the front panel
surrounding LED (white/blue) around each mute button. The position of the LED gives the
value of the volume, like it would be for a traditional analog volume pot. The picture bellow
gives the attenuation value for each LED.
The attenuation value can also be read on the LCD screen. To change the attenuation for a
given channel, select the channel first by pressing the corresponding “select” button. The
channel name on screen will then be put between bracket (see on the picture above,
channel 2 is selected). Then turn the wheel to change the volume setting.
You can select multiple channels by pressing several ‘Select’ buttons at the same time.
When a selected channel reaches the maximum value, it will cease to increase by
continuing to turn the wheel, but other selected channels may still increase the setting: be
careful not to change a gap between two channel settings when selecting multiple channels
at the same time.
Please note that all the LEDS for volume indication are white except the last one
(corresponding to 0 dB attenuation) which is Blue. That allows to quickly checking that all
volumes are correctly set on a NXAMP powered TDcontroller.
PAGE 44 OF 151
MENU DESCRIPTION
NB: You can adjust large differences of gain between channels with the volume menu.
There is no difference between gain and volume setting; this distinction is only done by
analogy with traditional amplifiers. The CPU will always check gain, volume, patch and
headroom settings and decide what the best combination is between analog or digital gain
to optimize the dynamic range of the system.
Adjusting Delay
The delay of each channel can be adjusted from the Delay menu. Bellow is a picture of this
menu.
The delay value can be read on the top of the LCD screen for each channel (unit is meters).
To change the delay for a given channel, select the channel first by pressing the
corresponding ‘Select’ button. The channel name on screen will then be put between
bracket (see on the picture above, channel 2 is selected). Then turn the wheel to change
the delay setting (maximum delay is 66.6 meters).
You can select multiple channels by pressing several ‘Select’ buttons at the same time.
When a selected channel reaches the maximum value, it will cease to increase by
continuing to turn the wheel, but other selected channels may still increase the setting: be
careful not to change a gap between two channel settings when selecting multiple channels
at the same time.
In some special situation (active setups in same enclosure for example, like PS15 active) it
is mandatory to have same delay settings on two or more channels. Then, changing the
delay on one of these channels will automatically adjust the delays on the other channels.
See the “Miscellaneous” menu for delay unit adjustment.
Adjusting Gain
The gain of each channel can be adjusted from the Gain menu. Bellow is a picture of this
menu.
PAGE 45 OF 151
MENU DESCRIPTION
The gain value can be read on the top of the LCD screen for each channel (unit is dB). To
change the gain for a channel, select it first by pressing the corresponding ‘Select’ button.
The channel name on screen will then be put between bracket (on picture above, CH2 is
selected). Then turn the wheel to change the gain setting (from –6 to +6 dB).
You can select multiple channels by pressing several ‘Select’ buttons at the same time.
When a selected channel reaches the maximum value, it will cease to increase by
continuing to turn the wheel, but other selected channels may still increase the setting: be
careful not to change a gap between two channel settings when selecting multiple channels
at the same time.
In some special circumstances (cardioids setups for example) it is mandatory to have same
gain settings on two or more channels. Then, changing the gain on one of these channels
will automatically adjust the gains on the other channels.
NB: You can adjust large differences of gain between channels with the volume menu.
There is no difference between gain and volume setting; this distinction is only done by
analogy with traditional amplifiers. The CPU will always check gain, volume, patch and
headroom settings and decide what the best combination is between analog or digital gain
to optimize the dynamic range of the system.
Adjusting Array EQ
The Array EQ of each channel can be adjusted from the Array EQ menu. Bellow is a picture
of this menu.
The Array EQ value can be read on the top of the LCD screen for each channel (unit is dB).
To change the Array EQ for a given channel, select the channel first by pressing the
PAGE 46 OF 151
MENU DESCRIPTION
corresponding ‘Select’ button. The channel name on screen will then be put between
bracket (see on the picture above, channel 2 is selected). Then turn the wheel to change
the Array EQ setting (from – 6 dB to + 6 dB).
You can select multiple channels by pressing several ‘Select’ buttons at the same time.
When a selected channel reaches the maximum value, it will cease to increase by
continuing to turn the wheel, but other selected channels may still increase the setting: be
careful not to change a gap between two channel settings when selecting multiple channels
at the same time.
In some special circumstances (cardioids setups for example) it is mandatory to have same
Array EQ settings on two or more channels. Then, changing the Array EQ on one of these
channels will automatically adjust the Array EQ on the other channels.
Adjusting Headroom
The headroom of each channel can be adjusted from the headroom menu. Bellow is a
picture of this menu.
The headroom value can be read on the top of the LCD screen for each channel (unit is
dB). To change the headroom for a given channel, select the channel first by pressing the
corresponding ‘Select’ button. The channel name on screen will then be put between
bracket (see on the picture above, channel 2 is selected). Then turn the wheel to change
the headroom setting (from – 8 dB to 0 dB).
You can select multiple channels by pressing several ‘Select’ buttons at the same time.
When a selected channel reaches the maximum value, it will cease to increase by
continuing to turn the wheel, but other selected channels may still increase the setting: be
careful not to change a gap between two channel settings when selecting multiple channels
at the same time.
In some special circumstances (cardioids setups for example) it is mandatory to have same
headroom settings on two or more channels. Then, changing the headroom on one of
these channels will automatically adjust the headroom on the other channels.
Headroom concept
The headroom settings adjust the input/output analog gain to ensure the best matching
between program material and NXAMP internal gain structure.
PAGE 47 OF 151
MENU DESCRIPTION
With heavy content, like open air rock concert, you will need the full input range sensitivity.
This is the most typical situation. In that case, the headroom should be adjusted to 0 dB.
Default headroom position (0 dB) situation :
Max input level
Max Output Level
Analog A
Analog B
Analog C
Amp ch1 Input
Analog input
level control
24 Bits
ADCs
Digital Signal
Processor
24 Bits
DACs
Analog Outputs
level control
Analog D
Amp ch2 Input
Amp ch3 Input
Amp ch4 Input
Example above shows large input attenuation and large output gain. Overall gain is 0 dB (before amplifier).
But in quiet environment, like background music or small acoustic set, you won’t use the
full dynamic of the NXAMP input converter. In that case, you can lower the headroom
value, meaning that the input headroom of the amplifier is reduced; thus improving the
effective resolution used on the analog to digital input converter.
Min headroom position (-8 dB) situation :
Max input level
Max Output Level
Analog A
Analog B
Analog C
Amp ch1 Input
Analog input
level control
24 Bits
ADCs
Digital Signal
Processor
Analog D
24 Bits
DACs
Analog Outputs
level control
Amp ch2 Input
Amp ch3 Input
Amp ch4 Input
Example above shows small input attenuation and small output gain. Overall gain is 0 dB (before amplifier).
In the same time, the output (analog or digital) gains of all the channels are automatically
adjusted to keep the same overall gain from inputs to outputs of the NXAMP.
Advantage of reducing the headroom is that it adapts the resolution of the converters to
the scale of the analog input signal, thus improving background noise and reducing
distortion.
Drawback of reducing the headroom is that you may clip the converters before clipping the
amplifier, thus virtually reducing the output power of the amplifier. Thus when adjusting
the headroom, be sure to always use program material that matches the actual program
that will be played, and check that the Peak LED for this channel is not starting to blink at a
lower level than before; it yes, it means that you are lowering the maximum output of the
amplifier because of a too low headroom, then increase the headroom.
Default headroom position (0 B) should be considered for most application. If
you are not sure of how to adjust headroom, leave if to the default position (0
dB) which is the safest position.
PAGE 48 OF 151
MENU DESCRIPTION
Note: Because same analog input signal can be routed to several outputs, it is always best
to use same value of headroom on all channels, or to use separate analog input to various
outputs (using link at the back of the amplifier if needed). Using different values of
headroom on channels using same input can reduce or cancel the effect of the headroom.
Note: Headroom effect is compensated on the digital inputs using digital gain.
Note: Software peak limiter prevents hard clipping of the converters if needed in case of
reduced headroom value; thus gentle lighting of the Peak LED can be authorized without
sound quality issue.
Options Menu
With this menu you can enter some sub-menu to adjust parameters of the NXAMP does do
not need to be changed during the normal use of the amplifier (mainly during setup of the
unit only). Bellow is a picture of this menu.
The sub-menu located on the top of the screen will blink (here it is 1.Systm Config).
Depressing ‘Select’ of channel 4 will enter this sub-menu (‘OK’ is displayed on the screen
align with ‘Select 4’ button). Turn the wheel to select another sub-menu. When coming
back to the Options menu later, the last selected sub-menu will be displayed first.
System config
This menu allows changing between several speaker setups inside a same family or even
through any family, even if this last solution is not recommended. Same family means that
same cabinet are connected to same outputs of the amplifier. Mainly this menu is for
comparing quickly to setup (Wideband and Crossover for example) without restarting the
amplifier.
You can also build you own setup by selecting on each channel which NEXO speaker you
want to connect. Moreover, you can choose for each output the crossover point you want
to use for this speaker (crossover options are different regarding the selected speaker).
To enter this menu, go to the OPTION menu, and select the sub-menu 1.Systm Config, like
shown above. You will be then prompt to choose between Nexo config (which are factory
prepared set of 4 x Nexo speakers, with optimum crossover frequency) and Custom config
where you can select the speaker and the crossover of your choice for each the channels.
PAGE 49 OF 151
MENU DESCRIPTION
Turn the wheel to make your choice blink on the first line of the screen, then press the “B”
button.
Nexo config
Select one speaker setup by turning the wheel till the setup number appears blinking on
the LCD screen (in this example, you can toggle between the Crossover (Xover) and the
Wide setup). Then depress the B button (OK). Once the setup is loaded, the amplifier will
go back to the default screen. If you don’t want to change the current speaker setup,
simply press the A button (Back).
201. S1210 XO
RS15 CD 80
All
OK
If you want to recall a setup from another family, you should first press the ‘Select 4’ (All)
button, the previous display (without “All” on screen) will be displayed, but this time all the
setup will be available when turning the wheel.
201. S1210 XO
RS15 CD 80
OK
N.B.: When changing setups inside the same speaker family, the settings of the unit (input
patch, delay, gain…) are kept. If you choose another family, settings will go back to the
default values.
PAGE 50 OF 151
MENU DESCRIPTION
Custom config
When entering the Custom config menu, the first display shows the current setup for the
selected output (including speaker name, variant and crossover points(s) if available).
You can display the current setup information for each output by depressing the
corresponding ‘Select’ button. If you want to change a setup for one output, just press the
‘Edit’ button.
First step is to select the Serie (i.e. family) by turning the wheel (for example here, the PS
Serie). You can then choose the speaker model among this Serie.
In the above example, the PS15R2 has been selected. You can now choose between
normal mode and bridge mode for this speaker.
PAGE 51 OF 151
MENU DESCRIPTION
Once the bridge mode has been selected (or not in our example) you will be prompt to
choose among various speaker mode if available. In the case of the PS15R2, the mode is
either “Normal” or “MON” for monitoring application. Let’s select the standard mode in this
example.
NB: if only one mode is available for the selected speaker, this step will be skipped.
Now the latest part of this custom setup for a specific channel is to choose among the
available crossover, when available. Most passive cabinets and subs offer multiple
crossover options, but HF output for active cabinets usually has just one.
NB: if only one crossover is available for the selected mode, this step will be skipped.
Once the OK button is pressed, the display goes back to the four channel information
display, while the selected speaker for CH1 is recalled into the NXAMP.
NB: If another channel is mandatory linked to the selected one (for example back and front
speakers of a CARDIO speaker) then the next channel will be automatically recalled.
PAGE 52 OF 151
MENU DESCRIPTION
Now you can choose between one of the following solutions: Either you enter the other
channel and setup the speaker you wish, or you can copy the setup from any channel to
one, two or three other channels.
To do this first keep the Select button down for the “Master” channel, the one that will be
copied to the other channels. While this channel is kept down, press simultaneously the
destinations channels. In the example bellow, channel one cabinet (PS15R2) is copied to
channel two, three and four.
1) Keep 1 down
2) Press the other three at once.
Once this new setup is recalled (4 x PS15R2 PA 50-20k) the display will be back to channel
information.
PAGE 53 OF 151
MENU DESCRIPTION
By depressing the cancel sign (‘x’) the display is now back to default mode; if the chosen
setups are equivalent to a known “Nexo setup”, then the default display is the classical
one, like displayed on the following picture:
If the chosen setups does not match any of the NEXO four channels setups (including
chosen crossover frequency) the display will show the speaker selected for each output.
Input Patch
This menu allows changing the inputs channels patched on the outputs channels of the
NXAMP. To access the Input Patch menu, go to the Option menu, and select the sub-menu
2. Input Patch.
By default and depending on the selected speaker setup selected, some or all of the four
inputs will be patched to the outputs. For example, 4 independent channels setups (like 4 x
PS15) will use each analog input patched to each output, but 4 way active setups (like
Alpha) will use only one analog input patched to all the outputs.
Most of the time, the user can freely change the way inputs are patched to the outputs.
However, in some special circumstances, like cardioids setups for example, it is mandatory
PAGE 54 OF 151
MENU DESCRIPTION
to have same signal feeding two channels of amplifier or more. In this situation, changing
the patch for one channel will automatically affect the other channels.
NB: If Analog fallback is ON (see further in this manual) then a warning will be displayed
here to remind that even if analog input are patched they will be muted while audio
network is operational.
First step to change the input patch is to go to the OPTION menu (see above). Then select
the sub-menu 2.Input Patch. The following menu displays the routing of the unit. Each
Colum represents an output speakon, from A to D. On the example bellow (4x PS10R2
setup) you can see that input A to D are patched to PS10R2 processing channels.
After a few seconds, the display will show the output speakon letter automatically.
PAGE 55 OF 151
MENU DESCRIPTION
Then a little bit later the display will change to the Speakon pinout.
Then a blank display is inserted, and the first display (routing to “PS10R2”) is displayed
again.
Now another example using the setup PS10R2 (2-4) and LS600 (1-3). In that case, the
main and the sub are supposed to share the same speakon cable. The ‘Input Patch’ sub
menu in the “Options” of the NXAMP will then display the following:
Note that the position of the text shows that output speakon A (1rst column) and output
speakon C (3rd column) should be used for connecting the LS600. This is confirmed in the
next display.
PAGE 56 OF 151
MENU DESCRIPTION
It is followed by the output pinout display.
Then a blank display appears to display clearly the limit between the two speakers’
parameters.
Now the display of the second speaker connected to these output speakon can start:
PAGE 57 OF 151
MENU DESCRIPTION
And the loop can start again.
NB: The ‘classical’ PS10R2 + LS600 setup also available allow using independent cable for
each output if needed (Speakon A and B for 2 x LS600 and Speakon C and D for 2 x
PS10R2).
This was for displaying the routing for each channel. The user can edit the input patch for
each channel simply depressing the select channel in front of the corresponding speakon.
For example, going back to the 4 x PS10R2 setup, depressing the ‘Select 2’ button will
edit the input patched on the output speakon B
Turning the encoder allows now to adjust the input patched on this channel (PS10R2)
going to that output (Speakon B). The bottom line of the display is still displaying
alternatively the speaker name (PS10R2) the concern speakon (Out B) and the pinout
(2+/2-).
Once the desired input channel is selected (from A to D for analog input on XLR A to analog
input on XLR B, and from E to H for digital input from the expansion slot, if an extension
PAGE 58 OF 151
MENU DESCRIPTION
card with digital inputs is used) the user can press the button B to go to the next input
channel to be patched on this Output, or go back to the previous ‘Routing display’ menu by
depressing the button 2 again (this will validate the selected input effectively).
Any combination of input can be patched on each output. Be careful when patching both
analog and digital input together to one channel: It is very unlikely that the two signals can
be in phase. We recommend using this solution only for analog backup of digital network,
meaning that only digital or analog inputs will be used at a time.
Save/recall user setups
User setups contain all the settings of the NXAMP Powered TDcontroller, so you can
consider that a user setup is a snapshot of the amplifier state. To access the Save/recall
menu, go to the Option menu, and select the sub-menu 3. Save/Recall (see above).
On the center of the screen will be displayed the various setups with the setups name. On
each side you can select either ‘Save’ or ‘Recall’ function.
To save a user setup select the memory block you want to use (there are 32 different
PAGE 59 OF 151
MENU DESCRIPTION
memory blocks) by turning the wheel till the chosen memory block appears on the top line
of the LCD screen. Then press the ‘Select 1’ button (for “Save”). Anytime you can exit this
menu by depressing the A button (for “Back”).
Once the button “Save” has been pressed, you will be requested to enter the name for that
user setup (default name is USERSET followed by the setup number). Starting from the
first character, turn the wheel to choose a letter, and then depress the ‘Select 4’ (for
“Next”) button to go to the next letter. Depressing button ‘Select 1’ (for “Prev”) will go
back to the previous character. When the last letter has been reached, press the “B” button
again to actually save the setup. A confirmation message will be displayed on screen.
To recall a user setup select the memory block you want to use by turning the wheel till the
chosen memory block appears on the top line of the LCD screen. Then press the ‘Select 4’
button (for “Recall”). Anytime you can exit this menu by depressing the A button (for
“Back”).
Once the button “Recall” has been pressed, a confirmation step is added. Choose “Yes” to
go on with recalling (this is button ‘Select 4’), or “No” to go back to the previous screen.
PAGE 60 OF 151
MENU DESCRIPTION
If the selected user setup is recalling a different speaker setup that the one currently in
use, another confirmation message will be displayed. Choose “Yes” to go on with recalling
(this is button ‘Select 4’), or “No” to go back to the previous screen.
At the end of the recall, the default display is shown on the LCD screen.
Security
The menu allows locking the local control or the remote control of the NXAMP. To access
the Security menu, go to the Option menu, and select the sub-menu 4. Security (see
above).
When the local controls are LOCKED, the user can navigate into the menus but cannot
change settings of the unit. However, the MUTE buttons are still working. This feature is
enabled through a password that the user can choose (8 letters).
The default password is NEXONEXO.
When the remote controls are LOCKED, the user can monitor the unit but cannot change
settings through the network. However, the MUTE buttons are still working. This feature is
enabled through the same password. When this menu is entered, the following display will
appear:
PAGE 61 OF 151
MENU DESCRIPTION
Local :
FREE
Remote :
FREE
Control
To change either the local or the remote control access, press the corresponding ‘Select 2’
(for local control) or ‘Select 4’ (for remote control) button. If the password has not been
entered yet, it will be asked now.
Prev
Password ?
A_______
Control
Next
If the wrong password is entered, it will be displayed and you can then only go back to
previous menu, which will be still in read-only. If the good password is entered, you then
either go back and edit the previous menu (press ‘Select 4’), or change the current
password (press ‘Select 1’). In this last situation, you will need to enter the new
password.
Password Ok
Change
Back
In the previous menu, you can then press the ‘Select 2’ or ‘Select 4’ buttons and toggle
the Local or Remote access between FREE or LOCKED. If you leave this menu and come
back to this security menu later on, you will need to enter the password again.
GPIO Mode
To access the GPIO Mode menu, go to the Option menu, and select the sub-menu 5.GPIO
mode (see above).
As a reminder, the pinout of the GPIO on the DB-25 connector is given bellow:
PAGE 62 OF 151
MENU DESCRIPTION
This menu allows choosing the way the GPIO are handled by the NXAMP Powered
TDcontroller. There are currently 5 modes of GPIO which are described bellow.
To change the current GPIO mode, press Edit (‘Select 4’ button) and turn the wheel up or
down to the selected GPIO mode. Once done, press OK (‘Select 4’ button) to validate your
choice.
GPIO is set to MODE 0
GPIO
Edit
To put a GPI pin in the ‘High’ state, connect it to one of the ‘+5 Volts’ output on the GPIO
DB-25 connector. See above in the user manual for proper pin-out. When nothing is
connected to a GPI, the state is ‘Low’ (internal pull-down). A switch can be directly
connected to this input, but if a GPIO output of another device should be connected, it is
mandatory to ensure a galvanic insulation between the two devices. Only direct connection
is authorized between NXAMP when they are located in the same rack.
GPIO mode 0 (Default mode / DMU mode)
In this default mode the GPIO port can be used with a NEXO DMU unit. See further in this
manual for more details about DMU set up.
GPIO mode 1 (Basic remote control mode)
This mode is intended to be used with permanently ‘High’ or ‘Low’ state signals. There is an
action depending on the state of each GPI. A state is validated when the state of the pin
has changed and is stable for 1 second. Here is the detail:
PAGE 63 OF 151
MENU DESCRIPTION
Pin Name
In/Out
Meaning when set to 0
(Default)
Meaning when set to 1
GPInput 1
In
CH 1 unmuted
CH 1 muted
GPInput 2
In
CH 2 unmuted
CH 2 muted
GPInput 3
In
CH 3 unmuted
CH 3 muted
GPInput 4
In
CH 4 unmuted
CH 4 muted
GPInput 5
In
NXAMP is ON
NXAMP is in Stand-by
GPOutput 1
Out
CH 1 no current out
CH 1 current out
GPOutput 2
Out
CH 2 no current out
CH 2 current out
GPOutput 3
Out
CH 3 no current out
CH 3 current out
GPOutput 4
Out
CH 4 no current out
CH 4 current out
GPOutput 5
Out
CH 1 no clip/protect
CH 1 clip or protect
GPOutput 6
Out
CH 2 no clip/protect
CH 2 clip or protect
GPOutput 7
Out
CH 3 no clip/protect
CH 3 clip or protect
GPOutput 8
Out
CH 4 no clip/protect
CH 4 clip or protect
If GPInput1 is ‘High’, Channel 1 will be muted. If GPInput1 is ‘Low’, Channel 1 will be
unmuted. Front Panel mute/Unmute is still working.
If GPInput2 is ‘High’, Channel 2 will be muted. If GPInput2 is ‘Low’, Channel 2 will be
unmuted. Front Panel mute/Unmute is still working.
If GPInput3 is ‘High’, Channel 3 will be muted. If GPInput3 is ‘Low’, Channel 3 will be
unmuted. Front Panel mute/Unmute is still working.
If GPInput4 is ‘High’, Channel 4 will be muted. If GPInput4 is ‘Low’, Channel 4 will be
unmuted. Front Panel mute/Unmute is still working.
If GPInput5 is ‘High’, Amplifier will go to Stand-by mode. If GPinput5 is ‘Low’, Amplifier will
go back to running mode.
GPOutput1 to 4 reflects the "Signal" LED on the front panel (meaning current flowing on
the output). It will be possible to select a threshold in a next release (a Pilot Tone
generator will be implemented also). The GPOutput5 to 8 reflects the "Protect" OR the
"Peak" signal for each channel.
GPIO mode 2 (Installer mode)
This mode is intended to be used with permanently ‘High’ or ‘Low’ state signals. A state is
validated when the state of the pin has changed and is stable for 1 second. There is an
action depending on the state of each GPI. Here is the detail:
PAGE 64 OF 151
MENU DESCRIPTION
Pin Name
In/Out
Meaning when set to 0
(Default)
Meaning when set to 1
GPInput 1
In
Power amp can start
Do not start power amp
GPInput 2
In
Analog input unmuted
Analog input muted
GPInput 3
In
Digital input muted
Digital input unmuted
GPInput 4
In
Scene 1 is recalled
Scene 2 is recalled
GPInput 5
In
NXAMP is ON
NXAMP is in Stand-by
GPOutput 1
Out
Power amp has started
Power amp not started
GPOutput 2
Out
Reflects the GPInput 2 status
GPOutput 3
Out
Reflects the GPInput 3 status
GPOutput 4
Out
Reflects the GPInput 4 status
GPOutput 5
Out
CH 1 no current out
CH 1 current out
GPOutput 6
Out
CH 2 no current out
CH 2 current out
GPOutput 7
Out
CH 3 no current out
CH 3 current out
GPOutput 8
Out
CH 4 no current out
CH 4 current out
When starting, if GPIO is set to mode 2, the NXAMP will wait that its GPInput1 pin goes
‘Low’ to start the amplifier part (big power supplies). Once started, it will put its GPOutput1
pin ‘Low’ also, so several amplifiers can be linked together.
If GPInput2 is ‘High’, the analog inputs will be muted. If GPinput2 is ‘Low’, the analog
inputs will be unmuted.
If GPInput3 is ‘High’, the digital inputs will be unmuted. If GPinput3 is ‘Low’, the digital
inputs will be muted.
If GPInput4 is ‘High’, Saved Scene number 2 will be recalled. IF GPInput 4 is ‘Low’, Saved
Scene number 1 will be recalled. Warning: Any setup can be recalled, regardless of the
loudspeaker family.
If GPInput5 is ‘High’, Amplifier will go to Stand-by mode. If GPinput5 is ‘Low’, Amplifier will
go back to running mode.
GPOutput1 has been described above.
GPOutput2 reflects the GPInput2 (with a small delay and without glitches).
GPOutput3 reflects the GPInput3 (with a small delay and without glitches).
GPOutput4 reflects the GPInput4 (with a small delay and without glitches).
GPOutput5 to 8 reflects the "Signal" LED on the front panel (meaning current flowing on
the output). It will be possible to select a threshold in a next release (a Pilot Tone
generator will be implemented also).
PAGE 65 OF 151
MENU DESCRIPTION
GPIO mode 3 (CP4SW simple remote mode)
This mode is intended to be used with momentary ‘High’ signals (like push buttons). It is
recommended to use the Yamaha CP4SW remote control panel for DME. Connect the
button 1 to 4 to the GPI 1 to 4, and each LED to GPO 1 to 4. Here is the detail:
Pin Name
In/Out
On each Impulse (From 0 to 1 and back to 0)
GPInput 1
In
Going to ON or to Stand-by mode
GPInput 2
In
One step of volume increase
GPInput 3
In
Mute/Attenuate or Unmute all channels
GPInput 4
In
One step of volume decrease
Pin Name
In/Out
Meaning when set to 0
(Default)
Meaning when set to 1
Attenuate mode
GPInput 5
In
Mute mode
GPOutput 1
Out
Blink if NXAMP in Stand-by, 1 if NXAMP ON.
GPOutput 2
Out
Max vol. not reached
Max vol. reached
GPOutput 3
Out
No Mute/Attenuation
Mute or Att. Is ON
GPOutput 4
Out
Min vol. not reached
Min vol. reached
GPOutput 5
Out
GPInput 1 impulse out to other amp
GPOutput 6
Out
GPInput 2 impulse out to other amp
GPOutput 7
Out
GPInput 3 impulse out to other amp
GPOutput 8
Out
GPInput 4 impulse out to other amp
When an impulse of at least 3 seconds is detected on GPInput1, amplifier will go from ON
to Stand-by state or from Stand-by to ON state.
When an impulse is detected on GPInput2, the volume of all channels is increased by one
volume step (see volume menu for steps values).
When an impulse is detected on GPInput3, all the channels are muted/attenuated
(depending on GPInput 5 status) or Unmuted. Front panel mute is still working.
When an impulse is detected on GPInput4, the volume of all channels is decreased by one
volume step (see volume menu for steps values).
When GPInput5 is set to 0, the Mute/Attenuator function of the GPInput 4 is set Mute
mode. When GPInput5 is set to 1, the mode is set to Attenuate (attenuation is roughly 20
dB).
GPOutput1 is blinking when the amplifier is in stand-by, and ON if the amplifier is running.
GPOutput2 is blinking each time an increase volume command is received, and is ON when
volume is set to max.
GPOutput3 is ON when all channels are muted, OFF in other situations.
PAGE 66 OF 151
MENU DESCRIPTION
GPOutput4 is blinking each time a decrease volume command is received, and is ON when
volume is set to min.
GPOutput5 reflects the GPInput1 (with a small delay and without glitches).
GPOutput6 reflects the GPInput2 (with a small delay and without glitches).
GPOutput7 reflects the GPInput3 (with a small delay and without glitches).
GPOutput8 reflects the GPInput4 (with a small delay and without glitches).
GPIO mode 4 (CP4SW setup switcher mode)
This mode is intended to be used with momentary "High" signals (like push buttons). It is
recommended to use the Yamaha CP4SW remote control panel for DME. Connect the
button 1 to 4 to the GPI 1 to 4, and each LED to GPO 1 to 4. Here is the detail:
Pin Name
In/Out
On each Impulse (From 0 to 1 and back to 0)
GPInput 1
In
Select scene 1
GPInput 2
In
Select scene 2
GPInput 3
In
Select scene 3
GPInput 4
In
Select scene 4
GPInput 5
In
Unused
Pin Name
In/Out
Meaning when set to 0
(Default)
Meaning when set to 1
GPOutput 1
Out
Scene 1 not in use
Scene 1 in use
GPOutput 2
Out
Scene 2 not in use
Scene 2 in use
GPOutput 3
Out
Scene 3 not in use
Scene 3 in use
GPOutput 4
Out
Scene 4 not in use
Scene 4 in use
GPOutput 5
Out
GPInput 1 impulse out to other amp
GPOutput 6
Out
GPInput 2 impulse out to other amp
GPOutput 7
Out
GPInput 3 impulse out to other amp
GPOutput 8
Out
GPInput 4 impulse out to other amp
When an impulse is detected on GPInput1, User setup 1 is recalled. Warning: Any setup
can be recalled, regardless of the loudspeaker family.
When an impulse is detected on GPInput2, User setup 2 is recalled. Warning: Any setup
can be recalled, regardless of the loudspeaker family.
When an impulse is detected on GPInput3, User setup 3 is recalled. Warning: Any setup
can be recalled, regardless of the loudspeaker family.
When an impulse is detected on GPInput4, User setup 4 is recalled. Warning: Any setup
can be recalled, regardless of the loudspeaker family.
PAGE 67 OF 151
MENU DESCRIPTION
GPOutput1 is ON when setup 1 has been recalled.
GPOutput2 is ON when setup 2 has been recalled.
GPOutput3 is ON when setup 3 has been recalled.
GPOutput4 is ON when setup 4 has been recalled.
GPOutput5 reflects the GPInput1 (with a small delay and without glitches).
GPOutput6 reflects the GPInput2 (with a small delay and without glitches).
GPOutput7 reflects the GPInput3 (with a small delay and without glitches).
GPOutput8 reflects the GPInput4 (with a small delay and without glitches).
Warning: If a setting is changed on the NXAMP unit (through front panel or remote
control), the LED will not turn off, and if the corresponding button is pressed again, the
originally saved setup will be recalled.
GPIO mode 5 (Loudspeaker Impedance monitoring)
This mode is used for outputting the status of the loudspeaker impedance monitoring
system integrated into the NXAMP on the GPIO port. You will need to set up the Load
Monitoring in the Options => Load Monitor menu to use this function properly.
Pin Name
In/Out
Meaning when set to 0
(Default)
Meaning when set to 1
GPInput 1
In
CH 1 unmuted
CH 1 muted
GPInput 2
In
CH 2 unmuted
CH 2 muted
GPInput 3
In
CH 3 unmuted
CH 3 muted
GPInput 4
In
CH 4 unmuted
CH 4 muted
GPInput 5
In
NXAMP is ON
NXAMP is in Stand-by
GPOutput 1
Out
CH 1 is not ok
CH 1 Impedance is OK
GPOutput 2
Out
CH 2 is not ok
CH 2 Impedance is OK
GPOutput 3
Out
CH 3 is not ok
CH 3 Impedance is OK
GPOutput 4
Out
CH 4 is not ok
CH 4 Impedance is OK
GPOutput 5
Out
Not All channels are ok
All Impedance are OK
GPOutput 6
Out
Not all amplifiers are ok
All amplifiers are OK
GPOutput 7
Out
Unused
Unused
GPOutput 8
Out
Unused
Unused
If GPInput1 is ‘High’, Channel 1 will be muted. If GPInput1 is ‘Low’, Channel 1 will be
unmuted. Front Panel mute/Unmute is still working.
PAGE 68 OF 151
MENU DESCRIPTION
If GPInput2 is ‘High’, Channel 2 will be muted. If GPInput2 is ‘Low’, Channel 2 will be
unmuted. Front Panel mute/Unmute is still working.
If GPInput3 is ‘High’, Channel 3 will be muted. If GPInput3 is ‘Low’, Channel 3 will be
unmuted. Front Panel mute/Unmute is still working.
If GPInput4 is ‘High’, Channel 4 will be muted. If GPInput4 is ‘Low’, Channel 4 will be
unmuted. Front Panel mute/Unmute is still working.
If GPInput5 is ‘High’, Amplifier will go to Stand-by mode. If GPinput5 is ‘Low’, Amplifier will
go back to running mode.
GPOutput1 is ‘High’ only if CH1 amplifier reports no fault AND the NXAMP is able to
measure the impedance of the speaker(s) connected to CH1 AND this impedance is
between the high and low impedance limits set up by the user (see Load monitoring
menu).
GPOutput2 is ‘High’ only if CH2 amplifier reports no fault AND the NXAMP is able to
measure the impedance of the speaker(s) connected to CH2 AND this impedance is
between the high and low impedance limits set up by the user (see Load monitoring
menu).
GPOutput3 is ‘High’ only if CH3 amplifier reports no fault AND the NXAMP is able to
measure the impedance of the speaker(s) connected to CH3 AND this impedance is
between the high and low impedance limits set up by the user (see Load monitoring
menu).
GPOutput4 is ‘High’ only if CH4 amplifier reports no fault AND the NXAMP is able to
measure the impedance of the speaker(s) connected to CH4 AND this impedance is
between the high and low impedance limits set up by the user (see Load monitoring
menu).
GPOutput5 is ‘High’ only if amplifiers of each channel reports no fault AND the NXAMP is
able to measure the impedance of the speaker(s) connected on all outputs AND these
impedance are between the high and low impedance limits set up by the user (see Load
monitoring menu).
GPOutput6 is ‘High’ only if amplifiers of each channel reports no fault (useful to monitor
amp status only if loudspeaker impedance monitoring is not used).
GPOutput7 and GPOutput8 are not used.
Load Monitor
This menu allows setting up the NXAMP impedance monitoring function, which allows to
report (through its GPIO port of through the Ethersound network) if the speakers are
correctly connected to the amplifier and ready to be used. This is particularly useful for
safety installations where the status of the connected speakers should always be known,
and any default in the audio chain should be reported.
PAGE 69 OF 151
MENU DESCRIPTION
There is two way of using the load monitor function:
1) Either the NXAMP uses the internal HF burst generator and measure the impedance of
the connected speakers for each channel at this frequency.
2) The NXAMP internal HF burst generator is OFF and the audio program sent to the
NXAMP contains a HF pilot tone; the impedance of the speakers can still be monitored
at the pilot tone frequency.
Thanks to the 24 bits 48 KHz current and voltage sense circuitry only a small HF burst
voltage is needed in most of the case (typically 1 volt).
To access the Load Monitor menu, go to the “OPTION” menu, and select the sub-menu 6.
Load Monitor. The following display will then appear.
7
1
2
3
4
5
6
You can see several zones in grey on the picture above. Here are the details for these
zones:
(1) Internal HF burst generator / External Pilot Tone frequency
Here you can adjust the frequency where the impedance measurement will be done for the
speaker(s) connected to the channel selected in the zone 6. The frequency is adjustable
from 14500 to 21100 Hz, in 1/12 octave steps. Most of the time, there is no need to
change this frequency if internal burst generator is ON.
If external pilot tone is used (from the audio program sent to the NXAMP on its analog or
digital inputs), be sure that the frequency selected here is as close as possible to the
frequency of the pilot tone.
(2) Internal HF burst generator level
The level of the internal HF burst generator can be adjusted here.
If the load monitoring function is not needed, or if external pilot tone is used, set the level
to OFF.
PAGE 70 OF 151
MENU DESCRIPTION
If the user wants to use the internal HF burst generator for impedance monitoring, then set
the level to the desired voltage between 0.5 and 5 volts. This voltage is intended at the
output of the NXAMP speakon connectors for the channel selected in zone 6, when all
settings are set to default position, with a FLAT setup, except the volume set to 0 dB
attenuation. The true output voltage can be slightly different depending on selected
speaker setup and user settings, but this does not affect the performance of the load
monitoring system.
Set the level to 1 volt is a good start, then adjust the output level to have a stable reading
of the impedance in the zone 7 of the display. Long speaker cable and high impedance
speaker(s) connected might need a higher output voltage. A too big output voltage can
lead to sub harmonic generation that can be audible at the speaker output.
(3) and (4) Impedance low and high limits
Once the measured impedance is display in the Zone 7, you can select low and high limits
that will trigger the fault report on the GPIO port of the NXAMP of on the Ethersound™
network.
To report the impedance fault on the GPIO port, set the GPIO to mode 5 (see above). To
report the impedance fault on the Ethersound™ network, dedicated hardware (like Auvitran
AVNF49-ES) or software should be used. Please contact us for further details on this.
These limits in zone 3 and 4 should be adjusted with care; External parameters such as
cable type and length, temperature, wind and output level can slightly change the
speaker’s impedance measurement.
Be sure to adjust these limits on site in real life conditions to prevent false triggering of the
impedance fault.
(5) Back to previous menu
Use the A button to go back to previous menu (“Options”).
(6) Selected Channel
Use the B button to select the channel currently affected by the settings of the zone 1, 2, 3
and 4.
(7) Measured impedance
The measured impedance of the channel selected in zone 6 is displayed here. The display is
one of the following:
1) If the NXAMP is unable to measure the impedance of the speaker (for example channel
is muted or no speaker connected, or no pilot tone at the selected frequency), “Z= ??
Ω” will be displayed (like on the picture above).
2) If the impedance of the connected load is between 0 and 100 Ohm at the
measurement frequency, the actual value of the impedance will be displayed, for
example “Z=17.3 Ω”.
PAGE 71 OF 151
MENU DESCRIPTION
3) If the impedance of the connected load is above 100 Ohm, “Z>100 Ω” will be
displayed.
Miscellaneous
This menu will allow tweaking different small options available in the NXAMP Powered
TDcontroller. In LOAD3_23, it allows to:
• Change the delay unit
• Set up the Dante™ ID when a NXDT104 card is fitted.
• Change the automatic patching of output speakon
• Setup the Analog Fallback mode
• Enable the relay mute
Bellow is a picture of this menu.
The sub-menu located on the top of the screen will blink. Depressing ‘Select’ of channel 4
will enter this sub-menu (“OK” is displayed on the screen align with “select” 4 button).
Delay Unit
This sub menu allows changing the way the delay is displayed on the front panel of the
NXAMP.
To change the current delay unit, press Edit (‘Select 4’ button) and turn the wheel up or
down to the selected unit. The available options are milliseconds (ms), meters (m) or
inches (’). Once done, press OK (‘Select 4’ button) to validate you choice.
PAGE 72 OF 151
MENU DESCRIPTION
Dante Id
This sub menu allows changing the Dante™ ID of the NXAMP. This menu is accessible only
when a NXDT104 card is fitted into the expansion slot of the NXAMP.
The Dante Id is used to easily address a device on a Dante™ network when used in
conjunction with other Yamaha compatible equipment. The Dante™ Id is always
represented with a “Y” followed by four hexadecimal numbers the range is from Y000 to
YFFF, and the default Dante™ Id is Y001.
To change the Dante™ Id, press Edit (‘Select 4’ button) and turn the wheel up or down to
change the highest digit of the address. The “Y” part of the Dante™ Id cannot be edited.
Then press OK (‘Select 4’ button) to go to next digit, and do the same.
If a NXDT104 card is fitted into the NXAMP, The Dante Id will be displayed on the default
screen of the unit like shown bellow.
Y001
~
0. FLAT - NO PROTN.
[4 ch amplifier]
~
Output Mode
By default output mode is set to “Dynamic” it means that if two speakers with output on
Speakon 4 poles, 2+/2- pins, are set up on two adjacent speakon, the controller will
automatically cross the amplifier outputs to have the channel 1 outputting on Speakon A
and channel 2 outputting Speakon B an so on.
PAGE 73 OF 151
MENU DESCRIPTION
Example of 2 x PS output routing in “Dynamic” mode
This could be a problem when using proprietary patch panel foreseen to be used with CH1
always outputting on Speakon A (1+/1-) and Speakon B (2+/2-). In this case, this menu
enables to go back to “Static” output mode, as you can see in the picture bellow (whatever
the speaker setup is).
Output routing in “Static” mode
Note that if both adjacent speakers does not output on 2+/2- this setting has no influence,
as output mode will always be like the “Static” one.
To change the Output Routing mode, press Edit (‘Select 4’ button) and turn the wheel up
or down to change the mode to ‘Static’ or ‘Dynamic’. Then press OK (‘Select 4’ button) to
save the settings.
WARNING! This setting is applied only after recalling a speaker setup or restarting.
Analog Fallback
Analog Fallback is intended to provide analog audio redundancy of the digital audio inputs.
It works with both NXDT104 (Dante™) and NXES104 (Ethersound™) digital input cards.
WARNING! NXDT104 should run with firmware 1C02 or above to provide this
functionality.
This function works by muting the analog inputs while the audio network is OK (see below
for details). If the audio network fails, the analog inputs are automatically unmuted. If the
audio network comes back, then the analog inputs are muted again.
PAGE 74 OF 151
MENU DESCRIPTION
NB: All analog and digital inputs are still available for NXAMP input patching when Analog
Fallback is used. But analog inputs will be muted if audio network is running.
When used with NXES104
The Ethersound™ network should be in star configuration for the Analog Fallback to
work properly. It does not work in daisy chain configuration (except for simple network
like one mixer to one receiver). It does not work with ASIO input either.
The detection is based on a valid Ethersound™ stream on the IN port of the NXES104.
If a valid Ethersound™ stream is detected, the analog inputs will be muted, else they
will be unmuted.
A typical example network is shown bellow:
As long as the Ethersound™ link between the Mixer output and the NXAMP inputs is
running, the analog inputs will be muted and the patched digital inputs will be used as
audio source for all channels.
If the Ethersound™ link is broken, the analog inputs will be unmuted and the patched
ones will be used as audio sources for all channels.
When used with NXDT104
Detection of a valid audio network when using NXDT104 is quite different. The ‘validity’
of the network uses audio subscription.
It means that the NXDT104 is checking if audio packets from the patched Dante™
PAGE 75 OF 151
MENU DESCRIPTION
Transmitter(s) are received correctly. If the network fails somewhere (cable removed,
switch configuration problem, or transmitter is switch off for example), the analog input
will be unmuted even if the NXAMP is still connected to the network and remote control
is working for example.
A typical example network is shown bellow:
If, for example, the NXAMP 2 does not receive the audio packets from the subscribed
source (here the mixer) then it will unmute the analog inputs, as shown bellow.
The name of the subscribed transmitter(s) can be checked into the Dante™ Controller,
“Device view”. On the bellow picture, we can see for example that the NXAMP with the
name “Y014-NEXO-NXAMP4x4-062c60” has subscribed to channel 01, 02, 03 and 04
from the Dante™ device named “NEXO-PC” (a computer running the Dante™ Virtual
Soundcard software).
NB: The NXDT104 can subscribe up to four different channels from four different
Dante™ transmitters.
PAGE 76 OF 151
MENU DESCRIPTION
If the Analog fallback mode is ON, and the audio from network (Ethersound™ or Dante™)
is missing, the NXAMP will display the following message periodically.
To change the Analog fallback mode, go to ‘Options’ menu, then select Miscellaneous, and
choose ‘Ana Fallback’. You will then have the following display:
Press Edit (‘Select 4’ button) and turn the wheel up or down to change the mode to ‘ON’
or ‘OFF’. Then press OK (‘Select 4’ button) to save the settings.
NB: If Analog fallback is ON, when entering the ‘Input Patch’ menu, a warning reminds you
that analog input, even patched, will be muted until network audio fails.
NB: At the time of writing there is no way to set up or visualize this option through AVSESmonitor yet.
PAGE 77 OF 151
MENU DESCRIPTION
Relay Mute
This option allows disconnecting the power amplifier input from the control board, thus
minimizing the output noise when NXAMP is muted.
NB: We recommend using this option only in application where extremely low output noise
while muted is needed to preserve amplifier small signal relay life.
Press Edit (‘Select 4’ button) and turn the wheel up or down to change the mode to ‘ON’
or ‘OFF’. Then press OK (‘Select 4’ button) to save the settings. The change is immediate.
PAGE 78 OF 151
INSTALLATION RECOMMENDATIONS
Installation Recommendations
Audio Chain Recommendations
About « Loudspeaker Management Devices »
The NXAMP’s factory delay presets are optimised to provide the best possible crossover
between the MAIN SYSTEM and SUB systems.
Optimum results are always obtained for strictly identical signals feeding
simultaneously all the NEXO NXAMP Digital TDcontrollers.
Typically, this signal is delivered by the stereo bus output of a parametric/graphic stereo
equalizer, which is fed by the stereo output of the mixing console.
Inserting devices such as “loudspeaker management controllers” that modify the
phase relationship between SUB’s NXAMP and MAIN SYSTEM’s NXAMP inputs will
lead to unpredictable results, and will severely damage the final result. NEXO
strongly recommends avoiding use of such devices.
N.B.: Do not use NEXO’s TDcontrollers (Analog or Digital) to feed the inputs of the NXAMP
as this processing is already included inside the NXAMP.
Operating SUB’s fed through an Aux Output
If the SUB’s are to be operated through a different output than the main system, NEXO
strongly recommends that:
• The audio chain is strictly identical for SUB’s and MAIN SYSTEM’s mixing board
outputs (same devices with same settings).
• Phase relation between the two feeds is aligned with proper measurement tools
(Easera SystuneTM, SpectralabTM or WinMLSTM).
Operation of Multiple Powered TDcontrollers
Some MAIN SYSTEM/SUB systems require a minimum of two NXAMP’s per side (one for
MAIN SYSTEM’s, another for the SUB’s). Eventually, two or more NXAMP’s will operate
within the same MAIN SYSTEM cluster. It is mandatory to verify the consistency of the
setups and adjustment between processors to avoid the problems described below.
When using multiple NXAMP’s in a single array, all parameters should be
identical and set to proper values.
System alignment
For a given measurement microphone or listening position, the reference point for this
adjustment is the closest point of each array (SUB and Main System) to the given position
PAGE 79 OF 151
INSTALLATION RECOMMENDATIONS
(see example below)
We recommend that the system is adjusted so that arrivals from MAIN SYSTEM array and
SUB speakers are coincident at a fairly distant listening position (typically further than the
mixing position).
Geometrical alignment
In the example below, r1 being the smaller distance from MAIN SYSTEM array to listener
position, and r2 being the smaller distance from SUB to listener position, the distance
difference is then r1–r2 (specified meters or feet).
• r1 > r2, the delay should be set on the SUB NXAMP Powered TDcontroller(s).
• r1 < r2, the delay should be set on the MAIN SYSTEM NXAMP Powered
TDcontroller(s)
To convert the result in time delay (specified in seconds), apply:
∆t = (r1-r2)/C r1 and r2 in meters, C (sound speed) ≈ 343 m/S.
The delay parameter is set in MENU “Delay” (See above).
r1
750 mm
[29.53"]
750 mm
[29.53"]
750 mm
[29.53"]
750 mm
[29.53"]
750 mm
[29.53"]
750 mm
[29.53"]
1200 mm
[47.24"]
r2
1200 mm
[47.24"]
However, it is a safe practice to double-check geometrical alignment with a proper
acoustical measurement tool.
1200 mm
[47.24"]
Measuring and aligning phase in the overlapping region
Microphone must be set on the ground, at a fairly distant listening position (typically
further than the mixing position).
Phase must be measured with a wrapped display, and measurement must be properly
windowed on signal arriving time (same window for SUB and MAIN SYSTEM). When
measurement is synchronized to the system-microphone distance, phase can be clearly
PAGE 80 OF 151
INSTALLATION RECOMMENDATIONS
displayed in the low-frequency range.
If the MAIN SYSTEM phase reading appears to be superior to the SUB phase reading, then
MAIN SYSTEM will have to be delayed with a value close to the one given by the
geometrical alignment.
If SUB appears to be in advance to MAIN SYSTEM, then SUB will have to be delayed with a
value close to the one given by the geometrical alignment.
Phase alignment can be considered as correct when phase is coincident over the entire
overlapping range (typically an octave from 60 Hz to 120 Hz), and when the overall
response is always superior to SUB’s and MAIN SYSTEM’s individual response.
PAGE 81 OF 151
NXES104 EXPANSION BOARD, REMOTE CONTROL AND ASIO DRIVER
NXES104 expansion board, remote control and ASIO driver
On the back panel of the NXAMP Powered TDcontroller there is a slot where the user can
easily insert an expansion board to add digital inputs and remote control to the unit.
Since July 2009, all NXAMP4x1s and NXAMP4x4s are shipped with an expansion card fitted
in, the NX-DFLT card. This card prevents output noises when main AC power feeding
NXAMPs is brutally shutdown (ie power down at the end of the show before NXAMPs are
switched off). NX-DFLT card should always be fitted in when no other expansion card is
used.
The NXES104 is an expansion card for NXAMP, compatible with the Ethersound™ network
technology (in its ES100 version). This board offers 4 digital inputs chosen among the 2 x
64 Channels of 24 bits/ 48 KHz audio data of the Ethersound™ frame, and also remote
control of the unit through the PC based application ESmonitor™.
WARNING! Only 48 KHz Ethersound networks are supported.
Since NXES104 firmware 0x0D0D, an ASIO functionality is available: the user can stream
4 channels of 24bits/48 KHz audio from the network card of any Windows® based
computer to the NXAMP, directly connected or through a LAN.
NB: The firmware of the NXES104 is automatically updated when the firmware of the host
NXAMP is updated (see further in this manual).
NXES104 Physical description
The NXES104 is designed to fit the NEXO’s slot form factor that can be located on the back
panel of the NXAMP Powered TDcontrollers.
NB: This slot features an 80-pins internal connector that is not compatible with the Yamaha
mini-YGDAI slot.
4
PAGE 82 OF 151
3
2
1
NXES104 EXPANSION BOARD, REMOTE CONTROL AND ASIO DRIVER
(1) Ethersound™ IN Port
This port features and Ethercon® connector. Use this type of connector to secure your
Ethersound™ network from unwanted unplugs. This type of connector also ensures a
longer life to the internal RJ45 contacts, because it preserves it from external traction.
Use this port as an Ethersound™ IN port when connecting to an Ethersound™ network.
(2) Ethersound™ network Status LEDs
The two LEDs next to the IN port shows that data is received from the IN port (when the
top one, marked “Rx” blinks) or are send through the IN port (when the bottom one,
marked “Tx” blinks).
NB: When used with mono-directional Ethersound™ network, if no remote control
computer is connected, only the Rx LED of the IN port will blink.
The two LEDs next to the OUT port shows that data is received from the OUT port (when
the top one, marked “Rx” blinks) or are send through the OUT port (when the bottom one,
marked “Tx” blinks).
NB: When used with mono-directional Ethersound™ network, if no remote control
computer is connected, only the Tx LED of the OUT port will blink.
(3) Ethersound™ OUT Port
This Port features an Ethercon® connector. Use this type of connector to secure your
Ethersound™ network from unwanted unplugs. This type of connector also ensures a
longer life to the internal RJ45 contacts, because if preserves it from external traction.
Use this port as an Ethersound™ OUT port when connecting to an Ethersound™ network.
(4) Remote ES100 port
The ES100 is an upgrade of the original Ethersound™ standard. It offers new functionalities
but can also be downgraded to standard Ethersound™ network for compatibility with older
devices. See bellow for details.
This Remote ES100 port is a remote control port / ASIO input port that is designed to be
used with shared Ethernet LAN (i.e. not dedicated to Ethersound™). Connect the PC
computer(s) running ESmonitor™ and/or the ASIO streamer to this port.
WARNING! Do not use this port if your NXAMP Powered TDcontroller is used in an
Ethersound network with some non ES-100 devices.
On top of this plug you will find 2 LEDS: The left one (Link), means that the equipment is
PAGE 83 OF 151
NXES104 EXPANSION BOARD, REMOTE CONTROL AND ASIO DRIVER
connected, the right one (Activity) meaning that Ethernet frames are received.
Various Ethersound™ devices description
Here is a short reminder about various Ethersound™ devices.
Mono-directional, non ES100 devices
Simplest Ethersound™ devices are mono-directional, non ES100: These devices features
two ports (ES IN and ES OUT) and can be only connected to mono-directional networks
(64 channels of 24bits/48 KHz). Do not use them in a bidirectional part of an Ethersound
network or in a network where ES100 functions are used.
Bi-directional, non ES100 devices
More sophisticated Ethersound™ devices are bi-directional, non ES100. These devices
features two ports (ES IN and ES OUT) and can be connected to both mono and bidirectional networks (2 x 64 channels of 24 bits/48 KHz). Do not use them in a network
where ES100 functions are used.
NB: The NEXO NX242-ES4 Digital TDcontroller is a bi-directional, non ES100 device.
ES100 devices
These devices compatible with the ES100 variant of the Ethersound™ network are bidirectional devices (compatible with both mono and bi-directional networks) that offer new
functionalities (we called them the ES100 functions). Here is a list of the new ES100
functions:
• Device to device communication: With classical Ethersound implementation,
only the remote control computer can communicate with the various devices or the
network, and only audio data can be exchanged between devices. With ES100,
devices can send non-audio data between them without passing through the remote
control computer.
• Ring topology: Instead of the classical daisy-chain Ethersound™ network, you
can now connect the last OUT port of the network to the IN port of the primary
master, that has to be defined as the Preferred Primary Master through ESmonitor™
(every other device should be set as a loop back device). See ESmonitor™ User
Manual included with this software for details. Thus one of the network cables can fail
without any lost on the network integrity. To control the network, at least one of the
ES100 devices inside the network should have a “Remote ES100 port” (see bellow).
• 3rd communication port: Optionally, a 3rd Ethernet port can be added on the
ES100 device (this is the “Remote ES100 port” that you can find on the NXES104).
From this port you can take control over the connected device, but also over the
whole Ethersound™ network. To do so, connect a computer running the ESmonitor™
software, just like you were connecting to the IN port of the Primary Master device of
the network.
N.B.: You can easily recognize the ES100 devices thanks to this logo
PAGE 84 OF 151
NXES104 EXPANSION BOARD, REMOTE CONTROL AND ASIO DRIVER
ES100/spkr devices
The ES100/spkr implementation is a light implementation of the ES100 above: ES100/spkr
is compatible only with mono-directional Ethersound™ network, and can only extract a
maximum of four outputs.
Ethernet Additional hardware
Hubs
A hub (also known as repeater) is a central connection point for computers on a startopology-based network. Any data it receives is broadcasted to all ports, and then only the
computer that is ‘listening’ for the data actually receives and processes the transmission.
Hubs are the ‘unintelligent’ relatives of switches.
WARNING! Due to their internal architecture, repeater hubs MUST NOT be used in
Ethersound™ networks.
Switches
There are different types of switches, using different protocols that interact with other
protocols to provide all the necessary transmission services. The outline for implementing
protocols in altogether seven layers is defined in a worldwide ISO standard called OSI
(Open System Interconnection)
Layer 2 is the communication protocol that contains the physical address of a network
device. It is called the “data link layer” or “MAC (=Media Access Control) layer” and
contains the address inspected by a bridge or switch. Layer 2 processing is faster than
layer 3 processing, because less analysis of the frame is required. As the EtherSound
protocol contains exclusively layer 2 information, switches other than layer two must not
be used.
WARNING! Layer 3 and Layer 4 switches are not compatible with the
Ethersound™ networks. Only Layer 2 switches can be used.
These layer 2 switches can be either managed or unmanaged. Managed switches are
necessary to set up VLAN networks so that EtherSound can co-exist on a larger network
with other applications. Some switches provide functionalities of the so-called SPANNING
TREE PROTOCOL for inter-switch communication and network management. The
EtherSound protocol is NOT COMPATIBLE with the Spanning Tree Protocol (should be
disabled on manageable switches).
Wireless LAN
A local area network that transmits over the air typically (but not exclusively) in an
PAGE 85 OF 151
NXES104 EXPANSION BOARD, REMOTE CONTROL AND ASIO DRIVER
unlicensed frequency or, among others, infrared line of sight. Wireless access points (base
stations) are connected to an Ethernet hub or server and transmit a radio frequency that
can penetrate walls and other non-metal barriers. Roaming users can be handed off from
one access point to another like, for example, in a cellular phone system. Wireless LANs
are not suitable for EtherSound networks due to significant bandwidth limitations.
Ethernet cables
Cables used within the EtherSound network are straight cables. The cable used to connect
directly the remote control PC to the Primary Master or to any of the “Remote ES100 port”
is a crossover cable.
The following paragraphs describe the main twisted pair cable types used. Among them,
you will find descriptions of cables listed for reasons of completeness, but that are not
suited for EtherSound networks.
Level 5 cable supports transmission rates of up to 100Mbps (200Mbps in full-duplex),
CAT5e, even 1Gbps - is the most common today. Category 6 supports up to 10Gbps, for
CAT6 and CAT7 new standards are under development.
Horizontal (solid) cable and patch (stranded) cable
Both UTP (Unshielded Twisted Pair) and STP (Shielded Twisted Pair) come in stranded and
solid wire varieties. The stranded wire is the most common and is also very flexible for
bending around corners. Solid wire cable has less attenuation and can span longer
distances, but is less flexible than stranded wire and cannot be repeatedly bent (and
therefore not suitable for live applications). Following are the twisted pair categories.
Horizontal cable (also called solid cable) is made of plain copper conductors and has a low
characteristics shift with aging. It must be used for long runs of steady cabling (typically
the cables inside walls and ceiling).
Patch cable (also called stranded cable), more flexible, is made of stranded copper
conductors and has larger losses and characteristics shifts than horizontal cable. It can be
used for versatile termination between wall outlet and device, or between devices. These
cables are explicitly labeled “PATCH”. The TIA/EIA 568A wiring standard allows the use of
horizontal cable up to 90m (295ft) lengths with a maximum amount of 10m of patch cable
for both ends added together.
UTP, FTP (ScTP), STP, SFTP cables
UTP stands for Unshielded Twisted Pair. It is a cable type with one or more pairs of twisted
insulated copper conductors contained in a single sheath. It is the most common type of
cabling used in desktop communications applications.
FTP stands for Overall Foil Shielded Twisted Pair (ScTP for Screened Twisted Pair): Cable is
wrapped with an aluminized plastic foil). That kind of cabling is not recommended for
applications where the cable is repeatedly bent. The foil tends to break leading to severe
loss of performance over the distance.
PAGE 86 OF 151
NXES104 EXPANSION BOARD, REMOTE CONTROL AND ASIO DRIVER
WARNING! Do not use FTP cabling for live application.
STP stands for Shielded Twisted Pair: Screen is made of copper braid. SFTP stands for
Overall Braid + Foil Shielded Twisted Pair: Foil screen and braid shield. For all these cables,
transmission characteristics are the same. The difference is the behavior with respect to
electromagnetic interference. We recommend cabling that has a superior quality sleeve in
order to protect the cable. Ideally this sleeve should halogen free in order to comply for the
installation standards.
Bellow are cables seriously tested by Auvitran (see www.auvitran.com for information).
Manufacturer
Cable
Reference
TYPE
Max. length Max length
Specific comments on tested cables
without Error for reliability
BELDEN
786OE
FTP
130 m
110 m
Ruggedized Cat6 Cable, Shielded, AWG24
difficult to fit in standard RJ45 "male" plugs
(Blue)
BELDEN
1875GB
UTP
120 m
100 m
Flat smooth ruggedized Cat6 Cable, no
shield (White)
CAEGROUPE AudioLan
FTP
85 m
75 m
Really smooth ruggedized cat5e, Look like a
mic Cable, a little bit hard to mount on RJ45
at the beginning (Black)
CAEGROUPE AX CA23653
S-FTP 140m
120 m
Ruggedized Cat5e cable, really good for
exteriors, SFTP+One shield fold per pair
(Green)
CAEGROUPE Giga-Audio
S-FTP 140m
120 m
Ruggedized Cat5e cable, very good live
cable, SFTP+One shield fold per pair (Black)
DRAKA
799090
S-FTP 140 m
120 m
Really Ruggedized Cat5e cable, Does not fit
in standard RJ45 "male" plugs (0.22m2),
SFTP+One fold per pair (Black)
DRAKA
CT2672600
FTP
100 m
90 m
Ruggedized Cat5e cable (Black)
Harting
IP20 System
cables 4-pole
S-TP
100 m
100 m
Industrial Ethernet stranded cable.
KLOTZ
RC5 RAMCATS
S-TP
100 ohms
70 m
65 m
STP stranded AWG26
KLOTZ
RC5 SU
90 m
AWG24/1
LINK
Eurocable
UTP
Extraflex Cat5
75 m
Very smooth Ruggedized Cat5, Without any
shield so be careful with EMC problem
(Black)
LINK
Eurocable
S-FTP 123 m
Extraflex Cat5
105 m
Ruggedized Cat5 cable, very good live cable
(Black)
Neutrik
ZNK
CT2672601
S/FTP 90 m
80 m
Cat5E Cable, Shielded
Proplex
PCCAT5EP
-
97 m
85 m
Cat5E Cable, Shielded
Proplex
PCCAT5EPUTPP UTP
88 m
80 m
Cat5E Cable, No shield
U/UTP 100 m
85 m
PAGE 87 OF 151
NXES104 EXPANSION BOARD, REMOTE CONTROL AND ASIO DRIVER
Fiber Optic
Fiber Optic is similar to twisted pair but does not conduct electricity. It is used in situations
where a network may suffer from environmental conditions (e.g. lightning), such as in LAN
connections between buildings. Fiber optic is also very valuable where electronic emissions
or electro-magnetic interferences may have an impact on the network, e.g. on particular
factory floors. Furthermore, fiber optic cables and Ethernet standard allow for segments up
to two km(1.24mi) long (cf. thin coaxial • 185m(607ft), UTP • 100m(328ft)) and thus
permit to connect remote nodes and buildings that otherwise would not be accessible.
To use Fiber Optic cable in EtherSound networks, Media Converters or dedicated
Ethersound™ devices such as AVAVRed-ES100/FoNeutrik (EtherSound Redundant link with
2 multimode optical OptiCon Neutrik connectors) must be used.
Installation inside the NXAMP
To install the NXES104 card inside an NXAMP Powered TDcontroller, first remove the two
screws on each side of the NX-DLFT card on the rear of the amplifier. Keep these screws as
they will be used with the NXES104 card. Use a small screwdriver to slightly separate the
card from the NXAMP chassis, and remove it.
Slide the NXES104 board inside the rails, and push it firmly inside the NXAMP. Then put the
two screws back to fix the NXES104 on the rear panel of the NXAMP.
N.B.: Keep the NX-DFLT card in a safe place as you would need to put it back if you decide
to remove the NXES104 board for some reason. Do not use the NXAMP Powered
TDcontroller without any expansion board fitted.
NXAMP with NXES104 remote control and monitoring in ESmonitor™ software
ESmonitor™ software by Auvitran is a free PC based application running under Windows XP
and Windows Vista, permitting full control over an Ethersound™ or network. From this
software you have access to the routing of the network and to some specific control
depending on the device connected.
NEXO provides in each revision of the NXAMP firmware the last version of the ESmonitor™
software that has been successfully tested with this firmware. It is recommended to use
PAGE 88 OF 151
NXES104 EXPANSION BOARD, REMOTE CONTROL AND ASIO DRIVER
this specific version of the ESmonitor™ software.
Please refer to the ESmonitor™ User Manual provided by Auvitran as a pdf file when
installing the ESmonitor™ application on your computer. Once your Ethersound™ network
is completed, you can access to the control page of the NXAMP Powered TDcontroller.
Compatibility issues
The table bellow sum up the remote control possibilities with various version of NXAMP
firmware and ESmonitor™ software so far.
ESmonitor™
Revision
NXAMP
ESmonitor™
ESmonitor™
ESmonitor™
before v3.5
v3.5 to v3.7
v3.8 to v3.15.2
Limited control
Limited control
Revision
LOAD2_46 to
LOAD2_51
LOAD2_52 to
LOAD2_58
ESmonitor™
ESmonitor™
v3.15.13 to
v3.20.5 to
v3.20.0
v4.1.6(*)
Limited control
Limited control
Full control
No control
LOAD3_01 to
LOAD3_15
LOAD3_16 to
LOAD3_23
Limited control,
buggy vuemeters.
Full control
Full control
Limited control,
No custom setups
Limited control,
No Copy/Paste
(*) v4.1.6 being the last release version of ESmonitor™ at the time this document was
written.
The ES-monitor tree view
From the tree view in ESmonitor™ as shown in the picture bellow, you can (from
ESmonitor™ v3.20.5 and NXAMP with LOAD3_16) select NXAMP specific functions by rightclicking the NXAMP.
PAGE 89 OF 151
NXES104 EXPANSION BOARD, REMOTE CONTROL AND ASIO DRIVER
Copy settings allows to copy the current setting of a NXAMP to another NXAMP, or group of
NXAMP in the network. Select the target NXAMP or NXAMP group (see Group tab in the
tree view) and choose Paste settings.
Copy all scenes copy the content of all scenes stored in the NXAMP memories to another
NXAMP or group of NXAMP. Select the target and press Paste all scenes. This is usefull to
have same scenes for all NXAMP in the inventory.
The control page
If you are using AVS-ESmonitor™ v3.8 or above with NXAMP using LOAD previous
LOAD2_52, only the limited control page shown bellow will appear:
Here is now the full control page when using ESmonitor™ v4.1.6 and LOAD3_23.
PAGE 90 OF 151
NXES104 EXPANSION BOARD, REMOTE CONTROL AND ASIO DRIVER
1
2
3
4
5
6
7
8
9
10 11
12 13
14 15
16
17
18 19
20
21 22
23 24
(1) Virtual front panel
This virtual front panel is a copy of the NXAMP user interface. You can see the LCD display
and the front panel LEDs status. You can use all the push buttons and the encoder wheel
by clicking with your mouse or using its wheel.
(2) Input meters
Here you can see the input meters of the NXAMP. The channels A, B, C and D are the four
analog inputs of the unit (on XLR at the back) and the channels E, F, G and H are the four
Network inputs of the unit (through the NXES104 fitted into the expansion slot).
N.B.: Use one of the previous tabs (Net Patch or I/O patch) to select which Ethersound™
channel will be routed to the NXAMP inputs. See the ESmonitor™ user manual for details.
PAGE 91 OF 151
NXES104 EXPANSION BOARD, REMOTE CONTROL AND ASIO DRIVER
(3) Standby button
Pressing this button will put the NXAMP in standby mode: the large power supplies used by
the power amplifiers are turned off, and the controller is put in a low power mode. Once in
standby, the control page of the NXAMP in ESmonitor™ will become gray and all the
controls are non working.
To resume from standby mode, you can either press the standby button again in
ESmonitor™, or press the “B” button on the front panel for at least 5 seconds (till the load
revision appears again on the LCD screen).
(4) Delay Unit
Here you can choose the delay unit between millisecond, meters or feet by depressing the
corresponding radio button.
(5) Security Lock
This button allows locking the “Local” (hardware interface on the front panel) or the
“Remote” (through the ESmonitor™) buttons to prevent changing the settings on the
NXAMP. Both controls can be locked at the same time. Locking/unlocking can be set/unset
through ESmonitor™ or through the NXAMP front panel.
(6) Group
If you want to group several NXAMP into the same group, in order to apply same setting to
several unit use the “Set” button to add the current NXAMP to the group you wish.
o If no group exists so far, you will be prompt to enter a group name.
o If a group already exists, you will be redirected to the “Properties” page of the
NXAMP where you will be able to select a group.
PAGE 92 OF 151
NXES104 EXPANSION BOARD, REMOTE CONTROL AND ASIO DRIVER
Select the group you wish to put the NXAMP in. You can group NXAMP4x1 and NXAMP4x4
into the same group. One NXAMP can be part of several groups (for example you can do a
group with all units, and some smaller ones for specific applications).
The remote control page of the group can be accessed if you press the “Group” tab in the
left view of ESmonitor™. If you select a non empty group, you will be able to access the
remote control page of the group, like shown bellow:
Note that only some settings are accessible to the user, if then the user interface is the
same than for an individual NXAMP. On top of the output meters you can choose the
NXAMP of the group you wish to monitor the output meters.
If some settings are different between two units inside the same group, the corresponding
control will be displayed in RED. Once a control is changed in the group control page, the
settings will be applied to all units in the group.
(7) Channels name
This section shows the speaker selected for each channel, together with the chosen
crossover.
Clicking any of these names allows the user to select a new family, speaker, mode or
crossover for each output, thus building a custom setup. Note that some cabinets required
that two channels are linked (cardio speakers for example), thus the next channel will be
automatically recalled.
PAGE 93 OF 151
NXES104 EXPANSION BOARD, REMOTE CONTROL AND ASIO DRIVER
N.B.: Once a custom setup has been created, it can be stored into the NXAMP memory
using the “Scene” function (see bellow).
(8) Input Patch
For each channel, you can see eight buttons corresponding to the eight available inputs (4
analog, from A to D, and 4 digital, from E to H). Click on the button to patch or unpatch an
input. If the button is dark, it means that the input is patched, if not it is white.
N.B.: On some setups the input patch may be linked.
(9) Output meters
For each channel there are two output meters; the left one is showing the output voltage
(V), whether the right one is showing the output current (A).
(10) Mute button
Click on this button to mute or unmute individually a channel.
(11) Volume control
This button can set up the volume for each channel of the NXAMP. To adjust the volume
with this virtual pot, you can click and drag the button itself or use the mouse wheel while
you are on the virtual pot area or use the two small arrows bellow the virtual pot.
N.B.: On some setups the volume settings may be linked.
(12) Gain control
To adjust the gain on one channel, use the two arrows bellow the value display. You can
also simply goes onto this control and use the mouse wheel.
N.B.: On some setups the volume settings may be linked.
(13) Delay settings
Use the arrows bellow the text box to increase/decrease the delay settings for a channel.
N.B.: On some setups the delay settings may be linked.
PAGE 94 OF 151
NXES104 EXPANSION BOARD, REMOTE CONTROL AND ASIO DRIVER
(14) ArrayEQ settings
To adjust the ArrayEQ on one channel, use the arrows bellow the text box. You can also
simply go to this control by utilizing the mouse wheel.
N.B.: On some setups the ArrayEQ settings may be linked.
(15) Headroom settings
By using the arrows bellow the text box the Headroom value for one channel can be
adjusted. You can also simply go to this control by utilizing the mouse wheel.
N.B.: On some setups the Headroom settings may be linked.
(16) Amplifier Status
This control displays the current status of the Amplifier. If all parameters are OK (like
temperature, DC offset, mains value, etc…) the display will be “NXAMP ALL OK”. If not, the
error will be displayed here. If the unit is in standby, it will be also shown here.
(17) Overmute
The “Mute all” button acts as an “Overmute” button: When pressed, the four channels of
the unit will be muted, but the individual mute status of each channel is preserved. That is
why the “Mute all” button is called “Overmute”; it is just like a second layer of muting, as
you can see in the picture bellow.
Channel 1
Channel 2
Mute All
Channel 3
Channel 4
If you are in the following situation: Some channels are individually muted and the Mute all
is ON, like on the picture bellow (gray channels are muted):
Channel 1
Channel 2
Mute All
Channel 3
Channel 4
PAGE 95 OF 151
NXES104 EXPANSION BOARD, REMOTE CONTROL AND ASIO DRIVER
Now, if you press the “Channel 2 Mute” on the amplifier front panel or into ESmonitor™,
the “Mute all” function will be copy back to the individual channel mute, except for the
Channel 2 that you have just pressed:
Channel 1
Channel 2
Mute All
Channel 3
Channel 4
(18) Notes
In this textbox you can take some notes of your choice. The text is saved on the computer,
not on the NXAMP itself.
(19) Alias
This is the alias of the NXAMP used to display the unit in the network list, tree or group on
the left of ESmonitor™. By default the NXAMP will have an alias like this “NXAMP-XXXXXX”,
where the last six characters is the end of the MAC address of the NXES104 board fitted
into the NXAMP.
The Alias is stored on the computer. It uses the MAC address of the NXES104 to identity a
specific unit. Changing the computer or the NXES104 will disturb the alias of the units.
(20) Hardware and Firmware information
Here you check whereas the connected unit is an NXAMP4x1 or an NXAMP4x4 and what is
the firmware revision inside.
(21) ASIO Mode
This control selects the way the Remote ES100 port is used as an ASIO receiver or not.
ASIO Off
In this mode the ASIO functionality is not used, meaning that the four digital inputs of the
NXES104 board are taken from the Ethersound™ network. For example four channels of
audio are selected among the 64 channels downstream on the Ethersound™ IN port.
PAGE 96 OF 151
NXES104 EXPANSION BOARD, REMOTE CONTROL AND ASIO DRIVER
ASIO to NXAMP
In this mode the four digital inputs of the NXES104 board are not fed by an Ethersound™
compatible device on the IN our OUT port, but from a computer connected directly or
through a LAN on the Remote ES100 port of the NXES104, running the ASIO streamer
software.
In that mode, the “Ethersound” title on the four digital input meters is replaced by “ASIO”,
and the Ethersound™ I/O Patch of the NXAMP becomes unavailable.
NB: Although remote control of the NXAMP can be done from the Ethersound™ IN port or
from the Remote ES100 port, streaming ASIO can only be done from the Remote ES100
port.
PAGE 97 OF 151
NXES104 EXPANSION BOARD, REMOTE CONTROL AND ASIO DRIVER
ASIO to NXAMP and Ethersound™ network
This mode is similar to the previous one except that the four audio channels from the ASIO
stream coming on the Remote ES100 port can be routed on the NXAMP on one hand but
also forwarded on the Ethersound™ network on the other hand, thus feeding other amp on
this network (these NXAMP should then be in ASIO mode OFF).
In that mode the NXAMP is no longer an Ethersound™ receiver and becomes a four
channel Ethersound™ source.
(22) Scene
Saving or recalling a scene can be done here pressing the Set button.
Select the Scene of your choice and then choose Save or Recall. The scene and there name
are saved into the NXAMP itself. For each channel the speaker setup information is
displayed.
PAGE 98 OF 151
NXES104 EXPANSION BOARD, REMOTE CONTROL AND ASIO DRIVER
Warning: Switching from a scene to another one is immediate and does not ask for any
confirmation, even if the cabinet family or cabinet type is changed. Therefore take care
when changing scene under live conditions.
(23) Cabinet Setup
Pressing the “Set” button in this control displays the list of the setups available into the
memory of the NXAMP. By default only the setup from the same family are displayed.
NB: First time you press the “Set” button for a NXAMP firmware that is not known yet by
ESmonitor™ on this computer, it might take a few seconds to read all the setups available.
The current setup is marked with a star. You can also see the setup number if the left
column. If you go to “Show all setups” mode by pressing the radio button, then all the
setups available in the unit will be displayed.
PAGE 99 OF 151
NXES104 EXPANSION BOARD, REMOTE CONTROL AND ASIO DRIVER
If you recall a setup from a different family, a confirmation window will appear to prevent
any mistake. A key combination on the computer keyboard will be then required to confirm
the selection.
(24) Virtual front panel size
In order to fit on smaller computer screen, you have the possibility to reduce the size of
the virtual front panel to display all the control of the unit on screen. There are three sizes
available: Maximized (the whole virtual front panel is displayed), intermediate (only the
virtual LCD display is visible) and minimized (only the part above the LCD is displayed).
NXAMP and NXES104 with the ASIO streamer
What are ASIO / ASIO streamer?
ASIO means Audio Stream Input/Output and is protocol designed to exchange audio data
between computers based audio programs and soundcard. Today most of professional
audio software (referred as “ASIO host” bellow) supports ASIO protocol.
The ASIO streamer allows you to send directly four channels of digital audio in 24 bits/48
KHz from a PC computer to any NXAMP connected directly or through a local area network.
No soundcard or external hardware is needed. Thus the NXAMP can be seen as a “remote
soundcard”.
The ASIO streamer works in point to point mode, meaning that a PC computer running the
ASIO streamer can send audio to one NXAMP only. But on the other hand:
1) From a unique NXAMP receiver in ASIO mode, the audio can be send to other NXAMP
as well using an Ethersound™ network (NXAMP in daisy chain for example), see ASIO
mode above.
2) Several pairs of computer/NXAMP can exchange audio data using ASIO streamers on a
local area network at the same time.
3) Several computers can be configured to stream audio to the same NXAMP, but cannot
send at the same time; once a computer stop playing audio, it will free the ASIO driver
(the audio host software might need to be shut down) thus another computer can use
the driver now.
PAGE 100 OF 151
NXES104 EXPANSION BOARD, REMOTE CONTROL AND ASIO DRIVER
Installing the ASIO streamer
The ASIO streamer is a piece of software designed by Auvitran and that can be
downloaded from there website (www.auvitran.com). It works on Windows® based PC
computer.
This software will install:
1) A virtual soundcard ASIO driver (named “Auvitran ASIO”) on your computer with 2 or 4
audio outputs. Thus any ASIO host will have the possibility to output sound on this
virtual soundcard.
2) A control panel (named “AVS-AsioControlPanel”) in which you can select which NXAMP
on your LAN network will be the physical receiver of the audio data sent by the Host.
Setting up the NXAMP for ASIO mode
See the “NXAMP control page in ESmonitor™ software” above for details.
Setting up the AsioControlPanel
The settings are very straightforward. Here is a picture of the AVS-AsioControlPanel. The
ASIO settings should be let unchanged in most of the cases. See the ASIO streamer user
manual on the Auvitran website for details about these settings and troubleshooting.
In Network settings, select the network adapter of you computer connected to the target
NXAMP, or through the LAN connected to the target NXAMP.
NB: Connecting through a Wi-Fi adapter is possible but not recommended, because of
potential packets drop that can be responsible of periodical audio mute.
PAGE 101 OF 151
NXES104 EXPANSION BOARD, REMOTE CONTROL AND ASIO DRIVER
In Network audio device select the target NXAMP. This NXAMP should be connected to the
LAN through its Remote ES100 port and should be in ASIO mode “To NXAMP” or “To
NXAMP+ES”.
Select the number of Inputs/Outputs with the I/O count setting. For NXAMP, this setting is
either 2/2 (meaning 2 channels of audio out from the computer to the NXAMP) or 4/4
(meaning 4 channels of audio out from the computer to the NXAMP). A bigger number of
channels mean more bandwidth used on the network and more ressources used on the
computer, so if 2 channels are enough (for stereo track playback for example) we
recommend using this setting.
The Status light should be green in the AVS-AsioControlPanel if the NXAMP is ready to
receive audio. It will blink if any ASIO host is currently streaming audio to the NXAMP.
Setting up the ASIO host
Select ‘Auvitran ASIO’ in the ASIO host output device menu. Most of the time the ASIO
host will allow to patch the output of the software to the device input channels.
WARNING! The NXAMP supports only a sampling rate of 48 KHz. Thus the ASIO
host should send data only at this sampling rate or the stream will be refused by the ASIO
streamer. Use eventually a software resampler on the audio host to convert the source
sample rate to 48 KHz.
PAGE 102 OF 151
NXDT104 EXPANSION BOARD, DANTE™ PATCHING AND REMOTE CONTROL
NXDT104 expansion board, Dante™ patching and remote control
On the back panel of the NXAMP Powered TDcontroller there is a slot where the user can
easily insert an expansion board to add digital inputs and remote control to the unit.
Since July 2009, all NXAMP4x1s and NXAMP4x4s are shipped with an expansion card fitted
in, the NX-DFLT card. This card prevents output noises when main AC power feeding
NXAMPs is brutally shutdown (ie power down at the end of the show before NXAMPs are
switched off). NX-DFLT card should always be fitted in when no other expansion card is
used.
The NXDT104 expansion board for NXAMP is compatible with the Dante™ network
technology. This board offers 4 digital inputs of 24 bits/ 48 KHz audio data from a Dante™
network, and also remote control of the unit through the PC based application ESmonitor™.
WARNING! Only 48 KHz audio from Dante™ network is supported.
NB: The firmware of the NXDT104 is automatically updated if needed when the firmware of
the host NXAMP is updated (see further in this manual).
NXDT104 Physical description
The NXDT104 is designed to fit the NEXO’s slot form factor that can be located on the back
panel of the NXAMP Powered TDcontrollers.
NB: This slot features an 80-pins internal connector that is not compatible with the Yamaha
mini-YGDAI slot.
1
2
3
4
(1) Dante™ Primary Port
This Port running at 100 Mb or 1 Gb (automatically selected) features and Ethercon®
connector. Use this type of connector to secure your Dante™ network from unwanted
unplugs. This type of connector also ensures a longer life to the internal RJ45 contacts,
because it preserves it from external traction.
PAGE 103 OF 151
NXDT104 EXPANSION BOARD, DANTE™ PATCHING AND REMOTE CONTROL
Use this port as a Dante™ Primary port when connecting to a Dante™ network.
(2) Network Ports Status LEDs
The two LEDs next to the Primary port show the link/activity status of the Primary port.
The two LEDs next to the Secondary port show the link/activity status of the Secondary
port.
(3) Dante™ Secondary Port
This Port running at 100 Mb or 1 Gb (automatically selected) features an Ethercon®
connector. Use this type of connector to secure your Dante™ network from unwanted
unplugs. This type of connector also ensures a longer life to the internal RJ45 contacts,
because if preserves it from external traction.
Use this port as a Dante™ Secondary port when connecting to a Dante™ network.
(4) Remote port
The Remote port running at 100 Mb or 1 Gb (automatically selected) expands the
functionality of the classical two ports Dante™ compatible network cards.
The first target of the Remote port is allowing the user to have a separate network for
control and monitoring, thus allowing full bandwidth for Dante™ audio data on the
dedicated Primary and/or Secondary ports.
WARNING! Do not connect several ports of the NXDT104 to the same switch. This
will create a loop and stop all traffic on all network ports of the card.
Another advantage of the Remote control port is to provide a redundancy of the remote
control when the two Primary/Secondary Dante™ ports are used in redundant mode, as
Secondary Dante™ port will then filter Dante™ audio data only.
Last important advantage of this Remote port is that all three port of the NXDT104 are
connected to a 100 Mb/1 Gb switch, so Dante™ data can also be transmitted/received
to/from this port. Thus when the Primary/Secondary Dante™ ports are using in switch
mode, the NXDT104 offers 3 switched Dante™ ports, meaning that each NXDT104 can be
linked to two other Dante™ compatible devices, thus reducing the number of switches in
the network.
On top of this plug you will find 2 LEDS: The left one (Link), means that the equipment is
connected, the right one (Activity) meaning that frames are received.
Ethernet Additional hardware
In the previous description of the NXES104 (Ethersound™ card for NXAMP) in this manual,
several characteristics of Ethernet additional hardware where described to achieve a good
implementation of Ethersound™ networks.
PAGE 104 OF 151
NXDT104 EXPANSION BOARD, DANTE™ PATCHING AND REMOTE CONTROL
Dante™ networks can be compared to a standard computer network. Dante™ is based on
TCP/IP so a very large choice of devices can deal with Dante™ information just like
standard network packets.
Bellow is a few advices for correct Dante™ network implementation.
Hubs
A hub (also known as repeater) is a central connection point for computers on a startopology-based network.
WARNING! Due to their internal architecture, repeater hubs MUST NOT be used in
Dante™ networks.
Switches
Dante™ is supported on 100 Mb or 1000 Mb Ethernet networks. Be sure to use only
switches compatible with these network speeds.
WARNING! Some Dante™ compatible devices support only one of the two above
speed. To connect a 100 Mb only Dante™ device with a 1 Gb only Dante™ device you
cannot use a direct cable, but you can run through a 100 Mb/1 Gb switch.
Wireless LAN
A local area network that transmits over the air typically (but not exclusively) in an
unlicensed frequency band or, among others, infrared line of sight. Wireless access points
(base stations) are connected to an Ethernet hub or server and transmit a radio frequency
that can penetrate walls and other non-metal barriers. Roaming users can be handed off
from one access point to another like, for example, in a cellular phone system. Wireless
LANs are not suitable for Dante™ networks due to significant bandwidth limitations and
unpredictable latency.
Ethernet cables and fiber optic
Cables used within the Dante™ network are straight cables. See previous description in
NXES104 paragraph about different cables type and fiber optic recommendations (same for
both network technologies).
Installation inside the NXAMP
To install the NXES104 card inside an NXAMP Powered TDcontroller, first remove the two
screws on each side of the NX-DLFT card on the rear of the amplifier. Keep these screws as
they will be used with the NXDT104 card. Use a small screwdriver to slightly separate the
card from the NXAMP chassis, and remove it.
PAGE 105 OF 151
NXDT104 EXPANSION BOARD, DANTE™ PATCHING AND REMOTE CONTROL
Slide the NXDT104 board inside the rails, and push it firmly inside the NXAMP. Then put
the two screws back to fix the NXDT104 on the rear panel of the NXAMP.
NB: Keep the NX-DFLT card in a safe place as you would need to put it back if you decide
to remove the NXDT104 board for some reason. Do not use the NXAMP Powered
TDcontroller without any expansion board fitted.
WARNING! Once a NXDT104 has been upgraded to firmware 0x1C02, it
cannot be used any more with previous versions of the NXAMP firmware.
If a NXAMP with a firmware revision older than LOAD3_16 boots up with a
NXDT104 with firmware 0x1C02 or above, it will display the following error
message:
Please upgrade your NXAMP firmware to LOAD3_16 or above to solve this problem.
When booting up the NXAMP with correct LOAD3_16 or above and a NXDT104 fitted, you
will have to wait for some time while the NXDT104 itself is booting and provides clean
audio clocks to the NXAMP. This is writing on the display.
PAGE 106 OF 151
NXDT104 EXPANSION BOARD, DANTE™ PATCHING AND REMOTE CONTROL
The NXDT104 boot time depends on configuration but it is usually around 20 seconds.
NXAMP with NXDT104 control page in Dante™ controller
Dante™ controller is a PC/MAC software used to discover Dante™ compatible devices on a
network and to patch audio from one device to the other. As a consequence, the NXAMP
fitted with a NXDT104 Dante™ expansion card will be visible in the Dante™ controller.
Dante™ controller does not take care of remote control or monitoring of Dante™ devices.
WARNING! Dante™ controller can be in conflict whit other hardware/software
trying to monitor the Dante™ network status (for example Yamaha™ CL consoles are using
an embedded controller of the Dante™ network). It is recommended to use Dante™
controller for patching audio over the Dante™ network only at setup stage, and to close it
before running a live show.
Routing audio inside a Dante™ network
Bellow is a picture of the first tab, the audio routing matrix page in the Dante™ controller,
showing 1 x Yamaha CL5 console, 2 x Yamaha RIO3224 stage boxes, 2 x NXAMP4x1 with
NXDT104 and 9 x NXAMP4x4 with NXDT104.
The top row shows the audio sources and the left most column shows the audio receivers.
Simply click at the intersection of a source column with a receiver line to patch the audio
channel from the source to the destination.
NB: Patching a source to a receiver can take a few seconds before being effective.
PAGE 107 OF 151
NXDT104 EXPANSION BOARD, DANTE™ PATCHING AND REMOTE CONTROL
Advanced option of the Dante™ controller
Next tab (Device Status) shows some generic information on the devices like Name, Type
(should be always Bklyn2 with NXDT104), the version of the Dante™ firmware (3.5.3 is the
last and only one at the moment of writing), the IP address and Link Speed for each
Primary and Secodary port.
NB: When used in Switched mode (default mode), the Secondary Address and Secondary
link speed is grayed.
This tab is useful to have a global view of the Dante™ devices on the network: Check that
all devices have an IP address assign.
NB: NXDT104, like all Dante™ compatible devices, supports Zeroconf protocols, meaning
that you don’t have to enter any IP address manually. If a DHCP (Dynamic Host
Configuration Protocol) server is available on the network, it will assign IP addresses to
Dante™ devices, if not, they will find a unique and unused IP address by themselves.
WARNING! Some manufacturers use some proprietary software layer on top of
standard Dante™ set of protocols which sometimes does not support the use of external
DHCP server. We recommend letting the Dante™ devices in self-addressing mode,
meaning that you should not connect any DHCP server to the network, to ensure best
compatibility with other manufacturers Dante™ devices.
NB: You can guess if the address given to a Dante™ device is from a DHCP server on the
network or from the device itself using Zeroconf, by checking the first digit of the address.
PAGE 108 OF 151
NXDT104 EXPANSION BOARD, DANTE™ PATCHING AND REMOTE CONTROL
The IP address when the device is in auto configuration mode is 169.254.xxx.xxx whereas
most of the time the local address when a local DHCP is used is 192.168.xxx.xxx or
172.16.xxx.xxx or 10.0.xxx.xxx.
Next tab (Clock Status) will show you which device is the Master clock of the network.
There is no obvious reason to set up a NXAMP as a Master clock (the ‘heart’ of the system
being a mixing desk in most of the cases) but this could still be done eventually. You can
check the “Preferred Master” box, meaning that if the Dante™ Controller has to select a
Master Clock, the “Preferred Master” devices will be chosen preferentially.
Last tab (Events) shows information log on the network status that can be useful for
troubleshooting.
Device View
When the name of a Dante™ device is double click in the Dante™ controller, a new window
called Device View will open. This new windows offers more information on a particular
device.
The first tab (Receive) allows checking which Dante™ device will send audio to the current
NXAMP. It is also the only place where you can Unsubscribe (by pressing the button in the
bottom of the window) meaning releasing the patch between a sender and a receiver. This
is useful when you want to remove unwanted error message in the Dante™ Controller
because of old route not used anymore.
The second tab (Transmit) is grayed because a NXAMP cannot send audio data on a
Dante™ network. Next tab is Status where you will have information about bandwidth
used and error counters on each network ports as well as software revision.
Next Device Config tab is a very important tab where you can adjust the Receive Latency.
PAGE 109 OF 151
NXDT104 EXPANSION BOARD, DANTE™ PATCHING AND REMOTE CONTROL
Dante™ protocol includes a network latency compensation ensuring all receivers patched
on the same source will output audio at the exact same time, but this is only for receivers
using the same receive latency.
WARNING! We recommend to always set the same receive latency for all NXAMP
on a Dante™ network.
The default value is 1 ms which will fit most of cases, but the value can be lowered down to
0.25 ms for time sensitive applications, like wedge monitoring.
Last tab if Network Config, allowing to switch the two Primary and Secondary ports of the
NXDT104 to Switched or Redundant mode.
Switch mode is the default mode. The three network ports of the NXDT104 (Primary,
secondary and Remote) can be seen as three ports of a switch, the NXAMP being
connected on an internal fourth port. Dante™ network can be connected to any of this
ports, and the remaining ports can be used to link to other devices on the network. Each
port can run independently at 1 Gb or 100 Mb depending on the connected device.
WARNING! Do not connect several ports of the NXDT104 to the same switch. This
will create a loop and stop all traffic on all network ports of the card.
The Redundant mode uses the primary and secondary ports as a redundant input to the
device. In that particular mode, the Primary ports of all redundant devices should be
connected to a first network, whereas the Secondary ports are connected to a second
PAGE 110 OF 151
NXDT104 EXPANSION BOARD, DANTE™ PATCHING AND REMOTE CONTROL
network.
WARNING! Switching from one link to the other can take up to a few seconds.
During that time audio will be muted.
NB: When redundant mode is used, the remote control data can go only through the
Primary port. Thus is the link connected to this port fails, it will be no more possible to
remote control the unit. A solution could be to send control data to the Remote port, thus
ensuring that the remote control will still be available.
Last buttons in the bottom of the page are here for compatibility reason and should not be
used.
WARNING! Never press the Reboot or Factory Reset buttons when speakers are
connected to NXAMP as it can lead to unpredictable noise on the output.
NXAMP with NXDT104 control page in ESmonitor™ software
ESmonitor™ software by Auvitran is a free PC based application running under Windows XP
and Windows Vista, permitting full control over an Ethersound™ network. It also allows to
remote control the NXAMP with NXDT104 cards. Thus NXAMP with any of the expansion
cards NXES104 (Ethersound™) or NXDT104 (Dante™) can be monitored and remote
controlled within the same software.
PAGE 111 OF 151
NXDT104 EXPANSION BOARD, DANTE™ PATCHING AND REMOTE CONTROL
NEXO provides in each revision of the NXAMP firmware the last version of the ESmonitor™
software that has been successfully tested with this firmware. It is recommended to use
this specific version of the ESmonitor™ software.
Please refer to the ESmonitor™ User Manual provided by Auvitran as a pdf file when
installing the ESmonitor™ application on your computer. Once completed, you can access
to the control page of the NXAMP Powered TDcontroller.
Enabling remote control of NXAMP with NXDT104 in ESmonitor™
To enable the monitoring of NXAMP on a Dante™ network through ESmonitor™, you have
to check the Enable Dante™ device control option in the AVS-Control Panel (installed
together with the ESmonitor™ software).
NB: This option is only available from ESmonitor™ v3.16.9
WARNING! Do not use ESservice on a distant computer when the Dante™ device
control is enabled.
The ES-monitor tree view
From the tree view in ESmonitor™ you can (from ESmonitor™ v3.20.5 and NXAMP with
LOAD3_16) select NXAMP specific functions by right-clicking the NXAMP. See
corresponding NXES104 description above for details.
PAGE 112 OF 151
NXDT104 EXPANSION BOARD, DANTE™ PATCHING AND REMOTE CONTROL
The control page
Picture bellow shows the control page when using ESmonitor™ v4.1.6 and LOAD3_23 on
an NXAMP powered TDcontroller with NXDT104 fitted.
1
We will not detail any of the controls that are common with the control page when
NXES104 is used. Please see above in the manual the complete description of this user
interface.
(1) Dante ID setup
Here you can see or adjust the Dante ID of the NXAMP. The Dante Id is used to easily
address a device on a Dante™ network when used in conjunction with other Yamaha
compatible equipment. The Dante Id is always represented with a “Y” followed by four
hexadecimal numbers the range is from Y000 to YFFF, and the default Dante™ Id is Y001.
PAGE 113 OF 151
NXDT104 EXPANSION BOARD, DANTE™ PATCHING AND REMOTE CONTROL
More information about setting up a Dante™ network
Check the Audinate website (http://www.audinate.com) to download documentation,
tutorials and software related to Dante™ networks.
PAGE 114 OF 151
DMU DIGITAL METERS UNIT FOR NXAMP
DMU Digital Meters Unit for NXAMP
The Digital Meters Unit (DMU) is a 1U 19” accessory for NXAMP4x1 and NXAMP4x4
powered TDcontrollers.
This device is intended to monitor the input level on the four analog inputs and the four
network inputs (from an Ethersound™ or Dante™ network if expansion board is fitted) of
the NXAMP powered TDcontroller. Network ports status can be monitored as well.
Front panel description
1
2
3
(1) Analog inputs with link
These XLR-3 connectors are intended to connect the analog audio source (analog outputs
of a mixer for example) to the NXAMP input. Both XLR3 male and female are in parallel for
each input (marked A to D), allowing to link several DMU together.
(2) Input view meter
Fore each input a view-meter is installed between the two XLR. This meter shows the audio
level with a maximum of 0 dBr (meaning the clip of the input stage witch is +28 dbU). The
scale is the following:
Number of LEDs ON
NXAMP A/D out level
8
7
6
5
4
3
2
1
0
0 dBr
-6 dB
-12 dB
-18 dB
-24 dB
-30 dB
-36 dB
-42 dB
<-42 dB
(3) Network inputs
These Ethercon® connectors can be used either when NXES104 or NXDT104 cards are
fitted into the NXAMP. Network status LEDs are fitted next to each network port, but there
meaning is slightly different depending on the card fitted.
PAGE 115 OF 151
DMU DIGITAL METERS UNIT FOR NXAMP
Network card
fitted
Network LEDs state
OFF
ON
Toggle
NXDT104
NXES104
No link
No Link
Link OK
unused
Activity
Link or Activity
Back panel description
1
2
3
(1) Network outputs
These three RJ45 outputs are passively connected to the front panel Ethercon®
connectors. A great care has been taken in PCB design to ensure a minimum loss on the
signal path.
The network data will always flow from front panel to back panel of the DMU even if it is
not powered.
(2) Analog outputs
These four XLR-3 outputs are passively connected to the front panel XLR marked from A to
D. A great care has been taken in PCB design to minimize the distortion on the signal path.
The analog audio signal will always flow from the front panel to the back panel of the DMU
even if it is not powered.
(3) GPIO port
This GPIO port is intended to be connected to the NXAMP GPIO. Thus power supply (5
Volts) from the NXAMP will be fed to the unit and the view-meters data will also be
provided through the GPIO port.
You will need a straight DB25, male/male cable to connect the NXAMP to the DMU.
NB: A cable kit for DMU containing
• 4 x Neutrik XLR to XLR cords
• 3 x RJ45 links (a red, a green and a blue one).
• 1 x DB25 male/male straight cable
can be purchased from NEXO separately.
Operating the DPU
Using the DMU is straightforward, as there is nothing to set up. The only requirement is
that the NXAMP firmware supports the DMU, otherwise the view-meters won’t work
properly.
PAGE 116 OF 151
DMU DIGITAL METERS UNIT FOR NXAMP
WARNING: NXAMP firmware should be at least LOAD3_11 for the DMU to work.
If not, the DMU view meters won’t work.
Connections and start up
Be sure that the host NXAMP is disconnected from mains.
Connect the four XLR-3 cables between DMU back panel XLR connector (from A to D)
and the NXAMP analog inputs (marked A to D).
If any network card is fitted, you will need also to connect the three RJ45 links between
the DMU back panel RJ45 and the network card ports.
WARNING: RJ45 links should be at least CAT5e to be compatible with Gigabit links
of the NXDT104.
We recommend following this color code bellow if possible:
RJ45 link color
Network port
RED
BLUE
GREEN
IN/1/Primary
OUT/2/Secondary
Remote/3rd
Then connect the GPIO port of the DMU to the GPIO port of the NXAMP using a straight
DB25 male/male cable.
Connect the NXAMP mains plug(s) and turn the NXAMP “ON”. Check the LOAD revision
while booting up; it should be LOAD3_11 or above.
All LEDs will be on at startup for a short time, allowing an easy check that the unit is
correctly powered and that all LEDs are working. Then after a few seconds the view-meters
will represent the actual input level or analog and digital inputs, whereas the network LEDs
will show the network port status.
WARNING: NXES104 firmware should be at least 0x0D0E for the network LEDs to
work. The NXES104 firmware revision can be checked with ESmonitor™. To upgrade the
firmware of the NXES104 you will have to download the LOAD3_11 firmware (or above)
into the NXAMP fitted with this NXES104 through the IN or Remote port of this card.
If the view-meter does not work, check the GPIO setting of the NXAMP and ensure it is set
to MODE 0.
PAGE 117 OF 151
DMU DIGITAL METERS UNIT FOR NXAMP
PAGE 118 OF 151
DPU DIGITAL PATCHING UNIT FOR NXAMP
DPU Digital Patching Unit for NXAMP
The Digital Patching Unit (DPU) is a 1U 19” accessory for NXAMP4x1 and NXAMP4x4
powered TDcontrollers.
This device is intended to set up automatically the power outputs of an NXAMP4x1 or
NXAMP4x4 Powered TDcontroller to the correct pins on speakON® 4 and speakON® 8
connectors. Thus connecting any of the NEXO speakers is very straight forward. More over
it is easy to connect several DPU together in case you need multiple amplifiers to feed a
unique speaker system.
Front panel description
1
2
3
(1) SpeakON® 4 poles output
There are four connectors like this on the front panel. These connectors will be used to
connect any Nexo speaker that uses the same type of connector.
(2) SpeakON® 8 poles output
There are two connectors like this on the front panel. These connectors will be used to
connect the Nexo speaker of your choice, if it uses the same type of connector of it is uses
EP6 connector. The use of speakers with EP6 connectors means the use of external pin to
pin adaptor from speakON® 8 to Amphenol EP6 with the following arrangement.
SpeakON® 8 input
EP6 output
11+
22+
33+
44+
1
2
3
4
5
6
NC
NC
(3) LCD display
There are four LCDs like this one on the DPU. These LCDs indicate which speaker should be
connected on which output. See further in the manual to have the actual displayed
information.
PAGE 119 OF 151
DPU DIGITAL PATCHING UNIT FOR NXAMP
Back panel description
1
2
3
(1) Mains connectors
There are two mains connectors on the DPU. These two connectors lead to two fully
redundant power supplies for redundancy purpose, meaning that the DPU can still work
even if one main is missing or in the very unlikely case that a power supplies fails.
Be sure to connect the two mains input to separate mains circuit to ensure maximum
redundancy.
(2) SpeakON® 4 inputs
These power inputs must be connected to the power outputs of the NEXO NXAMP4x4 or
NXAMP4x1 powered TDcontroller.
• Connect the NXAMP “Speakon A” output to the DPU “Input A” input.
• Connect the NXAMP “Speakon C” output to the DPU “Input C” input.
WARNING: Use 4 x 4 mm² (AWG11) cable and four poles speakON® to connect
NXAMP power outputs to DPU inputs (2 meters / 16 feet max).
This mark indicates a dangerous electrically live terminal. When connecting an
external wire to this terminal, it is necessary either to have “a person who have received
appropriate guidance on handling” make the connection or to use leads or a cord that have
been manufactured in such way that the connection can be made simply and without
problem.
PAGE 120 OF 151
DPU DIGITAL PATCHING UNIT FOR NXAMP
(3) RS232 port
Connect this serial port to NXAMP RS232 port using a shielded crossover (null-modem)
cable only (2 meters / 16 feet max) with female db9 connectors on each side. Bellow is the
cable to be used to connect NXAMP to DPU pinout.
NXAMP serial port pins
DPU serial port pins
2 (RXD)
3 (TXD)
5 (GND)
Other
NXAMP Receive
NXAMP Transmit
Signal ground
Unused
3 (TXD)
2 (RXD)
5 (GND)
Other
NB: A cable kit for DPU containing
• 2 x 4 poles 4 x 4mm² speakON® cable
• 1 x db9 crossover (null-modem) cable
• 2 x IEC mains cable with lockable connector (available with EU or US plugs)
can be purchased from NEXO separately.
Operating the DPU
Using the DPU is straightforward, as there is nothing to set up. The only requirement is
that the NXAMP firmware supports the DPU, otherwise it will stay in Stand-by mode with
nothing patched on its front panel connectors.
WARNING: NXAMP firmware should be at least LOAD3_11 for the DPU to work. If
not, the DPU will stay in stand-by with nothing routed on its outputs
Connections and start up
Be sure that the host NXAMP and the DPU are both disconnected from mains.
Connect the two four poles speakON® cables between NXAMP (Speakon A and C) and
DPU (Input A and C), and connect the RS232 port between the NXAMP and the DPU
using a crossover cable (see serial port cabling above).
Then connect at least one IEC cable to one of the IEC mains inlet of the DPU. The left most
display should lit and the message “Stand-by’” should appear on the screen.
Connect the NXAMP mains plug(s) and turn the NXAMP “ON”. Check the LOAD revision
PAGE 121 OF 151
DPU DIGITAL PATCHING UNIT FOR NXAMP
while booting up; it should be LOAD3_11 or above.
After a few second the current selected speakers on the NXAMP are routed inside the DPU
and their names are displayed on the DPU screens.
DPU front panel connectors routing
The front panel of the DPU is very symmetrical and shows two groups (one on grey
background, the other one on black background), each with two SPK4 and one SPK8.
For each of these blocks, the internal routing of SPK4 and SPK8 is done like on the bellow
picture.
This means that SPK4 and SPK8 are always connected (hardwired) in parallel. In most of
the cases, only one of this plug kind will be used at a time, but this parallel wiring can be
useful to carry two SPK4 outputs over a SPK8 long cable for example (with breakout box at
the other end) or to link several amplifier together (see further in this manual).
Or course the routing from the amplifier output to these front panel connectors is done
dynamically regarding the combination of four speakers’ setups done into the NXAMP.
DPU displayed information
Two next speakON® (one SPK4 and one SPK8) will share the same LCD display. In case of
SPK4 output, the displays will indicate some information regarding the following pinout:
Now if SPK8 output shall be used, the displays will indicate some information regarding the
following pinout:
Of course same rules apply to the next set of front panel connectors.
PAGE 122 OF 151
DPU DIGITAL PATCHING UNIT FOR NXAMP
There is three kind of information displayed alternatively on the DPU screens. But the
speakon to use is always indicated clearly with arrows next to the plug in use.
(1) Speaker Name
The speaker name is indicated next to each plug to be used. For example bellow for a set
of PS15R2 (setup number 41 in LOAD3_23).
You will notice that the second line of the display is used, meaning that the output is on the
2+/2- pair of each speakON® 4 connector. Note the arrow to each SPK4 connector.
For an Alpha setup (setup number 8 in LOAD3_23), using speakON® 8 connector:
The S2 and the B1-15 have an arrow to each side (one to the SPK8, the other one to the
SPK4) because you can either use a SPK4 to connect directly the S2 and the B1-15 or you
can use a SPK8 to a M3 cabinet, from which you will link a S2 or B1-15 using a SPK4.
The M3 cabinet can be connected using SPK8 only so it shows only arrow to this plug. Note
that the M3 text is displayed on both line because is is an active speaker using both 3+/3pair and 4+/4- pair of the SPK8 connector.
(2) Speaker Mode
For some setups, the mode is shown also on the display alternatively. For example for our
PS15R2 setup, if you edit the setup for Channel 2 and select a monitor setup, the DPU
display above will alternate with:
This information told us that the PS15R2 to be connected on the first SPK4 should be a
passive (PA) cabinet, the one connected to the second SPK4 will be passive (PA) also but
uses a Monitor setup.
PAGE 123 OF 151
DPU DIGITAL PATCHING UNIT FOR NXAMP
For our Alpha example, the S2 and the B1-15 has no alternate information to display but
the M3 output will show that 3+/3- pins are connected to the MF whereas the 4+/4- are
connected to the HF speaker of the cabinet.
(3) Amplifier channel
The amplifier channel in use on each output is also shown alternatively with the displays
above. For example in the four PS15R2 channels case:
And in our Alpha setup example:
Unused front panel connectors
The DPU will always try to use the maximum of outputs available to fit all the need of the
user without external adaptor or difficult cabling. Thus sometimes the same channel is
routed on several outputs.
Even if the DPU will never output a speaker signal on a wrong pinout, check the display
information to be sure to load the wanted amplifier channel.
In the bellow example, a setup using PS10R2/LS600/PS8/LS400 is selected.
Note that each amplifier channel is duplicated on several output, allowing to have the same
cable to feed PS (on 2+/2-) and LS (on 1+/1-) or use separate cable.
NB: In the example above, if the user want to have PS10R2 and LS400 on the same cable,
PAGE 124 OF 151
DPU DIGITAL PATCHING UNIT FOR NXAMP
then a setup with PS10R2/LS400/PS8/LS600 should be recalled.
Linking several DPU together
With some speakers setup it could be useful to link several DPU together. For example with
active setups, using NXAMP4x1 for HF and NXAMP4x4 for LF, or with GeoT setups,
requiring more than one NXAMP to feed all channels, or with STM to feed a four way
system using bridge amplifiers.
Each time a DPU has nothing displayed on a line of one of its display it means that the
corresponding pins on the associated speakON® connectors are floating. Thus it can be
feed with other DPU output.
The following example will show how to connect two DPU together to feed a speakON® 8
connector to a complete STM system (S118 + B112 + M46).
First NXAMP4x4 will run the setup number 76 of the LOAD3_23, running the STM in
stacked mode, feeding Main boxes M46 in active on two channels, and the STM bass box
B112 on two other bridged channels. The DPU outputs will then be:
Note that the 1+/1- pins of the first SPK4 are not connected to anything and that the
corresponding display line is empty.
Second NXAMP4x4 will run the setup number 81 of the LOAD3_23, meaning the S118 in
Omni mode.
Note that this time the 2+/2- pins on the first SPK4 are not used.
We will now use a SPK4 link cable to plug to link the first SPK4 output of the second DPU in
the first SPK4 output of the first DPU. Thus the S118 signal will be also available on the
SPK8, together with B112 and M46 allowing the user to have only one speakON® 8 cable
to feed up to 3 x S118, 3 x B112 and 3 x M46.
PAGE 125 OF 151
DPU DIGITAL PATCHING UNIT FOR NXAMP
SPK8 To STM Stack
SPK4 Link between DPUs
PAGE 126 OF 151
NXWIN4 SOFTWARE FOR NXAMP FIRMWARE UPGRADE
NXwin4 software for NXAMP firmware upgrade
Please check regularly on NEXO website (www.nexo-sa.com) for NXAMP Powered
TDcontroller firmware upgrade. These upgrades are freely downloadable and can improve:
• NEXO’s setup for cabinets (including new setups for new products).
• NXAMP firmware functions.
• NXAMP remote control functions.
WARNING! NXAMP Powered TDcontroller delivered with a LOAD_00x firmware
contains FLAT firmware only (no NEXO cabinet setup installed), so it is mandatory to
upgrade the firmware of the unit to the last available firmware that you will find on our
website. NXAMP Powered TDcontroller delivered with LOAD2_53 or higher contains all
NEXO speakers setups known at the moment, but upgrade can be needed for new
products. Please check the setup list in a separate document.
What you need to upgrade your NXAMP
NXAMP can be upgraded either:
• By its serial port (RS-232).
• By its “Ethersound™ IN” or “Remote ES100” port if a NXES104 board is fitted.
• By any of the network ports of a NXDT104 board.
NB: Upgrade through one of the above Ethersound™ ports when the unit is a Primary
Master. This provides faster results than the other solution.
WARNING! When a NXES104 or NXDT104 board is fitted into the unit, be sure to
upgrade the NXAMP firmware through a network port (not the serial port). Doing so will
allow to automatically upgrade the firmware of the expansion board if needed.
Serial port upgrade
To upgrade from the serial port you will need:
•
A computer running Windows XP / Windows Vista /Windows Seven / Windows 8, in
32 or 64 bit with NXwin4 installed.
•
A serial port or an USB to serial adapter.
•
A null-modem cable (“crossover” serial port cable, with 2 DB9 female plugs). See
pins cabling bellow.
PAGE 127 OF 151
NXWIN4 SOFTWARE FOR NXAMP FIRMWARE UPGRADE
NXAMP serial port pins
2 (RXD)
3 (TXD)
5 (GND)
Other
PC COM port pins
NXAMP Receive
NXAMP Transmit
Signal ground
Unused
3 (TXD)
2 (RXD)
5 (GND)
Other
NB: The serial port cable used to connect the DPU to the NXAMP is a null-modem cable:
you can use it together with a USB to serial adapter to upgrade your NXAMP.
Network port upgrade (from NXES104 or NXDT104)
To upgrade from a network port you will need:
•
A computer running Windows XP / Windows Vista /Windows Seven / Windows 8, in
32 or 64 bit with NXwin4 installed.
•
A RJ45 Ethernet 100 Mb or 1 Gb full duplex port.
•
A cat5 network cable (crossover or straight).
Connect the computer to the NXAMP
Locate the serial port or the one of the usable network port at the back of the controller,
and use the null-modem cable or the crossover cable to connect the computer.
1
2
3
4
(1) Remote ES100 port
This port can be used to upgrade the NXAMP when a NXES104 board is fitted. Be sure that
no non-ES100 devices are connected to the other Ethersound™ ports of the NXAMP.
(2) Ethersound™ IN port
This port can be used to upgrade the NXAMP when a NXES104 board is fitted. You can
PAGE 128 OF 151
NXWIN4 SOFTWARE FOR NXAMP FIRMWARE UPGRADE
either directly connect the computer to this port or reach the NXAMP through the
Ethersound™ network. If several NXAMP are connected together in an Ethersound™
network, you can upgrade automatically one after the other.
(3) RS-232 Serial port
This port can be used with or without NXES104/NXDT104 board fitted inside the amplifier.
However, we recommend using one of the network ports if a NXES104/NXDT104 board is
fitted because NXwin4 can also upgrade the firmware of the network card itself (what
cannot be done through the serial port).
(4) Dante™ primary, secondary or remote port
These ports are equivalent for firmware download, you can use any of them. Several amp
with NXDT104 cards can be linked through the available ports, and even NXAMP with
NXES104 board can be connected (through their Remote ES100 port) allowing to upgrade
at once mixed inventory of NXAMP.
Put the NXAMP in download mode
That means power the unit “ON” while having the ‘mute 1’ button down.
1
2
(1) Hold the mute 1 button down, and keep it down.
(2) Turn ON the NXAMP Powered TDcontroller.
The NXAMP screen will display the revision of the boot loader, and then the following
message will appear:
PAGE 129 OF 151
NXWIN4 SOFTWARE FOR NXAMP FIRMWARE UPGRADE
Using the NXwin4 software
Use the Nxwin4_setup.exe to install the software on a Windows based computer. During
the installation, there will be an option to upgrade the Ethersound™ API. This option will be
checked by default if no Ethersound™ API is present on your computer or is obsolete, and
will be unchecked if no update is necessary. We recommend leaving this option unchanged.
Then through the start menu, double-click on Programs> Nexo> Firmware Update>
NXwin4. The Nexo loader will appear on the screen of the computer. Use the “Browse”
button to select the firmware file (the extension is .dld).
Then choose the serial port (note: only the detected and available serial ports appear in the
list) or the Ethernet network card connected to the NXAMP Powered TDcontroller, and
finally press the download button. The following splash window should pop up on screen:
PAGE 130 OF 151
NXWIN4 SOFTWARE FOR NXAMP FIRMWARE UPGRADE
To upgrade the NXAMP (fitted with NXES104 or NXDT104 board) through the network,
choose the network port interface and select the network card connected to the NXAMP(s).
You will need to wait for 70 seconds before the detection ends, to ensure that an IP
address has been given to the card if needed. Select device that you want to upgrade (by
default only units in “Download mode” will be selected).
Begin the upgrade
You can now confirm the download by pressing the “Program” button. The Nxwin4 will
detect the connected NXAMP target, and then download the appropriate software. If a
NXES104 or NXDT104 is fitted and need to be upgraded, it will be automatically done as
well.
In the example bellow, we consider upgrading an NXAMP with a NXDT104 Dante™ card
fitted that needs also to be upgraded. If your NXAMP has another card fitted then the
following steps might be slightly different.
WARNING! Some NXDT104 with an old Dante™ firmware must be uploaded in two
steps, with a NXAMP hard reboot in between. Follow instructions given by Nxwin to
properly update the NXDT104.
PAGE 131 OF 151
NXWIN4 SOFTWARE FOR NXAMP FIRMWARE UPGRADE
Once the selected NXAMP with NXDT104 has been selected and the PROGRAM button
pressed, the software will first send the Dante™ firmware to the NXD104. “Please wait,
buffering…” is displayed in the status bar of Nxwin, then the firmware is upgraded into the
NXDT104.
During the upgrade of the DANTE™ firmware the NXAMP display asks to not turn off the
device.
WARNING! If the power supply is turn off during the DANTE™ firmware update
the NXDT104 card might become unusable and needs to be sent back to NEXO for repair.
PAGE 132 OF 151
NXWIN4 SOFTWARE FOR NXAMP FIRMWARE UPGRADE
Then Nxwin will upgrade the NEXO part of the NXDT104 firmware, while the status bar of
Nxwin displays the Estimated Arrival time.
Once finished with this NXDT104 part, Nxwin might ask to restart the NXAMP in download
mode again to upgrade another Dante™ firmware (only with NXDT104 running an old
firmware), or it will now update the NXAMP part of the firmware
Once the OK button is pressed, Nxwin will wait for 70 seconds for the NXDT104 to reboot
and eventually the DHCP to give an IP address to the card again. Then another Dante™
firmware or the NXAMP firmware download should start, but depending on your network
configuration you might encounter this message.
If so, press the OK button and the Nxwin will go back to its default screen.
PAGE 133 OF 151
NXWIN4 SOFTWARE FOR NXAMP FIRMWARE UPGRADE
Press the PROGRAM key again (note that the firmware version of the NXDT104 has
changed now from 0x1C01 to 0x1C02: this is the “intermediate” Dante™ firmware). If
Dante™ firmware is already 0x1C03 the download of the NXAMP part of the firmware will
begin now immediately.
The progress of the firmware update is displayed on the NXAMP screen.
At the end of the download the Nxwin will pop up to say that the download was successful.
PAGE 134 OF 151
NXWIN4 SOFTWARE FOR NXAMP FIRMWARE UPGRADE
Embedded since LOAD3_22 comes a new revision of the NXAMP boot firmware
(v1.37). When the NXAMP boots up for the first time after its firmware upgrade, it will
prompt the user to upgrade the boot firmware, if needed.
You have to answer ‘Yes’ to the above question, if not the NXAMP will be unable to run the
LOAD3_23 (yet you can still roll back to a previous LOAD and keep the boot in its current
state).
The NXAMP starts the upgrade of its boot firmware.
WARNING! If the power supply is turn off during the Boot firmware update the
NXAMP might become unusable and needs to be sent back to NEXO for repair.
Once the boot firmware has been updated the NXAMP, the default screen will appear on
the NXAMP screen. You are now running the latest version of the firmware.
PAGE 135 OF 151
Y001
~
0. FLAT - NO PROTN.
[4 ch amplifier]
~
NXWIN4 SOFTWARE FOR NXAMP FIRMWARE UPGRADE
Using the controller after a firmware update
Choosing a cabinet setup
After the download of a new firmware, the NXAMP powered TDcontroller will be by default
in FLAT mode, it means that the audio flows from the inputs to the outputs without
treatment.
To load the wanted setup (for example GeoD or PS15, …) you have to reset the unit by
repressing buttons A, B & “Select CH1” for 3 seconds at least.
0. FLAT - NO PROTN.
[4 ch amplifier]
~
~
(For 3 seconds)
Selecting cabinet family
~
42. GeoD PA WB
Back1-3 Front2-4
~
Simultaneously repressing A & B buttons at power up or during device RESET accesses the
system change menu. Keep the A & B Buttons held until the default display appears
(approx. 3 seconds). This will allow the selection of any cabinet in any family. Using the
rotary encoder, scroll through the configurations and press “B” to load the required
settings.
OK
Select your cabinet set-up
In the ‘Options’ menu, choose “Systm Config”, and you will be able to choose among the
different set-ups within the same cabinet family, (i.e. you don't have to modify the
amplifier to cabinet wiring) or eventually between all families (see above), or to build your
own custom setup.
PAGE 136 OF 151
NXAMP TECHNICAL SPECIFICATIONS
NXAMP TECHNICAL SPECIFICATIONS
POWER SPECIFICATIONS FOR NXAMP Powered TDcontroller
Number of channels
4 channels, 3 channels (2 non bridged + 1 bridged) or 2 channels (2 bridged)
NXAMP4X1
Max. output power (8 Ω)
NXAMP4X4
600 W (non bridged)
1900 W (non bridged)
1800 W (2 channels bridged)
Max. output power (4 Ω)
900 W (non bridged)
6600 W (2 channels bridged)
3300 W (non bridged)
2600 W (2 channels bridged mode)
8000 W (2 channels bridged)
Max. output power (2 Ω)
1300 W (non bridged)
4000 W (non bridged)
Power consumption
10 W Standby, 100 W Idle, 1100 W 1/8 Power
20 W Standby, 150 W Idle, 3500 W 1/8 Power
SPECIFICATIONS FROM ANALOG IN TO POWER OUT
Analog Inputs channels
4 channels analog inputs on XLR 3 with a second XLR 3 for linking
Frequency response
+/- 0.5 dB from 10 Hz to 20 KHz
Input Impedance
20 KOhm.
Max Input Level
+28 dBu
Dynamic Range
All Channels = 105dB unweighted
THD + Noise
Typical 0.1% flat setup
Latency time
0.5 ms on a flat setup
Power Supply
Dedicated version for 100 ~ 120 Volts or 220 ~ 240 Volts or Dual Voltage version
FRONT AND BACK PANEL FEATURES
Audio Inputs
• 4 balanced analog inputs on XLR with link, using 24 bit converters.
• 4 digital inputs via the optional network card slot at the back.
Power Outputs
4 Speakon outputs
RS232 port
Allow firmware upgrade for software improvement and new cabinet setups.
GPIO port
5 Global Purpose Inputs and 8 Global Purpose Outputs
Front Panel
On/Off switch, Wheel, A/B buttons, 40 char x 2 display. Amp protect/Stand-by/Power LED’s.
For each ch: volume (15 LEDs), Mute w LED, Output current LED, Protect LED, Peak LED.
Rear Panel
Dimensions & Weight
1 mains socket (2 for NXAMP4X4); RS232; GPIO, Expansion slot, 4 XLR w link, 4 Speakon 4
NXAMP4X1
NXAMP4X4
3U 19" Rack, 457 mm (18") Depth, 16.5kg
(36 lbs) net
4U 19" Rack, 457 mm (18") Depth, 24.5kg
(54 lbs) net
USER CONTROLS
System Selection
Allows control from all NEXO ranges.
System Set-up
Within the selected range when possible, allows the cabinet to be set for passive/active mode,
wideband/crossover mode, choose among crossover point, cardiod/supercardiod mode.
Protection
Multiple Peak Limiters fitted for both selected cabinet and amplifier. Multiple Acceleration,
Displacement and Temperature protections on every channel.
Delay
Up to 66m (145 ft.) of delay in 10cm (.4in ) steps
Input Patching
Any of the 4 analog (or 8) inputs combination to be routed on each output.
Output Gain
Channel gain +/-6dB in 0.5dB steps.
Volume control
Each channel with 16 steps from – inf dB to 0 dB.
Save/Recall
Set-up Stores 32 user set-ups
Array EQ
LF/HF shelving filters to compensate ground/stacking effects, +/-6dB
Security Mode
Password protected for Read-Only or Remote-Only Mode.
Remote control
Full remote control via the Ethersound protocol and ESmonitor™ software.
Certification
UL, SEMKO (CE), CCC, KOREA, TSS, PSE
Green status
Compliant with ROHS and WEEE directive
PAGE 137 OF 151
NXAMP THERMAL DISSIPATION AND CURRENT DRAWN
NXAMP Thermal dissipation and current drawn
Test signal: Pink Noise, bandwidth limited 22Hz to 22 kHz. All channels driven.
NXAMP4X1
Line Current (A)
120V
Idle
8ohms/ch
1/8out
4ohms/ch
2ohms/ch
NXAMP4X4
230V
1.6
11.1
16.7
21.8
0.9
6.1
9.2
12.0
Line Current (A)
120V
Idle
8ohms/ch
1/8out
4ohms/ch
2ohms/ch
230V
2.3
26.0
40.0
50.0
1.3
14.3
22.0
27.5
Watts
Dissipated
95
390
590
620
Watts
Dissipated
120
800
1300
1700
Thermal
Dissipation
Btu/h
kcal/h
326
1337
2023
2126
82
337
510
536
Thermal
Dissipation
Btu/h
kcal/h
411
2743
4457
5829
104
691
1123
1469
1 BTU = 1,055.06 J = 0.252 kcal
(W)*864=cal
N.B. These values are for NXAMP without NXES104/NXDT104 or NX-DFLT board fitted. If
card is fitted, please add 5 Watts to these values.
PAGE 138 OF 151
NXAMP DIMENSIONS
NXAMP Dimensions
NXAMP4X1 front view dimensions
NXAMP4X4 front view dimensions
NXAMP4X1 and NXAMP4X4 top view dimensions
PAGE 139 OF 151
DMU TECHNICAL SPECIFICATIONS
DMU TECHNICAL SPECIFICATIONS
Meters features
Integrated vue-meters
8 channels of 8 levels vue-meters, one per input (4 x Analog and 4 x Network)
Network activity
2 Leds per network input
Front panel features
Analog audio connectors
4 x Neutrik XLR-3 with parallel output link on XLR-3, named from A to D
Network connectors
3 x Neutrik Ethercon connectors, named from 1 to 3
Back panel features
Analog audio connectors
4 x Neutrik XLR-3 passive connection to front panel XLR
Network connectors
3 x RJ45 connectors, routed to front panel through matched impedance pairs
GPIO connector
DB-25 for digital communication and power from host NXAMP
Speficications
Power supply
From GPIO port, 5 Volts DC, 1Watts
Dimensions & weight
1U 19" Rack - 50 mm (2") Depth - 1.2 Kg (2.6 lbs) net
Certifications.
cETLus, CB (CE), CE, FCC
Green status
Compliant with ROHS and REACH directive
Ordering information
Digital Meters Unit
NX.DMU (1 x DMU, 1 x Quick Start Guide)
Cable Kit for DMU
DMT-CKIT (4 x Neutrik XLR to XLR cords, 3 x RJ45 link (R,G,B), and 1 x DB-25 link)
DPU TECHNICAL SPECIFICATIONS
Routing features
Routing matrix
Route any of the four input channels to one or several Speakon pins pairs on the front
Front panel features
Power outputs
4 Neutrik SpeakON® 4 and 2 Neutrik SpeakON® 8
LCD Displays
4 x Alphanumeric displays with backlight, 2 lines of 8 characters
Back panel features
NXAMP power inputs
Neutrik SpeakON® 4 for connecting the NXAMP Powered TDcontroller
NXAMP interface
RS232 interface for communication with the NXAMP Powered TDcontroller
Mains inputs
2 IEC connectors with security latch
Displayed information
Front panel displays
Connected speaker name and mode, speaker pin-out, connected NXAMP channel
Speficications
Power supply
Fully redundant, dual universal 100 ~ 240 Volts, 50 or 60 Hz, 25 Watts
Dimensions & weight
1U 19" Rack - 248 mm (10") Depth - 4.7 Kg (10.4 lbs) net
Electrical Safety Certif.
cETLus, CB (CE)
EMC Certification
CE, FCC
Green status
Compliant with ROHS and REACH directive
Ordering information
Digital Patching Unit
NX.DPU (1 x DPU, 1 x Quick Start Guide, 1 x US mains cord)
Cable Kit for DPU, 110 V
DPT-CKITU (2 x US lockable power cord, 1 x RS232 link, 2 x SpeakON® link 4x4 mm²)
Cable Kit for DMU, 220 V
DPT-CKITC (2 x EU lockable power cord, 1 x RS232 link, 2 x SpeakON® link 4x4 mm²)
PAGE 140 OF 151
DMU DIMENSIONS
44
50
DMU Dimensions
480
DMU top and front view dimensions in mm
44
248
DPU Dimensions
480
DPU top and front view dimensions in mm
PAGE 141 OF 151
NXES104 & NXDT104 TECHNICAL SPECIFICATIONS
NXES104 & NXDT104 TECHNICAL SPECIFICATIONS
NXES104
NXDT104
Compatible networks
Ethersound™ netwokrs
Dante™ networks
Network type
Ethernet 100 Mb
TCP/IP over Ethernet, 100 Mb or 1 Gb
Device addressing
Automatic, based on MAC address
Automatic, based on IP address with Zeroconf
Number of channels
4 channels from network to NXAMP
4 channels from network to NXAMP
Resolution / Sample Rate
24 bits / 48 KHz
24 bits / 48 KHz
Latency
0.10 ms
0.25 ms to 5.0 ms
Network format
Audio format
Front panel features
Network inputs
2 shielded Neutrik Ethercon®
2 shielded Neutrik Ethercon®
Additional port
RJ45 for additional remote control
Additional remote control/Dante™ port
LEDs on network ports
Tx and Rx on each port
Link/Act and Speed on each port
LEDs on additional port
Link and activity
Link and activity
Power supply
3.3 Volts DC, 2 W from NEXO slot
3.3 Volts DC, 3 W from NEXO slot
Dimensions & weight
120 x 160 x 40 mm (NXAMP slot) - 160 g
120 x 160 x 40 mm (NXAMP slot) – 200 g
EMC certification
CE, FCC, ICES
CE, FCC
Green Status
ROHS and REACH
ROHS and REACH
Specifications
Ordering information
Ordering code
NX.ES104
NX.DT104
PAGE 142 OF 151
APPLICATION NOTE: DRIVING THE SUB FROM THE AUX SEND
Application Note: Driving the Sub from the AUX send
It is quite common to use the AUX send of a mixing desk to drive the Sub section of a PA
system. This gives the mixing engineer more flexibility to set the level of its subbass
relative to the main PA, apply special effects, use a different EQ on the Sub…However, it
also rises some serious issues for the performance & safety of the system (mostly time
alignment).
What is the phase relation between the AUX and MAIN output of your Desk?
At NEXO, when we align systems, we take great care to have an optimum phase alignment
from one octave above to one octave below the crossover frequency point. By doing so, we
ensure that both drivers are working perfectly together and providing the best efficiency
possible. It is then up to the user to adjust the delay on the NXAMP to match the physical
path difference of the different systems. It is thus possible to get a well adjusted system,
even without measuring instruments.
If you choose to drive the Sub from the AUX, you feed the NXAMP with two signals coming
from different sources. If those two sources (MAIN output & AUX send) are not exactly in
phase, you are introducing a delay –without knowing it- into the crossover between your
main system and your sub. Without the proper measurement tools, you will never be able
to tune the system as it should be.
Why it is unlikely the AUX and MAIN have the same phase?
•
Signal paths are likely to be different; any filter modifying the bandwidth and EQ of
the signal is also affecting the phase.
Example: a 24dB/oct high pass filter set at 15Hz is only affecting amplitude of the
signal by 0.6dB at 30Hz but the phase shift is 90°!! At 100Hz we can still measure
25° of phase shift.
•
Should you want to restrict the bandwidth with a low pass filter, you can introduce
a phase difference of up to 180° (completely out of phase) at the cross over point.
•
If the signal is passing though any digital equipment you are adding between 1.4ms
and 2.2ms (around 70° phase shift at 100Hz) due to the converter delay only. The
additional delay due to the processing itself (look ahead compressor, delay…) can
be quite important.
At the end of the day, if you have not measured both outputs in the actual configuration
you can be 90% sure that you won’t get the correct phase alignment that you would have
had if the NXAMP was fed by a single source.
Consequences of badly aligned systems
Mis-aligned systems have less efficiency: i.e. for the same SPL you will be obliged to drive
the system harder, causing displacement & temperature protection at lower SPL than a
properly aligned system. The sound quality will decrease. The reliability will decrease as the
system is driven harder to achieve the same levels. In certain situations you may even
need more speakers to do the same job.
PAGE 143 OF 151
APPLICATION NOTE: DRIVING THE SUB FROM THE AUX SEND
Consider the simple example of the AUX signal passing through a digital device (without
processing) that is adding a delay of 2ms due to its conversion time. The AUX is then sent
to a CD12 sub while the MAIN is send to the S850 rig. The first graph display the phase
around the crossover point (85Hz in this case).
The two overlapping phases are those of the CD12 and S805 as they should be. The bellow
curve is the same as the above one with a 2ms delay.
On the magnitude graph display the difference between the well aligned system and the
one with the CD12 2ms delayed. The difference is 2dB at 100Hz. This example is displaying
the consequences of a slightly incorrect alignment. If we add to this the delay introduced
by a slightly different electric path plus the “small” delay introduced by some processing,
plus an EQ filter done by the user near the cut off frequency…The graph above could shows
differences in excess of 6dB. (Up to the point where the system might work better if you
reverse the polarity of the sub).
Precautions & check
Before using the AUX send of your desk ensure that the outputs are in phase (you can feed
a 100Hz signal at the input and monitor the MAIN and AUX on a dual trace scope).
Always apply EQ or processing to all signals feeding the NXAMP. So the phase relation is
not affected.
PAGE 144 OF 151
APPLICATION NOTE: DRIVING THE SUB FROM THE AUX SEND
Never add additional low pass filtering on the SUB. (Or high pass to the main system).
Inverting polarity on one channel should always result in a massive difference near the
crossover point. If the sound is more or less the same the system is no longer aligned.
PAGE 145 OF 151
APPENDIX A: LIST OF SUPPORTED PRESETS (LOAD3_23)
Appendix A: List of Supported presets (LOAD3_23)
Please see the LOAD3_23_4ch_setups_list.pdf included in the documentation to see a
complete list of four channels presets supported in LOAD3_23 by the NXAMP powered
TDcontroller.
Please see the LOAD3_23_speakers_setups_list.pdf included in the documentation to see a
complete list of the various modes and crossovers available for each speakers of each
family in the LOAD3_23.
Please refer to the documentation enclosed with the firmware if the one loaded in your
NXAMP is not LOAD3_23.
PAGE 146 OF 151
APPENDIX B: HOW IS MEASURED THE AMPLIFIER POWER?
Appendix B: How is measured the amplifier power?
This part of the document describes the setup we have used to measure the power
available on the NXAMP Powered TDcontroller outputs for each load (8, 4 and 2 Ohms).
General description of the setup
The drawing bellow shows the setup used to measure the output power:
Audio Generator
with
Distortion Analyzer
y
& Kjær
Digital Scope
NXAMP Under Test
4x Dummy
Loads
The Audio Generator with distortion analyzer is used to generate test signals. It analyzes
the output of the amplifier to measure the THD+N, thus we can know when we reach the
clip of the amplifier with a certain value of distortion (typically 1 %).
The NXAMP under test is powered through a monitored power supply with voltage adjusted
to 230 Volts (+2/- 0 Volts) and 50 Hz.
The 4 analog inputs of the NXAMP Powered TDcontroller are linked together so all the
channels are fed. DSP setup is “FLAT – NO PROTN”, meaning that no EQ or gain is applied
and that only the amplifier protections are working. The volume is set to 0 dB attenuation.
Each output of the amplifier is connected to a dummy load (8, 4 or 2 Ohms). On one
channel, we loop the voltage back to the distortion analyzer and to a digital scope, to
PAGE 147 OF 151
APPENDIX B: HOW IS MEASURED THE AMPLIFIER POWER?
measure directly the output voltage on the screen.
Precision of the measurement
• All the measurement tools (Digital scope and distortion analyzer) have been
recently calibrated (less than one year).
• We’ve made some measurements on some batch of NXAMP to have a clear idea of
the precision of the amplifier itself, from one unit to the other (small differences in
the manufacturing of the custom transformer of the larges power supplies are the
main factor for having different power capability).
• The precision on the dummy loads has also been checked with a calibrated
ohmmeter.
Due to all this tolerances, we can compute a value for the power output of each channel of
the amplifier in a precision of (+/- 10 %).
Measurement method
The input signal is a burst sine wave at 1 KHz, for 20 ms, every 500 ms. We increase the
input level up to reaching 1 % THD+N on the distortion analyzer. We measure the signal
with the scope cursor as shown in the picture bellow:
500 msec
Vburst
1 msec
20 msec
Close-up
The center of the emission line shall
be adopted as the measurement value.
The last one wave of burst signal
shall be measured.
Signal
Cursor
We do 4 measurements for each output, so we do 16 measurements per unit. Then we
average on 4 units of NXAMP4X1C or NXAMP4X4C.
Then we redo the same with 4 units of NXAMP4X1U or NXAMP4X4U, mains being 120 Volts
(+2, -0 Volts at 60 Hz).
Finally we average all the measurements and this is the values which are written in the
datasheet of the NXAMP Powered TDcontrollers.
PAGE 148 OF 151
USABLE MAINS CORD IN EUROPE
Usable mains cord in Europe
The SEMKO (CE) certification in Europe is based on the assumption that the user will use
one of the following mains cord to use NXAMP4X4 or NXAMP4X1. Please choose one from
the list bellow.
NXAMP4X1
PLUG
CORD
CONNECTOR
WELL SHIN
WS-010
WELL SHIN
H05VV-F 3G 1.0mm²
WELL SHIN
WS-002-1
WELL SHIN
WS-010A
WELL SHIN
H05VV-F 3G 1.0mm²
WELL SHIN
WS-002-1
LONGWELL
LP-33
LONGWELL
H05VV-F 3G 1.0mm²
LONGWELL
LS-60
LONGWELL
LP-34A
LONGWELL
H05VV-F 3G 1.0mm²
LONGWELL
LS-60
VOLEX
M2511
VOLEX
H05VV-F 3G 1.0mm²
VOLEX
V1625
VOLEX
M2511A
VOLEX
H05VV-F 3G 1.0mm²
VOLEX
V1625
YUNG LI
YP-22
YUNG LI
H05VV-F 3G 1.0mm²
YUNG LI
YC-12
YUNG LI
YP-23
YUNG LI
H05VV-F 3G 1.0mm²
YUNG LI
YC-12
NXAMP4X1
for UK
PLUG
CORD
CONNECTOR
WELL SHIN
WS-012A
WELL SHIN
H05VV-F 3G 1.0mm²
WELL SHIN
WS-002-1
LONGWELL
LP-61L
LONGWELL
H05VV-F 3G 1.0mm²
LONGWELL
LS-60
VOLEX
MP5004
VOLEX
H05VV-F 3G 1.0mm²
VOLEX
V1625
YUNG LI
YP-60
YUNG LI
H05VV-F 3G 1.0mm²
YUNG LI
YC-12
NXAMP4X4
PLUG
CORD
CONNECTOR
WELL SHIN
WS-010
WELL SHIN
H05VV-F 3G 1.5mm²
Neutrik
NAC3FCA
WELL SHIN
WS-010A
WELL SHIN
H05VV-F 3G 1.5mm²
Neutrik
NAC3FCA
LONGWELL
LP-33
LONGWELL
H05VV-F 3G 1.5mm²
Neutrik
NAC3FCA
LONGWELL
LP-34A
LONGWELL
H05VV-F 3G 1.5mm²
Neutrik
NAC3FCA
VOLEX
M2511
VOLEX
H05VV-F 3G 1.5mm²
Neutrik
NAC3FCA
VOLEX
M2511A
VOLEX
H05VV-F 3G 1.5mm²
Neutrik
NAC3FCA
NXAMP4X4
for UK
PLUG
CORD
CONNECTOR
WELL SHIN
WS-012A
WELL SHIN
H05VV-F 3G 1.5mm²
Neutrik
NAC3FCA
LONGWELL
LP-61L
LONGWELL
H05VV-F 3G 1.5mm²
Neutrik
NAC3FCA
VOLEX
MP5004
VOLEX
H05VV-F 3G 1.5mm²
Neutrik
NAC3FCA
PAGE 149 OF 151
ROHS CERTIFICATE
ROHS certificate
PAGE 150 OF 151
USER NOTES
User Notes
Nexo S.A.
Parc d’Activité de la Dame Jeanne
B.P. 5
F-60128 PLAILLY
Tel: +33 3 44 99 00 70
Fax: +33 3 44 99 00 30
E-mail: [email protected]
www.nexo-sa.com
PAGE 151 OF 151