1
Living up to Life
User Manual
Leica TL5000 Ergo Transmitted Light Base
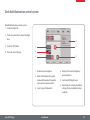
General Notes
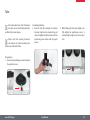
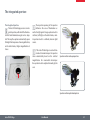
Safety concept
Before using your microscope for the first time,
please read the "Safety concept" brochure
included with your instrument. It contains
additional information about handling and
care.
Use in clean rooms
The Leica TL5000 Ergo can be used in clean
rooms without any problems.
Cleaning
▶▶ You can find notes on cleaning in the
appendix, which begins on page 53 .
Servicing
▶▶ Repairs may only be carried out by Leica
Microsystems-trained service technicians.
Only original Leica Microsystems spare
parts may be used.
Responsibilities of person in charge of
instrument
▶▶ Ensure that the Leica stereomicroscope
is operated, maintained and repaired by
authorized and trained personnel only.
Leica TL5000 Ergo
User Manual
2
Symbols Used
Warning! Safety hazard!
This symbol indicates especially important information that is mandatory to
read and observe.
Important information
This symbol indicates additional information or explanations that are intended
to provide clarity.
Failure to comply can cause the following:
▶▶ Hazards to personnel
▶▶ Functional disturbances or damaged
instruments
Explanatory notes
▶▶ This symbol within the text stands for additional information and explanations.
Warning of hazardous electrical voltage
This symbol indicates especially important information that is mandatory to
read and observe.
Figures
(1) Numbers in parentheses within the
descriptions relate to the figures and the
items within those figures.
Failure to comply can cause the following:
▶▶ Hazards to personnel
▶▶ Functional disturbances or damaged
instruments
Leica TL5000 Ergo
User Manual
3
Safety Instructions
Description
The safety instructions in this manual refer to
the installation and use of the Leica TL5000
Ergo transmitted light base. Be sure to read the
safety instructions noted in the manual for your
Leica stereomicroscope before use.
Intended use
▶▶ Refer to "Safety Concept" booklet
The instruments and accessories described in
this User Manual have been tested for safety
and potential hazards. The responsible Leica
affiliate must be consulted whenever the instrument is altered, modified or used in conjunction with non-Leica components that are
outside of the scope of this manual!
Place of use
▶▶ Refer to "Safety Concept" booklet
▶▶ Electrical components must be placed at
least 10 cm away from the wall and from
flammable substances.
Unauthorized alterations to the instrument or
noncompliant use shall void all rights to any
warranty claims!
Non-intended use
▶▶ Refer to "Safety Concept" booklet
Leica TL5000 Ergo
User Manual
4
Safety Instructions (continued)
Responsibilities of person in charge of
instrument
▶▶ Refer to "Safety Concept" booklet
Ensure that:
▶▶ the base, the M series stereomicroscopes
and accessories are operated, maintained
and repaired by authorized and trained
personnel only.
▶▶ All operators have read, understood and
observe this User Manual, and particularly
the safety instructions.
Leica TL5000 Ergo
Repairs, service work
▶▶ Refer to "Safety Concept" booklet
▶▶ Only original Leica Microsystems spare
parts may be used.
Integration in third-party products
▶▶ Refer to "Safety Concept" booklet
Disposal
▶▶ Refer to "Safety Concept" booklet
▶▶ Before opening the instruments, switch off
the power and unplug the power cable.
Touching the live circuit can cause
injury.
Legal regulations
▶▶ Refer to "Safety Concept" booklet
EC Declaration of Conformity
▶▶ Refer to "Safety Concept" booklet
User Manual
5
Contents
Leica TL5000 Ergo
Congratulations!8
The Modular Design: Everything is Relative
9
On We Go
10
Assembly
Important Information for Assembly
12
Assembling the Focusing Column
13
Motorized Focus: Restricting the Travel Path
14
Optics carrier
15
Tube16
Eyepieces17
Objective18
Quick Start Guide
An overview of the Leica TL5000 Ergo
The integrated aperture
The different contrast methods
Possible scenarios
Switching the transmitted light base on and off
Working with bright field illumination
Working with Rottermann contrast
Working with dark field illumination
Dark field for fluorescence applications
Switching the automatic control system for bright field on and off
Resetting the base to factory default settings
Leica TL5000 Ergo
20
21
22
23
24
26
27
29
30
31
32
Preparation for the automatic control system
The basics
Detection with SmartTouch™
Detection with Leica Application Suite
Detection with Leica Application Suite AF
34
35
36
37
Operation with Leica SmartTouch™
Leica SmartTouch™ expands your possibilities!
An overview of the Leica SmartTouch™
Controls on the Touchscreen
Accessing the Leica TL5000 Ergo
Bright field illumination control system
Rottermann contrast control system
Dark field illumination control system
Switching off the LED display
Resetting settings
Malfunction indicator / automatic shutoff
39
40
41
42
43
44
45
46
47
48
Dimensions and Specifications
Dimensions50
Specifications51
Appendix
Care, Maintenance, Contact Persons
User Manual
53
6
Leica TL5000 Ergo
Leica TL5000 Ergo
User Manual
7
Congratulations!
Congratulations on purchasing your new Leica TL5000 Ergo transmitted light base. The multitude of contrast methods will make your daily
work substantially easier. Whether bright field, dark field or Rottermann
contrast: The optimal illumination for your specimens is always available
while you work. The transmitted light base is maintenance-free due to
the energy saving, long-lasting LED light source; lamp replacements are
a thing of the past.
Though the reliability and robustness of Leica devices is world-renowned,
the Leica TL5000 Ergo requires a certain degree of care and attention.
Therefore, we recommend that you read this manual. It contains all the
information you need regarding operation, safety and maintenance.
Simply observing a few guidelines will ensure that even after years
of intensive use, your transmitted light base will continue to work as
smoothly and reliably as on the very first day.
Furthermore, the Leica TL5000 Ergo fits seamlessly with the encoded
components of the Leica M series. If, for example, you work with an
encoded Leica M205 C stereomicroscope, the information on magnification or objectives in use is automatically relayed to your Leica TL5000 Ergo
transmitted light base or Leica SmartTouch™ control unit.
We wish you the best of success in your work!
Leica TL5000 Ergo
User Manual
8
The Modular Design: Everything is Relative
The Leica M series provides maximum flexibility
in choosing equipment, thanks primarily to the
modular configuration and the compatibility
that Leica has painstakingly maintained for
decades. The optics carriers, eyepieces, bases
and more can be combined in any way you
choose, allowing you to create the microscope
that best suits your needs.
Leica TL5000 Ergo
Despite this, you will notice that the control
elements and individual components do not
differ significantly. Whichever configuration
you choose, you will quickly feel right at home.
User Manual
Have a special request? Let us know!
Leica Microsystems enjoys an exceptional reputation when it comes to devising customerspecific solutions. If you have a special request
that cannot be met with standard parts, contact
your Leica consultant. We have a solution for
every problem.
9
On We Go
If your new equipment configuration has
already been assembled and commissioned by
your Leica consultant, skip the installation instructions and start with the Quick Start Guide
on page 19..
Leica TL5000 Ergo
If, on the other hand, you are putting the base
and microscope together yourself, continue
with the "Assembly" chapter, which begins on
page .11
User Manual
10
Assembly
Leica TL5000 Ergo
User Manual
11
Important Information for Assembly
assembly of the Leica TL5000 Ergo transThe following instructions refer to the
mitted light base together with the Leica M205
C stereomicroscope. However, the transmitted
light base can be operated with all Leica M
series stereomicroscopes – with or without fluorescence. For details on assembling the optics
carrier, tube, and eyepieces please consult your
stereomicroscope's user manual.
Leica TL5000 Ergo
User Manual
12
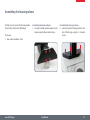
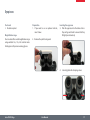
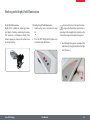
Assembling the focusing column
The first step is to connect the focusing column
of the M series to the Leica TL5000 Ergo.
Assembling the column adapter
1. Securely install the column adapter on the
column using the four included screws.
Tools used
▶▶ Hex socket screwdriver, 3 mm
Leica TL5000 Ergo
User Manual
Assembling the focusing column
2. Securely screw the focusing column to the
Leica TL5000 Ergo using the 6 included
screws.
13
Motorized Focus: Restricting the Travel Path
may be necessary to restrict the maxiDepending on the work situation, it
mum travel path of the stereomicroscope. This
prevents the following:
▶▶ Injuries when manipulating the specimen
because the fingers or hand get pinched.
Restricting the bottom travel range
1. Move the motorized focus into the lowest
position you want to reach.
2. Unscrew the screw of the limit stop on the
side of the focusing column.
3. Push the limit stop to the height of the
motorized focus.
It is easiest to move the limit stop by keeping the
screwdriver inserted and moving it upwards.
4. Tighten the screw of the limit stop.
▶▶ Accidental contact between the objective
and the specimen, and potential resulting
damage.
Readjusting the motorized focus
The motorized focus is factory-adjusted and
normally does not need to be readjusted – even
if the maximum travel path is changed.
• rized focus is moving, the position data
Exception: If the power fails while the moto-
are lost. In this case, the calibration must be
repeated using the Leica LAS software or the
Leica SmartTouch™. To do so, please consult the
respective manual.
Leica TL5000 Ergo
User Manual
14
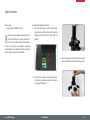
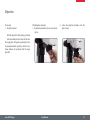
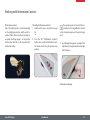
Optics Carrier
Tools used
▶▶ Hex socket screwdriver, 4 mm
tives of the M series (article numbers 10
Please use the planapochromatic objec-
Assembling the Optics Carrier
1. Place the microscope carrier on the focusing column so that the screw fits into the
thread provided and the lug fits into the
groove.
450 027 to 10 450 030) with the microscope
carrier. If you have any inquiries regarding
compatibility and adaptation of other models,
please contact your Leica consultant.
3. Insert the optics carrier into the microscope
carrier and fasten it with the locking screw.
2. Press the microscope carrier backwards to
the focusing column and screw it in place
using your other hand.
Leica TL5000 Ergo
User Manual
15
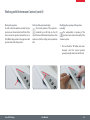
Tube
the optics carrier and the binocular tube
All intermediate tubes that fit between
are fitted in the same manner.
ate elements can lead to shading in the
Please note that inserting intermedi-
Assembling the tube
2. Push the tube (for example, the inclined
binocular tube) into the dovetail ring and
rotate it slightly in both directions until the
positioning screw meshes with the guide
groove.
3. While holding the tube only slightly, carefully tighten the positioning screw. It is
automatically brought to the correct position.
border area of the field of view.
Preparations
1. Unscrew the positioning screw and remove
the protective cover.
Leica TL5000 Ergo
User Manual
16
Eyepieces
Tools used
▶▶ No tools required.
Magnification range
You can extend the overall magnification range
using available 10×, 16×, 25× and 40× widefield eyepieces for persons wearing glasses.
Preparation
1. If you want to use an optional reticule,
insert it now.
Inserting the eyepieces
3. Push the eyepieces into the tubes as far as
they will go and check to ensure that they
fit tightly and accurately.
2. Remove the plastic tube guard.
4. Securely tighten the clamping screws.
Leica TL5000 Ergo
User Manual
17
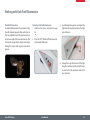
Objective
Tools used
▶▶ No tools required.
Attaching the objective
1. Remove the protective cover on the optics
carrier.
2. Screw the objective clockwise into the
optics carrier.
• and disassembly so that it does not fall onto
Hold the objective firmly during assembly
the stage plate. This applies particularly to the
2x planapochromatic objective, which is very
heavy. Remove all specimens from the stage
plate first.
Leica TL5000 Ergo
User Manual
18
Quick Start Guide
Leica TL5000 Ergo
User Manual
19
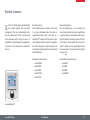
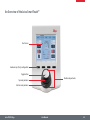
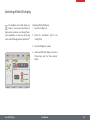
An Overview of the Leica TL5000 Ergo
1
2
3
4
1 2
3 4 5
1
2
Back panel
Left side
Right side
1
2
3
4
1 LED display for opening and positioning the
aperture or for balance in DF mode.
2 Control for the size of the aperture/balance
3 "BF" button for bright field (press and hold
for 2 seconds to (de)activate the automatic
aperture)
4 "RC" button for Rottermann Contrast / in the
RC mode, press and hold the button to define
the aperture size
5 "DF" button for dark field
1 On/Off switch for the light source / Press and
hold for 5 seconds to reset the base to factory
default settings
2 Controls for controlling the brightness intensity
Power switch for the base
Power connection
1 × USB port
3 × CAN bus port
Leica TL5000 Ergo
User Manual
20
The integrated aperture
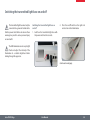
The integrated aperture
The Leica TL5000 Ergo possesses an integrated aperture, with which the illuminated field and illumination angle can be adjusted. This way the aperture automatically opens
for bright field exposures at low magnifications;
on the other hand, at higher magnifications it
closes.
influences the area of illumination as
The respective opening of the aperture
well as the light guide. A large aperture leads to
scattered, soft light; on the other hand, a smaller aperture leads to a defined, intensive light
source.
encoded stereomicroscope the aperture
If the Leica TL5000 Ergo is used with an
closes automatically based on the selected
magnification. For unencoded microscopes
the aperture must be adjusted manually by the
user.
Specimen with a wide-open aperture
Specimen with an optimized aperture
Leica TL5000 Ergo
User Manual
21
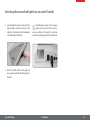
The Different Contrast Methods
Bright field
Bright field is suitable for examining translucent objects featuring contrasting structures.
The object is directly illuminated from below
and is seen in its natural colors against a bright
background.
Operation for bright field illumination is explained starting on page 26 .
Dark Field
For dark field illumination the specimen is lit by
two LED elements opposite from each other so
that only light that has hit the specimen travels
up the beam path of the stereomicroscope. The
structure of opaque objects disperses the light,
making the object visible against a dark background.
Operation for dark field illumination is explained starting on page 29 .
Fly with bright field illumination
Leica TL5000 Ergo
Identical subject with dark field illumination
User Manual
Rottermann contrast
Part of the lighting unit is covered depending
on the diaphragm position, which results in
contrast effects. Phase structures typically act
as spatial, relief-type images – in the positive
relief contrast like hills, in the inverted relief
contrast like valleys.
Operation for Rottermann contrast is explained
starting on page 27 .
Identical subject with Rottermann contrast
22
Possible Scenarios
base works together with any device
The Leica TL5000 Ergo transmitted light
configuration. The base automatically calculates the optimal size of the aperture based
on the objective used as well as the user's set
magnification. Depending on the configuration
used, more or less automation is available for
the user.
Encoded systems
The stereomicroscope is encoded – this means
it can relay information about the optics or
magnification being used to the base or a
SmartTouch™ control unit. The aperture is automatically adjusted to the respective magnification; if this changes, the aperture adapts to the
new situation automatically in order to provide
ideal illumination.
Unencoded systems
The stereomicroscope is not encoded and
cannot relay information about magnification
or optics to the base. Control takes place manually, but thanks to intuitive operation the optimal contrast is found quickly. The Leica SmartTouch™ control unit can significantly increase
the convenience of using unencoded systems
(see page 39).
Encoded stereomicroscopes:
• Leica M205 FA
• Leica M205 A
• Leica M205 C
• Leica M165 FC
• Leica M165 C
Unencoded stereomicroscopes:
• Leica M125
• Leica M80
• Leica M60
• Leica MZ10 F
Leica SmartTouch™
Leica TL5000 Ergo
User Manual
23
Switching the transmitted light base on and off
The transmitted light base must only be
connected to a grounded socket with a
faultless power cable! Failure to observe these
warnings may result in serious personal injury
or even death!
Switching the transmitted light base on
and off
1. Switch on the transmitted light base with
the power switch on the rear side.
2. Press the on/off switch on the right side
once to turn on the illumination.
Check and adjust the intensity of the
The LED illumination can be very bright!
illumination to a suitable brightness before
looking through the eyepieces.
Continued on next page.
Leica TL5000 Ergo
User Manual
24
Switching the transmitted light base on and off (cont'd)
3. Look through the eyepiece and adjust the
light intensity using the control on the
right side. The intensity of the illumination
is visualized by the LED scale.
switch on the rear side of the device is
The following assumes that the power
always switched on. This switch is not mentioned in the remaining part of this User Manual.
4. Press the on/off switch on the right side
once again to turn off the illumination on
the base.
Leica TL5000 Ergo
User Manual
25
Working with Bright Field Illumination
Bright field illumination
Bright field is suitable for examining translucent objects featuring contrasting structures.
The specimen is illuminated directly from
below to appear pin-sharp and in natural colors
on a bright surface.
Leica TL5000 Ergo
Activating bright field illumination
1. Switch on the base as described on page
24.
2. Press the "BF" ("Bright Field") button once
to activate bright field mode.
User Manual
or opens the illumination aperture correFor encoded systems, the aperture closes
sponding to the magnification selected on the
stereomicroscope and the optics being used.
3. Look through the eyepieces and adjust the
light intensity using the control on the right
side of the base.
26
Working with Rottermann Contrast
Rottermann contrast
Part of the lighting unit is covered depending
on the diaphragm position, which results in
contrast effects. Phase structures typically act
as spatial, relief-type images – in the positive
relief contrast like hills, in the inverted relief
contrast like valleys.
Activating Rottermann contrast
1. Switch on the base as described on page
24 .
2. Press the "RC" ("Rottermann Contrast")
button once to activate Rottermann contrast mode and to bring the aperture into
position.
The aperture opens or closes itself corresponding to the magnification selected
on the stereomicroscope and the optics being
used.
3. Look through the eyepieces and adjust the
light intensity using the control on the right
side of the base.
Continued on next page.
Leica TL5000 Ergo
User Manual
27
Working with Rottermann Contrast (cont'd)
Moving the aperture
In order to find the optimum contrast for your
specimen use the control on the left side of the
base to move the aperture towards the rear or
front. While doing so look in the eyepieces until
you have found the ideal position.
Position of the aperture display
The current position of the aperture is
visualized by an LED strip on the left
side of the base. Write down the position of the
aperture so that the setting can be reproduced
later.
Modifying the opening of the aperture
manually
The automatically set opening of the
aperture can be reduced manually if the
situation requires.
1. Press and hold the "RC"button and simultaneously select the desired aperture
opening using the control on the left side.
Leica TL5000 Ergo
User Manual
28
Working with Dark Field Illumination
Dark field illumination
For dark field illumination the specimen is lit by
two LED elements opposite from each other so
that only light that has hit the specimen travels
up the beam path of the stereomicroscope. The
structure of opaque objects disperses the light,
making the object visible against a dark background.
Activating dark field illumination
1. Switch on the base as described on page
24 .
3. Look through the eyepieces and adjust the
light intensity using the control on the right
side of the base.
2. Press the "DF" ("Dark Field") button once to
activate dark field mode.
4. Change the angle of incidence of the light
using the control on the left side of the base
in order to find the optimum contrast for
your specimen.
Leica TL5000 Ergo
User Manual
29
Dark Field for Fluorescence Applications
Display with minimal reflections
If you are be working mainly with dark
field illumination, you can remove the
protective glass plate from the light source. This
way you will have a low-reflection background
that will therefore be even darker.
The protective glass plate is located beneath
the glass cover of the base, directly above the
light source.
Leica TL5000 Ergo
User Manual
30
Switching the Automatic Control System for Bright Field On and Off
with an encoded stereomicroscope, the
If the Leica TL5000 Ergo is used together
aperture automatically adapts to the selected
magnification and the optics being used. This
automatic adjustment can be turned off at any
time in the bright field "BF" illumination mode.
Deactivating the automatic control system
1. Enable bright field mode ("BF").
2. Press and hold the "BF" button for 2
seconds.
Activating the automatic control system
1. Press the "BF" button again for 2 seconds to
reactivate the aperture's automatic control
system.
Leica TL5000 Ergo
User Manual
Manual control
The aperture can be adjusted by the
user with the knob on the left side while
manual control is active. This will, for example,
increase contrast with a reduction in the aperture.
curved LED display.
The size of the aperture is visualized by a
31
Resetting the Base to Factory Default Settings
Recalling factory settings
The transmitted light base can be returned to
its default state – that is, all settings are reset to
the value they were upon delivery.
1. Hold the on/off switch on the right side of
the base 5 seconds long in order to return
to the factory settings.
Leica TL5000 Ergo
User Manual
32
Preparation for the Automatic
Control System
Leica TL5000 Ergo
User Manual
33
The basics
Leica TL5000 Ergo base can be used,
Before the automatic contrast of the
the individual components in the equipment
configuration must be detected. This is the only
way, for example, that an optimum aperture
size can be calculated to eliminate stray light
during bright field illumination. The factors that
need to be detected are: Objective, visual tube,
eyepieces as well as (if present): Camera tube,
camera, HC adapter and zoom system accessories (e.g. AX carrier, objective turret, Fluo Combi,
coaxial illuminator, A tube, Y tube).
Leica TL5000 Ergo
out before the first time you use the base
This one time detection must be carried
with the Leica SmartTouch™, Leica Application
Suite or Leica Application Suite AF. The configured settings are automatically synchronized
between the Leica SmartTouch™ and Leica
Application Suite (AF). Redetection is only
necessary if the components in the equipment
configuration have been changed.
User Manual
34
Detection with SmartTouch™
Detection with Leica SmartTouch™
1. Connect the Leica SmartTouch™ control
unit to your microscope equipment.
components of your stereomicroscope
Detection is complete. Now all of the
are integrated into the automatic aperture
control system correctly.
2. On the Leica SmartTouch™, touch the
"Config." tab.
3. Touch the "Config." field.
4. In the "Microscope" field select the instrument categories you are using in sequence.
5. In each category, touch the component you
are using.
Leica TL5000 Ergo
User Manual
35
Detection with Leica Application Suite
Detection with Leica Application Suite
1. Start Leica Hardware Configurator.
5. Click the "Microscope" tab.
7. In each category, click on the component
you are using.
2. Configure your microscope in Hardware
Setup.
3. Start Leica Application Suite.
4. Select the "Configure" command from the
main menu.
6. Select the instrument categories you are
using in sequence.
components of your stereomicroscope
Detection is complete. Now all of the
are integrated into the automatic aperture
control system correctly.
Leica TL5000 Ergo
User Manual
36
Detection with Leica Application Suite AF
Detection with Leica Application Suite AF
1. Start Leica AF Hardware Configurator.
4. Select the instrument categories you are
using in sequence.
5. In each category, click on the component
you are using.
2. Configure your microscope in Hardware
Setup.
3. Click on the "Configure" button.
components of your stereomicroscope
Detection is complete. Now all of the
are integrated into the automatic aperture
control system correctly.
Leica TL5000 Ergo
User Manual
37
Operation with Leica SmartTouch™
Leica TL5000 Ergo
User Manual
38
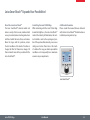
Leica SmartTouch™ Expands Your Possibilities!
About the Leica SmartTouch™
The Leica SmartTouch™ external control unit
makes a variety of tasks easier, combined with
an easy-to-understand and well-organized user
interface. Control the zoom, focus, and camera.
Move the stage with the specimen, restore
the test conditions at the touch of a button or
change the filter for fluorescence images. All
that and much more will be possible with the
Leica SmartTouch™.
Controlling the Leica TL5000 Ergo
While interacting with the Leica TL5000 Ergo
transmitted light base, the Leica SmartTouch™
controls the intensity of illumination, the contrast method as well as the opening and position of the aperture. But above all, you can save
settings and restore them later at the touch
of a button. This way you obtain reproducible
conditions and consequently have maximum
assurance in your experiments.
Additional information
Please consult the manual that was delivered
with the Leica SmartTouch™ for information on
installation, wiring and start-up.
Leica SmartTouch™
Leica TL5000 Ergo
User Manual
39
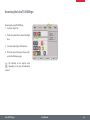
An Overview of the Leica SmartTouch™
Touchscreen
Hardware keys (freely configurable)
Toggle button
Double rotary actuator
Top rotary actuator
Bottom rotary actuator
Leica TL5000 Ergo
User Manual
40
Controls on the Touchscreen
Display conventions
The display on the display panel only
shows the configuration that is actually
present. For example, if the motorized mechanical stage is not connected, the corresponding
settings are not displayed. The screenshots in
this manual may thus differ from the display on
your Leica SmartTouch™.
Tab
Display
Button
Display of the current function
of a hardware key
Segment
Color coding conventions
All fixed elements of the user interface
(such as labels or titles) are displayed in
a black font. All the values that can be modified
(such as the zoom factor, status of the illuminator, etc.) are displayed in a red font.
Scroll bar arrows
Leica TL5000 Ergo
User Manual
41
Accessing the Leica TL5000 Ergo
Accessing the Leica TL5000 Ergo
1. Touch the "Light" tab.
2. Touch the symbol for the transmitted light
base.
3. Select the desired type of illumination.
4. Put in the desired settings as they are outlined on the following pages.
The indicator on the display varies
depending on the type of illumination
selected.
Leica TL5000 Ergo
User Manual
42
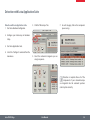
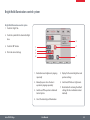
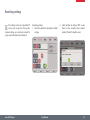
Bright field illumination control system
Bright field illumination control system
1. Touch the "Light" tab.
2. Touch the symbol for the transmitted light
base.
3. Touch the "BF" button.
4. Put in the desired settings.
5
6
1
2
3
4
7
1. Reduce/Increase brightness by tapping
repeatedly
5. Display for the current brightness and
aperture settings
2. Manually open or close the base's
aperture by tapping repeatedly
6. Switch on/off the base's light source
3. Switch on/off the aperture's Automatic
Control System
7. Reset button for restoring the default
settings (for all or individual contrast
methods)
4. Select the desired type of illumination
Leica TL5000 Ergo
User Manual
43
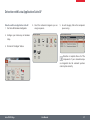
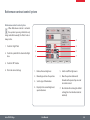
Rottermann contrast control system
Rottermann contrast control system
When Rottermann contrast is activated
the aperture's opening is limited to only
being controlled manually; the "Auto" mode is
always active.
1. Touch the "Light" field.
2. Touch the symbol for the transmitted light
base.
4
1
5
2
6
3
7
3. Touch the "RC" button.
4. Put in the desired settings.
1. Reduce/Increase brightness
5. Switch on/off the light source
2. Manually open/close the aperture
6. Move the aperture backwards/
forwards with repeated taps in order
to control contrast
3. Select a type of illumination
4. Display for the current brightness/
aperture/balance
Leica TL5000 Ergo
User Manual
7. Reset button for restoring the default
settings (for all or individual contrast
methods)
44
Dark field illumination control system
Dark field illumination control system
1. Touch the "Light" tab.
2. Touch the symbol for the transmitted light
base.
3. Touch the "DF" button.
4. Put in the desired settings.
4
5
1
2
3
6
1. Reduce/Increase brightness
2. Move the illumination focal point
backwards/forwards with repeated
taps in order to control contrast
3. Select a type of illumination
Leica TL5000 Ergo
User Manual
4. Display for the current brightness/
aperture/balance
5. Switch on/off the light source
6. Reset button for restoring the default
settings (for all or individual contrast
methods)
45
Switching off the LED display
The brightness of the LED display can
hinder or even prevent observation of
light-sensitive specimens and during fluorescence applications. In such cases the display
can be shut off through the Leica SmartTouch™.
Switching off the LED display
1. Touch the "Config." tab.
2.Touch the "SmartTouch" field in the
"Config." field.
3. Touch the "Brightness" symbol.
4. Switch on/off the LED display on the Leica
TL5000 Ergo with the "Zoom display"
button.
Leica TL5000 Ergo
User Manual
46
Resetting settings
can be reset at any time. This way the
The settings on the Leica SmartTouch™
standard settings are selectively restored for
every or just individual contrast methods.
Leica TL5000 Ergo
Resetting settings
1. Touch the symbol for restoring the default
settings.
User Manual
2. Select whether all settings ("All") or only
those for the currently active contrast
method ("Current") should be reset.
47
Malfunction Indicator/Automatic Shutoff
Visual note on the base
If an error arises in the base it is indicated
on the right side of the base via the blinking of the green LED for the illumination. This
is the case, for example, if the LED lighting unit
switches itself off due to too high of temperatures. This is due to a safety function designed
to prevent damage to the base. As soon as the
LED lighting unit has cooled off the base can be
used again as usual.
Leica TL5000 Ergo
User Manual
48
Dimensions and
Specifications
Leica TL5000 Ergo
User Manual
49
54
Dimensions
154
46
70
70
Leica M205 C with coarse/fine pinion and Leica TL5000 Ergo transmitted light base
154
346
547
412
431
292
217
346
Leica TL5000 Ergo
154
46
70
70
154
346
User Manual
50
Technical Data
Leica TL5000 Ergo
Light source
Light source
Power supply
by user
Input
120–240 VAC 47 – 63 Hz 3.2 A
Illuminated area: Bright field ∅
65 mm
Output
33 VDC 3.93 A 130 W max.
Illuminated area: Dark field ∅
40 mm
Connections
Relief Contrast System (RC ™)
Yes
CAN
3
Internal shutter/lamp control
Yes
USB
1
Remote control options
Yes
Power Supply
1
Integrated filter holder
Yes
Matching of high num. aperture
Yes
Anti-Shock™ Pads
Yes
Size (W×H×D, in mm)
412 × 341 × 46
Accessories
IsoPro™ cross-stage support
–
Integrated heating stage (optional)
Yes
Integrated slide adapter (optional)
Yes
ErgoRest™ (optional)
Leica TL5000 Ergo
–
User Manual
51
Appendix
Leica TL5000 Ergo
User Manual
52
Care, Maintenance, Contact Persons
We hope you enjoy using your transmitted light
base. Leica products are renowned for their
robustness and long service life. Observing the
following care and cleaning tips will ensure that
even after years and decades, your Leica configuration will continue to work as well as it did
on the very first day.
Warranty benefits
The warranty covers all faults in materials
and manufacture. It does not, however, cover
damage resulting from careless or improper
handling.
Contact address
However, if your instrument should no longer
function properly, contact your technician,
your Leica representative or Leica Microsystems
(Schweiz) AG, CH-9435 Heerbrugg.
Care
▶▶ Protect your equipment from moisture,
fumes and acids and from alkaline, caustic
and corrosive materials and keep chemicals
away from the instruments.
E-mail contact:
[email protected]
▶▶ Plugs, optical systems and mechanical
parts must not be disassembled or replaced, unless doing so is specifically permitted and described in this manual.
▶▶ Protect your microscope from oil and
grease.
▶▶ Do not grease guide surfaces or mechanical
parts.
Leica TL5000 Ergo
User Manual
53
Care, Maintenance, Contact Persons (continued)
Protection from dirt
Dust and dirt will affect the quality of your
results.
▶▶ Put a dust cover over the microscope when
it will not be used for a long time.
Cleaning polymer components
Some components are made of polymer or are
polymer-coated. They are, therefore, pleasant
and convenient to handle. The use of unsuitable cleaning agents and techniques can
damage polymers.
Permitted measures
▶▶ Clean the microscope (or parts of it)
using warm soapy water, then wipe using
distilled water.
▶▶ Use dust caps to protect tube openings,
tubes without eyepieces, and eyepieces.
▶▶ For stubborn dirt, you can also use ethanol
(industrial alcohol) or isopropanol. When
doing so, follow the corresponding safety
regulations.
▶▶ Keep accessories in a dust-free place when
not in use.
▶▶ Remove dust with a pneumatic rubber bulb
or with a soft brush.
▶▶ Clean objectives and eyepieces with special
optic cleaning cloths and with pure alcohol.
Leica TL5000 Ergo
User Manual
54