1
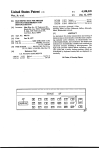
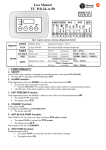
COHU, INC. Electronics Division Installation and Operation Instructions 1100 SERIES RS-170 AND CCIR MONOCHROME CAMERAS 5755 KEARNY VILLA ROAD SAN DIEGO, CA 92123-1111 PHONE (619) 277-6700 FAX (619) 277-0221 [email protected] 6X-970(B)pdf Change 2 1 1100 SERIES CAMERAS RS-170 AND CCIR S1 SWITCH SETTINGS SHUTTER SPEED OFF S1-1 S1-2 S1-3 Flickerless Mode • • 1/250 1/500 1/2000 1/4000 1/10,000 FIELDS EQUIPMENT SUPPLIED The following list does not include any optional or special-request items. 2. Manual, Installation and Operation 6X-970(B) 8 2. Adapter, CS-mount (Option)* • • • • S1-1 • • • • • • • • • • • S1-2 • S1-3 2 1. Camera, 1100 series, and 8364-6 power/video interface board 1. Power supply, 12 V dc, 300 mA (with a 12V ac output if the line lock option is being used) • S1-4 • • • 6 10 12 14 16 • • • • • • • • • • • • • • • • • 3. Adapter, C-mount (Consists of a 5 mm extension ring and a CS- mount) [Option]* NOTES: • = ON; All others OFF 4. Lens, TV type, CS-mount or C-mount. (When using the optional electronic iris circuit, a manual iris lens is required) For S1-6, ON = FIELD MODE; OFF = FRAME MODE 5. Monitor, RS-170 or CCIR, as required 6. Cables (video, power input, external sync, and others depending on the options and desired applications) 7. Available option boards: • • • • • • Sync interface board External sync (genlock) board Electronic iris board Linelock board Dc iris board Special reset (integration) board S1-5 (Settings from 2 to 16 available in field mode only) 4 EQUIPMENT REQUIRED BUT NOT SUPPLIED • • 1/125 1/1000 S1-5 • 1/100 (NTSC) 1/120 (CCIR) S1-4 Flickerless mode eliminates interference with ac power line lighting when a 60 Hz camera is used with 50 Hz lighting or a 50 Hz camera with 60 Hz lighting. When using either the optional electronic iris board or optional special reset board the 1/10,000 shutter mode must be selected *Includes a set screw (4-40 x 5/32) and hex wrench (0.050) CAUTION Be sure to maintain the correct pin to pin connections when plugging in the flexible jumper cables between the sensor board and the main board. Failure to do so will damage the camera. Refer to the figure on page 1. Also, replace the cable in the same orientation as when it was removed. 2 Change 2 6X-970(B)pdf 1100 SERIES CAMERAS RS-170 AND CCIR CONNECTOR J22 (AUTO IRIS LENS) PIN FUNCTIONS PIN NO . NAME INPUT / OUTPUT 1 Lens Power Output Provides 11.3 V dc, 100 mA (maximum), for use by auto-iris lenses having their own internal driver board 2 Lens Video Out Output Provides a low impedance, buffered, dc-isolated ac output signal related to video level for operation of an auto-iris lens that has its own driver board 3 Iris Video Output 4 Ground - FUNCTION Signal used by the dc iris option board Common for all other pins on the connector CONNECTOR J26 (SYNC INPUT) PIN FUNCTIONS PIN NO. NAME INPUT/ OUTPUT 1 Async Reset / Special Reset Input 2 Vertical Trigger Input 3 +5 D Output 4 H. Delay — 5 Horizonta l Trigger Input 6 Ground D — FUNCTION The input for asynchronously resetting the camera sync generator. The input for a vertical trigger pulse when the camera is being synchronized to externally applied horizontal (pin 5) and vertical pulses Provides 5 V dc for use by the optional external sync (genlock) board Circuit function implemented by an option board An input for horizontal trigger pulses when the camera is being synchronized to externally applied horizontal and vertical (pin 2) pulses A grounded pin for signals CONNECTOR J27 (POWER IN/VIDEO OUT) PIN FUNCTIONS PIN NO. NAME INPUT/ OUTPUT 1 12 V dc (+) Input 2 12 V dc (Common ) — 3 Ground — 4 Video Output FUNCTION A 12 V dc ±10 percent source of operating power for the camera Ground. Provides connection for the input power common lead. Provides common line for the video signal Provides the 75-ohm, 1-Vp-p video output signal from the camera for connection to a tv monitor or similar equipment Note: Page 1 shows two circuit boards that can be used as an interface when connecting to J27 6X-970(B)pdf 3 1100 SERIES CAMERAS RS-170 AND CCIR CONNECTOR J34 (INTEGRATION) PIN FUNCTIONS PIN NO. NAME INPUT/ OUTPUT FUNCTION Provide an output pulse of either positive or negative going polarity (jumper selectable) to sync a frame grabber with the integrated output video 1 Grab Pulse Output 2 Ground — 3 Integratio n Begin/En d Input Accepts input pulses to control the beginning and ending of integration by the sensor. Two types of inputs are jumper selectable: (1) Start/Stop Mode ⁄ Ιntegration is initiated by the negative-going leading edge of one pulse and stopped by the negative-going leading edge of a second pulse, or (2) Special Reset Mode ⁄ the negative-going edge of a pulse begins integration and the subsequent positive-going edge of that same pulse ends the integration. 4 Reset Input Initializes the special reset board 5 On(low)/ Off (high) Input Turns the special reset board on or off (If this board is to be turned on, shuttering switch must be set to 1/10,000) Signal common line Note: Use of the integration board requires that a frame grabber be connected to the camera. A frame grabber captures the single field/frame of the integrated video supplied at the camera video output. This video is digitally stored by the frame grabber to make it available for use. (Observing the video output with a standard monitor and no frame grabber produces the following result when integrating: First, 1/10,000 second shuttering must be established and field or frame mode selected. Then the special reset (integration) board must be turned on (pin 5 low). When integration is initiated (pin 3) the picture on the monitor will go black or very dark. At the end of the integraton period a single field/frame of the integrated video will “flash” on the monitor. After this field/frame appears, the output of the camera returns to a normal picture, which is being shuttered at 1/10,000 second.) See page 6 for input and output waveforms related to J34 CONNECTOR J36 (GENLOCK INPUT) PIN FUNCTIONS 4 PIN NO. NAME INPUT/ OUTPUT 1 Genlock Input 2 Ground — FUNCTION Provides an input for genlocking the camera to either composite video or composite sync Signal common line Change 1 6X-970(B)pdf 1100 SERIES CAMERAS REF DESIG RS-170 AND CCIR NAME FUNCTION MAIN BOARD Selects whether camera operates in asynchronous reset mode or normal mode JB1 ARESET/NOR JB2 Lens Video Sync JB3 Variable Shutter/E. Iris or Special Reset R74 Manual Gain R105 Gamma R110 Sharpness Rotating clockwise increases apparent contrast of scene by enhancing black/white and white/black transitions R114 Black Level Sets the level of black in the video, typically to 7.5 IRE units above blanking level S1 DIP Switch Bank S2 Agc On/Off Selects whether agc controls camera gain or whether the Manual Gain potentiometer (R74) sets a fixed gain for the camera TP1 Clock Test Test point for clock frequency at pin 63 (XCK) of U5 (EIA, 28.6363 MHz, CCIR, 28.3750 MHz) Jumper is installed to provide sync on the auto-iris lens video signal Jumper is installed for standard operation in variable shutter mode. Jumper must be removed before an option board can be installed onto J23 and J24. (Electronic Iris or Special Reset (integration) boards plug onto J23 and J24) Sets gain of camera through a 20 dB range when the Agc On/Off switch (S2) is in OFF position Sets gamma through a range of 0.45 to 1.0 Five DIP switches to select shutter speed or (in field mode) integration. Switch 6 selects field or frame mode. Switches must be set to 1/10,000 for either the optional electronic iris board or the special reset board to operate. See S1 Switch Settings table for a listing of switch positions. LINE LOCK BOARD Provides phase change of line lock reference by 180 degrees JB10 0/180 jumper R19 Line Phase Provides a fine adjustment for control of phase reference TP10 None Test point for reference signal at input to phase detector EXTERNAL SYNC (GENLOCK) BOARD JB1 Selects either 75 ohm termination or a high input impedance for the external sync being applied. If the camera is at the end of a cable this jumper must be set to 75 ohm. If the camera is mid cable, as in a loop-though arrangement, the jumper must be set to high. Termination/ High SPECIAL RESET (INTEGRATION) BOARD JB1 Start-Stop/ Special-Reset When this jumper is positioned to start/stop, the negative-going edge of two separate pulses begins and ends the integration period. With the jumper in special reset position, the negative-going edge of a pulse begins integration and the subsequent positive-going edge of that pulse ends it. (Note: 1/10,000 shutter speed must be selected on main board DIP switch S1 for special reset to operate) JB2 Negative / positive Determines whether the grab pulse output at J34-1 is a negative-going pulse (from +5 V dc to zero volts) or a positive-going pulse (from zero volts to +5 volts) DC IRIS BOARD R11 6X-970(B)pdf Iris Level Sets the lens iris opening when viewing a standard test pattern or other controlled condition Change 1 5 1100 SERIES CAMERAS REF DESIG RS-170 AND CCIR NAME FUNCTION ELECTRONIC IRIS BOARD JB1 E. Iris ON/OFF Setting jumper to ON turns the electronic iris board on. When set to OFF, the board defaults to 1/60 (1/50) (Note: 1/10,000 shutter speed must be selected on main board DIP switch S1 for the electronic iris board to operate) R19 DC With jumper JB1 (E. Iris ON/OFF) positioned to OFF and 85 IRE units of 50% APL video out of the camera at J27-4, adjust R19 for 0.0 V dc between TP1 and TP2 TP1 _ Test point for setting R19 TP2 _ Test point for setting R19 TP3 _ Test point that when grounded initiates 1/10,000 shutter speed Note: Adjustments and jumpers listed in this table may require changes in the field due to installation requirements or to the camera application. Making any adjustment not listed in this table could render the camera inoperable until a complete test-bench setup is performed with instruments. This would require step-by-step procedures found in the Maintenance Manual (6X-960). Use care when making an adjustment in this table to ensure that no other control is accidentally adjusted. 6 6X-970(B)pdf 1100 SERIES CAMERAS 6X-970(B)pdf RS-170 AND CCIR Change 1 7 1100 SERIES CAMERAS RS-170 AND CCIR WARRANTY Cohu, Inc., Electronics Division, warrants equipment manufactured to be free from defects of material and workmanship. Any part or parts will be repaired or replaced when proven by Cohu examination to have been defective within two years from date of shipment to the original purchaser for standard CCD cameras and one year from date of shipment to the original purchaser for intensified CCD cameras and all other Cohu manufactured products. All warranty repairs will be performed at the factory or as otherwise authorized by Cohu in writing. Transportation charges to Cohu shall be prepaid by purchaser. This warranty does not extend to Cohu equipment subjected to misuse, accident, neglect, or improper application, nor repaired or altered by other than Cohu or those authorized by Cohu in writing. Television image pickup tubes, image intensifiers, lenses, and products manufactured by companies other than Cohu are warranted by the original manufacturer. This warranty is in lieu of all other warranties expressed or implied. Cohu shall not be liable for collateral or consequential damages. September 18, 1995 Rev. 1 September 21, 1996 Rev. 2 February 2, 1998 8 Change 2 6X-970(B)pdf