1
Handling Precautions
(2) Do not take the printed circuit board of the module out of the case. It may
result in a failure.
B
(3) Be careful not to let foreign matter such as filings or wire chips get inside the
module while wiring. Remove all foreign matters if any get inside.
b
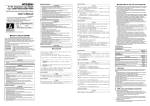
(4) Tighten the module mounting screws within the following torque range.
SLD
Applicable Systems
Screw area
There are no restrictions when using the Q series master modules
(QJ61BT11N, QJ61BT11).
2- ø4.5 installing hole
Tightening torque range
Module mounting screws (M4 screw)
The CC-Link system master modules that the AJ65BT-64RD can use are
explained below.
NP
Terminal block terminal screws (M3.5 screw)
Terminal block mounting screws (M3.5 screw)
MITSUBISHI
0.78 to 1.18 N · m
SW
0
1-4
9
0.59 to 0.88 N · m
0.98 to 1.37 N · m
*1 May be better to connect depending on the operating environment.
TH 35-7.5 Fe
TH 35-7.5 Al
TH 35-15 Fe
<Large-type>
4-wire type
When installing a DIN rail, tighten the screws with a space of less than 200
mm (7.9 in.).
<Small-type>
PROGRAMMABLE CONTROLLER
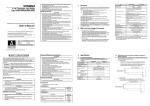
4. Name of Each Part
The name of each part in the AJ65BT-64RD is described.
MITSUBISHI
SW
0
1-4
9
MODE
NORMAL
TEST CH.
TEST
PW
RUN
L RUN
SD
RD
L ERR.
01
2
3
4
A
A
B
B
b
b
SLD
SLD
901
2
3
4
RESET
SET
Name
1)
Station setting switch
2)
Transmission baud rate setting switch
3)
MODE switch
4)
OFFSET/GAIN (Offset/gain) setting switch
5)
UP/DOWN switch
RESET switch
7)
LED for operation
status display
Wiring Example with CC-Link Module
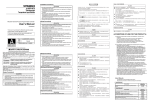
The twisted cable connections between the AJ65BT-64RD and master module
are as follows:
Connecting to the AJ65BT-64RD4
(1) The highest accuracy can be obtained when if a 4-wire type platinum
temperature-measuring resistor is used for AJ65BT-64RD4. The following
shows a connection example of a connecting the 4-wire type platinum
temperature-measuring resistor.
7) 3) 4) 5) 6)
Number
6)
6.1
9) (Side face)
6.4
GAIN DOWN
8)
RESET
Mitsubishi will not be held liable for damage caused by factors found not to be the cause of Mitsubishi;
machine damage or lost profits caused by faults in the Mitsubishi products; damage, secondary
damage, accident compensation caused by special factors unpredictable by Mitsubishi; damages to
products other than Mitsubishi products; and to other duties.
01
901
2 8
2
3 7
3
654
654
MODE OFFSET UP
SET
GAIN DOWN
Unit: mm (in.)
2-wire type
B RATE STATION NO.
X10
X1
MELSEC A J65BT-64RD
01
901
2 8
2
3 7
3
6 54
654
Function
version
6. Wiring
1)
9 01
2
3
4
151.9 (5.98)
Warranty
2)
01
2
3
4
MODE OFFSET UP
142.9 (5.63)
(2) A 4-wire type or 2-wire type platinum temperature-measuring resistor can
also be used for AJ65BT-64RD3.
Connect as shown in the diagrams below when using a 4-wire type or 2-wire
type platinum temperature-measuring resistor.
(b) Space between DIN rail mounting screws
Manufactured
date
PW
RUN
L RUN
SD
RD
L ERR.
(a) Applicable DIN rail types (conform to JIS C 2812)
The master modules that do not have "9707 B" recorded on the DATE column
cannot be used.
Function
version
MODE
NORMAL
TEST CH.
TEST
(5) When using a DIN rail adapter, install the DIN rail considering the
precautions described below.
When using the Q series master modules (AJ61QBT11, A1SJ61QBT11),
use one where the symbol shown below (9707 B or later) is recorded in the
DATE column on the rating name plate.
Manufactured
date
B RATE STATION NO.
X10
X1
MELSEC AJ65BT-64RD
56 (2.2)
A
Platinum temperaturemeasuring resistor
3.3
JPt 100 Pt 100
63 (2.48)
(1) Because it is made of resin, do not drop or given a strong shock to the
module case and the terminal block.
a
7. External Dimensions Diagram
Connecting to the AJ65BT-64RD3
(1) The highest accuracy can be obtained if a 3-wire type platinum temperaturemeasuring resistor is used for AJ65BT-64RD3.
The following shows a connection example of a 3-wire type platinum
temperature-measuring resistor.
65 (2.56)
5.1
100 Ω or less per line
6.3
9.5
5. Handling
(0.37)
(2) AJ65BT-64RD4
The lead resistance value between between platinum temperaturemeasuring resistor and AJ65BT-64RD4 should be 100 Ω or less per line.
PW
RUN
L RUN
SD
RD
L ERR.
8)
Terminal block
9)
Platinum temperature-measuring resistor type specification pin
Point
For the modules at both ends of the data link, make sure to connect the "terminal
resistor" that is attached to a master module (Connect between DA and DB).
6.2
Precautions when Wiring
To obtain maximum performance from the functions of AJ65BT-64RD and
improve the system reliability, a wiring with high durability against noise is
required.
The following describes the external wiring precautions.
(1) Use separate cables for the AC and the external input signals of the AJ65BT64RD, in order not to be affected by the AC side surge or conductivity.
(2) Always place a platinum temperature-measuring resistor at least 10 cm (3.9
in.) apart from the main circuit line and AC control circuit line. Place a
platinum temperature-measuring resistor sufficiently apart from circuits with
high frequency, such as high-voltage lines and inverter load main circuits. If
they are placed close to each other, the platinum temperature-measuring
resistor is influenced more easily by the noise, surge, or conductivity.
*1 May be better to connect depending on the operating environment.
(2) A 4-wire type or 3-wire type platinum temperature-measuring resistor can
also be used for AJ65BT-64RD4.
Connect as shown in the diagrams below when using a 3-wire type or 2-wire
type platinum temperature-measuring resistor.
3-wire type
2-wire type
a
a
A
A
B
B
b
b
SLD
SLD