1
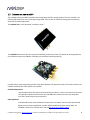
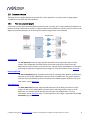
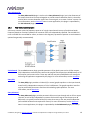
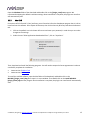
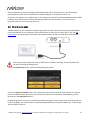
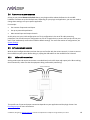
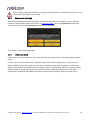
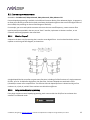
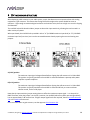
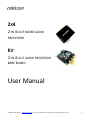
2X4 2-IN 4-OUT BOXED AUDIO PROCESSOR KIT 2-IN 4-OUT AUDIO PROCESSOR BARE BOARD User Manual miniDSP Ltd, Hong Kong / www.minidsp.com / Features and specifications subject to change without prior notice 1 Revision history Revision Description Date V1.5 miniDSP PCB revision - Rev1 31-05-2010 V1.6 New miniDSP PCB revision – Rev2 16-12-2010 V1.7 Jumper for RevA & B 26-03-2012 V2.0 V2.1 V2.2 Updated and revised for Rev3 PCB Merged with kit manual Added 2x4 Advanced plugin 15-06-2014 30-06-2014 15 May 2015 miniDSP Ltd, Hong Kong / www.minidsp.com / Features and specifications subject to change without prior notice 2 TABLE OF CONTENTS Important Information......................................................................................................................................... 5 System Requirements ...................................................................................................................................... 5 Disclaimer/Warning ......................................................................................................................................... 5 Warranty Terms ............................................................................................................................................... 6 A Note on this Manual ..................................................................................................................................... 6 1 Product Overview .......................................................................................................................................... 7 1.1 The miniDSP concept ............................................................................................................................ 7 1.2 Choosing the right miniDSP .................................................................................................................. 8 1.3 Choosing a plugin ................................................................................................................................. 9 1.3.1 Two-way crossover plugins ........................................................................................................... 9 1.3.2 Four-way crossover plugins......................................................................................................... 10 1.3.3 Non-crossover plugins ................................................................................................................ 11 1.3.4 Subwoofer applications .............................................................................................................. 11 2 The miniDSP Workflow ................................................................................................................................ 14 2.1 Download and install the plugin ......................................................................................................... 14 2.1.1 Windows .................................................................................................................................... 14 2.1.2 Mac OS X .................................................................................................................................... 15 2.2 Familiarize yourself with the plugin .................................................................................................... 16 2.3 Go into online mode ........................................................................................................................... 17 2.4 Perform initial configuration............................................................................................................... 18 2.5 Get audio up and running ................................................................................................................... 18 2.5.1 Make audio connections ............................................................................................................. 18 2.5.2 Reconnect to the plugin .............................................................................................................. 19 2.5.3 Initial audio check ....................................................................................................................... 19 2.6 Fine-tune your configuration .............................................................................................................. 20 2.7 Supply DC power ................................................................................................................................ 21 2.8 Continue to operate offline ................................................................................................................ 22 2.8.1 Notes on powering the miniDSP in offline mode ......................................................................... 22 2.8.2 Notes on modifying the configuration while in offline mode ....................................................... 22 3 Plugin Architecture and Features ................................................................................................................. 23 3.1 System settings .................................................................................................................................. 23 3.2 Input selection, level, and metering .................................................................................................... 25 3.3 Output level, delay, and metering ...................................................................................................... 26 3.4 Graphic EQ ......................................................................................................................................... 28 3.5 Parametric EQ .................................................................................................................................... 29 3.6 Crossover ........................................................................................................................................... 31 3.7 High pass and low pass filters ............................................................................................................. 33 3.8 Matrix mixer....................................................................................................................................... 33 3.9 Mono/stereo mode ............................................................................................................................ 34 3.10 Keyboard shortcuts ............................................................................................................................ 34 3.11 Custom biquad programming ............................................................................................................. 35 miniDSP Ltd, Hong Kong / www.minidsp.com / Features and specifications subject to change without prior notice 3 3.11.1 What’s a “biquad? ...................................................................................................................... 35 3.11.2 Using custom biquad programming ............................................................................................ 35 3.11.3 The plugin calculator................................................................................................................... 37 3.11.4 Biquad calculation spreadsheet .................................................................................................. 37 3.11.5 Room EQ Wizard (REW) .............................................................................................................. 37 3.11.6 Active Crossover Designer (ACD) ................................................................................................. 37 4 Optimizing gain structure ............................................................................................................................ 38 5 Kit documentation ....................................................................................................................................... 39 5.1 Board layout and features .................................................................................................................. 39 5.2 Expansion header and I2S connectivity ............................................................................................... 40 5.3 USB connectivity ................................................................................................................................ 41 5.4 Bypass/reset....................................................................................................................................... 41 5.5 Volume control................................................................................................................................... 42 5.6 Master/Slave master clock selection................................................................................................... 43 5.6.1 Examples .................................................................................................................................... 43 6 Additional Information ................................................................................................................................ 44 6.1 Specifications ..................................................................................................................................... 44 6.2 Troubleshooting ................................................................................................................................. 45 6.3 Obtaining Support .............................................................................................................................. 46 miniDSP Ltd, Hong Kong / www.minidsp.com / Features and specifications subject to change without prior notice 4 IMPORTANT INFORMATION Please read the following information before use. In case of any questions, please contact miniDSP via the support portal at minidsp.desk.com. SYSTEM REQUIREMENTS To configure the miniDSP 2x4, you will require a Windows PC or Apple Mac OS X computer with the following minimum specification: Windows PC with 1GHz or higher processor clock speed. Intel® Pentium®/Celeron® family, or AMD K6®/AMD Athlon®/AMD Duron® family, or compatible processor recommended. 512 megabytes (MB) of RAM or higher Keyboard and mouse or compatible pointing device USB 2.0 port Microsoft• ® Windows® Vista® SP1/ XP pro SP2/Win7/Win8.1 Microsoft• ® .NET framework v3.5 or later Adobe AIR environment (latest version) Adobe Flash player (latest version) Mac OS X Intel-based Mac with 1 GHz or higher processor clock speed 512 megabytes (MB) of RAM or higher Keyboard and mouse or compatible pointing device Mac OS X 10.4 or higher USB 2.0 port Adobe AIR environment (latest version) Adobe Flash player (latest version) DISCLAIMER/WARNING miniDSP cannot be held responsible for any damage that may result from the improper use or incorrect configuration of this product. The miniDSP 2x4 is a powerful tool and can easily generate signals that will damage your audio system if not used properly. Please read this manual carefully to ensure that you fully understand how to operate and use this product. To avoid mishap, be sure to configure the miniDSP 2x4 before connecting anything to its outputs, as described in the section The miniDSP workflow. This will ensure that the software is correctly configured and will greatly reduce any chance of causing damage to your system. Once again, miniDSP cannot be responsible for any damage the miniDSP 2x4 may cause to your system. miniDSP Ltd, Hong Kong / www.minidsp.com / Features and specifications subject to change without prior notice 5 Finally, note that the miniDSP 2x4 is a very flexible device, and many of the questions we receive at the tech support department are already answered in this user manual and in the online application notes on the miniDSP.com website. So please take the time to carefully read this user manual and the online technical support. And if an issue arises with your unit, please read through the Troubleshooting section first. Thank you for your understanding! WARRANTY TERMS miniDSP Ltd warrants this product to be free from defects in materials and workmanship for a period of one year from the invoice date. Our warranty does not cover failure of the product due to incorrect connection or installation, improper or undocumented use, unauthorized servicing, modification or alteration of the unit in any way, or any usage outside of that recommended in this manual. If in doubt, contact miniDSP prior to use. A NOTE ON THIS MANUAL This User Manual is designed for reading in both print and on the computer. If printing the manual, please print double-sided. The embedded page size is 8 ½” x 11”. Printing on A4 paper will result in a slightly reduced size. For reading on the computer, we have included hyperlinked cross-references throughout the manual. In addition, a table of contents is embedded in the PDF file. Displaying this table of contents will make navigation much easier: In Adobe Reader on Windows, click on the “bookmarks” icon at the left. The table of contents will appear on the left and can be unfolded at each level by clicking on the “+” icons. In Preview on the Mac, click on the View menu and select Table of Contents. The table of contents will appear on the left and can be unfolded at each level by clicking on the triangle icons. miniDSP Ltd, Hong Kong / www.minidsp.com / Features and specifications subject to change without prior notice 6 1 PRODUCT OVERVIEW Thank you for choosing the miniDSP kit board or the miniDSP 2x4 audio processor. Combined with an extensive range of plugins, the miniDSP kit and miniDSP 2x4 offer a compact, inexpensive, yet powerful and flexible platform for many audio applications: Active crossovers System equalization with graphic or parametric EQ Subwoofer integration Audio mixing and routing Center and rear channel synthesis 1.1 THE MINIDSP CONCEPT The miniDSP concept is “one hardware unit + one software plugin = audio processing solution.” This concept leverages the inherent flexibility of DSP (digital signal processing) to deliver a range of flexible but cost-effective solutions. Hardware unit In this case, the hardware unit is the miniDSP 2x4 or miniDSP kit. It has two analog inputs and four analog outputs. The internal processor converts the analog input signal to digital form, processes it according to the instructions from the plugin, and then converts it to analog again for the outputs. See Choosing the right miniDSP for more information on miniDSP hardware. Software plugin The software plugin is installed on your PC or Mac, and determines the processing that the DSP will perform. It provides a friendly user interface, and downloads instructions into the miniDSP hardware unit that tell it how to process the incoming audio signal. See Choosing a plugin for more information on plugins. miniDSP Ltd, Hong Kong / www.minidsp.com / Features and specifications subject to change without prior notice 7 1.2 CHOOSING THE RIGHT MINIDSP The miniDSP 2x4 and miniDSP kit provides two analog inputs and four analog outputs. They are a simple, costeffective DSP solution for many audio processing needs. They are also an excellent starting point for learning about DSP for audio applications. The miniDSP 2x4 is a self-contained “miniDSP in a box”: The miniDSP kit consists of just the circuit board without the external chassis. The board can be integrated into any build that requires the addition of flexible yet cost-effective audio processing. miniDSP make a large and growing number of hardware platforms for particular needs. If the 2x4 is not the most suitable hardware, then other options are available. miniDSP Balanced 2x4 Used for applications that require balanced audio connections, such as in pro-sound and in some car applications. Balanced connections provide additional immunity to noise over long cable runs and in electrically noisy environments. Other platforms miniDSP makes many other hardware units with up to ten output channels, with sophisticated digital room correction capabilities, and with inbuilt amplification (plate amps). Many are available in either kit of “boxed” form. See the full range of miniDSP products. miniDSP Ltd, Hong Kong / www.minidsp.com / Features and specifications subject to change without prior notice 8 1.3 CHOOSING A PLUGIN The plugin that you choose depends on the specifics of your application. Currently, there are eight plugins available for the miniDSP 2x4 and miniDSP kit. 1.3.1 Two-way crossover plugins A two-way crossover splits the audio frequency band into two. Typically, this is used to feed high frequencies to tweeters and low frequencies to woofers. A single miniDSP 2x4 or miniDSP kit is used for stereo, as shown in this diagram (protection capacitors on the tweeters are optional but generally recommended): 2x4 Advanced The 2x4 Advanced crossover plugin provides parametric EQ on both inputs and on all four outputs, fully independent crossovers/filters with a wide range of filter slopes (up to 48 dB/octave) on all four outputs, and a matrix mixer. Two-way active loudspeakers are among the wide range of applications supported by this plugin. For more information, see the datasheet. Stereo Graphic EQ The Stereo Graphic EQ plugin provides a 31-band (1/3rd octave) graphic equalizer on both input channels, as well as fully independent crossovers of 12 or 24 dB/octave. The graphic equalizer interface may be preferred by those more familiar with hardware graphic equalizers. For more information, see the datasheet. 2way Advanced The 2way Advanced crossover plugin provides parametric EQ on both inputs and on all four outputs, as well as fully independent crossovers with a wide range of filter slopes up to 48 dB/octave. It is typically used for building fully active two-way loudspeakers. For more information, see the datasheet. Note: in most applications, this plugin is superseded by the 2x4 Advanced plugin (see above). miniDSP Ltd, Hong Kong / www.minidsp.com / Features and specifications subject to change without prior notice 9 2way Advanced 21 The 2way Advanced 21 plugin is similar to the 2way Advanced plugin, but it also allows two of the output channels to be summed together to provide a mono subwoofer feed. It is therefore used to derive a mono subwoofer signal from a stereo signal, or to create “sub sat” systems. For more information, see the datasheet. Note: in most applications, this plugin is superseded by the 2x4 Advanced plugin (see above). 1.3.2 Four-way crossover plugins A four-way crossover splits the frequency spectrum of a single input channel into up to four distinct bands. Frequency bands can overlap if needed, as all crossover filters are independently specified. Two miniDSP 2x4 units or miniDSP kits are needed for stereo, as shown in this diagram (a protection capacitor on each tweeter is optional but generally recommended): 2x4 Advanced The new 2x4 crossover plugin provides parametric EQ on both inputs and on all four outputs, fully independent crossovers/filters with a wide range of filter slopes (up to 48 dB/octave) on all four outputs, and a matrix mixer. Three-way and four-way active loudspeakers are among the wide range of applications supported by this plugin. For more information, see the datasheet. 4way GEQ The 4way GEQ plugin provides a 31-band (1/3rd octave) graphic equalizer on the input channel, as well as fully independent crossovers of 12 or 24 dB/octave. The graphic equalizer interface may be preferred by those more familiar with hardware graphic equalizers. For more information, see the datasheet. 4way Advanced The 4way Advanced plugin provides parametric EQ on one input channel and on all four output channels, as well as fully-independent crossovers with a wide range of filter slopes up to 48 dB/octave. It is typically used to build a fully active three-way or four-way active loudspeaker (two miniDSP hardware units required for stereo). For more information, see the datasheet. Note: in most applications, this plugin is superseded by the 2x4 Advanced plugin (see above). miniDSP Ltd, Hong Kong / www.minidsp.com / Features and specifications subject to change without prior notice 10 1.3.3 Non-crossover plugins Two plugins provide specialized audio processing functions. Rear/Center Channel The Rear/Center Channel plugin provides a summed (L+R) or difference (L-R or R-L) signal for use in deriving center or rear channels from a stereo signal. It also provides a 31-band graphic EQ, high pass and low pass filters, and long delay (total 31 ms). For more information, see the datasheet. Mixer The Mixer plugin mixes the two input channels to the four output channels in arbitrary combinations. Each input channel also has a 31-band graphic EQ and high pass and low pass filters. For more information, see the datasheet. 1.3.4 Subwoofer applications For subwoofer applications, we usually recommend the use of the 2x4 Advanced plugin, because of its flexibility and ability to handle many different subwoofer configurations. This flexibility is provided by the use of the matrix mixer, which maps and mixes input channels to output channels. Here are four common subwoofer scenarios and the recommended routing for each. Mono subwoofer from stereo signal, and high passed speakers In this configuration, the miniDSP 2x4 or miniDSP kit is used to generate a single mono subwoofer feed from a stereo signal, as well as to high-pass the main speakers. The connection diagram is shown as follows: To accomplish this configuration, use the matrix mixer to mix input channels 1 and 2 to output 1, and to send input 1 to output 3, and input 2 to output 4: miniDSP Ltd, Hong Kong / www.minidsp.com / Features and specifications subject to change without prior notice 11 Stereo subwoofer from stereo signal To derive a separate left and right subwoofer signal from the stereo left and right signals, input channel 1 is sent to outputs 1 and 2, and input channel 2 is sent to outputs 3 and 4 (this is essentially the same as a two-way crossover): To accomplish this configuration, use the matrix mixer to send input channel 1 to outputs 1 and 2, and input channel 2 to outputs 3 and 4: One to four subwoofers from stereo signal If the miniDSP is used only for subwoofer control/EQ, up to four separate subwoofer signals, each with different delay and EQ, can be generated from a stereo signal: To accomplish this configuration, use the matrix mixer to mix both input channels to all four output channels: miniDSP Ltd, Hong Kong / www.minidsp.com / Features and specifications subject to change without prior notice 12 One to four subwoofers from mono signal (e.g. AVR) If you have an A/V processor or A/V receiver, it has already combined various signals together to generate a single subwoofer signal. The miniDSP 2x4 can generate up to four subwoofer signals with different EQ and delay from the AVR subwoofer output: To accomplish this configuration, the routing matrix sends input channel 1 to all four output channels: Two to four subwoofers from dual mono signal (e.g. AVR) Some A/V processors and A/V receivers provide two subwoofer outputs. You can send each input to any of the outputs. For example, this routing screen illustrates the case where input 1 is sent to output 1, and input 2 is sent to outputs 2 through 4: More advanced subwoofer applications There may be cases where you need more features than provided by the miniDSP 2x4 and miniDSP Kit – for example, higher signal levels, longer delays, or more output channels. In that case, please see the more powerful miniDSP units 10x10 Hd, nanoDIGI 2x8 b, nanoAVR HD, and nanoAVR HDA. miniDSP Ltd, Hong Kong / www.minidsp.com / Features and specifications subject to change without prior notice 13 2 THE MINIDSP WORKFLOW While each plugin is different, there is a common procedure or workflow that we recommend for all of them. 1. Download and install the plugin 2. Familiarize yourself with the plugin 3. Go into online mode 4. Perform initial configuration 5. Get audio up and running 6. Fine-tune your configuration 7. Supply DC power 8. Continue to operate offline 2.1 DOWNLOAD AND INSTALL THE PLUGIN When your order ships, your ordered plugin (or plugins) will be available from the User Downloads section of the miniDSP website. This link is visible from the dropdown menu at the top right of the website page. You will need to be logged into the site with the account you created when purchasing: Download the plugin (or plugins) that you purchased from the User Downloads section, and double-click to unzip. Then follow the installation procedure below according to your computer type. Note: the Adobe Air framework may need a network connection the first time the plugin is used. If the plugin does not start properly, see Troubleshooting. 2.1.1 Windows Prior to installing the miniDSP software, download and install the following programs. You will need to accept the license agreements in order to successfully complete the installation. Microsoft .NET framework (version 3.5 or later) Latest version of Adobe Flash Latest version of Adobe Air miniDSP Ltd, Hong Kong / www.minidsp.com / Features and specifications subject to change without prior notice 14 Open the Windows folder of the download and double-click on the [plugin_name].exe program. We recommend accepting the default installation settings. Once installation is complete, the plugin user interface will automatically start. 2.1.2 Mac OS X On versions of OS X from 10.7 (Lion) and later, you will need to inform the GateKeeper program that it is OK to install and run this software. Go to System Preferences, then click on Security & Privacy and select the General tab: 1. Click on the padlock icon in the lower left corner and enter your password, in order that you can make changes to the settings. 2. Under the text “Allow applications downloaded from:”, click on “Anywhere.” Then, download and install the following programs. You will need to accept the license agreements in order to successfully complete the installation. Latest version of Adobe Flash Latest version of Adobe Air To install the miniDSP software, open the Mac folder of the download, and double-click on the MiniDSP_[plugin_name].dmg file to open it in a new window. Then double-click on the Install MiniDSP[plugin_name].app installer program. Once installation is complete, the plugin user interface will automatically start. miniDSP Ltd, Hong Kong / www.minidsp.com / Features and specifications subject to change without prior notice 15 2.2 FAMILIARIZE YOURSELF WITH THE PLUGIN Before connecting your computer to the miniDSP 2x4 or kit board, it’s worth familiarizing yourself with the user interface presented by the plugin. When it starts, you will see the plugin screen as shown below. (This particular example is the 2way Advanced plugin, but they all share a common layout.) System tabs These tabs access various screens to provide access to different types of functionality. Control buttons (Synchronize, Master Mute, Help) The Synchronize button connects the user interface to the miniDSP hardware unit, downloading configuration data and putting it into online mode. The Master Mute button enables or disables all audio processing. Finally, the Help button brings up the help screen (shown above). Flow diagram The flow diagram (or “block diagram”) is a schematic representation of the audio processing that takes place in the miniDSP hardware unit. Audio “flows” through the diagram from the inputs on the left to the outputs on the right. Clicking on each block will show its control interface in the detail pane underneath it. Detail pane The detail pane shows the control interface of the processing blocks in the flow diagram. For the specifics of each type of processing block, see Plugin architecture and features. miniDSP Ltd, Hong Kong / www.minidsp.com / Features and specifications subject to change without prior notice 16 Now is a good time to explore the plugin and become familiar with all of the controls in each of the signal processing blocks. Click on each of the blocks in the block diagram to see what the controls are. At this time, the plugin is still in offline mode, so any changes you make will not be downloaded into the miniDSP hardware. Since we will reset all of the processing parameters in the next section, you can feel free to experiment with the user interface at this point. 2.3 GO INTO ONLINE MODE A USB connection to your computer is needed to go into online mode. Simply connect the supplied USB cable from a free USB port on your computer to the miniDSP 2x4 or kit board. (In the case of the kit, see also USB connectivity.) The USB connection will power the miniDSP hardware as well as provide data communication. Don’t connect other equipment to the miniDSP 2x4 or kit board at this stage. That will be done after correctly initializing the configuration. Click on the Synchronize button, and the following dialog will appear: Click on the Restore to Default button. This is essential the first time you connect to the miniDSP, as it ensures that the miniDSP hardware unit contains an internal set of data that it understands. (Subsequently, you will generally use the Synchronize button.) Provided all goes well, you will see a confirmation dialog. The plugin is now in online mode. Any change that you make in the plugin user interface will be immediately downloaded to the miniDSP hardware unit, so the change will take effect in real time. miniDSP Ltd, Hong Kong / www.minidsp.com / Features and specifications subject to change without prior notice 17 2.4 PERFORM INITIAL CONFIGURATION As long as you pressed Restore to Default above, your plugin and the onboard software in the miniDSP hardware have been set to their default state. Depending on your plugin and application, you may now need to change these settings to fit your specific application. For example: Set crossover frequencies and slopes Set up any essential equalization Mute unused input and output channels At this point, save your initial configuration to a file. A configuration is the set of all audio processing parameters. You should save your configuration to a file on a regular basis, to ensure that you do not lose your work if you inadvertently restore the miniDSP to default settings. For more information on configurations, see System settings. 2.5 GET AUDIO UP AND RUNNING With the initial configuration done and now that you are familiar with the various controls, it’s time to connect the miniDSP into your system. Before doing so, unplug the USB cable from the miniDSP 2x4 or kit board. 2.5.1 Make audio connections Analog audio input and output connections are made directly to the RCA input and output jacks. When making these connections, make sure that the equipment being connected is powered off. The specific use of input and output connections depends on your application and the plugin chosen. See Choosing a plugin for more information. miniDSP Ltd, Hong Kong / www.minidsp.com / Features and specifications subject to change without prior notice 18 When making analog audio connections, just push the RCA connectors on and pull them off. Try to avoid twisting the plugs to get them on and off. 2.5.2 Reconnect to the plugin With the connected equipment still turned off, reconnect the USB cable to the computer. You can optionally connect an auxiliary power supply at this time – see Supply DC power. Click on the Synchronize button again. This time, be sure to select the Synchronize option from the dialog box: The miniDSP is now in online mode again. 2.5.3 Initial audio check Power on your connected equipment: first on the input side (e.g. preamp), then on the output side (e.g. power amps). Turn the volume on your source and/or amplification down low, and start playing music or a pink noise test signal. Gradually increase the volume until your hear audio quietly coming from the speakers. Verify that the plugin is performing the intended function. For example, if you are implementing a two-way crossover, confirm that the tweeter is playing high frequencies, and that the woofer is playing low frequencies. (If you have a measurement microphone and software that allows real time spectrum analysis, then by all means use it.) miniDSP Ltd, Hong Kong / www.minidsp.com / Features and specifications subject to change without prior notice 19 2.6 FINE-TUNE YOUR CONFIGURATION With your initial setup running, you can now proceed to fine-tune and optimize your system. Although there are some applications where you can perform tuning by ear, applications like active crossovers and subwoofer integration are best optimized with the aid of acoustic measurements. The miniDSP UMIK-1 is an ideal accessory for this purpose, and works with any measurement program including the free Room EQ Wizard. For active crossovers Measure each driver individually, at (typically) a distance of 0.5 or 1 meter (1.5 or 3 feet). Use these measurements to adjust the parametric equalizer for each driver, and to fine-tune the crossover (frequency and slope) settings. For subwoofer integration Measure the subwoofer with the microphone placed at the listening position. Typically, moving the subwoofer to find the best response without EQ will yield best performance after EQ. The REW auto-EQ function can be used to quickly generate an optimum equalization setting. For room correction Measure the response of the system with the microphone placed at the listening position. Apply equalization using either the graphic equalizer or parametric equalizer. Adjustments can be confirmed by measurement as well as listening. For more detailed information on these topics, see our extensive collection of application notes on acoustic measurement and digital crossovers. Be sure to save your configuration on a regular basis while working on fine-tuning it. Configurations can be saved to different files, in order to archive different versions, or to enable auditioning of alternative configurations. See System settings for more information on configurations. miniDSP Ltd, Hong Kong / www.minidsp.com / Features and specifications subject to change without prior notice 20 2.7 SUPPLY DC POWER Once you have all of the parameters to your liking, first turn off any connected equipment, and then disconnect the USB cable from the miniDSP 2x4 or kit board. To be able to continue to operate the miniDSP in offline mode (without the computer connected), you will need to provide an alternate power source. There are two options: Connect the USB cable to a 5VDC USB charger. The 2x4 or kit board requires 150 mA of current, so almost any USB charger should be adequate. Connect an auxiliary DC power supply to the 2.1mm DC power connector. The power supply voltage can be in the range of 4.5 to 24 VDC, enabling use of a wide range of power sources. The DC power connector must have the positive voltage on the center pin. Be sure to check this before connecting the power supply, as otherwise your unit may be damaged. Note: Prior to Rev3 of the miniDSP circuit board (released in June 2014), auxiliary power for the miniDSP 2x4 and miniDSP kit is provided via a Phoenix connector with screw terminals instead of a 2.1mm DC connector. If you have an older version of the board, please refer to the older manuals miniDSP 2x4 User Manual v1.7 or miniDSP kit User Manual v1.6 for the correct power supply connection. miniDSP Ltd, Hong Kong / www.minidsp.com / Features and specifications subject to change without prior notice 21 2.8 CONTINUE TO OPERATE OFFLINE With your miniDSP hardware and software configured and a DC power source connected, you can continue to operate the miniDSP in offline mode – that is, without the computer connected. To do so, simply turn the connected equipment on again – source and preamp first, then power amps. The miniDSP “remembers” the configuration last set, and will continue to operate without the computer. 2.8.1 Notes on powering the miniDSP in offline mode 1. If using an auxiliary DC power supply, the USB cable to the computer can be reconnected at any time, with no ill effects. 2. The miniDSP does not have a power switch. We recommend that it simply be left powered on, as power consumption is very low. 3. If you do decide to power the miniDSP 2x4 or kit board off or on, please ensure that you: a. Turn the connected equipment off before disconnecting power from the miniDSP, and b. Connect power to the miniDSP before turning connected equipment on. 2.8.2 Notes on modifying the configuration while in offline mode While in offline mode, the configuration can still be modified in the plugin interface. These changes will of course not be downloaded to the miniDSP 2x4. So: When the miniDSP is next put into online mode, selecting the Synchronize option will download all changes to the miniDSP hardware unit. If you do not wish to have these changes downloaded to the miniDSP hardware unit (for example, you are just fiddling around in the user interface), then make sure that you have saved the configuration to a file before making any changes. Then reload the saved configuration before synchronizing again. The configuration contained in the miniDSP hardware unit cannot be uploaded back to the computer. Therefore, you must save your configuration to a file if you wish to recover from any changes you make while in offline mode. miniDSP Ltd, Hong Kong / www.minidsp.com / Features and specifications subject to change without prior notice 22 3 PLUGIN ARCHITECTURE AND FEATURES This section describes the functions available in the plugins. Different plugins have different functions, so each section also includes a note on which plugins support that function. 3.1 SYSTEM SETTINGS Available in: all plugins Load Configuration Loads a configuration file. This changes all the settings to match the settings saved into the file: o If the plugin is in online mode, the configuration settings will be downloaded immediately to the miniDSP hardware unit. o If the plugin is in offline mode, the configuration settings will be downloaded to the miniDSP hardware unit the next time it is put into online mode (provided that the Synchronize option is selected from the dialog box). The configuration file must have been saved with the same plugin. You cannot load a configuration file that was created with a different plugin. miniDSP Ltd, Hong Kong / www.minidsp.com / Features and specifications subject to change without prior notice 23 Save Configuration Saves the current configuration to a file. The file name must end in “.xml” so that the plugin will recognize the file when trying to load it. Default Configuration Restore the configuration to the factory default settings. o If the plugin is in online mode, the defaults settings will be downloaded immediately to the miniDSP hardware unit. o If the plugin is in offline mode, the default settings will be downloaded to the miniDSP hardware unit the next time it is put into online mode. Imported Frequency Response Click on the Import button to load a frequency response file. The required file format has, on each line, the frequency and the response magnitude. A maximum of 331 frequency points are allowed. For an example of the file format, go to the Help screen and click on the Import Template button. Once the response is loaded, it appears in the frequency response graphs of the relevant PEQ blocks. In the two-way crossovers, the response will be displayed in either the left or right channel, per the selector. Analog/Digital Input Selects between analog and digital input. If using the miniDSP kit board with an external data source via I2S (for example, the miniDIGI digital I/O card), setting this to Digital input will select the external data source instead of the onboard A/D convertors. If using the miniDSP 2x4, always leave this set to Analog input. External Volume Control Enables master volume with a potentiometer. With the miniDSP kit board, this option should be enabled if an external volume control potentiometer is connected (see Volume control). Do not enable this option when using the miniDSP 2x4. miniDSP Ltd, Hong Kong / www.minidsp.com / Features and specifications subject to change without prior notice 24 3.2 INPUT SELECTION, LEVEL, AND METERING Available in: all plugins Each input channel has a gain control, together with a level meter (active while the plugin is in online mode), and a mute button. Level Adjusts the level on that input channel. In the advanced plugins (2x4 Advanced, 2Way Advanced, 2Way Advanced 21, 4Way Advanced), gain adjustments are in increments of 0.1 dB. In all other plugins, gain adjustments are in increments of 1 dB. Meter Displays the current input signal level. The level is displayed in dB FS (relative to maximum input voltage). Make sure to keep the input signal below 0 dB FS (red), and keep enough headroom to avoid distortion. Mute Mutes the input channel. This is helpful when testing and refining your configuration. (For example, mute each input channel while testing the other channel.) Most plugins have two input control blocks. The 4-way plugins, 4Way Advanced and 4Way GEQ, have a single input control block, and an additional control to choose which input to use. miniDSP Ltd, Hong Kong / www.minidsp.com / Features and specifications subject to change without prior notice 25 3.3 OUTPUT LEVEL, DELAY, AND METERING Available in: all plugins (simplified version in Mixer) Each output channel has a gain control, together with a level meter (active while the plugin is in online mode), adjustable delay, a mute button and a button for polarity inversion. Level Adjusts the level on that output channel. This control is typically used to ensure equal levels on all channels in an active crossover. In the advanced plugins (2x4 Advanced, 2Way Advanced, 2Way Advanced 21, 4Way Advanced), gain adjustments are in increments of 0.1 dB. In all other plugins, gain adjustments are in increments of 1 dB. Meter Displays the current output signal level. The level is displayed in dB FS – that is, relative to fullscale output voltage, which is 0.9 V RMS. Make sure to keep the signal below 0 dB FS (red), and keep enough headroom to avoid distortion. Delay Specified a delay of up to 7.5 ms on that output channel (4 ms for the Rear/Center plugin). This is used to time-align drivers in an active speaker system, to adjust the timing of specific channels to match other speakers, or to adjust relative phase for better subwoofer integration. When a delay is set, the plugin also displays the equivalent distance – that is, the distance that sound travels in the given time. Mute Mutes that output channel. This is helpful when testing and refining your configuration. (For example, mute the tweeter to test the woofer, and vice versa.) miniDSP Ltd, Hong Kong / www.minidsp.com / Features and specifications subject to change without prior notice 26 Polarity Inverts the polarity of the output channel. In crossover applications, some slopes (e.g. 12 dB/octave) typically require that one of the output channels be inverted. In subwoofer applications, this can be helpful to improve integration with the main speakers. The Mixer plugin has a simplified output control block: The Rear/center channel plugin has an additional delay block that applies to both output channels. A delay of up to 27 ms can be set: miniDSP Ltd, Hong Kong / www.minidsp.com / Features and specifications subject to change without prior notice 27 3.4 GRAPHIC EQ Available in: Stereo Graphic EQ, 4Way GEQ, Mixer, Rear/Center The graphic equalizer block (GEQ) presents a 31-band, 1/3rd octave EQ, similar to a “traditional” analog EQ. The top section shows the overall response curve of all EQ bands. Hovering the mouse over the curve brings up an overlay with the frequency and gain at that frequency. Control sliders The sliders in the lower half of the control panel adjust the boost or cut of the signal around that frequency. The maximum control range is +/- 12 dB. Bypass Clicking on the Bypass button disables the graphic EQ processing. Reset Clicking the Reset button resets all sliders to 0 dB. Link channels If selected, the slider positions are applied to both audio channels. miniDSP Ltd, Hong Kong / www.minidsp.com / Features and specifications subject to change without prior notice 28 3.5 PARAMETRIC EQ Available in: 2x4 Advanced, 2Way Advanced, 2Way Advanced 21, 4Way Advanced The parametric EQ (PEQ) block provides six parametric filters, each of which can be set for a peaking or notch filter, high shelf filter, and low shelf filter. The top section of the control panel shows the overall response curve of all six PEQ filters. Hovering the mouse over the curve brings up an overlay showing the frequency and the gain at that frequency. The example above shows (by way of example, this is not a typical setting) a response curve with four filters: A low-shelf filter with 6 dB boost, centered at 50 Hz A peaking filter with 6 dB cut (gain set to a negative value), centered at 300 Hz A peaking filter with 6 dB boost, centered at 2 kHz A high-shelf filter with 6 dB cut (gain set to a negative value), centered at 10 kHz miniDSP Ltd, Hong Kong / www.minidsp.com / Features and specifications subject to change without prior notice 29 EQ band selection Click on the radio buttons EQ1, EQ2, etc. to display the parameters for that filter. Basic/Advanced By default, each filter is in basic mode, and shows the controls described below. Advanced mode enables custom biquad programming for almost infinite flexibility in filter implementation. This is described in Custom biquad programming. Filter type Selects the type of filter: PEAK Create a dip or a peak in the frequency response. LOW_SHELF Reduce or increase part of the frequency spectrum below a given frequency. HIGH_SHELF Reduce or increase part of the frequency spectrum above a given frequency. Frequency For the PEAK filter type, this is the center frequency of the peak or dip. For the HIGH_SHELF and LOW_SHELF filter types, this is the frequency at which the gain is half of the set value. Gain For the PEAK filter type, this is the gain in dB at the center frequency. For the HIGH_SHELF and LOW_SHELF filter types, this is the gain in dB reached at high or low frequencies respectively. A filter has no effect if its gain is set to 0. Gain can be adjusted in increments of 0.1 dB up to +/- 16 dB. Q Q controls the “sharpness” of the filter. For the PEAK filter type, lower Q gives a shallower peak or dip, while higher Q gives a narrower peak or dip. For the HIGH_SHELF and LOW_SHELF filter types, Q controls how quickly the filter transitions from no gain to maximum gain. Bypass Clicking on the Bypass button disables that filter. (All other filters are still operational unless individually bypassed.) Copy to… Clicking this button copies all of the filter settings to the corresponding PEQ block in the other channel. Import REW File This button selects a file exported from Room EQ Wizard’s automatic equalization function. For more information, see the app note Auto-EQ tuning with REW and the section Custom biquad programming. miniDSP Ltd, Hong Kong / www.minidsp.com / Features and specifications subject to change without prior notice 30 3.6 CROSSOVER Available in: 2x4 Advanced, 2Way Advanced, 2Way Advanced 21, 4Way Advanced, Stereo Graphic EQ, 4Way GEQ Crossovers “split” the frequency band to send to different drivers. In a two-way loudspeaker, for example, a low pass filter is used to remove high frequencies from the signal sent to the woofer, and a high pass filter is used to remove low frequencies from the signal sent to the tweeter. The above screenshot shows a two-way crossover. In a four-way crossover, the signal is split into four frequency bands: In the miniDSP 2x4 plugins, each output channel has a high pass filter and a low pass filter, each of which can be set to one of a range of filter types and slopes, or individually bypassed. Clicking on the bars labeled “CH1 Bandpass Filter OUT1,” and so on displays the filter parameters for that output channel. Unlike conventional analog crossovers, the flexibility of DSP allows a completely arbitrary mix of different filter slopes and types. Filters can be set at any frequency, or even disabled completely. This allows maximum flexibility in matching your crossover to the acoustic characteristics of the loudspeaker drivers that you are using. miniDSP Ltd, Hong Kong / www.minidsp.com / Features and specifications subject to change without prior notice 31 The graph at the right of the display shows the frequency response of the output channels. Hovering the mouse over the curve brings up an overlay showing the frequency and the attenuation at that frequency. Basic/Advanced BY default, the crossover is in basic mode, and shows the controls described below. Advanced mode enables custom biquad programming for almost infinite flexibility in crossover filter implementation. This is described in Custom biquad programming. Cutoff Frequency Sets the nominal cutoff frequency of the crossover. In actual fact, of course, the crossover has a more or less gradual transition from “full on” to “full off,” as determined by the filter slope. Filter type Selects the type and slope of the filter. The steeper the slope, the more quickly frequencies above or below the cutoff frequency are attenuated. There are three types of filter: Butterworth (BW) Available in 6, 12, 18, 24, 30, 36, 42, and 48 dB/octave, Butterworth crossover filters are 3 dB down at the cutoff frequency. Linkwitz-Riley (LR) Available in 12, 24, and 48 dB/octave, Linkwitz-Riley crossover filters are 6 dB down at the cutoff frequency. Bessel Available in 12 dB/octave only, a Bessel filter gives a more gradual roll-off through the crossover region. The Stereo Graphic EQ and 4way Graphic plugins are limited to 12 dB/octave Butterworth, 12 dB/octave Bessel, and 24 dB/octave Linkwitz-Riley. Bypass Clicking on the Bypass button disables that high pass or low pass filter. (All other crossover filters are still operational unless individually bypassed.) miniDSP Ltd, Hong Kong / www.minidsp.com / Features and specifications subject to change without prior notice 32 3.7 HIGH PASS AND LOW PASS FILTERS Available in: Mixer, Rear/Center channel High pass and low pass filters are a subset of crossover functionality. These blocks have a single input and a single output. Each filter can be individually set to one of the available filter types, or bypassed. The filter types are: Butterworth 12 dB/octave Bessel 12 dB/octave Linkwitz-Riley 24 dB/octave Note: the Mixer plugin has the high pass and low pass filters in separate blocks. The net result is the same. 3.8 MATRIX MIXER Available in: Mixer The matrix mixer provides arbitrary mixing of the two input channels to the four output channels. The position of the control knob indicates the level at which input channel 1 or 2 is mixed into each of the four outputs. For example, in the above screenshot, input 1 is mixed fully to output 1, not at all to output 2, and partially into outputs 3 and 4. Input 2 is not mixed to output 1, mixed fully to output 2, and mixed partially to outputs 3 and 4. miniDSP Ltd, Hong Kong / www.minidsp.com / Features and specifications subject to change without prior notice 33 3.9 MONO/STEREO MODE Available in: 2Way Advanced 21 The 2Way Advanced 21 plugin supports mixing of two output channels, allowing this plugin to be used in “2.1” applications where a mono subwoofer signal is derived from a stereo signal. To access this selection, click on the System Settings tab. In Mono Mode, output channels 1 and 2 will be mixed together. Note that mixing occurs at the end of the signal processing chain, so usually you will need to use the Copy function to copy settings from channel 1 to channel 2. In Stereo Mode, the two output channels are independent – that is, the plugin behaves as a two-way crossover. 3.10 KEYBOARD SHORTCUTS The miniDSP 2x4 plugins support the use of the keyboard for many operations. Tab The Tab key moves the focus to the next user interface element. A light blue surrounding box indicates the user interface element with the focus if it is a text entry box, a button, or a block in the signal flow diagram. Shift-Tab moves the focus in the opposite direction. Up/down arrows The up/down arrow keys adjust the value of the parameter with the focus. For example: Input and output channel gain Crossover frequency and filter type PEQ filter frequency, gain, and Q Space The Space bar toggles buttons that have two states, such as Bypass, Invert, and Mute. If the light blue highlight is one of the blocks in the signal flow diagram, then the Space bar will open the control panel for that block. Keyboard shortcuts are helpful for making rapid or fine adjustments. For example, in the input and output controls blocks of the advanced plugins, click on the gain slider, then on the Up and Down arrow keys to adjust the gain in 0.1 dB increments. miniDSP Ltd, Hong Kong / www.minidsp.com / Features and specifications subject to change without prior notice 34 3.11 CUSTOM BIQUAD PROGRAMMING Available in: 2x4 Advanced, 2Way Advanced, 4Way Advanced, 2Way Advanced 21 Custom biquad programming is available in the PEQ and Crossover blocks of the Advanced plugins. Its purpose is to allow you to directly provide the low-level parameters aka biquad coefficients that control the digital filters of the miniDSP, thus providing an almost infinite degree of flexibility. For example, you can create hybrid crossovers with more than one cutoff frequency, create crossover filter types beyond those provided in the easy-to-use “basic” interface, implement a Linkwitz transform, or mix crossover and filtering biquads in the same block. 3.11.1 What’s a “biquad? A biquad is the basic unit of processing that is used to create digital filters. It can be described either with an equation or with a signal flow diagram, as shown here: A single biquad like this can perform a great many functions, including all of the functions of a single parametric EQ filter, one 6 or 12 dB/octave high pass or low pass filter, and more. Biquads are combined in series (cascaded) to create more complex filters. The function that each biquad performs is determined by just five numbers: a1, a2, a0, b1, and b2. These numbers are called the coefficients. 3.11.2 Using custom biquad programming If the plugin supports custom biquad programming, each crossover block or PEQ filter has a selector that switches it to advanced mode: miniDSP Ltd, Hong Kong / www.minidsp.com / Features and specifications subject to change without prior notice 35 In advanced mode, the biquad coefficients are pasted directly into the user interface. These coefficients must be calculated using a filter design program – see the following sections for suggestions. Parametric EQ advanced mode In the parametric EQ blocks, advanced mode allows each individual filter to be specified by its coefficients. After pasting in the biquad coefficients, click on the Process button for them to take effect. Parametric EQ file import (REW integration) All six filters can be set at once by importing a coefficient file from Room EQ Wizard (REW). See Room EQ Wizard below. Crossover advanced mode The Crossover blocks have eight biquads on each output channel, allowing a high pass and low pass filter of up to 48 dB/octave in Basic mode. In Advanced mode, all eight biquads need to be specified. After pasting in the biquad coefficients, click on the Process button for them to take effect. For a cut-and-paste example of the biquad format, click on the Help button and then the Crossover Input Format button. miniDSP Ltd, Hong Kong / www.minidsp.com / Features and specifications subject to change without prior notice 36 3.11.3 The plugin calculator Plugins that support custom biquad programming include a basic biquad coefficient calculator. Click on the Biquad Calculator tab to access it. The calculator supports single parametric EQ bands, as shown in the above screenshot. To use the calculated biquad, simply copy the coefficients into the PEQ filter (set to Advanced mode) and click on the Process button. When calculating a crossover filter, the calculator will produce four biquads for the low pass filter, and four for the high pass filter. Paste each set into the crossover input screen (set to Advanced mode), and click on the Process button. 3.11.4 Biquad calculation spreadsheet The community-developed biquad calculation spreadsheet allows more filter types to be calculated, including notch filters, Linkwitz transforms, and filters with arbitrary Q-factor. Access this spreadsheet here (requires Microsoft Excel): http://www.minidsp.com/images/fbfiles/files/All_digital_coefs_v1-20101026.zip 3.11.5 Room EQ Wizard (REW) Room EQ Wizard is a free acoustic measurement and analysis tool, available for Windows, Mac and Linux platforms. It includes the ability to automatically generate a bank of parametric EQ biquads based on a measurement. These coefficients can be saved to a file from REW and loaded directly into a PEQ bank in a miniDSP plugin. Room EQ Wizard can be downloaded here: http://www.roomeqwizard.com/#downloads For guidance on using this feature, please refer to the app note Auto EQ with REW. 3.11.6 Active Crossover Designer (ACD) Active Crossover Designer (ACD) by Charlie Laub performs the complete set of functions for active crossover design and generates biquad coefficients as its output. Download it here (requires Microsoft Excel): http://audio.claub.net/software/ACD/ACD.html miniDSP Ltd, Hong Kong / www.minidsp.com / Features and specifications subject to change without prior notice 37 4 OPTIMIZING GAIN STRUCTURE When deploying a DSP solution in your audio system, a topic that becomes more important than with analog equipment is gain structure. This means that the signal levels throughout the system should be set to an optimum – high enough to maximize digital resolution and minimize noise, but not so high as to result in clipping and distortion. The miniDSP 2x4 and kit board include a jumper to select their input sensitivity, allowing them to be used in a wider variety of systems. When purchased, the miniDSP 2x4 is provided in either “A” (0.9 VRMS maximum input level) or “B” (2.0 VRMS maximum input level) versions, but it can be converted between them by opening the case and moving two jumpers. A (0.9 V) position The maximum input signal voltage allowed before clipping the A/D convertor is 0.9 Volts RMS. This position is typically used when the miniDSP is connected between a preamp and a power amplifier or power amplifiers. B (2.0 V) position The maximum input signal voltage allowed before clipping the A/D convertor is 2.0 Volts RMS. This position is typically used when the miniDSP is connected directly to a source without volume control, such as a CD player. Note that the input sensitivity jumper setting does not affect the maximum output signal – it is always 0.9 V RMS. Therefore, when the jumper is in the 2.0 V position, the miniDSP (without any other processing enabled) has an approximately 7 dB insertion loss. If higher output signal levels are required, then the miniDSP Balanced 2x4 or the 4x10 Hd can be used. For more information on gain structure, see the app note Gain Structure 101. miniDSP Ltd, Hong Kong / www.minidsp.com / Features and specifications subject to change without prior notice 38 5 KIT DOCUMENTATION The miniDSP kit is a bare circuit board that can be incorporated into your own chassis and combined with other electronics components. This section documents the supported connectivity and configuration of the kit board. 5.1 BOARD LAYOUT AND FEATURES This diagram shows the key features of the board. miniDSP Ltd, Hong Kong / www.minidsp.com / Features and specifications subject to change without prior notice 39 5.2 EXPANSION HEADER AND I2S CONNECTIVITY The expansion header #2 is available for expansion purposes. It carries, in addition to power and ground, the full set of analog signals and the digital equivalents in I2S format. The pinout of this header is shown below. I2S, also known as Inter IC Sound, is an electrical serial bus used to interface digital audio devices at the chip and circuit board level. Note that I2S is not a “plug and play” protocol, and requires attention to technical details such as clocking and wire layout. It is a solution that we make available for advanced DIYers with suitable knowledge, skills and measurement equipment to use it. For more information, please read the I2S technical note available in the download section of our website. miniDSP Ltd, Hong Kong / www.minidsp.com / Features and specifications subject to change without prior notice 40 5.3 USB CONNECTIVITY The miniDSP kit board has a 5-pin header (standard 0.1”/2.54mm pitch) located just behind its on-board USB connector, for use in builds requiring a panel mount USB connector. This header will interface to common off-the-shelf cable assemblies (typically used in computer hardware). Although this is a standard connector, you should nonetheless confirm the pin-out with the manufacturer, or you could easily cause damage to your computer or miniDSP kit. In most cases, pins 4 and 5 can be identified by a black wire, but once again, DO check the manufacturer’s spec of the connector to prevent any short-circuits. To make things simple, we provide a suitable cable for purchase in the accessories section of our website. 5.4 BYPASS/RESET A reset button is available on board and will bypass all processing by the DSP IC. If pressed once, the onboard LED will stop flashing, indicating that processing has stopped and that the miniDSP is in reset mode. To initialize the DSP, press the button again and the DSP will return to normal processing (LED flashing). While it is a handy feature to test certain configurations, beware that in DSP bypass mode, audio inputs 1 and 2 are routed directly (straight through) to outputs 3 & 4. We therefore recommend not pressing the reset button unless you know exactly what you are about to do. miniDSP Ltd, Hong Kong / www.minidsp.com / Features and specifications subject to change without prior notice 41 5.5 VOLUME CONTROL Master volume control of all output channels can be accomplished with a 10 kΩ linear potentiometer connected to the designated 3-pin header (standard 0.1”/2.54mm pitch). The wiring diagram for the potentiometer is shown in the diagram below. No attenuation (maximum volume) is applied when pin 2 of the header is at 3.3 V, while maximum attenuation (minimum volume) is applied when pin 2 is at 0 V. For your convenience, a suitable potentiometer already wired to a 3-pin female connector can be purchased together with the kit board, or separately from the Accessories section of our website. The connection to the volume header must be performed with the board powered down. If your volume control operates in reverse i.e. volume decreases as the pot is rotated clockwise, turn off connected equipment, remove power from the miniDSP board, and reverse the connector. A single potentiometer can be connected to multiple miniDSP kit boards. This allows master volume control of eight or more output channels. This diagram illustrates the wiring for master volume control of multiple boards: Finally, to enable the master volume control, use the Enable button in the System settings tab of the plugin user interface. (This must be disabled if no potentiometer is in place.) miniDSP Ltd, Hong Kong / www.minidsp.com / Features and specifications subject to change without prior notice 42 5.6 MASTER/SLAVE MASTER CLOCK SELECTION The MCLK jumper, located in the center of the board, selects the source of the master clock: If the board is used standalone, it generates its own master clock. In this case, the jumper must be in the Master position. If the board is used with an external device that generates the I2S signals, the board must slave to the external clock. In this case, the jumper must be in the Slave position. 5.6.1 Examples Board used standalone or with miniAMP only Set jumper to Master. Board used with miniDIGI, or with miniDIGI+miniAMP Set jumper to Slave. Board used with USB interface and direct I2S connection Set jumper to Slave. miniDSP Ltd, Hong Kong / www.minidsp.com / Features and specifications subject to change without prior notice 43 6 ADDITIONAL INFORMATION 6.1 SPECIFICATIONS Computer connectivity Driverless USB 2.0 control interface Digital Signal Processor 28/56 bit Digital Signal Processor Engine, double-precision internal processing ADC/DAC resolution and sample rate 24-bit, 48 kHz Analog Audio Input Unbalanced RCA Maximum input level, <1% THD 0.9 VRMS (RevA) or 2.0 VRMS (RevB) ADC dynamic range, un-weighted > 98 dB Input impedance 6 kΩ Analog Audio Output Unbalanced RCA Maximum output level, <1% THD 0.9 VRMS (2.5 Vp-p) DAC dynamic range, un-weighted > 98 dB Output impedance 560 Ω Certification CE / FCC certified - ROHS compliant Power supply USB-powered, or 4.5 – 24 VDC @150 mA via 2.1mm centerpositive Dimensions (H x W x D) 27 x 107 x 110 mm miniDSP Ltd, Hong Kong / www.minidsp.com / Features and specifications subject to change without prior notice 44 6.2 TROUBLESHOOTING The following table lists the most common causes of issues with the miniDSP 2x4. If following this table does not provide a solution, see Obtaining Support below. Item# Symptoms Troubleshooting recommendation 1 Cannot install software a. Confirm that you downloaded and installed the required frameworks first (see Download and install the plugin). 2 Cannot connect to the board a. If using an external DC supply, try connecting with USB power only. 3 “Missing biquad” error a. Quit the plugin. b. In the My Documents (or Documents on the Mac) folder, locate the miniDSP folder, and within it the folder with the plugin name. Delete this folder. c. Restart the plugin. d. Reload your saved configuration. a. Confirm the format of your file (.xml). b. Check that you are loading a file saved with the same plugin. a. Check the input meters are showing signal (if not, see item 6) b. Check that master mute is not enabled c. Check that the mute buttons in the output control blocks are not enabled d. [Crossover plugins only] Check that your crossover frequencies are correct e.g. that you don’t have high pass and low pass frequencies incorrectly set. e. [Mixer plugin only] Check that the matrix mixer controls are not set to zero. a. Check that the mute buttons in the input control blocks are not enabled. b. Check that your source is playing audio. c. Check that your source is not muted and is not playing at too low a level (e.g. volume control). a. Check the input meters and ensure that you are not overloading the inputs. If necessary, reduce the signal level from the source or switch the miniDSP to 2V input. b. Check the output meter and ensure that you are not overloading the outputs. If necessary, reduce the output gain and/or the amount of boost in the EQ blocks. 4 5 6 7 Cannot load a configuration No audio on outputs No signal showing on input meters Audio sounds distorted miniDSP Ltd, Hong Kong / www.minidsp.com / Features and specifications subject to change without prior notice 45 6.3 OBTAINING SUPPORT 1. Check the forums on miniDSP.com to see if this issue has already been raised and a solution or solutions provided. 2. Contact miniDSP via the support portal at minidsp.desk.com with: a. The specific product you are having an issue with. b. A clear explanation of the symptoms you are seeing. c. A description of the troubleshooting steps (see Troubleshooting above) you performed and the results obtained. miniDSP Ltd, Hong Kong / www.minidsp.com / Features and specifications subject to change without prior notice 46