1
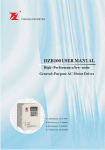
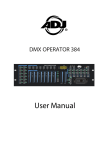
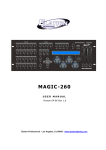
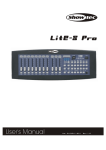
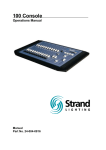
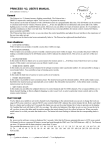
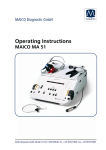
SCAN-1000 DMX
Technical Specifications
Power Input ...........................................................................DC9~15V, 500mA
Internal Fuse...................................................................500mA 250V, 5x20mm
MIDI IN...............................................................................5Pin MIDI connector
DMX OUT....................................................3Pin XLR (female) DMX connector
SOUND INPUT...........................................................................RCA connector
EXT STEP CONTROL................................................................DB-9 connector
Dimensions ...............................................................................483x135x82mm
Weight(approx.) ........................................................................................2.2 kg
10
10
10
10
10
10
10
10
8
8
8
8
8
8
8
8
6
6
6
6
6
6
6
6
4
4
4
4
4
4
4
4
2
2
2
2
2
2
2
2
PROGRAM
MUSIC/BKC
MIDI/REC
AUTO/DEL
TAP/DISP
BLACKOUT
PAN TILT
ASSIGN
REVERSE
MODE
0
0
0
0
0
0
0
0
TILT
PAN
FINE
SCAN-1000 DMX
Equipson, S.A.
www.equipson.es
[email protected]
SCAN 1000 DMX
User's Manual
26
SCAN-1000 DMX
Table of Contents
MIDI controller
Features ...........................................................................................1
By fixture 1-13, Scene 1-13, Chase 1-13 and joystick, the SCAN-1000 DMX can
function as a simple MIDI controller. The MIDI control function are falls into 10
pages. The following diagram is the details:
General Instruction..........................................................................2
Warnings.........................................................................................2
Page
Chase 1-12
Scene 1-12
Cautions......................................................................................... 3
1
Note 0-11
Note 12-19
Control and Functions....................................................................4
2
Note 0-11
Front Panel Overview...........................................................4 & 5
3
4
Rear Panel Overview..................................................................6
5
Operation Guide...............................................................................7
Joystick Set Up.....................................................................7, 8 & 9
Scene Operation.............................................................10, 11 & 12
Chase Operation.......................................................13, 14, 15 & 16
Bank copy & Fixture copy..............................................................17
6
Slider 1-8
Slider 9-16
Note 20-31
Cc 0-7
Cc 8-15
Note 12-19
Note 32-43
Cc16-23
Cc 24-31
Note 0-11
Note 12-19
Note 44-55
Cc 32-39
Cc 40-47
Note 56-67
Note 68-75
Note 76-87
Cc48-55
Cc 56-63
Note 100-107 Note 108-119
Cc 64-71
Cc72-79
Note 88-99 Note 120-127 Note 108-119
Cc 80-87
Cc 88-95
Note 88-99
Fixture 1-12
Note 08-19
Note 0-7
Note 20-31
Cc 96-103
Cc 104-111
8
Note 40-51
Note 32-39
Note 52-63
Cc 112-119
Cc 120-127
9
Note 64-75
Note 76-83
Cc 0-7
Cc 8-15
Cc 0-7
Cc 8-15
7
10
Note 84-95
Note 96-107 Note 108-115 Note 116-127
Fade Time Set Up......................................................................... 17
MIDI Set Up & Chart..................................................................... 18
ULink Operation....................................................................19 & 20
USB MEM Stick Data Send.........................................21, 22, 23, 24
MIDI Control..................................................................................25
The Fade Time joystick controls the function of Program Change.
Notes:
Cc is short for Control change.
You can select page by Bank UP/DOWN button.
Hold down Midi/Bkc and press UP/DOWN button you will alter the MIDI channel.
Technical Specifications ...............................................................26
25
SCAN-1000 DMX
USB MEM Stick (Data Transfer to SCAN-1000 DMX from MEM Stick (Send Data)
This operation will allow you to transfer data from your USB Memory stick to the
SCAN-1000 DMX console. You must first install the USave application software and
USB driver that was supplied with your USB MEM Stick. If you have not done so,
please do so now then proceed to step 1 below.
SCAN-1000 DMX
Features
SCAN-1000 DMX is a multifunction controller, which can work not only
as a LED controller but also as a simple MIDI controller. When it works
as a stage lighting controller, it has the following main features:
- 8 control channel faders
(1) Install the USB MEM Stick into the USB port on your SCAN-1000 DMX.
(2) Flip the DMX Operators power switch OFF which is located on the rear of the
SCAN-1000 DMX.
(3) On the SCAN-1000 DMX, simultaneously press and hold down the FIXTURE 8,
FIXTURE 9 and SCENE 2 buttons and power ON. If "Fail" appears in the controllers
display, it means that the memory stick was not installed properly. Please repeat
steps 1 & 2 and try again. (Note: if "noP" appears, it means that there are no files
currently stored in the memory stick. You must first write your file to the memory
stick by using the USave software program. If "FL0X" appears, X represents file
number 1-8 within the memory stick, it means files are already stored to that folder
and you can use the BANK UP/Down buttons to access other folders currently on
the stick at this time). Select the folder that you wish upload into the controller. For
example, if you have your programs stored in folder "FL01" then leave it set on
that folder and proceed to the next step.
(4) Simultaneously press the Program button and the Scene # button that corresponds
with the folder # that you wish to store to within the Memory stick. For example, if
you want to store to folder #4 then you’d simultaneously press the Program button
and Scene button # 4. (Scene buttons 1-8 correspond with memory stick folders
1-8). The controllers display will flash "dAtA" during the transfer. When the transfer
is complete, the display should read "101" and your file will have been successfully
stored to the computer.
- 192 total DMX channels
- Individual Speed & Fade Time faders
- 30 memory banks x 8 programmable scenes per bank
- 12 programmable chases, 240 steps per chase
- Assignable fade setting
- Manual control chase override
- Built-in microphone or line level input for audio triggering
- MIDI controllable
- Optional foot controller for chase step activation
- Onboard fog machine trigger button
- 7-segment LED display
- Multifunction USB connector for work light and data backup
- Ships with standard joystick module- optional jog wheel module available
Joystick module
Jog wheel module
When it works as a MIDI controller, it has features as follows:
- with 1-16 channel selectable
- MIDI Note
- Control change
- Program change
24
1
SCAN-1000 DMX
SCAN-1000 DMX
Every effort has been made to design dependable, reliable and user friendly
products. New products are being designed constantly to meet the needs
of both entertainment and special effects lighting industries. We welcome your
comments about our product and services and are open to suggestions on
how we can improve to better serve you.
USB MEM Stick (Reload Memory File to USB MEM Stick from Computer)
It is a privilege for us to be chosen as your control solution.
(1) Install the USB MEM Stick into a USB port on your computer.
General Introduction
(2) Open the USave program by clicking START on the Windows taskbar, then click
Programs or All programs and click USave.
This controller is an expansion of the simple to use SCAN-1000 DMX. We've
added 6 additional chase memory buttons which now give you a total 12 to work
with. In addition, we've added a USB input which can power up a USB work lite
and also can be used to back up your programs and settings via our optional USB
memory stick, model USB MEM Stick, or our data cable, model Ulink Cable.
A joystick is supplied for traditional X/Y control of a moving light. We also offer
optional data wheels, if you prefer to use them for control.
To optimize performance of this product, please read the instructions carefully
to familiarize yourself with the basic functions and operations.
Warnings
This operation will allow you to reload your memory files from your computer to your
USB MEM Stick. You must first install the USave application software and USB driver
that was supplied with your USB MEM Stick. If you have not done so, please do so
now then proceed to step 1 below.
(3) Click Select UStick in the upper left hand corner of the USave program.
(4) Click "Writ". A Send file window will pop up.
(5) Select the destination and click on the file that you wish to load into the memory
stick. The file names should consist of "FL01 through Fl08".
(6) Repeat step 4 & 5 to load additional files to your memory stick.
USB MEM Stick (Delete & Format files in Memory Stick)
This operation will allow you to individually delete files from your memory stick and
format the entire memory stick all at once which erases all files in one shot. You must
first install the USave application software and USB driver that was supplied with your
USB MEM Stick. If you have not done so, please do so now then proceed to step 1
below.
This unit is intended for indoor use only.
(1) Install the USB MEM Stick into a USB port on your computer.
Do not allow for any flammable liquids, water or metal objects to enter the unit.
(2) Open the USave program by clicking START on the Windows taskbar, then click
Programs or All programs and click USave.
(3) Click Select UStick in the upper left hand corner of the USave program.
To reduce the risk of fire or electric shock, do not expose the unit to rain or
high levels of moisture.
No user serviceable parts inside, do not dismantle the unit yourself.
Repairs must be done by qualified personnel only.
Please do not allow children to play and tamper with this product.
(4) Click "Dirtory". A list of files currently on the memory stick will appear in the UStick
option box. Warning! The following procedure will format the entire memory
stick. If you wish to delete files one at a time, proceed to step 5. To format
(delete) all files in one shot, click "Format" now. All files will immediately
erase from the memory stick.
(5) Highlight the file that you wish to delete by clicking on it once.
(6) Click "DEL". The file will delete immediately. To delete additional files, repeat steps
5 & 6.
2
23
SCAN-1000 DMX
SCAN-1000 DMX
USB MEM Stick (Store Memory File to Computer from USB MEM Stick)
This operation will allow you to store your memory files from your USB Memory
stick to your computer. You must first install the USave application software and
USB driver that was supplied with your USB MEM Stick. If you have not done so,
please do so now then proceed to step 1 below.
(1) Install the USB MEM Stick into a USB port on your computer.
(2) Open the Usave program by clicking START on the Windows taskbar, then click
Programs or All programs and click USave.
(3) Click Select UStick in the upper left hand corner of the USave program.
(4) Click "Dirtory". A list of files currently on the memory stick will appear in the UStick
option box.
Cautions
2
When unpacking, please ensure that the unit is not damaged. Should
something be wrong, please contact us immediately.
All rights reserved. No part of this manual may be reproduced, transmitted,
transcribed or translated into any language, in any form, by any means,
without authorized permission from WORK.
Notice:
Specifications and improvements in the design of this product and this
manual are subject to change without any prior notice.
(5) Highlight the file that you wish to store to your computer by clicking on it once.
(6) Click "Read'. A Send file window will pop up and automatically assign a file name.
It is very important that you do not change the file name. Otherwise, you will
have problems reloading the file back to the controller later.
(7) Select a destination for your file such as "Desktop" and click "Open". The transfer
will begin immediately. Once complete, you will return to the main USave screen.
To store additional files to your computer, repeat steps 5 , 6 & 7.
22
3
SCAN-1000 DMX
SCAN-1000 DMX
USB MEM Stick (Data Transfer to Memory stick from SCAN-1000 DMX) (Send Data)
Control and Functions
This operation will allow you to transfer data from your controller to our proprietary
USB Memory stick. There are 8 large folders to store to- total 128mb. You must
first install the USave application software and USB driver that was supplied with
your USB MEM Stick. If you have not done so, please do so now then proceed to
step 1 below.
Front Panel Overview
10
9
11
12
13
(1) Install the USB MEM Stick into the USB port on your SCAN-1000 DMX.
(2) Flip the DMX Operators power switch OFF which is located on the rear of the
SCAN-1000 DMX.
1
10
10
10
10
10
10
10
10
8
8
8
8
8
8
8
8
6
6
6
6
6
6
6
6
4
4
4
4
4
4
4
4
2
2
2
2
2
2
2
2
0
0
0
0
0
0
0
0
14
PROGRAM
MUSIC/BKC
MIDI/REC
AUTO/DEL
TAP/DISP
BLACKOUT
15~20
PAN TILT
ASSIGN
REVERSE
MODE
TILT
PAN
FINE
SCAN-1000 DMX
2
3
4 5
6
7
8
1. Fixture buttons(1~12):
Used to select relevant fixtures for control.
2. Channel faders(1~8):
Used to control the output of each corresponding fixture channel.
3. Channel Bank button:
Used to switch between channels 1-8 and 9-16.
4. Speed fader:
Used to adjust chase speed (range is 0.1 second to 10 minutes per step).
5. Fade Time fader:
Used to adjust chase fade time (range is 0 to 30 seconds).
6. FINE button:
Used in conjunction with the joystick or data wheels. When the FINE button is
engaged, adjusting the joystick or data wheels will be more precise when needing
to hit a specific area with a scanner or moving head.
(3) On the SCAN-1000 DMX, simultaneously press and hold down the FIXTURE 8,
FIXTURE 9 and SCENE 1 buttons and power ON. If "Fail" appears in the
controllers display, it means that the memory stick was not installed properly.
Please repeat steps 1 & 2 and try again. (Note: if "noP" appears, it means that
there are no files currently stored in the memory stick. You can store to any of the
8 available folders. If "FL0X" appears, X represents file number 1-8 within the
memory stick, it means files are already stored to that folder and you can use the
BANK UP/Down buttons to access other occupied folders currently on the stick at
this time). If a specific folder number doesn't come up, then it is empty and can be
used at this time. If you"ve used up all 8 folders within the memory stick, you will
have to overwrite one of them. Make sure you have a copy of it in your computer
before proceeding to overwrite it if you wish to use it later).
(4) Simultaneously press the Program button and the Scene # button that
corresponds with the folder # that you wish to store to within the Memory stick.
For example, if you want to store to folder #4 then you'd simultaneously press the
Program button and Scene button # 4. (Scene buttons 1-8 correspond with
memory stick folders 1-8). The controllers display will flash "dAtA" during the
transfer. When the transfer is complete, the display should read " 101" and your file
will have been successfully stored to the computer.
7. MODE button:
This is a multi-function button that is used when assigning the joystick & Fade setting.
8. Joystick/Jog wheel:
Traditionally used to adjust the X/Y channels of a moving light.
4
21
SCAN-1000 DMX
ULink (Data Transfer to SCAN-1000 DMX from Computer)( Receive Data)
This operation will allow you to transfer previously stored data from your computer
back into your SCAN-1000 DMX. You must first install the USave application
software and USB driver that was supplied with your ULink cable. If your using the
same computer that you used when storing the data to your computer, then you
should already have the USave program installed. If your using a different computer
or uninstalled the USave program, then you will have to install it at this time.
Proceed to step 1 below when you've confirmed that the USave program is installed
and ready for use.
(1) Connect the stick end, end with LED indicator, into a USB port on your computer
and the opposite end into the USB port on your SCAN-1000 DMX.
(2) Flip the DMX Operators power switch OFF which is located on the rear of the
console.
SCAN-1000 DMX
9. Scene buttons (1-8):
Used when storing or playing back programmed scenes. Also used when backing
up data to a USB MEM Stick or through a ULink Cable.
10. LED-display:
The LED-display shows you relevant information depending on current operation.
11. Bank Up/Down button:
Used to select a scene bank or chase step. Also used to view files in memory stick.
12. USB Input:
Used for data backup to USB MEM Stick or ULlink Cable. Also for USB work light.
13. Fog-machine button:
Used to trigger fog machine which should be connected to rear of console.
14. Chase buttons (1-12):
Used when storing or playing back relevant chases..
15. Program button :
Used to enter and exit Record mode when programming.
(3) On the SCAN-1000 DMX, simultaneously press and hold down the FIXTURE 2,
FIXTURE 3 and SCENE 2 buttons and power ON. The display will continually flash
"reAd" (abbreviation for READY). This means that the unit is ready to receive data.
16. Music/Bkc button:
Used to engage audio mode for chase synchronization and to copy a bank of
scenes to another.
(4) On your computer, open the Usave program by clicking START on the Windows
taskbar, then click Programs or All programs and click USave.
17. Midi/Rec button:
Used to record scenes and chase steps. Also used to setup Midi operation.
(5) On your computer, click Select ULink in the upper right hand corner of the Usave
program.
(6) On your computer, click Send File. A Send file window will pop up. Select the file
that you want to transfer into the SCAN-1000 DMX. Once selected, the transfer
will begin immediately. During the transfer, your controllers display will read " reCe".
(receiving). When the transfer is complete, the display should read "101" and your
file will have been successfully uploaded into your controller.
20
18. Auto/Del button :
Used to enter AUTO mode for automatic scene bank sequence or to delete a
scene or chase.
19. Tap/Disp button:
Used to tap sync chase playback and to change display view operation.
20. Black-out button:
Used to bring all current output down to zero.
5
SCAN-1000 DMX
SCAN-1000 DMX
ULink (Data Transfer to Computer from SCAN-1000 DMX) (Send Data)
Rear Panel Overview
DC input:
Product Name:
Serial Number:
SCAN-1000 DMX
S/ N : 13 83 35 16 Date: 09.April.2008
Midi Out
Midi In
1=NC; 2=NC 3
3=NC; 4=V+ 5
5=Signal
2
1 1=NC; 2=GND
4 3=NC; 4=V+
5=Signal
DMX Out
9V-12VDC, 500mA Min
Midi
1 = Ground
2 = Data 3 = Data +
DMX
Audio
USB
1
9 10
11
Line Input 0.1V-1Vp-p
DB-9
EXT Step Control
Mi di In
2
3
4
Mi di Out
12
FOG Machine
5
DMX Out
6
DC In
7
Power
This operation will allow you to transfer data from your controller to a standard PC
or laptop. You must first install the Usave application software and USB driver that
was supplied with your ULink cable. If you have not done so, please do so now then
proceed to step 1 below.
Ma de in PR C
8
1. Label:
lists model, serial number and production date.
2. Audio input:
to connect line level input for audio trigger (0.1V-1Vp-p).
3. DB-9 connector:
to connect optional external chase step controller.
4. MIDI IN:
to receive MIDI information from a midi sequencer or compatible device.
5. Fog machine connector:
to connect a compatible fog machine.
6. 3 Pin Female XLR:
DMX output. Connect to first device in line.
7. DC INPUT:
connects the included power supply to this input. (DC 9V~15V, 500mA Min).
8. Power switch:
used to switch the units power on and off.
9. USB Interface:
outputs the MIDI signal via USB interface when connected to MIDI controller.
(1) Connect the stick end, end with LED indicator, into a USB port on your computer
and the opposite end into the USB port on your SCAN-1000 DMX.
(2) Flip the DMX Operators power switch OFF which is located on the rear of the
SCAN-1000 DMX.
(3) On the SCAN-1000 DMX, simultaneously press and hold down the FIXTURE 2,
FIXTURE 3 and SCENE 1 buttons and power ON. The display will continually flash
"rEAd" (ready). This means that the unit is ready to send data.
(4) On your computer, open the Usave program by clicking START on the Windows
taskbar, then click Programs or All programs and click USave.
(5) On your computer, click Select ULink in the upper right hand corner of the Usave
program.
(6) On your computer, click Receive File. A Send window will pop up. Select a
destination to save your data to and type a name that you want your data saved as.
(A message should appear in the lower right hand corner that reads
"Waiting Receive Data" ).
(7) On the SCAN-1000 DMX, simultaneously press the Scene 7 and Scene 8 buttons.
The transfer will begin immediately. The controllers display should flash " Out"
during the transfer. When the transfer is complete, the display should read " 101" and
your file will have been successfully stored to the computer.
(During this process, you can press the Scene 1 button to restart the data transfer).
10. LED Lamp:
indicates the working state of USB interface.
11. Switch:
switches the function of DMX controller or MIDI controller. The change will work
after re-startup.
12. MIDI Out Socket:
output the MIDI signal when connected to the MIDI controller.
6
19
SCAN-1000 DMX
SCAN-1000 DMX
MIDI
Operation Guide
Set MIDI channel
Joystick Set Up
(1) Press and hold down the Midi button for 2 seconds or until the LED-display displays "
In:XX". "":XX" represents the current set midi channel.
(2) Use UP/DOWN BANK buttons to set your desired Midi channel from 01 to 16.
(3) Press and hold down the Midi button for 2 seconds or until all LED's flash three
times to save your setting.
MIDI Control :
This unit can receive MIDI data to trigger or activate Banks 1-30, Chases 1-12
and the Blackout function. See Midi chart below.
MIDI Note
0-11
12-19
20-49
50
51
52
Function
Turn on/off Chase1-12
Turn on/off Scene1-8
Select Bank1-30
Enable/disable Audio
Enable/disable Auto
Enable/disable Blackout
"Assign Joystick"
(1) Press and hold down the Program button for approximately 2 seconds or until the
PROG indicator in the LED-display flashes. Once the indicator is flashing, record
mode is engaged and you may release the Program button.
(2) Press and hold down the MODE button and then tap the FINE button. The "Assign"
and "Pan" LED's should illuminate.
(3) Select the fixtures that you wish to assign the "Pan" for by pressing the FIXTURES
# buttons, 1-12, so the selected fixture LED's illuminate.
(4) Press the Tap/Disp button to switch between "PL.XX" & "PH.XX". "PL.XX" represents
the Low Byte or Fine channel, generally listed as the Pan Fine channel and PH.XX
represents the High Byte or Coarse channel, generally listed as the Pan channel. Set
it to "PH.XX" and press and hold down the MODE button and then tap the SCENE
button that corresponds to the Pan channel of your fixture. For example, if your fixtures
Pan channel is 1 then you'd press the SCENE #1 button. Please refer to the fixtures
DMX chart. If your fixture includes a pan fine channel, press the Tap/Disp button so the
display reads "PL.XX". Press and hold down the MODE button and then tap the SCENE
button that corresponds to the Pan Fine channel of your fixture. For example, if your
fixtures Pan Fine channel is 2 then you'd press the SCENE #2 button.
(5) Press the BANK UP or DOWN buttons to switch between "TL.XX" & "TH.XX".
"TL.XX" represents the Low Byte or Fine channel, generally listed as the Tilt Fine
channel and TH.XX represents the High Byte or Coarse channel, generally listed as
the Tilt channel. Set it to "TH.XX" and p ress and hold down the MODE button and
then tap the SCENE button that corresponds to the Tilt channel of your fixture. For
example, if your fixtures Tilt channel is 3 then you'd press the SCENE #3 button.
Please refer to the fixtures DMX chart. If your fixture includes a Tilt Fine channel,
press the Tap/Disp button so the display reads "TL.XX". Press and hold down the
MODE button and then tap the SCENE button that corresponds to the Tilt Fine
channel of your fixture. For example, if your fixtures Pan Fine channel is 2 then
you'd press the SCENE #4 button.
(6) Press and hold down the Program button for approximately 2 seconds or until the
PROG indicator in the LED-display stops flashing. A flashing Blackout indicator in the
LED-display confirms that the controller is out of Program mode.
"Assign Joystick Reverse" (Pan/Tilt Invert)
18
7
SCAN-1000 DMX
(1) Press and hold down the Program button for approximately 2 seconds or until the
PROG indicator in the LED-display flashes. Once the indicator is flashing, record
mode is engaged and you may release the Program button.
(2) Press and hold down the MODE button and then tap the FINE button. The "Assign"
and "Pan" LED's should illuminate.
(3) Once again, press and hold down the MODE button and then tap the FINE button.
The "Reverse" LED should illuminate.
(4) Select the fixtures that you wish to assign the "Pan Reverse" & "Tilt Reverse" for
by pressing the FIXTURES # buttons, 1-12, so the selected fixture LED's
illuminate. Ideally, you should assign opposite fixtures for Pan/Tilt Reverse. For
example, fixtures 1, 3, 5, 7, etc... should be assigned normal as described in the
previous section and fixtures 2, 4, 6, etc..., should be assigned reversed so that
when moving the joystick around, fixtures movements are reversed from one
another. This feature is traditionally referred to as Pan/Tilt invert.
(5) Press the Tap/Disp button to switch between "PL.XX" & "PH.XX". "PL.XX"
represents the Low Byte or Fine channel, generally listed as the Pan Fine channel
and PH.XX represents the High Byte or Coarse channel, generally listed as the Pan
channel. Set it to "PH.XX" and press and hold down the MODE button and then tap
the SCENE button that corresponds to the Pan channel of your fixture. For example,
if your fixtures Pan channel is 1 then you'd press the SCENE #1 button. Please
refer to the fixtures DMX chart. If your fixture includes a pan fine channel, press the
Tap/Disp button so the display reads "PL.XX". Press and hold down the MODE
button and then tap the SCENE button that corresponds to the Pan Fine channel
of your fixture. For example, if your fixtures Pan Fine channel is 2 then you'd press
the SCENE #2 button.
(6) Press the BANK UP or DOWN buttons to switch between "TL.XX" & "TH.XX".
"TL.XX" represents the Low Byte or Fine channel, generally listed as the Tilt Fine
channel and TH.XX represents the High Byte or Coarse channel, generally listed as
the Tilt channel. Set it to "TH.XX" and p ress and hold down the MODE button and
then tap the SCENE button that corresponds to the Tilt channel of your fixture. For
example, if your fixtures Tilt channel is 3 then you'd press the SCENE #3 button.
Please refer to the fixtures DMX chart. If your fixture includes a Tilt Fine channel,
press the Tap/Disp button so the display reads "TL.XX". Press and hold down the
MODE button and then tap the SCENE button that corresponds to the Tilt Fine
channel of your fixture. For example, if your fixtures Pan Fine channel is 2 then
you'd press the SCENE #4 button.
(7) Press and hold down the Program button for approximately 2 seconds or until the
PROG indicator in the LED-display stops flashing. A flashing Blackout indicator in
the LED-display confirms that the controller is out of Program mode.
8
SCAN-1000 DMX
Bank copy & Fixture copy
Bank copy
(1) Enter the Program mode.
(2) Use the Bank UP/DOWN buttons to select the bank to be copied.
(3) Tap the Midi/Rec button, and then use the Bank UP/DOWN buttons to select the
bank that you want to copy to.
(4) Tap the Music/Bkc button. All LED's will flash three times to confirm your bank copy
operation.
Fixture copy
(1) Enter the Program mode.
(2) Press the Fixture # button, 1-12, that you wish to copy.
(3) Using channel faders 1-8, data wheels or joystick, set your look for the light.
(4) Press and hold down the same Fixture button, then tap the Fixture # button that
you want to copy the same settings to.
Fade Time
(1) Press and hold down the MODE button, then tap the Tap/Disp button. The
LED-display will display "OnLy " or "ALL" , for 3 seconds, depending on the current
setting. "OnLy" indicates that the Pan/Tilt channels will only be affected by the fade
time fader while "ALL" indicates that all channels will be affected by the fade time fader.
(2) To change this setting, tap the Tap/Disp button while pressing and holding down
the Mode button. Doing so, should switch between the OnLy and ALL options.
17
SCAN-1000 DMX
2. Auto trigger:
(1)
(2)
(3)
Press the AUTO/Del button, the Auto Trigger indicator light will illuminate in the
LED-display. This indicates you that you are now in the Auto trigger mode.
Press the Chase # button, 1-12, that you wish to playback. The selected Chase
LED should illuminate and begin to play. You can select more than one chase #
button at a time to create a chase sequence.
At any time, you can adjust the Speed and Fade fader to set your chase playback
state. You can also press the Tap/Disp button twice to establish a chase rate. The
rate will be determined by the tempo at which you press the Tap/Disp button .
3. Audio trigger:
(1)
(2)
Press the Music/Rec button, the Audio Trigger indicator light will illuminate in the
LED-display. This indicates you that you are now in the Audio trigger mode.
Press the Chase # button, 1-12, that you want to playback. The selected Chase
LED should illuminate and engage. The selected chase will trigger to sound via the
internal microphone or to audio via the line level input if connected. Pressing the
Music/Rec button again will disengage audio mode.
SCAN-1000 DMX
Delete Joystick Pan/Tilt Assignment
"Delete Pan/Tilt Joystick settings for selected fixtures"
(1) Press and hold down the Program button for approximately 2 seconds or until the
PROG indicator in the LED-display flashes. Once the indicator is flashing, record
mode is engaged and you may release the Program button.
(2) Press and hold down the MODE button and then tap the FINE button. The "Assign"
and "Pan" LED's should illuminate.
(3) Select the fixtures that you wish to delete the joystick Pan/Tilt settings for by pressing
the relevant FIXTURES # buttons, 1-12, so the relevant LED's illuminate.
(4) Press and hold down the MODE button, and then tap the Auto/DEL button to
delete the settings for the selected fixtures. All LED's will flash three times to
confirm that the settings were erased.
(5) Press and hold down the Program button for approximately 2 seconds or until the
PROG indicator in the LED-display stops flashing. A flashing Blackout indicator in
the LED-display confirms that the controller is out of Program mode.
"Delete Pan/Tilt Joystick settings for all fixtures"
(1) Flip the Operators power switch OFF which is located at the rear of the unit.
(2) Simultaneously, press and hold down the Auto/Del and MODE buttons and flip
the power switch ON. All LED's will flash three times to confirm that the Pan/Tilt
settings were erased.
Manual Control
When powered ON, this console defaults to Manual/Blackout mode. All output will be
in a black-out state until the Blackout button is deselected. To determine blackout status
there is an indicator light in the display that flashes when engaged and OFF when disengaged. To gain manual control, disengage blackout, select the fixtures that you wish
to control by selecting the relevant fixture buttons on the left then use the eight channel
faders, joystick or data wheels and the channel bank button to manually control the
fixtures. Note: in most cases, for the joystick or data wheels to work, you must first
assign them. Please see the Assign Joystick section of this manual.
16
9
SCAN-1000 DMX
Recording Scenes
Delete a Chase
(1) Press and hold down the Program button for approximately 2 seconds or until the
PROG indicator in the LED-display flashes. Once the indicator is flashing, record mode
is engaged and you may release the Program button.
(2) Select the fixtures that you wish to include into your scene by pressing the
FIXTURES # buttons, 1-12. so the selected fixture LED's illuminate.
(3) Set your scene using the eight Channel faders, joystick or data wheels and
Channel Bank button if needed. The Channel Bank button should be used to
switch between channel banks 1-8 and 9-16.
(4) Once you are satisfied with the look of your scene, press the Midi/REC button to
Record it.
(5) Using the BANK UP & DOWN buttons, select a scene bank to store to. There are
30 available Scene Banks and you can view them in the LED-display by referring
to the furthest two digits to the right.
(6) Press a Scene button, 1-8, to store to. Once pressed, all LED's will flash indicating
that your scene was stored. There are 8 Scene buttons to store to for each bank.
Make sure you select a different scene button each time you store a scene so you
don't record over something that you wanted to keep.
(7) To Record additional scenes, repeat steps 2 through 6.
(8) Once you've stored all of your scenes, press and hold down the Program button for
approximately 2 seconds to exit. A flashing Blackout indicator in the LED-display, is
indicative that you are out of program mode.
(1) Press and hold down the Program button for approximately 2 seconds or until the
PROG indicator in the LED-display flashes. Once the indicator is flashing, record
mode is engaged and you may release the Program button.
(2) Select the Chase # button, 1-12, that you want to delete.
(3) Simultaneously, press the Auto/Del button then press the same Chase # button
that you selected in step 2. All LED's should flash three times to confirm that the chase
was deleted.
(4) Repeat steps 2 & 3 to delete additional scenes.
(5) Press and hold down the Program button for approximately 2 seconds or until the
PROG indicator in the LED-display stops flashing. A flashing Blackout indicator, in the
LED-display,is indicative that you are out of program mode.
Editing Scenes
(1) Press and hold down the Program button for approximately 2 seconds or until the
PROG indicator in the LED-display flashes. Once the indicator is flashing, record
mode is engaged and you may release the Program button.
(2) Using the UP/Down BANK button, select the bank that contains the scene that you
want to edit. You can view the active bank in the LED-display.
(3) Press the Scene button, 1-8, that you want to edit so the scene comes on.
10
SCAN-1000 DMX
(4) Select the fixture or fixtures that you wish to change settings for in the current scene
by pressing the relevant Fixture # buttons, 1-12. The selected fixture LED's should
illuminate.
(5) Make your changes using the faders, joystick or data wheels.
(6) Press the Midi/Rec button and then press the scene # button that you are editing.
All LED's will flash three times to confirm that your new settings were saved.
(7) Press and hold down the Program button for approximately 2 seconds to exit. A
flashing Blackout indicator, in the LED-display, is indicative that you are out of program
mode.
Delete all chases
(1) Flip the Operators power switch OFF which is located at the rear of the unit.
(2) Simultaneously, press and hold down the Auto/Del and Bank Down buttons and
flip the power switch ON. All LED's will flash three times to confirm that all chases
were deleted.
Chase Playback
1. Manual trigger:
(1) When powered ON, this console defaults to Manual/Blackout mode. All output will be
in a black-out state until the Blackout button is deselected. To determine blackout
status there is an indicator light in the display that flashes when engaged and OFF
when disengaged. Press the Blackout button so the indicator stops flashing.
(2) Press the Chase # button, 1-12, that you want to playback. The selected chase LED
should illuminate.
(3) Press the BANK UP & DOWN buttons, as desired, to manual step through your
chase steps. You can also manually adjust the Fade Time fader if you wish to
incorporate a crossfade between step.
(4) Repeat steps 2 & 3 to manually playback additional chases.
15
SCAN-1000 DMX
Editing Chases
Copy a Scene
Add a Chase Step
(1)
(1) Press and hold down the Program button for approximately 2 seconds or until the
PROG indicator in the LED-display flashes. Once the indicator is flashing, record
mode is engaged and you may release the Program button.
(2) Select the Chase # button, 1-12, that you wish to add a step to. The relevant
Chase LED should illuminate.
(3) Press the Tap/Disp button , the Step indicator light should illuminate in the LEDdisplay.
(4) Press the Bank UP/DOWN buttons to manually step through the chase steps.
Find the chase step that you wish to add a step after.
(5) Press the Tap/Disp button disengage Step mode. The Step indicator, in the LEDdisplay,should be OFF.
(6) Using the BANK UP & DOWN buttons, select the scene bank, 1-30, that contains
the scene you want to add. You can view the scene banks in the LED-display by
referring to the furthest two digits to the right.
(7) Press the Midi/Rec button the record the step into your chase. All LED’s should
flash three times to confirm that the chase step was added.
(8) Repeat steps 3 through 7 to add additional chase steps.
(9) Press and hold down the Program button for approximately 2 seconds to exit. A
flashing Blackout indicator, in the LED-display, is indicative that you are out of program
mode.
Deleting Chase Steps
(1) Press and hold down the Program button for approximately 2 seconds or until the
PROG indicator in the LED-display flashes. Once the indicator is flashing, record
mode is engaged and you may release the Program button.
(2) Select the Chase # button, 1-12, that you want to delete a step in. The relevant
chase LED should illuminate.
(3) Press the Tap/Disp button , the Step indicator light should illuminate in the LED-display.
(4) Press the Bank UP/DOWN buttons to manually step through the chase steps.
Find the chase step that you want to delete.
(5) Press the Auto/Del button to delete the chase step. All LED's should flash three
times to confirm that the chase step was deleted.
(6) Repeat steps 4 & 5 to delete additional chase steps.
(7) Press and hold down the Program button for approximately 2 seconds or until the
PROG indicator in the LED-display stops flashing. A flashing Blackout indicator, in the
LED-display,is indicative that you are out of program mode.
14
SCAN-1000 DMX
(2)
(3)
(4)
(5)
(6)
Press and hold down the Program button for approximately 2 seconds or until the
PROG indicator in the LED-display flashes. Once the indicator is flashing, record
mode is engaged and you may release the Program button.
Select the bank that contains the scene you want to copy with the Bank UP/DOWN
buttons.
Select the Scene # button, 1-8, that you want to copy.
Use the UP/DOWN BANK buttons to change the scene bank if desired.
Press the Midi/Rec button followed by the Scene # button, 1-8, that you want to
copy the scene to. All LED's should flash three times to confirm and save settings.
Press and hold down the Program button for approximately 2 seconds or until the
PROG indicator in the LED-display stops flashing. A flashing Blackout indicator, in
the LED-display, is indicative that you are out of program mode.
Delete a Scene
(1) Press and hold down the Program button for approximately 2 seconds or until the
PROG indicator in the LED-display flashes. Once the indicator is flashing, record
mode is engaged and you may release the Program button.
(2) Select the bank that contains the scene you want to delete with the Bank UP/DOWN
buttons.
(3) Simultaneously, press the Auto/Del button then press the Scene # button, 1-8,
that you want to delete. All LED's should flash three times to confirm that the scene
was deleted.
(4) Repeat steps 2 & 3 to delete additional scenes.
(5) Press and hold down the Program button for approximately 2 seconds or until the
PROG indicator in the LED-display stops flashing. A flashing Blackout indicator, in
the LED-display, is indicative that you are out of program mode.
Delete All Scenes
(1)
Flip the Operators power switch OFF which is located at the rear of the unit.
(2)
Simultaneously, press and hold down the Program and Bank Down buttons and
flip the power switch ON. All LED's will flash three times to confirm that all scenes
were deleted.
11
SCAN-1000 DMX
Scene Playback
Recording Chases
1. Manual trigger:
(1) When powered ON, this console defaults to Manual/Blackout mode. All output will be
in a black-out state until the Blackout button is deselected. To determine blackout
status, there is an indicator light in the display that flashes when engaged and OFF
when disengaged. Press the Blackout button so the indicator stops flashing.
This product has 12 programmable chases. Each of which can store up to 240 scenes/
steps. Please see the below instructions for chase setting.
(2) Press the Bank UP/DOWN buttons to select the scene bank that contains the scene
that you want to playback.
(3) Press the Scene # button, 1-8, that you want to playback. The selected scene will
engage. Press the same scene # button again to disable the scene or the
Blackout button to bring all output to a blackout state.
(4) Repeat steps 2 & 3 to manually playback additional scenes.
2. Auto trigger:
(1) Press the AUTO/Del button, the Auto Trigger indicator light will illuminate in the
LED-display. This indicates you that you are now in the Auto trigger mode.
(2) Press the Bank UP/DOWN buttons to select a desired scene bank, 1-30, for
automatic playback. All eight scenes in the selected scene bank will sequence.
(3) At any time, you can adjust the Speed and Fade fader to the adjust your scene
sequence playback state. You can also press the Tap/Disp button twice to
establish a sequence rate. The rate will be determined by the tempo at which
you press the Tap/Disp button. Pressing the Auto/Del button again will disengage
automatic playback mode.
3. Audio trigger:
(1) Press the Music/Rec button, the Audio Trigger indicator light will illuminate in the
LED-display. This indicates you that you are now in the Audio trigger mode.
(2) Press the Bank UP/DOWN buttons to select a desired scene bank, 1-30, or
a chase # button, 1-12. The selected scene bank or chases will trigger to audio
via the internal microphone or line level input if connected. Pressing the Music/Rec
button again will disengage audio mode.
12
SCAN-1000 DMX
(1) Press and hold down the Program button for approximately 2 seconds or until the
PROG indicator in the LED-display flashes. Once the indicator is flashing, record
mode is engaged and you may release the Program button.
(2) Select a Chase # button, 1-12, that you wish to record to. The relevant Chase LED
should illuminate.
(3) Using the BANK UP & DOWN buttons, select the scene bank, 1-30, that contains
the scene you want added to your chase. You can view the scene banks in the LEDdisplay by referring to the furthest two digits to the right. You can also s et your scene
using the eight Channel faders, joystick or data wheels and Channel Bank button
on the fly if desired. The Channel Bank button should be used to switch between
channel banks 1-8 and 9-16.
(4) Press the Midi/REC button to record the chase step. All LED's will flash three times
to confirm that the chase step was recorded.
(5) Repeat steps 3 & 4 to record additional steps.
(6) Once you've recorded all of your steps, press and hold down the Program button
for approximately 2 seconds to exit. A flashing Blackout indicator, in the LED-display, is
indicative that you are out of program mode.
Recording a Bank of Scenes to a Chase
(1) Press and hold down the Program button for approximately 2 seconds or until the
PROG indicator in the LED-display flashes. Once the indicator is flashing, record
mode is engaged and you may release the Program button.
(2) Select a Chase # button, 1-12, that you wish to record to. The relevant Chase LED
should illuminate.
(3) Using the BANK UP & DOWN buttons, select the scene bank, 1-30, that you want
added to your chase. You can view the scene banks in the LED-display by referring to
the furthest two digits to the right.
(4) Simultaneously press the Music/Bkc and Midi/Rec buttons to record the entire
scene bank. All LED's will flash three times to confirm that the scene bank was
recorded. Scenes will record in the exact same sequence as stored in the bank.
(5) Repeat steps 3 & 4 to record additional scene banks.
(6) Once you've recorded all of your steps, press and hold down the Program button
for approximately 2 seconds to exit. A flashing Blackout indicator, in the LED-display, is
indicative that you are out of program mode.
13