1
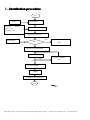
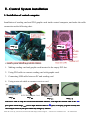
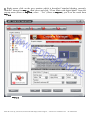
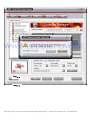
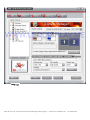
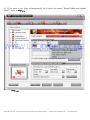
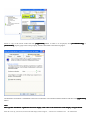
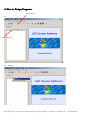
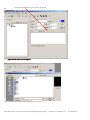
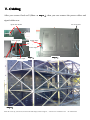
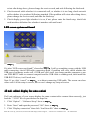
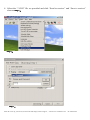
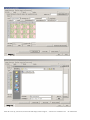
SHENZHEN VISULAL LUMEN CO.,LTD.
Outdoor & Indoor Full Color LED Display Screen
Installation Manual
Thank you for your selected Visual Lumen's outdoor & Indoor Full Color LED Display. For
proper operation, you must carefully read this manual before using.
This LED display provides various functions and convenience. Proper operation can bring such
profit to you and always keep product working well in its whole lifetime. Contrarily, improper
operation will lead to short lifetime, malfunction, fire disaster or any other serious accident as
well.
If product fails to work, at first, you should read the section Fault Detection in this manual for
solution. If problem still exists, contact local dealer or service center for help.
Tel: +86-755-28704020
Mobile: +86-13802700271
Web: www.visuallumen.com
Email: [email protected]
Online support: Msn: [email protected] Skype: leddisplayme Yahoo: leddisplayme
Add: Dawang Industrial Park, Shiyan, Bao'an District, Shenzhen, Guangdong, China
Install all screens by yourself now, Professional LED display technical support, website www.visuallumen.com +86-13802700271
Table of Content
Contentss
Ⅰ. Installation procedure......................................................................................................... 3
Ⅱ. Unpacking inspection......................................................................................................... 4
Ⅲ. Control System installation................................................................................................ 5
Ⅳ. Unit cabinet Test...............................................................................................................23
Ⅴ. Cabling............................................................................................................................. 25
Ⅵ. Screen Test........................................................................................................................28
Ⅶ. Troubleshooting................................................................................................................29
Ⅷ. Maintenance..................................................................................................................... 33
Install all screens by yourself now, Professional LED display technical support, website www.visuallumen.com +86-13802700271
Ⅰ. Installation procedure
Start
Design
Supporting
Preparation
facilities
Power system
Condition checking
grounding system
Unpacking inspection
Packing list
NO
OK
Problem feedback
table
Control system installation
Unit cabinet test
NO
Problem feedback
table
OK
Screen installation
Cabling
Inspection after installation
End
Image 1-1
Install all screens by yourself now, Professional LED display technical support, website www.visuallumen.com +86-13802700271
Ⅱ. Unpacking inspection
This section describes the procedure and notice during unpacking inspection.
The customer representative and engineering supervisor should be on site during unpacking
inspection. Otherwise the side who opens packing boxes alone should take the responsibility of
any missing or damage of goods.
The goods should be checked according to packing list as followings:
1). Checking of《packing list》
2). Checking if there is any damage on goods box, and checking the goods have been
dispatched to right site for installation.
3). Unpacking goods box and checking whether goods match packing list.
4). Any problem such as lacking of goods, wrong goods, or any damage of goods,
desquamation of element should be feed back to supplier on time for fast processing.
5). If there is no any problem of the goods, customer representative and engineering supervisor
should sign on report of《Unpacking Inspection Report》.
6). Both sides keep one《Unpacking Inspection Report》, and engineering supervisor is required
to send《Unpacking Inspection Report》back to supplierfor pigeonholing.
【Notice】
1). LED display screen is an expensive equipment, good packing and water proof method is
necessary during transportation, shockproof sign should be marked on packing box and
exposing to sunshine or rain is not allowed.
2). It should take us at least 30 minutes to wait to open the box when the equipment is moved
from a relative low temperature and dry place to hot and high moisture place, otherwise the
equipment will be damaged due to agglomeration of moisture on to the surface of equipment.
Install all screens by yourself now, Professional LED display technical support, website www.visuallumen.com +86-13802700271
Ⅲ. Control System installation
1. Installation of control computer
Installation of sending card and DVI graphic card inside control computer, and make the cable
connection as the following chat:
Image 3-1
Image 3-2
Control system install steps are as follows:
1. Making sending card and graphic card inserted to the empty PCI slot.
2. Using DVI cable to connect sending card with graphic card.
3. Connecting USB cable between PC and sending card
4. Using a network cable to connect receiver card.
Sending Card
Image 3-3
PCI-E DVI Graphic Card
Image 3-4
USB Cable
Image 3-5
DVI Cable
Image 3-6
Note: If we want to setup the screen from LED Studio software, we
we’’d input the network cable to the "u"
), If we input network cable to "D"p
ort, it can play program correctly but
port (please check Image 3-7),
"port,
can
can’’t setup in success by this port without any changes by software
software..
Install all screens by yourself now, Professional LED display technical support, website www.visuallumen.com +86-13802700271
U port
D port
Image 3-7
Default port by software, please connect to
this port while do the screen setup
2. Graphic card setup
2.1 Install graphic card driver and setup graphic card as these steps.
1). Click right mouse on desktop, select “ATI CATALYST(R) Control Center”, open ATI
control center(Show as Image 3-7, Image 3-8)
Image 3-7
Install all screens by yourself now, Professional LED display technical support, website www.visuallumen.com +86-13802700271
Image 3-8
Install all screens by yourself now, Professional LED display technical support, website www.visuallumen.com +86-13802700271
2). Click and select “Displays Manager” on the left menu bar (Show as Image 3-9)
Image 3-9
Install all screens by yourself now, Professional LED display technical support, website www.visuallumen.com +86-13802700271
3).
Right mouse click on the grey monitor which is described “attached displays currently
disabled” showed in Image 3-9, then select and click “Clone Main with digital panel” from the
pop-up menu (Show as Image 3-10), select “Yes” (Show as Image 3-11), you’ll see the result from
Image 3-12
Image 3-10
Install all screens by yourself now, Professional LED display technical support, website www.visuallumen.com +86-13802700271
Image 3-10
Image 3-11
Install all screens by yourself now, Professional LED display technical support, website www.visuallumen.com +86-13802700271
Image 3-12
Install all screens by yourself now, Professional LED display technical support, website www.visuallumen.com +86-13802700271
4). If we want to set “play in background” we’d select the menu “Extend Main onto digital
panel”, show as Image 3-13.
.
Image 3-13
Install all screens by yourself now, Professional LED display technical support, website www.visuallumen.com +86-13802700271
5). If we want to play video, please spread “Video” menu and click “Theater Mode”, then select
“Same on all”, click “apply” (Show as Image 3-14)
Image 3-14
Install all screens by yourself now, Professional LED display technical support, website www.visuallumen.com +86-13802700271
2.2 Setup for another interface
Press the right key of the mouse in the blank place of the desktop and click [Property] menu in the shortcut menu which has
popped out. Select [Set] option in the [Display property] dialogue box which has popped out and click [Senior] button to
select [Display] option. There is a red triangle button which will turn green when being clicked in the right side of FPD display
and then click [Application] button.
Note:
If video is played
played,, select [Cover] option in the senior property and click [Copy mode option] button, then select [Totally
identical] and click [Application] button.
Install all screens by yourself now, Professional LED display technical support, website www.visuallumen.com +86-13802700271
2.3 NVDIA series of display cards
Press the right key of the mouse in the blank place of the desktop and click [Property] menu in the shortcut menu which has
popped out. Select [Set] option in the dialogue box of [Display property] which has popped out and the property dialogue box
will appear:
Click [Set] and then click [Senior] button, the senior dialogue box illustrated as the following figure will appear:
…] and the following figure will appear after clicking nView of
The left hand side will appear menu after clicking [GeForce4
[GeForce4…
the menu on the side of the left hand:
Install all screens by yourself now, Professional LED display technical support, website www.visuallumen.com +86-13802700271
Select to copy in the nView mode and click [Application] button. If video is to be played, click [Troubleshooting] or
[Performance] property page in the senior property, which is illustrated as the following figure:
The hardware acceleration is established as the basic acceleration or acceleration without hardware and then click [application]
button.
Note:
More specific installation explanation about the display card refers to the instruction of the display card purchased.
Install all screens by yourself now, Professional LED display technical support, website www.visuallumen.com +86-13802700271
3. LED studio setup
3.1 Download software: http://www.leddisplay.me/software/Ledstudio.rar
3.2 Install
Double Click here
Sn: 888888
Run software
Double Click here
Before you connect the system hardware, after running the software, there will be
Click here to continue
After our connecting the system well, this window will not pop up
And the version of LED studio should be over 10.0
Update
Update: If we want to use the latest software, just operate as below:
Install all screens by yourself now, Professional LED display technical support, website www.visuallumen.com +86-13802700271
4. How to Design Program
First Click here
4.1
Then click here
4.2 Add step
Install all screens by yourself now, Professional LED display technical support, website www.visuallumen.com +86-13802700271
4.3 Add file window
4.4
Install all screens by yourself now, Professional LED display technical support, website www.visuallumen.com +86-13802700271
4.5.
4.6
Click here to add video or pic or .doc, .txt file etc
Open the file from your computer
Your can add more programs after repeating step 2.4 and 2.5
Install all screens by yourself now, Professional LED display technical support, website www.visuallumen.com +86-13802700271
5. How to Play Program
Click here to play
Click here to play all the time
4. Set up play window
If we want to adjust the screen play window on PC monitor, change as list:
Install all screens by yourself now, Professional LED display technical support, website www.visuallumen.com +86-13802700271
Change the screen play
window position on the PC
monitor
Change the screen size
Just install LED studio by double click the software and enter its serial number “888888”, then
start up LED studio, design the program as the LED studio user’s manual we provided.
Operating Environment
Install all screens by yourself now, Professional LED display technical support, website www.visuallumen.com +86-13802700271
Operating system
Chinese/English Windows98/me/2000/NT/XP/VISTA
Hardware Configuration
Pentium 300MHz or above
ROM: 64M or above
Graphics Card: Standard VGA 256mode or above
Related Software
Microsoft Media player compulsory
OFFICE2000—in case of *. doc files
RealPlayer—in case of RealPlayer files
Ⅳ. Unit cabinet Test
Test each unit cabinet to check whether it can work well before screen installation.
Install all screens by yourself now, Professional LED display technical support, website www.visuallumen.com +86-13802700271
Module with drive IC
Flat Cable
Fan
Fan
Power
Switch
Power
5V40A
Receiver
Card
Power wire
Digital Signal
Left: Input
Image 4-1
Press this button to
test unit cabinet
Receiver Card
Image 4-2
Image 4-3
Install all screens by yourself now, Professional LED display technical support, website www.visuallumen.com +86-13802700271
Image 4-4
Image 4-6
Image 4-5
Unit cabinet test steps are as follows:
1. Before power on to unit cabinet, we’d check each power supply as
4-3 Image 4-4, Image 4-5
Image
to avoid short-circuit. If ok, go next step.
2. Supply power to the unit cabinet which has been checked as step 1.
3. Press reset button on the receiving card as
Image 4-1, Image 4-2
to check
whether the unit cabinet will work well, such as Image 4-6.
4. You also could connect the unit cabinet with control computer to test.
Install all screens by yourself now, Professional LED display technical support, website www.visuallumen.com +86-13802700271
Ⅴ. Cabling
After your screen fixed well (Show as
Image 5-3),
then you can connect the power cables and
signal cables now.
Fix iron board
Open unit cabinet
Power output
Signal Input
Signal input
Power Input
Signal output
Power input
Image 5-1
Image 5-2
Image 5-3
Install all screens by yourself now, Professional LED display technical support, website www.visuallumen.com +86-13802700271
Image 5-4
1. Power cables connecting: The power cables inside unit cabinet is ready before goods
delivery; we just need to connect the power supply cables between each unit cabinet outside
as the cad drawing or picture diagram we provided.
2. Signal cabling
cabling: The Signal cable inside unit cabinet is ready before goods delivery; we just
need to connect the signal cable between each unit cabinet outside as the cad drawing or
picture diagram we provided.
We could take Image 5-1, Image 5-2 and Image 5-4 for reference.
If there is some problem to understand the cad drawing or picture diagram, you could ask our
sales to provide you some video of cabling.
Install all screens by yourself now, Professional LED display technical support, website www.visuallumen.com +86-13802700271
Ⅵ. Screen Test
To check and ensure that each unit cabinet is installed and fixed steadily, the surface of display
screen is flat and to ensure the numbering of unit cabinet is compliant with numbering rule.
To check and ensure the power cables are connected correctly. (We could test as step IV)
To check the signal cables are interconnected correctly, ensure the pin sequence definition
between the two ends is the same, and ensure the signal cable is inserted to jack with right
order.
Power on the control computer, run the control software and power on LED display screen after
ensuring all cabling is correct. To check if LED display screen is working normally. If some
part of display is displayed upside down or some LED tube is not lighted on, please power off
the display screen and check the cabling again, till the display is working normally.
Please refer to user manual of display software for operation and maintenance of LED display.
Install all screens by yourself now, Professional LED display technical support, website www.visuallumen.com +86-13802700271
Ⅶ. Troubleshooting
Power and signal indicator light
Indicator
Power
Signal
Color
Status
Problem
on
Normal
off
No power supply
Glittery
Normal
off
No signal
Red
Green
On but no
Need to restart power supply
Glittery
Detail:
Power supply test
test:
1. Check sending card’s red light whether it is lighting, if it is lighting all the time, please go
the second step, if not, please shut off the computer and put the sending card to slot again
and start the computer again.
2. Check red light in each unit cabinet, if it is lighting all the time, it declares the power supply
is normal, if not, there is now power supply, check the power connecting.
Signal tes
test:
1. Check sending card’s green light whether it glitters regularly; if glitters, please enter the
third step; if not, please restart the computer; before entering Win98/2K/xp/vista, please
check sending card’s green light whether it glitters regularly, if so, please enter the second
step, and check DVI cable whether it is connected well. If the problem still exists, there
must be something wrong among sending card, graphic card and DVI cable, please change
them, then redo following the first step.
2. Please follow the Chapter Ⅲ in the manual to set, or install again, then set; if the green
light can’t glitter regularly after doing so, please redo following the first step.
3. Check receiver card’s green light (data light) whether it and sending card’s green light
glitter synchronously. If so, please enter the fifth step, and check red light (power) whether
it is on; if so, please enter the fourth step, if not, please check red light (power protection)
whether it is on; if not, please check power whether it is connected wrong or no power
output; if the power is on, please check the supply voltage whether it is 5V; if so, please
turn off the power, and move the hub card and 50P lines, then retry. If the problem still
Install all screens by yourself now, Professional LED display technical support, website www.visuallumen.com +86-13802700271
exists after doing above, please change the receiver card, and redo following the third card.
4. Check network cable whether it is connected well, or whether it is too long; check network
cable whether it is produced following standard. If the problem still exists after doing above,
please change the receiver card, and redo the third step.
5. Check display power light whether it is on, if not, please enter the fourth step; check hub
card interface definition line whether it matches with unit board.
LED screen system not found
Image 7-1
If it alert “LED screen not found!” showed as Image 5-4, It tell us something wrong with the USB
cable connecting, check USB cable connecting again, if problem still exist, check whether the
USB port of computer works well, if USB port can’t work, just change another computer or use
one USB-RS232 cable to connect computer and the USB cable to sending card, then install the
USB-RS232 driver, it will work now.
Note: If we click “cancel” as Image 7-1, or without connecting USB cable, The screen can show
video well if all the setup is correct, but we can’t change any setup of screen.
All unit cabinet display the same content
If all unit cabinetes of your screen display the same content after connect them correctly, just
load the “*.CON” file we provided as the steps list:
1. Click “Option” – “Software Setup” show as Image 7-2
2. Enter “linsn” and input the password “168” show as Image 7-3
3. Click “Display connection” then click “load from file” show as Image 7-4
Install all screens by yourself now, Professional LED display technical support, website www.visuallumen.com +86-13802700271
4. Select the “*.CON” file we provided and click “Send to receiver” and “Save to receiver”
show as Image 7-5
Image 7-2
Image 7-3
Install all screens by yourself now, Professional LED display technical support, website www.visuallumen.com +86-13802700271
Image 7-4
Image 7-5
Install all screens by yourself now, Professional LED display technical support, website www.visuallumen.com +86-13802700271
Ⅷ. Maint
en
ance
Mainten
enance
◆ We provide free training for our customers, and provide the training video, pictures and files
all the screen life time.
◆ As we promise, we provide one year warranty to our customer for LED display.
◆ During the warranty period, we will repair the equipment units free of charge
unconditionally, if the deficiency caused by product quality problem or installation. We take no
responsibility if the failure coursed by disobeying operation regulations of the clients or under
the irrevocable exterior factors stipulated by our country.
◆ We promise a follow-up service for the life time of the equipment. When the warranty
expires, we can continue to provide maintenance service for whole life of the equipment, and
certain service fee will be charged.
◆ We can give the quick response for unit repairing and promise to complete repairing within
5 days after we receive the units. We can also dispatch engineer to site to support serious
system deficiency on the request of the customer.
◆ After our customer purchases our LED electronic display, we will also provide our customer
with the service of software upgrading free of charge. Our customer can download the new
version from our website or by e-mail.
Tel: +86-755-28704020
Mobile: +86-13802700271
Web: www.visuallumen.com
Email: [email protected]
Online support: Msn: [email protected] Skype: leddisplayme Yahoo: leddisplayme
Add: Dawang Industrial Park, Shiyan, Bao'an District, Shenzhen, Guangdong, China
Install all screens by yourself now, Professional LED display technical support, website www.visuallumen.com +86-13802700271