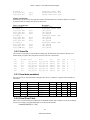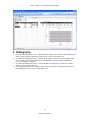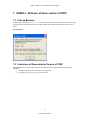
1
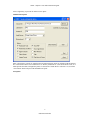
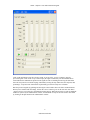
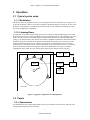
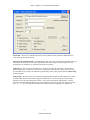
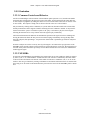
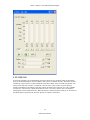
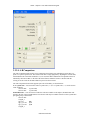
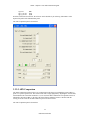
STEP – Subjective Test and Evaluation Program Subjective Training and Evaluation Program (STEP) Version 1.09 A computer-controlled system for audio presentation and subjective evaluation Audio Research Labs [email protected] January, 2015 1 Audio Research Labs STEP – Subjective Test and Evaluation Program Contents 1 2 3 4 5 6 7 8 Minimum Requirements ......................................................................................................................... 3 Getting started ........................................................................................................................................ 3 2.1 Fresh install of STEP ...................................................................................................................... 3 2.1.1 Download and install software ............................................................................................... 3 2.1.2 Associate Session files with the executable ............................................................................ 3 2.2 Updating STEP to the latest version .............................................. Error! Bookmark not defined. 2.3 Output devices ................................................................................................................................ 4 2.4 Run the demo .................................................................................................................................. 4 Operation ................................................................................................................................................ 7 3.1 Typical system setup ...................................................................................................................... 7 3.1.1 Workstation ............................................................................................................................ 7 3.1.2 Listening Room ...................................................................................................................... 7 3.2 Panels.............................................................................................................................................. 7 3.2.1 Administrator .......................................................................................................................... 7 3.2.2 Evaluation ..............................................................................................................................11 3.2.3 Training .................................................................................................................................15 3.3 Files ...............................................................................................................................................16 3.3.1 Backward compatibility issues ..............................................................................................16 3.3.2 Session ...................................................................................................................................16 3.3.3 Score ......................................................................................................................................16 3.3.4 Initialization ...........................................................................................................................17 Training .................................................................................................................................................17 Score analysis using Excel ....................................................................................................................17 5.1 Overview .......................................................................................................................................17 5.2 MUSHRA ......................................................................................................................................18 5.2.1 Session file.............................................................................................................................18 5.2.2 Score file ................................................................................................................................19 5.2.3 Excel data worksheet .............................................................................................................19 5.2.4 Excel Pivot Table...................................................................................................................20 5.3 BS-1116 .........................................................................................................................................21 5.3.1 Session file.............................................................................................................................21 5.3.2 Score file ................................................................................................................................22 5.3.3 Excel data worksheet .............................................................................................................22 5.3.4 Excel Pivot Table...................................................................................................................23 5.4 Comparative: AB5 and AB7 ..........................................................................................................25 5.4.1 Session file.............................................................................................................................25 5.4.2 Score file ................................................................................................................................25 5.4.3 Excel data worksheet .............................................................................................................26 5.4.4 Excel Pivot Table...................................................................................................................26 5.5 Comparative: ABX ........................................................................................................................27 5.5.1 Session file.............................................................................................................................27 5.5.2 Score file ................................................................................................................................28 5.5.3 Excel data worksheet .............................................................................................................28 5.5.4 Excel Pivot Table...................................................................................................................28 Bibliography ..........................................................................................................................................30 ANNEX I - Behavior of demo version of STEP ...................................................................................31 7.1 Start-up Behavior ...........................................................................................................................31 7.2 Limitations of Demonstration Version of STEP ............................................................................31 ANNEX II – Legacy File Formats.........................................................................................................32 8.1 Session files ...................................................................................................................................32 8.2 Score Files .....................................................................................................................................33 2 Audio Research Labs STEP – Subjective Test and Evaluation Program 1 Minimum Requirements The minimum system requirements to support this product are: • Microsoft Windows 7 operating system • 1 GHz Pentium 4 or compatible processor • 256 MB of memory • 1 MB of hard disk space • 2-channel or 6-channel audio output device with Direct Sound or ASIO drivers. 2 Getting started Assuming that your computer platform meets the minimum requirements, and that you have your 2-channel or 6-channel sound card installed, getting started requires the following steps: 2.1 Fresh install of STEP 2.1.1 Download and install software There is only one ARL STEP software program – the demo is the fully functional product, but it functions in demo mode when it finds no license file. When you purchase the software, you will receive your license file via email. You should have already downloaded the self-extracting zip archive ARL_STEP.exe. We recommend that you unzip the files to the following folder (which is the default location): C:\My Programs\ARL Do this by double-clicking on ARL_STEP.exe and clicking on the Unzip button. The extraction process will create the following directory structure under directory ARL: STEP contains STEP program and user’s manual Click the Close button when all files have been extracted. You may want to copy the User Manual to a folder in your own Documents, for example Documents\STEP so that they are easily accessible. When you purchase the software, you will receive a license file (license.txt). Please copy that to the folder containing the latest STEP executable: C:\Programs Files\ARL\STEP 2.1.2 Download STEP demo files We strongly recommend that you download the STEP demonstration signal files since this manual will use examples from the demo files. The files are available in a zip archive from the STEP download page. Unpack the files at some location in your documents file structure, for example “C:\ARL” It will create the folder STEP_Signal_Demo containing the following directory structure: analysis score files and data analysis spreadsheets setup channel identification signals (5.1 channels) interleaved\demo1 signal and Session files for interleaved file format mono signals interleaved\demo2 signal and Session files for interleaved file format stereo signals interleaved\demo5 signal and Session files for interleaved file format 5.1 channel signals mono\demo2 (not used by STEP Version 1) mono\demo5 (not used by STEP Version 1) 3 Audio Research Labs STEP – Subjective Test and Evaluation Program 2.1.3 Associate Session files with the executable STEP Session files control the presentation. The Session file extension is *.asi, and it is preferred to associate this extension with the STEP program. To do this: • double click on an example Session file (in the demo2 or demo5 directories). • When you are presented with the “Windows cannot open this file” dialog box, select “Select program from a list” and click “OK.” • When you are presented with the “Open with” dialog box, select the “Always use the selected program to open…” box. • Click on the “browse” button, browse to the folder into which you loaded the software (see Section 2.1), click on STEP.exe and finally click the “Open” button. 2.2 Output devices STEP should support most 2-channel and 5-channel audio output devices. However, please see www.audioresearchlabs.com/step/support.php for a list of output devices that are know to work with STEP. 2.3 Run the demo Along with the executable are two directories, demo1 and demo5, that contain several example Session files, which have extension *.asi, and the associated signal files. The Session files and associated test methodology are: • bs1116.asi BS.1116 test methodology • mushra.asi MUSHRA test methodology • ab.asi Two-comparison, 7-category forced-choice methodology • abx.asi Two-comparison ABX forced-choice methodology • training.asi Demonstrates the training or evaluation mode The signal files (in subdirectory demo2 for stereo signals and demo5 for 5-channel signals) are: • sigN.wav Reference or unprocessed test stimulus N, where N is 1 or 2. • sigN_sysM.wav Stimulus N processed by system-under-test M, where M is 1, 2 or 3. Note that if you have only a demonstration version of STEP, the behavior will be slightly different, as outlined in ANNEX 1. Double-click on mushra.asi and the program will start. First it presents the Welcome panel; Welcome panel: 4 Audio Research Labs STEP – Subjective Test and Evaluation Program After a slight delay, it presents the Administration panel. Administration panel: Enter a Session File, typically by using the Browse button and enter values for Laboratory ID and Listener ID. You should be able to leave Audio Device as “Primary Sound Driver” (if the demo doesn’t work, or if STEP presents the ASIO Configuration panel, see discussion of Audio Device in Section 3.2.1).Click the “start” button. STEP will present the MUSHRA trial panel. Trial panel: 5 Audio Research Labs STEP – Subjective Test and Evaluation Program Click on the Ref button to play the reference signal, or on any of the A, B or C buttons to play the processed signals. Click on the “Loop” button to play the signal continuously. The horizontal Position slider indicates the instantaneous position in the signal waveform. Grabbing and moving the Start slider alters the start point for waveform looping, and similarly moving the Stop slider alters the end point, thus permitting a “loop and zoom” function that is particularly powerful for subjective evaluation. Rate the processed signals by grabbing and moving the vertical sliders above the letter condition buttons. When you are satisfied with the ratings, click on the “Next” button to go on to the next trial. Note that if “Approve Scores” was selected, a confirmation window appears. When the last trial is scored, the MUSHA window is replaced by the Administrator window, and the STEP is ready for the next listener. Exit STEP by clicking on the Quit button in the Administrator window. 6 Audio Research Labs STEP – Subjective Test and Evaluation Program 3 Operation 3.1 Typical system setup 3.1.1 Workstation The STEP software is invaluable for use by a codec designer at his or her workstation. For example, it can be used in “Evaluation” mode to get a quick assessment of the quality impact of varying one or more coder parameters (each parameter set is a different System under Test). The workstation mode does not require any special configuration of equipment. 3.1.2 Listening Room One typically uses STEP to conduct listening tests in an acoustically conditioned listening room or sound booth. In this case, Figure 1 shows a simple and effective configuration for use with a listening room. Here the PC external to the room runs STEP, and has a sound card that produces an 8-channel digital output (using e.g. the ADAT format). This connects to an ADAT-compatible 8-channel D/A and associated audio amplifiers, which in turn connect to the speakers located inside the listening room. A Keyboard, Video, Mouse (KVM) switch permits the PC console to be either the Test Administrator Console (external to listening room) or the listener console, which would consist of only a presentation screen (e.g. LCD) and mouse, both located inside the listening room. After the test administrator sets up the test using the Administrator panel, KVM control is switched to the listener for the duration of the test session. 8-channel AMP C 8-channel D/A ADAT L R Listener Screen KVM sw itch mouse PC Admin Console LS RS Listening Room Figure 1. Suggested Configuration for Listening Room 3.2 Panels 3.2.1 Administrator The Administrator panel controls all parameters of the test presentation. It is shown here, and each of the settings made using this panel are described. 7 Audio Research Labs STEP – Subjective Test and Evaluation Program Session File – This text box indicates the Session file. The Browse button permits the administrator to easily select the desired Session file Laboratory ID and Listener ID – The administrator must enter values for Laboratory ID and Listener ID, which insures a unique Score file and a unique identification of the subject when the results of several listening labs are combined (e.g. when analyzed using a PivotTable). Audio Device – This box selects the audio device. If the PC has only one sound card, it is indicated as Primary Sound Driver. Otherwise, the choices are displayed in a drop-down box. If the device you select uses an ASIO driver (see http://en.wikipedia.org/wiki/Audio_stream_input_output), then the ASIO Config button will appear. ASIO Config – We have found some confusion in mapping audio channels to ASIO output device labels. To address this, STEP has the ASIO Config panel, shown below. You must assign every audio output channel to one of the ASIO output device labels. If you wish to fine-tune the output latency, click the Properties button and adjust the Buffer Size. This configuration need only be done once, and it is saved in the step.ini file. Note that the Test button can be used to check the mapping via an audible tone. 8 Audio Research Labs STEP – Subjective Test and Evaluation Program Muting – forces STEP to mute the audio output for the selected number of ms when switching from one condition to another. Selecting “0” means that there is a seamless transition from one condition to another with no muting. So, for example, if you select “0” muting and then transition from REF to Condition A which is the Hidden Reference, the audio output is no different from just remaining in the REF condition. Options The Options panel provides the following options, which are selected via check-box: • Randomize Trials – automatically randomize the order of presentation of trials with respect to the order indicated in the Session file. This is the default for all test modes. Regardless of whether or not this is selected, the Score file still corresponds exactly to the Session file. • Randomize Conditions – automatically randomize the order of conditions on the evaluation panel (i.e. randomize the correspondence between the processed files in the Session file and the lettered buttons on the evaluation panel). This is the default for all test modes. Regardless of whether or not this is selected, the Score file still corresponds exactly to the Session file. • Approve Scores – raise a dialog box with a confirmation checkbox that the listener must select in order to proceed to the next trial. • Check Scores – raise an error box if the listener score is invalid (i.e. if one of A or B in the BS.1116 mode is not 5.0). • Legacy Format – forces STEP to use legacy Session and Score file formats, as used in STEP versions 1.05 and earlier (see ANNNEX II). This is useful if you want to re-run old test scripts. • Show REF – causes the Ref button to appear on the Evaluation panel. This assumes that the first signal in the set of signals in the Session file is the original. • Show Signal Name – causes the signal filename to appear at the bottom of the Evaluation panel. This is the default for training. By default it is not selected for any test mode. Note that, if the Session file is not “double-blind” selecting this may reveal the identity of the System under Test. However, if the purpose of the session is “engineering evaluation” and it is desired to know what condition a letter button corresponds to, this option should be selected. 9 Audio Research Labs STEP – Subjective Test and Evaluation Program • • • Allow previous – causes the Prev button to appear on the Evaluation panel. This is the default for training. By default it is not selected for any test mode. Train – forces a session to operate in training mode. This makes the most sense for MUSHRA Session files. Play Mono as Stereo – when this is selected mono test items are played to both left and right output channels. If not selected, mono items are played to left channel only. The following table indicates the options selected by default for each Session type: Option BS-1116 MUSHRA Randomize Trials Randomize Conditions Approve Scores Check Scores Show REF Show Signal Name Allow previous Train Play Mono as Stereo X X X X X X X X AB Comparison X X X ABX Comparison X X X X Training X X X X X X X Check Session – This button performs the following checks on the Session files: • Checks that all files in the Session file exist • Checks that all versions of each signal file are (approximately) the same length The check process reports its results in the file “check.txt” and raises a error box if errors are found. Possible errors are • A file is missing (fatal) • A file has a very different length (e.g. greater than a 10% difference – not fatal) • A file has a different sampling rate or number of channels (fatal) An example check file follows: File ./test1/sig1.wav ./test1/sig1_sys1.wav ./test1/sig1_sys2.wav ./test1/sig1_sys3.wav Size Diff (samples) 0 0 0 0 ./test1/sig2.wav ./test1/sig2_sys1.wav ./test1/sig2_sys2.wav ./test1/sig2_sys3.wav 0 0 0 0 Start – This starts the test, which causes the Administrator panel to be replaced by the appropriate Evaluation panel. Quit – This exits STEP. About – This shows STEP version number. 10 Audio Research Labs STEP – Subjective Test and Evaluation Program 3.2.2 Evaluation 3.2.2.1 Common Controls and Behavior For all test methodologies each invocation of the Evaluation panel represents a trial, and the trial number and signal name is displayed in the upper left corner of the panel. In each trial the listener must make one or more subjective judgments by setting the values on a set of vertical sliders (where the set consists of one or more slider). The subjective rating scale is shown to the left of the set of vertical sliders. Play is initiated by clicking on the Conditions (or systems under test) buttons beneath each vertical slider, and the presentation software supports seamless switching from one condition to another. At any time the listener can click the “pause” icon button to pause or the “play” icon button to play the selected signal. Selecting the alternate action “Loop” button causes the signal to play continuously. The horizontal Position slider indicates the instantaneous position in the signal waveform. Grabbing and moving the Start slider alters the start point for waveform looping, and similarly moving the Stop slider alters the end point, thus permitting a “loop and zoom” function that is particularly powerful for subjective evaluation. Note that a subject can exit the test at any time (by selecting the “X” button in the top right corner of the MUSHRA panel), and the subject’s interim results are saved in the listener’s Score file. Re-entering the test will start exactly where the listener previously left off. When all trials have been scored, the Administrator window appears again. 3.2.2.2 MUSHRA In each trial in the MUSHRA test methodology the listener must rate several conditions, which are denoted by letters (A, B, C, etc.) underneath the vertical scroll bars. The reference is indicated by the button “REF” to the left of the letter buttons. The listener selects which of reference or conditions A, B, C, etc. he or she wishes to hear at a given instant by clicking on the REF or letter buttons. When the listener is satisfied with the scoring, he or she clicks on the NEXT button to proceed to the next trial. The MUSHRA panel is shown here: 11 Audio Research Labs STEP – Subjective Test and Evaluation Program 3.2.2.3 BS.1116 In each trial in the BS.1116 test methodology the listener must rate two conditions which are denoted by letters A and B underneath the vertical scroll bars. One of them is a hidden reference. The listener also has available the “open reference” which is indicated by the button “REF” to the left of the letter buttons. The listener selects which of reference or conditions A or B he or she wishes to hear at a given instant by clicking on the REF or letter buttons. Note that, because the listener knows that one of A or B is a hidden reference, the “Check Scores” option checks that one of the A or B scores has the value 5.0 (implicitly indicating that it is the hidden reference). When the listener is satisfied with the scoring, he or she clicks on the NEXT button to proceed to the next trial. The BS.1116 panel is shown here: 12 Audio Research Labs STEP – Subjective Test and Evaluation Program 3.2.2.4 A-B Comparison The A-B Comparison mode invokes a two-comparison forced-choice test methodology using either a 5point or a 7-point response scale. The listener must make a single judgment by adjusting the vertical slider, which indicates the extent that condition A is (or is not) better than condition B. The optional reference is indicated by the button “REF” to the left of the letter buttons. When the listener is satisfied with the scoring, he or she clicks on the NEXT button to proceed to the next trial. The A-B Comparison Session file supports quite a bit of flexibility, as described here: 5- or 7-point scale – You can invoke either a 5-point scale (+/- 2) or a 7-point scale (+/-3) via the session value as follows: session=AB5 (5-pont scale) session=AB7 (7-pont scale) Permit Reference – You can choose to make the reference available to the subject, the REF button will appear to the left of the A and B buttons. The reference will only be available if there are three system lines per signal group, as shown here: session=AB7 # Signal_1 sig1.wav REF sig1_sys1.wav SysA sig1_sys2.wav SysB # Signal_1 13 Audio Research Labs STEP – Subjective Test and Evaluation Program sig1.wav REF sig1_sys1.wav SysA sig1_sys3.wav SysB Note that, with such a Session file, the reference can be disables by de-selecting “Show REF” in the Options sub-panel of the Administrator panel. The A-B Comparison panel is shown here: 3.2.2.5 ABX Comparison The ABX Comparison mode invokes a two-comparison forced-choice test methodology using either a 5point or a 7-point response scale. The listener must make a single judgment by adjusting the vertical slider, which indicates the extent that condition A is (or is not) better than condition B. The optional reference is indicated by the button “REF” to the left of the letter buttons. When the listener is satisfied with the scoring, he or she clicks on the NEXT button to proceed to the next trial. The A-B Comparison panel is shown here: 14 Audio Research Labs STEP – Subjective Test and Evaluation Program 3.2.3 Training This mode can be used either for listener training or “Engineering Evaluation.” It does not require or support scoring, so the vertical sliders are not present. Since there is no scoring, it is not required to enter either a Laboratory or Listener ID. Optionally, the processed filename is shown at the bottom of the panel. Also, it allows browsing forward or back in the Session file, so that both PREV and NEXT buttons are available. The Training panel is shown here: 15 Audio Research Labs STEP – Subjective Test and Evaluation Program 3.3 Files The format of the MUSHRA Session and Score files will be discussed in this section. The difference between MUSHA Session and Score files of that of the other test methodologies is discussed in Section 5. 3.3.1 Backward compatibility issues STEP version 1.07 has incorporated a number of changes. Most prominent is support for ASIO drivers, but some of the test methodologies have new format for the Score file that permits much easier analysis of the test results via Microsoft Excel. Previously existing modes with new score formats are: • BS-1116 • Comparative If you wish to generate the legacy output score formats, there is a check-box in the Administrator’s Panel to select “Legacy Format.” 3.3.2 Session STEP Session files have extension asi. The structure of a MUSHA Session file is simple, and an example is shown here: session=MUSHRA # Signal_1 ./test1/sig1.wav ./test1/sig1.wav ./test1/sig1_sys1.wav ./test1/sig1_sys2.wav ./test1/sig1_sys3.wav ./test1/sig1_lp70.wav ./test1/sig1_lp35.wav # Signal_2 ./test1/sig2.wav ./test1/sig2.wav ./test1/sig2_sys1.wav ./test1/sig2_sys2.wav ./test1/sig2_sys3.wav ./test1/sig2_lp70.wav ./test1/sig2_lp35.wav Ref HR Sys1 Sys2 Sys3 LP70 LP35 Ref HR Sys1 Sys2 Sys3 LP70 LP35 It is plain ASCII text that be created with any text editor. The first line indicates the type of presentation (e.g. session=MUSHRA). The next line begins with a “#” followed by the name of the signal. This name is displayed in the Test panel and also written to the Score file. The next lines have two tab-separated fields. The first is the pathname, relative to the current directory, of the processed (or original) versions of the signal file that are to be evaluated by the listener. The second is the name of the Condition or System under Test, which is written to the Score file. Depending on the presentation type (i.e. session value), the original signal is the first of these files (and will be associated with the Ref button, and subsequent files are associated with Condition buttons A, B, C, …). Note that there is a limit of 14 processed files plus the reference file, for a total of 15 files. If there are more signal files, the structure is repeated. 3.3.3 Score STEP Score files have extension txt. The format of the MUSHRA score files is shown below. The file is tab-separated ASCII text with a header line followed by one line for each signal line in the associated Session file. Lab lab1 lab1 Listener lis1 lis1 File ./test1/sig1.wav ./test1/sig1_sys1.wav Sig Signal_1 Signal_1 16 Audio Research Labs Sys HR Sys1 Score 97 96 STEP – Subjective Test and Evaluation Program lab1 lab1 lab1 lab1 lab1 lab1 lab1 lab1 lab1 lab1 lis1 lis1 lis1 lis1 lis1 lis1 lis1 lis1 lis1 lis1 ./test1/sig1_sys2.wav ./test1/sig1_sys3.wav ./test1/sig1_lp70.wav ./test1/sig1_lp35.wav ./test1/sig2.wav ./test1/sig2_sys1.wav ./test1/sig2_sys2.wav ./test1/sig2_sys3.wav ./test1/sig2_lp70.wav ./test1/sig2_lp35.wav Signal_1 Signal_1 Signal_1 Signal_1 Signal_2 Signal_2 Signal_2 Signal_2 Signal_2 Signal_2 Sys2 Sys3 LP70 LP35 HR Sys1 Sys2 Sys3 LP70 LP35 66 98 28 22 100 86 74 53 34 20 3.3.4 Initialization Each time you quit STEP while in a testing mode, it creates a “step.ini” file in the current directory. This file “remembers” all the options that the administrator may have selected. The next time STEP is started in that directory, default option settings are over-ridden by the initialization file settings. This insures consistency from one listener session to the next. If one does not desire this behavior, simply delete the “step.ini” file prior to starting STEP. 4 Training For every listener should receive training prior to their first test session. This has two functions: first, to familiarize the listener with the range and types of impairments that he or she will hear in the test and second, to familiarize the listener with the trial panel to be used in the test. For the first objective, STEP can be used in training mode. In training mode the signal name and system name are both visible on the trial panel (see Section 3.2.3) and the correspondence between filenames in the session file and buttons on the user panel are not randomized (i.e. REF is the first file, A is the second file, etc.). Using the training trial panel, the test administrator and the listeners can step through representative test files and discuss what impairments should be apparent. Remember – the administrator can discuss what impairment might be heard but not what score it might receive! A portion of the training Session file is shown here: Line is Session file session=training # Signal_1 sig1_sys1.wav sig1_sys2.wav sig1_sys3.wav # Signal_2 sig2_sys1.wav sig2_sys2.wav sig2_sys3.wav Sys1 Sys2 Sys3 Sys1 Sys2 Sys3 Description Session type Displayed signal name System under test Sys1 System under test Sys2 System under test Sys3 Displayed signal name System under test Sys1 System under test Sys2 System under test Sys3 For the second objective, STEP can be used in the target test mode, but with a set of training files. The test administrator can walk the listeners through using the trial panel to listen to and score the test items. Remember that the training items should be distinct from the test items! 5 Score analysis using Excel 5.1 Overview It is straightforward to analyze the results produced by STEP using a Microsoft Excel Pivot Table. An example of Session files, concatenated Score files and Excel Pivot Table analysis for each methodology that STEP supports is included in the demo directory. A step by step walk though of the analysis is given in 17 Audio Research Labs STEP – Subjective Test and Evaluation Program this section. MUSHRA is presented first, as it is most straightforward. Each other methodology is presented as differences relative to the MUSHRA analysis. 5.2 MUSHRA 5.2.1 Session file Assume that the STEP Session file uses “in the clear” naming. In this example, test items are named sig1, sig2, etc. and systems under test are named sys1, sys2, etc. but they could just as easily be named pop1, symphony1 (where different signals are different music genres) and AAC_Enc1, AAC_Enc2, (where we are testing differences between different MPEG Advanced Audio Coding encoders). Note that the Session file contains signals and Systems under Test is a systematic order: sig1, sig2, sig3, etc. and for each signal HR, Sys1, Sys2, Sys3, LP70 and LP35. Creating a Session file in the manner is straightforward, and since STEP by default randomized the presentation order of signals and the assignment of systems to Condition letters A, B, C, etc., there is no reason not to create a Session file in this straightforward manner. The this example, original (i.e. unprocessed) items are in subdirectory originals, anchor files (e.g. low pass filtered originals) are in subdirectory anchors, and processed files are located in a separate subdirectory for each System under Test (e.g. sys1, sys2, etc.). A portion of the Session file is shown here: Line in Session file session=MUSHRA # Signal_1 originals/sig1.wav originals/sig1.wav coder1/sig1.wav coder2/sig1.wav Coder3/sig1.wav anchors/sig1_lp70.wav anchors/sig1_lp35.wav # Signal_2 originals/sig2.wav originals/sig2.wav coder1/sig2.wav coder2/sig2.wav Coder3/sig2.wav anchors/sig2_lp70.wav anchors/sig2_lp35.wav Description Session type Displayed signal name Open reference Hidden reference System under test Sys1 System under test Sys2 System under test Sys3 7.0 kHz lowpass anchor 3.5 kHz lowpass anchor Displayed signal name Open reference Hidden reference System under test Sys1 System under test Sys2 System under test Sys3 7.0 kHz lowpass anchor 3.5 kHz lowpass anchor Ref HR Sys1 Sys2 Sys3 LP70 LP35 Ref HR Sys1 Sys2 Sys3 LP70 LP35 A portion of an equivalent Session file that captures signal and system in the filename rather than using directory structures is shown below. If we had wanted to make a truly double-blind experimental setup, we could have named every signal “sigN_sysM.wav, where N is signal number and N is system number, which would include the Hidden Reference, all Systems under Test and all low-pass anchors. Line in Session file session=mushra # Signal_1 sig1.wav sig1.wav sig1_sys1.wav sig1_sys2.wav sig1_sys3.wav sig1_lp70.wav sig1_lp35.wav # Signal_2 Description Session type Displayed signal name Open reference Hidden reference System under test Sys1 System under test Sys2 System under test Sys3 7.0 kHz lowpass anchor 3.5 kHz lowpass anchor Displayed signal name REF HR Sys1 Sys2 Sys3 LP70 LP35 18 Audio Research Labs STEP – Subjective Test and Evaluation Program sig2.wav sig2.wav sig2_sys1.wav sig2_sys2.wav sig2_sys3.wav sig2_lp70.wav sig2_lp35.wav REF HR Sys1 Sys2 Sys3 LP70 LP35 Open reference Hidden reference System under test Sys1 System under test Sys2 System under test Sys3 7.0 kHz lowpass anchor 3.5 kHz lowpass anchor 5.2.2 Score file This Session file shown above results in a Score file for each listener, where the filename is whatever text string was entered into the Listener ID field, with the suffix txt. The first part of the Score file for listener “SRQ” is shown here. The rows of the Score file consist of tab-separated fields with one score per row, with the result that the Score files can be directly opened by Microsoft Excel. The signal name string (after the “#” in the Session file) appears in the Sig column of the Score file. Similarly, system name string (after the file pathname in the Session file) appears in the Sys column. Score File Lab Listener ARL SRQ ARL SRQ ARL SRQ ARL SRQ ARL SRQ ARL SRQ ARL SRQ ARL SRQ ARL SRQ ARL SRQ ARL SRQ ARL SRQ File sig1.wav sig1_sys1.wav sig1_sys2.wav sig1_sys3.wav sig1_lp70.wav sig1_lp35.wav sig2.wav sig2_sys1.wav sig2_sys2.wav sig2_sys3.wav sig2_lp70.wav sig2_lp35.wav Sig Signal_1 Signal_1 Signal_1 Signal_1 Signal_1 Signal_1 Signal_2 Signal_2 Signal_2 Signal_2 Signal_2 Signal_2 Sys HR Sys1 Sys2 Sys3 LP70 LP35 HR Sys1 Sys2 Sys3 LP70 LP35 Score 100 96 66 98 28 22 100 86 74 53 34 10 Line Description Header line Hidden reference Sys1 Sys2 Sys3 7.0 kHz anchor 3.5 kHz anchor Hidden reference Sys1 Sys2 Sys3 7.0 kHz anchor 3.5 kHz anchor 5.2.3 Excel data worksheet The set of Score files must be concatenated, but with only one header line as the first line in the file. The resulting file (which should retain the extension txt) should be opened by Excel and loaded into a worksheet named, for example “Scores.” The first portion of such a worksheet is shown below: Lab ARL ARL ARL ARL ARL ARL ARL ARL ARL ARL ARL ARL Listener SRQ SRQ SRQ SRQ SRQ SRQ SRQ SRQ SRQ SRQ SRQ SRQ File sig1.wav sig1_sys1.wav sig1_sys2.wav sig1_sys3.wav sig1_lp70.wav sig1_lp35.wav sig2.wav sig2_sys1.wav sig2_sys2.wav sig2_sys3.wav sig2_lp70.wav sig2_lp35.wav Sig Signal_1 Signal_1 Signal_1 Signal_1 Signal_1 Signal_1 Signal_2 Signal_2 Signal_2 Signal_2 Signal_2 Signal_2 Sys HR Sys1 Sys2 Sys3 LP70 LP35 HR Sys1 Sys2 Sys3 LP70 LP35 Score 100 96 66 98 28 22 100 86 74 53 34 10 19 Audio Research Labs STEP – Subjective Test and Evaluation Program 5.2.4 Excel Pivot Table A review of the steps required for analysis of MUSHRA scores are: • Concatenate all Score files, retaining only the first header line. • Open the resulting file using Excel. Rename worksheet “Sheet 1” (which should contain the scores) to “Scores.” To create the Pivot Table, do the following: • Under the Data tab, select PivotTable (which will pop up the PivotTable Wizard). In the Wizard do the following: • Step 1 of 3: o For question “Where is the data that you want to analyze?” select “Microsoft Excel list” o For question “What kind of report do you want to create?” select “PivotTable” o Select Next • Step 2 of 3 o For question “Where is the data that you want to use?” click on the selection icon and select all the listener data (in “Scores” worksheet) and then click on the exit icon. o Select Next • Step 3 of 3 o For question “Where do you want to put the PivotTable report?” select “New worksheet” o Click on the Layout button • Layout o Drag Lab to the Page drop zone o Drag Listener to the Page drop zone o Ignore the File item – this will not be used. o Drag Sig to the Page drop zone o Drag Sys (i.e. Condition or System under Test) to the Row drop zone o Drag Score to the Data drop zone three times (where it will appear as “Sum of Score”) Double-click on the first “Sum of Score” and change to “Average” Double-click on the first “Sum of Score” and change to “StdDev” Double-click on the second “Sum of Score” and change to “Count” o Click on OK to exit Layout panel o Click on Finish to exit PivotTable wizard. • Reformat o In the PivotTable sheet, right-click anywhere in the PivotTable and select “Show PivotTable Toolbar.” o On the PivotTable Toolbar, left-click the “Report Format” icon Select the upper left format choice (selection indicated by bold outline) Click OK to exit Format Panel • Construct a table as shown below, where for each table row o Construct the 95% confidence (CI) interval for each of the Conditions using the following Excel formula. Note that the CI expression assumes that the error in the listener responses have approximately Gaussian distribution. CONFIDENCE (5%, StdDev, Count), where StdDev and Count are the PivotTable values for that condition. o Condition is the label for the condition or System under Test. o Mean is the PivotTable Average value for that condition. o Upper is the Mean plus the 95% confidence interval value. o Lower is the Mean minus the 5% confidence interval value. CI 2.20 4.03 4.33 4.68 Sys HR Sys1 Sys2 Sys3 High 98.35 85.90 80.13 68.75 Low 93.95 77.85 71.47 59.40 Mean 96.15 81.88 75.80 64.08 20 Audio Research Labs STEP – Subjective Test and Evaluation Program 3.87 4.24 • • • LP70 LP35 33.24 22.21 25.51 13.74 29.38 17.98 Plot the result using the “Stock” chart type in the Excel Chart Wizard, making sure to o Select the entire 95% Confidence Interval table, shown above as “souce.” o Select “Series in Columns.” o Select “Titles” tab and fill in Title (e.g. “Test 1”), X axis as “Systems” and Y axis as “Score”. o De-select “show legend” as it has no meaning in this context and click on “Next” o For the question “Place chart:” select “As object in PivotTable” and click on “Finish” Position the chart as you wish. Click on the Y-axis of the chart o Right-click “Format axis” o Select “Scale” tab and designate Minimum to be 0, Maximum to be 100 o Select “Number” tab and set Decimal places to be 0 The resulting Pivot Table and 95% CI plot are shown here: 5.3 BS-1116 The analysis of data from BS-1116 test methodology will be presented as differences relative to the MUSHRA analysis found in the previous section. 5.3.1 Session file We use a Session file that captures signal and system in the filename, and a portion of the Session file is shown below. As with the MUSHRA Session file, the BS.1116 Session file is constructed in a systematic 21 Audio Research Labs STEP – Subjective Test and Evaluation Program way, since by default STEP automatically randomizes the order of signal presentation and the assignment of Hidden Reference and System under Test to Condition buttons A and B. Line is Session file session=BS.1116 # Signal_1 sig1.wav sig1.wav sig1_sys1.wav # Signal_1 sig1.wav sig1.wav sig1_sys2.wav # Signal_1 sig1.wav sig1.wav sig1_sys3.wav # Signal_2 Sig2.wav Sig2.wav sig2_sys1.wav # Signal_2 Sig2.wav Sig2.wav sig2_sys2.wav # Signal_2 Sig2.wav Sig2.wav sig2_sys3.wav Description Session type Displayed signal name Open reference Hidden reference System under test Sys1 Displayed signal name Open reference Hidden reference System under test Sys2 Displayed signal name Open reference Hidden reference System under test Sys3 Displayed signal name Open reference Hidden reference System under test Sys1 Displayed signal name Open reference Hidden reference System under test Sys2 Displayed signal name Open reference Hidden reference System under test Sys3 REF HR Sys1 REF HR Sys2 REF HR Sys3 REF HR Sys1 REF HR Sys2 REF HR Sys3 5.3.2 Score file A portion of the corresponding Score file for one listener is shown in the following table. The Score file presents the signals and Systems under Test in the same order as the Session file. Realize, however, that when Randomize Trials and Randomize Conditions are selected in the Administrator panel (which they are by default), each listener experiences a randomized presentation. In addition, the BS-1116 test methodology the Score file lists the filenames and scores associated with each of buttons A and B for each trial. We will see that this format makes for easier data analysis. Lab Listener FileA FileB Sig SysA SysB ARL SRQ sig1.wav sig1_sys1.wav Signal_1 HR Sys1 ScoreA 5 ScoreB 4.41 ARL SRQ sig1.wav sig1_sys2.wav Signal_1 HR Sys2 5 4.36 ARL SRQ sig1.wav sig1_sys3.wav Signal_1 HR Sys3 5 3.21 ARL SRQ sig2.wav sig2_sys1.wav Signal_2 HR Sys1 5 5 ARL SRQ sig2.wav sig2_sys2.wav Signal_2 HR Sys2 5 3.93 ARL SRQ sig2.wav sig2_sys3.wav Signal_2 HR Sys3 5 3.56 5.3.3 Excel data worksheet Concatenate all the listener Score files, retaining only the first header line and open the resulting file using Excel. The first portion of the resulting worksheet is shown here: Lab Listener FileA FileB Sig SysA SysB ARL SRQ sig1.wav sig1_sys1.wav Signal_1 HR Sys1 5 4.41 ARL SRQ sig1.wav sig1_sys2.wav Signal_1 HR Sys2 5 4.36 22 Audio Research Labs ScoreA ScoreB STEP – Subjective Test and Evaluation Program ARL SRQ sig1.wav sig1_sys3.wav Signal_1 HR Sys3 5 ARL SRQ sig2.wav sig2_sys1.wav Signal_2 HR Sys1 5 5 ARL SRQ sig2.wav sig2_sys2.wav Signal_2 HR Sys2 5 3.93 ARL SRQ sig2.wav sig2_sys3.wav Signal_2 HR Sys3 5 3.56 5.3.4 Excel Pivot Table Systematic Session file The example Session file shown above is in systematic order. If you are using a Session file in systematic order, then you only need to do the following: Immediately to the right of the score data, create one new column (J) with heading Diff Grade. This will calculate the difference between the System under Test score and the Hidden Reference score. Enter the following formula in that column: =I2-H2 and copy this formulas through to the last row of score data. Randomized Session file If you wish to use a Session file that is not in systematic order (for example, due to double-bind test requirements), this section presents a procedure to un-scramble the assignment of Hidden Reference and System under Test to Condition buttons A and B. Immediately to the right of the score data, create five new columns (columns J, K, L, M and N) with headings HR, Sys, HR Score, Sys Score and Diff Grade. Enter the following formulas: under the HR column (J) =IF(F2="HR",F2,G2) under the Sys column (K) =IF(G2="HR", F2,G2) under the HR Score column (L) =IF(F2="HR",H2,I2) under the Sys Score column (M) =IF(G2="HR",H2,I2) under the Diff Grade column (N) =M2-L2 and copy these formulas through to the last row of score data. In this way for each trial column HR always has the hidden reference name, column Sys always has the System under Test name, column HR Score always has the hidden reference score, column Sys Score always has the System under Test score. This makes calculation of the difference grade straightforward. If you wish to do listener post-screening, adjust the column references in the next section accordingly. Post-Screening The BS-1116 test methodology assesses two items of information at each trial: the first is whether the listener can identify the hidden reference, which is done by giving it the score of 5.00, and the second is the listeners rating of the System under Test in a given trial. Failure to correctly identify the hidden reference may indicate an unacceptably low level of listener reliability and can be a reason to exclude a listener’s scores from the data analysis. If and how this is determined typically depend on the systems under test. For example, a miss-identification of the hidden reference might not be counted against the listener if the System under Test for that particular trial receives a very high score, e.g. greater than 4.90. The following is one way to use hidden reference identification to perform post-screening on listener data. (Note that it assumes a Session file having systematic order.) Create enter headings PostScr and HR ID in columns K and L. Note that rows 2:16 corresponds to the scores for the first listener. Enter the following formulas: In the first cell (K2) under the PostScr column (K) =IF(SUM(L2:L16)>0.95*COUNT(L2:L16),1,0) in cell K3 =K2 23 Audio Research Labs 3.21 STEP – Subjective Test and Evaluation Program and copy this formula through row 16. under the HR ID column (L) =IF(H2=5,1,0) and copy this formula through row 16. Now copy the cell block for the first listener (K2:L16) to all subsequent listeners. In this way, the PostScr column for each trial will indicate whether that listener correctly identified the hidden reference 95 percent of the time. Construct Pivot Table To construct the Pivot Table for the systems under test, proceed as in Section 5.2.4, but • Select all data for the Pivot Table (i.e. columns A through L or P) • In the Layout part of the Pivot Table o drop Lab, Listener, PostScr (if present) and Sig in the Page drop zone o drop SysB in the Row drop zone (the System under Test) o drop Diff Grade in the Data drop zone (three times, setting to Average, StdDev and Count) o ignore the FileA and FileB items Construct the chart of system mean scores and 95% confidence intervals, but • Click on the Y-axis of the chart, right-click and select “Format axis” o Select “Scale” tab and designate Minimum to be -4, Maximum to be 0 o Select “Number” tab and set Decimal places to be 2 • Click on the X-axis at the top of the chart, right-click and select “Format axis” o Select “Scale” tab and designate Minimum to be -4, Maximum to be 0 o Select “Patterns” tab and set Tick Mark Labels to be “high” This should result in the following Pivot Table and chart: 24 Audio Research Labs STEP – Subjective Test and Evaluation Program 5.4 Comparative: AB5 and AB7 5.4.1 Session file A portion of an example Session file for the 7-category A-B Comparison forced choice test methodology with Reference is shown below. There are two options in creating the A-B Comparison Session file: • Show REF signal button • Use 5 or 7 rating categories REF option Note that, within each signal block, the example Session file includes a Reference system line. Using this format, the Trial panel will display the REF button in addition to the A and B Condition buttons. The REF button can always be hidden by de-selecting the Show REF option in the Administrator panel. Alternatively, if no REF button is required, then the Session file can omit the Reference system line. 5 or 7 rating categories If the session value is AB5 then a 5-category rating scale is displayed. Alternatively, if the session value is AB7 then a 7-category rating scale is displayed. Line is Session file session=AB7 # Signal_1 sig1.wav sig1_sys1.wav sig1_sys2.wav # Signal_1 sig1.wav sig1_sys1.wav sig1_sys3.wav # Signal_1 sig1.wav sig1_sys2.wav sig1_sys3.wav # Signal_2 sig1.wav sig2_sys1.wav sig2_sys2.wav # Signal_2 sig1.wav sig2_sys1.wav sig2_sys3.wav # Signal_2 sig1.wav sig2_sys2.wav sig2_sys3.wav REF Sys1 Sys2 REF Sys1 Sys3 REF Sys2 Sys3 REF Sys1 Sys2 REF Sys1 Sys3 REF Sys2 Sys3 Description Session type Displayed signal name Open Reference System under test Sys1 System under test Sys2 Displayed signal name Open Reference System under test Sys1 System under test Sys3 Displayed signal name Open Reference System under test Sys2 System under test Sys3 Displayed signal name Open Reference System under test Sys1 System under test Sys2 Displayed signal name Open Reference System under Test Sys1 System under Test Sys3 Displayed signal name Open Reference System under Test Sys2 System under Test Sys3 5.4.2 Score file The set of Score files must be concatenated, retaining only the first header line in the file. However, no further editing is required. The first portion of the Score file is shown here: Lab Listener FileA FileB Sig lis1 sig1_sys1.wav sig1_sys2.wav Signal_1 SysA Sys1 SysA Sys2 Score lab1 lab1 lis1 sig1_sys1.wav sig1_sys3.wav Signal_1 Sys1 Sys3 3 lab1 lis1 sig1_sys2.wav sig1_sys3.wav Signal_1 Sys2 Sys3 1 25 Audio Research Labs 2 STEP – Subjective Test and Evaluation Program lab1 lis1 sig2_sys1.wav sig2_sys2.wav Signal_2 Sys1 Sys2 3 lab1 lis1 sig2_sys1.wav sig2_sys3.wav Signal_2 Sys1 Sys3 3 Signal_2 Sys2 Sys3 2 lab1 lis1 sig2_sys2.wav sig2_sys3.wav 5.4.3 Excel data worksheet The scores.txt file is opened with Excel and put in the “Scores” worksheet. A portion of the worksheet is shown here: Lab Listener FileA FileB Sig lab1 lis1 sig1_sys1.wav sig1_sys2.wav Signal_1 SysA Sys1 SysA Sys2 Score Sys3 3 2 lab1 lis1 sig1_sys1.wav sig1_sys3.wav Signal_1 Sys1 lab1 lis1 sig1_sys2.wav sig1_sys3.wav Signal_1 Sys2 Sys3 1 lab1 lis1 sig2_sys1.wav sig2_sys2.wav Signal_2 Sys1 Sys2 3 Sys3 3 Sys3 2 lab1 lis1 sig2_sys1.wav sig2_sys3.wav Signal_2 Sys1 lab1 lis1 sig2_sys2.wav sig2_sys3.wav Signal_2 Sys2 5.4.4 Excel Pivot Table Since a score is associated with a comparison, an additional column must be added to the Scores worksheet. Create a new column (I) with the label Sys. In cell I2 insert the formula =CONCATENATE(F2,"-",G2) and copy this formulas through to the last row of score data. Now the new column shows both systems associated with Condition buttons A and B, which will be used as a label in the analysis chart. To construct the Pivot Table for the systems under test, proceed as in Section 5.2.4, but • In the Layout part of the Pivot Table o drop Lab, Listener and Sig in the Page drop zone o drop Sys in the Row drop zone o drop Score in the Data drop zone (three times, setting to Average, StdDev and Count) o Ignore the FileA, FileB, SysA and SysB items Construct the chart of system mean scores and 95% confidence intervals, but • Click on the Y-axis of the chart, right-click and select “Format axis” o Select “Scale” tab and designate Minimum to be -3 and Maximum to be 3 (or Minimum to be -2 and Maximum to be 2 if this is a 5-level category comparison) o Select “Number” tab and set Decimal places to be 1 • Click on the X-axis at the middle of the chart (where it intersects 0 on the Y axis), right-click and select “Format axis” o Select “Scale” tab and designate Minimum to be -4, Maximum to be 0 o Select “Patterns” tab and set Tick Mark Labels to be “Low” This should result in the following Pivot Table and chart (note that the middle stroke is the axis tick mark not a 95% confidence interval): 26 Audio Research Labs STEP – Subjective Test and Evaluation Program 5.5 Comparative: ABX The ABX forced choice comparison is unique amongst the test methodologies in that the outcome is 1 (correct identification) or 0 (incorrect identification). Any statistic whose outcome is binary has the Binomial distribution which, as we will see, has implications computing the 95% confidence interval on the mean scores. An example of a statistic with a Binomial distribution is the outcome of a coin toss where P(Heads) = θ and P(Tails ) = 1 − θ . Note that if θ ≠ 0.5 the coin is not “fair.” 5.5.1 Session file Automatic Randomization A portion of an example Session file for the ABX Comparison forced choice test methodology using automatic randomization is shown below. Note that there are only two systems lines per signal block. STEP will randomly assign them to Condition buttons A and B and the randomly assign on of them to Condition button X. Line is Session file session=ABX # Signal_1 sig1_sys1.wav sig1_sys2.wav # Signal_1 sig1_sys1.wav sig1_sys3.wav # Signal_1 sig1_sys2.wav sig1_sys3.wav # Signal_2 sig2_sys1.wav sig2_sys2.wav Sys1 Sys2 Sys1 Sys3 Sys2 Sys3 Sys1 Sys2 Description Session type Displayed signal name System under test Sys1 System under test Sys2 Displayed signal name System under test Sys1 System under test Sys3 Displayed signal name System under test Sys2 System under test Sys3 Displayed signal name System under test Sys1 System under test Sys2 27 Audio Research Labs STEP – Subjective Test and Evaluation Program # Signal_2 sig2_sys1.wav sig2_sys3.wav Displayed signal name System under test Sys1 System under test Sys3 Sys1 Sys3 Manual randomization Alternatively, the Session file can explicitly indicate all randomization for Conditions buttons A, B and X. A portion of such an example Session file is shown here: Line is *.asi Session file session=ABX # signal_1 sig1_sys1.wav sig1_sys2.wav sig1_sys2.wav # signal_1 sig1_sys3.wav sig1_sys1.wav sig1_sys1.wav # signal_1 sig1_sys3.wav sig1_sys2.wav sig1_sys3.wav Description Session type Displayed signal name “A” system “B” system “X” system Displayed signal name “A” system “B” system “X” system Displayed signal name “A” system “B” system “X” system Sys1 Sys2 Sys2 Sys3 Sys1 Sys1 Sys3 Sys2 Sys3 5.5.2 Score file The set of Score files must be concatenated, retaining only the first header line in the file. However, no further editing is required. The first portion of such a Score file is shown here: Lab Listener FileA FileB Sig SysA SysB X lab1 lis1 sig1_sys1.wav sig1_sys2.wav Signal_1 Sys1 Sys2 A Score 0 lab1 lis1 sig1_sys1.wav sig1_sys3.wav Signal_1 Sys1 Sys3 B 1 lab1 lis1 sig1_sys2.wav sig1_sys3.wav Signal_1 Sys2 Sys3 A 1 lab1 lis1 sig2_sys1.wav sig2_sys2.wav Signal_2 Sys1 Sys2 B 1 lab1 lis1 sig2_sys1.wav sig2_sys3.wav Signal_2 Sys1 Sys3 B 0 lab1 lis1 sig2_sys2.wav sig2_sys3.wav Signal_2 Sys2 Sys3 A 1 5.5.3 Excel data worksheet The scores.txt file is opened with Excel and put in the “Scores” worksheet. A portion of the worksheet is shown here: Lab Listener FileA FileB Sig SysA SysB X lab1 lis1 sig1_sys1.wav sig1_sys2.wav Signal_1 Sys1 Sys2 B Score 0 lab1 lis1 sig1_sys1.wav sig1_sys3.wav Signal_1 Sys1 Sys3 A 1 lab1 lis1 sig1_sys2.wav sig1_sys3.wav Signal_1 Sys2 Sys3 B 1 lab1 lis1 sig2_sys1.wav sig2_sys2.wav Signal_2 Sys1 Sys2 B 1 lab1 lis1 sig2_sys1.wav sig2_sys3.wav Signal_2 Sys1 Sys3 A 0 lab1 lis1 sig2_sys2.wav sig2_sys3.wav Signal_2 Sys2 Sys3 B 1 5.5.4 Excel Pivot Table Since a score is associated with a comparison, an additional column must be added to the Scores worksheet. Create a new column (J) with the label Sys. In cell J2 insert the formula =CONCATENATE(F2,"-",G2) 28 Audio Research Labs STEP – Subjective Test and Evaluation Program and copy this formulas through to the last row of score data. Now the new column shows both systems associated with Condition buttons A and B, which will be used as a label in the analysis chart. To construct the Pivot Table for the systems under test, proceed as in Section 5.2.4, but • In the Layout part of the Pivot Table o drop Lab, Listener and Sig in the Page drop zone o drop Sys in the Row drop zone o drop Score in the Data drop zone (three times, setting to Average, StdDev and Count) o Ignore the FileA, FileB, SysA, SysB and X items As stated above, scores of the ABX forced choice comparison have the Binomial distribution. Let θ be the fraction of correct identifications of X, which is also equal to the average of the score. Then the mean score is µ =θ We define the following variables a = n + zα2 / 2 b = −(2nθ + zα2 / 2 ) c = nθ 2 where n is the total number of responses (Count of Score in the Pivot Table) and z 0.05 / 2 = 1.96 . Then the 95% confidence interval on the mean is given by the two roots of the quadratic equation: − b ± b 2 − 4ac 2a This is implemented in the example spreadsheet, which is shown below. Note that the standard deviation (StdDev) computed in the Pivot Table is not used in calculation of the 95% confidence interval, although it would yield quite close results. For comparison, the standard deviation (StdDev) for the Binomial distribution statistic is computed. According to the analysis, Sys2 has a mean score that is different from Sys1 at the 95% level of significance (i.e. the 95% CI does not encompass the 50% point), while the mean scores of Sys3 and Sys1 are not different at the 95% level of significance (i.e. the 95% CI does not encompass the 50% point). Hence Sys3 achieves transparency, that is subjects are not able to identify X when Sys3 is one of A or B with a probability greater than random chance. 29 Audio Research Labs STEP – Subjective Test and Evaluation Program 6 Bibliography 1. 2. 3. 4. ITU-R Recommendation BS. 1116-1, “Methods for the subjective assessment of small impairments in audio systems including multichannel sound systems,” Geneva, Switzerland, 1997. ITU-R Recommendation BS.1534-1, “Method for the subjective assessment of intermediate quality level of coding systems: MUlti-Stimulus test with Hidden Reference and Anchor (MUSHRA),” Geneva, Switzerland, 1998-2000. ITU-R Recommendation BS.1284-1, “General Methods for the Subjective Assessment of Sound Quality.” Geneva, Switzerland, 2003. ITU-R Recommendation P.830, “Subjective performance assessment of telephone-band and widebandwidth digital codecs,” Geneva, Switzerland, 1996. 30 Audio Research Labs STEP – Subjective Test and Evaluation Program 7 ANNEX I - Behavior of demo version of STEP 7.1 Start-up Behavior Double-click on Session file mushra.asi and the program will start. First it presents the Welcome panel. The user must click the “OK” button to close this window so that STEP can present the Administration panel. Welcome panel: 7.2 Limitations of Demonstration Version of STEP The demonstration version of STEP shows all the capabilities of the program, but has the following limitations: • It will present only the first 2 seconds of the signal files • It will only write out scores of “0” in the score file 31 Audio Research Labs STEP – Subjective Test and Evaluation Program 8 ANNEX II – Legacy File Formats 8.1 Session files The legacy format STEP Session files differ in that they do not contain the labels for the Systems under Test. Other differences are noted for each test methodology. The legacy formats are shown here: Note that since ABX test methodology is a new this version of STEP, there is no legacy format. MUSHRA session=MUSHRA # Signal_1 sig1.wav sig1_sys1.wav sig1_sys2.wav sig1_sys3.wav # Signal_2 sig2.wav sig2_sys1.wav sig2_sys2.wav sig2_sys3.wav BS.1116 session=BS.1116 # Signal_1 sig1.wav sig1.wav sig1_sys1.wav # Signal_2 sig2.wav sig2_sys1.wav sig2.wav # Signal_1 sig1.wav sig1.wav sig1_sys1.wav # Signal_2 sig2.wav sig2_sys1.wav sig2.wav A-B Comparison Note that, in the legacy format, the methodology name is A-B, and uses only the 7-category rating scale. session=A-B # signal_1 sig1_sys1.wav sig1_sys2.wav # signal_1 sig1_sys2.wav sig1_sys3.wav # signal_1 sig1_sys1.wav sig1_sys3.wav 32 Audio Research Labs STEP – Subjective Test and Evaluation Program 8.2 Score Files MUSHRA Note that, in the legacy format, there are no Sig or Sys columns. Hence some editing is required to construct of a proper data table for use in Pivot Table analysis. Lab ARL ARL ARL ARL ARL ARL Listener SRQ SRQ SRQ SRQ SRQ SRQ File sig1_sys1.wav sig1_sys2.wav sig1_sys3.wav sig2_sys1.wav sig2_sys2.wav sig2_sys3.wav Score 80 70 60 80 70 60 BS.1116 Note that, in the legacy format, there is one row per score, that is one row for slider A and one for slider B, and there is no label for the System under Test. This format requires considerable editing to construct of a proper data table for use in Pivot Table analysis. Lab ARL ARL ARL ARL ARL ARL ARL ARL Listener SRQ SRQ SRQ SRQ SRQ SRQ SRQ SRQ File sig1.wav sig1_sys1.wav sig2_sys1.wav sig2.wav sig1.wav sig1_sys1.wav sig2_sys1.wav sig2.wav Score 5.0 4.5 4.5 5.0 5.0 4.5 4.5 5.0 A-B Comparison Note that, in the legacy format, there is one row per System under Test, and one score of these two rows is always zero. Furthermore, there are no Sig, SysA or SysB columns. This format requires considerable editing to construct of a proper data table for use in Pivot Table analysis. Lab ARL ARL ARL ARL ARL ARL Listener SRQ SRQ SRQ SRQ SRQ SRQ File sig1_sys1.wav sig1_sys2.wav sig1_sys2.wav sig1_sys3.wav sig1_sys1.wav sig1_sys3.wav Score 0 3 0 -1 0 3 33 Audio Research Labs