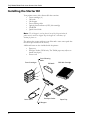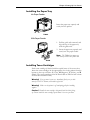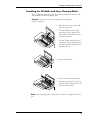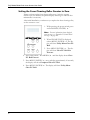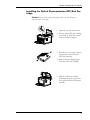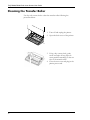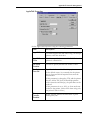
1
Tally T8006/T8306 Color Laser Printers User Guide Important Information Model: PCX-PW4120EC (T8006) PCX-PF4110EC, (T8306) EEC IEC 950 /EN 60950:1992+A1+A2+A3+A4+A11 (TUV GS Certification) UL Certification Model: PCX-PW4120US (T8006) PCX-PF4110US (T8306) UL1950/1995 Third Edition, CSA-22.2 No.950-95 This equipment generates and uses radio frequency energy and if not installed and used properly, that is, in accordance with the manufacturer’s instructions, may cause interference in radio and television reception. It has been type tested and found to comply with the limits for class B computing devices in accordance with the specification in subpart J of part 15 of FCC rules, which are designed to provide reasonable protection against such interference in a residential installation. However, there is no guarantee that interference will not occur in a partial installation. It this equipment does cause interference to radio or television reception, which can be determined by turning the equipment off and on, the user is encouraged to try to correct the interference by one or more of the following measures: • Reorient the receiving antenna • Relocate the peripheral away from the receiver • Move the peripheral away from the receiver • Plug the peripheral into a different outlet, so that the peripheral and the receiver are in different branch circuits If necessary, the user should consult the dealer or an experienced radio/television technician for additional suggestions. The user may find the following booklet, prepared by the Federal Communications Commission, helpful: “How to Identify and Resolve Radio-TV Interference Problems”. This booklet is available from the U.S. Government Printing Office, Washington DC 20402 Stock No. 004.000.00345.4 Warning: To comply with FCC regulations on electromagnetic interference for a class B computing device, the printer cable must be shielded. To assure compliance with FCC regulations for a computing device, use a shielded cable with a metal shell connector. The use of cables not properly shielded may result in violating FCC regulations. This digital apparatus does not exceed the class B limits for radio noise emissions from digital apparatus as set out in the radio interference regulations of the Canadian department of communications. This unit complies with DOC standard C108.8-M 1983. Attention: Le présent appareil numérique n’émet pas de bruits radioélectriques dépressant les limites applicables aux apprareils numériques de la classe B prescrites dans le règlement sur le brouillage radioélectrique édicté par le ministère des communications du Canada. This device fulfils the European standards requirements by complying with the Directive of the Commission dated May 3, 1989 (89/336/EEC) as well as 92/31/EEC, and 93/68/EEC relating to electromagnetic compatibility and the Directive dated February 19, 1973 (73/23/EEC) plus 1992+A1+A2+A3+A4+A11 relating to low-voltage electrical equipment. Conformity with the above mentioned Directives is indicated by the CE symbol attached to the device. Note: Conformity may be affected by: • using interface cables not complying with the specifications • non-observance of important instructions in the user’s manual • installing components not approved for this device by the manufacturer • unauthorized manipulation This Printer contains advanced energy conservation technology that reduces power consumption when it is not in active use. When the printer does not receive data for an extended period of time, power consumption is automatically lowered. For potentially faster printing of the first page, you may turn the power saver off from the user menu setting. The energy star emblem does not represent EPA endorsement of any product or service. Laser Safety Information This printer has been designed and manufactured according to FDA regulations “title 21, CFR, chapter 1, subchapter J, based on the Radiation Control for Health and Safety Act of 1968”, and is classified as a class 1 laser product. Warning: Use of controls, adjustments or performance of procedures other than those specified herein may result in hazardous radiation exposure. Ozone A standard for ozone emissions has been established by IEC 950. This printer meets the standard when shipped from the factory to our customers. Warning: Only trained and qualified personnel may open covers or remove parts that are not explicitly shown and described in the Operator’s Manual as being accessible to the operator. 2001 Tally Printer Corporation. All Rights Reserved. Contents Chapter 1 Introduction . . . . . . . . . . . . . . . . . . . . . . . . . 1 About This Manual . . . . . . . . . . . . . . . . . . . . . . . . . . . . . . . . . . . . . . . . 1 Warnings, Cautions, and Notes . . . . . . . . . . . . . . . . . . . . . . . . . . . 1 Numbered steps . . . . . . . . . . . . . . . . . . . . . . . . . . . . . . . . . . . . . . . 2 Illustrations . . . . . . . . . . . . . . . . . . . . . . . . . . . . . . . . . . . . . . . . . . . 2 Bold fonts . . . . . . . . . . . . . . . . . . . . . . . . . . . . . . . . . . . . . . . . . . . . 2 Displays. . . . . . . . . . . . . . . . . . . . . . . . . . . . . . . . . . . . . . . . . . . . . . 2 Product Overview. . . . . . . . . . . . . . . . . . . . . . . . . . . . . . . . . . . . . . . . . 2 Printer Components . . . . . . . . . . . . . . . . . . . . . . . . . . . . . . . . . . . . . . . 3 Chapter 2 Setting Up Your Printer. . . . . . . . . . . . . . . . . 7 System Requirements . . . . . . . . . . . . . . . . . . . . . . . . . . . . . . . . . . . . . . 7 Operating System Requirements . . . . . . . . . . . . . . . . . . . . . . . . . . 7 Hardware Requirements. . . . . . . . . . . . . . . . . . . . . . . . . . . . . . . . . 7 Printer Location . . . . . . . . . . . . . . . . . . . . . . . . . . . . . . . . . . . . . . . . . . 8 Space . . . . . . . . . . . . . . . . . . . . . . . . . . . . . . . . . . . . . . . . . . . . . . . . 8 Temperature . . . . . . . . . . . . . . . . . . . . . . . . . . . . . . . . . . . . . . . . . . 9 Humidity . . . . . . . . . . . . . . . . . . . . . . . . . . . . . . . . . . . . . . . . . . . . . 9 Power Source . . . . . . . . . . . . . . . . . . . . . . . . . . . . . . . . . . . . . . . . . 9 Unpacking the Printer. . . . . . . . . . . . . . . . . . . . . . . . . . . . . . . . . . . . . 10 Moving the Printer . . . . . . . . . . . . . . . . . . . . . . . . . . . . . . . . . . . . . . . 10 Repacking the Printer for Shipment . . . . . . . . . . . . . . . . . . . . . . . . . 10 Installing the Starter Kit . . . . . . . . . . . . . . . . . . . . . . . . . . . . . . . . . . . 12 Installing the Paper Tray . . . . . . . . . . . . . . . . . . . . . . . . . . . . . . . 13 Installing Toner Cartridges . . . . . . . . . . . . . . . . . . . . . . . . . . . . . 13 Installing the Oil Bottle and Fuser Cleaning Roller . . . . . . . . . . 15 Setting the Fuser Cleaning Roller Counter to Zero . . . . . . . . . . 16 Installing the Optical Photoconductor (OPC) Belt Cartridge . . 17 Setting the OPC Belt Counter to Zero . . . . . . . . . . . . . . . . . . . . 19 Installing the Power Cord . . . . . . . . . . . . . . . . . . . . . . . . . . . . . . 20 Starting the Printer . . . . . . . . . . . . . . . . . . . . . . . . . . . . . . . . . . . . . . . 20 Loading Paper for Test Printing . . . . . . . . . . . . . . . . . . . . . . . . . 20 Turning On the Printer . . . . . . . . . . . . . . . . . . . . . . . . . . . . . . . . 21 Printing a Test Page . . . . . . . . . . . . . . . . . . . . . . . . . . . . . . . . . . . 22 Chapter 3 Installing Printer Drivers and Utilities . . . . 25 Tally Printer Autoplay CD . . . . . . . . . . . . . . . . . . . . . . . . . . . . . . . . . 25 Setting up a Local Printer in Windows . . . . . . . . . . . . . . . . . . . . . . . 25 Setting up a Network Printer in Windows. . . . . . . . . . . . . . . . . . . . . 26 iii Tally T8006/T8306 Color Laser Printer User Guide Configuring Windows 95/98 to Print Using NetBEUI. . . . . . . 26 Configuring Windows NT 4.0 and Windows 2000 to Print Using NetBEUI . . . . . . . . . . . . . . . . . . . . . . . . . . . . . . . . . . . . . . 27 Configuring Windows to Print Using TCP/IP . . . . . . . . . . . . . 28 Configuring Windows to Print on a NetWare Network . . . . . . 31 Uninstalling Windows Drivers . . . . . . . . . . . . . . . . . . . . . . . . . . 33 Setting Up a Network Printer on Macintosh . . . . . . . . . . . . . . . . . . 34 Operating System Requirements. . . . . . . . . . . . . . . . . . . . . . . . . 34 Hardware Requirements . . . . . . . . . . . . . . . . . . . . . . . . . . . . . . . 34 Configuring Macintosh for Network Printing . . . . . . . . . . . . . . 34 Installing Macintosh Printer Drivers . . . . . . . . . . . . . . . . . . . . . 35 Uninstalling MacIntosh Printer Drivers . . . . . . . . . . . . . . . . . . . 35 Chapter 4 Operating Your Printer . . . . . . . . . . . . . . . . 37 Turning the Printer On . . . . . . . . . . . . . . . . . . . . . . . . . . . . . . . . . . . 37 Turning the Printer Off . . . . . . . . . . . . . . . . . . . . . . . . . . . . . . . . . . . 37 Selecting Media. . . . . . . . . . . . . . . . . . . . . . . . . . . . . . . . . . . . . . . . . . 37 Tray 1 . . . . . . . . . . . . . . . . . . . . . . . . . . . . . . . . . . . . . . . . . . . . . . 38 Trays 2 and 3 . . . . . . . . . . . . . . . . . . . . . . . . . . . . . . . . . . . . . . . . 38 Loading Media . . . . . . . . . . . . . . . . . . . . . . . . . . . . . . . . . . . . . . . . . . 39 Installing The Envelope Feeder (T8306 Only). . . . . . . . . . . . . . . . . 40 Control Panel . . . . . . . . . . . . . . . . . . . . . . . . . . . . . . . . . . . . . . . . . . . 41 Display . . . . . . . . . . . . . . . . . . . . . . . . . . . . . . . . . . . . . . . . . . . . . 41 Indicators . . . . . . . . . . . . . . . . . . . . . . . . . . . . . . . . . . . . . . . . . . . 41 Control Keys . . . . . . . . . . . . . . . . . . . . . . . . . . . . . . . . . . . . . . . . 42 Chapter 5 Changing Print Defaults . . . . . . . . . . . . . . . 45 Changing Default Print Driver Properties . . . . . . . . . . . . . . . . . . . . 46 Windows 95/98 . . . . . . . . . . . . . . . . . . . . . . . . . . . . . . . . . . . . . . 46 Windows NT 4.0 . . . . . . . . . . . . . . . . . . . . . . . . . . . . . . . . . . . . . 47 Windows 2000 . . . . . . . . . . . . . . . . . . . . . . . . . . . . . . . . . . . . . . . 48 Selecting Job Settings . . . . . . . . . . . . . . . . . . . . . . . . . . . . . . . . . . . . . 49 Setting Colors . . . . . . . . . . . . . . . . . . . . . . . . . . . . . . . . . . . . . . . . . . . 52 Adjusting Colors . . . . . . . . . . . . . . . . . . . . . . . . . . . . . . . . . . . . . . . . 53 Adjusting Density. . . . . . . . . . . . . . . . . . . . . . . . . . . . . . . . . . . . . . . . 54 Registering Custom Edits . . . . . . . . . . . . . . . . . . . . . . . . . . . . . . . . . 55 Setting Options . . . . . . . . . . . . . . . . . . . . . . . . . . . . . . . . . . . . . . . . . 56 Customizing Watermarks. . . . . . . . . . . . . . . . . . . . . . . . . . . . . . . . . . 58 Restoring All Items to Default . . . . . . . . . . . . . . . . . . . . . . . . . . . . . 59 Chapter 6 Maintaining Your Printer . . . . . . . . . . . . . . 61 Replacing Toner Cartridges . . . . . . . . . . . . . . . . . . . . . . . . . . . . . . . . 61 Replacing the Oil Bottle. . . . . . . . . . . . . . . . . . . . . . . . . . . . . . . . . . . 63 Replacing the Waste Toner Pack. . . . . . . . . . . . . . . . . . . . . . . . . . . . 64 Replacing the Fuser Cleaning Roller . . . . . . . . . . . . . . . . . . . . . . . . . 66 Replacing the Ozone Filter . . . . . . . . . . . . . . . . . . . . . . . . . . . . . . . . 68 Replacing the Optical Photoconductor (OPC) Belt Cartridge. . . . . 69 Disposing of Supplies . . . . . . . . . . . . . . . . . . . . . . . . . . . . . . . . . . . . 71 Chapter 7 Cleaning the Printer . . . . . . . . . . . . . . . . . . 73 Cleaning the Registration Roller . . . . . . . . . . . . . . . . . . . . . . . . . . . . 73 Cleaning the Transfer Roller . . . . . . . . . . . . . . . . . . . . . . . . . . . . . . . 74 iv Contents Cleaning the Paper Discharger . . . . . . . . . . . . . . . . . . . . . . . . . . . . . . 75 Cleaning the OPC Belt Cartridge . . . . . . . . . . . . . . . . . . . . . . . . . . . . 76 Cleaning the Optical Unit Glass. . . . . . . . . . . . . . . . . . . . . . . . . . . . . 79 Cleaning the Inside of the Printer . . . . . . . . . . . . . . . . . . . . . . . . . . . 80 Chapter 8 Options and Accessories . . . . . . . . . . . . . . . 83 Memory Module . . . . . . . . . . . . . . . . . . . . . . . . . . . . . . . . . . . . . . . . . 83 Installing Additional Memory Modules . . . . . . . . . . . . . . . . . . . . . . . 83 Duplex Printing Unit . . . . . . . . . . . . . . . . . . . . . . . . . . . . . . . . . . . . . 86 Installing the Duplex Printing Unit . . . . . . . . . . . . . . . . . . . . . . . . . . 86 Paper Feeder . . . . . . . . . . . . . . . . . . . . . . . . . . . . . . . . . . . . . . . . . . . . 86 Installing The Paper Feeder . . . . . . . . . . . . . . . . . . . . . . . . . . . . . . . . 86 Adjusting the Paper Feeder . . . . . . . . . . . . . . . . . . . . . . . . . . . . . . . . 87 Chapter 9 Troubleshooting . . . . . . . . . . . . . . . . . . . . . 89 How to Solve Printing Problems . . . . . . . . . . . . . . . . . . . . . . . . . . . . 89 Paper Jam Areas . . . . . . . . . . . . . . . . . . . . . . . . . . . . . . . . . . . . . . . . . 89 Clearing Jam 1. . . . . . . . . . . . . . . . . . . . . . . . . . . . . . . . . . . . . . . . 90 Clearing Jam 2. . . . . . . . . . . . . . . . . . . . . . . . . . . . . . . . . . . . . . . . 93 Clearing Jams 3 and 4. . . . . . . . . . . . . . . . . . . . . . . . . . . . . . . . . . 96 Poor Print Quality. . . . . . . . . . . . . . . . . . . . . . . . . . . . . . . . . . . . . . . 100 Slow or No Printing . . . . . . . . . . . . . . . . . . . . . . . . . . . . . . . . . . . . . 103 Macintosh Chooser Problems . . . . . . . . . . . . . . . . . . . . . . . . . . . . . 106 Network Problems . . . . . . . . . . . . . . . . . . . . . . . . . . . . . . . . . . . . . . 107 Printer Driver Restrictions . . . . . . . . . . . . . . . . . . . . . . . . . . . . . . . . 109 Appendix A Printer Specifications . . . . . . . . . . . . . . . 111 Tally Model T8006 Specifications . . . . . . . . . . . . . . . . . . . . . . . . . . 111 Tally Model T8306 Specifications . . . . . . . . . . . . . . . . . . . . . . . . . . 114 Appendix B Periodic Replacement Parts . . . . . . . . . . 117 Appendix C Control Panel Menu Functions . . . . . . . . 119 Menu Tree . . . . . . . . . . . . . . . . . . . . . . . . . . . . . . . . . . . . . . . . . . . . . 120 Menu Navigation Keys . . . . . . . . . . . . . . . . . . . . . . . . . . . . . . . . . . . 121 Menu Display Format. . . . . . . . . . . . . . . . . . . . . . . . . . . . . . . . . . . . 121 Test Menu . . . . . . . . . . . . . . . . . . . . . . . . . . . . . . . . . . . . . . . . . . . . . 122 TestPrint . . . . . . . . . . . . . . . . . . . . . . . . . . . . . . . . . . . . . . . . . . . 122 ConfigPage . . . . . . . . . . . . . . . . . . . . . . . . . . . . . . . . . . . . . . . . . 123 TestMode . . . . . . . . . . . . . . . . . . . . . . . . . . . . . . . . . . . . . . . . . . 124 Config Menu . . . . . . . . . . . . . . . . . . . . . . . . . . . . . . . . . . . . . . . . . . . 125 Timeout. . . . . . . . . . . . . . . . . . . . . . . . . . . . . . . . . . . . . . . . . . . . 125 SleepTime . . . . . . . . . . . . . . . . . . . . . . . . . . . . . . . . . . . . . . . . . . 126 Port . . . . . . . . . . . . . . . . . . . . . . . . . . . . . . . . . . . . . . . . . . . . . . . 127 Priority. . . . . . . . . . . . . . . . . . . . . . . . . . . . . . . . . . . . . . . . . . . . . 128 Display . . . . . . . . . . . . . . . . . . . . . . . . . . . . . . . . . . . . . . . . . . . . 129 Parallel Menu. . . . . . . . . . . . . . . . . . . . . . . . . . . . . . . . . . . . . . . . . . . 131 ComMode . . . . . . . . . . . . . . . . . . . . . . . . . . . . . . . . . . . . . . . . . . 131 HighSpeed. . . . . . . . . . . . . . . . . . . . . . . . . . . . . . . . . . . . . . . . . . 133 Timing . . . . . . . . . . . . . . . . . . . . . . . . . . . . . . . . . . . . . . . . . . . . . 134 v Tally T8006/T8306 Color Laser Printer User Guide Network Menu . . . . . . . . . . . . . . . . . . . . . . . . . . . . . . . . . . . . . . . . . 135 IP Address . . . . . . . . . . . . . . . . . . . . . . . . . . . . . . . . . . . . . . . . . 135 Subnet Address . . . . . . . . . . . . . . . . . . . . . . . . . . . . . . . . . . . . . 136 Gateway Address . . . . . . . . . . . . . . . . . . . . . . . . . . . . . . . . . . . . 138 Appendix D Control Panel Messages . . . . . . . . . . . . . 141 Messages . . . . . . . . . . . . . . . . . . . . . . . . . . . . . . . . . . . . . . . . . . . . . . 141 Paper Sizes . . . . . . . . . . . . . . . . . . . . . . . . . . . . . . . . . . . . . . . . . . . . 145 Paper Types . . . . . . . . . . . . . . . . . . . . . . . . . . . . . . . . . . . . . . . . . . . 145 Appendix E Network Management . . . . . . . . . . . . . . 147 Test Button for LAN Configuration. . . . . . . . . . . . . . . . . . . . . . . . 147 Printing a Print Server Test Page . . . . . . . . . . . . . . . . . . . . . . . 147 Printing a Parameter List. . . . . . . . . . . . . . . . . . . . . . . . . . . . . . 147 Setting the Factory-Set Default Values. . . . . . . . . . . . . . . . . . . 147 Remote Configuration and Monitoring . . . . . . . . . . . . . . . . . . . . . 148 Configuring the Printer With NetPilot . . . . . . . . . . . . . . . . . . . . . . 149 Network Dialog . . . . . . . . . . . . . . . . . . . . . . . . . . . . . . . . . . . . . 149 Properties Dialog . . . . . . . . . . . . . . . . . . . . . . . . . . . . . . . . . . . . 153 Configuring the Printer With TCP/IP Utilities . . . . . . . . . . . . . . . 158 Setting with ARP . . . . . . . . . . . . . . . . . . . . . . . . . . . . . . . . . . . . 158 Setting with RARP. . . . . . . . . . . . . . . . . . . . . . . . . . . . . . . . . . . 159 Setting with BOOTP . . . . . . . . . . . . . . . . . . . . . . . . . . . . . . . . . 159 Setting with DHCP . . . . . . . . . . . . . . . . . . . . . . . . . . . . . . . . . . 160 Configuring the Printer Using HTTP . . . . . . . . . . . . . . . . . . . . . . . 160 Configuration . . . . . . . . . . . . . . . . . . . . . . . . . . . . . . . . . . . . . . . 160 Management. . . . . . . . . . . . . . . . . . . . . . . . . . . . . . . . . . . . . . . . 160 Status . . . . . . . . . . . . . . . . . . . . . . . . . . . . . . . . . . . . . . . . . . . . . 161 Account . . . . . . . . . . . . . . . . . . . . . . . . . . . . . . . . . . . . . . . . . . . 161 Printer. . . . . . . . . . . . . . . . . . . . . . . . . . . . . . . . . . . . . . . . . . . . . 161 Help . . . . . . . . . . . . . . . . . . . . . . . . . . . . . . . . . . . . . . . . . . . . . . 161 Configuring the Printer Using Telnet . . . . . . . . . . . . . . . . . . . . . . . 161 Configuring the Printer Using FTP. . . . . . . . . . . . . . . . . . . . . . . . . 163 Monitoring the Printer Using SNMP . . . . . . . . . . . . . . . . . . . . . . . 163 Configuring the SNMP Manager. . . . . . . . . . . . . . . . . . . . . . . . . . . 163 Using Logical Printers . . . . . . . . . . . . . . . . . . . . . . . . . . . . . . . . . . . 164 Adding Character Strings . . . . . . . . . . . . . . . . . . . . . . . . . . . . . 164 Replacing Character Strings . . . . . . . . . . . . . . . . . . . . . . . . . . . 165 Conversion from ASCII to PostScript . . . . . . . . . . . . . . . . . . . 165 Sample Network Configuration File . . . . . . . . . . . . . . . . . . . . . . . . 167 Index . . . . . . . . . . . . . . . . . . . . . . . . . . . . . . . . . . . . . 181 vi Chapter 1 Introduction About This Manual This manual is intended to provide guidance for the proper installation, operation, and maintenance of your Tally T8006/T8306 printer. Please read this manual carefully to ensure proper use of the printer. Keep the CD-ROM in a safe place, where it can be retrieved readily when needed. The following documentation conventions are used in this manual for ease in understanding and use. Warnings, Cautions, and Notes Warnings, cautions and notes provide important safety information throughout this manual. Carefully follow all the warnings, cautions and notes as you read through the instructions in this manual before you operate the printer. Information in the warnings and cautions describe potential hazards. If you don’t understand the safety information, contact Tally Technical Services. Here are the warning, caution, and note definitions: Warning! If a specific action or procedure in a Warning is not followed, equipment damage or personal injury can occur. Caution! If a specific action or procedure in a Caution is not followed, damage to equipment can occur. Note: Notes offer additional information to help you more fully understand a concept or subject. If a note is not followed, a task or procedure may not be properly accomplished. 1 Tally T8006/T8306 Color Laser Printers User Guide Numbered steps Instructions are presented under main topic headings with easy-to-follow, sequential steps. Illustrations Illustrations are displayed alongside numbered steps. Bold fonts Software commands and key commands are printed in bold type fonts. Displays Text messages that display on the printer control panel are shown as they appear on the control panel. Product Overview Tally has engineered the following features into the T8006/T8306 printers. Space-saving design. The printer is compact for easy installation in small office spaces or on desk tops. Low-cost operation. The printer toner cartridges and the developer are incorporated as a single unit, so there are fewer supplies to replace. T8006/T8306 accepts various printing media. The printer accepts many types, sizes, and weights of paper and other media, including envelopes, heavy paper stocks, OHP transparencies, and labels. Note: The T8006 accepts paper sizes up to legal size (8.5” x 14”), and the T8306 accepts paper sizes up to 13” x 19” (A3W). Simple network connection. The printer has an RJ-45 port for LAN connections, and the printer can adapt to your existing network protocol whether it is a TCP/IP, Windows® or IPX/SPX network. You can also use a Web control function to monitor the printer from a browser screen. Time-saving color adjustments. The printer supports functions for fine color adjustment, and allows you to manually save the settings. You can save color adjustments under a specific name, and retrieve these specific user-defined color adjustments later for quick printing. 2 Chapter 1 Introduction First-class print quality. The printer uses Tally’s smoothing technology to correct characters, illustrations, and photographs to a high quality of 2400 dpi x 600 dpi, as shown below. Before correction 600 dpi x 600 dpi Correction After correction 2,400 dpi (equivalent) x 600 dpi Printer Components Control Panel keys and indicator lights allow you to control and monitor printer operations. Top Cover provides access to internal supplies such as the oil bottle, and functions as the paper exit tray. Front Cover provides access to the toner cartridges. Power Switch controls all power to the printer. Paper Trays provide the media to be printed. 3 Tally T8006/T8306 Color Laser Printers User Guide Parallel Port provides direct printer-to-computer connection. Power Cord Socket provides power to the printer. RJ-45 Port provides printer-to-network connection. Fusing Unit thermally bonds the toner to the media. Fuser Cleaning Roller removes any dust from the fusing unit and the fixing roller. Oil Bottle stores oil for use in the fixing process. Optical Photoconductor (OPC) Belt Cartridge processes laser beam activity that produces images one color at a time (not shown). 4 Chapter 1 Introduction Toner Cartridges provide the toner for the printing process. Waste Toner Pack collects and retains waste toner. Ozone Filter reduces the amount of ozone emitted during the printing process. 5 Chapter 2 Setting Up Your Printer System Requirements For optimum printer performance and productivity, install the Tally printer driver software in a computer operating system that meets the following specifications. Operating System Requirements To use the Tally printer drivers included for this model, the connecting computer must use one of the following Microsoft operating systems: • Windows 95 • Windows 98/ME • Windows NT 4.0 (The Windows NT 4.0 printer driver will only operate on X86 architectures.) • Windows 2000 Hardware Requirements The connecting computer must meet the following minimum hardware requirements: Microprocessor Pentium® 133 MHz minimum. Pentium® 200 MHz or higher microprocessor is recommended. Memory At least 32 MB. 64 MB or more of memory is recommended. Disk Space At least 100 MB. 200 MB or more of disk space is recommended. Note: For Apple Macintosh hardware requirements, see “Setting Up a Network Printer on Macintosh” on page 34. 7 Tally T8006/T8306 Color Laser Printers User Guide Printer Location Tally color printers require the following environment specifications for optimal operation. Space Put the printer on a stable surface with good ventilation. Keep the printer away from corrosive chemicals, gases, dust, and other contamination, and away from equipment that generates magnetic fields, electrical noise, vibration, or shock. The surface that holds the printer must support at least 313 pounds or 142 kilograms, which includes the weight of the printer, paper, and all optional components. The surface must be large enough to support an extended paper tray. Allow enough clear space around your printer to provide good airflow for printer cooling and for easy maintenance access. The recommended clearance between a printer and other objects is shown here: 7.88 in. (20 cm) 19.70 in. (50 cm) 3.94 in. (10 cm) 27.50 in. (70 cm) 8 Chapter 2 Setting Up Your Printer Temperature Make sure the temperature in the printer location stays constant. Keep the printer away from direct sunlight. For best printer operation, install the printer in a location where the temperature levels stay within the following ranges: Fahrenheit Recommended range: 63.5º to 80.6º Permitted range: 50º to 90.5º Celsius 17.5º to 27º 10º to 32.5º Humidity Excessive changes in humidity can cause unwanted condensation inside the printer. For best printer operation, install the printer in a location where humidity levels stay within the following ranges: Recommended range: Permitted range: 50% to 70% 20% to 80% Power Source Each printer model requires different types of electrical power, as shown below. If you need additional information about the power requirements, contact your dealer or a Tally Service Technician. Warning! Use properly grounded wall sockets. Do not use converter plugs. Caution! Use surge protection between the power source and the printer. Model 8306 Part Number: 083188 Voltage Consumption 120 VAC + 10% 60 Hz + 2 Hz Up to 1,350 W Model 8306 Part Number: 083186 Voltage Consumption 220 VAC to 240 VAC 50 Hz + 2 Hz Up to 1,350 W Model T8006 Part Number: 083218 Voltage 120 VAC + 10% 60 Hz + 2 Hz Up to 1,350 W Frequency Frequency Frequency Consumption 9 Tally T8006/T8306 Color Laser Printers User Guide Model T8006 Part Number: 083220 Voltage 220 VAC to 240 VAC 50 - 60 Hz + 2 Hz Up to 1,350 W Frequency Consumption Unpacking the Printer The printer is heavy. Two or more persons must use the four grip locations on the underside of the printer to move it. The printer is packaged with a lift-off box top and bottom tray carton. Depending on the printer model, the printer can be delivered on a pallet. Warning! Do not lift the printer using the polyethylene bag that covers the printer. 1. Remove the Starter Kit and the polyethylene bag. 2. Remove the carton from the printer and lift the printer from the bottom carton tray using the four grips on the underside of the printer. 3. Put the printer in the desired location. Moving the Printer A printer can be damaged by toner and oil spillage if it is tilted while being moved. Always keep it horizontal. If you use a cart to move the printer, push it carefully and slowly. Sudden shocks or strong vibration may damage the printer. Caution! Have two people carry the printer without tilting it. Repacking the Printer for Shipment Before the printer can be repacked for shipment, the supplies in the printer must be removed and the inside of the printer must be cleaned. After the fuser oil bottle is removed, the residual fuser oil that remains within the printer, must be removed. 10 Chapter 2 Setting Up Your Printer Repacking a printer that has previously been installed needs careful attention. To find out more about the printer repacking instructions or for assistance, go to World Wide Web site www.Tally.com, or contact Tally at e-mail address [email protected]. See the Tally T8006/ T8306 Color Laser Printers Quick Start Guide on the Tally CD-ROM. The following diagram shows how the printer and supplies are packaged. Starter Kit Note: The T8306 packaging, shown here, has a built-in pallet; the T8006 packaging does not. 11 Tally T8006/T8306 Color Laser Printers User Guide Installing the Starter Kit Your printer comes with a Starter Kit that contains: • Toner cartridges (4) • Oil bottle • Oil dropper • Fuser cleaning roller • Optical photoconductor (OPC) belt cartridge • CD-ROM • Quick Start Guide Note: The oil dropper is used to draw oil out of the fusing unit when the printer must be moved or shipped. Keep the dropper in a convenient, safe location for future use. The printer also comes with an ozone filter and a waste toner pack that have been pre-installed at the factory. Additional items are also included with the printer: • Paper tray • Envelope feeder (T8306 only. The T8006 paper tray adjusts to handle envelopes.) • Power cord Fuser Cleaning Roller Toner Cartridges Oil Bottle OPC Belt Cartridge Y M C K Power Cord Envelope Feeder Oil Dropper 12 Paper Tray Chapter 2 Setting Up Your Printer Installing the Paper Tray No Paper Feeder Insert the paper tray squarely and evenly into the printer. T8006 With Paper Feeder 1. Pull the guide rails outward, and align the tip of the paper tray with the guide rails. 2. Insert the paper tray squarely and evenly into the paper feeder. Note: The T8006 lower paper tray slides directly into the lower feeder unit. T8306 Installing Toner Cartridges Each toner cartridge is labeled with the capital letter of the toner color. Insert the toner cartridges in the appropriate slots in the printer from the bottom to the top as follows: C (Cyan), M (Magenta), Y (Yellow), and K (Black). The toner cartridges from the Starter Kit are filled at half volume for first-time installation only. Warning! If you get toner in your eyes, immediately flush your eyes with water for at least 15 minutes, and contact a physician. Warning! Make sure the printer is off and unplugged before installing supplies. Caution! Handle the toner cartridges horizontally with the labels facing up. Do not install the toner cartridges upside-down or in reverse positions. 13 Tally T8006/T8306 Color Laser Printers User Guide 1. Release the front cover latch. 2. Open the front cover. 3. Rock the toner cartridge three or four times in the direction of the arrows on the cartridge to level out the toner inside. 4. Peel the tape off the cartridge and remove the protective cover from the cartridge. Note: Save the protective cover for future use when shipping the printer and toner cartridge separately. 5. Insert the toner cartridge carefully along the guide and into the appropriate toner cartridge slot in the printer. 6. Repeat steps 3 through 5 for each toner cartridge. 7. Close the front cover. 14 Chapter 2 Setting Up Your Printer Installing the Oil Bottle and Fuser Cleaning Roller The oil lubricates the fusing unit. The fuser cleaning roller removes any accumulated dust from the fusing unit. Caution! Always keep the printer horizontal to prevent spillage of residual oil and toner. 1. Release the top cover latch and open the top cover. 2. For the T8006, push the large green levers at the sides of the fuser rollers backward until they click into position. For the T8306, remove the two orange fuser stops from between the fuser rollers by pulling them upward and out. 3. Insert the oil bottle. 4. Insert the fuser cleaning roller. 5. Turn the two green lock levers to lock the fuser cleaning roller and the oil bottle in place. Note: After replacing the fuser cleaning roller, reset the fuser cleaning roller counter to zero. 15 Tally T8006/T8306 Color Laser Printers User Guide Setting the Fuser Cleaning Roller Counter to Zero Printer software tracks fuser cleaner roller usage. After the counter reaches a pre-set number, the printer displays a message to indicate that maintenance is necessary. After initial installation, or whenever you replace the fuser cleaning roller, set the counter to zero. 1. While pressing the power switch, press and hold MENU/ENTER/ . Note: For more information about displayed error messages, see “Appendix D Control Panel Messages” on page 141. 2. When PLEASE WAIT is displayed, release MENU/ENTER/ . The display will show Utility Menu Clear FC. Roll. 3. Press MENU/ENTER/ . The display will show Clear FC. Roll Not Execute. 4. Press either TRAY/ or MEDIA/ until the display shows Clear FC. Roll Execute. 5. Press MENU/ENTER/ once, and after approximately 10 seconds, the display will show Completed Clear FC. Roll. 6. Press MENU/ENTER/ . The display will show Utility Menu Clear FC. Roll. 16 Chapter 2 Setting Up Your Printer Installing the Optical Photoconductor (OPC) Belt Cartridge Caution! Do not touch or wipe off any powder that is on the OPC belt, or expose the OPC belt to light. 1. Open the top and front covers. 2. Lift the green OPC belt cartridge lock levers up until they unlock, with the channels upright. 3. With the top cover open, remove the protective sheet from the OPC belt cartridge. 4. Remove the two shipping pins from the OPC belt cartridge. 5. Slide the OPC belt cartridge downward along the green locklever guides and into the printer carefully. 17 Tally T8006/T8306 Color Laser Printers User Guide 6. Press the green OPC belt cartridge lock levers to the closed position. 7. Close the top and front covers carefully until they lock shut. Note: After replacing the OPC belt cartridge, reset the OPC belt counter to zero. 18 Chapter 2 Setting Up Your Printer Setting the OPC Belt Counter to Zero Printer software tracks OPC belt usage. After the counter reaches a preset number, the printer displays a message to indicate that maintenance is necessary. After the first installation, and after every replacement of the OPC belt, set the counter to zero. 1. While pressing the power switch, press and hold MENU/ ENTER/ . Note: For information about displayed error messages, see “Appendix D Control Panel Messages” on page 141. 2. When PLEASE WAIT is displayed, release MENU/ ENTER/ . The display will show Utility Menu Clear FC. Roll. 3. Press either TRAY/ or MEDIA/ until the display shows Clear BeltCG. 4. Press MENU/ENTER/ . The display will show Clear BeltCG Not Execute. 5. Press either TRAY/ or MEDIA/ until the display shows Clear BeltCG Execute. 6. Press MENU/ENTER/ . The display will show Clear BeltCG Execute. 7. Press MENU/ENTER/ . The display will show Completed Clear BeltCG. 8. Press MENU/ENTER/ . The display will show Utility Menu Clear BeltCG. 9. Press to exit the Utility Menu and return the printer to normal operating mode, or turn the power switch off. 19 Tally T8006/T8306 Color Laser Printers User Guide Installing the Power Cord Warning! Use properly grounded wall sockets. Do not use converter plugs. 1. Plug the printer power cord into the printer. 2. Plug the printer power cord into a power source with surge protection. Starting the Printer After you install the Starter Kit and plug in the printer, load paper into the paper tray, turn on the printer, and print a test page. Loading Paper for Test Printing 1. Remove the paper tray from the printer by gently lifting both sides of the tray while pulling outward. 2. Remove the tray cover (T8306 only). 20 Chapter 2 Setting Up Your Printer PAPER LABEL OHP FILM ENVELOPE 3. Place about 100 sheets of A4 or standard letter-size (8-1/2” x 11”) paper into the paper tray. T8006 4. Replace the tray cover (T8306 only). T8306 5. Slide the paper tray back into the printer carefully until it locks. Turning On the Printer 1. Press the main power switch. The printer will perform a series of diagnostic tests and then begin the warm-up cycle. This process may take up to 4 minutes. 2. Once the printer has completed the warm-up cycle, make sure the printer display reads “Ready.” Note: If the MESSAGE lamp is lit, a printer error has occurred. Check the display for an error message. See “Chapter 9 Troubleshooting” on page 89. 21 Tally T8006/T8306 Color Laser Printers User Guide Printing a Test Page To print a test page, use A4 or standard letter-size (8-1/2” x 11”) paper. 22 Tray 1: A4 Ready 1. Check that the control panel displays “Ready.” Tray 1: A4 Not Ready 2. Press the ONLINE key. Tray 1: A4 Test Menu 3. Press the MENU/ENTER/ key. Tray 1: A4 Test Print 4. Press the MENU/ENTER key a second time. Tray 1: A4 Test Print 5. Press the MENU/ENTER key a third time. The DATA lamp will blink as the test page starts to print. Tray 1: A4 Not Ready 6. When the test print is complete, the DATA lamp will go out. Tray 1: A4 Ready 7. Press the ONLINE key. Chapter 2 Setting Up Your Printer Here is a typical printed test page for the Tally T8006/T8306 color printers: If the test page doesn’t print properly, check for error indications on the control panel display. See “Chapter 9 Troubleshooting” on page 89. Before you can send files from your computer application to the printer, you must install the appropriate print driver and utilities for your specific computing system. See “Chapter 3 Installing Printer Drivers and Utilities” on page 25. 23 Chapter 3 Installing Printer Drivers and Utilities Tally Printer Autoplay CD The Tally T8006/T8306 CD included with your printer has an autoplay feature that will automatically start the installation process of the drivers and utilities for your printer. The CD contains the T8006/T8306 printer drivers, network utilities, and the documentation for your printer. The CD automatically senses your operating system and supplies the appropriate driver. Setting up a Local Printer in Windows The Tally auto-install CD-ROM automatically installs the Tally T8006/ T8306 printer drivers on your computer and installs the printer on the LPT1 port. To install the printer on your LPT1 port: 1. Insert the CD in your CD-ROM drive. 2. Click the language you want to use. 3. Click the I Accept button. 4. Click the T8006 - Install Software button or the T8306 - Install Software button. 5. To begin the local installation process, click Local. 6. Click Install Printer Driver. 7. Click Exit This CD. 25 Tally T8006/T8306 Color Laser Printers User Guide Setting up a Network Printer in Windows Configuring Windows 95/98 to Print Using NetBEUI The Tally auto-install CD-ROM automatically installs the drivers and utilities your computer needs to print using the NetBEUI protocol. If you are uncertain whether your network settings are correct for printing over the network, consult your Windows 95/98 Help. To install the network printer software on a computer using NetBEUI: 1. Insert the CD in your CD-ROM drive. 2. Click the language you want to use. 3. Click the I Accept button. 4. Click the T8006 - Install Software button or the T8306 - Install Software button. 5. Click the Network button to configure the computer for network printing. 6. Click the Install Printer Driver button to install the drivers. 7. Click the Network Utilities button to install the network utilities. 8. When prompted by the installation wizard, choose Custom Install. 9. When prompted by the installation wizard select install NetPilot and PrintMonitor. 10. Click Exit This CD to complete the software installation process. Note: By default, your printer is installed on LPT1 — the physical printer port of your computer. To print over the network, you must now tell Windows to print over a virtual printer port rather than the physical port. 11. From the Start button, select Settings and click Printers. 12. In the Printers folder, right-click the T8006 or T8306 printer you just installed. 13. Click Properties. 14. In the Printer Properties window, select the Details tab. 15. In the Print to the following port list, select the printer name.LP1 port. By default the printer name is “PS” followed by six letters and numbers of the print server’s node address; for example, “PS1f83a5.LP1.” See “Test Button for LAN Configuration” on page 147 to obtain a LAN configuration page with your print server’s node address. 16. In the Printer Properties window, select the port you just added and click OK. 26 Chapter 3 Installing Printer Drivers and Utilities Configuring Windows NT 4.0 and Windows 2000 to Print Using NetBEUI The Tally auto-install CD-ROM automatically installs the drivers and utilities your computer needs to print using the NetBEUI protocol. If you are uncertain whether your network settings are correct for printing over the network, consult your Windows Help. To install the network printer software on a computer using NetBEUI: 1. Insert the CD in your CD-ROM. 2. Click the language you want to use. 3. click the I Accept button. 4. Click the T8006 - Install Software button or the T8306 - Install Software button. 5. Click the Network button to configure the computer for network printing. 6. Click the Install Printer Driver button to install the printer drivers. 7. Click the Network Utilities button to install the network utilities. 8. When prompted by the installation wizard, choose Custom Install. 9. When prompted by the installation wizard select install NetPilot and PrintMonitor. 10. Click Exit This CD to complete the software installation process. Note: By default, your printer is installed on LPT1 — the physical printer port of your computer. In order to print over the network, you must now install a virtual port, and tell Windows to print over the virtual printer port rather than the physical port. 11. From the Start button, select Settings and click Printers. 12. In the Printers folder, right-click the T8006 or T8306 printer you just installed. 13. Click Properties. 14. In the Printer Properties window, select the Ports tab. 15. Click the Add Port button. 16. In the Printer Ports dialog, select Print Server Port. 17. In the Add Print Server Port dialog, select NetBIOS/NetBEUI. 18. In the Add Print Server NetBIOS/NetBEUI dialog, select the Tally printer you just installed. By default the printer name is “PS” followed by six letters and numbers, for example “PS1f83a5.” If you later decide to change the name of the printer, you will need to reset the port. 19. In the Printer Properties window, select the port you just added and click OK. 27 Tally T8006/T8306 Color Laser Printers User Guide Configuring Windows to Print Using TCP/IP The Tally auto-install CD-ROM automatically installs the drivers and utilities your computer needs to print using TCP/IP. If you are uncertain whether your network settings are correct for printing over the network, consult your Windows Help for your operating system. To install the network printer software on a computer using TCP/IP: 1. Insert the CD in your CD-ROM drive. 2. Click the language you want to use. 3. Click the I Accept button. 4. Click the T8006 - Install Software button or the T8306 - Install Software button. 5. Click the Network button to configure the computer for network printing. 6. Click the Install Printer Driver button to install the printer drivers. 7. Click the Network Utilities button to install the network utilities. 8. When prompted by the installation wizard, choose Custom Install. 9. When prompted by the installation wizard select install NetPilot and PrintMonitor. 10. Click Exit This CD to complete the software installation process. 11. From the Windows Start button select Programs, then select Print Server Utilities. Under Print Server Utilities, select NetPilot and click NetPilot. 12. In NetPilot, click the Install button. 13. In the Installation Options dialog, select with Installation Wizard and click OK. 28 Chapter 3 Installing Printer Drivers and Utilities 14. Change the name of the printer to the name you would like it to have and click the Next button. This name will be the name shown on the network. 15. In the Network Environments dialog, deselect all but the TCP/IP check box and click the Next button. 16. In the TCP/IP address configuration window, choose the way you want the IP address of the printer to be configured and click the Next button. Note: If you are uncertain about the IP address that should be used, consult your network administrator. 17. Enter an eight character name that your printer will have on your network. 18. If you have a dedicated WINS server on your network, select the WINS check box and fill in the IP address of the Primary and Secondary WINS server. If you are unsure whether your network is configured to use dedicated WINS servers, do not check the WINS box and click Next. 19. If you want to password protect your configuration, select the Set configuration protection check box, enter the password in the box, and click Next. 29 Tally T8006/T8306 Color Laser Printers User Guide 20. Click the OK button to complete the TCP/IP configuration. To complete the installation of the printer, go to the port configuration section for your operating system. Configuring the TCP/IP Printer Port in Windows 95/98 By default, your printer is installed on LPT1 — the physical printer port of your computer. To print over the network, you must now install a virtual port, and tell Windows to print over the virtual printer port rather than the physical port. 1. From the Start button, select Settings and click Printers. 2. In the Printers folder, right-click the Tally T8006 or the Tally T8306 printer you just installed. 3. Click Properties. 4. In the Printer Properties window, select the Details tab. 5. Click the Add Port button. 6. Click the Other button and from the list choose Print Server Port, then click OK. 7. Select LPR (TCP/IP) as the network protocol and click OK. 8. Enter the IP address of your print server (the logical printer name should remain LPT1), and click OK. 9. The LPR port will then be added automatically to the list of available ports and will be selected as the current port. 10. Click OK to complete the port installation. Configuring the TCP/IP printer port in Windows NT 4.0 By default, your printer is installed on LPT1 — the physical printer port of your computer. To print over the network, you must now install a virtual port, and tell Windows to print over the virtual printer port rather than the physical port. 1. From the Start button, select Settings and click Printers. 2. In the Printers folder, right-click the Tally T8006 or Tally T8306 printer you just installed and select Properties. 3. In the Printer Properties window, select the Ports tab. 4. Click the Add Port button to open the Printer Ports window. 30 Chapter 3 Installing Printer Drivers and Utilities 5. In the Printer Ports window, select LPR Port and then select New Port. 6. In the Add LPR Compatible Printer window, enter the IP address, enter LPT1 for the printer name, and click OK. 7. In the Printer Properties window, click Close to complete the port installation. Configuring the TCP/IP Printer Port in Windows 2000 By default, your printer is installed on LPT1 — the physical printer port of your computer. To print over the network, you must now install a virtual port, and tell Windows to print over the virtual printer port rather than the physical port. 1. From the Start button, select Settings and click Printers. 2. In the Printers folder, right-click the Tally T8006 or Tally T8306 printer you just installed and select Properties. 3. In the Printer Properties window, select the Ports tab. 4. Click the Add Port button to open the Printer Ports window. 5. In the Printer Ports window, select Standard TCP/IP Port to start the Add Standard TCP/IP Printer Port Wizard. Click Next to begin the Wizard. 6. Enter the IP address. This will also be used as the Port Name of the printer. Click Next to continue. 7. If the printer was found on the network, the Wizard will display the network characteristics of the printer. Verify that the settings are correct and click Finish to complete the Add Standard TCP/IP Printer Port Wizard. 8. Click Close to close the Printer Ports window. 9. In the Tally T8006 Properties or Tally T8306 Properties window, click Close to complete the printer port installation. Configuring Windows to Print on a NetWare Network The Tally auto-install CD-ROM automatically installs the drivers and utilities your computer needs to print using NetWare. To print on a NetWare network, you must have the Novell client installed. If you are uncertain whether your network settings are correct for printing over the network, consult your Windows Help or your NetWare operators manual. Note: To configure NetWare, you must have administrative authority. Under 3.x you must log in as supervisor and under 4.1x, you must log in as Admin. To set bindery, you should log in under bindery mode. 31 Tally T8006/T8306 Color Laser Printers User Guide To install the network printer software on a computer using a Novell NetWare client: 1. Insert the CD in your CD-ROM drive. 2. Click the language you want to use. 3. Click the I Accept button. 4. Click the T8006 - Install Software button or the T8306 - Install Software button. 5. Click the Network button to configure the computer for network printing 6. Click the Install Printer Driver button to install the printer drivers. 7. Click the Network Utilities button to install the network utilities. 8. When prompted by the installation wizard, choose Custom Install. 9. When prompted by the installation wizard select install NetPilot and PrintMonitor. 10. Click Exit This CD to complete the software installation process. 11. From the Windows Start button, select Programs, then select Print Server Utilities. Under Print Server Utilities, select NetPilot and click NetPilot. 12. In NetPilot, click the Install button. 13. In the Installation Options dialog, select with Installation Wizard and click OK. 32 Chapter 3 Installing Printer Drivers and Utilities 14. Change the name of the printer to the name you would like it to have and click the Next button. This name will be the name shown on the network. 15. In the Network Environments dialog, deselect all but the Netware check box and click the Next button. 16. Select the print queue that the printer will be connected to. If the printer will be on a Bindery File Server, enter the name of the file server. Click Next. 17. NDS tree users only. Set the context that the print queue will be placed in, and the NDS tree that the printer will log in through. Next choose the context for the queue, and the context for the queue volume. Click the Next button. 18. Enter the name of the print queue that the printer will be connected to. Uninstalling Windows Drivers Before installing any updates to the printer drivers, you should uninstall the old drivers. To uninstall Windows drivers: 1. From the Windows Start button, select Settings and click Printers. 33 Tally T8006/T8306 Color Laser Printers User Guide 2. In the Printers folder, right-click the Tally T8006 or Tally T8306 printer and select Delete. Setting Up a Network Printer on Macintosh Operating System Requirements For optimum printer performance, use the Macintosh printer driver in the following system and network environment: • Mac OS 8.1 or later • AppleTalk connection • Standard 10BASE-T/100BASE-TX Ethernet interface Hardware Requirements The Macintosh computer must meet the following minimum hardware requirements. Microprocessor Power PC. Memory At least 32 MB. 64 MB or more of memory is recommended. Disk Space At least 16 MB. 100 MB or more of disk space is recommended. Configuring Macintosh for Network Printing To print from your Macintosh over an Ethernet network, you must first configure your printer. Make sure the printer is connected to the network and turned on, and then set up the configuration as follows: 1. Set an IP address in the printer. See “Appendix C Control Panel Menu Functions” on page 119. 2. From your Web browser, go to the IP Address that is set in your printer to access the internal configuration Web page. 3. In the Network Print Server window, click the Configuration button. 4. Click AppleTalk. 5. In the Configuration [AppleTalk] window, set the Binary Enabled button to NO. In Name Printer 1:, enter the name of your printer as you want it to appear in the Chooser. In Type Printer 1:, enter TALLY_BS. 6. Click Submit AppleTalk Settings, and verify the settings were successfully set. 7. Exit the Web browser. 34 Chapter 3 Installing Printer Drivers and Utilities Installing Macintosh Printer Drivers 1. Insert the CD into your CD-ROM drive. 2. Double-click the Tally T8006/T8306 CD-ROM. 3. Double click the folder of the language you want to use. 4. In the driver folder for your printer model, double-click Installer. 5. The Installer will present a license agreement. Click Agree to continue. 6. In the Easy install tab of the Installer, click the Install button. 7. When the computer prompts you, click Restart. 8. After the computer restarts, go to the Chooser. 9. Click the Tally T8006/T8306 printer icon. The Connected To: window will display the name of your printer. Note: If the Connected To: window does not show your printer, verify the printer is connected to the network and the printer is configured properly. For further help, see “Macintosh Chooser Problems” on page 106. 10. Close the Chooser. Uninstalling MacIntosh Printer Drivers 1. Insert the CD into your CD-ROM drive. 2. Double click the Tally T8006/T8306 CD-ROM. 3. Double click the folder of the language you want to use. 4. In the driver folder for your printer model, double-click Installer. 5. The Installer will present a license agreement. Click Agree to continue. 6. Select the Custom Remove tab. 7. Select the “All the software which QuickDraw uses.” tab. 8. Click the Remove button. 9. When the computer prompts you, click Restart. Note: For specific information about Macintosh driver features and operation, see the Macintosh driver help files. 35 Chapter 4 Operating Your Printer Turning the Printer On 1. Press the main power switch. The printer will perform a series of diagnostic tests and then begin the warm-up cycle. This process may take up to 4 minutes. 2. Once the printer has completed the warm-up cycle, make sure the printer display reads “Ready.” Note: If the MESSAGE lamp is lit, a printer error has occurred. Check the display for an error message, and take the appropriate action. Turning the Printer Off 1. Ensure that the printer is not printing a job or warming up. 2. Press the power switch. Note: When restarting the printer, wait at least five seconds after turning off the printer before turning it on again. Selecting Media Loading your printer with the correct media is important in keeping your printer running well. Because some types of paper may shorten the life span of the printer components or quickly exhaust toner supplies, you should use paper of the correct type, weight and size. Following the guidelines for filling the paper trays listed below will maximize the performance of your printer and the quality of your print jobs. When loading transparencies, labels or envelopes, you must use Tray 1. 37 Tally T8006/T8306 Color Laser Printers User Guide Tray 1 Media Type Media Specifications Capacity Media Size Plain Paper Laser Printer Stock Paper weight: 16 - 24 lb. bond (60 to 90 g/ m2) 250 sheets T8006 A4, B5 JIS, B5 ISO, letter, legal, executive, and custom sizes to 8.5” x 11.7”. T8306 In addition to the sizes above, this model handles A3, B4, WB (13” x 19”), tabloid, and custom sizes to 13” x 19”. Thick Stock Laser Printer Stock Paper weight: 90 lb. Index (90 to 160 g/ m2) 80 sheets Label Paper Laser Printer Stock 80 sheets Transparency 50 sheets A4 and letter Laser Printer Stock Envelope 15 Commercial #10, International DL Trays 2 and 3 Media Type Media Specifications Capacity Media Size Plain Paper Laser Printer Stock Paper weight: 16 - 24 lb. bond (60 - 90 g/ m2) About A4, A3, B4, B5, letter, 500 sheets ledger, and legal Note: Some types of paper may result in frequent paper jams or poor printing quality. When determining the paper to use, consult the table above for capacities. 38 Chapter 4 Operating Your Printer Loading Media When loading paper or transparencies into your printer, do not load too much and make sure that the media is all the same size. Loading beyond the specified capacity will cause paper jams. 1. With both hands, gently lift and pull the paper tray out of the printer. 2. Remove the tray cover (T8306 only). 3. Using the green grips, adjust the lateral and end paper retainers according to the paper size. PAPER LABEL OHP FILM ENVELOPE T8006 4. Place the paper in the paper tray with the printing surface facing up. Make sure that the paper does not exceed the limit marked on the inside of the green grips. 5. Set the tray cover on the tray (T8306 only). T8306 39 Tally T8006/T8306 Color Laser Printers User Guide 6. Put the paper tray into the printer. 7. Confirm that the display shows the correct paper size. If --appears on the display as the paper size, reinstall the paper, making sure the paper fits securely in the tray. Installing The Envelope Feeder (T8306 Only) Note: The T8006 printer does not need an envelope feeder. The T8006 paper tray can be adjusted to handle envelopes. The envelope feeder will only work in Tray 1. 1. Adjust the lateral and end retainers in the paper tray to the full open position. 2. Hook the envelope feeder on the tray base. 3. Adjust the lateral and end retainers to secure the envelope feeder. 40 Chapter 4 Operating Your Printer Control Panel The control panel is made up of the display, four indicator lamps, and seven control keys that allow you to control and monitor printer operations. Display The display provides messages indicating the state of the printer. The example display below shows the printer printing a paper loaded into Tray 1. Paper tray selected Tray1: Size of paper contained in the selected paper tray LTR. Processing Indicators . MESSAGE lamp (orange): Lights when an error message is on the display. READY lamp (green): Is lit when the printer is ready to print. During warm-up, this lamp blinks. DATA lamp (green): Blinks while the printer is receiving an incoming print job. ONLINE lamp (green): Is lit when the printer is ready to receive print jobs. 41 Tally T8006/T8306 Color Laser Printers User Guide Control Keys The T8006/T8306 control panel has seven control keys that allow you to control the printer functions. FORMFEED: Forces a job to print. CLEAR: Clears print data. ONLINE: Places the printer in online or offline status. MENU/ENTER/ changes. TRAY / : Opens the menu and enters : Changes the paper feed source tray for printing. MEDIA / ing. : Changes the media type for print- : Navigates to the next higher menu level. FORMFEED Use FORMFEED to force the printer to print to the currently loaded media. Note: Using FORMFEED to print on paper smaller than the size specified on the display will cause the printer to print the job incorrectly and reduce overall print quality of the printer. 1. Confirm that the printer has print data to print by checking that the data lamp is blinking. 2. Press FORMFEED. The following example shows the messages that will display when you use FORMFEED to print on letter paper instead of transparencies. 42 Tray1: LTR. Tray1 Load Trans The display indicates that Tray 1 requires transparencies to be loaded. Tray1: LTR. Processing By pressing FORMFEED printing begins; the display shows normal printing. Chapter 4 Operating Your Printer CLEAR Use CLEAR to clear the printer memory once a job has been started. 1. Press ONLINE to stop printing. 2. Cancel the print job on the sending computer. 3. Hold down CLEAR for at least two seconds. When the print data is erased, the DATA lamp will shut off, and the printer will automatically return to online mode. If the MESSAGE lamp is lit, and the printer has not returned to online mode, check the message on the display, and take the appropriate action. ONLINE Use ONLINE to switch the printer state from the online printing mode to the offline printer configuration mode. TRAY Use TRAY to change the paper feed source tray. 1. When the display prompts to load a new paper size or type, press TRAY to select the correct tray. The new tray is indicated on the top row of the display. 2. Press ONLINE to begin printing from the new source tray. The following example shows the messages that will be displayed when changing the source tray. In this example, the source tray is changed from Tray 1, containing letter paper, to Tray 2, containing the required tabloid paper needed for the current job (T8306 only; the T8006 operates in a similar manner when changing from letter to legal size paper.) Tray1: LTR. Tray1 Load Tabloid The display indicates that Tray 1 contains A4 paper and needs A3 paper to print the current job. Tray2: Tabloid Tray1 Load Tabloid By pressing TRAY, Tray 2 is selected. Tray2: Tabloid Ready 2534KB Once Tray 2 is displayed, pressing ONLINE starts the job. MEDIA Use MEDIA to change the media to be printed on when the media specified on the display is not available. 43 Tally T8006/T8306 Color Laser Printers User Guide The following example shows the messages that will be displayed when changing the media. In this example, the media is changed from transparencies to plain paper. . Tray1: LTR. Tray1 Load Trans The display indicates that the currently selected source tray (Tray 1) contains letter-size paper, and transparencies need to be loaded to print the current job. Tray1: Tray1: By pressing the MEDIA key, the media already contained in Tray 1 (plain paper) is selected. LTR. Load Plain Tray1: LTR. Processing Press ONLINE. More information about Control Panel menu functions and display messages is contained in the appendixes. See “Appendix C Control Panel Menu Functions” on page 119, and “Appendix D Control Panel Messages” on page 141. 44 Chapter 5 Changing Print Defaults A printer driver is software your computer uses to translate your documents into a format the printer can understand. By configuring the printer driver settings, you can change how your computer sends documents to the printer. There are two ways that you can configure the printer driver settings; you can set default properties for all documents sent from your computer, or you can set a document’s properties in the application you are currently printing from. Whether you are setting the default properties, or customizing the settings for a particular document, the Tally driver interface is exactly the same. To set the print properties for a particular document, use the Print dialog of the application you are printing from. The Print dialog is normally located in the File menu of the application you are currently using. From the File menu, select Print to open the Print Setup window. In the Print Setup window, click on the Properties button. To configure the driver settings permanently, use the procedures on the following pages to open up the default printer settings dialog. 45 Tally T8006/T8306 Color Laser Printer User Guide Changing Default Print Driver Properties Windows 95/98 1. From the Windows taskbar, click the Start button. 2. Go to Settings. 3. Click on Printers to open the Printers folder. 4. In the Printers folder, right click the Tally T8006/T8306 Printer icon. 5. Click on Properties. 6. Click on the Job tab. 46 Chapter 5 Changing Print Defaults Windows NT 4.0 1. From the Windows taskbar, click the Start button. 2. Go to Settings. 3. Click on Printers to open the Printers folder. 4. In the Printers folder, right click the Tally T8006/T8306 Printer icon. 5. Click on Document Defaults. 47 Tally T8006/T8306 Color Laser Printer User Guide Windows 2000 1. From the Windows taskbar, click the Start button. 2. Go to Settings. 3. Click on Printers to open the Printers folder. 4. In the Printers folder, right click the Tally T8006/T8306 Printer icon. 5. Click on Properties to open the Tally T8006/T8306 Properties dialog. 6. From the General tab, select Printing Preferences. 48 Chapter 5 Changing Print Defaults Selecting Job Settings The Tally Print Driver Job tab allows you to select optional paper sources and media types. Here you can begin to change settings to make the page look the way you want it to look. In addition, you can select several options such as the number of copies you want to print. Following is a summary of the settings. To finalize your custom print job after you select the settings, click OK. Item Description Paper Size Use Paper Size to select a desired size from the list box. You can select predefined paper sizes or your own custom size. Use the Custom Size window to set width, length, and units of measurement. Paper Set Direction shows the direction the paper is loaded in the current paper tray. Paper Source Paper Source allows you to select the current paper tray. Use Media Type to select the type of media you want to print on. Use Copies to select the number of copies to print. Media Type Copies Orientation Display for Paper Changing Layout Orientation allows you to choose to print in portrait or landscape mode. The number below the Orientation icon indicates the reduced print ratio — determined according to the paper size, print size and layout. If none of the paper trays contain the paper required for the current print job, the printer will display the paper required and a four-character user-identification message. Use the Display for Paper Changing selection to customize the message that will be displayed when the printer requires the paper to be changed. Use Layout to select how many pages will be printed on the same sheet of paper. You can select one, two or four. 49 Tally T8006/T8306 Color Laser Printer User Guide Item Description Duplex Printing Use Duplex Printing to print on both sides of the currently selected media. To use the Duplex Printing mode, select the Duplex Printing check box. Duplex Printing is not available for Commercial#10, International DL, or custom paper sizes. Duplex Printing on A3, Ledger or A3 wide (13” x 19”) sizes require an additional memory module to be installed. Within Set Print Details, there are three major selection choices. Use Binding Position to select which edge the binding will be set to on the paper, and how large the margin will be. Use Print Order to specify the page order when you select one page, two pages, or four pages in the Layout setting. Use Print Page Border to select whether a border should be printed around the print area. Set Print Details Print Mode Setting Information 50 Use Print Mode to select whether print speed or print quality has a higher priority. Standard mode is the optimal median between speed and quality printing. This list provides a visual summary of the current print settings. Chapter 5 Changing Print Defaults 51 Tally T8006/T8306 Color Laser Printer User Guide Setting Colors The Color tab allows you to make customized color and mode choices for documents, photographs, and graphics. The default setting is document, which provides the best settings for printing text or mixed text and graphics. For sharper photographs, choose photographs; for sharper graphics, or to match a specific color, choose graphics. It also allows you to choose to print the color black either from a combination of colors or from a black color cartridge. You can customize settings further, with Color Adjustment and Density Adjustment. Each time you make a custom Color Mode setting scheme, you can name it, save it, and use it again. After you choose your settings on the Color tab, click OK. Item Description Color Mode Settings Use Color Mode settings to configure how images will be printed according to the type of image to be printed. Use Black Generation to create black color using black toner instead of a combination of toner colors. Selecting Black Generation can improve printing results of a densely-colored image. When printing black over a large area, black created through a combination of colors may not fully adhere to the media and peel away. To make custom color settings, the Custom Setting button in the Color Mode Settings must be selected. Custom Setting features allow you to make several sets of color and density settings, and save (register) them with a specific 10-character name. A custom setting can be chosen from the drop-down list. Black Generation Setting Custom Setting 52 Chapter 5 Changing Print Defaults Adjusting Colors Use the Color Adjustment button to adjust the hue, color, and density of the printer output. Color Adjustment will only work when Custom Setting is selected under Color Mode settings. Following is a summary of the available adjustments to customize the color output of your printer. Each has 21 levels of gradation, from -10 to 10. Item Description Sample Use the Sample drop-down list to select the image to be shown in the sample window when adjusting the colors. Use the Base Color drop-down list to select a color mode based on the content you are printing. Base Color Brightness Saturation Contrast Color Balance When you move the scroll box to the right, the colors lighten. The colors darken when you move the scroll box to the left. Or, you can use the arrow buttons for incremental adjustments. When you move the scroll box to the right, the colors become sharper, and to the left, the colors become paler. Moving the scroll box to the right provides a high contrast, and to the left provides a low contrast. Use Color Balance to adjust the hue by changing values between cyan and red, magenta and green, and yellow and blue. 53 Tally T8006/T8306 Color Laser Printer User Guide Adjusting Density From the Density Adjustment tab, select the Adjust Density check box to adjust the print density for each color. Use the scroll box for each color—Black, Cyan, Magenta, and Yellow—to decrease or increase 21 density levels from light, -10, to dark, +10. Item Description Black Move the scroll box to the left to make the black print density lighter or to the right to make it darker. Move the scroll box to the left to make the cyan print density lighter or to the right to make it darker. Cyan Magenta Yellow Restore Default 54 Move the scroll box to the left to make the magenta print density lighter or to the right to make it darker. Move the scroll box to the left to make the yellow print density lighter or to the right to make it darker. Click this button to change density adjustments back to the original default settings. Chapter 5 Changing Print Defaults Registering Custom Edits Use the Edit option to register custom color settings and save them for later use. The registration name can include up to ten characters, and you can register up to ten configurations. To use the custom color settings, you must select Custom Setting from the Color Mode section of the Color tab. Item Description List Displays names of your custom settings. Allows you to type the name of your custom setting. Click this button to save a new setting name. After you have adjusted the current custom color settings, select a name in the list to change, and click Modify to save the changes to this file. Select a setting name in the list and click Delete to permanently remove it from the list. Click Close to end the Edit option. Name Save Modify Delete Close 55 Tally T8006/T8306 Color Laser Printer User Guide Setting Options The Options tab allows you to further customize your print job. For example, you can choose to make the printer feed a sheet of paper between each print job, or display some information while a job is printing. Also, Printing Options and Other Features allow you to set character smoothing or special black characters, among other available settings. Item Description Output Tab Page Select Output Tab Page to produce a tab page for each print job. A tab page is a sheet of paper that separates one print job from another. Select this box to direct the printer to put a tab page before your job prints. Select this box to put a tab page after your job prints. Select this box to put a tab page before and after your print job. Before Print Job After Print Job Before and After Print Job Display User ID when printing Smoothing Save Toner Output Blank Paper Print Slowly EMF Spooling Print Special Black Character 56 Select Display User ID when printing, to adjust the user information that displays during printing. To change the user information, select this box and then enter a custom message to be displayed. Select Smoothing to make printed characters smooth and less jagged. Save Toner uses less toner on the printed page and therefore lightens the printed page for draft printing. Select Output Blank Paper to prevent the printer from producing blank pages that are not created by a page break. Select Print Slowly to help reduce inconsistencies in density. EMF Spooling enables Expanded Meta File spooling. This setting accelerates print speed. If incorrect printing results, however, clear the EMF Spooling check box. Check the Print Special Black Character box if some part, or all of some characters, are missing or needless characters are printed when using black text. Chapter 5 Changing Print Defaults Item Description Increase Compression Ratio Select Increase Compression Ratio to increase the compression of print data sent to the printer. Clear this box to reduce the chances of printing errors. The Watermark button provides a separate properties sheet to make customized choices for watermarks on a printed page. Watermark 57 Tally T8006/T8306 Color Laser Printer User Guide Customizing Watermarks Custom color watermarks can identify special types of documents, such as “Confidential.” The Watermark settings allow you to position your watermarks on your printed page, and to specify, register, or delete watermarks. Item Description Print Watermark Select this check box to print watermarks. Select a predefined watermark from this list, or type in up to sixteen characters to specify your custom watermark. Select a font for the watermark. Select a character style. Select a font point size between 8 and 72. Select a color for the watermark. Specify where you want to put the watermark on the page. Move the slider left or right to select the density of a watermark from within the range of 0 to 15. Watermark Font Style Font Size Color Position Density Angle 58 Move the slider to select the watermark print angle. Any angle within the range of 0 to 355 degrees can be set in steps of five degrees. Chapter 5 Changing Print Defaults Restoring All Items to Default The About tab provides information about the Tally Color Printer Driver, and also gives you an opportunity to replace all of your customized settings with the original Tally default print settings. To close the About tab, click OK. Item Description Restore All Items to Default Click the Restore All Items to Default button to reset all of your customized print settings to the initial default settings of the printer. 59 Chapter 6 Maintaining Your Printer When supplies such as toner cartridges and fuser oil need replacement, and when printer parts need replacement after high-volume printing (approximately 100,000 to 600,000 pages), the control panel displays messages. See “Chapter 4 Operating Your Printer” on page 37, and “Appendix D Control Panel Messages” on page 141for more information about control panel messages. Printer parts must be replaced by a qualified Tally Service Technician. For more information on part replacement, see “Appendix B Periodic Replacement Parts” on page 117. For more information about supply orders, see the Tally T8006/T8306 Color Laser Printers Quick Start Guide on the Tally CD-ROM. Perform the following steps to replenish the supplies in your printer. Warning! Make sure the power switch is off, and that the printer has cooled for a minimum of 30 minutes before supplies near the fusing unit. Replacing Toner Cartridges Replace toner cartridges at least once every 12 months, or more often depending on usage. At a 5% coverage rate and continuous printing of letter-size paper, T8006 toner cartridges can print about 12,000 pages for black (K), and 7,200 pages for color (C, M and Y). The T8306 toner cartridges can print about 14,000 pages for black (K), and 8,500 pages for color (C, M and Y). Note: The original toner cartridges from the Starter Kit are filled at half volume for first-time installation only. Their early replacement does not reflect the replacement cycle stated above. Warning! If you get toner in your eyes, immediately flush your eyes with water for at least 15 minutes, and contact a physician. 61 Tally T8006/T8306 Color Laser Printers User Guide 1. Unlock the lever. 2. Open the front cover. Caution! Do not install the toner cartridges upside-down or in reverse order. To avoid toner spillage, keep the toner cartridge horizontal with the labels facing upward. 3. Pull the empty toner cartridge out of the printer. 4. Discard the empty toner cartridge. See “Disposing of Supplies” on page 71. 5. Rock the new toner cartridge three or four times in the direction of the arrows on the cartridge to level out the toner. 6. Peel the tape off the cartridge and remove the protective cover from the cartridge. Note: Save the protective cover for future use when shipping the printer and toner cartridges separately. 62 Chapter 6 Maintaining Your Printer 7. Carefully insert the toner cartridge along the guide and into the appropriate toner cartridge slot in the printer. 8. Close the front cover by carefully pushing it inward until it locks. Replacing the Oil Bottle Replace the oil bottle after 12,000 pages have printed (at a 5% toner coverage rate on letter-size paper). The oil must be replaced sooner than the 12,000-page specification if the fusing unit has been replaced, because the new fusing unit requires extra oil for the initial coating of its rollers. Warning! Make sure the power switch is off and the printer has cooled for a minimum of 30 minutes before replacing supplies near the fusing unit. 1. Pull and unlock the lever. 2. Open the top cover fully. 3. Turn the two green lock levers to unlock the oil bottle. 63 Tally T8006/T8306 Color Laser Printers User Guide 4. Lift the used oil bottle out of the printer. 5. Discard the used oil bottle as indicated in “Disposing of Supplies” on page 71. Note: To avoid drips, hold a sheet of paper under the used oil bottle while you lift it out of the printer. 6. Insert the new oil bottle. 7. Turn the two green lock levers to lock the new oil bottle in place. 8. Close the top cover carefully until it locks. Replacing the Waste Toner Pack Replace the waste toner pack in the T8006 after 12,000 pages (3000 color pages) of printing. Replace the waste toner pack in the T8306 after 18,000 pages (4,500 color pages) of printing (at a 5% toner coverage rate on letter-size paper). Warning! If you get toner in your eyes, immediately flush your eyes with water for a minimum of 15 minutes and contact a physician. 64 Chapter 6 Maintaining Your Printer 1. Unlock the lever. 2. Open the front cover. 3. Remove the used waste toner pack. 4. Peel the provided seal off of the side of the used waste toner pack, and seal the used toner pack. 5. Remove the new waste toner pack from its polyethylene bag. 6. Insert the used waste toner pack in the bag and seal it shut. 7. Discard the used waste toner pack as indicated in “Disposing of Supplies” on page 71. 65 Tally T8006/T8306 Color Laser Printers User Guide 8. Install the new waste toner pack. 9. Close the front cover by carefully pushing it inward until it locks. Replacing the Fuser Cleaning Roller Replace the fuser cleaning roller at least once every 12 months, or when the control panel display indicates that replacement is necessary. The life of the fuser cleaning roller in the T8006 is about 12,000 pages, and in the T8306 is about 20,000 pages (at a 5% toner coverage rate on letter-size paper). Warning! Make sure the power switch is off, and that the printer has cooled for a minimum of 30 minutes before replacing supplies near the fusing unit. Caution! Always replace the ozone filter when you replace the fuser cleaning roller. 1. Turn off the power switch. 66 Chapter 6 Maintaining Your Printer 2. Pull and unlock the lever. 3. Open the top cover fully. 4. Turn the two green lock levers to unlock the used fuser cleaning roller. 5. Lift the fuser cleaning roller out of the printer. 6. Discard the used fuser cleaning roller as indicated in “Disposing of Supplies” on page 71. 7. Insert the new fuser cleaning roller. 8. Turn the two green lock levers to lock the new fuser cleaning roller in place. 9. Close the top cover carefully until it locks. Note: Set the fuser cleaning roller counter to zero after initial installation and replacement. For more information, see “Setting the Fuser Cleaning Roller Counter to Zero” on page 16. 67 Tally T8006/T8306 Color Laser Printers User Guide Replacing the Ozone Filter Replace the ozone filter whenever you replace the fuser cleaning roller, at least once every 12 months. 1. Turn the power switch off. 2. At the rear of the printer, slide the ozone-filter case out. 3. Remove the ozone filter from the case. 4. Discard the used ozone filter as indicated in “Disposing of Supplies” on page 71. 5. Insert the new ozone filter into the case. 6. Slide the case back into the printer. 68 Chapter 6 Maintaining Your Printer Replacing the Optical Photoconductor (OPC) Belt Cartridge Replace the OPC belt cartridge at least once every 12 months, or when the control panel display indicates that replacement is necessary. The life of the OPC belt cartridge for the T8006 is about 60,000 images (15,000 color pages), and for the T8306 is about 120,000 images (30,000 colorprinted pages) at a 5% toner coverage rate on letter-size paper. 1. Turn the power switch off. 2. Unlock the lever to open the front cover. This releases the pressure on the toner cartridges. 3. Unlock the lever to open the top cover fully. 4. Pull the green OPC belt cartridge lock levers up until they unlock. 69 Tally T8006/T8306 Color Laser Printers User Guide 5. Pull the used OPC belt cartridge upward and out of the printer carefully to avoid spilling toner. 6. Discard the used OPC belt cartridge as indicated in “Disposing of Supplies” on page 71. Caution! Do not touch or wipe off any powder that is on the OPC belt, nor expose the OPC belt to light. 7. Remove the two shipping pins from the new OPC belt cartridge. 8. Remove the protective sheet that covers the photosensitive belt. 9. Slide the new OPC belt cartridge downward into both green lock-lever guides and into the printer carefully. 10. Push the green OPC belt cartridge lock levers down until they lock. 70 Chapter 6 Maintaining Your Printer 11. Close the top and front covers carefully until they both lock. Note: Set the OPC belt counter to zero after initial installation and replacement. For more information, see “Setting the OPC Belt Counter to Zero” on page 19. Disposing of Supplies Discard supplies as general nonflammable articles (waste plastics and metal). Follow a method for disposing of and sorting such articles if the method is specified by municipal bylaws. If you rely on a commercial processor to dispose of your consumables as industrial waste, refer to the following types and characteristics of the supplies: Component Type Toner Cartridges Waste plastics Shape Heavy metals Solid None Solid None Cinders Scrap metal OPC Belt Cartridge Waste plastics Cinders Scrap metal Fuser Cleaning Roller Waste plastics Solid None Ozone Filter Waste plastics Solid None Oil Bottle Waste plastics Solid None Solid None Scrap metal Waste Toner Pack Waste plastics Cinders Warning! Never burn toner cartridges or waste toner packs. For more information on Tally replacement printer parts, see “Appendix B Periodic Replacement Parts” on page 117. 71 Chapter 7 Cleaning the Printer Cleaning the Registration Roller Use dry soft cotton cloth to clean the registration roller following the procedure below. Caution! Do not use alcohol or water to clean the registration roller. 1. Turn off and unplug the printer. 2. Open the back cover of the printer. 3. Using a dry cotton cloth, gently wipe the registration roller. 4. Close the rear cover and plug in the printer power cord. 73 Tally T8006/T8306 Color Laser Printers User Guide Cleaning the Transfer Roller Use dry soft cotton cloth to clean the transfer roller following the procedure below. 1. Turn off and unplug the printer. 2. Open the back cover of the printer. 3. Using a dry cotton cloth, gently rotate and wipe off any paper or toner particles remaining on the surface of the transfer roller. 4. Close the rear cover and plug in the printer power cord. 74 Chapter 7 Cleaning the Printer Cleaning the Paper Discharger Use dry soft cotton cloth and a cotton swab to clean the transfer roller following the procedure below. 1. Turn off and unplug the printer. 2. Open the back cover of the printer. 3. Remove the paper discharger by sliding it to the left, then lifting it out of its cradle on the right side. 4. Use a dry cotton cloth to remove any dust or toner on the exterior of the discharger. 5. Use a dry cotton swab to clean the paper discharger wire and the interior of the discharger. 6. Reinstall the paper discharger by inserting the left end of the paper discharger into the cradle, and then lowering the right side until it is fully seated. 7. Close the rear cover and plug in the printer power cord. 75 Tally T8006/T8306 Color Laser Printers User Guide Cleaning the OPC Belt Cartridge Clean the OPC belt cartridge following the procedure below. Caution! Do not expose the OPC belt cartridge to light, and do not touch the surface of the OPC belt. 1. Turn off and unplug the printer. 2. Open the front cover. 3. Open the top cover. 4. Push the green OPC belt cartridge lock levers up until they unlock. 76 Chapter 7 Cleaning the Printer 5. Pull the OPC belt cartridge out of the printer. 6. Put the OPC belt cartridge on a sheet of clean paper with the photosensitive belt facing upward. 7. Put several sheets of clean paper over the OPC belt cartridge to protect the photosensitive belt from light. 8. Gently slide the wire cleaner lever along the charging wire several times. 9. Reposition the wire cleaner lever to its original flush left position when the charging wire is clean. 10. Slide the OPC belt cartridge downward into both green locklever guides and into the printer carefully. 77 Tally T8006/T8306 Color Laser Printers User Guide 11. Push the green OPC belt cartridge lock levers down until they lock. 12. Close the top and front covers and plug in the printer power cord. 78 Chapter 7 Cleaning the Printer Cleaning the Optical Unit Glass Use dry soft cotton cloth to clean the optical unit glass following the procedure below. Caution! Do not expose the OPC belt cartridge to light, and do not touch the surface of the OPC belt. 1. Turn off and unplug the printer. 2. Open the front cover. 3. Open the top cover. 4. Remove the toner cartridges. 5. Remove the OPC belt cartridge. 6. Put the OPC belt cartridge on a sheet of clean paper with the photosensitive belt facing upward. 79 Tally T8006/T8306 Color Laser Printers User Guide 7. Put several sheets of clean paper over the OPC belt cartridge to protect the photosensitive belt from light. 8. In the T8006, slide the glass cover out of the optical unit. On the T8306, rotate the glass cover toward the back of the optical unit. 9. Using a dry cotton cloth, clean the surface of the glass. 10. On the T8006, slide the glass cover into the optical unit. On the T8306, rotate the glass cover toward the front of the optical unit. 11. Reinstall the OPC belt cartridge and toner cartridges. 12. Close top and front covers and plug in the printer power cord. Cleaning the Inside of the Printer Use a toner vacuum and a soft cotton cloth to clean the inside of the printer following the procedure below. Caution! Before cleaning the inside of the printer, put a sheet of paper around the transfer drum so the toner vacuum does not touch the drum. Use only a dry cotton cloth to wipe the inside of the printer. Do not expose the OPC belt cartridge to light, and do not touch the surface of the OPC belt. 1. Open the top and front covers. 2. Remove the toner cartridges. 80 Chapter 7 Cleaning the Printer 3. Remove the OPC belt cartridge. 4. Put the OPC belt cartridge on a sheet of clean paper with the photosensitive belt facing upward. 5. Put several sheets of clean paper over the OPC belt cartridge to protect the photosensitive belt from light. 6. Use a toner vacuum to clean any dust or toner that is loose in the bottom of the printer. 7. Use a dry cloth to gently wipe the inside of the printer. 8. Reinstall the OPC belt cartridge. 9. Remove the drum cleaner roller cover. 10. Pull the drum cleaner roller up and out of the printer. 81 Tally T8006/T8306 Color Laser Printers User Guide 11. Carefully vacuum the drum cleaner roller. 12. Carefully vacuum around the waste toner removal auger directly below the drum cleaning roller. 13. Reinstall the drum cleaning roller. 14. Reinstall the toner cartridges. 15. Close the top cover. 16. Carefully remove the waste toner pack. 17. Vacuum the end of the waste toner tube and the waste toner pack holder. 18. Reinstall the waste toner pack. 19. Close the front cover and plug in the printer power cord. 82 Chapter 8 Options and Accessories Options and accessories for your printer include memory modules, a hard disk, a duplex printing unit, and a paper feeder. Memory modules increase the speed of your printer computing and printing, and a hard disk caches data for high speed printing of multiple copies in page order. The duplex printing unit provides the ability to print images on both sides of paper or media. To support large print jobs, you can add paper feeder trays to increase the paper capacity up to 750 sheets in the T8006 and 1,250 sheets in the T8306. For information on how to order options and accessories for the Tally T8006/T8306 printers, see the Color Laser Printers Quick Start Guide on the CD-ROM. Memory Module The memory module can increase printing speed when printing multiple-page documents. You can install up to two additional memory modules. Installing Additional Memory Modules Caution! The memory module is sensitive to static discharge. Before removing the memory module from its protective bag, touch a grounded metal object to discharge any static electricity that could be stored in your body. 83 Tally T8006/T8306 Color Laser Printers User Guide Installation procedureAfter you install additional memory: 1. Turn off the printer. 2. Remove the power cord, and the interface cables if they are connected. 3. Using a small Phillips-head screwdriver, remove the two screws holding the controller board, and slide the controller board out of the printer. 4. Place the controller board on a flat surface. 5. Holding the memory module by the edges, remove the memory module from its protective bag. 6. Hold the memory module so the metal edge faces toward the first available memory socket and the two notches on the metal edge are aligned correctly with the socket. 7. Carefully insert the memory module into the socket until it is fully seated and the retaining clips on both sides of the module secure it into place. 84 Chapter 8 Options and Accessories 8. Slide the controller board back into the printer and reinstall the screws. 9. Connect the power cord and the interface cable to the printer. PLEASE WAIT 007 DRAM WRITE 128 10. Turn on the printer and ensure that during the self-test cycle, the display shows the new memory in the DRAM tests. Note: The amount of memory installed is shown on the bottom row of the display immediately after start-up. 11. If the memory indicated is incorrect, reinstall the memory module. 85 Tally T8006/T8306 Color Laser Printers User Guide Duplex Printing Unit The duplex printing unit will allow you to print images on both sides of the paper. To install this unit, you must install one or more expansion paper feeders. Installing the Duplex Printing Unit For details on how to install the optional Duplex Unit, see the operation manual supplied with the Duplex Unit. Paper Feeder The additional paper feeder can hold up to 500 sheets of paper. You can install one paper feeder in the T8006, and up to two additional paper feeders in the T8306. Installing The Paper Feeder For details on how to install the optional paper feeder, see the operation manual supplied with the paper feeder. When you have installed the paper feeder, test the installation by printing the print test pattern. 86 Chapter 8 Options and Accessories Adjusting the Paper Feeder When printing from the paper feeder, if your documents are not centered on the paper, use the following procedure to adjust the margins of the documents. Paper feeding direction A B Printed image 1. Set the paper feeder as the source tray and print a test pattern. 2. Measure the left margin and right margin in millimeters. 3. Subtract the left margin from the right margin and multiply the result by five. 4. Restart the printer while holding down the ENTER key on the control panel. Utility Menu Tray 2 Margin Utility Menu Tray 2 Margin Select Margin 2 0 Select Margin 2 -15 Tray 2 Margin New:-15 Old: 0 5. In the Utility menu, adjust the Margin settings using the menu navigation keys. 6. Select the appropriate paper tray. 7. Press the ENTER key. The current settings appear at the bottom of the display. 8. Use the navigation keys to change the value to the number calculated in step 3. 9. Press the ENTER key to update the settings. 87 Tally T8006/T8306 Color Laser Printers User Guide Utility Menu Tray 2 Margin 10. Press the ENTER key again to confirm the settings. 11. Restart the printer. 12. Reprint the test pattern and check the margins. 88 Chapter 9 Troubleshooting How to Solve Printing Problems To correct a printer problem, use the troubleshooting tables in this chapter as follows: 1. Locate your current printer problem in the left “PROBLEM” column. 2. Match the problem to the possible causes in the “POSSIBLE CAUSE” column. 3. Match the correction procedure to the possible cause, and proceed with the corrective action to solve the printing problem. Possible causes are listed from top to bottom from the most to least likely. Some corrections are summarized. If needed, these corrections are supported by reference to detailed procedures in other sections of this manual. Caution! Do not disassemble the printer for further troubleshooting and/ or repair. If the problem is not found and corrected after following these troubleshooting steps, contact a Tally Service Technician. Paper Jam Areas Paper jams are indicated by messages on the control panel display. The messages give you the name of the jam area within the printer that needs clearing or attention. 89 Tally T8006/T8306 Color Laser Printers User Guide Clearing Jam 1 The illustration below shows the Jam 1 area within the printer. Jams usually occur in this area because paper is jammed between the paper tray and the transfer drum. If you are unable to clear the jam or if the jam continues to occur, follow the troubleshooting procedures at the end of the steps for clearing the Jam 1 area. K Y M C Caution! Do not force jammed paper out of the printer. . 1. Remove the paper tray indicated on the control panel display. 2. Pull the jammed paper out of the printer slowly and evenly. 90 Chapter 9 Troubleshooting 3. Open the back cover(s) of the paper feeder and/or the printer. 4. Pull the jammed paper slowly and evenly out of the printer or the paper feeder, whichever is applicable. 5. Make sure that no jammed or torn pieces of paper remain in the printer. 6. Close and carefully lock the back cover(s). 7. Insert the paper tray squarely and evenly back into the printer. 91 Tally T8006/T8306 Color Laser Printers User Guide 8. If the T8306 printer model has a feeder tray and it is out of the printer, pull the paper-feed guide rails outward, and align the tip of the tray with the guide rails. Insert the paper tray squarely and evenly back into the paper feeder. For T8006 printers with a paper feeder, use the same steps as main paper tray. Note: Make sure that the four corners of the paper are aligned squarely and sit firmly in the paper tray. 9. Close the back cover carefully until it locks. Troubleshooting Jam 1 If jams occur often in the Jam 1 area, proceed to the following problemand-correction procedures. Caution! Do not disassemble the printer for further troubleshooting and/ or repair. If the problem is not found and corrected after following these troubleshooting steps, contact a Tally Service Technician. . Jam 1 Possible Cause Correction Paper from the paper tray jams between the paper tray and the transfer drum. Too many sheets of paper are in the paper tray. Put the proper number of sheets of paper in the tray. The paper guides do not guide the paper properly. Adjust the paper guides to the paper size. Paper from a previous paper jam is caught inside of the printer. Remove or release the paper. The paper is damp from infrequent use of the printer. Reload paper trays with fresh paper from new packages. The paper or material is the wrong thickness for proper printer operation. Reload trays with paper or material of the proper thickness. 92 Chapter 9 Troubleshooting Clearing Jam 2 The illustration below shows the Jam 2 area within the printer. Jams usually occur in this area because the paper jams near the transfer drum. If you are unable to clear the jam or if the jam continues to occur, follow the troubleshooting procedures at the end of the steps for clearing the Jam 2 area. . K Y M C Caution! Do not force jammed paper out of the printer. 1. Open the back cover. Caution! Do not touch the transfer drum. 93 Tally T8006/T8306 Color Laser Printers User Guide 2. Pull the jammed paper out of the printer slowly and evenly. Warning! The toner on the paper is not fixed. 3. Make sure that no jammed or torn pieces of paper remain in the printer. 4. Close the back cover carefully until it locks. Troubleshooting Jam 2 If jams occur often in the Jam 2 area, proceed to the following problemand-correction procedures. Caution! Do not disassemble the printer for further troubleshooting and/ or repair. If the problem is not found and corrected after following these troubleshooting steps, contact a Tally Service Technician. 94 Chapter 9 Troubleshooting Jam 2 Possible Cause Correction Paper from the paper tray jams near the transfer drum. The back cover is not locked and completely closed. Open and close the back cover and make sure that it is locked into position. Paper from a previous paper jam is caught inside of the printer. Remove or release the paper. The paper is damp from infrequent use of the printer. Reload the tray with fresh paper from new packages. The edges of the paper are damaged. Make sure that paper or media is not damaged or wrinkled. Reload paper trays with fresh paper from new packages. The paper or media is the wrong thickness for proper printer operation. Reload trays with the proper paper or media. Paper or media has been put in the paper tray with the proper side facing the wrong direction. Flip the stack of paper or material so the proper side will accept the toner. The printer operating environment is too hot. Install the printer in a location with the proper operating environment. 95 Tally T8006/T8306 Color Laser Printers User Guide Clearing Jams 3 and 4 The illustration below shows the Jam 3 and 4 areas within the printer. Jams usually occur in this area because the paper jams between the fuser unit and the paper exit. If you are unable to clear the jam or if the jam continues to occur, follow the troubleshooting procedures at the end of the steps for clearing the Jam 3 and 4 areas. K Y M C Warning! Make sure that the printer power switch is off, and that the printer has cooled for a minimum of 30 minutes before removing jammed paper near the fusing unit. Caution! Do not force jammed paper out of the printer. 1. Pull the jammed paper out of the printer paper exit slowly and evenly. 2. Open the back cover. Caution! Do not pull the jammed paper upward and out of the printer through the top. 96 Chapter 9 Troubleshooting 3. Open the top cover. 4. Remove the fuser cleaning roller by turning the small green handles between the fuser cleaning roller and the oil bottle and pulling the fuser cleaning roller out by the green handle at its center. 5. Pull the large green levers at the ends of the fuser cleaning roller housing toward the front of the printer. Caution! Do not touch the transfer drum. 6. Pull the jammed paper out of the printer slowly and evenly. Warning! The toner on the paper is not fixed. 7. Make sure that no jammed or torn pieces of paper remain in the printer. 97 Tally T8006/T8306 Color Laser Printers User Guide 8. Push the large green levers at the end of the fuser cleaning roller housing toward the rear of the printer. 9. Reinstall the fuser cleaning roller and turn the small green levers between the fuser cleaning roller and the oil bottle to the locked position. 10. Close the back and top covers carefully until they lock. Troubleshooting Jams 3 and 4 If jams occur often in the Jam 3 and 4 areas, proceed to the following problem-and-correction procedures. Caution! Do not disassemble the printer for further troubleshooting and/ or repair. If the problem is not found and corrected after following these troubleshooting steps, contact a Tally Service Technician. 98 Chapter 9 Troubleshooting Jams 3 and Jam 4 Possible Cause Correction Paper jams between the fusing unit and the paper exit. The back and/or top covers are not locked. Open and close the covers and make sure that they are fully locked. Paper is caught inside of the printer from a previous paper jam. Remove or release the paper. The paper is damp from infrequent use of the printer. Reload paper trays with fresh paper from new packages. The edges of the paper are damaged. Make sure the paper is not damaged or wrinkled. Reload trays with fresh paper from new packages. The paper or material is the wrong thickness for proper printer operation. Reload trays with paper or material of the proper thickness. Paper or media has been placed in the paper tray with the proper side facing the wrong direction. Flip the stack of paper or media so the proper side will accept the toner. The printer operating environment is too hot. Install the printer in a location with the proper operating environment. The fixing roller is dirty. Contact a Tally Service Technician to clean or replace the fusing unit. 99 Tally T8006/T8306 Color Laser Printers User Guide Poor Print Quality Poor print quality may be due to various causes. Proceed to the following problem-and-correction procedures. Caution! Do not disassemble the printer for further troubleshooting and/ or repair. If the problem is not found and corrected after following these troubleshooting steps, contact a Tally Service Technician. Poor Print Quality Possible Cause Correction Characters and lines are faint. Graphics are partially blank and/or have light striping. Characters and graphics printed on labels or thick paper peel off. Characters and graphics printed on plain paper are too glossy. Characters and graphics printed on transparencies are too light or dark when projected. The printer is set to print at Standard or High-Speed Mode. Set the printer to High-Quality Mode. The printer is set for Toner Save. Turn off the Toner Save (page 52). The Density Adjustment is set too light. Adjust the Density Adjustment to the darker setting (page 54). The wrong paper type is specified. Specify the correct paper type. The paper is incompatible for printing. Reload the paper tray with the correct paper type. The paper is too old and/or is extremely dry. Reload the paper tray with fresh paper. Multiple sheets of paper overlap while printing one sheet. Make sure multiple pages are not jammed within the printer. The toner is depleted. Replace the toner cartridge(s) (page 61). The OPC belt charging wire is dirty. Clean the charging wire (page 76). 100 Chapter 9 Troubleshooting Poor Print Quality Possible Cause Correction Characters, lines, and graphics are too dark, and/ or have black striping. Images and backgrounds are dirty with toner. Characters and graphics are dull. The Density Adjustment is set too dark. Reset the Density Adjustment to a lighter setting (page 54). The paper is damp. Reload the tray with fresh paper. Paper is jammed inside of the printer. Remove the paper. Improper mixing of color toner. Turn Black Generation on (page 52). The charging wire in the OPC belt cartridge is dirty. Clean the charging wire (page 76). The OPC belt is damaged, or has deteriorated from high usage. Replace the OPC belt (page 69). The back-side of the paper is dirty with toner. The inside of the printer has residual toner as a result of extracting jammed paper. Print several sheets to remove residual toner. General printing of characters and graphics is poor. The color of printed graphics and electronic image differs significantly. The electronic image is of low resolution. Enhance image resolution, or replace the image with one of acceptable resolution. Color settings are not properly set. Adjust the color settings on the Color Mode of the Color Tab (page 52). Characters, lines, or graphics do not completely print out. Characters, lines, or graphics are incorrectly oriented. The linefeed is incorrect or out of phase. The print data is printed without being spooled. (Continued next page.) The source print data was deleted from the network during printing. Restore print data and repeat printing. The page size of the electronic file does not match the physical dimensions of the paper to be printed. Adjust page sizes to match, and check print preview. 101 Tally T8006/T8306 Color Laser Printers User Guide Poor Print Quality Possible Cause Correction (continued) Characters, lines, or graphics do not completely print out. Characters, lines, or graphics are incorrectly oriented. The linefeed is incorrect or out of phase. The print data is printed without being spooled. If a file size is too large (megabytes), the printer or the user’s computer may go into a timeout period or a sleep mode before all data has been transferred and spooled. Reduce the file size by breaking the file into smaller print jobs. Postpone the timeout or sleep mode of the user’s computer or printer (page 125). If a file size is too large (megabytes), the print data may be printed without being spooled, regardless if printer is set to spool. Reduce the file size by breaking the file into smaller print jobs. Set the printer to spool the data before printing. An incompatible printer driver is being used. Load the correct printer driver (page 25). Power surge, poor interface connection, network problems. Connect the printer properly. Make sure software, network, and operating environment is compatible for printer. The incorrect color mode is selected. Select the proper mode for printing gray-scale (monochromatic) or color. Characters, lines, and graphics are printed in gray-scale instead of color; or the printed output is color instead of gray-scale. 102 Chapter 9 Troubleshooting Slow or No Printing Slow or no printing may be due to various causes. Proceed to the following problem-and-correction procedures. Caution! Do not disassemble the printer for further troubleshooting and/ or repair. If the problem is not found and corrected after following these troubleshooting steps, contact a Tally Service Technician. Slow or No Printing Possible Cause Correction The printer will not turn on. The power cord is disconnected or damaged. Replace and/or connect the power cord. There is no power to the wall socket. Have the circuit breakers and power source checked by a qualified electrician. Unknown or garbled control panel message. The printer was not turned on properly. Turn the power switch off. Wait approximately 5 seconds. Turn the power switch on. Printing is slow. The printer is set to print on special paper, which takes twice the time as printing on plain paper. Set printer to plain paper printing. The printer is set to print in High-Quality mode. Set the printer to Standard mode or High Speed mode (page 49). The personal computer cannot process the print data quickly. Provide proper operating hardware and software for the printer. The parallel port operating mode for the personal computer and the printer is set for Standard or Bidirectional mode. Set the operating mode for the parallel port to ECP (page 131). The logical printer is adding or replacing character strings. Set the logical printer so it cannot add or replace character strings. 103 Tally T8006/T8306 Color Laser Printers User Guide Slow or No Printing Possible Cause Correction The printer does not print. Print process has stopped and/or has stopped responding. Intermittent printing. Random characters and symbols are printed. (Continued on next page.) The printer is offline (the ONLINE lamp is off). Press the ONLINE button (the ONLINE lamp will light when the printer is online). An incompatible printer driver is being used. Load the correct printer driver (page 25). The source print data has been deleted from the network during printing, and/or user software has stopped responding. Restore print data and/or printing program, and repeat printing. If a file size is too large (megabytes), the printer or the user’s computer may go into a timeout period or a sleep mode before all data has been transferred and spooled. Reduce the file size by breaking the file into smaller print jobs. Postpone the timeout or sleep mode of the user’s computer (page 125). The image and/or file is too large (megabytes) for available disk space. Reduce the file size by breaking the file into smaller print jobs, or provide more disk space. Power surge, poor interface connection, network problems. Connect the printer properly. Make sure that the software, network, and operating environment is compatible for the printer. An incompatible printer driver is being used. Load the correct printer driver (page 25). The port selection and the prioritized port settings prevent the printer from using the parallel port. Correct the settings on the printer control panel for the port selection and the prioritized port (page 125). The operating mode for the parallel port does not match the printer operating mode. Select the correct operating. mode for the parallel port (page 131). 104 Chapter 9 Troubleshooting Slow or No Printing Possible Cause Correction (continued) The printer does not print. Print process has stopped and/or has stopped responding. Intermittent printing. Random characters and symbols are printed. The LAN Network interface cable is disconnected or is damaged. Make sure the LAN Network interface cable is not damaged and properly connected. The logical printer is adding or replacing character strings. Set the logical printer so it cannot add or replace character strings. Set the Network operating system so it will not add text-code data. Example 1: Set the Network operating system so it does not print the banner page at the end of the job. Example 2: Disable the automatic Form Feed or New page settings for NetWare®. The operating mode for the parallel port does not match the printer operating mode. Select the correct operating mode for the parallel port (page 131). The LAN Network interface cable is disconnected, or it is damaged. Check and connect the LAN Network interface cable. 105 Tally T8006/T8306 Color Laser Printers User Guide Macintosh Chooser Problems If your Tally T8006/T8306 printer does not show in the Connected To: window when you click the Tally T8006/T8306 printer icon in the Chooser, check for the following items. Not in Connected To: Possible Cause Correction Nothing in Connected To: The Macintosh may not be configured to use the same protocols the printer is using. Verify Ethernet is selected in the Appletalk window on the Control Panel. Verify that TCP/IP is selected for the connection in the TCP/IP window on the Control Panel. Others on the network are visible, but not the printer. 106 The printer may not be correctly connected to your network. Verify the printer is connected to network. Print a network configuration page (page 147) and check the following: Appletalk Enabled YES Binary Enabled NO Type Printer 1 TALLY_BS Other items are set to default values. Use telnet, FTP or a web browser to connect to the printer on-board HTTP server and change any values that need correction. Chapter 9 Troubleshooting Network Problems Network problems may be caused by various problems and situations. Proceed to the following problem-and-correction procedures. Caution! Do not disassemble the printer for further troubleshooting and/ or repair. If the problem is not found and corrected after following these troubleshooting steps, contact a tally Service Technician. Network Problem Possible Correction Bitmaps (Windows RLE compressed graphic data) Sometimes the printing of RLE-compressed image data may not be successful. If this happens, convert the image into a non-compressed format and try printing again. Color Matching The result of an image printed in CMYK mode processed with an image processing application may be improved by turning on “No Color Adjustment”. Copies Some applications do not allow the number of copies to be set by the printer driver. If this happens, set the number of copies in the application. EMF spooling EMF spooling can increase printing speed, but may also cause incorrect printing to occur. If errors occur in the print output, turn off EMF Spooling. Excel spreadsheets Excel print settings must be made in the print properties dialog on a per-document basis. Halftone printing The printer driver may not print faint halftone colors. In this case, use deeper halftone color or change the halftone pattern. Margin When the user-defined size is used, an excess margin may occur. This may occur because the print location is misaligned. Change the margin setting. Monochrome printing If the application’s color/monochrome setting is different from the print driver’s, your printer may not print correctly. Apply the same setting to both the application and driver settings. Orientation When the print orientation is set to landscape in the user-defined size, the print result may be partially missing. If this occurs, set the print orientation to portrait. 107 Tally T8006/T8306 Color Laser Printers User Guide Network Problem Possible Correction Paper size If the paper size specified for the driver differs from the paper size specified by the application, the print size may not be correct. Set the application and driver to use the same paper size. If pages within a document specify different page sizes, the document may not print correctly. Specify the same page size throughout the document. Performance If you feel that monochrome printing speed is too slow, you can speed up the printing by setting the printer driver to monochrome. Priority when different settings are specified When you customize print settings, you can do it at one of three places: the application properties, the default driver settings and at the printer control panel. Any application print settings that you enter in the application’s Print Properties dialog will override the default driver settings on a per-session basis. Your default print driver settings will override any settings entered at the printer control panel until they are changed. Reduced Print from Word If reduced printing and 2 pages/4 pages printing from MS-Word is specified, printout may not be reduced. In such a case, specify the same setting of paper size for the application. Spool error If a spool error occurs during printing, the system may stop printing and the Printer window may be inaccessible. If this occurs, delete data from the spooler and restart the computer. Spool setting If there is not enough memory installed in the printer to spool the entire job, use the Printer Properties’ Scheduling tab to allow the data to be printed directly. When printing directly, increase the timeout setting significantly. Timeout When sending a large document, the printer resets before the document is printed. This indicates that the printer or print driver timeout setting is not set to a long enough interval. If this occurs, set the printer and print driver timeout interval to a greater value. 108 Chapter 9 Troubleshooting Printer Driver Restrictions Printing may be unsuccessful in the following applications using the indicated printer driver. Application Printer Driver Possible Errors or Restrictions Access95 Print image may be irregular. Access97 Background may be misaligned. Approach Graph data may not be printed. Corel Draw Print results may be partially missing or contain lines. Excel Image may be printed without reduction. Colored dashed lines may appear in black solid lines. Some characters or lines may be missing. Freelance Graph data may be misaligned. Illustrator Print results may contain lines. Some characters may be missing. Lotus 1-2-3 (96): When print orientation differs between the application and the driver, print results may be partially missing. Lotus 1-2-3 (97) Some characters may be missing. Mediachef/Print Overall image is printed in black. Notepad Printout may be partially missing. Adjust the print location. Organizer(96) Solid lines or dashes lines may not be printed. Organizer (97) Characters may overlap. PageMaker Halftone may not be printed. PaintShopPro White lines may appear in print results. PowerPoint (95/97) Color bit maps may be printed in monochrome. Word Colored dashed lines may appear in black solid lines. Background halftones may not be printed. Word98 Characters may not be printed. WordPerfect An image may be overlapped by characters. 109 Tally T8006/T8306 Color Laser Printers User Guide Application Printer Driver Possible Errors or Restrictions WordPro Some characters may be missing. Background may appear in black and white. Part of the image may be missing. Line feed position or characters may be misaligned. Image data print location may be wrong. Lines may be partially missing. 110 Appendix A Printer Specifications Tally Model T8006 Specifications T8006 Description PERFORMANCE Print Technology: Print Speed (Letter): Resolution: Max. Workload: Acoustic Level: Time to First Page: Warmup Time: Electro-photographic semiconductor laser Monochrome 24 PPM Black + 1 Color 12 PPM Black + 2 Colors 8 PPM 4 Color 6 PPM 600 x 600 DPI (2400 DPI Quality with Tally Rendering Enhancement Technology) 30,000 Pages Per Month (50% Color/50% Monochrome) Standby: Less than or equal to 48 dB(A) Operation: Less than or equal to 55 dB(A) Monochrome Plain Paper: 16.5 sec. Color: 24 sec. Max: 240 sec. HARDWARE/SOFTWARE CAPABILITIES Processor: Memory: Print Language: Intel i80960JA 16 MHz, plus 33 MHz ASIC Standard: 64 MB; Max. 192 MB Tally Compressed Printer Language (CPL) Compatibility: Color Matching: Windows 95/98, NT 4.0, 2000 & Macintosh Automatic one button color - Document, Photograph, Graphics; Windows ICM; Custom Color Adjustment 111 Tally T8006/T8306 Color Laser Printers User Guide T8006 Interface: Network Management: Description 10BaseT/100 Base TX Ethernet; IEEE 1284 Bi-directional parallel NetPilot - discovery/installation/configuration; Tally Web Panel - Web Browser based management; HP Web JetAdmin basic compatibility - network configuration/ printer status PAPER HANDLING Paper Sizes: Max. Print Area: Paper Input: Paper Output: Duplexing: Print Media: Media Weights: Letter, Executive, Legal, A4, B5 JIS, B5 ISO, #10 Commercial and International DL envelopes + Custom Sizes to 8.5” x 11.7” Letter: 8.1” x 10.6”; Legal: 8.1” x 13.6” Standard: 250 sheets; Optional: 500 sheet Lower Sheet Feeder (Max. 1) 250 sheets face down Optional Automatic Duplex Plain Paper, Transparencies, Thick Stocks, Labels (Avery 5260) & Envelopes Plain Paper: 18 to 24 lb Bond (Simplex and Duplex) Thick Stock: Simplex 43 lb Bond (90 lb Index); Duplex 28 lb Bond POWER Requirements: Consumption: 120V, 60 Hz/220-240V, 50-60 Hz 260W Standby (Avg.) 600W Operation (Avg.) 1,350W Max. 30W Sleep Mode (Energy Saver) ENVIRONMENTAL Dimensions & Weights: Base Unit: 19.7” (W) x 16.1” (H) x 20.5” (D); 86 lb With LFU: 19.7” (W) x 21.9” (H) x 20.5” (D); 89.6 lb With LFU & Duplexer: (19.7” (W) x 23.8” (H) x 23.8” (D); 107 lb Temperature: Operating: 50° F - 90.5° F Non-Operating: 41° F - 95° F Humidity: Operating: 20% - 80% Non-Condensing Non-Operating: 10% - 80% Non-Condensing Energy Star: Yes 112 Appendix A Printer Specifications T8006 Description RELIABILITY Jam Rate: MTBF: 1/2,000 pages 5,000 Hours MTTR: 30 Minutes or Less WARRANTY Standard Warranty Extended Warranty One Year Onsite 2 & 3 Years Onsite CONSUMABLES Toner OPC Belt Cartridge Fuser Oil Bottle Fuser Cleaning Roller Waste Toner Pack Black - 12,000 pages (Avg)/C,M,Y 7200 pages each (Avg) (@ 5% of each color) 60,000 Color Planes (Avg) (15,000 pages color/60,000 pages monochrome)(@ 5% coverage each color) 12,000 pages (Avg.) 12,000 pages (Avg.)(@5% Toner Coverage Each Color) 12,000 pages (Avg.)(@5% Toner Coverage Each Color) OPTIONS Lower Feeder Unit (w/500-sheet Cassette - Letter/A4) Standard Cassette (250 sheet - Letter/A4) Legal Cassette (250-sheet) Lower Feeder Cassette (500-sheet - Letter/A4) Duplexer Additional 64 MB DRAM DIMMs (Max. 2) 113 Tally T8006/T8306 Color Laser Printers User Guide Tally Model T8306 Specifications T8306 Description PERFORMANCE Print Technology: Electro-photographic semiconductor laser Print Speed (Letter): Monochrome 24 PPM Black + 1 Color 12 PPM Black + 2 Colors 8 PPM 4 Color 6 PPM 600 x 600 DPI (2400 DPI Quality with Tally Rendering Enhancement Technology) 75,000 Pages Per Month (50% Color/50% Monochrome) Standby: Less than or equal to 48 dB(A) Operation: Less than or equal to 55 dB(A) Monochrome Plain Paper: 19 sec. Color: 34 sec. Max: 210 sec. Resolution: Max. Workload: Acoustic Level: Time to First Page: Warmup Time: HARDWARE/SOFTWARE CAPABILITIES Processor: Memory: Print Language: Compatibility: Color Matching: Interface: Network Management: Intel i80960JA 16 MHz, plus 33 MHz ASIC Standard: 64 MB; Max. 192 MB Tally Compressed Printer Language (CPL) Windows 95/98, NT 4.0, 2000 & Macintosh Automatic one button color - Document, Photograph, Graphics; Windows ICM; Custom Color Adjustment 10BaseT/100 Base TX Ethernet; IEEE 1284 Bi-directional parallel NetPilot - discovery/installation/configuration; Tally Web Panel - Web Browser based management; HP Web JetAdmin basic compatibility - network configuration/ printer status PAPER HANDLING Paper Sizes: Max. Print Area: Paper Input: 114 WB (13” x 19”); Tabloid; Legal; Letter; #10 COM Envelopes + Custom Sizes to 13” x 19” A4, A3, B4, B5 JIS, B5 ISO, International DL envelopes WB: 12.6” x 18.6”; Tabloid: 10.6” x 16.6”; Letter: 8.1” x 10.6”; Legal: 8.1” x 13.6” Standard: 250 sheets, Optional: 500 sheet Lower Sheet Feeders (Max. 2) Appendix A Printer Specifications T8306 Paper Output: Duplexing: Print Media: Media Weights: Description 250 sheets face down Optional Automatic Duplex Plain Paper, Transparencies, Thick Stocks, Labels (Avery 5260) & Envelopes Plain Paper: 18 to 24 lb Bond (Simplex and Duplex) Thick Stock: Simplex 43 lb Bond (90 lb Index); Duplex 28 lb Bond POWER Requirements: Consumption: 120V, 60 Hz/220-240V, 50-60 Hz 200W Standby (Avg.) 600W Operation (Avg.) 1,350W Max. 30W Sleep Mode (Energy Saver) ENVIRONMENTAL Dimensions & Weights: Temperature: Humidity: Energy Star: Base Unit: 19.7” (W) x 16.1” (H) x 20.5” (D); 86 lb With LFU: 19.7” (W) x 21.9” (H) x 20.5” (D); 89.6 lb With LFU & Duplexer:(19.7” (W) x 23.8” (H) x 23.8” (D); 107 lb Operating: 50° F - 90.5° F Non-Operating: 41° F - 95° F Operating: 20% - 80% Non-Condensing Non-Operating: 10% - 80% Non-Condensing Yes RELIABILITY Jam Rate: MTBF: MTTR: 1/2,000 pages 5,000 Hours 30 Minutes or Less WARRANTY Standard Warranty Extended Warranty One Year Onsite 2 & 3 Years Onsite CONSUMABLES Toner OPC Belt Cartridge Fuser Oil Bottle Black - 14,000 pages (Avg)/C,M,Y 8,500 pages each (Avg) (@ 5% of each color) 120,000 Color Planes (Avg) (30,000 pages color/120,000 pages monochrome)(@ 5% coverage each color) 12,000 pages (Avg.) 115 Tally T8006/T8306 Color Laser Printers User Guide T8306 Fuser Cleaning Roller Waste Toner Pack Description 20,000 pages (Avg.)(@5% Toner Coverage Each Color) 18,000 pages (Avg.)(@5% Toner Coverage Each Color) OPTIONS Lower Feeder Unit (w/500-sheet Cassette - Letter/A4) Standard Cassette (Universal to 13” x 19”) Lower Feeder Cassette (500-sheet - 13” x 19”) Duplexer Additional 64 MB DRAM DIMMs (Max. 2) Printer Stand 116 Appendix B Periodic Replacement Parts Some of the component parts of the printer naturally deteriorate over time. Periodic replacement of these parts will ensure the highest quality output from your printer. The following table gives suggested intervals for replacing these parts. Because the life span of periodic replacement parts depends on how the part was used, it may have to be replaced earlier than the time indicated below. If you use a periodic replacement part beyond its specified life span, printing quality may be reduced and errors or paper jams may occur. A service engineer should replace these parts. Contact your dealer or authorized Tally service representative. Note: After high-volume printing conditions (approximately 100,000 to 600,000 pages), the control panel may begin to display messages indicating that certain printer parts are worn and need to be replaced (refer to “Appendix D Control Panel Messages” on page 141 for more information). These parts should only be replaced by a qualified service technician or a Tally service engineer. Periodic Replacement Parts Replace When Part Location Fusing Unit About 100,000 pages are printed Printer Feeder Roller About 120,000 pages are printed Printer and paper feeder Separation Pad About 120,000 pages are printed Printer and paper feeder 117 Tally T8006/T8306 Color Laser Printers User Guide Periodic Replacement Parts 118 Replace When Part Location Paper Discharger About 240,000 pages are printed Printer Transfer Roller About 240,000 pages are printed Printer Drum Cleaner About 240,000 pages are printed Printer Transfer Drum About 240,000 pages are printed (About 150,000 pages for color printing) Printer Appendix C Control Panel Menu Functions 119 Tally T8006/T8306 Color Laser Printer User Guide Menu Tree The following chart shows navigation through the printer menu. To enter the menu, press the ONLINE key, then press the MENU key. Test Menu TestPrint ConfigPage TestMode PLAIN TRANS THICK Config Menu Timeout 5-999 OFF SleepTime Port Priority Display 5M 15M 30M 60M 120M 240M AUTO NET LOCAL AUTO NET LOCAL ENGLISH GERMAN FRENCH SPANISH ITALIAN Parallel Menu ComMode Auto ECP BYTE NIBBLE CMPA HighSpeed ON OFF Timing A–B A–B–A B–A 120 Appendix C Control Panel Menu Functions Menu Navigation Keys The menus on the control panel allow you to test and change the configuration of the printer. ONLINE key: Allows you to switch between normal operating mode and offline mode for menu configuration. MENU/ENTER/ key: Starts the Test, Config or Parallel Menu. Displays items further down the menu, and enters the displayed settings. key: Displays the next item at the same menu level. If the item is a numeric value, it is incremented. key: Displays an item at a higher menu level. This key also starts the Network Menu. key: Displays the immediately previous item in the same menu level. If the item is a numeric value, it is decremented. Menu Display Format Menu options are shown in the bottom row of the display. Following is an example of navigation through the menu to the Timeout settings. Notice the top row of the display does not change. Tray1: LTR. ConfigMenu Top row: Paper tray and media size. Bottom row: ConfigMenu. Use the and keys to select a menu. Tray1: LTR. Timeout Top row: Paper tray and media size. Bottom row: Timeout submenu. Press the key to enter the Timeout submenu. Tray1: LTR. Timeout = 300* Top row: Paper tray and media size. Bottom row: Timeout setting. Use the and keys to enter the setting. An * indicates the current setting. To return menu settings to the default values, turn on the printer while holding down the CLEAR key for at least five seconds. After five seconds the printer settings will return to the default values. 121 Tally T8006/T8306 Color Laser Printer User Guide Test Menu The Test Menu allows you to print the test pattern, current menu settings, and printer information. TestPrint TestPrint is a built-in feature that allows you to check printer operations. To print a TestPrint: Tray2: Ready 122 A3 1. Check that “Ready” appears on the display and the DATA light is off. Tray2: A3 Not Ready 2. Press ONLINE to go offline. Tray1: A4 Not Ready 3. Press TRAY, and select a tray as the paper feed source for the test print. Tray1: A4 Test Menu 4. Press the MENU key. Tray1: A4 Test Menu 5. Press the key to enter Test Menu. Tray1: A4 TestPrint 6. Press the ing. key twice to begin print- Tray1: A4 Not Ready 7. When the test print is complete, press the ONLINE key to return to normal operations. Appendix C Control Panel Menu Functions ConfigPage ConfigPage is a built-in feature of the T8006 and T8306 which prints out the current menu settings and printer information. To print a ConfigPage: Tray2: Ready A3 1. Check that “Ready” appears on the display and the DATA light is off. Tray2: A3 Not Ready 2. Press ONLINE to go offline. Tray1: A4 Not Ready 3. Press TRAY, and select a tray as the paper feed source for the test print. Tray1: A4 Test Menu 4. Press the MENU key. Tray1: A4 Test Menu 5. Press the Tray1: A4 ConfigPage 6. Using the and Page. Tray1: A4 ConfigPage 7. Press the Tray1: A4 Not Ready 8. Press the ONLINE key. key to enter Test Menu. keys, select Config- key to begin printing. Note: The menu disappears when the printer goes into the online mode. The ConfigPage printout provides the following information: • Printer information • Parts life information • Unit information • Software information • Panel menu information 123 Tally T8006/T8306 Color Laser Printer User Guide TestMode TestMode allows you to select the page size and media types for printing the TestPrint and ConfigPage. Test mode settings include PLAIN (plain paper), TRANS (transparencies), and THICK (thick or label paper). The following example shows how to change the TestMode settings from PLAIN to TRANS. Tray2: Ready 124 A3 1. Check that “Ready” appears on the display and the DATA light is off. Tray2: A3 Not Ready 2. Press ONLINE to go offline. Tray1: A4 Test Menu 3. Press the MENU key. Tray1: A4 Test Menu 4. Press the key to select Test Menu. Tray1: A4 TestPrint 5. Press the key to enter Test Menu. Tray1: A4 TestMode 6. Using the Mode. and Tray1: A4 TestMode = PLAIN* 7. Press the key to enter the TestMode submenu. The display shows the current setting. Tray1: A4 TestMode = TRANS 8. Using the and desired setting. keys, select Test- keys, select the Appendix C Control Panel Menu Functions Tray1: A4 TestMode = TRANS* 9. Press the key to enter the setting into memory. 10. Press the ONLINE key to resume normal operations. Note: If you specify TRANS, printing stops until the paper in Tray 1 is replaced with transparencies. Config Menu The Config Menu allows you to configure the Timeout, SleepTime, Port Priority and Display functions. Timeout The Timeout function allows you to choose how long the printer will wait after a break in data reception before it moves on to the next job. You can set Timeout for 5 to 999 seconds (the default Timeout setting is 300 seconds). The following example shows how to change the Timeout setting from 300 to 600 seconds. Tray1: Ready LTR. 1. Check that Ready appears on the display and the DATA light is off. Tray1: LTR. Not Ready 2. Press the ONLINE key to go offline. Tray1: LTR. Test Menu 3. Press the MENU key to enter the menu. Tray1: LTR. ConfigMenu 4. Using the figMenu. and Tray1: LTR. Timeout 5. Press the Menu. key to enter Config- keys, select Con- 125 Tally T8006/T8306 Color Laser Printer User Guide Tray1: LTR. Timeout = 300* 6. Press the key to enter the Timeout submenu. The display shows the current setting. Tray1: LTR. Timeout = 600 7. Using the and desired setting. Tray1: LTR. Timeout = 600* 8. Press the key to enter the setting into memory. keys, select the 9. Press the ONLINE key to return to online mode. SleepTime SleepTime allows you to set the amount of time the printer will wait before it enters sleep mode (from 5 to 240 minutes). When in sleep mode, the printer uses less power (the default SleepTime setting is 30 minutes). The following example shows how to change the SleepTime setting from 30 minutes to 15 minutes. Tray1: Ready 126 EXE. 1. Check that “Ready” appears on the display and the DATA light is off. Tray1: EXE. Not Ready 2. Press the ONLINE key to go offline. Tray1: EXE. Test Menu 3. Press the MENU key to enter the menu. Tray1: EXE. ConfigMenu 4. Using the figMenu. and Tray1: EXE. Timeout 5. Press the Menu. key to enter Config- keys, select Con- Appendix C Control Panel Menu Functions Tray1: EXE. SleepTime 6. Using the and SleepTime. Tray1: EXE. SleepTime = 30M* 7. Press the key to enter the SleepTime submenu. The display shows the current setting. Tray1: EXE. SleepTime = 15M 8. Using the and desired setting. Tray1: EXE. SleepTime = 15M* 9. Press the key to enter the setting into memory. keys, select keys, select the 10. Press the ONLINE key to return to online mode. Port Port allows you to choose whether the printer will use the parallel interface, the network interface, or both. Port settings include AUTO, which allows you to use both the parallel and network interface; NET, which allows only the network interface to be used; and LOCAL, which allows only the parallel interface to be used. The following example shows how to change the Port setting from AUTO to NET. Tray1: Ready A4 1. Check that “Ready” appears on the display and the DATA light is off. Tray1: A4 Not Ready 2. Press the ONLINE key to go offline. Tray1: A4 Test Menu 3. Press the MENU key to enter the menu. Tray1: A4 ConfigMenu 4. Using the and keys, select ConfigMenu. The display shows the current setting. 127 Tally T8006/T8306 Color Laser Printer User Guide Tray1: A4 Timeout 5. Press the Menu. key to enter Config- Tray1: Port 6. Using the and A4 keys, select Port. Tray1: A4 Port = AUTO* 7. Press the key to enter the Port submenu. The display shows the current setting. Tray1: A4 Port = NET 8. Using the and desired setting. Tray1: A4 Port = NET* 9. Press the key to enter the setting into memory. keys, select the 10. Press the ONLINE key to return to the online mode. Priority Priority allows you to select which port has a greater priority for processing print jobs. Priority settings include AUTO, which automatically alternates between the parallel and network interface; LOCAL, which gives the parallel interface priority; and NET, which gives the network interface priority. The following example shows how to change the Priority setting from AUTO to LOCAL. Tray1: Ready 128 A4 1. Check that “Ready” appears on the display and the DATA light is off. Tray1: A4 Not Ready 2. Press the ONLINE key to go offline. Tray1: A4 Test Menu 3. Press the MENU key to enter the menu. Appendix C Control Panel Menu Functions Tray1: A4 ConfigMenu 4. Using the figMenu. and Tray1: A4 Timeout 5. Press the Menu. key to enter Config- Tray1: A4 Priority 6. Using the ority. and Tray1: A4 Priority = AUTO* 7. Press the key to enter the Priority submenu. The display shows the current setting. Tray1: A4 Priority = LOCAL 8. Using the and desired setting. Tray1: A4 Priority = LOCAL* 9. Press the key to enter the setting into memory. keys, select Con- keys, select Pri- keys, select the 10. Press the ONLINE key to return to online mode. Display Display allows you to select the desired language used on the display. You can select English, German, French, Italian or Spanish. The following example shows how to change the display from ENGLISH to FRENCH. Tray1: Ready A4 Tray1: A4 Not Ready 1. Check that “Ready” appears on the display and the DATA light is off. 2. Press the ONLINE key to go offline. 129 Tally T8006/T8306 Color Laser Printer User Guide Tray1: A4 Test Menu 3. Press the MENU key to enter the menu. Tray1: A4 ConfigMenu 4. Using the figMenu. and Tray1: A4 Timeout 5. Press the Menu. key to enter Config- Tray1: A4 Display 6. Using the play. and Tray1: A4 Display = ENGLISH* 7. Press the key to enter the Display submenu. The display shows the current setting. Tray1: A4 Display = FRENCH 8. Using the and desired setting. Tray1: A4 Display = FRENCH* 9. Press the key to enter the setting into memory. keys, select Con- keys, select Dis- keys, select the 10. Press the ONLINE key to return to the online mode. 130 Appendix C Control Panel Menu Functions Parallel Menu The Parallel Menu allows you to choose settings for the printer parallel interface, using the ComMode, HighSpeed, and Timing submenus. ComMode ComMode allows you to select the operating mode for the parallel interface. Under normal circumstances, you should operate in the AUTO mode. ComMode settings include AUTO, which enables ECP, byte, nibble or compatible mode; ECP, which enables ECP, byte, nibble or compatible mode; BYTE, which enables byte, nibble or compatible mode; NIBBLE, which enables nibble or compatible mode; or CMPA, which enables compatible mode only. The following example shows how to change the ComMode setting from AUTO to CMPA: Tray1: Ready LGL. 1. Check that “Ready” appears on the display and the DATA light is off. Tray1: LGL. Not Ready 2. Press the ONLINE key to enter the offline mode. Tray1: LGL. Test Menu 3. Press the MENU key to enter the menu. Tray1: LGL. Parallel Menu 4. Using the lel Menu. and Tray1: LGL. ComMode 5. Press the Menu. key to enter the Parallel Tray1: LGL. ComMode = AUTO* 6. Press the key to enter the ComMode submenu. The display shows the current setting. Tray1: LGL. ComMode = CMPA 7. Using the and desired setting. keys, select Paral- keys, select the 131 Tally T8006/T8306 Color Laser Printer User Guide Tray1: LGL. ComMode = CMPA* 8. Press the key to enter the setting into memory. 9. Press the ONLINE key to return to the online mode. 132 Appendix C Control Panel Menu Functions HighSpeed HighSpeed allows you to choose whether the parallel interface’s high speed function will be on or off. Under normal operating circumstances, the high speed mode should be used. The following example shows how to change HighSpeed from ON to OFF: Tray1: Ready A4 1. Check that “Ready” appears on the display and the DATA light is off. Tray1: A4 Not Ready 2. Press the ONLINE key to enter the offline mode. Tray1: A4 Test Menu 3. Press the MENU key to enter the menu. Tray1: A4 Parallel Menu 4. Using the lel Menu. and Tray1: A4 ComMode 5. Press the Menu. key to enter the Parallel Tray1: A4 HighSpeed 6. Using the and HighSpeed. Tray1: A4 HighSpeed = ON* 7. Press the key. The display shows the current setting. Tray1: A4 HighSpeed = OFF* 8. Using the and new setting. Tray1: A4 HighSpeed = OFF* 9. Press the key to enter the setting into memory. keys, select Paral- keys, select keys, select the 10. Press the ONLINE key to return to the online mode. 133 Tally T8006/T8306 Color Laser Printer User Guide Timing Timing allows you to select the timing sequence of the Ack and Busy signals for the parallel interface. The Timing settings include A-B, A-B-A, and B-A. The following example shows how to change the timing of the parallel interface from A-B to A-B-A. Tray1: Ready 134 A4 1. Make sure that “Ready” appears on the display and the DATA light is off. Tray1: A4 Not Ready 2. Press the ONLINE key to enter the offline mode. Tray1: A4 Test Menu 3. Press the MENU key to enter the menu. Tray1: A4 Parallel Menu 4. Using the allel Menu. and Tray1: A4 ComMode 5. Press the Menu. key to enter the Parallel Tray1: Timing 6. Using the ing. and A4 keys, select Par- keys, select Tim- Tray1: A4 Timing = A-B* 7. Press the key to enter the Timing submenu. The display shows the current setting. Tray1: A4 Timing = A-B-A 8. Using the and desired setting. keys, select the Appendix C Control Panel Menu Functions Tray1: A4 Timing = A-B-A* 9. Press the key to enter the setting into memory. 10. Press the ONLINE key to return to the online mode. Network Menu The Network Menu allows the network administrator to configure network settings for the printer. Before starting the Network Menu, disconnect the network cable. To enter the Network Menu, hold down the key while turning the printer on. The chart below shows navigation through the Network Menu. Network Menu IP Addr 0.0.0.0 to 255.255.255.255 SubNetMask 0.0.0.0 to 255.255.255.255 GateWayAddr 0.0.0.0 to 255.255.255.255 IP Address The example below shows how to set the IP address to 192.168.31.27. To return to the previous step, press the key: 1. While holding down the key, turn on the printer. 2. Once the printer’s initial diagnostics begin, release the wait for the diagnostic checks to complete. Network Menu key and 3. Press the key to enter the Network Menu. 135 Tally T8006/T8306 Color Laser Printer User Guide IP Addr 4. Use the and keys to select the IP Addr submenu. IP Addr 5. Press the key to enter the IP (000) Addr submenu. IP Addr IP Addr IP Addr 192. (192). 6. Using the and keys, change the number in parentheses to 192. Then, press the key. 192. (168) 7. Using the and keys, change the number in parentheses to 168. Then, press the key. 168. (031) 8. Using the and keys, change the number in parentheses to 031. Then, press the key. IP Addr 192.168. 31. (027) 9. Using the and keys, change the number in parentheses to 027. Then, press the key. IP Addr 192. 168. 31. 27* 10. The IP address has now been set. Network Menu 11. Press the key to leave the IP Addr submenu. The Network Menu appears. Tray1: Ready 12. Press the key, or the ONLINE key to return to online mode. A4 Exit the Network Menu before shutting down the printer. The fixed address is not saved to memory until the Network Menu has been exited. Subnet Address The example below shows how to set the subnet address to 255.255.255.0. To return to the previous step, press the key. 136 Appendix C Control Panel Menu Functions 1. While holding down the key, turn on the printer. 2. Once the printer’s initial diagnostics begin, release the wait for the diagnostic checks to complete. key and Network Menu 3. Press the key to enter the Network Menu. SubNet Mask 4. Use the and keys to select the SubNet Mask submenu. SubNet Mask 5. Press the key to enter the SubNet Mask submenu. SubNet Mask 6. Using the and keys, change the number in parentheses to (255) 255. Then, press the key. SubNet Mask 255. (255) SubNet Mask 255. 255. (255) 7. Using the and keys, change the number in parentheses to 255. Then, press the key. 8. Using the and keys, change the number in parentheses to 255. Then, press the key. SubNet Mask 9. Using the and keys, change 255. 255. 255. (000) the number in parentheses to 000. Then, press the key. SubNet Mask 255. 255. 255. Network Menu 0* 10. The SubNet Mask has now been set. 11. Press the key to leave the SubNet Mask submenu. 137 Tally T8006/T8306 Color Laser Printer User Guide Tray1: Ready A4 12. Press the key, or the ONLINE key to return to online mode. Gateway Address The example below shows how to set the gateway address to 192.168.31.1. To return to the previous step, press the key: 1. While holding down the key, turn on the printer. 2. Once the printer’s initial diagnostics begin, release the wait for the diagnostic checks to complete. key and Network Menu 3. Press the key to enter the Network Menu. GateWay Addr 4. Use the and keys to select the Gateway Addr submenu. GateWay Addr (000) GateWay Addr GateWay Addr 5. Press the key to enter the Gateway Addr submenu. 6. Using the and keys, change (192) the number in parentheses to 192. Then, press the key. 192.(168) GateWay Addr 192. 168. (031) 7. Using the and keys, change the number in parentheses to 168. Then, press the key. 8. Using the and keys, change the number in parentheses to 031. Then, press the key. GateWay Addr 9. Using the and keys, change 192. 168. 31. (001) the number in parentheses to 001. Then, press the key. 138 Appendix C Control Panel Menu Functions GateWay Addr 192. 168. 31. 1* 10. The Gateway address has now been set. Network Menu 11. Press the key to leave the Gateway Addr submenu. Tray1: Ready 12. Press the key, or the ONLINE key to return to online mode. A4 139 Appendix D Control Panel Messages Messages The following messages may appear on the control panel display. Can’t Use Duplex The printer requires a firmware update from Tally. Change Tray 2 LTR (Plain): JDOE User has sent a job that requires a certain media size and type in Tray 1, 2 or 3. Check Front Cover The front cover is not fully closed. Check Output Tray The output tray will soon be full. Check Toner K The indicated toner cartridge is running out of toner. Close Back Cover The back cover is not fully closed. 141 Tally T8006/T8306 Color Laser Printer User Guide 142 Close Front Cover The front cover is not fully closed. Close PFU Cover The paper feeder unit cover is not fully closed. Close Top Cover The top cover is not fully closed. Data Error Invalid print data received by the printer. EEPROM Error A temporary error occurred. Check the print job and continue printing. Jam3 Upper, Rear A paper jam has occurred in the indicated place. Not Ready The printer is not ready to receive print data. Output Tray Full The output tray is full. PLEASE WAIT (06) Printer is running initial diagnostics. READY The printer is ready to receive print data. Appendix D Control Panel Messages Replace Belt CG Belt cartridge requires replacement. Replace FC. Roll Fuser cleaning roller requires replacement. Replace Fuser Oil The oil bottle requires replacement. Replace WT. Pack The waste toner pack requires replacement or is not properly installed. Replace Fuser Contact a qualified Tally service representative. Replace Parts 0092 Contact a qualified Tally service representative. Replace Toner K The specified toner cartridge is empty. Set C Toner CG The specified toner cartridge is not correctly installed. Set FC. Roll The fuser cleaning roller is not properly installed. Set Fuser Unit Contact a qualified Tally service representative. 143 Tally T8006/T8306 Color Laser Printer User Guide 144 Set Transfer Roll Contact a qualified Tally service representative. Set Tray 1 Paper Tray 1, 2 or 3 is not securely attached to the printer. SLEEP MODE The printer is operating in energy-saving mode until a new print job is received. SVC 05 ERROR A printer error has been detected. Turn the printer off, wait five seconds and then turn the printer back on. If this message appears regularly, contact your dealer or Tally Technical Services. Toner CG Error The installed toner cartridge is not the correct type. Tray 2 Load A4 Paper Tray 1, 2 or 3 does not contain the correct media size. Tray 1 Load Trans Paper Tray 1, 2 or 3 does not contain the correct media type. Tray 1:--Load A3 Land The media loaded in Tray 1, 2, or 3 is not oriented correctly. UNAME Print data for the indicated user is being printed. WARMING UP The printer is warming up. Printing will begin once it has finished warming up. Appendix D Control Panel Messages Paper Sizes The following table lists and describes the types of paper that may display in messages on the control panel. Display Description A3W A3W (T8306 only, 13” x 19”) A3 A3 (T8306 only) B4 B4 (T8306 only) A4 A4 B5 B5 EXE. Executive LDR. Ledger (T8306 only) LGL. Legal LTR. Letter Free User-defined paper size Paper Types The following table lists and describes the types of paper and media that may display in messages on the control panel. Display Description Trans OHP transparency Plain Plain paper Thick Thick paper Label Label paper 145 Appendix E Network Management Test Button for LAN Configuration The test button is located near the LAN port. The following functions can be executed by pressing the test button: • Printing a print server test page—this function is used to test the printer connection. • Printing a parameter list to confirm the LAN port setting. • Setting the LAN port parameter values to the factory-set default values. The test button function is determined by the number of times the test button is pressed. The following explains how to execute these functions. Printing a Print Server Test Page Press the test button once (1 time) to output the test page. After installing the printer, you can output a test page to confirm whether the interface is functioning normally. Basic information about the LAN port is printed on the test page, including the node address for the print server. Printing a Parameter List Press the test button twice (2 times) to print the LAN port parameter settings to the connected printer. All parameters and the current setting values are printed in the parameter list. Setting the Factory-Set Default Values To return the LAN port parameter values to the factory-set default values, follow these steps: 1. Turn off the printer. 147 Tally T8006/T8306 Color Laser Printer User Guide 2. While holding down the test button, turn on the printer. Keep the test button held down until the network LED starts to blink at one-second intervals. 3. Release the test button and wait until the network LED blinks at least five times. 4. Hold the test button down again. When the network LED lights steadily, the function has completed. 5. Turn off the printer and then turn the printer on again to make the settings effective. Note: When the default setting function is executed, the IP address (INT_ADDR parameter) is not reset to the default value. Remote Configuration and Monitoring The Tally T8006 and T8306 allow a network administrator to set up and change the printer’s network configuration through the Tally NetPilot and a number of on-board network servers. Tally NetPilot Tally’s NetPilot is an administration tool that allows you to quickly change the configuration of your printer from within Windows. HTTP HTTP allows you to change printer settings from any computer that has a Web browser. FTP FTP allows you to download a configuration file to your computer, edit it, and upload it to the printer. Telnet Telnet allows changes of the network configuration file from any computer or terminal. Using these tools, you can quickly configure the printer’s network settings from any computer on the network. Your Tally printer also allows you to monitor its state remotely through Tally’s PrintMonitor and the included Tally.MIB file for SNMB administration utilities. 148 Appendix E Network Management Configuring the Printer With NetPilot Configuring your Tally printer through NetPilot happens in two dialogs, the Network dialog and the Properties dialog. Network Dialog The Network dialog allows you to change the interface settings for NetBEUI/NetBIOS, Appletalk and IPX/SPX networks. NetWare Network Settings The Network dialog allows you to change your printer’s print server, the bindery file server and the banner type. The NetWare dialog window will display your connection to the printer. The printer can operate in either print server mode or remote printer mode. The following briefly explains the advantages and disadvantages of each mode. Print Server Mode In this mode, the file server is logged in and the printer queue is repeatedly polled to determine whether a printer job exists. The NetWare print server, or workstation on which PSERVER runs, is emulated. This enables high-speed printing without applying a load to the network. In this print server mode, a single-user NetWare license is required. Remote Printer Mode In this mode, a connection is made to a dedicated workstation that is executing PSERVER.NLM or PSERVER.EXE. A print job is received from the file server via the NetWare print server. The network interface emulates the workstation on which the NetWare RPRINTER and NPRINTER operate. This mode is recommended for a small-scale network. To reference the print queue, you must first log on to either the file server or NDS tree. Using Print Server Mode will allow for easy installation and high speed, but will require one license for each connection to the file server. Using Remote Printer Mode is slower, and adds additional traffic to the network, but it doesn’t require any additional licenses. 149 Tally T8006/T8306 Color Laser Printer User Guide Netware Network Dialog Settings Available buttons for the NetWare network window: 150 Button Description Connect… Displays the Connect NetWare Print Queues window. Disconnect Releases the print queue connection. Show… Displays the location of the printer operating in remote printer mode. The NetWare print server is displayed at the bottom, separate from the printer port and print queue. Delete Deletes a printer that is running in remote printer mode. Use this button when the printer queue, network interface or printer is deleted manually from the NetWare file server. You can only click this button after the remote printer has been displayed by clicking the Show button. Banner Type Sets the banner page format to Text or PostScript. Context Selects the location of the printer on the network. Preferred NDS Tree Selects the login tree. Preferred File Server Selects the NDS file server. Change… Enables the file server to be changed. Appendix E Network Management Windows Network Settings Under Windows network settings, only one actual output destination printer can be used, even if printers are added by using the logical printer function. When a printer is selected on a Windows PC, the logical printer and physical port are both given as the printer name. Available buttons of the Windows network dialog: Button Description Delete Deletes the existing printer name. Click the printer in the window, then click the Delete button. Add Enables a new printer to be used. Enter an appropriate printer name, select a logical printer (PR1 to PR4) from the drop-down list, then click the Add button. Once the maximum number of attached printers is reached, the Add button is grayed. 151 Tally T8006/T8306 Color Laser Printer User Guide Apple EtherTalk Network Settings Under EtherTalk network settings, only one actual output destination printer can be used, even if printers are added by using the logical printer function of the printer. Available buttons of the EtherTalk network dialog: Button Description Delete Deletes the existing printer name. Click the printer in the window, then click the Delete button. Add Enables a new printer to be used. Enter an appropriate printer name, select a logical printer (PR1 to PR4) from the drop-down list, then click the Add button. Once the maximum number of attached printers is reached, the Add button is grayed. 152 Appendix E Network Management Properties Dialog Using the Properties dialog, you can add or remove network protocols that the printer will use, and change how the printer uses each protocol. Note: Enable only the protocols you need on your network. Activating additional protocols increases network traffic and can decrease the performance of other protocols. To open the Properties dialog: 6. Click the Network Print Server folder, then click the Tally printer you want to configure. 7. Click the Properties button on the toolbar. General Properties Item Description Node Address In the factory-set status, a 12-digit alphanumeric Ethernet address is set which corresponds to the number on the label attached to the rear of the printer. Configuration Password Access can be restricted by setting a password in the network interface setting file. If a password is set, that password must be entered before a user can change the Property page or Network window. When entering a password, enter ‘root’ in the name field. If you forget the password, restore the network interface settings to the factory-set default values. Then, perform setup again. Even if a password is set, the Property page and Network window can be viewed. Use the Users Access Rights option of the FTP properties page to prevent the Property page and Network window from being viewed by users. Internal Printout Destination This parameter specifies the test page output destination. Base URL Defines the network interface base URL. The default is set to http:// www.tally.com. 153 Tally T8006/T8306 Color Laser Printer User Guide NetWare Properties Item Description NetWare To enable NetWare, select this box. Frame Types Enables communication suitable for the environment to be established by selecting the frame type. Job Check Delay Enter the interval (in seconds) at which the network interface checks whether the queue contains a print job. The valid range is from 1 to 255 seconds. Conf. Check Delay Enter the interval at which the network interface (dedicated to NDS mode) updates the setting by retrieving the NDS tree. NCP Burst Mode If this check box is selected, burst transfer is enabled and data is transferred between the file server and network interface at high speed. Windows Properties 154 Item Description Windows To enable the Windows printer drivers, select this check box. Frame Type If FR_Auto is selected, the network interface scans the network and determines the type to be used, at activation. By using the FR_802_2 and FR_DIX frame type, this automatic sequence can be stopped. Appendix E Network Management AppleTalk Properties Set the AppleTalk Properties using the following parameters: Item Description AppleTalk To enable Apple EtherTalk when using a PostScript printer, select this check box. AppleTalk Zone Use this to specify the name of the ZONE that the printer is connected to. HP Zoner Enabled Use this to specify whether HP Zoner is valid. PostScript Font Set Specifies the fonts of the PostScript printer. In the default status, it is assumed that the printer has no fonts and that all required fonts must be downloaded. If this parameter is changed to 35N, and the printer has the Adobe 35N font (all PostScript printers sold in America and Europe), the print time can be reduced. If this parameter is set to ALL, no fonts are downloaded to the printer. (Select ALL when using only the printer’s built-in fonts.) Binary Transfer Enabled When selected, reduces the time taken to print binary print jobs. 155 Tally T8006/T8306 Color Laser Printer User Guide Item Description Binary Type Specifies the type of binary transfer used when the Binary Transfer Enabled check box is checked. • TBCP (Tagged Binary Communication Protocol) • BCP (Binary Communication Protocol) TCP/IP Properties 156 Item Description TCP/IP To enable TCP/IP, select this check box. IP Address Enter the IP address to be set on the network interface. Subnet Mask Enter the subnet mask. For the default value 0.0.0.0, the subnet mask is automatically set according to the IP address. Default Router Enter the IP address of the default router. For the default value 0.0.0.0, no gateway is set. PROS Protocol Password Unsupported at this time. PROS Port Number Unsupported at this time. Enable RARP Requests Enable BOOTP Requests Enable DHCP Request Specifies whether RARP, BOOTP, and DHCP are valid. Banner OFF No banner page. AUTO Prints the LPD banner page. Whether the banner page is printed first or last depends on the OS being used. LAST Prints the banner page last regardless of the OS being used. Appendix E Network Management FTP Properties Item Description User Access Rights Sets the access rights for printing via FTP and accessing printer properties. If nothing is set here, anyone can perform printing via FTP and can access the Property pages. Add... Register a user and set the access rights for the printer, or logical printers. Modify... Select the user to be changed, then click the Modify... button. Delete Select the user to be deleted, then click the Delete button. Logical Printer Properties Item Description Logical Printer Select the logical printer to be set, from PR1 to PR8. Filters Select a filter from the display in the window. Physical port Should be left in the default setting. Read-Back Port Should be left in the default setting. Printer Port Properties Item Description Printer Port Select the printer port to be set. Busy Status Timeout Set how long the network interface will wait for a busy signal to be sent from the printer. The valid range is from 0 to 255 seconds. Centronics Interface Timing Select the interface timing. 157 Tally T8006/T8306 Color Laser Printer User Guide Configuring the Printer With TCP/IP Utilities When configuring the printer using TCP/IP utilities, you must first configure the basic TCP/IP settings either on the printer control panel, with Tally’s NetPilot, or with one of the methods outlined below. Configuring TCP/IP allows you to later use the Web interface, Telnet, or FTP interface to configure the rest of the printer’s network settings. If you use ARP or RARP to set TCP/IP, the Ethernet address of your printer can be accessed by printing a test page, or by referring to the label on the back of the printer. Note: In order to make changes to the printer’s network settings, root or administrator authority is required. The IP address can be configured on the control panel, or remotely configured using any of these methods: • ARP: Used under UNIX, Windows 95/98, and Windows NT. • RARP: Used under UNIX. This method cannot be used on a router. • BOOTP: Used under UNIX. This method can be used through a router. • DHCP: Used under both Windows NT and UNIX. • NetPilot: Set by using the NetPilot wizard. Setting with ARP In Windows 95/98 or Windows NT open the DOS window, then execute the following command: arp -s IP-address ethernet-address The example below shows how to set the IP address of a printer with an Ethernet address of 0:0:87:90:d6:a1 to 192.168.3.191. arp -s 192.168.3.191 00008790d6a1 192.168.3.191 Once the address is set, ping the IP address of the printer to confirm the configuration. ping 192.168.1.191s The host returns the message Reply from 192.168.3.191... This indicates that the address has been set. Note: Because Windows 95 does not implement ARP mapping correctly, before setting the IP address with Windows 95, ping another device to confirm TCP/IP is operating, and after executing the ARP command, confirm the 158 Appendix E Network Management contents of the ARP table with arp -a. On a UNIX workstation, use the command: arp -s host-name ethernet-address temp The example below shows how to set the IP address of a printer named PS90d6a1 to 192.168.1.191. arp -s PS90d6a1 192.168.1.191 temp Once the address is set, ping the IP address of the printer to confirm the configuration. ping 192.168.1.191 If you receive a message indicating that the network is unreachable, the Ethernet address of the PC or workstation does not match the IP address that has attempted to set the network interface. Consult the network administrator and specify an appropriate IP address. For a more complete discussion of setting up and using ARP under Unix, see the ARP manual. Note: If the ping command results in a timeout, turn the printer power off then back on, and retry immediately after printer warm-up. Setting with RARP An example of the setting made by RARP is given below. For details, see the RARP manual. Add the following line to the Ethernet address table (usually, etc/ethers): ethernet-address host-name or IP-address Activate the RARP daemon (usually rarpd -a). Reactivate the printer. The IP address is set. Setting with BOOTP An example of the setting by BOOTP is given below. For details, see the BOOTP manual. Add the following entry to the boot table (usually, /etc/bootptab): host-name:ht=hardware-type:vm=vendor-magic:\ :ha=hardware-address:ip=IP-address:\ :sm=subnet-mask:gw=gateway-field 159 Tally T8006/T8306 Color Laser Printer User Guide Activate the BOOTP daemon (usually bootpd). The printer will not use the new configuration until the printer is restarted. Note: The “ha” field is a network interface Ethernet address. The “ip” field is an IP address. The “gw” field and “sm” field correspond to the default router address and net mask (DEF_ROUT and NET_MASK parameters), respectively. Setting with DHCP Your printer comes with DHCP turned off by default. To set up TCP/IP using DHCP, you must turn on DHCP using NetPilot, or by accessing one of the printer’s TCP/IP based servers through a static IP address. Whatever method you use to set up TCP/IP, you should confirm the connection by using the ping utility: ping host-name or IP-address Confirm the settings by using the network test button located on the back of the printer. Configuring the Printer Using HTTP To use the Web browser, the TCP/IP must already be configured on the printer. To access the printer’s HTTP server, type in the network address or host name (if defined) of your printer in your browser’s location bar. There are six configuration pages that you can use to set up your printer. Configuration The Configuration page allows you to change the access settings of the printer. Management The Management page enables you to view basic information about the network interface (version of the current network interface software, Ethernet address, base URL address, and whether the network protocol is valid). The Management page also enables you to reset the network interface or to set the parameters to the factory-set default values. 160 Appendix E Network Management Status The Status page enables you to see the status of the connected printer such as the number of printed bytes. Account The Account page displays past records of print jobs, including users, protocols, logical printers, file sizes, elapsed time and offline time. Printer The Printer page displays the Manufacturer, Model and Command Set for the connected printer. Help The Help page contains additional information about configuring the printer through the Web server. Configuring the Printer Using Telnet The Tally T8006 and T8306 have built-in commands that can be executed via Telnet. Using the Windows Telnet utility (C:\Windows\telnet) or Unix terminal, you can log on to the printer. When logging on to the printer’s Telnet server for the first time, use the name ‘root’ and the password ‘pass’. telnet host-name (IP-address) 161 Tally T8006/T8306 Color Laser Printer User Guide > telnet 192.36.253.80 Trying 192.36.253.80... Connected to 192.36.253.80. Escape character is '^]'. Tally PS TELNET Printer Server 1.0 Apr 27 2001 Tally PS network login: root Password: pass ¨ (Invisible) Tally PS TELNET Printer Server 1.0 Apr 27 2001 Root> help Commands may be abbreviated: logout logout from TELNET version print current software version help print this list status show current printing status account show current account file softreset protocol restart of Tally PS hardreset reboot of Tally PS defaults set default parameters in Tally PS Root> logout Goodbye! Connection closed by foreign host. > The usable commands are listed below. Be aware that the commands may change, as a result of control software upgrading. To ensure that you are always using the correct commands, use the printer’s built-in command display function. 162 Command Function logout Log out from TELNET. version Displays the control software version. help Displays the command list. status Displays the printer status and logical printer status. account Displays information about the latest 10 print jobs: internal job numbers (JOBs), user (USER) who sent jobs, used protocols (PROT), logical printers (LPRs), current status (C: completion, O: offline, and P: printing in progress), number of printed bytes (BYTES), elapsed time (ETIME), and offline time (OTIME). softreset Restarts the protocol. hardreset Reboots the network interface. Appendix E Network Management Command Function defaults Returns the network interface setting to the default setting. Configuring the Printer Using FTP The network interface can be set by uploading a network configuration file to the printer via FTP. 1. Using FTP, log on to the printer’s FTP interface (use root as your name and pass as the password) 2. get the printer’s configuration file config. 3. Using a plain text editor, change the settings of the configuration file. 4. FTP the printer and put config CONFIG. Ensure that the uppercase CONFIG argument is attached to the put command or the settings will not be saved. 5. Restart the printer. Note: If you attempt to put a config file with an incorrect format, the printer will reset the network interface. For an explanation of the parameters, see “Sample Network Configuration File” on page 167. Monitoring the Printer Using SNMP The Simple Network Management Protocol (SNMP) can be used for the remote monitoring of the network interface. SNMP is the standard network management protocol. In order to use SNMP, you must first set up the TCP/IP configuration of your printer, including protocols, database structure specifications and the data object group. The SNMP manager software performs the actual management. This manager sends inquiries or instructions for a device, or receives notification that uses a specific event in the device as a trigger. The object is contained in the database called the Management Information Base (MIB). Configuring the SNMP Manager The MIB file is distributed on the T8006/T8306 CD-ROM and is downloadable from the printer through FTP. The printer’s stored MIB file is described in ASN.1 format. To upgrade the printer with a newer Tally MIB file, use FTP to replace the older file. 163 Tally T8006/T8306 Color Laser Printer User Guide Use the following sample procedure to add MIB to the SNMP manager: 1. Log in to the printer’s FTP server. 2. Upload MIB file/snmp/Tally.mib to the SNMP manager. 3. Insert MIB as described in the SNMP administration software manual. The MIB file contains a menu object, a printer status and management object, and a trap object. The menu object allows you to view or change the settings of the printer’s network interface. The printer status and management object allows you to monitor functions of the printer, such as job status through the network interface. The trap object returns various error messages to the SNMP manager. For details of MIB, refer to the MIB file (Tally.mib) by using any text editor. Using Logical Printers Logical Printers allows your printer to automatically filter print data in various ways by simply selecting a logical printer to print to. With Logical Printers you can: • Add character strings before and after print data. • Replace character strings in print data. • Convert data from ASCII to PostScript. The network interface has eight logical printers that you can set by using any of the configuration methods outlined above. In the default status, logical printers 1 to 4 do not change the print data and logical printers 5 to 8 add CR control characters to LF control characters. A logical printer functions as a filter between the network and printer. For example, some PostScript drivers have no code indicating the end of the job (0x04). This problem can be solved by configuring the Logical Printers function to add this code to the end of any print jobs sent to the logical printer. Note: If character string replacement is frequently used, the network interface throughput falls considerably. Adding Character Strings The character string function can send the printer a control command before and after each print job. This function can be set differently for each logical printer. Enter all character strings as hexadecimal numeric values. 164 Appendix E Network Management For example, some PostScript drivers do not suffix the code (0x04), indicating the end of a job, to the print job. In this case, edit the following entry: PR1_AFT.:04 PRI_AFT.:04 Replacing Character Strings Replacement of up to 20 sets of character strings can be specified for each logical printer. All character strings must be entered as hexadecimal numeric characters. The count byte must be placed before a retrieval character string and before a replacement character string. For example, edit the following parameter in the config file to replace a UNIX line feed (0x0A) with a DOS line feed (0x0D 0x0A) for logical printer 1: PR1_STR. : 01 0A 02 0D 0A 01 0A 02 0D0A Count byte of the retrieval character string (length of the retrieval character string) Retrieval character string Count byte of the replacement character string (length of the replacement character string) Replacement character string This is the default setting for logical printers 5 to 8. Conversion from ASCII to PostScript To set PostScript conversion, you must turn on postscript filtering in the printer configuration file and set the page size, direction, format, and the font to be used. The default size is A4 and default orientation is portrait. To change these settings, use these parameters: Page Format Default Value Number of lines per page (LPP) 66 Number of characters per line (CPL) 0 Meaning 0 = Turn of a line invalid 165 Tally T8006/T8306 Color Laser Printer User Guide Number of characters per inch (CPI) 10 100 = 10.0 characters per inch Number of lines per inch (LPI) 60 60 = 6.0 lines per inch Left margin 30 30 = 1/8 inch (3.0 mm) Upper margin 50 50 = 1/5 inch (5.0 mm) Any PostScript font loaded in the printer can be used, but if no font is specified, Courier is used. For example, to set logical printer 2 for conversion from ASCII to PostScript, the following parameters must be set in the config file: 166 PR2_FILT.:POSTSCR (PostScript conversion ON) PR2_SIZE.:LETTER (Page size = letter) PR2_ORNT.:LANDS (Orientation = Landscape) PR2_FORM.:48 0 120 60 30 50 (48 LPP, 0 CPL, 12 CPI, 6 LPI, left margin 3 mm, upper margin 5 mm) PR2_FONT.:Helvetica (Font = Helvetica) Appendix E Network Management Sample Network Configuration File A sample parameter list used to configure the network interface is shown below. The config file parameter names and their default values are listed on the left side of the parameter list and simplified explanations of the parameters are listed on the right side. The sample parameter list shows the default values of a configuration file. For this example, the Ethernet address is 0:0:87:90:d6:a1, and the factory set printer name is PS90D6A1. The last six digits of the printer name (90D6A1) are the six low-order digits of the Ethernet address. --- General Menu NODE_ADDR. : 00 00 87 90 D6 A1 Node address ROOT_PWD. : pass root password USERS. : User authority and printer access BASE URL. : www.Tally.com/printer Default base URL address HP_JETADMIN. : AUTO_SENSE (AUTO_SENSE, YES, NO) HP emulation setting DEF_OUT. : PR1 (PR1, PR2, PR3, PR4, PR5, PR6,PR7, PR8, LPT1) Internal print output destination TCP_ENB. : YES Whether the TCP/IP protocol is valid INT_ADDR. :0 0 0 0 IP address DEF_ROUT. :0 0 0 0 Default router address (0.0.0.0 when no router is supported) NET_MASK. :0 0 0 0 Subnet mask (0.0.0.0 for automatic detection) PROS_PWD. : netprinter Must not be changed PROS_PRT. : 35 Must not be changed --- TCP/IP Menu 167 Tally T8006/T8306 Color Laser Printer User Guide LPD_BANN. : OFF (OFF, AUTO, LAST) Whether the LPD banner page is valid DHCP_ENB. : NO Whether the DHCP protocol is valid BOOTP_ENB. : YES Whether the BOOTP protocol is valid RARP_ENB. : YES Whether the RARP protocol is valid WINS_ENB. YES Whether the WINS is valid. WINS_ADDR1. 0 0 0 0 IP address for the primary WINS server WINS_ADDR2. 0 0 0 0 IP address for the secondary WINS server Must not be set NBT_SCOPE_ID. RTN_OPT. YES Must not be changed RTEL_PR1. :0 Must not be changed RTEL_PR2. :0 Must not be changed RTEL_PR3. :0 Must not be changed RTEL_PR4. :0 Must not be changed RTEL_PR5. :0 Must not be changed RTEL_PR6. :0 Must not be changed RTEL_PR7. :0 Must not be changed RTEL_PR8. :0 Must not be changed READ_COM. : public Read-only community name WRT_COM. : pass Readable and writable community name TRAPADDR. :0 0 0 0 SNMP trap IP address TRAP_COM. : public SNMP trap community name SYS_CONT. : System contact destination --- SNMP Menu 168 Appendix E Network Management SYS_NAME. : System name SYS_LOC. : System location SNMP_AUT. : DISABLE ENABLE) (DISABLE, Whether the certification failure trap is valid TRAP_PRT. : DISABLE ENABLE) (DISABLE, Whether the printer trap is valid --- NetWare Menu NETW_ENB. : YES Whether the NetWare protocol is valid PS_NAME. : PS90D6A1 Print server name JOB_CHECK_DELAY. :5 Queue polling interval of the print server CONF_CHECK_DELAY. : 300 Automatic setting check interval FR_802_3. : YES Whether the IEEE 802.3 frame type is valid FR_ETH_2. : YES Whether the Ethernet II frame type is valid FR_802_2. : YES Whether the IEEE 802.2 frame type is valid FR_SNAP. : YES Whether the SNAP frame type is valid NCP_BURST_MODE. YES Whether the NetWare burst mode is valid (Reactivation required) PSERVER_NDS. : File server name, or login NDS tree name and print server context name PSERVER_BINDERY1. : Bindery file server name PSERVER_BINDERY2. : Bindery file server name 169 Tally T8006/T8306 Color Laser Printer User Guide PSERVER_BINDERY3. : Bindery file server name PSERVER_BINDERY4. : Bindery file server name PSERVER_BINDERY5. : Bindery file server name PSERVER_BINDERY6. : Bindery file server name PSERVER_BINDERY7. : Bindery file server name PSERVER_BINDERY8. : Bindery file server name PSERVER_BINDERY9. : Bindery file server name PSERVER_BINDERY10 . : Bindery file server name PSERVER_BINDERY11 . : Bindery file server name PSERVER_BINDERY12 . : Bindery file server name PSERVER_BINDERY13 . : Bindery file server name PSERVER_BINDERY14 . : Bindery file server name PSERVER_BINDERY15 . : Bindery file server name PSERVER_BINDERY16 . : Bindery file server name NPRINTER1. : Print server name and slot number NPRINTER2. : Print server name and slot number NPRINTER3. : Print server name and slot number NPRINTER4. : Print server name and slot number NPRINTER5. : Print server name and slot number NPRINTER6. : Print server name and slot number 170 Appendix E Network Management NPRINTER7. : Print server name and slot number NPRINTER8. : Print server name and slot number --- NetBIOS/NetBEUI Menu LSLM_ENB. : YES Whether the NetBIOS/NetBEUI protocol is valid NB_FR_TYPE. : FR_AUTO (FR_AUTO, FR_802_2, FR_DIX) Frame type (reactivation required) LPRINT_1. : PS90D6A1.LP1 Name of printer 1 LLOGIC_1. : LPT1 (PR1, PR2, PR3, PR4, PR5, PR6, PR7, PR8, LPT1) Logical printer of printer 1 LPRINT_2. : Name of printer 2 LLOGIC_2. : PR2 Logical printer of printer 2 LPRINT_3. : Name of printer 3 LLOGIC_3. : PR3 Logical printer of printer 3 LPRINT_4. : Name of printer 4 LLOGIC_4. : PR4 Logical printer of printer 4 LPRINT_5. : Name of printer 5 LLOGIC_5. : PR5 Logical printer of printer 5 LPRINT_6. : Name of printer 6 LLOGIC_6. : PR6 Logical printer of printer 6 LPRINT_7. : Name of printer 7 LLOGIC_7. : PR7 Logical printer of printer 7 LPRINT_8. : Name of printer 8 LLOGIC_8. : PR8 Logical printer of printer 8 171 Tally T8006/T8306 Color Laser Printer User Guide --- AppleTalk Menu ATLK_ENB. : YES Whether the AppleTalk protocol is valid ATK_ZONE. : AppleTalk zone ZONER_EN. : YES Whether the HP zoner is valid ATK_FONT. : DEFAULT (DEFAULT, 35N, ALL) PostScript font set BINARY. : YES Whether binary transfer is valid BINARY_TYPE. : TBCP APRINT_1. : PS90D6A1_LPT1 Name of printer 1 ATYPE_1. : LaserWriter Type of printer 1 ALOGIC_1. : LPT1 (PR1, PR2, PR3, PR4, PR5, PR6, PR7, PR8, LPT1) Logical printer of printer 1 APRINT_2. : Name of printer 2 ATYPE_2. : Type of printer 2 ALOGIC_2. : PR2 Logical printer of printer 2 PR1_IN. : AUTO (AUTO, NONE, COM1) Read-back port of logical printer 1 PR1_BEF. : Character string before the print job of logical printer 1 PR1_STR. : Replacement of character strings of logical printer 1 PR1_CSET. : NONE Must not be changed (character set conversion) PR1_FILT. : NONE (NONE, POSTSCR, AUTO_PS) Conversion of printer language of logical printer 1 (TBCP, BCP) Binary used when binary transfer is valid Communication protocol ---Printer1 Menu 172 Appendix E Network Management PR1_AFT. : Character string after the print job of logical printer 1 PR1_DUMP. : NO Hexadecimal dump mode of logical printer 1 PR1_SIZE. : A4 (A4, LETTER, LEGAL, EXECUT) PostScript page size of logical printer 1 PR1_ORNT. : PORTR (PORTR, LANDS, R_PORTR, R_LANDS) Orientation of the PostScript page of logical printer 1 PR1_FORM. : 66 0 100 60 30 50 PostScript page format of logical printer 1 (LPP_CPL_CPI_LPI_LM_TM) : PostScript font of logical printer 1 (Courier when omitted) PR2_IN. :AUTO (AUTO, NONE, COM1) Read-back port of logical printer 2 PR2_BEF. : Character string before the print job of logical printer 2 PR2_STR. : Replacement of character strings of logical printer 2 PR2_CSET. :NONE Must not be changed (character set conversion) PR2_FILT. :NONE NONE, POSTSCR, AUTO_PS) Conversion of printer language of logical printer 2 PR2_AFT. : Character string after the print job of logical printer 2 PR2_DUMP. :NO Hexadecimal dump mode of logical printer 2 PR2_SIZE. :A4 PostScript page size of logical printer 2 PR2_ORNT. :PORTR (PORTR, LANDS, R_PORTR, R_LANDS) Orientation of the PostScript page of logical printer 2 PR1_FONT. --- Printer2 Menu 173 Tally T8006/T8306 Color Laser Printer User Guide PR2_FORM. :66 0 100 60 30 50 PostScript page format of logical printer 2 (LPP_CPL_CPI_LPI_LM_TM) : PostScript font of logical printer 2 (Courier when omitted) PR3_IN. :AUTO (AUTO, NONE, COM1) Read-back port of logical printer 3 PR3_BEF. : Character string before the print job of logical printer 3 PR3_STR. : Replacement of character strings of logical printer 3 PR3_CSET. :NONE Must not be changed (character set conversion) PR3_FILT. :NONE (NONE, POSTSCR, AUTO_PS) Conversion of printer language of logical printer 3 PR3_AFT. : Character string after the print job of logical printer 3 PR3_DUMP. :NO Hexadecimal dump mode of logical printer 3 PR3_SIZE. :A4 (A4, LETTER, LEGAL, EXECUT) PostScript page size of logical printer 3 PR3_ORNT. :PORTR (PORTR, LANDS, R_PORTR, R_LANDS) Orientation of the PostScript page of logical printer 3 PR3_FORM. :66 0 100 60 30 50 PostScript page format of logical printer 3 PR2_FONT. --- Printer3 Menu (LPP_CPL_CPI_LPI_LM_TM) PR3_FONT. 174 : PostScript font of logical printer 3 (Courier when omitted) Appendix E Network Management --- Printer4 Menu PR4_IN. :AUTO (AUTO, NONE, COM1) Read-back port of logical printer 4 PR4_BEF. : Character string before the print job of logical printer 4 PR4_STR. : Replacement of character strings of logical printer 4 PR4_CSET. :NONE Must not be changed (character set conversion) PR4_FILT. :NONE (NONE, POSTSCR, AUTO_PS) Conversion of printer language of logical printer 4 PR4_AFT. : Character string after the print job of logical printer 4 PR4_DUMP. :NO Hexadecimal dump mode of logical printer 4 PR4_SIZE. :A4 (A4, LETTER, LEGAL, EXECUT) PostScript page size of logical printer 4 PR4_ORNT. :PORTR (PORTR, LANDS, R_PORTR, R_LANDS) Orientation of the PostScript page of logical printer 4 PR4_FORM. :66 0 100 60 30 50 PostScript page format of logical printer 4 (LPP_CPL_CPI_LPI_LM_TM) : PostScript font of logical printer 4 (Courier when omitted) PR5_IN. :AUTO (AUTO, NONE, COM1) Read-back port of logical printer 5 PR5_BEF. : Character string before the print job of logical printer 5 PR4_FONT. --- Printer5 Menu 175 Tally T8006/T8306 Color Laser Printer User Guide PR5_STR. :01 0A 02 0D 0A Replacement of character strings of logical printer 5 PR5_CSET. :NONE Replacement of character strings of logical printer 5 PR5_FILT. :NONE (NONE, POSTSCR, AUTO_PS) Conversion of printer language of logical printer 5 PR5_AFT. : Character string after the print job of logical printer 5 PR5_DUMP. :NO Hexadecimal dump mode of logical printer 5 PR5_SIZE. :A4 (A4, LETTER, LEGAL, EXECUT) PostScript page size of logical printer 5 PR5_ORNT. :PORTR (PORTR, LANDS, R_PORTR, R_LANDS) Orientation of the PostScript page of logical printer 5 PR5_FORM. :66 0 100 60 30 50 PostScript page format of logical printer 5 (LPP_CPL_CPI_LPI_LM_TM) : PostScript font of logical printer 5 (Courier when omitted) PR6_IN. :AUTO (AUTO, NONE, COM1) Read-back port of logical printer 6 PR6_BEF. : Character string before the print job of logical printer 6 PR6_STR. :01 0A 02 0D 0A Replacement of character strings of logical printer 6 PR6_CSET. :NONE Must not be changed (character set conversion) PR6_FILT. :NONE (NONE, POSTSCR, AUTO_PS) Conversion of printer language of logical printer 6 PR6_AFT. : Character string after the print job of logical printer 6 PR6_DUMP. :NO Hexadecimal dump mode of logical printer 6 PR5_FONT. --- Printer6 Menu 176 Appendix E Network Management PR6_SIZE. :A4 (A4, LETTER, LEGAL, EXECUT) PostScript page size of logical printer 6 PR6_ORNT. :PORTR (PORTR, LANDS, R_PORTR, R_LANDS) Orientation of the PostScript page of logical printer 6 PR6_FORM. :66 0 100 60 30 50 PostScript page format of logical printer 6 (LPP_CPL_CPI_LPI_LM_TM) : PostScript font of logical printer 6 (Courier when omitted) PR7_IN. :AUTO (AUTO, NONE, COM1) Read-back port of logical printer 7 PR7_BEF. : Character string before the print job of logical printer 7 PR7_STR. :01 0A 02 0D 0A Replacement of character strings of logical printer 7 PR7_CSET. :NONE Must not be changed (character set conversion) PR7_FILT. :NONE (NONE, POSTSCR, AUTO_PS) Conversion of printer language of logical printer 7 PR7_AFT. : Character string after the print job of logical printer 7 PR7_DUMP. :NO Hexadecimal dump mode of logical printer 7 PR7_SIZE. :A4 (A4, LETTER, LEGAL, EXECUT) PostScript page size of logical printer 7 PR7_ORNT. :PORTR (PORTR, LANDS, R_PORTR, R_LANDS) Orientation of the PostScript page of logical printer 7 PR7_FORM. :66 0 100 60 30 50 PostScript page format of logical printer 7 PR6_FONT. --- Printer7 Menu (LPP_CPL_CPI_LPI_LM_TM) 177 : PostScript font of logical printer 7 (Courier when omitted) PR8_IN. :AUTO (AUTO, NONE, COM1) Read-back port of logical printer 8 PR8_BEF. : Character string before the print job of logical printer 8 PR8_STR. :01 0A 02 0D 0A Replacement of character strings of logical printer 8 PR8_CSET. :NONE Must not be changed (character set conversion) PR8_FILT. :NONE (NONE, POSTSCR, AUTO_PS) Conversion of printer language of logical printer 8 PR8_AFT. : Character string after the print job of logical printer 8 PR8_DUMP. :NO Hexadecimal dump mode of logical printer 8 PR8_SIZE. :A4 (A4, LETTER, LEGAL, EXECUT) PostScript page size of logical printer 8 PR8_ORNT. :PORTR (PORTR, LANDS, R_PORTR, R_LANDS) Orientation of the PostScript page of logical printer 8 PR8_FORM. :66 0 100 60 30 50 PostScript page format of logical printer 8 PR7_FONT. --- Printer8 Menu (LPP_CPL_CPI_LPI_LM_TM) PR8_FONT. --- Output Menu : PostScript font of logical printer 8 (Courier when omitted) Appendix E Network Management L1_CENTR. :HISPEED (IBM_PC, STNDRD, FAST, HISPEED) Interface timing L1_BSYTM. :60 Busy status time-out (For 0, all status reports are invalid.) L1_MGM_INFO. :AUTO (DISABLE, AUTO) Whether the printer management information is valid 179 Index A accessories 83 memory module 83 paper feeder 86 adjustments, paper feeder 87 ASCII, conversion to PostScript 165 autoplay CD 25 C cartridges OPC belt cleaning 76 OPC belt installation 17 OPC belt replacement 69 toner 13 toner replacement 61 CD, autoplay 25 character strings, replacement 165 cleaning OPC belt cartridge 76 optical unit glass 79 paper discharger 75 printer 73 printer interior 80 registration roller 73 transfer roller 74 color adjustment 2, 52 density 54 print driver 53 components, printer 3 Config Menu 125 configuration NetPilot 149 network 148 utilities for printer 158 control keys, control panel 42 control panel Config Menu 125 display 41 indicators 41 keys 3, 42 menu display 121 menu functions 119 messages 141 navigation keys 121 Network Menu 135 paper sizes 145 paper types 145 Parallel Menu 131 Test Menu 122 counter fuser cleaning roller 16 OPC belt cartridge 19 custom edits, print driver 55 D defaults LAN port parameters 147 print driver changes 46 print driver restoration 59 dialog, network 149 display control panel 41 menu format 121 drivers, autoplay CD 25 duplex printing unit installing 86 options 86 E envelope feeder, installation 40 181 Tally T8006/T8306 Color Laser Printer User Guide F FTP 148 printer configuration 163 properties 157 fuser cleaning roller 4 counter setting 16 installing 15 replacing 66 fusing unit 4 H HTTP 148 printer configuration 160 I indicators, control panel 41 installation autoplay CD 25 duplex printing unit 86 envelope feeder 40 fuser cleaning roller 15 memory module 83 oil bottle 15 OPC belt cartridge 17 paper feeder 86 paper tray 13 power cord 20 Starter Kit 12 toner cartridges 13 J Jam 2, clearing 93 Jams 3 and 4, clearing 96 Job tab settings 49 K keys, control panel 42, 121 L LAN configuration test 147 loading media 39 location, printer 8 logical printers 164 M Macintosh chooser problems 106 182 printer driver 34, 35 maintenance fuser cleaning roller 16, 66 OPC belt cartridge 69 OPC belt counter 19 ozone filter 68 printer 61 toner cartridges 61 waste toner pack 64 media loading 39 selection 37 memory module, installation 83 menu Config Menu 125 control panel 119 control panel display 121 Network Menu 135 Parallel Menu 131 Test Menu 122 messages, control panel 141 moving, printer 10 N NetBEUI 26 NetPilot 112, 114 installation 26 network configuration 148 printer configuration 149 NetWare network settings 149 properties 154 windows configuration 31 network configuration 148 dialog 149 management 147 monitoring 148 NetWare 31 parameter list 147 printer setup 26 problems 107 properties dialog 153 protocols 2, 153 sample configuration 167 troubleshooting 107 Index Network Menu 135 O oil bottle 4 installing 15 replacing 63 oil dropper 12 OPC belt cartridge 4 cleaning 76 counter setting 19 installing 17 replacing 69 operating system, requirements 7 operation, on and off 37 optical unit glass, cleaning 79 options 83 duplex printing unit 86 memory module 83 paper feeder 86 options and accessories 83 overview printer 2 ozone filter 5, 12 replacing 68 P paper loading 39 media selection 37 sizes 145 test print 20 trays 3 types 145 paper discharger, cleaning 75 paper feeder installation 86 options and accessories 86 paper jam Jam 2 area 93 Jam 3 and 4 areas 96 troubleshooting 89 paper tray, installation 13 Parallel Menu 131 parts, replacement 117 port LAN settings list 147 parallel 4 RJ-45 4 TCP/IP configurations 30 power cord installing 20 socket 4 power switch 3 print defaults 45 test function 122 print driver color adjustment 53 color settings 52 custom edits 55 default settings 45 density adjustment 54 Job tab settings 49 option settings 56 properties 46 restore defaults 59 restrictions 109 software 45 troubleshooting 109 watermarks 58 Windows 2000 48 Windows 95/98 46 Windows local setup 25 Windows NT 4.0 47 print quality 3 troubleshooting 100 print server test page 147 printer accessories 83 cleaning 73 components 3 configuration 149, 158 configuration using FTP 163 configuration using HTTP 160 configuration using Telnet 161 driver and utilities installation 25 interior cleaning 80 location 8 maintenance 61 moving 10 NetPilot 149 183 Tally T8006/T8306 Color Laser Printer User Guide operation 37 options 83 overview 2 repacking for shipment 10 setup 7 specifications 111 start-up 20 turning on 21 unpacking 10 printer driver Macintosh 34, 35 printers, logical 164 printing option settings 56 slow or none 103 test 20 test page 22 troubleshooting 89 PrintMonitor 27, 148 problems Macintosh Chooser 106 network 107 printing 89 properties dialog, network 153 R registration roller, cleaning 73 repacking, printer for shipment 10 repair, replacement parts 117 replacement fuser cleaning roller 66 oil bottle 63 OPC belt cartridge 69 ozone filter 68 toner cartridges 61 waste toner pack 64 requirements, system 7, 34 restrictions, print driver 109 RJ-45 port 4 S SNMP, configuring 163 software, print driver 45 specifications printer 111 system 7 184 start printer 20 Starter Kit installation 12 system requirements 7 T Tally NetPilot 148 Tally, network management 147 TCP/IP configuring windows 28 properties 156 utilities 158 Telnet 148 printer configuration 161 test button 147 print 122 printing 20 printing page 22 Test Button 147 Test Menu 122 test page, print server 147 TestPrint 122 toner cartridges 5 installing 13 replacing 61 toner, waste pack 64 transfer roller, cleaning 74 troubleshooting 89 Jam 2 clearing 93 Jam 3 and 4 96 Macintosh Chooser 106 network 107 paper jam areas 89 poor print quality 100 print driver 109 printing 89 slow or no printing 103 U unpacking printers 10 utilities autoplay CD 25 PrintMonitor 148 TCP/IP 158 Telnet 161 Index W waste toner pack 5, 12 replacing 64 watermarks, custom 58 Windows configuring for NetWare 31 local print driver setup 25 network printer setup 26 Windows 2000 print driver 48 system requirements 7 Windows 95/98 print driver 46 system requirements 7 Windows NT 4.0 print driver 47 system requirements 7 Z zero setting cleaning roller counter to 16 setting OPC belt counter to 19 185