1
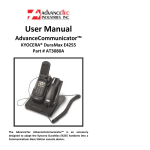
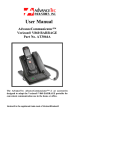
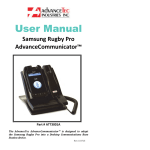
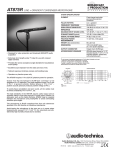
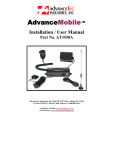
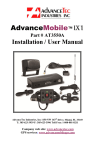
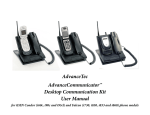
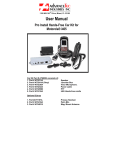
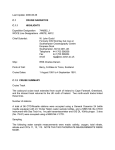
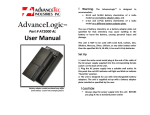
User Manual AdvanceCommunicator™ KYOCERA® DuraPlus™ Part # AT3082A The AdvanceTec AdvanceCommunicator™ is an accessory designed to adapt the Kyocera DuraPlus handsets into a Communications Base Station console device. Rev A 1001 2
INDEX Page Details 2 3 3 4 4 4 ‐ 5 5 5 5 5 5 6 6‐7 7 7 Important Phone Settings Replacing phone contact plate Setting up AdvanceCommunicator™ Installing phone into AdvanceCommunicator™ Making and receiving calls in Hands‐ free mode Making and receiving call via Handset Use of AdvanceCommunicator™ with dispatch calls Volume control Recording feature Summary of LED indicators Charging of the battery OPTION EXTRAS Palm Mic. Part # AT8428A Head Set Part # AT8421A Foot Pedal Part # AT8400A Y‐Connector Part # AT8405A IMPORTANT PHONE SETTINGS The following phone settings are necessary to enable use of the phone with the AdvanceCommunicator: 1. Press > Settings > DC Settings > Direct Connect ON 2. Press > Settings > DC Settings > Headset Mode > Headset button starts DC calls. [DC button]. 3. Press > Settings > Others > Accessibility > TTY >TTY Off. 4. Increase or Decrease the volume must be done while phone is connected to the unit and is on an active call. 3
! NOTE: To enable the phone to latch into the cradle it is necessary to remove and replace the contact plate on the back of the phone as follows: PhoneContactPlate
Diagram 1 1. Remove the 2 screws from the Phone Contact Plate on the back of the phone and remove the plate keeping the screws as they will be needed. 2. Replace the Phone Contact Plate with the Ridged Plate (see below) supplied and screw into place into the back of the phone with the screws removed from the Phone Contact Plate. Ridgedplate
P/NAT8434A
Diagram 2 Setting up the AT3082A AdvanceCommunicator™ 1. Place the AdvanceCommunicator™ in a convenient position
withineasyreachofanACpoweroutlet.
2. Attachtheplugattheendofthecoilcordofthehandsetinto
thecorrespondingRJ45handsetreceptacleonthebackofthe
AdvanceCommunicator™.
3. Plug the power supply into the wall AC power outlet and the
round barrel plug at the end of the cord of the power supply
into the corresponding power receptacle on the back of the
AdvanceCommunicator™
4. AtthispointtheLEDwillflashRED
4
InstallingtheportableintotheAdvanceCommunicator™
1. Plugthetwo(2)pinconnectorintothecorrespondingsocket
oftheleftbottomsideoftheAdvanceCommunicator™
2 Pin into AdvanceCommunicator USB Connector Audio Connector
2. Remove the rubber protective cover from the connector
receptaclecoveringthemicroUSBconnectorontheleftsideof
the handset (handset facing you) and align the micro USB
connectorattheendontheonecableandinserttheconnector
intothehandsetwiththecablefacingDOWN.
3. Remove the rubber protective cover from the connector
receptacle covering the audio connector on the right side of
the handset (handset facing you) and align the pin connector
attheendoftheothercableandinserttheconnectorintothe
handsetwiththecablefacingUP.
4. Insert the bottom of the handset behind the ridge on the
cradle and press the top of the handset back into the Cradle
untilitsnapsintoplace.
5. TurntheHandseton.
6. To remove the handset from the Cradle, press the release
buttononthetopofthecradle.TheHandsetwillsnapforward
outofthecradle.
MakingandReceivingcallsinHandsFreeMode.
1. TomakeacallinHands‐freemode,dialthedesirednumberon
the phone keypad and press SEND/GREEN BUTTON. Speak
towardstheMicrophonewhichissituatedonthebottomright
corneroftheAdvanceCommunicator™
5
2. Thevoiceofthepersonyouarecallingwillbeheardviathe
built‐inspeakerintheAdvanceCommunicator™
3. To receive a call in Hands‐free mode, press SEND/GREEN
BUTTONonthephoneorpressshortlyonthePTT/Spacebar
and speak towards the Microphone. The caller’s voice will be
heardviathebuilt‐inspeakerintheAdvanceCommunicator™
4. Toendacallinhands‐freemodepresstheEND/REDbuttonon
thephone.
MakingandReceivingcallsviatheHandset.
1. To make a call using the AdvanceCommunicator™ Handset,
dial the desired number on the phone’s keypad and press
SEND/GREEN button. Use the handset as you would with a
regulardesktopphone.
2. To receive a call with the Handset, lift the Handset and press
the SEND/GREEN button on the phone’s keypad. Use the
handsetasyouwouldwitharegulardesktopphone.
3. Toendacallwhileusingthehandset,placethehandsetback
intothecradleandpresstheEND/REDbuttononthephone.
UseoftheAdvanceCommunicator™withDispatchcalls
1. ToansweradispatchcallinHands‐freemode,pressandhold
downthePTT/SpaceBarandspeaktowardstheMicrophone.
2. To answer a dispatch call using the handset, pick up the
handset, press and hold down the round PTT button on the
backoftheHandsetandspeakintothehandsetasyouwould
witharegulardesktopphone.
3. To hear the other party in a dispatch call, release the
PTT/Space bar (in Hands‐free mode) or the round PTT
handsetbuttonifusingtheHandset
VolumeControl
The volume of the AdvanceCommunicator™ can be increased
orloweredwiththevolumebuttonsonthesideofthephone.
RecordingFeature
1. TheAdvanceCommunicator™willallowtherecordingofaudio
trafficwithanexternalrecordingdeviceviaa3.5mmplugon
thebackoftheAdvanceCommunicator™.
2. Dispatchcallswillberecordedbothaudioinandaudioout.
3. Cellularcallswillberecordedaudio‐inandaudioout.
6
SummaryofLEDIndicators
FlashingRED:
SteadyRED:
PhonenotconnectedtotheBase
PhoneisconnectedtotheBasewithpower
OFF
PhoneconnectedwithpowerON
SteadyGREEN:
Chargingthebattery
Withtheportableturnedoff,theAdvanceCommunicator™willcharge
thebattery to 60%in approximately1 hour.Thechargetimewill be
longeriftheportableisoperationalduringchargetime.
NOTE: Batteries of the portable will charge within the temperature
windowof‐10Cto+40C(50Fto104F).Ifthebatteryisoutsidethis
temperature window, no charge current will be supplied to the
battery.
Optional Extras The following optional extras are available to compliment the
AdvanceCommunicator™:
1.PalmMic‐Part#AT8428A
1. To use a Palm Mic. with the AdvanceCommunicator™ unplug the
privacyhandsetsuppliedwiththeunit(andremoveitfromitscradle)
and plug the RJ45 connector of the Palm Mic into the corresponding
RJ45receptacleonbackoftheAdvanceCommunicator™
2. Once connected, the pressing of the switch on the Palm Mic. will
activatethePalmMic.
7
2. Headset ‐ Part # AT8421A 1.TousetheHeadsetwiththeAdvanceCommunicator™unplugthe
privacyhandsetsuppliedwiththeunit(andremoveitfromits
cradle)andplugtheRJ45connectoroftheHeadsetintothe
corresponding
RJ45
receptacle
on
back
of
the
AdvanceCommunicator™
2.Onceconnected,audiowillbetransferredtotheHeadset.
3.PTTcallscanbemadewiththePTT/SpaceBarorthePTTbuttonon
thecableontheHeadset.
3.FootPedal‐Part#AT8400A(withPart#AT8405A)
1.TousetheFootPedalwiththeAdvanceCommunicator™unplugthe
privacyhandsetsuppliedwiththeunit(andremoveitfromitscradle)
2. Plug the RJ45 connector of the Y Adapter Cable (Part # AT8405A
supplied) into the corresponding RJ45 receptacle on back of the
AdvanceCommunicator™
RJ45 connector 3. Plug the RJ45 connector of the Foot pedal into one of the
correspondingRJ45receptacleoftheYAdapterCableAT8405A.
8
RJ45 connector 4.YConnectorAdapter‐Part#AT8405A
1.TouseboththeHeadsetandFootPedalwiththe
AdvanceCommunicator™simultaneously,usetheYconnectoradapter
Part#8504AsuppliedwiththeFootPedal..
2. Unplug the privacy handset supplied with the unit (and remove it
from its cradle) and plug the RJ45 connector of the Y Adapter Cable
into the corresponding RJ45 receptacle on back of the
AdvanceCommunicator™
3. Plug the Headset and Foot Pedal into the corresponding RJ45
receptaclesoftheYAdapterConnector.
!NOTE:IfneithertheheadsetnorFootPedalwork,swaparoundthe
plugsintotheYAdapterConnector.
3.Onceconnected,theHeadsetandFootPedalwillfunctionassetout
above.
1150 NW 163rd Drive, Miami, FL 33169
T: 305-623-3939 F: 305-623-3996
Toll free USA 1-800-881-8211
www.advancetec.com
www.advancemobileGPS.com