1
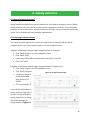
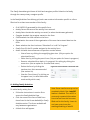
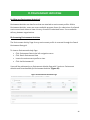
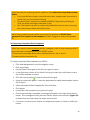
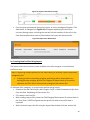
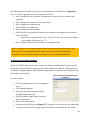
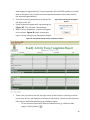
User Manual for
Providers & Program Administrators
Table of Contents
1. Introduction to DAISEY
a. What is DAISEY?
b. About This User Manual
2. DAISEY Orientation
a. Webpage
b. Policy Statement
c. Homepage
d. My Profile
e. Help
f. Organizational Access
3. System Navigation
a. Left Navigation Menu
b. Search Grid Navigation
4. Caregiver Profiles
a. What are Caregiver Profiles?
b. Managing Caregiver Profiles
c. Adding Primary Caregiver Profiles
d. Adding Secondary Caregiver Profiles
e. Editing a Caregiver Profile
f. Deleting a Caregiver Profile
1
5. Child Profiles
a. What are Child Profiles?
b. Managing Child Profiles
c. Adding Child Profiles
d. Associating Child Profiles with Caregiver Profiles
e. Editing Child Profiles
f. Deleting Child Profiles
6. Family Activities
a. What are Family Activities?
b. Accessing Family Activities
c. Adding Family Activities
d. Editing Family Activities
e. Deleting Family Activities
f. Safety Mode Feature
7. Environment Profiles
a. What is Environment Data?
b. Managing Environment Profiles
c. Adding New Environment Profiles
d. Associating Children to Environment Profiles
e. Editing Environment Profiles
f. Deleting Environment Profiles
8. Environment Activities
a. What are Environment Activities?
b. Accessing Environment Activities
c. Adding Environment Activities
d. Editing Environment Activities
e. Deleting Environment Activities
9. Data Management
a. Importing Data to DAISEY
b. Matching ID Numbers Using ID Reports
2
c. Downloading Data Templates for Import
d. Importing Completed Data Templates
e. Creating New Profiles Using Import
f. Updating Profiles Using Import
g. List of Common Import Errors
h. Exporting Data
i. Generating Intelligent Reports
DAISEY Data Governance and Security Statement
3
1. Introduction to DAISEY
1a. What is DAISEY?
DAISEY stands for “Data Application and Integration Solutions for the Early Years”. DAISEY
is a secure HIPAA-compliant web-based outcome reporting system developed by the
University of Kansas Center for Public Partnerships and Research. Its primary purpose is to
support early childhood programs to collect and report on child and family outcomes. It is
licensed to funders or users who are interested in building data system capacity to
demonstrate the success of early childhood programming.
1b. About This User Manual
Welcome to the DAISEY User Manual for Provider and Program Admin users. This manual is
intended to help users navigate DAISEY, successfully perform all of its functions, and
manage program data within this online system.
Please note that all data shown in the screenshots for this manual were fabricated for
training purposes. These are not real families, environments, or data.
4
2. DAISEY Orientation
2a. Webpage
To use the system, visit
Figure 1: Login Screen
http://daisey.cete.us (Figure 1). Users
must have a valid login before entering
the site.
•
Enter username and password.
•
Press Sign In.
•
Users may also click Forgot
Password? to be redirected to a
help page to reset his or her
DAISEY password.
Note: DAISEY usernames and
passwords are case-sensitive.
Note: For best results, users should use Mozilla Firefox or Google Chrome when logging
into DAISEY.
Note: DAISEY users are automatically logged off after 30 minutes of inactivity.
2b. Policy Statement
Users will see this policy statement each
Figure 2: Policy Statement
time logging in. (Figure 2). All users of the
DAISEY system must adhere to the
guidelines of University of Kansas (KU)
policies and procedures. For more
information, see the DAISEY Data
Governance and Security Statement at the
end of this manual.
•
To continue to the site, press OK.
•
Pressing Cancel will redirect users to the login screen.
5
2c. Homepage
Once logged in, users begin at the DAISEY homepage (Figure 3). From here, users navigate
the system using the left navigation menu. Links in the top-right corner allow users to
check organizational access, modify their account using My Profile, and/or access Help.
System announcements are also displayed on the homepage.
Figure 3: Homepage
2d. My Profile
Figure 4: My Profile
Access My Profile by clicking the profile icon
in the upper right-hand corner (Figure 4).
Click My Profile to edit user’s first name, last
name, or password. Click Sign Out to log out
of DAISEY immediately.
Note: Users are automatically logged
out after 30 minutes of inactivity.
However, for data security purposes, it
is recommended that all users log out
as soon as they are finished using the
DAISEY system.
6
2e. Help
The Help screen (Figure 5) allows users to access materials to assist in using DAISEY:
announcements, video tutorials, FAQs, and the most updated version of user manuals. If
further assistance is needed after visiting the Help screen, please email
[email protected].
Figure 5: Help Screen
2f. Organizational Access
Before entering any data, users should always check organizational access. Near the top
right corner of DAISEY, users will see an orange rectangle that displays the name of the
organization that user is logged in under.
Some users have the ability to
Figure 6: Switching Organizational Access
switch access between multiple
organizations. In such cases,
this orange rectangle acts as a
drop-down menu. Users may
click on the organization button
to switch to a different
organization (see Figure 6).
Simply click another
organization listed to complete
the switch.
7
3. System Navigation
3a. Left Navigation Menu
A navigation menu appears on the left side of each DAISEY
webpage. This menu contains 3 options: Family Profiles,
Figure 7: Left Navigation
Menu Links
Environment Data, and Data Management.
Family Profiles is used to navigate to and manage all child and
caregiver profiles, as well as associated activity data. All form
data collected at the level of the individual or family can be
entered and viewed here. Menu links include Search Caregiver
and Search Child.
Environment Data is used to navigate to and manage all environment profiles, as well as
associated activity data. All form data collected at the level of the environment (i.e. group of
children such as daycare or classroom) can be entered and viewed here. Menu links
include Search Environment Data.
Data Management is used to import multiple forms of data, export data that has been
entered into DAISEY, and view reports that summarize data entered into DAISEY. Menu
links include Import, Export, and Intelligent Reports.
3b. Search Grid Navigation
While navigating the DAISEY system, it is often necessary to navigate various search grids
(e.g lists of caregivers, children, forms). Below are tips for easier navigation and use of such
search grids.
Figure 8: Sorting by Child ID
Sorting: To sort a search grid by any field, click on the
header of that field column.
Sorting example: To sort a child grid by Child ID, click on
Child ID header at the top of that column (Figure 8). A
blue triangle appears pointing up, which indicates that
the children are now sorted by Child ID in ascending
order. To sort in descending order, click Child ID again (note: blue triangle will point down).
8
Searching: To search a grid by any field, enter the
Figure 9: Searching by caregiver last name
text to search for in the search box at the top of
that field column. There is also now a general
search box near the top-right side of each search
grid.
Searching example: To search for a caregiver with
the last name “Smith” in the Search Caregiver grid,
type “Smith” in the text entry box directly under the
Figure 10: Drop-down Sorting
column heading Last Name. The grid will now only
contain caregivers with a last name that begins with
“Smith” (Figure 9).
Drop-Down Sorting: Columns that have limited
possible entries use a drop-down box for sorting.
For these columns (such as the Status column in
Figure 10), simply select the criteria to sort by from
the drop-down box.
Page Navigation: Search grids visually by using the
page navigation bar at the bottom of the grid
(Figure 11). Use arrow buttons to skip forward or
Figure 11: Page navigation
backward by page, or type in desired page number.
Users may also choose how many entries to see on
each page of a search grid.
Zooming In/Out: If search grids are not aligned well on screen (e.g. all the columns of a
table do not fit on the screen), adjusting the browser zoom may help. Check the web
browser menu for a zoom function.
Keyboard shortcuts are another way to zoom in or out:
Zooming in Windows: hold Ctrl and press - to zoom out, or hold Ctrl and press + to zoom in.
Zooming on a Mac: hold Command and press - to zoom out, or hold Command and press + to
zoom in.
9
4. Caregiver Profiles
4a. What are Caregiver Profiles?
Caregiver profiles are records DAISEY users create for each adult that is receiving services
from the organization. The caregiver may be receiving services directly from the
organization or be the guardian of a child who receives services. Caregiver profiles include
demographic information about the adult. Each caregiver profile is designated as ”primary”
or “secondary”. In DAISEY, all adults and children in a family are connected through a single
primary caregiver profile.
Note: Although a DAISEY caregiver is often a parent or guardian, a caregiver may be any
adult who is receiving services from your organization; A caregiver profile can exist in
DAISEY without being tied to a child profile.
4b. Managing Caregiver Profiles
The Search Caregiver link is found under Family Profiles on the left navigation menu. This
page contains a search grid of caregiver profiles created by DAISEY users.
In the Search Caregivers grid, each row contains information specific to that caregiver:
•
Caregiver ID: the ID number of the caregiver automatically generated by DAISEY
o
Click the Caregiver ID to open the Family Activities Page for that caregiver. (See
section 6 for more on Family Activities.)
•
Alternate ID: the number an organization has assigned to the caregiver;
•
Last Name and First Name of the caregiver.
•
Enrollment Date: the date the caregiver began receiving services at this organization.
•
Caregiver Status: whether the caregiver is the “primary” caregiver
(i.e. “yes” = primary).
•
Program(s): program(s) a caregiver is associated with.
•
Action: clickable icons allow users to perform certain actions:
o
View or edit a caregiver profile by clicking the pencil icon.
o
Delete caregiver profile by clicking the trashcan icon. Not
Figure 12: Action
Column
recommended (See section 4f).
o
View the “form history” by clicking on the paper icon (i.e.
see when edits were made and by which user).
10
4c. Adding Primary Caregiver Profiles
A caregiver is an adult who is either receiving services directly or cares for a child who is
receiving services. Although using the term “caregiver” implies there is a child involved,
caregivers do not need to be associated to any children. This is simply the term used to
denote an adult profile in DAISEY.
Note: Before you create a new profile, browse or search for the caregiver to see if a
profile has already been created.
To add a new primary caregiver profile:
•
Click Family Profiles in the left navigation menu.
•
Click Search Caregiver.
•
Near the top-right corner of the search grid, click the Add Caregiver button (Figure
13).
Figure 13: Search Caregiver grid
•
A blank caregiver profile form appears (Figure 14). Note that an organization’s
caregiver profile may contain different questions from those shown in Figure 14.
•
Fill in all information collected on the caregiver.
Note: Users must add the primary caregiver in the household first, before adding
secondary or other caregivers in a household. The drop-down menu for the question Is
this the primary caregiver of the child? is automatically set to “yes” when adding a new
caregiver. If adding other caregivers in the household, see section 4d.
11
Figure 14: Add New Caregiver Information Fields
•
Mandatory fields are marked with an asterisk (*) and must be filled in in order to
save the caregiver profile. Please note that each organization may have data
collection requirements above and beyond those mandatory fields.
•
Once all information is entered, click Save near the bottom of the page. An alert box
will pop up that reads: “Successfully saved caregiver with ID” followed by the
automatically generated caregiver ID.
•
Click OK.
4d. Adding Secondary Caregiver Profiles
To add a new secondary caregiver profile:
•
Click Family Profiles in the left navigation menu.
•
Click Search Caregiver.
•
Locate the primary caregiver of the
household this secondary caregiver will be
Figure 15: Add Secondary Caregiver Button
associated to.
•
Click the pencil icon (Edit) under the Action
column.
•
Click the Add Secondary Caregiver button
near the bottom of the page (Figure 15).
•
Rather than being directed to a new page,
the demographic information fields on the
current page will go blank.
•
Fill in all information collected on the
secondary caregiver.
12
Note: The drop-down menu for the question “Is this the primary caregiver of the child?”
is automatically set to “No”.
•
5. Child Profiles
Mandatory fields are marked with an asterisk (*) and must be filled in in order to
save the caregiver profile. Please note that each organization may have data
collection requirements above and beyond those mandatory fields.
•
Once all information is entered, click Save near the bottom of the page. An alert box
will pop up that reads: “Successfully saved caregiver with ID” followed by the
automatically generated caregiver ID.
•
Click OK.
Note: When saving a new Secondary Caregiver, be careful to hit the Save button and not
the Add Secondary Caregiver button (again), which will clear the form again.
4e. Editing a Caregiver Profile
To edit a caregiver profile:
•
Click Family Profiles in the left navigation menu.
•
Click Search Caregiver.
•
Locate caregiver profile to edit.
•
Click the pencil icon in the Action column.
•
Make changes.
•
Click Save near the bottom of the page.
4f. Deleting a Caregiver Profile
Note: Deleting is not recommended. Do not delete a profile if connected to any Family
Activity data. Profiles created accidentally may be deleted (e.g. a duplicate).
To delete a caregiver profile:
•
Click Family Profiles in the left navigation menu.
•
Click Search Caregiver.
•
Locate caregiver profile to delete.
•
Click the trashcan icon in the Action column.
•
A prompt will appear that asks “Are you sure you want to Delete the selected form”?
•
Click OK to confirm and delete. Or, click Cancel to cancel the deletion.
13
5. Child Profiles
5a. What are Child Profiles?
Child profiles are records DAISEY users create for each child that is associated with an
organization. Child profiles include demographic information about the child. Child profiles
can be linked to caregiver profiles in the system.
5b. Managing Child Profiles
The Search Child link is found under Family Profiles on the left navigation menu. This page
contains a search grid of child profiles created by DAISEY users.
In the Search Child grid, each row contains information specific to that child:
•
Child ID: the ID number of the child automatically generated by DAISEY.
o
Click the Child ID to open the Family Activities Page for that child. (See section
6 for more on Family Activities.)
•
Alternate ID: the number an organization has assigned to the child.
•
Child Last Name and Child First Name.
•
Caregiver ID: the DAISEY Caregiver ID of the associated primary caregiver.
•
Caregiver First Name and Caregiver Last Name of the associated primary caregiver.
•
Enrollment Date: the date the child began receiving services
•
Status: whether or not the child is actively receiving
services.
•
Program(s): program(s) a child is associated with.
•
Action: clickable icons allow users to perform certain
Figure 16: Action
Column
actions:
o
View or edit a child profile by clicking the pencil icon.
o
Delete child profile by clicking the trashcan icon. Not
recommended (See section 5f).
o
View the “form history” by clicking on the paper icon
(i.e. when edits were made and by which user).
5c. Adding Child Profiles
Note: Browse or search for the child’s name to see if a profile has already been created.
14
To add a new child profile:
•
Click Family Profiles in the left navigation menu.
•
Click Search Child.
•
Near the top-right corner of the search grid, click the Add Child button (Figure 17).
Figure 17: Search Child Grid
•
A blank child profile form appears (Figure 18). Note that an organization’s caregiver
profile may contain different questions from those shown in Figure 18.
Figure 18: Add Child Profile Page
•
Fill in all information collected on the child.
•
Mandatory fields are marked with an asterisk (*) and must be filled in in order to
save the child profile. Please note that each organization may have data collection
requirements above and beyond those mandatory fields.
•
Once all information is entered, click Save near the bottom of the page. An alert box
will pop up that reads: “Successfully saved child with ID” followed by the
automatically generated child ID.
•
Click OK.
15
5d. Associating Child Profiles with Caregiver Profiles
Note: All child and caregiver profiles are associated to a family in DAISEY through one
primary caregiver profile.
To associate a child profile with an existing primary caregiver profile:
•
Click Family Profiles in the left navigation menu.
•
Click Search Child.
•
Locate the child profile to be associated a
Figure 19: Choose Primary Caregiver
primary caregiver.
•
Click the pencil icon (Edit) under the Action
column.
•
Near the bottom of the page, above the
“Associated Caregiver” section and next to
the Save button, click the button that says
Choose Primary Caregiver
Figure 20: Existing Caregiver List: Associating Child Profiles
(Figure 19).
•
A list of all the existing
primary caregivers for this
organization will appear
(Figure 20).
•
Locate the primary caregiver
for this child profile. Click the
Caregiver ID to create the
association.
•
The caregiver will appear in
the Associated Caregiver table at the bottom of the page, along with any associated
secondary caregivers.
•
Click Save.
Note: If the wrong primary caregiver was accidentally selected, simply repeat the above
steps. Click on the correct Caregiver ID and then Save. Users may remove the primary
caregiver by clicking the trash icon can next to the caregiver in the Associated Caregiver
table at the bottom of the child profile.
16
5e. Editing Child Profiles
To edit a child profile:
•
Click Family Profiles in the left navigation menu.
•
Click Search Child.
•
Locate child profile to edit.
•
Click the pencil icon in the Action column.
•
Make changes.
•
Click Save near the bottom of the page.
5f. Deleting Child Profiles
Note: Deleting is not recommended. Do not delete a profile if connected to any Family
Activity data. Profiles created accidentally may be deleted (e.g. a duplicate).
To delete a child profile:
•
Click Family Profiles in the left navigation menu.
•
Click Search Child.
•
Locate child profile to delete.
•
Click the trashcan icon in the Action column.
•
A prompt will appear that asks “Are you sure you want to Delete the selected form?”
•
Click OK to confirm and delete. Or, click Cancel to cancel the deletion.
17
6. Family Activities
6a. What are Family Activities?
Family Activities are data forms that are attached to child and/or caregiver records. Within
Family Activities, users can view all children and/or caregivers in a family, access available
program forms for submission of collected data, and view a history of saved or submitted
forms. Forms available will vary between organizations.
6b. Accessing Family Activities
The Family Activities Page can be accessed through both the Search Child and Search
Caregiver menu links under Family Profiles in the left navigation menu.
Navigate to the Family Activities Page through the Search Child grid:
•
Click Family Profiles in the left navigation menu.
•
Click Search Child.
•
Locate any child profile associated with the family in DAISEY.
•
Click the Child ID.
Navigate to the Family Activities Page through the Search Caregiver grid:
•
Click Family Profiles in the left navigation menu.
•
Click Search Caregiver.
•
Locate any caregiver
Figure 21: Family Activities Page
profile associated
with the family in
DAISEY.
•
Click the Caregiver ID.
Users will be redirected to a
Family Activities Page with 3
sections: Family Association,
Family Activities Form History,
and Forms Available for
Family Activities. (Figure 21)
18
The Family Association grid shows all child and caregiver profiles linked to the family
through the same primary caregiver profile.
In the Family Activities Form History grid, each row contains information specific to a form
filled out for at least one member of this family:
•
ID: A DAISEY ID generated for this specific form.
•
Activity Forms: the name of the activity form entered.
•
Activity Date: the date the activity occurred (i.e. when the data was gathered).
•
Caregiver Involved: the caregiver named on the form.
•
Child Involved: the child named on the form.
•
Organization: the name of the organization of the user that entered data into the
form.
•
Status: whether the form has been “Submitted” or is still “In Progress”.
•
Family Form ID: the ID number assigned to the activity form.
•
Action: clickable icons allow users to perform certain actions:
o
View a form my clicking the magnifying glass icon. (Only an option for
submitted forms.)
o
Edit a form by clicking the pencil icon. (Only an option for forms in progress.)
o
Revert a submitted form back to “in progress” for editing by clicking the
arrow icon. (Not an option for Provider-level users.)
o
Delete the form by clicking the
Figure 22: Action Column Commands: Edit
trashcan icon. Not recommended
(See section 6e).
o
View the “form history” by clicking on
the paper icon (i.e. when edits were
made and by which user).
6c. Adding Family Activities
To add a family activity form:
•
Follow the instructions in section 6b to
access the Family Activities Page.
•
Click the name of the form to add from
those listed in the Forms Available for Family
Activities section. The forms available will
vary between organizations.
•
A blank form will appear.
Note: Some new forms may not be
completely blank if the “autofill”
feature is enabled. This will fill in
commonly repeated information
from the last time this form was
filled out for this family. Users do
not have control over the
enabling/disabling of autofill.
19
•
Fill in all collected data.
•
Click Save to save data as “in progress” and continue working on the form; OR
•
Click Submit if the information is correct and ready to be fully submitted.
•
Once Submit is clicked, users are redirected to the Family Activities Page. In the Family
Activities Form History grid, the recently-created form will appear.
Note: Users with the Provider role in DAISEY are unable to revert a form once
submitted. Users with the Program Admin role are able to revert form status for editing
if needed.
6d. Editing Family Activities
To edit a family activity form:
•
Follow the instructions in section 6b to access the Family Activities Page.
•
Locate the activity form to edit in the Family Activities Form History section.
Note: Submitted forms cannot be edited and must first be reverted to “in progress”.
•
Click the pencil icon in the Action column.
•
Make changes.
•
Click Save to save data as “in progress” (i.e. incomplete); OR
•
Click Submit if the information is correct and ready to be fully submitted.
6e. Deleting Family Activities
Note: Deleting is not recommended. Forms created accidentally may be deleted.
To delete a family activity form:
•
Follow the instructions in section 6b to access the Family Activities Page.
•
Locate the activity form to delete in the Family Activities Form History section.
•
Click the trashcan icon in the Action column.
•
A prompt will appear that asks “Are you sure you want to Delete the selected form”?
•
Click OK to confirm and delete; OR click Cancel to cancel the deletion.
6f. Safety Mode Feature
Note: Not all organizations have forms with the safety mode feature added.
20
Safety mode provides a way to allow non-DAISEY users (e.g. clients or caregivers of clients)
to directly enter data into DAISEY without compromising the security of other data in
DAISEY. If the safety mode feature has been added to a form, a green Safety Mode button
will appear (Figure 23). To enable safety mode for this form, click that button.
Figure 23: Example of Form with Safety Mode Feature
After clicking the Safety Mode button, an alert box will appear on the screen (Figure 24).
Click Enable Safety Mode to continue. Click Cancel to return.
Figure 24: Safety Mode Alert Box
Once safety mode is enabled, this will be indicated by a blue box near the top of the form
(Figure 25). The form can now be filled out. Once the form is submitted, the user is logged
out of DAISEY. No other data can be accessed by the person filling out the form.
Figure 25: Safety Mode Enabled
21
7. Environment Profiles
7a. What is Environment Data?
The Environment Data menu link contains a search grid of environment profiles (e.g.,
daycares and classrooms) that users have entered into DAISEY. These profiles are used to
track environment-level data (e.g. classroom observation data), as well as which children
are in each environment.
7b. Managing Environment Profiles
The Search Environment Data link is found under Environment Data in the left navigation
menu. This page contains a search grid of environment profiles created by DAISEY users.
In the Search Environment Data grid (Figure 26), each row contains information specific to
that environment profile:
•
Environment ID: the ID number of the environment automatically generated by
DAISEY.
o
Click the Environment ID to open the Environment Activities (see section 8).
•
Type: what type of environment is reflected in the profile (e.g., Day Care, Classroom).
•
Name: the user-chosen name of the environment.
•
Organization: the name of the organization that added the Environment Profile.
•
Program(s): program(s) an environment is associated with.
•
Action: clickable icons allow users to perform certain actions:
o
View or edit a profile by clicking the pencil icon.
o
Delete profile by clicking the trashcan icon. Not recommended (see section
7f).
o
View the “form history” by clicking on the paper icon (i.e. when edits were
made and by which user).
Figure 26: Search Environment Data Grid
22
7c. Adding New Environment Profiles
To add a new environment profile:
•
Click Environment Data in the left navigation menu.
•
Click Search Environment Data.
•
Near the top-right corner of the search grid, click the Add Environment button
(Figure 26).
•
A blank environment profile form appears (Figure 27). Note that an organization’s
environment profile may contain different questions from those shown in Figure
27.
•
Fill in all information collected on the environment.
Note: It is helpful for each group of children to have their own environment profile. For
instance, if a classroom is a half-day classroom, users may find it helpful to denote this
in the environment names: “Ladybug Class AM” and “Ladybug Class PM”. It may also be
helpful to include the class year in the name (e.g. “Ladybug Class 2015-2016”).
•
Mandatory fields are marked with an asterisk (*) and must be filled in in order to
save the profile. Please note that each organization may have data collection
requirements above and beyond those mandatory fields.
•
Once all information is entered, click Save near the bottom of the page. An alert box
will pop up that reads: “Successfully saved environment with ID” followed by the
automatically generated environment ID.
•
Click OK.
Figure 27: Creating an Environment Profile
The new environment will now appear in the Search Environment Data grid.
23
7d. Associating Children to Environment Profiles
When creating or editing an environment profile, users may associate children with the
environment.
Note: Child profiles to associate must be created before associating them to
environments.
To associate child profiles with an environment profile:
•
Click Environment Data in the left navigation menu.
•
Click Search Environment Data.
•
Locate the environment profile to associate children to.
•
Click the pencil icon (Edit) under the Action column.
•
Click the Choose Associated Children button near the bottom of the form (Figure 27).
•
A search grid of child profiles
appears (Figure 28).
•
Select the children to associate with
Figure 28: Associating Children with the
Environment Profile
this environment by clicking the
check box next to each child in this
environment.
•
Click the Select button.
•
The selected children now appear in
the Associated Children section of
the profile.
•
Click Save to save the newly
associated children to the
Environment Profile.
7e. Editing Environment Profiles
To edit an environment profile:
•
Click Environment Data in the left navigation menu.
•
Click Search Environment Data.
•
Locate the environment profile to edit.
•
Click the pencil icon (Edit) under the Action column.
•
Make changes.
•
Click Save near the bottom of the page.
24
7f. Deleting Environment Profiles
Note: Deleting is not recommended. Profiles created accidentally may be deleted (e.g. a
duplicate).
To delete an environment profile:
•
Click Environment Data in the left navigation menu.
•
Click Search Environment Data.
•
Locate environment profile to delete.
•
Click the trashcan icon in the Action column.
•
A prompt will appear that asks “Are you sure you want to Delete the selected form”?
•
Click OK to confirm and delete. Or, click Cancel to cancel the deletion.
25
8. Environment Activities
8a. What are Environment Activities?
Environment Activities are data forms that are attached to environment profiles. Within
Environment Activities, users can access available program forms for submission of collected
environment-level data and view a history of saved or submitted forms. Forms available
will vary between organizations.
8b. Accessing Environment Activities
The Environment Activity Page for any environment profile is accessed through the Search
Environment Data grid.
To view an Environment Activity Page:
•
Click Environment Data in the left navigation menu.
•
Click Search Environment Data.
•
Locate the environment profile to view.
•
Click the Environment ID.
Users will be redirected to an Environment Activities Page with 2 sections. Environment
Activities and Forms Available for Environment Activities. (Figure 29)
Figure 29: Environment Activities Page
26
In the Environment Activities grid, each row contains information specific to a form filled out
for this environment profile:
•
ID: A DAISEY ID generated for this specific form.
•
Activity Forms: the name of the activity form entered.
•
Activity Date: the date the activity occurred (i.e. when the data was gathered).
•
Organization: the name of the organization of the user that entered data into the
form.
•
Status: whether the form has been “Submitted” or is still “In Progress”.
•
Action: clickable icons allow users to perform certain actions:
o
View a form my clicking the magnifying glass icon. (Only an option for
submitted forms.)
o
Edit a form by clicking the pencil icon. (Only an option for forms in progress.)
o
Revert a submitted form back to “in progress” for editing by clicking the
arrow icon. (Not an option for Provider-level users.)
o
Delete the form by clicking the trashcan icon.
o
View the “form history” by clicking on the paper icon (i.e. when edits were
made and by which user).
8c. Adding Environment Activities
To add an environment activity:
•
Click Environment Data in the left navigation menu.
•
Click Search Environment Data.
•
Locate the environment profile to add form data to.
•
Click the Environment ID.
•
Click the name of the activity form to add from the list of Forms Available for
Environment Activities.
•
A blank form will appear.
•
Fill in all collected data.
•
Click Save to save data as “in progress” (i.e. incomplete); OR
•
Click Submit if the information is correct and ready to be fully submitted.
Note: Users with the Provider role in DAISEY are unable to revert a form once
submitted. Users with the Program Admin role are able to revert form status for editing
if needed.
The new form will now appear in Environment Activities.
27
8d. Editing Environment Activities
To edit an environment activity form:
•
Click Environment Data in the left navigation menu.
•
Click Search Environment Data.
•
Locate the environment profile attached to the activity form to be edited.
•
Click the Environment ID.
•
Locate the activity form to edit in the Environment Activities grid.
Note: Submitted forms cannot be edited and must first be reverted to “in progress”.
•
Click the pencil icon in the Action column.
•
Make changes.
•
Click Save to save data as “in progress” (i.e. incomplete); OR
•
Click Submit if the information is correct and ready to be fully submitted.
8e. Deleting Environment Activities
Note: Deleting is not recommended. Forms created accidentally may be deleted.
To delete an environment activity form:
•
Click Environment Data in the left navigation menu.
•
Click Search Environment Data.
•
Locate the environment profile attached to the activity form to be edited.
•
Click the Environment ID.
•
Locate the activity form to delete in the Environment Activities grid.
•
Click the trashcan icon in the Action column.
•
A prompt will appear that asks “Are you sure you want to Delete the selected form”?
•
Click OK to confirm and delete; OR click Cancel to cancel the deletion.
28
9. Data Management
From the Data Management menu links, users can import data into DAISEY, export data
from DAISEY, and view reports generated by DAISEY.
9a. Importing Data to DAISEY
This section demonstrates how to use data templates to gather and format data for
importing. Some users may have an existing data system or tool to collect data on the
children and families they serve. The import function is available to those users who wish
to export data from their system, prepare it for importing into DAISEY, and load the data
into the system. Importing data requires that users prepare their data in specific ways so it
is formatted and ready for DAISEY. Data templates are available to ensure that all imported
information aligns with DAISEY requirements.
Note: The import process requires that users have basic Excel skills such as copying,
pasting, and formatting cells.
When users click Import under Data Management in the left navigation sidebar, three links
will appear: Import Data, Data Templates, and ID Reports. Using these links, users can import
data for forms and profiles.
The import process is slightly different when importing new profile forms versus importing
new activities forms. The tables below show the steps in each process:
Table 1: Importing New Profile Form Data
Step 1:
Download the Data Template for the specific profile form to import (section 9c).
Step 2:
Fill out the Data Template by entering data into the template (section 9c).
Step 3:
Save template and close.
Step 4:
Import the file to the DAISEY system (section 9d).
See section 9e for details on importing profiles.
See section 9f for how to edit and overwrite existing profiles using the import function.
29
Table 2: Importing New Activities Form Data
Step 1:
Child, caregiver, and/or environment profiles must exist before importing
activities data for those profiles. Profiles may be:
• Entered manually (see sections 4c, 4d, 5c, & 7c) OR
• Imported (see table 1 above and section 9e).
Step 2:
Download the appropriate ID Report(s): child, caregiver, and environment IDs
for the type of data to be imported (see section 9b).
Step 3:
Download the Data Template for the specific form data to import (section 9c).
Step 4:
Copy and paste ID numbers from the ID Reports to children, caregivers, and/or
environments in the Data Template.
Step 5:
Complete the rest of the Data Template by entering data into the template
(section 9c).
Step 6:
Save template and close.
Step 7:
Import the file to the DAISEY system (section 9d).
9b. Matching ID Numbers Using ID Reports
Each caregiver, child, and environment profile is assigned a unique DAISEY ID number upon
creation. If a user’s organization assigns ID numbers, each profile will have an alternative ID
number that may be different. To successfully complete the import process, users need to
use an ID Report to match the data to corresponding DAISEY ID numbers.
Note: Some organizations utilize an optional DAISEY feature to share profiles with
other organizations under the same grantee. This means that users in those
organizations can view profiles created by other organizations in their search grids.
At this time, only profiles created by the current user’s organization will show up in their
ID Report. Therefore, this report only includes profiles beginning with the same
organizational ID before the dash. If such users need to import data for other profiles
they have access to, they will need to export the profile data instead of downloading
the ID Report to get an Excel list of all profile IDs viewable in their search grids. For more
on the exporting process, see section 9h.
To download an ID report:
•
Click Data Management in the left navigation menu.
•
Click Import.
•
Click ID Reports.
•
Click the download icon (
) in the Action column to download either the Child IDs,
Caregiver IDs, or Environment IDs data file.
30
Once the file is open, users can view all children, caregivers, or environments created by
their organization (Figure 30). The left column contains the DAISEY ID. Users will need to
enter the DAISEY ID number on the import template for any activity data.
Figure 30 : Child ID Report
9c. Downloading Data Templates for Import
Data templates are Excel files which contain all the fields necessary to import child,
caregiver, environment, and/or activities data. Clicking the Import Data menu link brings
users to the Search Forms grid (Figure 31). The Search Forms grid is a list of all the templates
available for importing data into DAISEY.
To download a Data Template:
•
Click Data Management in the left navigation menu.
•
Click Data Templates.
•
Click the download icon (
) in the Action column in the row that corresponds to the
type of form to import.
Figure 31: Search Forms Grid
31
The data template will contain a column for each question in the form (Figure 32).
Rows 1-7 provide guidance on how to fill out the form:
•
Row 1 displays the text “Data Sheet for” followed by the name of the form which will
be created upon importing.
•
Row 2 displays the question ID for each column
•
Row 3 displays the question text.
•
Row 4 indicates the data type.
•
Row 5 indicates the format type.
•
Row 6 specifies the allowable responses for questions that appear as drop-down
boxes in DAISEY.
•
Row 7 indicates whether this question is a mandatory field.
Figure 32: Data Template Example
Each row filled out beginning with row 8 (highlighted in Figure 32), will create a new form
when imported. Note that users must have the correct format type for filled out cells (e.g.
columns marked as “Date” in rows 4 & 5 must be formatted as dates in Excel) When a row
has been filled out for each form to be created, save the data template in a familiar
location.
One or both of these questions will be required to import Family Activities forms:
“Which child was involved?” and “Which caregiver was involved?” These are
marked as “dynamic” fields. Each will pull the answer from the related ID filled out
elsewhere in the template. Therefore, simply provide the Child ID and/or Caregiver ID
as required in the Child ID and/or Caregiver ID field and leave the “Which _______ was
involved?” columns blank.
Important rules for importing data for questions with single-select drop-down answer
boxes:
• All possible choices will be in row 6. Each choice will be separated by a vertical
line(|).
• Answer must match exactly as written between the vertical bars in row 6. Extra
spaces or incorrect capitalization will prevent data from importing correctly.
32
Important rules for importing data for questions with multi-select drop-down answer
boxes:
• If users would like to import more than one choice, separate each choice with a
vertical line. (e.g. Pre-K|Home Visiting)
• The vertical line is created on a standard (QWERTY) keyboard by holding the
“shift” key while pressing the backslash (\) key.
• Hint: The answers can also be copied and pasted directly from row 6, removing
any unnecessary answers and vertical lines.
Note: Unless importing new profiles (see section 9e), at least one DAISEY Autogenerated ID is required in the template: Child ID, Caregiver ID, and/or Environment
ID.
9d. Importing Completed Data Templates
Note: Users cannot import activities data for a caregiver, child, or environment profile if
the profile does not already exist in the DAISEY system.
To learn how to manually add profiles, review sections 4c, 4d, 5c, and 7c.
To import profiles, see section 9e.
To import completed Data Templates into DAISEY:
•
Click Data Management in the left navigation menu.
•
Click Import Data.
•
Use the Search Forms grid to find the form type to import.
•
In the right-most column of the Search Forms grid, select the radio button next to
the chosen template to import.
•
Click the Excel symbol (
) under the Search Forms grid.
•
A pop-up screen will appear. Locate the prepared and saved data template (section
9c) to import.
•
Select the prepared Data Template file, then click Open.
•
Click Import.
•
It may take a few moments to process the import.
•
Once the processing is complete, a message will appear to the right of the Import
button. This message will notify the user that the import was successful (Figure 33)
or detail the errors that made the import unsuccessful.
•
If no errors occurred, press Confirm to complete the import or Cancel to nullify the
import.
33
Figure 33: Import Confirmation Prompt
If errors were encountered during the import, an error message will appear. Click
•
View Details. A dialogue box (Figure 34) will appear explaining the error that
occurred during import, including the row and column number of the cells in the
Excel data template that must be fixed before the import will be successful.
Figure 34: Import Error Notification
9e. Creating New Profiles Using Import
The import tools can be used to create multiple new child, caregiver, or environment
profiles at once.
Note: If importing multiple profiles for the same family (or families), import the primary
caregiver(s) first:
•
If adding a child or secondary caregiver profile that will be associated to an
existing primary caregiver profile, the Caregiver ID Report needs to be used to
reference and fill in the ID of the primary caregiver (see section 9b).
To add new child, caregiver, or environment profiles using import:
•
Download the Add Child Profile, Add Caregiver Profile, or Add Environment Profile form
from the Data Templates grid (see section 9c).
•
Fill in data in the Excel file.
•
When adding new profiles, leave the Child/Caregiver/Environment ID column blank in
the Excel form. DAISEY will generate new profile IDs when the profile data is
imported.
•
When finished, import the file using the Import Data sidebar link (see section 9d).
34
9f. Updating Profiles Using Import
The import tools can be used to overwrite existing child, caregiver, and environment
profiles. Users cannot overwrite Family or Environment Activities using the import function.
To edit multiple existing child, caregiver, or environment profiles using import:
Download the Add Child Profile, Add Caregiver Profile, or Add Environment Profile form
•
from the Data Templates grid (see section 9c).
Fill in data in the Excel template.
•
o
Use ID Reports to specify which profile(s) to overwrite (see section 9b).
o
Hint: Use data from a profile export to fill in data which will remain the same
(see section 9h).
Note: Using import tools to edit profile data will overwrite existing data in DAISEY.
•
Any existing profile data that overlaps with data entered in the template will be
replaced.
•
Any data fields left blank in the template will be imported as blanks. If only a few
fields need to be updated, it is best to edit profiles manually (covered in sections
4e, 5e, and 7e).
•
If an incorrect ID number is entered in the data template, data for that record
will be lost and overwritten.
When finished, import the Date Template using Import Data (see section 9d).
9g. List of Common Import Errors
The following table is a list of common errors encountered while importing data into the
DAISEY system. If an error occurs while importing, refer to the table in order to correct any
errors before attempting to import again. Please note that this list is not exhaustive, and
other errors may occur.
Error Message
Explanation
INCORRECT_FORM_ERROR_GLOBAL
The data user is trying to import does not match
the current template. Please go to Data
Templates to download the latest version of the
form. Please ensure data begins in the second
column, eighth row (B8).
User is trying to import an incorrect, deleted or
dissociated form.
INCORRECT_OR_CORRUPT_GLOBAL
35
INCORRECT_OR_EMPTY_GLOBAL
INVALID_TEMPLATE_GLOBAL
UNFILLED_GLOBAL
INCORRECT_FORMAT_QUESTIONID_GLOBAL
INCORRECT_FORM_TEMPLATE_GLOBAL
SELECTED_FORM_DOES_NOT_EXIST_GLOBAL
UPLOADED_FORM_DOES_NOT_EXIST_GLOBAL
FORM_WITH_MULTIPLE_CHILDID_CAREGIVERID_QUES
TION_GLOBAL
NOT_LATEST_FORM_GLOBAL
NO_QUESTIONS_IN_THE_FORM_GLOBAL
FORM_DELETED_OR_DEASSOCIATED_GLOBAL
EMPTY_CHILDID
INCORRECT_CHILDID
INCORRECT_CAREGIVERID
EMPTY_CAREGIVERID
EMPTY_BOTH_CHILD_CAREGIVER
ADD_ERROR
ADD_ERROR_DATA
IMPORT_SYSTEM_ERROR_GLOBAL
IMPORT_ERROR_GLOBAL
User is trying to import an incorrect or empty
form.
User is not using a valid template. Please go to
Data Templates to download the latest version
of the form. Please ensure data begins in the
second column, eighth row (B8).
User is not using the correct template. Please
download the appropriate template for the
required form and try again.
Question ID must be numeric. User is trying to
import an incorrect form.
User is trying to import data for a form that does
not have any data. Please ensure data begins in
the second column, eighth row (B8).
Selected form does not exist. Confirm the
location of the file for upload.
Uploaded form does not exist. Confirm the
location of the file for upload.
A form cannot have more than one child
involved or caregiver involved questions.
Form template is not latest. The data the user is
trying to import does not match the current
template. Please go to Data Templates to
download the latest version of the form. Please
ensure data begins in the second column, eighth
row (B8).
The form does not contain any questions. Please
go to Data Templates to download the latest
version of the form.
The form has been deleted or disassociated
from the user organization.
Child ID field is not recognized or missing.
Child ID is not found.
Caregiver ID is not found.
Caregiver ID field is not recognized or missing.
Both Child and Caregiver IDs are either incorrect
or both empty.
Error adding record.
Failed to add record.
Unexpected error. Failed to import.
Incompatible file or file might have been
corrupted.
36
9h. Exporting Data
Some users may need to extract data that has been entered into the DAISEY system and
use that data within other applications (e.g. Excel, SPSS). In the Data Management tab, Users
can export data that have been entered into the DAISEY system.
Note: Before exporting data, users may want to see if there is an Intelligent Report
available within DAISEY that meets the user’s data reporting needs (see section 9i).
To export Family or Environment Activities form data as an Excel workbook:
•
Click Data Management in the left navigation menu.
•
Click Export.
•
In Export Data, locate the type of data to export (i.e. the name of the form).
•
Click the radio button in the far right column to select the data for export.
•
Click Export button near the bottom left corner of the Export Data grid (Figure 35).
Figure 35: Selecting Data Form to Export
Figure 36: Export Spreadsheet
37
The data export will contain a column for each question in the DAISEY form (Figure 36).
Rows 1-7 provide guidance on how to interpret the form:
•
Row 1 displays the text “Data for” followed by the name of the form which was
exported.
•
Row 2 displays the question ID for each column
•
Row 3 displays the question text.
•
Row 4 indicates the data type.
•
Row 5 indicates the format type.
•
Row 6 specifies the allowable responses for questions that appear as drop-down
boxes in DAISEY.
o
Note that for coded answers (e.g. “1,Yes|0,No”) only the number will appear
in the answer cells below (e.g. “1”).
•
Row 7 indicates whether this question is a mandatory field.
Note: If a question has changed between when a form was entered into DAISEY and
when the form was exported, some answers may not match current allowable
responses or some answers may be missing from newly-mandatory questions.
9i. Generating Intelligent Reports
Within the DAISEY system, there are a number of reports available which summarize the
Family or Environment Activities data that have been entered into DAISEY. Although the list
of available Intelligent Reports differ between organizations, the basics steps for generating
each report are the same.
To view a report:
•
Figure 37: Entering Intelligent Report
Parameters
Click Data Management in the left navigation
menu.
•
Click Intelligent Reports.
•
Sub-menu options that appear under
Intelligent Reports will vary.
•
Once in a reports search grid, locate the
report to generate.
•
Click on the report name.
•
A parameter box will pop up (Figure 37). The options in this box will vary depending
on which type of report being generated. However, users always need to select a
38
date range and organization(s). These parameters tell the DAISEY system to include
data in the report only if the forms were completed between those dates and for
the selected organization(s).
•
Once all necessary parameters are selected for
the report, click OK.
•
Figure 38: Processing an Intelligent
Report
A pop-up box will appear with a processing bar
(Figure 38). This may take a few minutes.
•
When the box disappears, a report will appear
on the screen. Figure 39 shows an example
report: Family Activity Form Completion Report.
Figure 39: Example of Family Activity Completion Report
•
There is an icon menu near the top-right corner of each report. Hovering a mouse
cursor over an icon will display the function of that button. Here are some functions
that may be useful after generating an Intelligent Report:
o
To run the same report with different parameters (e.g. a different date
range), click Run Report (
).
39
o
To export the unformatted data, click Export Data. (
o
To export the report in a different format (e.g. PDF, Excel workbook), click
Export Report (
o
)
).
To print a paper copy, select Print Report (
).
Note: If there is no Intelligent Report available within DAISEY that meets a user’s data
reporting needs or to allow more flexibility in data visualization/summarization, users
may want to export data (see section 9h) and use other programs (e.g. Excel, SPSS) to
create the needed report.
40
Data Governance and Security
About DAISEY
The University of Kansas Center for Public Partnerships and Research (CPPR) is working
with early childhood system partners to build upon existing efforts and infrastructure to
ensure Kansas can effectively coordinate, improve, and track outcomes for infants and
toddlers across the state. To this end, CPPR developed Data Application and Integration
Solution for the Early Years (DAISEY), a web-based shared measurement tool used by early
childhood system partners and funders. DAISEY consolidates data for the purpose of
centralized data storage and single-source reporting. DAISEY provides the capacity to fulfill
funder reporting requirements and provides access to data for reporting and analysis to
improve practice and services to children and families.
Security Policies and Procedures
CPPR recognizes the sensitive nature of data in DAISEY, as well as the trust partners place
in CPPR to protect that information. As a result there are extensive policies and procedures
that govern all aspects of DAISEY operations. University of Kansas Information Technology
(KU IT) has extensive policies and procedures relevant to DAISEY, most notably the Data
Classification and Handling Policy , Data Classification Procedures Guide, and the Security
Policy. In addition, the Center for Public Partnerships and Research established the Data
Management and Security Policies and Procedures Manual, and the DAISEY Policy and
Procedures Manual to bolster KU IT’s safeguards.
Data Governance Documentation
In addition to established policies and procedures, CPPR works with its partners to
implement data governance documentation that ensures protections and safeguards for
DAISEY information at all levels.
Terms of Use: between our partner and their grantees, this document establishes
what data will go into DAISEY, how it will be used, and how it will be protected.
Memorandum of Agreement: between grantees in a data sharing community, this
document outlines terms regarding how shared data is used and protected.
41
User Confidentiality and Data Security Agreements: signed by DAISEY users, this
document requires their commitment to protect data and follow DAISEY use
regulations.
Because there are a variety of organizations using DAISEY, CPPR also provides support to
determine appropriate avenues for documentation of client consent for data entry and
data sharing in DAISEY.
Technical Specifications
DAISEY is hosted on two single use virtual servers. The servers address HIPAA Security Rule
requirements for the protection of Protected Health Information (PHI). The system has the
necessary safeguards in place for administrative, technical, and physical security of data to
ensure the proper handling, access, storage, and recovery of PHI.
Electronic access to the system is controlled via SSH keys which encrypts information in
transit. DAISEY systems are physically located in the Secure Data Center within KU’s Price
Computing facility. Access to equipment is controlled and monitored by staff 24/7.
If you have questions about DAISEY data governance and security or would like to request
documentation referred to above, please email [email protected].
42